
You are here:
Home » Windows 10 » How To Restore File Explorer To Default Settings In Windows 10/11
The best way to manage files on your Windows 10/11 PC is with File Explorer (also known as Windows Explorer). It lets you create, organize, and delete files on your computer.
The File Explorer offers various settings and options to personalize it to your requirement. For example, you can change the default view and search to your desired settings. File Explorer settings can be managed either from File Explorer or Folder Options.
If you have changed several settings of File Explorer and want to restore it to the default settings, you can do so by resetting File Explorer to default settings. Restoring File Explorer to default settings might also help you fix issues if any.
This guide will show you how to reset the Windows 10/11 File Explorer to default settings.
NOTE: Restoring the File Explorer to default settings does not cause data loss. In other words, when you restore File Explorer to default settings, your files and folders will not be deleted.
Step 1: Open This PC or any folder located anywhere on your PC.
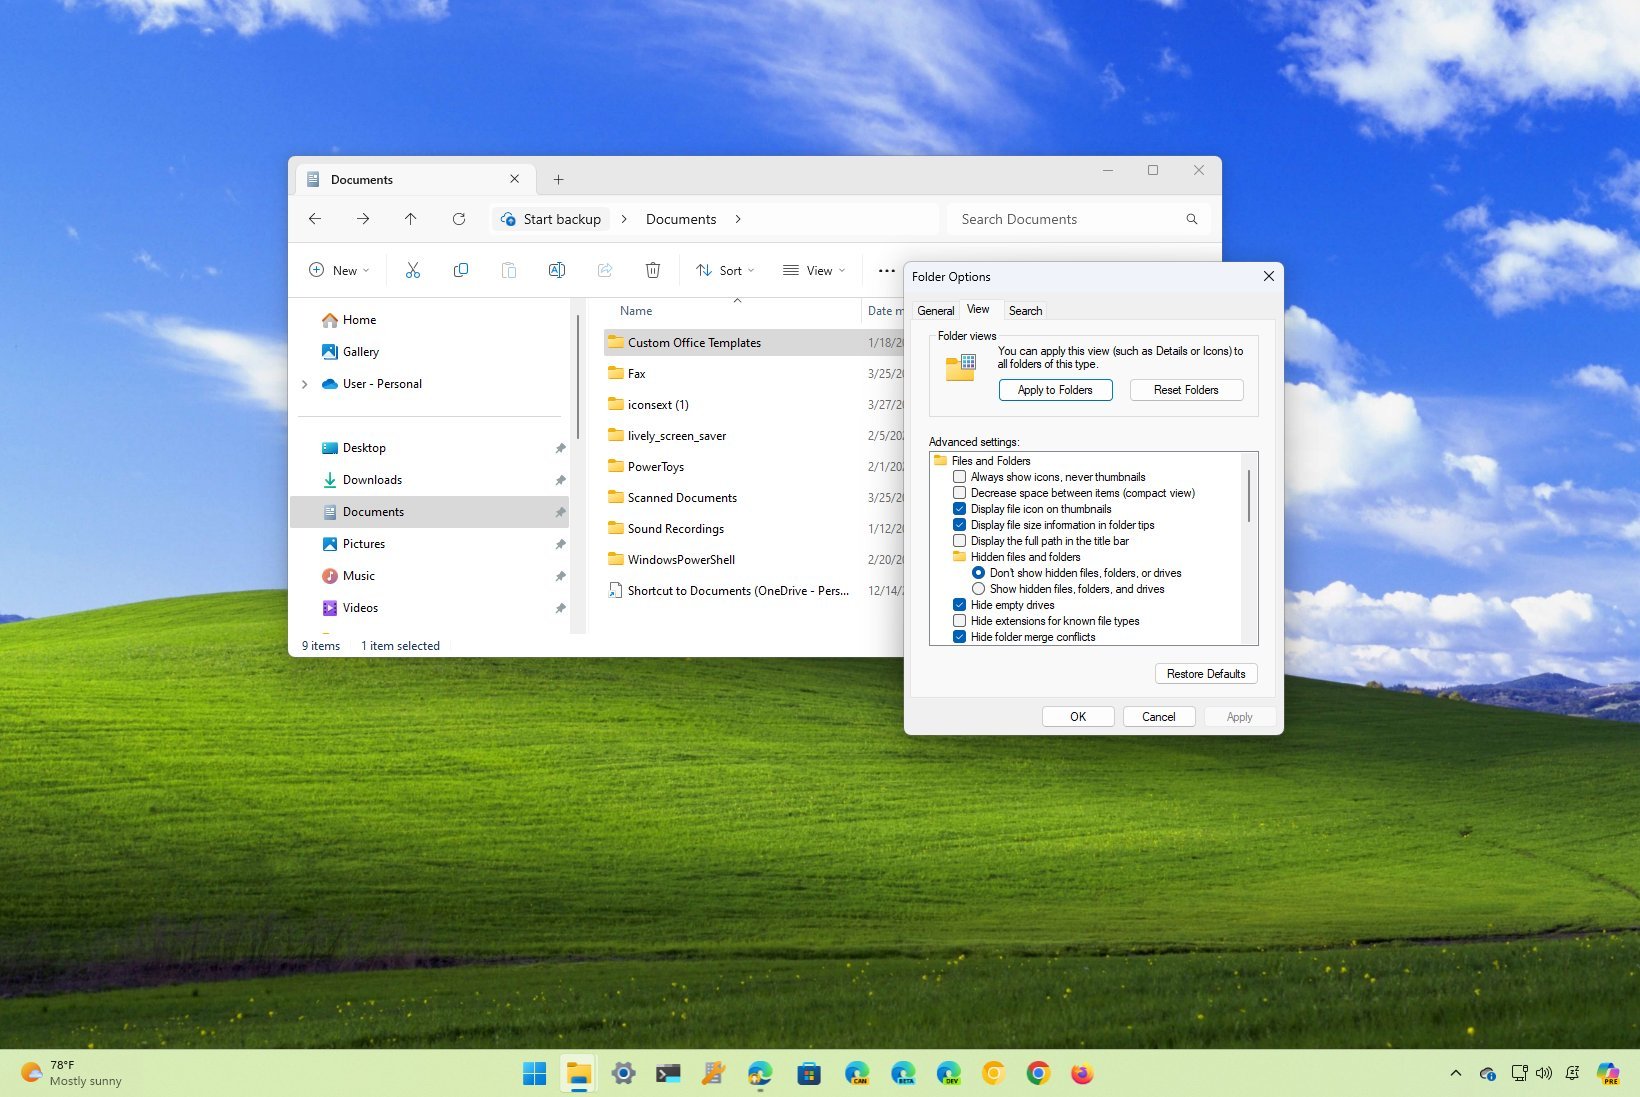
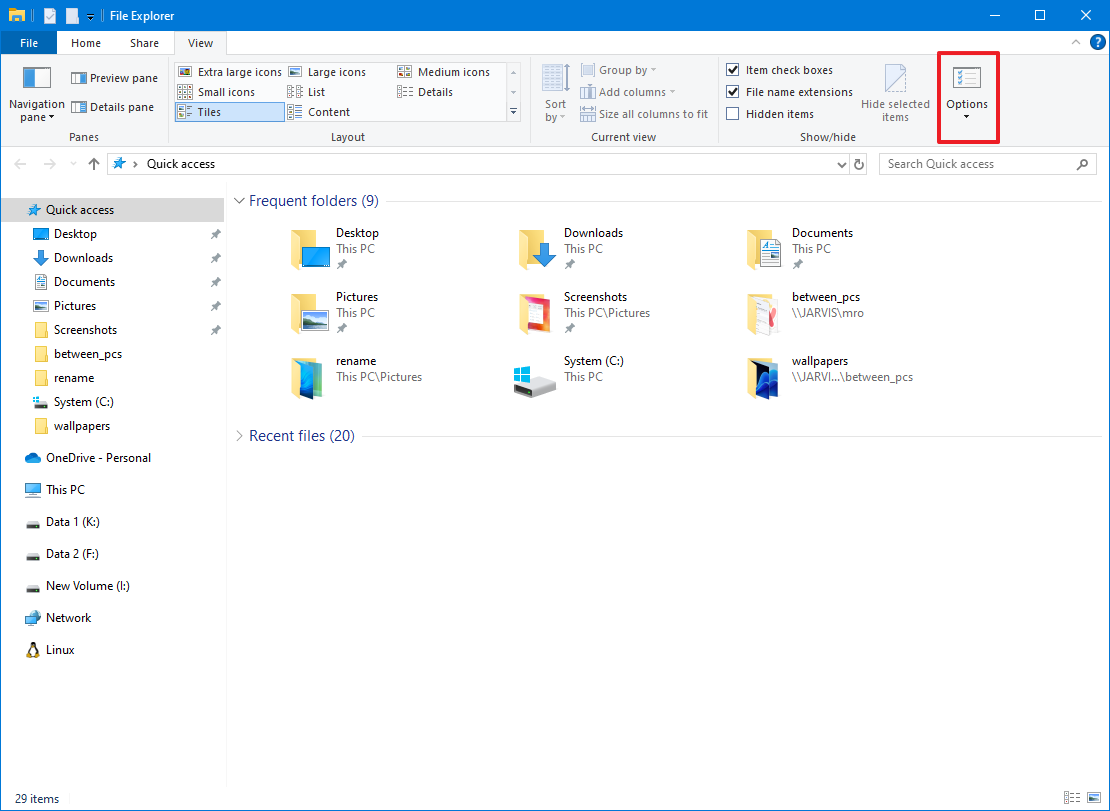
Step 2: In Windows 11, click on the three dots (refer to the picture below) in the toolbar and then click Options to open Folder Options. In Windows 10, click the File menu and then click Change folder and search options.


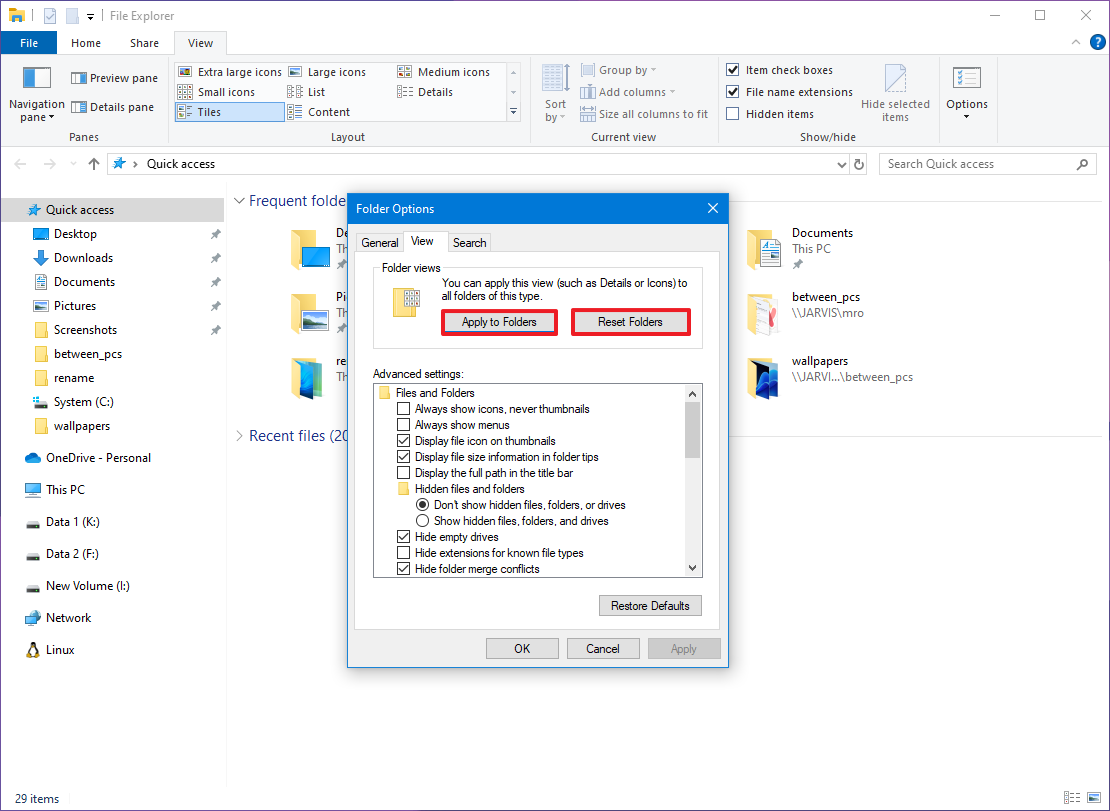
Step 3: Under the General tab of Folder Options, click the Restore Defaults button.

Step 4: Next, switch to the View tab. Here, click on the Restore Defaults button to reset File Explorer view settings to default.

Step 5: Finally, click on the Search tab to see the search settings. Once again, click on the Restore Defaults button to restore search settings to default settings.
Last but not the least, do not forget to click on the Apply button. That is it! You just restored File Explorer to default settings in Windows 10 and 11.

Tip 1: You can use the Windows + E keyboard shortcut to open File Explorer.
Tip 2: To preview an image or supported file, select the file and then use the Alt + P hotkey.
Tip 3: In Windows 10, you can use Ctrl + F1 hotkey to show or hide the ribbon.
Download Windows Speedup Tool to fix errors and make PC run faster
Windows 11/10 is easy to use and customize, but it becomes annoying when your Folder View settings change automatically. We usually set our Folder View settings on our own preferences like the view as grid/list, large/medium/small icons, etc., but it changes automatically after some time, and we have to adjust it manually. Thankfully, there is a fix to this problem.
Windows 11/10 often forgets your folder view settings, and this is when you need to reset them. These settings include the sorting order of files, view mode, grouping, etc. All Windows versions let you customize and reset your folders. You can do so using File Explorer or the Windows Registry. In this post, we will learn how to reset your folders in Windows PC.
You can change the folder view settings both via File Explorer and via Windows Registry.
To reset Folder View in via File Explorer Options, do the following:
- Press Win+E to open File Explorer and Click on File on the top menu ribbon.
- Select “Change folder and search options”.
- This will open the File Explorer Options window
- Go on ‘View’ tab and click on Reset Folders, if you want to reset all folders of this type to their default settings.
- You can also adjust the folder settings manually by checking or un-checking the checkboxes mentioned under ‘Advanced Settings’ tab.
- Under ‘General’ tab, you can tweak the settings like ‘opening each folder in same or a different window’ or ‘Single or double click to open a window’.
- Select the options, click on Apply and you are done.
For Folder Settings in Windows 7, go to the toolbar > Organize, and select Folder and search options.
Using Windows Registry

You can also use the Registry as follows:
Open Registry Editor by typing Regedit.exe
Navigate to the following key-
HKEY_CURRENT_USER\Software\Classes\Local Settings\Software\Microsoft\Windows\Shell
Delete Bags and BagMRU subkeys
Exit the Registry Editor.
You need to restart the Explorer shell to make the changes take effect.
Related reads:
- Windows forgets Folder View settings
- How to set a default Folder View for all folders.
Shiwangi loves to dabble with and write about computers. Creating a System Restore Point first before installing new software, and being careful about any third-party offers while installing freeware is recommended.
В Windows 10 многие элементы интерфейса были переработаны. В первую очередь в глаза бросается измененный внешний вид проводника. Если ваше знакомство с продукцией Microsoft началось с «десятки», то дизайн файлового менеджера не вызовет особых проблем, ведь навигация в этой операционной системе вполне логичная и удобная. Но владельцам старых ОС подобная организация может быть непривычна. Это не беда, ведь всё можно исправить в пару кликов.
Настройка внешнего вида
Многие визуальные параметры в Windows 10 поддаются тонкой настройке, в том числе и тип отображения папок. Для того, чтобы проводник выглядел «как в старые, добрые», придется его открыть и зайти в меню «Вид» в верхней части окна. Нас интересует раздел «Параметры» и пункт «Изменить параметры папок и поиска».
Чтобы заменить меню быстрого доступа (которое открывается по умолчанию) на основной раздел компьютера, выбираем соответствующий пункт в первой опции. Если вы также хотите избавиться от недавно и часто используемых файлов на панели быстрого доступа, придется снять галочки в разделе с конфиденциальностью чуть ниже.
Это не единственный способ, который возвращает старый вид проводнику. Поэтому, если данный метод у вас по каким-то причинам не сработал, вы можете сделать всё то же самое с помощью редактора реестра.
Редактор реестра
Чтобы его запустить нажмите комбинацию клавиш Win + R и в появившемся поле введите команду regedit. Нас интересует ветка, находящаяся по адресу: HKEY_LOCAL_MACHINE\SOFTWARE\Microsoft\Windows\CurrentVersion\FlightedFeatures.
В правой части окна кликаем правой кнопкой мыши и выбираем пункт «Создать параметр DWORD (32-бита)». Задаём для него имя ImmersiveContextMenu и подтверждаем операцию. По умолчанию этому параметру присвоится значение 0. Это то, что нам и нужно, менять ничего не стоит. Для того, чтобы изменения вступили в силу, необходимо перезагрузить операционную систему. Чтобы вернуть всё в исходное состояние, разумеется, придется параметр удалить из реестра аналогичным способом.
Меняем меню «Пуск»
Также любителям Windows XP и Windows 7 зачастую не нравится новое меню «Пуск». В этом вопросе нам поможет программа Classic Shell, которая распространяется на бесплатной основе, но, к сожалению, не поддерживает русский язык. Впрочем, от вас не потребуется копаться в настройках (при желании это сделать всё же можно для более детальной кастомизации), нужно будет просто запустить утилиту после инсталляции.
После завершения установки просто кликните по меню «Пуск». Запустится программа, которая предложит вам выбрать один из трех основных видов. Сделать это нужно один раз. При последующих запусках меню «Пуск» вы каждый раз будете наблюдать выбранный скин. Поменять его можно, если кликнуть правой кнопкой по меню «Пуск» и перейти в раздел с настройками.
Читайте также:
- Как изменить браузер по умолчанию в Windows 10 и более ранних версиях
- 3 главные причины перейти с Windows 7 на Windows 10
(Image credit: Mauro Huculak)
On Windows 11 and 10, File Explorer includes five different templates to customize the view of folders, including «General items» (the default for every new folder), «Documents,» «Pictures,» «Music,» and «Videos.» Each template provides a unique layout with icons and specific sorting and grouping depending on the folder’s content type.
For instance, the «Pictures» template view offers a layout with large icons, while the «Music» view applies the details layout, which offers a list view sorting by track number, title, artist, and additional information.
You can use any template for a particular folder to customize your viewing experience further. However, if you made many changes to the folders, you can always reset the view to its original settings with the «Folders options» settings.
In this how-to guide, I will walk you through the easy steps to reset (or change) the folder view settings on File Explorer.
How to reset folder view settings on File Explorer for Windows 11
To restore the default settings for folders on File Explorer, use these steps:
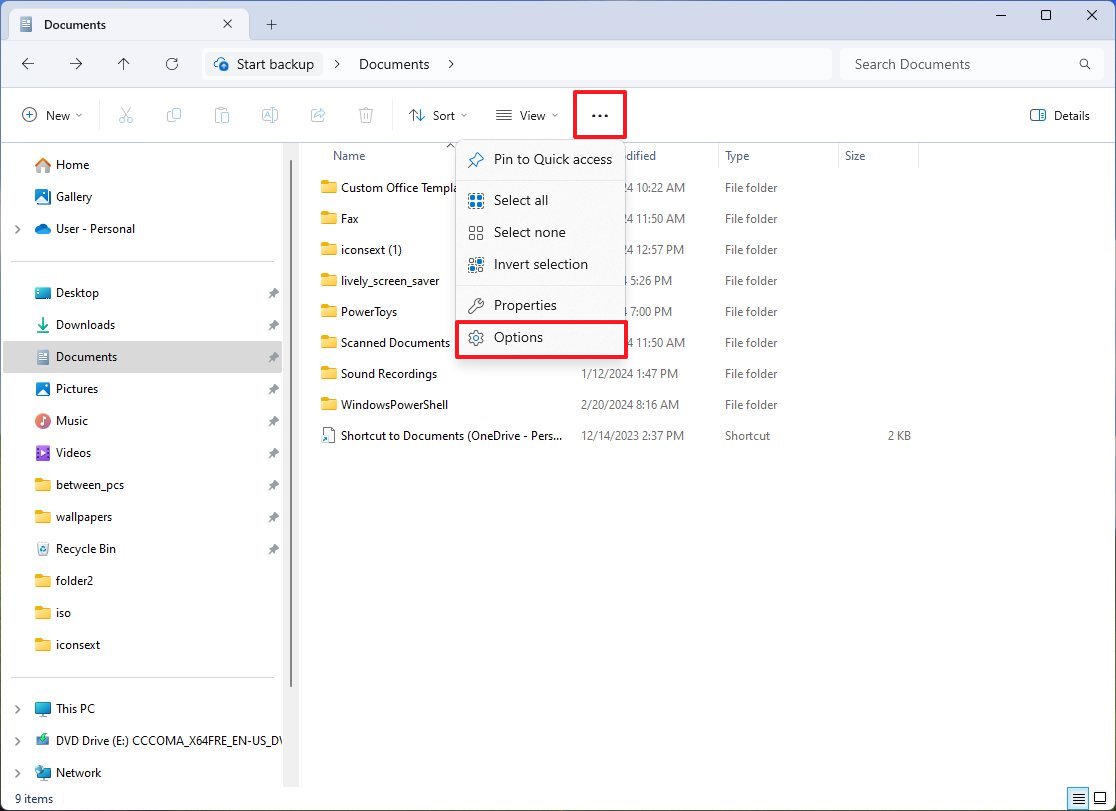
- Open File Explorer.
- Click the See more menu.
- Click on Options.
- Click the View tab.
- Click the «Reset Folders» button to reset similar folder types.
- Click the Yes button.
- Click the «Apply to Folders» to reset the settings for all folder types.
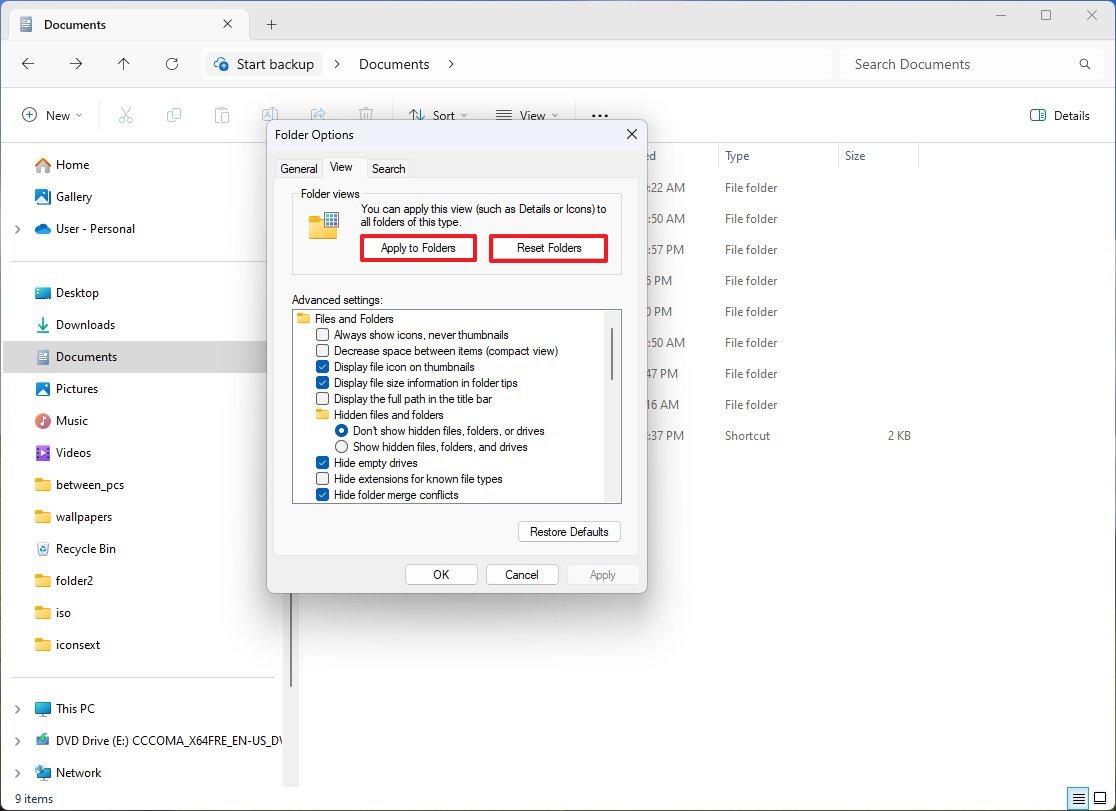
- Click the Yes button.
- Click the OK button.
Once you complete the steps, the view for your folders will reset to the system default template.
Change folder view template
To change the folder view template, use these steps:
All the latest news, reviews, and guides for Windows and Xbox diehards.
- Open File Explorer.
- Open the folder location.
- Right-click the folder and choose the Properties option.

- Click the Customize tab.
- Choose the correct folder template:
- General items.
- Documents.
- Pictures.
- Music.
- Videos.
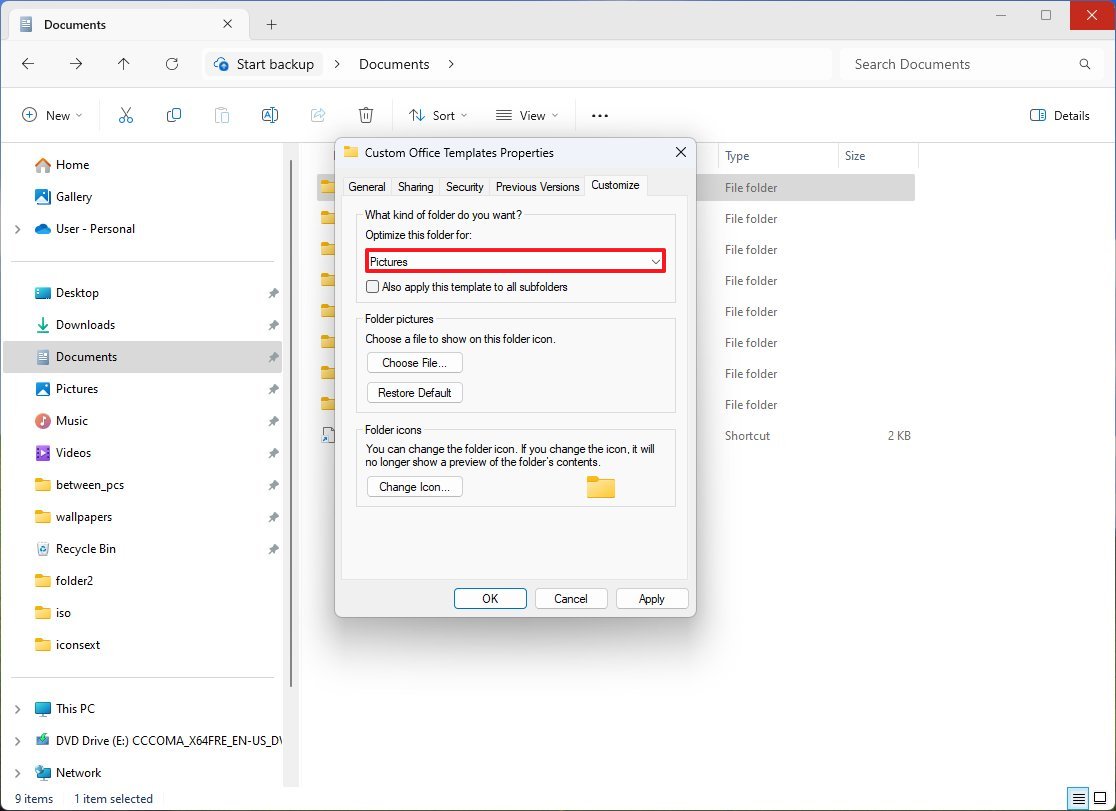
- (Optional) Check the «Also apply this template to all subfolders» option.
- Click the Apply button.
- Click the OK button.
After you complete the steps, the view will be optimized for the content type you specified for the folder.
How to reset folder view settings on File Explorer for Windows 10
To restore the original settings for a particular folder in File Explorer, use these steps:
- Open File Explorer.
- Click on the View tab.
- Click on the Options button.
- Click on the View tab.
- Click the Reset Folders button.
- Click the «Reset Folders» button to reset similar folder types.
- Click the Yes button.
- Click the «Apply to Folders» to reset the settings for all folder types.
- Click the Yes button.
- Click the Yes button.
- Click the OK button.
Once you complete the steps, the folder will reset to the default template settings.
Change folder view template
If you’re using the wrong folder view template, use these steps to switch templates:
- Open File Explorer.
- Browse to the location of the folder that you want to customize.
- Right-click the folder and select the Properties option.

- Click the Customize tab.
- Use the «Optimize this folder for» drop-down menu and select the correct folder view template:
- General items.
- Documents.
- Pictures.
- Music.
- Videos.

- (Optional) Check the «Also apply this template to all subfolders» option.
- Click the Apply button.
- Click the OK button.
Once you complete the steps, File Explorer will apply the view template to the folder.
More resources
For more helpful articles, coverage, and answers to common questions about Windows 10 and Windows 11, visit the following resources:
- Windows 11 on Windows Central — All you need to know
- Windows 10 on Windows Central — All you need to know
Mauro Huculak has been a Windows How-To Expert contributor for WindowsCentral.com for nearly a decade and has over 15 years of experience writing comprehensive guides. He also has an IT background and has achieved different professional certifications from Microsoft, Cisco, VMware, and CompTIA. He has been recognized as a Microsoft MVP for many years.