
Если служба обновлений Windows работает не корректно, обновления не загружаются или не устанавливаются, то самый простой и эффективней способ решить проблему со службой Windows Update – восстановить ее исходные настройки. В этой статье мы покажем, как сбросить конфигурацию агента и службы обновлений Windows Update.
Содержание:
- Средство устранения неполадок Центра обновления Windows
- Сброс настроек Windows Update с помощью PowerShell
- Утилита Reset Windows Update Tool
- Восстановление исходных настроек Windows Update из командной строки
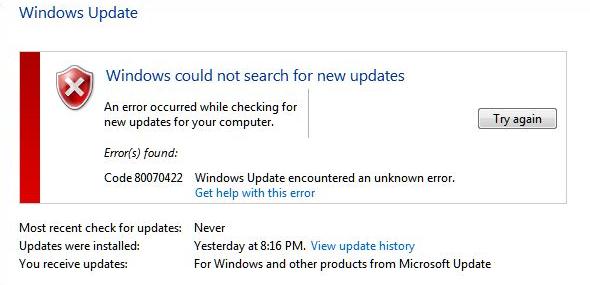
Обычно для отладки и дебага ошибок службы обновления Windows администратору необходимо проанализировать коды ошибок в файле журнала обновлений %windir%\WindowsUpdate.log (в Windows 10 и 11 получить файл WindowsUpdate.log можно таким способом). Количество возможных ошибок, с которыми может столкнуться администратор при анализе журнала обновлений исчисляется десятками (список всех ошибок Windows Update) и процесс их разрешения в основном нетривиальный. В некоторых случаях вместо детального анализа ошибок Windows Update гораздо быстрее и проще сначала произвести полный сброс настроек службы Windows Update. После сброса Windows Update вы можете выполнить сканирование и поиск обновлений.
Средство устранения неполадок Центра обновления Windows
Прежде чем перейти к сбросу конфигурации центра обновления Windows, настоятельно рекомендуем сначала попробовать более встроенное средство для автоматического исправления проблем в службе обновления Windows – средство устранения неполадок Центра обновления Windows (Windows Update Troubleshooter).
В Windows 10 и 11 Windows Update Troubleshooter уже встроен в современную панель Settings. Для предыдущих версий Windows его придется скачать вручную по ссылкам ниже:
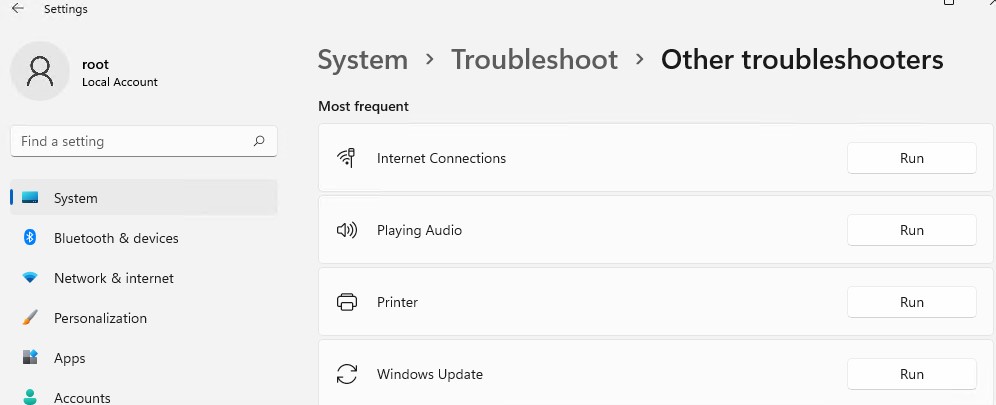
- Windows 11 — Settings -> System -> Troubleshooter -> Other Troubleshooter -> Windows Update;

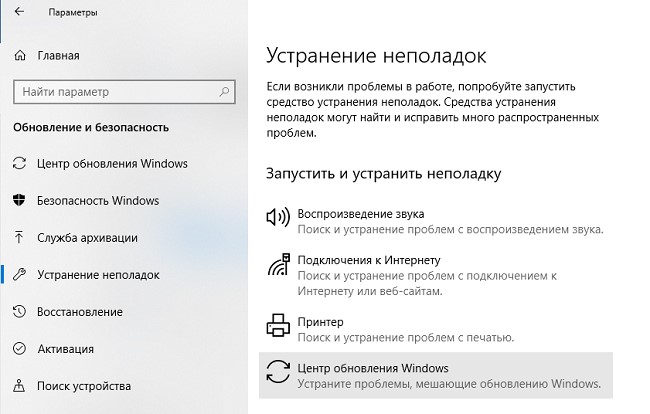
- Windows 10 – скачите wu10.diagcab по ссылке https://aka.ms/wudiag , либо запустите локальную версию инструмента: Пуск -> Параметры -> Обновления и безопасность -> Устранение неполадок -> Центр обновлений Windows (Start -> Settings -> Updates and Security -> Troubleshoot -> Additional Troubleshooters-> Windows Updates – resolve problems that prevent you from updating windows);

Для быстрого доступа к средствам исправления неполадок Windows можно использовать команду ms-settings:
ms-settings:troubleshoot - Windows 7 и Windows 8.1 — WindowsUpdate.diagcab (https://aka.ms/diag_wu).
Дождитесь пока средство устранения неполадок Центра обновления Windows просканирует систему и попытается автоматически исправить все ошибки в службе Windows Update и связанных компонентах.
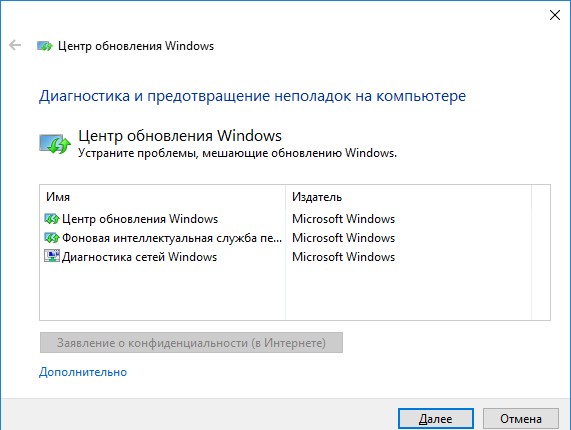
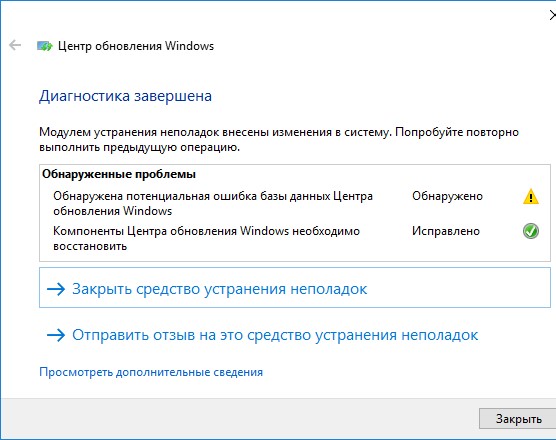
В моем случае была обнаружена и исправлена потенциальная ошибка в базе данных Центра обновления Windows. После этого перезагрузите компьютер и попробуйте выполнить поиск обновлений. Если обновления не загружаются или не устанавливаются, перейдите к следующему этапу.
Сброс настроек Windows Update с помощью PowerShell
Вы можете использовать PowerShell модуль PSWindowsUpdate для сброса настроек агента и службы Windows Update.
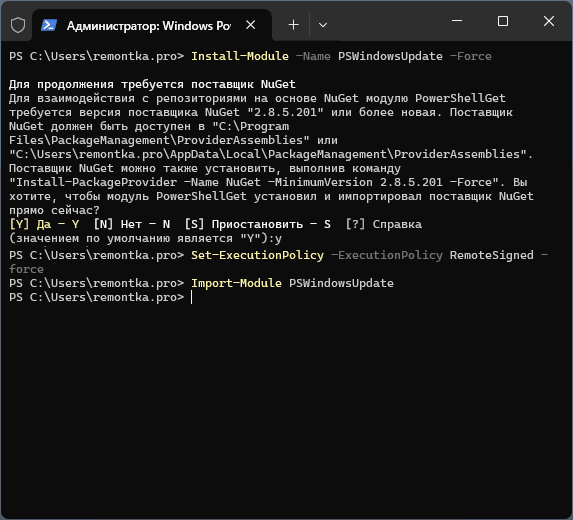
Установите модуль на свой компьютер из галереи скриптов PSGallery:
Install-Module -Name PSWindowsUpdate
Разрешите запуск PowerShell скриптов:
Set-ExecutionPolicy –ExecutionPolicy RemoteSigned -force
Выполните команду:
Reset-WUComponents –verbose
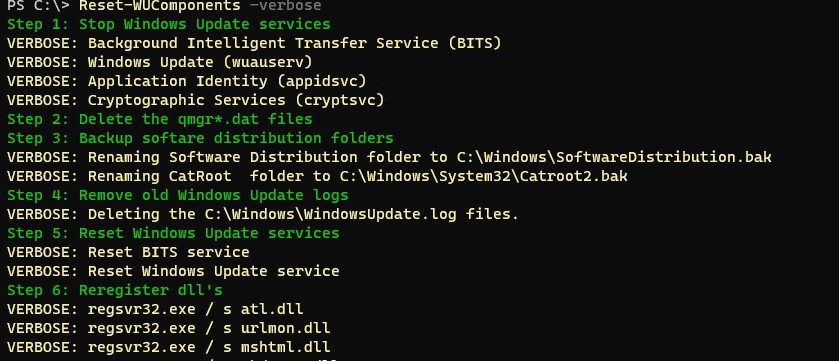
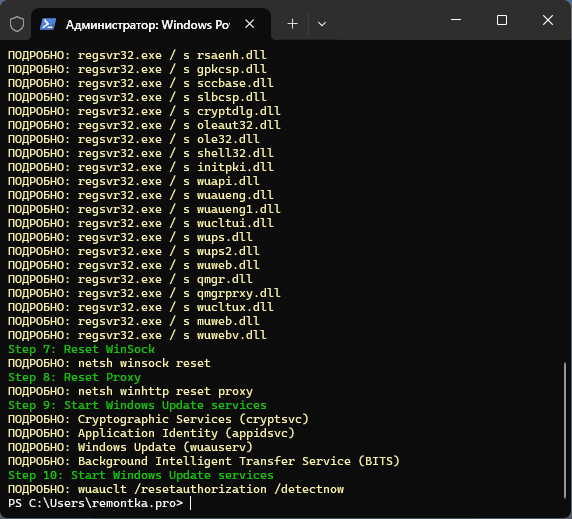
Команда Reset-WUComponents выполняет действия, по остановке служб, перерегистрации dll и очистке каталога C:\Windows\SoftwareDistribution, что и описанный чуть ниже bat скрипт.
VERBOSE: Background Intelligent Transfer Service (BITS)
VERBOSE: Windows Update (wuauserv)
VERBOSE: Application Identity (appidsvc)
VERBOSE: Cryptographic Services (cryptsvc)
Step 2: Delete the qmgr*.dat files
Step 3: Backup software distribution folders
VERBOSE: Renaming Software Distribution folder to C:\Windows\SoftwareDistribution.bak
VERBOSE: Renaming CatRoot  folder to C:\Windows\System32\Catroot2.bak
 Step 4: Remove old Windows Update logs
VERBOSE: Deleting the C:\Windows\WindowsUpdate.log files.
Step 5: Reset Windows Update services
VERBOSE: Reset BITS service
VERBOSE: Reset Windows Update service
Step 6: Reregister dll's
VERBOSE: regsvr32.exe / s atl.dll
VERBOSE: regsvr32.exe / s urlmon.dll
VERBOSE: regsvr32.exe / s mshtml.dll
VERBOSE: regsvr32.exe / s shdocvw.dll
VERBOSE: regsvr32.exe / s browseui.dll
VERBOSE: regsvr32.exe / s jscript.dll
VERBOSE: regsvr32.exe / s vbscript.dll
VERBOSE: regsvr32.exe / s scrrun.dll
VERBOSE: regsvr32.exe / s msxml.dll
VERBOSE: regsvr32.exe / s msxml3.dll
VERBOSE: regsvr32.exe / s msxml6.dll
VERBOSE: regsvr32.exe / s actxprxy.dll
VERBOSE: regsvr32.exe / s softpub.dll
VERBOSE: regsvr32.exe / s wintrust.dll
VERBOSE: regsvr32.exe / s dssenh.dll
VERBOSE: regsvr32.exe / s rsaenh.dll
 VERBOSE: regsvr32.exe / s gpkcsp.dll
VERBOSE: regsvr32.exe / s sccbase.dll
VERBOSE: regsvr32.exe / s slbcsp.dll
VERBOSE: regsvr32.exe / s cryptdlg.dll
VERBOSE: regsvr32.exe / s oleaut32.dll
VERBOSE: regsvr32.exe / s ole32.dll
VERBOSE: regsvr32.exe / s shell32.dll
VERBOSE: regsvr32.exe / s initpki.dll
VERBOSE: regsvr32.exe / s wuapi.dll
VERBOSE: regsvr32.exe / s wuaueng.dll
VERBOSE: regsvr32.exe / s wuaueng1.dll
VERBOSE: regsvr32.exe / s wucltui.dll
VERBOSE: regsvr32.exe / s wups.dll
VERBOSE: regsvr32.exe / s wups2.dll
VERBOSE: regsvr32.exe / s wuweb.dll
VERBOSE: regsvr32.exe / s qmgr.dll
VERBOSE: regsvr32.exe / s qmgrprxy.dll
VERBOSE: regsvr32.exe / s wucltux.dll
VERBOSE: regsvr32.exe / s muweb.dll
VERBOSE: regsvr32.exe / s wuwebv.dll
Step 7: Reset WinSock
VERBOSE: netsh winsock reset
Step 8: Reset Proxy
VERBOSE: netsh winhttp reset proxy
Step 9: Start Windows Update services
VERBOSE: Cryptographic Services (cryptsvc)
VERBOSE: Application Identity (appidsvc)
VERBOSE: Windows Update (wuauserv)
VERBOSE: Background Intelligent Transfer Service (BITS)
Step 10: Start Windows Update services
VERBOSE: wuauclt /resetauthorization /detectnow
Запустите поиск обновлений из панели управления или выполните поиск доступных обновлений с помощью команды PowerShell:
Get-WUList

Утилита Reset Windows Update Tool
Есть еще одни полезный и простой инструмент для сброса настроек Windows Update — Reset Windows Update Tool. Раньше это скрипт был доступен на TechNet. Сейчас автор ведет репозиторий на GitHub (м https://github.com/ManuelGil/Script-Reset-Windows-Update-Tool ).
Для загрузки предлагается скомпилированный exe файл (C++) или обычный скрипт. Я предпочитаю использовать cmd скрипт.
- Скачайте ResetWUEng.zip и распакуйте на диск;
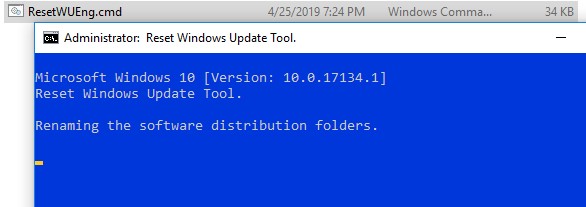
- Запустите файл ResetWUEng.cmd с правами администратора;
- Скрипт определит вашу версию ОС (в моем примере это Windows 10) и предложит 18 различных опций. Некоторые из них напрямую не относятся к сбросу настроек агента WU, но могут быть полезны для исправления различных неисправностей в Windows (проверка диска chkdsk, исправление ошибок в образе Windows с помощью DISM, сброс Winsock, очистка временных файлов и т.д.);

- Для сброса настроек Windows Update достаточно использовать опцию 2 — Resets the Windows Update Components (Сбросить компоненты службы обновления Windows). Нажмите 2 и Enter;
- Скрипт автоматически выполнит все действия, которые мы описали выше при выполнении ручного сброса агента обновлений Windows из командной строки.

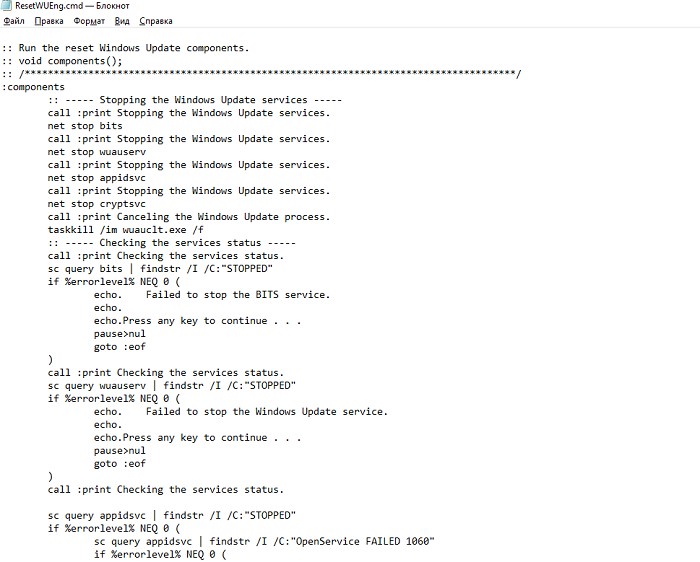
Вы можете самостоятельно посмотреть, что делает скрипт, открыв в файл ResetWUEng.cmd в любом текстовом редакторе и изучив его содержимое. Например, опция 2 отправляет на процедуру components.

- После окончания работы скрипта Reset Windows Update Agent перезагрузите компьютер и проверьте работу службы обновлений.

Скрипт ResetWUEng.cmd универсальный и подходит для всех версий Windows: начиная с Windows XP и вплоть до Windows 11.
Восстановление исходных настроек Windows Update из командной строки
Процесс сброса настроек агента и службы обновления Windows состоит из нескольких этапов. Все описанные операции выполняются в командной строке и собраны в один bat файл (готовый скрипт можно скачать по ссылке ниже).
С помощью данного скрипта можно полностью сбросить конфигурацию службы Центра обновлений Windows, и очистить локальный кэш обновлений. Скрипт является универсальный и будет работать как в Windows 11/10/8.1/7, так и в Windows Server 2022/2019/2016/2012 R2/2008 R2. Скрипт помогает устранить большинство типовых ошибок в работе службы Windows Update, когда центр обновлений перестает загружать новые обновления или пишет, что при установке обновления возникают ошибки.
Убедитесь, что настройки Windows Update на вашем компьютере на задаются с помощью доменных или локальных политик. Для вывода результирующих настроек GPO можно воспользоваться утилитой gpresult или rsop.msc. Можно сбросить настройки локальной GPO по этой инструкции.
Итак, по порядку о том, что делает скрипт:
- Остановить службы Windows Update (Центр обновлений Windows), BITS и службы криптографии:
net stop bits
net stop wuauserv
net stop appidsvc
net stop cryptsvc
taskkill /im wuauclt.exe /f - Удалить служебных файлы qmgr*.dat в каталоге %ALLUSERSPROFILE%\Application Data\Microsoft\Network\Downloader\:
Del "%ALLUSERSPROFILE%\Application Data\Microsoft\Network\Downloader\qmgr*.dat" - Переименовать служебные каталоги, в которых хранятся конфигурационные файлы и кэш обновлений (в случае необходимости их можно будет использовать как резервные копии). После перезапуска службы обновления, эти каталоги автоматически пересоздадутся:
Ren %systemroot%\SoftwareDistribution SoftwareDistribution.bak
Ren %systemroot%\system32\catroot2 catroot2.bak - Удаление старого журнала windowsupdate.log
del /f /s /q %windir%\windowsupdate.log - Сброс разрешений на службы BITS и Windows Update (в случае, если права на службы были изменены)
sc.exe sdset bits D:(A;;CCLCSWRPWPDTLOCRRC;;;SY) (A;;CCDCLCSWRPWPDTLOCRSDRCWDWO;;;BA) (A;;CCLCSWLOCRRC;;;AU) (A;;CCLCSWRPWPDTLOCRRC;;;PU)
sc.exe sdset wuauserv D:(A;;CCLCSWRPWPDTLOCRRC;;;SY) (A;;CCDCLCSWRPWPDTLOCRSDRCWDWO;;;BA) (A;;CCLCSWLOCRRC;;;AU) (A;;CCLCSWRPWPDTLOCRRC;;;PU)
sc.exe sdset cryptsvc D:(A;;CCLCSWLOCRRC;;;AU)(A;;CCDCLCSWRPWPDTLOCRSDRCWDWO;;;BA)(A;;CCDCLCSWRPWPDTLCRSDRCWDWO;;;SO)(A;;CCLCSWRPWPDTLOCRRC;;;SY)S:(AU;FA;CCDCLCSWRPWPDTLOCRSDRCWDWO;;WD)
sc.exe sdset trustedinstaller D:(A;;CCLCSWLOCRRC;;;AU)(A;;CCDCLCSWRPWPDTLOCRSDRCWDWO;;;BA)(A;;CCDCLCSWRPWPDTLCRSDRCWDWO;;;SO)(A;;CCLCSWRPWPDTLOCRRC;;;SY)S:(AU;FA;CCDCLCSWRPWPDTLOCRSDRCWDWO;;WD) - Перерегистрация файлов системных динамических библиотек (dll), связанных со службами BITS и Windows Update:
cd /d %windir%\system32
regsvr32.exe /s atl.dll
regsvr32.exe /s urlmon.dll
regsvr32.exe /s mshtml.dll
regsvr32.exe /s shdocvw.dll
regsvr32.exe /s browseui.dll
regsvr32.exe /s jscript.dll
regsvr32.exe /s vbscript.dll
regsvr32.exe /s scrrun.dll
regsvr32.exe /s msxml.dll
regsvr32.exe /s msxml3.dll
regsvr32.exe /s msxml6.dll
regsvr32.exe /s actxprxy.dll
regsvr32.exe /s softpub.dll
regsvr32.exe /s wintrust.dll
regsvr32.exe /s dssenh.dll
regsvr32.exe /s rsaenh.dll
regsvr32.exe /s gpkcsp.dll
regsvr32.exe /s sccbase.dll
regsvr32.exe /s slbcsp.dll
regsvr32.exe /s cryptdlg.dll
regsvr32.exe /s oleaut32.dll
regsvr32.exe /s ole32.dll
regsvr32.exe /s shell32.dll
regsvr32.exe /s initpki.dll
regsvr32.exe /s wuapi.dll
regsvr32.exe /s wuaueng.dll
regsvr32.exe /s wuaueng1.dll
regsvr32.exe /s wucltui.dll
regsvr32.exe /s wups.dll
regsvr32.exe /s wups2.dll
regsvr32.exe /s wuweb.dll
regsvr32.exe /s qmgr.dll
regsvr32.exe /s qmgrprxy.dll
regsvr32.exe /s wucltux.dll
regsvr32.exe /s muweb.dll
regsvr32.exe /s wuwebv.dll - Сброс параметров Winsock
netsh winsock reset - Сброс параметров системного прокси
netsh winhttp reset proxy - Опционально. При использовании локального сервера WSUS, возможно дополнительно сбросить текущую привязку клиента к серверу WSUS путем удаления следующих параметров в ветке реестра HKLM\SOFTWARE\Microsoft\Windows\CurrentVersion\WindowsUpdate:
REG DELETE "HKLM\SOFTWARE\Microsoft\Windows\CurrentVersion\WindowsUpdate" /v AccountDomainSid /f
REG DELETE "HKLM\SOFTWARE\Microsoft\Windows\CurrentVersion\WindowsUpdate" /v PingID /f
REG DELETE "HKLM\SOFTWARE\Microsoft\Windows\CurrentVersion\WindowsUpdate" /v SusClientId /f
REG DELETE "HKLM\SOFTWARE\Policies\Microsoft\Windows\WindowsUpdate" /v TargetGroup /f
REG DELETE "HKLM\SOFTWARE\Policies\Microsoft\Windows\WindowsUpdate" /v WUServer /f
REG DELETE "HKLM\SOFTWARE\Policies\Microsoft\Windows\WindowsUpdate" /v WUStatusServer /f - Запуск остановленных служб:
sc.exe config wuauserv start= auto
sc.exe config bits start= delayed-auto
sc.exe config cryptsvc start= auto
sc.exe config TrustedInstaller start= demand
sc.exe config DcomLaunch start= auto
net start bits
net start wuauserv
net start appidsvc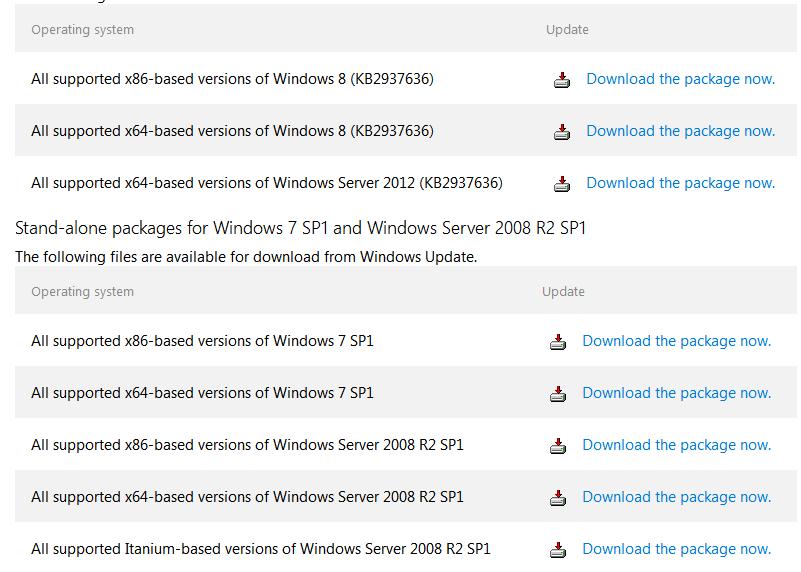
net start cryptsvc - Опционально. Для Windows 7 и 8.1 можно установить/переустановить последнюю версию агента Windows Update Agent (WUA). Скачать актуальную версию агента можно со страницы https://support.microsoft.com/en-us/kb/949104. Нужно скачать файл для вашей версии Windows

Актуальная версия агента WUA для Windows 7 SP1 x64 — 7.6. Принудительная переустановка агента WindowsUpdate выполняется следующими командами:
- для Windows 7 x86:
WindowsUpdateAgent-7.6-x86.exe /quiet /norestart /wuforce - для Windows 7 x64:
WindowsUpdateAgent-7.6-x64.exe /quiet /norestart /wuforce
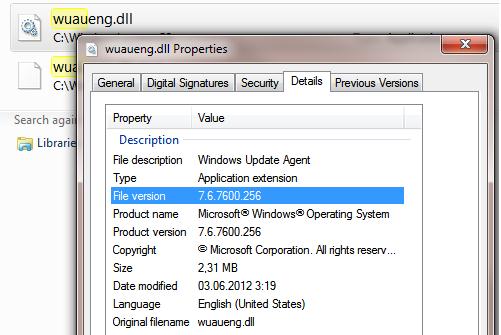
Совет. Текущую версию агента Windows Update Agent (WUA) в Windows 7 можно узнать в свойствах файла %windir%\system32\Wuaueng.dll. В нашем примере это 7.6.7600.256.

- для Windows 7 x86:
Осталось перезагрузить компьютер и запустить синхронизацию с сервером Windows Update /WSUS.
wuauclt /resetauthorization /detectnow
Затем зайдите в Центр обновления и проверьте, пропали ли проблемы при поиске, скачивании и установке обновлений.
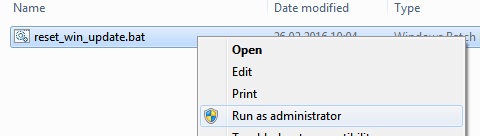
Сам скрипт reset_win_update.bat можно скачать по ссылке reset_win_update.zip (пункты 9 и 11 в скрипте не выполняются, т.к. являются опциональными). Скрипт нужно скачать, распаковать и запустить с правами администратора.
После этого перезагрузите компьютер, затем зайдите в Центр обновлений и проверьте, пропали ли проблемы при поиске, скачивании и установке обновлений.
Если обновления Windows стали скачиваться и устанавливать корректно, можно удалить папки резервные копии папок:
Ren %systemroot%\SoftwareDistribution SoftwareDistribution.bak
Ren %systemroot%\system32\catroot2 catroot2.bak
Если ничего не помогло, попробуйте вручную скачать и установить последнее кумулятивное обновление для вашей версии Windows из каталога обновлений Microsoft Update Catalog.
Ошибки при установке обновлений Windows 11 и 10 — одна из самых частых проблем, с которыми сталкиваются пользователей. А наиболее чаще всего применяемое решение — сброс компонентов Центра обновлений, удаление временных файлов, сброс параметров сети, перерегистрация DLL.
Всё это можно сделать вручную или автоматически, в том числе в PowerShell, именно этот способ описан далее в статье.
Использование модуля PSWindowsUpdate для сброса Центра обновления
Для PowerShell имеется специальный модуль для управления обновлениями — PSWindowsUpdate, с помощью которого можно устанавливать обновления и выполнять множество других задач, например, отключать скачивание и установку ненужных обновлений. С его же помощью возможно исправить большинство ошибок Центра обновлений, но сначала потребуется установить соответствующий модуль:
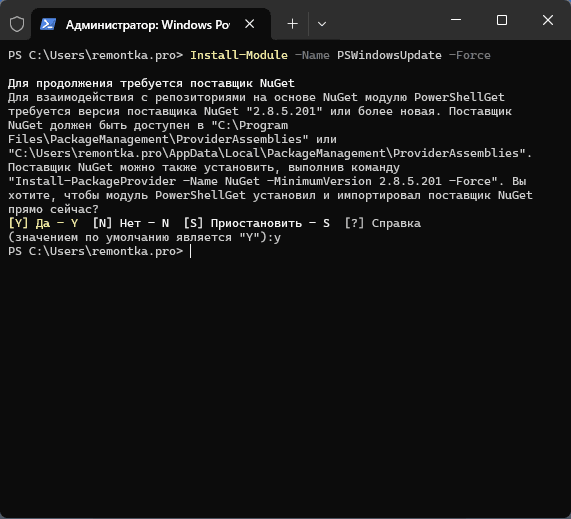
- Запустите Windows PowerShell или Терминал Windows от имени администратора, это можно сделать, нажав правой кнопкой мыши по кнопке «Пуск» и выбрав соответствующий пункт контекстного меню.
- Введите команду
Install-Module -Name PSWindowsUpdate -Force
и подтвердите установку, нажав Y и Enter.

- Измените политику выполнения скриптов PowerShell для возможности запуска удалённо подписанных сценариев, используя одну из следующих команд. Первая изменит политику навсегда, вторая — только для текущей сессии:
Set-ExecutionPolicy -ExecutionPolicy RemoteSigned -force
Set-ExecutionPolicy -ExecutionPolicy RemoteSigned -Scope Process
- Введите команду
Import-Module PSWindowsUpdate
для импорта модуля в текущую сессию.

Готово, теперь вы можете использовать все команды PSWindowsUpdate в PowerShell. Для последующего использования все команды, приведённые выше уже не потребуются: модуль установлен и его функции доступны всегда.
Для получения полного списка команд можно использовать
Get-Command -module PSWindowsUpdate
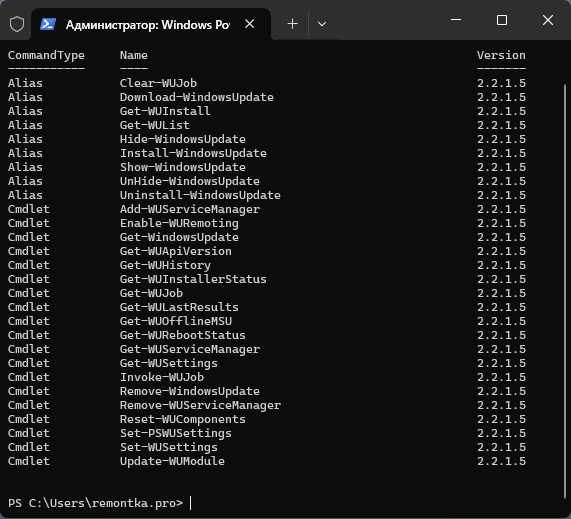
В контексте сброса компонентов Центра обновлений нас интересует лишь одна:
Reset-WUComponents -Verbose
Достаточно использовать эту команду и по порядку автоматически будут выполнены следующие задачи:
- Отключение служб, используемых Центром обновлений Windows — BITS, wuauserv, appidsvc, cryptsvc.
- Удаление файлов состояния службы BITS.
- Резервное копирование папки SoftwareDistribution с загруженными файлами обновлений.
- Резервное копирование папки CatRoot для пересоздания базы данных каталогов.
- Удаление старых журналов Центра обновлений.
- Сброс служб Центра обновлений.
- Перерегистрация библиотек DLL, использующихся службами Центра обновлений.
- Сброс WinSocks и прокси.
- Перезапуск служб Центра обновлений.
В результате, если проблемы обновлений не вызваны более серьёзными повреждениями системы или недоступностью Интернета и серверов Майкрософт, с большой вероятностью они будут решены, причем быстрее чем если все эти операции выполнять вручную.
Есть и другие похожие инструменты, например, отдельная утилита Reset Windows Update Tool, описанная в материале про исправление ошибок Центра обновлений, но PSWindowsUpdate заслуживает внимания, поскольку описываемая задача — лишь одна из его возможностей в части работы с обновлениями Windows.
Все способы:
- Способ 1: Сброс настроек в твикерах
- Способ 2: Проверка политики автообновления
- Способ 3: Проверка службы обновления
- Способ 4: Проверка реестра
- Способ 5: Откат к точке восстановления
- Вопросы и ответы: 6
Причиной появления этого сообщения является изменение некоторых настроек Windows 10, в частности, связанных с обновлениями и безопасностью. Причем изменения эти могли быть внесены как непосредственно администратором, так и с помощью специальных программ-твикеров.
Способ 1: Сброс настроек в твикерах
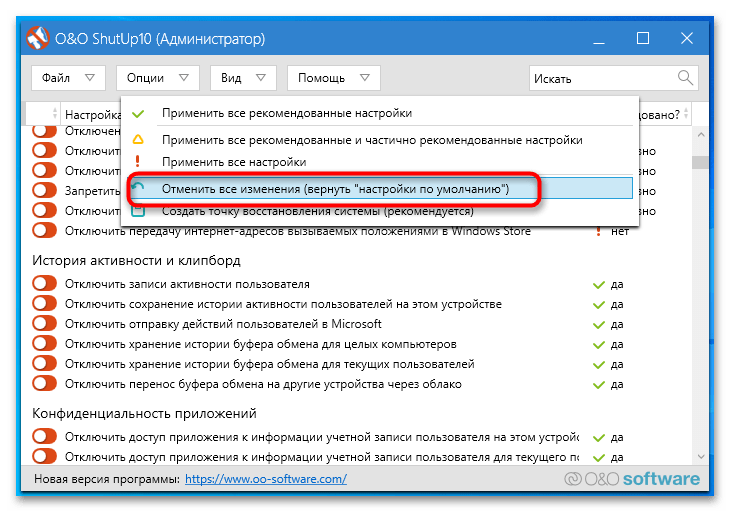
В Windows 10 программы-твикеры обычно применяются для тонкой настройки операционной системы, а также для отключения следящих функций. Пользоваться такими инструментами нужно с осторожностью, в противном случае можно нарушить работу компонентов системы. Если вы использовали подобные утилиты, восстановите измененные ими настройки — благо, большинство твикеров позволяют отменять изменения. Например, в популярном твикере OOSU10 для этого нужно выбрать опцию «Отменить все изменения» на одноименной вкладке.
Способ 2: Проверка политики автообновления
Уведомление «Ваша организация отключила автоматические обновления» появится, если пользователь или администратор отключил автоматическое обновление системы в локальных групповых политиках.
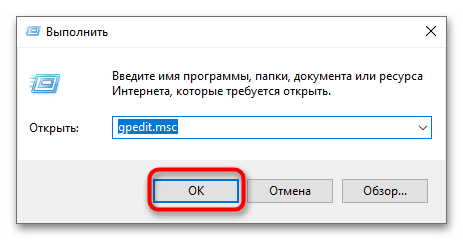
- Откройте нажатием Win + R окошко быстрого выполнения команд, введите в него команду
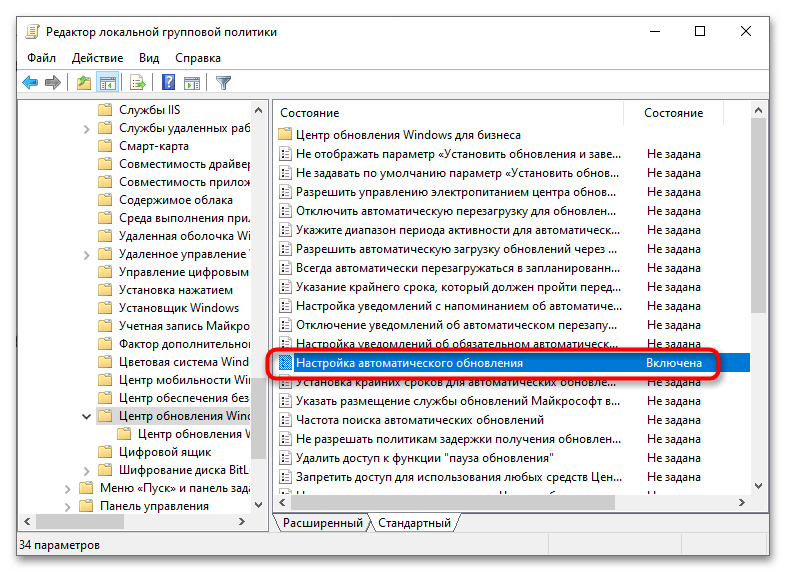
gpedit.mscи нажмите клавишу ввода. - Запустится «Редактор локальных групповых политик». Перейдите в нем по цепочке «Конфигурация компьютера» → «Административные шаблоны» → «Компоненты Windows» → «Центр обновления Windows» и отыщите в правой колонке политику «Настройка автоматического обновления».
- Если политика имеет статус «Включена», откройте двойным кликом ее свойства и выставьте для нее значение «Не задана» или «Отключена».
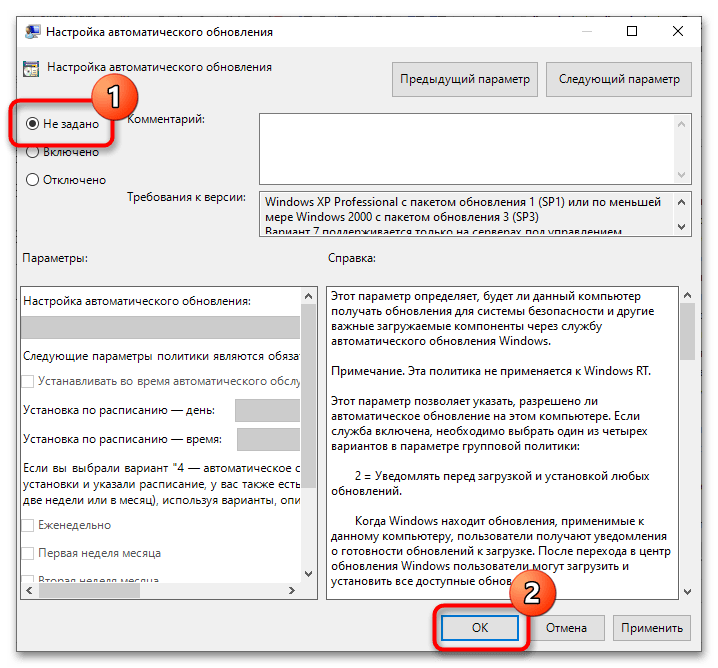
Сохраните настройки и перезагрузите компьютер.
Способ 3: Проверка службы обновления
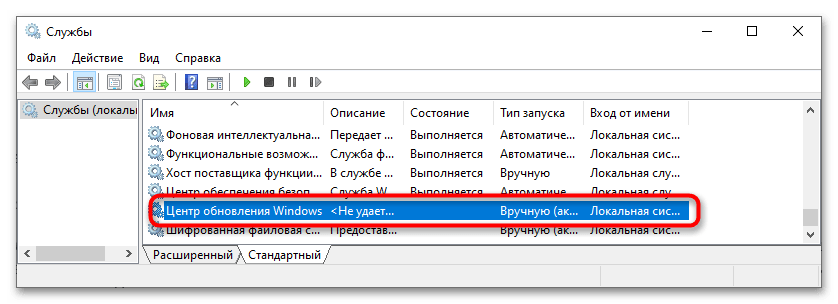
Проверьте состояние службы, отвечающей за получение обновлений Windows. Она должна быть активной.
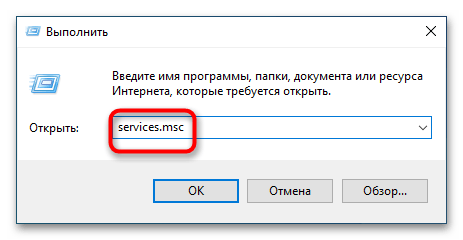
- Откройте оснастку управления службами, для чего в диалоговом окошке Win + R выполните команду
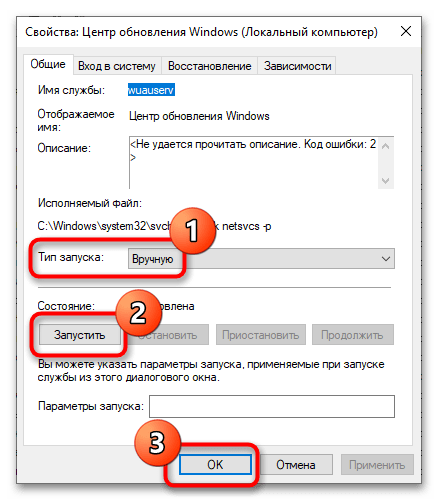
services.msc. - Отыщите в списке служб службу «Центр обновления Windows» и убедитесь, что она выполняется и имеет тип запуска «Автоматически» или «Вручную».
- В противном случае откройте «Свойства» службы двойным кликом и попробуйте ее запустить нажатием одноименной кнопки, изменив тип запуска на «Автоматически» или «Вручную».
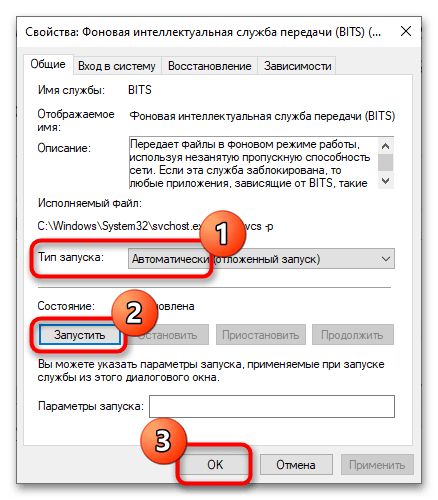
- Аналогичным образом найдите в списке службу «Фоновая интеллектуальная служба передачи (BITS)» и запустите ее, если не запущена. Тип запуска этой службы выставьте «Автоматически».
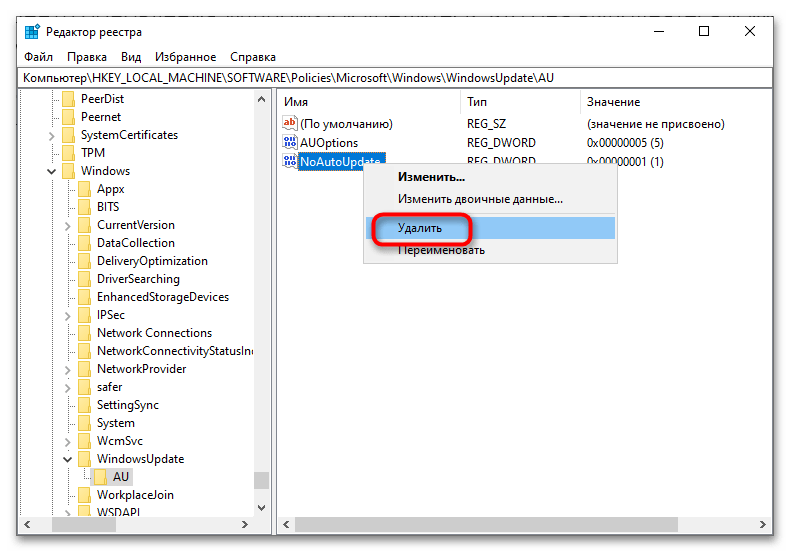
Способ 4: Проверка реестра
Для отключения автоматического обновления администраторы нередко применяют твик реестра. Проверьте указанный ниже ключ на предмет внесенных в него изменений.
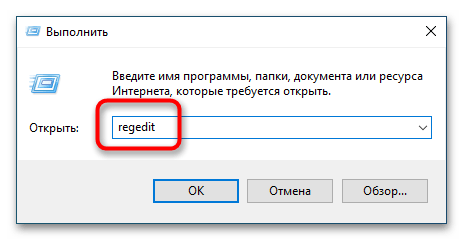
- Откройте «Редактор реестра» командой
regeditв диалоговом окошке «Выполнить», вызванном нажатием комбинации клавиш Win + R. - Разверните в левой колонке ключ
HKLM\SOFTWARE\Policies\Microsoft\Windows\WindowsUpdate\AUи удалите из последнего подраздела все параметры. Это восстановит настройки обновления по умолчанию. - Перезагрузите компьютер.
Способ 5: Откат к точке восстановления
Если вы не нашли подходящего решения, выполните откат Windows 10 к ближайшей точке восстановления. Эта операция восстанавливает некоторые системные файлы и реестр, а вместе с ним и измененные настройки, которые могли привести к появлению уведомления «Ваша организация отключила автоматические обновления».
Подробнее: Откат к точке восстановления в Windows 10
Наша группа в TelegramПолезные советы и помощь
-
Home
-
News
- How to Reset Windows Update Components in Windows 11/10?
By Vera | Follow |
Last Updated
How do I reset Windows Update components in Windows 11/10? Perhaps you are looking for the answer to this question. Take it easy and you can find three effective ways to reset Windows Update components to fix the update problems. Now, let’s go on with this post from MiniTool.
Besides drivers and other security enhancements, Windows Update components are responsible for downloading and installing all the feature and quality updates. They are indispensable. However, sometimes the cache gets corrupted or some related services go wrong, Windows update issues appear.
Although there are many ways to fix the update problems, if you always run into update errors, you should reset Windows update to its default settings. If the Windows update fails to install, this will be quite useful.
Well then, how can you reset Windows Update components? This is an easy task and you can follow these methods below.
How to Reset Windows Update Components on Windows 11/10?
Run Windows Troubleshooter
In Windows 11/10, some useful snap-in troubleshooters can be used to fix several computer issues. Windows Update Troubleshooter can be used to fix update issues by resetting some components that need it.
Follow these steps to reset Windows Update components:
Step 1: Right-click the Start button and choose Settings from the context menu.
Step 2: Go to System > Troubleshoot > Other troubleshooters.
Step 3: Locate Windows Update and click Run.
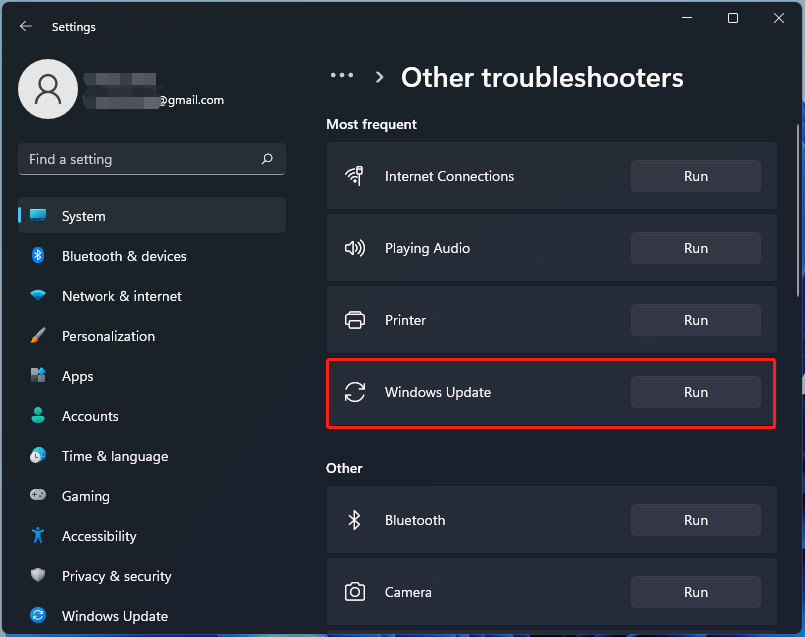
This troubleshooter will start scanning for any issues and fix them. Note that this way only resets Windows Update components when needed.
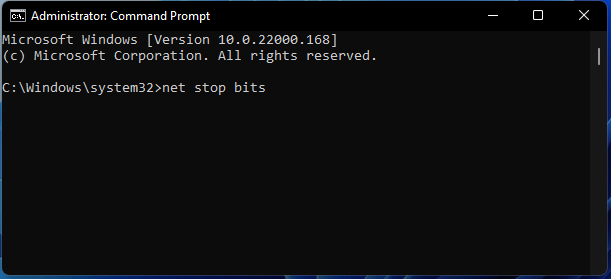
Run Command Prompt to Reset Windows Update Components
Resetting Windows Update components via Command Prompt is a time-consuming process but it is fairly effective. The process is a bit complicated and you should follow the guide below for this task.
Step 1: Launch Command Prompt in Windows 11/10 with admin privileges.
Step 2: Run these commands below to stop the BITS (Background Intelligent Transfer Service), Windows Update service, and Cryptographic service and press Enter after each command.
net stop bits
net stop wuauserv
net stop appidsvc
net stop cryptsvc
Step 3: Delete the qmgr*.dat files by typing this command – Del “%ALLUSERSPROFILE%\Application Data\Microsoft\Network\Downloader\qmgr*.dat” and press Enter.
Tip: If you first try to reset Windows Update components, you can skip this step. If you have tried all the steps but don’t work, try this step.
Step 4: Rename the SoftwareDistribution and catroot2 folder by typing the commands below and press Enter.
Ren %systemroot%\SoftwareDistribution SoftwareDistribution.bak
Ren %systemroot%\system32\catroot2 catroot2.bak
Step 5: Run these commands to reset the BITS service and the Windows Update service, and then press Enter after each command.
sc.exe sdset bits D:(A;;CCLCSWRPWPDTLOCRRC;;;SY)(A;;CCDCLCSWRPWPDTLOCRSDRCWDWO;;;BA)(A;;CCLCSWLOCRRC;;;AU)(A;;CCLCSWRPWPDTLOCRRC;;;PU)
sc.exe sdset wuauserv D:(A;;CCLCSWRPWPDTLOCRRC;;;SY)(A;;CCDCLCSWRPWPDTLOCRSDRCWDWO;;;BA)(A;;CCLCSWLOCRRC;;;AU)(A;;CCLCSWRPWPDTLOCRRC;;;PU)
Step 6: Run this command – cd /d %windir%\system32.
Step 7: Type the following commands to re-register all the related BITS and Windows Update .dll files and press Enter after each line
regsvr32.exe atl.dll
regsvr32.exe urlmon.dll
regsvr32.exe mshtml.dll
regsvr32.exe shdocvw.dll
regsvr32.exe browseui.dll
regsvr32.exe jscript.dll
regsvr32.exe vbscript.dll
regsvr32.exe scrrun.dll
regsvr32.exe msxml.dll
regsvr32.exe msxml3.dll
regsvr32.exe msxml6.dll
regsvr32.exe actxprxy.dll
regsvr32.exe softpub.dll
regsvr32.exe wintrust.dll
regsvr32.exe dssenh.dll
regsvr32.exe rsaenh.dll
regsvr32.exe gpkcsp.dll
regsvr32.exe sccbase.dll
regsvr32.exe slbcsp.dll
regsvr32.exe cryptdlg.dll
regsvr32.exe oleaut32.dll
regsvr32.exe ole32.dll
regsvr32.exe shell32.dll
regsvr32.exe initpki.dll
regsvr32.exe wuapi.dll
regsvr32.exe wuaueng.dll
regsvr32.exe wuaueng1.dll
regsvr32.exe wucltui.dll
regsvr32.exe wups.dll
regsvr32.exe wups2.dll
regsvr32.exe wuweb.dll
regsvr32.exe qmgr.dll
regsvr32.exe qmgrprxy.dll
regsvr32.exe wucltux.dll
regsvr32.exe muweb.dll
regsvr32.exe wuwebv.dll
Step 8: Launch Registry Editor, go to HKEY_LOCAL_MACHINE\COMPONENTS and then delete some incorrect registry values including PendingXmlIdentifier, NextQueueEntryIndex, and AdvancedInstallersNeedResolving.
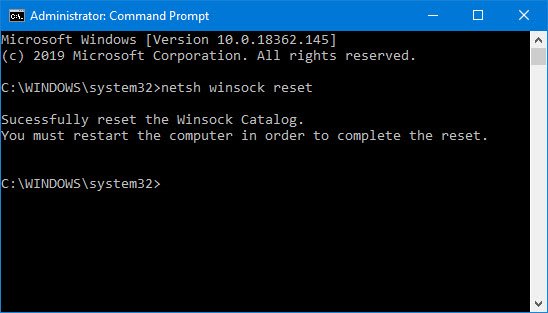
Step 9: Restart your computer and then open CMD as an administrator. Then, type the command – netsh winsock reset and press Enter to reset Winsock.
Step 10: Execute these commands below and press Enter after each one command to reset Windows update services:
net start bits
net start wuauserv
net start appidsvc
net start cryptsvc
Step 11: At last, reboot your computer to let all changes take effect.
That’s all the steps to reset Windows Update components in Windows 11/10. Just follow the detailed process to easily do this task when needed.
About The Author
Position: Columnist
Vera is an editor of the MiniTool Team since 2016 who has more than 7 years’ writing experiences in the field of technical articles. Her articles mainly focus on disk & partition management, PC data recovery, video conversion, as well as PC backup & restore, helping users to solve some errors and issues when using their computers. In her spare times, she likes shopping, playing games and reading some articles.
At times, users experience trouble using Windows Update. While there are several ways to troubleshoot various Windows Update issues, if this happens frequently, it would be a good idea to reset Windows Update settings to default. This can be useful if your Windows Updates fail to Install.
We have already seen how to reset Windows Update Agent to default using the Reset Windows Update Components Tool. Our Fix WU Utility re-registers all Windows Update related dll files and resets other settings to default. But if you want to know how to manually reset each Windows Update component individually to default in Windows 11/10/8/7, then this post is what you are looking for.

Here is the summary of all the steps you need to take to reset Windows Update Components to defaults in Windows 11/10:
- Stop Windows Update Services
- Delete the qmgr*.dat files.
- Flush the SoftwareDistribution and catroot2 folders
- Reset the BITS service and the Windows Update service to the default security descriptor
- Re-register the BITS files and the Windows Update related DLL files
- Delete incorrect Registry values
- Reset Winsock
- Restart Windows Update Services.
1] Stop Windows Update Services
First you will need to stop the Background Intelligent Transfer, Windows Update, Cryptographic Services. The services basically allow Windows to download all files and update that are used by Automatic Windows Update and other Windows components. It uses the idle bandwidth of network connection when your connection is idle and silently downloads files in the background. It is, therefore, the best practice to disable the BITS service before proceeding.
To do so, in an elevated command prompt window, type the following commands and press Enter after you type each command.
net stop bits
net stop wuauserv
net stop appidsvc
net stop cryptsvc
2] Delete the qmgr*.dat files
Next, you need to delete the qmgr*.dat files. In order to reset Windows Update components, you will need to delete the files. To do this, at a command prompt, type the following command, and then press Enter:
Del "%ALLUSERSPROFILE%\Application Data\Microsoft\Network\Downloader\qmgr*.dat"
It’s worth mentioning here that if this is the first time you are trying to resolve your Windows Update issues by following the steps in this post, it is advisable to skip this very step and jump directly to the next step. The step should only be followed for troubleshooting when you see no solution in sight despite trying all steps outlined in the article except this step since the step is performed by the “Aggressive” mode of the Fix it Solution.
3] Flush the SoftwareDistribution and catroot2 folders
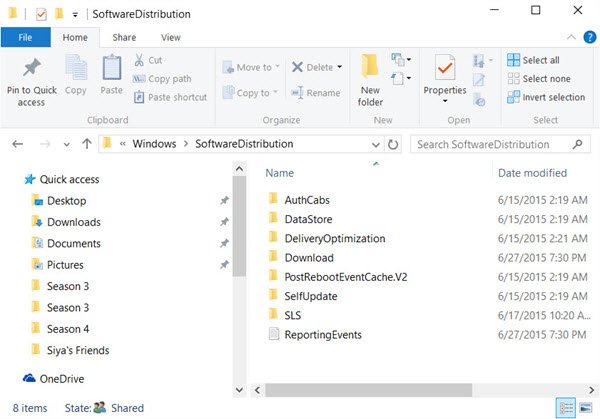
Rename the SoftwareDistribution and catroot2 folders. To do this, at a command prompt, type the following commands. Make sure that you press Enter after you type each command.
Ren %systemroot%\SoftwareDistribution SoftwareDistribution.bak
Ren %systemroot%\system32\catroot2 catroot2.bak
Read: Windows Update keeps disabling itself automatically.
4] Reset the BITS service and the Windows Update service to the default security descriptor
To do this, at a command prompt, type the following commands. Make sure that you press Enter after you type each command.
sc.exe sdset bits D:(A;;CCLCSWRPWPDTLOCRRC;;;SY)(A;;CCDCLCSWRPWPDTLOCRSDRCWDWO;;;BA)(A;;CCLCSWLOCRRC;;;AU)(A;;CCLCSWRPWPDTLOCRRC;;;PU)
sc.exe sdset wuauserv D:(A;;CCLCSWRPWPDTLOCRRC;;;SY)(A;;CCDCLCSWRPWPDTLOCRSDRCWDWO;;;BA)(A;;CCLCSWLOCRRC;;;AU)(A;;CCLCSWRPWPDTLOCRRC;;;PU)
Now, in the command prompt window that is opened, type the following command, and then press Enter:
cd /d %windir%\system32
5] Re-register the BITS files and the Windows Update related DLL files
Re-register the BITS files and the Windows Update related dll files, in the command prompt window, type the following commands. Do not forget to hit the Enter key after every command you type.
regsvr32.exe atl.dll

regsvr32.exe urlmon.dll

regsvr32.exe mshtml.dll

regsvr32.exe shdocvw.dll

regsvr32.exe browseui.dll

regsvr32.exe jscript.dll

regsvr32.exe vbscript.dll

regsvr32.exe scrrun.dll

regsvr32.exe msxml.dll

regsvr32.exe msxml3.dll

regsvr32.exe msxml6.dll

regsvr32.exe actxprxy.dll

regsvr32.exe softpub.dll

regsvr32.exe wintrust.dll

regsvr32.exe dssenh.dll

regsvr32.exe rsaenh.dll

regsvr32.exe gpkcsp.dll

regsvr32.exe sccbase.dll

regsvr32.exe slbcsp.dll

regsvr32.exe cryptdlg.dll

regsvr32.exe oleaut32.dll

regsvr32.exe ole32.dll

regsvr32.exe shell32.dll

regsvr32.exe initpki.dll

regsvr32.exe wuapi.dll

regsvr32.exe wuaueng.dll

regsvr32.exe wuaueng1.dll

regsvr32.exe wucltui.dll

regsvr32.exe wups.dll

regsvr32.exe wups2.dll

regsvr32.exe wuweb.dll

regsvr32.exe qmgr.dll

regsvr32.exe qmgrprxy.dll

regsvr32.exe wucltux.dll

regsvr32.exe muweb.dll

regsvr32.exe wuwebv.dll

regsvr32.exe wudriver.dll
6] Delete incorrect Registry values
Open Registry Editor and navigate to the following key:
HKEY_LOCAL_MACHINE\COMPONENTS
Right-click COMPONENTS. Now in the right-pane, delete the following if they exist:
- PendingXmlIdentifier
- NextQueueEntryIndex
- AdvancedInstallersNeedResolving
Restart your computer.
Related: Windows Update fails to install or will not download.
7] Reset Winsock
It is a technical specification that defines how Windows network software should access network services, especially TCP/IP. Windows OS comes with a Dynamic Link Library (DLL) file called winsock.dll which implements the API and coordinates Windows programs and TCP/IP connections. Due to some reason, Windows Sockets popularly referred to as Winsock may get corrupted. As such, a user may experience difficulty in establishing a connection to the Internet. It, therefore, becomes necessary to repair Winsock by resetting it.
To Reset Winsock, in the command prompt window, type the following command, and then press Enter:
netsh winsock reset
Related:
- PowerShell Script to reset Windows Update Client
- Reset Windows Update Tool will restore settings & components to default automatically.
8] Restart Windows Update Services
Once all is done, restart the BITS service, the Windows Update service, and the Cryptographic service. To do this, switch back to the command prompt and enter the following commands. Again, make sure that you press Enter after you type each command.
net start bits

net start wuauserv

net start appidsvc

net start cryptsvc
Finally, make sure that you have installed the latest Windows Update Agent on your computer.
Restart your computer to complete the process.
The Windows Update Troubleshooter basically automated the entire manual process and helps you fix Windows Update problems in a click.
How do I get rid of Windows 11 Update permanently?
There are many ways by which you can block Windows 11 automatic updates. The easiest method is to pause the update for 1 to 5 weeks. After that, you can extend this time in Windows 11 Settings manually. You can permanently disable Windows Updates by using Windows Group Policy Editor and Registry Editor. These two methods are for advanced users. If you do not want to modify the Windows Registry, you can enable the metered connection. Windows 11 does not download updates automatically when you are connected to a metered connection.
What happens if Windows 11 update is stuck?
If the Windows update is stuck downloading on Windows 11 or on any other version of the Windows operating system, first, check your internet connection. Your internet connection should be working fine in order to install Windows Updates. Also, make sure that your hard disk has enough space to download and install Windows Updates.
I hope this helps.