
Is your Windows 10 Start menu not working? Do you want to reset the Start menu of Windows 10? The Start Menu is one of the most used places in Windows 10. It is an all-in-one place where we search the system for something and quickly access the pinned tiles.
Basically, Windows 10 Start menu is a table of contents for all the apps (programs), folders, and contacts you use often. In Desktop mode, all the app icons appear in an alphabetical list on the left side of the screen, and they can be made to appear on the right side as tiles. If the tiles are “live,” they can display changing information from the application in real time, such as stock quotes or the weather. Just select the Start button on the taskbar. Next, customize it according to choice by pinning apps and programs or moving and regrouping tiles. If you need more space, you can resize the Start menu as well.

Due to any reason, if your Start menu is not working, this gearupwindows article will help you troubleshoot them.
Like any other program on Windows 10, the Start Menu also depends upon a process that runs in the background. If the Start Menu behaves abnormally or is completely unavailable, or icons have wavered, a simple restart of its process may help you to recover them without rebooting your computer.
You can restart the Start menu in Windows 10 using the following ways:-
- Using Task Manager
- Via Command Prompt
- Through Windows PowerShell
How to Restart the Start Menu using the Windows 10 Task Manager?
Perhaps, Task Manager is the easiest way to restart the Start menu on Windows 10 PC. Simply kill the associated process from the Task Manager, and then it will re-run automatically. Perform the following steps to do so:-
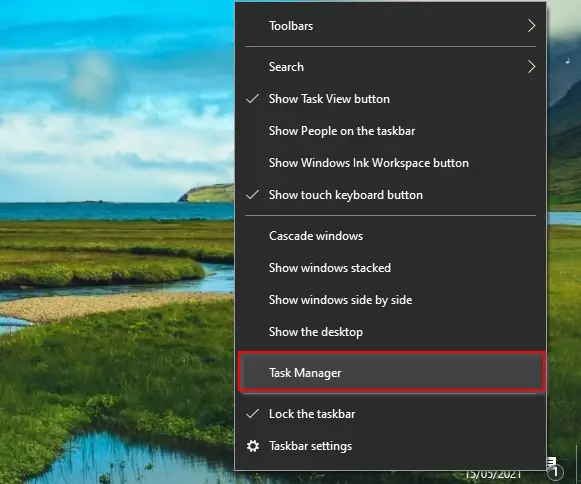
Step 1. Launch Task Manager by right-clicking the Taskbar and selecting Task Manager, or use the shortcut keys Ctrl + Shift + Esc to open it.
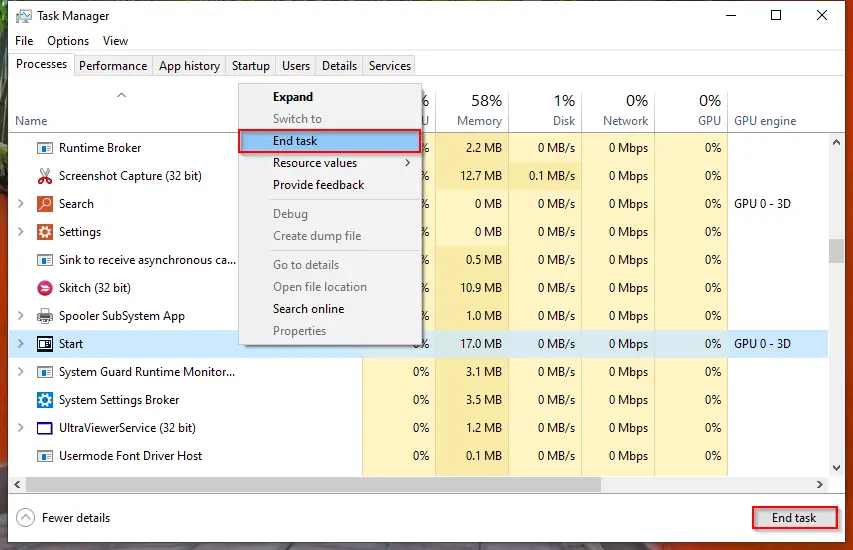
Step 2. Navigate to the Processes tab and locate the Start process under it. Select the End task by right-clicking on it. Alternatively, select the Start process and click End Task at the bottom-right of the Task Manager window.
Once you execute the above steps, Start Menu will disappear and appear again automatically. That means the Start process will restart automatically within the next few seconds.
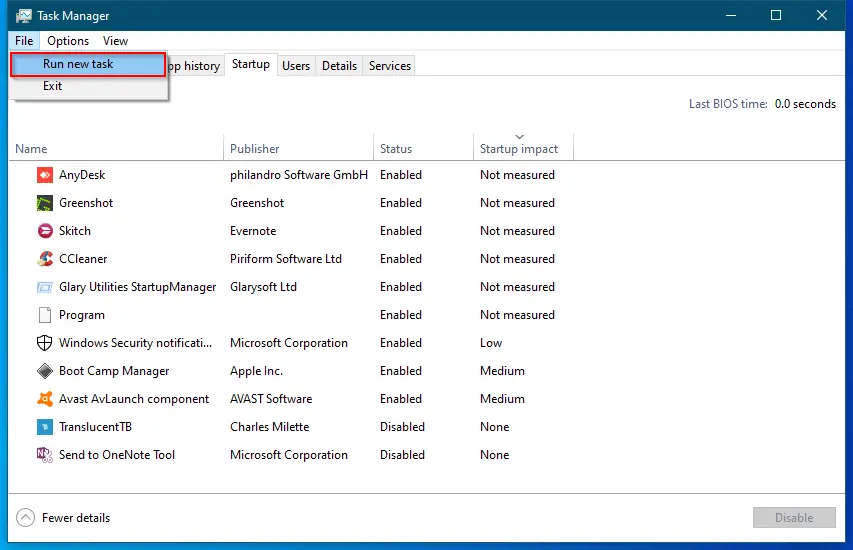
If you see that the Start process does not launch automatically, click on the File menu and then select the Run new task option.
In the dialog box that opens, paste the following command:-
C:\Windows\SystemApps\Microsoft.Windows.StartMenuExperienceHost_cw5n1h2txyewy\StartMenuExperienceHost.exe
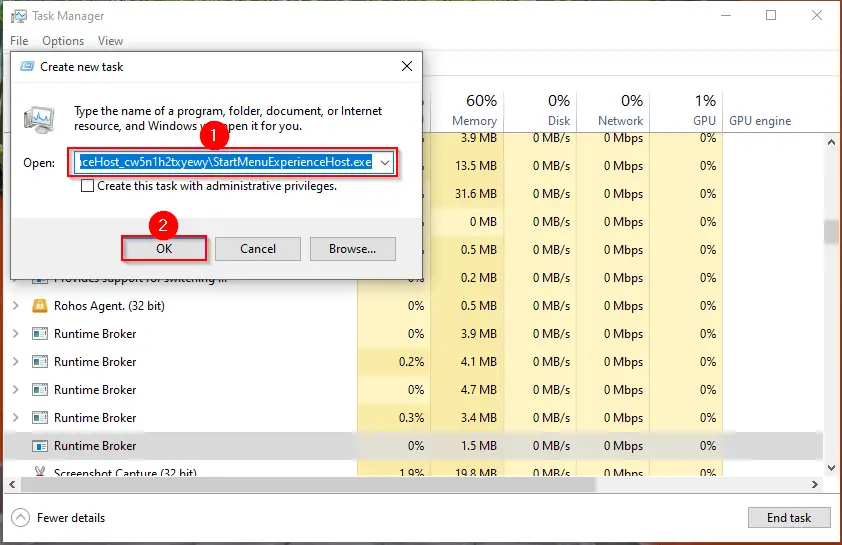
Click OK.
The Start process will start again, and now the Start Menu should work perfectly and normally respond as it should.
How to Restart the Start Menu via Command Prompt?
Follow these steps to restart the Start Menu via Command Prompt:-
Step 1. Open the Command Prompt with elevated rights.
Step 2. In the prompt, type the following command and hit Enter from the keyboard:-
taskkill /im StartMenuExperienceHost.exe /f
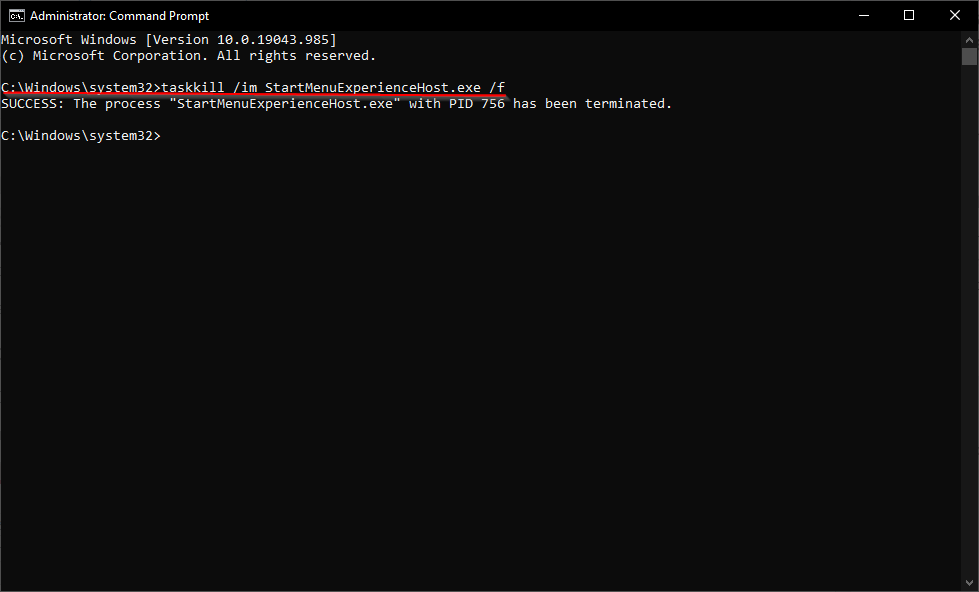
You should receive a message, “SUCCESS: The process “StartMenuExperienceHost.exe” with PID 756 has been terminated.”
Now, the Start process will stop and start automatically.
Step 3. If the Start process cannot rise automatically, execute the following command again:-
start %windir%\SystemApps\Microsoft.Windows.StartMenuExperienceHost_cw5n1h2txyewy\StartMenuExperienceHost.exe
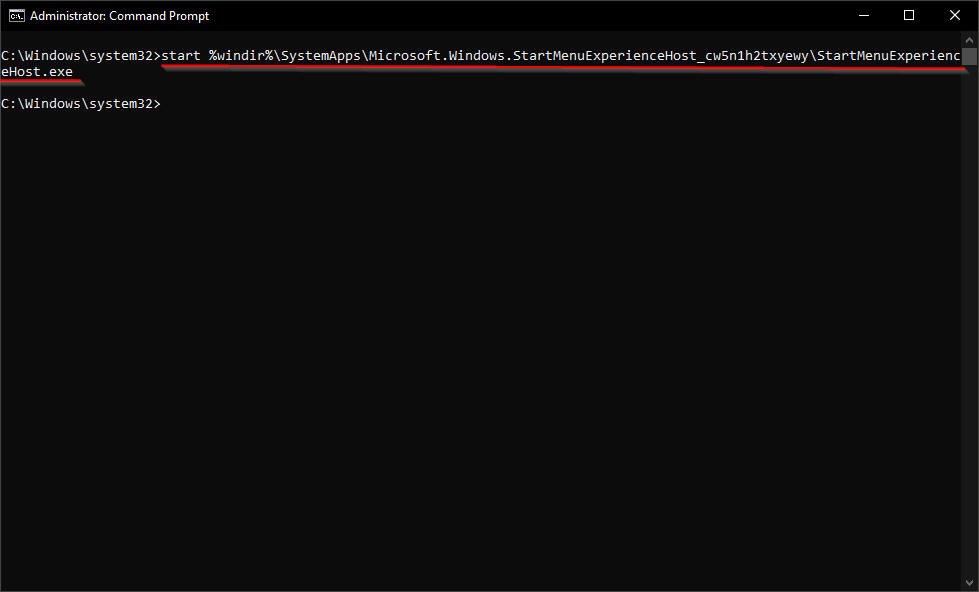
After executing the above steps, the Start menu will start working again.
How to Restart the Start Menu in Windows 10 through PowerShell?
To restart the Start menu in Windows 10 using PowerShell, use these steps:-
Step 1. Open Windows PowerShell as an administrator.
Step 2. In the elevated Windows PowerShell, copy and paste the following and then hit Enter key on the keyboard:-
Stop-Process -Name "StartMenuExperienceHost" -Force
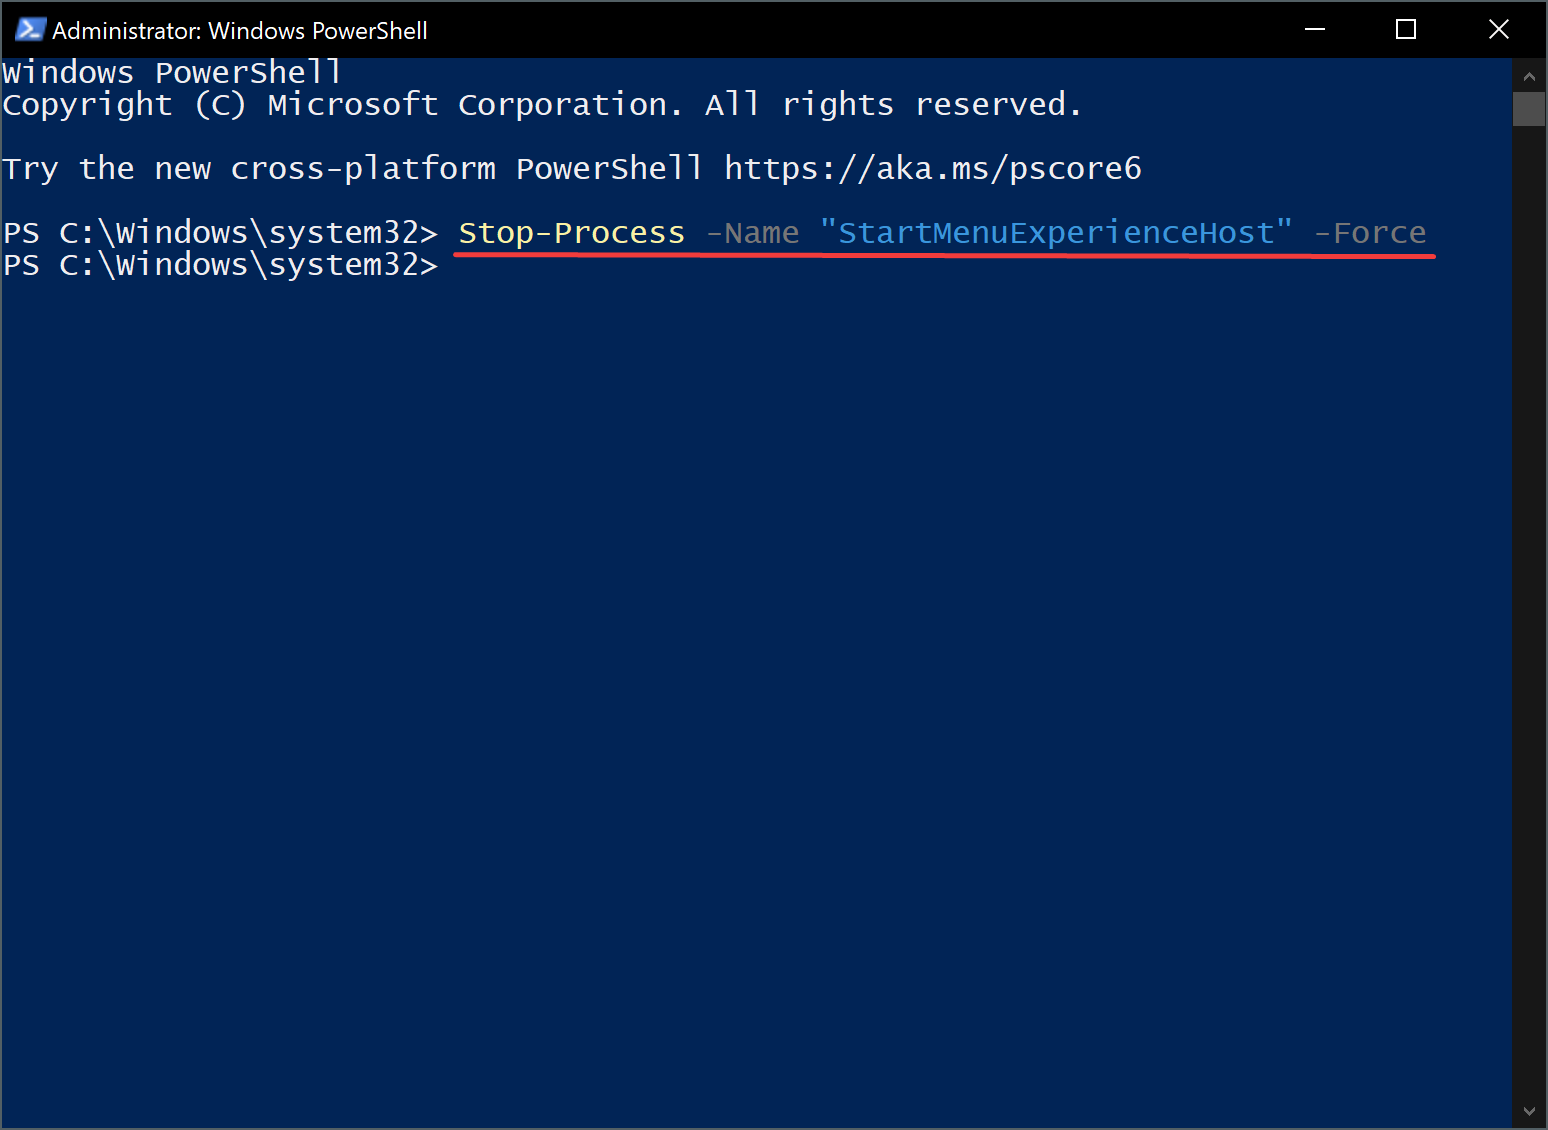
That’s it. Now, the Start menu process will exit and restart automatically.
How to Reset the Start Menu in Windows 10?
Please don’t confuse it with the Restarting the Start menu. The above method is used to restart the Start menu, but Resetting is different. Resetting will completely restore the Start menu to its original state. If you have made several changes to your Start menu, all be erased automatically. So, if you don’t want to eliminate your Start menu settings, please use the above-mentioned restarting steps only.
There are at least two known methods available through which you can reset the Start menu of Windows 10; these are the following:-
- Using Registry Editor
- Via Local User Account
How to Reset the Start Menu in Windows 10 using Windows Registry?
Since we will modify Windows Registry in this method, we recommend you take a full backup of the registry and create a system restore point. In case something goes wrong, you can restore your PC to its previous working state.
Those who have made several changes to Windows 10 Start menu and want to remove them completely, do the following:-
Step 1. Press the Windows logo + R keys to open the Run dialog box.
Step 2. In the Run box, type the following and hit Enter from the keyboard or click the OK button:-
regedit
If the User Account Control dialog opens, click the Yes button to continue opening the Registry Editor window.
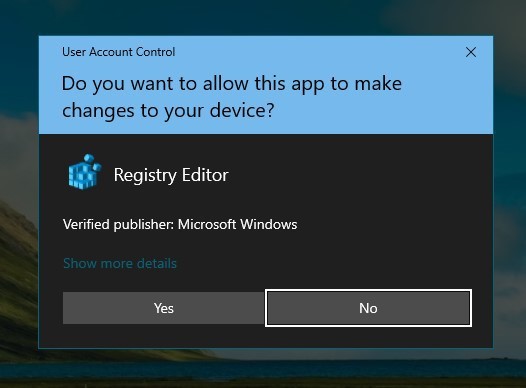
The above action will open Registry Editor.

Step 3. In the Registry Editor window, from the left side pane, point to the following registry key:-
Computer\HKEY_CURRENT_USER\SOFTWARE\Microsoft\Windows\CurrentVersion\CloudStore\Store\Cache\DefaultAccount
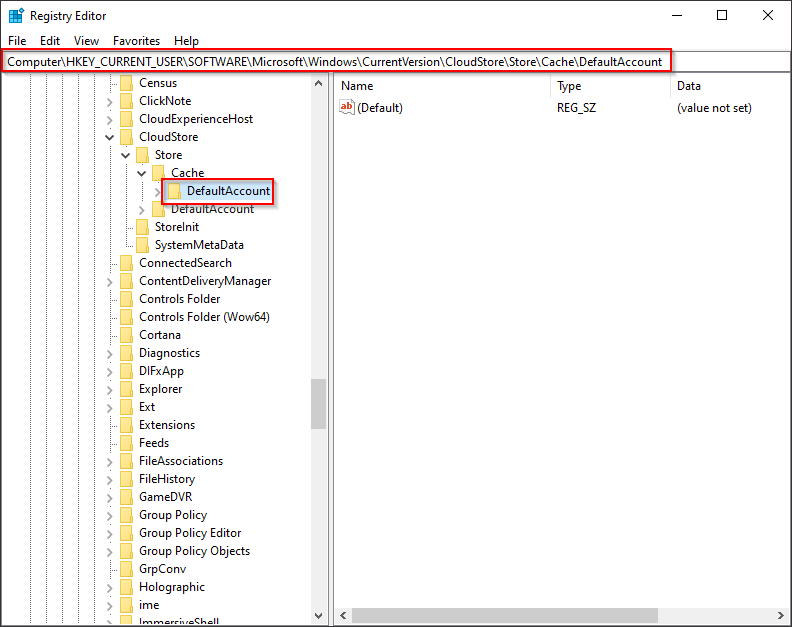
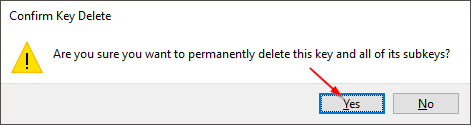
Step 4. Right-click on select Delete.

Step 5. Click Yes to confirm the deletion.
Step 6. Now, close the Registry Editor and restart your computer.
After executing the above steps, click on the Start button to see Windows 10 Start menu layout. You will notice your customization has gone, and it is reset to factory default.
How to Reset the Start Menu in Windows 10 via Local User Account?
For those who don’t want to modify the Windows Registry, this is an alternate method. In this method, we will take the help of a Local User Account. Let us see what to do.
Note: Microsoft has deprecated the “TileDataLayer” model in the Windows 10 1703 Creators Update. So, if you are using an older Windows 10 version before Windows 10 1703 Creators Update, then only this method will work. Otherwise, you can continue with the Registry method to reset the Start menu on Windows 10.
All the Start menu layout information remains stored in a database inside the TileDataLayer folder for your information. If this database is corrupt, your Start menu will not work properly. If we replace this faulty database with a working database, the problem will be fixed immediately. Fortunately, there is a workaround to reset the Start menu layout on your Windows 10 computer that is not complicated.
Before proceeding with the steps, ensure you’ll need to have three user accounts on your computer. These are the following:-
- Your account: The user account in which the Start menu isn’t working correctly, and you want to reset them.
- Local account: A temporary account from where you will copy the Start menu files to reset the menu on your account.
- Administrator account: You’ll need this account to copy the Start menu files between user accounts because you can’t overwrite files while they’re in memory.
How do I create a new Local User Account?
To create a fresh Local User Account, perform the following steps:-
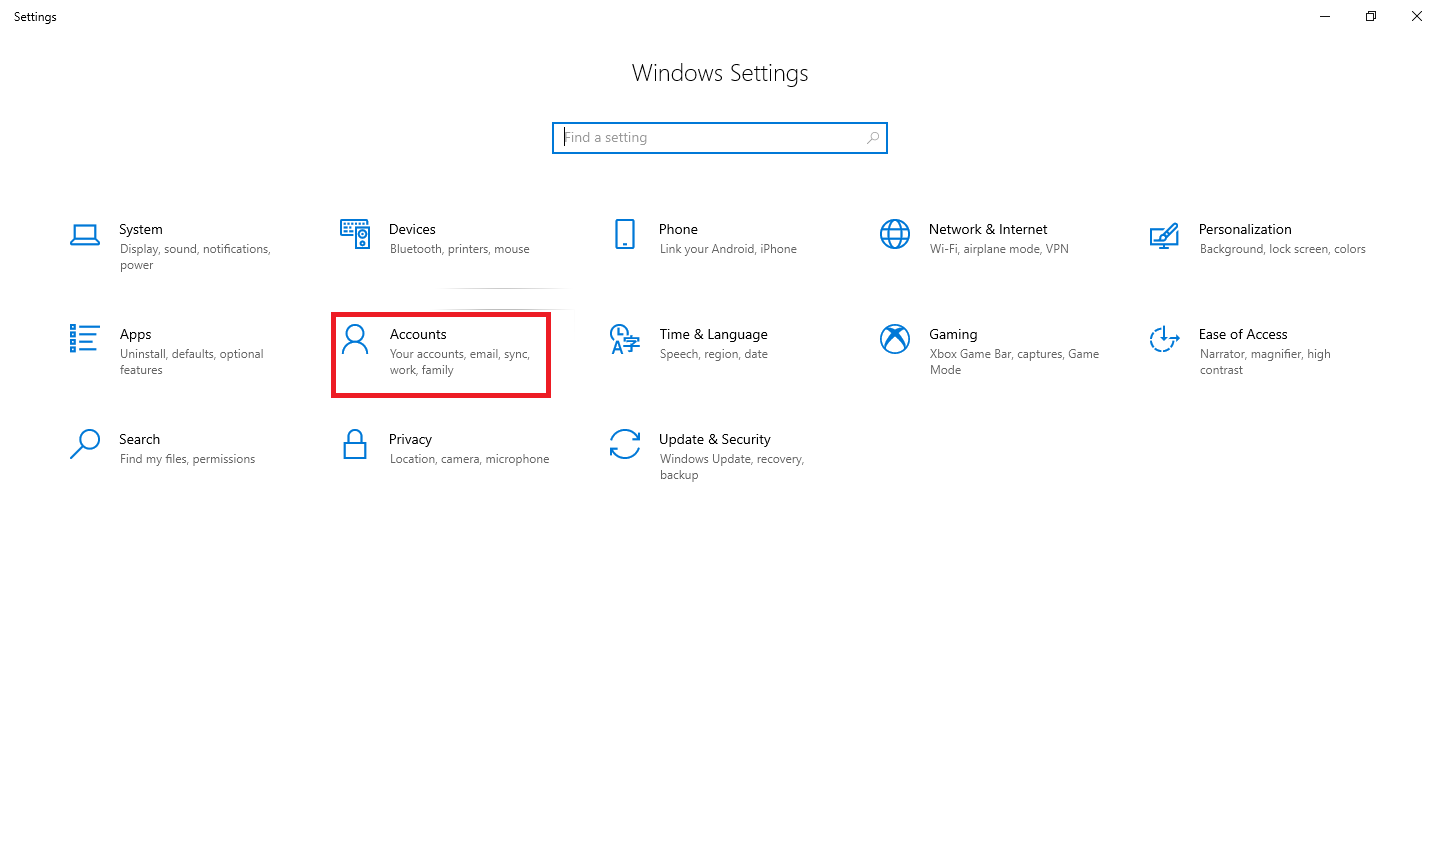
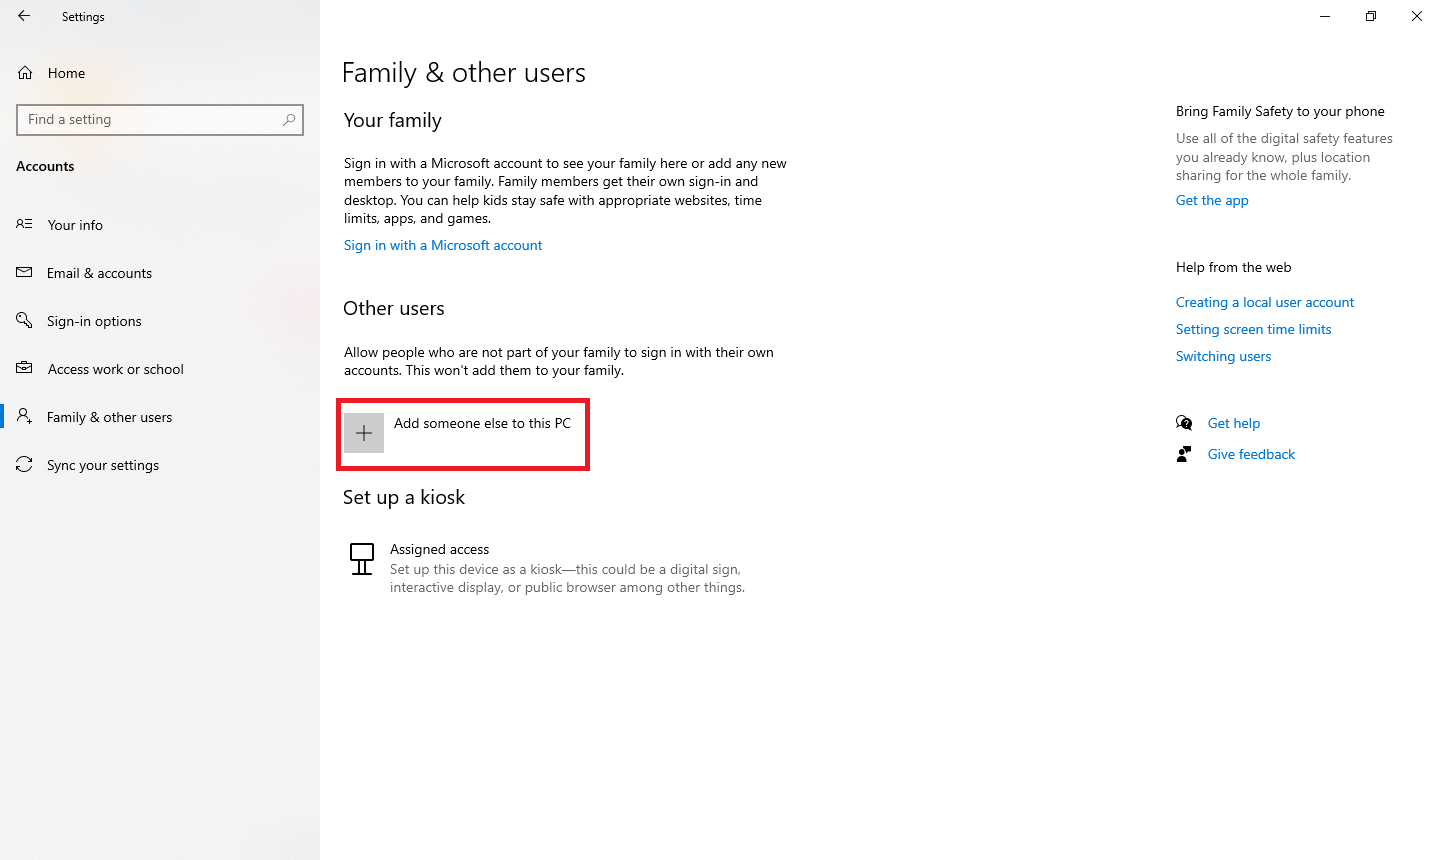
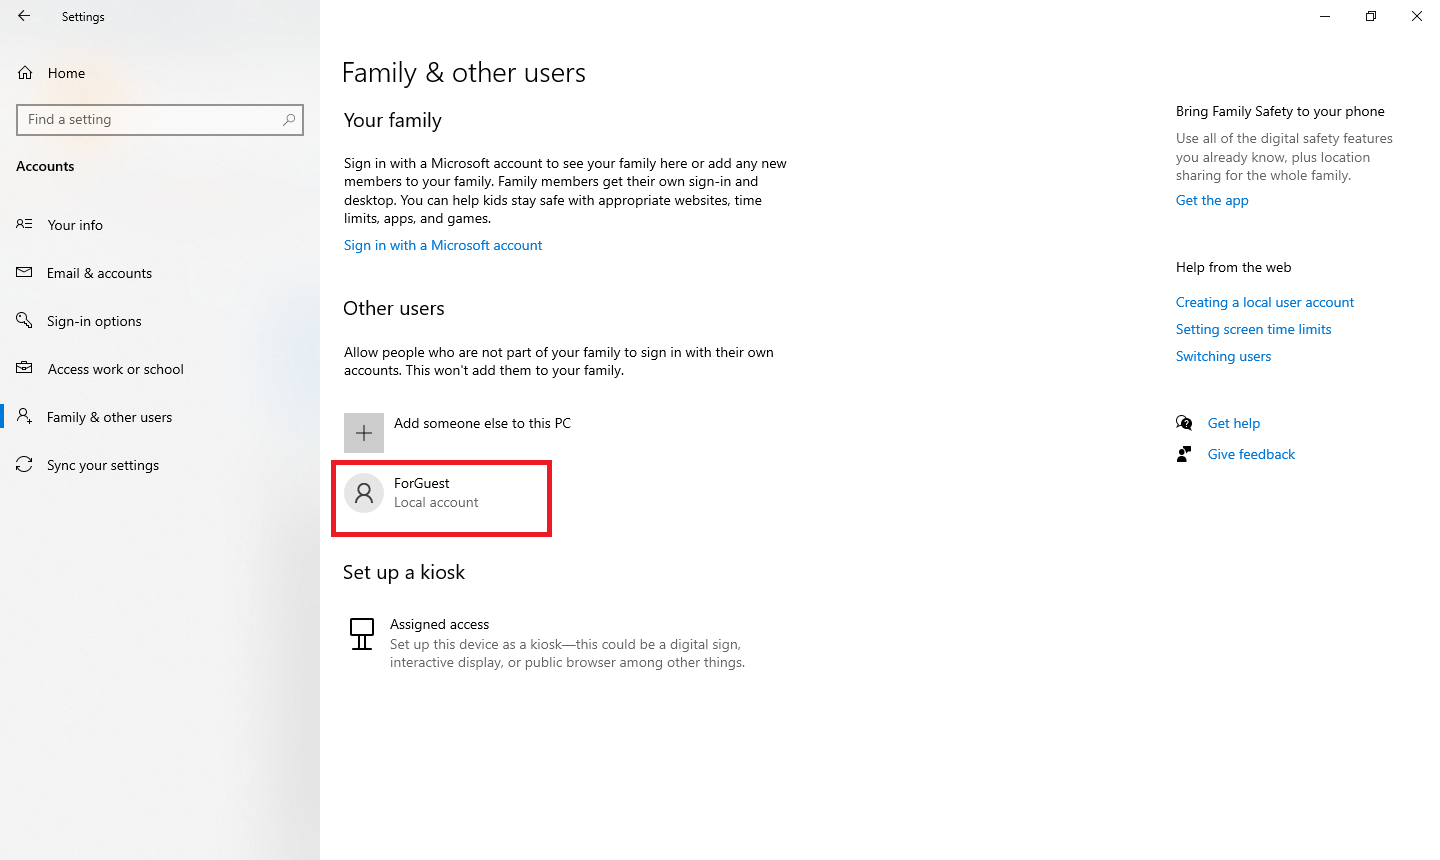
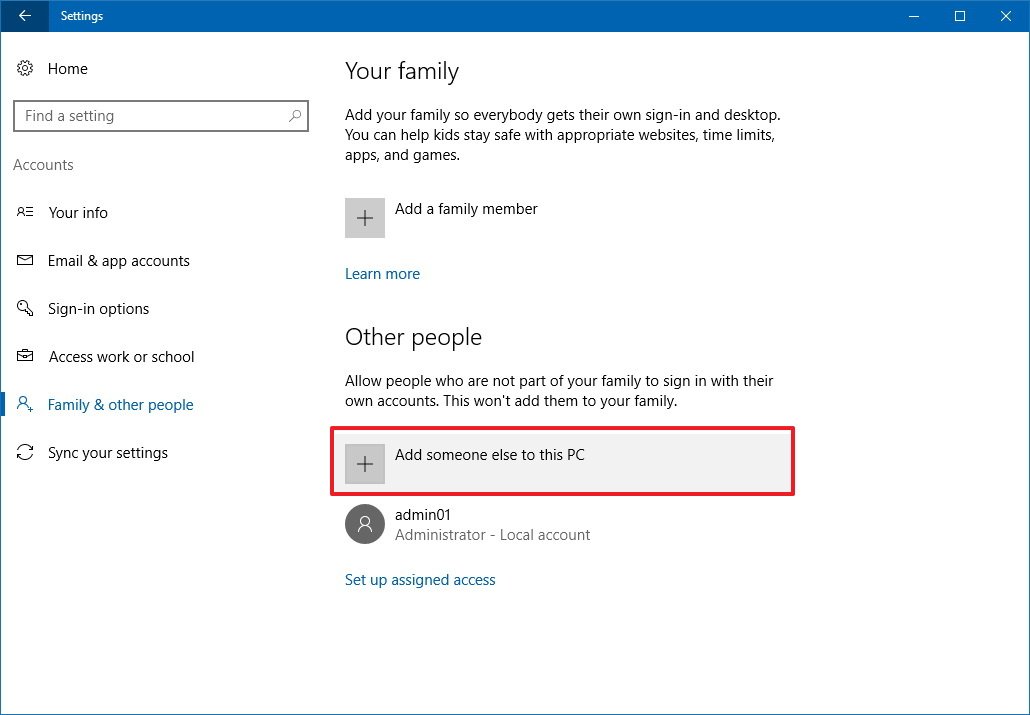
Step 2. In Settings, click the Accounts category.
Step 3. In the left side pane under the Accounts, click the “Family and other users” tab.
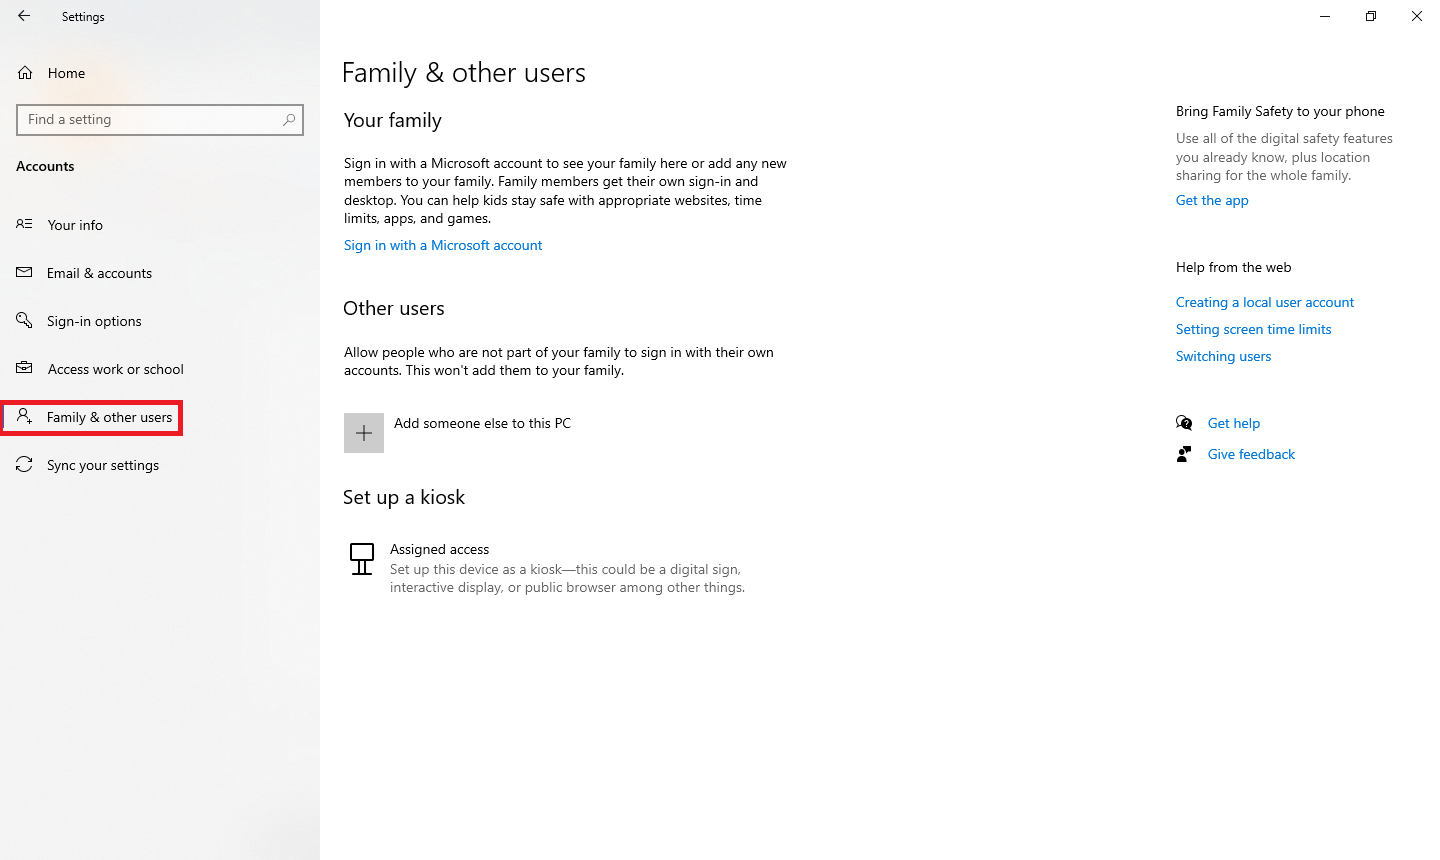
Step 4. From the right-side pane, click the “Add someone else to this PC” button.
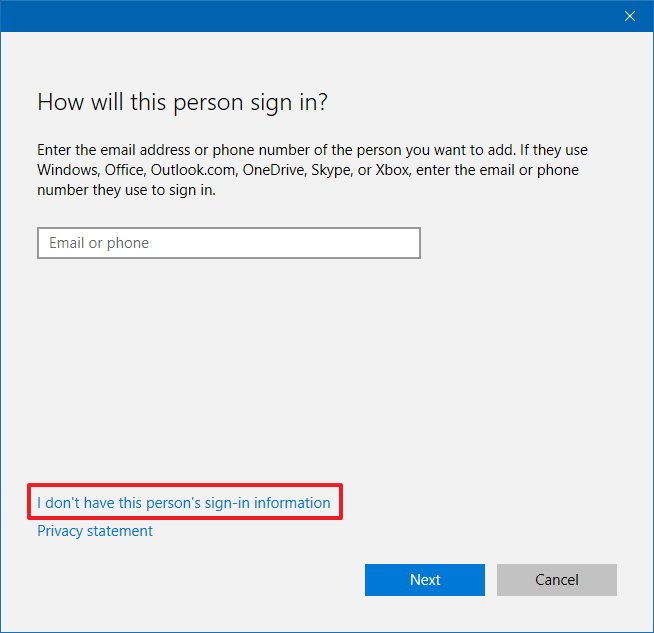
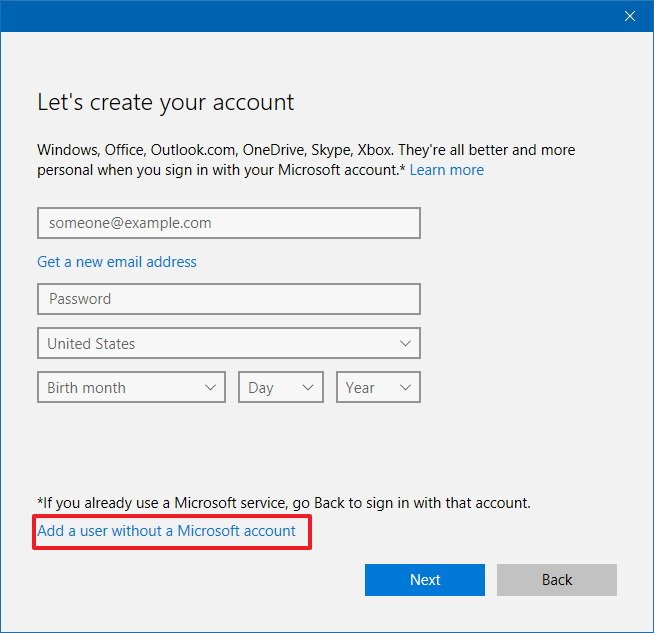
Step 5. In the Microsoft window that pops up, click on the “I do not have this person’s login information” link at the bottom of the page.
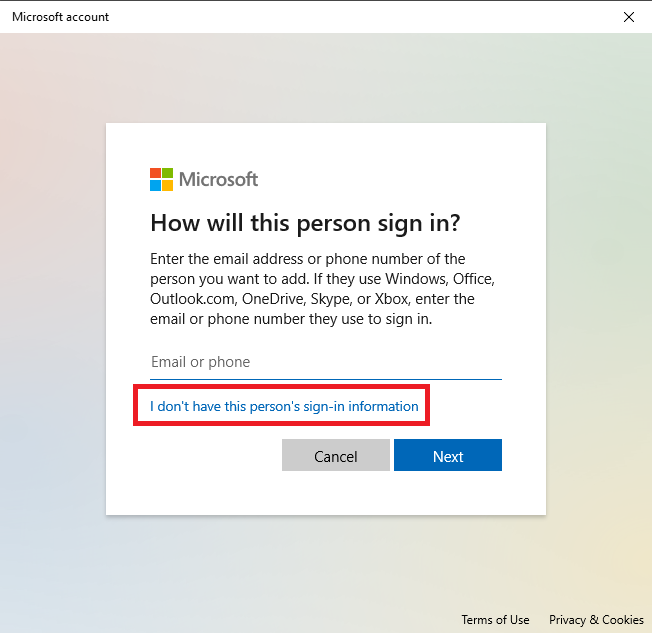
Step 6. Click the Next button.
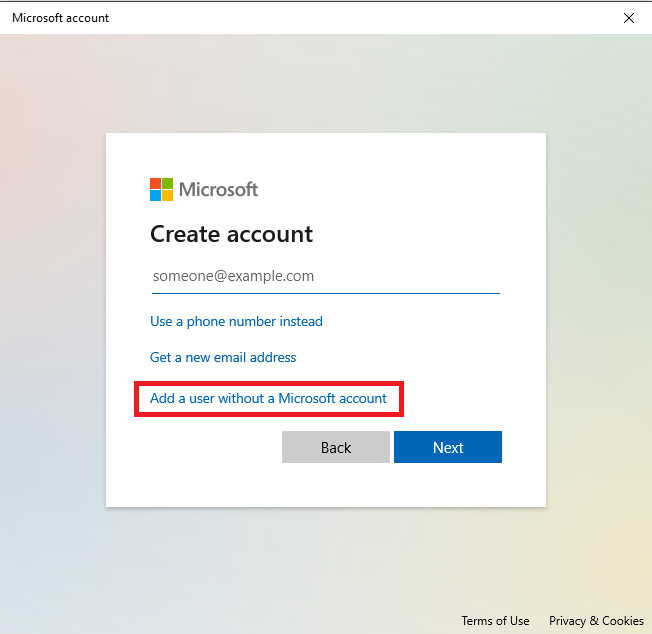
Step 7. On the next page, click on the ‘”Add a user without a Microsoft account” link at the bottom of the page.
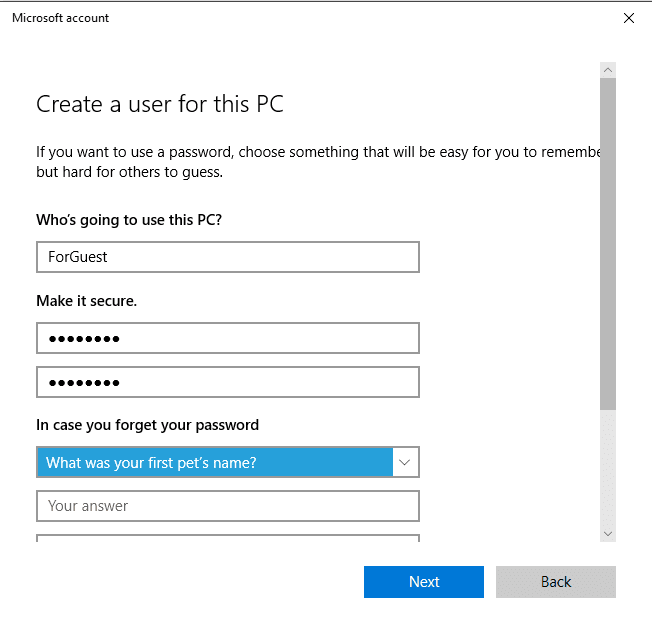
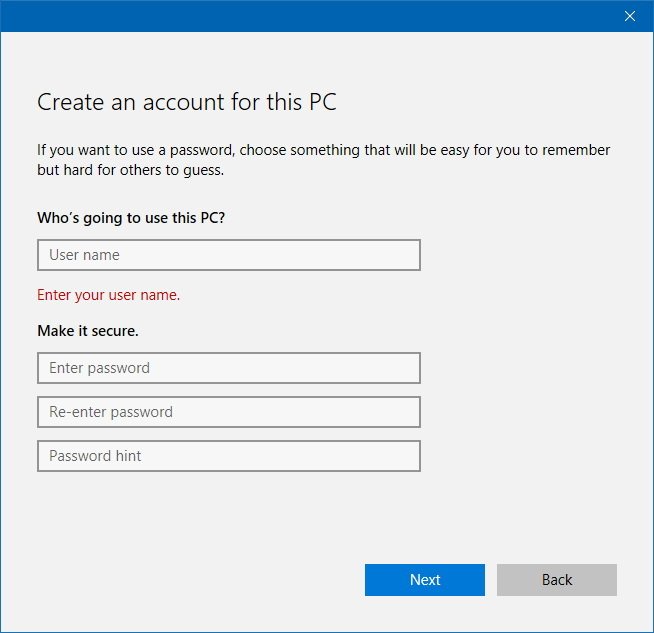
Step 8. Enter a username, password, confirm the password, set three security questions and answers, and then click on the Next button.
Step 9. Clicking on the “Next” button will lead you to the previous “Family and other users” window. This will show you that your new account is listed.
How to enable the built-in Administrator account?
Follow these steps to turn on the built-in Administrator account:-
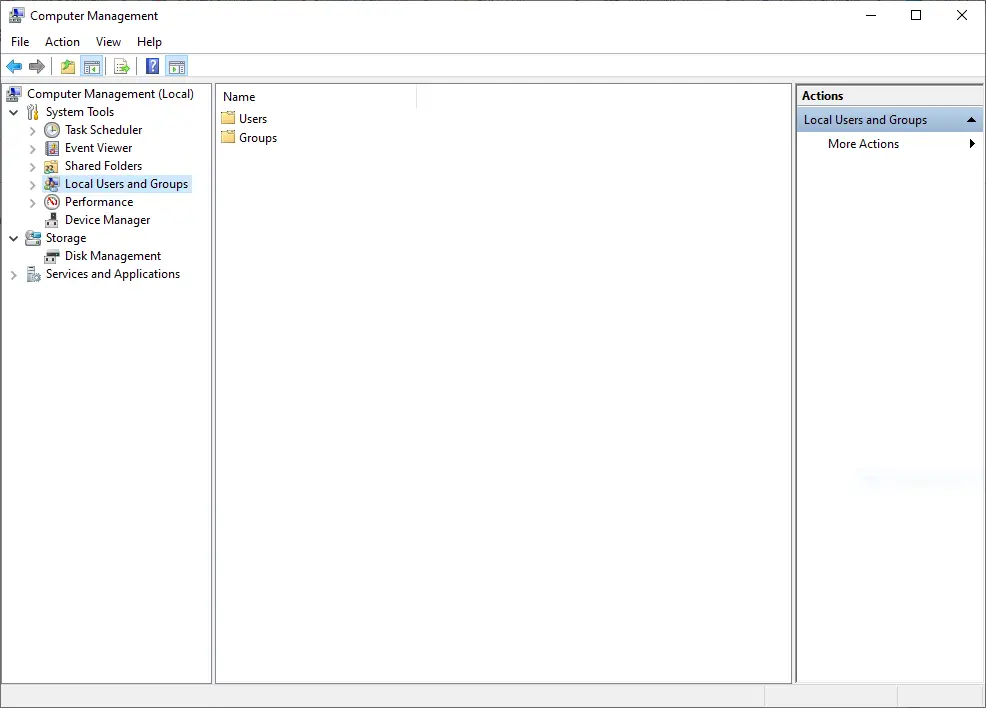
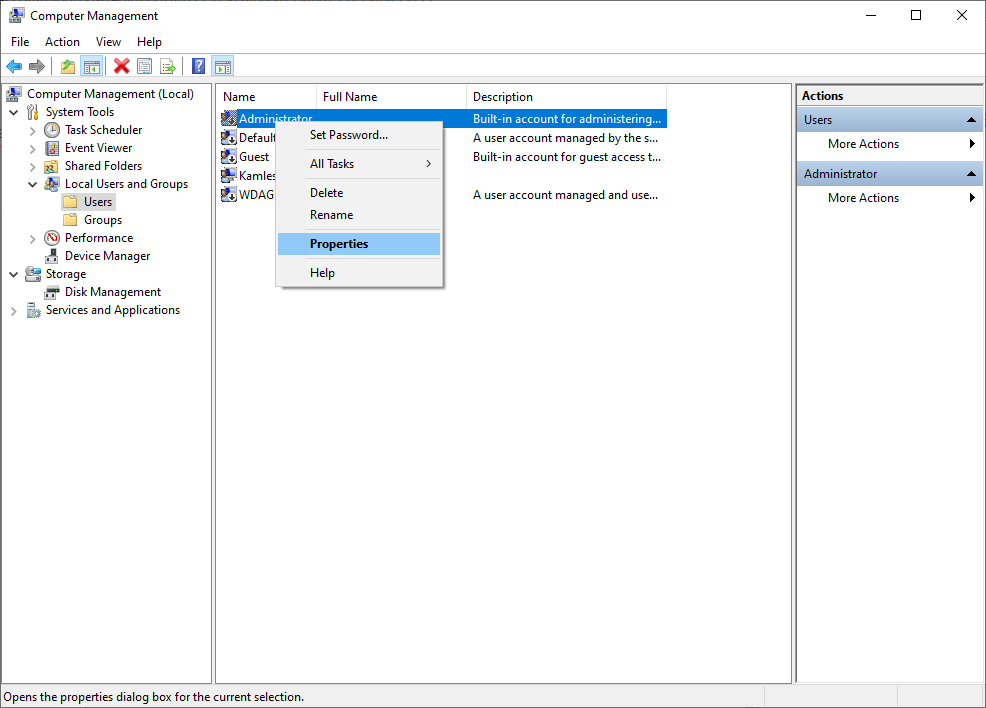
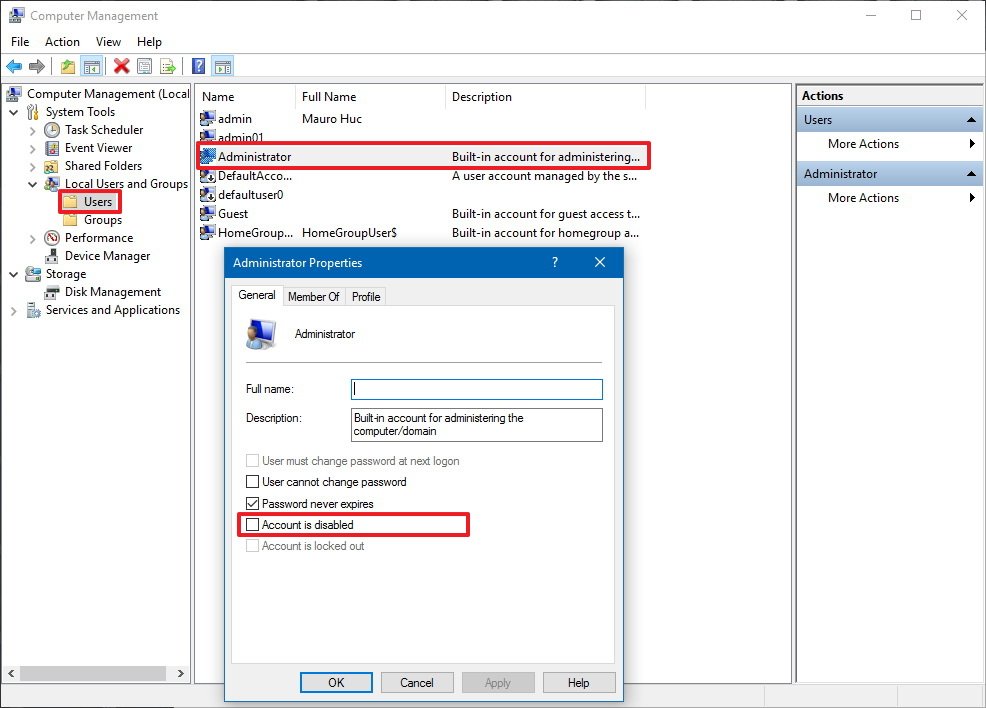
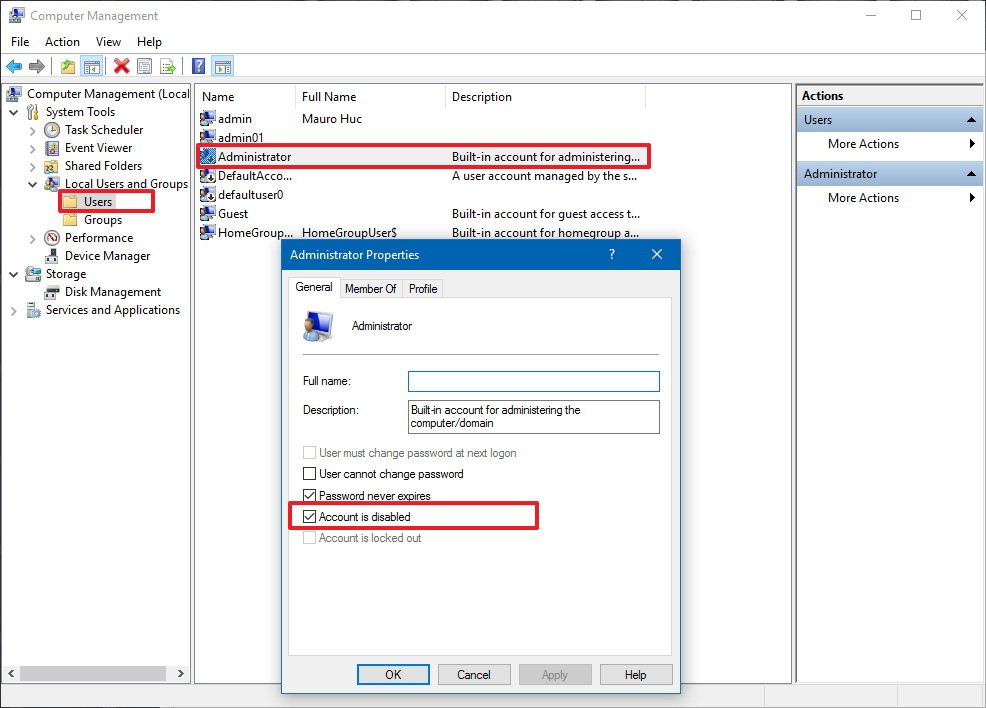
Step 1. Right-click on This PC from the desktop and select Manage.
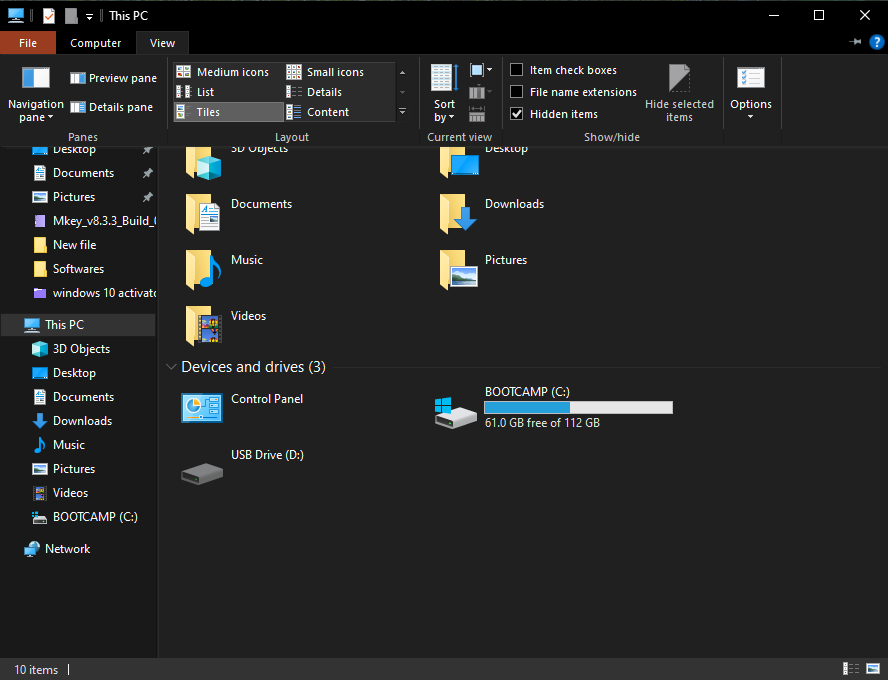
Note: If you don’t find This PC icon on the Desktop, you can restore This PC icon from the Personalize app. You can even find This PC by clicking on the Search button and typing This PC.
Step 2. From the Computer Management window, click on Local Users and Groups.
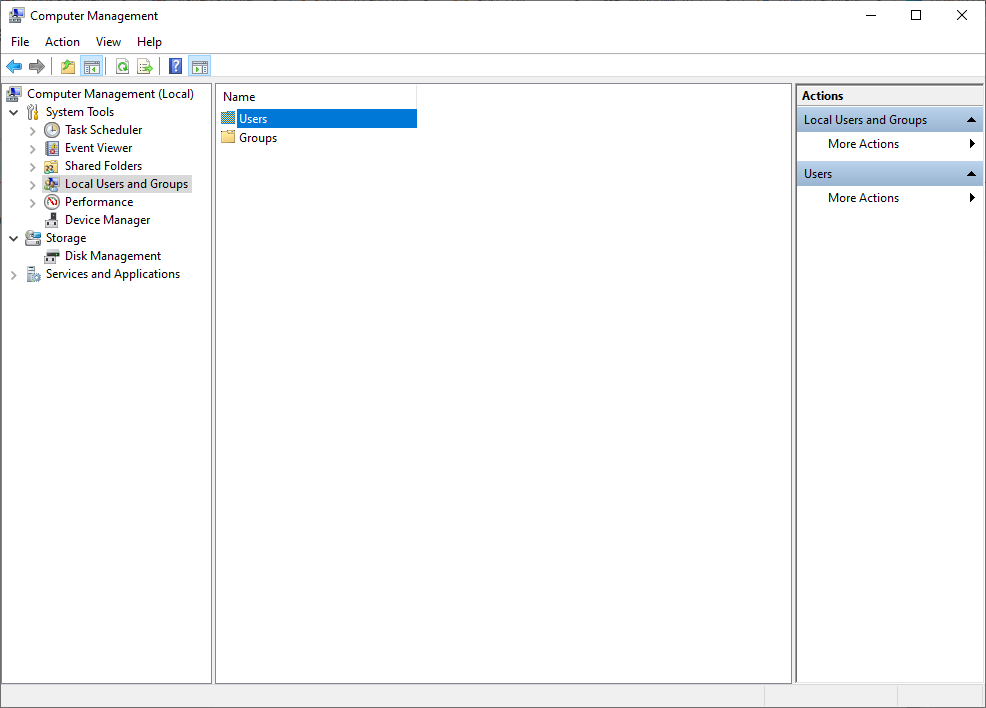
Step 3. Double-click on Users from the right side pane.
Step 4. You will find a down arrow on the Administrator account.
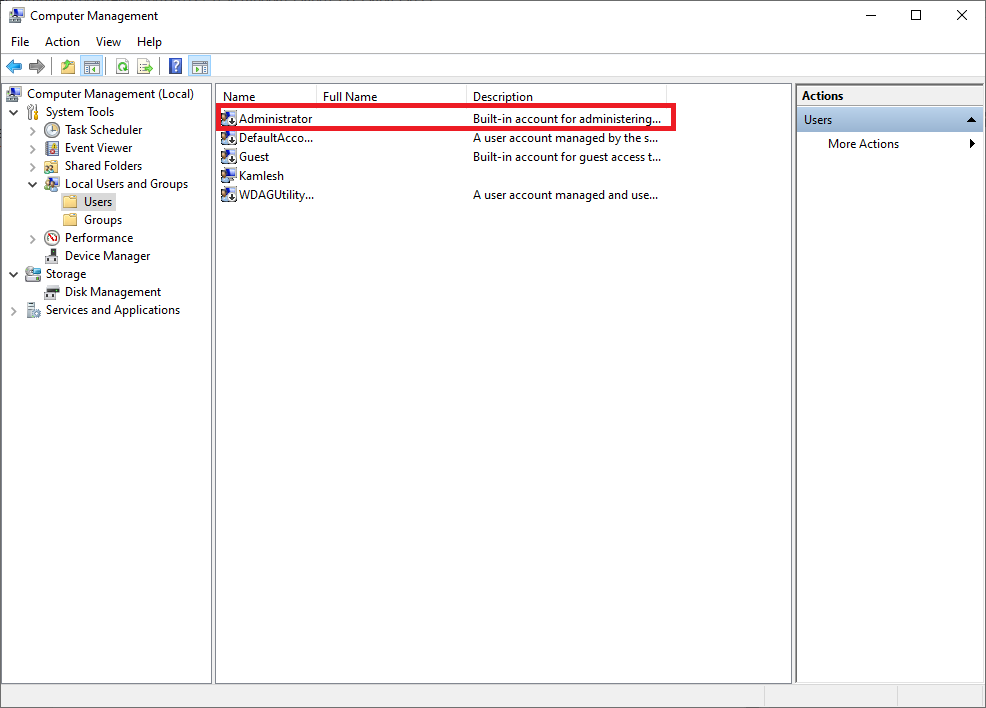
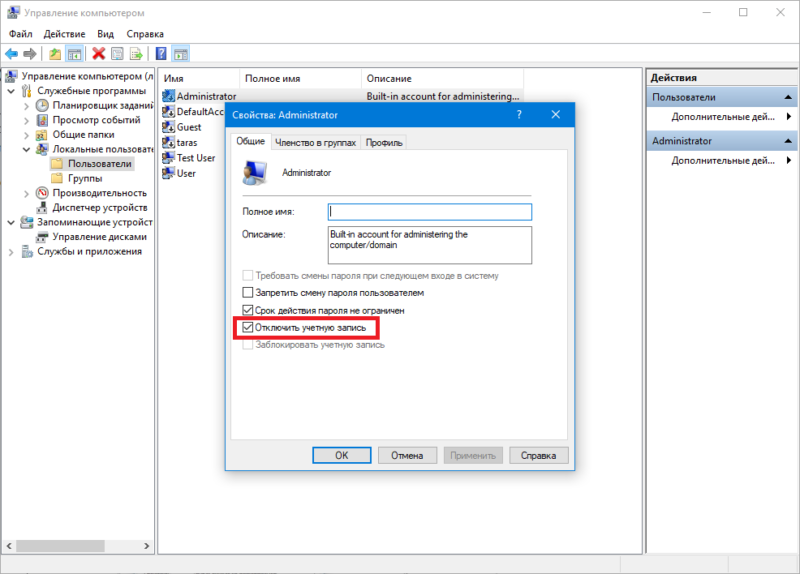
Step 5. Select the Administrator account, right-click, and choose Properties from the available options.
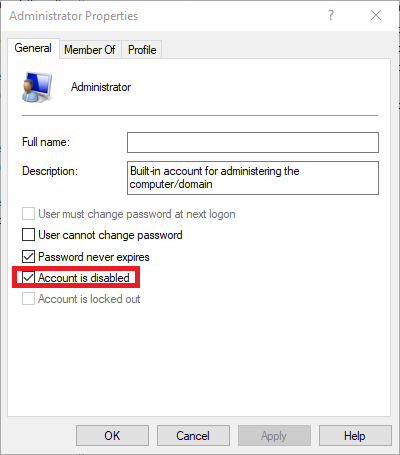
Step 6. You will see a checkmark on “Account is disabled,” uncheck the same to enable the built-in Administrator account.
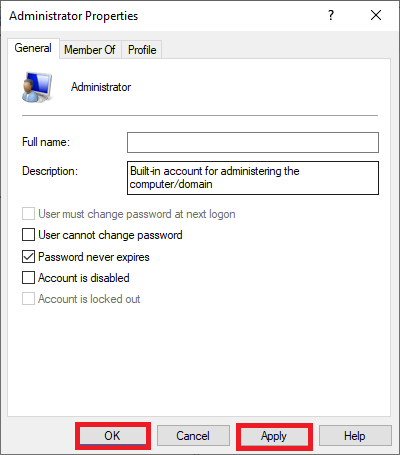
Step 7. Click Apply and then the OK button.
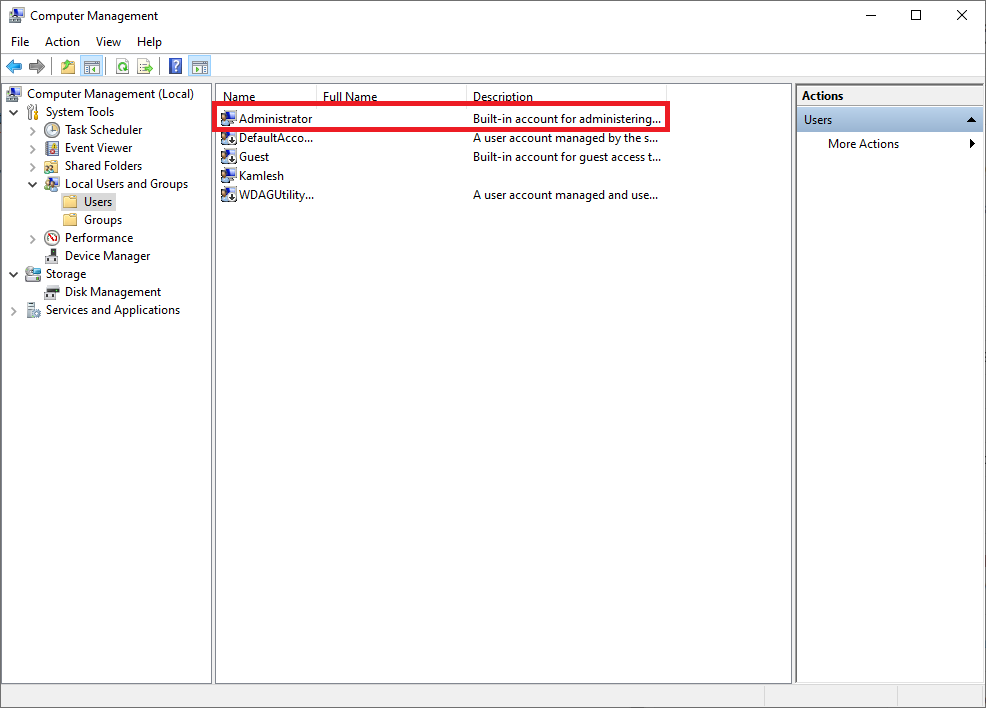
Step 8. Now, you will notice the down arrow button is removed, and the Administrator account is activated.
How to Reset the Start menu layout using a Local User Account?
Follow these steps to reset the Start menu layout using a Local User Account:-
Step 1. Sign-in to the newly created local account to create its profile.
Step 2. Now, Sign out from the newly created local account.
Step 3. Sign-in to the Administrator account.
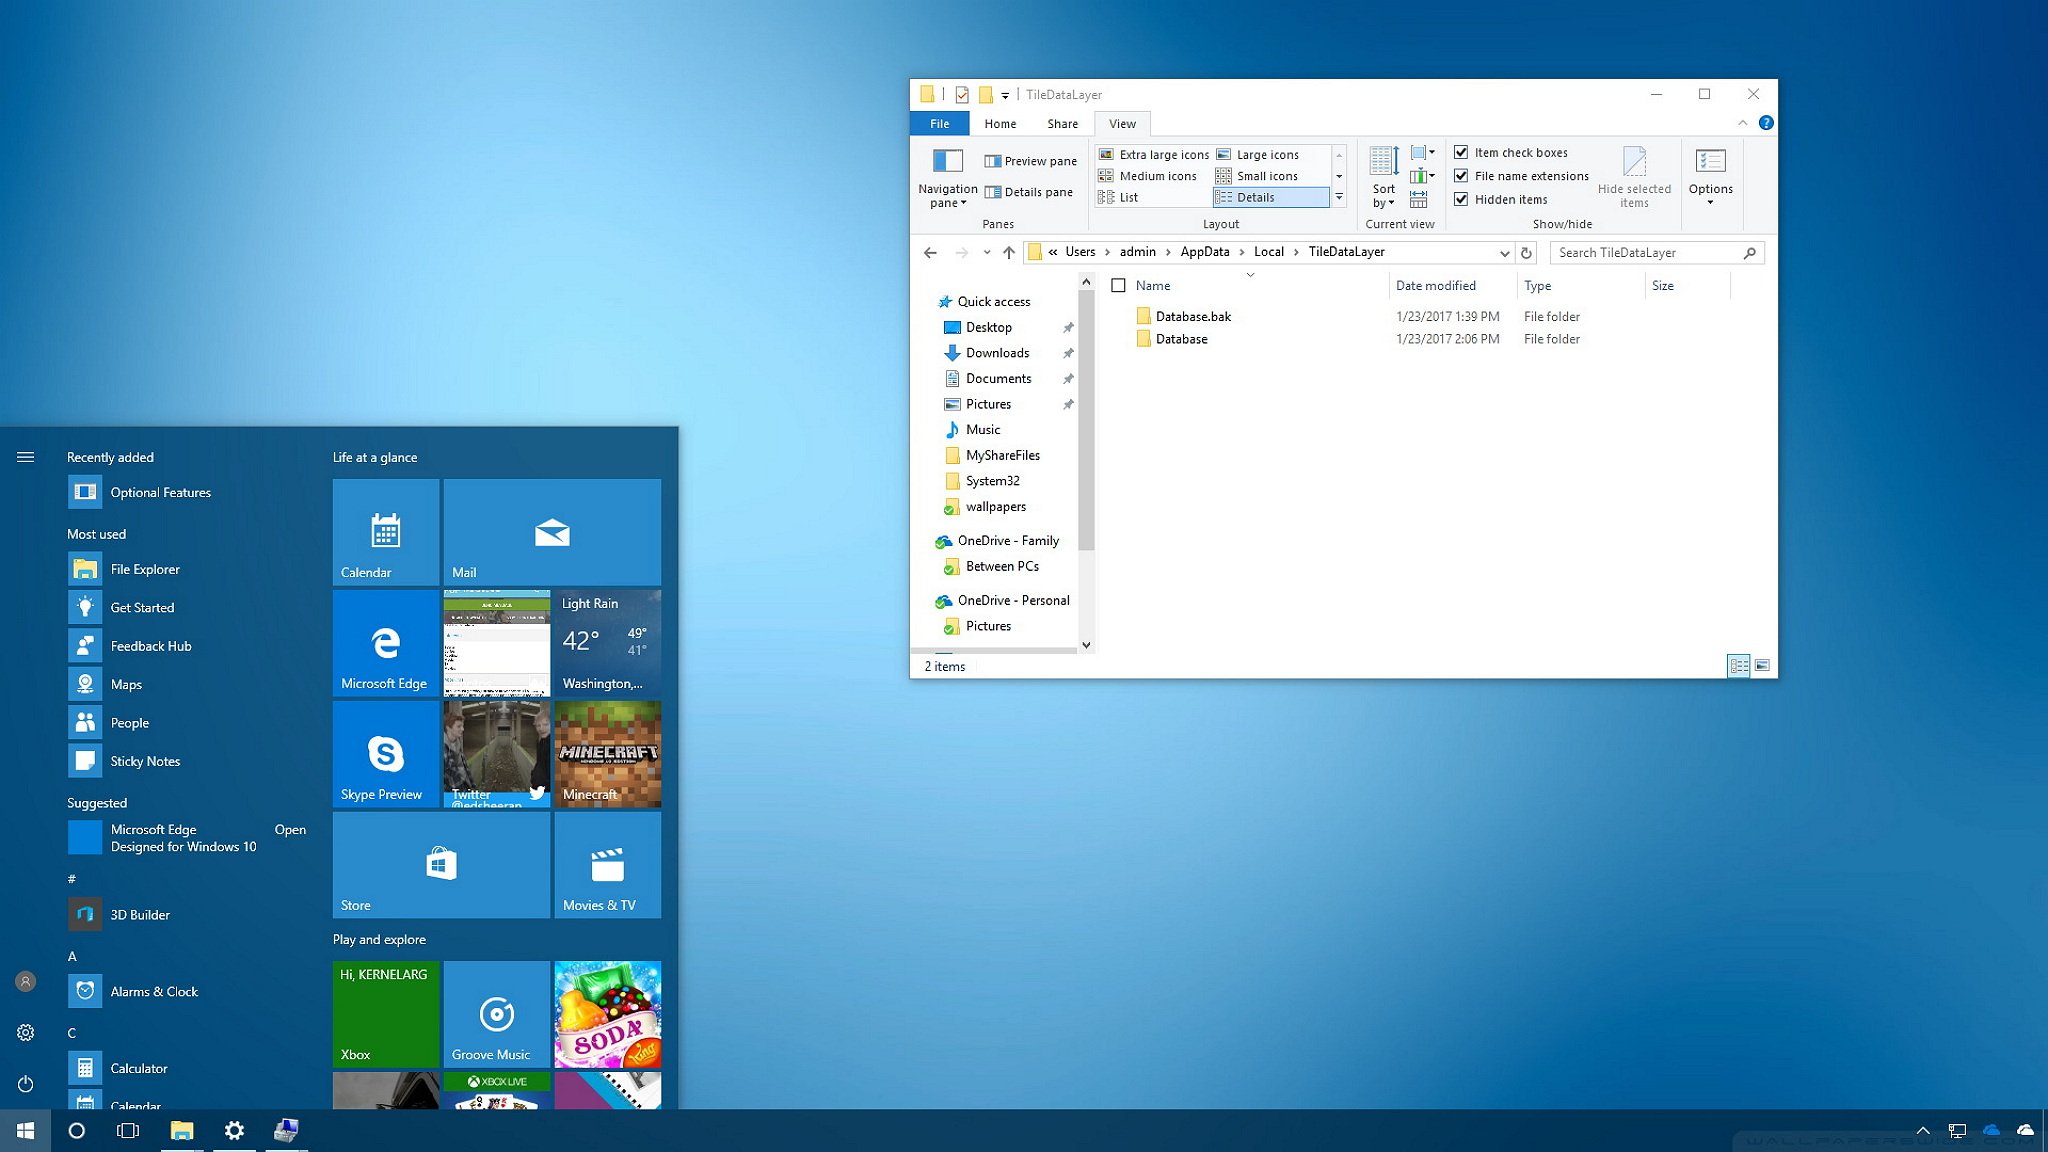
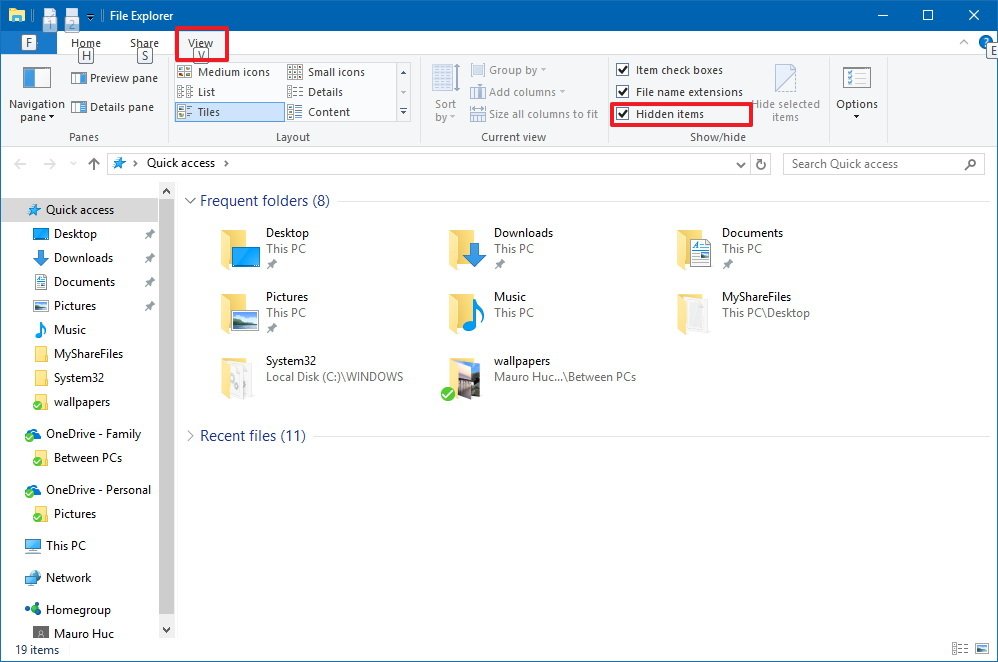
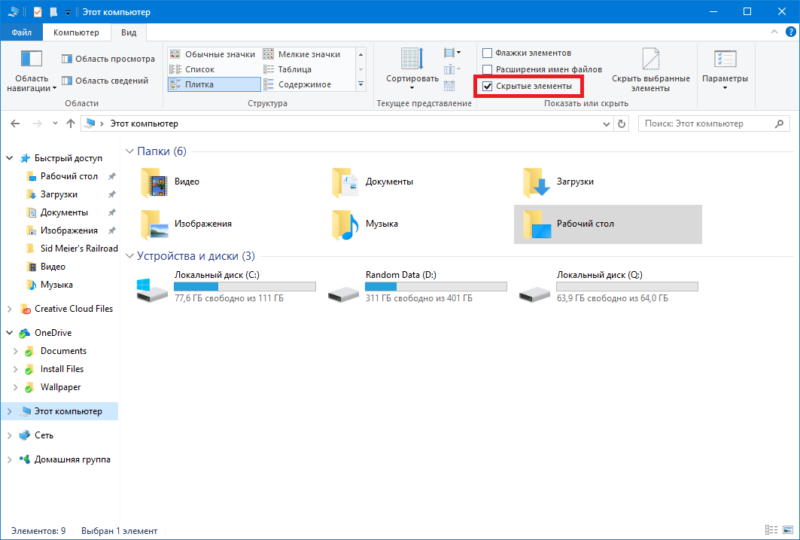
Step 4. Open File Explorer by pressing the Windows logo + E keys simultaneously.
Step 5. On the View tab, check the Hidden items checkbox to show hidden files and folders.
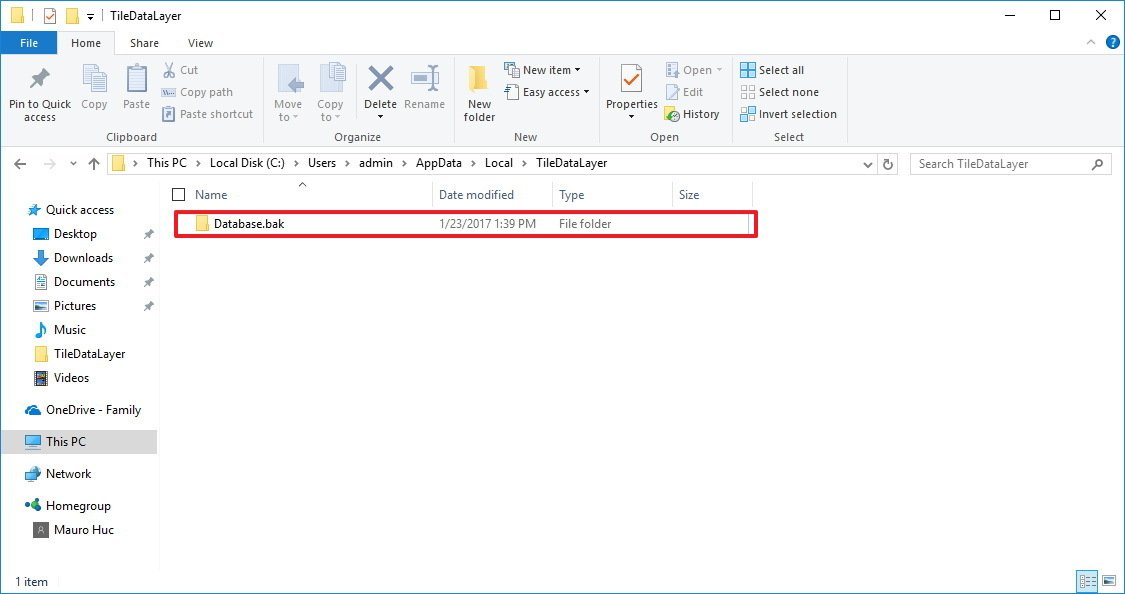
Step 6. Navigate to the following path:-
C:\Users\BROKEN-START-USER-NAME\AppData\Local\TileDataLayer
Note: Replace BROKEN-START-USER-NAME in the above path with the user account’s name so that the Start menu isn’t working properly.
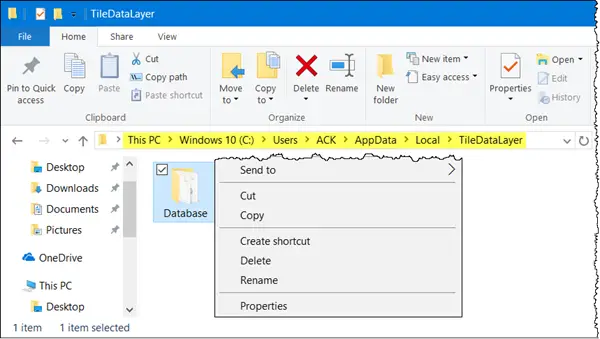
Step 7. Right-click the Database folder and select Rename. Rename the folder as Database.bak and press Enter.
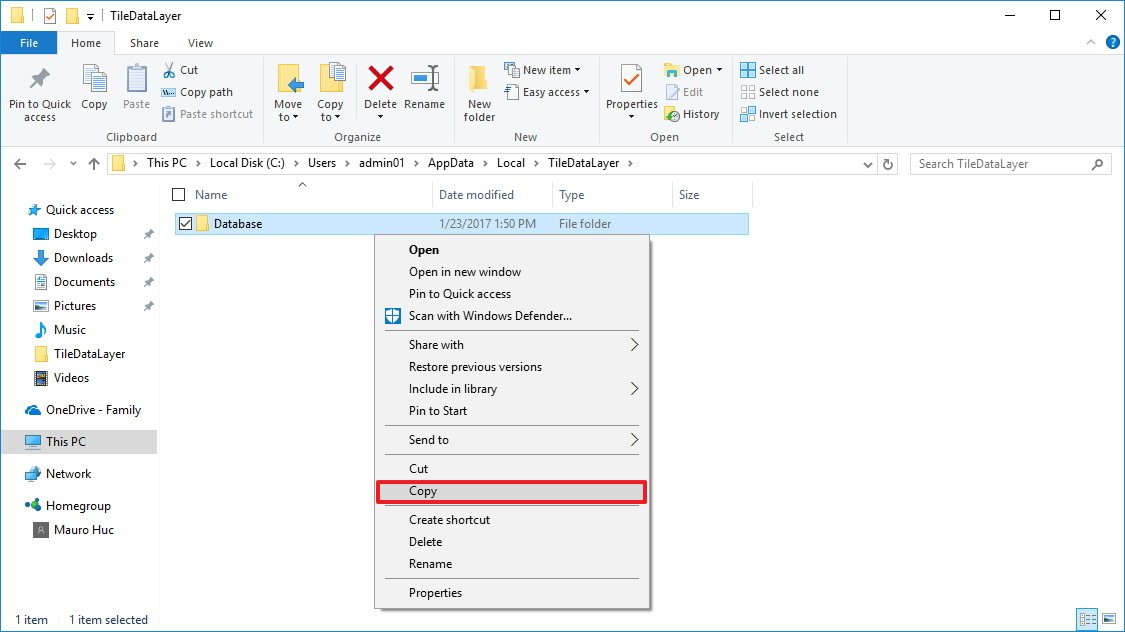
Step 8. Now, browse the following path:-
C:\Users\WORKING-START-USER-NAME\AppData\Local\TileDataLayer
Note: In the above path, replace WORKING-START-USER-NAME with the newly created account name.
Inside the TileDataLayer folder, you’ll see a Database folder; right-click the folder and select Copy.
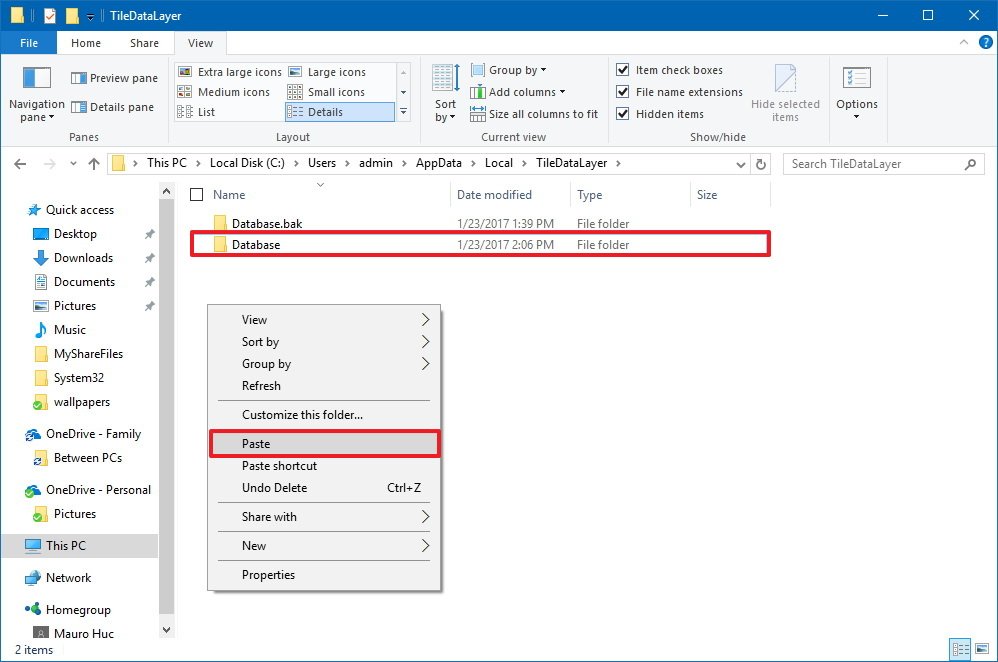
Step 9. Again, navigate to the following path:-
C:\Users\BROKEN-START-USER-NAME\AppData\Local\TileDataLayer
Note: Replace BROKEN-START-USER-NAME in the above path with the user account’s name so that the Start menu isn’t working properly. Right-click and select Paste to paste the working database which you have copied in earlier steps.
Step 10. Now, Sign-out from the Administrator account.
Step 11. Sign-in to your original user account on which the Start menu was broken or not responding. It should normally work now.
Conclusion
In conclusion, the Windows 10 Start menu is a vital feature that allows users to access programs and apps quickly. When it is not working as it should, it can be frustrating. However, restarting the Start menu using Task Manager, Command Prompt, or Windows PowerShell is an easy process that can help troubleshoot the problem. It is important to note that resetting the Start menu should only be done if necessary since it will erase all customizations made to the Start menu. Users can reset the Start menu using Registry Editor or Local User Account. Remember to take a backup of the registry and create a system restore point before resetting the Start menu, as any mistakes made can affect the system.
On Windows 10, Microsoft introduced an updated version of the Start menu that combines the familiarity of the classic menu from Windows 7 with parts of the Start screen included with Windows 8.
In this new version, you get a left rail with buttons to access different settings and locations. Then there is your list of apps installed on your device, and on the right, you get your Live Tiles, which are always lighting up keeping you up to date without you even needing to open the app.
All the information about the Start menu layout is stored in a database inside the TileDataLayer folder. The only issue is that sometimes the database can get corrupted causing the menu not to work properly. Fortunately, there is a workaround you can use to reset the Start menu layout on your Windows 10 computer.
In this Windows 10 guide, we’ll walk you through the steps to reset the Start menu layout to its default settings if for any reason it’s not displaying or working correctly.
In order to reset the Start menu layout on Windows 10, you’ll need to have three user accounts on your computer.
- Your account: The account with the Start menu that isn’t working correctly.
- Local account: This is a temporary account that you’ll need to create to copy the Start menu files to reset the menu on your account.
- Administrator account: You’ll need an administrator account to copy the Start menu files between accounts, because you can’t overwrite files while they’re in memory.
How to create a new local account
- Open Settings.
- Click on Accounts.
- Click on Family & other people.
- Click on Add someone else to this PC.
- Click the I don’t have this person’s sign-in information link.
- Click the Add a user without a Microsoft account link.
- Enter the information required to create an account.
- Click Next to complete the task.
How to enable the built-in Administrator account
You’ll need another account to copy the database files between accounts. You can either create another account with administrator permissions, or you can quickly enable the Windows 10 built-in Administrator account to complete this task.
To enable the built-in Administrator account, do the following:
All the latest news, reviews, and guides for Windows and Xbox diehards.
- Use the Windows key + X keyboard shortcut to open the power user menu and select Computer Management.
- Expand Local Users and Groups.
- Select Users.
- Double-click the Administrator account.
- Clear the Account is disabled option to enable the account.
- Click Apply.
- Click OK to complete the task.
- Sign-out of your account with the Start menu that isn’t working correctly.
- Sign-in to the newly created local account to populate and set the environment.
- Sign-out of the newly created local account.
- Sign-in to the Administrator account.
- Open File Explorer.
- On the View tab, check the Hidden items option to show hidden files.
- Navigate the following path:
C:\Users\BROKEN-START-USERNAME\AppData\Local\TileDataLayerRemember to replace BROKEN-START-USERNAME in the path with the name of the user account with the Start menu that isn’t working properly. - Right-click the Database folder that contains all the Start menu layout settings and select Rename.
- Rename the folder Database.bak and press Enter.
- Navigate to the TileDataLayer folder of the newly created local account:
C:\Users\WORKING-START-USERNAME\AppData\Local\TileDataLayerRemember to replace WORKING-START-USERNAME in the path with the name of the local user account you created earlier. - Inside the TileDataLayer folder, you’ll find a Database folder that contains a working layout of the Start menu, right-click the folder and select Copy.
- Navigate the following path:
C:\Users\BROKEN-START-USERNAME\AppData\Local\TileDataLayerRemember to replace BROKEN-START-USERNAME in the path with the name of the user account with the Start menu that isn’t working properly. - Right-click inside the folder and select Paste to copy the new Database folder to your account.
- Sign-out of the Administrator account.
- Sign-in to your original user account to complete the task.
Once you completed the steps, the Start menu should be reset and working properly.
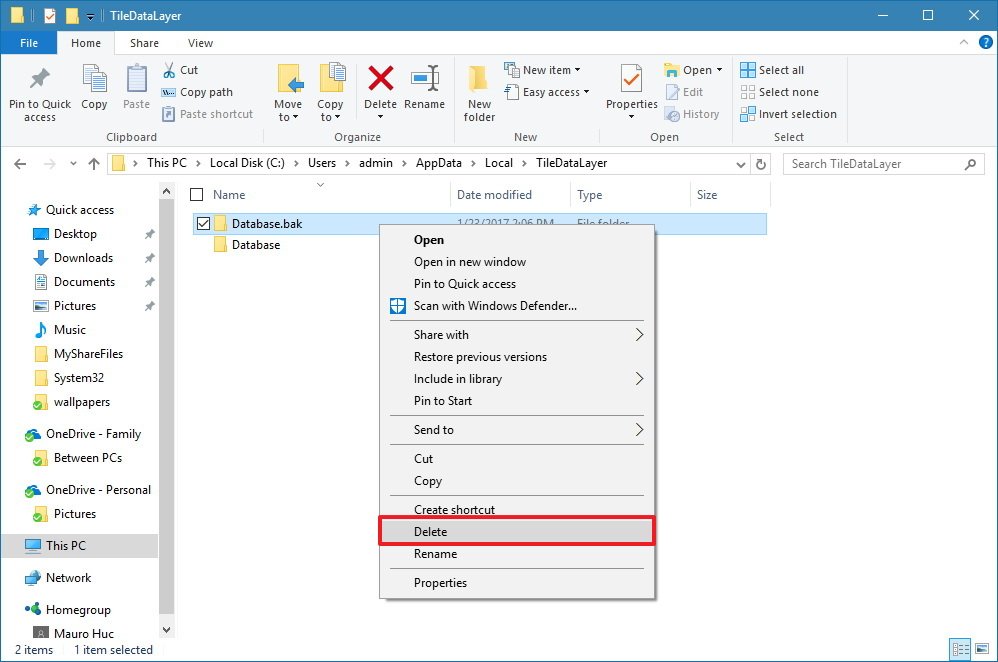
If everything is working as expected, you can now delete the Database.bak folder containing the corrupted Start menu data.
- Use the Windows key + R keyboard shortcut to open the Run command.
- Type the following command to open the TileDataLayer folder and press Enter:
%HOMEPATH%\AppData\Local\TileDataLayer - Right-click the Database.bak folder and select Delete to complete the task.
In addition, you shouldn’t forget to disable the built-in Administrator account.
- Use the Windows key + X to open the power user menu and select Computer Management.
- Expand Local Users and Groups.
- Select Users.
- Double-click the Administrator account.
- Check the Account is disabled option to disable the built-in account.
- Click Apply.
- Click OK to complete the task.
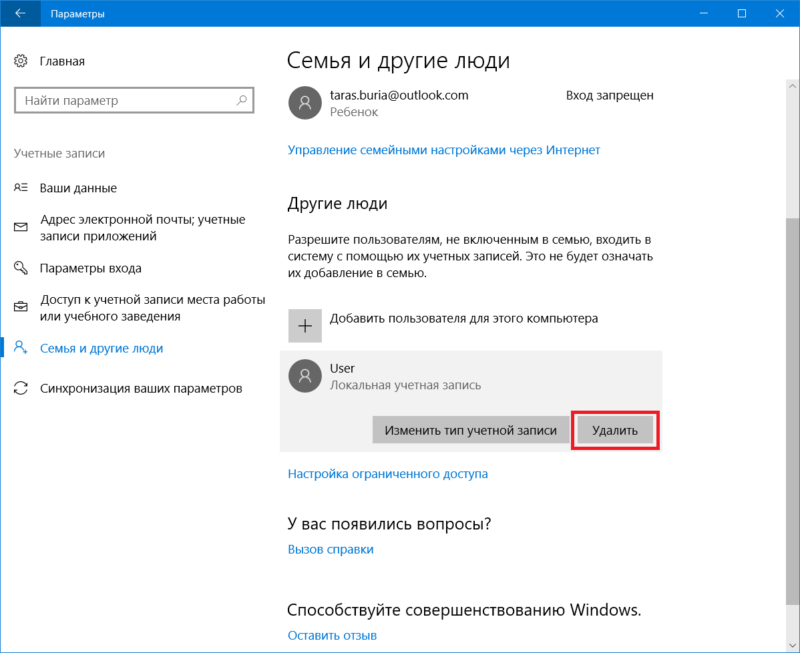
And you should also delete the temporary local user account you created.
- Open Settings.
- Click on Accounts.
- Click on Family & other people.
- Click on the temporary account you’ve created previously.
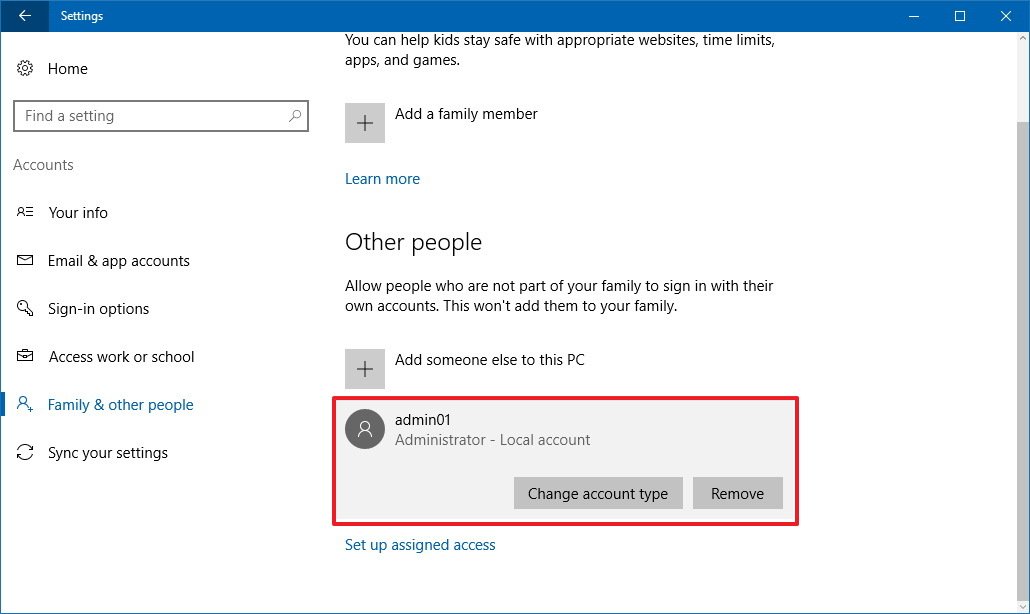
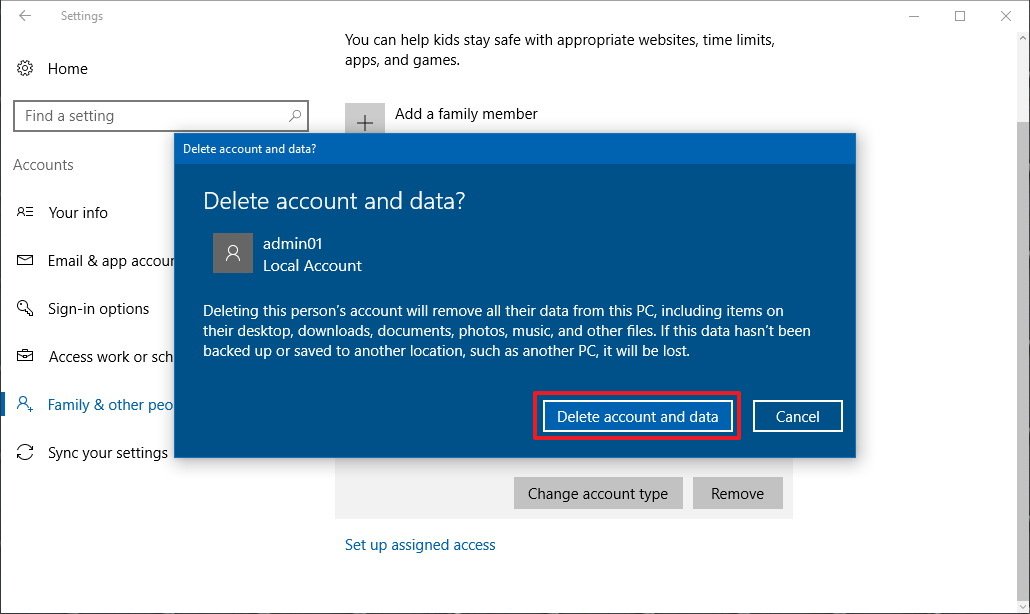
- Click the Remove button.
- Click the Delete account and data button to complete the task.
If the problem persist, you can use this guide to move to a new account, which may fix this and other issues with your current Windows 10 account. In case you have any questions, you can also head over the forums on Windows Central to find help.
Were you able to reset the Start menu layout on Windows 10? Tell us in the comments below.
More Windows 10 resources
For more help articles, coverage, and answers on Windows 10, you can visit the following resources:
- Windows 10 on Windows Central – All you need to know
- Windows 10 help, tips, and tricks
- Windows 10 forums on Windows Central
Mauro Huculak has been a Windows How-To Expert contributor for WindowsCentral.com for nearly a decade and has over 15 years of experience writing comprehensive guides. He also has an IT background and has achieved different professional certifications from Microsoft, Cisco, VMware, and CompTIA. He has been recognized as a Microsoft MVP for many years.
Windows 10 – это хорошая и весьма стабильная операционная система, но различные неприятности случаются везде и со всеми. Так может случится, что меню Пуск, один из ключевых компонентов Windows 10, просто перестает работать. Если вы столкнулись с тем, что зависло меню Пуск, тогда эта инструкция расскажет о том, как его сбросить.
Примечание: процедура выполняется с учетной записи Администратора. Если у вас нет должных прав, понадобится пароль Администратора.
Начните с создания локальной учетной записи, не связанной с профилем Microsoft и активации встроенной учетной записи Администратора.
Создание локальной учетной записи Windows 10
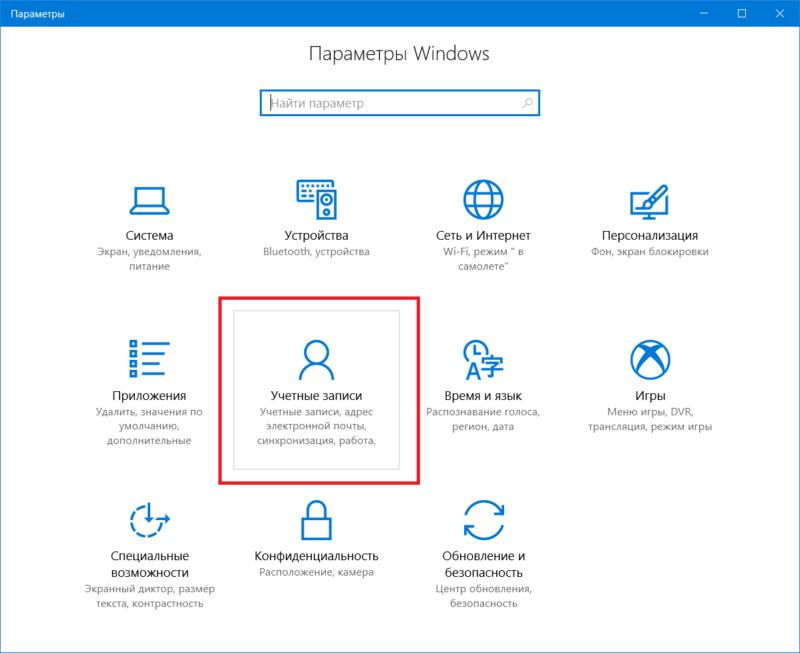
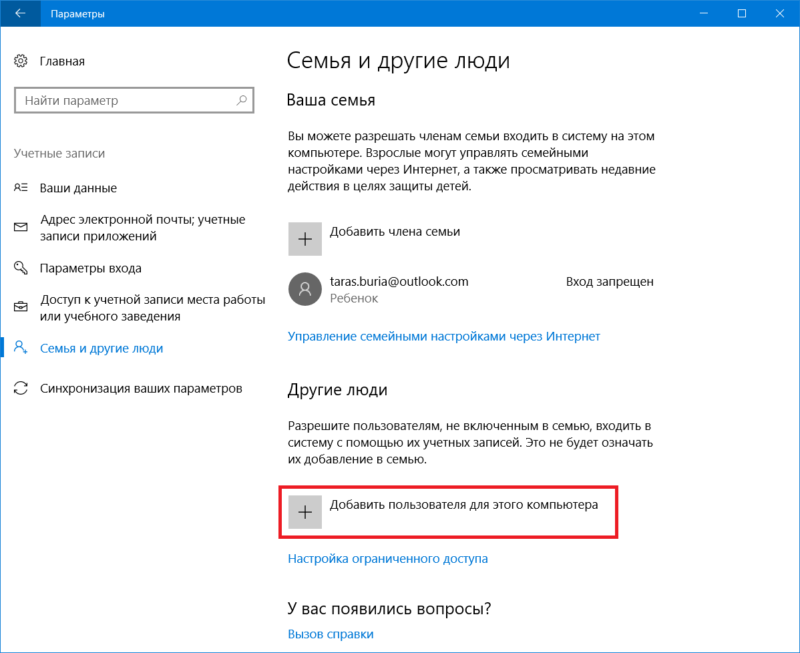
- Нажмите Win + I или откройте Параметры любым другим удобным вам способом.

- Перейдите в раздел Учетные записи – Семья и другие люди. Нажмите Добавить пользователя для этого компьютера.
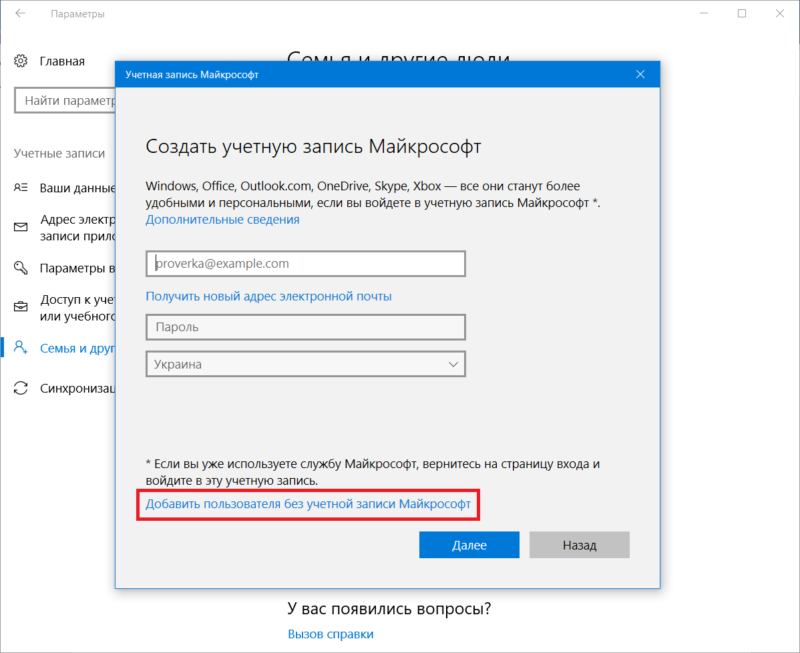
- Откроется окно создания нового профиля. Нажмите в нижней части У меня нет данных для входа этого человека.
- На следующем окне нажмите Добавить пользователя без учетной записи Майкрософт.
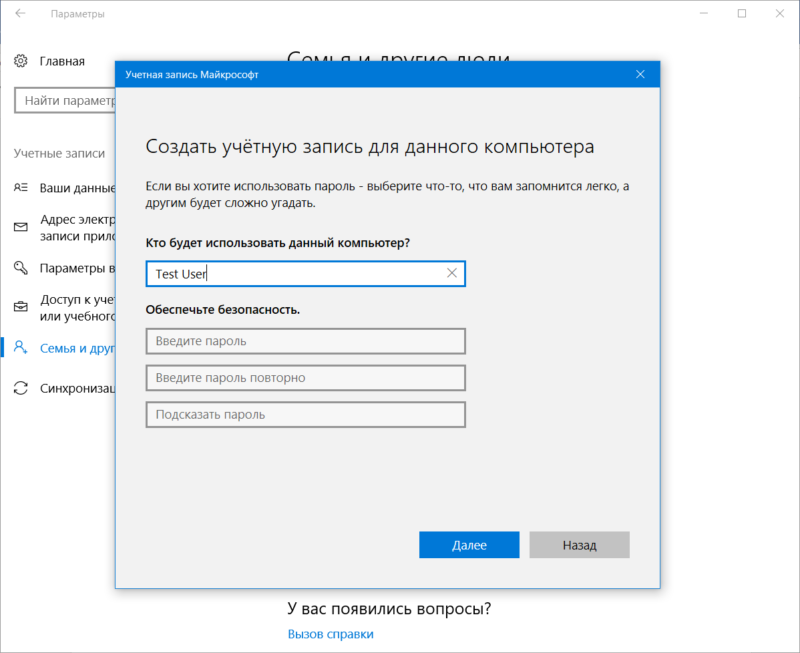
- Введите любое имя пользователя. К примеру, User. Это временный аккаунт и после выполнения инструкции его можно будет удалить.

Теперь надо активировать встроенную учетную запись Администратора.
Включение учетной записи Администратора в Windows 10
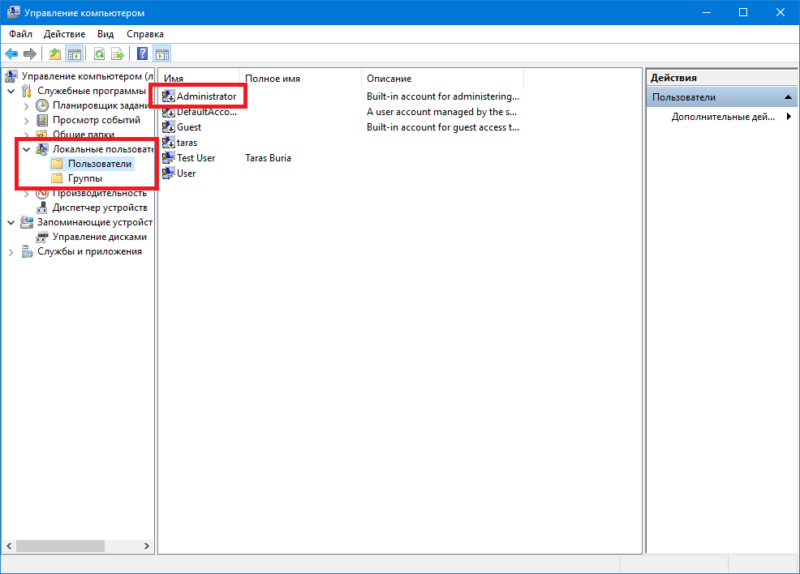
- Нажмите Win + X и выберите Управление компьютером. В левой части экрана выберите Локальные пользователи – Пользователи.

- В правой части окна отобразится список пользователей. Самым первым будет идти Administrator. Нажмите по нему правой кнопкой мыши и выберите Свойства.
- В открывшемся окне снимите отметку возле пункта Отключить учетную запись. Нажмите Ок.
Сброс меню Пуск в Windows 10
- Выйдите из своей учетной записи и войдите тестовую учетную запись, которую мы выше назвали User. Дождитесь, пока система выполнит подготовительные работы.
- Когда попадете на рабочий стол, выйдите из этой учетной записи.
- Теперь войдите в активированную учетную запись Администратора.
- Опять же, подождите, пока система подготовит профиль для работы.
- После запуска откройте Проводник. На вкладке просмотр поставьте отметку возле пункта Скрытые файлы.

- Теперь перейдите по адресу C:\Пользователи\!Ваш основной профиль\AppData\Local\TileDataLayer. Вместо !Ваш основной профиль должно быть имя вашего основного профиля, в котором сломалось меню Пуск.
- Нажмите правой кнопкой мыши по папке Database и переименуйте его в Database.bak.
- Перейдите по адресу C:\Пользователи\!Локальный профиль\AppData\Local\TileDataLayer. Вместо !Локальный профиль должно быть имя созданного локального профиля.
- Скопируйте папку Database. Перейдите в C:\Пользователи\!Ваш основной профиль\AppData\Local\TileDataLayer. Вставьте скопированную папку.
- Выйдите из локального профиля Администратора и войдите в свою основную учетную запись.
- Если все работает хорошо, перейдите по адресу C:\Пользователи\!Ваш основной профиль\AppData\Local\TileDataLayer и удалите папку Database.bak.
Отключите созданные учетные записи:
- Нажмите Win + X и выберите Управление компьютером. В левой части экрана выберите Локальные пользователи – Пользователи.
- В правой части окна отобразится список пользователей. Самым первым будет идти Administrator. Нажмите по нему правой кнопкой мыши и выберите Свойства.
- В открывшемся окне установите отметку возле пункта Отключить учетную запись. Нажмите Ок.
- Далее откройте Win + I и перейдите в раздел Учетные записи – Семья и другие люди. Выберите локальную учетную запись, нажмите на нее и выберите Удалить. Подтвердите удаление.
Возможно, описанный в статье способ не помог. В таком случае воспользуйтесь руководством «Как исправить ошибки в Windows 10».
Download Windows Speedup Tool to fix errors and make PC run faster
At times you may want to preserve your Start Menu layout or keep the same layout across your Windows 11/10 devices. In such a case it might be a good idea to backup your Start Menu layout so that you can restore it again. This post will show you how to Backup and Restore Start Menu layout, and even how to Reset Start Menu to default in Windows 11/10.
To begin, you need to do the following first – Enable the super built-in Administrator account in Windows. So, if you are running a different account, we suggest you sign out from that account and sign in with the Administrator account you just enabled moments ago.
Next, you need to make File Explorer show Hidden & System files and folders.
Backup Start Menu settings in Windows 11/10
Having done the initial basic things, navigate to the following address:
C:\Users\<username>\AppData\Local\TileDataLayer
Remember to replace the <user name> portion with the name of the user whose Start Menu layout you need to backup.
Click open TileDataLayer folder and you will see a folder with the name – Database. This folder stores all the required information about the Tiles displayed and the Start Menu layout for the selected user account.
To create a backup of the Start menu layout in Windows, make a copy of this Database folder and save it elsewhere in a safe place, and sign out from the Administrator account. Do not forget to disable the built-in Administrator account.
TIP: You can also Backup Start Menu Layout using this free software.
Restore Start Menu settings in Windows 11/10
Now, if ever you need to restore your Start Menu layout, enable the built-in Administrator account, make File Explorer show hidden files and folders. and then delete the following folder:
C:\Users\<username>\AppData\Local\TileDataLayer\Database
Now copy-paste the folder that you had earlier, in this TileDataLayout folder location, and restart your computer.
Related: How to Restart Start Menu in Windows 11/0
If you wish to reset Start Menu settings to default, simply rename the Database folder to say – Database-Bak. On restart you will see the default Start Menu layout.
Before you exit, remember to disable the built-in Administrator account and change back the Show Hidden files & folder setting.
This is how you can backup, restore and even reset Start Menu layout in Windows 11/10.
This post will show you how to Import, Export the Start Menu layout in XML file format using PowerShell.
Anand Khanse is the Admin of TheWindowsClub.com, a 10-year Microsoft MVP (2006-16) & a Windows Insider MVP (2016-2022). Please read the entire post & the comments first, create a System Restore Point before making any changes to your system & be careful about any 3rd-party offers while installing freeware.