
Некоторые пользователи могут столкнуться с тем, что иконки (значки) файлов, папок и ярлыков в Проводнике и на рабочем столе Windows отображаются неправильно или с иными проблемами: например, показ одинаковых значков по умолчанию для различных типов файлов. В этом случае может помочь очистка их кэша.
В этой инструкции подробно о том, как очистить кэш иконок в Windows 11 или 10 и дополнительная информация на тему, которая может оказаться полезной.
Ручное удаление файла IconCache.db
Кэш значков Windows 11/10 и предыдущих версий ОС для текущего пользователя хранится в файле базы данных IconCache.db. Соответственно, для его очистки достаточно удалить этот файл, после чего он будет автоматически создан вновь.
Сделать это можно вручную в Проводнике, используя следующие шаги:
- В Параметрах Проводника на вкладке «Вид» (перейти в параметры можно в меню Проводника или с помощью команды Win+R — control folders) отключите опцию «Скрывать защищенные системные файлы» и включите опцию «Показывать скрытые файлы, папки и диски», примените настройки (подробно про включение показа скрытых и системных файлов).
- Введите
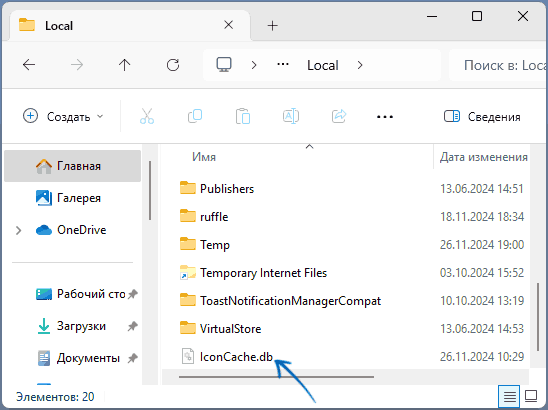
%userprofile%\AppData\Local
в адресную строку Проводника и нажмите Enter.
- В открывшейся папке вы найдёте файл IconCache.db, удалите его.

- Перейдите в папку
%userprofile%\AppData\Local\Microsoft\Windows\Explorer
и удалите все файлы, имена которых начинаются с iconcache в этой папке. Если при этом вы увидите сообщения об ошибках, используйте метод с командной строкой, описанный далее.
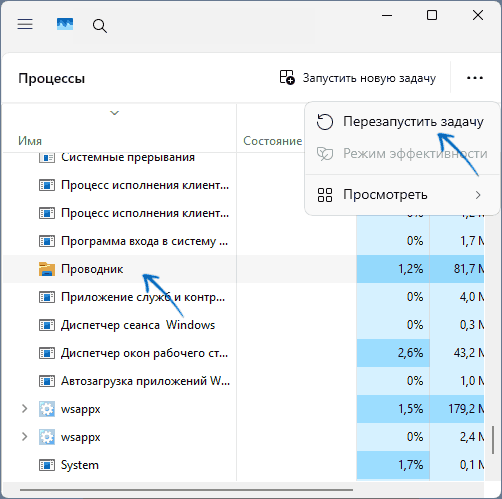
- Перезапустите Проводник (explorer.exe) — сделать это можно в диспетчере задач (или перезагрузите компьютер).

Готово, кэш значков будет очищен и создан заново.
Командная строка
Возможно, более простым способом будет использование командной строки или же создание bat-файла для очистки кэша иконок. В случае с командной строкой достаточно запустить её от имени администратора, после чего по порядку ввести команды (после второй команды пропадёт рабочий стол, но последняя его вернёт):
cd /d %userprofile%\AppData\Local
taskkill /f /im explorer.exe
attrib -h iconcache.db
del iconcache.db
cd /d %userprofile%\AppData\Local\Microsoft\Windows\Explorer
attrib -h iconcache_*.db
del iconcache_*.db
start %windir%\explorer.exe
Если эти же команды прописать в командный файл .bat, то очистку кэша значков и перезапуск Проводника будет выполнять простой запуск этого файла, лучше от имени администратора.
Некоторые дополнительные нюансы в контексте темы очистки кэша иконок:
- Если проблемы возникли с отображением миниатюр (эскизов), очистить их можно в утилите «Очистка диска» (Win+R — cleanmgr)
- Очистка эскизов также возможна в командной строке:
cd /d %userprofile%\AppData\Local\Microsoft\Windows\Explorer
taskkill /f /im explorer.exe
attrib -h thumbcache_*.db
del thumbcache_*.db
start %windir%\explorer.exe
- Существуют сторонние программы для очистки кэша иконок, например, IconsRefresh (разработка более не ведётся, но утилита исправно работает и в Windows 11).
В случае, если у вас остаются вопросы, касающиеся кэша значков Windows, вы можете задать их в комментариях ниже, я постараюсь помочь.
При отображении иконок различных программ или типов файлов в проводнике File Explorer, Windows вместо обращения к исходным файлам с иконками, получает копии картинок значков из специальных файлов с кэшем иконок. За счет того, что операционной системе не нужно каждый раз загружать оригинальные файлы иконок, ускоряется работа и прорисовка объектов в проводнике Windows.
В некоторых случаях, при повреждении файла с кэшем иконок, в проводнике (и на рабочем столе) могут отображаться белые иконки ярлыков и файлов, или вместо иконок приложений отображаются стандартные иконки Windows. В этом случае рекомендуется выполнить сброс системного кэша иконок.
На скриншоте ниже видно, что в макете стартового меню Windows 10 вместо значков некоторых приложений отображаются стандартные иконки папок.
Примечание. Некоторые пользователи при появлении такого бага пытаются переустановить проблемное приложение, что помогает далеко не всегда.
Кэш иконок в различных версиях Windows представляет собой один или несколько db файлов, хранящихся в профиле пользователя.
- В Windows 7 это файл IconCache.db в каталоге %userprofile%\AppData\Local
- В Windows 10 и Windows 8.1 – это множество файлов, имя которых начинается с iconcache_ (iconcache_16.db, iconcache_32.db, iconcache_48.db и т.д. в соответствии с размерами иконки в пикселях) и хранятся в каталоге %userprofile%\AppData\Local\Microsoft\Windows\Explorer
Не путайте файлы кэша иконок с файлами thumbs.db, которые содержат кэш эскизов изображения и видео в папке.

Сброс кэша иконок в Windows с помощью утилиты ie4uinit
В Windows есть специальная встроенная утилита ie4uinit (IE Per-User Initialization Utility), которую можно использовать для быстрого сброса кэша иконок.
- В Windows 10:
ie4uinit.exe -show - Для Windows 7:
ie4uinit.exe -ClearIconCache
Эту команду нужно выполнить через меню Win+R -> команда -> Enter.
Команды абсолютно безопасные, но помогают восстановить нормальное состояние кэша иконок далеко не во всех случаях.
Скрипт удаления файлов с кэшем иконок в Windows
Чтобы сбросить кэш иконок, достаточно удалить db файлы с кэшем. Но предварительно нужно завершить процесс проводника File Explorer, чтобы он не блокировал доступ к файлам iconcache. Рассмотрим, как сбросить базу данных кэша иконок без перезагрузки Windows.
- Закройте все запущенные приложения;
- Откройте окно командной строки (
cmd.exe
или
powershell.exe
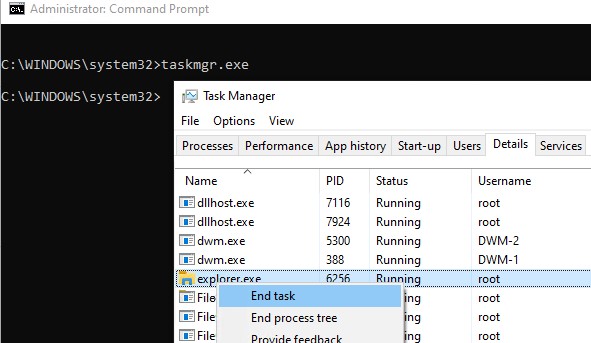
) с правами администратора; - Запустите диспетчер задач
taskmgr.exe - В окне Task Manager перейдите на вкладку Details, найдите процесс explorer.exe и завершите его (End Task);

- Также вы можете завершить процесс из командной строки:
taskkill /f /im explorer.exe - Затем последовательно выполните следующие команды для удаления кэша иконок в профиле пользователя (в зависимости от версии ОС):
Для Windows 10/ 8.1 (просто скопируйте этот код в окно командной строки или сохраните как текстовый файл reset_icon_windows.bat).
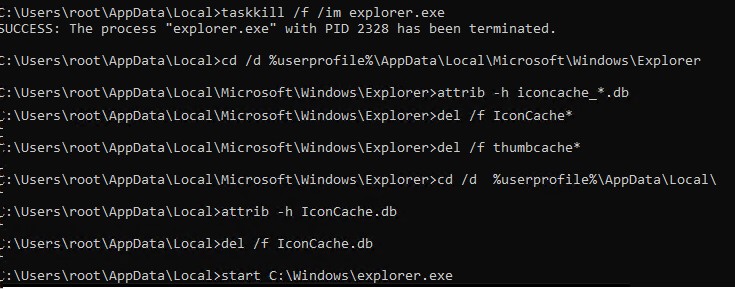
taskkill /f /im explorer.exe
cd /d %userprofile%\AppData\Local\Microsoft\Windows\Explorer
 attrib -h iconcache_*.db
del /f IconCache*
del /f thumbcache*
cd /d  %userprofile%\AppData\Local\
attrib -h  IconCache.db
del /f IconCache.db
start C:\Windows\explorer.exe
В моем случае скрипт не смог удалить только файл
iconcache_idx.db
(Access is denied), но это не повлияло на итоговый результат. Кэш иконок был успешно сброшен.
Для Windows 7:
cd /d %userprofile%\AppData\Local
del /f /a s IconCache.db
start C:\Windows\explorer.exe<
Последняя команда в обоих случаях перезапустит процесс проводника Windows (
explorer.exe
), который при запуске пересоздаст файлы с кэшем иконок (в соответствии с заданными файловыми ассоциациями).
В этой публикации, друзья, рассмотрим, как очистить кэш значков в Windows. Очистка кэша значков может помочь в случаях, когда имеются проблемы с отображением значков в меню «Пуск», проводнике, на панели задач и рабочем столе — когда значки отображаются неправильно (как пустые), либо вовсе отсутствуют. Есть разные способы очистки кэша значков, рассмотрим их. Все способы подходят для любой из актуальных версий Windows.
Итак, друзья, значки в Windows могут отображаться неправильно или не отображаться вообще. Происходит это потому, что для более оперативного отображения значков Windows кэширует их в специальные файлы. Системному интерфейсу не нужно каждый раз извлекать значки из программ и типов файлов, значки для отображения берутся в одном месте хранения файлов их кэша. Благодаря чему мы можем видеть значки в Windows мгновенно.
Однако если кэш значков повреждается, мы сталкиваемся с проблемами их отображения. И чтобы устранить эти проблемы, кэш значков необходимо сбросить, т.е. очистить.
Для сброса кэша значков в Windows можно использовать системную утилиту IE Per-User Initialization Utility. Жмём клавиши Win+R, в командлет «Выполнить» вводим:
ie4uinit.exe -showЭто команда для Windows 10 и 11, для Windows 7 необходимо использовать команду:
ie4uinit.exe -cleariconcacheОчистить кэш значков в Windows можно с помощью системной функции очистки диска. Жмём клавиши Win+R, в командлет «Выполнить» вводим:
Выбираем системный диск C. За очистку кэш значков отвечает предустановленная галочка пункта очистки эскизов. Смотрим, чтобы эта галочка была выставлена. Жмём «Ок».
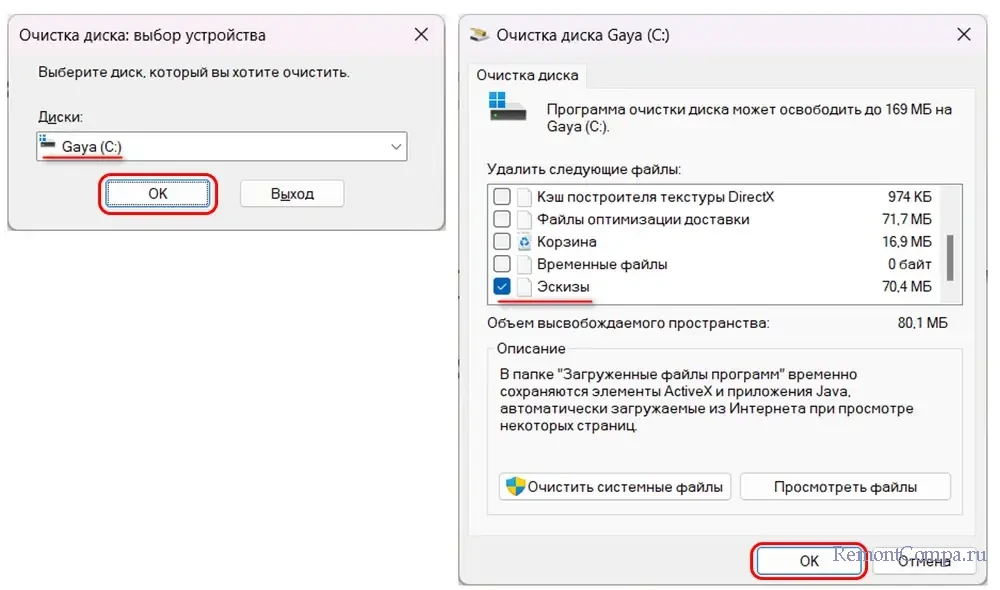
И подтверждаем выполнение очистки.
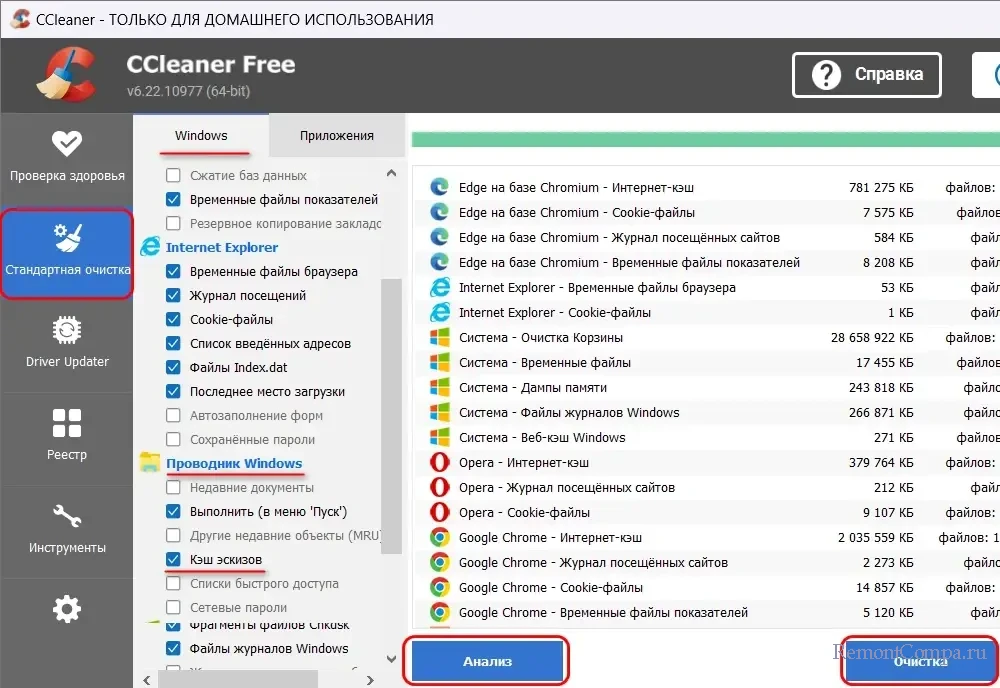
Решить поставленную задачу можно с помощью известной бесплатной программы для чистки и оптимизации Windows CCleaner. В числе очищаемых данных эта программа предусматривает кэш значков Windows. Выполняем очистку Windows с помощью CCleaner, для этого в её окне открываем программный раздел «Стандартная очистка». Перед запуском очистки смотрим, какие данные будут удаляться из операционной системы. Отдельно обращаем внимание на вкладку «Windows», здесь по умолчанию в блоке «Проводник» должен быть выбран для очистки кэш эскизов, это, собственно, и есть кэш значков. Далее кликаем внизу «Анализ», а после выполнения анализа данных жмём «Очистка».
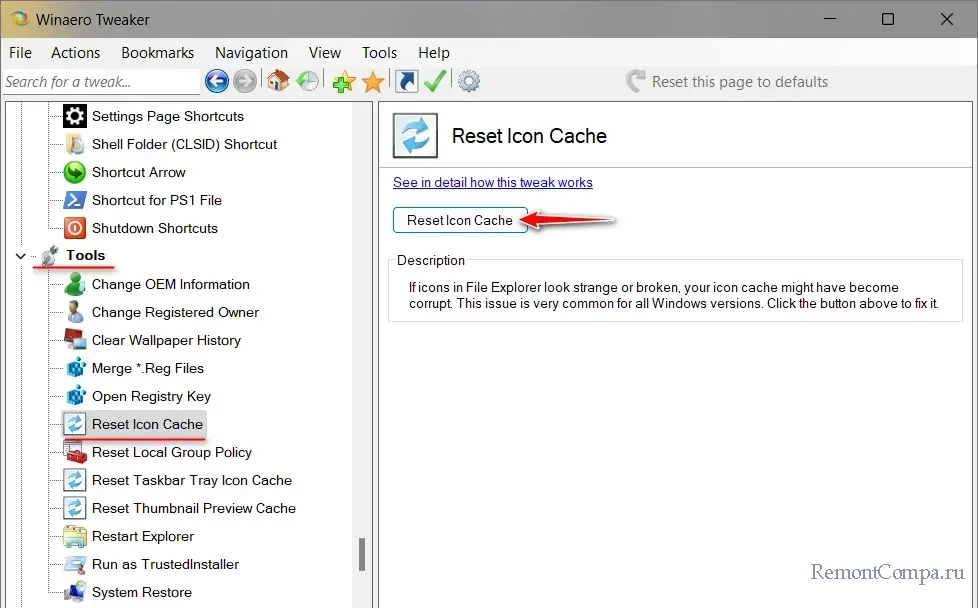
Сброс кэша значков Windows предусматривается бесплатной программой-твикерой WinaeroTweaker. В её окне в разделе «Tools» смотрим пункт «Reset Icon Cache». Кликаем в нём кнопку «Reset Icon Cache».
Друзья, предложенные выше способы автоматизированной очистки могут удалять не все файлы кэша значков Windows. В некоторых случаях, когда рассмотренные выше способы не дали положительного результата, может потребоваться решение-максимум в виде ручной очистки кэша значков. При ручной очистке удаляется больше файлов кэша или даже все, и Windows при следующем запуске вынуждена будет пересоздать их заново. Но такое решение-максимум несёт определённые риски, перед его применением необходимо создать точку восстановления или бэкап Windows.
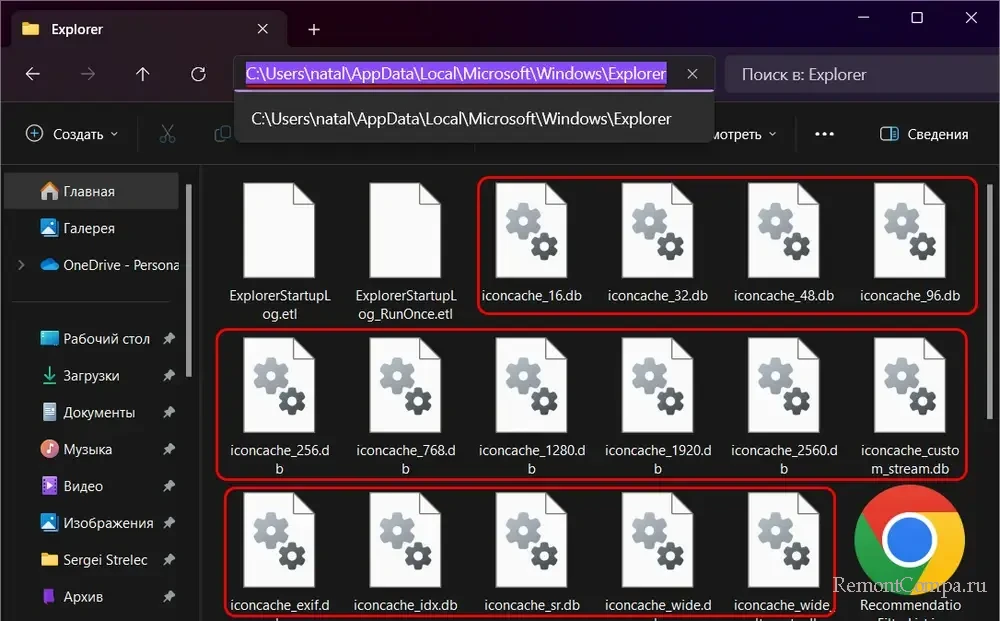
Ручную очистку кэша значков в работающей Windows можно выполнить путём удаления файлов кэша из их папки расположения. Закрываем все лишние окна проводника Windows, оставляем только одно. И в его адресную строку вводим:
%localappdata%\Microsoft\Windows\Explorer
В открывшемся расположении удаляем файлы с фигурированием в названии «iconcache» и «thumbcache» с расширением «.db».
После удаления файлов кэша значков перезагружаем компьютер.
Но, друзья, папка «Explorer» по указанному пути – это системная папка. И, возможно, для столь радикального вмешательства в неё вам потребуется сначала получить полные права на эту папку.
Но и получив такие права, не сможем удалить все файлы кэша значков. Нам это не позволит сделать как минимум активный процесс самого проводника Windows. Если удаление тех файлов, что доступны для удаления, не решило проблему, можно попробовать удалить все файлы кэша значков. Чтобы удалить все файлы кэша значков, необходимо открыть их расположение в среде LiveDisk’а. Или в другой учётной записи с правами администратора, и в качестве таковой можно использовать, например, скрытую учётную запись «Администратор», активировав её на время выполнения нужных действий. Что в среде LiveDisk’а, что в учётной записи «Администратор» в проводнике открываем тот же путь расположения файлов кэша значков Windows, но путь внутри своей учётной записи:
C:\Users\Имя_пользователя\AppData\Local\Microsoft\Windows\Explorer
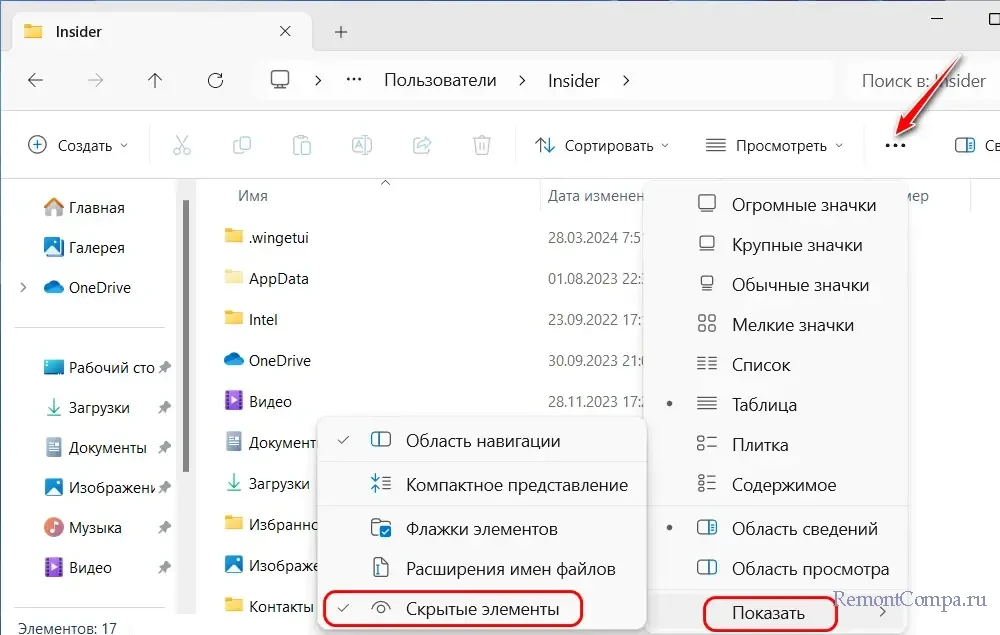
Чтобы в папке нашей учётной записи отображалась скрытая папка «AppData», необходимо включить отображение скрытых элементов. Смотрим, как это делается в Windows 10 и более ранних версиях операционной системы. В Windows 11 же это делается просто: в меню проводника «Просмотреть» жмём «Показать», затем – «Скрытые элементы».
Удаляем файлы кэша значков, перезагружаем компьютер и входим в свою учётную запись.
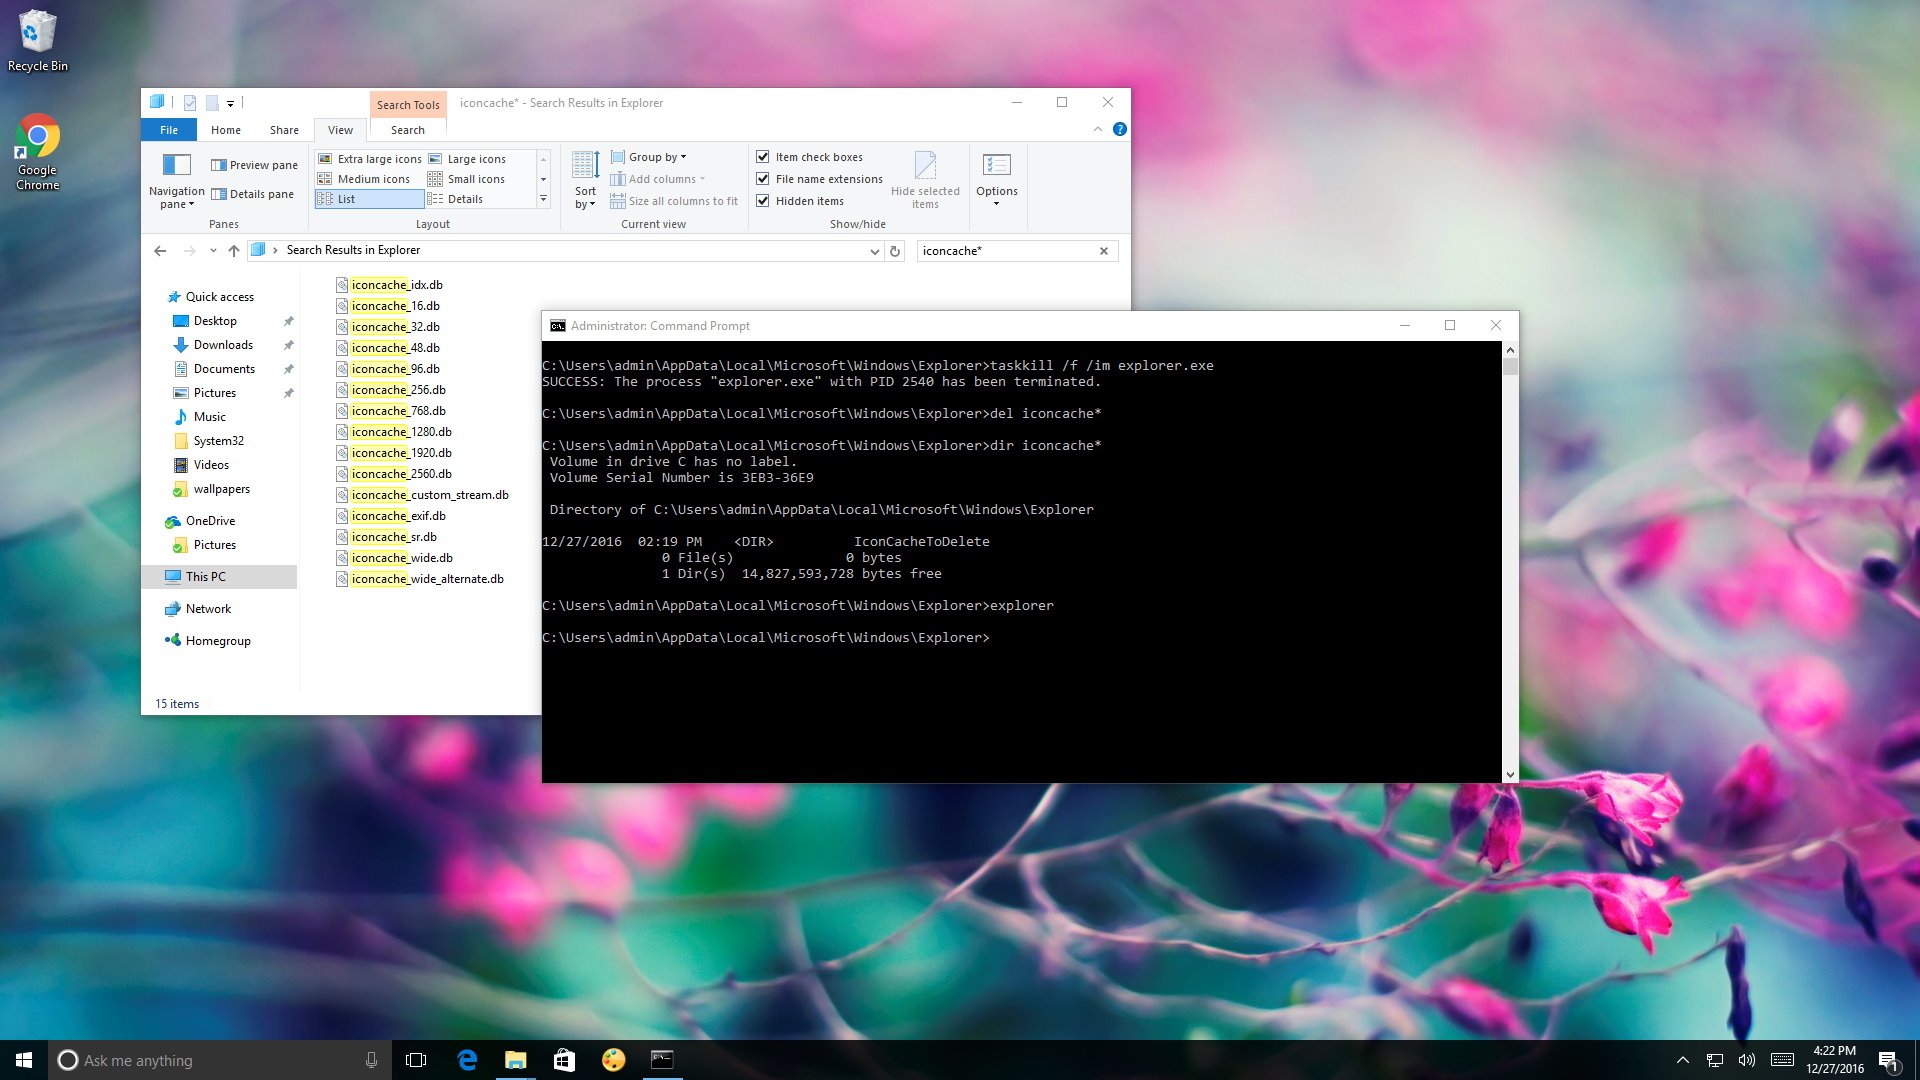
Sometimes you find icons on windows 10 PC broken or distorted or messed up. To fix this issue, you need to delete and rebuild icon cache. Here you will read a tutorial for the same issue.
Well, you must be thinking what problems icons create in Windows 10. Because of some unknown reasons, Windows 10 exhibits you wrong icons for different file types. For instance, you have updated an application to its higher level and the new edition has a new icon for the advanced version, but instead of the new icon, you still face the old icon for that application. Some users also face a destructed icon instead of its original best icon or some experience messed up icons also. So, this sort of problem arises when your Windows icon cache gets corrupted.
What does Icon Cache mean?
Windows uses an exceptional file, called icon cache and keeps a copy of all the icons there which are accessible easily. Let me explain this with an example – When Windows needs an icon, it simply fetches a copy of that icon from the icon cache folder instead of fetching it from the actual application file. So, in this way it helps Windows to accomplish work in an easier way. This is when this icon cache gets corrupted; you have to face different issues of icons. But nothing to worry, you need to force Windows 10 to rebuild icon cache for you.
To rebuild an icon cache, the suggested method is to delete the Iconcache.db file because when the file gets missed out completely; Windows 10 will build it again from its basic. But, removing this file is not an easy task. The reason is, in Windows RAM memory a copy of this file is always kept. And when you simply delete it, Windows will establish a new copy of the file from RAM’s copy, without renewing the icon images. Hence, you need to prevent File Explorer from establishing the old icon cache file.
Ways to Delete and Rebuild Icon Cache in Windows 10
The icon cache in Windows 10 is hidden and you need to enable the hidden files and folders option to proceed. To do so, read the below steps –
- Launch This PC on your screen.
- Click View button of the menu bar.
- Take your attention to the right corner of the View ribbon and click Options.
- A new Folder Options window will pop up.
- Be into the View tab.
- Under the Advanced settings section, find the option Show hidden files, folders or drives.
- Check the radio button of the option.
- Also, make sure to uncheck the option of Hide extensions for known file types.
- To save the changes done, click Apply followed by the OK button.
As you have enabled the display of hidden files, folders and drives, you can easily navigate to the location where iconcache is stored. So navigate to the following location of your File Explorer.
C:\Users\<your username>\AppData\Local\Microsoft\Windows\Explorer
Note: Replace the “username” with the actual username of your Windows 10 computer. For example, my Windows 10 computer’s username is Aum Sai Ram
Now, you can see many database files with names like iconcache_16.db, iconcache_32.db, iconcache_256, iconcache _1920.db, iconcache_2560.db and many more. In order to rebuild icon cache, you have to remove all iconcache files that you see in this folder. It sounds pretty easy right? No dear, not all. Windows cannot remove all the iconcache files because few of them will be active in the File Explorer. Hence, Windows cannot delete the files that are still active. And to delete the files, you need to close the File Explorer, but then how the files will be deleted if the File Explorer is closed? Here, comes everyone rescuer – Command Prompt. The Command Prompt will help you in deleting the iconcache files.
Read the below steps carefully and see how the iconcache files are deleted with the help of Command Prompt.
- Open Command Prompt by using your preferred method.
- Using the cd command navigate to the iconcache folder. Naturally, Command Prompts starts with your user directory. In this example, the user is AUM SAI RAM. So to get into the iconcache folder you need to type
cd C:\Users\AUM SAI RAM\AppData\Local\Microsoft\Windows\Explorer
- Press Enter key and then you will be shown the entire path of the iconcache folder.
You need to check whether the Command Prompt is in the correct folder or not. So use the dir command and see whether the displayed list has iconcache files or not. Type the following command at the end of the shown path.
dir
Example:
(C:\Users\AUM SAI RAM\AppData\Local\Microsoft\Windows\Explorer>dir)
(C:\Users\AUM SAI RAM\AppData\Local\Microsoft\Windows\Explorer>dir)
- You can see the list of iconcache files in the folder.
- Now, you have to delete the iconcache files. But before that you must close File Explorer and all other programs that are currently active to make sure that none of them are using the iconcache files.
You need to apply a small tweak which will close the active File Explorer. To close File Explorer do the following steps –
- Execute a right-click on the Taskbar and choose Task Manager option.
- Take yourself to the Details tab.
- Look for explorer.exe in the Details tab.
- Right-click on it and hit select End task option.
- The File Explorer along with desktop will vanish. Nothing to worry, they will be back.
- Again see properly if you left any other program in active mode. Only the Command Prompt that you have opened should be active.
- In case you are unable to see Command Prompt, open it from the Task Manager which is still active. Go to Process Tab => Apps => Command Prompt. Double click on the command prompt and is will open as it was.
- Close Task manager after you get the active Command Prompt window)
- Now go to the opened Command Prompt window and type del iconcache* (the star mark after the iconcache is important so that the delete process should include all the names which start with iconcache files).
- This will delete all the iconcache files.
- Again use the dir command and check if any of the iconcache files got missed or not. If you see any iconcache files it means you have not entered the command correctly or some application is still using the icon cache.
- Now, everything is done, you need to get back the normal and usual desktop. So jointly press Ctrl + Alt + Del keys.
- Choose the option Sign out.
- Again sign in to Windows 10 and see the desktop is back to its normal condition and the broken icons are now repaired.
Delete and Rebuild Icon Cache in Windows 10 using a downloadable bat File
You can directly delete the existing Icon Cache and rebuild them using a bat file. Just download the file given below and double-click to open the file and click any key on your keyboard when asked on a DOS file. After a while write Y to restart your computer.
If you view Discard button on the downloaded file click on the arrow mark and select Keep. So, when you open the file you will see the message Windows Protected your PC. Click the more info link at the left side and hit Run Anyway Button.
On Windows 10, those icons you see on files and apps are stored in the icon cache database to allow the operating system to display them quickly on the screen. The process of caching icons, instead of retrieving them from the source, helps to prevent your system from getting bogged down by the mere task of «showing icons».
However, as the database grows, the odds of icon cache database getting corrupted also grows. When this happens, icons on your desktop and throughout the operating system may not render correctly or even appear broken.
Although Windows 10 doesn’t include an option to reset the database, you can still fix the problem using a few commands in Command Prompt.
In this Windows 10 guide, we’ll walk you through the steps to rebuild the icon cache database on your computer when they appear blank or broken.
How to rebuild the icon cache database
To rebuild the icon cache database on Windows 10, close any application that you may be running, and then do the following:
- Open Start and do a search for Command Prompt.
- Right-click the result and select Run as administrator.
- Type the following command to navigate to the icon cache database location and press Enter:
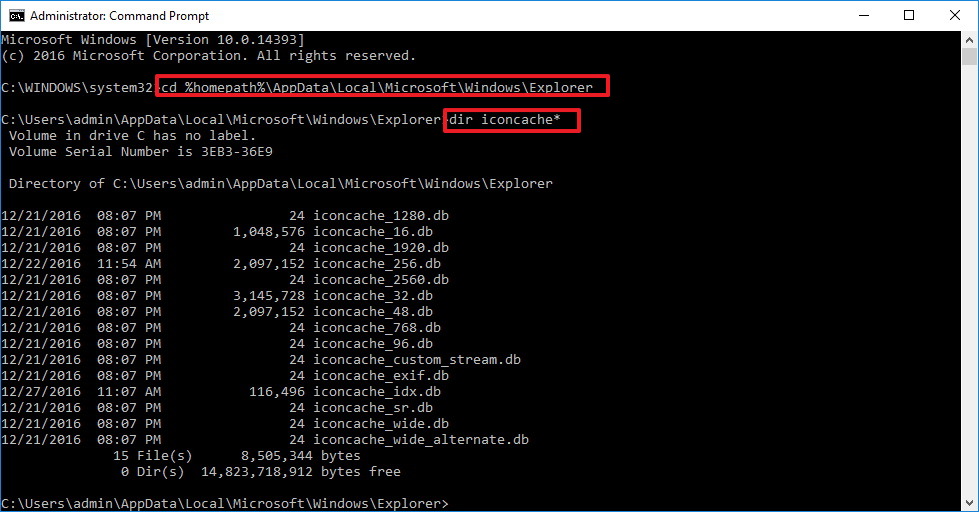
cd %homepath%\AppData\Local\Microsoft\Windows\Explorer - Type the following command to verify the icon cache database files are at the location and press Enter:
dir iconcache*The output of the dir command should list these database files:- iconcache_1280.db
- iconcache_16.db
- iconcache_1920.db
- iconcache_256.db
- iconcache_2560.db
- iconcache_32.db
- iconcache_48.db
- iconcache_768.db
- iconcache_96.db
- iconcache_custom_stream.db
- iconcache_exif.db
- iconcache_idx.db
- iconcache_sr.db
- iconcache_wide.db
- iconcache_wide_alternate.db
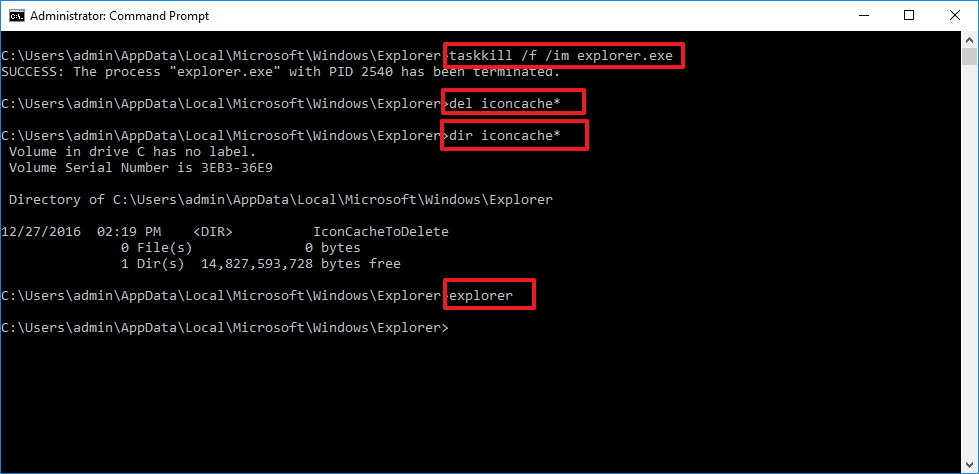
- Type the following command to stop File Explorer and press Enter:
taskkill /f /im explorer.exeImportant: Once you terminate File Explorer, your desktop background and taskbar will disappear, leaving a black screen — but it’s OK, it’s only temporarily. You need to close File Explorer to be able to delete the icon cache files. Otherwise, you won’t be able to do it. - Type the following command to delete the iconcache files and press Enter:
del iconcache*Quick Tip: If you get access denied trying to remove the files, you’re probably not running Command Prompt with as an administrator. Repeat these steps, but making sure Command Prompt starts with administrative privileges. - Type the following command to verify that you successfully deleted the icon cache files and press Enter:
dir iconcache*If you still see some iconcache files, then it’s likely that some apps are still running, which will prevent you from deleting the database files. Make sure to close them all, and repeat the steps. - Type the following command to start File Explorer and press Enter:
explorer.exe
- Close Command Prompt to complete the task.
Once you completed the steps, Windows 10 will automatically recreate the database files with fresh new icons.
Keep in mind that these steps won’t delete and recreate the thumbnails. However, you can always follow our guide to rebuild the thumbnails cache on Windows 10, if they’re not working correctly on your PC.
All the latest news, reviews, and guides for Windows and Xbox diehards.
While we’re focusing this guide on Windows 10, you can use the same exact steps on Windows 8.1.
More Windows 10 resources
For more help articles, coverage, and answers on Windows 10, you can visit the following resources:
- Windows 10 on Windows Central – All you need to know
- Windows 10 help, tips, and tricks
- Windows 10 forums on Windows Central
Mauro Huculak has been a Windows How-To Expert contributor for WindowsCentral.com for nearly a decade and has over 15 years of experience writing comprehensive guides. He also has an IT background and has achieved different professional certifications from Microsoft, Cisco, VMware, and CompTIA. He has been recognized as a Microsoft MVP for many years.