
Applies ToMicrosoft accessories
You can reassign some keys to access different commands, shortcuts, or Microsoft Mouse and Keyboard Center features to better fit your work style.
Note: The options listed in this wizard vary depending on the key selected. For example, since you cannot reassign the Windows key, the only option available is to disable it.
To reassign a key
-
Download and install the Microsoft Mouse and Keyboard Center.
-
Connect the keyboard that you want to configure.
-
Select the Start button, and then select Microsoft Mouse and Keyboard Center.
-
From the displayed list of key names, select the key that you want to reassign.
-
In the command list of the key that you want to reassign, select a command.
Need more help?
Want more options?
Explore subscription benefits, browse training courses, learn how to secure your device, and more.
Все способы:
- Методы переназначения горячих клавиш в Windows 10
- Способ 1: «Параметры» ОС
- Способ 2: Key Remapper
- Способ 2: Mkey
- Вопросы и ответы: 8
Зачастую все пользователи управляют операционной системой Windows с помощью мышки. Однако эти же действия можно реализовать посредством специальных сочетаний клавиш. К сожалению, они не всегда удобны для использования, поэтому в данной статье мы расскажем вам о том, как их изменить в Виндовс 10.
Методы переназначения горячих клавиш в Windows 10
Всего можно выделить два основных способа, которые позволяют изменить сочетания клавиш для различных действий. В первом используются инструменты операционной системы, а во втором – специальное программное обеспечение. Обо всех нюансах каждого метода мы расскажем далее.
Способ 1: «Параметры» ОС
Сразу отметим, что разработчики Windows 10 не предусмотрели возможность переназначения сочетания клавиш для всех команд с помощью системных настроек. Единственная комбинация, доступная для редактирования – это клавиши смены языка. Ранее мы подробно описывали данный процесс в отдельном руководстве, ознакомиться с ним вы можете по ссылке ниже.
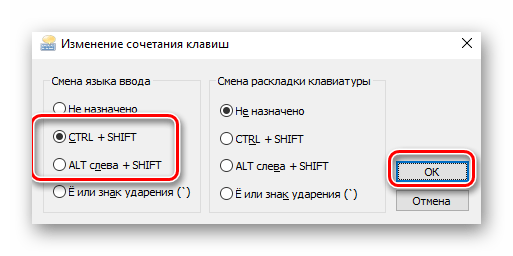
Подробнее: Настройка переключения раскладки в Windows 10
Для переназначения других комбинаций воспользуйтесь одним из следующих методов.
Способ 2: Key Remapper
Данная программа предназначена именно для того, чтобы назначить на любую доступную клавишу другую клавишу или их комбинацию. Также можно с ее помощью назначить мультимедийные действия и запуск различных приложений. Процесс установки мы не будем затрагивать в рамках данного руководства, так как он весьма интуитивен и прост.
Скачать приложение Key Remapper
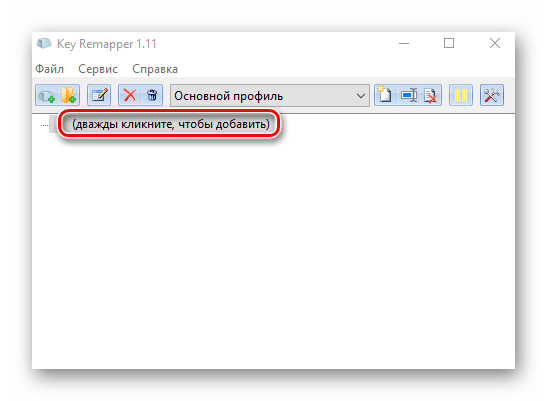
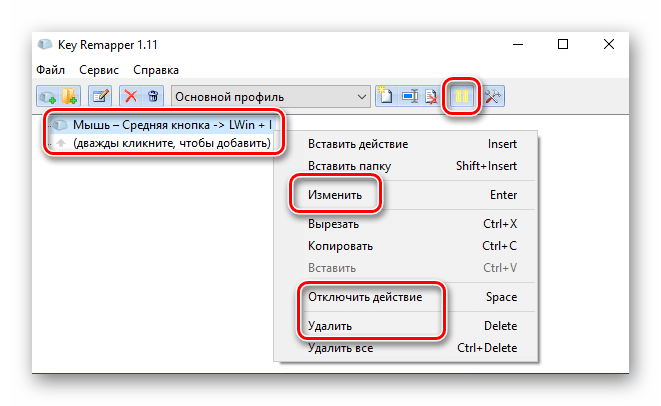
- Запустите программу. В главном окне нажмите два раза левой кнопкой мышки по строке, отмеченной на скриншоте ниже.
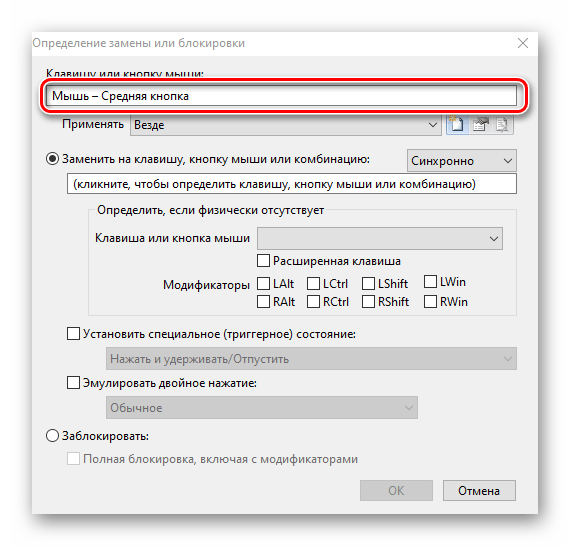
- В самом первом поле следующего окна нужно указать клавишу, на которую будет в дальнейшем назначена комбинация. Обратите внимание, что действия можно привязать именно к одной кнопке, а не к их сочетанию. Кликните ЛКМ по первому полю в окне и нажмите на клавиатуре или мышке желаемую кнопку.
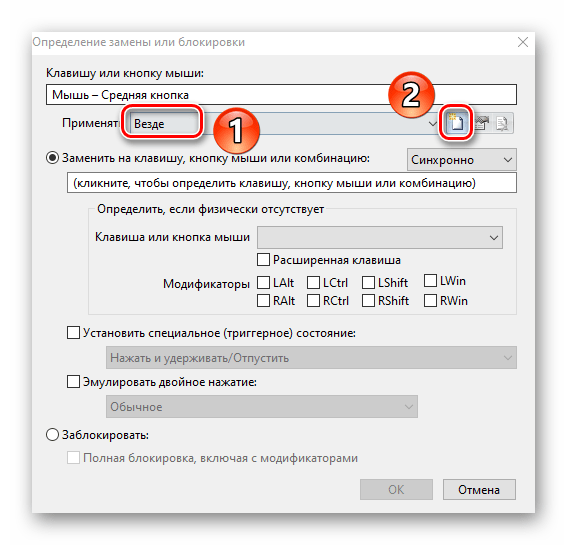
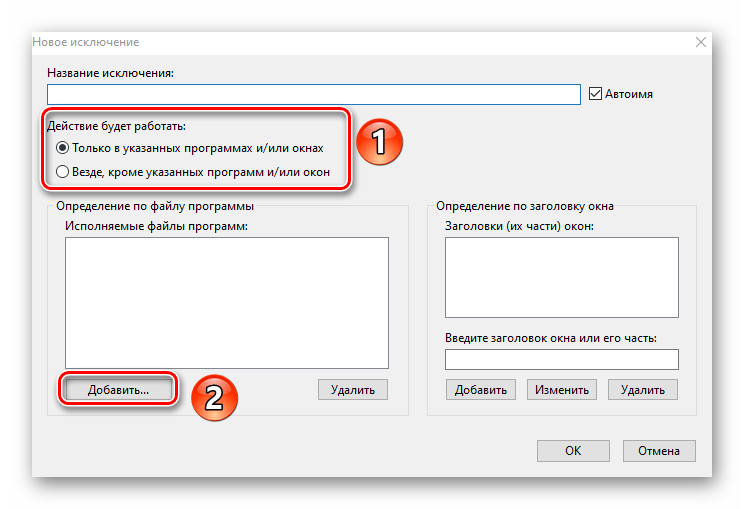
- Следующим шагом является указание среды, в которой замена будет работать. Вы можете использовать ее везде или же в конкретном приложении. Если она должна выполняться повсеместно, просто пропустите данный шаг и двигайтесь далее. В противном случае нажмите кнопку «Добавить исключение» рядом с отмеченной строкой.
- В следующем окне нужно выбрать, будет ли сочетание клавиш работать в какой-то конкретной программе или, наоборот, везде кроме нее. Для этого поставьте отметку возле одной из подходящих строк, а затем нажмите кнопку «Добавить».
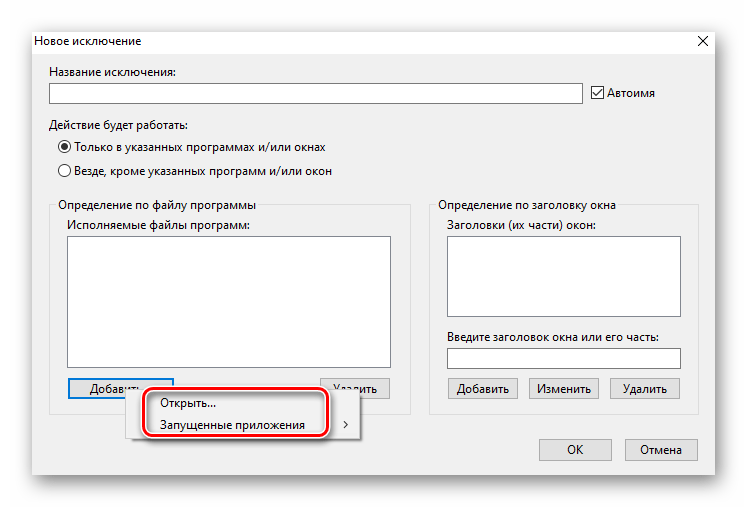
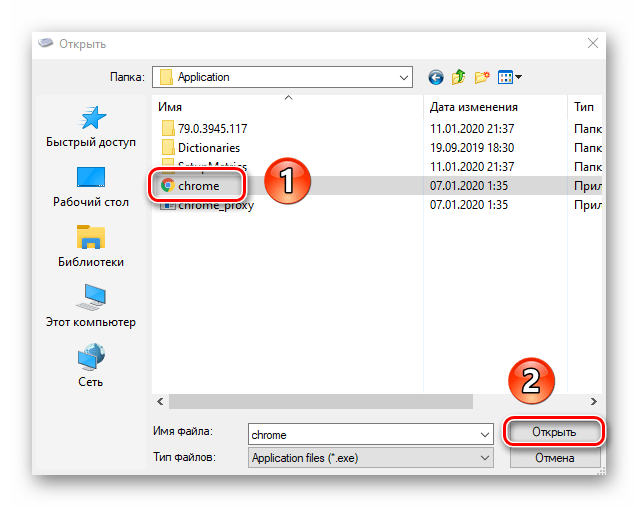
- В результате появится контекстное меню. Вы можете выбрать одну из уже запущенных программ на компьютере либо же указать исполняемый файл к нужному приложению на жестком диске.
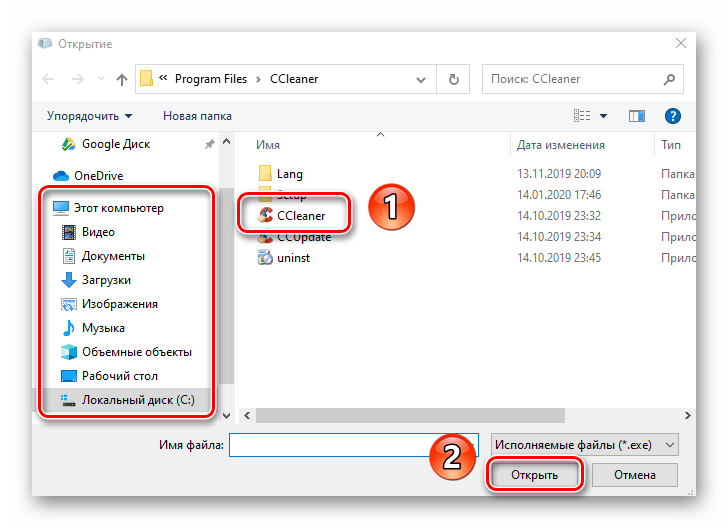
- Выбрав последний вариант, вы увидите стандартное окно файлового менеджера. В нем найдите желаемый софт, выберите его исполняемый файл одиночным нажатием ЛКМ, а затем нажмите «Открыть».
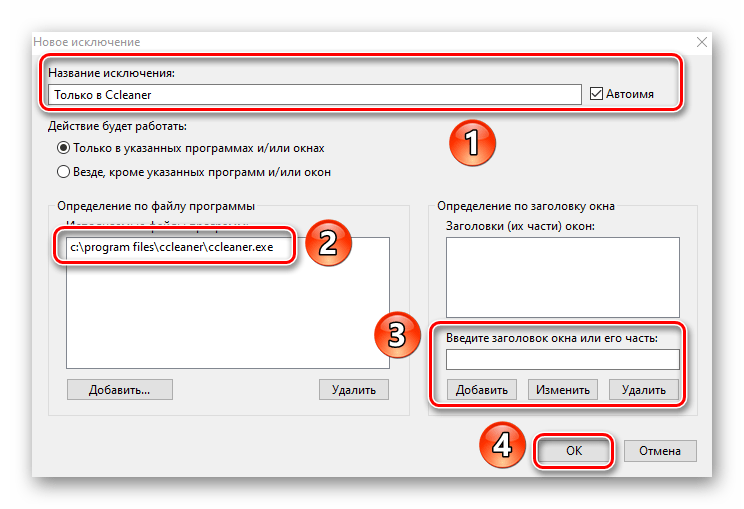
- В итоге в окне добавления исключений появится название правила и выбранное приложение. При необходимости аналогичным образом тут же можно указать заголовок окна, к которому созданное правило будет также применимо. По завершении всех действий нажмите кнопку «OK».
- Далее вы вернетесь в окно переназначения клавиш. Во втором его поле необходимо указать действия или комбинацию клавиш, которые будут срабатывать при нажатии на заданную ранее кнопку. Обязательно убедитесь в том, что активирована опция «Синхронно» в указанном на скриншоте месте (цифра 3). Если нужно назначить мультимедийное действие (изменение громкости, выключение звука и так далее), тогда выберите его из выпадающего списка. При необходимости можно добавить действию модификатор (нажатием «Shift», «Ctrl», «Alt» или «Win»). На скриншоте данный блок показан под цифрой 2. После выполнения всех действий нажмите кнопку «OK».
- В главном окне появится запись о переназначении. В будущем вы всегда сможете ее удалить, остановить или поставить на паузу. Для этого кликните правой кнопкой мышки по нужной строке и выберите желаемое действие из контекстного меню. Либо нажмите кнопку «Пауза» в правой верхней области.

Если понадобится переназначить другие комбинации, просто повторите действия из данного способа.
Способ 2: Mkey
Данная программа работает по тому же принципу, что и предыдущая. Однако разница в том, что на конкретную клавишу можно назначить множество различных комбинация («Ctrl+C», «Ctrl+V» и так далее), а также мультимедийных действий. Иными словами, возможности Mkey гораздо больше, чем у Key Remapper.
Скачать приложение Mkey
- Запустите программу и для начала выберите язык, на котором будет отображаться ее интерфейс. Кликните ЛКМ по нужной строке и нажмите «OK».
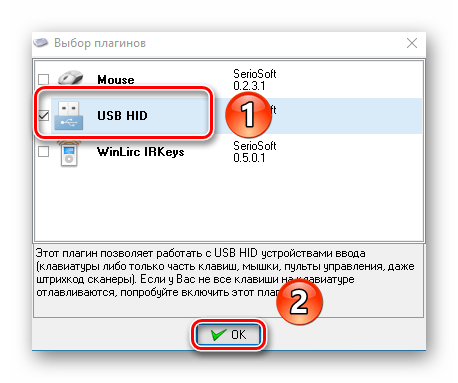
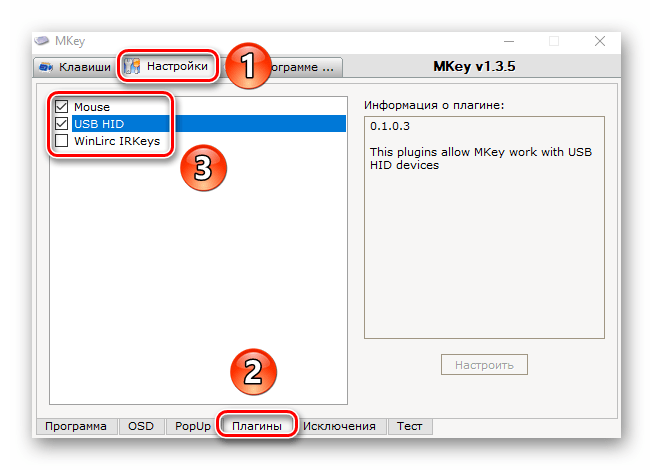
- В следующем окне нужно включить специальные плагины. Если вы хотите использовать лишь элементы клавиатуры, поставьте галочку возле второй строки — «USB HID». Если же планируется назначить действия на кнопки мышки, дополнительно отметьте и первый пункт. Затем нажмите кнопку «OK».
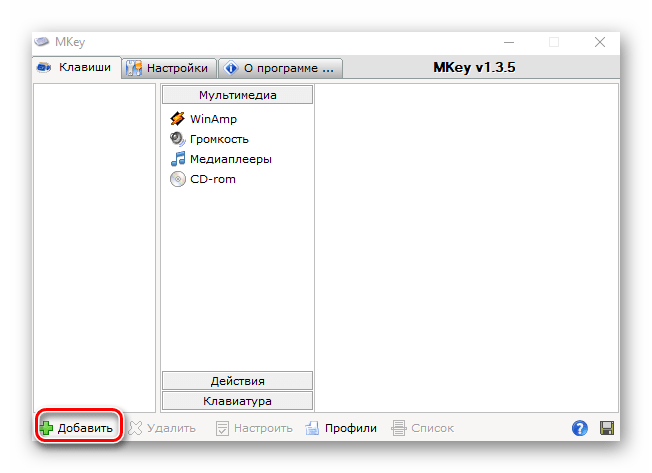
- В главном окне программы нажмите кнопку «Добавить» в левом нижнем углу.
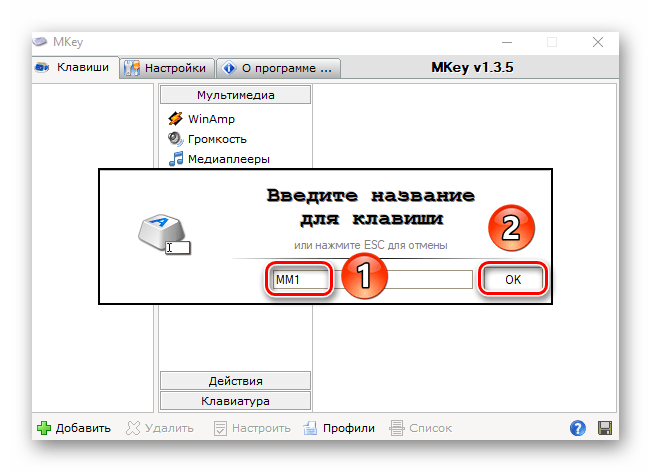
- После этого необходимо нажать кнопку, к которой в дальнейшем будет привязано выбранное действие. При этом можно использовать дополнительные модификаторы «Alt», «Shift», «Ctrl» и «Win». Затем присвойте любое имя созданной записи и нажмите «OK».
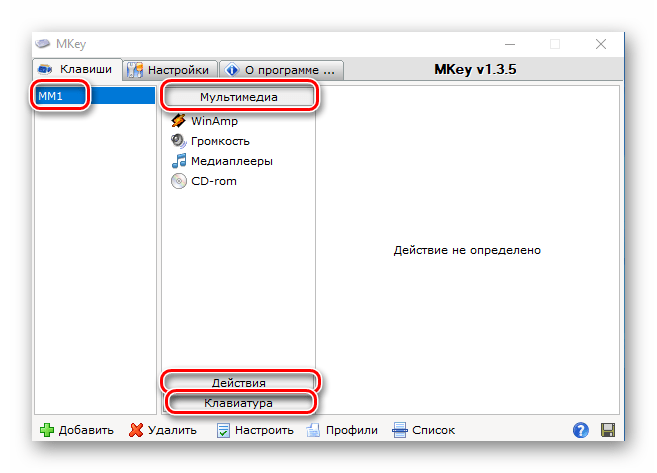
- Следующим шагом будет выбор комбинации или действия, которое произойдет при нажатии назначенной клавиши. Все возможные варианты разбиты на три основные категории — «Мультимедиа», «Действия» и «Клавиатура». В них есть перечень подразделов, с допустимыми вариантами. Мы настоятельно рекомендуем просмотреть их самостоятельно, так как описать все имеющиеся строки не хватит статьи.
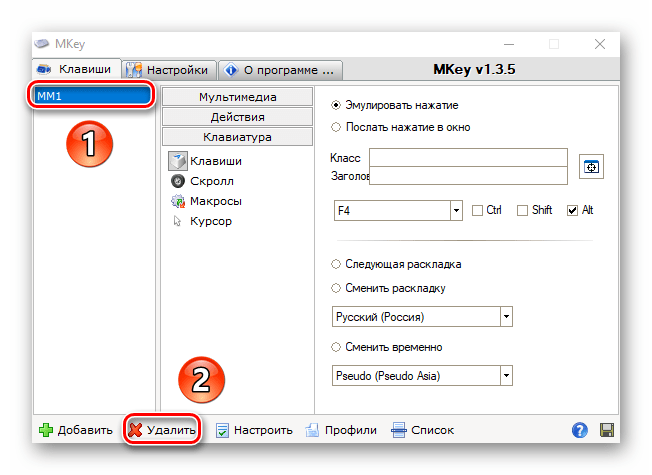
- Если вы намерены назначить на выбранную кнопку именно сочетания клавиш, тогда перейдите в раздел «Клавиатура» и выберите строку «Клавиши». Затем в правой части окна поставьте отметку возле строки «Эмулировать нажатие». После этого в поле ниже установите клавишу, комбинацию или действие. Обратите внимание, что при этом можно использовать модификаторы клавиш. Выполнив все действия, нажмите кнопку сохранения в виде дискеты в правом нижнем углу.
- При необходимости любую замену можно удалить. Для этого выделите строку с именем переназначения и нажмите кнопку с одноименным названием в нижней части окна.
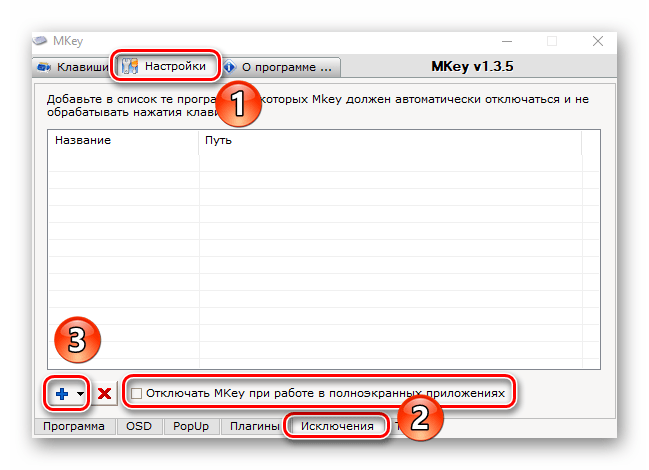
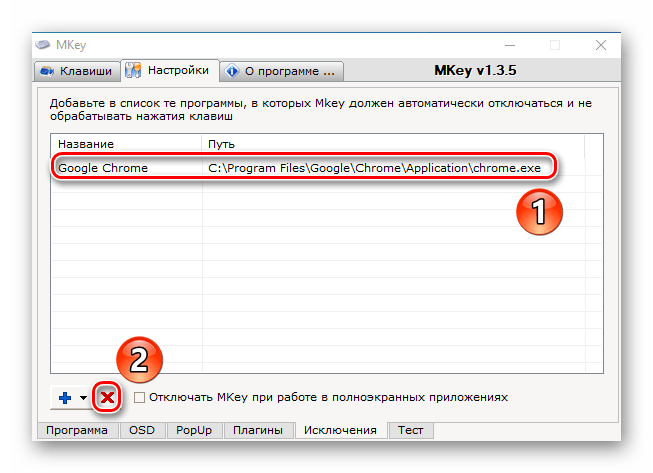
- В программе есть возможность добавления приложений, в которых выбранные изменения не будут работать. Для этого из главного окна перейдите во вкладку «Настройки», затем внизу кликните по разделу «Исключения». Обратите внимание, что можно запретить приложению обрабатывать переназначения в полноэкранных программах — для этого предусмотрена отметка возле соответствующей строки. Для добавления дополнительного ПО в список исключений нажмите кнопку в виде синего плюсика.
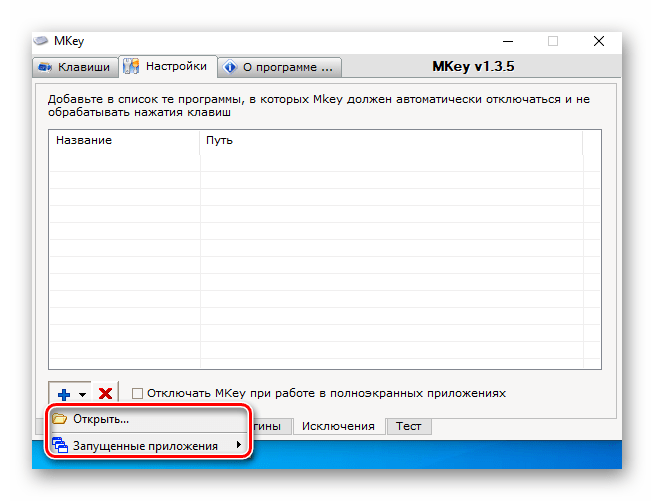
- На выбор можно добавить софт из уже запущенных или же указать путь к исполняемому файлу такового на компьютере. В данном примере мы используем второй вариант.
- В результате откроется стандартное окно файлового менеджера Windows 10. В нем найдите искомый файл, выберите его и нажмите «Открыть».
- В списке исключений вы увидите добавленные ранее приложения. Для удаления любого из них выделите желаемую строку и нажмите на кнопку с красным крестиком.
- Если в заглавном меню вы не активировали нужные платины, тогда попросту не будет возможности использовать клавиши клавиатуры, мышки и зависимые сочетания. Для исправления проблемы просто перейдите во вкладку «Настройки» из главного окна программы, а затем зайдите в раздел «Плагины». Поставьте галочки возле нужных модулей и перезагрузите софт.

Таким образом вы узнали об основных методах, позволяющих с легкостью переназначить горячие клавиши в Windows 10. Кроме того, с помощью описанного софта вы сможете создать свои сочетания и действия.
Наша группа в TelegramПолезные советы и помощь
Remember hitting the F5 key to refresh on your Windows 95 computer? It was almost obsessive. Back in the day, the F1–F12 keys had just one function each, but modern keyboards often include extra functions that you access with an Fn key (also called the Function key).

How are Fn Keys Helpful?
The Fn key turns the F1–F12 keys into dual-purpose keys. Essentially, it works as a default hotkey, but there’s a slight difference. The combinations differ among manufacturers and models. You’ll mostly find them on laptops (where you can usually change things like screen brightness), but you’ll also find them on some specialty keyboards (like gaming or productivity-centric boards).
For instance, on a Dell XPS15z, Fn + F5 increases the brightness, while on a Lenovo G560, the same combination will display the wireless device settings.
In addition to F-keys, you can also use Fn keys with other keys like PgUp, Insert, and arrow keys. Using a combination of Fn along with one of these keys comes in handy for doing a wide range of things, including adjusting the screen brightness, turning off the display, or controlling the volume, among many other things.

However, sometimes, you find that simply pressing an F-key (without the Fn key) triggers a command like increasing the playback volume. In such cases, you’ll be unable to use F-keys for standard keyboard shortcuts like hitting the F5 key for refreshing.
There’s a simple fix for this. You can tinker with the Fn key settings in several ways, and that’s what we’ll walk you through in this guide.
Disable the Fn Lock
Modern desktop and laptop keyboards have an Fn Lock key (i.e., a key with a lock icon). In most cases, you’ll find a lock icon printed on your Esc key, but it’s also possible that your keyboard has the lock on the Shift key or the Num Lock key.
When you press Fn + Esc (or the key with the lock icon), it toggles the Fn lock.

Once you’ve done this, you won’t need to press the Fn key for performing functions like adjusting the screen brightness or enabling and disabling WiFi or Bluetooth. Simply press the relevant F-key, and that should work. It’s similar to how you use Caps Lock. You won’t need to hold the Shift key for typing caps when Caps Lock is enabled.
If you’re experiencing something similar but want to use your standard F-keys, you’ll need to disable the Fn lock. You can disable it the same way as you’d enable it. Press the key with the lock icon along with the Fn key.
Change Fn Key Settings from Within Windows
You can also change Fn key settings from within your operating system. If you own a Dell laptop that runs Microsoft Windows 10 or 8, you can change function key settings from Windows Mobility Center.
Press Win + X or right-click the Start Menu button on Windows 10 to open the power menu and select Mobility Center. Alternatively, you can go to the Control Panel and navigate to Hardware and Sound > Windows Mobility Center.
Select the drop-down menu under the Function Key Row option under the Customized by Dell Inc. section. You’ll see two options here: Function key and Multimedia key.

Select Function key if you’d like to use the F-keys for standard functions, and Multimedia key if you want to use F-keys for performing functions that would otherwise require you to press the Fn key.
Similarly, on laptops from other manufacturers, you might find the option to change function key options in its system configuration tool. For instance, on Lenovo, you can use the Lenovo Keyboard Manager or the Samsung Settings app on a Samsung laptop to change function key behavior.
In most cases, the previous two methods should help you change Fn key settings, but on the off chance that they didn’t, you can use the BIOS settings.
Note that you shouldn’t mess around with any settings you don’t fully understand because it can render your computer unbootable.
Many, though not all, laptops will allow you to change Fn key settings from the BIOS or UEFI firmware. You can enter your BIOS setup with a reboot. Press F2, F10, or Delete (the keys differ among manufacturers) at the startup when your computer is still booting. Alternatively, you can use the new way of accessing the BIOS on Windows 10.
At this point, you’ll need to look around a little because UEFI settings are placed under different sections based on the BIOS interface, which differs among manufacturers.
For instance, on my HP laptop, the setting is under the System Configuration tab. Changing the Action Keys Mode to Enabled will make the F-keys function like normal, i.e., you’ll need to use the Fn key along with an F-key to perform a relevant function.

Fn Key Makes Life Easy
If an OS upgrade or an accidental change in settings has caused your Fn key to not work as it should, it can cause you momentary annoyance.
However, the Fn key is still one of the most helpful keys on your keyboard. It eliminates a few clicks for plenty of functions and lets you perform them just by pressing a combination of keys.
Fn key is also available on several Apple keyboards. If it’s not working correctly, you can troubleshoot Fn key problems on Mac OS as well.
Related Posts
- How to Fix a “This file does not have an app associated with it” Error on Windows
- How to Fix an Update Error 0x800705b4 on Windows
- How to Resolve “A JavaScript error occured in the main process” Error on Windows
- How to Fix the Network Discovery Is Turned Off Error on Windows
- How to Change Folder Icons in Windows
Sign in to your MUO account
Quick Links
-
Use the Settings App (for Certain Hotkeys)
-
Disable Shortcuts Using the Group Policy Editor
-
Disable Keyboard Shortcuts Using the Registry Editor
Accidental keystrokes can disrupt your workflow and cause unnecessary interruptions. Fortunately, you can disable keyboard shortcuts on Windows to prevent these issues and create a smoother typing experience. Below, we’ll explore your options for getting rid of unwanted shortcuts.
1. Use the Settings App (for Certain Hotkeys)
The Settings app on Windows can be useful for disabling a few specific Windows shortcut keys, such as those for Windows Narrator, Sticky Keys, Print Screen, Filter Keys, Toggle Keys, and color filters.
Here’s how to disable hotkeys using the Settings app:
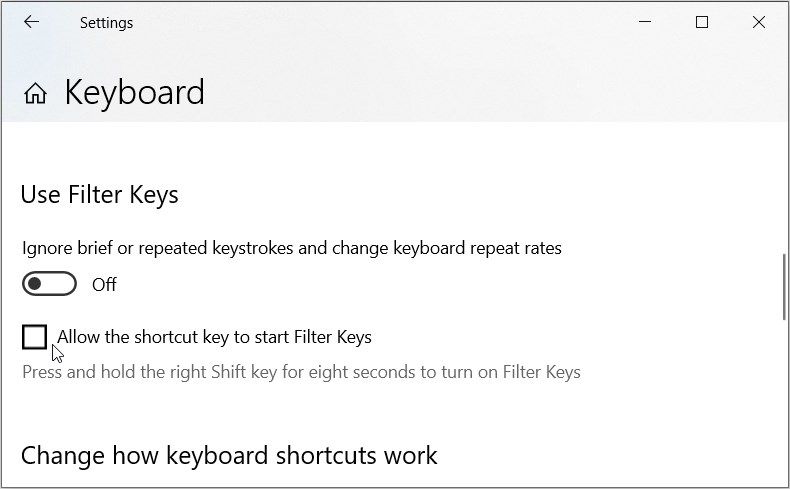
- Type Allow the shortcut key to start Filter Keys in the Start menu search bar and select the Best match.
- Uncheck the Allow the shortcut key to start Filter Keys box to disable this option. When this option is enabled, pressing and holding the right Shift key for about eight seconds will activate Filter Keys.
- Likewise, if you scroll up, you’ll see similar checkboxes for Sticky Keys and Toggle Keys. Uncheck them too.
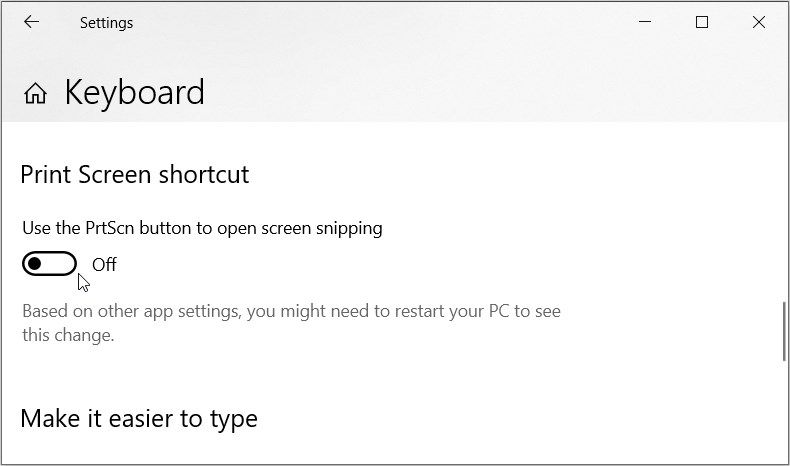
- Next, scroll down and disable the toggle below Print Screen Shortcut to prevent the PrtScn button from opening the snipping tool.
Now, you can follow the set of instructions below to disable keyboard shortcuts for color filters:
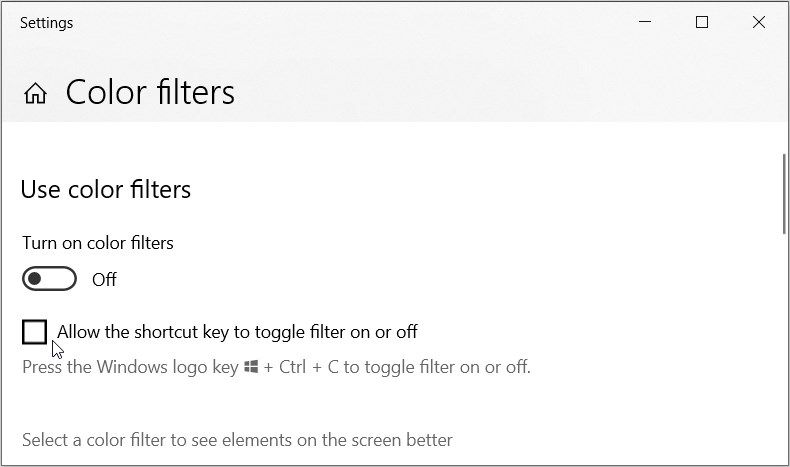
- Now, type Allow the shortcut key to turn color filters on or off in the Start menu search bar and select the Best match.
- Uncheck the Allow the shortcut key to toggle filter on or off box. When this is enabled, pressing Win + Ctrl + C will toggle the color filters on or off.
Finally, we’ll show you how to disable keyboard shortcuts for the Narrator feature that describes the content that appears on your screen:
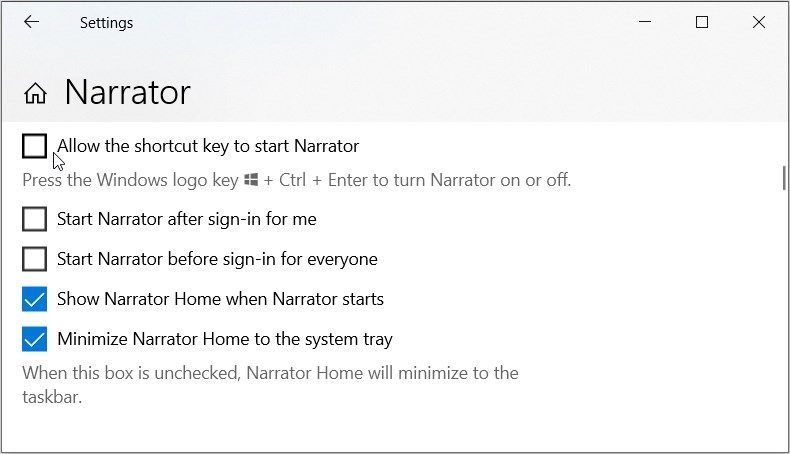
- Type Allow the shortcut key to start Narrator in the Start menu search bar and select the Best match.
- Next, uncheck the Allow the shortcut key to start Narrator box to disable this option. When this option is enabled, pressing Win + Ctrl + Enter will turn Narrator on or off.
2. Disable Shortcuts Using the Group Policy Editor
Unfortunately, the Settings app on Windows doesn’t let you manage all the keyboard shortcuts. That’s where the Group Policy Editor comes in. The Local Group Policy Editor allows you to troubleshoot PC issues and tweak various system settings.
Here’s how to use it to disable the Windows shortcut keys:
- Type Edit group policy in the Start menu search bar.
- Right-click on the Best match result and select Run as administrator.
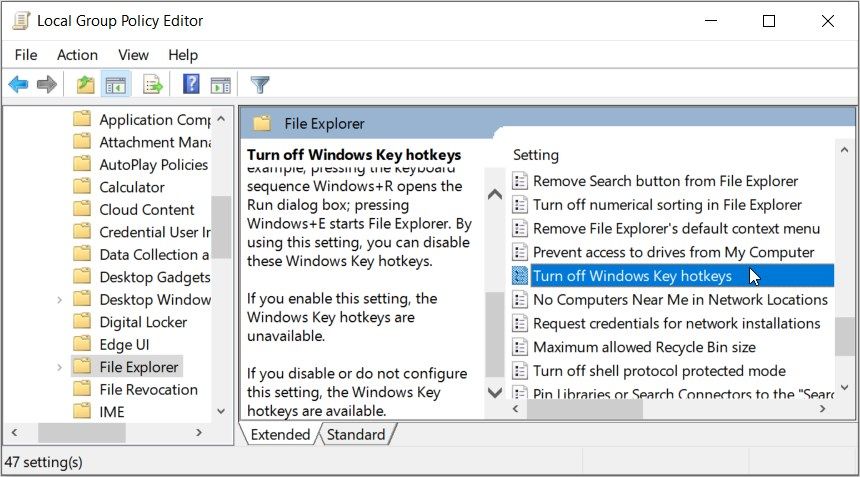
- Navigate to User Configuration > Administrative Templates > Windows Components and click the File Explorer folder.
- Now, scroll down on the right and double-click the Turn off Windows Key Hotkeys option.
- Select Enabled from the window that appears.
Finally, close the Local Group Policy Editor and restart your computer to apply these changes.
3. Disable Keyboard Shortcuts Using the Registry Editor
You can disable the keyboard shortcuts by tweaking a few Registry keys. But before you begin, consider backing up the Windows Registry to ensure you can recover it if issues arise. Now, here’s how to disable keyboard shortcuts using the Registry Editor:
- Type Registry Editor in the Start menu search bar. Right-click on the Best match result and select Run as administrator.
-
Copy-paste the following command into the address bar and press Enter:
HKEY_CURRENT_USER\Software\Microsoft\Windows\CurrentVersion\Policies - Now, double-click Policies to expand and reveal the Explorer key. If it’s missing, create it by right-clicking the Policies key and selecting New > Key. From there, name this key as Explorer.
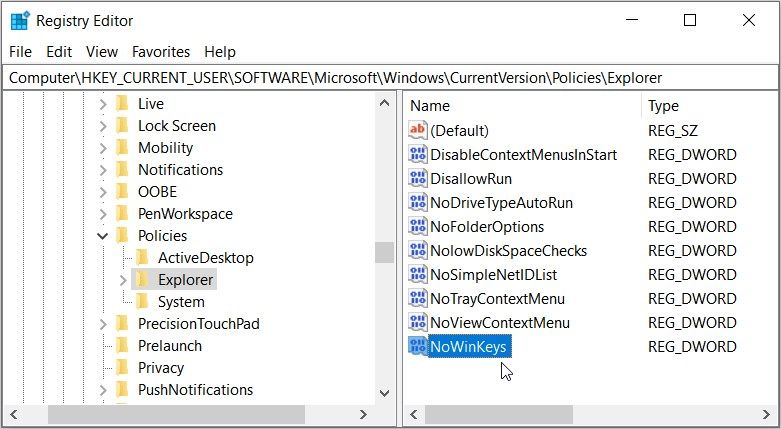
- When you’re on the «Explorer» key, right-click on a blank space on the right and select New > DWORD (32-bit) Value. Next, name this value as NoWinKeys and press Enter.
- To disable the hotkeys, double-click on the NoWinKeys value and set the Value data as 1.
Finally, close the Registry Editor and restart your computer to save these changes.
While keyboard shortcuts can improve efficiency and speed up certain operations, they can cause unintended actions if you’re prone to misclicking and interrupt your workflow. Hopefully, with our detailed instructions, you managed to disable all the keyboard shortcuts you don’t really use or need.