
You can install Windows 10 from a wide range of external media. Keeping a backup copy of Windows 10 on a USB flash storage drive is useful. But what if you need a copy of Windows 10 when you’re out and about?
In that instance, you could install Windows 10 direct from your Android smartphone via the DriveDroid app. Here’s how you set up DriveDroid, then install Windows 10 from your smartphone.
What Is DriveDroid?
DriveDroid is an Android app that allows you to mount an operating system disc image and make it act as an installation media, such as a bootable USB flash drive or CD/DVD-ROM.
You can use DriveDroid to install a wide range of operating systems. It is commonly associated with Linux distros, but you can also use it to install Windows 10.
Important: DriveDroid requires Android root access.
Rooting is a process that gives you privileged access to the device. It allows an app more control and access than a standard app. Rooting is similar to jailbreaking an iOS device.
You can ask if rooting is still useful for Android devices. However, as you’ll see from this tutorial, there is definitely some use!
If you want to root your Android smartphone, check out our guide on the best way to root your Android device. In my experience, Magisk is the easiest method to rooting your device—but you’ll need to take a system backup before committing because the process potentially involves wiping your device.
How to Install Windows 10 From Your Android Device with DriveDroid
If you don’t have root access on your Android device, the rest of this tutorial will not work properly. DriveDroid requires root access on your device to mount the Windows 10 ISO properly. You’ll also need root access if you want to install a different operating system, such as a Linux distro.
From here on in, this tutorial assumes your Android device has root access.
0. A Note Before You Install DriveDroid
Unfortunately, the DriveDroid app is no longer being actively updated. Recent reviews on the DriveDroid Google Play page reveal that potential DriveDroid users using recently released smartphones running recent versions of Android are struggling to get DriveDroid up and running properly.
For example, on 27 July 2022, user Swaroop Ghimire wrote:
This app really needs an update. It says no hosting device which is an error for latest devices, but it works on my old Android phones
The long and short of this is that you can still attempt this tutorial, but there is a chance that it might not work with your Android device—you have been warned!
Furthermore, rooting your device can have other consequences, such as some apps failing to work post-root. You could attempt to trick apps into thinking your Android is not rooted, but there is no guarantee that it will work.
1. Download the Latest Version of Windows 10
To install Windows 10 from your Android device, you’ll need a copy of Windows 10. The Windows Media Creation Tool is the easiest way to download the latest version of Windows 10.
Head to the Windows 10 software download page and select the Download tool now.
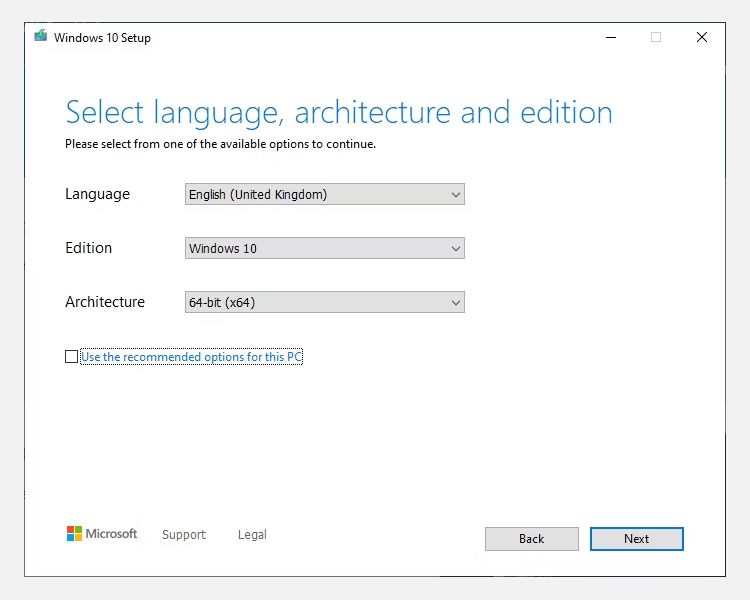
- Open the Windows Media Creation Tool.
- Select Create installation media for another PC, then create your Windows 10 ISO settings.
- If you’re creating a backup ISO for the PC you’re using, you can Use the recommended options for this PC.
- Press Next, then let the process complete.
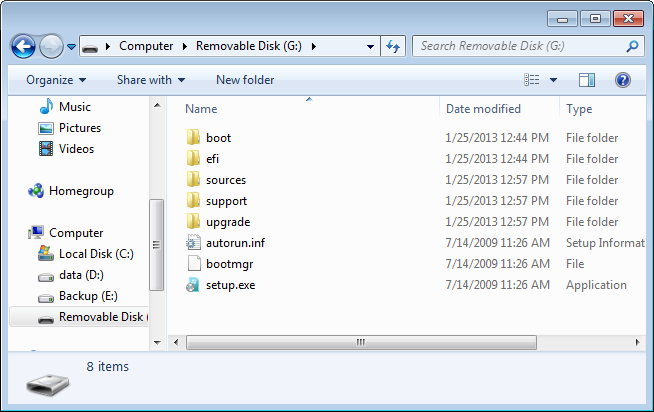
After the Windows 10 ISO finishes downloading, you need to copy it onto your Android smartphone in an easily remembered folder. It is best to copy the files to your Android using a USB cable, as you will also require an active connection for the rest of the tutorial.
2. Download and Configure DriveDroid
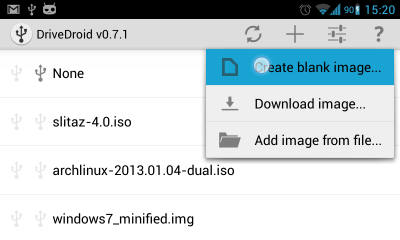
Download and install DriveDroid.
Open DriveDroid. The app will immediately request root access, which you should Grant.
Configure the Image Directory. The Image Directory is the folder where you store your disc images (ISOs), such as the Windows 10 version you copied to your device.
During the DriveDroid initial setup, you will select a default folder, but you can change this later.
Download: DriveDroid for Android (Free)
3. Test Your DriveDroid USB Settings
DriveDroid will now test the USB connection settings for your Android device. DriveDroid needs to handle the USB connection as a mass storage device, allowing it to mount your Windows 10 ISO as a bootable image.
Follow the steps with the help of the screenshots below:
For most users, the Standard Android Kernel is the correct option. Select the first option, then press Next. Wait for the DriveDroid test file to appear as a mountable drive.
If the device doesn’t appear in your File Explorer, select Choose a Different USB System and try again.
When you cycle through the three basic USB settings and the DriveDroid test file does not appear, don’t worry.
Adjust DriveDroid USB Options
You can modify the DriveDroid USB options from the main page.
Select the Gear icon in the top-right corner, then scroll down. Next, select USB Settings > Manually Change USB Mode > Mass Storage, then Confirm.
4. Mount Your Windows 10 ISO in DriveDroid
Now, you need to mount the Windows 10 image. Depending on the default image folder option, the Windows 10 ISO might already feature on the DriveDroid main page.
If not, select the Gear icon in the top-right, then select Image Directories.
Press the red icon in the bottom corner. Now, browse to the folder containing your disc images and provide access when requested.
Select the correct directory from the Image Directory, then head back to the DriveDroid homepage.
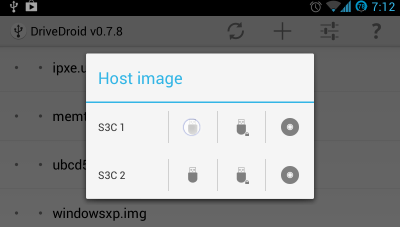
Next, select the Windows 10 ISO, then Host image using CD-ROM. A small disc icon should appear on the disc image, indicating it is mounted and ready to go.
Using a USB cable, you need to connect your Android device to the PC you want to install Windows on. The PC should be switched off, to begin with. Connect the USB cable and your Android device to the computer.
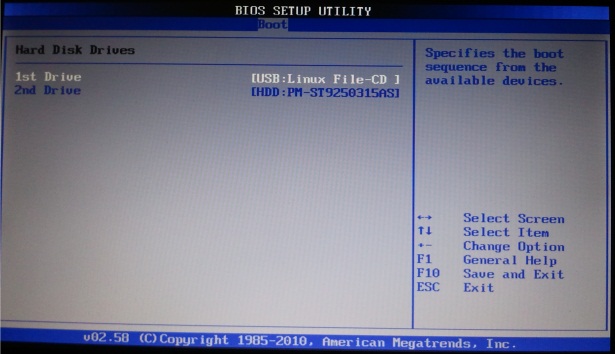
When you switch it on, you need to enter the boot menu using the dedicated shortcut. For most PCs, the boot menu shortcut is F8, F11, or DEL, although it does vary between manufacturers.
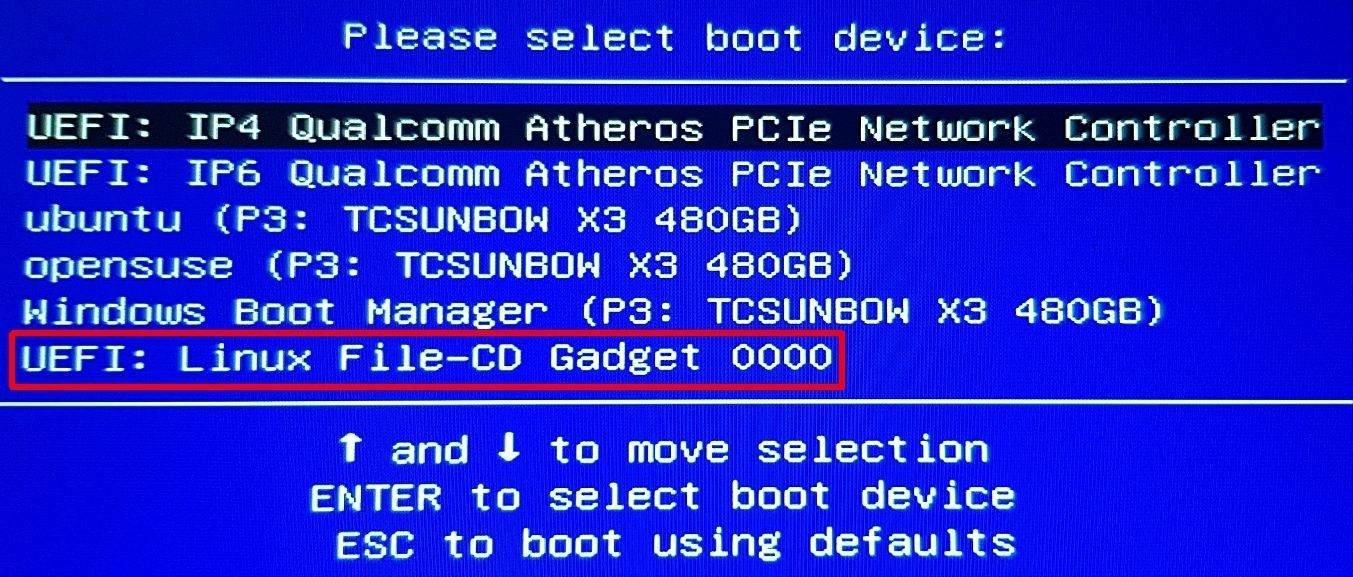
When the boot menu loads, scroll down to find the DriveDroid option, named something similar to Linux File-CD Gadget. Press Enter.
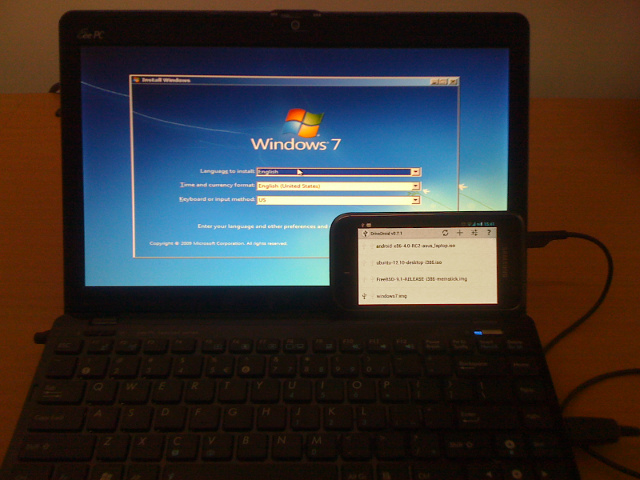
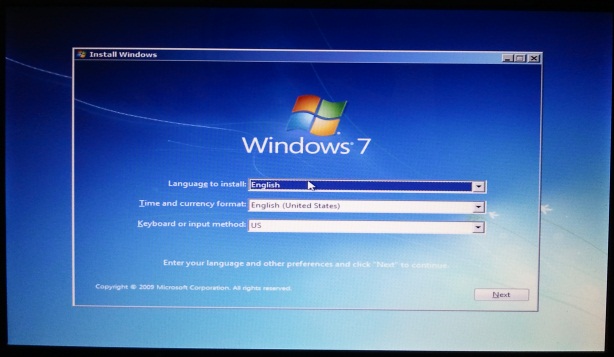
The Windows 10 installation screen will now load, and you can install a clean version of Windows 10 on your computer.
Install Windows 10 From Your Android Smartphone on Any Computer
Once you have the Windows 10 ISO and DriveDroid setup on your Android device, you’re good to go. The only significant downside to the DriveDroid installation method is that your Windows 10 ISO will eventually become outdated.
When that happens, you’ll have to download the latest version, then copy it across to your Android device to use with DriveDroid.
DriveDroid is a handy app to keep close by. You can use the app to even boot your PC directly over a USB cable using any ISO or IMG file stored on your phone.
Если вас часто просят родственники или знакомые, переустановить систему на их устройстве, тогда это руководство может вам пригодиться. Мы сделали самое простое руководство для каждого пользователя который часто сталкивается с переустановкой Windows.
В этой статье мы обсудим то Как установить Windows с помощью Android смартфона. Если вы часто делаете переустановку системы, а диск или флешка находятся где-то в другом месте, вам на помощь придет это руководство. Есть программа с интересным названием DriveDroid которая позволяет делать из памяти вашего смартфона, загрузочную флешку для установки системы. Ее суть заключается в том что образы которые хранятся в памяти телефона, выдаются за USB образы дисков.
Поверьте этот способ очень простой и удобный. Думаю, справится сможет даже новичок в этом деле. А процесс установки может быть даже быстрее чем с флешки. Что определенно является плюсом.
Содержание
- Как установить Windows с помощью Android смартфона
- Необходимые инструменты
- Подготовка образа
Как установить Windows с помощью Android смартфона
Сразу стоит сказать, что данная программа больше приспособлена для Linux систем, но если все правильно настроить можно и создать загрузочный образ диска с Windows.
Необходимые инструменты
Давайте же начнем. Для начала нужно удостовериться что на вашем смартфоне установлен Root версии 2.0 или выше и есть в доступном, свободном объеме 3 Гигабайта основной памяти. После этого нужно установить из Google Play свежую версию программы DriveDroid и скачать нужную нам версию Windows. После этого скачайте программу для создания загрузочного образа для Windows — Winusb. Установить эту программу можно из офицциальных репозиториев Ubuntu:
$ sudo apt-get install winusb
Пользоваться программой DriveDroid очень просто, и как мы сказали ранее: Справится даже новичок.
Подготовка образа
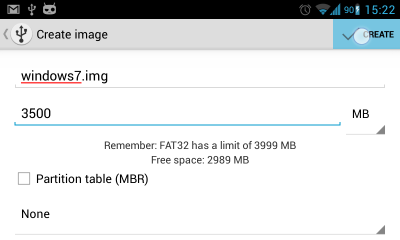
Как мы заметили выше, взять и установить ISO образ установщика Windows не получиться, потому что программа изначально работает с образами Linux. Поэтому нам придется ее настроить. После запуска прогаммы, появится новое окно с подтверждением прав на Root-доступ, предоставьте нужную информацию и нажмите на кнопку плюс «+». Она находится в правом верхнем углу экрана. Затем выберите Create Blank Image, и создайте чистый образ.
В новом окне, вы должны указать названием образа и размер, который должен быть равен оригинальному образу с Windows. Снимите галочку с Partition table (MBR) и после этого выберите файловую систему None.
Создание образа может занять некоторое время, после того как процесс будет готов, подключите только что созданную вами флешку к вашему устройству, затем нажмите на Writable USB для того чтобы иметь доступ к записи.
После этого нужно перейти к вашему Ubuntu и ввести такую команду как:
$ cfdisk /dev/sdb
Здесь /dev/sdb служит как путь к памяти вашего смартфона, с помощью которого вы собираетесь Windows. Выберите таблицу разделов dos и намете новые, затем Enter, Запись и Yes. После этого отформатируйте диск с файловой системой NTFS.
$ mkfs -t ntfs /dev/sdb1
И после этого, мы можем записывать образ:
winusb —install windows7.iso /dev/sdb1
Важно: Windows7.iso это название установочного образа диска с Windows, а /dev/sdb1 это путь к подключенной флешке. Если вам нужно узнать этот адрес, просто ведите запрос в командной строке:
$ ls /dev | grep sd
Это позволит узнать какие новые устройства появились после подключения к флешке.
После того как программа завершит запись, нужно будет перезагрузить систему и начать установку Windows. Также нужно будет зайти в BIOS и выставить приоритет нашей флешке при загрузке. После этого вы можете приступать к установке Windows с вашего смартфона.
Если у вас остались какие то вопросы по теме «Как установить Windows с помощью Android смартфона» то можете задавать их в комментарии на сайте. Также поделитесь была полезна ли для вас эта информация.
There is another great app from Android Google Play store which allows you to boot your PC from .ISO/.IMG files stored on your Android phone. This app is called DriveDroid, it makes you live free from carrying a number of Windows or Linux CD/DVD or USB flash drive with you, as we always carry our phones with us so we’ll have it always, this is ideal for IT professionals and don’t need to carry any additional USB, CD or DVD, it is best for trying Linux distributions or Antivirus rescue-system on the go without the need to burn different CDs or USB pen drives.
DriveDroid App is Capable of:
Burns any Windows ISO (XP, 7,8, or 10).
Burns any Linux-based ISO (ArchLinux, Ubuntu, Knoppix, etc).
Burns a number of handy ISOs (Hiren’s Boot CD, FreeDOS, BartPE, Ultimate Boot CD).
Handles UEFI as well as legacy booting.
Handles GPT as well as MBR partition tables
This post will go through the steps of creating an image in the Android phone DriveDroid app and burning an ISO to that image using a Rufus tool.
See Also >> 5 FREE Tools To Make Bootable USB Flash Drive – Windows & Linux
Requirements:
1. Rooted Android phone ver. 2.2 or higher
2. A tool called Rufus (there are a number of tools but this is recommended and tested). For the second way.
3. 4GB free space on your Android phone for Windows 7 or 8 ISO, 6GB for Windows 10 ISO.
4. USB cable.
Steps to Make Android Phone as a Bootable USB Device using DriveDroid 0.10.50:
Setting up and configuring DriveDroid
Step 2: Launch DriveDroid. Then grant root access.
Step 3: Configure the Image Directory to store USB and CD/DVD images.
For example, you might choose the Download directory:
Step 4: Connect your Android phone with the USB cable to your PC. Check if a disk with a size of 182 KB has appeared. Then disconnect the phone from the computer.
Step 5: Then DriveDroid will prompt you to choose a USB system. I usually choose the first option and check whether the computer will boot from my smartphone. If not, then I choose the next option. Standard Android Kernel and Standard Android work in most cases.
Step 6: You need to specify exactly what type of media you saw on your computer: USB, CD-ROM, or none. This is easy to check through file explorer. If your device showed up in your system, choose Android shows up in OS. Otherwise, try with a different USB system
Step 7: Then select Booted successfully using DriveDroid
Step 8: On the summary screen click NEXT
Step 9: Now you created DriveDroid Boot Tester. Then you should restart the computer and try to boot from your smartphone by changing the boot order options in the BIOS.
You should see the test image loading screen:
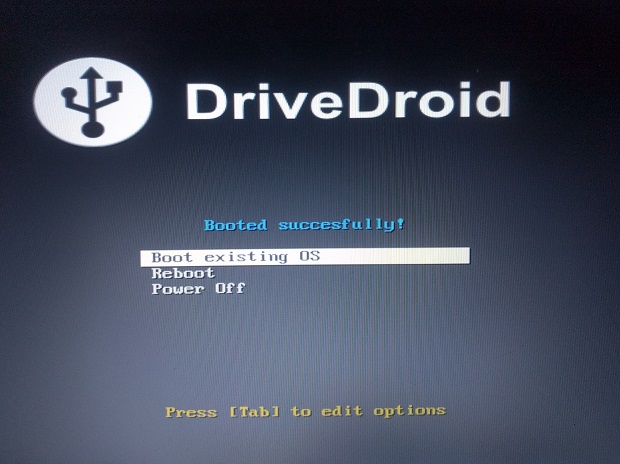
If you see this screen then everything was done correctly. If you don’t see this screen, try selecting a different USB system in the program settings and re-boot. After updating the parameters, do not forget to click on the update icon.
Preparing images of the system you want to install
Now you can proceed to copy boot images to your phone. DriveDroid works with images of the IMG format and with some images of the ISO format. Moreover, it works successfully mainly with Linux images and windows installation iso images will not be able to connect and therefore we will have to convert our ISO images to IMG images.
DriveDroid also includes convenient download images (.iso or .img), where you can download images of a number of operating systems on your phone. You can also create USB images that allow you to have a blank USB drive where you can store files in. Blank images also allow you to use tools on your PC to burn images to the drive and create an Android phone as a bootable USB disk, like we have to do next in this post.
So, there are 3 ways to create an img image of DriveDroid:
- Download images directly from DriveDroid. But there are only Linux images. If you want to install Windows, then you will have to use the following 2 methods
- Download an iso image and burn it using Rufus or another similar program
- Download the iso image directly to your phone and convert it using isohybrid which is embedded in the DriveDroid
The first way: Download images directly from DriveDroid. But there are only Linux images.
- Press the + button and choose to download the image
2. Choose to download the image of the system you want to install
The second way: Download an iso image and burn it using Rufus or another similar program
Step 1: First you have to connect your Android phone with the USB cable to your PC.
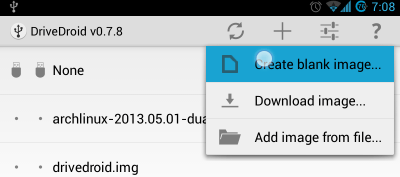
Step 2: Open your app DriveDroid on your phone, you’ll see the + button, click on it, now you will find the option ‘Create blank image‘ here, click on it.
Step 3: After clicking on Create blank image you’ll see a pop-up dialog like below where you can name the file and size for the image that is appropriate for the ISO you’re burning, we are burning downloaded Windows 10 iso file from the Official Windows site for this post.
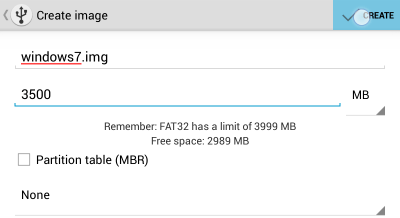
Step 4: Choose a filename like ‘win10x64.img’ and choose 6000 MB as the size for the image. You have to uncheck ‘Partition table (MBR)’ and choose ‘None‘ for the filesystem because we’ll do these things with the Rufus tool in the next step. Now click on the Create button right top.
Step 5: Once image creation has finished you can select the image in the DriveDroid app.
Step 6: After selecting an image, a popup dialog will ask you how to host the image. Choose the first option to host the image as a writable USB drive (see screenshot below).
Step 7: Now plug your phone into your PC and start the Rufus tool.
We can make Android phones bootable without tool any tool, Diskpart makes these things possible which is built-in Windows 10 but will be quite lengthy and tough.
Step 8: Choose the USB device that corresponds to your phone. This is shown as NO_LABEL in Rufus.
Step 9: Now the main and important things to do, check ‘Create a bootable disk using:‘, choose ‘ISO Image‘ from the dropdown box, and click the CD Rom icon to choose the ISO you want to burn. Once the ISO is scanned by Rufus, it will fill in other options automatically.
Step 10: Finally, click ‘Start‘ to let Rufus burn the ISO for you into your phone and make it bootable.
Step 11: Now you have your bootable image in your phone, when you need to install Windows from your phone, connect your phone with the USB cable and go to BIOS setup by pressing F2 or F10 depending upon BIOS make to change the boot priority to boot from your USB Phone.
The third way: Download the iso image directly to your phone and convert it using isohybrid which is embedded in the DriveDroid application
1. Using your phone’s browser, download the desired ISO image from the Internet. If you want to install Windows 10, download the iso image from Microsoft’s download page
2. Move the downloaded file to the directory with images
3. Then open the DriveDroid app, select the downloaded image, and press Convert image using isohybrid
4. After selecting an image a popup dialog asking how to host the image. Choose the first option to host the image as a writable USB drive.
5. Connect your phone with the USB cable and go to BIOS setup by pressing F2 or F10 depending upon BIOS make to change the boot priority to boot from your USB Phone.
Now, whenever you need to install Windows or Linux whichever iso you have with you in your phone, just change the BIOS settings to USB and connect your phone with the USB cable to boot from your device anytime anywhere.
Update: Rufus is now the recommended to write Windows installation ISOs to DriveDroid and other USB drives. Please refer to Using Rufus to create bootable USB images. The tutorial below still explains in more detailed steps how the same thing is done using more low-level tools.
In version v0.7.0 of DriveDroid (Free) and DriveDroid (Paid) a feature has been added to create blank images that look like normal USB disks. This allows you to use tools on your PC to fill the blank USB disk with whatever you want.
In this post I will show how to create a Windows 7 installation disk that can be booted from your phone with DriveDroid. The disk will be made using files of the official Windows 7 ISO.
Requirements
- DriveDroid v0.7.0+
- 4GB free space on your Android phone
- A PC with Windows 7 and 7-zip installed
- Diskpart utility (installed by default on Windows 7)
- A Windows 7 installation disk or ISO
Note that on some systems diskpart is not installed. I installed it seperately using the diskpart setup.
Image creation
First hook up your phone to your PC using a USB cable.
Next we’ll have to create a blank image on your phone. On this image we will eventually store the installation disk. In DriveDroid we go to the + button and choose ‘Create blank image…’.
Choose a filename like ‘windows7.img’ and choose 3500MB as the size for the image. You can uncheck ‘Partition table (MBR)’ and choose ‘None’ for the filesystem. Now hit the ‘Create’ button on the top-right.
As a side-note, we choose to not create a partition table and filesystem here because DriveDroid does not support formatting NTFS filesystems. NTFS is required for the Windows 7 installer to work. We will partition and format the image from your PC in Windows, but we’ll get to that.
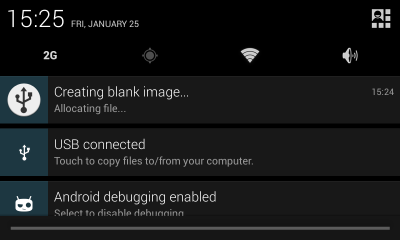
This will create the image file in the background. Open the notification-bar to see when the image creation is finished. Most time will be used by ‘Allocating file…’, which creates a 3500MB file. This can take half an hour or so on most devices that have a FAT-32 filesystem on their SD-card, other filesystems do not seem to have this problem and will finish almost instantly.
It is recommended not to do anything else on your phone while the image is being created. At the moment the image creation process can be killed by Android when there isn’t enough memory available on the device to launch other applications. I still need to figure out how to avoid this.
Once the image is created go to DriveDroid.
Partitioning and formatting
Select the image in DriveDroid and click the option that says ‘(read-write)’. As soon as we have done that, Windows will find a new USB drive. A window will popup in Windows asking to format the drive.
Choose ‘Cancel’: this method of formatting is not compatible with a Windows 7 install disk, since it’ll not create a partition table and bootsector. Thus it will not boot using this option. We will partition and format the disk properly using diskpart.
Go to start and type cmd.exe. Command prompt will open.

Start diskpart by typing diskpart.
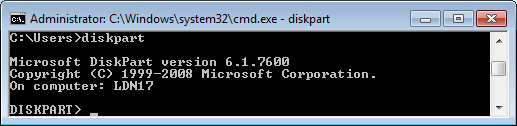
Show the connected disks by typing list disk.
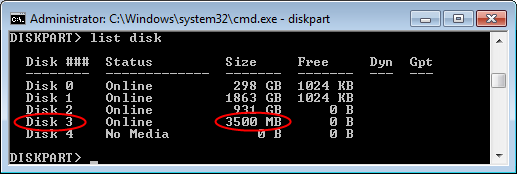
You will see that the image you just created in DriveDroid is listed here as a disk of 3500MB. In this example it is listed as Disk 3.
To work on disk 3, we need to select it by typing select disk 3.

Next we create a partition table and fill the bootsector by typing clean.

Now we can create a partition by typing create partition primary.

The partition hasn’t got a filesystem yet. For the Windows 7 install disk we need a NTFS filesystem. We can format a NTFS filesystem on the partition by typing format fs=ntfs quick. This will take a few seconds to a minute or so.

Now we have a bootsector, partition table, partition and filesystem. We only have to mark the partition as ‘bootable’ to be able to boot from it. We do this by typing active.

Finally we leave diskpart by typing exit. You can close the window after that.

Copying files
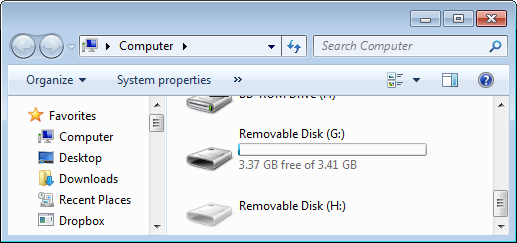
Now we have a disk that has a filesystem and can be booted from. We should be able to see the empty disk in ‘My Computer’. In this example it is disk G:.
Next we need to copy files from the official Windows 7 installation CD to the USB drive. If you have the CD at hand, you can just copy those files over.
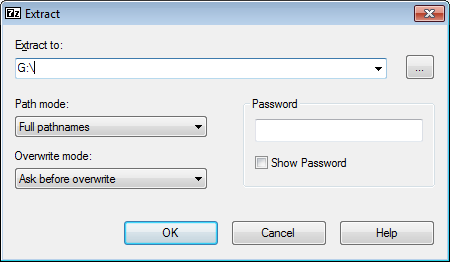
However, since I only have an ISO file I need to extract the ISO to the USB drive. We can do this using 7-zip. Go to the Windows 7 ISO using Windows Explorer. Right click the ISO file, choose 7-Zip and choose Extract files....

Choose G:\ as the destination to extract the files to and hit OK.
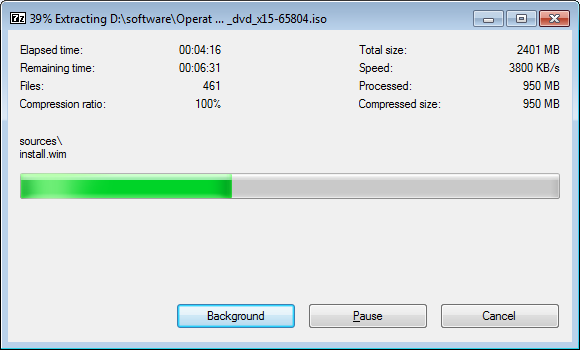
Extracting the files will take a while.
Once the files are extracted the contents of your disk should look similar to this.
We are finished. The disk should be usable and is stored in windows7.img on your Android phone. If you want to try it on another PC, first safely remove the disk by left clicking the icon in your system tray.
And choosing your phone from the menu. In my case it is GT-I9000 (Samsung Galaxy S).
Unplug your USB cable and plug it in a PC where you want to install Windows 7. Make sure you still have windows7.img selected in DriveDroid.
Boot the other PC, go to the bios and put your phone as the first boot device.
Save the changes and reboot. The PC should now boot the Windows 7 installer from your phone.
Как использовать телефон в качестве загрузочного диска для компьютера
Не успели мы еще толком привыкнуть к тому, что оптические носители информации безвозвратно ушли в прошлое, как грозные тучи начинают сгущаться и над флешками. Стремительное развитие облачных файловых хранилищ лишает смысла использование usb-брелков для переноса цифровых данных между компьютерами. В остальных случаях с этой задачей могут прекрасно справиться мобильные устройства, размеры дискового пространства которых все продолжают увеличиваться.
Поэтому все чаще получается, что флешкам остается скорбная участь быть извлеченными на свет только тогда, когда нам потребуется очередная переустановка системы. Впрочем, утилита DriveDroid лишает их и этого — теперь вы сможете установить систему на ПК прямо со своего телефона.
DriveDroid является приложением для устройств под управлением Android, которое позволяет использовать телефон в качестве загрузочного носителя для загрузки компьютера с помощью образов дисков в форматах ISO или IMG, сохраненных на телефоне. Это может быть вам удобно по нескольким причинам. Может быть, вы хотите, чтобы ваш сервисный набор инструментов для лечения, обслуживания и ремонта операционных систем был всегда с вами. Может быть вам понадобится переустановить систему, а ничего другого, кроме мобильного под рукой нет.
Прежде всего необходимо отметить, что приложение DriveDroid работает под управлением Android 2.2 и выше, требует прав суперпользователя. Кроме этого, ваше устройство должно поддерживать технологию USB Mass Storage и, разумеется, понадобится кабель для соединения с компьютером.
После запуска приложения вы имеете возможность создать пустой образ, загрузить образ диска из сети или добавить уже существующий. Для загрузки доступны несколько популярных Linux-систем. После того, как вы указали программе на уже существующий образ загрузочного диска или скачали его из интернета, становится возможным загрузить с него свой компьютер. Просто задайте в настройках BIOS в качестве первого загрузочного устройство USB и перезагрузите систему.
Несмотря на то, что создатель утилиты большее внимание уделил возможности использования систем на базе Linux, все же Windows тоже вполне можно установить таким необычным способом.
DriveDroid →