
При соединении с каким-либо сайтом, прежде чем запросить его IP у DNS-сервера, Windows проверяет файл hosts: если для каких-то сайтов в этом файле заданы IP-адреса, используются именно они. Это может использоваться для блокировки доступа к некоторым сайтам (и некоторые вирусы блокируют доступ к сайтам антивирусов) и других задач.
В этой инструкции пошагово о том, где находится файл hosts в Windows 11, как его отредактировать и как выглядит файл hosts по умолчанию.
Где находится файл hosts в Windows 11
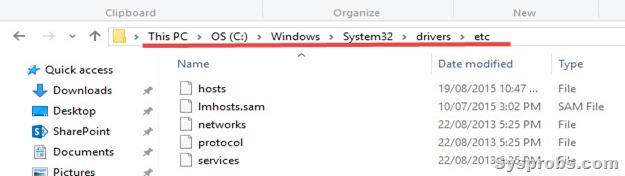
Расположение файла hosts одинаково во всех версиях Windows: он находится в папке C:\Windows\system32\drivers\etc

Иногда в указанной папке можно обнаружить более одного файла с именем hosts, в этом случае нужный — тот, который не имеет никакого расширения.
Дополнительные нюансы, касающиеся файла hosts:
- Иногда его может и не быть в указанной папке. Если вы столкнулись с таким, это странно, но никак не влияет на работу вашего Интернет-подключения (по умолчанию файл hosts не содержит значимых записей).
- Теоретически возможно изменение расположения файла hosts. Оно прописывается в разделе реестра
HKEY_LOCAL_MACHINE\SYSTEM\CurrentControlSet\Services\Tcpip\Parameters\
в параметре DataBasePath. На изображении ниже — значение этого параметра по умолчанию.


Как изменить файл hosts
Если вам требуется отредактировать файл hosts, сделать это можно в любом текстовом редакторе, но его обязательно следует запускать от имени администратора. Пример изменения файла hosts с помощью блокнота в Windows 11:
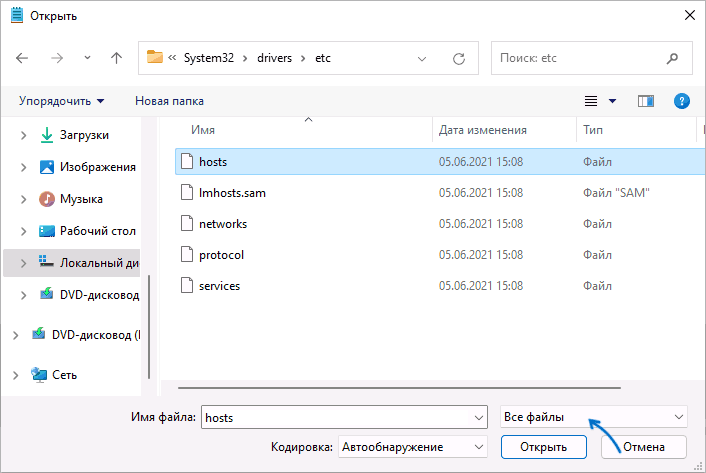
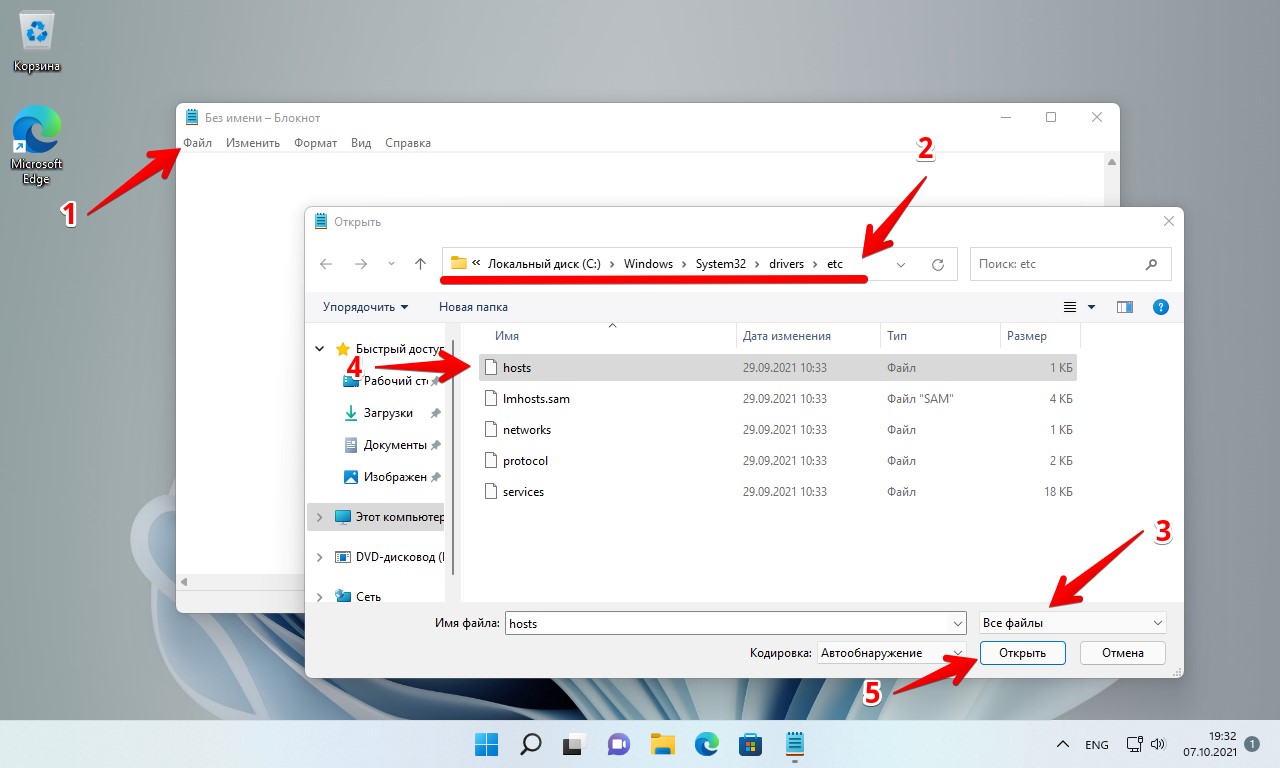
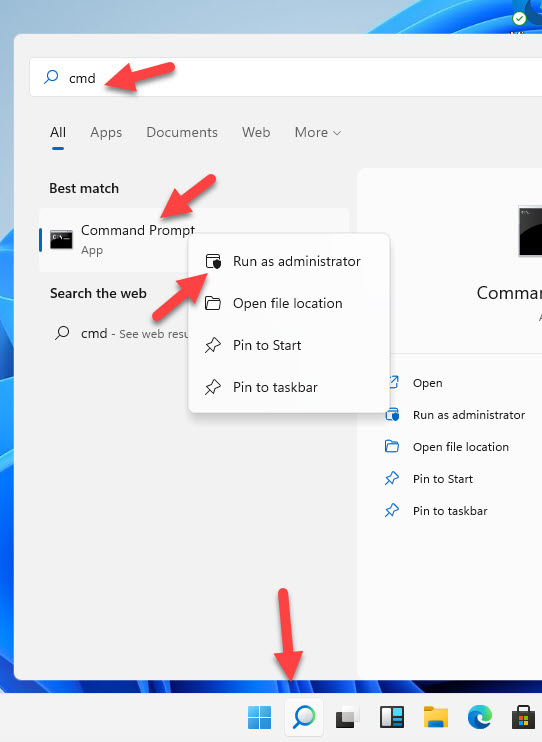
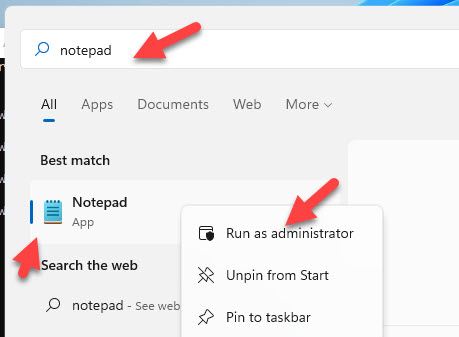
- С помощью поиска на панели задач найдите «Блокнот», нажмите по найденному результату правой кнопкой мыши и выберите пункт «Запуск от имени администратора».

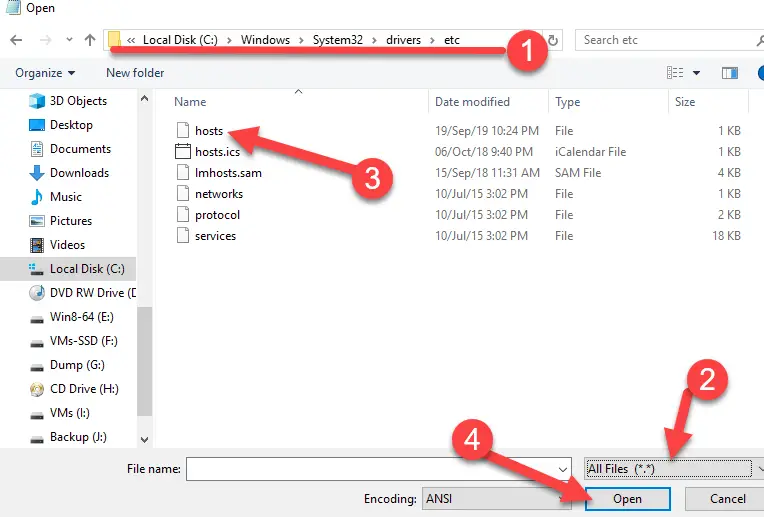
- После запуска в меню блокнота выберите «Файл» — «Открыть», а затем в поле внизу слева выберите «Все файлы».

- Перейдите к папке C:\Windows\system32\drivers\etc и откройте файл hosts без расширения.
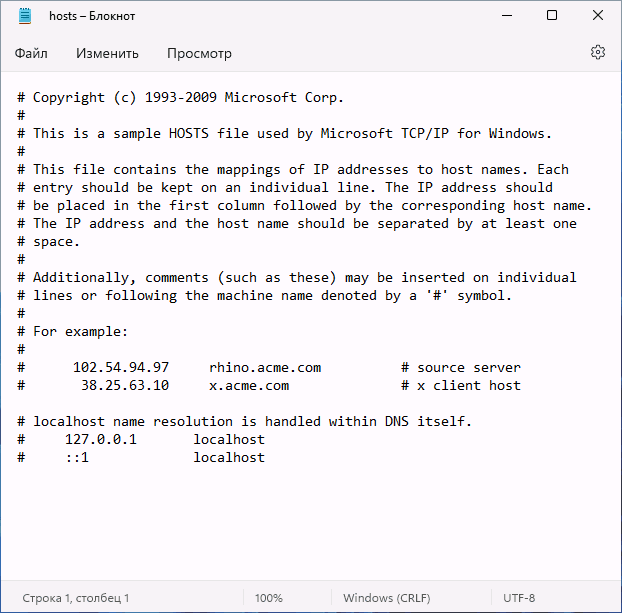
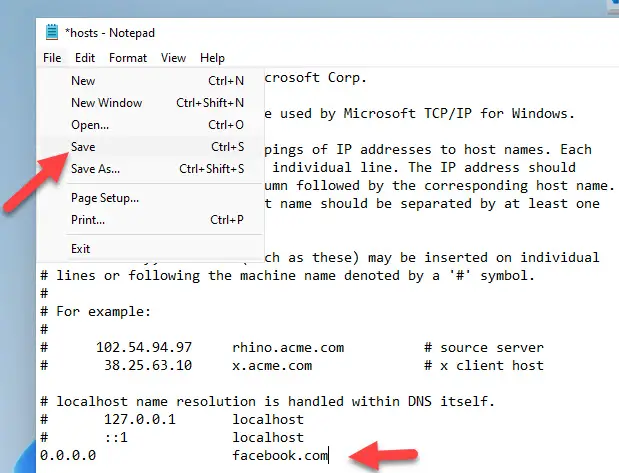
- По умолчанию файл hosts может иметь вид либо как на скриншоте ниже, либо быть пустым — оба варианта равнозначны, поскольку все строки, начинающиеся с символа решётки являются комментариями и не участвуют в работе этого файла.

- Для добавления записей, добавьте их на новой строке: сначала IP-адрес, а затем через пробел — сайт, при открытии которого будет открываться указанный IP-адрес. Например, если вы хотите заблокировать сайт Одноклассники, вы можете добавить новую строку 0.0.0.0 ok.ru (для блокировки обычно используются IP-адреса 127.0.0.1 или 0.0.0.0, но второй вариант предпочтительнее, так как при некоторых условиях на первом адресе может открываться HTTP-ресурс, запущенный на текущем компьютере).

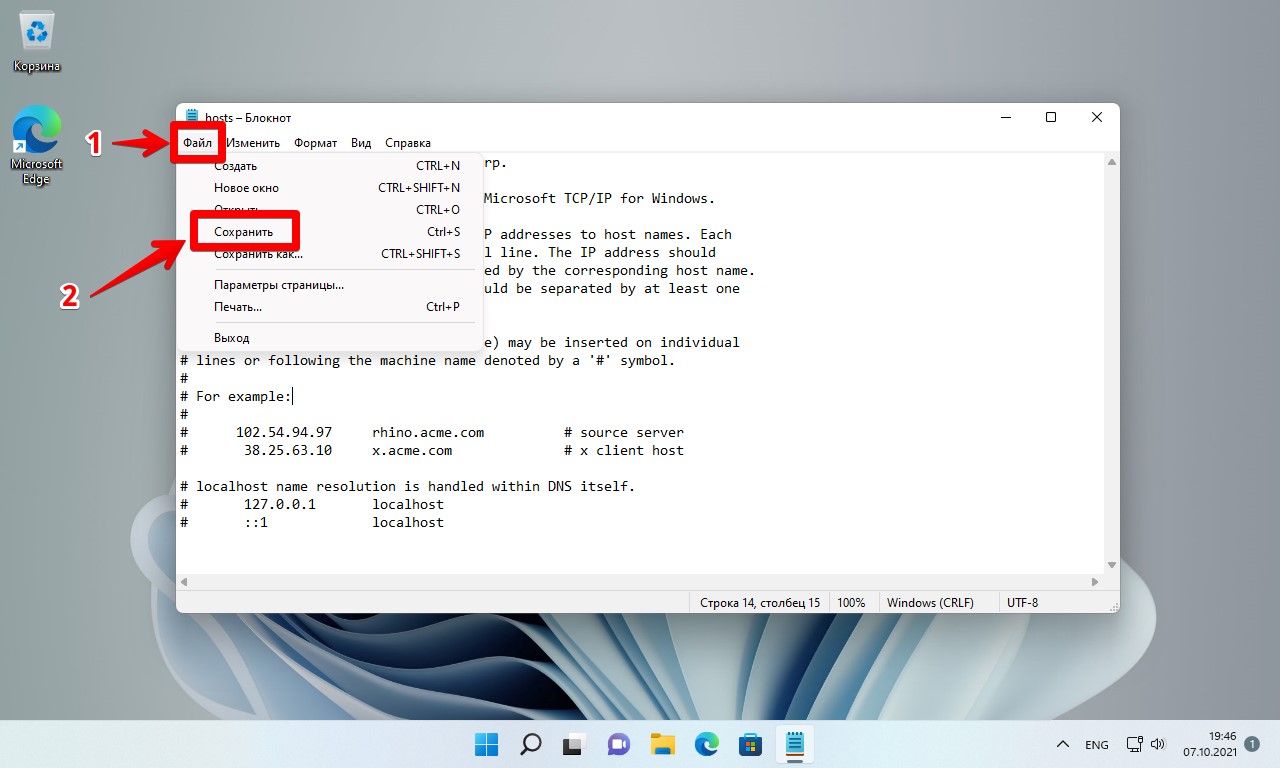
- После завершения редактирования, в меню выберите Файл — Сохранить. Каких-либо окон для выбора места сохранения появиться не должно, а если появились, это говорит о том, что вы запустили блокнот не от имени администратора и сохранить файл hosts «правильно» не получится.


Восстановление файла hosts по умолчанию
Если в вашем файле hosts появились блокировки каких-то нужных сайтов (антивирусов, компьютерных или других), то для его восстановления вам достаточно выполнить описанные выше 1–3, а затем либо удалить всё содержимое файла, либо, если вам требуется первозданный файл hosts — скопировать и вставить следующее содержимое:
# Copyright (c) 1993-2009 Microsoft Corp.
#
# This is a sample HOSTS file used by Microsoft TCP/IP for Windows.
#
# This file contains the mappings of IP addresses to host names. Each
# entry should be kept on an individual line. The IP address should
# be placed in the first column followed by the corresponding host name.
# The IP address and the host name should be separated by at least one
# space.
#
# Additionally, comments (such as these) may be inserted on individual
# lines or following the machine name denoted by a '#' symbol.
#
# For example:
#
#      102.54.94.97     rhino.acme.com          # source server
#       38.25.63.10     x.acme.com              # x client host

# localhost name resolution is handled within DNS itself.
#	127.0.0.1       localhost
#	::1             localhost
После удаления строк или вставки содержимого файла hosts, сохраните его (Файл — Сохранить). Как и в предыдущем случае, если при сохранении появилось окно выбора места сохранения, это говорит о том, что текстовый редактор был запущен не от имени администратора.
Также вы можете использовать сторонние средства удаления вредоносных программ, которые, помимо прочего, умеют восстанавливать файл hosts.
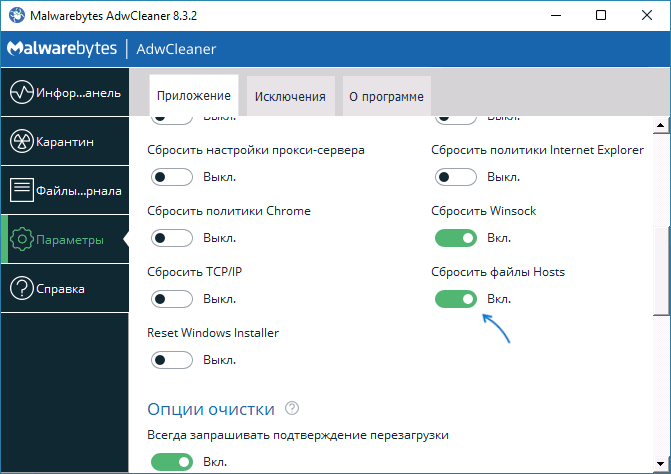
Например, если перед сканированием AdwCleaner зайти в «Параметры» и включить опцию «Сбросить файлы Hosts», то в ходе сканирования и последующей очистки компьютера будет сброшен и этот файл.
Если изменения, сделанные в файле hosts не работают
Как правило, все внесённые в файл hosts изменения начинают работать сразу после его сохранения, какая-либо перезагрузка не требуется. Однако, в некоторых случаях это может быть не так. Здесь могут помочь следующие действия:
- Если вы убирали блокировку сайтов в файле hosts, а они все равно заблокированы, возможно, блокировка присутствует где-то ещё, например, в брандмауэре Windows.
- Если вы блокировали сайт, а он продолжает открываться, причиной может быть тот факт, что многие современные браузеры начали использовать DNS over HTTPS и блокировка не заработает, пока вы не включите DNS over HTTPS в Windows 11.
- Неверный синтаксис в строках hosts также может приводить к неработоспособности записей. В начале строки не требуются пробелы или символы решётки. Между IP-адресом и доменом используйте один символ пробела, допускается использование табуляции. Кодировка файла — ANSI или UTF-8 (блокнот по умолчанию сохранит в правильной кодировке).
- Использование прокси и некоторых VPN-сервисов также может повлиять на работу файла hosts.
Файл Hosts — текстовый файл, содержащий список доменных имён и IP-адресов, которые им соответствуют
Отредактировать файл hosts в Windows 11 довольно просто, для этого переходим в проводнике по следующему пути:
C:\Windows\system32\drivers\etc
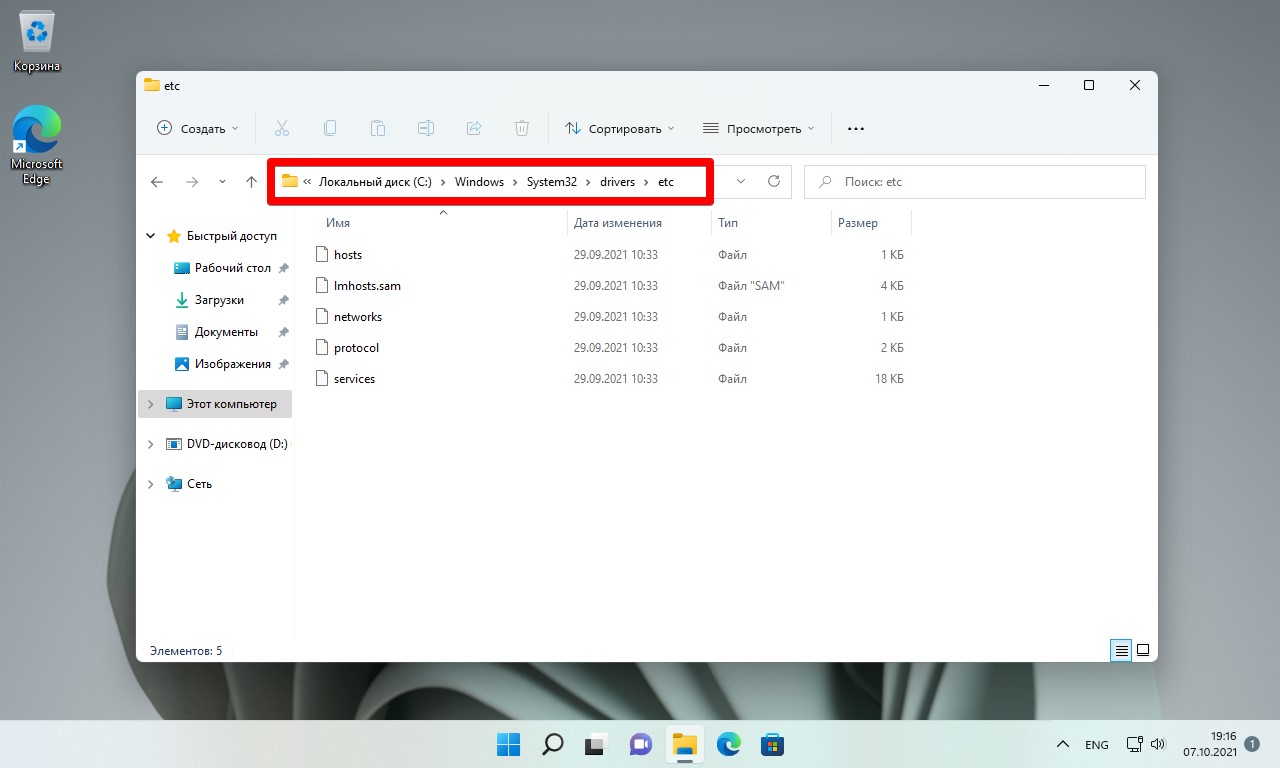
В папке «etc» мы увидим файл с именем «hosts». Перед редактированием файла создаем резервную копию — можно сохранить файл в папке etc под другим именем, либо скопировать в другое место.
Затем открываем блокнот Windows 11 (Netepad) от имени администратора, который можно найти через поиск или в меню «Пуск». В блокноте щелкаем «Файл» — «Открыть» (Ctrl+O) для вызова окна «Открыть». Переходим в папку «etc», выбираем «Все файлы», выделяем файл «hosts» и нажимаем на кнопку «Открыть».
Теперь файл доступен для редактирования, делаем необходимые изменения, нажимаем «Файл» — «Сохранить» (Ctrl+S).
Вот и все. Мы успешно изменили файл hosts в Windows 11.
July 31st 2023
Working on a client site? Need reliable web hosting or SEO help? That’s what we do — see how we can support your next project.
The hosts file on Windows 11 is used to map hostnames (often referred to as domain names) to specific IP addresses, overriding DNS resolution. This means that you can redirect a hostname such as www.websitename.com to any IP address you want. This is particularly useful when DNS isn’t working properly! Be aware that it only applies to your local computer and can cause problems if done incorrectly. To manually edit the hosts file and redirect a hostname to a specific IP address, follow these steps or skip to the bottom for the faster PowerShell method for experienced users, contributed by Hunter from KIT Professionals.
Manual Method
Editing the hosts file on Windows 11 is quite similar to how it’s done on previous Windows versions. To edit the hosts file and redirect a domain name to a specific IP address, follow these steps:
-
Open File Explorer: Press
Windows key + Eto open File Explorer or access it through the Start menu. -
Navigate to the Hosts File: The hosts file is located in the
C:\Windows\System32\drivers\etcdirectory. By default, you won’t see the file in the folder, as it is hidden. To make it visible, click on the «View» tab in File Explorer, and check the «Hidden items» option. -
Copy the Hosts File: Before editing the file, it’s a good idea to create a backup. Right-click on the hosts file, select «Copy,» then right-click in the same directory and choose «Paste» to create a duplicate named
hosts - Copy. -
Open Notepad as Administrator: To edit the hosts file, you need administrative privileges. Search for «Notepad» in the Start menu, right-click on «Notepad,» and select «Run as administrator.» Confirm the UAC prompt if asked.
-
Open the Hosts File: In Notepad, go to «File» > «Open» and navigate to
C:\Windows\System32\drivers\etc. Make sure to select «All Files» from the file type dropdown to see the hosts file. -
Edit the Hosts File: The hosts file contains lines of text with IP addresses and domain names. To redirect a domain name to a specific IP address, add a new line at the end of the file in the following format:
Replace
with the specific IP address you want to redirect the domain to, andwith the domain you want to redirect. For example:192.168.1.100 example.comThis line will redirect «example.com» to the IP address «192.168.1.100».
-
Save the Hosts File: After making the necessary changes, save the hosts file by clicking on «File» > «Save» in Notepad.
-
Flush DNS Cache: To apply the changes immediately, you need to flush the DNS cache. Open Command Prompt as Administrator by searching for «Command Prompt» in the Start menu, right-clicking it, and selecting «Run as administrator.» In the Command Prompt, type the following command and press Enter:
ipconfig /flushdnsThis will flush the DNS cache, so your system will start using the updated hosts file.
PowerShell Method
For those comfortable with PowerShell, Hunter from KIT Professionals shared an efficient method to edit the hosts file quickly:
Backup the Hosts File
-
Press
Windows key + Rto open the Run window. -
Paste the following command and press
Ctrl+Shift+Enterto run it with admin privileges:copy "C:\Windows\System32\drivers\etc\hosts" "C:\Windows\System32\drivers\etc\hostsBACKUP"
Verify Backup File Exists
-
Press
Windows key + Rto open the Run window. -
Paste this command and press Enter:
notepad C:\Windows\System32\drivers\etc\hostsBACKUPIf the backup file opens in Notepad, you’re good to proceed.
Open Hosts File for Editing
-
Press
Windows key + Rto open the Run window. -
Paste this command and press
Ctrl+Shift+Enterto open Notepad as an administrator:notepad "C:\Windows\System32\drivers\etc\hosts" -
Make the necessary changes and press
Ctrl+Sto save.
Note: The hosts file doesn’t affect
nslookupresults. Usepinginstead.
Now, when you access the domain you’ve redirected in your web browser, it should go to the specified IP address instead of the regular DNS resolution. Keep in mind that this change only affects your local system, and other devices on the network won’t be affected by this modification.
Once you’ve finished working with a custom hosts file entry, it’s best to remove it to avoid confusion in the future. If you need further assistance with IT solutions, check out KIT Professionals for expert support.
Find more technical support articles on our blog!
Editing the hosts file in Windows 11 might sound technical, but it’s actually pretty straightforward. By following a few simple steps, you’ll be able to modify this file to block websites, redirect them, or even create shortcuts for internal network resources. Ready to dive in? Let’s get started!
In this section, we’ll cover the detailed steps needed to successfully edit your hosts file. You’ll need administrator rights on your computer, and be careful, as this file plays a crucial role in your system’s networking.
Step 1: Open Notepad as Administrator
First, search for Notepad in the Start menu, right-click it, and select “Run as administrator.”
Running Notepad as an administrator is crucial because the hosts file is protected by the system. Without these rights, you won’t be able to save any changes.
Step 2: Open the Hosts File
In Notepad, click on File > Open, then navigate to C:WindowsSystem32driversetc. Select “All Files” in the bottom right to see the hosts file and open it.
The hosts file is located in a protected system directory. By navigating to this folder, you ensure you’re accessing the correct file. Remember to change the file type filter to see all files, as the hosts file doesn’t have a .txt extension.
Step 3: Make Your Changes
Add your desired entries at the bottom of the file. For example, typing “127.0.0.1 example.com” will block that website.
Entries in the hosts file map IP addresses to domain names. By adding a new line with an IP address followed by a domain name, you’re telling your computer to use that IP address instead of looking it up online. The IP address “127.0.0.1” is a loopback address, effectively blocking access to that domain.
Step 4: Save the File
Go to File > Save to save your changes. You may need to confirm with administrative privileges.
Simply saving the file will apply your changes. If you encounter any errors, double-check that you are running Notepad as an administrator; otherwise, the system will prevent you from saving your modifications.
Step 5: Flush DNS Cache
Open Command Prompt as an administrator and type “ipconfig /flushdns” to clear the DNS cache.
Flushing the DNS cache ensures that your changes take effect immediately. Without this step, your computer might still refer to the outdated DNS information stored in the cache.
Once you’ve completed these steps, the changes will take effect immediately. Any websites you redirected, blocked, or added will now follow the rules you set in the hosts file.
Tips for Editing Hosts File Windows 11
- Always create a backup of the hosts file before making any changes.
- Use Notepad or another basic text editor—do not use word processors like Microsoft Word.
- Remember to sync changes across multiple devices if needed.
- Keep entries organized and leave comments using the “#” symbol for future reference.
- Revert any unwanted changes by restoring the original hosts file from your backup.
FAQs for Editing Hosts File Windows 11
What is the hosts file?
The hosts file is a plain text file used by the operating system to map IP addresses to hostnames.
Can I block websites using the hosts file?
Yes, by redirecting a domain to the IP address “127.0.0.1,” you can effectively block access to that website.
Do I need to restart my computer for changes to take effect?
No, but you should flush the DNS cache using Command Prompt to ensure immediate effect.
Can editing the hosts file harm my computer?
Improper changes can disrupt your network connections, so always exercise caution and create backups.
How do I restore the original hosts file?
Replace the modified hosts file with a backup copy you created before making any changes.
Summary of Steps
- Open Notepad as Administrator.
- Open the Hosts File.
- Make Your Changes.
- Save the File.
- Flush DNS Cache.
Conclusion
Editing the hosts file in Windows 11 is a powerful way to control domain name resolution on your computer. By following the simple steps outlined above, you can easily block unwanted websites, create shortcuts for local networks, or make other useful changes. Always remember to exercise caution and create backups, as this file plays a significant role in your system’s networking functions.
If you’re interested in more advanced tasks, like scripting entries into the hosts file or understanding more about DNS resolution, there are plenty of resources available to deepen your knowledge. Feel free to explore and experiment, but always keep a backup handy!
So, next time you need to make network tweaks, you know where to start. Happy editing!
Matthew Burleigh has been writing tech tutorials since 2008. His writing has appeared on dozens of different websites and been read over 50 million times.
After receiving his Bachelor’s and Master’s degrees in Computer Science he spent several years working in IT management for small businesses. However, he now works full time writing content online and creating websites.
His main writing topics include iPhones, Microsoft Office, Google Apps, Android, and Photoshop, but he has also written about many other tech topics as well.
Read his full bio here.
This guide shows you how to edit hosts file in Windows 10 and Windows 11 easily without any additional system tools. The hosts file is an important system file that maps the host/website names with its IP addresses. Basically, it translates the hostname to IP and vice versa. So browsing and accessing network websites and shares by the name becomes easy by avoiding DNS server requests or remembering the relevant IP addresses.
We can manually edit DNS names and IP addresses for specific websites in the hosts file which will be helpful in several ways. The hosts file is a simple text file without any file extensions.
We used to modify this file by ‘edit’ DOS command in earlier Windows operating systems, but the edit DOS command is not included in Windows 11 and 10/8.1 anymore. You will get the following error message when you try the edit command in recent Operating Systems.
“ ‘edit’ is not recognized as an internal or external command, operable program or batch file.”
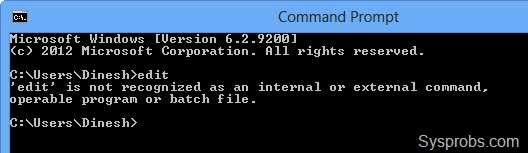
This is because of edit DOS command requires 16-bit QBASIC.EXE which will not work on the 64 Bit versions of Windows Operating Systems. So how to edit the hosts file here? we can use the built-in Notepad program for this purpose.
In Windows Operating Systems, the hosts file is located here,
C:\Windows\System32\Drivers\etc
C – is the drive where Windows OS is installed in most cases. If your OS is installed in a different partition, then you need to change this letter.
Make sure you have administrative access/privilege on the computer before attempting to modify the hosts file.
Important Note: Some of the Antivirus software including Microsoft Security Essential (Windows Defender) will not allow modifying hosts file as a security precaution. This is to prevent hosts file modification by any virus, spyware or malware threat. If you experience this, you need to disable the Antivirus software temporarily or exclude the hosts file from the protection.
Method-1:
1) Open the command prompt as administrator.
Search ‘cmd’ on Windows 11 or 10 and right-click on the Command Prompt and select ‘Run as administrator.’ (This is an important step).
2) It will probably open from C:\Windows\System32, then type ‘cd drivers’ and ENTER.
Now type ‘cd etc’, ENTER as shown below. This is to go to the location where the host file is located.
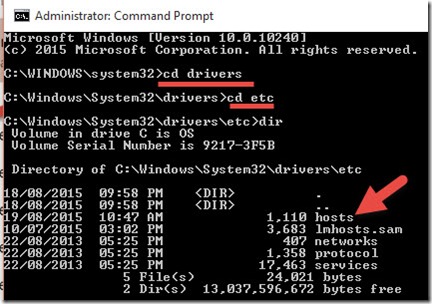
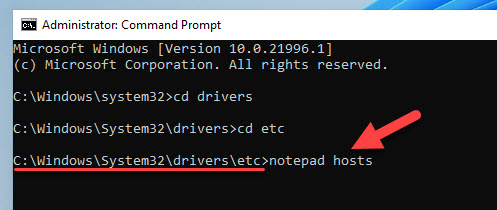
3) Make sure you are in the correct folder path, it should be C:\Windows\System32\Drivers\etc. Type ‘notepad hosts’ to open the file in notepad.
4) We assume that you know the content of the file. Type the IP address of the domain/hostname and DNS name of it. You can see the examples in the same file.
Here is an example, Let’s say if I need to block Facebook on a PC, I can enter the wrong IP address and map it to facebook.com as we showed here.
Once you have modified the file with appropriate settings, click Save from File menu.
Important Note: If you haven’t opened the notepad from the ‘Run as Administrator’ command prompt, then you can’t save the Hosts file in the above case.
Method-2:
This could be the easiest way to edit hosts file in Windows 11 without typing any commands in the command prompt.
5) Search for the notepad and open it with administrative access. Right-click and ‘Run as Administrator’.
6) Navigate to the hosts file location. It’s under C:\Windows\System32\Drivers\etc.
Change the file format to ‘All files,’ then open the hosts file and modify the settings as you want.
7) Save the file once changes are done as we did in method 1.
Since these changes are related to DNS, it is better to clear the DNS cache before checking the impact of hosts file modification.
Open command prompt, and type;
ipconfig /flushdnsWhy Modify Hosts file in Windows OS or other Operating Systems?
This is an advanced user action and most of the time you do not need to touch the hosts file. But, here are the possible scenarios you may need to modify.
- Block a website by giving the wrong IP. So, the PC will look for wrong IP for particular website and ultimatly it will not work.
- You are testing a website which was migrated to a different host. Before changing the public DNS entries, you can modify the hosts file on your local PC with the new IP and test.
- Unintentional changes by any programs or virus attacks to the hosts file. In this case, you need to clear or edit the hosts file to default settings.
- Manipulate the DNS entries. If you need to resolve a name to IP which can’t be done by the DNS servers, the modifying the hosts file is the only one option.
We hope this guide is helpful in editing the hosts file in Windows 11/10 or earlier Operating Systems.