
Microsoft is launching the all-new Windows 11 22H2 update that will be completely free and it is going to be the powerhouse for productivity. Installing a new Windows gives you peace of mind that your computer will work properly and won’t crash into errors. But as soon as you install a fresh Windows, it asks you about Defaultuser0 password right off the bat which you never even set up in the first place.
Defaultuser0 is the account that is created by the system itself during the installation stages of Windows. It’s a temporary profile and it must get deleted automatically as soon as the user creates a personal user profile while setting up Windows.
If it doesn’t get disposed of and Windows asks you to enter the Defaultuser0 password, it’s time to use UnlockGo – Windows Password Recovery to remove the Defaultuser0 account without logging in.
Fix Defaultuser0 Password on Windows 11/10
Fixing the Defaultuser0 password in Windows 11 and 10 is possible and there are quite a few effective solutions for it. In this blog, we have listed all the possible solutions that you can try to fix the defaultuser0 password issue.
- 1. Reinstall/Revert Windows OS
- 2. Create Another Account
- 3. Reset System/Restart PC
- 4. Enable Built-in Administrator
- 5. Set a Password on Default0user
- 6. Remove Default0user Account
Way 1. Reinstall/Revert Windows OS
Let’s have a look at the detailed guide on how to follow these solutions and what are the possible steps.
Since the Defaultuser0 password is a system-based error, the best solution is to reinstall or revert your Windows operating system. Both the methods will do the job pretty effectively. You can either move to the previous version of Windows or reinstall Windows from scratch.
To reinstall the Windows OS, you’d need a bootable USB drive or a CD loaded with Windows files. Insert the USB flash drive into the computer and restart it. When it boots up, press the button that opens the boot-device selection (Esc/F10/F12). Continue installing the fresh Windows to fix the Defaultuser0 issue.
Way 2. Create Another Account
Creating another account might fix the problem, but the problem is that you can’t access Settings to do that. Well, there is one way you can create another account from the boot menu using bootable device media.
- Create a bootable USB flash drive or use Windows CD/DVD and insert it into your computer.
- Boot your computer with the USB flash drive you just attached.
- Select keyboard layout and set date & time.
- In the next window, click on the ‘Repair your computer’ button from the bottom left side.
- Select the ‘troubleshoot’ option and click Advanced Options.
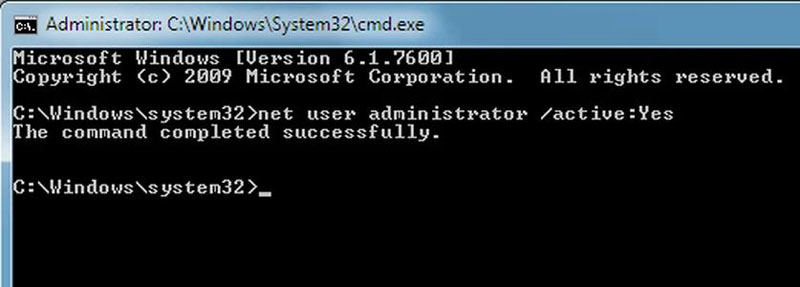
- Select the Command Prompt and execute the following command:
- Once it’s executed. Close the command prompt and restart your computer.
- Make sure that you either remove the USB bootable drive or boot your system with an internal drive (not a bootable one or CD/DVD).
- On the login page, you must be able to bypass the defaultuser0 profile. Log in with your built-in administrator account, create a new administrator account and delete both the built-in administrator and the defaultuser0 profiles.
- If you’re having defaultuser0 password on Lenovo or any other device, this method will work just fine.
net user administrator /active:yes
Once you remove the defaultuser0 profile and get access to your computer, you can also change the default administrator password of your PC.
Way 3. Reset System/Restart PC
Before resetting your system, make sure you have a secure backup of it. Remove the drives from your system, store their data on another computer, and install them back in.
- Turn on your system. On the login screen, click on the Power button.
- Hold down the shift key and click on Restart.
- Keep holding the Shift key until you see Windows Recovery Environment.
- Click on Troubleshoot.
- Click on Reset this PC > Remove Everything. And you’re done with resetting your system.
This method works perfectly fine with the defaultuser0 password on Dell computers and other manufacturers’ computers as well.
Way 4. Enable Built-in Administrator
Enabling a built-in administrator account isn’t that difficult. Repeat the first 4 steps of the above method.
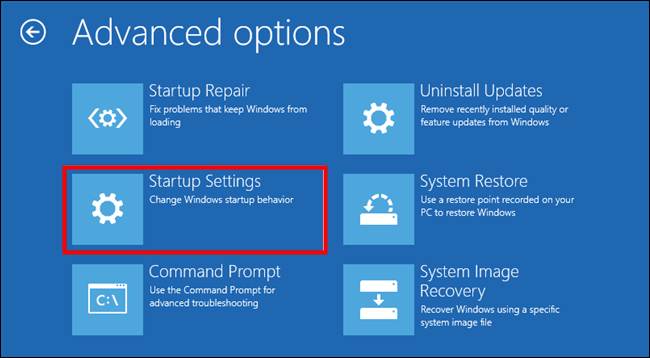
- Once you click on Troubleshoot, open Advanced Options.
- Click on Startup Settings, and click on Restart. Once it boots up, you’ll see the Startup Setting screen.
- Press 6 to initiate the Safe Mode with Command Prompt.
- When the command prompt window opens, execute the following commands.
- Exit the command prompt and reboot your system. On the login page, you’ll be able to log in with your built-in administrator account using the password that you just set in the command prompt during the previous step.
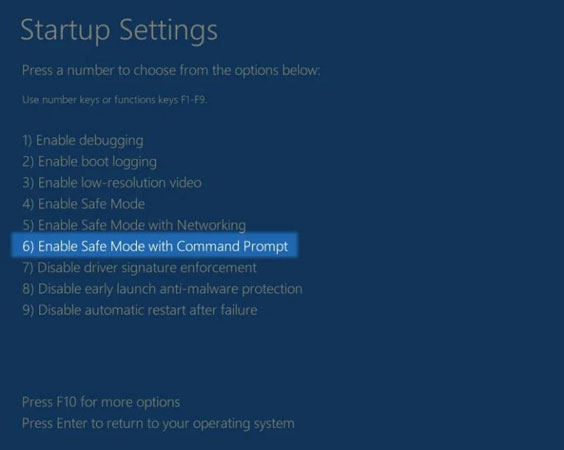
net user Administrator passwordofyourchoice
net user Administrator /active:yes
Way 5. Set a Password on Defaultuser0
For defaultuser0 password reset, you have to boot your computer into the Windows Recovery Environment. The process is the same as we’ve mentioned above.
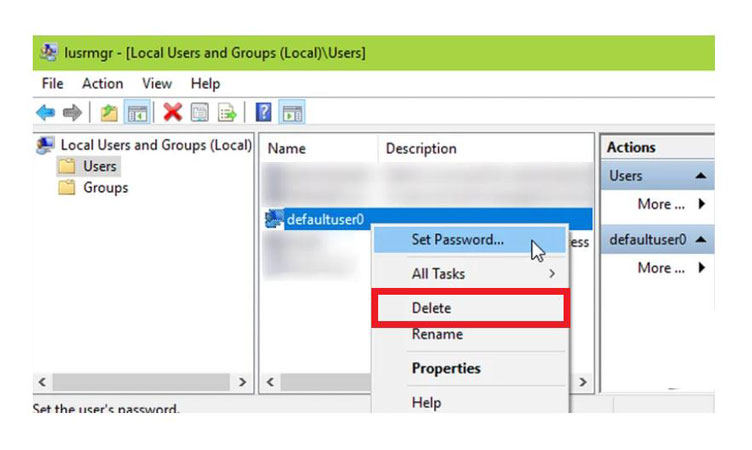
Way 6. Remove defaultuser0 Account
Follow the first 5 methods of the above-mentioned process. When you right-click on the defaultuser0 account, you’ll see the Delete option. Click it and delete the defaultuser0 profile from your system.
With this method, you can delete the defaultuser0 password on HP and all other devices.
Do You Still See the Defaultuser0 Account & Profile?
If you still see the defaultuser0 account or profile in your user list, it’s time to use a powerful tool: UnlockGo – Windows Password Recovery. It dives deep into your system you crack all the passwords for you. If you can’t log in to your system, use UnlockGo – Windows Password Recovery tool to reset or remove the password of the defaultuser0 or any other user profile. It can even help you delete defaultuser0 account directly without logging in or password in minutes.I works for all windows system and laptop brands.
Simple Steps To Use UnlockGo – Windows Password Recovery:
Using UnlockGo – Windows Password Recovery tool only requires 3 simple steps!
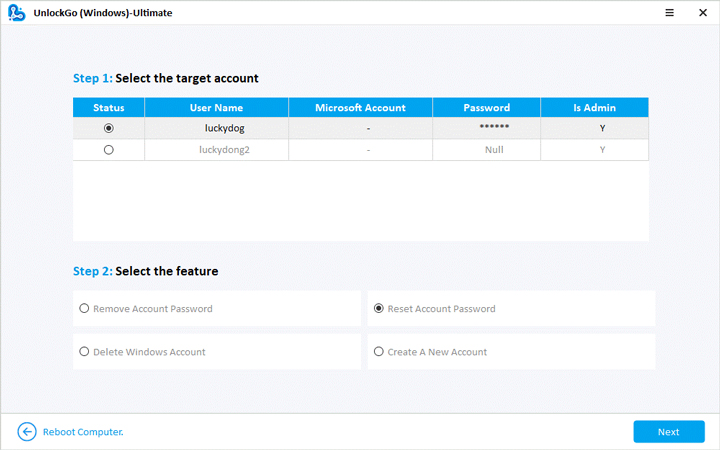
Since UnlockGo – Windows Password Recovery is an all-in-one recovery tool, you can delete the defaultuser0 profile from your computer quite conveniently.
Summary
Not being able to access your computer after installing a new Windows can be really frustrating. Removing the defaultuser0 profile might seem impossible, but with this guide, it’s not anymore! We discussed how you can fix the defaultuser0 account either by removing it or changing its password. We provided you with the 6 most effective solutions to fix the defaultuser0 password.
If you can’t fix the issue with these methods, we recommend using UnlockGo (Windows) that reset any Windows-related passwords.
Привет, друзья. Тема сегодняшней публикации — автоматический вход в Windows 10 без ввода пароля. Если вы используете запароленную учётную запись, каждый раз при включении компьютера Windows 10 у вас будет загружаться и останавливаться на экране блокировки. И лишь после вашей авторизации в учётной записи операционная система с вашим профилем загрузится. Согласитесь, это очень неудобно. Вы не сможете нажать кнопку включения компьютера и отвлечься на пару минут по своим делам, а, придя к компьютеру, застать его в состоянии полной рабочей готовности – с полностью запущенной самой операционной системой, с запущенными фоновыми задачами и программами из автозапуска. Дабы при старте компьютера возможен был автоматический вход в Windows 10 без ввода пароля, необходимо отказаться от пароля. Как это сделать, в частности, при использовании учётной записи Microsoft, которая априори не может существовать без пароля?
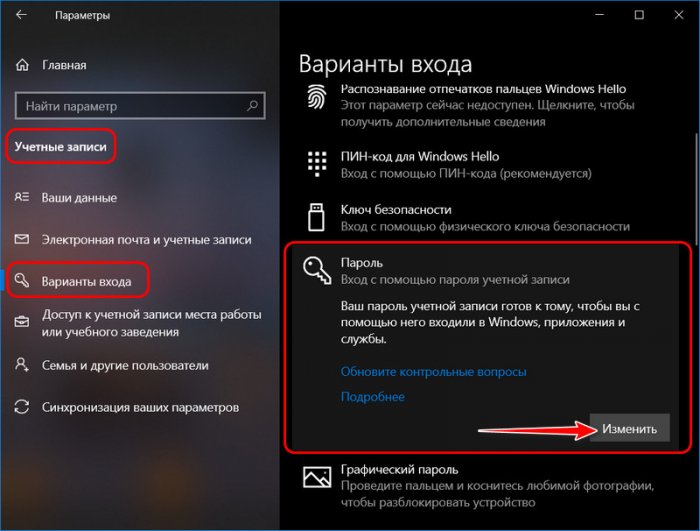
Друзья, самый простой вариант упростить себе жизнь – отказаться от пароля. Возможно, вы его создавали для локальной учётной записи, когда в защите доступа к вашему компьютеру была необходимость, но теперь она отпала. Или же если у вас изначально такой необходимости не было, но вы используете учётную запись Microsoft, которая привязана к вашему интернет-аккаунту компании и по условию не может существовать без пароля. Отказаться от пароля можем в системном приложении Windows 10 «Параметры», в нём идём в раздел «Учётные записи». Если у вас запароленная локальная учётная запись, далее идём в «Варианты входа», кликаем «Пароль», жмём «Изменить».
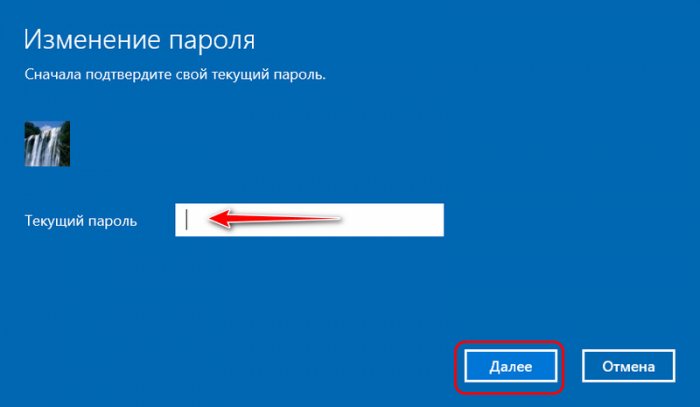
Указываем наш пароль, жмём «Далее».
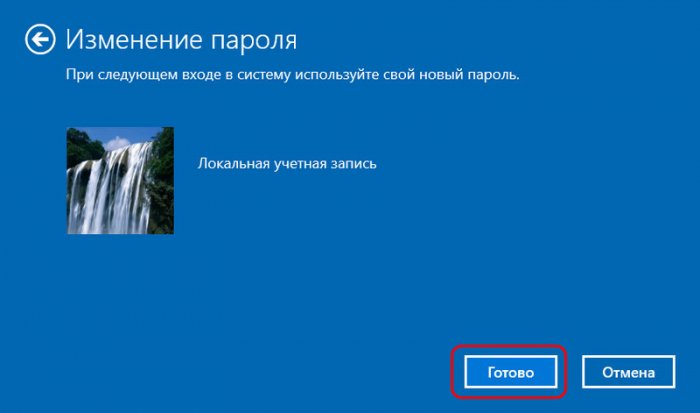
Поля ввода нового пароля оставляем пустыми. Жмём «Далее».
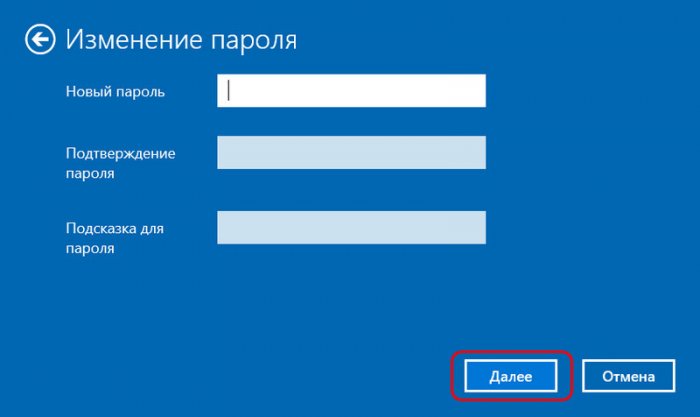
Готово.
Если же у вас подключена учётная запись Microsoft, и она вам по большому счёту не нужна, вы можете её отключить и пользоваться локальной учётной записью. При этом вам не нужно создавать новую учётную запись и терять ваши профильные данные и настройки программ.
Примечание: друзья, компания Microsoft и ранее навязывала нам, пользователям свою учётную запись, но в последнее время стала это делать особо активно. Так, начиная с версии Windows 10 1909 при установке домашней редакции Home, если у вас подключён Интернет, вы не сможете создать на этапе установки локальную учётную запись, сможете только подключить или создать новую учётную запись Microsoft. И чтобы вы могли создать локальную учётную запись, в процессе установки операционной системы нужно отключать Интернет. Детально об этом нюансе смотрите в статье «Как установить Windows 10», в самом конце, в разделе статьи «Особенности установки Windows 10 Home».
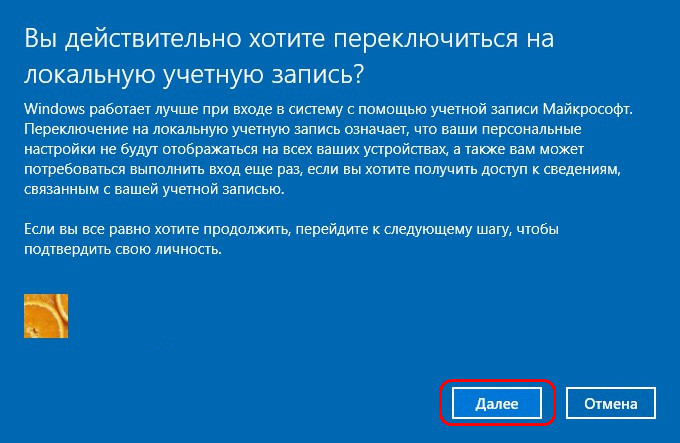
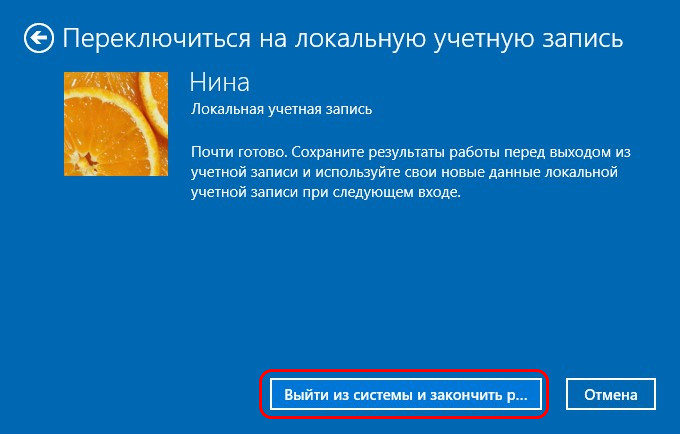
Чтобы отключить учётную запись Microsoft, в разделе параметров «Учётные записи» идём в «Ваши данные». И здесь жмём «Войти вместо этого с локальной учётной записью».

Жмём «Далее».
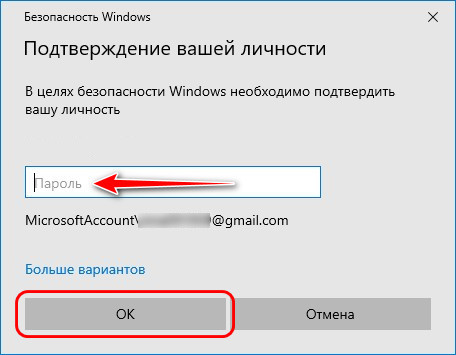
Указываем пароль от учётной записи Microsoft.
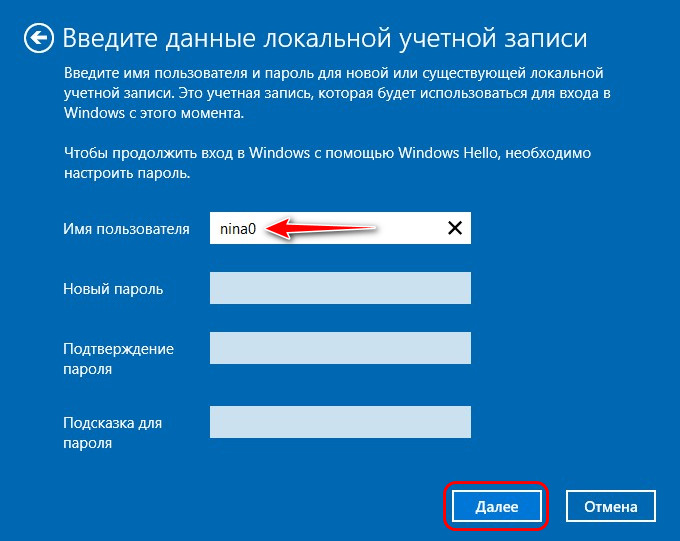
Если вы подключали учётную запись Microsoft поверх изначально созданной локальной учётной записи, то система предложит её вам вновь. Если же изначально существовала только учётная запись Microsoft, то вы сможете ввести какое вы хотите локальное имя. Формы ввода пароля, соответственно, мы не заполняем, жмём «Далее».
Выходим из системы и входим уже в локальную учётную запись.
Но что делать, если нам нужна учётная запись Microsoft, но не в целях обеспечения безопасности компьютера? Как в таком случае сделать так, чтобы каждый раз при запуске компьютера не надо было вводить пароль, и система автоматически запускалась с нашей учётной записью Microsoft?
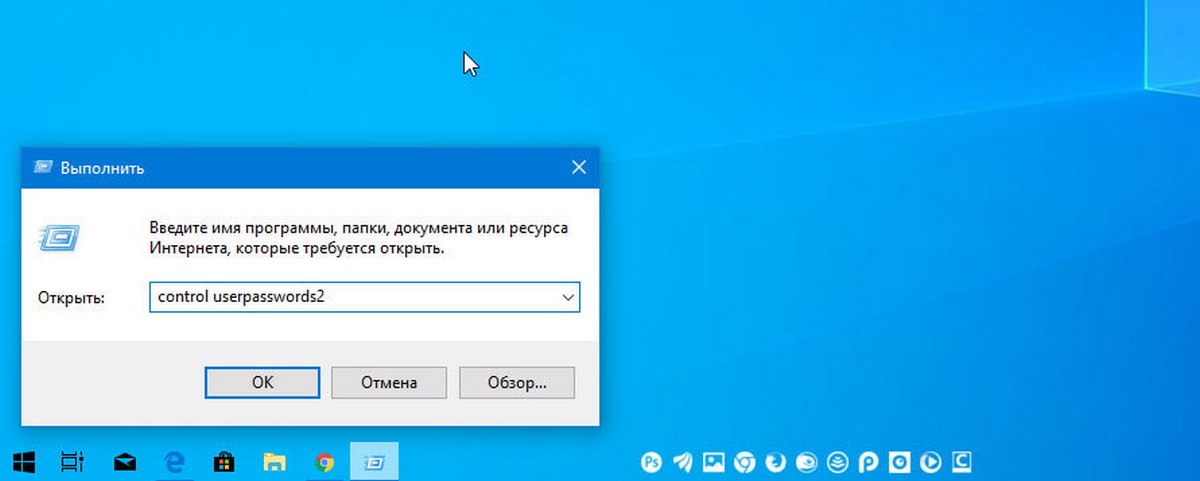
Настроить автоматический вход в Windows 10 без ввода пароля можно с помощью средств самой операционной системы, делается это с помощью оснастки netplwiz из числа системных средств администрирования. Запускаем оснастку с помощью поиска или команды «Выполнить», вводим:
netplwiz
Описанному выше способу с использованием оснастки netplwiz есть альтернатива — утилита Autologon от самой компании Microsoft. Скачиваем утилиту на сайте Microsoft:
https://docs.microsoft.com/ru-ru/sysinternals/downloads/autologon
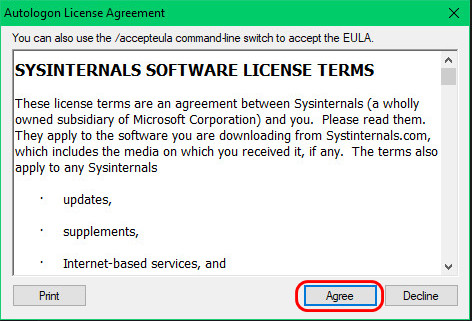
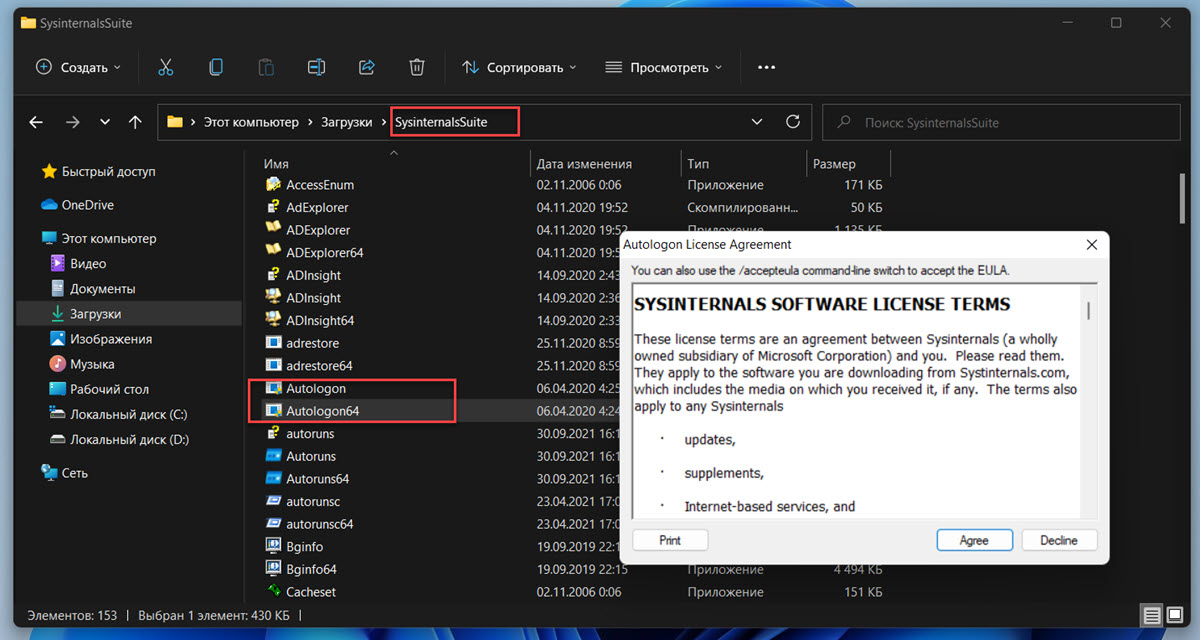
Распаковываем, запускаем, соглашаемся с лицензией.
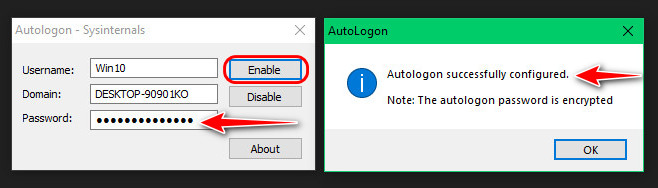
Вводим пароль нашей учётной записи Microsoft и жмём «Enable». После чего в идеале должно появиться сообщение об успешном выполнении конфигурации автовхода в систему.
Вот, собственно, и всё. Перезагружаемся и тестируем автоматический вход в Windows 10 без ввода пароля.
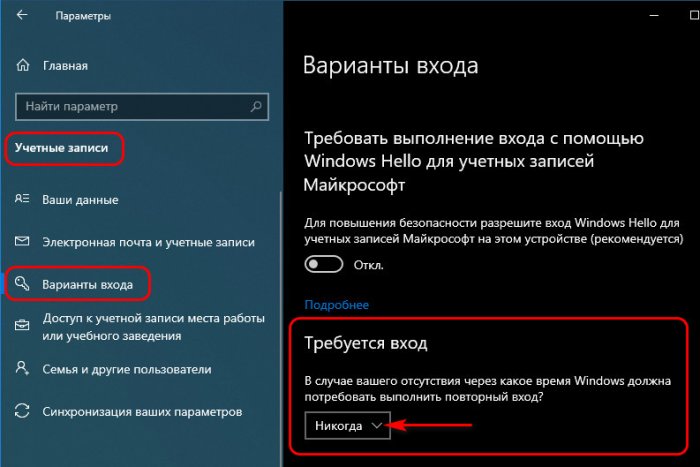
Друзья, рассмотренные способы настройки автоматического входа в Windows 10 будут работать только для запуска операционной системы. При выходе компьютера из режима сна система будет запрашивать пароль. И чтобы она не запрашивала, в параметрах учётных записей, в вариантах входа необходимо установить в графе «Требуется вход» значение «Никогда».
Друзья, если вы вдруг забыли пароль к своей учётной записи Windows, вы можете его сбросить. Как это сделать, об этом у нас на сайте есть целая серия публикаций «Сброс пароля Windows».
Пароль не отвечает требованиям политики — как исправить?
При изменении пароля в Windows 11, Windows 10 или других версиях системы вы можете столкнуться с сообщением: «Введенный пароль не отвечает требованиям политики паролей. Проверьте минимальную длину пароля, его сложность, отличие от ранее использованных паролей». Текст сообщения может варьироваться, в зависимости от того, какой именно способ вы будете использовать для изменения пароля Windows.
В этой инструкции подробно о том, как отключить требования к паролям в Windows путем настройки соответствующих политик безопасности. Способы приведены для компьютера с личной учетной записью, а не для учетной записи домена, впрочем, логика остается той же и для этого сценария. На близкую тему: Способы изменить пароль Windows 11 и Windows 10.
О каких политиках паролей и требованиях идет речь

Сообщение «Введенный пароль не отвечает требованиям политики» появляется в ситуации, когда в политиках безопасности заданы какие-либо ограничения для паролей, а именно:
- Минимальная длина пароля
- Требования к сложности пароля, которые включают в себя:
- Пароль не должен содержать имя или часть имени пользователя.
- Пароль должен содержать не менее 6 символов
- Пароль должен содержать символы по меньшей мере трёх из следующих видов: прописные латинские буквы, строчные латинские буквы, цифры, символы (не являющиеся буквами или цифрами).
В большинстве случаев оказывается включенным вторая из двух политик. Есть и другие политики паролей, например, задающие максимальный срок их действия, но появляющееся сообщение в этом случае будет другим: Пароль просрочен и должен быть заменен.
Если у вас нет задачи отключать требования к паролям или речь идёт о компьютере организации, просто установите пароль, соответствующий указанным требованиям (об определении заданной минимальной длины пароля — далее в инструкции).
В ситуации, когда это ваш личный компьютер, вы можете отключить требования к паролям несколькими способами.
Как отключить требования политики безопасности к паролям
Есть несколько способов отключения требований политики безопасности, относящихся к паролям. Основной — использование оснастки «Локальная политика безопасности». Шаги будут следующими:
- Нажмите клавиши Win+R на клавиатуре (или нажмите правой кнопкой мыши по кнопке «Пуск» и выберите пункт «Выполнить»), введите secpol.msc и нажмите Enter.
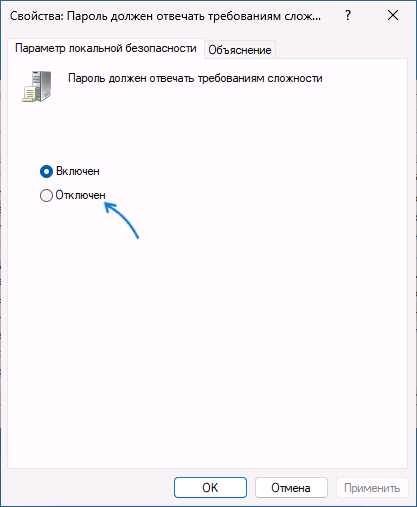
- Перейдите в раздел «Политики учетных записей» — «Политика паролей». По умолчанию, без настроенных ограничений все значения должны выглядеть как на изображении ниже.

- Если вы видите, что настроена минимальная длина пароля (значение отличается от 0) или включена политика «Пароль должен отвечать требованиям сложности», дважды нажмите по такой политике и измените значение на 0 или «Отключен» соответственно.

- Примените сделанные настройки.

Вторая возможность — использование Windows PowerShell. Отключить требования к минимальной длине пароля можно следующим образом:
- Запустите PowerShell или Терминал Windows от имени Администратора. Сделать это можно через меню по правому клику на кнопке Пуск.
- Введите команду net accounts и проверьте, установлена ли минимальная длина пароля.
- Если значение задано, используйте команду
net accounts /minpwlen:0
чтобы отключить требования к длине пароля.


Настроить требования политики к сложности пароля с помощью net accounts не получится, но можно использовать следующий набор команд:
secedit /export /cfg c:\edit.cfg
((get-content c:\edit.cfg) -replace ('PasswordComplexity = 1', 'PasswordComplexity = 0')) | Out-File c:\edit.cfg
secedit /configure /db $env:windir\security\edit.sdb /cfg c:\edit.cfg /areas SECURITYPOLICY
rm c:\edit.cfg

Также на эту тему может быть полезным: Как сбросить локальные групповые политики и политики безопасности в Windows.
Given the importance of digital security, adding a password to open your Windows 10 computer is a common practice. However, what to do if Windows 10 stops recognizing your password? What if you cannot login to Windows 10 with correct password?
This Windows 10 not accepting password problem can be perplexing and frustrating. Not knowing why your Windows 10 computer suddenly refuses to accept the correct password is concerning. However, there is no need to panic as this guide will thoroughly examine this issue. EaseUS Software will provide you with multiple effective methods to resolve the Windows 10 not accepting password problem.
Emergency Plan: Remove Windows 10 Password via Password Reset Tool
For the first solution to address the issue of not being able to log into the computer with the correct password, we delve into a powerful tool that can make the process remarkably simple. Introducing EaseUS Partition Master, a comprehensive software renowned for its multifaceted capabilities. Among its impressive array of features, EaseUS Partition Master boasts a «Password Reset» functionality that can be a game-changer in scenarios like this one.
This feature allows you to effortlessly remove or reset the original Windows 10 password, granting you access to your computer without the need for complex procedures. EaseUS Partition Master is designed with user convenience in mind, ensuring that even those with limited technical expertise can navigate the tool seamlessly.
Follow the simplified step-by-step instructions guided below to resolve Windows password not working with the help of EaseUS Partition Master:
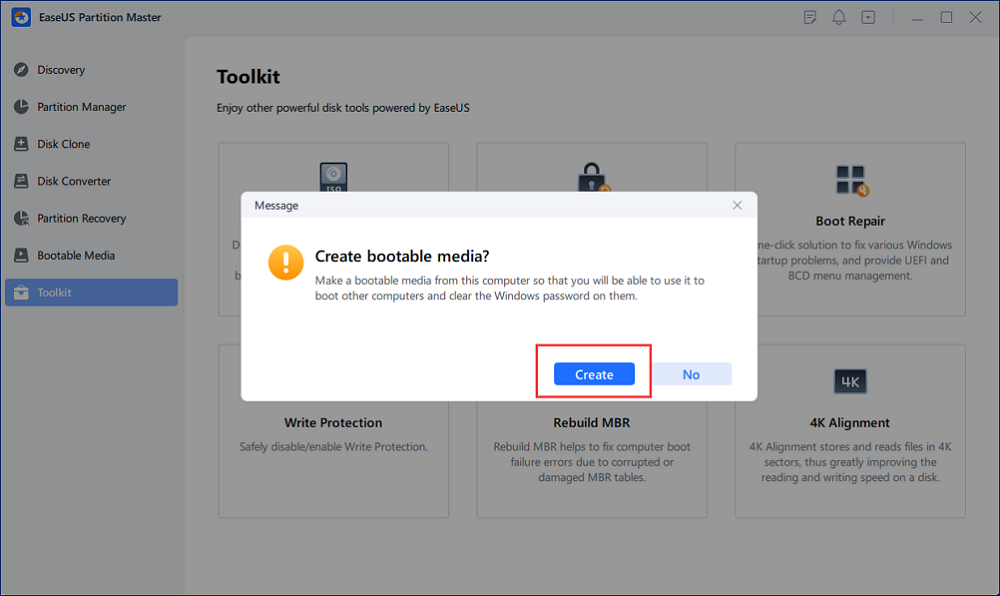
Step 1. Insert the target USB disk into the computer, download and run EaseUS Partition Master, and click «Toolkit» > «Password Reset.»

Step 2. A small window will pop up. After reading it carefully, click «Create».
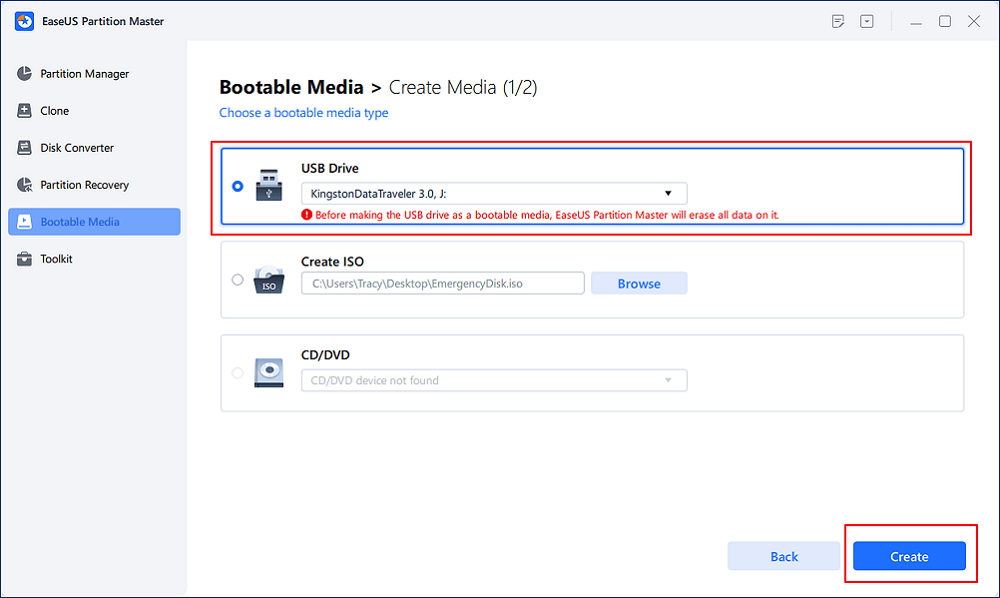
Step 3. Select the correct USB flash drive or external mobile hard disk and click «Create» again. Wait patiently. After the password reset USB flash drive is created, click «Finish.»
Step 4. Remove the password reset USB, insert it into the locked PC, and restart. You will be asked to change the boot drive to boot the PC from USB. Once completed, the system will automatically boot from USB.
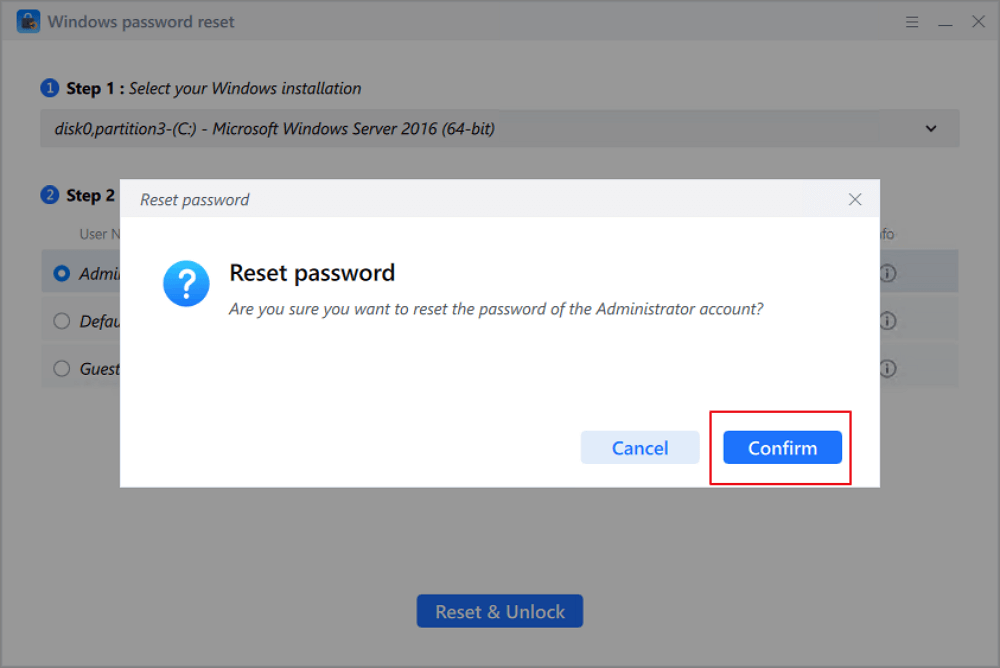
Step 5. After restarting, find EaseUS Partition Master again and go to «Password Reset.» All accounts on the PC will be displayed in the interface; click on the target account and check «Reset & Unlock.»
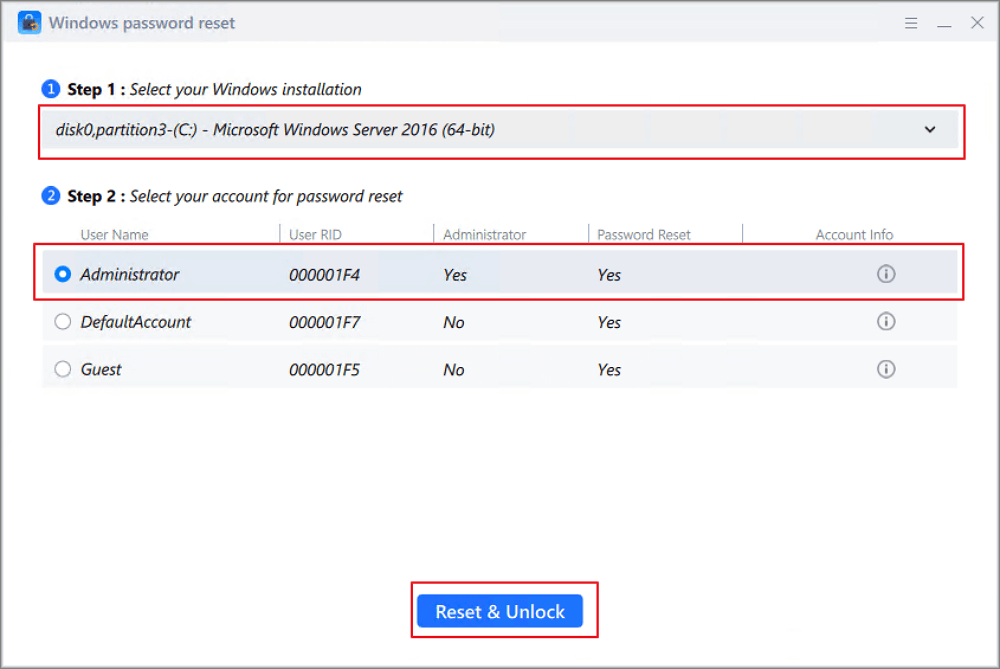
Step 6. When you receive this prompt, click «Confirm» to continue. Your password will be erased.
Beyond password resetting, EaseUS Partition Master offers a wide range of partition and disk management features to optimize your computer’s performance.
If you’re facing the challenge of Windows 10 not recognizing your password, we highly suggest considering EaseUS Partition Master as your initial solution. Utilizing this tool, which you should download, may offer the most efficient and effective means of regaining access to your computer, such as:
- Create bootable USB
- Make a password reset USB for another computer
- Fix Your PIN is no longer available
- Unlock laptops without passwords
- Remove the Windows 10 password with simple clicks
- Reset Windows 10 forgotten password
Nevertheless, for those who prefer to explore alternative approaches, don’t worry; we will also delve into additional methods for addressing this complex problem.
There are multiple ways through which you can fix the Windows 10 not accepting password problem. Given below are six quick fixes that can help you get out of this messy situation:
Fix 1. Reboot Windows 10 Once or Several Times
What should you do if your laptop won’t accept the password Windows 10? The simplest way is to restart your computer or PC once or several times. Sign out and sign in again to see if you can boot into your Windows 10 PC with your current password.
Rebooting your Windows 10 helps flush out temporary bugs and reset all processes. If rebooting one time doesn’t help, try doing it several times. Here is how to reboot your Windows 10 computer:
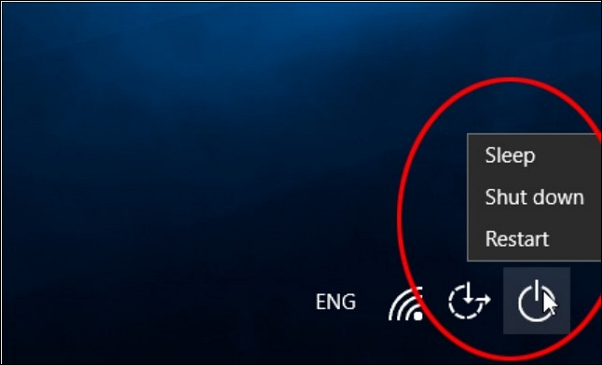
Instructions: Click the Power button from the bottom right corner and select «Restart.» Once the computer is rebooted, try to log in. If it fails, go through the procedure multiple times.
If you are running Windows 11, you can click the following link to learn more.
Fix 2. Connect to the Internet
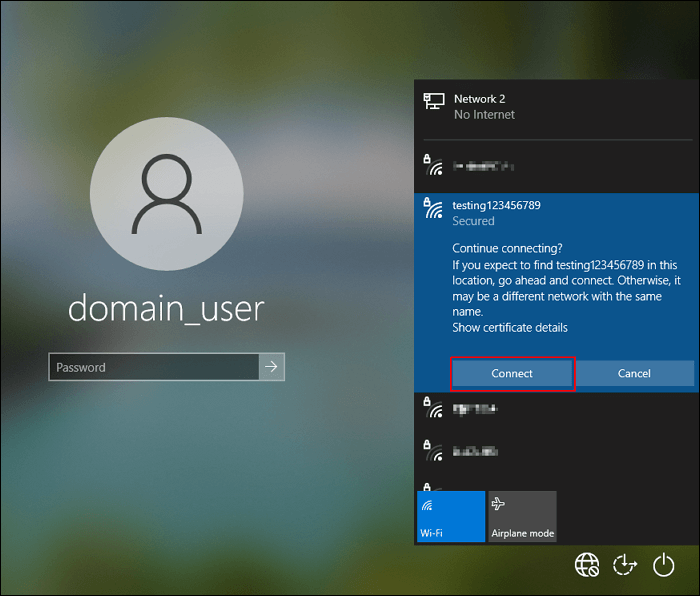
In specific scenarios, Windows 10 may necessitate an active internet connection to verify your password, particularly when employing a Microsoft account for authentication. To resolve the ‘Windows 10 Password Authentication Failure’ problem, adhere to these instructions:
Instructions: If you’re not connected to the internet, locate the «Network» icon in the lower right corner and click it. Next, choose your Wi-Fi network and enter your Wi-Fi password. Afterward, attempt to log into Windows 10 once more.
Fix 3. Use the Virtual Keyboard
If you suspect that there might be a problem with your physical keyboard preventing you from entering your password correctly on Windows 10, you can utilize the virtual keyboard as a solution. Follow these instructions to address the problem of «Windows 10 Not Accepting Password»:
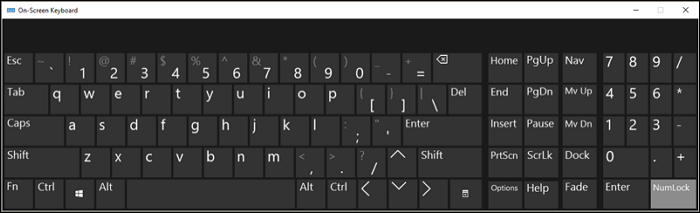
Step 1: Start by finding the «Ease of Access» icon positioned at the lower-right corner of the login screen, then give it a click. A menu will pop up; from within this menu, opt for «On-Screen Keyboard.» This action will open the virtual keyboard on your display.
Step 2: Employ your mouse or touch screen to click on the virtual keys and enter your password. Once you’ve input your password using the virtual keyboard, click the «Sign In» button and check if the problem has been resolved.
Fix 4. Boot Windows 10 into Safe Mode
Booting Windows 10 into Safe Mode can be a valuable troubleshooting step when you encounter the «Windows 10 Not Accepting Password» error. Safe Mode loads only essential drivers and services, which can help bypass potential issues causing login problems. Proceed with these instructions to initiate Safe Mode:
Step 1: When on the login screen, click the «Power» button and tap «Restart» while holding the «Shift» key. This combination will take you to the Advanced Startup Options.
Step 2: Here, select «Troubleshoot» and then proceed by clicking on «Advanced Options.» Next, navigate to «Startup Settings» and choose the option labeled «Enable Safe Mode.»
Step 3: After Windows 10 enters Safe Mode, your computer will load only essential drivers and services. This can help determine if a third-party application or driver is causing the login problem.
Fix 5: Use the Startup Repair Tool
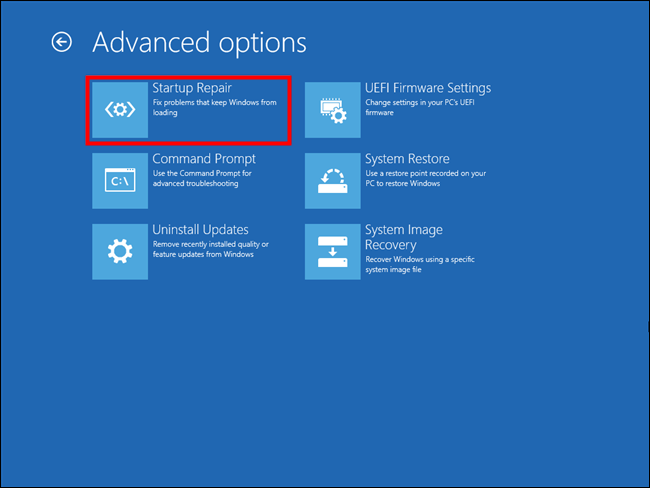
If your Windows 10 computer still does not accept your password, you can use the built-in Startup Repair tool. It can identify and fix potential issues that might be causing the login problem. This is the method for utilizing the Startup Repair tool:
Step 1: Begin by pressing the «Shift» key and click on «Restart» within the «Power» options. This will grant you entry to the «Advanced Startup Options,» where you should proceed by selecting «Troubleshoot.»
Step 2: Here, click «Advanced Options» and follow it by tapping «Startup Repair» or «Automatic Repair.» It will commence the repair operation, after which you can try to re-login.
Fix 6. Recover Original Microsoft Account Password Online
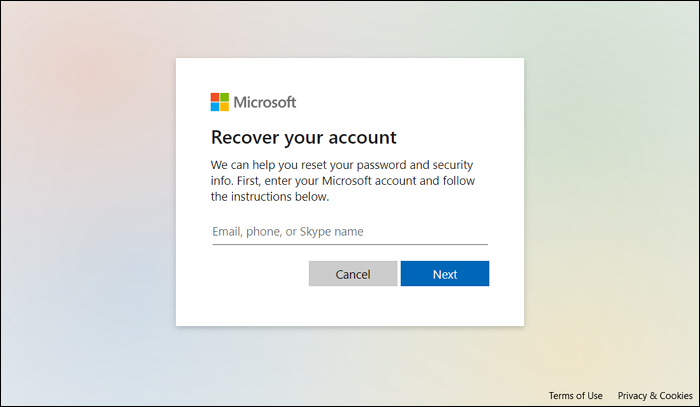
Utilizing a Microsoft account for Windows 10 login? If you’ve misplaced your password or suspect it’s responsible for the ‘Windows 10 Not Accepting Password’ issue, there is a way. You can initiate the process of resetting your Microsoft account password online. Here are the essential procedures for this operation:
Step 1: Use a device to access the «Microsoft Account Reset Page.» Here, type in your email ID or phone number associated with the Microsoft account.
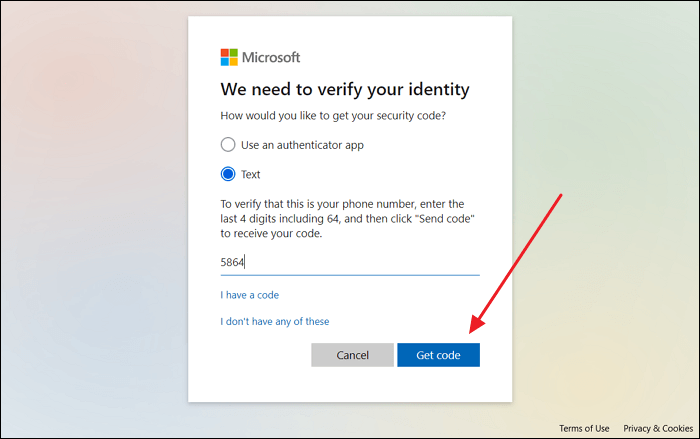
Step 2: On the following screen, proceed with the verification step and establish a new password. After successfully setting the password, employ it to access your Windows 10 computer.
Or, you can follow the guide video to reset forgotten Windows password with the mentioned methods:
Why Won’t Windows 10 Accept Password
The frustration of encountering a «Windows 10 Not Accepting Password» error can be overwhelming. Nonetheless, delving into the possible causes of this problem can assist you in troubleshooting and discovering a viable resolution. Below, you’ll find some prevalent factors that could impede Windows 10 from recognizing your password:
- Incorrect Password: Human error is a common culprit. Ensure that you’re entering your password correctly, paying attention to capitalization, special characters, and any potential typos.
- Keyboard Issues: Physical keyboard problems or a malfunctioning key can result in incorrect password entry. Try using an on-screen keyboard or an external keyboard to rule out this possibility.
- Forgotten Password: Forgetting a password can happen quite easily. Consider a scenario where your password hasn’t been used for an extended period. In such cases, exploring solutions like initiating a password reset is recommended.
- Microsoft Account Issues: If you use a Microsoft account to log in to Windows 10, issues with your Microsoft account can prevent login. These include a forgotten password or a locked account.
- Network Connection: An internet connection may be necessary for Windows. This applies when utilizing a Microsoft account. Thus, ensure that your computer is currently connected to the internet.
- Software Conflicts: Third-party software, especially security or password management tools, can sometimes interfere with the login process. Uninstalling or disabling such software temporarily might help.
Share this article to help others facing the same issues and needing help.
Conclusion
To sum it up, encountering the frustrating «Windows 10 Not Accepting Password» error can be a daunting experience. Nonetheless, this article offers a thorough handbook to empower you in effectively addressing this issue. We’ve delved into six solutions, each tailored to target various facets of the problem.
While all these solutions have their merits, we highly recommend EaseUS Partition Master as an exceptional tool to address the «Windows 10 Not Accepting Password» error. EaseUS Partition Master offers a specialized «Password Reset» feature that simplifies the process of removing or resetting your original Windows 10 password. Its intuitive interface, robust data protection measures, and versatile disk management functionalities render it a valuable asset within your arsenal for troubleshooting.
Windows Not Accepting Password FAQs
If you’re still encountering issues or have specific questions related to Windows 10 passwords, we’ve compiled some frequently asked questions to provide further guidance:
1. How do I fix Windows 10 not accepting my password?
One straightforward and frequently successful remedy involves restarting your computer following these steps:
Instructions: Locate the «Power» button in the lower right corner and choose «Restart.» This action will initiate a computer reboot.
2. Why does it say my password is incorrect when it’s right?
Several factors could contribute to this issue, but to avoid this, make sure that the Caps Lock key isn’t inadvertently activated since Windows passwords are sensitive to letter cases. Second, thoroughly review your password for any typographical mistakes or capitalization errors. If you’ve recently modified your Microsoft account password and haven’t yet synchronized it with your computer, utilize the local password of your device.
3. How to bypass Windows 10 password?
Use the following simplified steps to bypass the Windows 10 password:
Step 1: Begin by initiating a restart of your laptop. Once it completes the reboot, proceed by pressing the «F8» key. This action will navigate you to the Administrator login screen on your laptop.
Step 2: While on the Administrator login screen, simultaneously press the «Ctrl + Alt + Del» keys. Among the available options, select «Switch User» and input «Administrator» as your username.
Step 3: Leave the password field empty and press the «Enter» key. This will grant you access to your laptop without the need for a password.
При запуске Windows 10 или 8, вам будет предложено ввести пароль, чтобы иметь возможность войти в систему. Это позволяет защитить ваш компьютер, от несанкционированного доступа. Но если вы единственный человек, который использует компьютер, и вы не хотите, получать запрос на ввод пароля каждый раз, вы можете избавиться от этого процесса и войти в систему Windows автоматически без ввода пароля.
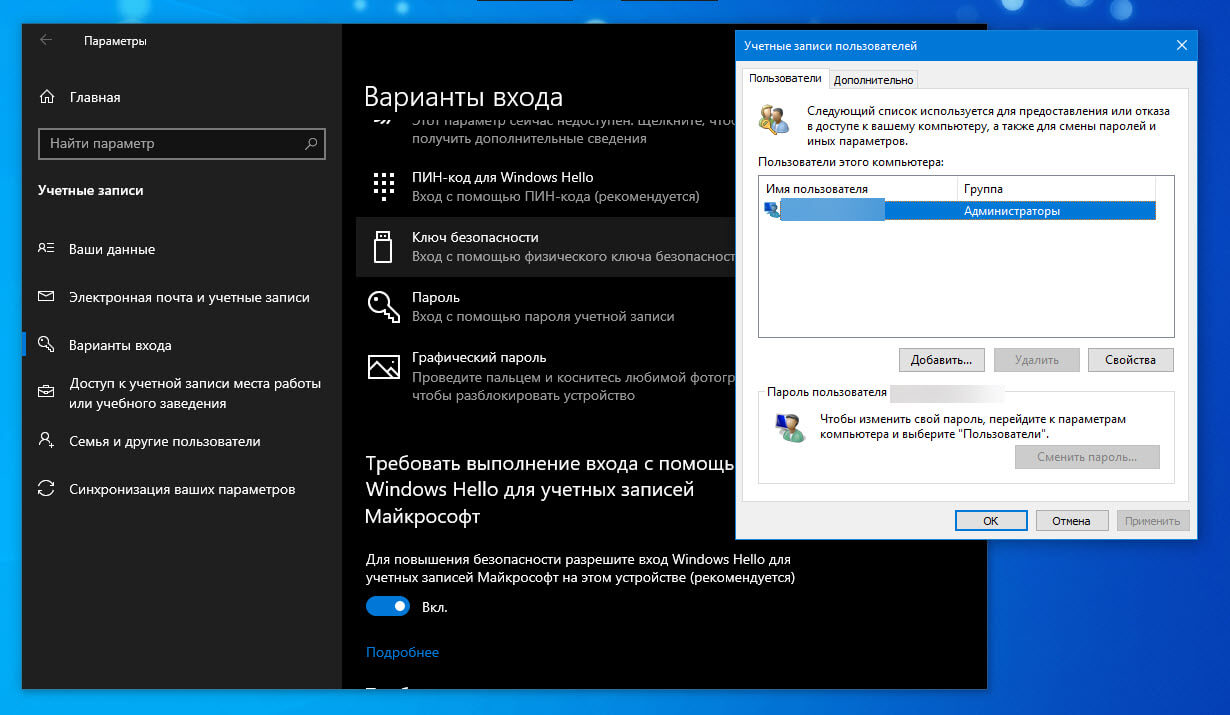
Начиная с Windows 10 версии 2004, которая выйдет весной 2020 г, также известной под кодовым именем «20H1», Microsoft изменила поведение по умолчанию для функции автоматического входа в систему. Теперь, если у вас включен какой-либо из параметров безопасности Windows Hello, вы не сможете автоматически войти в свою учетную запись.
Начиная с Windows 10 build 19033, если вы установили PIN-код или другую безопасную функцию Windows Hello, Windows 10 скрывает параметр «Требовать ввод имени пользователя и пароля», чтобы использовать этот компьютер в классическом стиле control userpasswords2. Смотрите следующий скриншот:
В этой статье, мы рассмотрим три способа, с помощью которых вы можете отключить экран входа в систему и автоматически входить Windows 10 версии 2004 (20H1) и предыдущих версий без ввода пароля.
Способ 1.
Автоматический вход в Windows, с помощью команд — control userpasswords2 и netplwiz.
Чтобы отключить экран входа в систему, и автоматически входить Windows 10 версии 2004, выполните следующие действия:
Шаг 1: Откройте приложение «Параметры» самый быстрый способ нажать одновременно клавиши Win + I.
Шаг 2: Перейдите в раздел «Учетные записи» → «Варианты входа».
Шаг 3: Выключите опцию — «Требовать выполнение входа с помощью Windows Hello для учетных записей Microsoft».

Шаг 4: Нажмите сочетание клавиш Win + R открыв диалоговое окно «Выполнить», введите одну из двух команд, представленных ниже:
control userpasswords2 или,
netplwiz
или,
Перейдите в папку C:\Windows\SysWOW64 и запустите там Netplwiz.exe.
Шаг 5: Нажмите Enter, чтобы открыть окно «Учетные записи пользователей» и снимите флажок — «Требовать ввод имени пользователя и пароля», нажмите кнопку «Применить» → «OK».
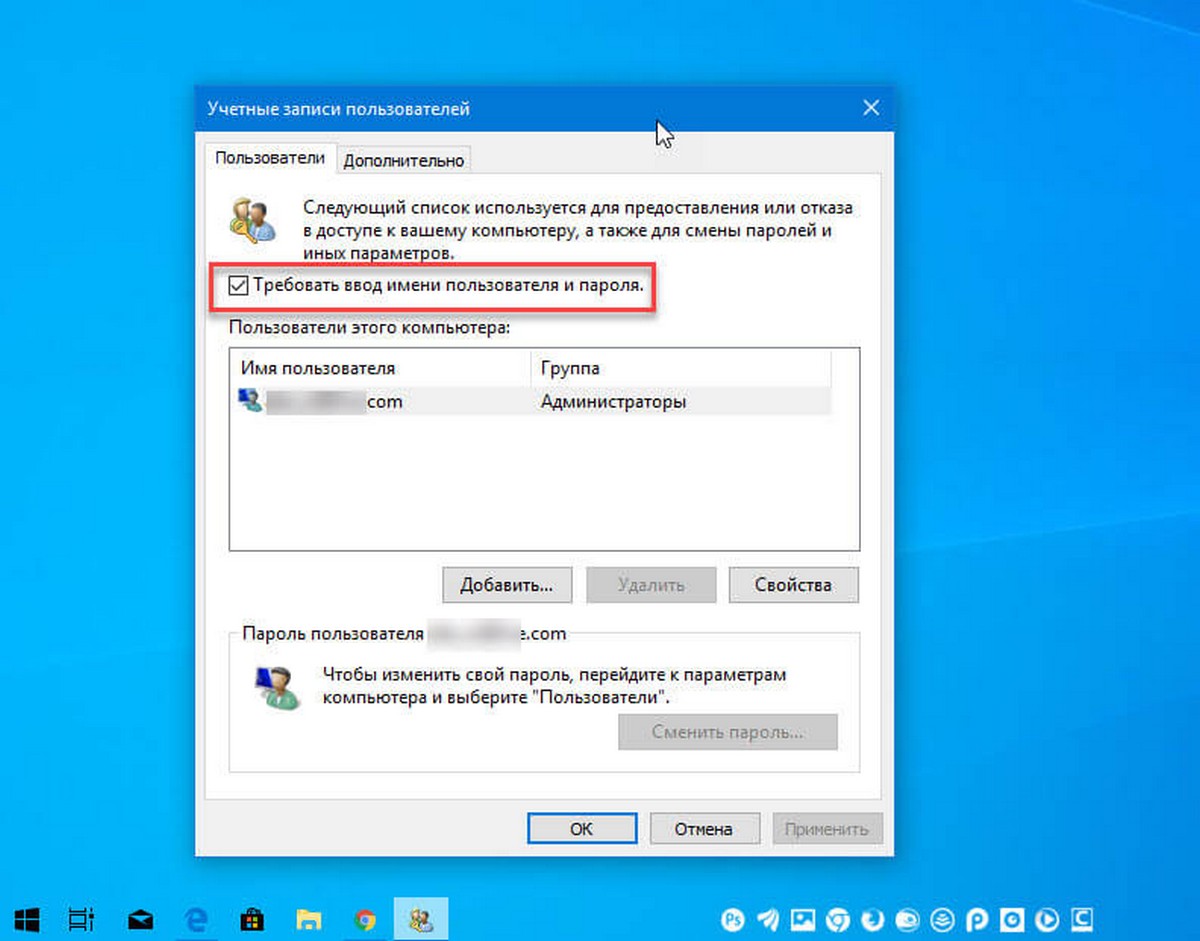
Это действие — открывает окно, в котором вы должны ввести свой пароль для учетной записи. Если учетная запись является локальной записью и не имеет пароля, просто оставьте это поле пустым.
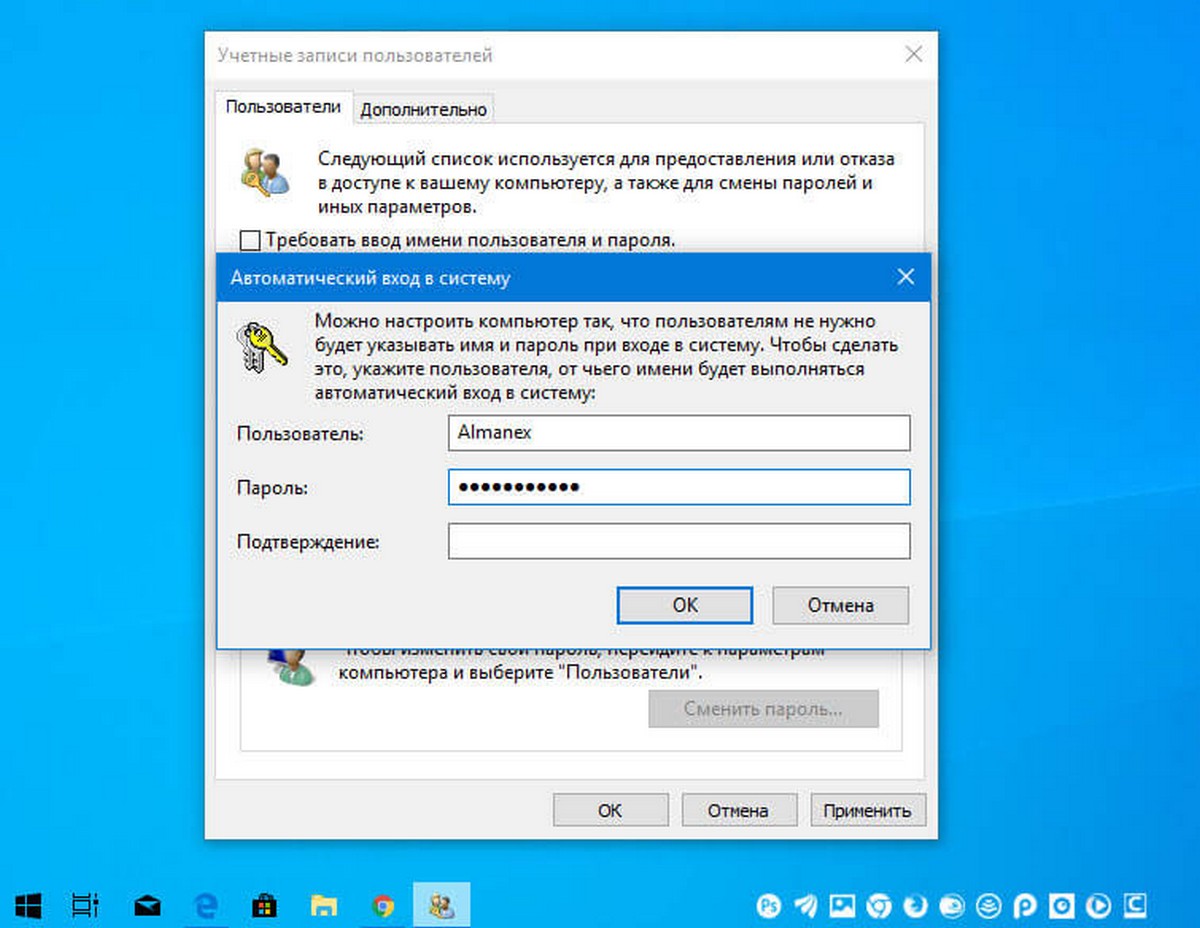
Шаг 6: Перезагрузите компьютер.
После того, как вы сделаете это, вы обнаружите, что вы можете войти в систему Windows 10, 8 автоматически и вам ненужно вводить пароль или данные вашей учетной записи Microsoft.
Шаг 7: Осталось отключить запрос пароля после сна, ознакомится с инструкцией вы можете в нашей статье: Как отключить запрос пароля во время выхода из режима сна.
Способ 2.
Автоматический вход в Windows с помощью утилиты Microsoft «AutoLogon».
Microsoft Autologon это небольшая, бесплатная утилита предлагаемая Microsoft, которая может быть использована для настройки встроенного механизма автоматического входа в систему Windows 10. Подобно утилите netplwiz, вы можете сохранить учетные данные для любого локальной или MSA — учетной записи Microsoft. Наиболее важным преимуществом Autologon это шифрование пароля перед сохранением его в реестр.
Шаг 1: Перейдите на страницу docs.microsoft.com и загрузите архив с утилитами Sysinternals. Архив содержит отдельные инструменты для устранения неполадок, а также утилиту «AutoLogon».
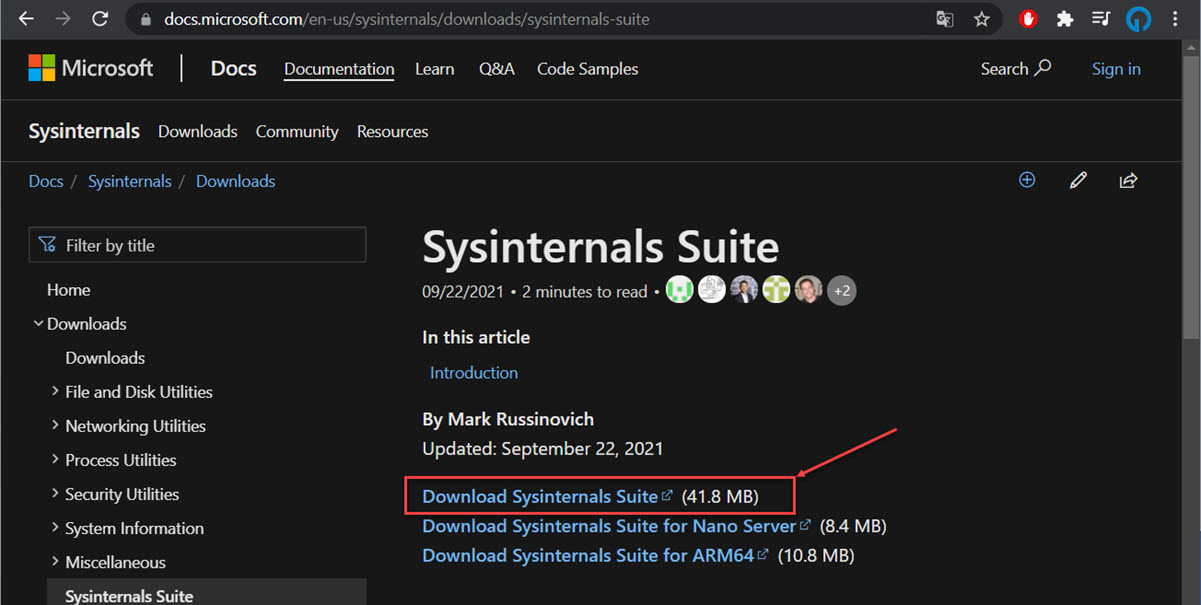
Шаг 2: Распакуйте архив и запустите файл Autologon.exe или Autologon64.exe в зависимости от разрядности вашей системы, чтобы установить его.
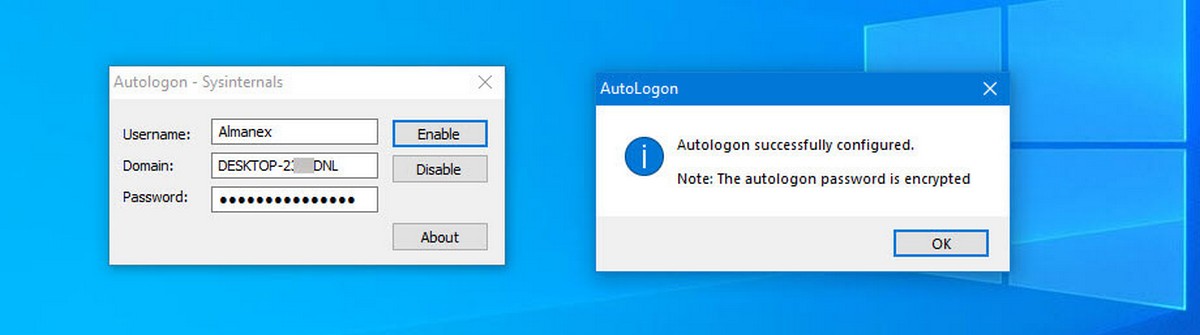
Шаг 3: После установки, запустите приложение и заполните необходимую информацию логин, пароль и нажмите кнопку «Enable», чтобы включить механизм обхода ввода пароля для выбранной учетной записи пользователя. На экране, появится сообщение подтверждающее, что Autologon успешно сконфигурирован.
Вы также можете использовать утилиту AutoLogon с помощью командной строки, используя приведенный ниже синтаксис:
autologon user domain password
Шаг 4: Перезагрузите ПК.
Способ 3.
Автоматический вход в Windows с помощью редактора реестра.
Как автоматически выполнить вход в учетную запись пользователя в Windows 10 версии 2004 «20H1» с помощью редактора реестра.
Шаг 1: Создайте точку восстановления системы, а затем нажмите Win + R на клавиатуре, чтобы запустить диалоговое окно «Выполнить». Введите regedit.exe и нажмите клавишу Enter, чтобы открыть редактор реестра.
Шаг 2: Перейдите к следующему пути на левой боковой панели редактора реестра.
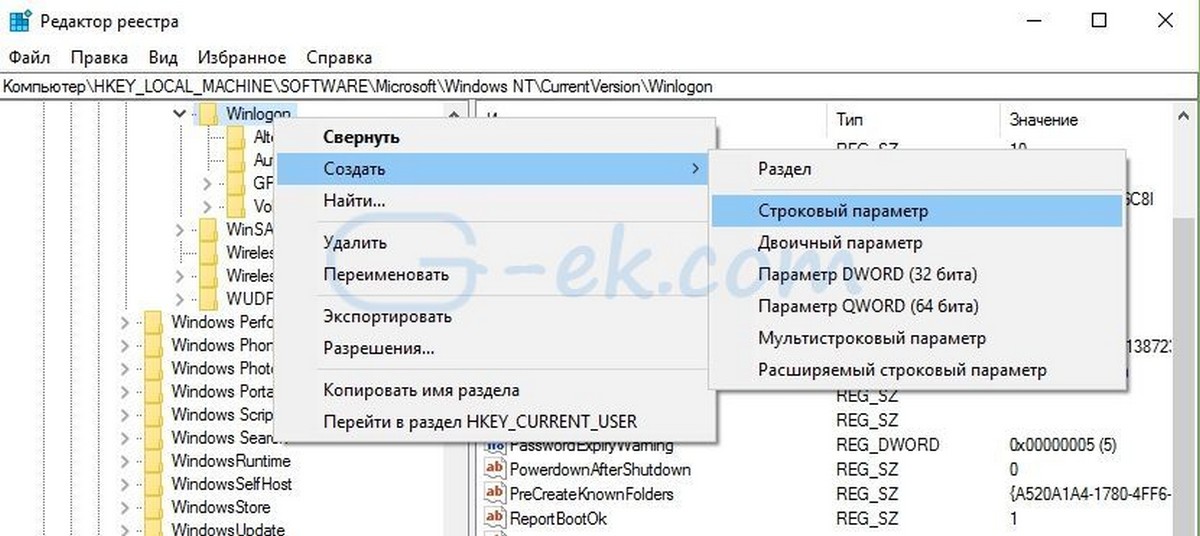
HKEY_LOCAL_MACHINE\SOFTWARE\Microsoft\Windows NT\CurrentVersion\Winlogon
Шаг 3: Теперь, с права найдите параметр «AutoAdminLogon» и измените его значение на 1.
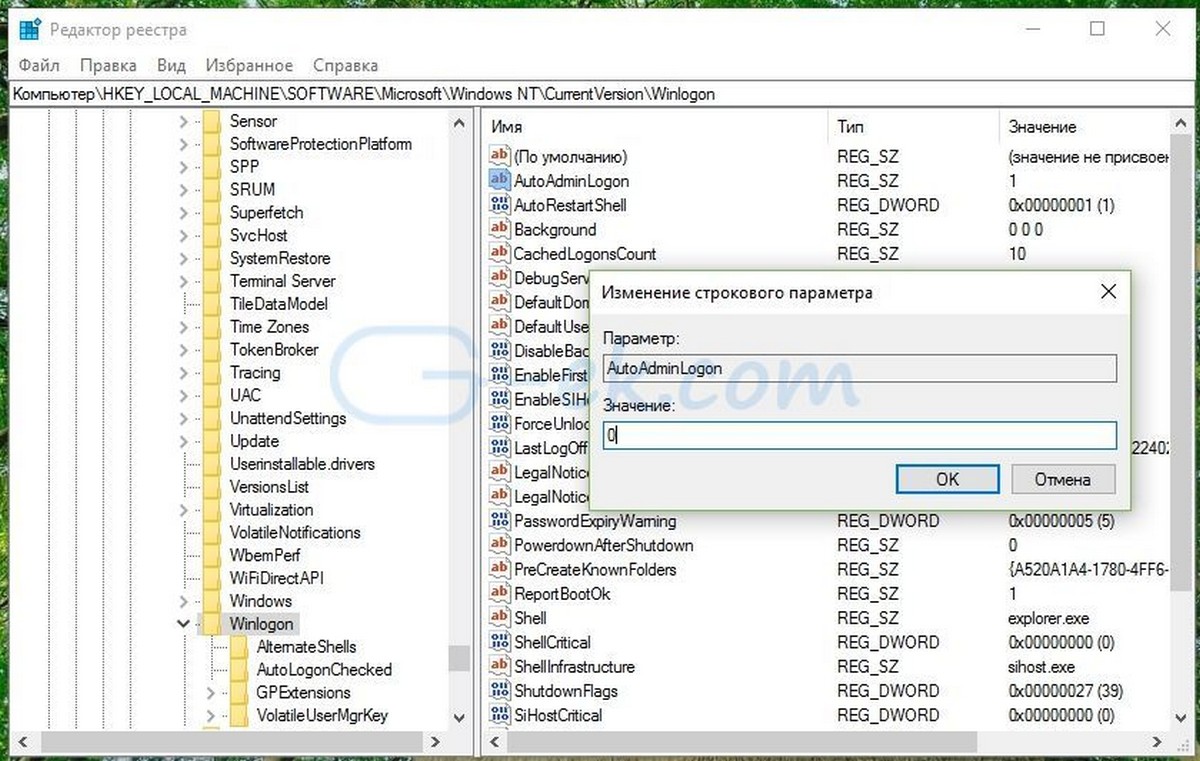
После этого, вам нужно создать несколько дополнительных строковых параметров для хранения значений данных учетной записи. Просто кликните правой кнопкой мыши на разделе Winlogon и выберите «Создать» → «Строковой параметр» и заполните их соответствующими значениями, в зависимости от присвоенного имени.
| Имя Строкового параметра | Значение |
| DefaultDomainName | Имя компьютера (для локальной учетной записи) или имя домена |
| DefaultUserName | Имя пользователя (как в C:\Users\<Имя пользователя>) |
| DefaultPassword | Пароль для выбранной учетной записи |
Если Строковой параметр уже существует, вам просто нужно изменить значение соответствующим образом.
Шаг 4: После того, как заполнены все значения сохраните настройки и закройте редактор реестра.
Должен отметить, что одним из недостатков использования редактора реестра для автоматического входа в систему, ваш пароль хранится в незашифрованном виде. Любой пользователь, имеющий доступ к реестру может посмотреть его. Поэтому рекомендуем вам использовать Способ с netplwiz или Autologon, ваш пароль будет надежно зашифрован и не будет хранится в редакторе реестра.
Чтобы отключить автоматический вход в систему с помощью этого метода, удалите значение DefaultPassword и установите для AutoAdminLogon значение 0.
Надеюсь, что этот совет будет полезен для вас.
Рекомендуем:
Сброс пароля Windows 10 с помощью встроенной учетной записи Администратора.
Как автоматически входить в Windows 11 минуя окно блокировки и ввод пароля