
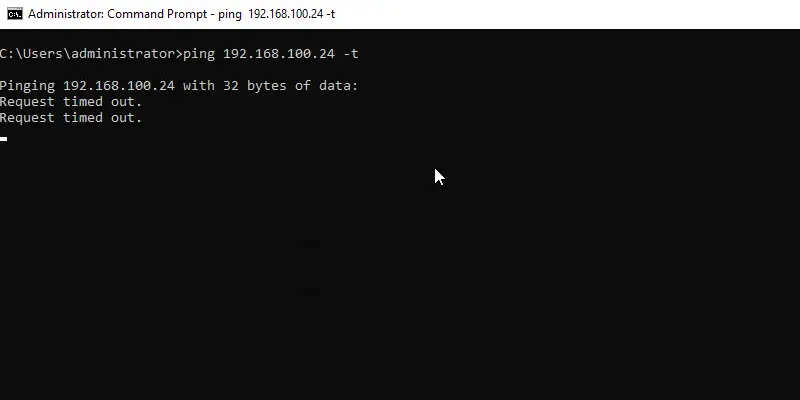
Встроенный брандмауэр Windows в целях безопасности по умолчанию блокирует входящий ICMP трафик как в десктопных Windows 10/11, так и в Windows Server. Это означает, что вы не сможете удаленно проверить доступность компьютера с помощью стандартной команды
ping
, т.к. она будет отвечать о превышении интервала ожидания запроса (
Request timed out
) для ICMP Echo-Reply. Если вы хотите сделать возможной проверку доступности хостов Windows по протоколу ICMP из системы мониторинга или вручную из командной строки, можно разрешить ответы на ICMP эхо-запросы.
Чтобы разрешить отправку ответов на запросы по протоколу ICMP, нужно включить предустановленные правила в брандмауэре Windows.
- Откройте оснастку управления Windows Defender Firewall with Advanced Security, выполнив команду
wf.msc - Перейдите в раздел Inbound Rules
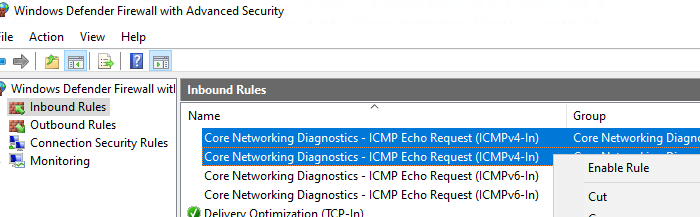
- Найдите правило Core Network Diagnostics – ICMP Echo Request (ICMPv4-In) и включите его.
- В моем случае есть два правила с этим именем. Одно для частного и общедоступного сетевого профиля Windows, и второе для доменного. Я включил их оба. Можно также включить правило, разрешающее ICMP ответы для IPv6 протокола (если используется).

Есть также другое правило File and Printer Sharing (Echo Request – ICMPv4-In), которое также разрешает компьютеру отвечать на эхо-запросы
ping
.
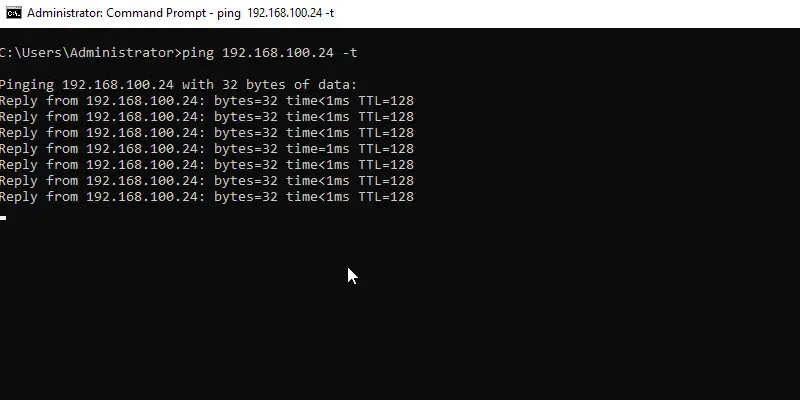
Попробуйте пропиговать ваш компьютер и убедитесь, что теперь он отвечает на ICMP запросы.
Можно включить правила Windows Firewall, разрешающие ответы на эхо-запросы ICMP с помощью такой команды PowerShell:
Set-NetFirewallRule -Name CoreNet-Diag-ICMP4-EchoRequest-In -enabled True
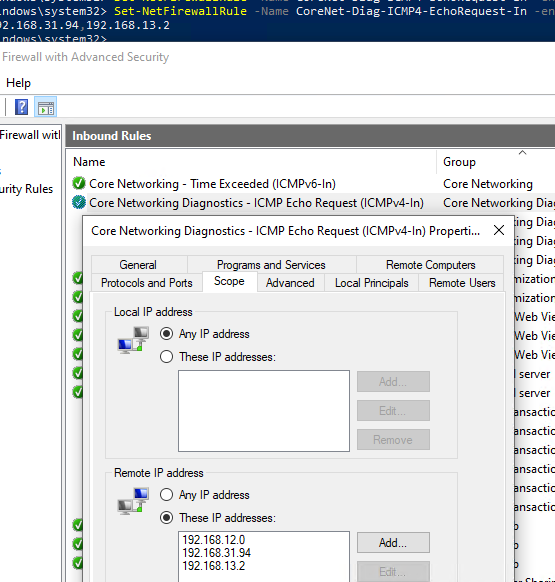
Если нужно ограничить список IP подсетей или хостов, которым разрешено отправлять ответы на ICMP запросы, выполните команду:
Set-NetFirewallRule -Name CoreNet-Diag-ICMP4-EchoRequest-In -enabled True -RemoteAddress 192.168.12.0,192.168.31.94
Откройте свойства правила в Windows Firewall и проверьте, что теперь правило разрешающие ICMP ответы будет работать только для указанных IP/подсетей.
Если в файрволе отсутствует (удалено) правило для входящих ICMP запросов, можно создать его из командной строки:
netsh advfirewall firewall add rule name="Allow_ICMPv4_Echo" protocol=icmpv4:8,any dir=in action=allow
Другой пример PowerShell команды, которое создаст правило файервола, разрешающего ping для всех хостов в локальной сети:
New-NetFirewallRule -DisplayName "Allow_ICMPv4_Echo" -Direction Inbound -Protocol ICMPv4 -IcmpType 8 -RemoteAddress localsubnet -Action Allow
Если нужно заблокировать ответы на ICMP эхо-запрос независимо от того, какие правила включены, создайте запрещающее правило, которое будет иметь более высокий приоритет:
New-NetFirewallRule -DisplayName "Block_ICMPv4_Echo" -Direction Inbound -Protocol ICMPv4 -IcmpType 8 -RemoteAddress localsubnet -Action Block
Чтобы разрешить ответы на ICMP ping на всех компьютерах в сети, можно включить правило Windows Firewall с помощью доменной групповой политики .
- Откройте редактор доменных GPO (
gpmc.msc
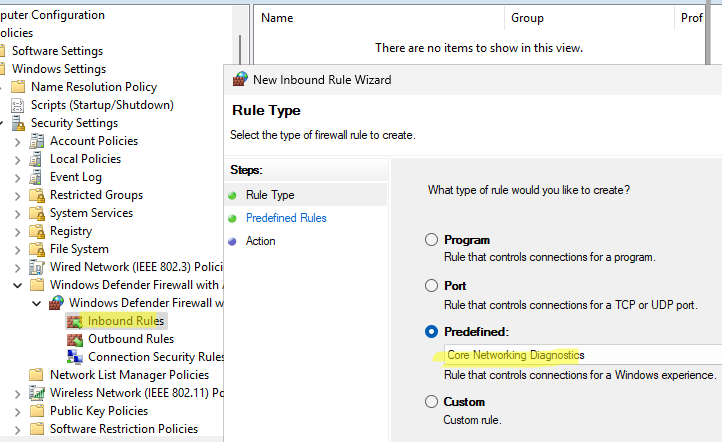
), создайте или отредактируйте имеющуюся GPO и назначьте ее на целевую OU или корень домена. - Перейдите в раздел Computer Configuration -> Windows Settings -> Security Settings -> Windows Firewall with Advanced Security -> Inbound rules
- Создайте новое правило, выберите Predefined rule типа Core Networking Diagnostics

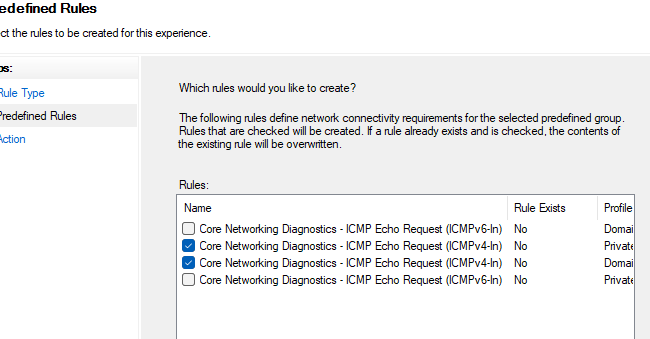
- Укажите какие правила ICMP Echo request нужно включить.

- На следующем шаге вы берите Allow the connection.
ICMP, также известный как PING, обычно используется системными администраторами для проверки работоспособности компьютеров (и других сетевых устройств).
Брандмауэр в Windows 10 по умолчанию блокирует ответы ICMP. Чтобы разрешить ICMP в Windows, нам нужно создать два правила брандмауэра. Один для IPv4 и один для IPV6.
Мы можем добиться этого с помощью графического интерфейса или командной строки.
Использование PowerShell для разрешения проверки связи
Самый простой способ — запустить следующие две команды в окне PowerShell:
netsh advfirewall firewall add rule name="Allow ICMPv4" protocol=icmpv4:8,any dir=in action=allow
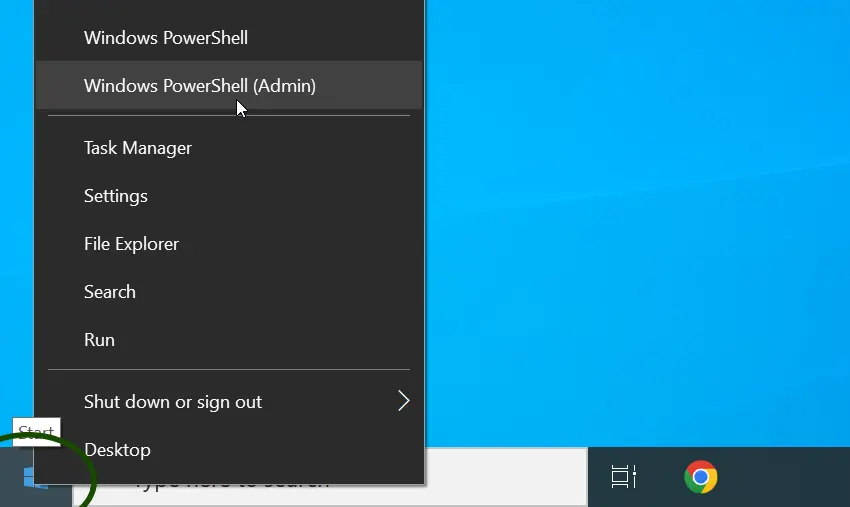
netsh advfirewall firewall add rule name="Allow ICMPv6" protocol=icmpv6:8,any dir=in action=allowЧтобы открыть окно PowerShell, щелкните правой кнопкой мыши кнопку «Пуск» и выберите в меню Windows PowerShell (Admin).
Когда откроется командное окно, запустите две команды, которые мы указали выше.

Ваш ПК/сервер с Windows теперь будет отвечать на запросы ping. Если вы хотите снова заблокировать ping, удалите эти два правила брандмауэра, используя следующие две команды:
netsh advfirewall firewall delete rule name="Allow ICMPv4"
netsh advfirewall firewall delete rule name="Allow ICMPv6"
Использование брандмауэра Защитника Windows
Если вам не нравится командная строка, используйте графический интерфейс, чтобы разрешить эхо-запросы через брандмауэр Windows.
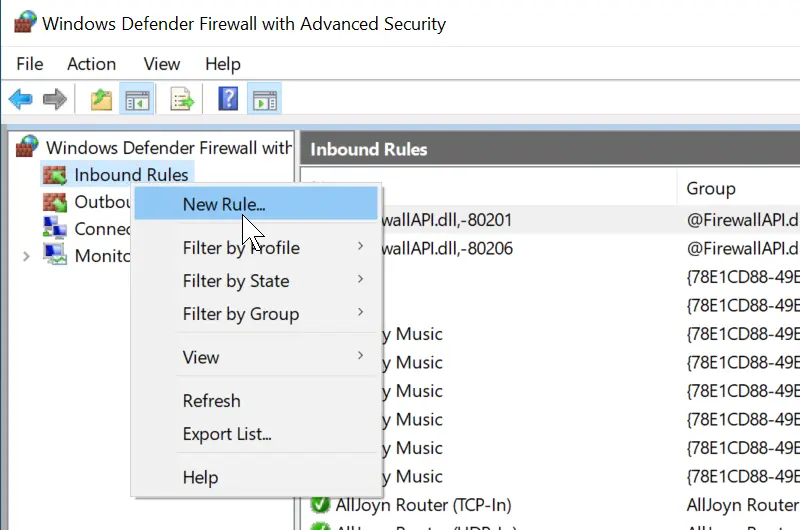
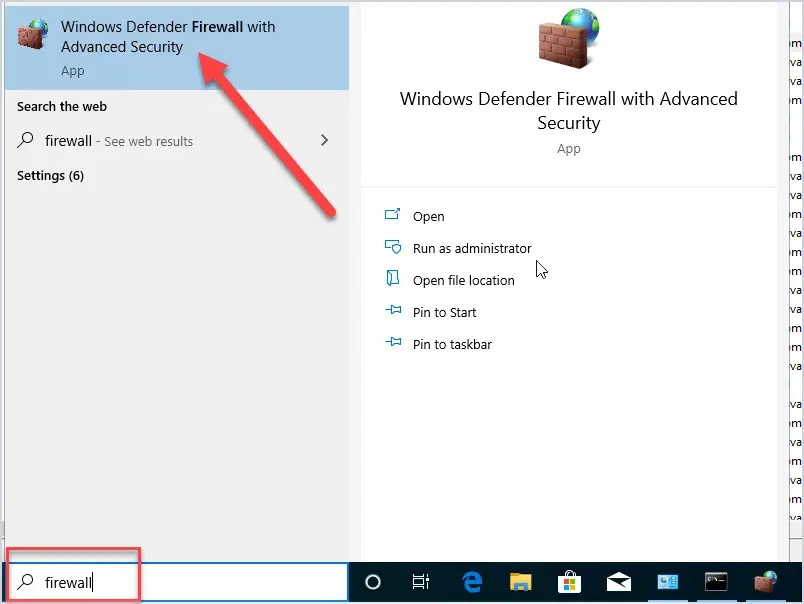
Нажмите кнопку «Пуск» и введите брандмауэр. В результатах поиска выберите Брандмауэр Защитника окон в режиме повышенной безопасности. В приложении брандмауэра щелкните правой кнопкой мыши «Правила для входящих подключений» и выберите «Новое правило» в контекстном меню.
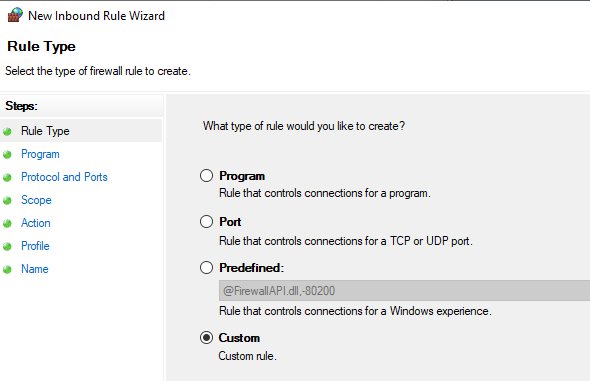
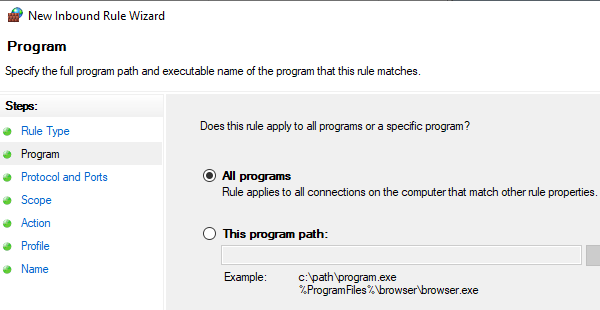
На первом экране выберите Пользовательский тип правила, нажмите Далее, а затем выберите Все программы. Нажмите «Далее» еще раз.
В раскрывающемся меню «Тип протокола» выберите ICMPv4 и нажмите «Далее».
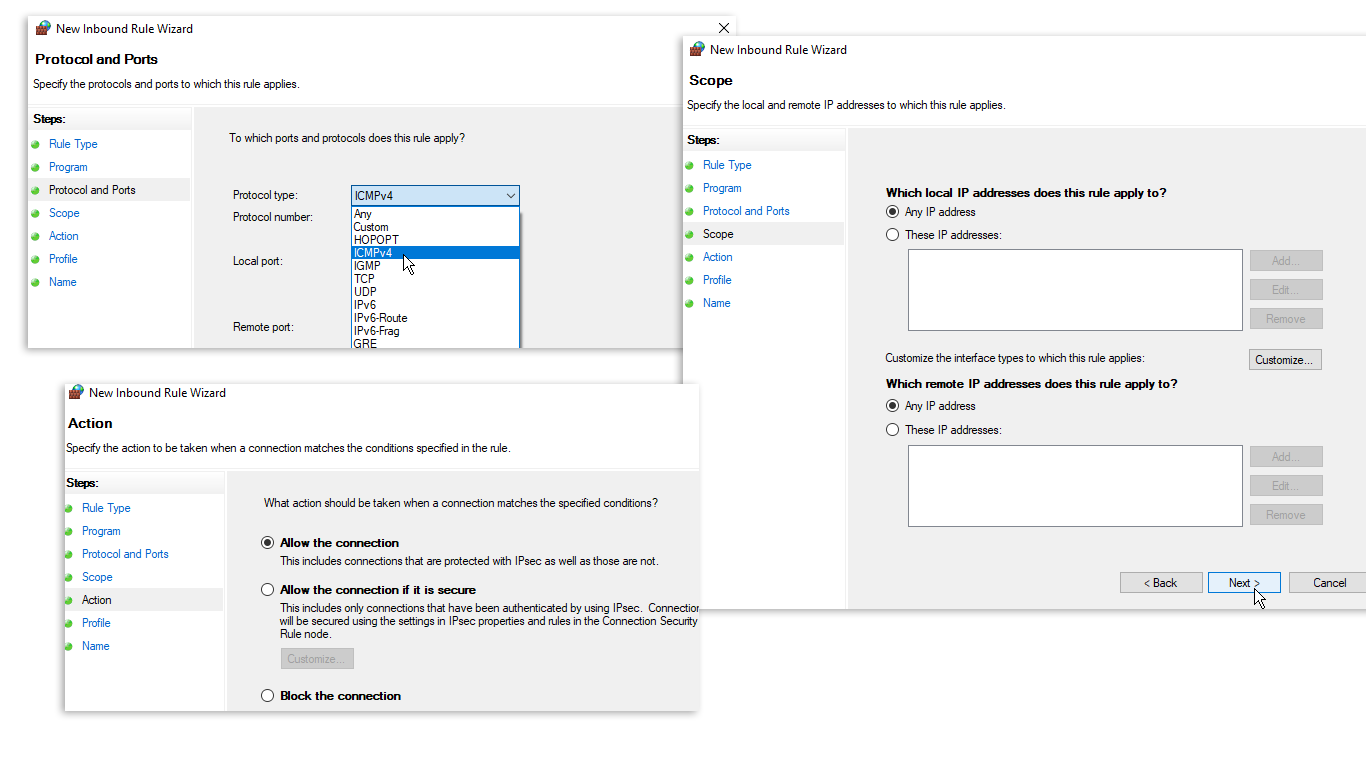
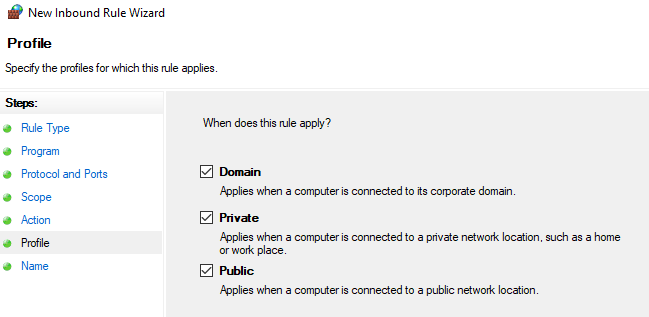
На экране «Область» выберите «Любые IP-адреса», нажмите «Далее» и выберите «Разрешить подключение». На экране «Профиль» оставьте все три профиля брандмауэра отмеченными.
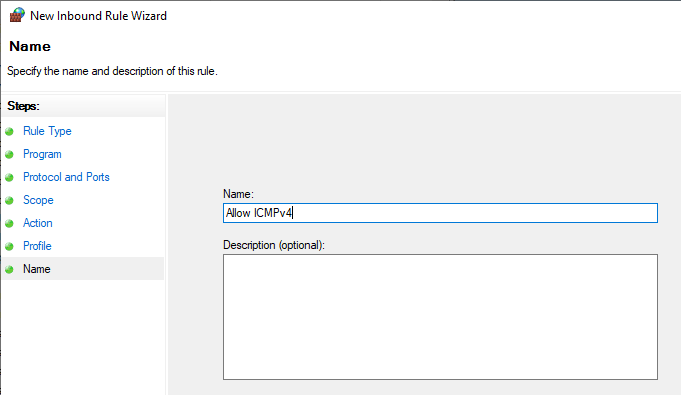
Наконец, дайте имя правилу брандмауэра и нажмите «Готово», чтобы завершить работу мастера.
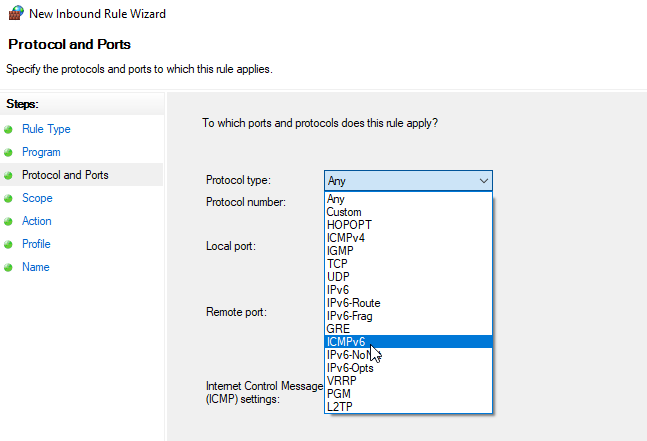
Это правило разрешает трафик ICMPv4 через брандмауэр. Чтобы разрешить трафик ICMPv6, повторите ту же процедуру, но на экране «Протокол и порты» выберите ICMPv6.
И это все. Вы можете использовать описанные выше методы, чтобы разрешить проверку связи в любой операционной системе Windows, включая Windows 10, 11 и Server.
Просмотров: 15 786
In this guide, you will learn how to enable ping requests in Windows client and server operating systems.
I’ll show you the steps for a single computer and how to use group policy to enable ping requests for multiple computers.
By default, the Windows Firewall blocks ping requests. Blocking ping requests adds another layer of security to your network by making systems appear offline or unavailable. This helps to slow down viruses, ransomware, and attackers. For these reasons it is recommended that ICMP ping requests are blocked.
I understand blocking ping requests can cause problems with other systems and in troubleshooting network problems. Many management tools use ICMP requests to check for uptime, system status, and so on. If you need to unblock ping requests try to allow it only where needed.
Allow Ping Requests in Windows 10
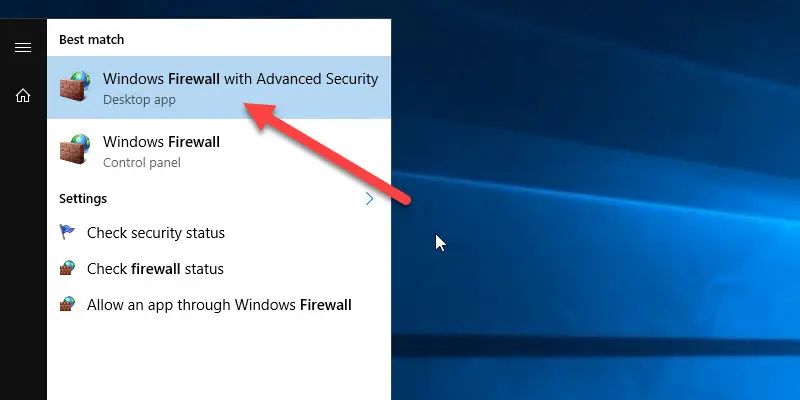
Step 1: Open the Windows Firewall
Click the start button then type firewall and click on “Windows Defender Firewall with Advanced Security”
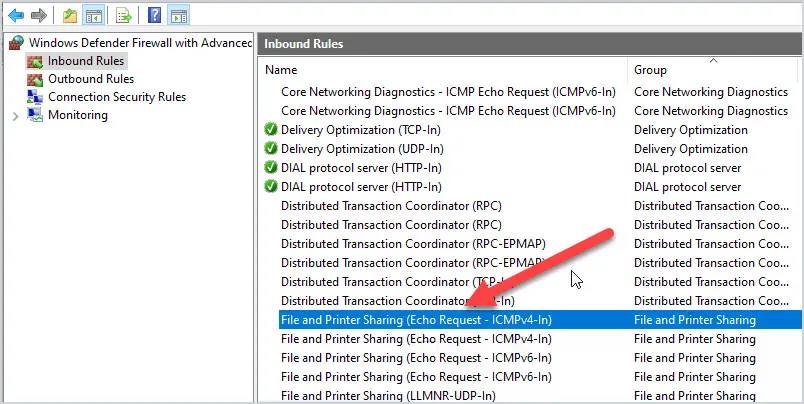
Step 2: Click on Inbound Rules
In the Firewall console click on inbound rules

Step 3: Find File and Printer Sharing (Echo Request – ICMPv4-In) Rule
In the inbound rule list scroll down to find the “File and Printer Sharing (Echo Request
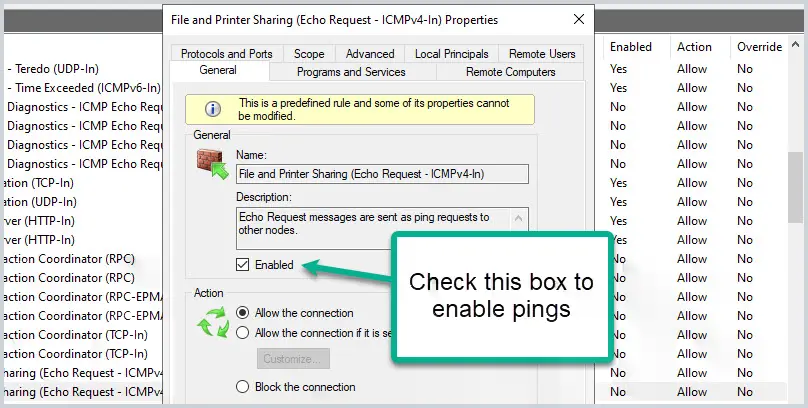
If you look at the Enabled column it should say no and this is why ping requests are being blocked. To allow pings just pick your profile and then click on Enabled. In this example, I will enable pings only for the domain profile.
I do not recommend enabling pings on your public profile.
With pings enabled you should now be able to ping this system. I enabled pings on PC2 so I’ll test this from another computer.
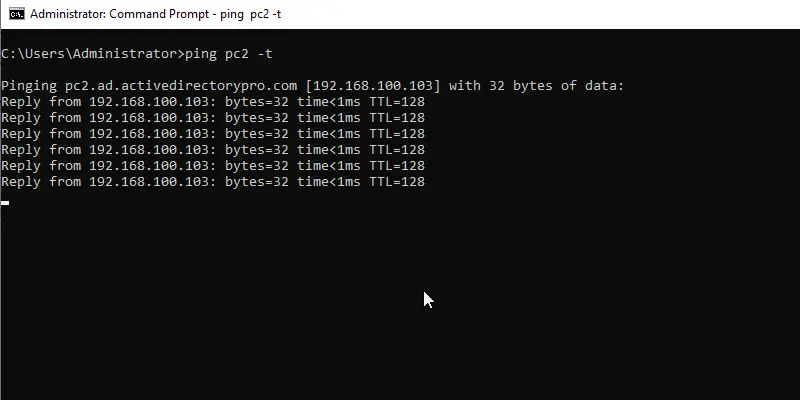
Yes, pings are now working.
If you need to enable ping requests for multiple computers then group policy is a better option, see the next section for example.
Related: 11 Windows Firewall Best Practices
Enable Ping Request Using Group Policy
If you need to enable pings on multiple computers then you should use group policy. This will also prevent someone from disabling it.
These GPO settings will work with Windows 10, Server 2008, and later versions.
Open the group policy management console.
Create and link and new GPO to an OU. In this example, I’m going to enable pings on all computers in my ADPRO Computers OU.
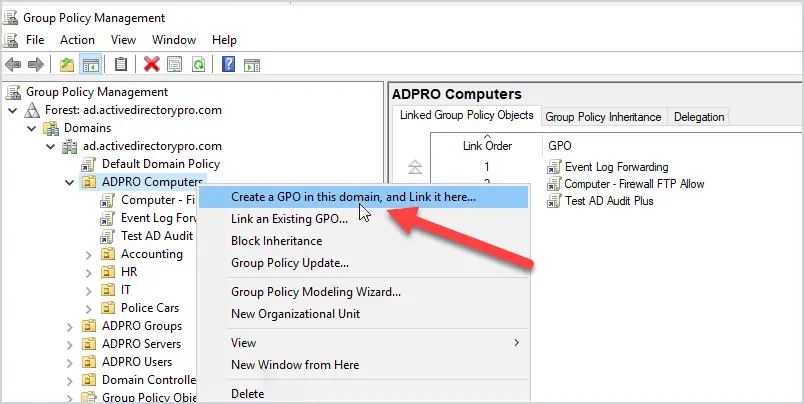
Give the GPO a name, I’ll name mine “Computer – Allow Pings”
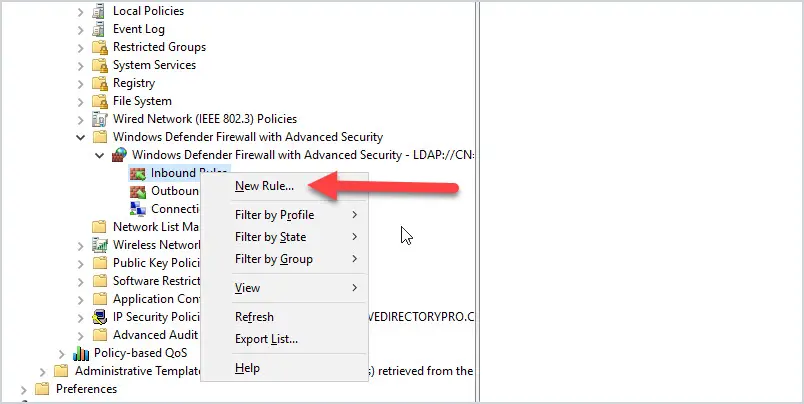
Edit the new GPO and navigate to “Policies -> Windows Settings -> Security Settings -> Windows Defender Firewall with Advanced Security”
Click on inbound rules, right-click and select “New Rule”
Select “Predefined”
In the dropdown select “File and Printer Sharing”
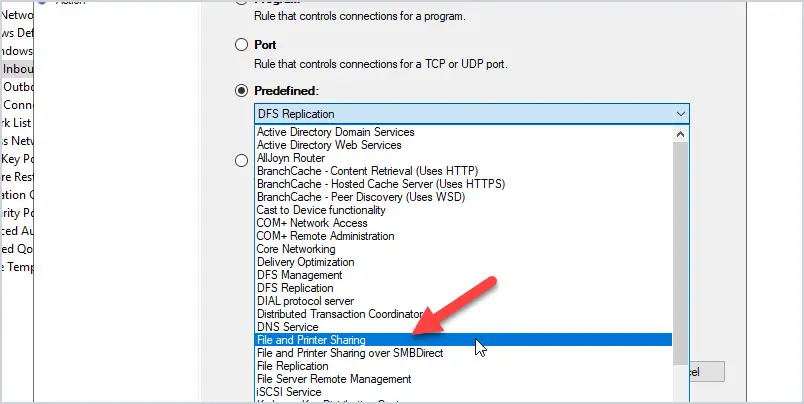
Uncheck all rules except “File and Printer Sharing (Echo Request -ICMPv4-in)
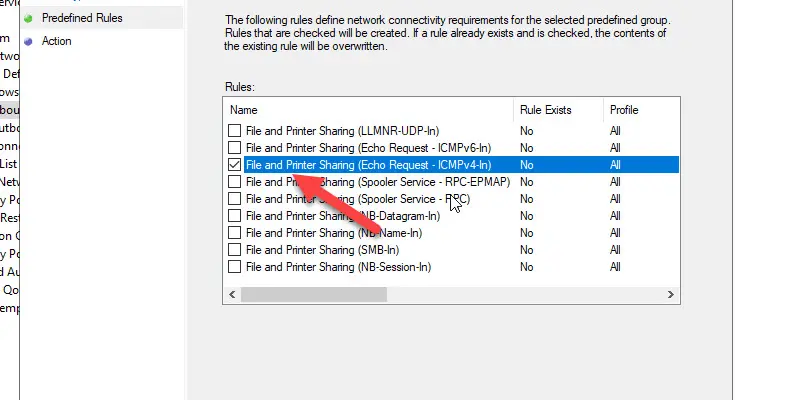
Click Next.
Select “Allow the Connection” and click Finish.
The rule is now created but we need to change the profiles.
Double click the rule and click on the Advanced tab. Unselect any profiles you don’t need. I just need the domain profile enabled so I will unselect “private” and “public” and then click apply.
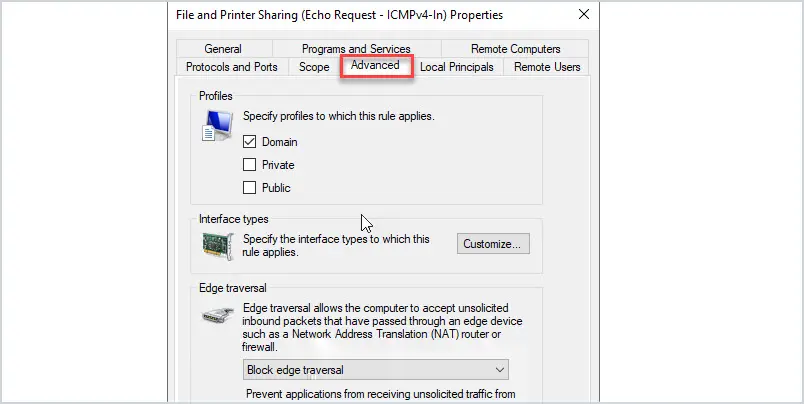
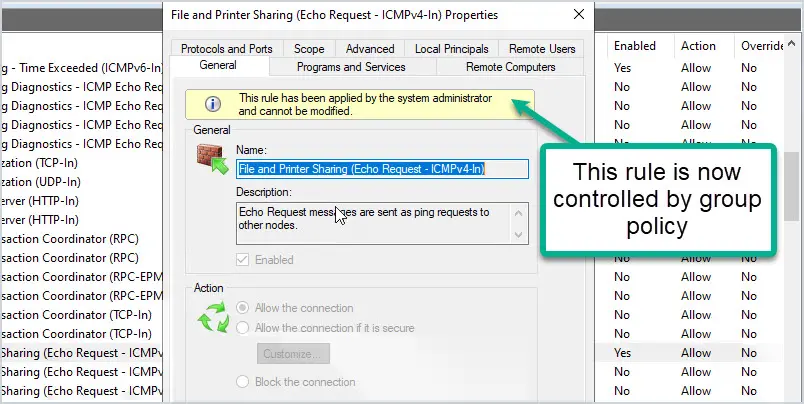
This rule will enable ping requests on any system that the GPO is applied to. It will also prevent changing the rule on the local computer as it is now controlled by group policy. Below is a screenshot of the rule on a local computer. it is locked down and cannot be edited since it is controlled by group policy.
How to Enable Ping Requests in Server 2016
The steps are the same as a Windows 10 computer. The only difference is the firewall is called “Windows Firewall with Advanced Security”
Enable the “File and Printer Sharing (Echo Request – ICMPv4-in) rule and pings will be allowed.
Allow Ping Requests and Limit Scope
For added security, you can use the scope settings to limit which systems can accept and return pings. This is a nice feature as it lets you enable firewall rules with added security.
For example, I need to allow ping requests on my 2016 server but there is no reason Lenny’s computer in finance should have access to ping the server. I can use the scope option to limit which IP addresses can send pings to the server.
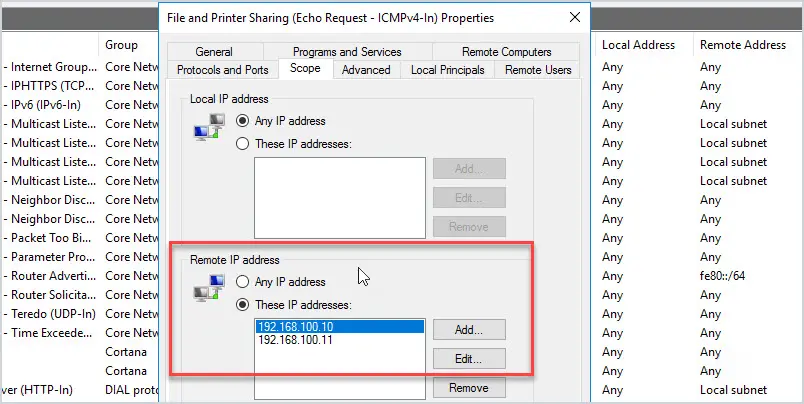
In the picture above, I added the IP addresses of the systems that my 2016 server will accept pings from.
So if I send a ping from my PC2 (192.168.100.103) the ping fails.
Now I’ll send a ping from the server (192.168.100.10)
The ping works because this IP is allowed by the firewall scope settings.
This is a great way to add additional security using the Windows Firewall. I use this setting all the time with various rules.
So that is how you enable ping requests in the Windows Firewall. If you liked this guide then check out more of my Active Directory Security tips for Windows domain environments.
If you have questions post them in the comment section below.
No one can send ping requests to your system to know whether it is alive or not when the Firewall is enabled on your Windows 10 computer system. You can enable ping by disabling the Firewall but this can prove to be very disastrous, as your PC will be exposed to external threats and malware. In this article, we will explain to you how to allow ping requests coming through the Firewall in Windows 10. We also have a guide that shows you how to use ping command in Windows.
For allowing ping from the Firewall in Windows 10, you need to proceed as follows:
Type control panel in the search section of your taskbar and click on the search result to launch a new control panel window. The newly opened Control Panel window is shown in the following image:

Click on the System and Security tab located at the top left corner of the image shown above.
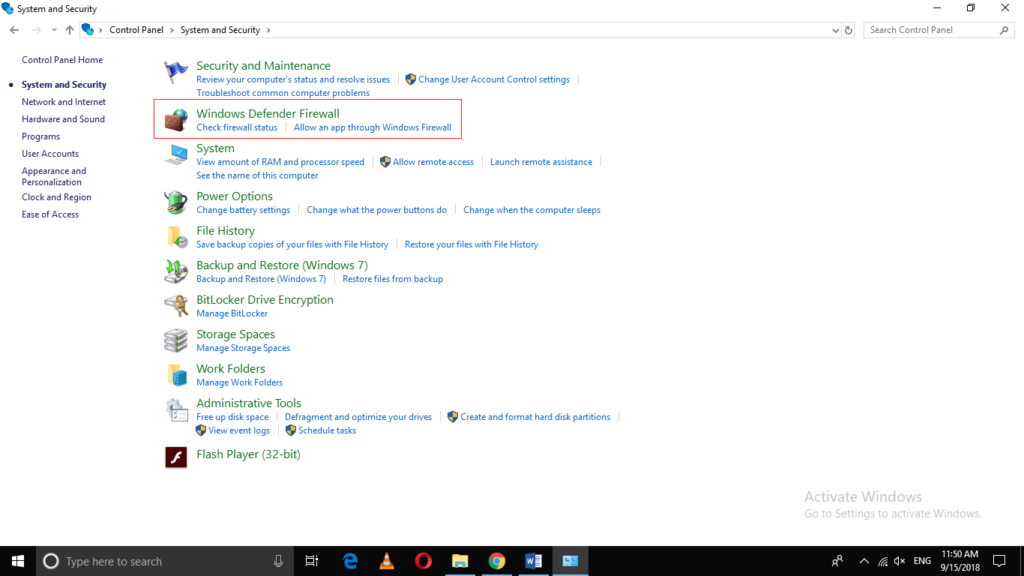
Now click on Windows Defender Firewall as highlighted in the image shown above.
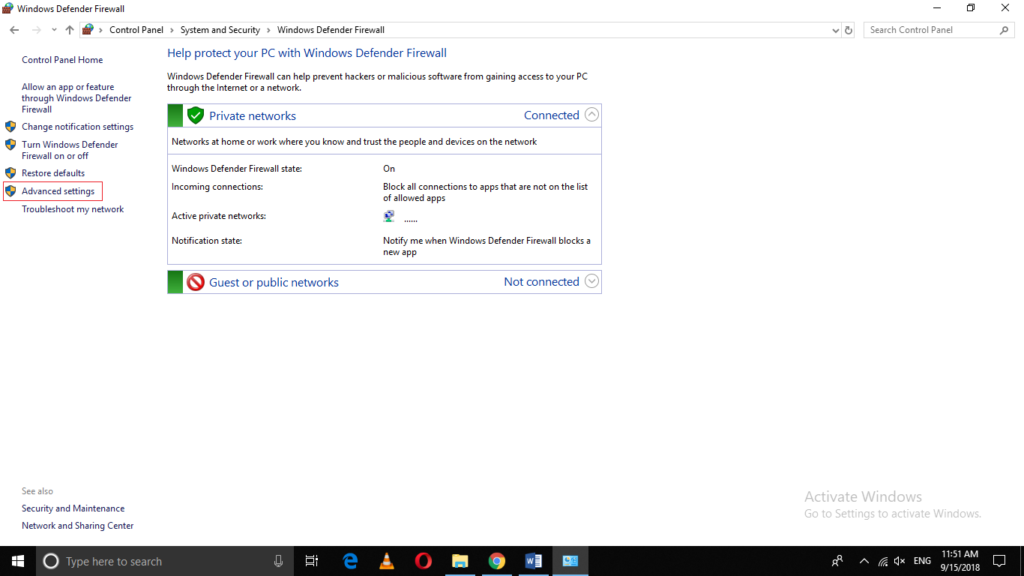
Click on Advanced Settings.
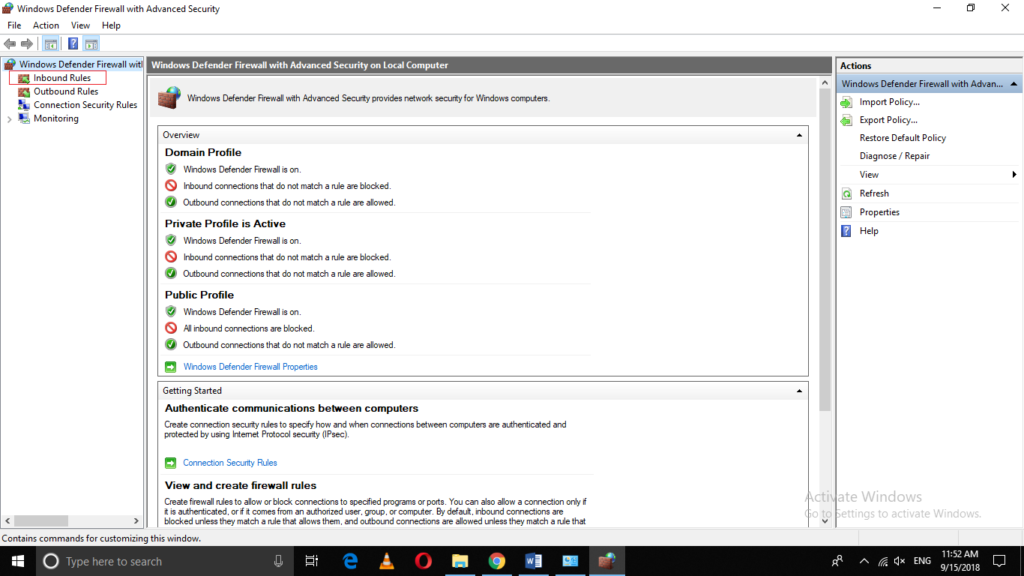
As soon as you will click on it, Windows Defender Firewall with Advanced Security window will appear as shown in the following image:
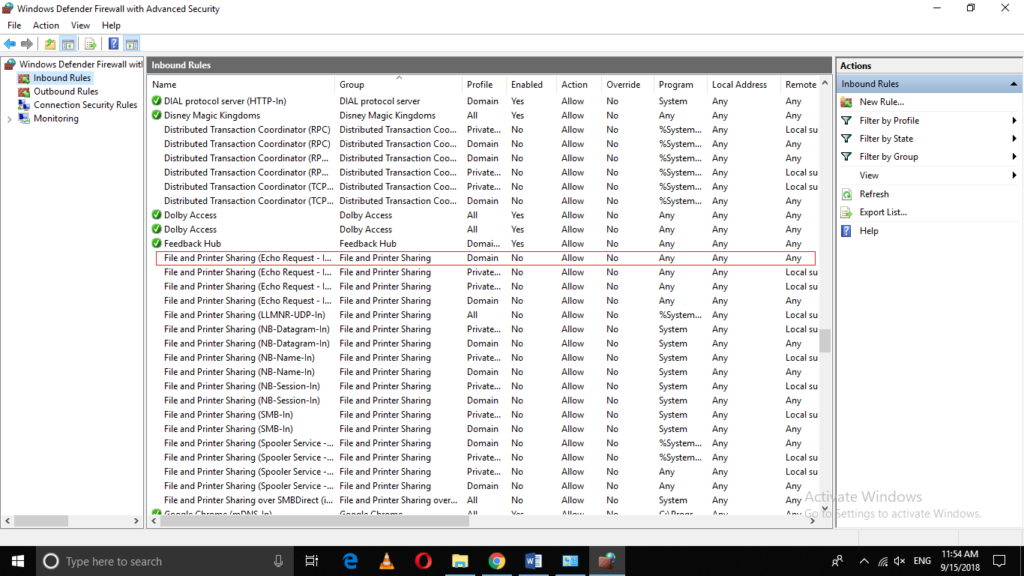
Now click on the Inbound Rules as highlighted in the image shown above.
Scroll down to locate “File and Printer Sharing (Echo Request – ICMPv4 – In)” as highlighted in the image shown below:
As soon as you manage to locate it, just click on it for once.
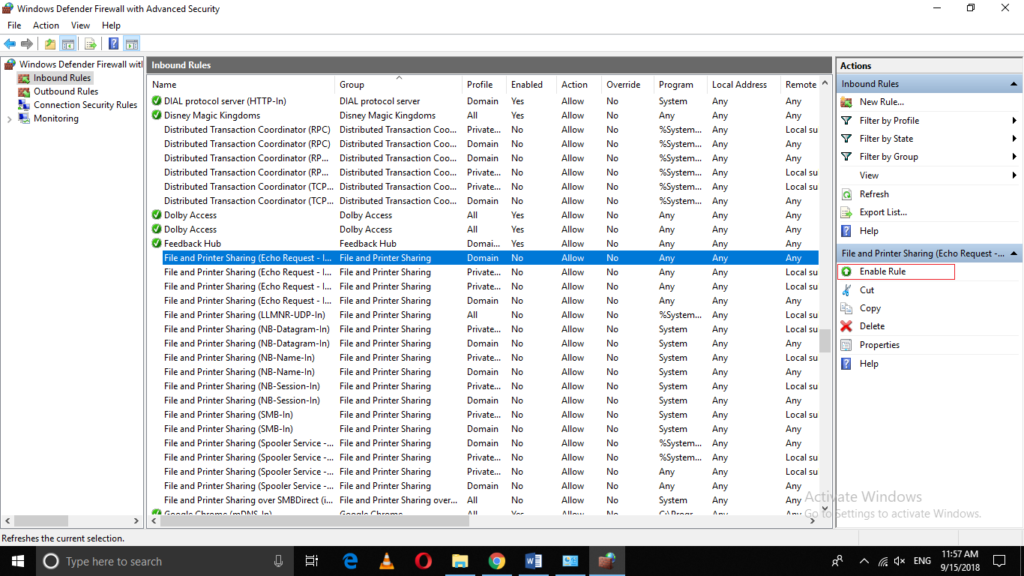
When you will click on it, some options will appear in the extreme right pane of the window as shown in the following image. Click on “Enable Rule” from these options in order to allow ping from the Firewall in Windows 10.
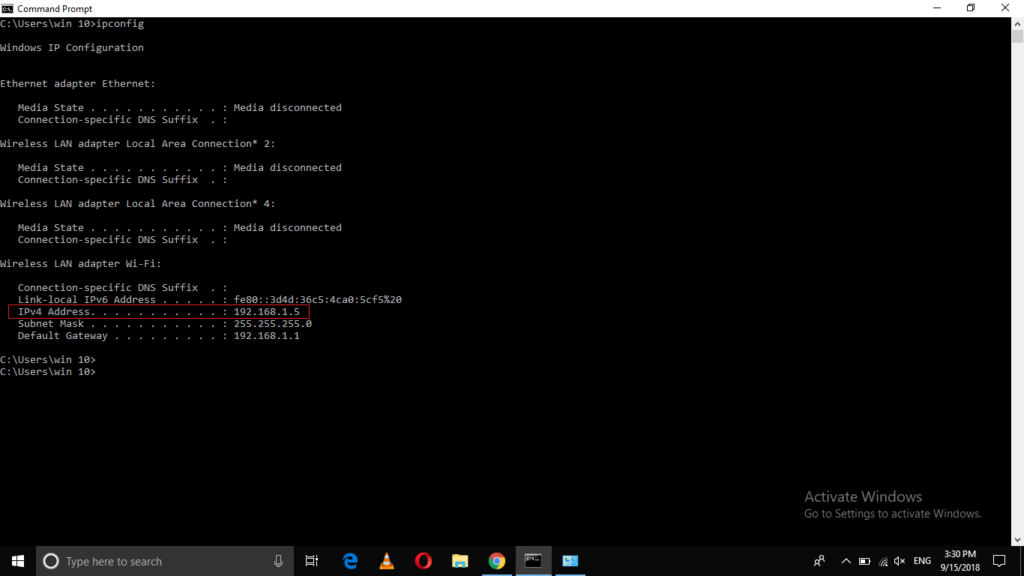
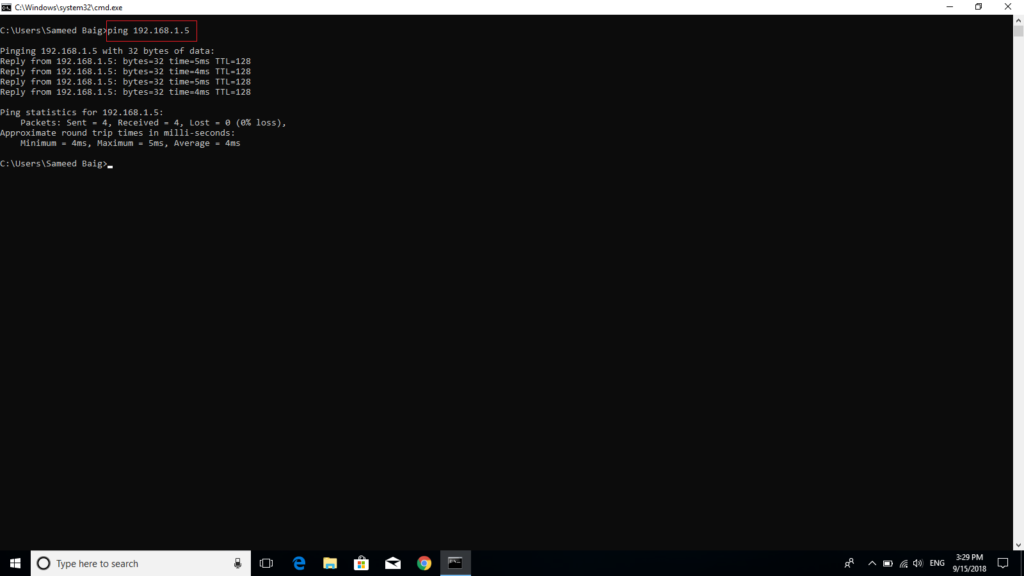
In this example, I have pinged my PC from another PC on the same network after enabling this rule. The IP address of my machine is highlighted in the following image:
The image given below shows the success of ping from Firewall after enabling this rule.
Conclusion
By following the method discussed above, you can easily allow ping from the Firewall in Windows 10 without disabling your Firewall and exposing your system to external threats. Whenever you want to disable the ping requests from the Firewall, just follow the same steps and as soon as you will locate that rule, just click on it and then select “Disable Rule”. There is also a guide on creating advanced firewall rules in Windows.
By default, the built-in Windows Defender Firewall blocks all inbound ICMP traffic. As a result, if you try to ping the Windows host from a different device, the computer will not respond to the ICMP echo request (with the Request timed out description). In this article, we’ll look at how to enable or disable host network connectivity checks (ICMP echo requests) using the ping command on Windows 10/11 and Windows Server 2022/2019/2016.

You can use the graphical MMC snap-in, the command line, and the PowerShell console to manage the rules of the Windows Firewall. Let’s look at all three ways of enabling and disabling ICMP rules in the firewall.
How to Allow Ping in Windows Firewall
Search for Firewall in the quick search bar and open the Windows Defender Firewall with Advanced Security snap-in (or press Win+R and run the wf.msc command).

Select Inbound Rules in the left pane and find the File and Printer Sharing (Echo Request – ICMPv4-In) rule. As you can see, the rules for both ICMPv4 and ICMPv6 are available here for both the Domain and the Private network profiles. All of these rules are disabled by default.
You can turn on a firewall rule by right-clicking on it and selecting Enable Rule.

You can remotely check the availability of this computer using the ping command. Now Windows Firewall is not blocking ICMP requests and you can see that the remote host is accessible over the network.

By default, this rule allows ICMP echo requests from any source on the local network. If you want to restrict the list of computers that are allowed to send ICMP requests, or allow ICMP ping for external IP addresses, you can edit the existing rules.
- Open the properties of the firewall rule and go to the ‘Scopes’ tab;
- As you can see, the rule allows ICMP replies for all hosts on the Local subnet;
- You can edit the list of accepted IP addresses in Remote IP Address;
- This is where you can add specific IP addresses, ranges of IP addresses, or subnets.


You can enable and disable the Windows Defender firewall rule from the command line.. Open the elevated cmd prompt or PowerShell console. To allow ICMPv4 ping for all network profiles, run the command:
netsh advfirewall firewall set rule name="File and Printer Sharing (Echo Request - ICMPv4-In)" new enable=yes
You should see the following message:
Updated 2 rule(s).
Ok.

You must also enable the ICMP rule for the IPv6 protocol if it is used in your network communications:
netsh advfirewall firewall set rule name="File and Printer Sharing (Echo Request - ICMPv6-In)" new enable=yes
Separate cmdlets for managing Windows Firewall rules are available in the built-in NetSecurity PowerShell module. To allow ICMP ping for all profiles, run the following commands:
Enable-NetFirewallRule -displayName "File and Printer Sharing (Echo Request - ICMPv4-In)"

Enable-NetFirewallRule -displayName "File and Printer Sharing (Echo Request - ICMPv6-In)"
Disable ICMP Ping in Windows Firewall
You can disable ICMP echo request rules from the Windows Defender Firewall graphical console. Select all the rules in the list (by holding down the CTLR key), right click and select Disable Rule.

It is also possible to disable the ICMP ping rules from the command prompt:
netsh advfirewall firewall set rule name="File and Printer Sharing (Echo Request - ICMPv4-In)" new enable=no

netsh advfirewall firewall set rule name="File and Printer Sharing (Echo Request - ICMPv6-In)" new enable=no
Or with PowerShell:
Disable-NetFirewallRule -displayName "File and Printer Sharing (Echo Request - ICMPv4-In)"

Disable-NetFirewallRule -displayName "File and Printer Sharing (Echo Request - ICMPv6-In)"
Cyril Kardashevsky
I enjoy technology and developing websites. Since 2012 I’m running a few of my own websites, and share useful content on gadgets, PC administration and website promotion.