
В версиях Windows Server, предшествующих Windows Server 2016, создать отказоустойчивый кластер из нескольких серверов можно было только между серверами одного домена Active Directory. В новой версии теперь можно создавать двух (и более) узловой failover кластер между серверами в разных доменах, и даже между серверами рабочей группы (вообще без домена Active Directory).
Естественно, что на всех узлах кластера нужно устаровить Windows Server 2016. Поддерживаются следующие сценарии кластеризации:
| Служба | Статус | Комментарий |
| SQL server | Поддерживается | Рекомендуется использовать встроенную аутентификацию SQL Server |
| Файловый сервер | Поддерживается, но не рекомендуется | Не поддерживается Kerberos-аутентфикация для SMB |
| Hyper-V | Поддерживается, но не рекомендуется | Не поддерживается режим Live Migration, доступна только Quick migration |
| Message Queuing (MSMQ) | Не поддерживается | MSMQ хранит свои свойства в Active Directory. |
На всех будущих узлах кластера нужно
- Установить роль Failover Clustering:
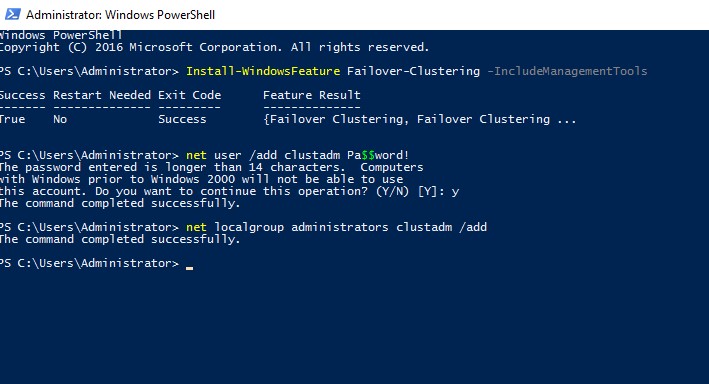
Install-WindowsFeature Failover-Clustering –IncludeManagementTools - На каждой кластерной ноде нужно создать локальную учетную запись с правами администратора (или использовать встроенную учетку администратора) с одинаковыми паролями.
net user /add clustadm Pa$$word!
net localgroup administrators clustadm /add
- При появлении ошибки Requested Registry access is not allowed, необходимо изменить в реестре параметр удаленного UAC — Данный ключ разрешает удаленный доступ к административным шарам.
New-ItemProperty -Path HKLM:\SOFTWARE\Microsoft\Windows\CurrentVersion\Policies\System -Name LocalAccountTokenFilterPolicy -Value 1 - На всех узлах кластера нужно задать одинаковой первичный DNS суффикс (Primary DNS suffix). Это нужно для того, чтобы сервера кластера могли обращаться друг к другу по FQDN именам
- Также нужно снять галку Register DNS connection addresses
- В файл hosts на всех узлах кластера нужно внести изменения, чтобы сервера могли отрезолвить имена других членов кластера, а также имя кластера (в том числе FQDN имена). Добавить имена в файл c:\windows\system32\drivers\etc\hosts можно так:
Set file="%windir%\System32\drivers\etc\hosts"
echo 192.168.1.21 clust-host1 >> %file%
echo 192.168.1.21 clust-host1.mylocal.net >> %file%
echo 192.168.1.22 clust-host2 >>  %file%
echo 192.168.1.22 clust-host2.mylocal.net >> %file%
echo 192.168.1.20 cluster1 >> %file%
echo 192.168.1.20 cluster1.mylocal.net>> %file%

Для предварительной валидации узлов кластера можно воспользоваться командой:
test-cluster -node "clust-host1.mylocal.net"," clust-host2.mylocal.net"
Для создания кластера через PowerShell, нужно выполнить такую команду:
New-Cluster -Name cluster1 -Node clust-host1.mylocal.net, clust-host2.mylocal.net -AdministrativeAccessPoint DNS -StaticAddress 192.168.1.20
Теперь можно проверить статус кластера и его компонентов командлетами get-cluster и get-clusterresource.
Для подключения (и удаленного управления) кластером через GUI нужно воспользоваться оснасткой Failover Cluster Manager (входит в состав) RSAT для Windows 10.
Теперь с помощью пункта меню Connect to cluster можно подключаться к созданному кластеру. В том случае, если в кластере четное количество серверов, придется настроить ресурс-свидетель. Отметим, что в качестве кворумного свидетеля нельзя использовать сетевую папку SMB. Поддерживается режим Disk Witness — общий диск (с одновременным доступом к нему с обоих узлов), либо Cloud Witness — облачный дисковый ресурс в Azure.
Estimated Reading Time: 3 minute(s)
Table of Contents
- Case
- Solution
Case #
You have a Windows Failover Cluster (WFC) comprising one or more nodes. The WFC cluster can be a physical cluster (for example a Hyper-V cluster) or a virtual (aka guest) cluster, for example a SQL Server virtual machine cluster. This article provides guidance on how to delete a Windows Failover Cluster via Powershell.
If you need to deploy a Hyper-V Windows Failover Cluster via Powershell, you should consult the following KB article: https://docs.cloudschool.tv/kb/how-to-deploy-a-hyper-v-cluster-with-powershell/.
For more details and design considerations about Windows Failover Clusters, you should review my book at https://docs.cloudschool.tv/windows-failover-clustering-design-handbook/.
Solution #
Carry out the following steps to delete a Windows Failover Cluster via Powershell.
- First off, review the current state of your WFC cluster by running the following cmdlets.
Get-Cluster
Get-ClusterNode
Get-ClusterResource
Get-ClusterLog
- Ensure that the cluster nodes do not service any application workloads or end user traffic.
- Gracefully stop all WFC roles, for example stop all SQL Server clustered instances running on a SQL Server guest cluster. Run the following cmdlets to accomplish this.
#Identify the resources or resource group which includes all resources related to the cluster roles you need to stop
Get-ClusterResource
Stop-ClusterGroup "Resource Name"
- At this point, you must uninstall and cleanup any software installed on the WFC nodes which is related to the clustered roles, for example SQL Server cluster node or Hyper-V. Unless you perform this task, you may have issues with your cluster nodes being left in an inconsistent state (for example Active Directory stale objects) and you may receive unexpected errors. An example of graceful removal of a SQL Server guest cluster node is shown below.


- After you have removed the underlying guest cluster services from each node, then run the Remove-ClusterNode cmdlet on that node: https://docs.microsoft.com/en-us/powershell/module/failoverclusters/remove-clusternode?view=windowsserver2022-ps. The Remove-ClusterNode cmdlet removes a node from a failover cluster. After the node is removed, the node no longer functions as part of the cluster unless the node is added back to the cluster. Removing a node is also called evicting a node from the cluster. Note: This cmdlet cannot be run remotely without Credential Security Service Provider (CredSSP) authentication on the server computer.
Remove-ClusterNode [Node name]
- Run the Clear-ClusterNode cmdlet: https://docs.microsoft.com/en-us/powershell/module/failoverclusters/clear-clusternode?view=windowsserver2022-ps. The Clear-ClusterNode cmdlet clears the cluster configuration from a node that was evicted from a failover cluster. This cmdlet helps ensure that the failover cluster configuration has been completely removed from a node that was evicted.
Clear-ClusterNode [Node name]
- Repeat the above three (3) steps for all remaining WFC nodes, except for the last cluster node. If you try to remove the last cluster node you will receive the following error. At this point you are ready to run the Remove-Cluster cmdlet as described below.

- After all above tasks have been completed for all WFC nodes except for the last node, run the Remove-Cluster cmdlet: https://docs.microsoft.com/en-us/powershell/module/failoverclusters/remove-cluster?view=windowsserver2022-ps.
Get-Cluster -Name [Cluster Name] | Remove-Cluster -CleanupAD
Finally validate there are no leftovers in file system, in registry and in cluster objects in the operating system of the cluster nodes. Double check the operating system event logs that there are no warnings or errors which may impact your server(s).

In my last article “How to remove node from File Share Cluster (DFS) on Windows Server” we had three nodes in DFS Namespace Server role that was clustered. I removed one node from DFS Namespace, but that node is still available in Failover Cluster Manager. In this short guide we will learn how to remove node from Failover Cluster.
Before we begin
This article is in relation with guide “How to remove node from File Share Cluster (DFS) on Windows Server” I wrote earlier.
Before you start – make sure that you have backups.
If you want to remove node from Failover Cluster, you need to make sure that roles you have on that cluster do not depend on that node. Be careful not do destroy cluster completely (if you don’t plan to do that – and make sure you plan downtime and have backup in place).
So, I first removed DFS1 from DFS Namespace role, and next step is to remove DFS1 from Failover Cluster.
Prerequisites
All is referenced in “How to remove node from File Share Cluster (DFS) on Windows Server” so you can go to that article and articles I mentioned in that guide to see how the whole lab is set.
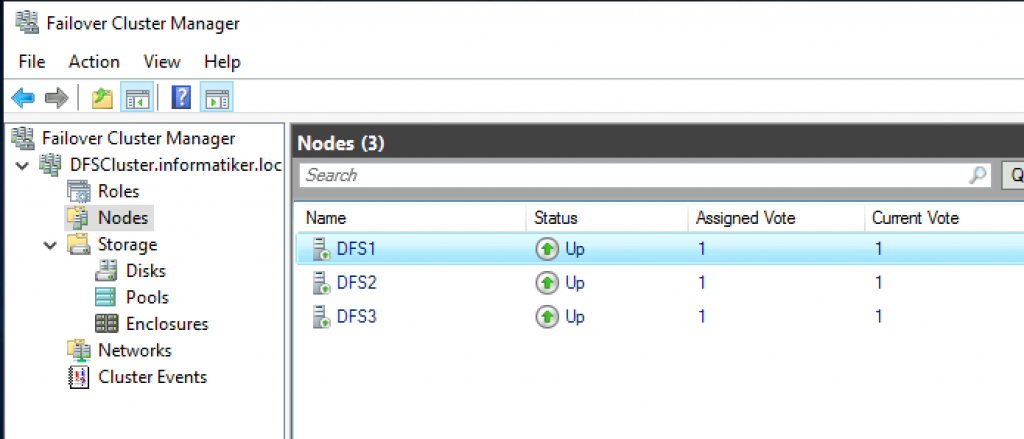
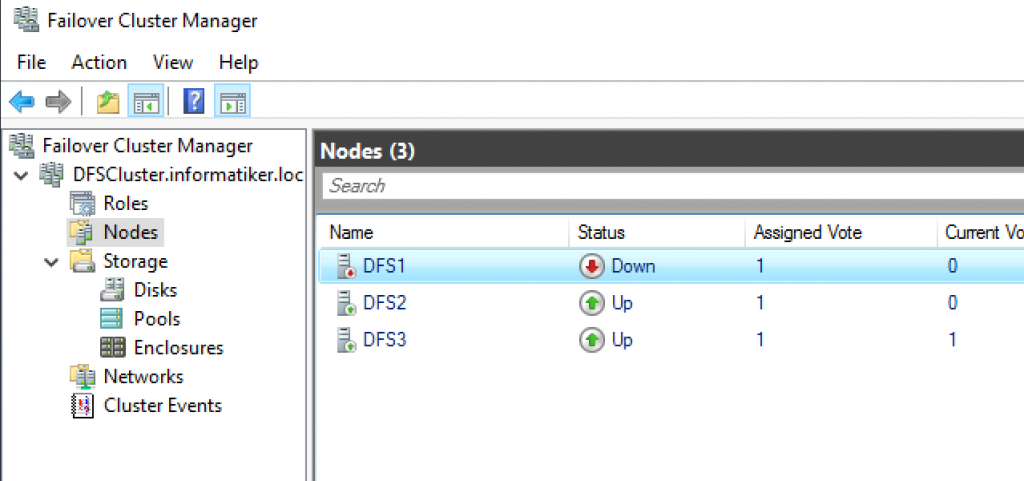
In short. I have three nodes – DFS1, DFS2 and DFS3.
I want to remove DFS1 from Failover Cluster.
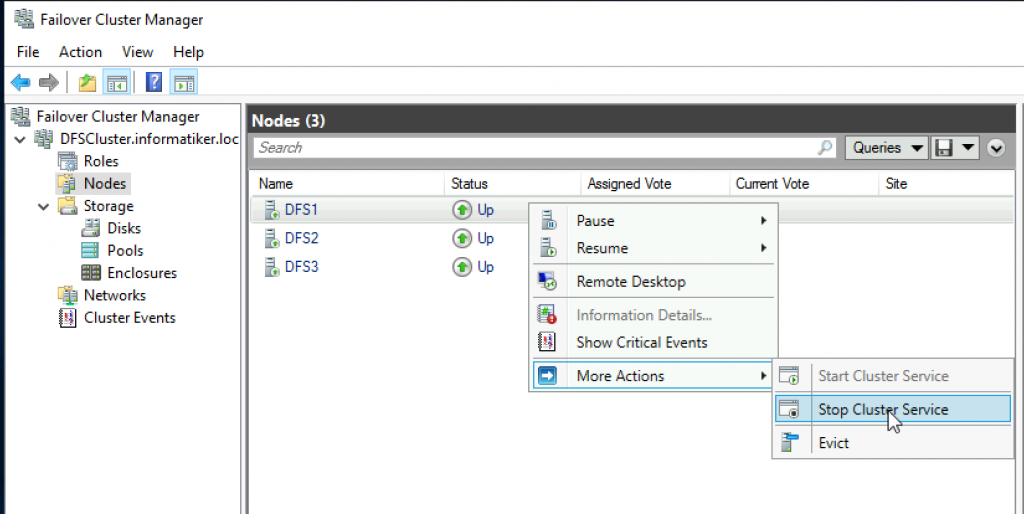
I will be doing this from DFS3. I will open Failover Cluster Manager and click on Nodes section. I will right click on DFS1 and select Stop Cluster Service from More Actions
Draining…
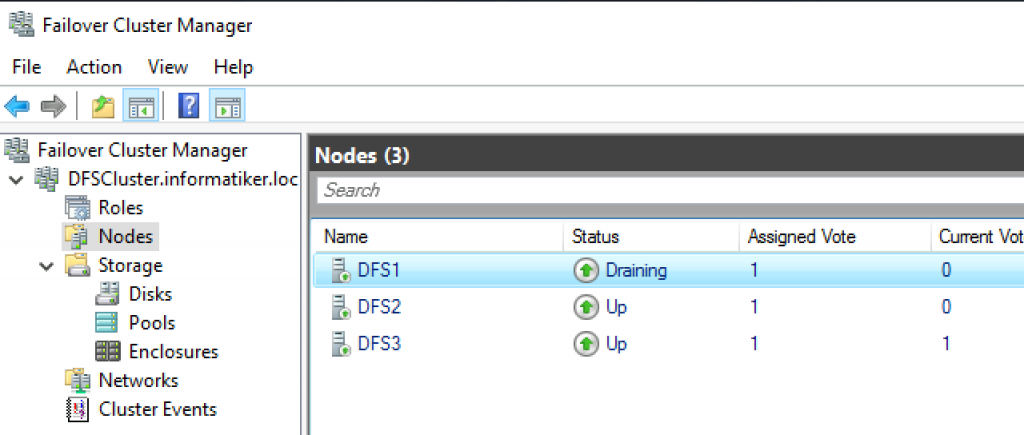
Down
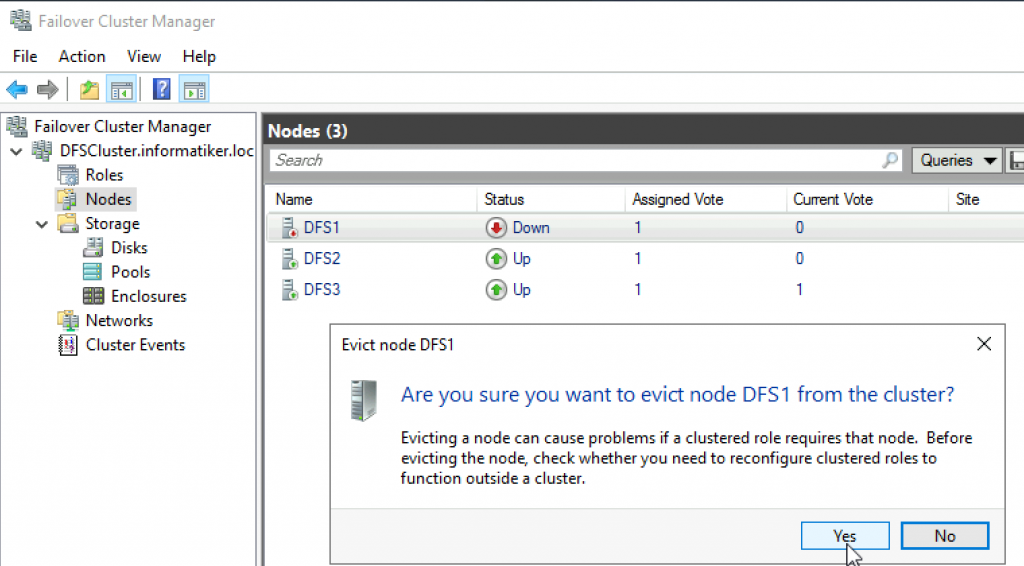
Now, again right click on DFS1, More Actions, Evict
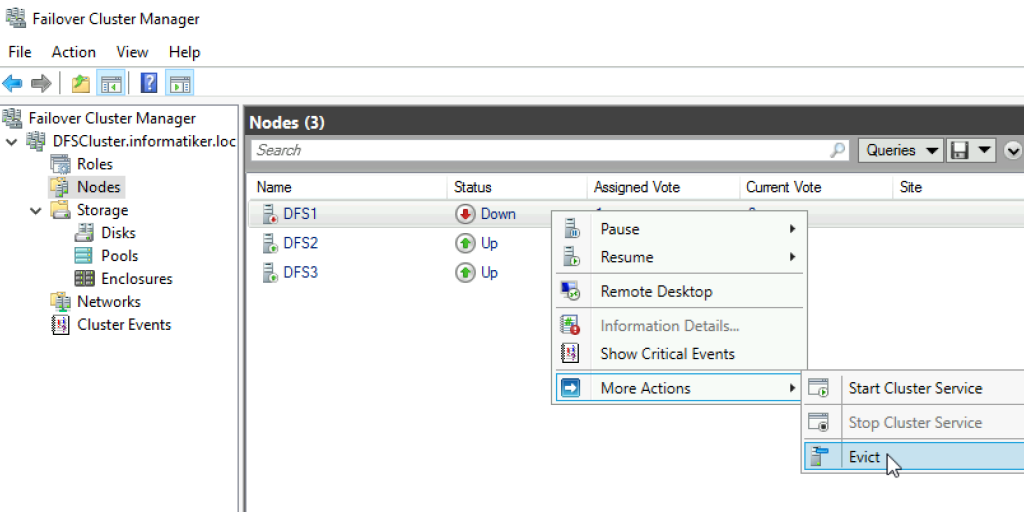
Warning will be displayed. Of course make sure your services will function after you evict the node, and make sure you have a backup. Yes
And just like that – we have two nodes left in cluster
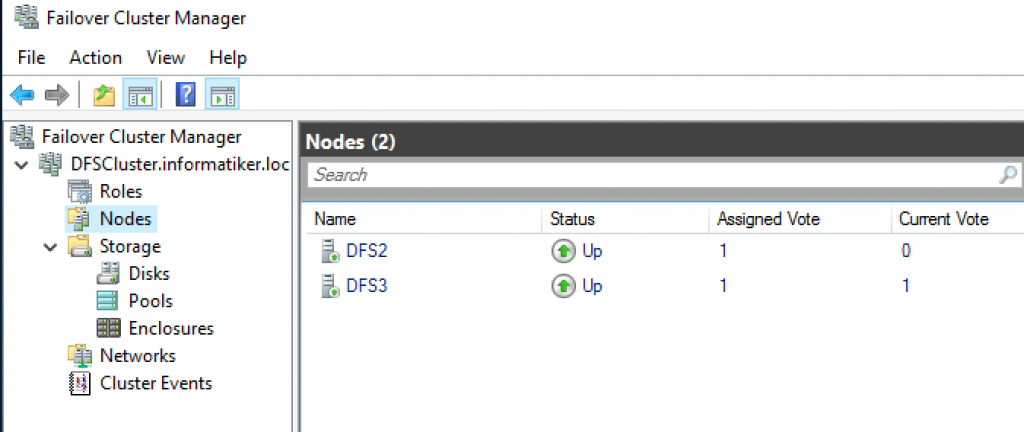
I turned off DFS1 to make sure everything will function. I also tried to move roles from DFS2 to DFS3 and vice versa, everything works flawlessly.
Disclaimer
I haven’t posted for a while but thought I’d dust off the blog and get a post out. I have a pipeline of blogs from David and Ian waiting to be scheduled and they should be out before Christmas.
Warning – Do not do this on your production boxes
I have been doing some work, first with CTP3 and now RC0 and Availability Groups. For those of you that don’t know you need a windows cluster configured to use AlwaysOn Availability Groups. I wanted to remove the cluster from my virtual nodes…so I could rebuild it. That’s a long story. I thought, before I started that removing the cluster would be difficult. As it turns out it is very simple in Windows 2008R2.
To destroy you cluster from Failover Cluster Manager right-click the name of your Windows cluster, scroll down to other tasks and select <Destroy Cluster> You get a warning which, if you accept then goes away and removes the cluster from all nodes in your cluster…Its gone!
As I said don’t do this on your production boxes but if you ever want remove clustering from your Windows environment then it can be quite simple to do so.