
Как размонтировать диск — Краткая инструкция
Рассмотрим случай, когда Вы эмулировали образ диска стандартными средствами Widnows (в Windows 10 или 11) и после установки приложения его нужно размонтировать, например, чтобы после удалить образ диска.
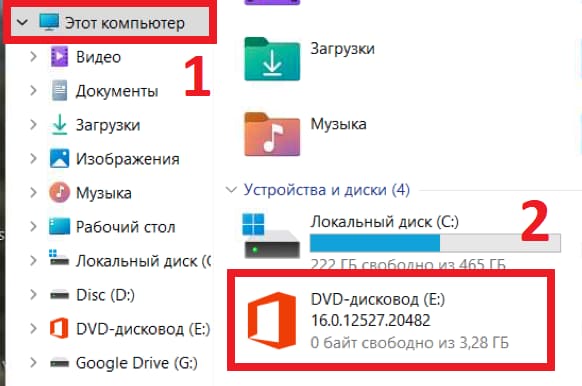
1) Заходим в проводник => Меню «Этот компьютер» => После находим там нужный Вам эмулированный образ
2) Нажимаем на него правой кнопкой мыши => Извлечь
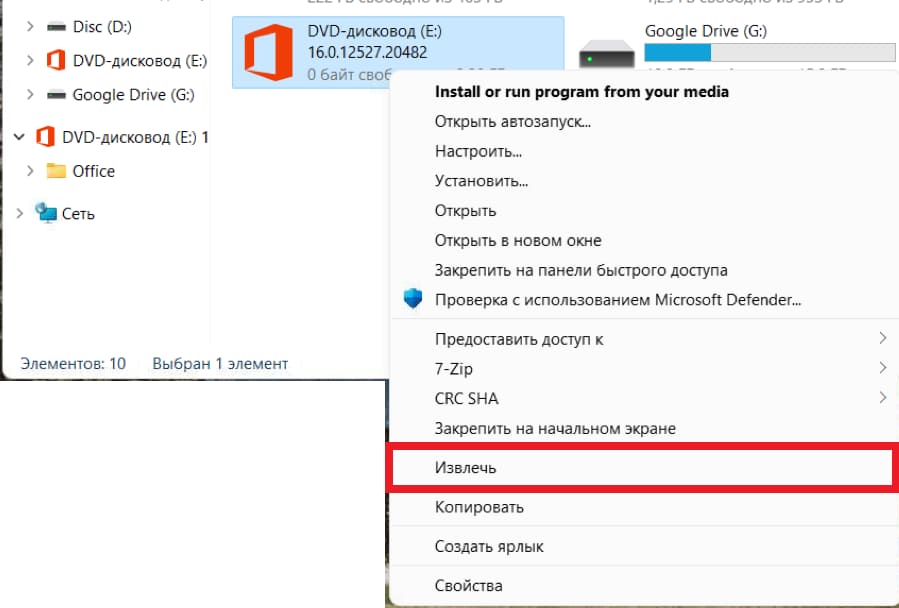
На этом все, образ диска размонтирован.
842
Похожие статьи
Получайте первыми лучшие скидки и свежие новости!

Dispart is the latest version of fdisk which is a command-line utility that you can use to manage disks, partitions, or values in the system running all versions of OS since the first Windows release including the latest release. We have put together the most used and common DiskPart Commands for Windows 11 along with their examples for you to learn. They are also available in PDF format to save.
Today we can input these commands and organize hard disk partitions, create text file scripts and format volumes. For those who do not know, remember that many of these operations performed in the disk management tools are integrated into DiskPart.
How to Open DiskPart in Windows 11
- Launch Windows 11 CMD with administrator permission.
- In the search box type in “DiskPart”, as it appears right-click on it and select “Run as administrator”. Alternatively, you can press “Windows logo + R” from the keyboard and then hit “ok”.
Now, making this in use you first need to select an object to give it focus, once done any command typed in shall act on the particular object.
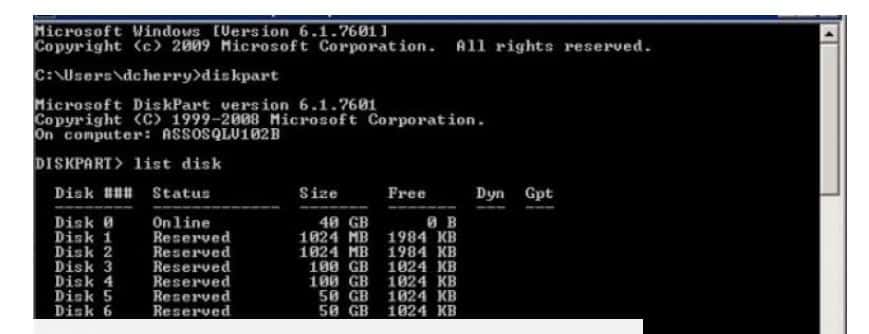
- At DISKPART> prompt, you need to type in “list disk” in order to display all the disks in the system.
- Each shall come with a certain number of disk beginnings with 0.
- (*) asterisk there under GPT row means that the disk is of GPT partition style.
- Now if there is only one disk then you need to tell it which disk needs to be managed by using the “Select Disk n” command to give it focus. Now, n is used to represent a number of disks.
- At DISKPART> prompt, you need to type in “list volume” in order to display the volumes of all disks.
- Each shall have a certain number beginning with 0 which starts with zero. Type in “select volume n” to tell it which volume to manage and give it focus, in this n can be the volume number or drive letter of the volume if it has.
- To see what DiskPart can do for you, just type in help in order to see the command list.
We have taken some common commands which it uses as examples for some further understanding.
Managing your disk volumes
As when selecting volume, the focus remains on it till a different volume is selected, the “select volume” command might not be used in all the operations. Moreover, the examples are usually performed one after another plus the last operations effect shall be viewed in the next operation. Now, if you intend to perform only one operation then you need to select volume before using the corresponding command.
Note: Make sure to hit “enter” every time you type a command to apply it.
Deleting Volumes
For this, you need to use the following commands:
- List volume
- Select volume 7 (In here take G: drive for example)
- Delete volume
After this, you shall get a message which says:
Successfully deleted the volume
Note: Any volume which carries the active paging file or crash dump, system volume and boot volume cannot be deleted.
FEATURED: Disable and Turn Off Hibernate in Windows 11 from CMD.
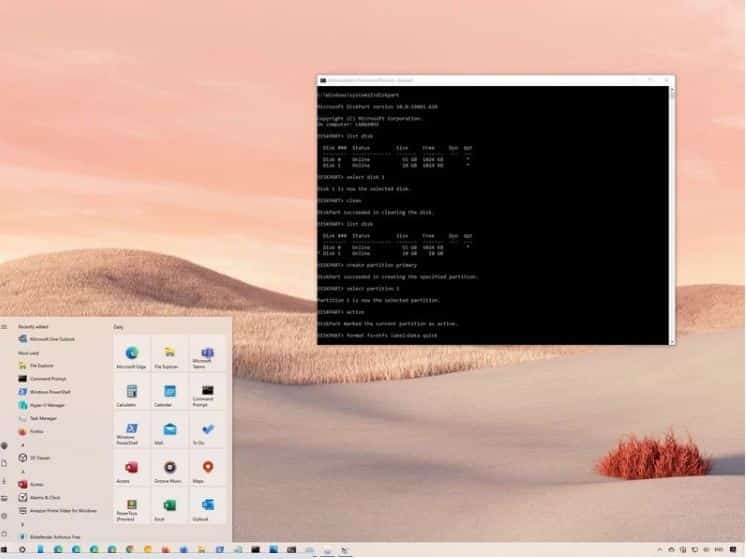
Creating Partitions

For this see the following command:
Create partition primary size=22500
After this you shall get a message which says:
Succeeded in creating the specified partition
With the above command, we can create a 102400 MB, a 100 GB primary partition. To create others all you need to do is replace the primary with one of the following:
Note: There should be unallocated space on the disk to create a partition.
ALSO CHECK: How To Use Quick Access Toolbar in Windows 11.
Formatting Partitions
You need to type the list volume command and see that the new partition that is created is RAW which means that we need to format the partition before it can be used. Now, to format a partition you need to refer to the command below:
Format fs=ntfs label=”DekiSoft” quick
After this, you shall get a message:
Successfully formatted the volume
With the command mentioned above, you can perform a quick format on the partition, it shall be formatted with the NTFS file system and also labeled as Windows 7. Now, make another file system partition such as FAT, FAT32 all you need to do is replace NTFS with fat or fat32. Give the label any name you want.
Keep in mind that DiskPart is not able to format 32GB+ partitions to FAT32, now to format a larger hard drive to FAT32 you need to run a third-party partition manager.
Assign a Drive Letter
Partitions not having a drive letter shall be hidden under “file explorer”, to assign one to an existing partition you need to refer to the command below:
assign letter=F ( in this you can replace F with some other letter that has not been used yet)
After this you shall get a message that says:
DiskPart successfully assigned the drive letter or mount point
ALSO CHECK: How To Open Folder Options in Windows 11.
Extending your Partitions
For this you need to see the following command:
Extend size=10256
After this you shall get a message says:
DiskPart successfully extended the volume
This command means to add in 2048MB which is 20GB to volume 6. Now, if no size is given the contiguous unallocated space on the right side shall be added.
Note: Contagious unallocated space must be on the ride side to extend the partition.
- Shrink Partition
For this refer to the command below:
Shrink desired= 11000
After this you shall get a message which says:
Successfully shrunk the volume by 11 GB
Note: You can reduce volume size only if it is formatted with help of using the NTFS file system.
Active
After this you shall get a message which says:
Marked the current position as active
ALSO CHECK: Turn Off Microsoft Account Syncing in Windows 11.
List and clean your drives
These need to be MBR and GPT conversion. On a disk, if you want to delete all partitions or volumes and also convert the disk between MBR and GPT refer to the commands below:
#1:
List disk

#2:
Select disk 2


#3:
Clean

#4:

“convert got” or “convert mbr”
DiskPart Commands PDF
If you want a hard copy or get this printed to attach in your office or home, feel free to do so.
DiskPart Commands List for Windows 11 (PDF)
Concluding
DiskPart has always been the best disk partitioning tool for Windows. This is why we have created a guide on all the Windows 11 DiskPart commands and working examples for listing drives, formatting and creating them. We have also saved it in a PDF file that you can keep or print locally for knowledge or guidance when needed.
Download Article
Remove drives and disks in Windows, macOS, and Linux
Download Article
- Using Windows
- Using Mac
- Using Linux
- Q&A
- Tips
- Warnings
|
|
|
|
|
Do you need to unmount a disk or flash drive from your computer? Unmounting a drive is the same as ejecting a drive. With most devices, you cannot unmount your computer’s main hard drive (the hard drive where your operating system is installed). This wikiHow will show you how to unmount a drive on your Windows, Mac, or Linux computer.
Unmounting a Disk or USB Drive
If you’re using Windows, right-click the drive in File Explorer and click Eject on the Manage tab. On a Mac, open the Finder and click the eject button next to the drive. To unmount in Linux, use sudo umount followed by the mount point.
-

Open the File Explorer. Right-click the Start menu and select File Explorer.
- On Windows 7 and Vista, click Computer in the right column.
- Alternatively, press the Win key.
- If you need to remove or replace a physical hard drive built into your computer, see this article instead.
-

This may also look like Computer or My Computer.
Advertisement
-

A list of all currently active drives will be available under the «Devices and drives» header.
- This drive must be either a removable drive (e.g., a flash drive or SD card) or a secondary internal drive.
-

This will be in the Drive Tools tab. If you aren’t already on this tab, click it to navigate there now.
- Once you click Eject, you’ll see the drive’s icon disappear from the File Explorer window, and a notification letting you know that it’s safe to remove the drive will appear.
-
This will complete the unmounting process.
-

If you want to change or remove the drive letter, you can use the Disk Management app. This is helpful if you have a lot of partitions or volumes, or if you’d rather manually mount the drive yourself. Do the following:
- Press the Windows key + R to open the Run menu.
- Type diskmgmt.msc and press Enter.
- Right-click the drive.
- Click Change Drive Letter and Paths.
- Click Remove.
- Click Yes.
- Close Disk Management.


Advertisement
-

This can be found in the Dock.
-
You can find this in the left panel. This will safely disconnect the drive from your device.[1]
- Alternatively, you can drag the drive to the Trash to quickly eject it.
-
This will complete the unmounting process.
-

If you want to unmount an internal disk drive, do the following:
- Open the Disk Utility app.[2]
- Select the disk or disk set you want to unmount.
- Click Unmount.
- Open the Disk Utility app.[2]


Advertisement
-
Open the Terminal. On most devices, you can use the keyboard shortcut Ctrl + Alt + T.
-
This will list all human readable drives on your system.
- Take note of the drive’s path.
-

You must have superuser privileges to do this.
- Note: The command is umount, not unmount.
-
The drive will be unmounted.
-
This will complete the unmounting process.


Advertisement
Add New Question
-
Question
How do I fix an unmounted hard drive disk utility on my MacBook Pro when it doesn’t show up anymore?
Look for errors in the hardware (look for problems in the physical drive or drive connector). It usually does that when there is a physical error so try connecting the drive to a different computer to see if there are any problems.
-
Question
How do I dismount a drive that doesn’t have an «eject» button? On This PC, nothing happens if I click on the popup in the taskbar.
You can right click on the partition and press eject. Or rght click on ‘My Computer’, and select manage>Storage>Disk Management>.
Ask a Question
200 characters left
Include your email address to get a message when this question is answered.
Submit
Advertisement
-
On Windows, you can unmount a drive by clicking the USB icon in the bottom-right side of the screen and then clicking Eject.
Thanks for submitting a tip for review!
Advertisement
-
Failing to unmount a drive before disconnecting it may result in data loss or corruption.
Advertisement
About This Article
Thanks to all authors for creating a page that has been read 24,167,554 times.
Is this article up to date?
Windows automatically mounts any connected drive. When needed, you can mount or unmount a drive in Windows manually. Here’s how.
If you turn on the computer and open File Explorer, you will see all the available drives ready to use. This is because Windows automatically mounts all the drives or volumes connected to the system. Of course, the drive’s file system should be compatible. That way, you can access all the files and programs in those drives right from the start—no need to manually mount drives on each reboot.
Though this is a good thing, there might be a time when you need to unmount a drive in Windows. For example, maybe the drive is causing errors, you no longer need the drive to appear in the File Explorer, etc. On the other hand, you might want to manually mount a drive in Windows if it is not mounting automatically.
No matter the reason, if you ever needed it, Windows makes it easy to mount and unmount a drive. All it takes is a few clicks or a couple of commands, depending on your use case.
This simple Windows how-to guide shows you the steps to mount and unmount a drive in Windows without ado.
Table of contents:
- How to mount a drive in Windows
- Using the Disk Management tool
- Using Command Prompt
- How to unmount a drive in Windows
- Using the Disk Management tool
- Using Command Prompt
If a specific drive does not mount automatically, you can use the disk management or Command Prompt tool to mount it. It is pretty easy to do. I will show both methods, and they achieve the same thing. Follow the one you think is easy. Generally, if you want a point-and-click method, follow the Disk Management method. Follow the Command Prompt method if you want to dabble with commands or create a script.
Using the Disk Management tool
The Disk Management application is the built-in tool to manage drives or volumes in Windows. Follow the steps below to mount a Windows drive using the Disk Management tool.
- Open the Start menu.
- Search and open “Create and format hard disk partitions.”
- Identify the unmounted volume.
- Right-click on the unmounted drive.
- Choose the “Change Drive Letter and Paths” option.
- Press the “Add” button.
- Select the “Assign the following drive letter” radio option.
- Choose a drive letter from the dropdown menu.
- Press the “Ok” button.
- With that, the drive/partition is mounted.
- You can close the Disk Management tool.
- Open the File Explorer to see the newly mounted drive.

Using Command Prompt
You can also mount a drive using the Command Prompt with just a few commands. Here’s how.
Open the Command Prompt window with admin rights. To do that, search for “Command Prompt” in the Start menu and choose the “Run as administrator” option.

Next, execute the below command to list all the drives or volumes.
mountvolThe above command lists all the mounted and unmounted volumes with their respective GUIDs. Identify the unmounted volume and copy the respective Volume GUID.
A volume GUID looks something like “\\?\Volume{cf8ec040-28a9-43c6-bc10-3152b85b34cd}\.” You should copy the entire thing.

Next, execute the below command while replacing the “DriveLetter” with the drive letter you want to assign and the “VolumeGUID” with the actual string you copied earlier.
Important note: Make sure there is a space between the drive letter’s “:” and the volume GUID. Otherwise, the command won’t get executed. The drive letter you use in the command should not already be in use.
mountvol DriveLetter: VolumeGUIDThe actual command looks something like this:
mountvol E: \\?\Volume{cf8ec040-28a9-43c6-bc10-3152b85b34cd}\
As soon as you execute the command, Windows mounts the target volume with the drive letter.
How to unmount a drive in Windows
You can unmount a drive in Windows using the Disk Management tool or Command Prompt. Both methods are easy. Follow the one you think is easy. For beginners, I recommend following the Disk Management tool. If you are not afraid of commands or want to create custom scripts, follow the Command Prompt method.
Using the Disk Management tool
Follow these steps to unmount a drive in Windows using the Disk Management tool.
- Open the Start menu.
- Search and open “Create and format hard disk partitions.”
- Identify the drive you want to unmount.
- Right-click on the drive.
- Choose the “Change Drive Letter and Paths” option.
- Press the “Remove” button.
- Press “Yes” in the warning window.
- With that, the drive/partition is unmounted.
- You can close the Disk Management tool.
- Open the File Explorer, and you will no longer see the unmounted drive.

Using Command Prompt
You can unmount a drive in Windows using Command Prompt with a single command. It is pretty neat and easy to use. Let me show you how.
Press the Start key, search for “Command Prompt,” and choose the “Run as administrator” option to open the CMD window with admin rights.
Execute the below command while replacing the “DriveLetter” with the actual drive letter of the drive you want to unmount. For example, if I want to unmount the E: drive, I will relace “DriveLetter” with “E.”
mountvol DriveLetter: /P
Close the Command Prompt window after executing the command. You will no longer see the unmounted drive in File Explorer.
–
That is all. It is that simple to mount or unmount a drive in Windows.
I hope this simple Windows how-to guide helped you.
If you are stuck or need some help, comment below, and I will try to help as much as possible.
Applies ToWindows 11 Windows 10
Управление дисками в Windows помогает выполнять дополнительные задачи с хранилищем, такие как инициализация нового диска, расширение и сжатие томов.
Чтобы открыть оснастку «Управление дисками», щелкните правой кнопкой мыши (или нажмите и удерживайте) кнопку Пуск и выберите Управление дисками.
-
Откройте управление дисками.
-
Выберите и удерживайте (или щелкните правой кнопкой мыши) диск, который нужно инициализировать, а затем выберите Инициализировать диск. Если диск указан как автономный, сначала выберите и удерживайте (или щелкните правой кнопкой мыши) диск, а затем выберите В сети.
Некоторые USB-диски не могут быть инициализированы. Эти диски только форматируются, а затем назначаются буквы диска.
-
В диалоговом окне Инициализация диска убедитесь, что выбран правильный диск, а затем нажмите кнопку ОК, чтобы принять стиль секции по умолчанию или изменить его при необходимости.
-
Используйте GPT , если у вас есть современная система с встроенным ПО UEFI и требуется поддержка больших дисков и более четырех секций.
-
Используйте MBR , если вы работаете с более старым оборудованием или операционными системами, которые не поддерживают UEFI.
Затем состояние диска кратко меняется на Инициализация, а затем на состояние «В сети«. Если инициализация по какой-либо причине завершается сбоем, см. статью Устранение неполадок с управлением дисками.
Чтобы создать раздел или том (эти два термина часто используют как взаимозаменяемые) на жестком диске, вам необходимо войти в систему с правами администратора. Кроме того, на жестком диске должно быть либо нераспределенное дисковое пространство, либо свободное место в дополнительном разделе.
Если нераспределенного дискового пространства нет, вы можете создать его, сжав или удалив один из существующих разделов либо использовав программу стороннего производителя для работы с разделами жесткого диска.
-
Откройте управление дисками.
-
Щелкните правой кнопкой мыши нераспределенную область на жестком диске, а затем выберите Создать простой том.
-
В мастере создания простого тома нажмите кнопку Далее.
-
Введите размер тома, который вы хотите создать, в мегабайтах (МБ) или подтвердите максимальный размер, заданный по умолчанию, а затем нажмите кнопку Далее.
-
Подтвердите букву диска, предложенную по умолчанию, или выберите другую букву диска для идентификации раздела, а затем нажмите кнопку Далее.
-
В диалоговом окне Форматирование раздела выполните одно из указанных ниже действий.
-
-
Если вы хотите отложить форматирование тома, выберите Не форматировать данный том, а затем нажмите кнопку Далее.
-
Чтобы отформатировать том, используя параметры, заданные по умолчанию, нажмите кнопку Далее.
-
-
Проверьте все выбранные вами параметры и нажмите кнопку Готово.
Примечание: При создании разделов на базовом диске первые три раздела будут отформатированы как основные разделы. Начиная с четвертого, каждый раздел будет настроен в качестве логического диска в дополнительном разделе.
Предупреждение: При форматировании тома все имеющиеся на нем данные будут уничтожены. Перед началом работы сделайте резервную копию всех нужных данных.
-
Откройте управление дисками.
-
Щелкните правой кнопкой мыши том, который вы хотите отформатировать, а затем выберите пункт Форматировать.
-
Чтобы отформатировать том, используя параметры, заданные по умолчанию, в диалоговом окне Форматирование нажмите кнопку ОК, а затем еще раз нажмите кнопку ОК.
Примечания:
-
Вам не удастся отформатировать диск или раздел, которые на момент попытки форматирования используются другими программами, а также раздел, содержащий Windows.
-
Параметр Выполнить быстрое форматирование создаст таблицу файлов, но не будет полностью перезаписывать или стереть том. Быстрое форматирование выполняется намного быстрее, чем обычное форматирование, при котором полностью стираются имеющиеся в томе данные.
Нужна дополнительная помощь?
Нужны дополнительные параметры?
Изучите преимущества подписки, просмотрите учебные курсы, узнайте, как защитить свое устройство и т. д.