
Привет, друзья. В этой статье разберём такую тему как: установка Windows 10 на SSD GPT. Т.е. как установить актуальную операционную систему от Microsoft на жёсткий диск, в данном случае на твердотельный накопитель SSD, со стилем разметки GPT. Тип носителя информации и процесс установки Windows 10 в этом деле играют далеко не ключевые роли. Процесс установки системы что для HDD, что SSD, что для GPT-дисков, что для дисков MBR одинаков и не содержит совершенно никаких отличий. Ключевую роль в процессе играют настройки BIOS – активен ли в ней режим UEFI, ведь только при таковом на компьютере возможна работа GPT-дисков, и запущена ли установочная флешка операционной системы в режиме UEFI. Давайте рассмотрим нюансы установки Windows 10 на GPT-диск. И также поговорим о преобразовании в GPT накопителя, у которого изначально стиль разметки MBR.
Итак, стиль разделов диска GPT, он же таблица разделов диска GUID. SSD GPT – это то же самое, что обычный жёсткий диск HDD со стилем разметки GPT. Стиль разметки не имеет отношения к физическому типу устройства информации, это аспект их логической структуры. Что в стиле GPT, что в стиле MBR можно инициализировать HDD, SSD, SD-карты и флешки. GPT – это современный стиль разметки, и он предпочтительнее MBR. Так, GPT поддерживает более 2,2 Тб дискового пространства, он лучше в плане восстановления данных, более производительный и более устойчив к логическим ошибкам носителей информации.
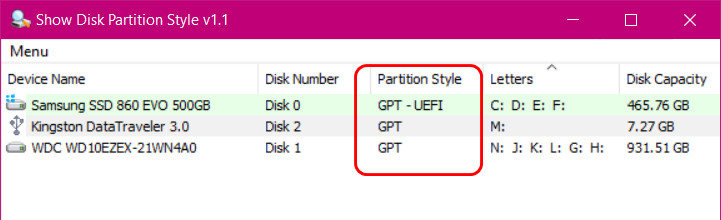
Для использования этого стиля разметки материнка ПК или ноутбук должны быть оснащены BIOS UEFI. Что такое BIOS UEFI, и что такое GPT-диски, друзья, можете почитать в статье сайта «БИОС UEFI». Здесь же отмечу лишь, что с UEFI материнки ПК и ноутбуки начали поставляться на рынок начиная с 2012 года. Т.е. сегодня это уже не новшество какое-то. Если у вас не совсем уж древний какой-то компьютер, у вас наверняка есть BIOS UEFI, и вы можете использовать жёсткие диски с GPT-разметкой. Более того, друзья, GPT – не просто актуальный и предпочтительный стиль разметки, в скором будущем он может стать единственным для новых компьютеров, поскольку производители железа уже давно подумывают об отправлении на свалку истории BIOS старого формата Legacy, в режиме которой могут работать диски со стилем MBR. Сегодня в Legacy и MBR совершенно нет никакой необходимости: под UEFI адаптированы все Windows начиная с Vista, с UEFI могут работать практически все LiveDisk’и. Если вы не работаете с DOS-софтом, вам Legacy не нужен никак.
Ну и давайте рассмотрим поэтапно, как происходит установка Windows 10 на SSD GPT.
Первое, о чём нужно позаботиться, устанавливая Windows 10 на SSD со стилем разметки GPT – об установочном UEFI-совместимом носителе операционной системы, т.е. об установочной флешке UEFI. Такую флешку умеют создавать сегодня если не все, то как минимум многие программы, записывающие дистрибутив на внешние носители. Приоритетной такой программой является утилита Media Creation Tool от Microsoft, она и установочный образ с серверов компании качает, и записывает UEFI/Legacy-совместимую установочную флешку. Также вы можете отдельно скачать установочный образ Windows 10, возможно, не чистый, а кастомный. И записать его на флешку UEFI программами Rufus, WinUSB или прочими.
Что, друзья, важно знать о UEFI в контексте подготовки установочного носителя тем из вас, кто хочет установить 32-битную Windows 10? Если у вас слабый ноутбук или ПК с оперативной памятью до 4 Гб (не включительно) оперативной памяти, очень хорошая идея установить на такой 32-битную, а не 64-битную Windows 10. 32-битная система будет работать шустрее. Но у материнки ПК или ноутбука может быть только 64-битная реализация ПО EFI, и, соответственно, на таких устройствах в режиме UEFI можно загружать только 64-битные Windows. Если вам неизвестно, есть ли у вашего UEFI поддержка 32-битного ПО, можно сделать вот что. При создании установочной флешки с помощью Media Creation Tool от Microsoft или при отдельном скачивании дистрибутива выберите два образа Windows 10 – и 32-, и 64-битный. Попробуйте сначала установить 32-битный образ, и если операционная система не сможет загрузиться, тогда переустанавливайте её из 64-битного образа. Ну либо устанавливайте 32-битную систему, но только в режиме BIOS Legacy.
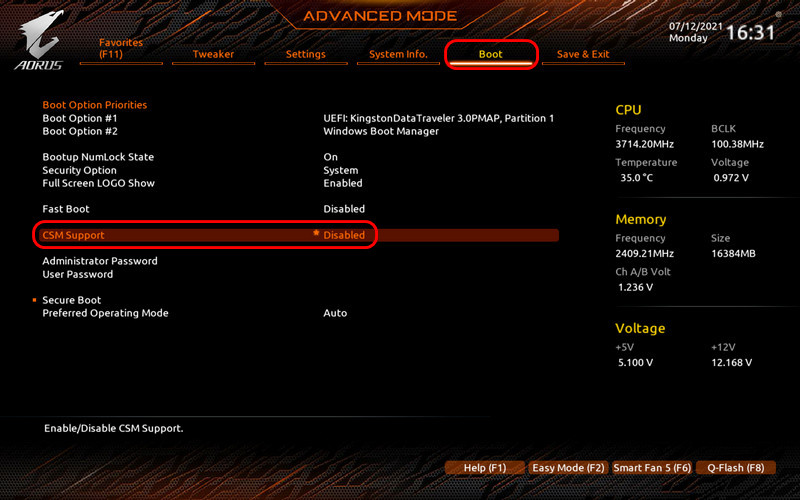
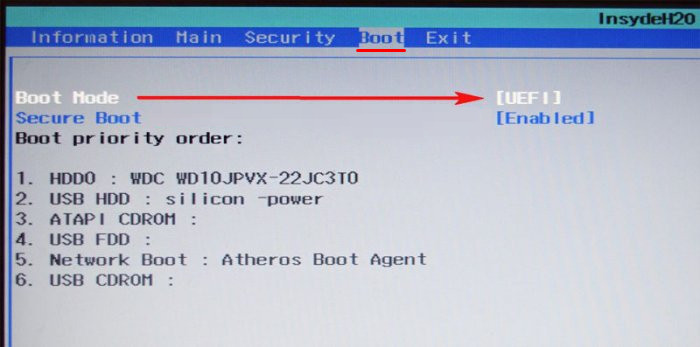
После создания установочного носителя с Windows 10 заходим в BIOS компьютера и настраиваем режим работы UEFI. Совершенно по-разному, друзья, обустроен BIOS UEFI на разных материнках и ноутбуках, но обычно в названии настроек, отвечающих за работу UEFI, будет фигурировать значение, соответственно, «UEFI». Обычно настройка, отвечающая за режим UEFI – это настройка загрузки в UEFI. Для всех устройств загрузки компьютера или как минимум для жёстких дисков и флешек необходимо выставить режим UEFI. Есть, например, такая реализация активации UEFI.
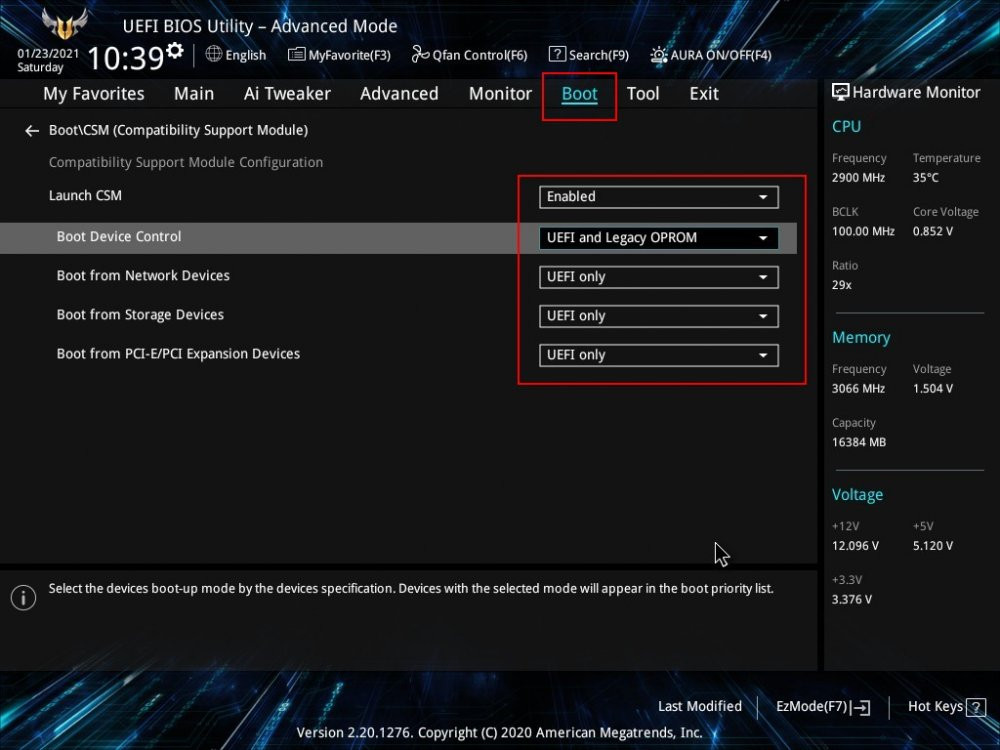
Вот такая.
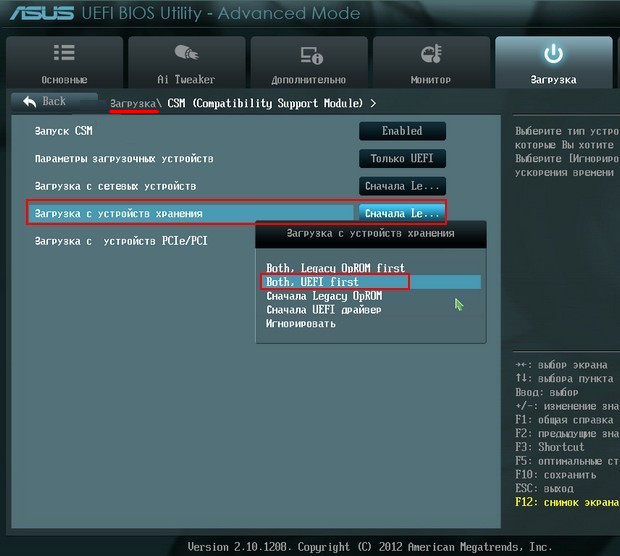
Такая.
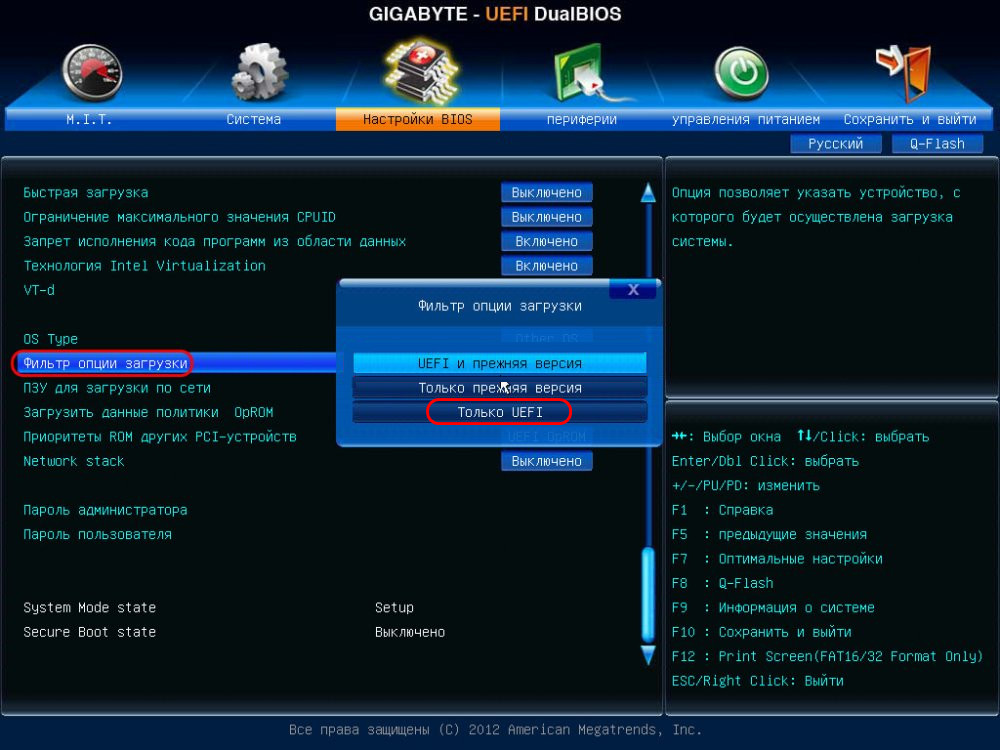
Или вот такая в упрощённой BIOS на ноутбуках.
В контексте настройки BIOS в режиме UEFI стоит упомянуть о важной настройке в рамках работы этого режима – протокола безопасной загрузки Secure Boot. Для установки Windows 10 его отключать не нужно, более того, на некоторых ноутбуках режим UEFI и Secure Boot неразрывно связаны и включаются/отключаются одной настройкой. Но если у вас настройки UEFI и Secure Boot разные, отключайте последний только при необходимости – т.е. когда вам потребуется загрузить компьютер с LiveDisk’а, который не пройдёт контроль Secure Boot, а таких много. Более подробно о Secure Boot, о его отключении смотрите в статье сайта «Как отключить Secure Boot».
Чтобы установка Windows 10 на SSD GPT была возможна, нам нужно загрузить компьютер с установочной флешки непременно в режиме UEFI. После того, как мы активировали UEFI в BIOS, далее выставляем его загрузку с флешки. В числе устройств загрузки компьютера флешка будет значиться дважды: просто по своему названию и названию с допиской «UEFI». Так вот если мы хотим загрузиться с флешки в режиме UEFI, нам надо выставить её приоритетным устройством загрузки тем значением, где она фигурирует с допиской «UEFI». После чего сохраняем проделанные настройки и перезагружаем компьютер.
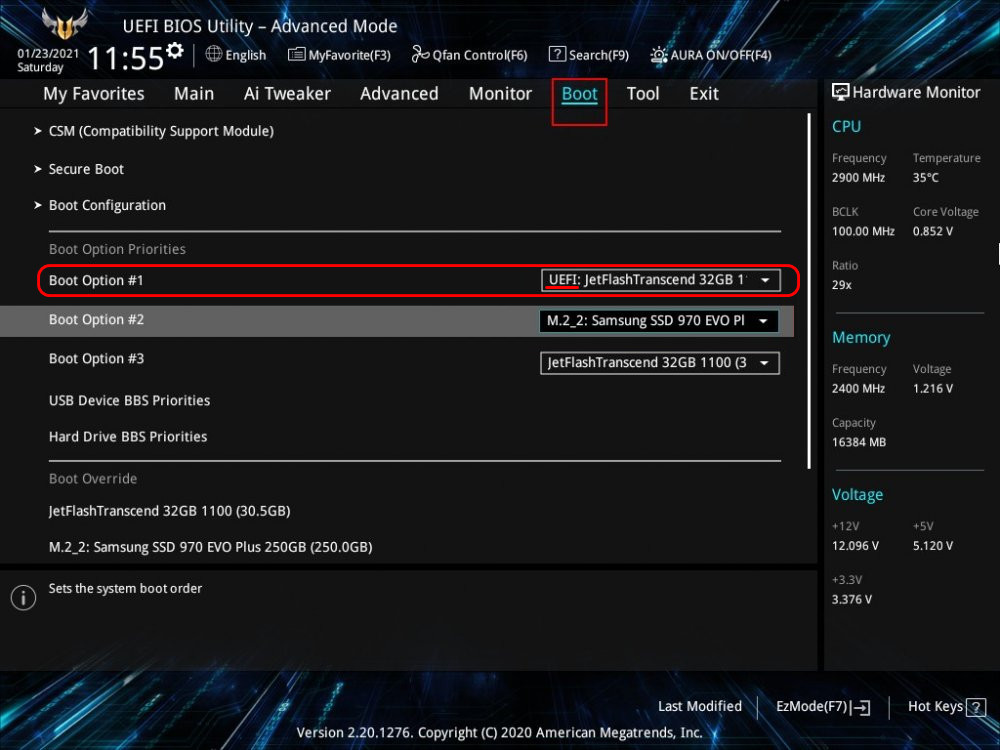
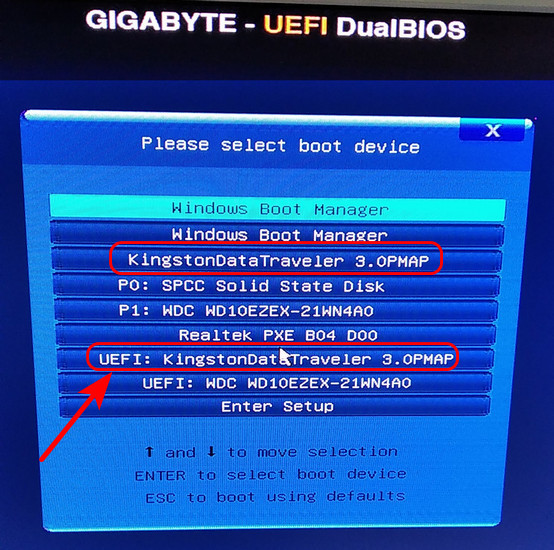
Но, друзья, в приоритете загрузки BIOS можно ничего не менять, пусть там приоритетным устройством значится SSD, на который мы будет ставить Windows 10. Можем просто активировать UEFI, сохраниться и перезагрузиться. А в момент запуска компьютера вызвать Boot-меню компьютера. Клавиша его вызова будет отображаться первые секунды на экране при запуске компьютера, либо эту клавишу можно узнать в инструкции материнки ПК или ноутбука. Boot-меню примечательно тем, что реализует запуск с конкретного устройства только один раз, и нам потом не нужно возвращаться снова в BIOS и менять приоритетное устройство загрузки с флешки на SSD. Чтобы флешка запустилась в режиме UEFI, в Boot-меню её также нужно выбирать с допиской «UEFI».
Как упоминалось выше, друзья, непосредственно процесс установки Windows 10 не имеет никаких особенностей в зависимости от стиля разметки диска GPT или MBR. Как происходит этот процесс, в деталях описано в статье сайта «Как установить Windows 10». Здесь отмечу лишь, что если вы правильно настроили работу BIOS в режиме UEFI, если запустились с установочной флешки в режиме UEFI, и если ваш SSD имеет стиль GPT, либо же он чистый, например, новый, без инициализации и разметки, то вы без проблем установите Windows 10 на него. Но если ваш компьютер и флешка в режиме UEFI, а SSD имеет стиль разметки MBR, то на этапе выбора места установки Windows 10 вы получите ошибку с указанием, что на диске находится таблица MBR-разделов.
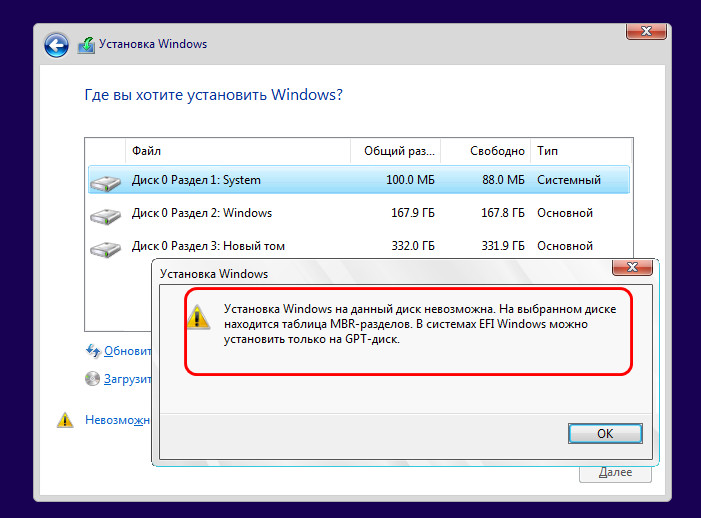
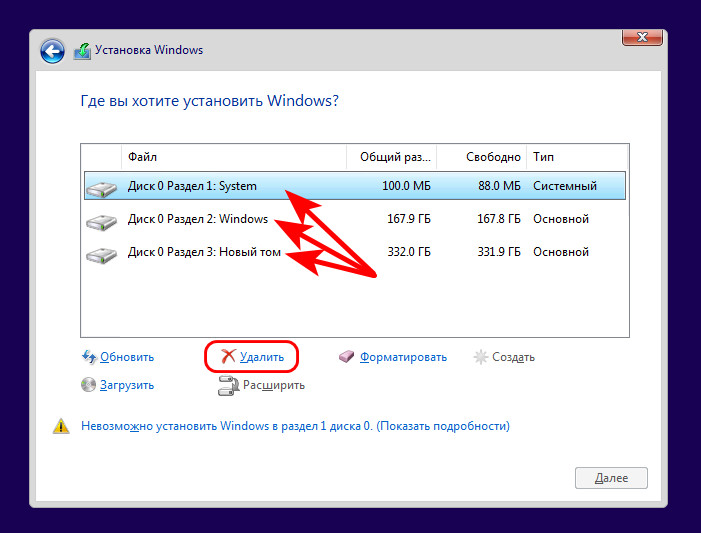
Что делать в таком случае? Проще всего, если данные на несистемных пользовательских разделах накопителя вам не нужны, либо таких разделов как таковых вовсе нет. В таком случае на этапе выбора места установки Windows 10 вы просто удаляете все разделы на накопителе.
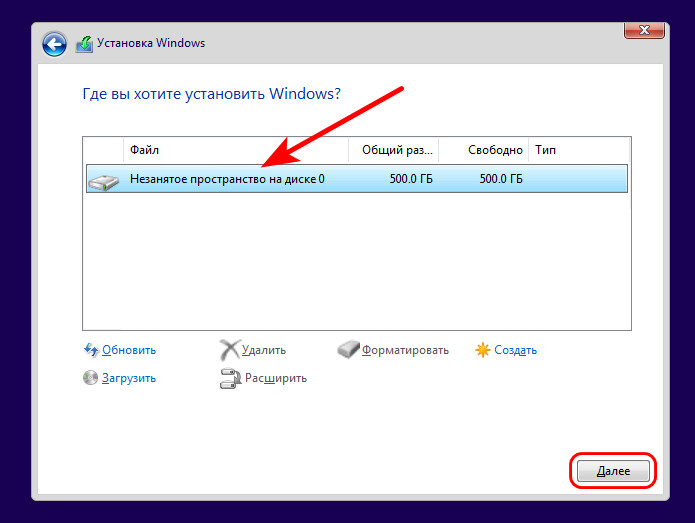
Устанавливаете Windows 10 на незанятое пространство и затем при необходимости уже в установленной операционной системе создаёте пользовательские разделы.
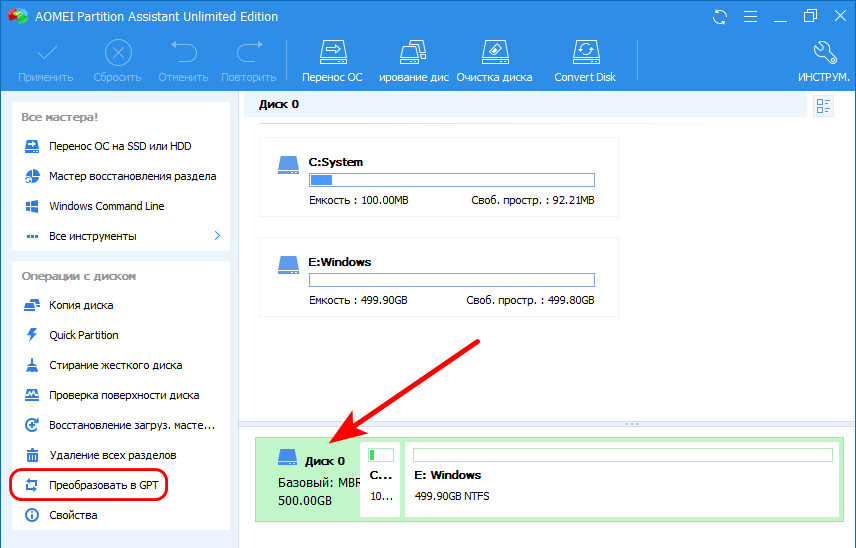
Если на пользовательских разделах SSD есть какие-то важные данные, дабы их сохранить, необходимо конвертировать стиль разметки MBR в GPT. Для этого нужно воспользоваться функционалом LiveDisk’а, например, WinPE 10-8 Sergei Strelec. Качаем образ этого WinPE, записываем на флешку. Флешка также должна быть UEFI. На эту же флешку помещаем установочный ISO-образ Windows 10. Загружаем компьютер с неё в режиме UEFI. В среде WinPE запускаем любой менеджер дисков из имеющихся, который умеет конвертировать стили разметки дисков, например, AOMEI Partition Assistant.
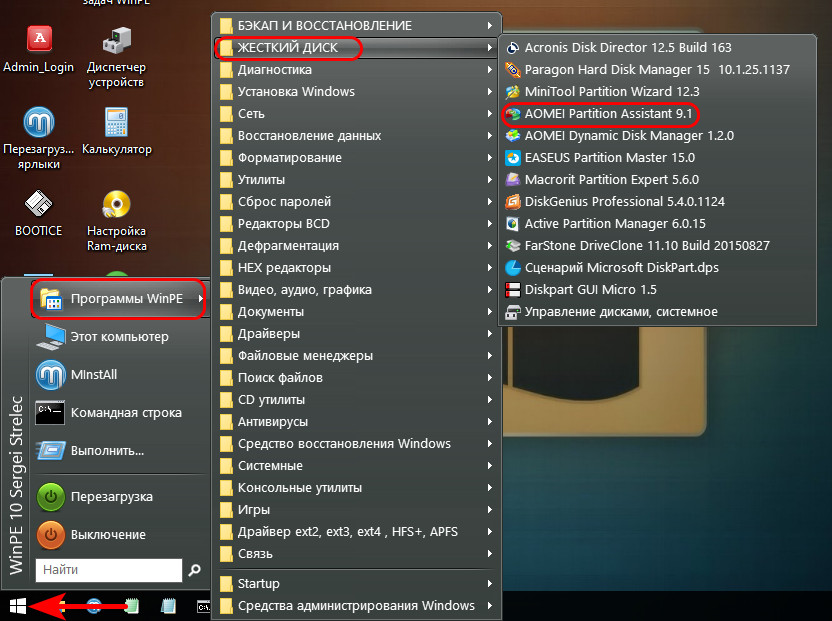
Конвертируем SSD в стиль GPT.
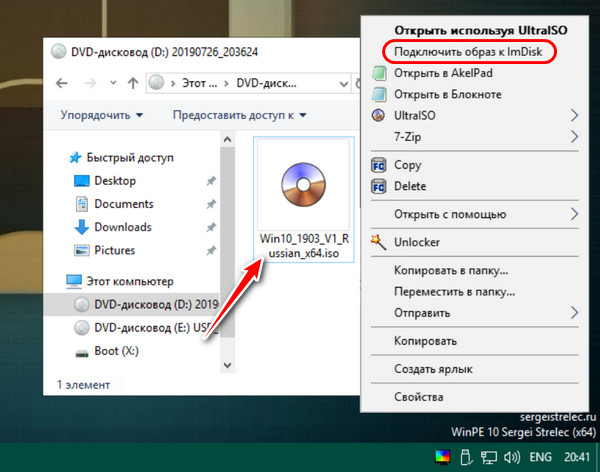
Далее устанавливаем Windows 10 прямо в среде WinPE 10-8 Sergei Strelec. Подключаем для отображения установочный ISO.
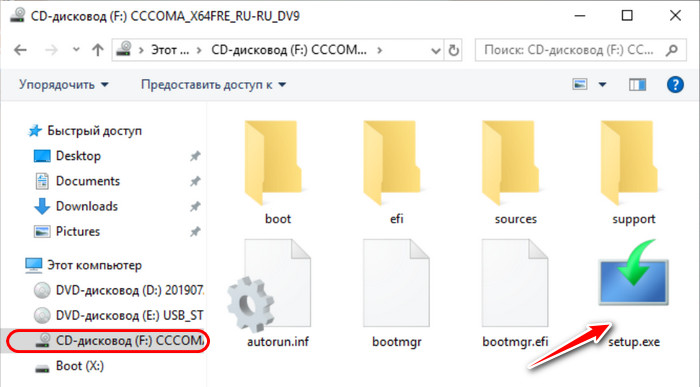
Заходим в подключённый образ, запускаем файл setup.exe.
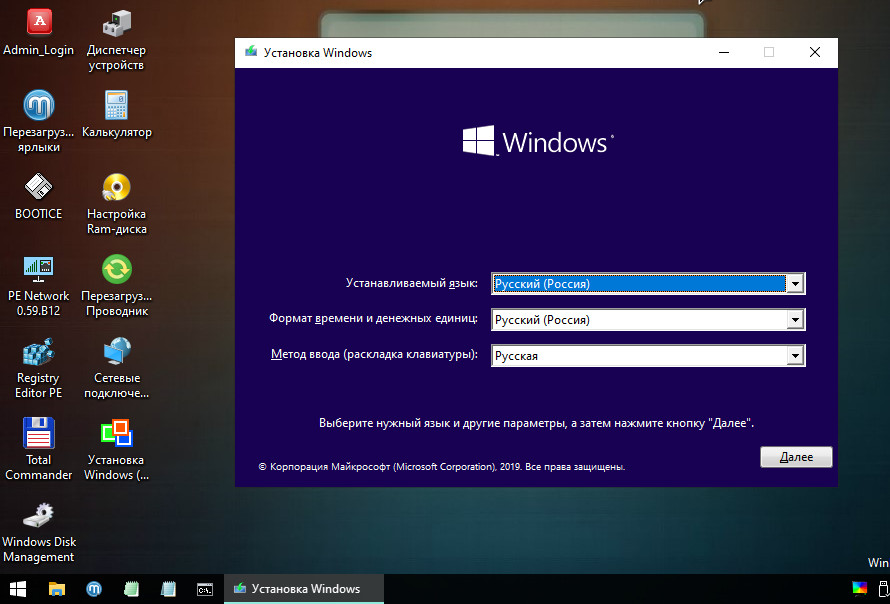
И устанавливаем Windows 10 точно так же, как устанавливали бы её обычно.
Друзья, если у вас ПК со старой материнкой, выпущенной в эпоху только продвижения на рынок UEFI, в некоторых случаях может быть так, что в BIOS есть поддержка режима UEFI, и компьютер может работать с жёсткими дисками со стилем разметки GPT, но он не поддерживает загрузку с флешек UEFI. В таком случае установка Windows 10 на SSD GPT с флешки будет невозможна. Если у вас нет оптического привода, просто записывайте обычную Legacy-флешку с WinPE 10-8 Sergei Strelec. Конвертируйте накопитель в GPT. Если он у вас чистый, сделайте ему разметку UEFI/GPT вот этим способом. И установите Windows 10 с помощью присутствующей на WinPE утилиты WinNTSetup.
This tutorial will show you how to partition new SSD and how to create new partition on an existing or external SSD in Windows 11 or Windows 10 without formatting or losing any data. Since all these can be done using Disk Management – a Windows built-in disk manager, you don’t have to pay for or install any third party software just to format or partition your SSD.
Also see: How to Format New SSD Drive in Windows 11/10
Partition new SSD in Windows 10/11 using Disk Management
When you plug in a brand new SSD you’ve recently purchased, it won’t show up in This PC or File Explorer immediately. In general, there are 3 states a SSD or HDD can be in.
- Not Initialized – You need to initialize the SSD first to make it detectable and usable in Windows. It is usually the case for a brand new SSD.
- Unallocated – The SSD is initialized but the disk space is unallocated yet. This is the state where you can create new volume / partition on the SSD from the unallocated space.
- Already partitioned – If a SSD is already partitioned, the partitioned volume(s) will show up in “This PC”. It means that the SSD can be used right away (or that the SSD is already in use). You can still create new partition from the available empty disk space on the SSD without formatting (follow the second part of this guide about how to “partition existing SSD without formatting” below).
To check what states your SSD is in right now, on the Windows search bar, search for a open “Disk Management“. From there, you can see whether the SSD shows “not initialized”, “unallocated” or that there are already partitions on it.
All the disk drives, regardless if it’s a HDD or SSD, will show up as Disk # in Disk Management. You can identify them by right-clicking them and select Properties. The disk’s name will be shown in the properties window.
Initialize SSD
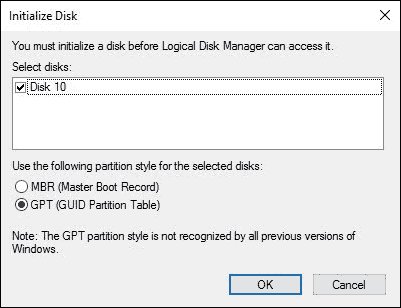
To initialize a new SSD, right-click on the SSD that shows “Not initialized”, and then click on Initialize Disk.
You will then be given two choices for the partition styles to be used on the SSD – MBR or GPT (You may want to do some research on this prior to making your choice). Select your preferred partition style and proceed to initialize the disk.
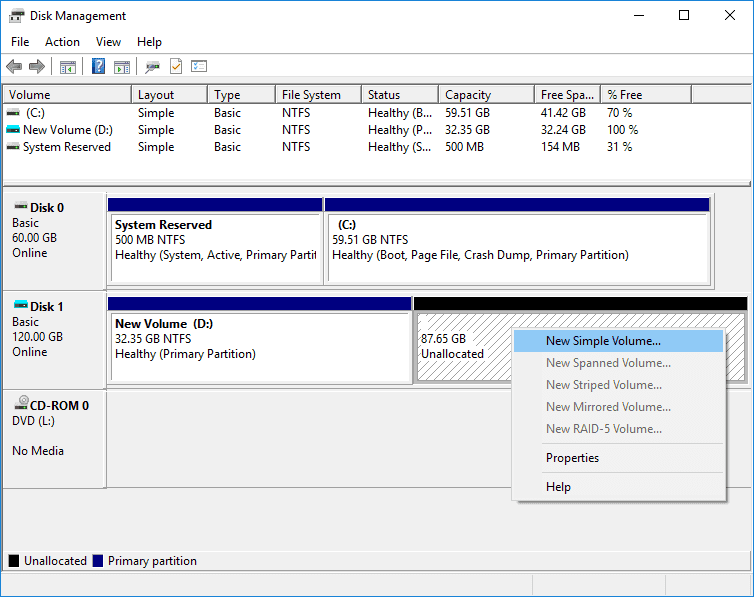
Create partition on unallocated space
After initializing the SSD, the disk should show up as “Online” with unallocated space in Disk Management. To create partition on the unallocated space, right-click on the SSD and select “New Simple Volume“.
When you are prompted to specify volume size, enter a volume size for the new partition.
For example, if you want to create only one partition that fully utilize all the unallocated space, simply enter the “maximum” disk space as the volume size.
If you want to divide the disk space so that you can create multiple partitions on it instead, enter a volume size of your choice (between minimum and maximum disk space). You can repeat the “New Simple Volume” process later to create other new partition using the remaining disk space.
On the next screen, assign a drive letter for the new partition. Click Next to continue.
Next, select “format this volume with the following settings” and enter a volume label (a name for the partition which will be shown in places such as This PC). Click Next to start formatting the new volume.
Once formatting process is completed, the new partition will then be created. You can now start using the new partition / volume.

Partition existing SSD in Windows 11/10 without formatting or losing data
If you have an existing or already in-use SSD (even after installing Windows 11 or 10 on it), you can still create new partition from the available empty disk space on the SSD without formatting or losing data. The feature that makes this possible is the Shrink volume function in Disk Management.
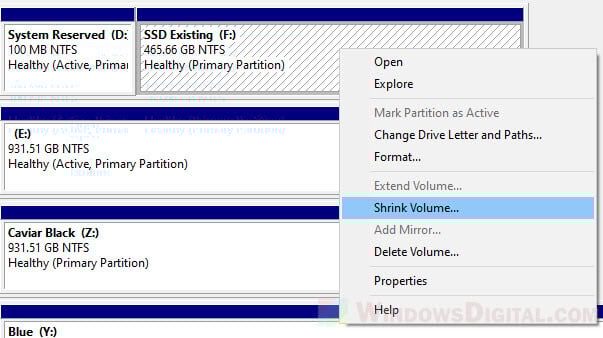
For a detailed step-by-step guide on how to create new partition on an already in use SSD using Disk Management, go to: How to Split Drive in Windows 11 or 10 Without Formatting.
Все способы:
- Настраиваем SSD под Windows 10
- Способ 1: Отключение гибернации
- Способ 2: Настройка временного хранилища
- Способ 3: Настройка файла подкачки
- Способ 4: Отключение дефрагментации
- Способ 5: Отключение индексации
- Вопросы и ответы: 5
Оптимизация SSD диска очень важна, ведь не смотря на высокую скорость и надёжность, у него ограничено число циклов перезаписи. Существует несколько способов продления срока службы диска под Windows 10.
Читайте также: Настраиваем SSD для работы в Windows 7
Настраиваем SSD под Windows 10
Чтобы твердотельный накопитель прослужил вам максимально долго, имеется несколько способов его оптимизации. Данные советы актуальны для системного диска. Если вы используете SSD для хранения файлов, то большинство вариантов по оптимизации вам не понадобятся.
Способ 1: Отключение гибернации
При гибернации (режиме глубокого сна) информация, которая содержится в оперативной памяти, преобразуется в специальный файл на компьютере, а после отключается питание. Данный режим полезен тем, что пользователь может через некоторое время вернутся и продолжить работу дальше с теми же файлами и программами. Частое использование режима гибернации негативно влияет на SSD диск, ведь использование глубокого сна приводит к частой перезаписи, а она в свою очередь тратит циклы перезаписи диска. Надобность в гибернации отпадает еще и потому, что система на SSD запускается довольно быстро.
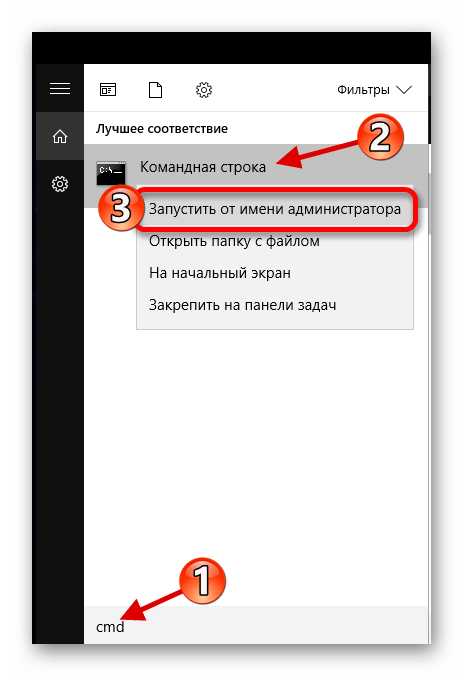
- Чтобы отключить функцию, нужно зайти в «Командную строку». Для этого найдите значок с лупой на панели задач и в поисковом поле впишите «cmd».
- Запустите приложение от имени администратора, выбрав соответствующую опцию в контекстном меню.
- Введите в консоли команду:
powercfg –H off - Выполните клавишей Enter.

Читайте также: 3 способа отключить спящий режим в Windows 8
Способ 2: Настройка временного хранилища
Операционная система Виндовс всегда сохраняет служебную информацию в специальную папку. Данная функция необходима, но она тоже влияет на цикл перезаписи. Если у вас есть жесткий диск, то нужно перенести директорию «Temp» на него.
Важно понимать, что из-за перенесения этого каталога скорость работы системы может немного упасть.
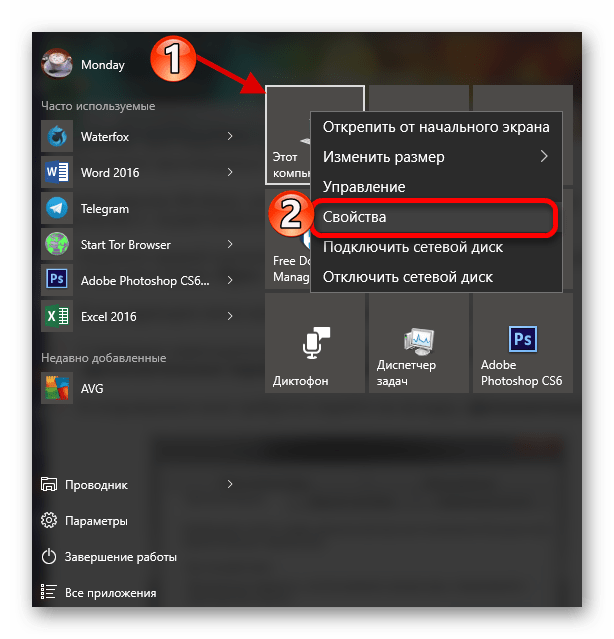
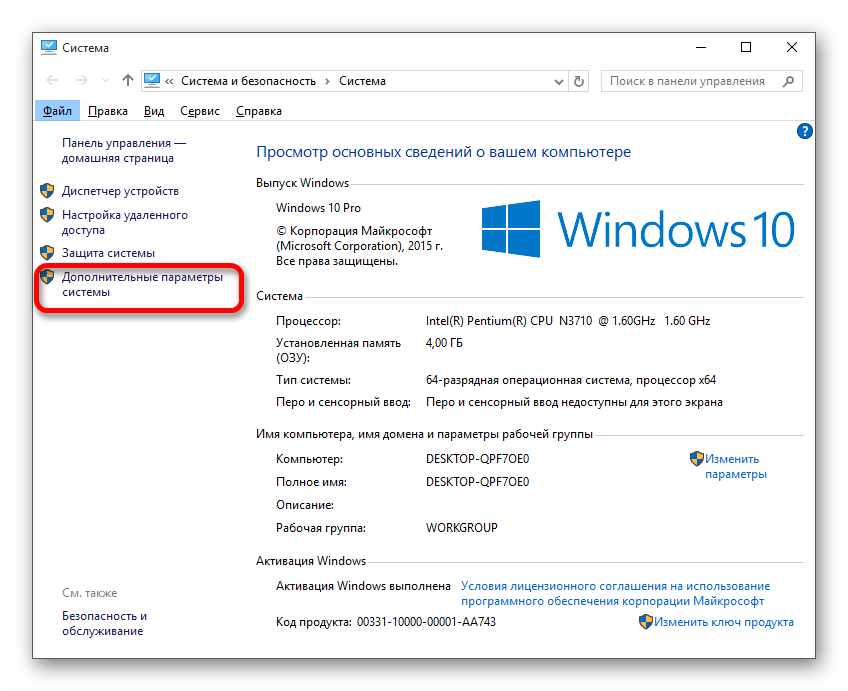
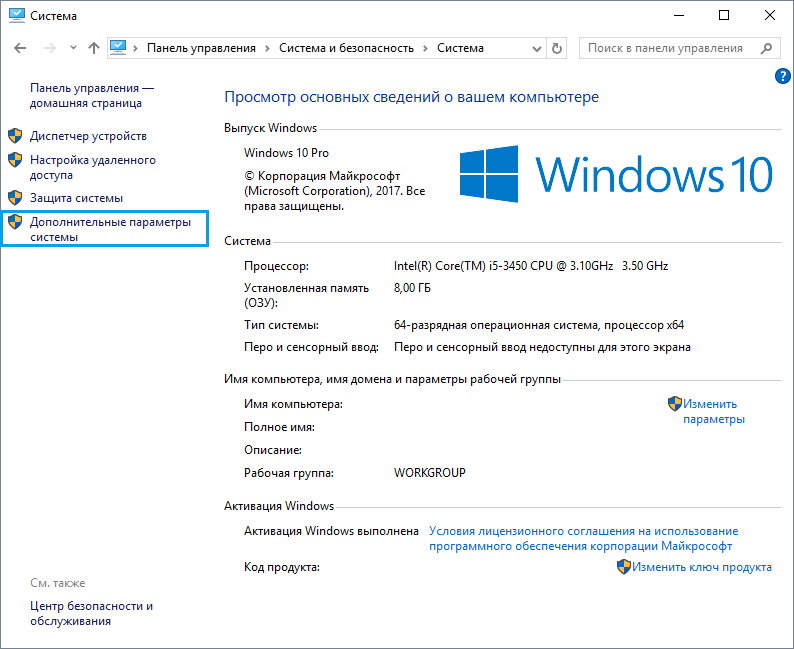
- Если у вас прикреплён значок «Компьютер» в меню «Пуск», то нажмите на него правой клавишей мыши и перейдите в «Свойства».

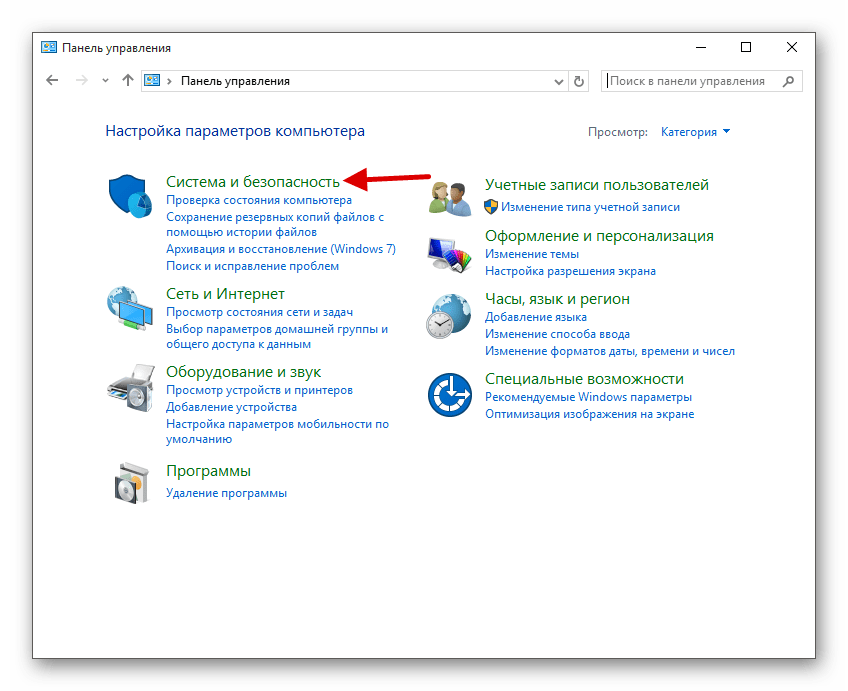
Или найдите «Панель управления» и перейдите по пути «Система и безопасность» — «Система».
- Найдите пункт «Дополнительные параметры системы».
- В первом разделе найдите кнопку, указанную на скриншоте.
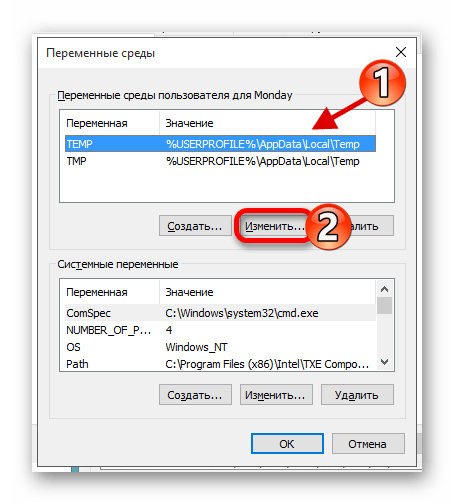
- Выделите один из двух параметров.
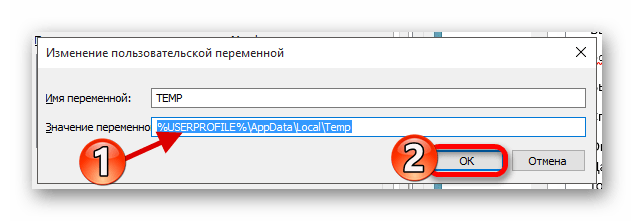
- В поле «Значение переменной» напишите желаемое расположение.
- Проделайте то же самое с другим параметром и сохраните изменения.

Способ 3: Настройка файла подкачки
Когда на компьютере недостаточно оперативной памяти, система создаёт на диске файл подкачки, в котором хранится вся необходимая информация, а после попадает в RAM. Одним из самых лучших решений является установка дополнительных планок оперативной памяти, если есть такова возможность, ведь регулярная перезапись изнашивает ССД.
Читайте также:
Нужен ли файл подкачки на SSD
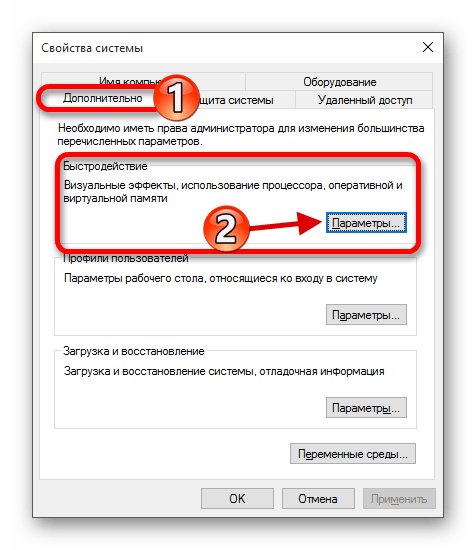
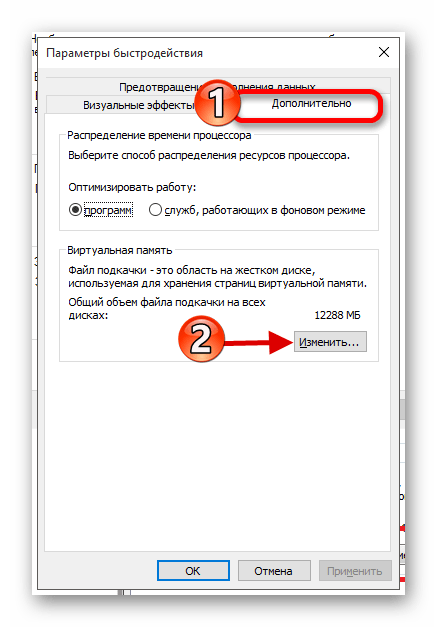
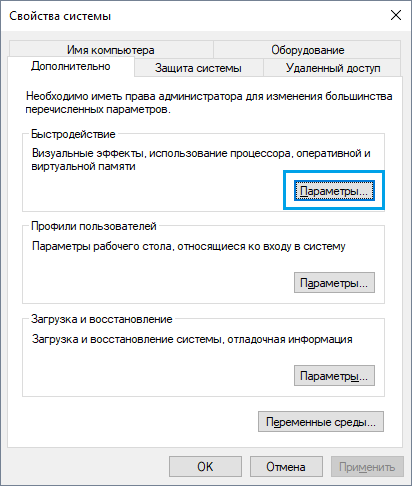
- Перейдите по пути «Панель управления» — «Система и безопасность» — «Система» — «Дополнительные параметры системы».
- В первой вкладке найдите «Быстродействие» и зайдите в настройки.
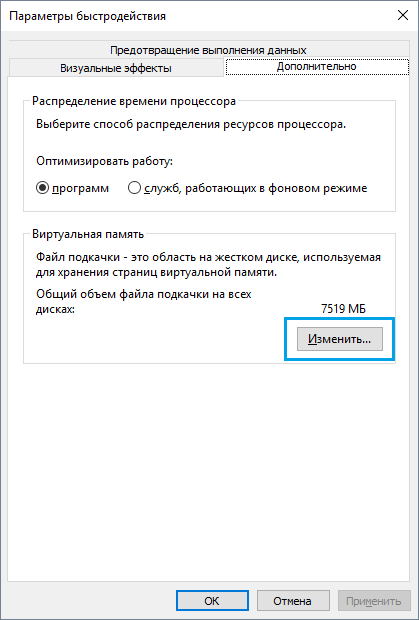
- Перейдите в дополнительные параметры и выберите «Изменить».
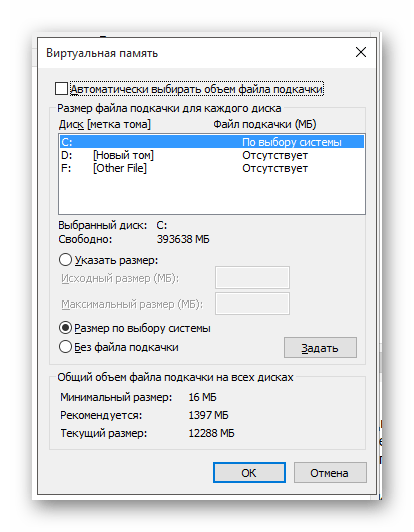
- Отключаем первую галочку и редактируем настройки по своему усмотрению.
- Вы можете указать диск для создания файла подкачки, а также его размер, или вовсе отключить данную функцию.

Способ 4: Отключение дефрагментации
Дефрагментация необходима для HDD дисков, ведь она увеличивает скорость их работы за счёт записи основных частей файлов рядом друг с другом. Так записывающая головка не будет долго переходить в поиске нужной части. А вот для твердотельных дисков дефрагментация бесполезна и даже вредна, так как уменьшает срок их службы. Виндовс 10 автоматически отключает данную функцию для SSD.
Способ 5: Отключение индексации
Индексация полезна, когда вам нужно найти что-то. Если вы не храните на своём твердотельном диске никакой полезной информации, то индексацию лучше отключить.
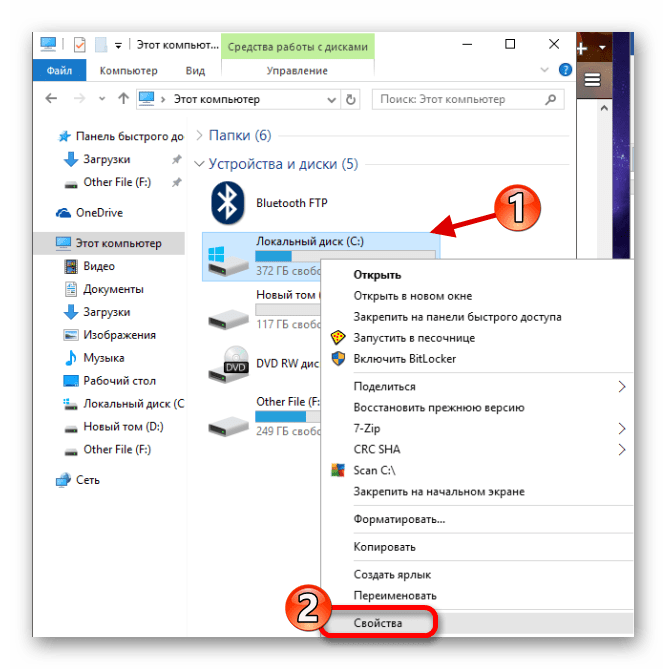
- Перейдите в «Проводник» через ярлык «Мой компьютер».
- Найдите свой ССД диск и в контекстном меню перейдите к «Свойства».
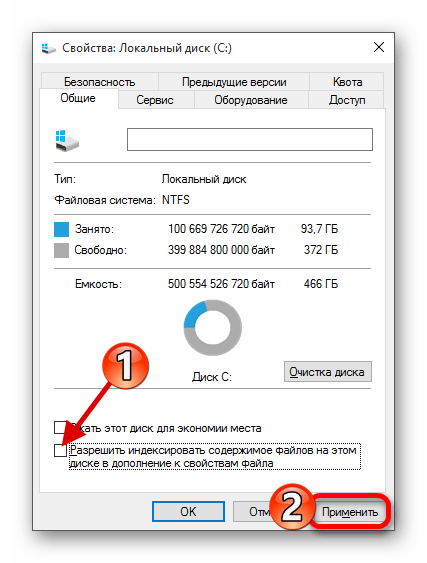
- Уберите галочку с «Разрешить индексировать» и примените настройки.
Вот такие основные способы оптимизации SSD вы можете проделать, чтобы продлить срок службы своего накопителя.
Наша группа в TelegramПолезные советы и помощь
Архитектура SSD-накопителя такова, что дефрагментация в привычном нам понимании ему не требуется. Сравним его c HDD: классические жёсткие диски основаны на кластерах, которые периодически перезаписываются, данные в них постоянно «скачут» из ячейки в ячейку. SSD работает не так, а все необходимое для него – это технология TRIM, которая сообщает системе о блоках, которые можно удалить (так как они не существуют). Как включить TRIM?
- Откройте «Проводник» Windows, выберите «Этот компьютер» (в различных версиях операционной системы приставка может меняться на «Мой» или отсутствовать вовсе), щёлкните правой кнопки по диску, в котором установлена ваша Windows (как правило, это диск C), и в появившемся контекстном меню откройте «Свойства».

- В открывшемся окне свойств откройте вкладку «Сервис» и нажмите кнопку «Оптимизировать».
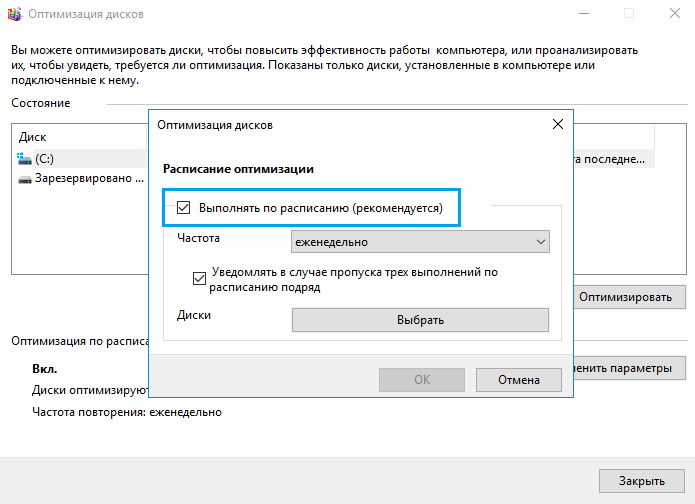
- Графа «Типа носителя» показывает нам, что выбранный диск твердотельный (то есть SSD), в левом нижнем углу написано, что в системе установлена оптимизация SSD по расписанию (это и есть технология TRIM). Если эта функция выключена, переходим в «Изменить параметры» и в открывшемся окне ставим галочку напротив «Выполнять по расписанию».


Немного информации от команды разработчиков, которые работают над накопителями в Windows по поводу того, как работает оптимизация SSD:
В Windows 10 оптимизация твердотельных накопителей дефрагментирует SSD один раз в месяц, при условии, что включена защита системы (под названием «теневое копирование тома»). Это необходимо в связи с тем, что фрагментированность SSD в отдельных случаях также может влиять на производительность. Большинство людей считает, что фрагментация – это проблема исключительно HDD, но это ошибочное мнение. Фрагментация SSD может достигнуть такого уровня, что система не сможет предоставлять новые фрагменты файлов. Как следствие – увеличение размера файла, а также возможные ошибки при попытках записи. Также нужно отметить, что чем больше фрагментов файлов, тем больше системе необходимо читать и записывать файл, что негативно сказывается на производительности системы в целом.
Дефрагментация выполняется автоматически в случае необходимости и зависит от работы команды TRIM. Когда место освобождается (при удалении файла и т. д.), файловая система Windows ставит в очередь запрос на реализацию команды TRIM. Эта очередь может вырасти слишком сильно (в операционной системе имеется ограничение нагрузки), что приведёт к игнорированию последующих запросов. В таком случае оптимизация автоматически вызовет функцию дефрагментации для очистки блоков.
Подводя итоги:
- Оптимизация SSD нужна для пометки неиспользуемых блоков.
- Дефрагментация системы на SSD автоматическая и выполняется только в случае, когда защита системы активна.
- Есть данные, что дефрагментация твердотельных накопителей происходит по иному алгоритму, нежели для HDD.
Настройка файла подкачки Windows
Часто под настройкой Windows для SSD подразумевается полное отключение файла подкачки. Это несколько неверный подход, потому что существуют программы, которые могут не работать без файла подкачки. К ним можно отнести многим известный Adobe Photoshop, а также большинство продуктов из этого семейства. Отключение файла подкачки нужно для оптимизации программ в фоновом режиме, поэтому давайте настроим его для правильной работы.
- Введите «Система» в поисковик Windows, расположенный в левом нижнем углу. В контекстном меню выберите пункт «Система», затем «Дополнительные параметры системы».
- Вкладка по умолчанию в открывшемся окне – «Дополнительно» – она-то нам и нужна. Нажимаем на кнопку «Параметры».
- В новом окне выбираем вкладку «Дополнительно» и жмём кнопку «Изменить…».
- Ставим галочку, чтобы система автоматически определяла объем файла подкачки.
Питание, ReadyBoost и Superfetch/Prefetch
Операционная система Windows автоматически использует оптимизированный план питания для вашего твердотельного накопителя, здесь менять ничего не нужно.
ReadyBoot по умолчанию отключена. Эта функция призвана анализировать часто запрашиваемые файлы, чтобы вынести их в оперативную память для их большего быстродействия в будущем. Нам это не надо.
А вот по поводу Superfetch/Prefetch однозначно сказать нельзя. По умолчанию они используются и некоторые производители, например, Intel, считают, что отключать их не нужно. Другие же, к примеру, Samsung, думают по-другому. Для вашего собственного спокойствия и долгой стабильной работы диска рекомендуем вам обратиться за советом к разработчикам конкретно вашего SSD.
Что беречь: SSD или аккумулятор?
В этом разделе речь пойдёт о режиме «Гибернация». Когда вместо выключения мы отправляем ноутбук в спящий режим, то процесс работы с памятью не прекращается. Этот бесконечный процесс работы с памятью достаточно вреден для твердотельного диска. Сперва может показаться, что перед пользователями ноутбуков стоит тяжелейший вопрос: не жалеть SSD или аккумулятор? На деле же все обстоит куда ярче. Суть спящего режима в том, чтобы как можно быстрее начать работу, ведь включение (будь то ноутбук или настольный ПК) системы на HDD тратит уйму времени. Это абсолютно не требуется в ситуации с SSD. Сама суть такого диска в том, что он в несколько раз быстрее. А значит и включаться ноутбук будет за считанные секунды.
Но даже с такими аргументами у пользователей могут возникнуть сомнения о том, нужно ли отключение гибернации. Давайте остановимся поподробнее на том, как она работает. При отправке устройства «в сон» все содержимое оперативной памяти выгружается в файл «hiberfil.sys», после чего его размер равен примерно 75% от размера всей оперативной памяти. Вспомним, что средний размер ОЗУ сегодня составляет 8–32 ГБ. Постоянно перезаписываемый массив данных такого размера сильно укоротит срок службы SSD.
Убедились? Давайте разберёмся, как отключить этот режим.
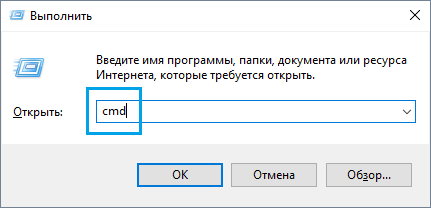
- Одновременно нажмите кнопки Win + R.
- Введите «cmd» в открывшемся окне и нажмите «Ок» или «Enter».
- Введите в консоль команду «powercfg -h off» (без кавычек) и нажмите Enter.
Индексация файлов
Ещё один ненужный владельцам SSD инструмент – индексация файлов в Windows. Суть этой функции в том, что она запоминает где находятся файлы, тем самым позволяя достаточно быстро искать эти файлы. Все бы ничего, но это сопровождается постоянной записью новых данных, а также занимает какое-то место на диске. По аналогии с предыдущим пунктом, твердотельные накопители не нуждаются в ускоряющих работу инструментах, потому что способны самостоятельно обеспечить быстрый доступ к файлам и папкам. Как отключить индексацию?
- Открываем свойства системного диска (см. пункт 1 в разделе о дефрагментации и оптимизации).
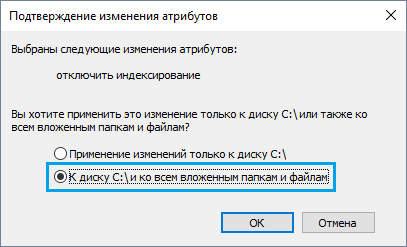
- Вас встретит вкладка по умолчанию под названием «Общие». Убираем галочку напротив текста в самом низу и нажимаем «ОК».
- Далее система попросит вас подтвердить внесённые изменения. Выберите значение «К диску C:\…» и смело нажимайте «ОК».
- Дожидаемся завершения внесения настроек.
Оптимизация при помощи сторонних программ
Не спешите закидывать камнями за то, что этот пункт стоит в самом конце статьи. Это связано с тем, что использование программ не от разработчика происходит на ваш страх и риск.
Наиболее популярные программы для Windows:
- SSD Tweaker – бесплатная лицензия и на русском языке. Очень мало весит и достаточно проста в освоении.
- Tweak-SSD – лицензия платная, но присутствует и demo-версия. Русский язык отсутствует, а функциональность несколько шире.
- SSDLife Pro – отличная программа, помогающая следить за состоянием “здоровья” вашего “пациента”, работает в фоновом режиме. Однако лицензия стоит денег, но работает программа на русском языке.
Общие правила при работе с SSD
- Чтобы максимально растянуть срок службы, а также не снизить производительность, рекомендуется всегда иметь 10-15% свободного места. Это объясняется особенностями самого SSD. У большинства производителей твердотельных накопителей есть утилиты для работы с этими продуктами. Во всех этих утилитах есть функция под названием «Over Provisioning». Она создаёт недоступный пустой раздел, из-за которого вы не сможете забивать диск более, чем на 10-15% (это значение указывается в настройках).
- Устанавливать SSD полезно в порт SATA 3 6 GB/s, который не использует сторонних чипов. Многие материнские платы имеют порты с чипсетами известных компаний (AMD, Intel), а также ещё несколько портов на сторонних контроллерах. Лучшим вариантом будет подключение к первым.
- Время от времени посещайте сайт производителя имеющегося у вас накопителя, чтобы всегда иметь актуальную версию прошивки. В большинстве случае, когда разработчик выпускает новую прошивку – это хорошо сказывается на работе его продукта в целом.
О сроках работы твердотельного накопителя
Да, SSD в сравнении с HDD имеет гораздо меньший срок службы. Но не нужно паниковать, ведь технологии неустанно идут вперёд. Можно с уверенностью сказать, что при покупке современного твердотельного накопителя (средней цены и выше), при использовании его в обычных целях – работа, игры и так далее – в современной операционной системе он прослужит гораздо дольше, чем вам нужно. Под «больше нужного» подразумевается то, что старый диск будет заменён на более современного и более ёмкого собрата.
Подводим итоги
Если вы будете выполнять все рекомендуемые советы, то это, несомненно, увеличит время работы вашего SSD. Но нужно помнить, что современные накопители и так работают сверх необходимого, поэтому решение принимайте сами.
Is It Good to Partition an SSD In Windows 11/10/8/7?
Do I have to partition my SSD? Is it healthy to partition my SSD? Partitioning an SSD (Solid-State Drive) is similar to partitioning a traditional hard drive, and the process is generally the same regardless of the storage medium. Partitioning an SSD in Windows can have both advantages and disadvantages, depending on your specific needs and circumstances. In short, whether it is good to partition your SSD in Windows depends on your specific requirements and preferences. If you have a clear plan for organization, want to separate different types of data, or need to set up a dual-boot configuration, partitioning can be beneficial. However, if you don’t have a specific need for partitioning or prefer simplicity, keeping your SSD as a single partition may be more suitable. Here are some considerations:
Advantages of partitioning an SSD:
- Organization and data management: Partitioning allows you to logically divide your SSD into separate sections, making it easier to organize your data and files. For example, you can create separate partitions for your operating system, applications, and personal files.
- Improved performance: Partitioning an SSD can potentially enhance performance by segregating different types of data. For instance, you can allocate a partition specifically for the operating system and applications, which may result in faster access times and improved overall system responsiveness.
- Data protection and recovery: By creating separate partitions, you can isolate your important files and data from the operating system and application files. This separation can provide an additional layer of protection in case of system failures or software issues. If one partition becomes corrupted, it’s possible to recover data from other unaffected partitions.
- Dual-boot setups: Partitioning an SSD is often necessary for setting up dual-boot configurations, where you can install multiple operating systems on different partitions. This allows you to switch between different operating systems on the same computer.
- Performance considerations: While partitioning an SSD does not provide significant performance benefits compared to traditional hard drives, it can still offer some advantages. For example, separating the operating system files from user data can help optimize file access and system responsiveness. However, the performance gain may be relatively minor compared to other factors, such as the SSD’s overall performance capabilities.
Disadvantages of partitioning an SSD:
- Potential space constraints: Partitioning can lead to limitations on available space for each partition. If you allocate too little space to a partition, you may run out of room for storing files, while allocating too much space to one partition can leave other partitions underutilized.
- Complexity and maintenance: Managing multiple partitions requires additional effort and attention. You may need to resize or reorganize partitions as your storage needs change, and this process can be more complicated than managing a single partition.
- Reduced flexibility: Once you create partitions, it can be challenging to adjust their sizes or reallocate space between them. While it’s possible to resize partitions using disk management tools, it may involve data backup and restoration processes.
Guide #1: How to Partition an SSD In Windows Disk Management?
This guide will show you how to partition an SSD in Windows 10 Disk Management. Remember to plan the partition size and consider your storage needs before proceeding. Note that the steps may vary slightly depending on the specific version of Windows you are using, but the general process remains similar.
Step 1. Right-click on the Start menu and choose «Disk Management» from the menu. This will open the Disk Management utility.
Step 2. Locate the SSD you want to partition and identify the unallocated space on the SSD.
In the Disk Management window, you’ll see a list of disks connected to the computer. Find the SSD you want to partition. Moreover, you should also locate unallocated space on the SSD so that you can create a new partition. If there is unallocated space on the SSD, you can proceed to the next step. Otherwise, you’ll need to shrink an existing partition to get unallocated space (Right-click the partition and select «Shrink Volume», and then follow prompts to specify the desired size).
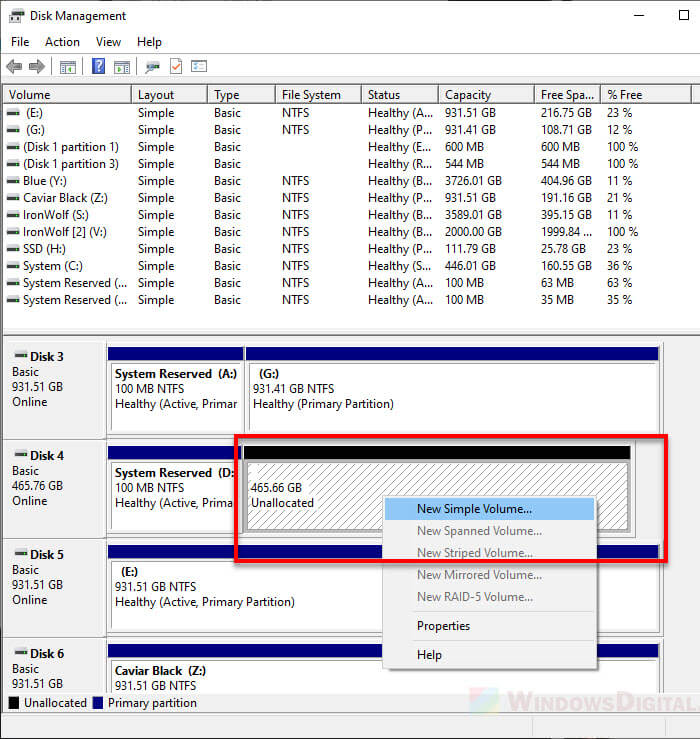
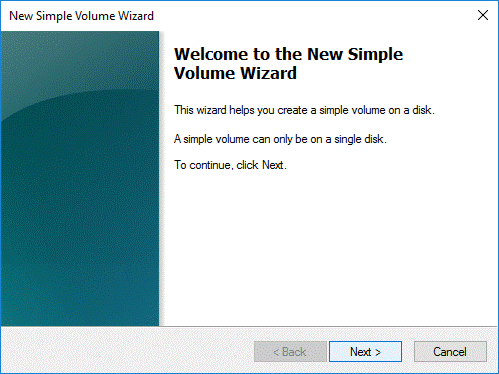
Step 3. Right-click the unallocated space on the SSD and choose «New Simple Volume». The New Simple Volume Wizard will open.
Step 4. In the New Simple Volume window, click «Next» button to continue.
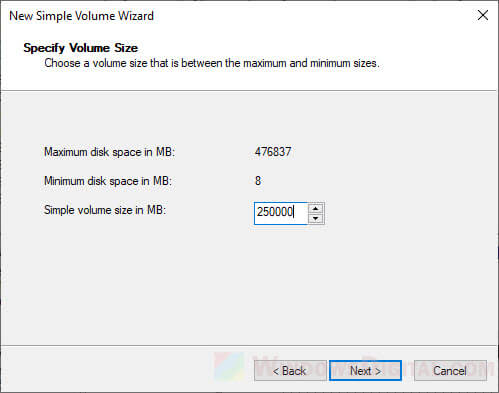
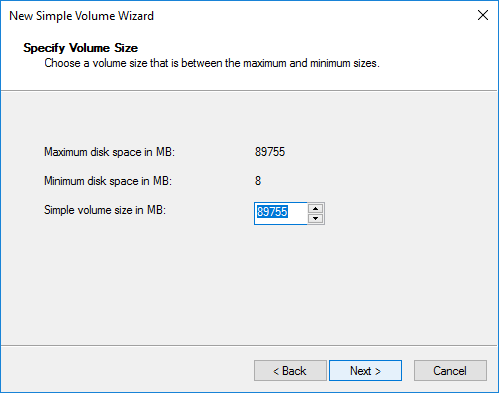
Step 5. Specify the size for the partition to be created and click «Next» button.
The partition size entered here are calculated in megabytes (MB), so make sure you enter a proper number. You can accept the default maximum size if you just want to create one partition on the available space.
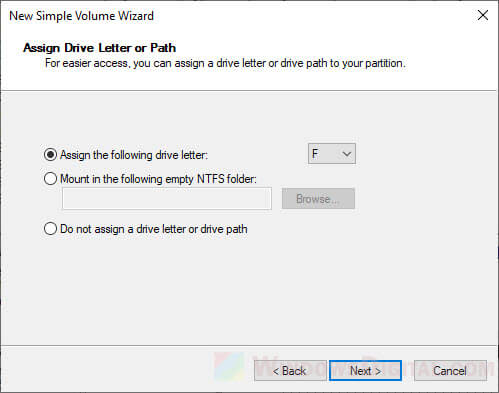
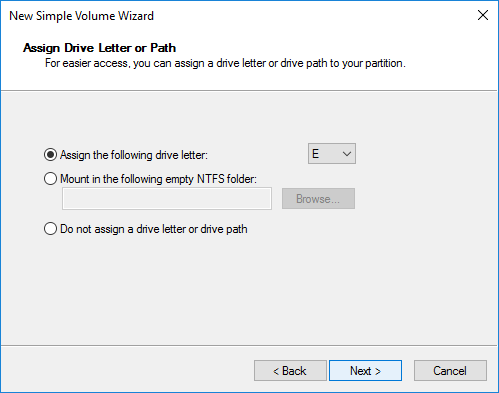
Step 6. Select a driver letter from the dropdown menu and click «Next» button.
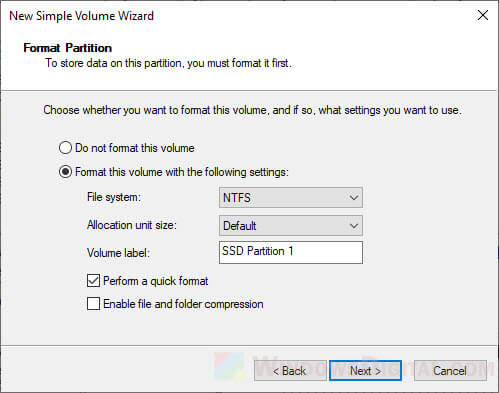
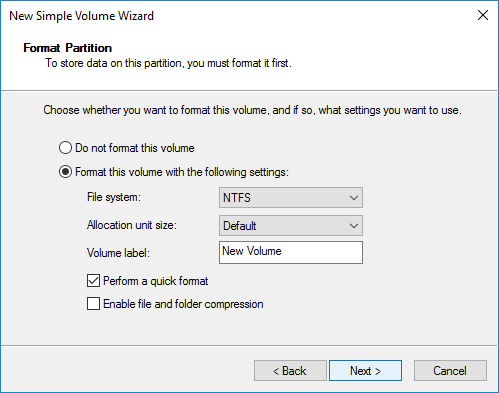
Step 7. Select a file system type that you want to use for the partition and click «Next» button.
The NTFS file system is the default and recommended file system for local drives, and yet if you want to create a large FAT32 partition or EXT4 partition, then try third-party disk partitioning software like DiskGenius Free Edition.
Step 8. View all settings for the new partition. Click «Finish» button if everything is okay.
Then Disk Management will create the partition, format the partition and assign a drive letter for it.
Guide #2: How to Partition an SSD Using Free Disk Partitioning Software?
This part will show you how to partition an unallocated SSD (re-partition SSD) via simple steps as well as how to create a partition on an existing partition. These tasks are done by a free disk partition program – DiskGenius Free Edition. In addition to partitioning SSDs, you can also use DiskGenius to manage your SSDs:
- Convert MBR/GPT Disks without Losing Data
- Clone Larger Hard Drive to Smaller SSD/HDD
- Migrate Windows 11 or Windows 10 to HDD/SSD
- Back up the Entire SSD into an Image File
- Format SSD to FAT32/EXT4
- Resize/Extend/Split SSD Partitions
- Merger Unallocated Space to an Existing Partition
- Check SSD Health (View SMART Data and Check Bad Sectors)
- Convert Dynamic Disk to Basic Disk
- Recover Deleted or Lost Partitions, etc.
Way 1: Partition the SSD using «Quick Partition» Feature (Re-partition the SSD)
Step 1. Open DiskGenius Free Edition and locate the SSD you want to partition.
All disks connected to your computer are listed in DiskGenius. Select one disk from the left pane, and you can view detailed information on the interface, for example, capacity, SN, sector size, disk GUID, partition table type, adapter type, etc.
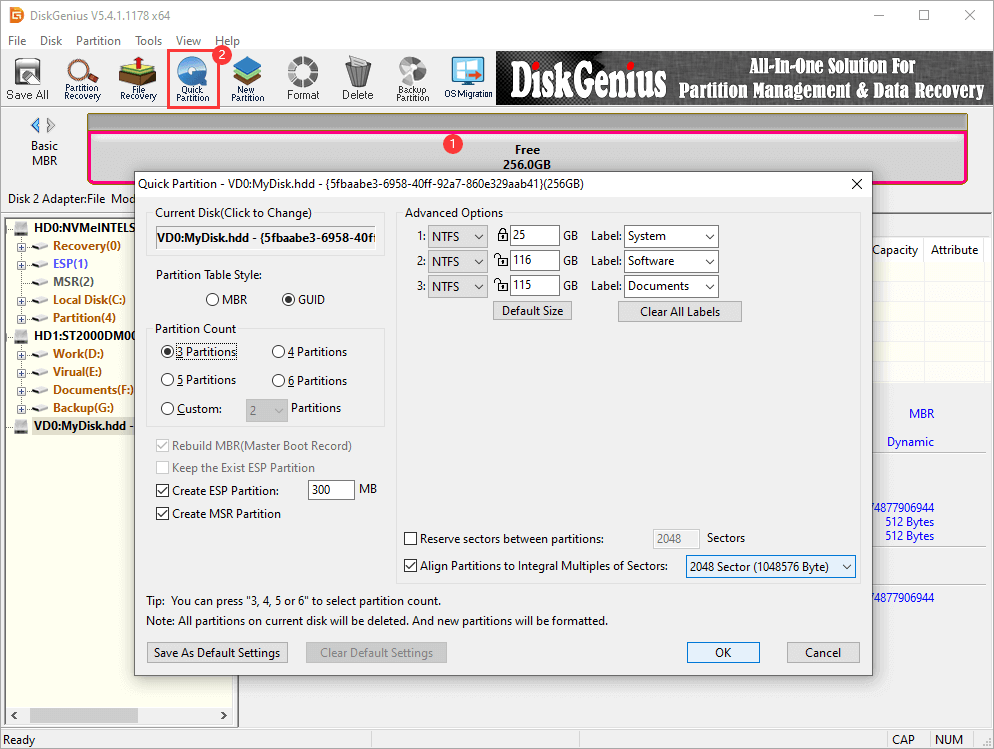
Step 2. Select the SSD you want to repartition, click «Quick Partition» on the toolbar. Then the Quick Partition window will open.
Be cautious to select the correct disk, as partitioning operations will remove any existing partitions and files. If you choose the wrong disk, you will suffer data loss issue.
Step 3. In the Quick Partition window, select a partition table between MBR and GUID, select partition count, set partition size, choose file system type, and select «Align Partitions to Integral Multiples of Sectors».
Click «OK» after configuring these settings, and DiskGenius starts to create and format partitions right away. A few seconds later, partitions will be created successfully, and you can view them in File Explorer.
Way 2: Create a New Partition on an Existing Partition without Losing Data
If there are already partitions on the SSD for which you want to partition, but you don’t want to delete any partition or files, you can follow steps below to create a new partition based on an existing partition. The process neither formats the partition nor deletes files.
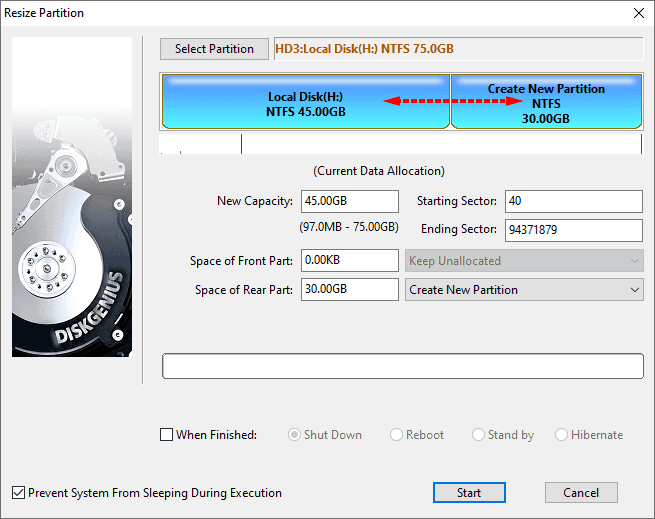
Step 1. In DiskGenius, Right-click a partition on the SSD and choose «Create New Partition».
It is recommended to choose the partition which is large and has much free disk space.
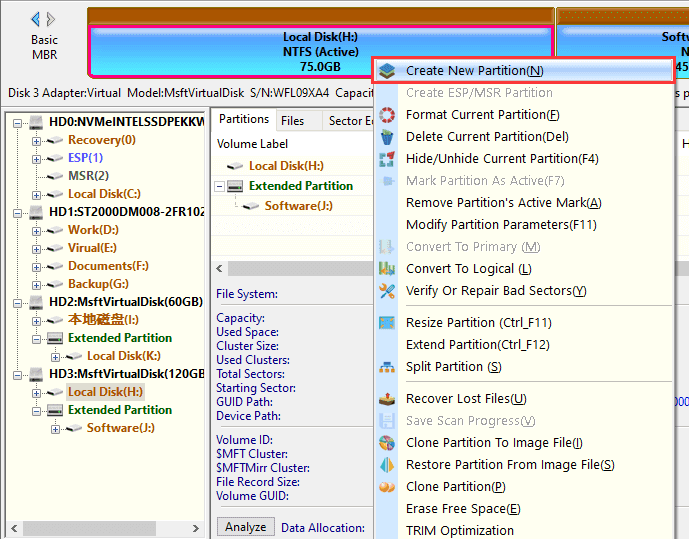
Step 2. Set partition size for both old and new partitions by dragging the edge of these two partitions or enter the exact number. Then click «Start» button.
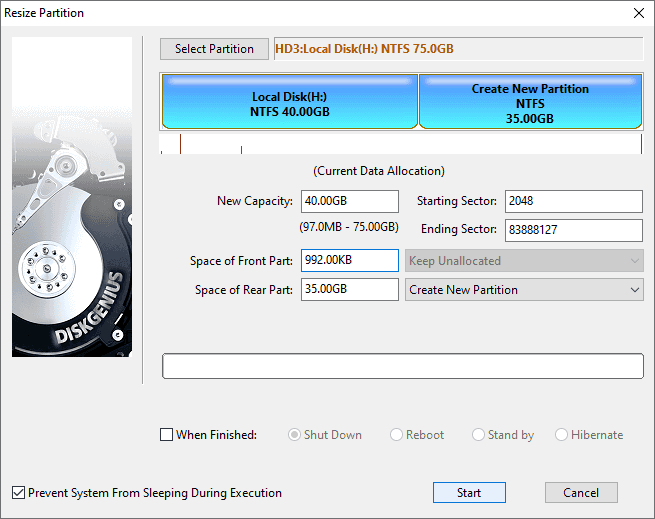
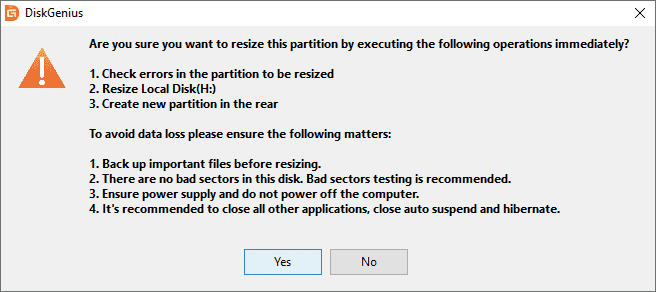
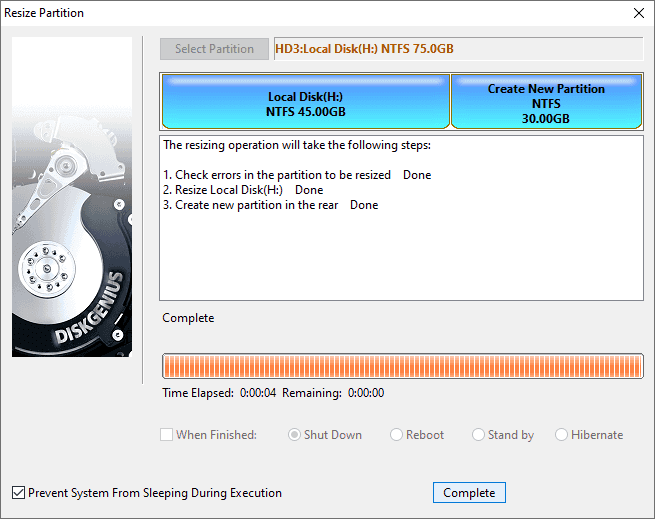
Step 3. Read any messages prompted by the application and follow the wizard to finish creating the partition.
Guide #3: How to Partition an SSDs with DiskPart Commands?
DiskPart is a command-line utility in Windows that can be used to partition various storage devices, including SSDs. DiskPart commands are capable of creating, deleting, formatting, and modifying partitions on SSDs. Here’s a general outline of how you can use DiskPart to partition an SSD:
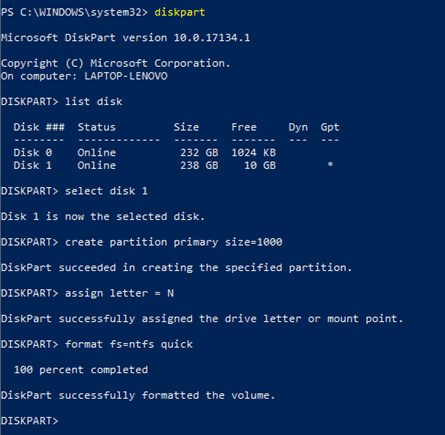
Step 1. Press Windows + E and choose «Windows PowerShell (Admin)».
Step 2. In Windows PowerShell, type diskpart and press Enter key.
Step 3. Type following commands and press Enter key after each command.
List disk (This command will list all available disks connected to your computer. Identify the SSD you want to partition based on its size or other attributes and remember the disk number)
Select disk # (Replace # with the number of your SSD so that it will be selected)
Create a partition primary (This will create a primary partition on the SSD. If you want to set the partitions size, then add parameters to the command, for example, create a partition primary size=1000)
Assign letter=N (Replace N with desired driver letter for the partition)
format fs=NTFS quick (This command will format the newly created partition as NTFS. You can replace NTFS with desired file system, for example exFAT.)
It’s important to note that DiskPart commands directly modify disk partitions, so it’s crucial to use them with caution and double-check your actions to avoid unintended data loss. Make sure to back up any important data on the SSD before proceeding with partitioning.
Guide #4: How to Split an SSD Partition into 2 Partitions without Formatting or Deleting Files in Windows 11/10?
How to divide SSD storage in Windows 11 or Windows 10? The partition on your SSD can be divided into two partitions without formatting or deleting files. You may want to better organize files or install operating system, and yet there is a single large partition on the SSD. One of the solutions will be splitting the partition into two without affecting existing files. Here are steps to split an SSD partition:
Step 1. In DiskGenius, right click the partition that you want to split and choose «Split Partition» from the context menu.
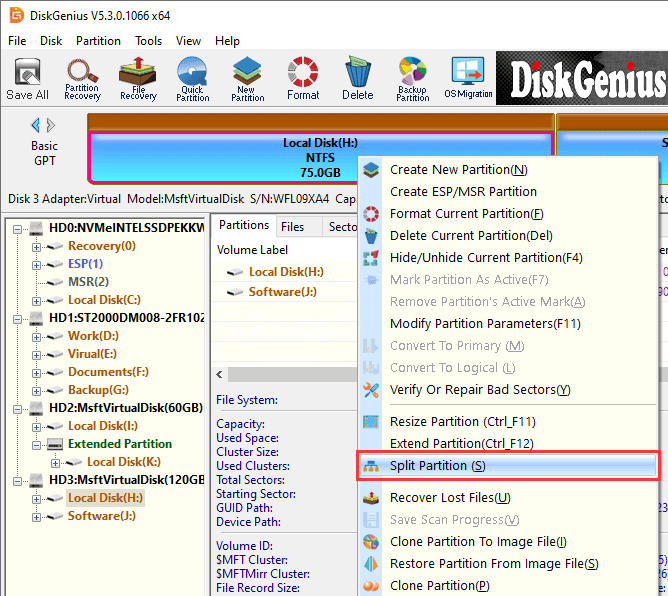
Step 2. Specify size for both partitions and click «Start» button.
Step 3. Read messages on the dialog box which tells steps to be done and things should be noted. Click «Yes» button if you want to continue.
Step 4. Wait for the process to complete.
What Should Be Noted Before Partitioning SSD?
Usually, a newly bought SSD typically does not have any partitions by default. When you purchase a new SSD, it usually comes unpartitioned and appears as unallocated space in the Disk Management tool or any partitioning software you use. Unallocated space means that the SSD has not been divided into separate partitions or allocated for any specific use. It is a blank canvas for you to partition and format according to your needs. Thus, you need to initialize the SSD after it is installed on your computer. An easy way to initialize the SSD is right-clicking it in Disk Management and choosing «Initialize Disk»:
Then select the appropriate partition style (MBR or GPT) and click «OK» button.
In addition to installing and initializing the SSD, there are several factors should be considered. By taking these precautions and carefully planning your partitioning process, you can reduce the likelihood of issues and ensure a smoother experience when partitioning your SSD.
- Backup your data if the SSD contains important files: Partitioning involves modifying the disk structure, which carries a risk of data loss or corruption. It’s crucial to create a backup of all your important data before proceeding with any partitioning operations. This way, even if something goes wrong during the partitioning process, you can restore your data from the backup.
- Understand the partitioning tools: Familiarize yourself with the partitioning tools available in your operating system. Windows provides built-in tools like Disk Management and PowerShell, while there are also third-party tools available such as DiskGenius Free Edition. Understand the features, limitations, and potential risks associated with the tools you plan to use.
- Plan your partitioning scheme: Before partitioning, consider your storage needs, organization preferences, and any specific requirements you have. Decide how many partitions you need, how much space to allocate to each partition, and the file system to use (e.g., NTFS, exFAT). Think about whether you want separate partitions for the operating system, applications, personal files, or other purposes.
- Consider future needs: Anticipate your future storage requirements and whether your planned partitioning scheme will accommodate them. It can be challenging to modify partition sizes later without data backup and restoration processes. Allocating sufficient space and leaving room for expansion can save you from potential complications down the line.
- MBR VS. GPT: Determine whether you want to use MBR or GPT as the partitioning scheme for your SSD. As discussed earlier, GPT is generally recommended for SSDs due to its advantages over MBR, especially for larger capacities and modern systems with UEFI firmware. Ensure that your system supports the chosen partitioning scheme.
- Understand the implications: Partitioning an SSD may have consequences, such as reducing the overall available storage space due to partition table overhead. Additionally, moving or resizing partitions may require time-consuming operations and can impact system performance temporarily. Consider these factors and weigh the benefits against potential drawbacks.
- Follow best practices: When partitioning your SSD, it’s generally recommended to start with a clean and empty drive. If your SSD already contains data, consider performing a secure erase to wipe the drive completely before partitioning. This ensures a fresh start and avoids potential conflicts or complications.
- Seek professional assistance if unsure: If you’re uncertain about the partitioning process or lack experience, it’s advisable to seek assistance from a knowledgeable professional or consult reputable resources for guidance. They can provide specific advice based on your unique situation and help minimize the risk of errors or data loss.
Is MBR or GPT Better for SSD?
MBR VS GPT, Which Is the Better Choice for Your Computer? GPT (GUID Partition Table) is generally considered better for SSDs (Solid State Drives) compared to MBR (Master Boot Record) for several reasons:
- Capacity and partition support: MBR is limited to a maximum of 2.2 terabytes (TB) in partition size and can only support up to four primary partitions. In contrast, GPT supports much larger partition sizes, allowing for efficient utilization of the larger capacities typically found in modern SSDs. GPT also supports an unlimited number of partitions, making it more flexible for complex storage configurations.
- Compatibility: GPT is designed to be compatible with both newer UEFI (Unified Extensible Firmware Interface) and legacy BIOS (Basic Input/Output System) systems. UEFI is the modern standard firmware interface and is commonly used in newer computers, while BIOS is the older firmware interface. MBR, on the other hand, is primarily designed for BIOS systems and may have compatibility issues with UEFI.
- Data redundancy and integrity: GPT includes a protective MBR that helps prevent disk utilities and older operating systems from accidentally modifying or overwriting GPT partitions. GPT also maintains a backup of partition information throughout the disk, which helps improve data redundancy and increases the chances of successful recovery in case of partition damage or corruption.
- Security features: GPT includes support for Secure Boot, a feature that verifies the authenticity and integrity of the firmware and operating system during system startup. This provides an additional layer of security against boot-level malware and unauthorized modifications.
- Futureproofing: GPT is the modern standard and is expected to be widely supported in the future. As storage technology continues to advance, GPT is better equipped to handle new features and requirements that may emerge.
It’s important to note that GPT is the recommended partitioning scheme for most SSDs, particularly in newer systems with UEFI firmware. However, if you have an older system that only supports BIOS or if you have specific compatibility requirements, MBR may still be suitable. In such cases, it’s essential to consider the limitations of MBR and ensure it meets your needs.
Conclusion
As you can see, either partitioning an SSD or resizing partition is a simple task, and you can do it on your own. If the SSD contains files, do remember to back up your important data before repartitioning your SSD or hard drive to safeguard against any potential data loss or corruption. Should you need any help regarding partitioning an SSD, hard drive or USB drive, feel free to contact the support team who would like to provide you with free technical support.
FAQs on Partitioning SSDs
1. Is it OK to make partition on SSD?
Yes, it is perfectly okay and acceptable to make partitions on an SSD (Solid State Drive). Partitioning an SSD can provide various benefits such as performance, better performance and flexibility. By planning carefully and considering your specific needs, you can effectively utilize the advantages of partitioning while ensuring efficient data management on your SSD.
2. How to partition SSD disk in Windows 10?
To partition an SSD disk, you can use the built-in disk management tools in Windows 10, for example, create new partitions, merge unallocated space, format SSD, etc. You can also use third-party partitioning tools like DiskGenius Free edition to manage and partition your SSD disk. The free disk partitioning software provides additional features and more advanced functionality compared to the basic Disk Management.
3. How to split SSD into 2 partitions?
To split an SSD into 2 partitions without losing data, you can use either Windows Disk Management or third-party disk partitioning freeware DiskGenius.
In Disk Management, you need to shrink the SSD drive to get unallocated disk space first. Then create a new partition on the unallocated space. For DiskGenius, the SSD drive will be divided into two partitions directly, the partition splitting process does not affect or deleting existing data. Here are steps to split a partition without losing data.
4. Should I partition my SSD for Windows 11?
Partitioning your SSD for Windows 11 is not a mandatory requirement, but it can be a useful strategy depending on your specific needs and preferences. The decision to partition your SSD for Windows 11 depends on your specific requirements and preferences. If you value organization, need a dual-boot setup, or prefer to separate system files from personal data, partitioning can be beneficial. However, if these factors are not significant considerations for you, or if you are comfortable managing your files within a single partition, partitioning may not be necessary.
5. How to partition SSD in laptop?
There are several options available when partitioning an SSD in laptop, for example, partition the SSD in Windows Disk Management, partition SSDs using Diskpart commands, partition the drive using free disk partitioning software.
6. Does partition make SSD slower?
Partitioning an SSD itself does not make it slower. The act of creating partitions on an SSD does not directly impact its performance. Modern SSDs are designed to handle partitioning and perform optimally under normal usage. The benefits of partitioning, such as improved organization, data management, and separation of operating system files from user data, often outweigh any potential performance impact.
To ensure optimal performance, it is recommended to keep your SSD firmware up to date, maintain sufficient free space, perform regular disk maintenance, and follow best practices for SSD usage.
7. Can I partition 256GB SSD?
Yes, you can partition a 256GB SSD. Partitioning is a process that divides a disk into separate sections or partitions, and the size of the disk does not restrict the ability to create partitions.
With a 256GB SSD, you have a significant amount of storage space to work with. You can create multiple partitions on the SSD based on your specific needs and preferences. For example, you can allocate one partition for the operating system and programs, and another partition for storing personal files, documents, and media.
When partitioning, it’s important to consider the size requirements of each partition and allocate space accordingly. Be mindful of leaving enough free space for the SSD to maintain optimal performance. It’s also a good practice to back up your data before performing any partitioning operations to protect against potential data loss or corruption.
8. How should I partition my 1TB SSD?
When partitioning a 1TB SSD, the partitioning strategy will depend on your specific needs and preferences. As to steps of partitioning an SSD, you can follow guidance discussed above.
9. How many partitions should I have on 2TB SSD?
You can decide the number and sizes of partitions based on your specific requirements. For example, you may want additional partitions for specific purposes, such as a partition for virtual machines, a partition for media editing projects, or a partition for gaming libraries. It is also okay to have one 2TB partition on the drive as long as it meets your needs.
10. Can you merge SSD partitions without losing data?
Merging SSD partitions without losing data is technically possible, but it involves more complex procedures and carries a higher risk of data loss compared to other partition operations. For example, in Disk Management, you need to delete a partition to get unallocated space which will be merged to another partition. It is always recommended to back up your data before attempting any partition modifications, including merging partitions.
11. Can SSD be partitioned for dual boot?
Yes, an SSD can be partitioned for a dual-boot setup. Partitioning the SSD allows you to install and run multiple operating systems on separate partitions of the same drive. This enables you to choose between different operating systems when starting up your computer. Ensure that your SSD has sufficient capacity to accommodate multiple operating systems and associated programs/files.
12. How to partition SSD without OS?
To partition an SSD without an operating system installed, you can use a bootable partition management tool. Here’s a general guide on how to partition an SSD without an operating system:
Step 1. Create a bootable USB drive using DiskGenius Free Edition.
Step 2. Boot the computer from the USB drive.
Step 3. Select the SSD drive you want to partition and click «Quick Partition».
Step 4. Select partition number and size. Then click «OK» button.
13. How to increase C drive space in Windows 11 without formatting?
In Windows 11, you can increase the space of the C drive (system partition) without formatting by utilizing the Disk Management tool, Diskpart commands or DiskGenius Free Edition. For detailed steps, refer to the page: How to Extend C Drive without Data Loss In Windows 11/10/8/7?
14. How to change partition size in Windows 11 without formatting?
Partition size can be changed without losing data, and there are various ways to resize a partition, see the article: How To Resize Partition in Windows 11/10/8/7 Without Data Loss? [3 Ways]
It’s important to note that the resizing process may take some time, especially if you’re working with large partitions or a significant amount of data. Additionally, make sure you have a backup of your important data before making any changes to your partitions to avoid the risk of data loss.
15. How to re partition without destroying the data in Windows 11?
Disk repartitioning process deletes all partitions and data, causing data loss. If you want to repartition a drive without destroying the data in Windows 11 or Windows 10, you need to back up files to another disk before partitioning the disk.
Related Topics
- How to Partition a Hard Disk in Windows 11/10/8/7? [2 Methods]
- How to Do Partition in Windows 11/10/8/7? [4 Guides to Partition Hard Drive]
- How to Unpartition a Hard Drive in Windows 11/10/8/7? [3 Methods]
- How to Fix Unallocated Hard Drive Without Losing Data in Windows 10/11?