
Updated on Apr 28, 2025
| Workable Solutions | Step-by-step Troubleshooting |
|---|---|
| Disk Partition CMD | Step 1: You can use the two methods mentioned above to open the command prompt or Run window…Full steps |
| EaseUS Partition Master |
1. Disk migration and cloning…Full steps 2. Partition Recovery…Full steps |
«Unable to select a drive, as it is showing 0 MB while installing Windows 10, I tried to check-in cmd, but I don’t know its instructions. Can I get the cmd guide or other software?»
Are you confused about how to use disk partition cmd? Don’t worry. We know what you want to know. In the following, this page lists many practical tips about cmd. And we recommend a third party software — EaseUS Partition Master Professional that can replace the cmd function.
Overview of disk partition cmd
Cmd, the abbreviation for command, is a Microsoft Windows command that opens the Windows command line window.
Notes: Windows 95 & 98 users can only enter the command line by entering command; other Windows users can enter command or cmd to use.
How to open Windows cmd
Method 1: You can input cmd in the Start Menu search bar to open the Windows Command Prompt.
Method 2: You can press Win+R to open the Run box, type cmd, and press Enter.
What is Diskpart
After open cmd, you need to type ‘diskpart’ for disk partitioning. Diskpart is a command-line utility in Windows 10, which enables you to operate disk partition by using Diskpart command prompt, including create, merge, extend, shrink, format, delete, wipe disk partition, and other features.
Next, we will provide more information about how to use disk partition cmd in Windows 11/10. If you like this page, don’t hesitate to click the buttons below to share it with more people!
Steps to create a partition in Windows 11/10 using command prompt.
Warning: Do not use the Diskpart until a full backup.
Step 1: You can use the two methods mentioned above to open the command prompt or Run window.
Step 2: Enter Diskpart
Steps about essential partition functions are as follows:
- Create a partition using Diskpart
1. At the Diskpart prompt, type: List Disk
2. Input: Select Disk * (* represents the disk number)
3. Type: Create partition primary size=*(* means the partition size.)
4. Input: Assign letter=* (* represents Choose a drive letter not already being used.)
5. Type: Exit (Exit is the Esc on the top left of the keyboard.)
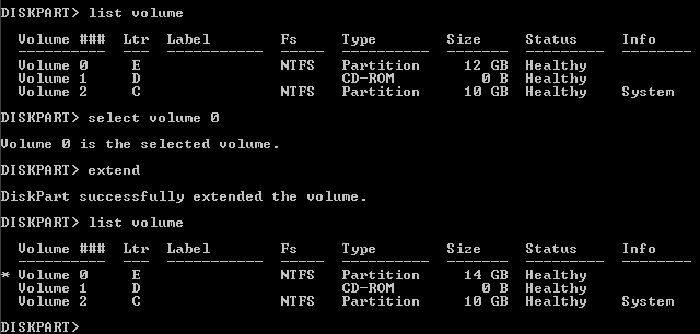
- Extending a partition using Diskpart
Note: If you try it or any other method, make sure you have a full backup.
1. Verify that contiguous free space is available on the same drive and that free space is next to the partition you intend on extending, with no partitions in between.
2. Type: Select Disk * (Selects the disk.)
3. Type: Select Volume *(Selects the volume.)
4. Type: Extend Size=*
5. Type: Exit
- Deleting a partition using Diskpart
Note: You cannot delete an active system or boot partition or a partition with a dynamic page file.
1. Input: Diskpart.exe
2. Select disk *
3. Select Partition *
4. Delete partition
5. Exit
- Wiping a disk using Diskpart
This operation deletes all data on the disk.
1. Type: Select disk *
2. Type: Clean all(The CLEAN ALL command removes all partition and volume information from the hard drive being focused on.)
3. Exit
The diskpart also has other features, such as assign drive letters, shrink partition, mark partition as active, convert MBR/GPT. If you want to learn these parts, FAQ, at the end of the article, will bring you the right answer.
After reading the above guide, I believe you have a specific understanding of how to use cmd via Diskpart in Windows 11/10. Cmd is a powerful tool, but it is not suitable for a beginner. Misoperations can easily cause partition problems. There is a better software — EaseUS Partition Master.
How to manage partitions with EaseUS Partition Master
EaseUS Partition Master is an all-in-one partition manager, which helps you create, resize, clone, move, merge, and format partitions. The following video tutorial shows you how to create, deleted, shrink, and resize a partition with this powerful disk management program.
Favored by millions of users. It contains all features Diskpart has and many other superior functions like the two demonstrated below.
1. Disk migration and cloning
Nowadays, for better performance of computer disk, you may want to migrate the operating system and clone disk to the target one. It saves the user’s time to download programs. It only takes a few steps to get remarkable results. For example, there is a guide about transfer Windows 10 to another drive.
Steps to migrate OS to HDD/SSD:
- Run EaseUS Partition Master, and select «Clone» from the left menu.
- Check «Migrate OS» and click «Next».
- Select the SSD or HDD as the destination disk and click «Next».
- Check Warning: the data and partitions on the target disk will be deleted. Make sure that you’ve backed up important data in advance. If not, do it now.
- Then click «Yes».
- Preview the layout of your target disk. Then click «Start» to start migrating your OS to a new disk.
- After this, click «Reboot Now» or «Done» to determine if you want to reboot the computer from the new disk immediately.
«Reboot Now» means to keep the changes instantly, while «Done» means you need to restart the computer later manually.

Note: The operation of migrating OS to SSD or HDD will delete and remove existing partitions and data on your target disk when there is not enough unallocated space on the target disk. If you saved important data there, back up them to an external hard drive in advance.
2. Partition Recovery
Partition Recovery is a practical feature targeting your lost partitions.
It is worth trying to scan your selected disk. The spending time of a deep scan may in line with your disk volume.
You can check the related article about «recover unallocated space in Windows 10» to get further learning.
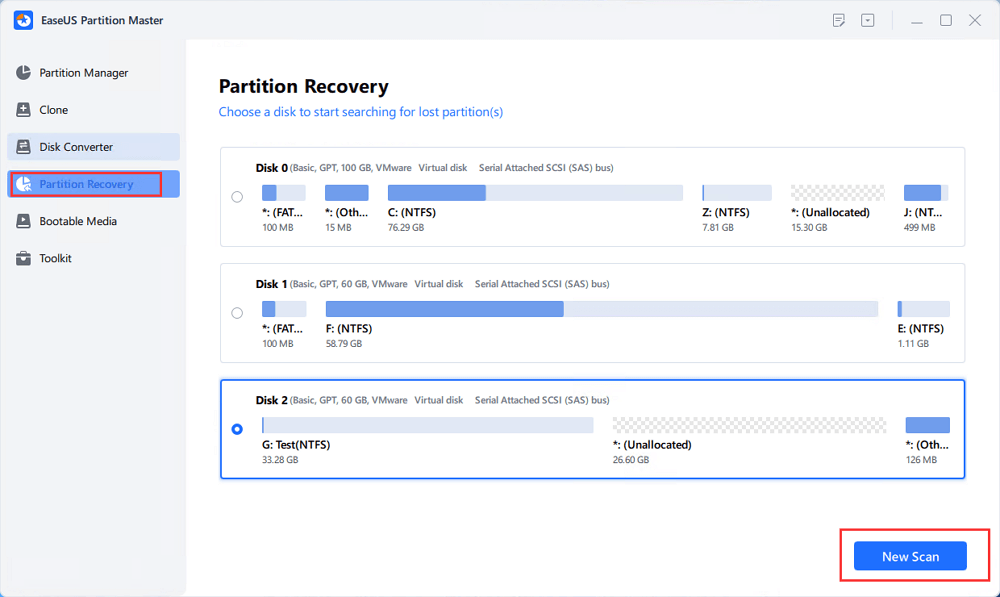
Step 1. Open EaseUS Partition Master and click «Partition Recovery». Select the target disk with your lost partition and click «New Scan».
Step 2. Wait patiently to let the software execute «Quick Scan» and «Full Scan» operation. It will mark your deleted partition as «lost» as the Status section. Select the lost partition, and click «Recover».
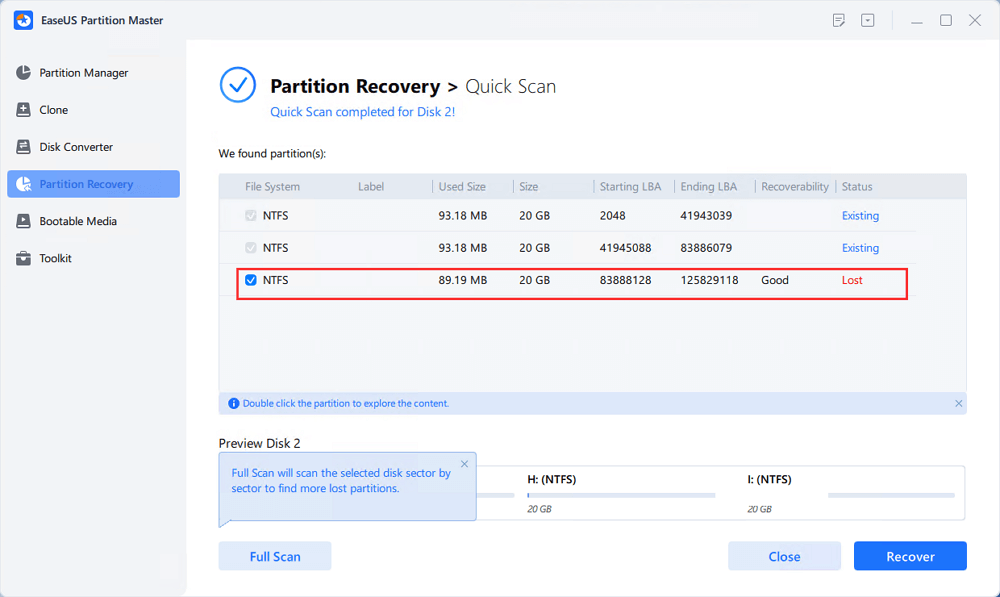
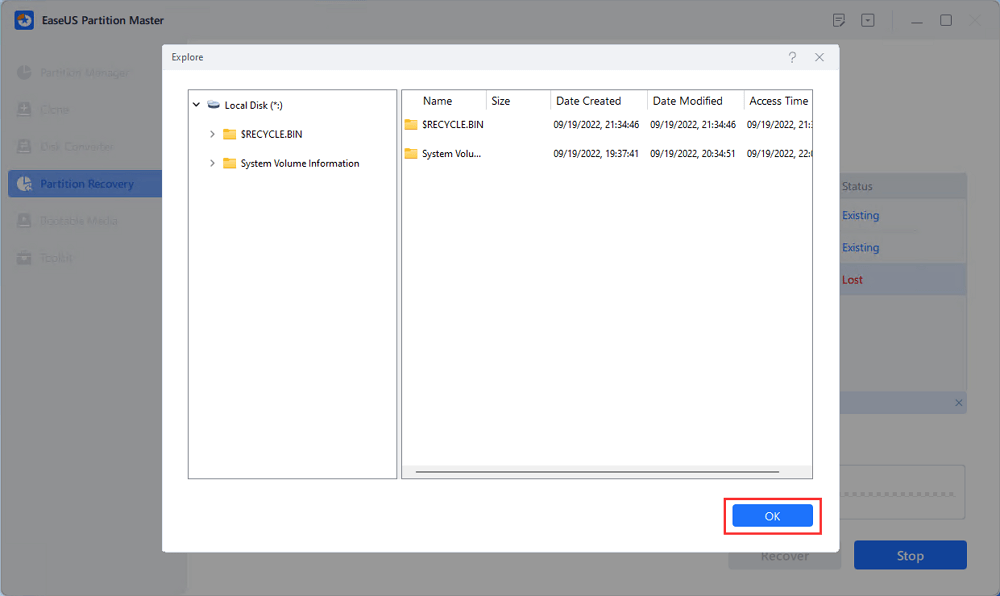
You can also double click on the partition you’re looking for to preview its content and click «OK» to confirm.
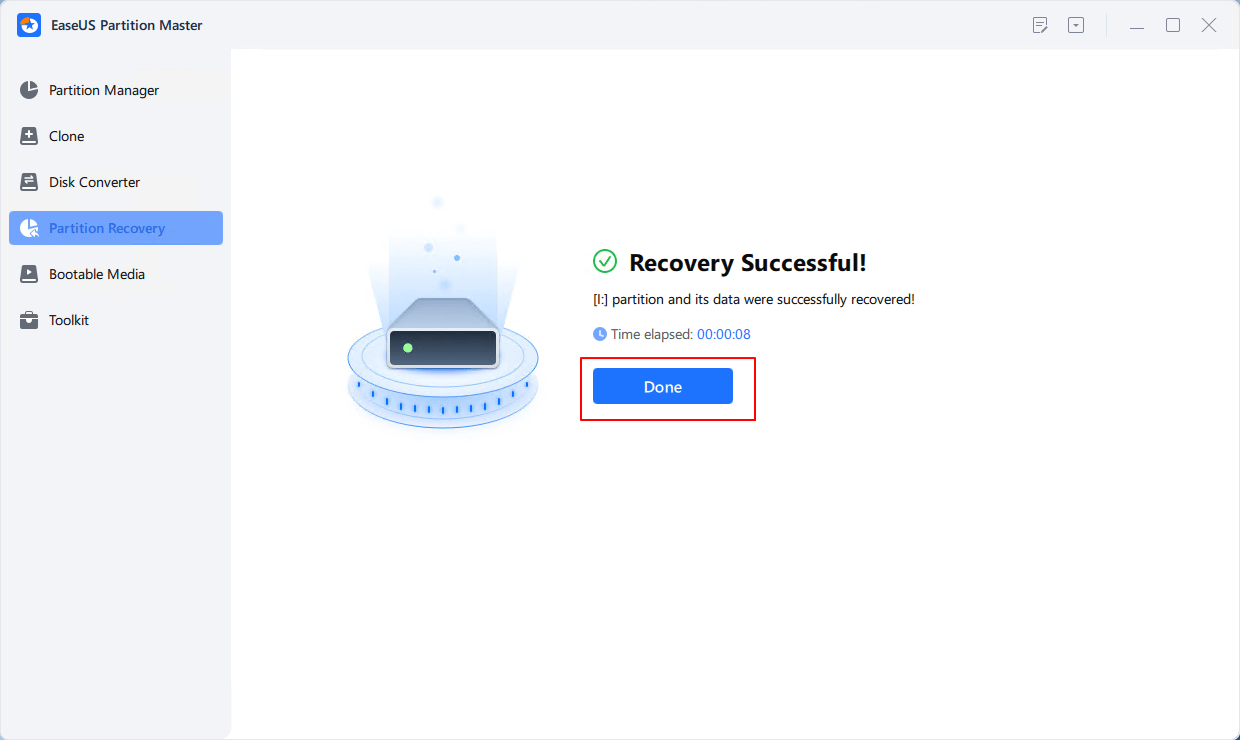
Step 3. Wait patiently and click «Done» when the partition recovery process completes.
FAQ
1. How do I use diskpart command in Windows 11/10?
-Boot into Windows 10
-Press the Windows key and C to open the charm bar.
-Type cmd
-Click Command Prompt
-When Command Prompt opens, type diskpart
-Press Enter
2. How to assign drive letter via Diskpart?
—Type «assign letter=F» (F can be replaced with another letter that has not been used yet).
—And then, you will receive a message that says: DiskPart successfully assigned the drive letter or mount point.
3. How to shrink partition via Diskpart
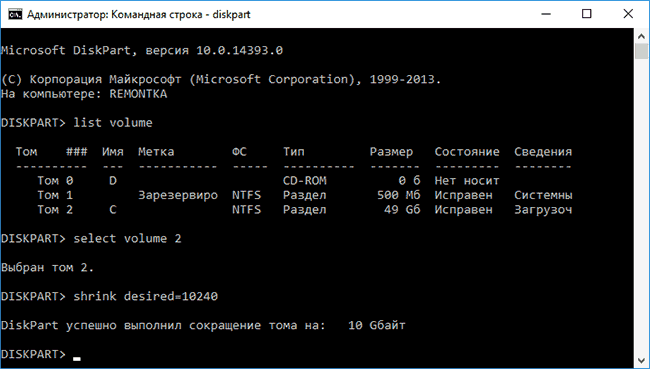
Type shrink directly will automatically shrink the partition by Windows, and you can also type shrink desired=*** to define your partition size.
(Such as: Type «shrink desired=10240». And then, you will receive a message that says: DiskPart successfully shrunk the volume by 10GB.)
Note: You can reduce the size of a volume only if it is formatted using the NTFS file system.
4. How to mark a partition as active via Diskpart?
—Type active.
—And then, you will receive a message that says: DiskPart marked the current separation as active.
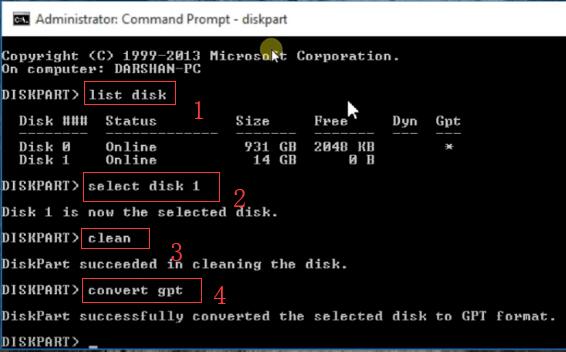
5. How to clean Disk/convert a disk to GPT/ convert a disk to MBR?
-Type: list disk.
-Type: select disk 1.
-Type: clean.
-Type: convert gpt or convert mbr.
Many users assume diskpart create partition is difficult. Actually, diskpart create partition is not that complicated. This article will show you how to create partition Windows 10 with Diskpart and two Diskpart alternatives.
What Is Diskpart
DiskPart is a command-line disk partition management tool built-in all Windows versions, such as Windows 10, Windows 8, Windows 7, which replaces its predecessor, FDISK. See: Alternative to FDISK Format Tool – MiniTool Partition Wizard.
This utility enables users to perform many disk and partition operations. You can use it to view, create, delete, and resize the computer’s disk partitions. Diskpart supports the use of scripts to automate its usage.
How to Open Diskpart
Some users may ask: how can I open the diskpart window? Well, don’t worry about that. Here are 3 ways to access diskpart.
- Type diskpart in the Windows 10 Cortana search box, and then right-click the best match diskpart in the search results to select Run as administrator. Then Diskpart command window will show up.
- Press Windows keyand R at the same time OR right-click the Windows Start menu to choose Run, and then type diskpart in the pop-up Run
- Type cmd in the Runbox and press the Enter key to launch the Command Prompt. Then in the command prompt window, type diskpart and press the Enter key again. The command prompt will launch the diskpart utility in a new window.
This is how to diskpart in three different ways. Next I will show you how to create new partition diskpart in Windows 10.
Diskpart Create Partition Windows 10
To create partition using diskpart is very simple. If you are a novice, you can follow the steps and screenshots as below to create partition Windows 10.
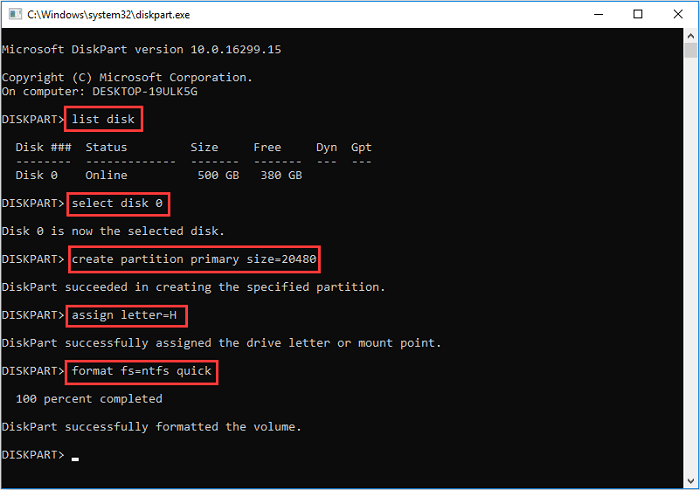
Step 1. Press WIN+R key at the same time to open the Run window and then input diskpart to open the diskpart window.
Step 2. At the diskpart window, input list disk. Then all the disks in current system will be listed so that you know the disk number on which you want to create a partition.
Step 3. Input select disk *(* represents the disk number)
Tip: To create a new partition with diskpart, make sure there is unallocated space on the disk you select.
Step 4. After selecting the disk, type one of the following commands according to your requirements.
If you want to create a primary partition, type:
create partition primary size=n (n represents the partition size in MB)
If you want to create a logical partition, you need to create an extended partition at first and then create a logical partition. Type:
create partition extended size=x (x reprents the extended partition size in MB)
create partition logical size=y (y represents the logical partition size in MB)
Step 5. Input assign letter=H to give the new partition a name.
Step 6. Input format fs=ntfs and press Enter. To use the new partition, you must format the partition firstly. This process could be very slow sometimes, so if you want to quicken the process, you can input format fs=ntfs quick and press Enter.
Step 7. Type exit and press Enter.

After seeing the steps above, you may find it is not so difficult to create partition using diskpart. If you still find diskpart create volume is a little complicated, you can try some software with graphic interface to create partition Windows 10.
Actually, most people use diskpart to perform all kinds of disk partition operations, not just diskpart create partition. Here are some common operations that users would like to perform them with diskpart.
Create partition: You can create a primary partition, extended partition, logical partition by using the create partition primary/create partition extended/create partition logical commands respectively. Later I will demonstrate you detailed steps about how diskpart create partition.
Delete partition: You can delete the target partition with diskpart. Just select the target partition on the target disk and then use the delete partition command to delete it.
Format: Format partition with diskpart is very popular for Windows users. You can format any volume using this command. When performing format operation, make sure you select the right partition to format, as all the data on the partition will get lost.
Convert disk to basic/dynamic: You can convert a disk from dynamic to basic or from basic to dynamic with convert basic or covert dynamic command. However, if you want to convert a dynamic disk back to a basic disk with diskpart, you must delete all volumes from the disk, which will cause data loss.
Convert disk to MBR/GPT: You can convert an empty disk with MBR/GPT partition style to GPT/MBR partition style with convert gpt OR convert mbr command on the target disk, but make sure the disk is empty. Otherwise, you might lose all of your data.
Clean: The clean command will remove all partition or volume from the disk. All information on the disk will be cleared once you run clean command. But the data is recoverable as it will only mark the data on the disk as deleted, not secure erase the disk.
When you want to perform an operation on a particular disk/partition, firstly, you need list these disks, and then select a specific disk or partition to give it focus. When the disk or partition has been selected, any following diskpart commands you input will act on that object.
Note: If you open diskpart in Windows 2000, Windows XP and Windows Server 2003 with Recovery Console, there is a diskpart command which is significantly different from the one included in the actual operating system. It only provides functionality for adding and deleting partitions, and it does not support to set a partition active.
After learning what people usually do with diskpart, you may have a deeper understanding of diskpart.
Next, I will show you how to create partition Windows 10 with two diskpart create partition alternatives. Both of them are very easy to use with their graphical interface. Now let’s see how to create partition with the two diskpart create partition alternatives.
MiniTool Partition Wizard Free Edition is a professional partition manager trusted by millions of user. With this all-in-one partition manager, you can reconfigure hard disk and maximize the usage of hard disk space with its functions like create partition, delete partition, move/resize partition, extend partition, merge/split partition, etc.
Besides, this software also develops many advanced features to optimize hard disk and Windows operating system with very simple steps, like align partition, convert MBR to GPT without data loss, migrate OS to SSD/HD, disk benchmark, space analyzer and so on.
Next, let’s see how to create partition Windows 10 with MiniTool Partition Wizard Free Wizard.
Step 1. Download MiniTool Partition Wizard Free Edition by clicking the following button. Install it on your computer and launch it to get its main interface.
MiniTool Partition Wizard FreeClick to Download100%Clean & Safe
Step 2. Here is the main interface of MiniTool Partition Wizard Free Edition. Then select the unallocated space and choose the function Create Partition from action panel to get the following interface.
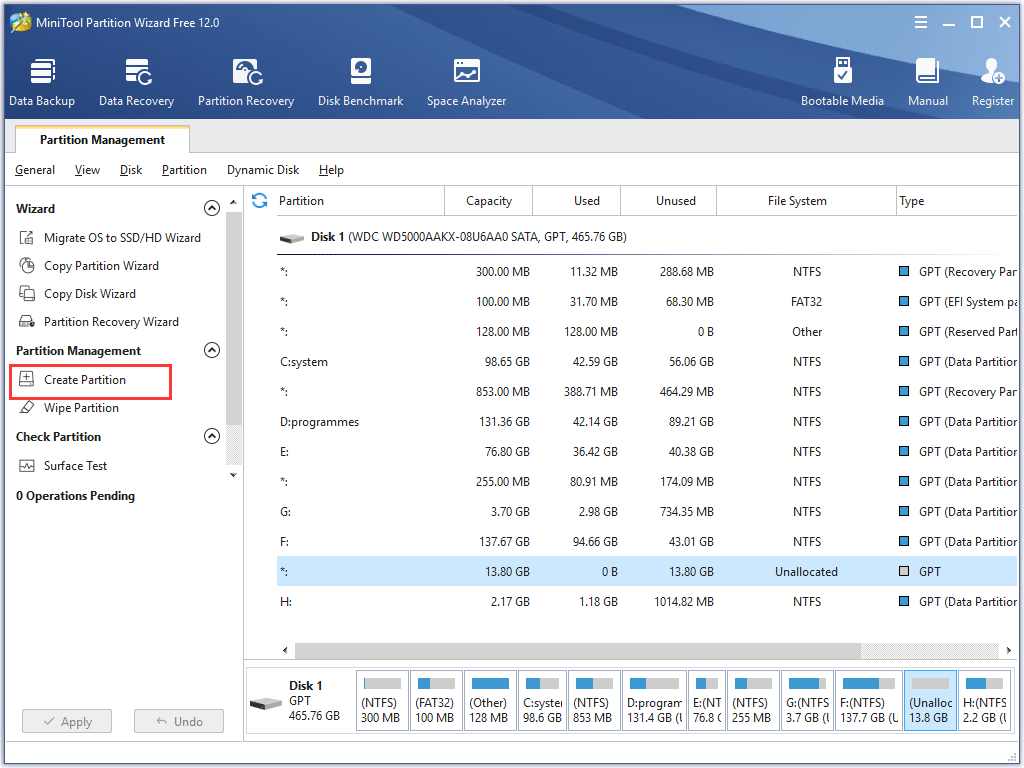
Tip: If there is no unallocated space, you can resize a partition to get some unallocated space and then create a new partition.
Step 3. This interface shows the new partition is set as primary partition by default. You can change it if you want to create a logical partition. And you can also set partition label, drive letter, file system and cluster size by yourself. After making other settings, click OK to go back to the main interface.
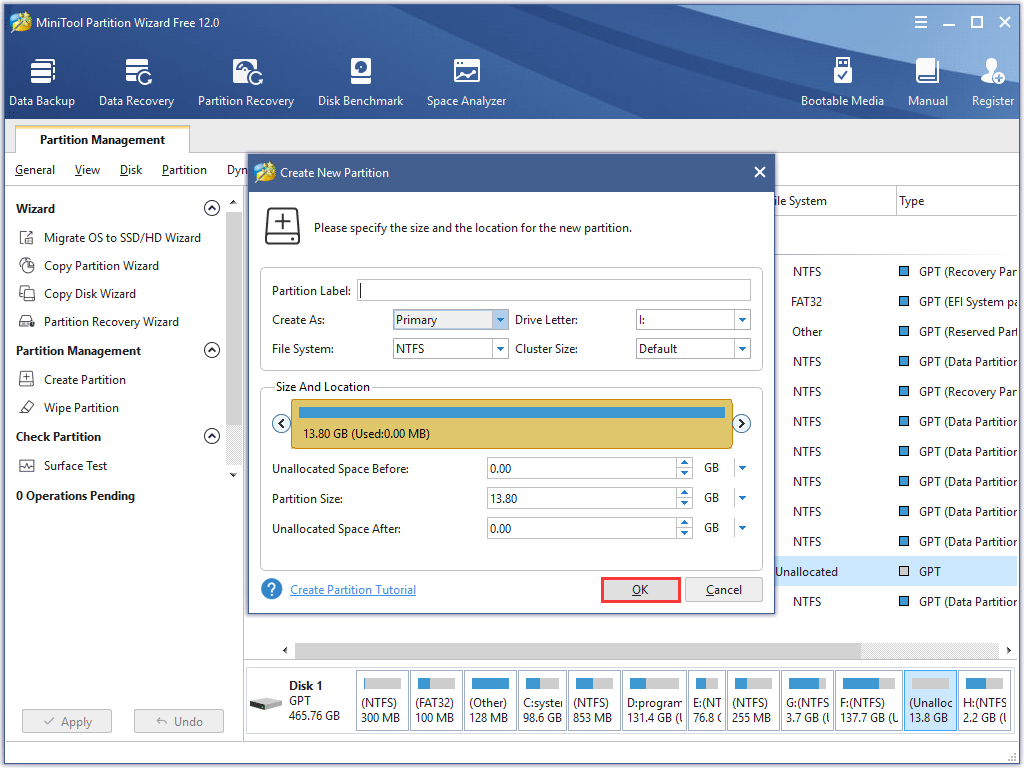
Note: If the disk has a logical partition already, to create another logical partition between 2 primary partitions is not allowed in Partition Wizard as logical partitions must be adjacent to each other.
Step 4. Now you can see the new partition has been created, but this is just a preview. At this time, click Apply button on the upper left corner to apply changes.
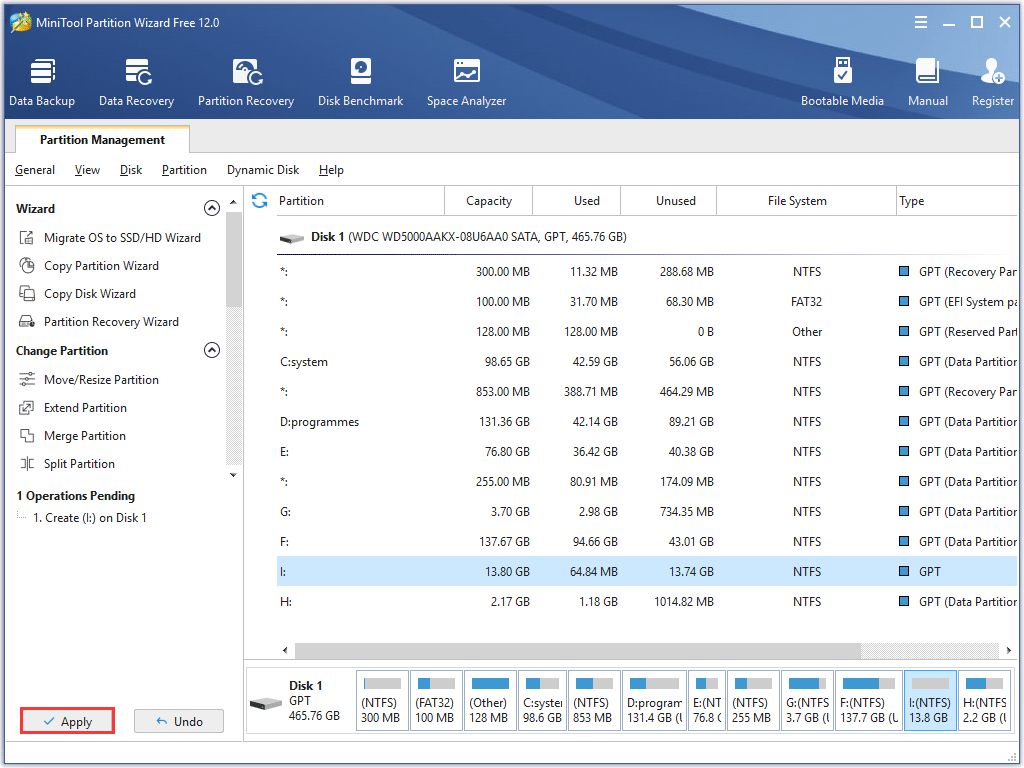
You see! By using MiniTool Partition Wizard, you can easily create partition Windows 10.
Nowadays, tens of millions of users use MiniTool Partition Wizard Free Edition to manage their hard drives as it can help you manage partitions in an effortless way. If you don’t want to create partition using diskpart, get MiniTool Partition Wizard to help you now!
MiniTool Partition Wizard FreeClick to Download100%Clean & Safe
Using Disk Management to Create Partition
Disk Management is not as powerful as MiniTool Partition Wizard Free Edition, but as a Windows built-in partition manager, it can complete most simple and basic partition managements like create partition, delete partition, format partition, etc.
So if you find the Diskpart create partition is a little complicated and you don’t want to resort to third-party partition software either, you can try the Windows built-in Disk Management, which is very convenient for Windows users.
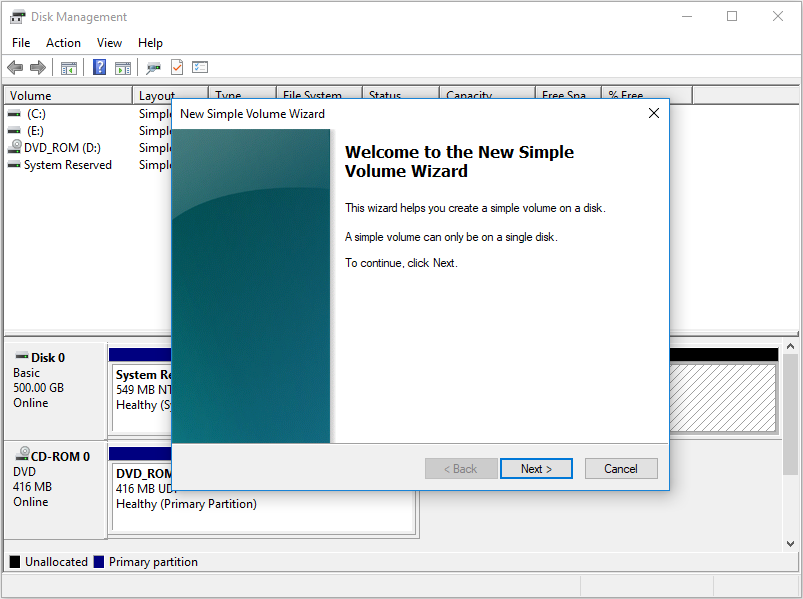
Step 1. Right-click Windows Start menu and choose Disk Management to enter into the Windows 10 Disk Management interface.
Step 2. Right-click the unallocated space and select New Simple Volume to get the New Simple Volume Wizard interface.

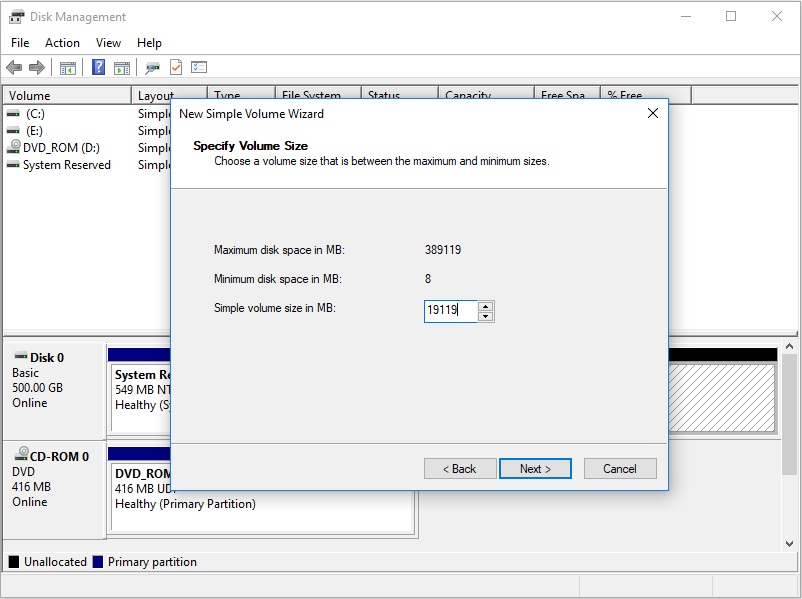
Step 3. Click Next and specify volume size.
Step 4. Input the size of the partition that you want to create and the click Next. If you don’t input a specified number, it will create a partition with all the unallocated space as default.
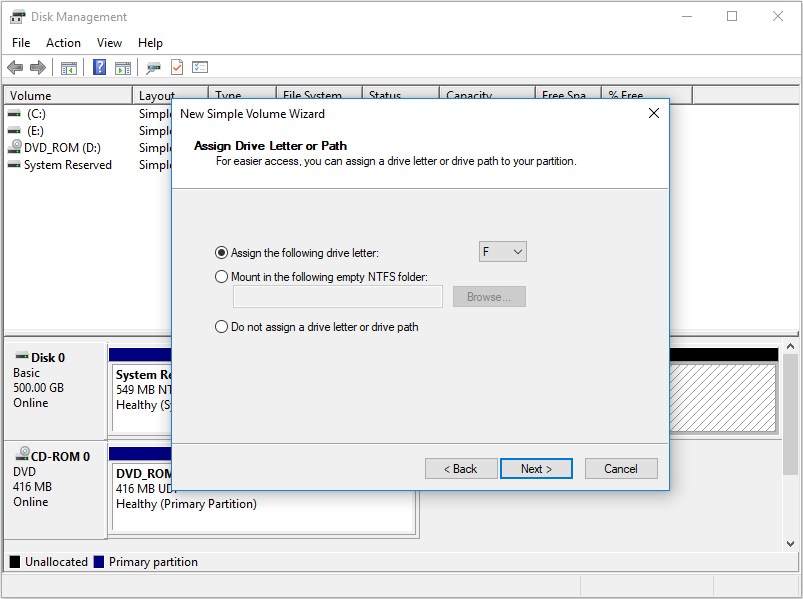
Step 5. Assign a drive letter and click Next.
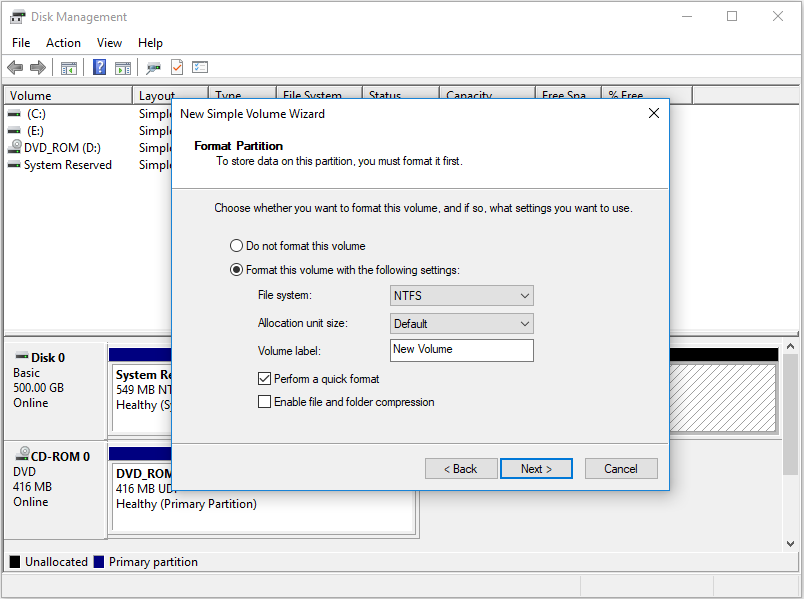
Step 6. At this page, you can format the partition and set file system, allocation unit size and volume label for the partition. Then click Next to format this partition.
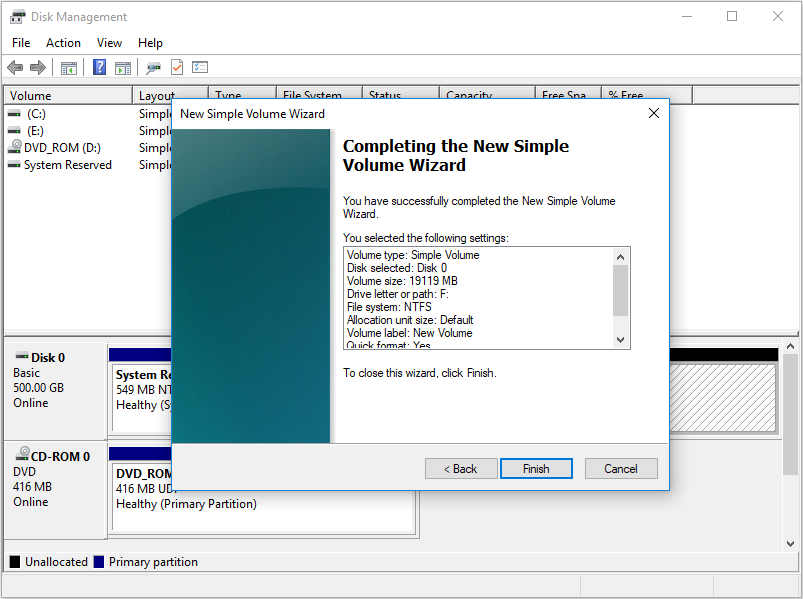
Step 7. Click Finish to complete creating a new partition in Windows 10.
Tip: If you fail in creating a new partition, you may check this post: Fix – Disk Already Contains Maximum Number of Partitions Error.
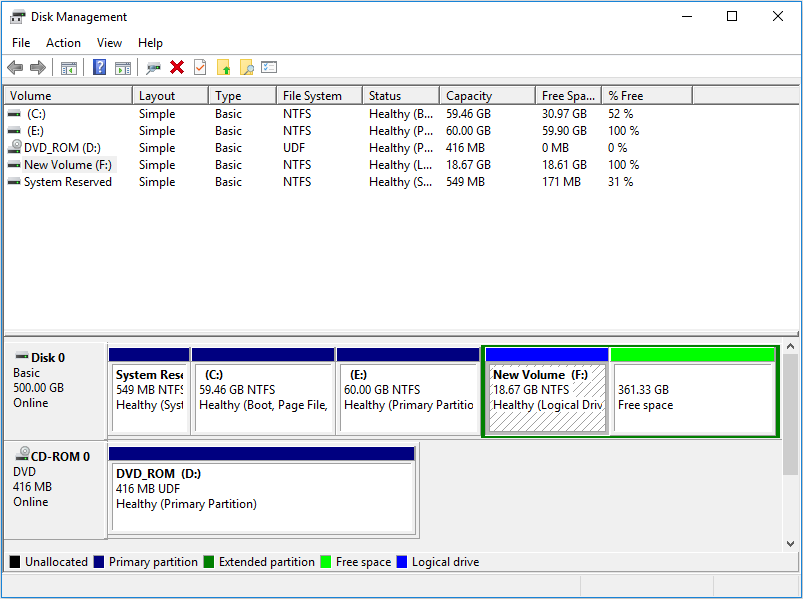
Step 8. Then when you get back to the main interface, you can see the new partition has been created.
After reading this post, you can see that diskpart is not the only way to create partition Windows 10. If you don’t like to create partition using commands, try using diskpart create partition alternatives.
MiniTool Partition Wizard FreeClick to Download100%Clean & Safe
By following the steps in this post, I learned how to create partition with diskpart and the two diskpart alternatives are also excellent and simple to manage disks and partitions. People who don’t know how to create partition diskpart can check this post.Click to Tweet
Wrapping Things Up
After reading this post, now you know how to create partition Windows 10 with Diskpart. And other methods like Disk Management, MiniTool Partition Wizard Free Edition are also good-to-use software for you to create partition Windows 10.
If you have any question about Diskpart create partition Windows 10 or about MiniTool Partition Wizard, you can leave a message on the following comment zone. We will reply as soon as possible. If you need any help when using MiniTool software, you can contact us via [email protected].
При покупке компьютера или при установке Windows или другой ОС многие пользователи хотят разбить жесткий диск на два или, точнее, на несколько разделов (например, диск C на два диска). Эта процедура дает возможность хранить отдельно системные файлы и личные данные, т.е. позволяет сохранить свои файлы в случае внезапного «слета» системы и улучшить быстродействие ОС путем уменьшения фрагментации системного раздела.
В этой инструкции подробно о способах разделения диска на разделы во всех актуальных версиях Windows. На сайте также присутствуют отдельные материалы: Как разделить диск в Windows 11, Как разбить диск на разделы в Windows 10.
Как разбить диск в Windows 11, Windows 10 и предыдущих версий системы без программ
Разбить жесткий диск можно несколькими путями:
- В Windows 11, 10, 8.1 и 7 — без использования дополнительных программ, стандартными средствами.
- Во время установки ОС (в том числе, будет рассмотрено, как это сделать при установке XP).
- С помощью программ Minitool Partition Wizard, AOMEI Partition Assistant, DiskGenius, Acronis Disk Director и дургих
Вы можете разделить жесткий диск или SSD во всех последних версиях Windows в уже установленной системе. Единственное условие — чтобы свободного места на диске было не меньше, чем вы хотите выделить под второй логический диск.
Для этого, проделайте следующие шаги (в этом примере будет разбит системный диск C):
- Нажмите клавиши Win+R на клавиатуре и введите diskmgmt.msc в окно «Выполнить» (клавиша Win — это та, которая с эмблемой Windows). В Windows 11 и 10 для запуска можно использовать контекстное меню кнопки Пуск.

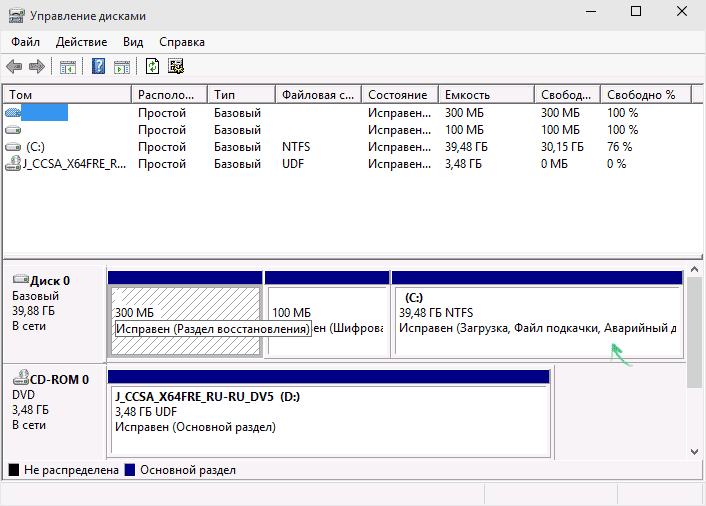
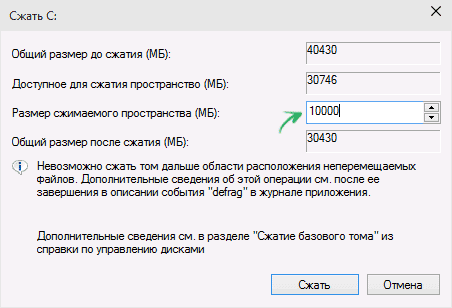
- После загрузки утилиты управления дисками, кликните правой кнопкой мыши по разделу, соответствующему вашему диску C (или другому, который нужно разделить) и выберите пункт меню «Сжать том».

- В окне сжатия тома, укажите в поле «Размер сжимаемого пространства» тот размер, который вы хотите выделить под новый диск (логический раздел на диске). Нажмите кнопку «Сжать».

- После этого, справа от вашего диска появится пространство, которое «Не распределено». Кликните по нему правой кнопкой мыши и выберите «Создать простой том».

- По умолчанию для нового простого тома указан размер, равный всему незанятому пространству. Но вы можете указать меньше, если требуется создать несколько логических дисков.
- На следующем шаге укажите букву создаваемого диска.
- Задайте файловую систему для нового раздела (лучше оставить все как есть) и нажмите «Далее».


После этих действий, ваш диск будет разделен на два, а вновь созданный получит свою букву и будет отформатирован в выбранную файловую систему. Можно закрывать «Управление дисками» Windows.
Примечание: может оказаться, что позже вы захотите увеличить размер системного раздела. Однако, сделать это точно так же не получится в связи с некоторыми ограничениями рассмотренной системной утилиты. Вам поможет статья Как увеличить диск C.
Как разделить диск на разделы в командной строке
Разбить жесткий диск или SSD на несколько разделов можно не только в «Управление дисками», но и с помощью командной строки.
Будьте внимательны: показанный далее пример сработает без проблем только в тех случаях, когда у вас есть единственный системный раздел (и, возможно, пара скрытых), который нужно разделить на два раздела — под систему и данные. В некоторых других ситуациях (диск MBR и уже есть 4 раздела, при уменьшении диска, «после которого» находится еще один диск) это может работать неожиданно, если вы начинающий пользователь.
Следующие шаги показывают, как разделить диск C на две части в командной строке.
- Запустите командную строку от имени администратора (как это сделать). Затем по порядку введите следующие команды
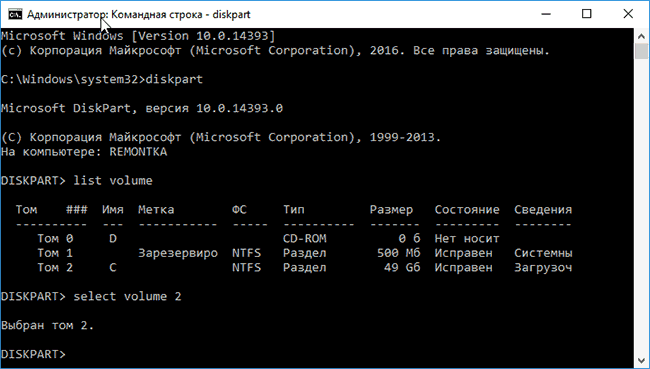
- diskpart
- list volume (в результате выполнения этой команды следует обратить внимание на номер тома, соответствующего диску C)
- select volume N (где N — номер из предыдущего пункта)

- shrink desired=размер (где размер — число, заданное в мегабайтах, на которое мы сократим диск C, чтобы разбить его на два диска).
- list disk (здесь обратите внимание на номер того физического диска HDD или SSD, на котором находится раздел C).

- select disk M (где M — номер диска из предыдущего пункта).
- create partition primary
- format fs=ntfs quick
- assign letter=желаемая_буква_диска
- exit

Готово, теперь можно закрыть командную строку: в проводнике Windows вы увидите вновь созданный диск или, вернее, раздел диска с указанной вами буквой.
Как разделить диск на разделы в программе Minitool Partition Wizard Free
Minitool Partition Wizard Free — отличная бесплатная программа, позволяющая управлять разделами на дисках, в том числе делить один раздел на два и более. Одно из преимуществ программы в том, что на официальном сайте доступен загрузочный образ ISO с ней, который можно использовать для создания загрузочной флешки (разработчики рекомендуют делать это с помощью Rufus) или для записи диска.
Это позволяет легко выполнить действия по разделению диска в тех случаях, когда в запущенной системе выполнить это не удается.
После загрузки в Partition Wizard вам достаточно будет кликнуть по диску, который нужно разделить, правой кнопкой мыши и выбрать пункт «Split» (разделить).

Дальнейшие шаги просты: настройте размеры разделов, нажмите Ок, а затем нажмите кнопку «Apply» (применить) слева вверху, чтобы применить сделанные изменения.

Бесплатно скачать загрузочный образ ISO Minitool Partition Wizard Free можно с официального сайта https://www.partitionwizard.com/partition-wizard-bootable-cd.html
Как разделить диск во время установки Windows 11/10 и предыдущих версий
Если вам необходимо выполнить разделение диска на этапе установки системы, сделать это ещё проще. Разбиение к тому же займет относительно немного времени, а сам процесс очень нагляден. Главный недостаток – применить способ можно только при установке или переустановке операционной системы, что само по себе не очень удобно, к тому же нет возможности редактирования разделов и их размеров без форматирования HDD (например, в случае, когда закончилось место системного раздела, и пользователь хочет добавить немного пространства с другого раздела жесткого диска). Более подробно создание разделов на диске при установке Windows 10 описано в статье Установка Windows 10 с флешки.
Если эти недостатки не являются критичными, рассмотрим процесс разбивки диска во время установки ОС. Данная инструкция полностью применима при установке Windows 11/10, 8.1 и Windows 7.
- После запуска программы установки загрузчиком предложит выбрать раздел, на который будет установлена ОС. Именно в этом меню и можно создавать, редактировать и удалять разделы жесткого диска. Если до этого жесткий диск не разбивался, будет предложен один раздел. Если разбивался – необходимо удалить те разделы, объем которых требуется перераспределить. Для того, чтобы настроить разделы на жестком диске, нажмите соответствующую ссылку внизу их списка — «Настройка диска» (при установке новых версий системы опция отсутствует и можно сразу перейти к следующему шагу).

- Для того, чтобы удалить разделы на жестком диске воспользуйтесь соответствующей кнопкой (ссылкой)


Внимание! При удалении разделов диска будут удалены все данные, которые на них находятся.
- После этого, создайте системный раздел, нажав «Создать». В появившемся окошке введите объем раздела (в мегабайтах) и нажмите «Применить».
- Система предложит выделить немного места для резервной области, подтвердите запрос.
- Аналогичным образом создайте нужное количество разделов.
- Далее выберите раздел, который будет использоваться для Windows 10, 8 или Windows 7 и нажмите «Далее». После этого продолжите установку системы в обычном режиме.


Разбиваем жесткий диск при установке Windows XP
Во время разработки Windows XP не было создано интуитивно понятного графического интерфейса. Но хоть управление и происходит через консоль, разделить жесткий диск при установке Windows XP также просто, как и при установке любой другой операционной системы.
Шаг 1. Удаляем существующие разделы.
Перераспределить диск можно во время определения системного раздела. Требуется разделить раздел на два. К сожалению, Windows XP не позволяет проводить эту операцию без форматирования жесткого диска. Поэтому последовательность действий следующая:
- Выделяете раздел;
- Жмете «D» и подтверждаете удаление раздела нажатием кнопки «L». При удалении системного раздела Вас также попросят подтверждение этого действия с помощью кнопки Enter;

- Раздел удаляется и Вы получаете неразмеченную область.

Шаг 2. Создаем новые разделы.
Теперь нужно из неразмеченной области создать нужные разделы жесткого диска. Делается это довольно просто:
- Нажимаете кнопку «C»;
- В появившемся окне вводите необходимый размер раздела (в мегабайтах) и жмёте Enter;
- После этого новый раздел будет создан, а Вы вернетесь в меню определения системного диска. Аналогичным образом создайте необходимое количество разделов.


Шаг 3. Определяем формат файловой системы.
После того, как разделы созданы, выберите раздел, который должен быть системным и нажмите Enter. Вам будет предложено выбрать формат файловой системы. FAT-формат – более устаревший. С ним у Вас не будет проблем с совместимостью, например, Windows 9.x, однако из-за того, что системы старше XP сегодня – редкость, это достоинство не играет особой роли. Если к тому же учесть, что NTFS – более быстрый и надежный, позволяет работать с файлами любого объема (FAT – до 4Гб), выбор очевиден. Выбираете нужный формат и жмёте Enter.
Дальше установка пойдет в стандартном режиме – после форматирования раздела на него начнется установка системы. От Вас будет требоваться только ввести пользовательские параметры в конце установки (имя компьютера, дата и время, часовой пояс и т.д.). Как правило, это делается в удобном графическом режиме, поэтому сложности не представляет.
Бесплатная программа AOMEI Partition Assistant
AOMEI Partition Assistant — одна из лучших бесплатных программ для изменения структуры разделов на диске, переноса системы с HDD на SSD и, в том числе, с ее помощью можно разбить диск на два и более. При этом, интерфейс программы на русском языке, в отличие от другого хорошего аналогичного продукта — MiniTool Partition Wizard.
Примечание: несмотря на то, что в программе заявлена поддержка Windows 10, у меня в этой системе она не выполнила разбиение по какой-то причине, но и никаких сбоев не произошло (думаю, к 29 июля 2015 должны поправить). В Windows 8.1 и Windows 7 работает без проблем.
После запуска AOMEI Partition Assistant, в главном окне программы вы увидите подключенные жесткие диски и SSD, а также разделы на них.

Чтобы разбить диск, кликните по нему правой кнопкой мыши (в моем случае по C), и выберите пункт меню «Разделение раздела».
На следующем шаге необходимо будет указать размер создаваемого раздела — сделать это можно путем ввода числе, либо передвигая разделитель между двумя дисками.

После того, как вы нажмете Ок, в программе будет отображаться, что диск уже разделен. На самом деле, это еще не так — чтобы применить все сделанные изменения, необходимо нажать кнопку «Применить». После этого вы можете быть предупреждены о том, что компьютер перезагрузится для завершения выполнения операции.

И уже после перезагрузки у себя в проводнике вы сможете наблюдать результат разделения дисков.
Другие программы для создания разделов на жестком диске
Для разбиения жесткого диска существует огромное количество различного ПО. Это как коммерческие продукты, например, от Acronis или Paragon, так и распространяющиеся по бесплатной лицензии – Partition Magic, MiniTool Partition Wizard. Рассмотрим деление жесткого диска с использованием одной из них – программы Acronis Disk Director.
- Скачайте и установите программу. При первом запуске будет предложено выбрать режим работы. Выбираете «Ручной» – он более настраиваемый и работает более гибко, нежели «Автоматический»
- В открывшемся окне выберите раздел, который необходимо разбить, щелкните по нему правой кнопкой и выберите «Разделить том»

- Задайте размер нового раздела. Он будет вычтен из того тома, который разбивается. После выставления объема, нажмите «ОК»
- Однако, это еще не все. Мы только смоделировали схему разбивки диска, чтобы воплотить план в реальность, необходимо подтвердить операцию. Для этого нажмите «Применить ожидающие операции». Будет начато создание нового раздела.

- Будет выведено сообщение о необходимости перезагрузить компьютер. Нажмите «ОК», после этого компьютер перезагрузится и будет создан новый раздел.


Как разбить жесткий диск в MacOS X штатными средствами
Можно выполнить разбивку жесткого диска, не переустанавливая операционную систему и не ставя дополнительный софт на свой компьютер. В Windows Vista и выше утилита работы с диском встроена в систему, также обстоят дела в Linux-системах и в MacOS.
Чтобы выполнить разбивку диска в Mac OS, проделайте следующее:
- Запустите Дисковую утилиту (для этого выберите «Программы»— «Служебные программы»— «Дисковая утилита») или найдите ее с помощью поиска Spotlight
- Слева выберите диск (не раздел, а именно диск), который нужно разделить на разделы, нажмите кнопку Разбить на разделы вверху.

- Под списком томов нажмите кнопку + и укажите название, файловую систему и объем нового раздела. После этого подтвердите операцию нажатием на кнопку «Применить».


После этого, после непродолжительного (во всяком случае, для SSD) процесса создания раздела, он будет создан и доступен в Finder.
Надеюсь, информация будет полезной, а если что-то работает не так, как ожидается или возникли вопросы, вы оставите комментарий.
Как вы, возможно, знаете, разбиение диска на разделы — это процесс, при котором мы разделяем память жесткого диска на разные диски для различных целей, таких как управление памятью, создание резервной копии, отделение системных файлов от личных и т.д. Если вы также хотите создать раздел в Windows 10, но не знаете, как это сделать, ни в коем случае не волнуйтесь. Вот подробное руководство, которое поможет вам узнать, как использовать Diskpart Создать Раздел. Итак, давайте начнем!
- Часть 1: Проверьте свободное пространство и создайте резервную копию Вашего компьютера перед разделением
- Часть 2: Используйте Diskpart для создания раздела в Windows 10
- Часть 3: Альтернатива Diskpart-4DDiG Partition ManagerHOT
Часть 1: Проверьте свободное пространство и создайте резервную копию Вашего компьютера перед разделением
Прежде чем мы сможем обсудить, как создать раздел в Windows 10, важно принять несколько мер предосторожности. Во-первых, крайне важно проверить наличие свободного места на вашем жестком диске перед разделением. Это гарантирует, что у вас будет достаточно места для создания нового раздела без ущерба для производительности вашей системы.
Кроме того, рекомендуется создать резервную копию данных вашего компьютера перед разделением, поскольку этот процесс включает в себя внесение изменений на ваш жесткий диск, что может привести к потере данных. Создание резервной копии гарантирует, что вы сможете восстановить свои данные в случае, если что-то пойдет не так в процессе разбиения на разделы.
После того как вы проверили свое свободное пространство и создали резервную копию своих данных, вы можете приступить к следующим шагам.
Убедившись, что на вашем компьютере достаточно свободного места для создания нового раздела, вы можете переходить к созданию раздела в Windows 10. В этой части мы сосредоточимся на использовании Diskpart для создания раздела.
Diskpart — это служебная программа командной строки, встроенная в операционные системы Microsoft Windows. Это позволяет пользователям управлять дисковыми накопителями, разделами и томами своего компьютера с помощью ряда команд. Если вы хотите использовать Diskpart для создания раздела, вы можете выполнить действия, приведенные ниже:
-
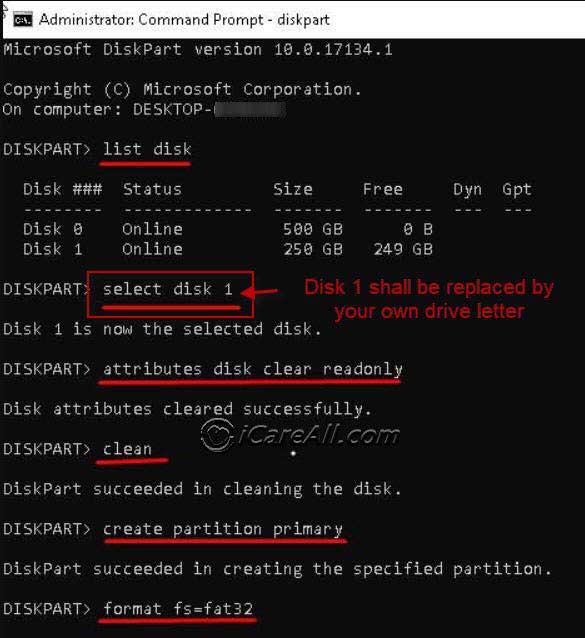
Откройте командную строку от имени администратора, введите «diskpart» и нажмите Enter. Это откроет инструмент командной строки Diskpart.
- Введите «список дисков» и нажмите Enter. При этом отобразится список всех дисков на вашем компьютере. Затем определите диск, который вы хотите разбить на разделы, и напишите «выберите диск X» (где X — номер диска), нажав клавишу Enter.
- Введите «список разделов» и нажмите Enter, чтобы просмотреть список существующих разделов на выбранном диске.
- Введите «создать основной размер раздела=Y» (где Y — размер раздела, который вы хотите создать) и нажмите Enter.
- Введите «format fs=ntfs quick» и нажмите Enter, чтобы отформатировать вновь созданный раздел в файловой системе NTFS. Вам следует сначала отформатировать раздел, прежде чем использовать новый раздел.
- Введите «назначить букву=H» (где H — буква диска, которую вы хотите назначить разделу) и нажмите Enter.
-
Введите «выход» и нажмите Enter
Возможно, вы обнаружите, что использовать Diskpart для создания разделов не так сложно, как вы думали, ознакомившись с описанными выше процедурами. Если вы все еще считаете, что использовать Diskpart для создания раздела немного сложно, вы можете попробовать использовать другое программное обеспечение.
Часть 3: Альтернатива Diskpart-4DDiG Partition ManagerHOT
Если у вас возникли проблемы с использованием Diskpart для создания раздела, доступно несколько вариантов программного обеспечения сторонних производителей. Одним из таких вариантов является 4DDiG Partition Manager, который предлагает ряд функций, помогающих вам управлять разделами вашего жесткого диска.
Функции 4DDiG Partition Manager:
- Создавайте, удаляйте, изменяйте размер и форматируйте разделы без потери данных
- Преобразование между основным и логическим разделами
- Клонировать разделы или целые диски
- Перенос операционной системы на SSD или жесткий диск
- Выровняйте раздел для повышения производительности
- Проверьте файловую систему и исправьте ошибки
Вот шаги по созданию нового раздела с помощью 4DDiG Partition Manager:
-
Скачайте и установите 4DDiG Partition Manager на свой компьютер. На левой панели навигации выберите «Управление разделами». Затем щелкните правой кнопкой мыши нераспределенный раздел, из которого вы хотите создать новый раздел, и выберите «Создать».
-
Задайте характеристики нового раздела во всплывающем окне, выбрав букву диска, метку тома и файловую систему (NTFS, exFAT, FAT16 или FAT32), прежде чем нажать кнопку ОК.
-
Вы можете просмотреть предварительный просмотр размера и расположения недавно созданного раздела в главном интерфейсе. Нажмите «Выполнить 1 задачу(ы)», а затем, если вы уверены, нажмите «ОК».
-
Дождитесь создания нового раздела. В процессе создания раздела программа автоматически отформатирует раздел таким образом, чтобы его можно было использовать для хранения данных.
-
Нажмите кнопку Готово, когда новый раздел будет успешно создан.
Итак, вот как создать раздел в Windows 10 с помощью диспетчера разделов 4DDiG. Это займет всего 5 шагов и поможет вам сэкономить много времени!
Заключение
Итак, вот как создать раздел в Windows 10 как с помощью Diskpart, так и стороннего приложения, такого как 4DDiG Partition Manager. Оба метода хороши и позволят выполнить работу, но использование Diskpart для создания раздела может оказаться трудным для некоторых людей, поскольку это требует от пользователя выполнения некоторых команд вручную. Итак, в данном случае 4DDiG Partition Manager больше подходит для пользователей, которые боятся неприятностей, потому что он может помочь вам создать раздел всего за пять шагов, поторопитесь и попробуйте его!
4DDiG Partition Manager
4DDiG Partition Manager – это простой и безопасный профессиональный инструмент для переноса системы, который может перенести ОС Windows на SSD в один клик без необходимости переустанавливать систему, эффективно клонировать весь жесткий диск для резервного копирования данных и многое другое. Он поддерживает безопасное перемещение установленных приложений, системных обновлений, драйверов, пользовательских настроек с одного ПК на другой.
СКАЧАТЬ БЕСПЛАТНО
КУПИТЬ СЕЙЧАС
СКАЧАТЬ БЕСПЛАТНО
КУПИТЬ СЕЙЧАС
diskpart create partition fat32/mbr/gpt/efi or even bootable usb
How do I create a partition using diskpart? How do I create a new partition? Diskpart is able to create volume using command and disk management can create volume too with easier interface to manage on Windows computers like Windows 11/10/8/7/Vista/XP/2000.
Here this article will show you guide to create partition using diskpart of the following items.
Content Navi
- how do I create a primary partition?
- How do I create a gpt partition using diskpart
- diskpart create efi partition
- dispart create mbr partition
- diskpart create fat32 partition
- diskpart create bootable usb
- diskpart create recovery partition
- FAQs
- diskpart create partition and format
- diskpart create partition usb
- diskpart create partition offset
How do I create a primary partition?
The diskpart command line to create a primary partition is: create partition primary
Here are the steps for a primary partition creation using diskpart cmd.
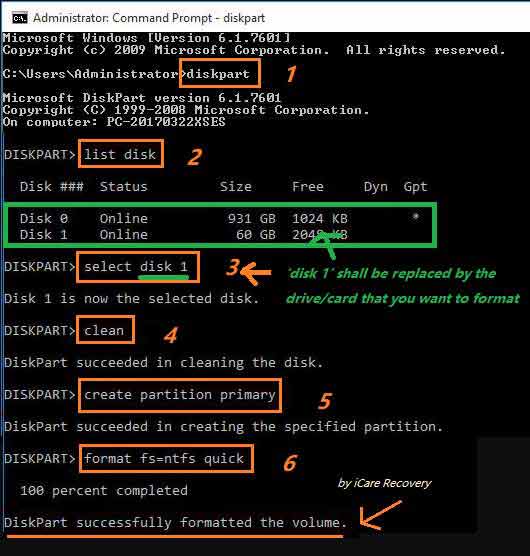
- Run cmd and type ‘diskpart‘ in the cmd for the first step
- type ‘list disk‘
- type ‘select disk *‘ (the * shall be replaced by the disk number that shows in the list, the one that you want to create primary partition)
- type ‘clean‘
- type ‘create partition primary‘
- type ‘format fs=ntfs quick‘ (this is a required step if you want to make the partition work for data storage.)
Note: if you want to make one volume the primary partition, you may go with the following steps if there are several volumes on the disk
- Run cmd and type ‘diskpart‘ in the cmd for the first step
- type ‘list volume‘
- type ‘select volume *‘ (the * shall be replaced by the volume number that shows in the list, the one that you want to create primary partition)
- type ‘clean‘
- type ‘create partition primary‘
- type ‘format fs=ntfs quick‘
How do I create a gpt partition using diskpart
Diskpart create partition or disk gpt shall be like this way. Diskpart can convert disk gpt, however the data shall be moved to somewhere else since it would delete all files.
Also read: how to format disk gpt with diskpart cmd
It is easy to use Diskpart command to manage disk partition, and create EFI boot partition with the following steps.
- Enter Win8/10/7 PE, or press Shift + F10 when installing Windows.
- entering CMD, type ‘diskpart’
- List disk
- Select disk 0
- Detail disk: displays the detailed information of the current disk to help judge whether the disk you selected is correct
- Clean, this command will remove all disk partitions and data! Dangerous order. Please backup data before this whole operations.
- Convert GPT ——— convert disk to GPT format
- Iist partition ——- list the partitions on the disk. Because we have just converted to GPT format, the partition is empty
- Create partition EFI size = 200
- Create partition MSR size = 128 ——— create MSR partition. If Microsoft creates MSR partition by default, the size is 128M
- Create partition primary size = 51200 ——- create a primary partition with a size of 50g
- Create partition primary
- List partition
Video — how to delete and create efi partition using diskpart command in Windows 10
dispart create mbr partition
Here are the steps to convert disk mbr using diskpart. The steps are the same as change disk gpt in its first three steps. The difference only comes with the last step ‘convert mbr’ or ‘convert gpt’
- Start Run, and type ‘diskpart’
- type ‘list disk’
- type ‘select disk *’
- type ‘clean’
- type ‘convert mbr’
Video — how to convert disk mbr during Windows install
diskpart create fat32 partition
If you want to use dispart create partition fat32 when your drive is less than size 32gb, set it to fat32 file system by diskpart with the following steps.
Also read: how to convert partition fat32 quick diskpart cmd
diskpart create bootable usb
How to use diskpart to create usb bootable? Try this.
- Run cmd as admin
- type diskpart
- type ‘list disk’
- type ‘select disk *’
- type ‘clean’
- type ‘create partition primary’
- type ‘select partition 1’
- type ‘active’
- type ‘format fs=ntfs quick’
- type ‘assign drive letter N’ (N can be replaced by a proper one that you like)
NEXT -> Copy your Windows installer files onto this usb stick. Then you may start installing os with this usb drive.
Also read: how to make a bootable usb on pc
diskpart create recovery partition
Video — how to create a recovery partition using diskpart cmd
Or you may also see this video — How to Create Windows 10 System Recovery Partition
FAQs
diskpart create partition and format
=> Diskpart create partition is along with format cmd that shall be used together to make a drive work.
diskpart create partition usb
=> Diskpart is able to create usb as a whole volume/disk by formatting it.
diskpart create partition offset
=>Offset = n: applies only to the MBR disk. Here are what it can be used.
create partition primary [size=n] [offset=n] [ID={byte|GUID}] [noerr] —>Create primary partition
create partition extended [size=n] [offset=n] [noerr] —>create extended partition
create partition logical [size=n] [offset=n] [noerr] —>Create logical partition
- format fs=fat32 quick
- diskpart clean
- diskpart create partition
- diskpart format sd
- diskpart format usb
- diskpart fix raw partition