
Шифрование диска BitLocker – особая технология защиты данных в операционной системе Microsoft Windows. БитЛокер обеспечивает информационную безопасность через шифрование томов, что позволяет снизить риск похищения и раскрытия персональных данных. Шифрование дисков BitLocker может иметь негативные последствия, поэтому при необходимости его можно отключить.
В этом гайде подробно разберем шифрование BitLocker в Windows 10 и 11. Читайте дальше, чтобы узнать, как отключить БитЛокер и разблокировать диск.
Шифрование BitLocker недоступно в домашней версии Windows 10.
Что такое BitLocker для Windows 10/11
Кратко опишем, зачем нужен BitLocker в системах Windows:
- Защищает данные через полное шифрование.
- Используется для устранения несанкционированного доступа к информации на потерянных или украденных устройствах.
Не смотря на очевидные достоинства, шифрование BitLocker замедляет SSD и жесткие диски.
Как узнать, включен ли BitLocker
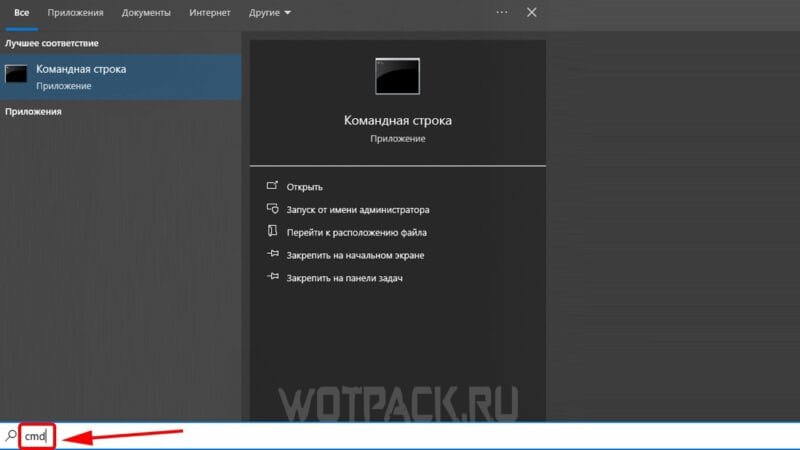
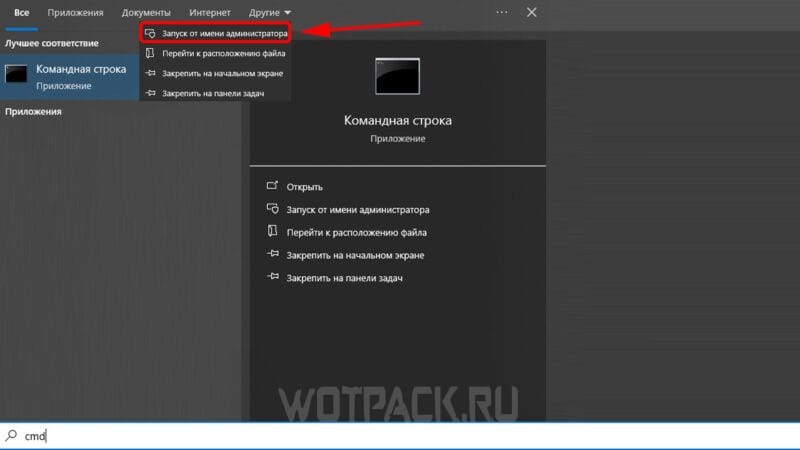
Ниже представлена инструкция для проверки шифрования через BitLocker Windows:
- Введите в строку поиска «cmd».

- Откройте приложение «Командная строка» от имени администратора с помощью правой кнопки мыши.
- Введите в консоль команду «Manage-bde –status» и дождитесь загрузки данных.
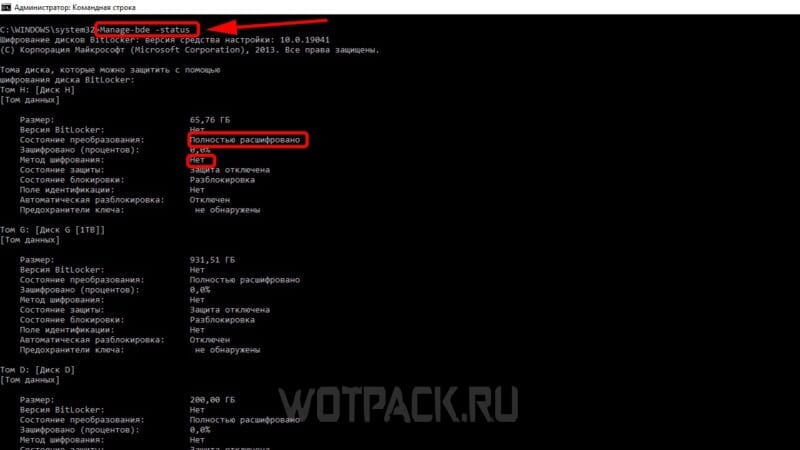
Если в пункте «Состояние преобразования» [Conversion Status] есть запись «Полностью расшифровано», а в графе «Метод шифрования» [Encryption Method] написано «Нет», то BitLocker отключен.
Нужно ли отключать шифрование диска BitLocker
Бесплатное шифрование диска BitLocker по умолчанию встроено в системы Windows 10/11, поэтому разберем, необходима ли активация этой защиты:
- Если случится так, что ПК будет украден или утерян, то злоумышленники не смогут завладеть данными, что хранятся на дисках.
- Когда пользователь включает компьютер и заходит в свою учетную запись, все данные расшифровываются, поэтому файлы будут защиты до принудительной блокировки ПК.
- Шифрование дисков может замедлить работу системы.
- Если ключ восстановления BitLocker [BitLocker Recovery Key] будет утерян, то зашифрованные данные не получится восстановить, а диск придется форматировать.
Таким образом БитЛокер рекомендуется использовать в том случае, когда есть риск потерять конфиденциальные данные или очень ценную информацию, а если компьютер используется только для видеоигр и воспроизведения медиафайлов, то активировать шифрование не обязательно.
Как отключить шифрование диска BitLocker
В следующих пунктах покажем, как выключить БитЛокер в Windows 10 и 11.
Отключить БитЛокер можно через консоль с помощью команды «Manage-bde -off диск» – где вместо слова «диск» необходимо вписать букву нужного тома.
На Windows 10
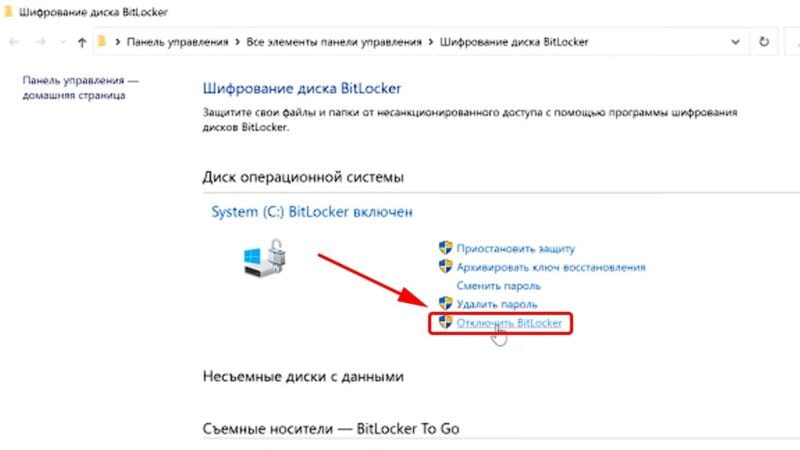
Следующие действия помогут отключить BitLocker в Windows 10:
- Войдите в систему с правами администратора.
- Откройте панель управления, нажмите на раздел «Система и безопасность», после чего выберете пункт «Шифрование устройства» или «Шифрование диска BitLocker».
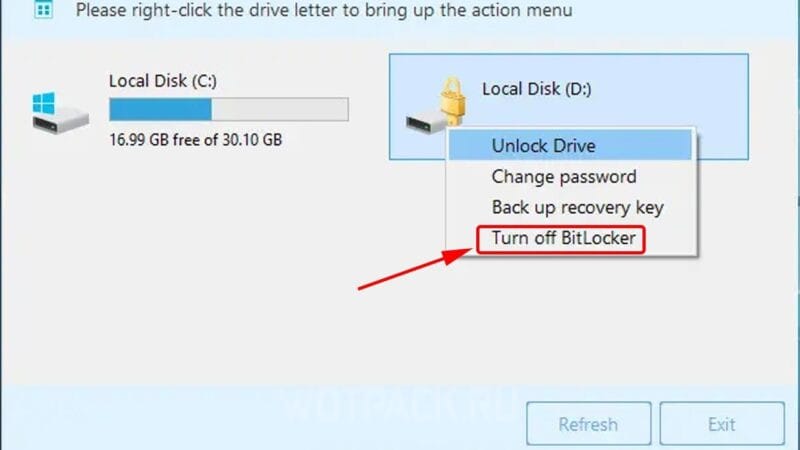
- Около иконки с нужным томом нажмите «Отключить BitLocker».
На Windows 11
Кратко поясним, как отключить BitLocker в Windows 11:
- Запустите Windows с правами администратора.
- Откройте через параметры системы раздел «Конфиденциальность и безопасность» и выберете пункт «Шифрование устройства» или «Шифрование диска BitLocker».
- Около нужного диска нажмите кнопку «Отключить BitLocker».
Как разблокировать диск с BitLocker
Системные диски с защитой БитЛокер можно разблокировать – расскажем об этом в следующих пунктах.
Существует два основных способа для разблокировки диска с защитой БитЛокер – с помощью пароля и через ключ восстановления.
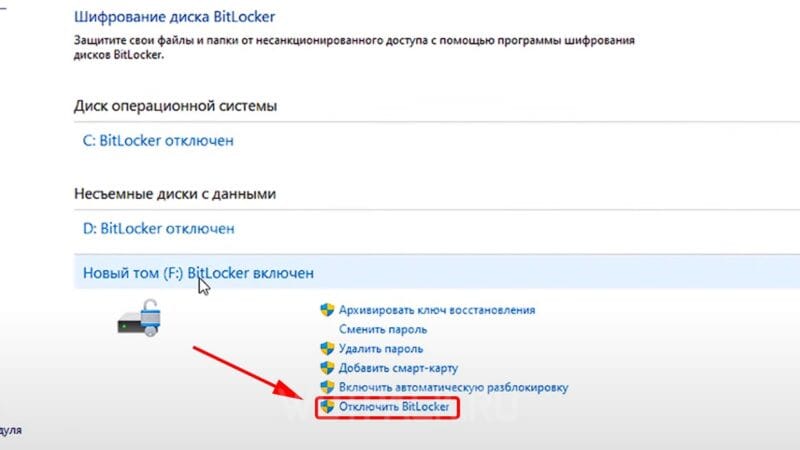
На Windows 10
Перечислим действия, которые позволят разблокировать диск с БитЛокер в Windows 10:
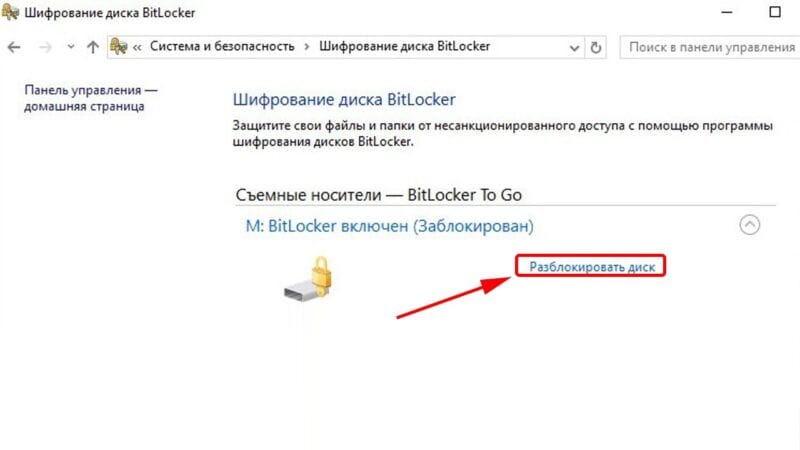
- Откройте панель управления компьютера, после чего перейдите в раздел «Система и безопасность» и нажмите на пункт «Шифрование диска BitLocker».
- В списке выберите зашифрованный том и нажмите «Разблокировать диск».
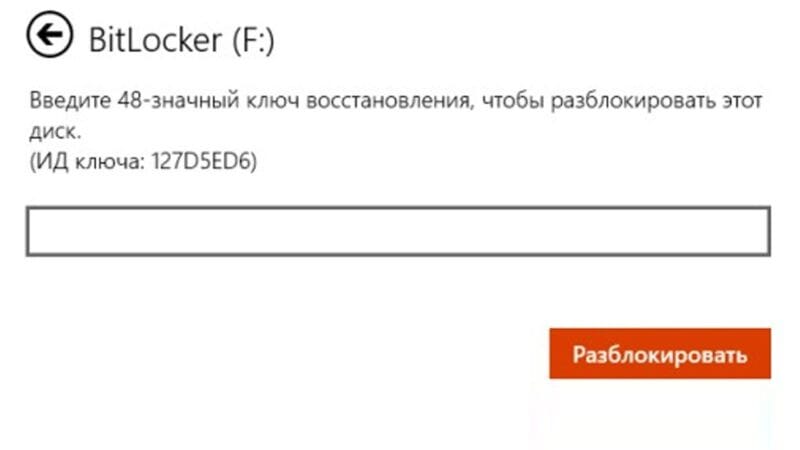
- Введите правильный пароль или подключите идентификационную карту, а если это невозможно, то используйте ключ восстановления через подраздел «Дополнительные параметры».
На Windows 11
Перечислим действия, которые позволят разблокировать диск с БитЛокер в Windows 11:
- Откройте параметры компьютера, перейдите в раздел «Конфиденциальность и безопасность», выберете пункт «Шифрование».
- Выберите нужный зашифрованный том и нажмите «Разблокировать диск».
- Введите требуемый пароль или ключ восстановления БитЛокер.
Как разблокировать диск без ключа
Бывают ситуации, когда ключ восстановления утерян и стоит вопрос, как разблокировать BitLocker. БитЛокер – это продукт Microsoft для обеспечения безопасности данных, поэтому сотрудники компании и служба поддержки не смогут предоставить новый индивидуальный ключ восстановления. Таким образом разблокировать диск без ключа невозможно.
Как включить шифрование диска BitLocker
Далее приведем инструкции, которые позволят активировать шифрование БитЛокер в Windows.
Обязательно сохраните ключ восстановления БитЛокер в удобном месте (распечатанный лист, текстовый файл или на электронной почте).
На Windows 10
Способ включить BitLocker в Windows 10:
- Войдите в систему под учетной записью администратора.
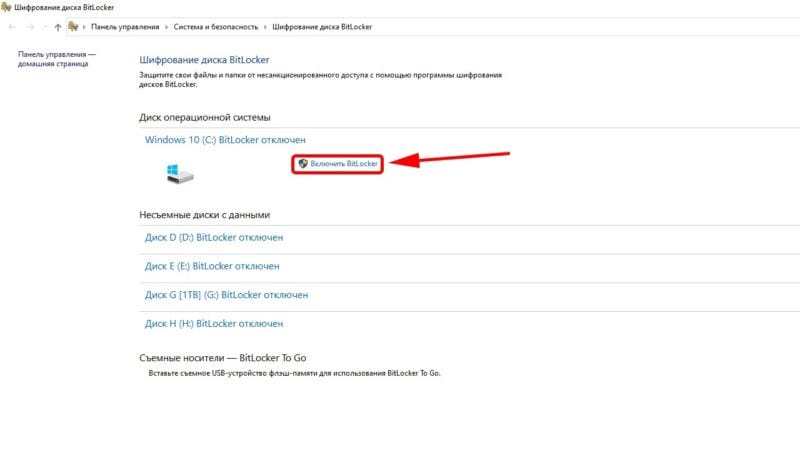
- Вбейте в строку поиска «BitLocker», чтобы открыть «Шифрование диска BitLocker», или откройте этот раздел через панель управления в пункте «Система и безопасность».
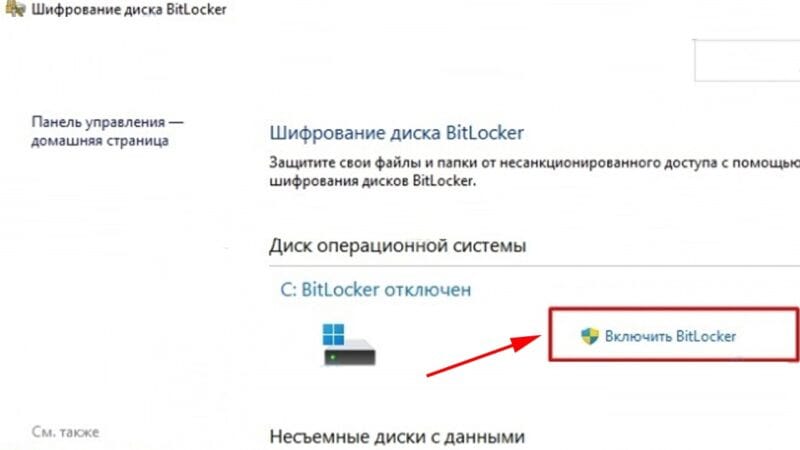
- Выберите из списка нужный диск операционной системы, после чего нажмите на кнопку «Включить BitLocker».
На Windows 11
Способ включить BitLocker в Windows 11:
- Запустите Windows с профиля администратора.
- Откройте через «Пуск» меню «Параметры».
- Выберите раздел «Конфиденциальность и безопасность».
- Откройте пункт «Шифрование устройства», а если он отсутствует, то – «Шифрование диска BitLocker».
- Для нужного диска выберете «Включить BitLocker».
Надеемся, что подготовленный материал помог узнать, что такое БитЛокер Windows, а также отключить его. Дополнительные вопросы можно оставить в комментариях.
Ошибка появляется из-за проблем с загрузочным разделом или автоматической блокировки драйверов, не прошедших проверку. В зависимости от причины используются разные способы восстановления доступа.
Исправление ошибок загрузки
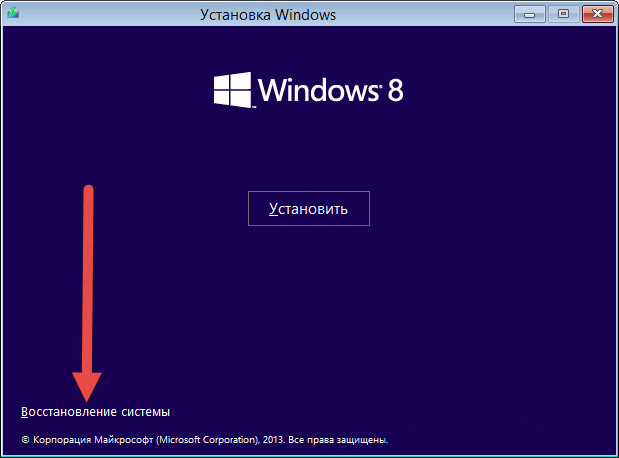
Наиболее распространённая ситуация — ошибки при загрузке. Для их устранения нужна установочная флешка с записанным дистрибутивом Windows. Порядок восстановления будет такой:
- Подключаем установочный диск и загружаемся с него через BIOS.
- Нажимаем «Далее» на первом экране мастера установки.
- Кликаем по ссылке «Восстановление системы».

Переход в среду восстановления Windows
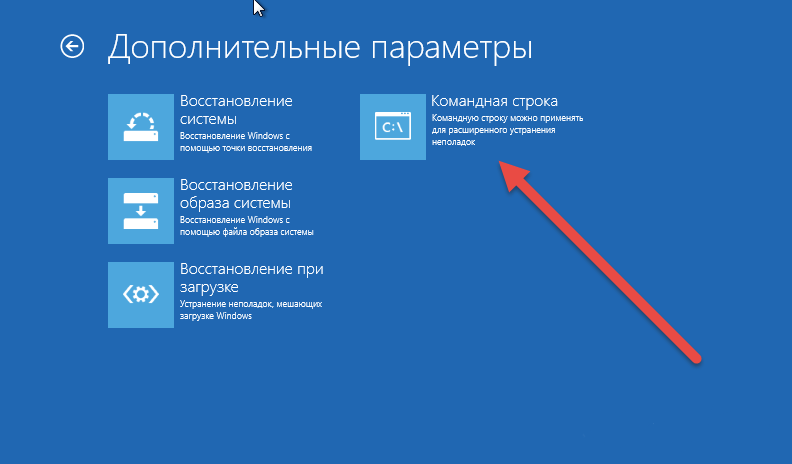
- В окне «Выбор действий» переходим в раздел «Диагностика».
- Открываем «Дополнительные параметры».
- Выбираем запуск командной строки.

Запускаем консоль
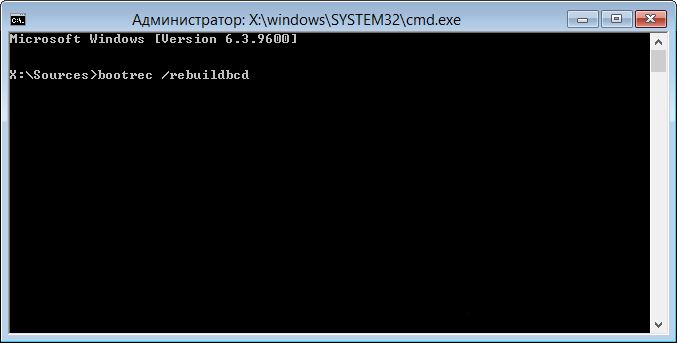
Для исправления ошибок при загрузке мы будем использовать стандартную утилиту Windows, которая называется bootrec. Выполняем последовательно следующие команды:
- bootrec /fixmbr

Выполняем bootrec /fixmbr
- bootrec /fixboot
Затем bootrec /fixboot
- bootrec /rebuildbcd
И завершаем bootrec /rebuildbcd


После ввода третьей команды закрываем командную строку и перезагружаем компьютер. Отключаем установочную флешку или ставим в BIOS загрузку с диска. Проверяем, запускается ли Windows.
На Windows 7, 8 10 для устранения ошибок при загрузке используются одинаковые команды. Запуск командной строки из среды восстановления выполняется аналогичным образом.
Отключение Secure Boot
На форуме Microsoft пользователи сообщают, что проблема с блокировкой диска также может возникать из-за драйверов. Если в UEFI включен протокол безопасности Secure Boot, то при попытке загрузиться с жёсткого диска, контроллер которого не имеет цифровой подписи или не проходит проверку, появляется сообщение об ошибке, а система не загружается.
Чтобы снять блокировку, необходимо отключить в настройках BIOS режим Secure Boot. О том, как это сделать на разных версиях материнских плат, мы рассказали в отдельном материале.
Загрузка …
Post Views: 4 438
- Author
- Recent Posts
I started writing code around 20 years ago, and throughout the years, I have gained a lot of expertise from hands-on experience as well as learning from others. This website has also grown with me and is now something that I am proud of.
Finding your SSD locked in read-only mode is like discovering your car stuck in park with a long road trip ahead. 🤔 It can be pretty frustrating. We’ve all been there, staring at the screen and wondering what’s gone wrong. There are several potential causes ranging from file system corruption to disk management settings. Our mission today is to guide you through swift solutions to get your SSD back in working order.

One of the common culprits behind this pesky issue is write protection. When your SSD switches to write-protected mode, you can’t make any changes or save files to it. This can happen due to software glitches or accidental changes in disk settings. In such cases, tweaking a few settings in Command Prompt usually does the trick. You’ll want to run a diskpart command to clear the read-only attributes.
Another factor to consider is the health of your SSD. Like all hardware, SSDs have a lifespan, and issues can arise as they age. Sometimes the problem might be with the firmware that needs an update or faulty disk management settings. Regularly updating your SSD firmware and keeping an eye on disk health can prevent these problems from getting out of hand.
JUMP TO TOPIC
- Exploring Disk Management in Windows 10
- Understanding Diskpart and Its Uses
- The Significance of Partitioning and Formatting
- Addressing Common File System Errors and Solutions
- Combatting Virus and Malware Infestations
- Fixing Bad Sectors and Corruptions with Chkdsk
- Overcoming Write Protection Challenges
- Identifying Causes and Removing Write Protection
- Using Third-Party Software for Solutions
- Maintaining System Health Through Disk Maintenance
- Incorporating Regular Disk Checks with Chkdsk and Antivirus
- Managing Files and Avoiding Read Only Mode Complications
Exploring Disk Management in Windows 10
In Windows 10, Disk Management is a crucial tool for managing storage devices like SSDs. We’ll explore Diskpart and the importance of partitioning and formatting drives.
Understanding Diskpart and Its Uses
Diskpart is a command-line utility that enables us to manage disk partitions. It is especially useful for fixing read-only SSDs. To access Diskpart, open the Command Prompt as an administrator and type diskpart.
Once inside Diskpart, we can list all disks with list disk. This will show a table of all connected drives. Selecting our disk is done with select disk #, where # is the desired disk number. To remove read-only attributes from an SSD, we use the command attributes disk clear readonly. This clears any write protection and potentially fixes the locked status of the SSD.
Diskpart also allows more advanced operations like creating, deleting, and resizing partitions. It’s a powerful tool that enhances our ability to manage storage devices effectively.
The Significance of Partitioning and Formatting
Partitioning and formatting are key steps in preparing an SSD for use. Partitioning divides the drive into segments that can store different types of data or operating systems. In Disk Management, right-click the unallocated space and choose New Simple Volume to start partitioning. Follow the wizard to assign a drive letter and size for the new partition.
Formatting prepares the partition for data storage. We usually choose the NTFS file system for its reliability and support for large files. Right-click the new partition and select Format. Choose NTFS and set the Allocation Unit Size to Default. Formatting erases all data on the partition but sets up the file system required for file storage.
Partitioning and formatting not only organize our data better but also optimize the performance and lifespan of our SSDs.
Addressing Common File System Errors and Solutions
Let’s examine practical ways to overcome file system errors that can lead to SSDs being locked as read-only. We will cover strategies for combating virus and malware infestations, as well as fixing bad sectors and corruptions using chkdsk.
Combatting Virus and Malware Infestations
Viruses and malware can wreak havoc on file systems, leading to read-only states. To tackle this, we should consider using robust antivirus software. Regular scans are essential to detect and remove malicious software.
Using real-time protection can prevent infections before they cause damage. Tools like Windows Defender, Norton, or McAfee are reliable choices. Additionally, keeping software up-to-date ensures we have the latest defenses against new threats.
In practice, if our system shows signs of infection, we should immediately run a thorough scan. Removing detected threats often restores the SSD to full functionality. Remember, periodic scanning is crucial even when there are no visible issues.
Fixing Bad Sectors and Corruptions with Chkdsk
Bad sectors and corrupted files can also cause SSD issues. Using the chkdsk utility is an effective method to address this. Running the command chkdsk X: /f /r (replacing ‘X’ with the relevant drive letter) scans the SSD for errors and attempts to repair them.
Here’s a brief process:
-
Open Command Prompt as an administrator.
-
Type the command:
chkdsk X: /f /r. -
Press Enter and let the utility work its magic.
This command checks for file system errors and locates bad sectors, marking them to prevent future use. It’s a robust tool that can fix various issues, making our SSDs reliable again.
Using chkdsk can be time-consuming but is often worth the wait. It ensures that minor issues are resolved before they turn into major problems. Regularly running chkdsk can help maintain the health of our drives and keep them running smoothly.
Overcoming Write Protection Challenges
Addressing write protection on SSDs often requires identifying causes and using various methods to remove the restrictions. Solutions range from using command line tools to third-party software to ensure a smooth experience.
Identifying Causes and Removing Write Protection
Before we jump into solutions, pinpointing the cause of the write protection is crucial. For example, write protection can be activated accidentally, by firmware bugs, or when an SSD reaches its end of life. Understanding the root issue can save us a substantial amount of time.
Using the command prompt (cmd) can be highly effective. We can access cmd, then type:
diskpart
list disk
select disk [disk number]
attributes disk clear readonly
These commands aim to clear the write-protection attribute directly. Another handy method is modifying the Windows Registry key. Navigate to HKEY_LOCAL_MACHINE\SYSTEM\CurrentControlSet\Control\StorageDevicePolicies and set the WriteProtect value to 0. Making these adjustments will often resolve the issue.
Using Third-Party Software for Solutions
Sometimes built-in solutions aren’t enough. Third-party software like AOMEI Partition Assistant comes to the rescue. AOMEI Partition Assistant Standard is especially user-friendly, and it provides options to manage write-protected drives effectively.
Using these software solutions, we can often bypass more complex issues. For instance, MiniTool Partition Wizard is another effective tool. These applications offer rich interfaces that make managing disks more intuitive.
Several third-party tools allow us to:
– Clear write protection
- Format SSDs
- Fix disk errors
Opting for these tools can save time and quickly resolve seemingly complicated problems. Remember always to use reputable software to avoid further complications.
By addressing the cause and leveraging the right tools, we can navigate and fix write-protection challenges on SSDs with confidence.
Maintaining System Health Through Disk Maintenance
Regular maintenance of our SSDs can prevent issues and prolong their lifespan. By performing consistent disk checks and managing files properly, we can avoid complications related to read-only mode.
Incorporating Regular Disk Checks with Chkdsk and Antivirus
To keep our SSDs in optimal condition, we need to incorporate regular disk checks using tools like Chkdsk. The Check Disk utility is pivotal in identifying and resolving disk errors. It’s as simple as typing chkdsk /f in the command prompt. We shouldn’t underestimate the importance of antivirus scans either. Malicious software can corrupt our drive, making it read-only.
We should schedule weekly scans to ensure our system’s integrity. The Registry Editor should be approached with caution but can be highly effective. For instance, altering the Write Protect value to 0 can remedy accidental read-only settings.
Managing Files and Avoiding Read Only Mode Complications
Effective file management can prevent many common issues. By organizing files properly and not overloading the SSD, we can maintain efficient performance. Disk management tools are crucial in this respect. By using these tools, we can monitor quotas and ensure there’s plenty of free space.
A common mistake is deleting critical system files, which can inadvertently trigger read-only mode. Let’s also remember to back up data regularly. This way, even if our SSD decides to act up, our valuable files remain safe. With just a bit of regular maintenance, we can dodge the read-only bullet and keep our SSD running smoothly.
Introduction
Unlocking an SSD (Solid State Drive) in Windows 10 can be a crucial step in gaining access to your valuable data. SSDs have become increasingly popular due to their fast read and write speeds, improved reliability, and energy efficiency. However, sometimes you may encounter situations where your SSD gets locked, preventing you from accessing your files and operating system.
When an SSD gets locked, it can occur for various reasons. It could be due to security features such as BitLocker encryption, ATA Security Feature Set, or even a drive lock enabled in the BIOS. Regardless of the cause, it is important to understand how to unlock your SSD to regain access to your data.
In this article, we will explore different methods to unlock an SSD in Windows 10. We will cover both built-in Windows features as well as third-party software tools that can help you unlock your SSD with ease. Whether you are experiencing an SSD lock due to security settings or accidental drive lock, we have the solutions for you.
It is crucial to note that unlocking an SSD requires proper caution and follow-up steps. Always ensure that you have the necessary administrative privileges, backup your important data, and proceed with the unlocking process carefully. With that being said, let’s dive into the various methods you can use to unlock your SSD in Windows 10.
What is SSD?
A Solid State Drive (SSD) is a type of storage device that uses flash memory to store data and provide high-speed access to that data. Unlike traditional hard disk drives (HDDs) that use spinning magnetic disks, SSDs have no moving parts. Instead, they rely on integrated circuits to store and retrieve data, resulting in faster performance and improved reliability.
SSDs offer several advantages over HDDs. One of the main benefits is speed. SSDs have significantly faster read and write speeds, allowing for quick boot times, faster application launches, and snappy file transfers. This speed boost can greatly enhance the overall performance of your computer, resulting in a seamless user experience.
Another advantage of SSDs is their durability. Since they do not have any mechanical components, they are less prone to physical damage caused by drops or vibrations. This makes them ideal for portable devices such as laptops, where durability is essential.
In addition to speed and durability, SSDs are also energy efficient. They consume less power compared to HDDs, resulting in longer battery life for laptops and reduced energy costs for desktop computers. This energy efficiency is achieved by the absence of moving parts and the ability to enter low-power states when not in use.
SSDs also offer improved reliability. Since there are no spinning disks, there is a reduced risk of mechanical failures. This means that your data is less likely to become inaccessible due to mechanical issues, providing added peace of mind.
Overall, SSDs provide a significant upgrade in terms of performance, durability, energy efficiency, and reliability compared to traditional HDDs. Their increasing popularity in the consumer market is a testament to their effectiveness in enhancing computer performance and storage capabilities.
Why does SSD get locked?
There are several reasons why an SSD may get locked, preventing access to your data. Understanding these reasons can help you troubleshoot and resolve the issue effectively. Here are some common causes of SSD lock:
1. Security features: Some SSDs come with built-in security features such as BitLocker encryption or ATA Security Feature Set. These features help protect your data from unauthorized access. However, if you forget your encryption password or the security settings get misconfigured, it can result in the SSD getting locked.
2. Accidental lock: You may accidentally lock your SSD by enabling a drive lock in the BIOS settings. This can happen if you mistakenly change the BIOS settings or if someone else with access to your computer enables the lock without your knowledge.
3. Drive malfunction: In some cases, a malfunction or error in the SSD can cause it to become locked. This can happen due to firmware issues, hardware failures, or compatibility problems with the operating system.
4. Virus or malware: A virus or malware infection on your computer can sometimes lead to your SSD getting locked. These malicious programs can modify or encrypt the SSD’s files, making them inaccessible without the proper decryption key.
It’s important to note that different SSD manufacturers may have additional reasons for SSD lock, and the specific steps to unlock your SSD may vary. It’s recommended to consult the SSD manufacturer’s documentation or support resources for troubleshooting guidance specific to your SSD model.
In the following sections, we will explore various methods to unlock an SSD in Windows 10. These methods will help you unlock your SSD and regain access to your files and operating system.
Unlocking SSD in Windows 10
Unlocking an SSD in Windows 10 may seem like a daunting task, but fear not – there are several methods available to help you regain access to your locked SSD. In this section, we will explore these methods in detail.
It’s important to note that the specific method to unlock your SSD may vary depending on the reason for the lock and the SSD manufacturer. It’s recommended to consult the SSD manufacturer’s documentation or support resources for the most accurate and up-to-date instructions specific to your SSD model.
Here are some common methods to unlock an SSD in Windows 10:
1. Using BitLocker: BitLocker is a built-in encryption feature in Windows 10 that can also be used to unlock a locked SSD. If your SSD is encrypted using BitLocker and you have the password or recovery key, you can use the BitLocker management interface to unlock the SSD and gain access to your data.
2. Using ATA Security Feature Set: Some SSDs come with ATA Security Feature Set support, which allows you to set a password for your SSD. If your SSD has this feature enabled and you know the password, you can use the ATA Secure Erase command or a manufacturer-provided unlocking tool to unlock the SSD.
3. Disabling Drive Lock in BIOS: If you accidentally enabled a drive lock in the BIOS settings, you can access the BIOS setup, locate the drive lock setting, and disable it. This method will vary depending on your computer’s BIOS interface, so refer to your computer’s documentation or manufacturer’s website for specific instructions.
4. Unlocking SSD with Software Tools: There are various third-party software tools available that can help you unlock a locked SSD. These tools often provide additional features and options, such as password recovery, firmware updates, and drive diagnostics. It’s important to use trusted and reputable software tools to ensure the safety and integrity of your data.
By following these methods, you should be able to unlock your SSD and regain access to your valuable data. Remember to proceed with caution and follow the instructions specific to your SSD model. If you are unsure or encounter any issues, it’s always recommended to reach out to the SSD manufacturer’s support for further assistance.
Method 1: Using BitLocker
BitLocker is a built-in encryption feature in Windows 10 that can also be used to unlock a locked SSD. If your SSD is encrypted using BitLocker and you have the necessary password or recovery key, you can easily unlock the SSD using the following steps:
1. Open the BitLocker management interface: Go to the Start menu and search for “BitLocker Drive Encryption.” Click on the search result to open the BitLocker management interface.
2. Locate the locked SSD: In the BitLocker management interface, you will see a list of all the drives connected to your computer. Locate the locked SSD in the list and click on it.
3. Enter the password or recovery key: If your SSD is password-protected, enter the correct password in the provided field. If you don’t remember the password, you can use the recovery key to unlock the SSD. Click on the “Unlock” button.
4. Wait for the unlocking process: BitLocker will initiate the unlocking process for the SSD. This may take some time, depending on the size of the SSD and the amount of data stored on it. Be patient and allow the process to complete.
5. Access your unlocked SSD: Once the unlocking process is complete, you will be able to access your unlocked SSD and the data stored on it. You can now use the SSD as you normally would.
It is important to note that the availability of the BitLocker feature may vary depending on the edition of Windows 10 you are using. BitLocker is available in Windows 10 Pro, Enterprise, and Education editions. If you are using Windows 10 Home edition, you may need to consider alternative methods or upgrade to a higher edition to utilize BitLocker.
By using BitLocker, you can effectively unlock and access your locked SSD, provided you have the correct password or recovery key. This method provides a secure and reliable way to regain access to your data and ensure the integrity of your SSD.
Method 2: Using ATA Security Feature Set
If your SSD has the ATA Security Feature Set enabled, you can use this feature to set a password and unlock the locked SSD. The following steps outline the process of unlocking an SSD using the ATA Security Feature Set:
1. Determine the ATA Secure Erase command: Check the documentation or support resources provided by your SSD manufacturer to determine the ATA Secure Erase command specific to your SSD model. This command will be used to unlock the SSD.
2. Access the BIOS setup: Restart your computer and access the BIOS setup by pressing the designated key during boot-up. The key to enter the BIOS setup may vary depending on your computer’s manufacturer (common keys are F2, Del, or F10).
3. Locate the ATA Security Feature Set: In the BIOS setup, navigate to the “Security” or “Drives” section. Look for an option related to the ATA Security Feature Set. The option may be named differently depending on your BIOS interface.
4. Unlock the SSD: Select the option to unlock the SSD and enter the password associated with the ATA Security Feature Set. If you don’t remember the password, you may need to perform a reset or contact your SSD manufacturer for further assistance.
5. Save and exit BIOS: After successfully unlocking the SSD, save the changes in the BIOS setup and exit. Your computer will proceed with the boot process, and you should now be able to access the unlocked SSD.
It is important to note that the availability and implementation of the ATA Security Feature Set may vary depending on the SSD manufacturer and model. Some SSDs may provide manufacturer-specific unlocking tools or utilities to assist in the process. Refer to your SSD manufacturer’s documentation or support resources for more specific instructions on unlocking your SSD using the ATA Security Feature Set.
By utilizing the ATA Security Feature Set, you can unlock your SSD with the correct password and regain access to your data. This method provides an additional layer of security and control over your SSD, ensuring the protection of your information.
Method 3: Disabling Drive Lock in BIOS
If you accidentally enabled a drive lock in the BIOS settings, you can unlock your SSD by disabling the drive lock. Here are the steps to disable drive lock in the BIOS:
1. Restart your computer: Start by restarting your computer and press the designated key to enter the BIOS setup. The key to access the BIOS setup may vary depending on your computer’s manufacturer.
2. Navigate to the “Security” or “Drives” section: In the BIOS setup, look for a section that is related to “Security” or “Drives”. The exact name might differ depending on your computer’s BIOS interface.
3. Find the drive lock option: Within the “Security” or “Drives” section, locate an option that refers to drive lock. It may be named “DriveLock,” “Hard Drive Password,” or something similar. Select this option.
4. Disable the drive lock: Once you have selected the drive lock option, choose the option to disable or turn off drive lock. The exact method of disabling drive lock may vary depending on your BIOS interface. Confirm the changes and exit the BIOS setup.
5. Save and exit: Save the changes in the BIOS setup and exit. Your computer will proceed with the boot process, and the drive lock on your SSD should now be disabled.
It is important to note that the steps to disable drive lock in the BIOS may vary depending on your computer’s manufacturer and BIOS interface. Refer to the documentation or support resources provided by your computer manufacturer for specific instructions.
By successfully disabling the drive lock in the BIOS setup, you can regain access to your locked SSD. Ensure that you properly save and exit the BIOS after making the changes. It’s always advisable to double-check your computer’s documentation or contact customer support for assistance if you are unsure about the BIOS settings.
Method 4: Unlocking SSD with Software Tools
If other methods have not been successful in unlocking your SSD, you can turn to third-party software tools specifically designed to unlock SSDs. These tools offer additional features and options that can assist in unlocking a locked SSD. Here is a general overview of the process:
1. Research and choose a trusted software tool: Look for reputable software tools that provide SSD unlocking capabilities. Conduct thorough research and read reviews to ensure the tool is reliable, safe, and compatible with your SSD model.
2. Download and install the software tool: Visit the official website of the software tool and download the appropriate version for your operating system. Once downloaded, run the installer and follow the on-screen instructions to install the software on your computer.
3. Launch the software tool: Open the software tool after installation and familiarize yourself with the user interface and available features. Some software tools may require administrative privileges to access the locked SSD, so make sure to run the program as an administrator.
4. Follow the instructions provided: Each software tool may have different steps for unlocking an SSD. carefully follow the instructions provided by the software tool, ensuring that you understand each step before proceeding.
5. Unlock the SSD: Once you have followed the instructions and provided any necessary information or credentials, the software tool will attempt to unlock the SSD. Allow the tool to complete the process, which may take some time depending on the complexity of the lock.
6. Verify the unlocking: After the software tool completes the unlocking process, verify that your SSD is now accessible. You can check by attempting to access the SSD or by running disk management tools to detect the unlocked SSD.
It’s important to note that the specific steps and features of each software tool will vary. Some software tools may offer additional functionality such as password recovery, firmware updates, and drive diagnostics. It’s advisable to carefully read the documentation or user guide provided by the software tool to ensure proper usage.
When using third-party software tools, always exercise caution and verify the legitimacy and trustworthiness of the tool before downloading or installing it. Stick to well-known and reputable software providers to minimize the risk of introducing malware or compromising your data.
By utilizing trusted software tools, you can potentially unlock your SSD and regain access to your data. However, keep in mind that these tools should be used with care and in accordance with the instructions provided by the software developers.
Conclusion
Unlocking a locked SSD in Windows 10 can be a challenging process, but with the right methods and techniques, you can regain access to your valuable data. We have explored four different methods to unlock an SSD: using BitLocker, utilizing the ATA Security Feature Set, disabling drive lock in the BIOS, and employing third-party software tools.
By utilizing built-in features like BitLocker, you can unlock your SSD with ease, provided you have the necessary password or recovery key. The ATA Security Feature Set offers another avenue for unlocking your SSD, allowing you to set a password and regain access. Additionally, disabling drive lock in the BIOS can be a viable solution if you accidentally enabled it.
If these methods do not work, you can turn to trusted third-party software tools designed specifically for unlocking locked SSDs. These tools offer additional features and options that can assist in unlocking your SSD and getting your data back.
When attempting to unlock your SSD, it is crucial to proceed with caution and follow the instructions specific to your SSD model. Always ensure that you have the necessary administrative privileges and perform backups of your important data before proceeding with any unlocking method.
Remember to consult your SSD manufacturer’s documentation or support resources for the most accurate and up-to-date instructions specific to your SSD model. They can provide valuable guidance and troubleshooting steps if you encounter any issues during the unlocking process.
By following the appropriate methods and utilizing the resources available to you, you can successfully unlock your SSD in Windows 10 and regain access to your data. Whether it’s through built-in Windows features, BIOS settings, or third-party software tools, unlocking your SSD is an achievable task with the right knowledge and diligence.
|
|
|
0 / 0 / 0 Регистрация: 06.12.2014 Сообщений: 25 |
|
|
23.01.2016, 18:48. Показов 8371. Ответов 8 Привет всем. Проблема такая: Что делать посоветуете? Мб вообще стоит создать средством майкрософта загрузочную флешку и поставить вин10 на SSD с нуля? Ключ я уже из системы вытащил. Спасибо за советы заранее. Скоро жду пополнение в семье и не хотелось бы тратить 2-3тысячи прогерам на решение проблемы. Уважаю их работу, но вынужден сам искать решение. К тому же хотел бы поставить систему так чтобы всё работало и я сам все протестировал, интересно вникнуть в проблему и все вытекающие. Добавлено через 33 минуты
0 |
|
8584 / 3083 / 523 Регистрация: 14.04.2011 Сообщений: 7,732 |
|
|
23.01.2016, 19:10 |
|
|
lSpeeDl, Сделать чистую установку системы на SSD, по-моему тоже хороший вариант (на время установки HDD отключить физически).
1 |
|
0 / 0 / 0 Регистрация: 06.12.2014 Сообщений: 25 |
|
|
23.01.2016, 21:48 [ТС] |
|
|
Подскажите, а если буду ставить с нуля то достаточо будет ввеси ключ продукты который я вытащил из имеющейся системы? А то я читал информацию что когда винда идет в ноутбуке при продаже то там этот ключ как-то вшит в материнскую плате и при переустановке винды на другой диск может возникнуть проблема. Или тупо отрубаю HDD, ставлю винду на SSD, ввожу ключ и устанавливаю? Добавлено через 2 часа 26 минут
0 |
|
110 / 94 / 19 Регистрация: 09.01.2013 Сообщений: 371 |
|
|
24.01.2016, 00:23 |
|
|
Ключ активации вашей ОС вшит в биос. При переустановке Windows той же редакции и разрядности, что и была установлена у вас ранее, ключ подхватывается из биос автоматически (флешка ничего не понимает)
1 |
|
24.01.2016, 01:56 |
|
|
Не по теме: Это же десятка, ОНИ уже всё про вас знают =-O. В ключах больше нет необходимости…
0 |

|
0 / 0 / 0 Регистрация: 06.12.2014 Сообщений: 25 |
|
|
24.01.2016, 02:33 [ТС] |
|
|
Ага. Поставка: Russian Edition. Только нахрена Лицензинное соглашение принимать пришлось не понимаю… Добавлено через 7 минут Все вопросы решил, винда стоит полноценно на SSD. Спасибо. Больше проблем нет.
0 |
|
0 / 0 / 0 Регистрация: 23.08.2017 Сообщений: 2 |
|
|
24.08.2017, 20:08 |
|
|
У меня не хотел ноут Acer V5-572PG обнуляться до заводских настроек. СТавил SSD. сделал из диагностики биоса bdcedit fixboot. но, в винде заработало! через Acer Recovery Managment сделал откат до заводских.
0 |
|
24.08.2017, 22:11 |
|
|
Не по теме: Сообщение от fantasytime В ключах больше нет необходимости… с чего так решили что в ключах нет необходимости? а если переносится ос на другое железа или меняется материнка Сообщение от fantasytime Это же десятка, ОНИ уже всё про вас знают про вас и так всё унают(если понадобится) и без помощи десятки Сообщение от lSpeeDl Ага. Поставка: Russian Edition. Только нахрена Лицензинное соглашение принимать пришлось не понимаю… поэтому читать нужно соглашение, чтобы не было вопросов про якобы слежку за вами
0 |
|
25.08.2017, 11:15 |
|
|
Не по теме: На всякий. Теме больше года уже
0 |
|
Новые блоги и статьи
Все статьи Все блоги / |
||||
|
Как использовать OAuth2 со Spring Security в Java
Javaican 14.05.2025 Протокол OAuth2 часто путают с механизмами аутентификации, хотя по сути это протокол авторизации. Представьте, что вместо передачи ключей от всего дома вашему другу, который пришёл полить цветы, вы. . . |
Анализ текста на Python с NLTK и Spacy
AI_Generated 14.05.2025 NLTK, старожил в мире обработки естественного языка на Python, содержит богатейшую коллекцию алгоритмов и готовых моделей. Эта библиотека отлично подходит для образовательных целей и. . . |
Реализация DI в PHP
Jason-Webb 13.05.2025 Когда я начинал писать свой первый крупный PHP-проект, моя архитектура напоминала запутаный клубок спагетти. Классы создавали другие классы внутри себя, зависимости жостко прописывались в коде, а о. . . |
Обработка изображений в реальном времени на C# с OpenCV
stackOverflow 13.05.2025 Объединение библиотеки компьютерного зрения OpenCV с современным языком программирования C# создаёт симбиоз, который открывает доступ к впечатляющему набору возможностей. Ключевое преимущество этого. . . |
POCO, ACE, Loki и другие продвинутые C++ библиотеки
NullReferenced 13.05.2025 В C++ разработки существует такое обилие библиотек, что порой кажется, будто ты заблудился в дремучем лесу. И среди этого многообразия POCO (Portable Components) – как маяк для тех, кто ищет. . . |
|
Паттерны проектирования GoF на C#
UnmanagedCoder 13.05.2025 Вы наверняка сталкивались с ситуациями, когда код разрастается до неприличных размеров, а его поддержка становится настоящим испытанием. Именно в такие моменты на помощь приходят паттерны Gang of. . . |
Создаем CLI приложение на Python с Prompt Toolkit
py-thonny 13.05.2025 Современные командные интерфейсы давно перестали быть черно-белыми текстовыми программами, которые многие помнят по старым операционным системам. CLI сегодня – это мощные, интуитивные и даже. . . |
Конвейеры ETL с Apache Airflow и Python
AI_Generated 13.05.2025 ETL-конвейеры – это набор процессов, отвечающих за извлечение данных из различных источников (Extract), их преобразование в нужный формат (Transform) и загрузку в целевое хранилище (Load). . . . |
Выполнение асинхронных задач в Python с asyncio
py-thonny 12.05.2025 Современный мир программирования похож на оживлённый мегаполис – тысячи процессов одновременно требуют внимания, ресурсов и времени. В этих джунглях операций возникают ситуации, когда программа. . . |
Работа с gRPC сервисами на C#
UnmanagedCoder 12.05.2025 gRPC (Google Remote Procedure Call) — открытый высокопроизводительный RPC-фреймворк, изначально разработанный компанией Google. Он отличается от традиционых REST-сервисов как минимум тем, что. . . |
Наверх