
Как сузить или расширить экран на компьютере и ноутбуке
Иногда, после переустановки Windows или очередного обновления драйверов, а также в других случаях, вы можете столкнуться с проблемой: экран на компьютере сужен или расширен, показываются чёрные стороны по краям экрана, изображение растянуто или помещено на удалении от границ монитора.
В этой инструкции подробно о том, как решить проблему, сузить или расширить экран на ПК или ноутбуке и чем может быть вызвана рассматриваемая проблема с изображением на мониторе.
Разрешение экрана
Первое, с чего следует начать — проверить, выставлено ли правильное для вашего монитора разрешение. Если для современных дисплеев выставить разрешение, отличающееся от физического разрешения матрицы, результат будет одним из:
- Низкое качество изображения
- Растянутое или суженное изображение
- Отсутствие изображения и сообщение «Вне диапазона» или «Out of range»
Таким образом, во всех случаях (кроме, возможно игр, о чём также будет упомянуто), следует выставлять разрешение экрана, соответствующее физическому разрешению вашего монитора или экрана ноутбука, заявленному в технических характеристиках. Обычно сделать это просто:
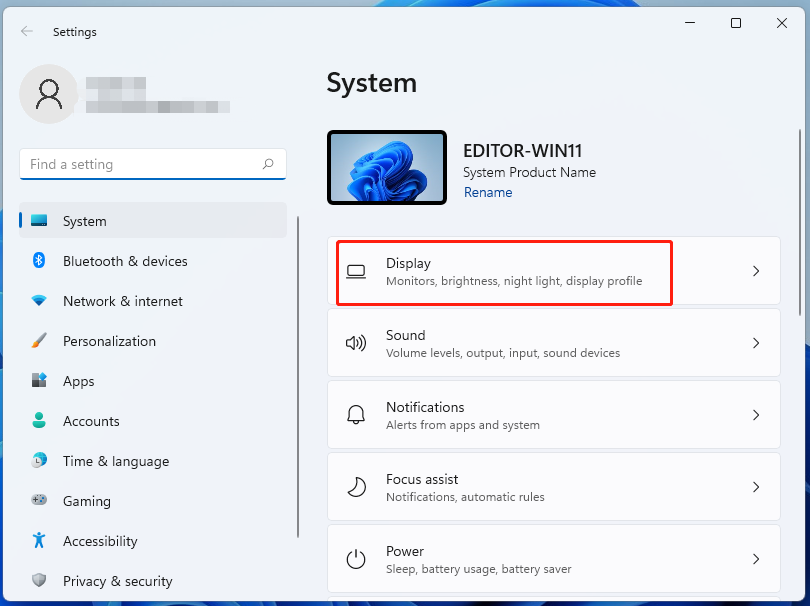
- Нажмите правой кнопкой мыши в пустом месте рабочего стола и выберите пункт «Параметры экрана».
- В пункте «Разрешение дисплея» в разделе «Масштаб и разметка» установите разрешение, справа от которого указано «Рекомендуется».


Здесь есть некоторые нюансы, которые следует учитывать:
- Если вы специально устанавливали разрешение, отличное от рекомендуемого, чтобы увеличить размер текста и элементов, установите рекомендуемое разрешение, а затем используйте функции масштабирования в том же разделе параметров экрана. Сразу после применения они могут работать не совсем правильно, но после перезагрузки компьютера для большинства приложений проблем в Windows 11 и Windows 10 не наблюдается.
- При использовании различных переходников и адаптеров для подключения монитора «Рекомендуемое» разрешение может быть не совпадать с тем, которое по факту должно использоваться на вашем экране. Уточните технические характеристики монитора по его модели с помощью поиска в Интернете и установите нужное разрешение.
- Правильное разрешение экрана может быть не доступно в списке: чаще всего это говорит об отсутствующих драйверах видеокарты, причем не обязательно дискретной от NVIDIA или AMD, причина может быть и в интегрированной видеокарте, особенно в случае ноутбука. Этот пункт подробно разобран в следующем разделе инструкции.
- В некоторых случаях, например, в играх, у вас может отсутствовать возможность выставить «родное» разрешение монитора, так как в этом случае видеокарта не будет справляться с игрой. Если проблема с растянутым изображением или черными полосами возникает именно в игре, попробуйте выбрать другие разрешения, доступные в её настройках: большинство экранов поддерживают автоматическое масштабирование для стандартных разрешений и на одном из них проблема, вероятнее всего, пропадёт.
- При использовании нескольких мониторов в режиме дублирования, на них устанавливается одинаковое разрешение: если один из мониторов не поддерживает его — на нем могут появиться проблемы с масштабированием. Решение: использовать режим «Расширить эти экраны».
Драйверы видеокарты
Если проблема возникла после недавней переустановки Windows, то первое, на что следует обратить внимание — драйверы видеокарты. Важно: если у вас есть дискретная и интегрированная видеокарты, драйверы нужно установить на обе. Обычно ОС сама автоматически скачивает их из Интернета и устанавливает через некоторое время после первого запуска, однако это происходит не всегда.
Некоторые пользователи нажимают «Обновить драйвер» в диспетчере устройств и, видя сообщение «Наиболее подходящий драйвер уже установлен», могут ошибочно полагать, что это действительно так, хотя в диспетчере устройств и отображается «Базовый видеоадаптер (Майкрософт)» (что прямо говорит об отсутствующем драйвере). На самом деле это говорит лишь о том, что Windows вам не может предложить ничего лучше.
Правильный подход:
- Скачайте драйвер для вашей видеокарты (или видеокарт) с сайта NVIDIA , AMD или Intel (в случае Intel загрузка из РФ на сегодня ограничена, можно использовать следующий способ) и установите его.
- В случае, если по какой-то причине загрузка с указанных выше сайтов невозможна, то драйверы можно скачать с официальной страницы поддержки вашей модели ноутбука или материнской платы ПК: просто введите в любой поисковой системе «модель устройства + поддержка». В обоих случаях драйверы будут не последних версий, а во втором случае (для ПК) будут доступны лишь драйверы для интегрированного видео, но они будут работать, что нам и требуется. Учитывайте: даже если на официальном сайте представлены драйверы только для предыдущих версий Windows, они обычно исправно работают и в новых версиях.
После установки оригинальных драйверов от производителя проблема может решиться сама, а изображение будет иметь размер, совпадающий с размером экрана.
Как сузить или расширить экран в программах от производителей видеокарт
Если предыдущие варианты не сработали или ситуация отличается от описанной, сузить или, в некоторых случаях — расширить изображение на экране монитора можно с помощью ПО от производителя видеокарты.
Изменение размера изображения в Панели управления NVIDIA
Если у вас установлена видеокарта NVIDIA GeForce и монитор подключен к ней, шаги будут следующими:
- Нажмите правой кнопкой мыши в пустом месте рабочего стола и выберите пункт «Панель управления NVIDIA», в Windows 11 может потребоваться сначала нажать «Показать дополнительные параметры».
- В разделе «Дисплей» перейдите к подразделу «Регулировка размера и положения рабочего стола». Если пункт «Дисплей» отсутствует, вероятнее всего у вас ноутбук и экран физически подключен к интегрированной видеокарте Intel (подробнее: Нет пункта Дисплей в Панели управления NVIDIA) — в этом случае вам подойдет следующий раздел статьи.
- На вкладке «Масштабирование» вы можете изменить режим масштабирования изображения на экране: попробуйте разные пункты и проверьте, получится ли получить желаемый результат, но этот метод может не подойти.

- На вкладке «Размер» можно установить отметку «Включить изменение размеров рабочего стола», а затем нажать кнопку «Изменить размер».
- В результате появится возможность ручной регулировки вывода изображения на экран.


Центр управления графикой Intel
Если экран ноутбука или монитор ПК подключен к встроенной видеокарте Intel, размеры и масштабирование можно настроить в Центре управления графикой Intel.
- Запустите Центр управления графикой Intel — обычно это приложение устанавливается автоматически в Windows 11 и Windows 10, а для запуска можно использовать поиск в панели задач: просто начните вводить «Intel».
- Перейдите на вкладку «Дисплей» и пролистайте до пункта «Масштаб». Здесь вы можете выбрать режим масштабирования изображения (количество доступных пунктов может отличаться).

- Если выбрать опцию «Пользовательский», вам станет доступной ручная настройка размеров экрана по вертикали и горизонтали: при первоначальном выборе она откроется автоматически, а в дальнейшем её можно будет открыть, нажав на значок с изображением шестеренки справа от поля режима масштабирования.

Настройки AMD Radeon
Для видеокарт AMD Radeon шаги похожи на таковые для NVIDIA:
- Нажмите правой кнопкой мыши по пустому месту рабочего стола и выберите пункт «Настройки Radeon»/
- Перейдите на вкладку «Дисплей» и измените режим масштабирования.
- Если на вкладке «Дисплей» нажать «Дополнительные настройки», в разделе «Управление рабочим столом» вы найдете дополнительные параметры ручной настройки масштабирования.
Изменение масштабирования в настройках монитора
Для некоторых мониторов настройки масштабирования и положения изображения на экране доступны в настройках самого монитора. Выглядеть и называться они могут по-разному: Масштабирование, Размер, Разрешение.

Обычно найти их сравнительно не сложно: набор параметров в меню монитора ограничен и можно быстро пролистать их все.
Дополнительно, в части мониторов может быть полезной следующая информация:
- В настройках большинства мониторов есть опция сброса настроек — иногда она помогает решить проблему суженного или расширенного экрана.

- Некоторые «продвинутые» мониторы требуют установки драйверов с сайта производителя для правильной работы. Для них же на сайте поддержки могут предоставляться утилиты для управления настройками (для некоторых моделей — и масштабированием).

Напомню, что использование различных адаптеров и переходников для подключения старых мониторов к новым видеокартам само по себе может приводить к проблемам с правильным выводом изображения: по возможности используйте прямое подключение к одинаковому интерфейсу как со стороны видеокарты, так и со стороны монитора.
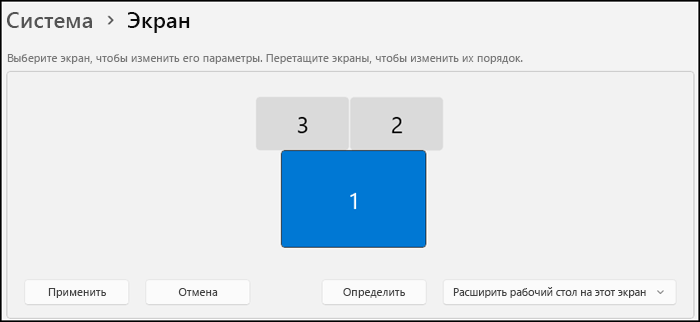
Если у вас есть внешние дисплеи, подключенные к компьютеру, до начала работы не забудьте выбрать, какие дисплеи нужно изменить.
-
Выберите Пуск > Параметры > Системный > Дисплей и просмотрите раздел, в котором отображаются ваши дисплеи.
-
Выберите дисплей, который необходимо изменить. После этого следуйте приведенным ниже инструкциям.

«Изменение размера текста, приложений и прочих элементов»
-
Оставайтесь на экране или откройте параметры дисплея.Откройте параметры дисплея
-
Прокрутите до раздела Масштаб и макет.
-
Выберите Масштаб, а затем выберите параметр. Как правило, лучше всего выбрать один из помеченных как (Рекомендуется).
Изменение разрешения дисплея
-
Оставайтесь на экране или откройте параметры дисплея.Откройте параметры дисплея
-
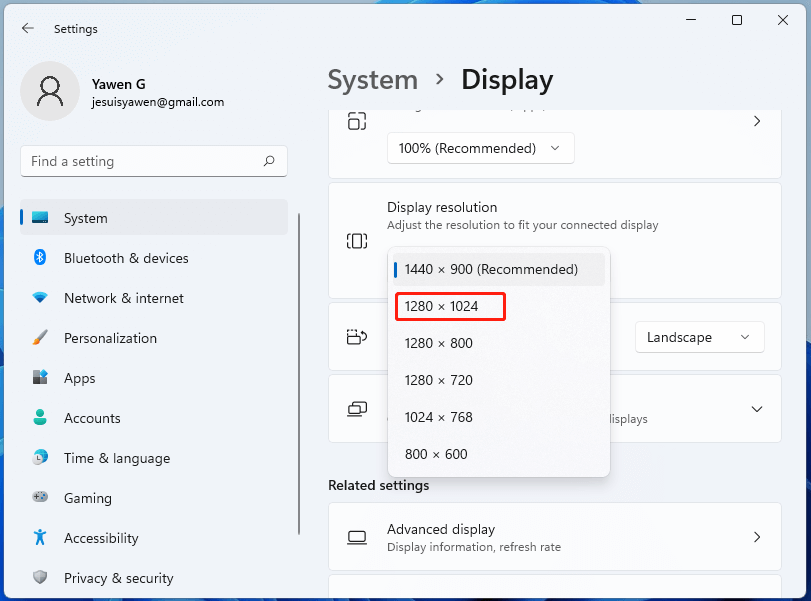
В строке Разрешение экрана выберите список и параметр. Как правило, лучше всего использовать тот, который помечен (рекомендуется). Мониторы могут поддерживать разрешение ниже основного, но в этом случае текст будет менее четким, а изображение может занимать не весь экран, быть растянутым или располагаться по центру черного экрана.
Примечание: Если в разрешении экрана есть непредвиденные изменения, возможно, потребуется обновить графический драйвер. Чтобы просмотреть и установить доступные обновления, выберите Пуск > Параметры > Центр обновления Windows > Проверить наличие обновлений.
Изменение ориентации дисплея
Нажмите кнопку Пуск и введите параметры. Выберите Параметры > Системный > Дисплей и выберите ориентацию экрана в раскрывающемся списке рядом с пунктом Ориентация экрана.
Windows порекомендует ориентацию для вашего экрана. Если вы измените ориентацию монитора, вам также потребуется физически повернуть экран. Например, вам нужно будет повернуть свой внешний монитор, чтобы использовать его в книжной ориентации вместо альбомной.
Изменение ориентации экрана
Thanks to recent improvements around the world, PC parts are now being sold at their MSRPs which has prompted many users to finally build their dream PCs. Building a PC can have its challenges and among them is the task of fitting your screen to your monitor’s display. If you’re unable to fit your screen to your monitor on Windows 11, then here’s all you need to know about it. Let’s get started.
To fit your screen to your monitor, you can either adjust your resolution, scaling, or display output settings depending on your current setup. We recommend you try resizing your resolution to retain visual quality and dpi. However, if this does not work for you, you can try using one of the other options mentioned in the guide below. Follow either of the sections below depending on your preferences.
Method 1: Using the Settings app
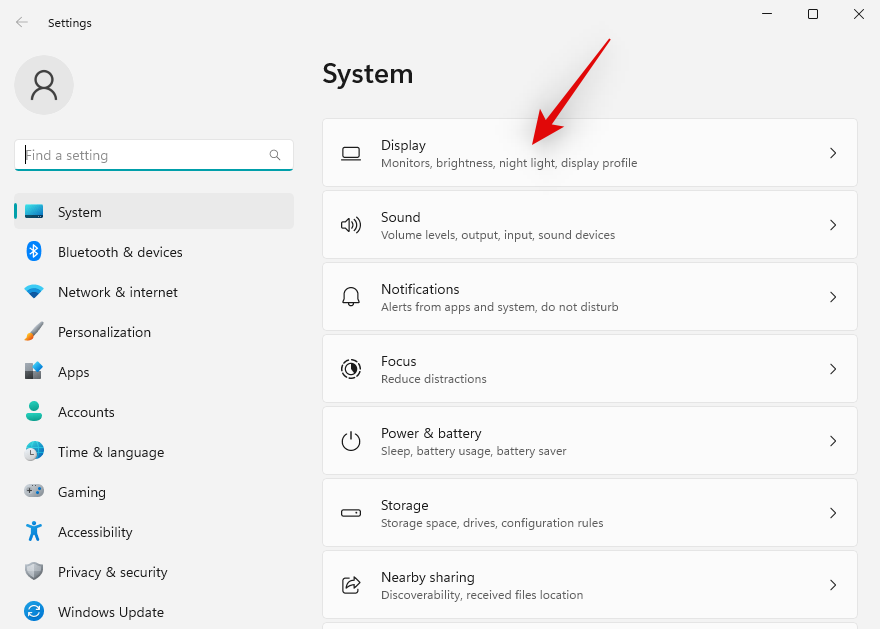
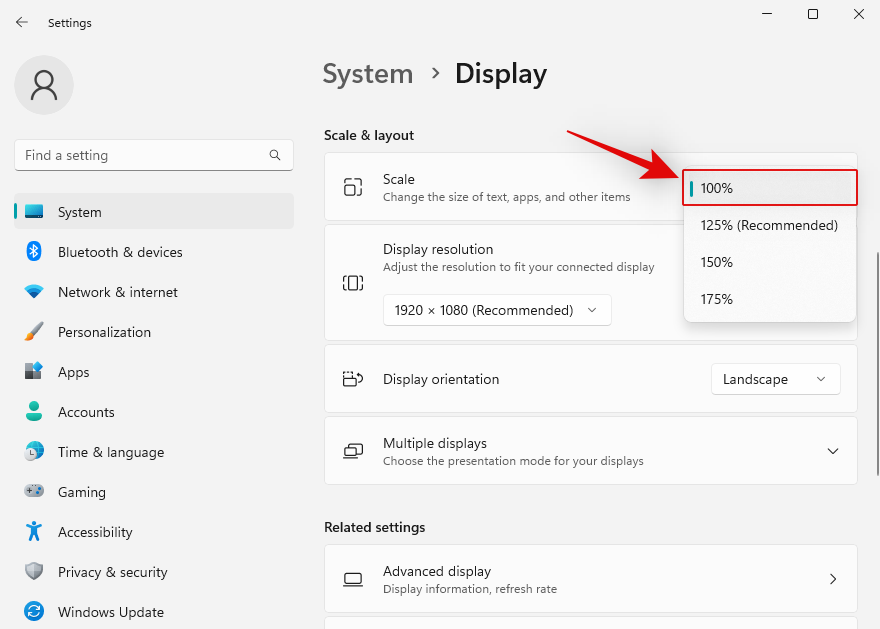
Press Windows + i on your keyboard to open the Settings app. Now click Display.
Click the drop-down menu for Scale.
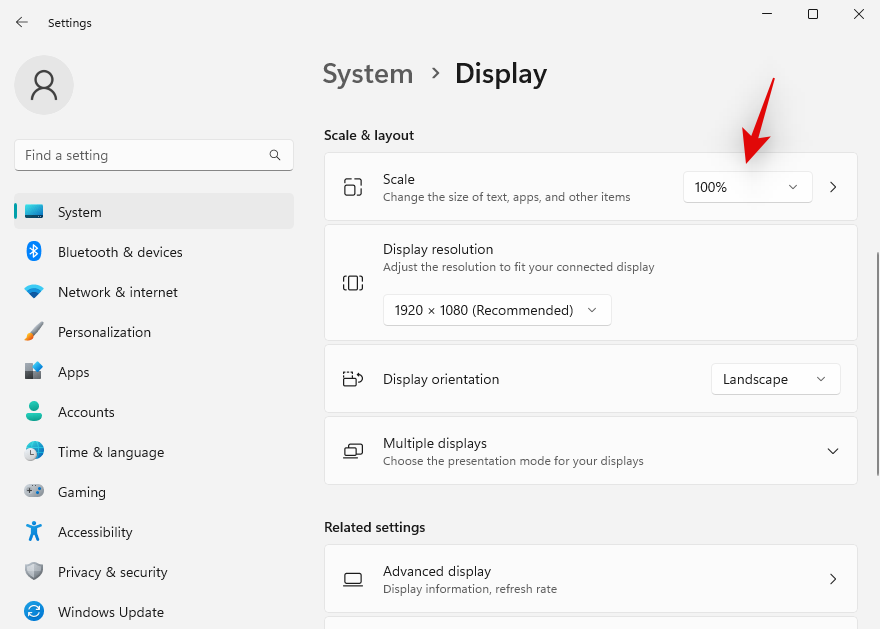
Select 100% despite the recommended choice.
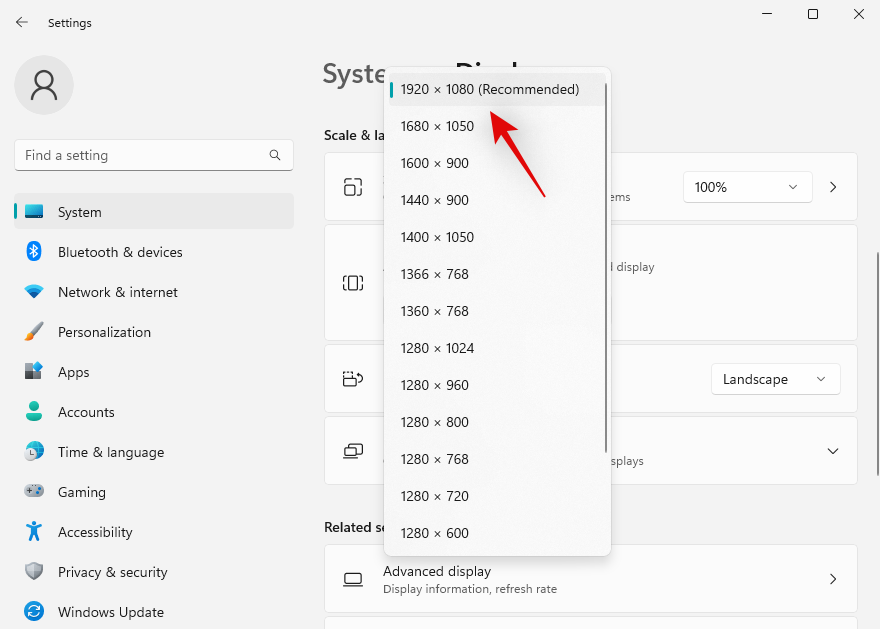
Now click the drop-down menu for Display resolution.
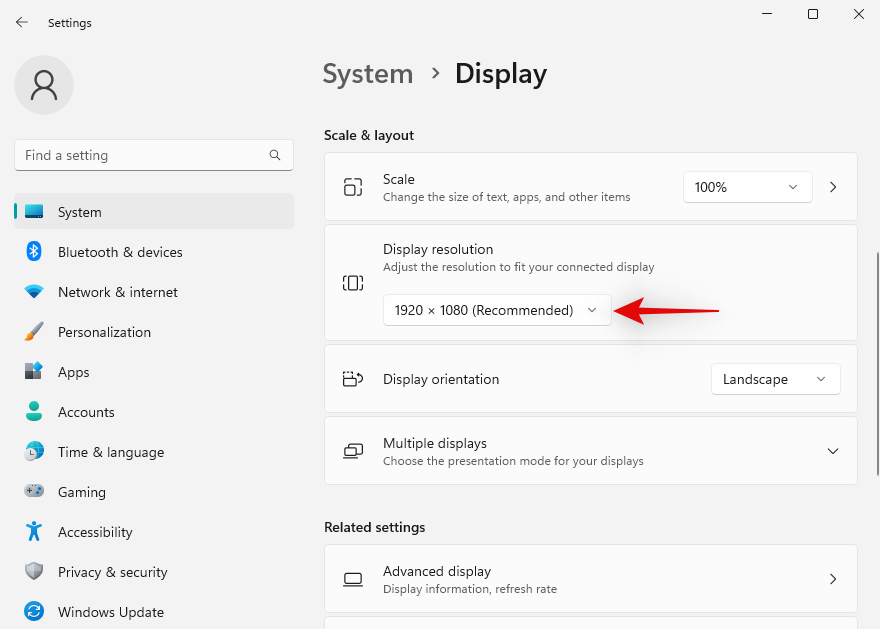
Select the default resolution of the monitor from the list on your screen.
Note: You can find your monitor’s resolution in the product manual or on the product page. You can also find the same information on the OEM support site as well.
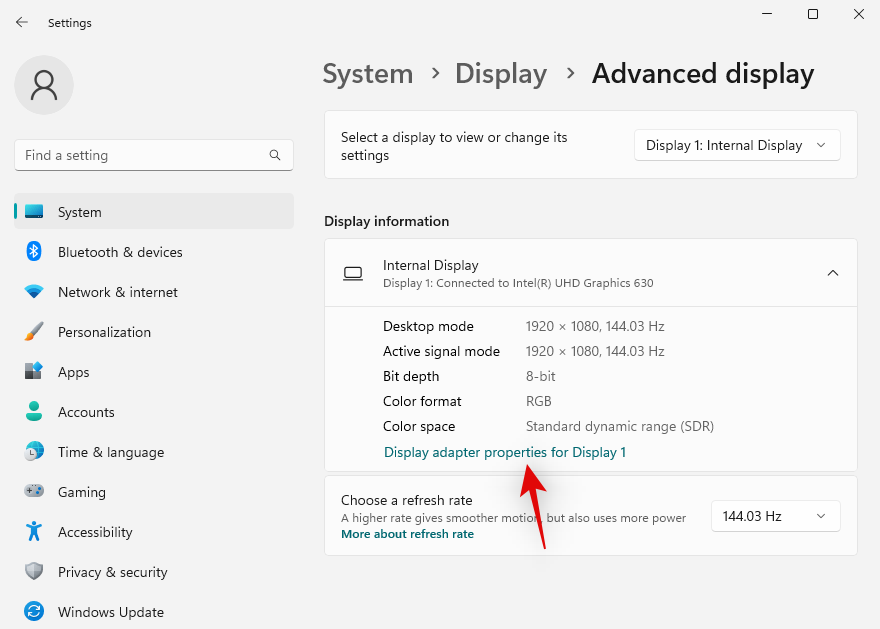
If you’re unable to select the resolution at this point or are facing issues, scroll to the bottom and click Advanced display.
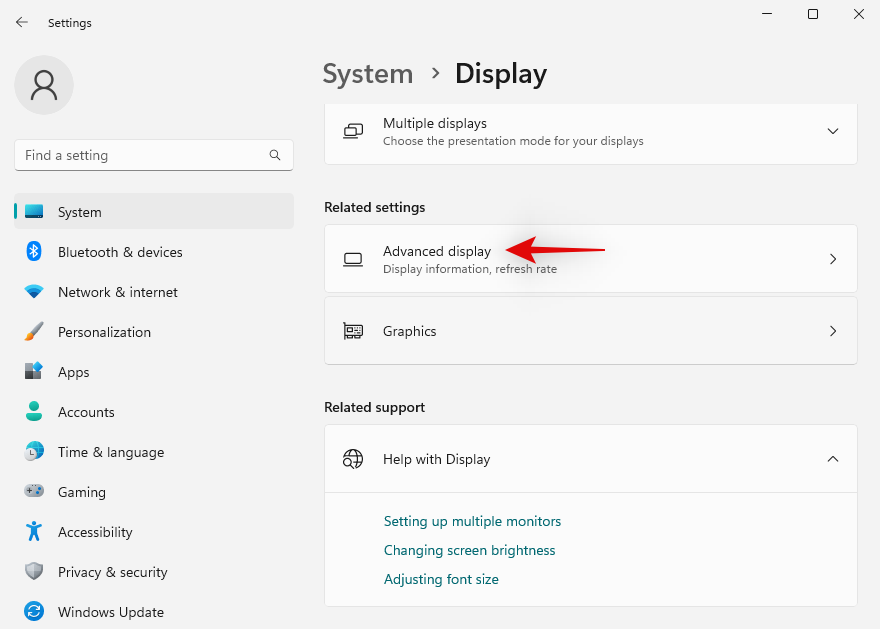
Click Display adapter properties for Display N where N is the number of assigned to your current display if you have a multi-monitor setup.
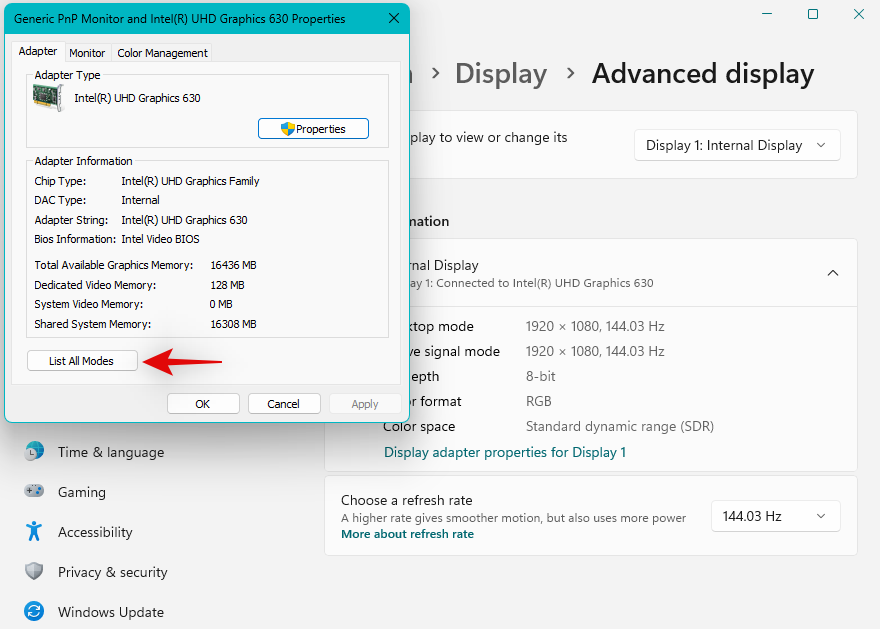
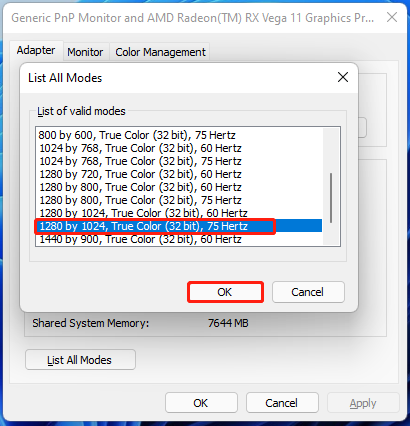
Click List All Modes.
Now select a resolution, color, and refresh rate combo compatible and relevant to your monitor.
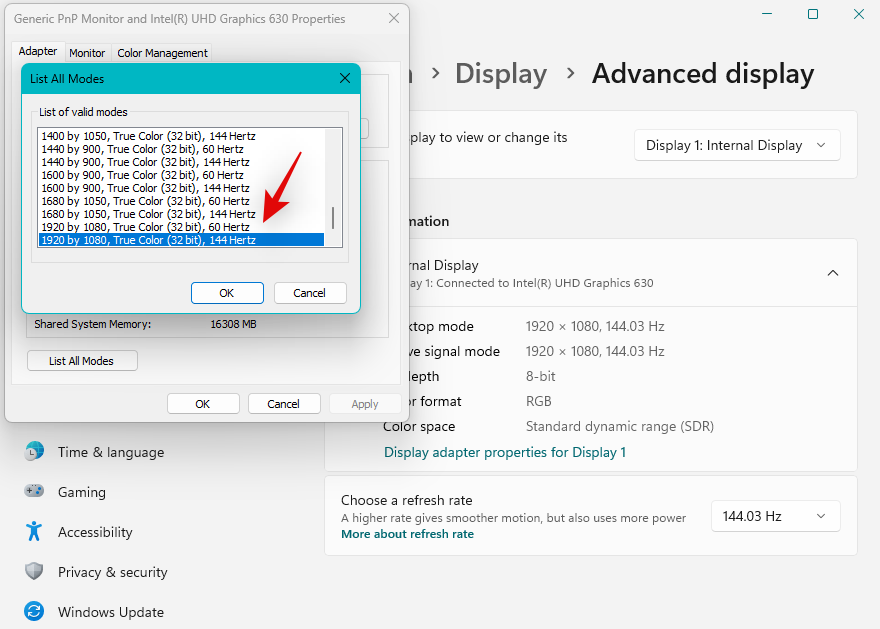
Click OK.
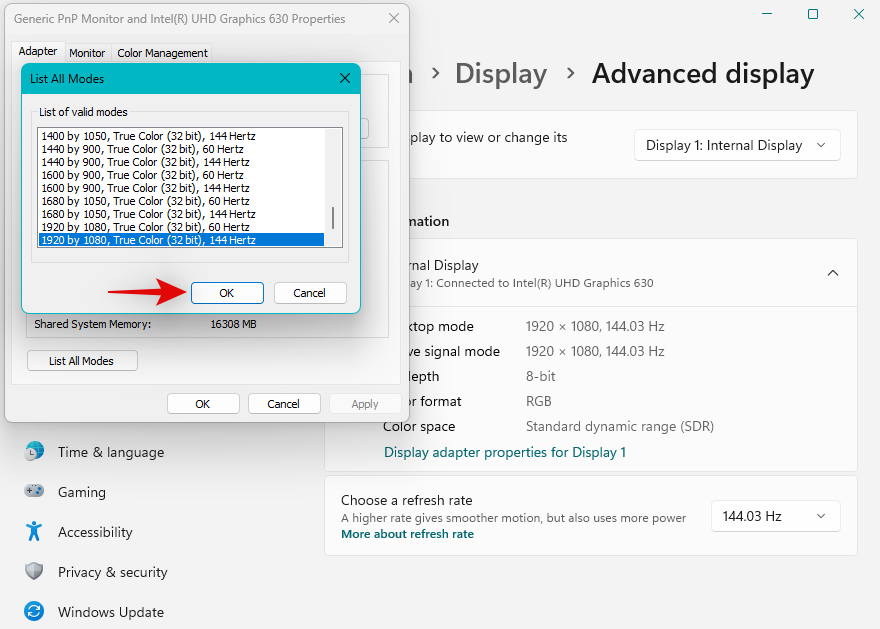
Click OK again.
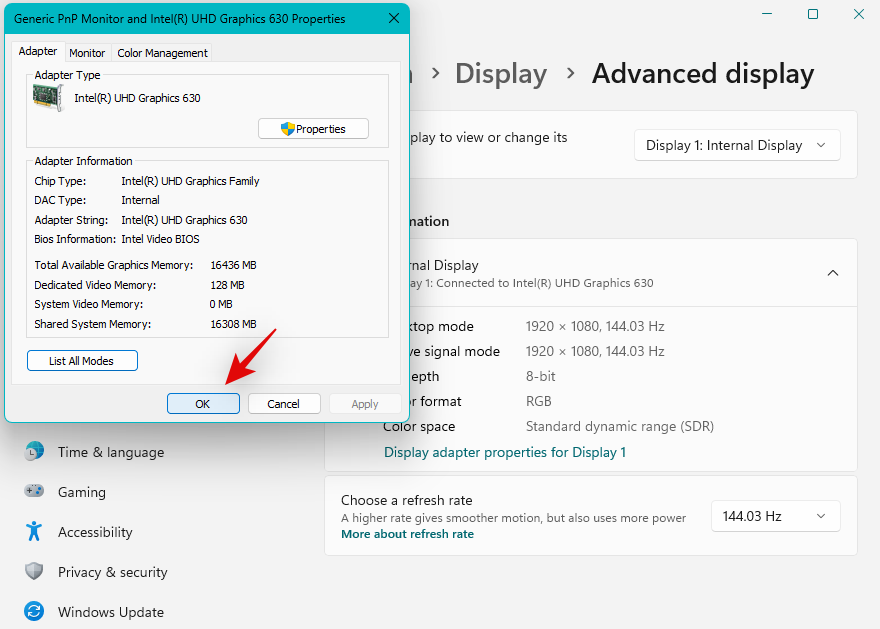
And that’s it! You should now have fit your screen to your monitor depending on its default resolution.
Method 2: Adjust display scaling
If you’re still unable to fit your screen to your monitor, we then recommend you try adjusting the scaling in Windows settings. Scaling allows you to increase or decrease the size of on-screen elements regardless of your screen resolution. This can help improve visibility and in some cases, help fit the screen to your monitor. Follow the steps below to help you along with the process.
Press Windows + i to launch the Settings app and click Display.
Now click the drop-down menu for Scale and select a higher scale than 100%.
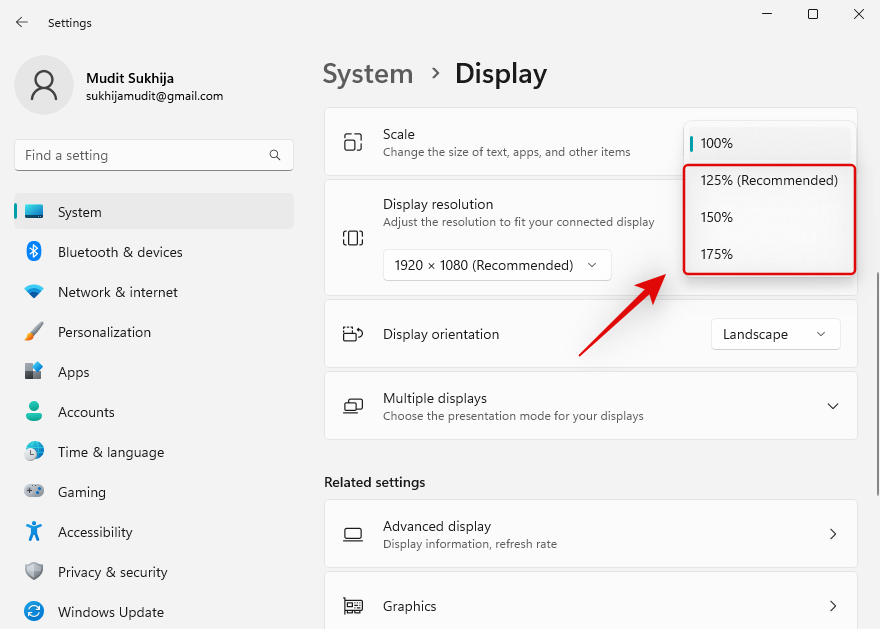
Elements on your screen should be automatically resized once you make your selection. Continue trying out other options until you find one that works best for your display and monitor. You should now have fit your screen to your monitor.
Method 3: Using Nvidia Control Panel
If you have an Nvidia GPU then you can use the Nvidia Control Panel to adjust your resolution, scale, and other display properties. This should help you easily fit your screen to your display size. Follow the steps below to help you along with the process.
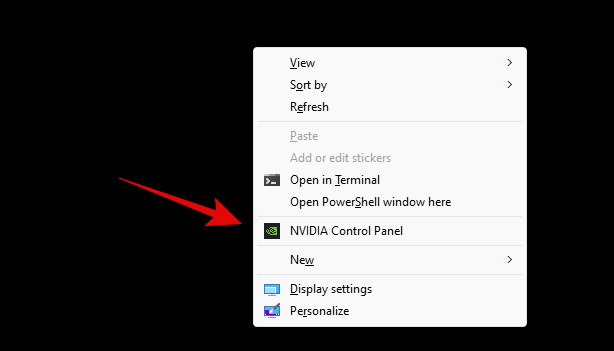
Shift + Right-click an empty area on your desktop and select NVIDIA Control Panel.
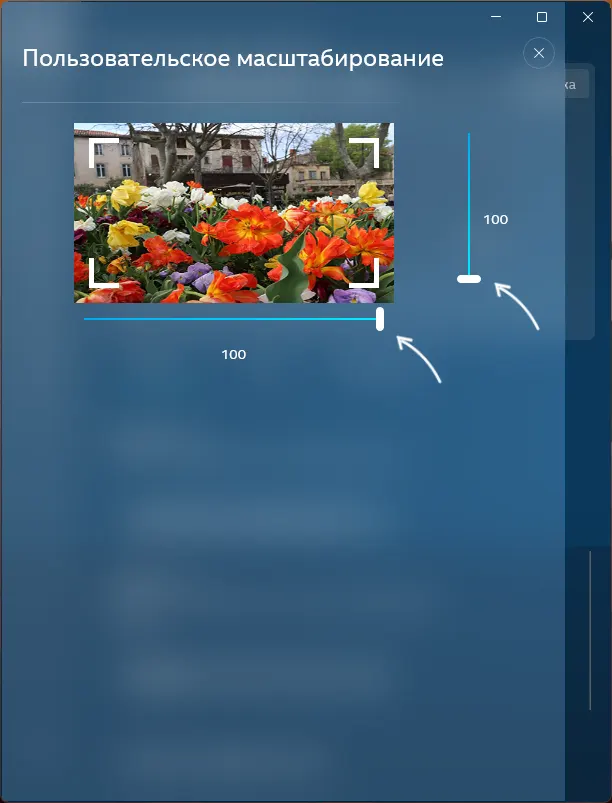
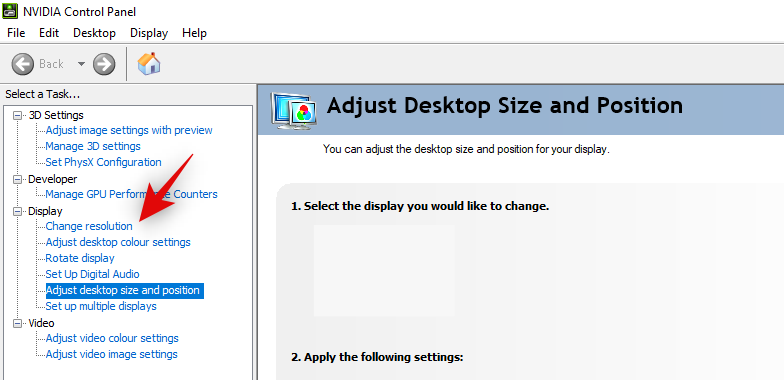
Once the Control Panel launches, click and select Adjust Desktop Size and Position on your left under Display.
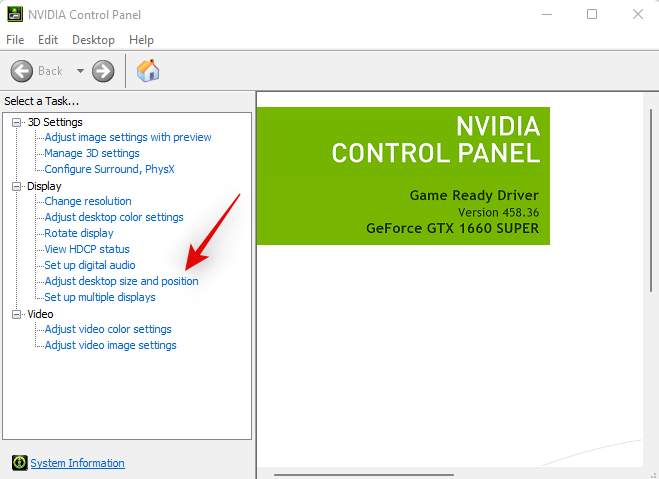
Click and select Aspect Ratio under Scaling.
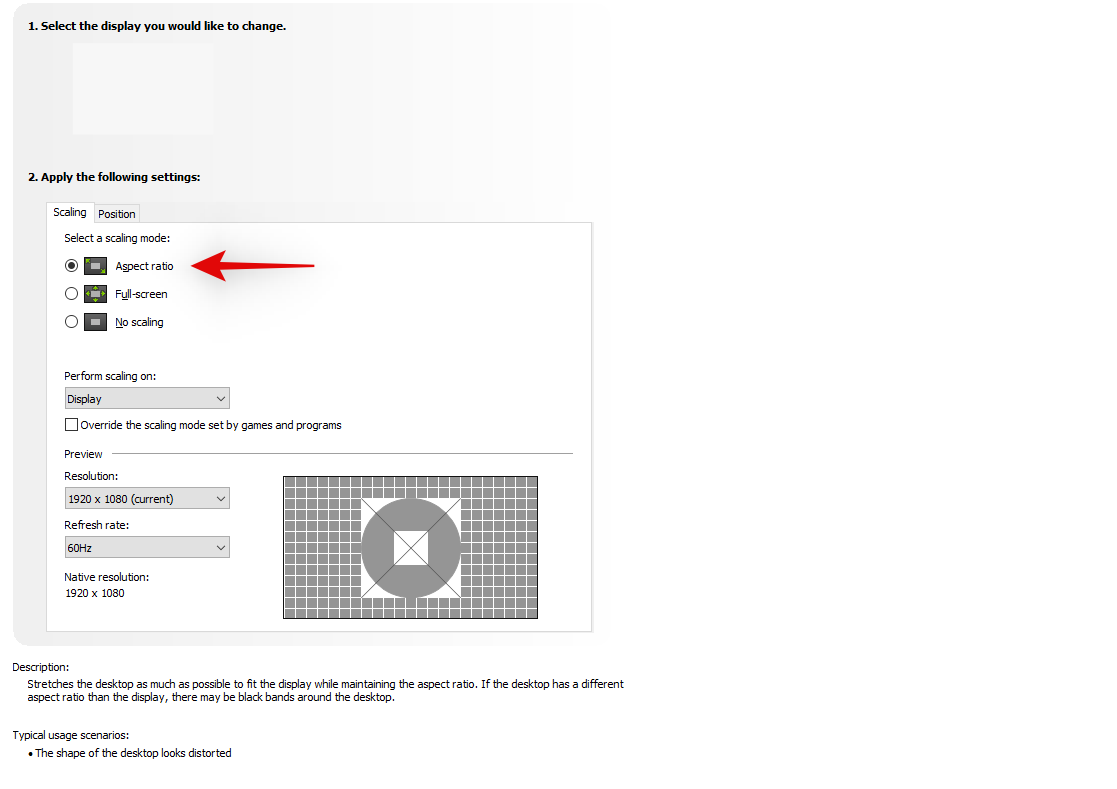
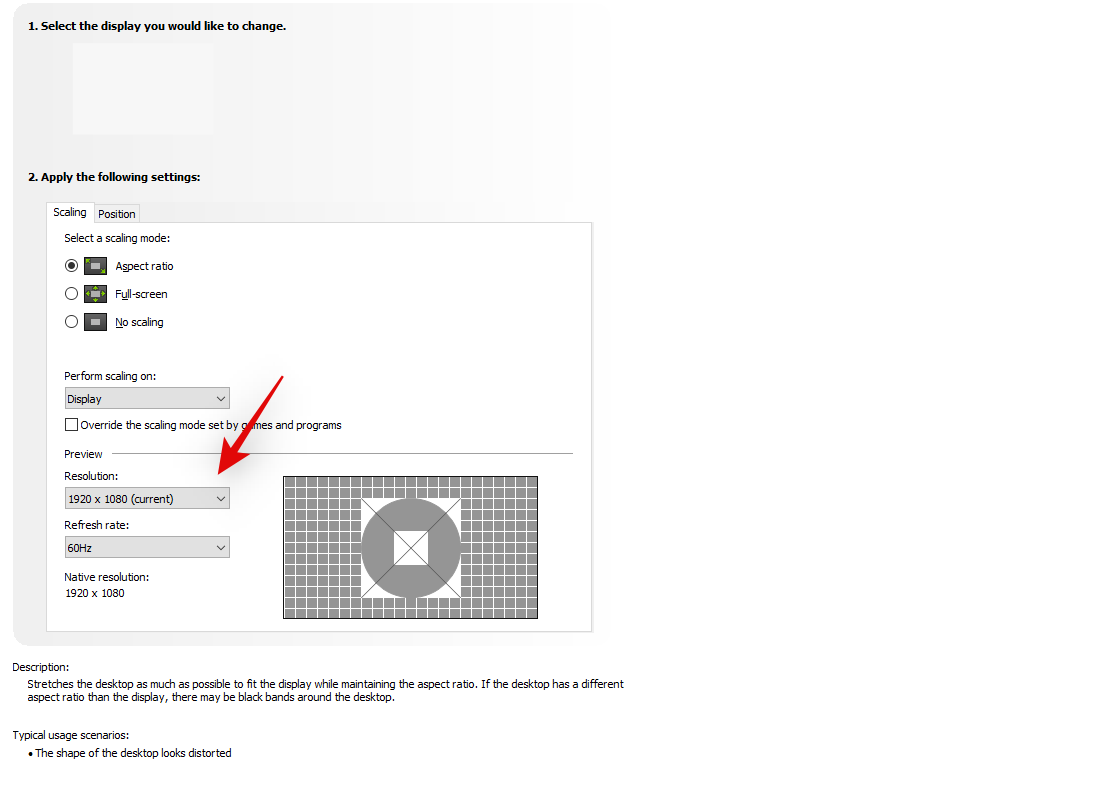
Click the drop-down menu for Resolution: and select a supported resolution by your monitor.
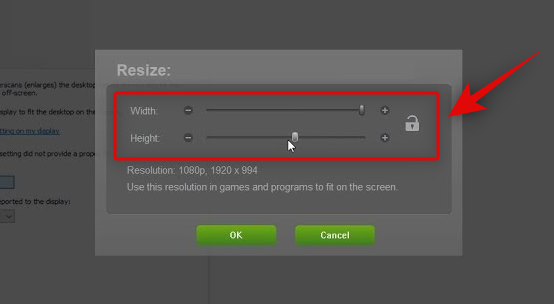
Now click and switch to the Size tab by clicking the same at the top.

Check the box for Enable desktop resizing.
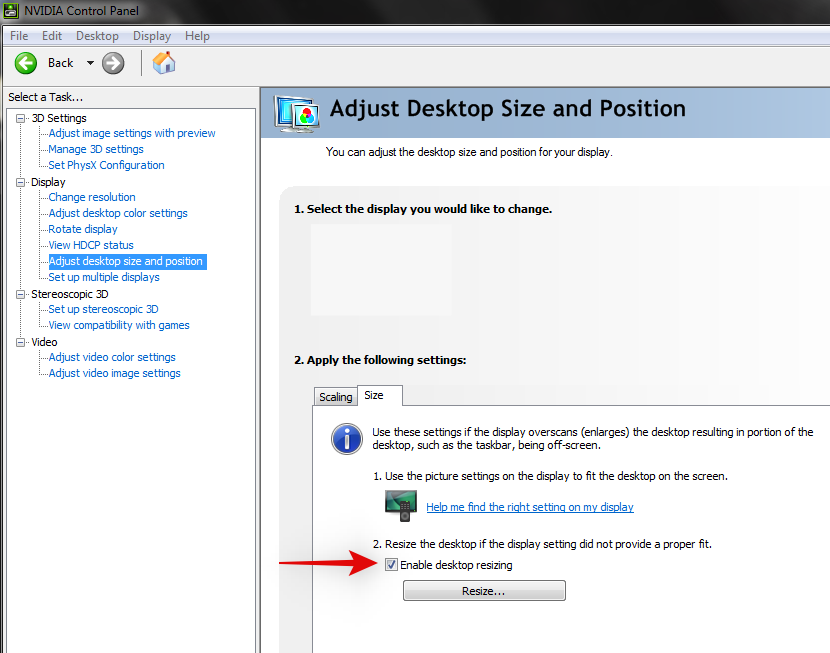
Click Resize… under the same.
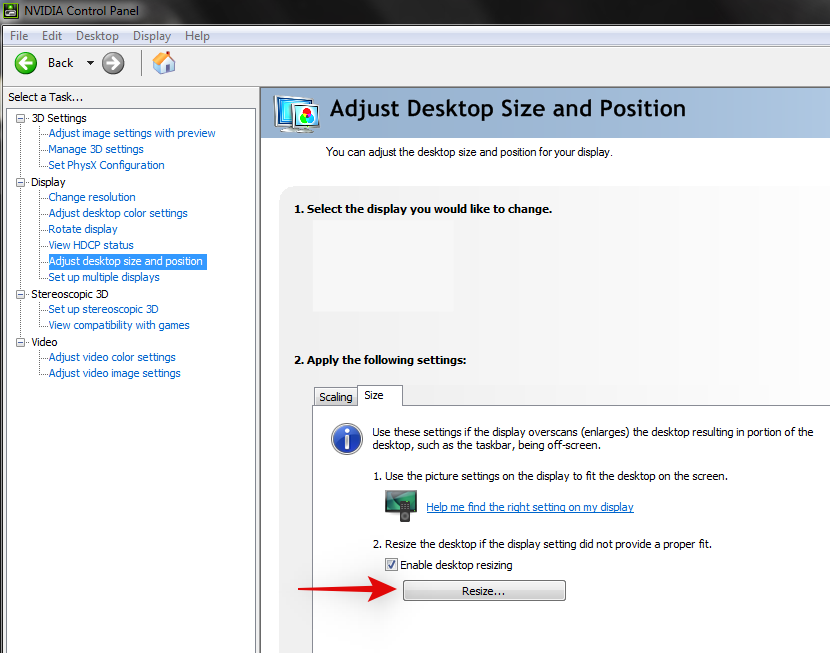
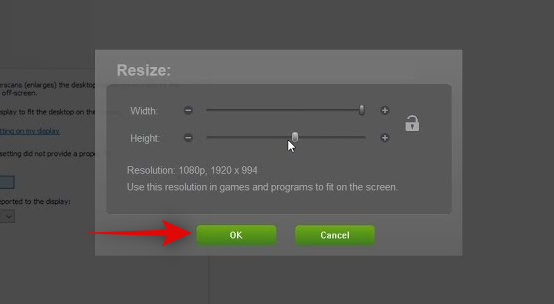
Now use the Width and Height sliders on your screen to adjust your screen position. You can fine-tune and adjust your screen using the same to fit the corners of your monitor perfectly.
Click OK once done.
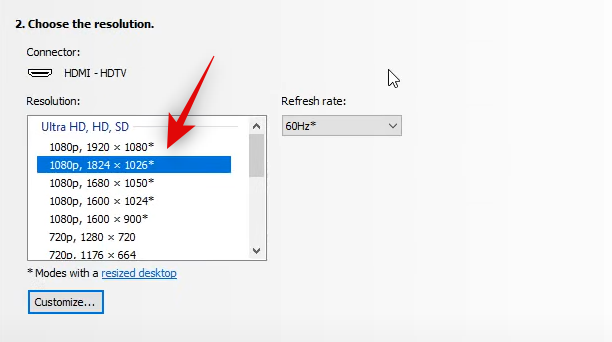
A new custom resolution will now be created and applied depending on your display. Let’s verify the same. Click Change resolution on your left.
Your new resolution should now be listed and selected under Resolution on your right.
And that’s it! You will now have fit your screen to your monitor, using the Nvidia control panel.
Method 4: Using AMD Radeon Software
AMD Radeon Software allows you to fine-tune your screen size and adjust its position using HDMI scaling. This can help you easily fit your screen to your monitor’s display. Use the steps below to help you along with the process.
Shift + Right-click an empty area on your desktop and select AMD Radeon Software.
Now click the Gear () icon in the top right corner.
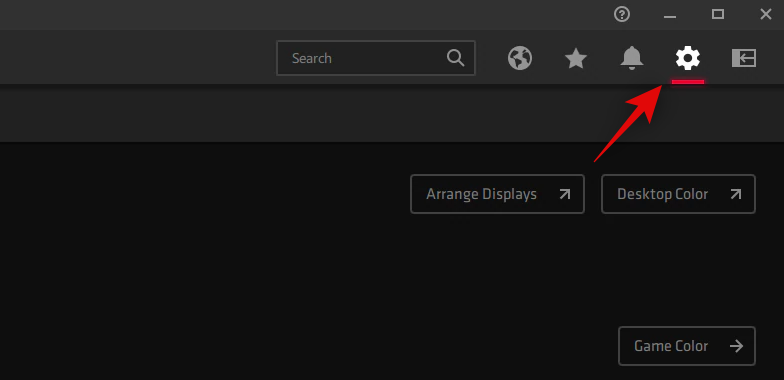
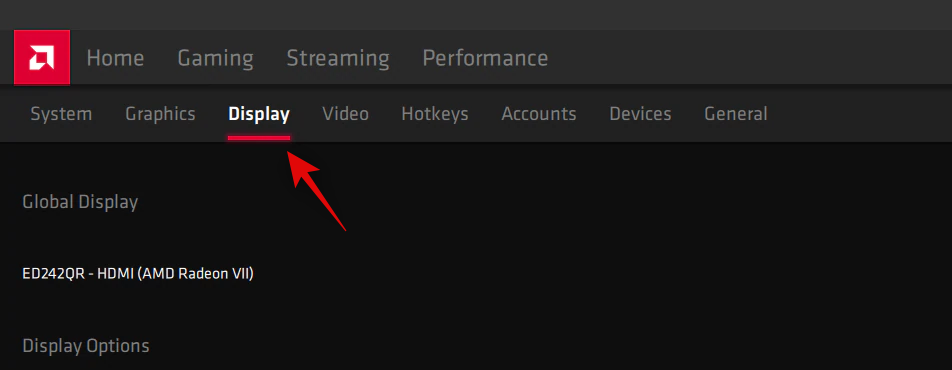
Click and switch to the Display tab.
Click and enable the toggle for GPU scaling if not already enabled.
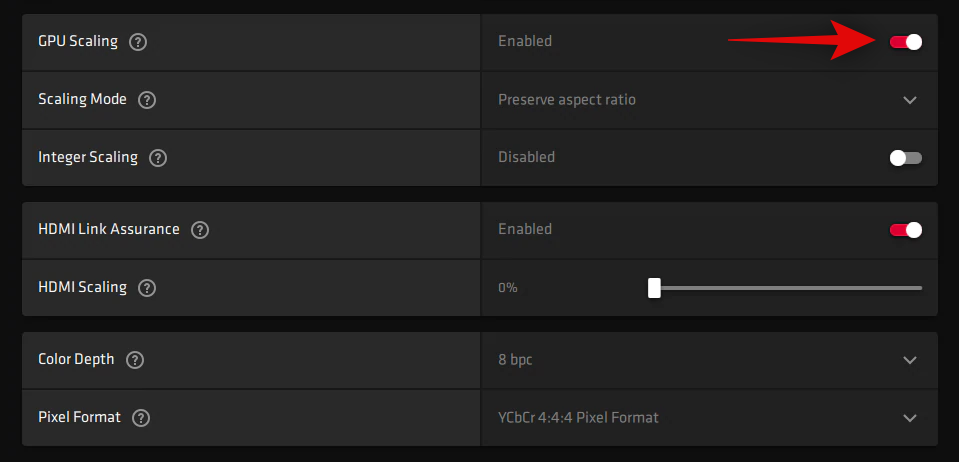
Click the drop-down menu for Scaling Mode and select Preserve aspect ratio.

Now scroll down and use the slider for HDMI Scaling to adjust your display. You can now resize your display to fit your monitor.
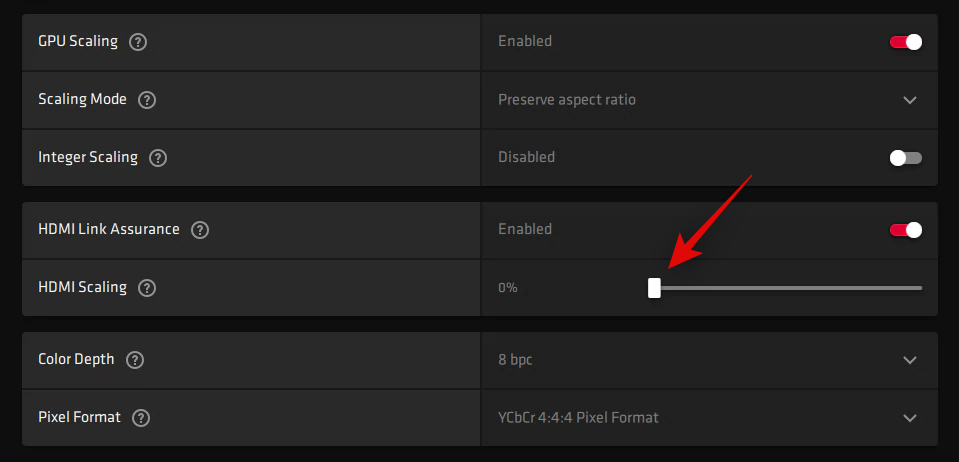
You will now have resized your display to fit your monitor.
However, if this does not work for you then we recommend you try using a custom resolution on your system. Use the steps below to help you along with the process.
Open AMD Radeon Software as we did above and click the Gear () icon.
Click and select Display.
Now click Read & Accept the EULA under Custom Resolution.
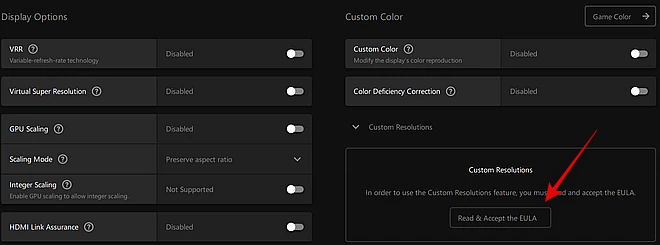
Click I Accept. Now click Create New under Custom Resolution. We recommend you leave most settings at their default values to avoid display issues. We need to focus on the Resolution (Px) values at the top.
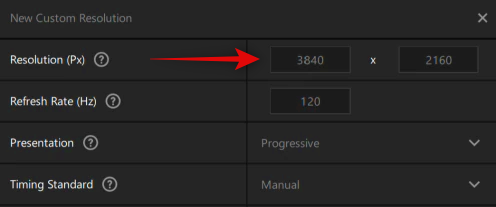
Enter your desired custom resolution that fits your monitor. You can find more information on your default resolution for the monitor either in the Product manual, on the product page, or the product support page by your OEM.
Note: You can, however, select your desired refresh rate when setting a custom resolution depending on your display.
Once you’ve entered the desired resolution, click Create.
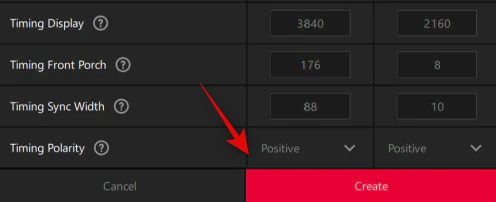
Your screen will now go blank for a few moments. This is normal behavior as AMD Radeon Software is now testing your custom resolution for compatibility. If all goes well your custom resolution will be applied and added as an option under Custom Resolutions.
However, if the custom resolution is incompatible with your display, you will be notified of the same. Click Ok and try a different custom resolution until you find one that best fits your current monitor.
You will now have fit your screen to your monitor using AMD Radeon Software.
Method 5: Using the Intel Graphics Command Center
If you’re using an iGPU or have a laptop then you can use the Intel Graphics Command Center to adjust your screen to your monitor. Follow the steps below to help you along with the process.
- Intel Graphics Command Center | Download Link
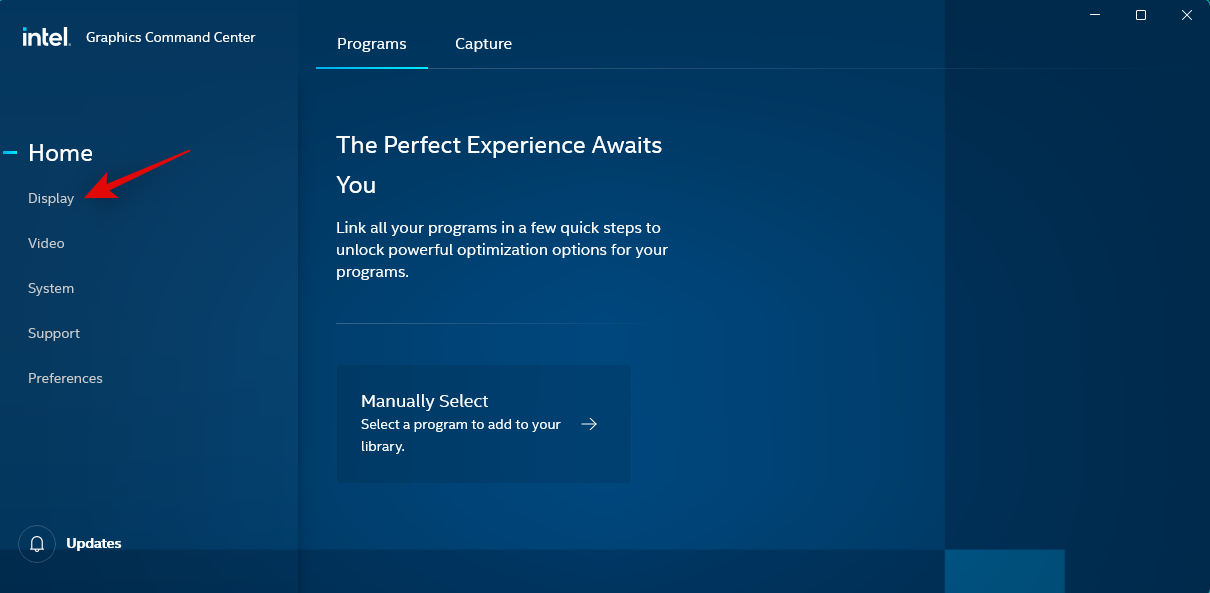
Download and install Intel Graphics Command Center on your PC using the link above. Once done, launch the same and click Display.
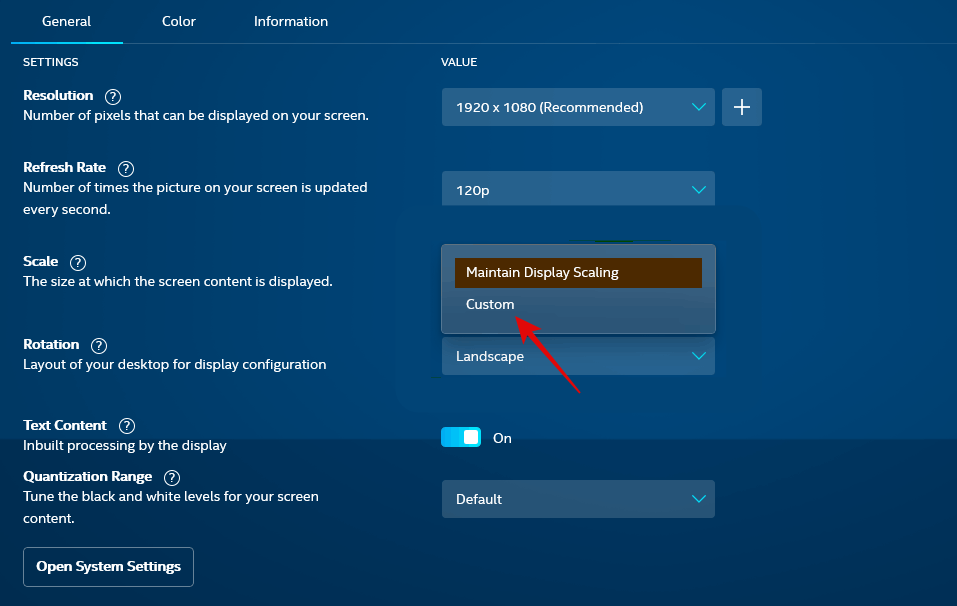
Now ensure General is selected at the top and scroll down and click the drop-down menu for Scale.
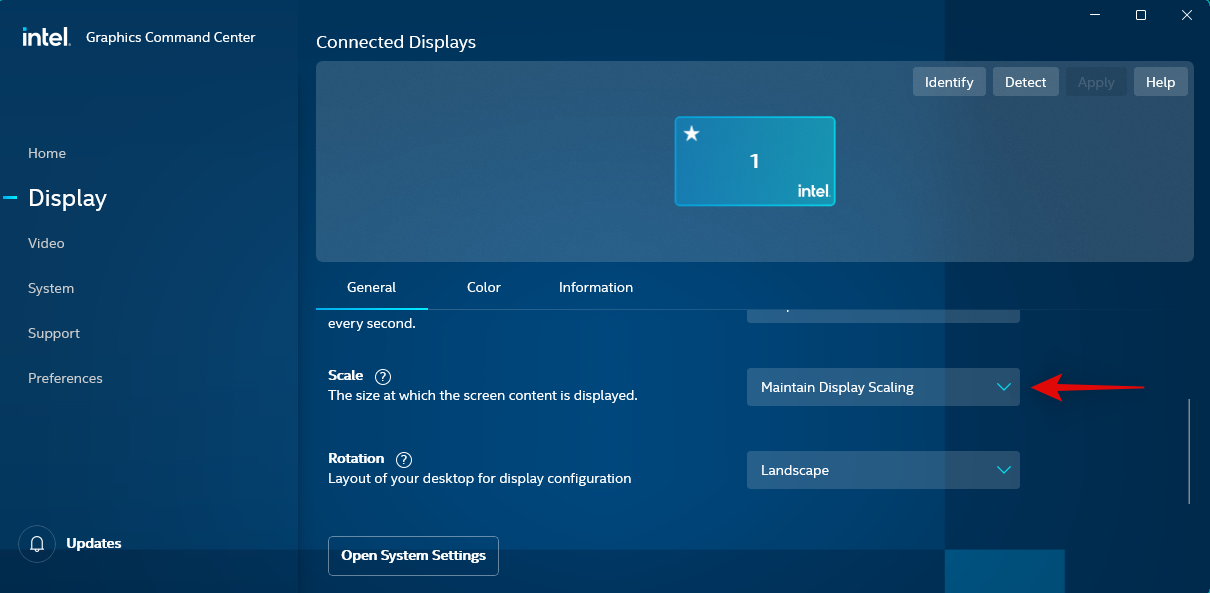
Select Custom.
Note: If you’re using a laptop, then you will only be able to access this option once you’re connected to your external display.
Now use the sliders on your screen to adjust your screen to your monitor.
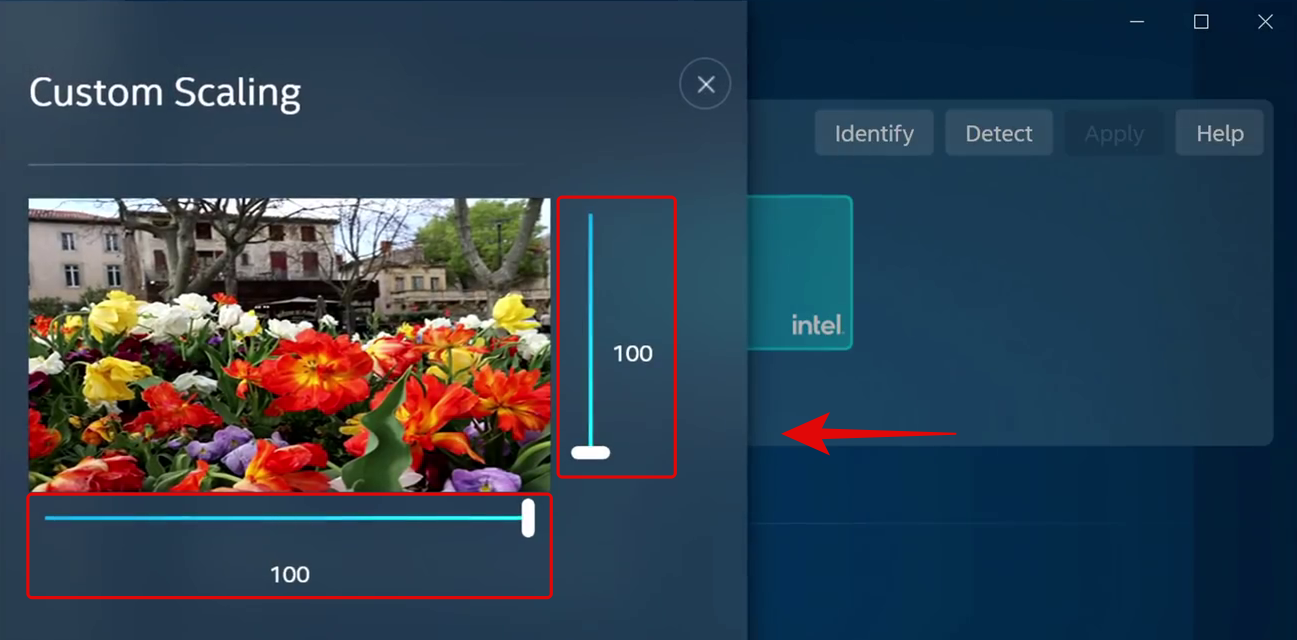
Save your settings once you’re done and you will now have fit your screen to your monitor using the Intel Graphics Command Center.
If however, this does not work for you then we recommend you try using a custom resolution instead. Revert changes to your scaling settings and click + beside Resolution. Adjust and enter your custom resolution in the left sidebar. If you’re facing Underscan issues, then you can try out a custom value beside Underscan %.
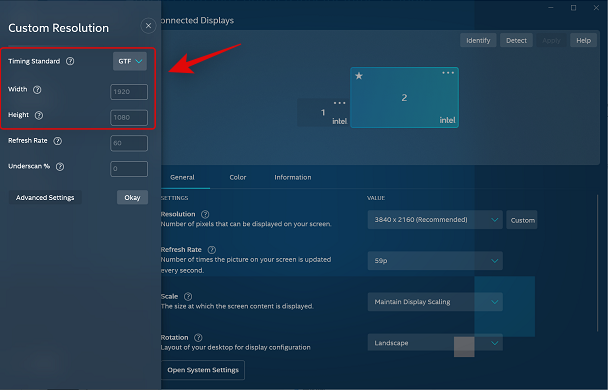
Once done, click Okay.
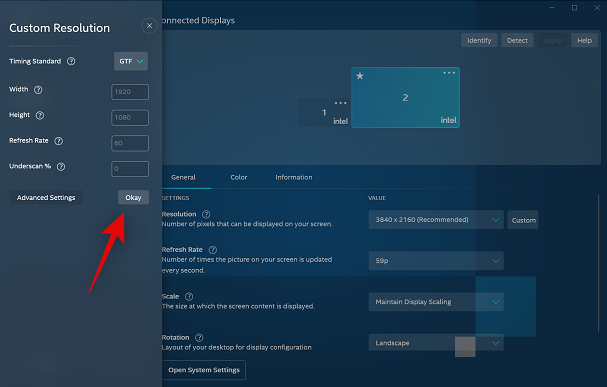
You should now have fit your screen to your monitor using a custom resolution. You might have to try out a few values before you find the one that best fits your current monitor.
Method 6: Using your monitor settings

Most monitors nowadays come with in-built independent settings for your display that help you adjust your screen as well as special features offered by your monitor.
We recommend you try using the same to adjust your display to your monitor’s screen. While you won’t be able to scale the display signal received by your monitor, you should be able to adjust its position on your screen.
We recommend you apply a custom resolution that matches your monitor and then use the Settings offered by your monitor to reposition the display on your monitor’s screen. You can find more information about the same on your monitor’s OEM support page.
Unable to fit your screen? Try these fixes!
If you’re still unable to fit your screen to your monitor’s display, then it could be an issue related to your graphics driver or hardware components. We recommend you use the sections below to help check and fix the same on your PC. Let’s get started.
Fix 1: Update Graphics Drivers
Most scaling and resolution issues stem from outdated or malfunctioning graphics drivers. Updating your drivers can help fix the same on your PC.
We, however, recommend you force delete your drivers first to ensure that Windows does not resort to using your older drivers. Follow the steps below to help you along with the process.
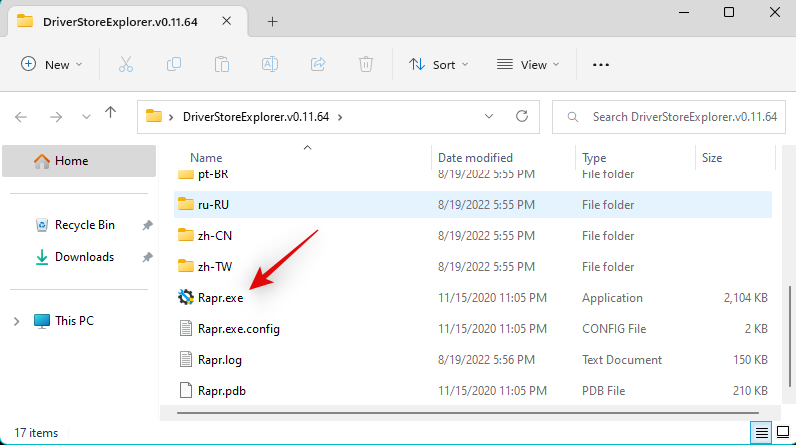
- DriverStoreExplorer | Download Link
Download and extract DriverStoreExplorer on your PC using the link above. Once done, launch the same using the .exe file.
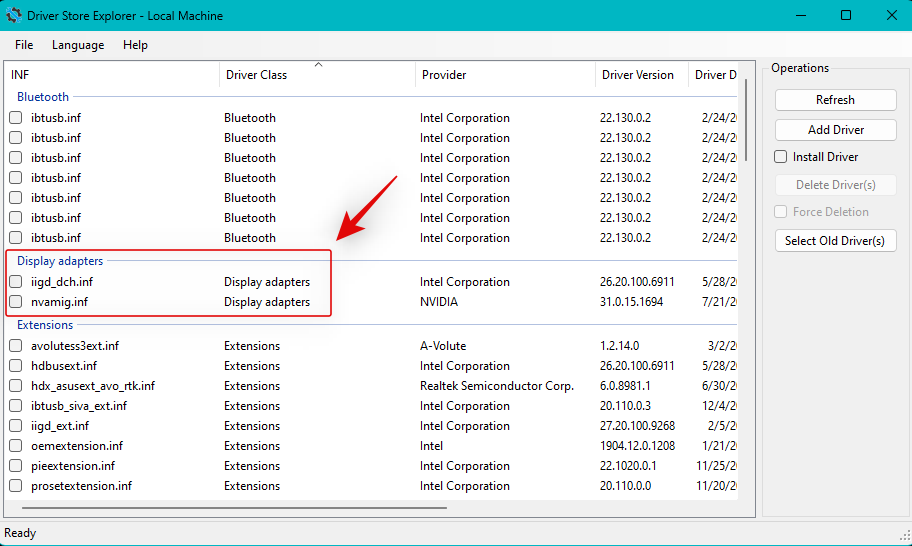
Click Driver Class at the top and use the same to identify your graphics drivers.
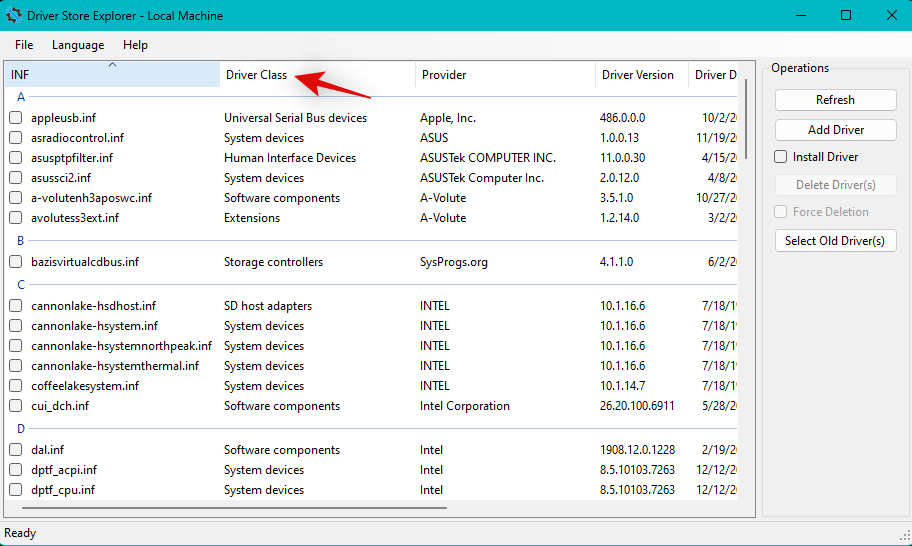
Once found, select all your graphics drivers by checking their boxes.
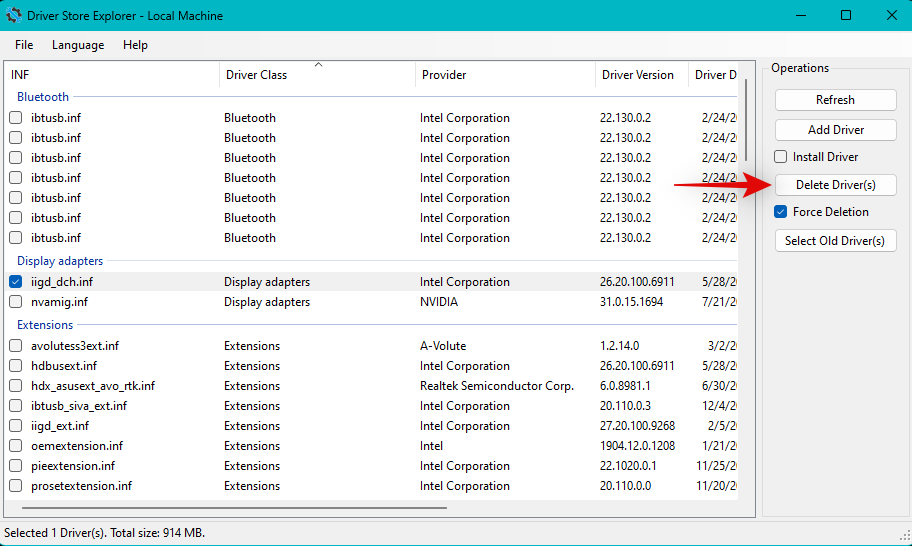
Check the box for Force Deletion.
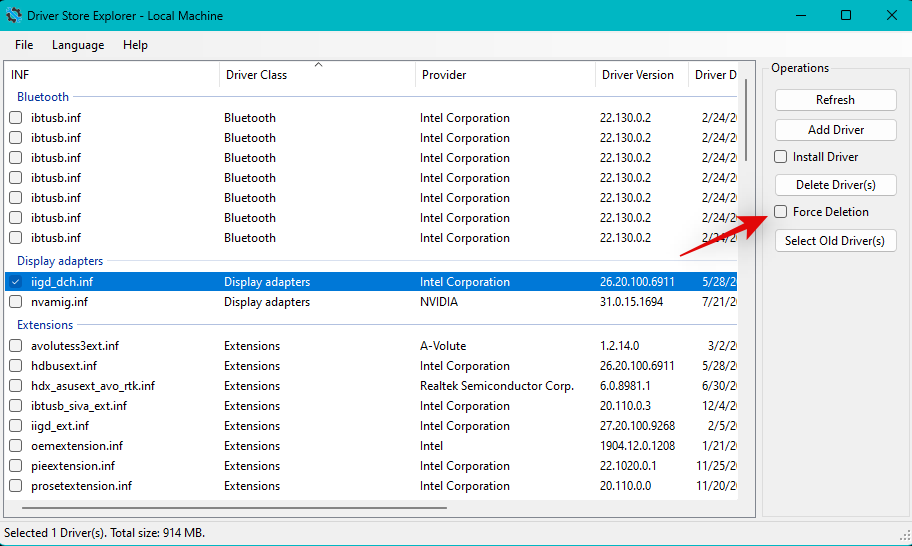
Now click Delete Driver(s).
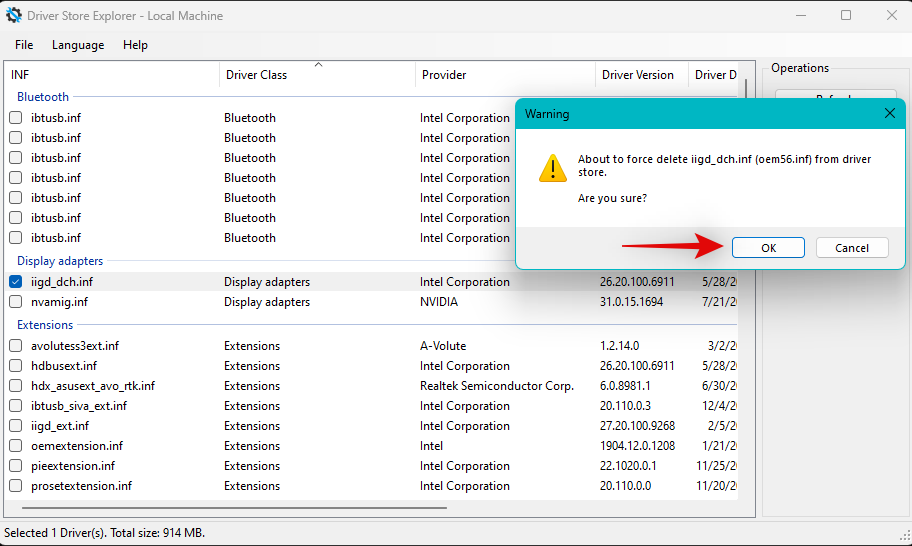
Click Yes to confirm your choice.
The graphics drivers will now be forcibly removed from your PC. Your display will go blank and blurry during this process. This is normal, as Windows will be using the generic display driver during this time. Once the process finishes, close DriverStoreExplorer and download the latest drivers for your GPU using either of the links below.
- Intel GPU Drivers
- Nvidia GPU Drivers
- AMD GPU Drivers
Once downloaded, install your display drivers and restart your PC. You should now be able to use the methods above to fit your screen to your monitor’s display.
Fix 2: Change your cable
We now recommend you try using a different cable to connect to your monitor. Modern display port and cable standards make it difficult to judge compatibility beforehand unless you’re familiar with the specifications.
There are many common HDMI and Display Port cable standards on the market. Incompatibility with your display cable can cause issues with scaling and resolution which in turn can prevent you from adjusting it on your PC. We recommend you try using a different cable to rule out cable incompatibility as the cause of your issue.
Fix 3: Try a different port
We now recommend you try using a different display port. You could be facing incompatibility with your monitor depending on its features and capabilities. Switching ports can help you identify and fix the same on your PC.
You can try using a different HDMI port or switch to a Display or VGA port depending on availability. If you no longer face issues with scaling on your monitor then you’re looking at a failing display port on your PC. We recommend you get in touch with a certified technician to weigh all your options in such cases.
Fix 4: Try a different monitor
If by this point you’re still facing issues then we recommend you try using a different monitor to rule out hardware issues either with your PC or monitor. If you do not have access to a second monitor, you can try connecting to your TV using an HDMI cable.
Most TVs require you to adjust the resolution and scaling to fit the screen properly. If you can connect to your TV/second monitor and adjust these settings as intended then your monitor is likely facing a hardware issue. In such cases, you can get your monitor repaired by a certified technician to fix your issue.
If however, you aren’t able to adjust settings and fit your screen on the secondary display as well then we recommend you get in touch with your PC’s support team to further diagnose and identify your issue.
We hope this post helped you easily fit your screen to your monitor on Windows 11. If you face any issues or have more questions, feel free to drop them in the comments below.
-
Home
-
Partition Magic
- How to Change Resolution on Windows 11? [5 Ways]
By Amy | Follow |
Last Updated
MiniTool would tell you how to change resolution on Windows 11 via five methods in this post. You can conduct a Windows 11 resolution change by picking a method from the list.
Do you know how to change resolution on Windows 11? If you don’t know, this post is what you need. It offers you 5 methods.
Way 1: Change Resolution on Windows 11 via Settings
A simple way to make a Windows 11 resolution change is to use the Settings utility. The following steps show you how to change resolution on Windows 11 via Settings.
Step 1: Press Windows and I keys to open Settings at first.
Step 2: Click on System > Display to move forward.
Step 3: Navigate to the Display resolution section and choose a resolution from the drop-down menu.
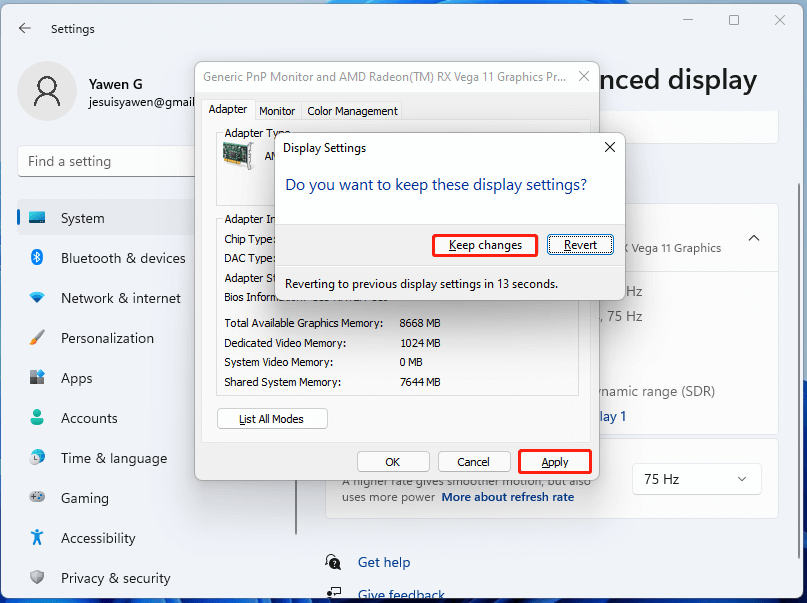
Step 4: In the prompted window, choose Keep changes to confirm the operation.
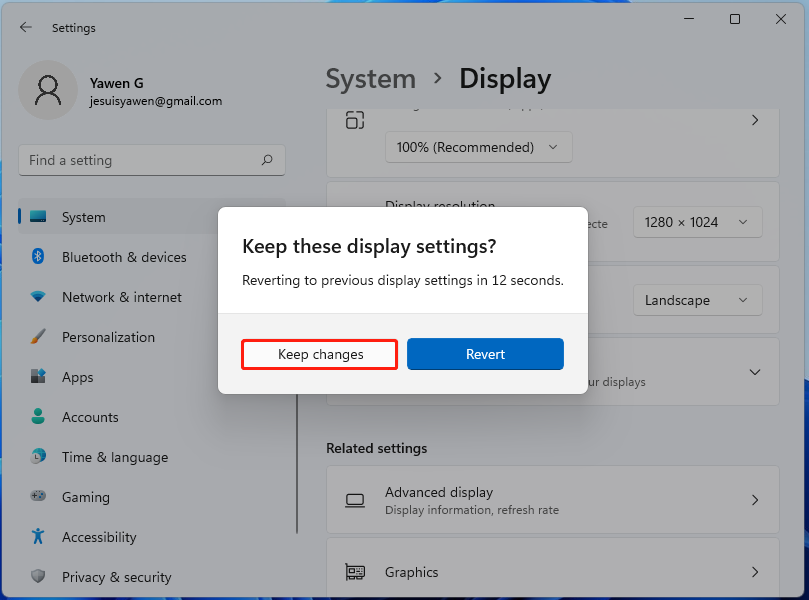
Step 5: After that, the resolution will be changed to the selected one.
Way 2: Change Resolution on Windows 11 via Display Adapter Properties
You can also make a Windows 11 resolution change via display adapter properties with the following steps.
Step 1: Likewise, open Settings and then click System in the left pane. Move to the right side of the window and scroll down the content until you locate to the Advanced display section. Click on it.
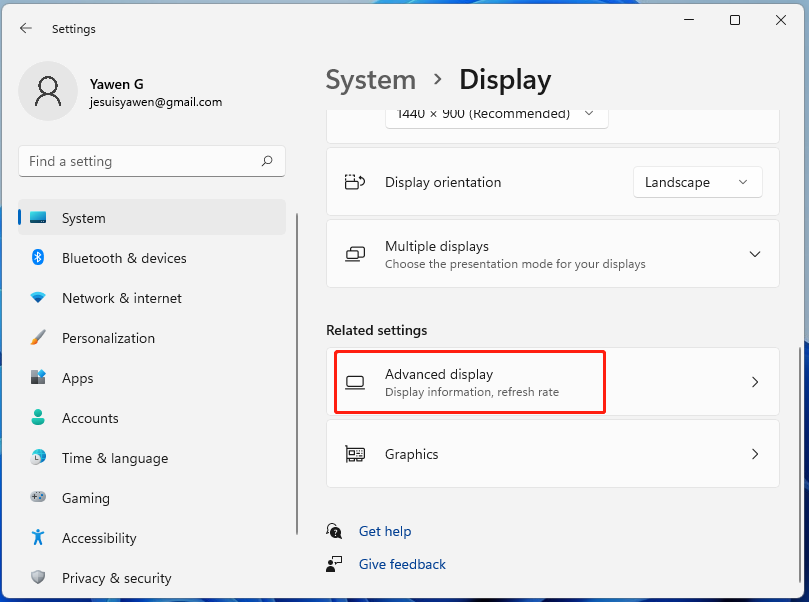
Step 2: Click on Display adapter properties for Display 1 to continue.
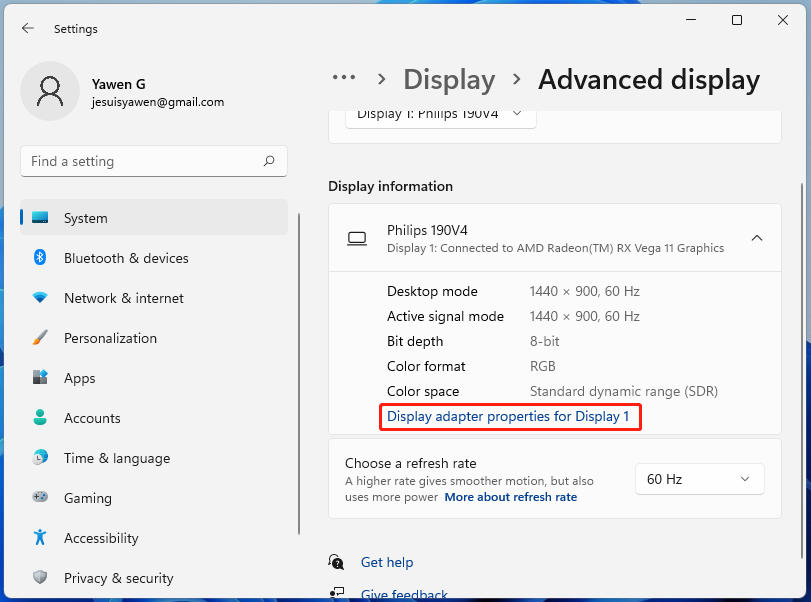
Step 3: In the Properties window, click List All Modes.
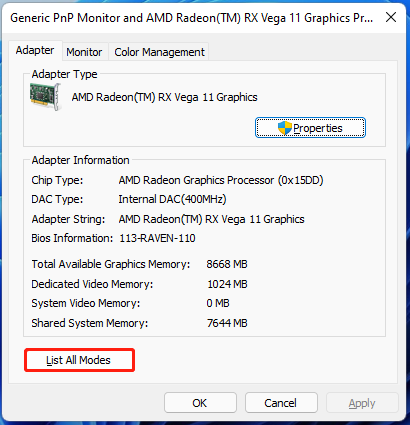
Step 4: Choose a mode (resolution) from the list in the prompted window and then click OK to save changes.
Step 5: Click Apply in the Properties window to confirm the operation. In the elevated Display Settings window, click Keep changes to take the operation into effect.
Way 3: Change Resolution on Windows 11 via Keyboard Shortcuts
Though Windows 11 doesn’t include any built-in hotkey options for resolutions, you can set up keyboard shortcuts for different screen resolutions with HotKey Resolution Changer. It is compatible with all Windows platforms from XP up.
Establish keyboard shortcuts to change resolution on Windows 11 by using these steps.
Step 1: Open the HotKey Resolution Changer webpage on the browser.
Step 2: Tap the Download button to save the HotKey Resolution Changer ZIP archive.
Step 3: Press the File Explorer taskbar button to open the folder that includes the HRC ZIP archive.
Step 4: Double-click the HRC ZIP and then click Extract all to open it.
Step 5: Choose Browse to decide a path for the extracted folder.
Step 6: Check the Show extracted files when complete checkbox and Extract on the Extract Compressed (Zipped) Folders window.
Step 7: Then double-click HRC in its extracted folder to open the window.
Step 8: Click a hotkey resolution drop-down menu to choose a resolution for a keyboard shortcut to apply.
Step 9: Press the hotkey you would like to change the resolution with and click the Set button. You are also allowed to select additional color bit and refresh rate values for the keyboard shortcut to apply the hotkey’s other two drop-down menus.
Step 10: Press the hotkey you set up with HRC right now to change your display resolution.
Way 4: Change Resolution on Windows 11 via Intel Graphics Command Center
The Intel Graphics Command Center app can be used to change resolution on Windows 11 if Intel graphics is used on the device. Here are steps for doing that.
Step 1: Download and install the Intel Graphics Command Center app on your computer, and then run it.
Step 2: After entering the main interface, click Display in the left pane.
Step 3: Choose a resolution from the drop-down menu of Resolution under the General tab.
Step 4: If you get a notice window, click the Keep button to configure the selected resolution.
Also read: [Full Guide] Unlock Windows 11 with Your Face in Windows Hello
Way 5: Change Resolution on Windows 11 via AMD Radeon Software
Step 1: Open the AMD Radeon Software and click on the Display tab.
Step 2: If you utilize more than one monitor, choose the one you need.
Step 3: Find and expand the Custom resolutions section.
Step 4: Click Read & Accept the EULA > Create New.
Step 5: Set a new display resolution using the “Resolution (Px)” input fields and click Create.
How to change resolution on Windows 11? Here are 5 methods for you. Pick one based on your preference.
About The Author
Position: Columnist
Having writing articles about computer tech for a long time, I am rather experienced especially on the aspect of computer optimization, PC enhancement, as well as tech terms explanation. The habit of looking through tech forums makes me a great computer issues collector. And then, many articles related to these issues are released, which benefit plenty of users. Professional, effective, and innovative are always the pursuit of an editing worker.
If you have an app or game on your Windows 11 or Windows 10 device that you would like to go full screen on but can’t find the full-screen, windowed, or border-less options, this short tutorial will show you how to go full screen on most apps, games or browsers.
Also see: Stop Games From Minimizing on Dual Monitors Windows 11
Universal full-screen shortcut keys
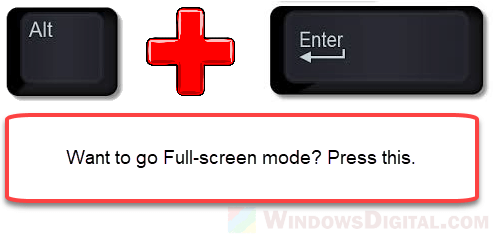
In most apps or games, you can use the universal full-screen shortcut keys – the Alt + Enter keys combination, which usually works to change an app or game into full-screen mode immediately.
To enter full screen on an app or game, while you are on the app or game, press Alt + Enter keys on your keyboard. The app should then switch itself into full-screen mode.
Please note that this method won’t work to go full screen on browsers in Windows. To enter full screen on a browser, use the second method below instead.
Going full screen on browsers such as Chrome, Edge or Firefox in Windows 11 or 10
Going full screen on browsers is different than that of other apps. The Alt + Enter keys will not work to switch browsers to full screen on Windows 10/11.
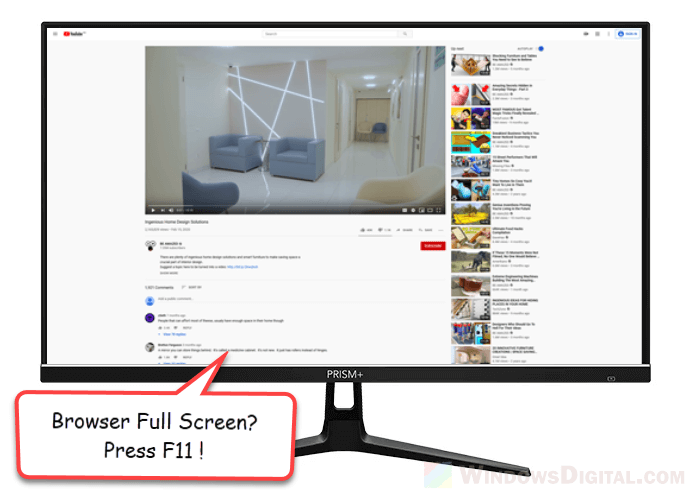
The magic shortcut key for most browsers to go full screen is the F11 key. To open a webpage in full-screen mode on Chrome, Edge, or Firefox, while you are on the webpage, press the F11 key on your keyboard. The page should then cover your entire screen, achieving a borderless full-screen effect.
Going full screen on Chrome without F11 key
If your keyboard doesn’t have an F11 key or it’s not functioning properly, you can still go full screen on Chrome by using the menu options.
- Open Chrome and navigate to the webpage you want to view in full screen.
- Click the three-dot menu icon in the top-right corner of the window.
- Hover your mouse over the “Zoom” option in the menu that appears.
- Click on the “Fullscreen” option in the sub-menu that appears.
- The webpage should now be displayed in full screen mode.

Alternatively, you can also use the keyboard shortcut Ctrl + Shift + F to go full screen on Chrome without using the F11 key.
Keep in mind that not all versions of Chrome may have the “Fullscreen” option in the Zoom menu, and some websites may not allow you to go full screen through this method. In those cases, you may need to use a different browser or find a workaround specific to that website or app.
How to exit full screen on Windows 10 or 11
If it’s an app or a game, to get out of full-screen mode, try to use the same shortcut keys – Alt + Enter keys again to switch back to windowed mode. The Alt + Enter shortcut key is actually a toggle button to switch between full-screen and windowed mode on most apps or games.
If it’s a browser, simply press F11 keys to revert back to windowed mode. Similar to the Alt + Enter keys method, F11 key is also a toggle button to switch between full-screen and windowed mode in most modern browsers.
Still can’t get full screen on your app or game?
The methods above may not work on certain modern apps or games if they don’t allow such shortcut keys that may interfere with the apps to exist.
If that’s the case, you have to try to look for any available in-game video options or configurations that allow you to manually modify the screen settings to full-screen mode. It’s usually called “Display mode” or “Screen mode” which can usually be found under Video Settings or Graphic Options in most apps or games if there is any.
Some apps or games don’t allow full-screen mode at all, in which case, there is no way you can change it to full-screen mode.