
Linux Mint has always been known for its simple interface and ease of use. One of its many benefits is its ability to share files and folders across a network, which can be helpful for businesses or individuals who need to collaborate on projects or transfer data between computers. These files can be shared through various methods, including Samba, NFS, and FTP. This article will focus on Samba, a popular and widely used file-sharing tool on Linux systems.
Let us walk you through setting up and configuring file sharing. All essential steps for enabling file-sharing options, configuring network settings, and setting up user permissions and access controls will be covered. There are also tips for going around common issues during this process. By the end, you will have a comprehensive understanding of sharing files and folders on a Linux Mint network using Samba and will be equipped with the knowledge and skills to share data seamlessly. Sharing files between Linux and other operating systems is another point of concern for many users. Are you looking to do so? Go through this comprehensive guide on how to share files between Android and Linux wirelessly.
Sharing files and folders on a Linux Mint network
Sharing files on a Mint network can benefit individuals and businesses alike. Sharing files and folders allows you to collaborate more efficiently, streamline workflows, and access data from multiple computers or devices. For businesses, file sharing on a Linux Mint network can be particularly useful for project teams. This allows team members to collaborate in real-time, make changes to documents or files, and access the most up-to-date versions of files without transferring data between devices or sending them via email manually.
Sharing files on a Linux Mint network
Individuals can also benefit from these valuable features. For example, you may want to share music, videos, or documents if you have multiple computers at home. With this quick setup, you can easily access all files from any of your devices without copying them separately. Moreover, sharing files on a Mint network is much more secure than sending them through email or transferring them via USB drives. By setting up user permissions and access controls, you can ensure that only authorized users can access shared material, reducing the risk of breaches or unauthorized access.
Setting up file sharing
Setting up file sharing on a Linux Mint network involves a few basic steps. These include enabling file-sharing options and configuring network settings. This section will walk you through these processes in a step-by-step guide. Installing software on Linux Mint can be a challenge for new users. However, Snap packages offer an easier way to install and update applications. Learn all about them in this detailed article.
Enabling file-sharing options
Step 1: The first step to set up file sharing on a Linux Mint network is to enable file-sharing options. Open the Cinnamon menu by clicking on the Linux Mint logo in the bottom left corner of your screen.
Opening the Cinnamon menu
Step 2: Navigate to “Preferences” in the “System settings.”
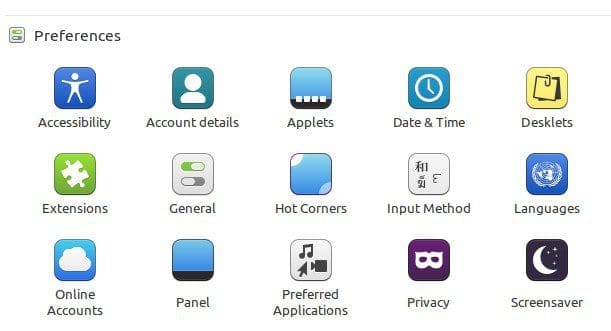
Preferences section in system settings
Step 3: Go to “Sharing options,” and in the Sharing window, toggle the “Share this folder” button to the “On” position.
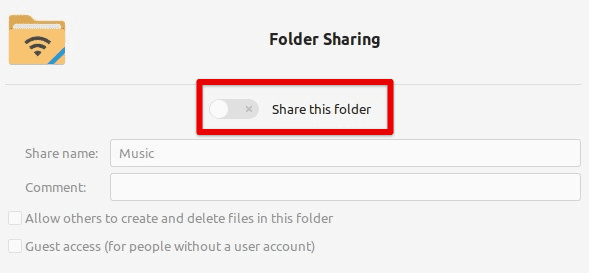
Toggling the share this folder button
Configuring network settings
Step 1: Once you have enabled file-sharing options, you must also configure the network settings. Open the Cinnamon menu by clicking on the Linux Mint logo in the bottom left corner of your screen.
Step 2: Navigate to “Network” in the “System settings.”

Opening the Network settings
Step 3: Make sure that the connection you want to use for file sharing (e.g., Ethernet or Wi-Fi) has been set up in the network settings window.
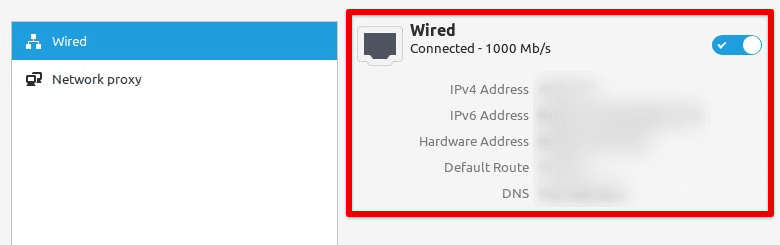
Verifying the network connection
Connecting shared folders
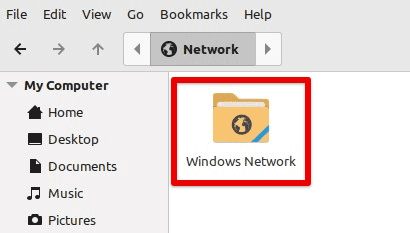
Step 1: After enabling file sharing and configuring the network settings, you can connect shared folders on the network. Open the file manager by clicking on your desktop’s folder icon or the Cinnamon menu.
Opening the file manager
Step 2: Click “Network” in the left-hand sidebar of the file manager.
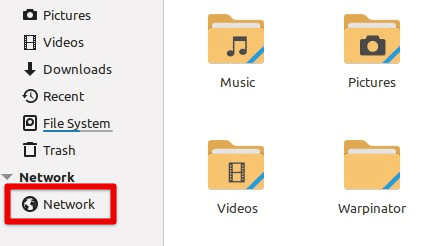
Opening the network from the file manager sidebar
Step 3: Find the computer with the shared folder you want to access and double-click on it.
Finding a shared folder
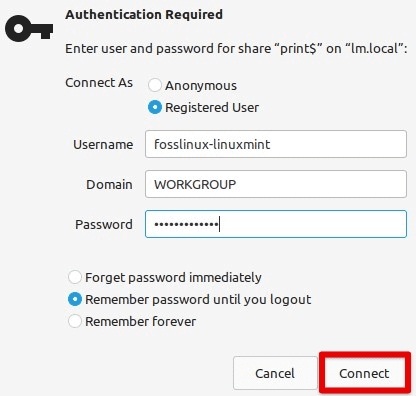
Step 4: Enter your username and password (if required) and click “Create Share.”

Creating a shared connection with the connected folder
Sharing files and folders using Samba
Samba is a standard tool for file sharing on Linux systems, and it is also widely used for sharing files and folders on networks. This section will walk you through setting up and using Samba to share files and folders on a Linux Mint network.
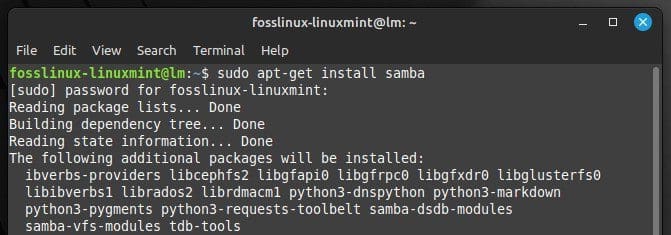
Step 1: The first step is to install Samba on your system. To do this, open a terminal window and enter the following command. Doing so installs Samba on your device.
sudo apt-get install samba
Installing Samba on your system
Step 2: The next step is to create a shared folder you want to share with other users on the network. Create a new folder in your system’s home directory or anywhere else.
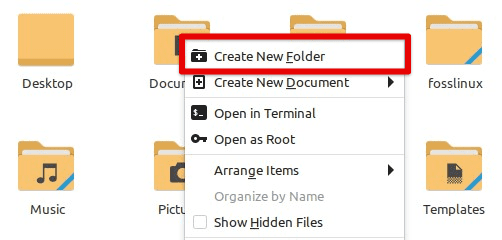
Creating a new folder to be shared
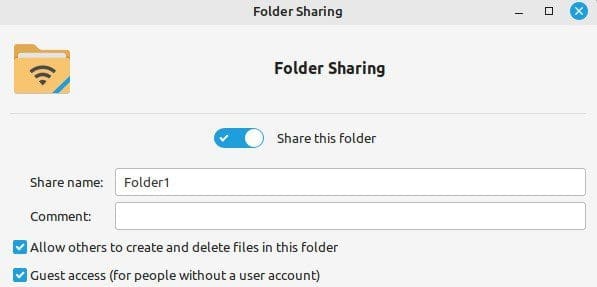
Step 3: Right-click on the folder and select “Sharing Options.” Toggle the “Share this folder” option to “On.” Next, set the “Guest access” option to “Allow access to everyone” and set the “File sharing” option to “SMB.”
Setting up sharing options for the folder
Step 4: Once you have created a shared folder, you must configure Samba to allow other users on your network to access it. Open the Samba configuration file by typing the following command in a terminal window.
sudo nano /etc/samba/smb.conf
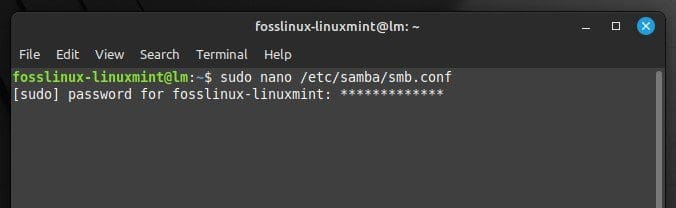
Opening the Samba configuration file
Step 5: Scroll down to the end of the file and add the following lines:
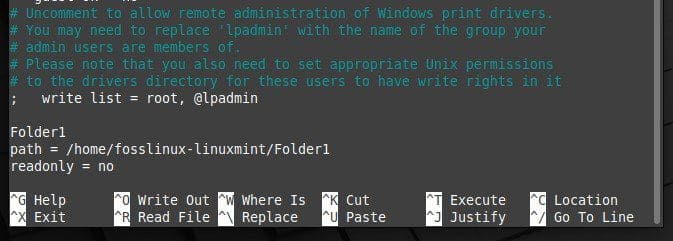
Editing the Samba configuration file
Replace “Folder1” with the name of your shared folder and the path with the actual path to that folder.
Step 6: After configuring Samba, you must restart it for the changes to take effect. To restart, enter and run the following command in a terminal window.
sudo service smbd restart
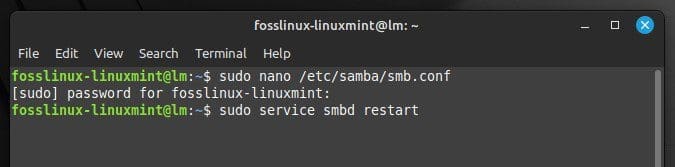
Restarting Samba
Step 7: Open the file manager and navigate to “Network.” Find the computer that has the shared folder and double-click on it.
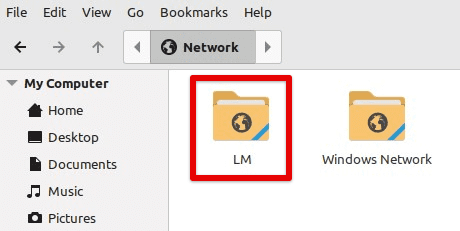
Opening the network with a shared folder
Step 8: Enter your username and password (if required) and click “Connect.” You can now navigate to that folder and send its contents throughout the network.
Connecting with the shared folder across the network
Configuring file permissions and access
When sharing files and folders on a Linux Mint network, it is essential to configure file permissions and access controls to ensure that only authorized users can access shared files. This section includes configuring these permissions and access controls on a Mint network.
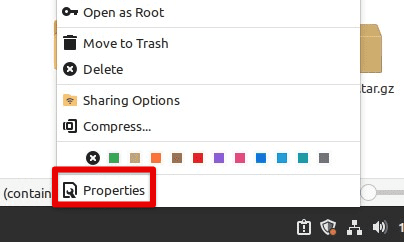
Step 1: The first step is to set file permissions for the shared folder. Right-click on the shared folder and select “Properties.” Navigate to the “Permissions” tab.
Opening properties of the shared folder
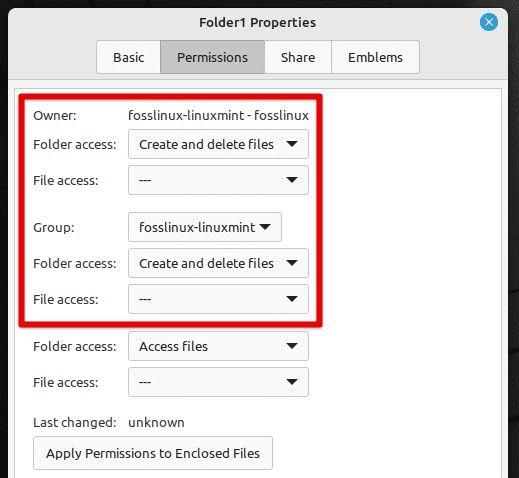
Step 2: Set the “Owner” and “Group” permissions to your username and group, respectively. Set the “Others” permissions to “None.”
Setting the owner and group permissions
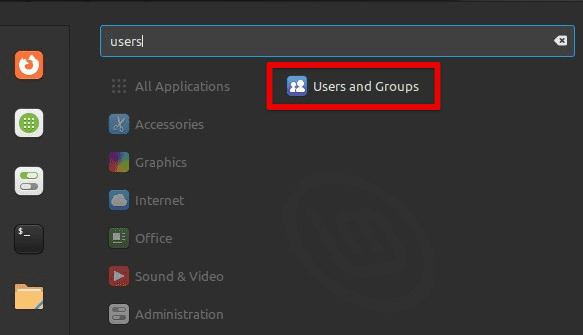
Step 3: The next step is to create user accounts for other users who need access to the shared folder. Open the Users and Groups window by clicking the Cinnamon menu and selecting “Users and Groups.”
Opening the users and group section
Step 4: Create a new user by clicking the “+” button. Enter the user’s name and password, and click “Add.” Repeat this process for each user who needs access to the shared folder.
Adding a user to the network
Step 5: After creating user accounts, you must grant them access to the shared folder. Right-click on the shared folder and select “Sharing Options.” Navigate to the “Permissions” tab. Add a new user to share that folder with.
Allowing folder access to the created user
Step 6: Select the user you want to grant access to and set their access level to “Read” or “Write.” Repeat this process for each user who needs access to the shared folder.
Step 7: After configuring file permissions and access controls, you must restart Samba for the changes to take effect.
Conclusion
Sharing files and folders on a Linux Mint network is a powerful way to collaborate and exchange information among users. Linux Mint users can share files and folders on a local network by enabling file-sharing options, configuring network settings, and using tools like Samba. We have covered the basic steps for setting up file sharing and configuring permissions and access controls to ensure that only authorized users can get access.
File sharing on a Linux Mint network is a valuable capability for businesses, organizations, and individuals who need to collaborate and exchange information regularly. With the right tools and settings, it can be a simple and effective way to enhance productivity and communication within a network. OpenVPN is a free VPN service for secure remote access to your server/machine. Here is how you can set it up on Linux Mint.
Настроить локальную сеть между Linux и Windows через роутер по Wi-Fi оказалось не сложной задачей. Возможно, настройки по умолчанию были выстроены как надо. Честно сказать, я не специалист по настройке локальной сети и данная статья не содержит каких-то углублённых настроек и сложной конфигурации сети. Всё просто: обмен данных идёт через роутер, доверяем сети и позволяем Windows и Linux менять содержимое папки.
Покажу как я настраивал обмен данными по локальной сети через расшаренную папку. Для взаимодействия Linux с другими компьютерами нужно установить samba:
sudo apt-get install samba
Создаём папку с необходимым именем (напр., shared_folder) в своей домашней папке и открываем доступ (опубликовываем) через контекстное меню, другими словами нужно щёлкнуть правой кнопкой по папке и выбрать «Опубликовать…» (у кого-то пункт может называться «открыть доступ»).
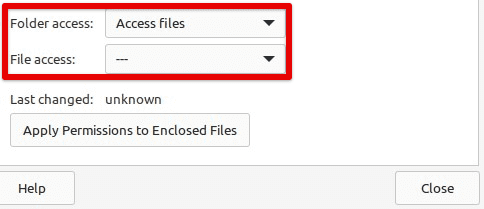
Вводим пароль администратора и в появившемся окошке выставляем следующие параметры:
Затем заходим в свойства папки:
Везде выставляем максимальные права на изменение содержимого папки:
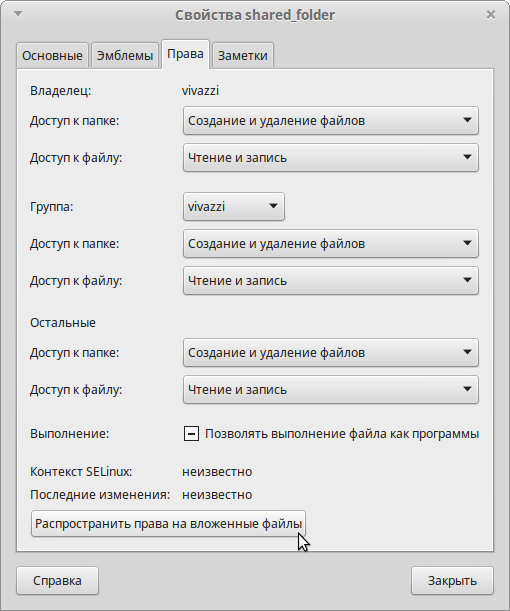
Щелкаем распространить права на вложенные файлы и нажимаем «Закрыть».
Теперь должно работать расшаривание в обе стороны: можно добавлять и изменять содержимое папки как в Linux, так и в Windows.
Чтобы из Windows открыть расшаренную папку нужно в проводнике найти пункт «Сеть». В этой папке должен быть виден другой компьютер Linux:
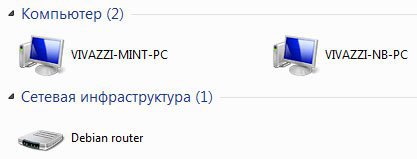
Виден компьютер VIVAZZI-MINT-PC и папочку shared_folder. В ней можно вставлять и доставать файлы.
Вот и всё. Если что-то пошло не так, то искать в гугле, потому как, ещё раз повторюсь, с локальными сетями я имею дело крайне редко.
П. С. Прошу прощения за качество некоторых изображений — в Linux Mint почему-то не могу сделать скриншот, когда открыто контекстное меню.
Оцените статью
После нажатия кнопки «Отправить» ваше сообщение будет доставлено мне на почту.
Артём Мальцев
Веб-разработчик, владеющий знаниями языка программирования Python, фреймворка Django, системы управления содержимым сайта Django CMS, платформы для создания интернет-магазина Django Shop и многих различных приложений, использующих эти технологии.
Права на использование материала, расположенного на этой странице https://vivazzi.pro/ru/it/common-folder-windows-linux/:
Разрешается копировать материал с указанием её автора и ссылки на оригинал без использования параметра rel="nofollow" в теге <a>. Использование:
Автор статьи: Артём Мальцев
Ссылка на статью: <a href="https://vivazzi.pro/ru/it/common-folder-windows-linux/">https://vivazzi.pro/ru/it/common-folder-windows-linux/</a>
Больше: Правила использования сайта
Представляю вашему вниманию книгу, написанную моим близким другом Максимом Макуриным: Секреты эффективного управления ассортиментом.
Книга предназначается для широкого круга читателей и, по мнению автора, будет полезна специалистам отдела закупок и логистики, категорийным и финансовым менеджерам, менеджерам по продажам, аналитикам, руководителям и директорам, в компетенции которых принятие решений по управлению ассортиментом.
Let’s learn commands and steps – how to share files and folders using Samba by installing it on Linux Mint which is not there by default.
Install and Configure Samba Server on Linux Mint 201. Run system update2. Install Samba on Linux Mint3. Allow samba in Linux Mint Firewall4. Add your user to the Samba group5. Share some Linux Mint folder6. Access the shared folder on Windows or LinuxExtra tip- Linux Mint SambaShare User
What is a Samba server?
Samba is a popular, open-source networking software that computers with a Unix or Linux – operating system allow the sharing of network resources from Windows -networks, such as files and printers. However, it is not limited to Windows only, we can install and use on Unix / Linux- based servers pr Desktop to share resources over the network. The common protocols Server Message Block (SMB) and Common Internet File System (CIFS, an open version of SMB) are the basis on which Samba is based. The name ” Samba ” is just a name given to represent “SMB”.
If you are using Linux Mint and want to share some folder, then right-click on it and select properties. And then the Share Tab. However, you will not able to enable this option because samba is not there yet. To confirm, you can see a message given at the bottom “Samba needs to be installed, appropriate firewall rules need to be added and your user account needs to join the ‘samba share group“.
To solve this let’s follow the given steps in this article…

Install and Configure Samba Server on Linux Mint 20
1. Run system update
Well, it is not a necessary step, however, run the system update command to rebuild the repo cache and make sure all the system installed packages are up to date.
sudo apt update
2. Install Samba on Linux Mint
Next, in your command terminal use the APT package manager to install Samba on your Linux Mint. The packages to set it up are already there in the system repository, thus we don’t need to add anything extra.
sudo apt install samba
Check its service is active and running:
sudo systemctl status smbd

If it is not active then run:
sudo systemctl --enable now smbd
3. Allow samba in Linux Mint Firewall
To connect and access the shared files over SMB protocol, we have to first whitelist and allow its service to get accessed from the outside of the computer. Thus, allow it in the firewall
sudo ufw allow samba
4. Add your user to the Samba group
Let’s add the current System user to the SambaShare group, so it can access all files and folders shared under it.
sudo usermod -aG sambashare $USER
set the password for share: This will be different from your system password.
sudo smbpasswd -a $USER
Note: $USER means your current user, if you want to set some other user then change $USER with the particular user name. Also, the file or folder you want to share must be accessible to that particular user.
Alternatively, if you want to add some other users to the SAMBA group use:
sudo usermod -aG sambashare your-user
To set password:
sudo smbpasswd -a your-user
Lets’ say I want to share the Pictures folder or any other on my Linux Mint that is owned by my current user. So, for that simply go to that folder, right-click on it and select the Share tab.

6. Access the shared folder on Windows or Linux
Now, we can mount the Linux Mint shared folder on other Windows or Linux systems available in the same network or domain.
On Windows 10/8/7
On Linux systems such as Ubuntu, CentOS, and others…
The place to connect the samba server can be different from Linux to Linux, depending upon the desktop environment.
Here we are showing an example for Ubuntu and CentOS using GNOME.
- Open File Manager
- Select Other Locations from the right side given panel.
- At the bottom, in the “Connect Server” box type-
smb://server-ip/shared-folder-path

If you want to create a new user to access the folder you want to share except it cannot access anything else then follow the below steps:
Create users:
sudo useradd new-user
Add user to Sambashare group
sudo usermode -aG new-user sambshare
Change the folder rights of a folder that you want to share to read and write for all users. So, that our new user can access that.
sudo chmod 777 folder-path
Example- Pictures
sudo chmod 777 Pictures
Now, you can access the shared folder using the new user and its password.
Чтоб разобраться с настройками был переведен файл smb.conf
|
smb1.conf |
smb3.conf |
|
# Sample configuration file for the Samba suite for Debian GNU/Linux. |
# Пример файла конфигурации для пакета Samba для Debian GNU/Linux. # # # Это основной файл конфигурации Samba. Вам следует прочитать страницу руководства # smb.conf(5), чтобы понять перечисленные здесь параметры #. Samba имеет огромное количество настраиваемых параметров, большинство из которых # не показаны в этом примере # # Некоторые параметры, которые часто стоит настроить, были включены в качестве # закомментированных примеров в этом файле. # — Когда такие параметры комментируются с помощью «;», предлагаемая настройка # отличается от поведения Samba по умолчанию # — При комментарии с помощью «#» предлагаемая настройка используется по умолчанию # поведение Samba, но этот параметр считается важным # достаточно, чтобы быть упомянутым здесь # # ПРИМЕЧАНИЕ: Всякий раз, когда вы изменяете этот файл, вам следует запускать команду # «testparm», чтобы убедиться, что вы не допустили никаких базовых синтаксических # ошибок. |
|
#======================= Global Settings ======================= [global] ## Browsing/Identification ### # Change this to the workgroup/NT-domain name your Samba server will part of # server string is the equivalent of the NT Description field #### Networking #### # The specific set of interfaces / networks to bind to # Only bind to the named interfaces and/or networks; you must use the |
#======================= Глобальные настройки ======================= [глобальные] ## Просмотр/идентификация ### # Измените это на workgroup/NT-доменное имя, которое ваш сервер Samba будет частью workgroup = WORKGROUP # строка сервера эквивалентна полю описания NT строка сервера = %h сервер (Samba, Ubuntu) #### Сеть #### # Конкретный набор интерфейсов/сетей для привязки # Это может быть либо имя интерфейса, либо IP-адрес/маска сети; # Обычно предпочтительны имена интерфейсов ; interfaces = 127.0.0.0/8 eth0 # Привязываться только к именованным интерфейсам и/или сетям; для этого необходимо использовать параметр # «интерфейсы», указанный выше. # Рекомендуется включить эту функцию, если ваш компьютер Samba # не защищен брандмауэром или сам является брандмауэром. Однако это # параметр не может корректно обрабатывать динамические или не широковещательные интерфейсы. ; только привязка интерфейсов = да |
|
#### Debugging/Accounting #### # This tells Samba to use a separate log file for each machine # Cap the size of the individual log files (in KiB). # We want Samba to only log to /var/log/samba/log.{smbd,nmbd}. # Do something sensible when Samba crashes: mail the admin a backtrace |
#### Отладка/учет #### # Это указывает Samba использовать отдельный файл журнала для каждого компьютера # который подключается файл журнала = /var/log/samba/log.%m # Ограничивает размер отдельных файлов журнала (в КБ). максимальный размер журнала = 1000 # Мы хотим, чтобы Samba регистрировалась только в /var/log/samba/log.{smbd,nmbd}. # Добавьте syslog@1, если вы хотите, чтобы важные сообщения также отправлялись в системный журнал. ведение журнала = файл # Сделайте что-нибудь разумное, когда Samba выйдет из строя: отправьте администратору электронное письмо с запросом возврата действие паники = /usr/share/samba/panic-action %d |
|
# Server role. Defines in which mode Samba will operate. Possible obey pam restrictions = yes # This boolean parameter controls whether Samba attempts to sync the Unix # For Unix password sync to work on a Debian GNU/Linux system, the following # This boolean controls whether PAM will be used for password changes # This option controls how unsuccessful authentication attempts are mapped
|
####### Аутентификация ####### # Роль сервера. Определяет, в каком режиме будет работать Samba. Возможный # значениями являются «автономный сервер», «сервер-участник», «классический основной # контроллер домена», «классический резервный контроллер домена», «активный # контроллер домена каталога». # # Большинство людей захотят «автономный сервер» или «сервер-участник». # Для запуска от имени «контроллера домена active directory» сначала потребуется # запустить «samba-tool domain provision», чтобы очистить базы данных и создать # новый домен. #роль сервера = автономный сервер #соблюдать ограничения pam = да
server role = standalone server # Этот логический параметр определяет, пытается ли Samba синхронизировать Unix # пароль с паролем SMB при изменении зашифрованного пароля SMB в # passdb. #синхронизация паролей unix = да
unix password sync = yes # Чтобы синхронизация паролей Unix работала в системе Debian GNU/Linux, выполните следующие действия # параметры должны быть установлены (спасибо Яну Кахану <<kahan@informatik.tu-muenchen.de> за # отправку правильного сценария чата для программы passwd в Debian Sarge). программа passwd = /usr/bin/passwd %u чат passwd = *Введите\snew\s*\spassword:* %n\n * Повторно введите\snew\s*\spassword:* %n\n *пароль\обновлен\успешно* . # Это логическое значение определяет, будет ли PAM использоваться для смены пароля # по запросу SMB-клиента вместо программы, указанной в # «программа passwd». Значение по умолчанию «нет». смена пароля pam = да # Этот параметр определяет, как сопоставляются неудачные попытки аутентификации # с анонимными подключениями сопоставление с гостевым = плохой пользователь |
|
########## Domains ########### # # It specifies the location of the user’s # The following setting only takes effect if ‘domain logons’ is set # The following setting only takes effect if ‘domain logons’ is set # This allows Unix users to be created on the domain controller via the SAMR # This allows machine accounts to be created on the domain controller via the # This allows Unix groups to be created on the domain controller via the SAMR
|
########## Домены ########### # # Следующие настройки вступают в силу только в том случае, если задано значение «роль сервера = классический # основной контроллер домена», «роль сервера = классический резервный контроллер домена» # или «вход в домен» # # Указывает местоположение учетной записи пользователя. # каталог профилей с точки зрения клиента) Следующий # требуется настроить общий доступ [profiles] на сервере samba (см. # ниже) ; путь для входа = \\%N\profiles\%U # Другим распространенным выбором является сохранение профиля в домашнем каталоге пользователя # (это по умолчанию в Samba) # путь для входа в систему = \\%N\%U\profile # Следующий параметр вступает в силу только в том случае, если задан параметр «вход в домен» # Он указывает местоположение домашнего каталога пользователя (с точки зрения клиента #) ; диск для входа в систему = H: # logon home = \\%N\%U # Следующий параметр вступает в силу только в том случае, если установлен параметр «вход в домен» # Он указывает сценарий, который будет запускаться во время входа в систему. Сценарий должен быть сохранен # в общем доступе [netlogon] # ПРИМЕЧАНИЕ: Должно храниться в соответствии с соглашением о формате файла ‘DOS’ ; сценарий входа в систему = logon.cmd # Это позволяет создавать пользователей Unix на контроллере домена через SAMR # Канал RPC. Команда примера создает учетную запись пользователя с отключенным Unix # пароль; пожалуйста, адаптируйте к вашим потребностям ; добавьте пользовательский скрипт = /usr/sbin/adduser —quiet —disabled-password —gecos «» %u # Это позволяет создавать учетные записи компьютеров на контроллере домена через канал RPC # SAMR. # Далее предполагается, что в системе существует группа «машины» ; добавить машинный скрипт = /usr/sbin/useradd -g машины -c «учетная запись компьютера%u» -d /var/lib/samba -s /bin/false %u # Это позволяет создавать группы Unix на контроллере домена через SAMR # RPC-канал. ; скрипт добавления группы = /usr/sbin/addgroup —force-badname %g |
|
############ Misc ############ # Using the following line enables you to customise your configuration # Some defaults for winbind (make sure you’re not using the ranges # Setup usershare options to enable non-root users to share folders # Maximum number of usershare. 0 means that usershare is disabled. # Allow users who’ve been granted usershare privileges to create
|
############ Разное ############ # Использование следующей строки позволяет настроить конфигурацию # для каждой машины. %m заменяется именем netbios # подключаемого компьютера ; include = /home/samba/etc/smb.conf.%m # Некоторые значения по умолчанию для winbind (убедитесь, что вы не используете диапазоны # для чего-то другого.) ; idmap config * : серверная часть = tdb ; idmap config * : диапазон = 3000-7999 ; idmap config YOURDOMAINHERE : серверная часть = tdb ; idmap config YOURDOMAINHERE : диапазон = 100000-999999 ; оболочка шаблона = /bin/bash # Настройте параметры usershare, чтобы разрешить пользователям, не являющимся root, предоставлять общий доступ к папкам # с помощью команды net usershare. # Максимальное количество usershare. 0 означает, что usershare отключен. # максимальное количество общих ресурсов usershare = 100 # Разрешить пользователям, которым были предоставлены привилегии usershare, создавать # общедоступные ресурсы, а не только те, которые прошли проверку подлинности usershare разрешать гостям = да |
|
#======================= Share Definitions ======================= # Un-comment the following (and tweak the other settings below to suit) # By default, the home directories are exported read-only. Change the # File creation mask is set to 0700 for security reasons. If you want to # Directory creation mask is set to 0700 for security reasons. If you want to # By default, \\server\username shares can be connected to by anyone # Un-comment the following and create the netlogon directory for Domain Logons # Un-comment the following and create the profiles directory to store # Windows clients look for this share name as a source of downloadable |
#======================= Делиться определениями ======================= # Откомментируйте следующее (и измените другие параметры, приведенные ниже, в соответствии с ними) #, чтобы включить общий доступ к домашнему каталогу по умолчанию. Это позволит использовать общий доступ к домашнему каталогу каждого # пользователя как \\server\username ;[дома] ; комментарий = Домашние каталоги ; доступно для просмотра = нет # По умолчанию домашние каталоги экспортируются только для чтения. Измените параметр # next на «нет», если вы хотите иметь возможность записи в них. ; только для чтения = да # Маска создания файла установлена на 0700 по соображениям безопасности. Если вы хотите # создайте файлы с правами доступа group=rw, установите следующий параметр равным 0775. ; create mask = 0700 # Маска создания каталога установлена на 0700 по соображениям безопасности. Если вы хотите # создайте каталоги. с правами доступа group=rw установите следующий параметр равным 0775. ; маска каталога = 0700 # По умолчанию к общим ресурсам \\server\username может подключаться любой желающий # имеющий доступ к серверу samba. # Откомментируйте следующий параметр, чтобы убедиться, что только «username» # может подключаться к \\серверу\username # Это может потребовать настройки при использовании внешних схем аутентификации ; допустимые пользователи = %S # Откомментируйте следующее и создайте каталог netlogon для входа в домен # (вам также необходимо настроить Samba для работы в качестве контроллера домена.) ;[netlogon] ; комментарий = Служба сетевого входа ; путь = /home/samba/netlogon ; гостевой ок = да ; только для чтения = да # Откомментируйте следующее и создайте каталог профилей для хранения # профили пользователей (смотрите параметр «путь для входа» выше) # (вам также необходимо настроить Samba для работы в качестве контроллера домена.) # Путь, указанный ниже, должен быть доступен для записи всеми пользователями, чтобы их # каталог профилей мог быть создан при первом входе в систему ;[профили] ; комментарий = Профили пользователей ; путь = /главная/домашняя сеть ; гостевой ок = да ; доступен для просмотра = да ; маска создания = 0600 ; маска каталога = 0700 только для чтения = нет # [принтеры] комментарий = Все принтеры доступно для просмотра = нет путь = /var/spool/samba доступно для печати = да гостевой ок = нет только для чтения = да маска создания = 0700 # Клиенты Windows ищут это имя общего ресурса как источник загружаемых данных # драйверы принтера [print$] комментарий = Драйверы принтера путь = /var/lib/samba/принтеры доступно для просмотра = да доступно только для чтения = да гостевой ок = нет # Раскомментируйте, чтобы разрешить удаленное администрирование драйверов печати Windows. # Возможно, вам потребуется заменить «lpadmin» на название группы, в которую входят ваши # пользователи с правами администратора. # Обратите внимание, что вам также необходимо установить соответствующие разрешения Unix # в каталог драйверов, чтобы у этих пользователей были права на запись в него ; список записей = root, @lpadmin |
Как правильно задавать вопросы
Правильно сформулированный вопрос и его грамотное оформление способствует высокой вероятности получения достаточно содержательного и по существу ответа. Общая рекомендация по составлению тем: 1. Для начала воспользуйтесь поиском форума. 2. Укажите версию ОС вместе с разрядностью. Пример: LM 19.3 x64, LM Sarah x32 3. DE. Если вопрос касается двух, то через запятую. (xfce, KDE, cinnamon, mate) 4. Какое железо. (достаточно вывод inxi -Fxz в спойлере (как пользоваться спойлером смотрим здесь)) или же дать ссылку на hw-probe 5. Суть. Желательно с выводом консоли, логами. 6. Скрин. Просьба указывать 2, 3 и 4 независимо от того, имеет ли это отношение к вопросу или нет. Так же не забываем об общих правилах Как пример вот
-
SaToR
- Сообщения: 15
- Зарегистрирован: 27 дек 2018, 13:25
- Благодарил (а): 1 раз
- Контактная информация:
Расшаривание папки в сети Windows на Mint
30 июл 2019, 19:15
Здравствуйте. Опять вопросик возник, как расшарить папку для доступа из виндовс, на mint? Делал вот по этой тривиальной инструкции —
http://alligator.work/%D1%80%D0%B0%D1%8 … untu-mint/
, установил самбу, отредактировал конфиг, но после перезапуска доступа к папке так и не появилось. Попытался из файлового менеджера свойствами на этой папке, с установкой двух галок — разрешить пользователям удалять файлы в этой папке и гостевой доступ, после чего спрашивает сделать ли автоматические права на папку, соглашаюсь, но ругается что не может. Хотел расшарить по сети папку home/ftpuser, чтоб к ней был доступ и по фтп и по сети. Что я не так делаю? Спасибо
-
Dja
- Сообщения: 7069
- Зарегистрирован: 27 авг 2016, 20:03
- Решено: 30
- Откуда: Voskresensk
- Благодарил (а): 1368 раз
- Поблагодарили: 734 раза
- Контактная информация:
Расшаривание папки в сети Windows на Mint
#2
31 июл 2019, 11:32
SaToR, посмотрите сюда
Шарить полностью хомяк я не стал бы и тем более 777.
Если хотите чтоб еще принтера можно было шарить, то добавить
[printers]
   comment = All Printers
   browseable = no
   path = /var/spool/samba
   printable = yes
   guest ok = no
   read only = yes
   create mask = 0700

# Windows clients look for this share name as a source of downloadable
# printer drivers
[print$]
   comment = Printer Drivers
   path = /var/lib/samba/printers
   browseable = yes
   read only = yes
   guest ok = no
# Uncomment to allow remote administration of Windows print drivers.
# You may need to replace 'lpadmin' with the name of the group your
# admin users are members of.
# Please note that you also need to set appropriate Unix permissions
# to the drivers directory for these users to have write rights in it
;   write list = root, @lpadmin
-
madesta
- Сообщения: 2390
- Зарегистрирован: 11 июн 2017, 21:47
- Решено: 31
- Откуда: BY
- Благодарил (а): 83 раза
- Поблагодарили: 501 раз
- Контактная информация:
Расшаривание папки в сети Windows на Mint
#3
31 июл 2019, 15:27
SaToR писал(а): ↑
30 июл 2019, 19:15
расшарить папку для доступа из виндовс
Права на папки, на файлы и на вложенные в папке данные. Тут надо подходить очень вдумчиво и осторожно. Если под собой любимым, то не вопрос, но если под каким анонимом, то получится путаница во владельцах объектов в папке. Так, например, запишет кто под анонимом данные, а потом пользователь Mint под своей учёткой может их и не удалить, так как права для «Остальные» будут «Только чтение». Придётся лезть на свою же локальную папку через сетевое окружение под анонимом и удалять. Или настраивать членство в группах и т.д. и т.п.
-
Dja
- Сообщения: 7069
- Зарегистрирован: 27 авг 2016, 20:03
- Решено: 30
- Откуда: Voskresensk
- Благодарил (а): 1368 раз
- Поблагодарили: 734 раза
- Контактная информация:
Расшаривание папки в сети Windows на Mint
#4
31 июл 2019, 15:33
madesta, не обязательно. Удалить можно с sudo (с рутовыми правами).
Но я считаю, что нужно закрыть пользователя в каталог. Ведь в самом хомяке своя структура каталогов и делать там помойку от всяких анонимусов…думаю не стоит.
-
madesta
- Сообщения: 2390
- Зарегистрирован: 11 июн 2017, 21:47
- Решено: 31
- Откуда: BY
- Благодарил (а): 83 раза
- Поблагодарили: 501 раз
- Контактная информация:
Расшаривание папки в сети Windows на Mint
#5
31 июл 2019, 15:42
Dja писал(а): ↑
31 июл 2019, 15:33
не обязательно. Удалить можно с sudo (с рутовыми правами)
Ничего не могу возразить, кроме как согласиться
-
2zer0
- Сообщения: 175
- Зарегистрирован: 23 май 2019, 23:25
- Благодарил (а): 24 раза
- Поблагодарили: 7 раз
- Контактная информация:
Расшаривание папки в сети Windows на Mint
#6
31 июл 2019, 16:32
SaToR писал(а): ↑
30 июл 2019, 19:15
Что я не так делаю? Спасибо
[global]
workgroup = WORKGROUP
idmap config * : backend = tdb
max log size = 1000
dns proxy = No
unix password sync = Yes
usershare allow guests = Yes
passwd program = /usr/bin/passwd %u
log file = /var/log/samba/log.%m
panic action = /usr/share/samba/panic-action %d
syslog = 0
passwd chat = *Enter\snew\s*\spassword:* %n\n *Retype\snew\s*\spassword:* %n\n *password\supdated\ssuccessfully* .
map to guest = Bad User
server role = standalone server
os level = 20
usershare owner only = No
server string = %h server (Samba, Ubuntu)
obey pam restrictions = Yes
pam password change = Yes
# Global parameters
[printers]
comment = All Printers
path = /var/spool/samba
create mask = 0700
printable = Yes
browseable = No
[print$]
comment = Printer Drivers
path = /var/lib/samba/printers
+ Mint пользователь должен быть в группах sambamachines , sambashare
Вся остальная ботва права/доступ и тп выставляются при расшаривании папок
-
SaToR
- Сообщения: 15
- Зарегистрирован: 27 дек 2018, 13:25
- Благодарил (а): 1 раз
- Контактная информация:
Расшаривание папки в сети Windows на Mint
#7
09 авг 2019, 11:06
2zer0 писал(а): ↑
31 июл 2019, 16:32
SaToR писал(а): ↑
30 июл 2019, 19:15
Что я не так делаю? Спасибо
[global]
workgroup = WORKGROUP
idmap config * : backend = tdb
max log size = 1000
dns proxy = No
unix password sync = Yes
usershare allow guests = Yes
passwd program = /usr/bin/passwd %u
log file = /var/log/samba/log.%m
panic action = /usr/share/samba/panic-action %d
syslog = 0
passwd chat = *Enter\snew\s*\spassword:* %n\n *Retype\snew\s*\spassword:* %n\n *password\supdated\ssuccessfully* .
map to guest = Bad User
server role = standalone server
os level = 20
usershare owner only = No
server string = %h server (Samba, Ubuntu)
obey pam restrictions = Yes
pam password change = Yes
# Global parameters
[printers]
comment = All Printers
path = /var/spool/samba
create mask = 0700
printable = Yes
browseable = No
[print$]
comment = Printer Drivers
path = /var/lib/samba/printers
+ Mint пользователь должен быть в группах sambamachines , sambashare
Вся остальная ботва права/доступ и тп выставляются при расшаривании папок
Не увидел в этом конфиге путь до расшареной папки? все принтера только
-
SaToR
- Сообщения: 15
- Зарегистрирован: 27 дек 2018, 13:25
- Благодарил (а): 1 раз
- Контактная информация:
Расшаривание папки в сети Windows на Mint
#8
09 авг 2019, 11:24
Dja писал(а): ↑
31 июл 2019, 11:32
SaToR, посмотрите сюда
Шарить полностью хомяк я не стал бы и тем более 777.
Если хотите чтоб еще принтера можно было шарить, то добавить[printers] comment = All Printers browseable = no path = /var/spool/samba printable = yes guest ok = no read only = yes create mask = 0700 # Windows clients look for this share name as a source of downloadable # printer drivers [print$] comment = Printer Drivers path = /var/lib/samba/printers browseable = yes read only = yes guest ok = no # Uncomment to allow remote administration of Windows print drivers. # You may need to replace 'lpadmin' with the name of the group your # admin users are members of. # Please note that you also need to set appropriate Unix permissions # to the drivers directory for these users to have write rights in it ; write list = root, @lpadmin
Вроде все добавил из https://dja.linuxmint.com.ru/wiki/doku.php?id=smb_share , только одну папку со всеми правами, а не две как там, одну с чтением другую без. Но не чего не дало, служба самбы вроде запущена. Но при сканировании этого компа с линуксом по сети, Advanced IP Scaner вижу только расшаренный фтп, и не одной папки.
-
Dja
- Сообщения: 7069
- Зарегистрирован: 27 авг 2016, 20:03
- Решено: 30
- Откуда: Voskresensk
- Благодарил (а): 1368 раз
- Поблагодарили: 734 раза
- Контактная информация:
Расшаривание папки в сети Windows на Mint
#9
09 авг 2019, 13:12
SaToR,
dja@dja-work:~$ smbclient -L 127.0.0.1
Enter WORKGROUP\dja's password:

	Sharename       Type      Comment
	---------       ----      -------
	pub             Disk      This is a folder accessible from everyone
	Distrib         Disk      This is a folder accessible from everyone
	Instructions    Disk      This is a folder accessible from everyone
	incoming        Disk      This is a folder accessible from everyone
	Documents       Disk      Only dja
	Video           Disk      Only dja
	Pictures        Disk      Only dja
	Download        Disk      Only dja
	Music           Disk      Only dja
	TASU            Disk      Only dja
	print$          Disk      Printer Drivers
	IPC$            IPC       IPC Service (dja-work server)
	MF4700-Series   Printer   Canon MF4700 Series
Reconnecting with SMB1 for workgroup listing.

	Server               Comment
	---------            -------

	Workgroup            Master
	---------            -------
	MEDCENTER        DC2008
	WORKGROUP            DJA
dja@dja-work:~$
-
SaToR
- Сообщения: 15
- Зарегистрирован: 27 дек 2018, 13:25
- Благодарил (а): 1 раз
- Контактная информация:
Расшаривание папки в сети Windows на Mint
#10
12 авг 2019, 10:28
Dja писал(а): ↑
09 авг 2019, 13:12
SaToR,
dja@dja-work:~$ smbclient -L 127.0.0.1
Enter WORKGROUP\dja's password:

	Sharename       Type      Comment
	---------       ----      -------
	pub             Disk      This is a folder accessible from everyone
	Distrib         Disk      This is a folder accessible from everyone
	Instructions    Disk      This is a folder accessible from everyone
	incoming        Disk      This is a folder accessible from everyone
	Documents       Disk      Only dja
	Video           Disk      Only dja
	Pictures        Disk      Only dja
	Download        Disk      Only dja
	Music           Disk      Only dja
	TASU            Disk      Only dja
	print$          Disk      Printer Drivers
	IPC$            IPC       IPC Service (dja-work server)
	MF4700-Series   Printer   Canon MF4700 Series
Reconnecting with SMB1 for workgroup listing.

	Server               Comment
	---------            -------

	Workgroup            Master
	---------            -------
	MEDCENTER        DC2008
	WORKGROUP            DJA
dja@dja-work:~$
А если тогда полностью в том конфиге заменить настройки на ваши? или там остальные тоже нужные?
-
Dja
- Сообщения: 7069
- Зарегистрирован: 27 авг 2016, 20:03
- Решено: 30
- Откуда: Voskresensk
- Благодарил (а): 1368 раз
- Поблагодарили: 734 раза
- Контактная информация:
Расшаривание папки в сети Windows на Mint
#11
12 авг 2019, 11:26
SaToR, попробуйте.
Кстати сейчас в секции Global у меня еще присутствует