
Updated on Apr 28, 2025
The hard drive is the most important place to store data in your computer, and it cannot be replaced like other software or hardware. Its lifespan will continue to shorten during constant reading and writing.
So, it’s crucial that you maintain a close eye on hard drive health in Windows 11 and Windows 10 to prevent any unforeseen crashes and the subsequent data loss they would cause. We have attempted to cover the precise methods to check hard drive health in this text. Let’s start straight now.
When Do We Need to Check Hard Drive Health on Windows 11/10
Given that you cannot predict how long your hard disk will last, it is critical to remain alert for any indications of trouble. The following are some signs you should be careful of to check if a disk is healthy and avoid corrupted hard drives:
Physical Hard Drive Failure Symptoms:
- Overheating
- Sharp screeching or clicking sounds
- Slow boot or slow processes
Logical Hard Drive Failure Symptom:
- Blue screen of death appears
- Frequent system crashes
- Files/folders disappearing
- Operating system is unable to boot
- Longer file load times in File Explorer
You can avoid data loss and hassle if you can identify the problem with your HDD before it happens. If you believe your hardware is nearing the end of its useful life, you can also prepare by purchasing a new storage drive.
If you want to know more about repair tools on Windows 11, click the link below:
There are different ways to check for physical and logical hard drive damage. Let’s look at how to check hard drive health physically or logically.
#1. Via EaseUS Partition Master
EaseUS Partition Master is an all-in-one disk partitioning software for all Windows systems. It offers the «Disk Health» feature to check different properties of the hard drive, such as free space, health, temperature, performance, etc.
This tool simplifies the process of Windows built-in tools so that even a computer novice can master computer skills like a technical expert. Check out the steps below to check the health of your disk.
Step 1. Launch EaseUS Partition Master and click the blue arrow to activate the «Disk Health» feature under the «Discovery» section.
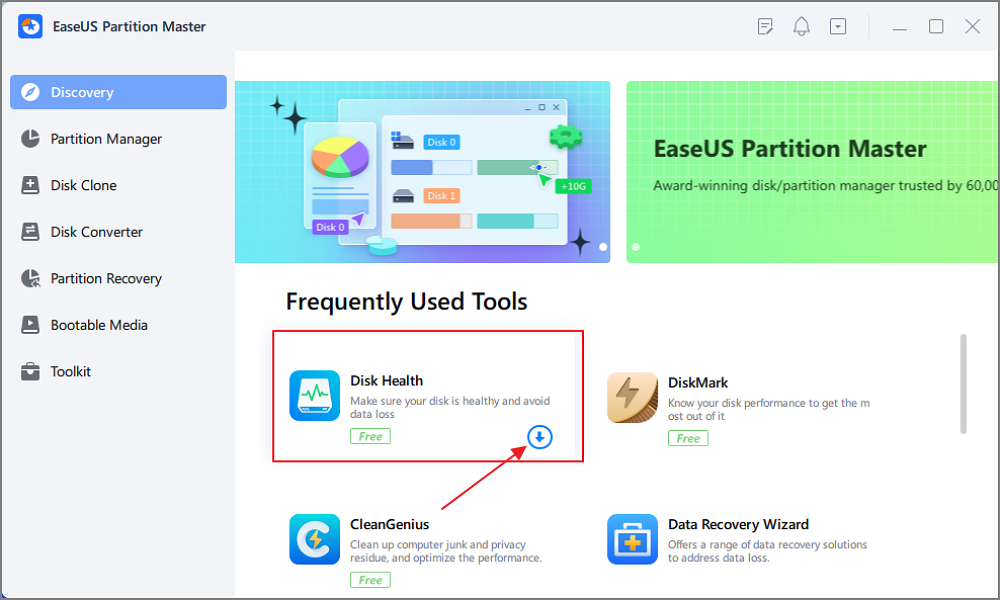
Step 2. Select the target disk and click the «Refresh» button. Then, you can see the health condition of your disk.
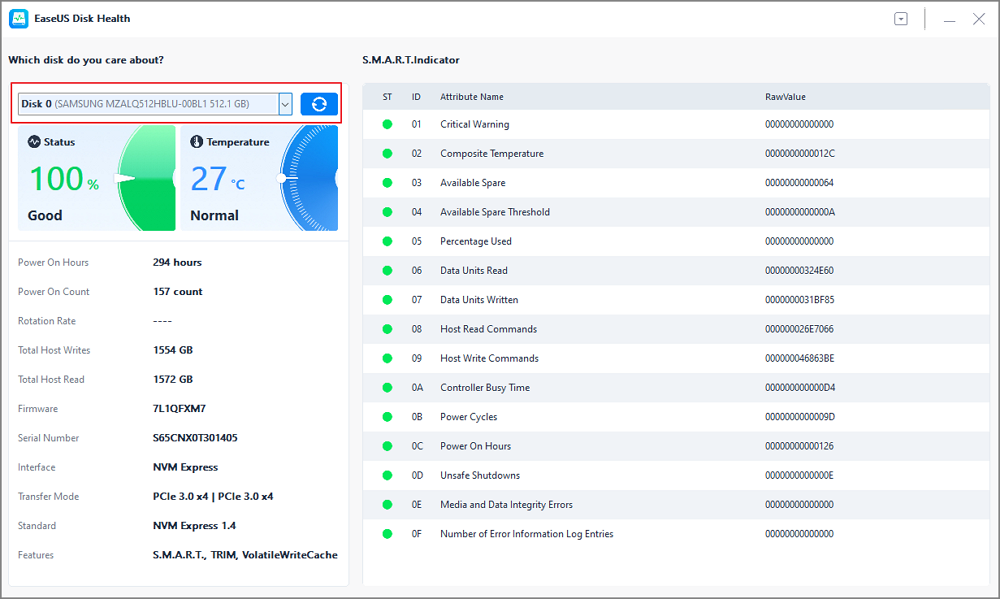
In addition, the tool can perform a disk surface test to check for corrupted file systems or bad sectors and repair them. Feel free to share this professional and easy method to help more of your friends monitoring disk health on their own:
You may also like:
#2. Via CMD
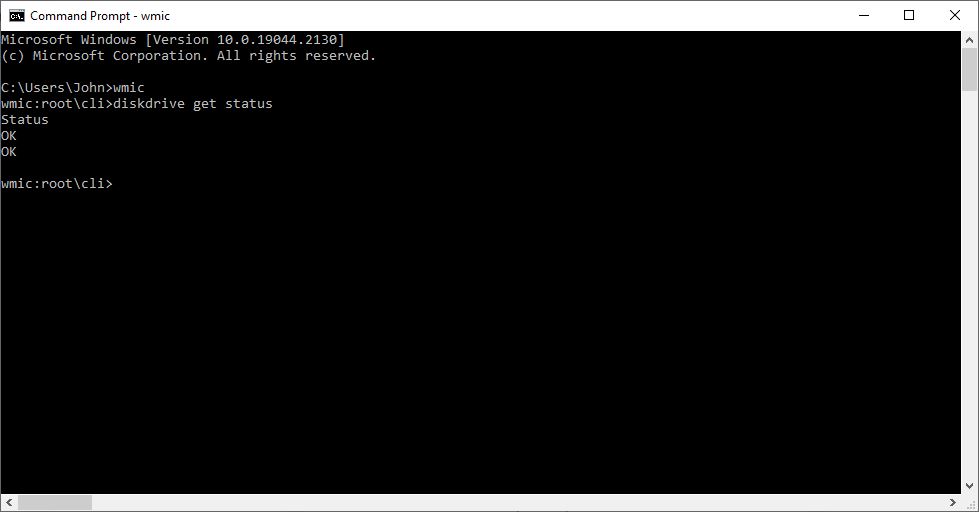
Windows provides command line tools to check hard drive health and provide simple conclusions such as «OK,» «Pred Fail,» etc. Performing a hard disk health check can be done quickly using WMIC (Windows Management Instrumentation).
Follow the steps to check hard drive health via CMD:
- Click Windows + R to open the Run window and type cmd.
- Type «wmic» and press Enter.
- Type «wmic diskdrive get status,» and press Enter to view the disk health status.
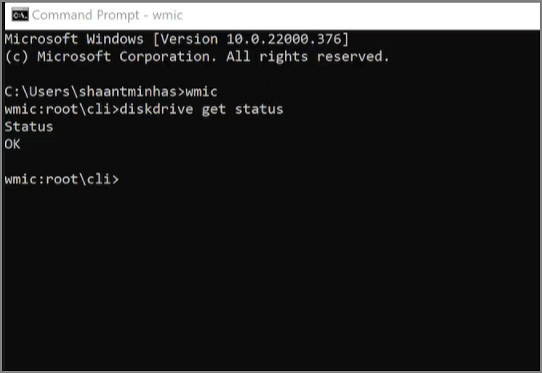
If you receive «OK,» the drive is in good condition. If you receive «bad,» «unknown,» or «caution,» the disk drive is faulty, and you should use EaseUS Partition Master to repair it.
#3. Via CHKDSK
CHKDSK is an abbreviation for check disk. This command is another method provided by Windows to check the operational status of the disk. This tool checks the integrity of the file system and fixes its logical errors.
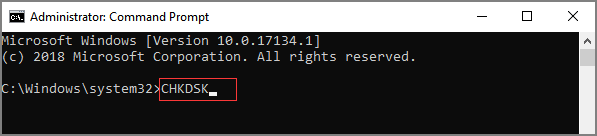
- Open a Run window and type cmd.
- Type «CHKDSK» in the Command Prompt window and Enter. It will run a basic scan.
- If you want to repair errors on your hard drive, use the chkdsk/f/r command.
To get more details about hard drives, click the link below to learn.
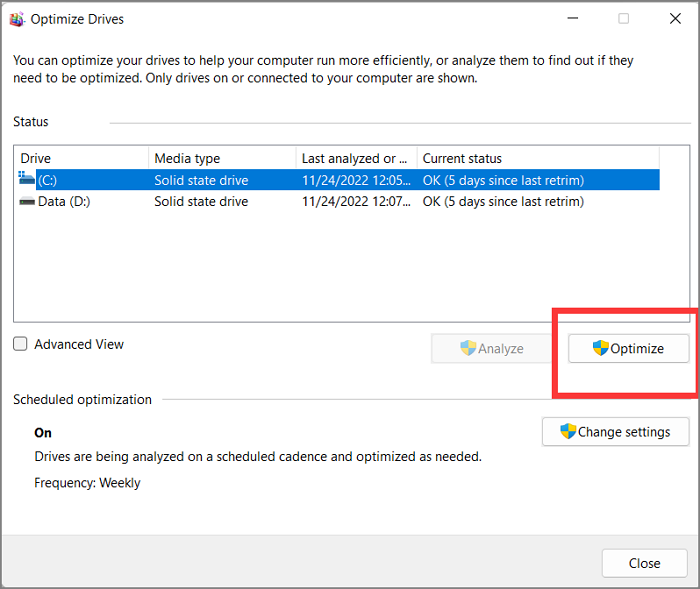
#4. Via Defrag and Optimize
The disk defragmenter provided by Windows can detect the fragmentation level on your hard disk and help reorganize fragmented data. Using this tool will enhance disk health and improve overall computer performance. To complete defragmentation, follow these steps:
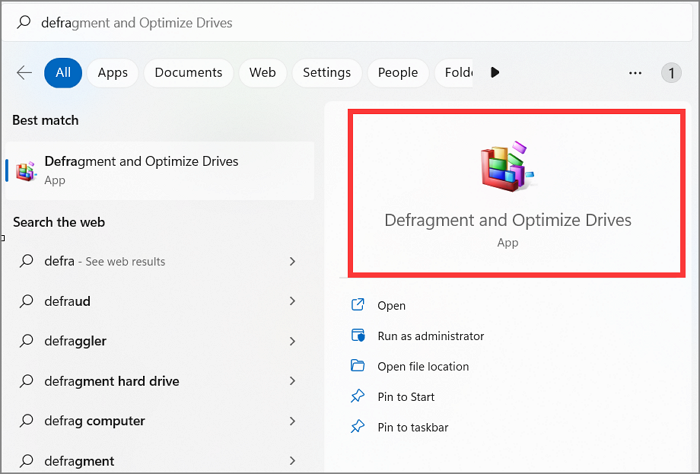
Step 1. Click on the search box, type «defrag,» and select «Defragment and Optimize Driver.»
Step 2. Select your hard drive and click «Optimize» to start the defragmentation.
- Notice:
- If you are using an SSD, defragmentation is not necessary. Otherwise, it may cause wear and tear on the hardware and shorten its life.
Video Tutorial of Checking Hard Drive Health
This video shows you the comprehensive methods provided on this page to viewing hard drive health from different angels, follow and to learn more about the details if you need a more clear guide:

#5. Via HDD Manufacturer’s Tools
Most hard drive manufacturers offer free tools to check the health and performance of hard drives, such as Western Digital, Samsung, and Seagate all offer diagnostic tools. If you do not know the manufacturer of your hard drive, you can check it in Device Manager:
Step 1. Right-click on the Windows icon and select «Device Manager.»
Step 2. Click on «Disk Drives» to view the list of storage devices.
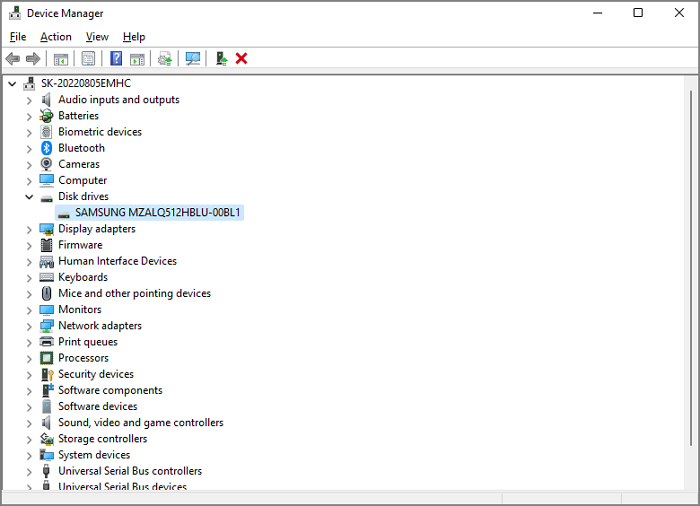
Step 3. Copy the drive model number to Google search to see the manufacturer’s name.
Step 4. Download and install the manufacturer’s tool to analyze the drive’s status.
Download page for some well-known hard drive brands:
- Seagate
- Samsung
- Western Digital
#6. Check Hard Drive Health Physically
It is the fastest and simplest way to check hard drive health. You should safely open your computer case and follow the steps to check its health status:
Step 1. Check connections: Ensure that the cables are securely linked and connected correctly.
Step 2. Clear dust and debris: The dust from the case and hard drive should be safely blown away with a can of pressurized air.
Step 3. Look for physical damage: Check the possible exterior damage and listen for weird noises.
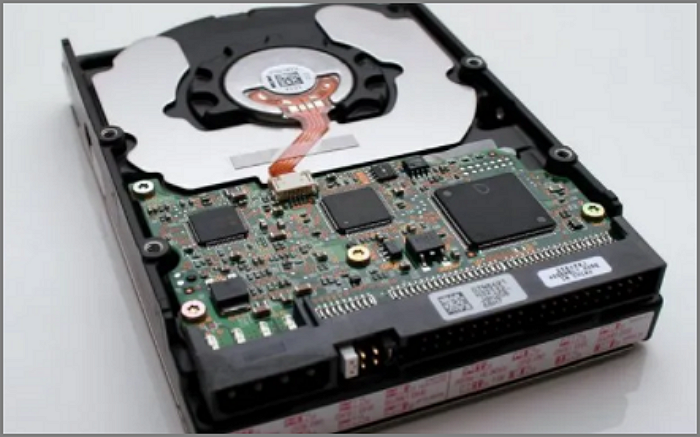
If your hard drive is physically damaged, you may need to replace it with a new one. If your hard drive is not physically damaged, you can perform a logical check by following the methods above.
Now, we have finished learning the six ways to check hard drive health. Here are some other topics related to hard drive. You can click the button to learn more:
Conclusion
Hard drives are necessary storage devices that may cause more damage if not checked in time. This article helps you analyze when you should perform a disk check. For example, when you encounter strange noises, when your hard drive starts to heat up, or when you receive frequent error messages, it is time for you to actively track the hard drive’s health.
This article provides five effective ways to check hard drive health on Windows 11/10. One of them, EaseUS Partition Master, is the easiest. As a powerful tool related to disk partition, it not only checks hard drive health but also provides the ability to repair corrupted file systems and bad sectors if they exist.
Moreover, you can also apply this tool to: Tell if a Hard Drive Is Bad, Tell if a Hard Drive is New or Used, etc.
FAQs Of Checking Hard Drive Health
Let’s take a look at some other frequently asked questions related to checking the health of your hard drive:
1. How do you check if an HDD is dying?
If any of these signs are present, your HDD is having problems, and its life may be affected:
- The hard drive is constantly noisy and hot
- Slow boot and processing speeds
- Many bad sectors on the hard drive
- Data is lost, and files cannot be opened
- Frequent blue or black screens on your computer
2. What is the best program to check HDD health?
EaseUS Partition Master is one of the best tools to check HDD health. It can also repair bad sectors and corrupted file systems. Alternatively, you can use the command line tool that comes with Windows, CHKDSK also provides very powerful functions, but you need to avoid parameter errors when entering commands.
3. How can I test the health of my hard drive?
You can either download EaseUS Partition Master and test the health of your hard drive or use the command line tool with Windows.
Step 1. Hold down Windows + R to open the Run window and type cmd.
Step 2. Type CHKDSK and press Enter.
- To check hard drive health on Windows 11, open Settings > System > Storage > Advanced storage settings > Disks & volumes. Open the properties for the hard drive and check the health status.
- The status will show the estimated remaining life, available spare, and temperature.
Windows 11 has a storage health monitoring feature that can detect hardware problems on hard drives and notify you ahead of time to give you enough time to create a backup of your data, and in this guide, you will learn how to use it.
The feature is part of the modern “Disks & volumes” settings, and it’s available for Non-Volatile Memory Express (NVMe) Solid-State Drives (SSDs). If a possible hardware problem is detected on the hard drive, you will get a desktop notification letting you know that “a storage device may be at risk of failure and requires your attention,” which you can click to access more details about the problem.
If you missed the notification, the storage drive performance is degrading or acting up, and you want to check its health, you will have to access the details manually through the Settings app.
This guide will teach you the steps to check the hard drive’s health without the need for third-party software on Windows 11.
To check the health of the hard disk on Windows 11, use these steps:
-
Open Settings on Windows 11.
-
Click on System.
-
Click the Storage tab.
-
Under the “Storage management” section, select on Advanced storage settings option.
-
Click the “Disks & volumes” setting.

-
Select the hard drive to check the health report on Windows 11.
-
Click the Properties button.

-
Under the “Drive health” section, confirm if the drive is at risk of failure and is going bad.


Once you complete the steps, if the feature detects a potential problem, you will see a warning message, which it might read, “reliability is degraded Back up your data in case of drive failure.” Along with the warning, you also get estimated remaining life, available space, and temperature information.
If you get a risk of failure warning for a hard drive, it is strongly recommended to back up the data immediately because the chances of failure are imminent.
You can also click the “Back up now” option to access the backup settings to upload the files to OneDrive. However, you can use other tools, such as the System Image Backup tool, or third-party software to back up the data, such as Macrium Reflect.
The screenshot of the drive health for this post is from a virtual SSD, and it doesn’t reflect the real information. If the hard drive has issues, the health information may look like the screenshot below.

If you don’t see the drive health information, it’s likely that you don’t have a supported drive (currently, only NVMe SSDs are supported).
Whether your computer has an SSD or HDD drive, it’s always a good idea to replace the drive as soon as you start noticing problems or the age of the drive is around two or three years.
Why You Can Trust Pureinfotech
The author combines expert insights with user-centric guidance, rigorously researching and testing to ensure you receive trustworthy, easy-to-follow tech guides. Review the publishing process.
The Windows Management Instrumentation Command-Line Utility (WMIC) is a simple tool that allows users to manage their Windows operating system.
It runs through the Command Prompt and can access information from Self-Monitoring, Analysis and Reporting Technology (SMART), a monitoring system that determines whether your hard drive or solid-state drive (SSD) is functioning as expected.
If you’re noticing slow performance, corrupt files, or other symptoms of media failure, you can quickly use WMIC to determine whether your system is anticipating a media failure. Here are two ways to get that information.
Datarecovery.com provides risk-free media evaluations for SSDs and HDDs, and our no data, no charge guarantee gives you peace of mind as your case progresses. Call 1-800-237-4200 or set up a case online.
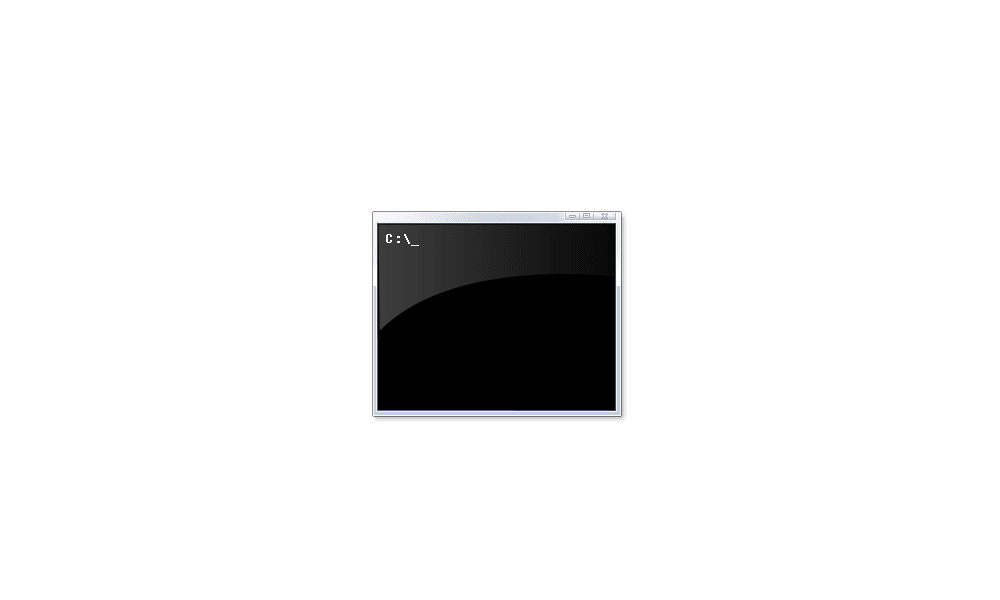
Using WMIC to Get Basic HDD/SDD Health Status
The simplest way to use WMIC is to follow these steps:
- Select the Windows button on your taskbar.
- In the search filed, type CMD and hit enter (or select the Command Prompt app).
- Type WMIC and hit enter.
- Type or paste diskdrive get status and hit enter.
This will generate feedback that reads “OK” (which means your drive is working as expected) or “Pred Fail” (which predicts a failure). The below screenshot shows output of the WMIC tool.
While this tells you if your drives are failing, it doesn’t provide much additional info. That may not be necessary; if the drive is on its way out, it’s time to replace it. However, if you want to get more info, you simply need to run WMIC as an administrator and use a different set of commands.
Running WMIC as an Administrator
By running WMIC as an administrator, you can get more information about a potential failure. Follow these steps:
- Select Start and search for the Command Prompt.
- Right-click the Command Prompt and select Run as Administrator.
- Type or paste the following command: wmic /namespace:\\root\wmi path MSStorageDriver_FailurePredictStatus
The program will output a PredictFailure value, along with a Reason code. If the drive is working normally, the PredictFailure will read “False.” By running WMIC in administrator mode, you can get more information about media failures predicted by SMART.
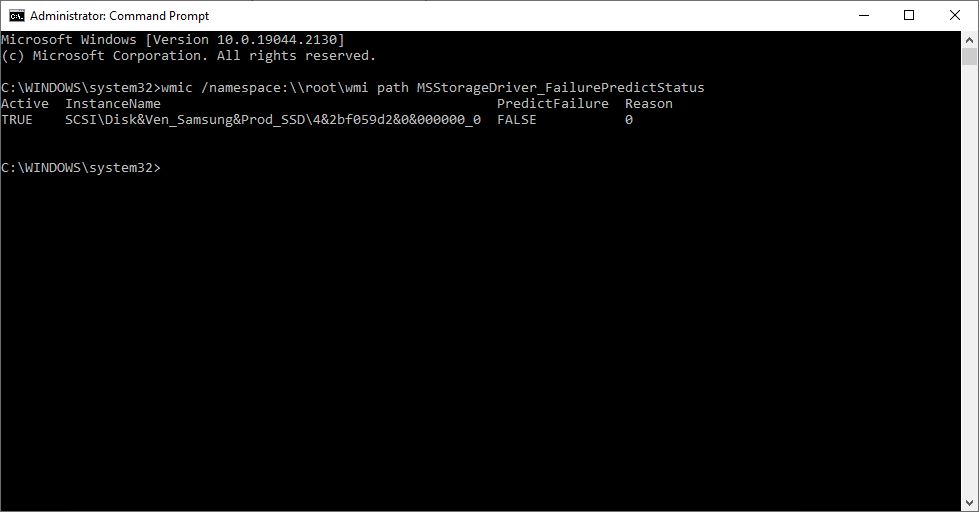
If the PredictFailure value is “True,” SMART predicts — you guessed it — a media failure. The Reason value will provide more information, but regardless of the value, you should back up any important files as soon as possible, then replace the drive.
SMART Failure “Reason” Codes
SMART error codes are not standardized — they’re specific to the drive and the manufacturer — so you’ll need to consult your drive’s documentation to figure out why it’s failing. With that said, these error codes are generally consistent from drive to drive:
- 01 – A high (or unexpected) read error rate.
- 02 – Decreasing throughput performance.
- 03 – Low spin-up time.
- 05 – A high count of reallocated sectors.
- 10 – A high count of spin-start attempts (specific to hard drives).
This isn’t a comprehensive list. Wikipedia’s SMART page contains an updated list of SMART codes, though again, those codes are not universal. If your hard drive has a manufacturer-specific health monitoring utility, you can use that utility to get more information.
Can you fix a hard drive or SSD with a SMART error?
In some cases, yes, but you should back up the device before taking any other action.
For hard drives with soft (non-physical) errors, defragmenting the drive may give the drive an accurate list of bad and healthy sectors. Here’s a guide from Microsoft for defragmenting a hard drive.
But if you don’t know why the error occurred, you shouldn’t take this step (especially if you haven’t backed up your data). Defragmenting can exacerbate physical issues such read/write head failures and spindle failures.
If the drive is failing physically, defragmenting it could cause the drive to mark healthy sectors as bad, which can greatly complicate the data recovery process.
If your drive has important data, the safest course of action is to contact a professional data recovery provider. Even if the drive has not failed physically, a data recovery engineer can recover files without risking damage, and you won’t pay much for the attempt.
That’s one of the major reasons that we offer risk-free media evaluations: If a hard drive or SSD arrives in a working condition, we charge a minimal fee for the transfer. We want to encourage people to take a cautious approach — and to avoid tactics that could endanger their data.
To get started, set up a risk-free evaluation online or contact us at 1-800-237-4200.
Windows 11 имеет большое количество утилит, которыми можно воспользоваться через командную строку. Команда chkdsk (проверка диска) — одна из таких утилит. Эта команда позволяет сканировать и проверять диск, установленный на ПК, на ошибки, а также исправлять эти ошибки.
В этой статье рассмотрим, как можно использовать этот инструмент на своем ПК и извлечь из него максимум пользы.
Основное предназначение команды «chkdsk» — проверка целостности файловой системы на жестком диске и внесение необходимых исправлений. Команда также поможет исправить поврежденные сектора на жестком диске.
Вот список проблем, которые команда «chkdsk» способна решить:
- Невозможно прочитать данные с жесткого диска
- Компьютер выдает ошибки загрузки
- Низкая производительность при доступе к файлам на компьютере
- Компьютер внезапно выключается во время выполнения задачи
Запускаем CHKDSK через проводник Windows 11
Если вы не очень опытный пользователь ПК, запустить «chkdsk» можно из файлового проводника, не вводя никаких команд в командной строке.
Для этого сначала дважды щелкаем по значку «Этот компьютер» на рабочем столе или находим его в проводнике, нажав сочетание клавиш «Win+E» на клавиатуре.
Затем щелкаем по необходимому HDD (жесткому диску) правой кнопкой мыши и в контекстном меню выбираем «Свойства» (или Alt+Enter).
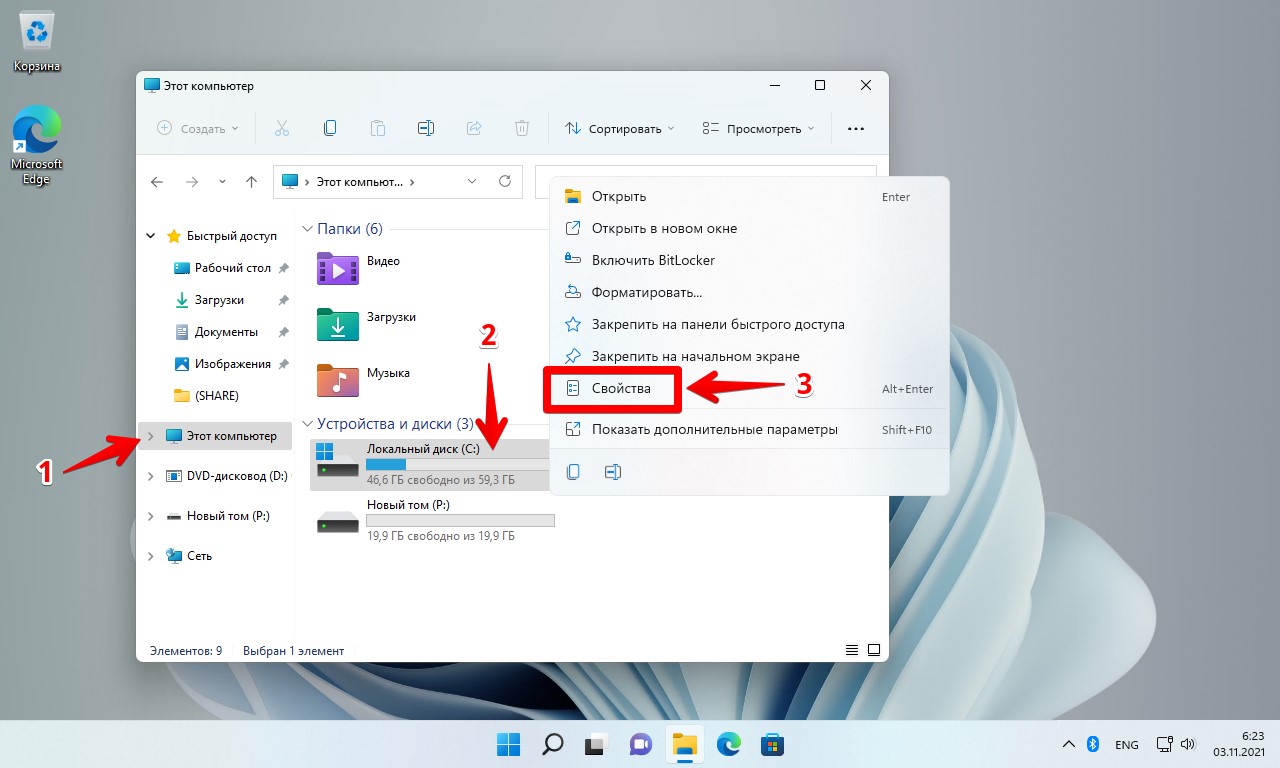
Откроется окно свойств локального диска, в котором переходим во вкладку «Сервис» и в разделе «Проверка на наличие ошибок» нажимаем кнопку «Проверить».

Появится окно «Проверка ошибок», нажимаем на кнопку со стрелкой «Проверить диск».
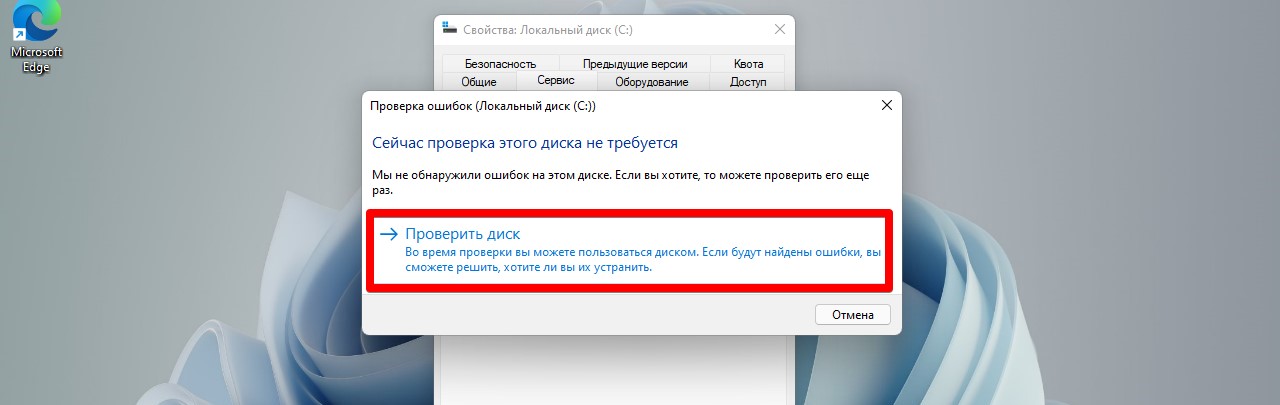
Начнется сканирование диска на ошибки.

Запускаем CHKDSK через командную строку в Windows 11
Этот способ не предполагает работу через графический интерфейс, но через CMD можно получить полный контроль и большую гибкость в использовании команд с помощью параметров.
Находим «Терминал Windows» в меню «Пуск», затем щелкаем правой кнопкой мыши по приложению «Терминал Windows» и выбираем «Запуск от имени администратора» в контекстном меню.
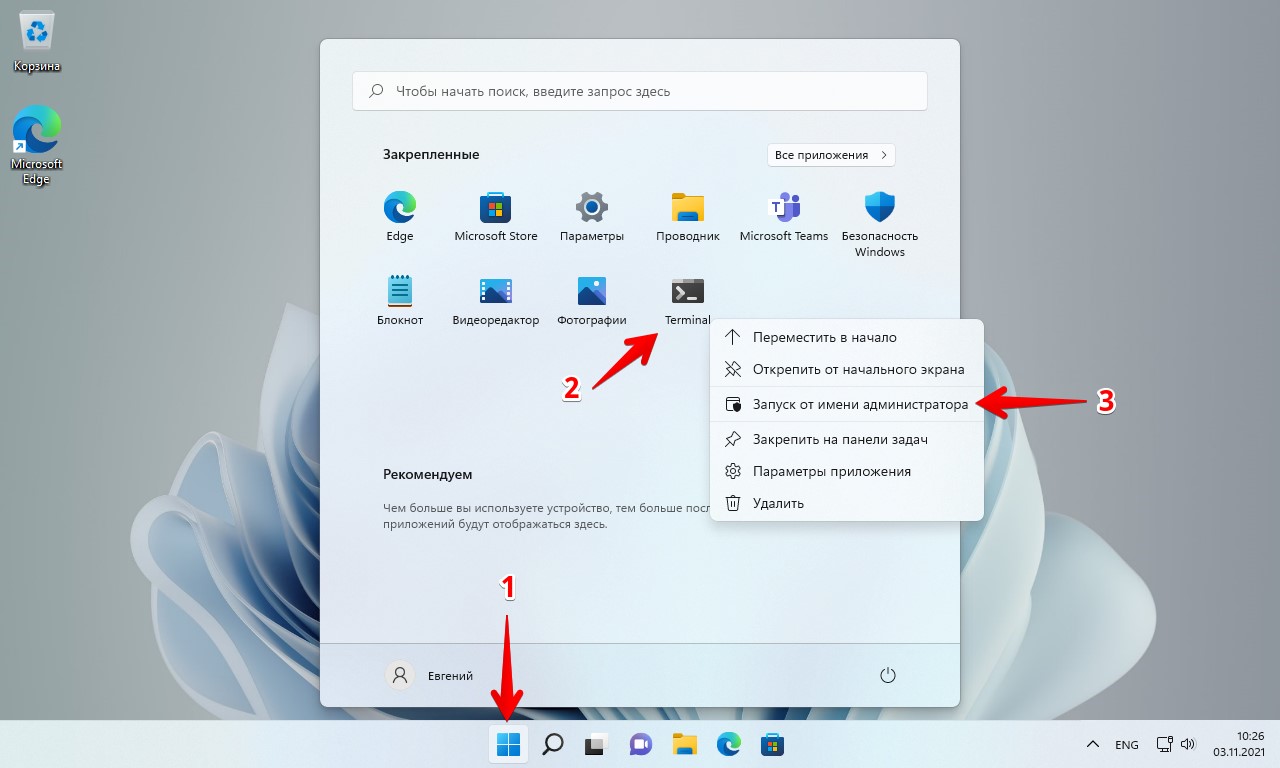
Затем мы увидим окно UAC (Контроль учетных записей пользователей). Нажимаем кнопку «Да», чтобы открыть окно Терминала Windows с повышенными правами. Если мы не вошли в систему с учетной записью администратора, вводим необходимые учетные данные для входа в систему с правами администратора.

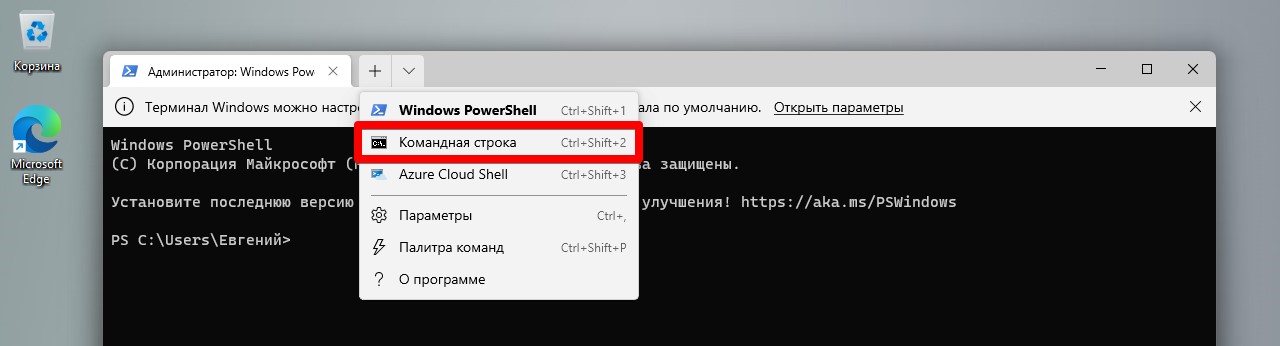
Затем нажимаем на клавиатуре «Ctrl+Shift+2», либо на кнопку со стрелкой вниз и в появившемся меню на пункт «Командная строка».
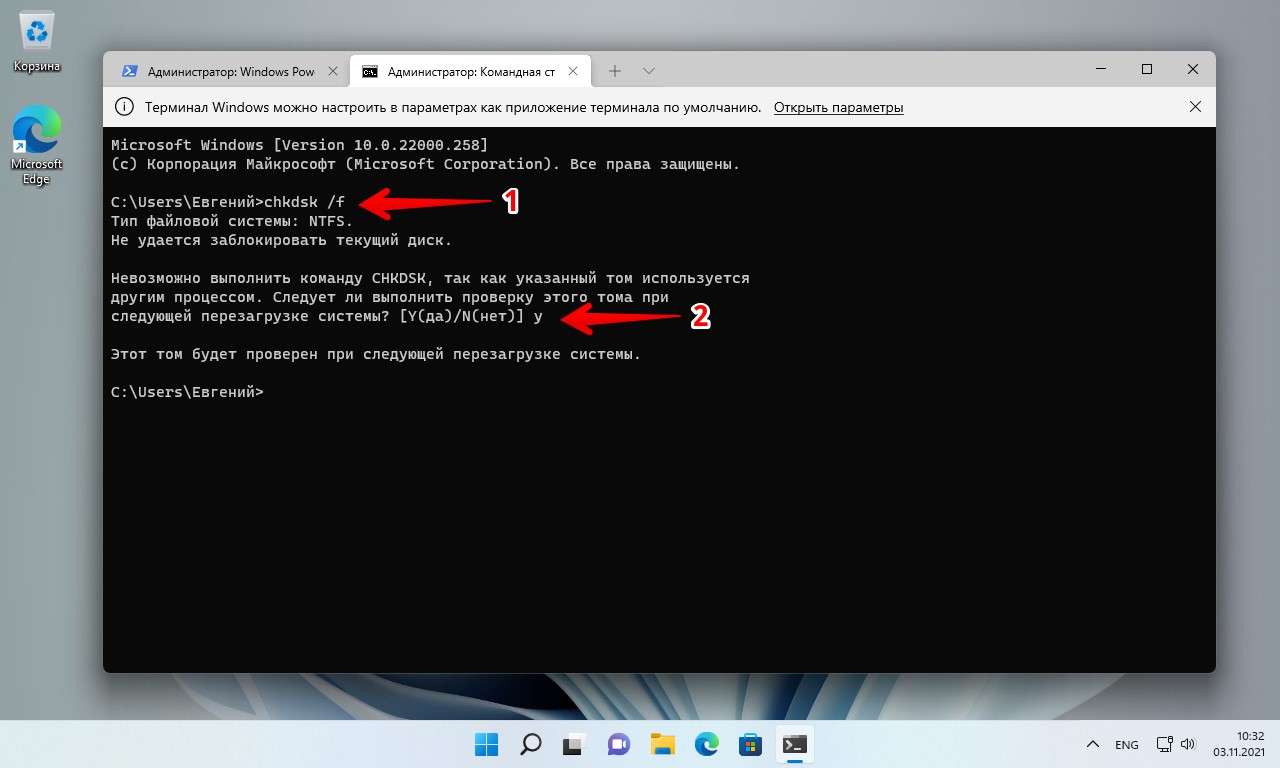
Теперь вводим команду:
chkdsk /f
И нажимаем «Enter» на клавиатуре. После чего появится сообщение «Следует ли выполнить проверку этого тома при следующей перезагрузке системы?», вводим «Y» и нажимаем еще раз «Enter».
Далее перезагружаем ПК — «Пуск» — «Выключение» — «Перезагрузка».
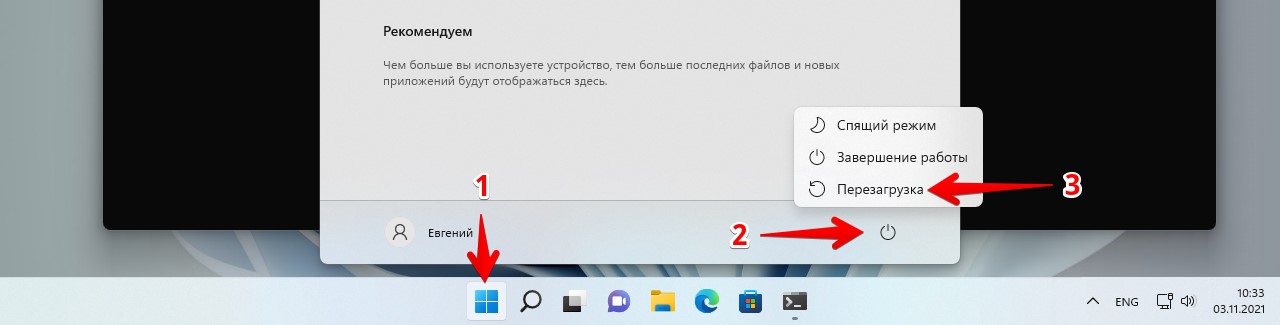
Перезагрузившись, ПК начнет проверку жесткого диска.
Надеюсь, статья вам помогла в исправлении ошибок, связанных с HDD.

This tutorial will show you how to check the current health, SMART status, temperature, and estimated remaining life of drives in Windows 11.
S.M.A.R.T. (Self-Monitoring, Analysis and Reporting Technology; often written as SMART) is a monitoring system included in computer hard disk drives (HDDs), solid-state drives (SSDs), and eMMC drives. Its primary function is to detect and report various indicators of drive reliability with the intent of anticipating imminent hardware failures.
Reference:
Contents
- Option One: Check Health and SMART Status of NVMe SSD Drives in Settings
- Option Two: Check Health and SMART Status of Drives using WMIC Command
- Option Three: Check Health and SMART Status of Drives using Get-PhysicalDisk Command
- Option Four: Check Health and SMART Status of Drives in Command Prompt at Boot
EXAMPLE: Drive failure notification

Option One
Check Health and SMART Status of NVMe SSD Drives in Settings
Windows only monitors NVMe SSD and not SATA SSD or hard disk drives (HDD).
1 Open Settings (Win+I).
2 Click/tap on System on the left side, and click/tap on Storage on the right side. (see screenshot below)

3 Click/tap on Advanced storage settings to expand it open, and click/tap on Disks & volumes. (see screenshot below)

4 Click/tap on Properties for a «Disk» you want to see the «Drive health» for. see screenshot below)
You will see a quick status (ex: «Healthy») under each NVMe SSD listed.

5 You will now see the current Drive health status of the NVMe SSD. (see screenshots below)
There are three types of critical warnings:
|
Warning |
Description |
|---|---|
| Spare capacity is low | Spare storage capacity is below the manufacturer’s safety threshold. |
| Reliability is degraded | Reliability is degraded because of significant media-related errors or an internal error to the NVM subsystem. |
| Drive is set to read-only | Data stored on the device can still be accessed but you can’t write to it. |
There are also three disk health attributes you can watch that affect disk performance:
|
Attribute |
Description |
|---|---|
| Estimated remaining life | The approximate percentage used, which is based on the manufacturer’s prediction of drive life. Note that although the value is capped at 0%, a value below that is possible as consumption does not automatically mean device failure. |
| Available spare | A normalized percentage (0% to 100%) of the remaining spare capacity available. |
| Temperature | Temperature of the overall device in degrees Celsius. |


Option Two
Check Health and SMART Status of Drives using Command
Add or Remove WMIC command Feature in Windows 11
This tutorial will show you how to add or remove the WMIC command as an optional feature for all users in Windows 11. The WMI command-line (WMIC) utility provides a command-line interface for Windows Management Instrumentation (WMI). WMIC is compatible with existing shells and utility commands…
www.elevenforum.com
1 Open Windows Terminal, and select either Windows PowerShell or Command Prompt.
2 Copy and paste the command below into Windows Terminal, and press Enter. (see screenshot below)
wmic diskdrive get model,name,serialnumber,status
If the Status of a drive shows as OK, then no issues were found with the drive.
If the Status of a drive shows as Bad or Caution, then the drive has an imminent hardware failure.
If the Status of a drive shows as Unknown, then the drive may have an imminent hardware failure, or is having problems querying the status from the firmware of the drive.

Option Three
Check Health and SMART Status of Drives using Command
1 Open Windows Terminal, and select Windows PowerShell.
2 Copy and paste the command below into Windows Terminal, and press Enter. (see screenshot below)
Get-PhysicalDisk | Select-Object FriendlyName, MediaType, SerialNumber, HealthStatus
If the HealthStatus of a drive shows as Healthy, then no issues were found with the drive.
If the HealthStatus of a drive shows as Bad or Caution, then the drive has an imminent hardware failure.
If the HealthStatus of a drive shows as Unknown, then the drive may have an imminent hardware failure, or is having problems querying the status from the firmware of the drive.

Option Four
Check Health and SMART Status of Drives in Command Prompt at Boot
Add or Remove WMIC command Feature in Windows 11
This tutorial will show you how to add or remove the WMIC command as an optional feature for all users in Windows 11. The WMI command-line (WMIC) utility provides a command-line interface for Windows Management Instrumentation (WMI). WMIC is compatible with existing shells and utility commands…
www.elevenforum.com
1 Open a command prompt at boot.
2 Type the command below into the command prompt at boot, and press Enter. (see screenshot below)
wmic diskdrive get model,name,serialnumber,status
If the Status of a drive shows as OK, then no issues were found with the drive.
If the Status of a drive shows as Unhealthy or Warning, then the drive has an imminent hardware failure.
If the Status of a drive shows as Unknown, then the drive may have an imminent hardware failure, or is having problems querying the status from the firmware of the drive.

3 When finished, close the command prompt at boot.
4 Click/tap on Continue to exit and continue to Windows 11. (see screenshot below)
That’s it,
Shawn Brink
Related Tutorials
- Check NVMe SSD Disk Drive Temperature in Windows 11
- Check if HDD, SSD, or NVMe Disk Drive in Windows 11
- Check Drive for Errors with CHKDSK (Check Disk) in Windows 11
- Check if Disk Drive uses MBR or GPT Partition Style in Windows 11