
(Image credit: Future)
On Windows 11 (and 10), the «.NET Framework» («dot net») is a development platform made up of programming languages, libraries, and tools for programmers to build different types of programs for desktops, laptops, tablets, servers, web apps, and games.
The .NET platform is not limited to Windows since it is open-source and cross-platform, which means it’s also supported on macOS and Linux devices.
Although regular users rarely have to worry about the version of .NET installed on their devices, some apps require specific releases to install and run as properly. In addition, developers usually have to use multiple versions of the development platform to build and test their apps. As a result, knowing the version of .NET installed on the computer can come in handy in many scenarios.
Whether you are a developer or a standard user, Windows 11 (and 10) provides several methods to determine the .NET Framework version through File Explorer, Registry, Command Prompt, and PowerShell.
This how-to guide will walk you through the steps to determine the .NET Framework version installed on Windows 11.
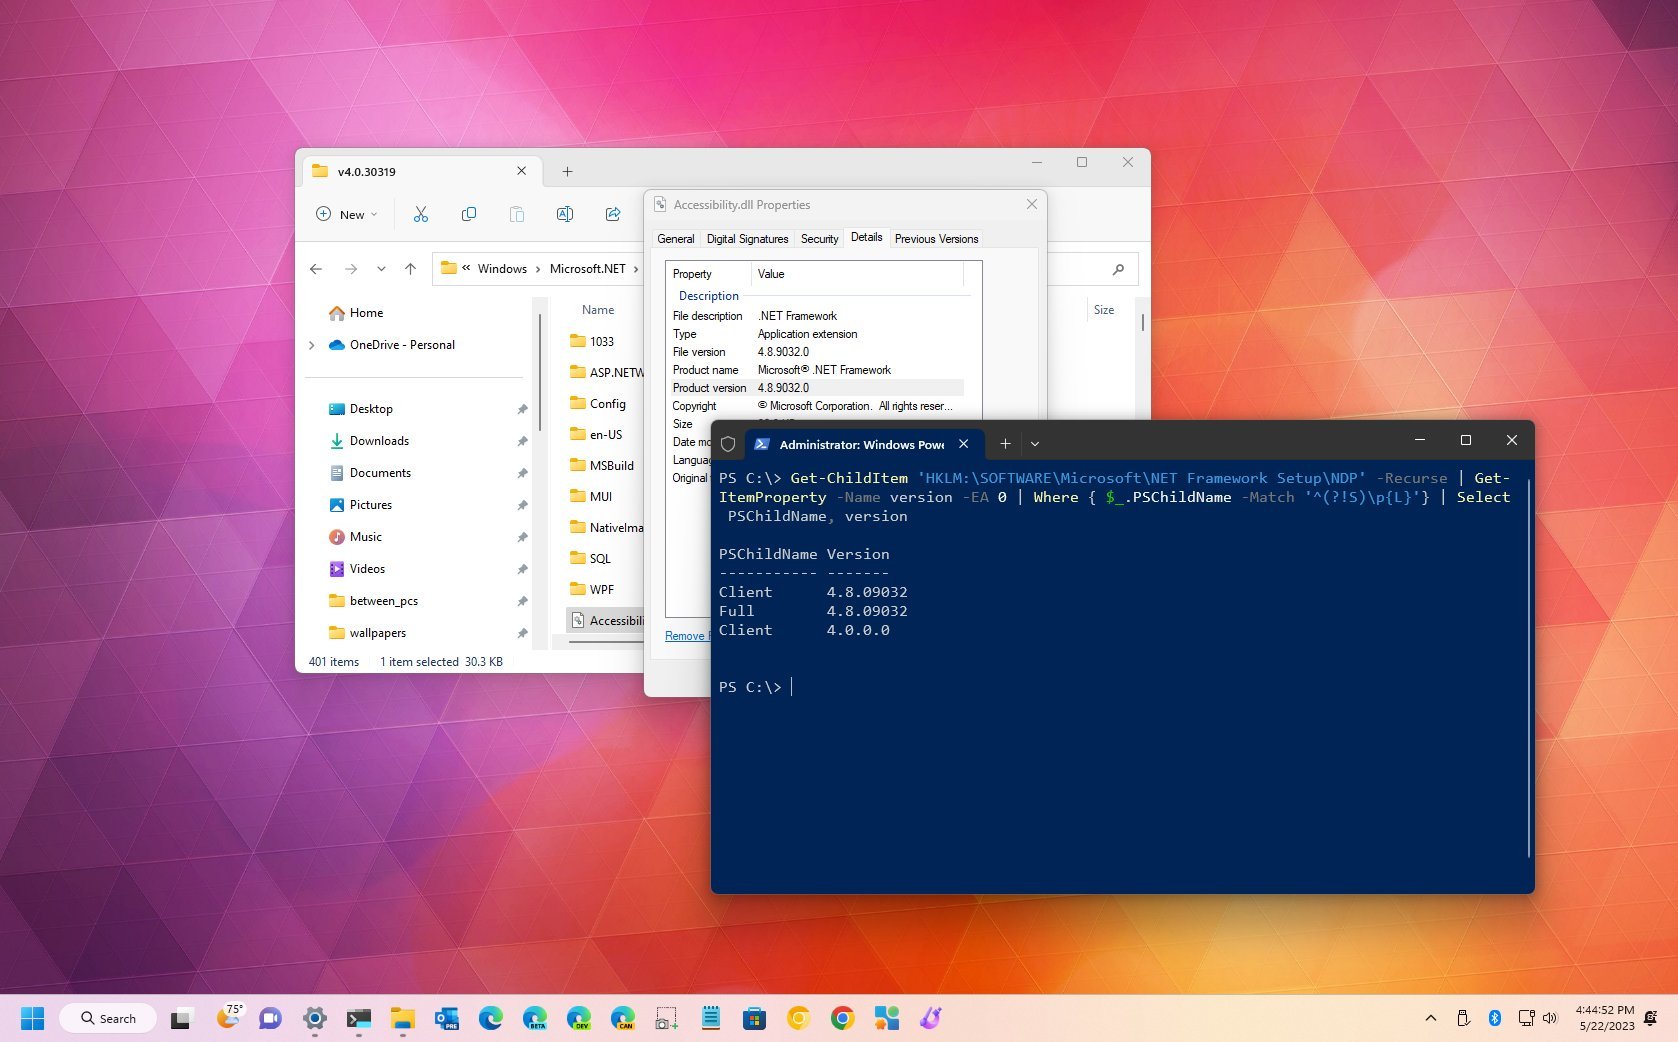
How to check .NET version using File Explorer
To use File Explorer to check the .NET Framework version on Windows 11, use these steps:
- Open File Explorer.
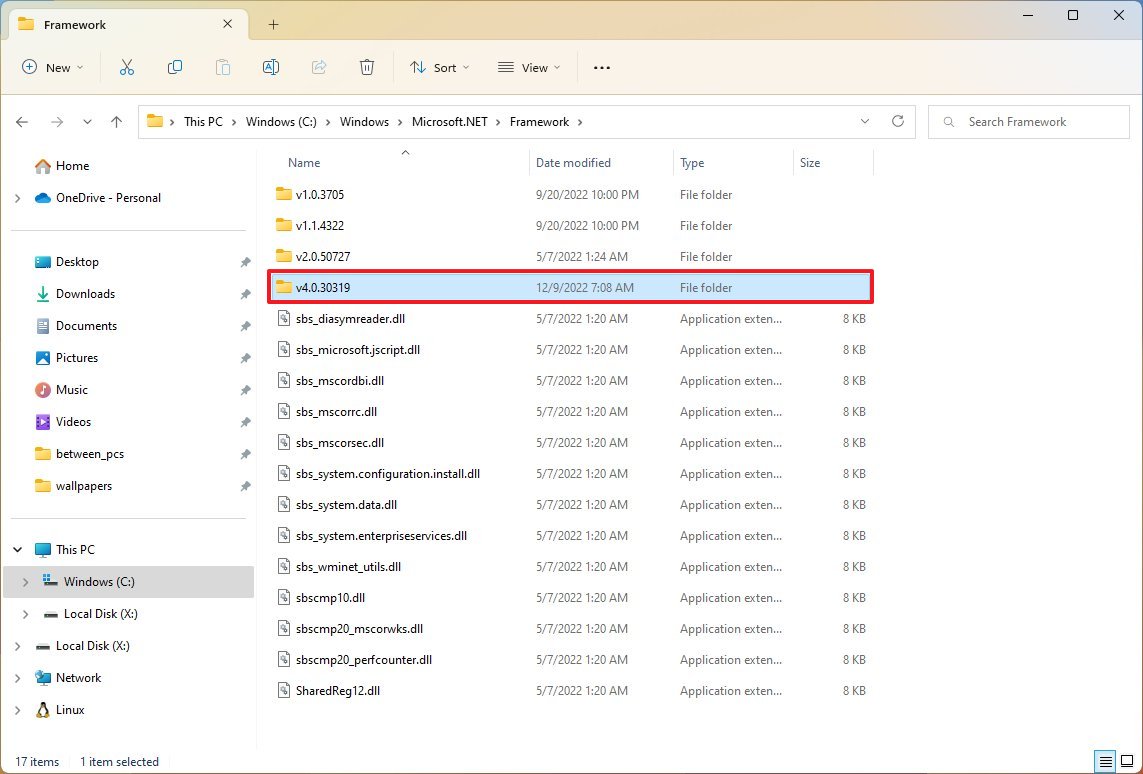
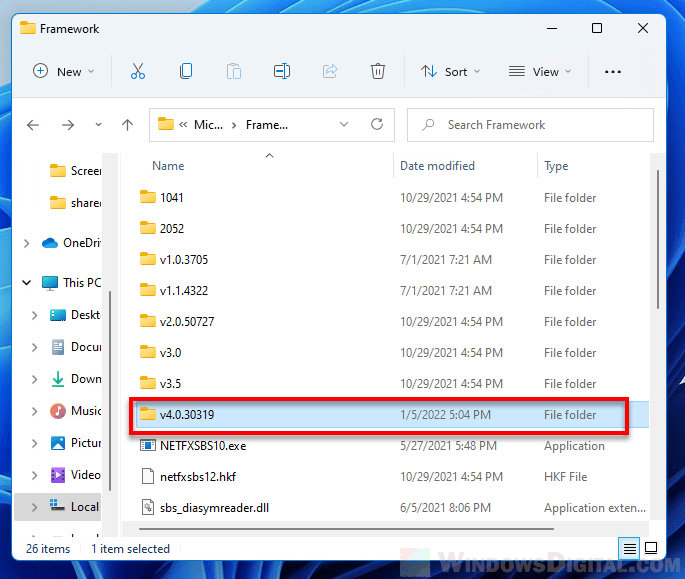
- Browse the following path: C:\Windows\Microsoft.NET\Framework
- Open the folder with the latest version – for example, v4.0.30319.
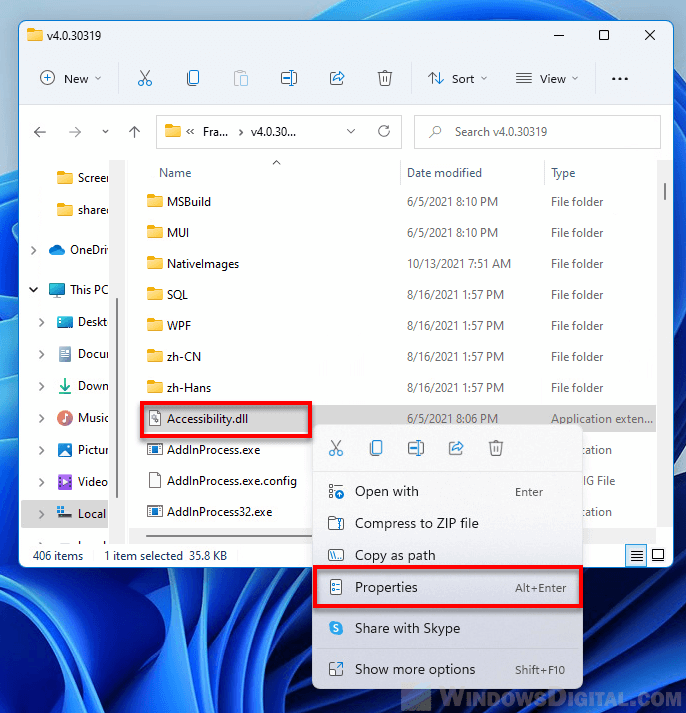
- Right-click any of the «.dll» files and select the Properties option.
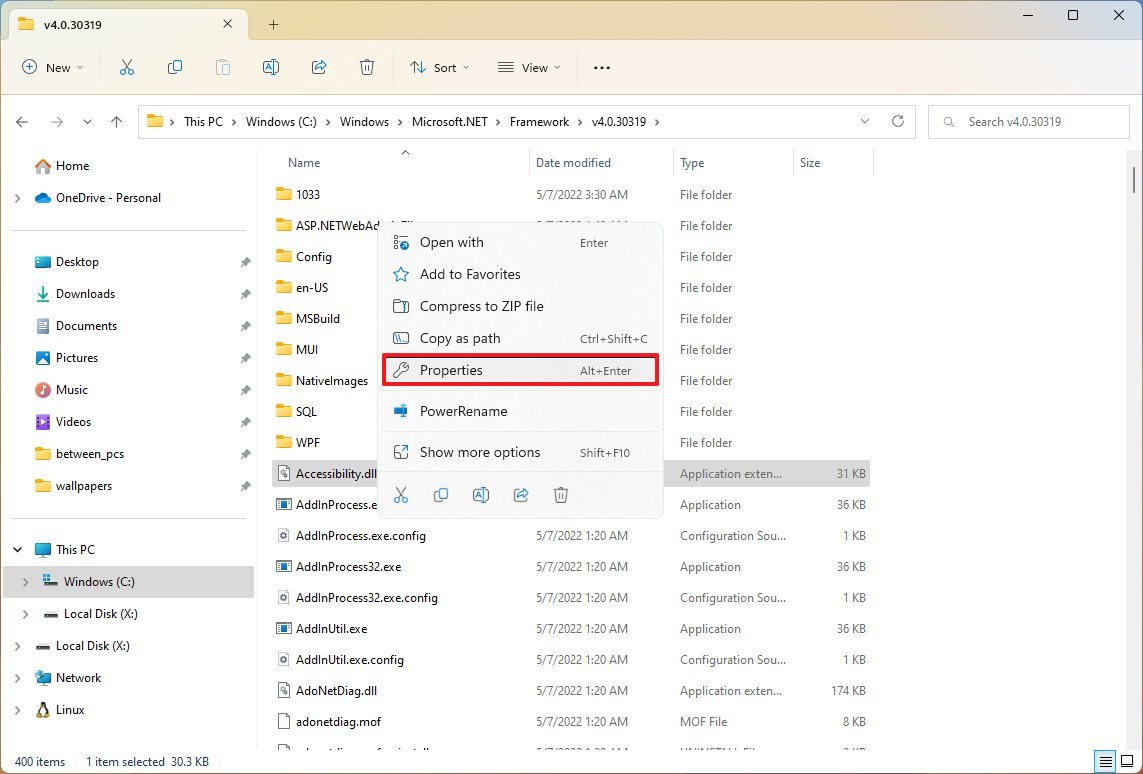
- Click the Details tab.
- In the «Product version» section, confirm the version of .NET – for example, 4.8.9032.0.

Once you complete the steps, the file details will unveil the framework platform’s version installed on Windows.
All the latest news, reviews, and guides for Windows and Xbox diehards.
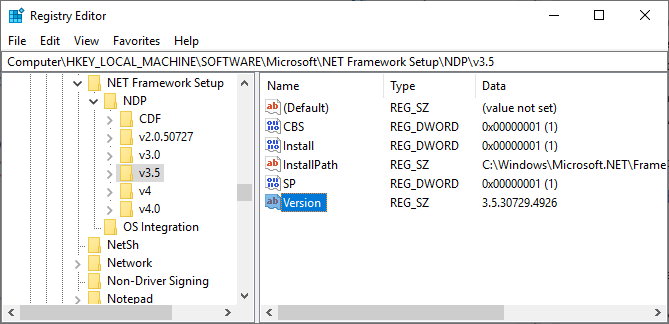
How to check .NET version using Registry
To determine the .NET Framework version through the Registry, use these steps:
- Open Start.
- Search for regedit and click the top result to open the Registry.
- Browse the following path: HKEY_LOCAL_MACHINE\SOFTWARE\Microsoft\NET Framework Setup\NDP
- Expand the main version key – for example, v4 or v4.0.
- Select the Client key.
- Quick tip: In releases older than version 4, the key will be a number or «Setup.» For example, .NET version 3.5 includes the version number under the 1033 key.
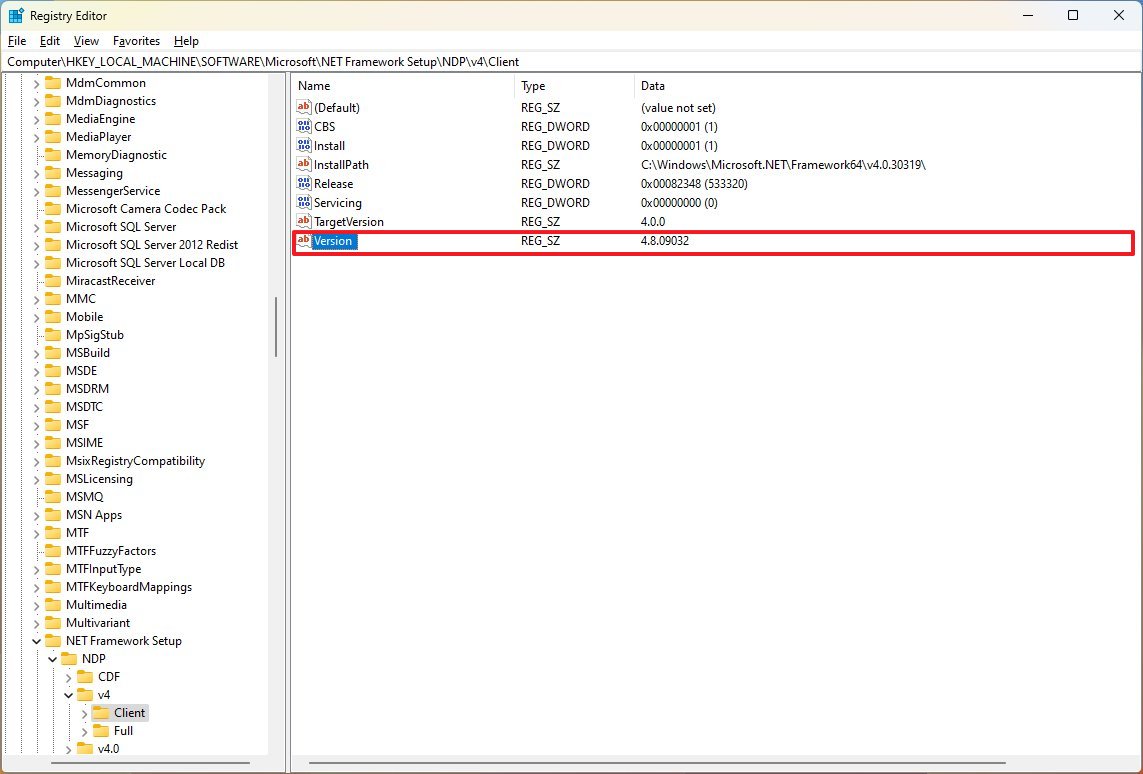
- On the right, check the «Version» string to determine the release of the .NET Framework.
After you complete the steps, you will know the releases of the Microsoft framework available on your version of Windows.
How to check .NET version with Command Prompt
To check the version of the .NET Framework with Command Prompt on Windows 11, use these steps:
- Open Start.
- Search for Command Prompt, right-click the top result, and select the Run as administrator option.
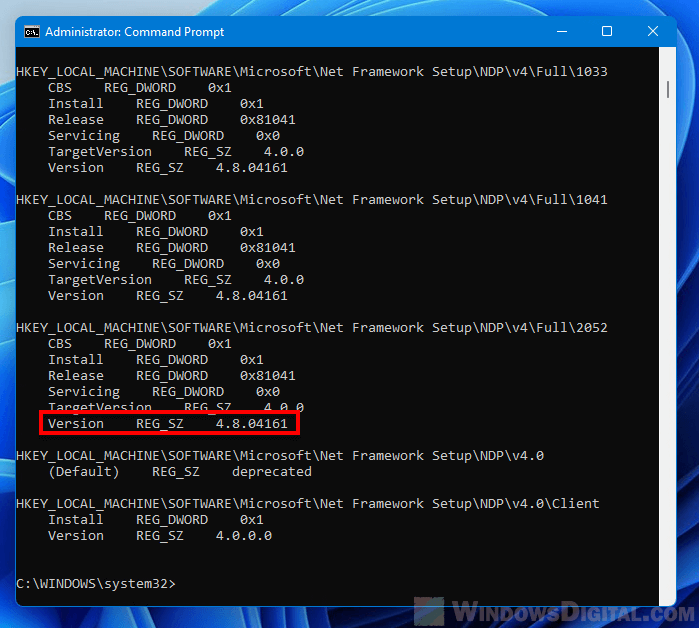
- Type the following command to determine the version of .NET installed on Windows and press Enter: reg query «HKLM\SOFTWARE\Microsoft\Net Framework Setup\NDP» /s
To make sure that version 4.x is installed, use this variant of the command: reg query «HKLM\SOFTWARE\Microsoft\Net Framework Setup\NDP\v4» /s
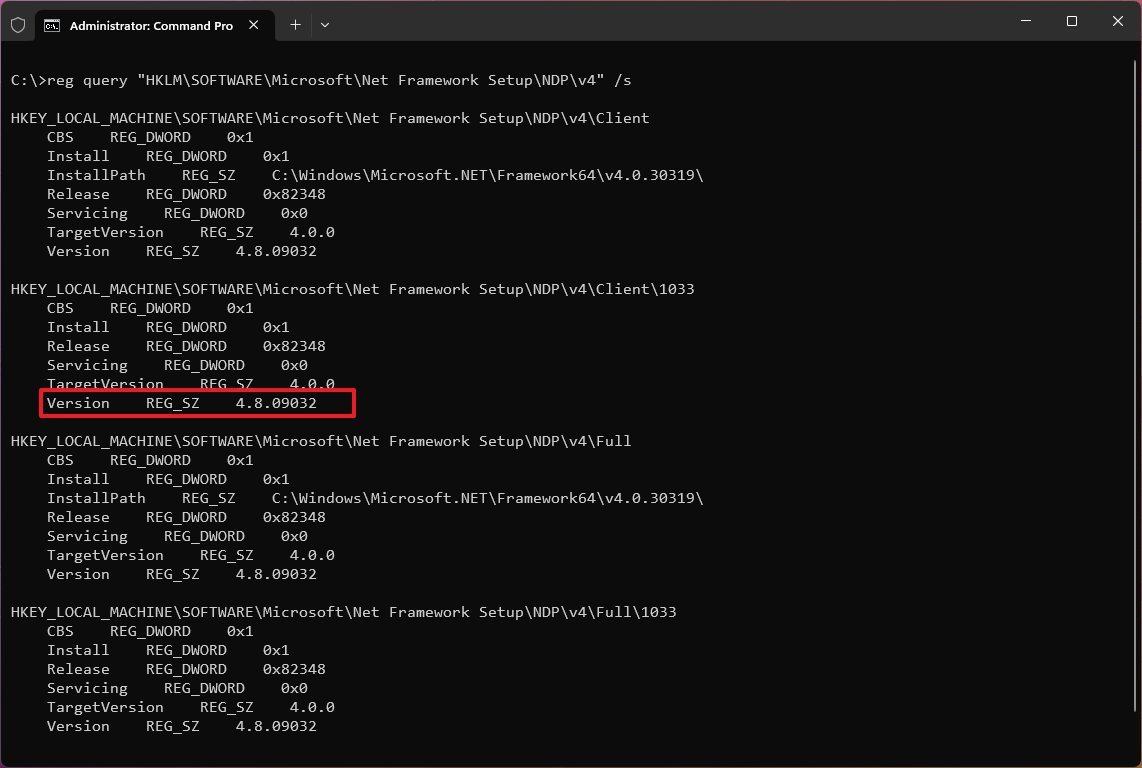
- Check the «Version» field to confirm the releases of the .NET Framework installed on Windows 11.
Once you complete the steps, the versions of .NET running on the computer will be revealed.
How to check .NET version with PowerShell
To check the .NET version with PowerShell on Windows 11, use these steps:
- Open Start.
- Search for PowerShell, right-click the top result, and select the Run as administrator option.
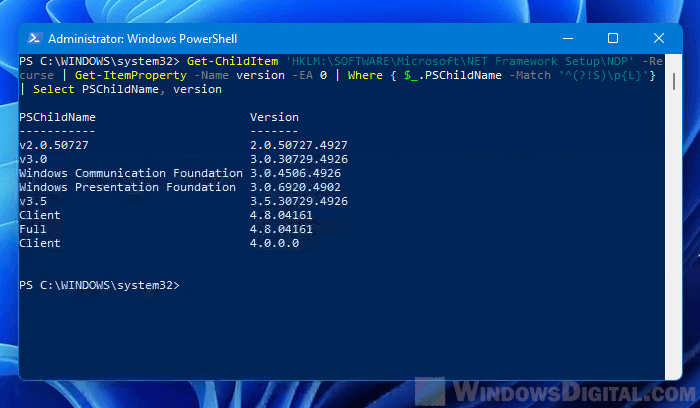
- Type the following command to check the version of .NET installed and press Enter: Get-ChildItem ‘HKLM:\SOFTWARE\Microsoft\NET Framework Setup\NDP’ -Recurse | Get-ItemProperty -Name version -EA 0 | Where { $_.PSChildName -Match ‘^(?!S)\p{L}’} | Select PSChildName, version
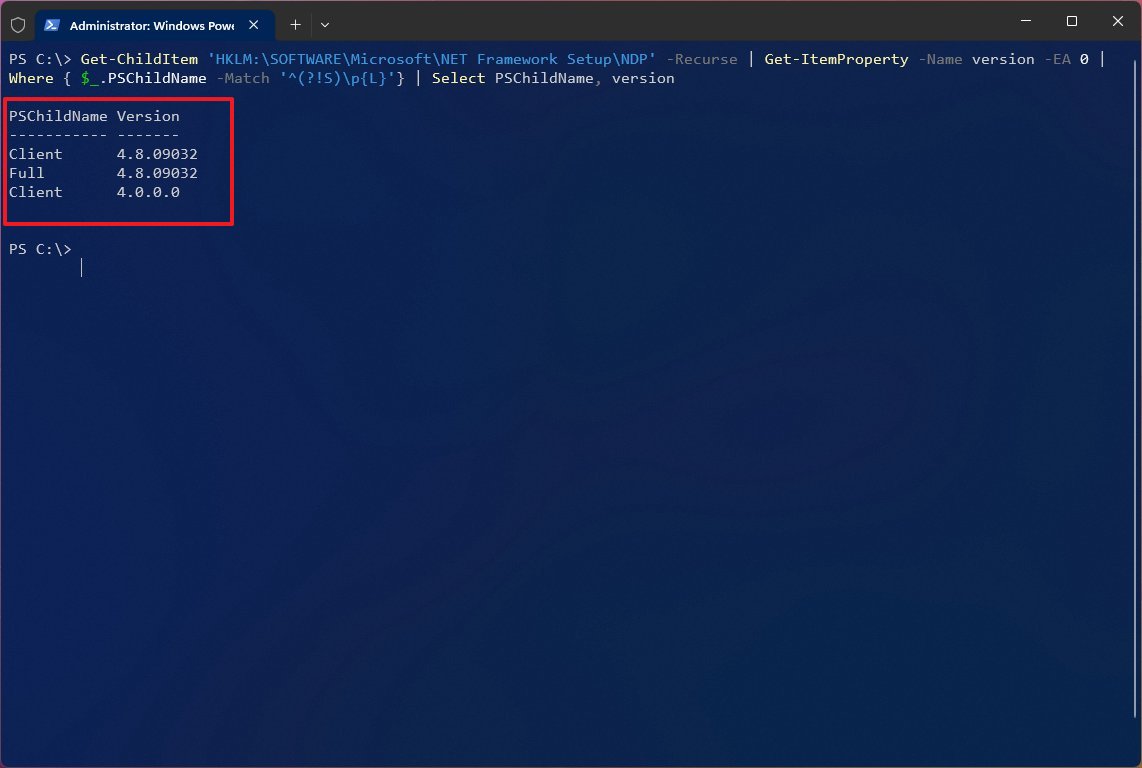
- Confirm the version of the .NET Framework installed on the computer.
After you complete the steps, PowerShell will return the information for both the client and the full version of .NET installed on Windows 11 (or 10) (if applicable).
More resources
For more helpful articles, coverage, and answers to common questions about Windows 10 and Windows 11, visit the following resources:
- Windows 11 on Windows Central — All you need to know
- Windows 10 on Windows Central — All you need to know
Mauro Huculak has been a Windows How-To Expert contributor for WindowsCentral.com for nearly a decade and has over 15 years of experience writing comprehensive guides. He also has an IT background and has achieved different professional certifications from Microsoft, Cisco, VMware, and CompTIA. He has been recognized as a Microsoft MVP for many years.

I’m a Windows enthusiast and a web app developer. I recently upgraded my PC to the MSI Vector series and enhanced its RAM and CPU to match my programming needs. When I tried to install the Microsoft legacy IDE, Visual Studio Code, I was stopped by a requirement for the .NET framework. My new PC came with an outdated version of the .NET framework, but Visual Studio Code needs .NET 4.8 to install and run on Windows 11.
To upgrade to .NET Framework 4.8 , I first needed to find out which version was currently installed on my PC. Unfortunately, I didn’t know how to do this. After some research, I learned the steps to find the .NET framework version on a Windows 11 PC. I realized this could be a common issue for others who are new to Windows 11 or Visual Studio Code, so I decided to write a detailed guide on the topic. This guide will help users easily overcome this issue and continue with their installations. Let’s dive in.
Quick Steps:
- Open File Explorer. In the Address bar on the top, Enter the following command :
C:\Windows\Microsoft.NET\Framework\and hit the Enter button.- Now, you will see multiple version folders like v1.0.xxxx, v2.0.xxxx, v3.0, v3.5, and v4.xxxx.
- Open the latest version folder (v4.xxxx).
- In the top-right corner, you’ll see a Search Box. Enter the text “mscorlib.dll” and hit the Enter button.
- When the file appears, right click on it and select the Properties option.
- Go to the Details tab, where you can find the .NET Framework version (4.8.92610) listed under Product version.
1a: Find .Net Framework Version using Command Prompt:
This method is one of the quickest and nerdiest ways to find the .NET Framework version. For those who are completely new to Command Prompt and PowerShell , this is a great first way to begin.
- Click the Start Menu and search for Command Prompt
- You need to choose the “ Run as Administrator ” option to launch the command prompt in admin mode.

Open Command Prompt using Run as Administrator
- You need to enter the following command:
reg query "HKLM\SOFTWARE\Microsoft\Net Framework Setup\NDP" /sand hit the Enter button to execute it.

Execute the command to display .net framework version
As you can see in the image above, once the command is executed, the .NET Framework version is displayed as 4.8.09032 listed under Version.
1b: Alternate Command Prompt Command:
The command given above is a straightforward one that directly displays the version in just a single step. However, it shows multiple outputs, which might seem confusing. So, I’ve come up with an alternative command that displays only the .NET Framework version, avoiding unnecessary information.
- Click the Start Menu and search for Command Prompt
- You need to choose the “ Run as Administrator ” option to launch the command prompt in admin mode.
Open Command Prompt using Run as Administrator
- Now you need to copy the command
reg query "HKLM\SOFTWARE\Microsoft\Net Framework Setup\NDP\v4\Full" /v Releaseand hit the Enter button to execute it.

Alternate command to display .net framework in windows 11
- As you can see in the image above, the output shows “Release” -> “REG_DWORD” -> “0x82348”. The output value is given in hexadecimal, and it represents the .NET Framework version 4.8.1.
The table below provides the hexadecimal codes and their corresponding .NET Framework versions.
| .NET Framework Version | Hexadecimal Value (Release) |
|---|---|
| .NET Framework 4.8.1 | 0x82348 |
| .NET Framework 4.8 | 0x80EA8 |
| .NET Framework 4.7.2 | 0x70AF0 |
| .NET Framework 4.7.1 | 0x707DE |
| .NET Framework 4.7 | 0x707E5 |
| .NET Framework 4.6.2 | 0x60632 |
| .NET Framework 4.6.1 | 0x5F230 |
| .NET Framework 4.6 | 0x5AC00 |
| .NET Framework 4.5.2 | 0x50000 |
| .NET Framework 4.5.1 | 0x47B18 |
| .NET Framework 4.5 | 0x439B0 |
Hexadecimal values and their corresponding .NET Framework versions
Compare your output hexadecimal value with the table above to find your installed .NET Framework version. Then, install the required version that suits your needs.
2a: Find .Net Framework Version using PowerShell:
- Click the Start Menu and search for PowerShell
- You need to choose the “ Run as Administrator ” option to launch the powershell in admin mode.

Opening PowerShell as Admin Mode
- Now you need to enter the following command:
Get-ChildItem 'HKLM:\SOFTWARE\Microsoft\NET Framework Setup\NDP' -Recurse | Get-ItemProperty -Name version -EA 0 | Where { $_.PSChildName -Match '^(?!S)\p{L}'} | Select PSChildName, versionand hit the Enter button.

PowerShell command to display .net framework version
- In the command output image above, you can clearly see the version of the current .NET Framework installed on your PC. The current version is 4.8.09032 , listed under “Full”.
2b: Alternate PowerShell Command:
- Click the Start Menu and search for PowerShell
- You need to choose the “ Run as Administrator ” option to launch the powershell in admin mode.
Opening PowerShell as Admin Mode
- You need to enter the following command
Get-ChildItem 'HKLM:\SOFTWARE\Microsoft\Net Framework Setup\NDP\v4\Full\' | Get-ItemPropertyValue -Name Releaseand hit the Enter button.

Alternate PowerShell Commands Output
- As you can see in the alternate command output image above, it displayed 533320 as the output value. This is a decimal value equivalent to the .NET Framework version 4.8.
The table below provides the decimal codes and their corresponding .NET Framework versions.
| .NET Framework Version | Decimal Value (Release) |
|---|---|
| .NET Framework 4.8.1 | 533320 |
| .NET Framework 4.8 | 528040 |
| .NET Framework 4.7.2 | 461808 |
| .NET Framework 4.7.1 | 460798 |
| .NET Framework 4.7 | 460805 |
| .NET Framework 4.6.2 | 394802 |
| .NET Framework 4.6.1 | 394254 |
| .NET Framework 4.6 | 393295 |
| .NET Framework 4.5.2 | 379893 |
| .NET Framework 4.5.1 | 378675 |
| .NET Framework 4.5 | 378389 |
Decimal values and their corresponding .NET Framework versions
Compare your output decimal value with the table above to find your installed .NET Framework version. Then, install the required version that suits your needs.
3: Using File Explorer Method:
- Firstly, you need to open the File Explorer on your PC.

Opening File Explorer on your PC
- Now, in the top address bar, you need to enter the following command:
C:\Windows\Microsoft.NET\Framework\and hit Enter button to navigate in to the directory.

Navigate into .Net Framework Directory
- Now, in the .NET directory, you’ll see multiple folders named v1.0, v2.0, and so on. From the list, you need to choose the latest version folder, which in our case is the v4.0.XXXX folder.
- Once you’re in the directory, you’ll see the search box in the top right corner. Enter the file name “mscorlib.dll” and hit the Enter button to display the file.

Looking for mscorlib.dll in v4.0 .net directory
- Right click the file and select Properties. Then, go to the Details tab, where you can see the .NET version listed under the Product version option.

Found .net Framework version using File Explorer.
This is the easiest way to find the installed .net framework version on your Windows 11 pc.
4: Using Windows Registry Editor:
This is one of the unique way and this method requires access to registry editor!
- Firstly, you need to open the Run Command Window using the keyboard shortcut
Winkey + R. - Once the Run window appears, enter the following command
regeditand hit the Enter button to launch the Registry editor.

Opening Registry Editor using Run Window
- In the top, paste the following command in the address bar:
Computer\HKEY_LOCAL_MACHINE\SOFTWARE\Microsoft\NET Framework Setup\NDP\v4\Full\1033and hit the Enter button. - Now, you need to click the file named “ Version ” which displays the properties as 4.8.09032

Finding .Net Framework Version from Registry Editor
- The data value 4.8.09032 which represents the .net 4.8 framework version has been installed on the pc.
5: Using Windows Features Method:
- Firstly, you need to open the Run Command Window using the keyboard shortcut
Winkey + R. - Once the Run window appears, enter the following command
optionalfeaturesand hit the Enter button to launch the Turn Windows Features on or off window.

Opening Turn Windows Features on or off using Run Window
- Now you need to Scroll through the list to see the versions of the .NET Framework installed on your system. Typically, you’ll see checkboxes for
.NET Framework 3.5(includes .NET 2.0 and 3.0) and.NET Framework 4.x.

Enabling .Net Framework 4.8 using Windows Features
- The above step concludes that .net 4.8.XXXX version has been installed on your pc.
Conclusion:
By following the steps outlined in this guide, you can quickly determine the .NET Framework version installed on your Windows 11 PC and take the necessary steps to upgrade if needed. Ensuring that your system meets the requirements for software like Visual Studio Code is crucial for a smooth development experience. With this knowledge, you’ll be well prepared to troubleshoot similar issues in the future and continue developing your projects without interruption. Happy coding! Find more tutorials at WinSides.
В Windows одновременно можно одновременно установить и запустить несколько версий .NET Framework. При разработке или развертывания нового приложения, основанного на библиотеках .NET, иногда нужно предварительно узнать какие версии и пакеты обновления .Net Framework уже установлены на компьютере пользователя или на сервере. Вы можете получить список версий .NET Framework, установленных на компьютере, несколькими способами.
Содержание:
- Информация об установленных версиях .NET Framework в реестре
- Как узнать версию .NET Framework с помощью PowerShell?
- Проверить версию .Net Framework на удаленных компьютерах
- Вывести версии .NET Framework в командной строке
Информация об установленных версиях .NET Framework в реестре
При установке или обновлении любой версии .NET Framework, изменения записываются в реестр Windows.
Откройте редактор реестра (regedit.exe) и перейдите в раздел HKLM\ SOFTWARE\Microsoft\NET Framework Setup\NDP. В этой ветке хранится информация обо всех версиях .NET на компьютере. Разверните любой раздел и обратите внимание на следующие параметры (для .Net 4.x нужно развернуть ветку Full):
- Install — флаг установки (если равен 1, значит данная версия .Net установлена на компьютере);
- Install Path — каталог, в который установлена данная версия .Net;
- Release — номер релиза .Net;
- Version — полный номер версии .Net Framework.

Примечание. Для .NET 4.0 и выше, если подраздел Full отсутствует, это значит, что данная версия Framework на компьютере не установлена.
К примеру, в данном примере видно, что на компьютере установлены .NET Framework v2.0.50727, 3.0, 3.5 и 4.7 (релиз 460805).
Обратите внимание, что в серверных ОС начиная с Windows Server 2012, все базовые версии .Net (3.5 и 4.5) является частью системы и устанавливаются в виде отдельного компонента (Установка .NET Framework 3.5 в Windows Server 2016, в Windows Server 2012 R2), а минорные (4.5.1, 4.5.2 и т.д.) устанавливаются уже в виде обновлений через Windows Update или WSUS.
С помощью следующей таблицы вы можете установить соответствие между номером релиза и версией .NET Framework (применимо к .NET 4.5 и выше).
| Значение DWORD параметра Release | Версия .NET Framework |
| 378389 | .NET Framework 4.5 |
| 378675 | NET Framework 4.5.1 на Windows 8.1 / Windows Server 2012 R2 |
| 378758 | .NET Framework 4.5.1 на Windows 8, Windows 7 SP1, Windows Vista SP2 |
| 379893 | .NET Framework 4.5.2 |
| 393295 | .NET Framework 4.6 на Windows 10 |
| 393297 | .NET Framework 4.6 |
| 394254 | .NET Framework 4.6.1 на Windows 10 1511 |
| 394271 | .NET Framework 4.6.1 |
| 394802 | .NET Framework 4.6.2 на Windows 10 1607 |
| 394806 | .NET Framework 4.6.2 |
| 460798 | .NET Framework 4.7 на Windows 10 1703 |
| 460805 | .NET Framework 4.7 |
| 461308 | .NET Framework 4.7.1 на Windows 10 1709 |
| 461310 | .NET Framework 4.7.1 |
| 461808 | .NET Framework 4.7.2 на Windows 10 1803 |
| 461814 | .NET Framework 4.7.2 |
| 528372 | .NET Framework 4.8 на Windows 10 2004, 20H2, и 21H1 |
| 528040 | .NET Framework 4.8 на Windows 10 1903 и 1909 |
| 528449 | .NET Framework 4.8 в Windows Server 2022 и Windows 11 |
| 528049 | .NET Framework 4.8 (остальные версии Window) |
.NET Framework 4.8 сегодня — самая последняя доступная версия .NET Framework.
Как узнать версию .NET Framework с помощью PowerShell?
Можно получить информацию об установленных версиях и релизах NET Framework на компьютере с помощью PowerShell. Проще всего получить эти данные напрямую из реестра с помощью командлетов
Get-ChildItem
и
Get-ItemProperty
(подробнее о работе с записями реестра из PowerShell).
Чтобы вывести таблицу по всем версиям .Net Framework на компьютере, выполните команду:
Get-ChildItem ‘HKLM:\SOFTWARE\Microsoft\NET Framework Setup\NDP’ -Recurse | Get-ItemProperty -Name version -EA 0 | Where { $_.PSChildName -Match ‘^(?!S)\p{L}’} | Select PSChildName, version
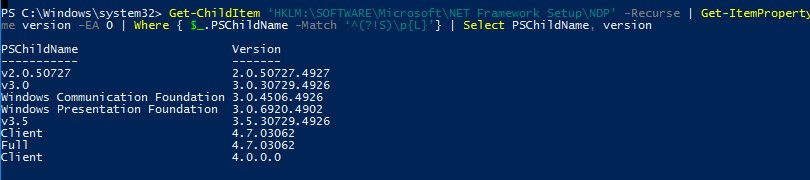
На этом компьютере установлены версии .Net 2.0, 3.0, 3.5 и 4.7.
Начиная с версии .Net v4.0 более новая версия Framework перезаписывает (заменяет) старую версию. Т.е. если на компьютере был установлен .NET Framework 4.7, то при установке .NET Framework 4.8, старая версия пропадет.
Можно вывести только номер релиза (для версий .Net 4.x):
(Get-ItemProperty ‘HKLM:\SOFTWARE\Microsoft\NET Framework Setup\NDP\v4\Full’ -Name Release).Release

Согласно таблице, номер 528449 соответствует версии .Net Framework 4.8 в Windows 11.
Проверить версию .Net Framework на удаленных компьютерах
Вы можете удаленно получить список версий .Net Framework, установленных на компьютерах в вашей сети помощью PowerShell.
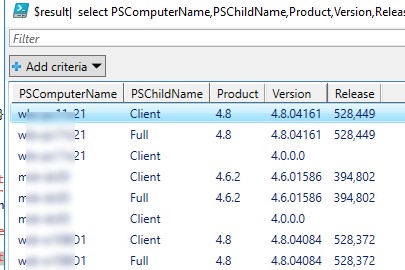
Ниже представлен небольшой PowerShell скрипт, который получает список компьютеров из текстового файла и проверяет на всех версию .Net Framework. Для запуска команд на удаленных компьютерах используется WinRM командлет Invoke-Command.
Function GetNetFramework {
Get-ChildItem 'HKLM:\SOFTWARE\Microsoft\NET Framework Setup\NDP' -recurse |
Get-ItemProperty -name Version,Release -EA 0 |
Where { $_.PSChildName -match '^(?![SW])\p{L}'} |
Select PSChildName, Version, Release, @{
name="Product"
expression={
switch -regex ($_.Release) {
"378389" { [Version]"4.5" }
"378675|378758" { [Version]"4.5.1" }
"379893" { [Version]"4.5.2" }
"393295|393297" { [Version]"4.6" }
"394254|394271" { [Version]"4.6.1" }
"394802|394806" { [Version]"4.6.2" }
"460798|460805" { [Version]"4.7" }
"461308|461310" { [Version]"4.7.1" }
"461808|461814" { [Version]"4.7.2" }
"528040|528049|528449|528372" { [Version]"4.8" }
{$_ -gt 528449} { [Version]"Undocumented version (> 4.8)" }
}
}
}
}
$result=@()
$servers= Get-Content C:\PS\servers.txt
foreach ($server in $servers)
{
$result+=Invoke-Command -ComputerName $server -ScriptBlock $function:GetNetFramework
}
$result|  select PSComputerName,@{name = ".NET Framework"; expression = {$_.PSChildName}},Product,Version,Release| Out-GridView
Скрипт выводит табличку (через Out-GridView) со списком версий .Net Framework, установленных на удаленных компьютерах.
Также вы можете задать список компьютеров, на которых нужно проверить .NET так:
$servers= @("pc1","pc2","pc3","pc4","pc5")
Или выбрать список компьютеров из домена с помощью командлета Get-ADComputer из модуля AD PowerShell. Следующая команда выберет все активные хосты Windows Server в домене:
$servers= Get-ADComputer -Filter 'operatingsystem -like "*Windows server*" -and enabled -eq "true"'
Вывести версии .NET Framework в командной строке
Все версии.NET Framework устанавливаются в следующие каталоги Windows:
-
%SystemRoot%\Microsoft.NET\Framework -
%SystemRoot%\Microsoft.NET\Framework64
Вы можете просто открыть этот каталог и увидеть список установленных версий .NET. Каждой версии соответствует отдельный каталог с символом v и номером версии в качестве имени папки. Можно вывести список установленных версий .NET Framework из команды строки:
dir %WINDIR%\Microsoft.Net\Framework\v* /O:-N /B

Команда выведет все установленные версии кроме 4.5, т.к. .NET Framework 4.5 устанавливается в подкаталог v4.0.xxxxx.
The .NET Framework is a software development platform developed by Microsoft. It is made up of programming languages, libraries and tools for developers to build Windows applications such as games, web apps, etc. .NET Framework is also required to be installed in Windows in order to run an application built with .NET Framework.
A software built with a specific version of .NET Framework will require exactly the same version of .NET Framework to be installed on the Windows in order for it to run successfully. For example, if a game or app is built with .NET Framework version 4.8, you will need to install .NET Framework Runtime 4.8 in order to run the software.
Besides, .NET Framework is backward compatible. It means that the latest version of .NET Framework will includes all previous versions. For instance, if you install .NET Framework 4.8, you should also be able to run apps that requires older versions of .NET Framework such as 4.7, 4.6, 4.5, etc.
However, there are some exceptions where software may require explicitly a specific .NET Framework version in order to run. You will need to install the required version of .NET Framework in order to run the software successfully.
If you are not sure what version of .NET Framework is installed on your Windows, this guide will show you 3 methods on how to check .NET Framework version in Windows 11.
Method 1: Check .NET Framework version using PowerShell command
In Windows 11, you can execute a few lines of PowerShell commands to quickly check all the versions (including older versions) of .NET Framework ever installed on your PC. There is a Windows built-in command and also a community command-line tool you can use to check the .NET Framework version in Windows.
We recommend to try using the community tool called DotNetVersionLister first. If it doesn’t work, use the built-in command. You can execute these PowerShell commands in either Windows PowerShell or Windows Terminal (Windows 11) with administrative privileges.
DotNetVersionLister
The DotNetVersionLister is community tool available at GitHub. You don’t need to manually download or install anything. It can all be done using one line of command in PowerShell. To check .NET Framework version in Windows 11, follow the steps below.
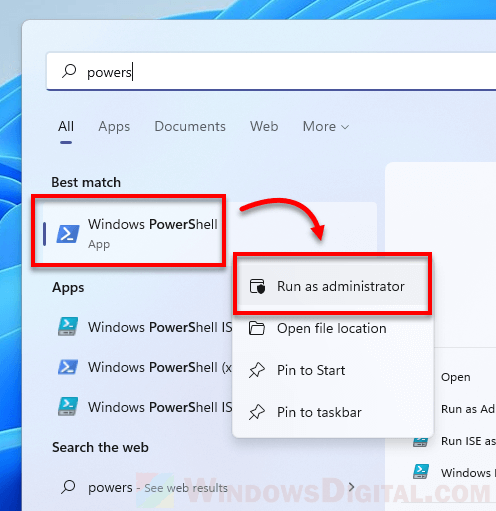
1. Search for Windows PowerShell via Start. Then, right-click the top result and select Run as administrator.
2. In the PowerShell window, enter the following command.
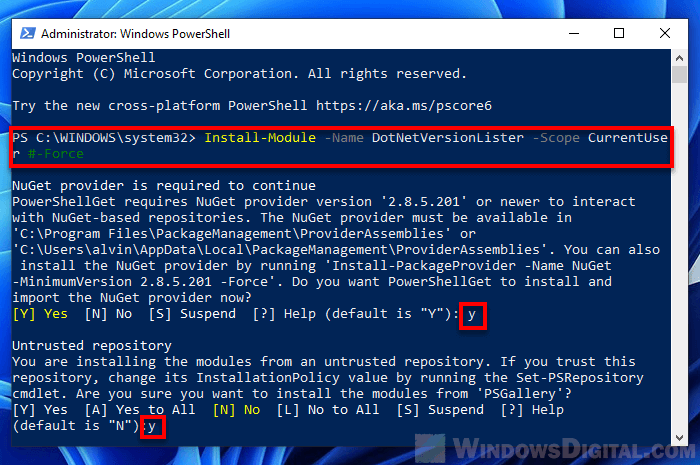
Install-Module -Name DotNetVersionLister -Scope CurrentUser #-Force
3. If you have never installed NuGet provider which the module requires, you will be prompted to install it. Type Y and hit Enter to continue.
4. When asked if you are sure you want to install the module, type Y and hit Enter to install it.
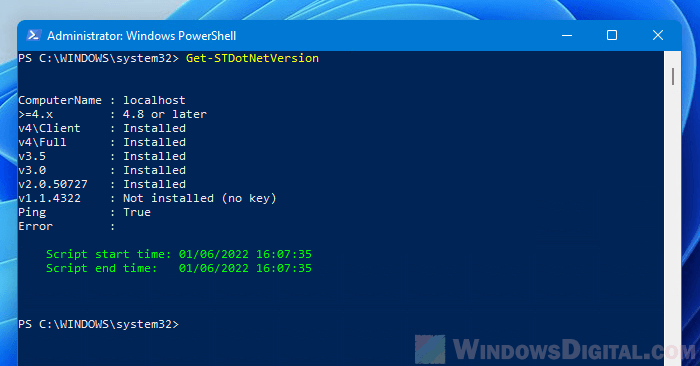
5. After installing the module, execute the following command to view the .NET Framework version in Windows 11.
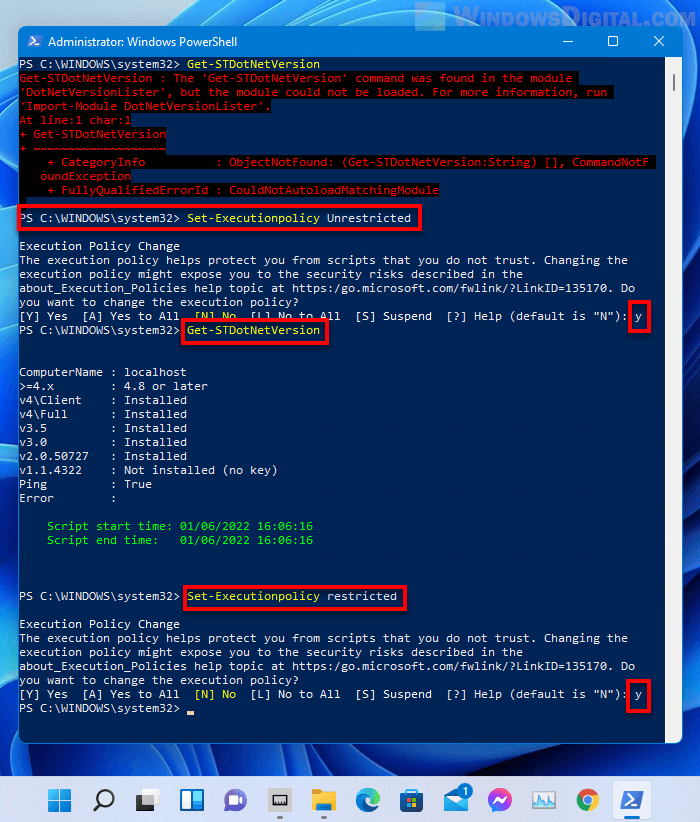
Get-STDotNetVersion
If you get error that says “The ‘Get-STDotNetVersion’ command was found in the module
‘DotNetVersionLister’, but the module could not be loaded“, it is because the Execution Policy is set to Restricted. This is to protect your PC from scripts that do not trust. You can temporary set the Execution Policy to unrestricted by typing the following command.
Set-Executionpolicy Unrestricted
Type Y and hit Enter to confirm the changes. Then, execute the get dot net version command to view the installed .NET Framework version.
Get-STDotNetVersion
After viewing your .NET version, set the execution policy back to restricted again. After entering the command below, type Y and hit Enter to confirm the changes.
Set-Executionpolicy Restricted
Check .NET version using Get-ChildItem command
If you prefer not to install any module, you can use the following command instead to check the version of .NET Framework installed on your PC. The following command will work in both Windows PowerShell and Windows Terminal.
Get-ChildItem 'HKLM:\SOFTWARE\Microsoft\NET Framework Setup\NDP' -Recurse | Get-ItemProperty -Name version -EA 0 | Where { $_.PSChildName -Match '^(?!S)\p{L}'} | Select PSChildName, version
Method 2: Check .NET version via Command Prompt
To check .NET Framework version via Command Prompt in Windows 11, follow the steps below.
1. Click Start. Search for Command Prompt or CMD and run it as administrator.
2. In the elevated Command Prompt window, enter the following command.
reg query "HKLM\SOFTWARE\Microsoft\Net Framework Setup\NDP" /s
This command will display a list of .NET Framework versions that were installed in your Windows. The downside of checking .NET version using command in CMD as compared to using PowerShell is that the output that shows the installed .NET versions in CMD using the command above is not as clean and easy to view as using the PowerShell command in Windows PowerShell.
Method 3: Check .NET version through File Explorer
If you don’t want to use any command in CMD or PowerShell, you can manually check the installed .NET Framework versions via File Explorer in Windows 11. Here’s how to do so.
1. Open File Explorer and browse to the following location. Change the C: drive if your Windows was installed on a different drive.
C:\Windows\Microsoft.NET\Framework
2. Next, select the folder that shows that latest version.
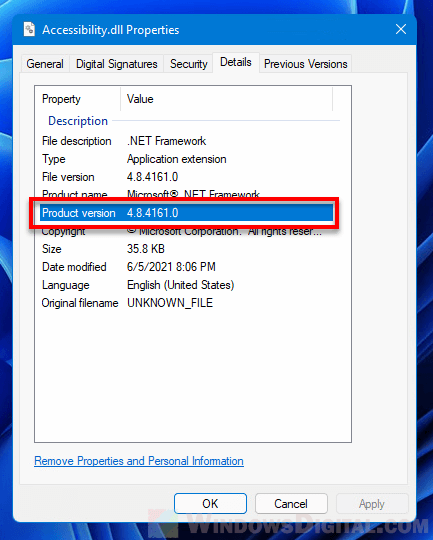
3. In the selected folder, right-click a file called “Accessibility.dll” and select Properties.
4. Then, click the Details tab. The installed .NET Framework version will be shown next to Product version.
The Microsoft .NET Framework is an important feature of the modern Windows operating system. It provides developers with a ready-made collection of code that Microsoft maintains. Most of the time, you have no direct dealings with .NET Framework. However, that’s not always the case. At times, you need to know the specific version of the .NET Framework installed on your system.
Here are six ways you can find out which versions of .NET Framework are installed on your version of Windows.
Find Newer .NET Framework Versions: 4.5 and Later
There are three methods you can use to find out your .NET Framework version for versions 4.5 and later. «But Gavin,» I hear you say, «I’m doing this to find out which version I have, I don’t know if it is version 4.5 or not.»
You are exactly right. Checking for the .NET Framework version only takes a moment. You can quickly establish if you have .NET Framework version 4.5 or later. If you don’t, you can safely assume that you have an earlier version installed, or no .NET Framework version at all (which is highly unlikely).
1. Use the Registry Editor to Find the .NET Framework Version
You can find the .NET Framework versions installed on your system in the registry. (What is the Windows Registry, anyway?)
- Press Ctrl + R to open Run, then input regedit.
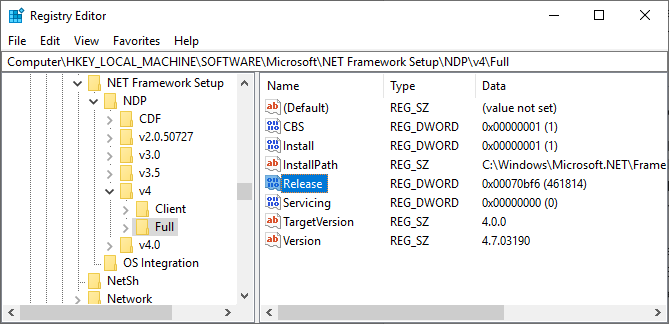
- When the Registry Editor opens, find the following entry:HKEY_LOCAL_MACHINE\SOFTWARE\Microsoft\NET Framework Setup\NDP\v4
- Under v4, check for the Full If it is there, you have .NET Framework version 4.5 or later.
- In the right-hand panel, check for a DWORD entry named Release. If the Release DWORD exists, you have .NET Framework 4.5 or a later version.
- The Release DWORD data contains a value relating to the specific .NET Framework version. For instance, in the image below, the Release DWORD has a value of 461814. That means my system has .NET Framework 4.7.2 installed. Check the table below for your Release DWORD value.
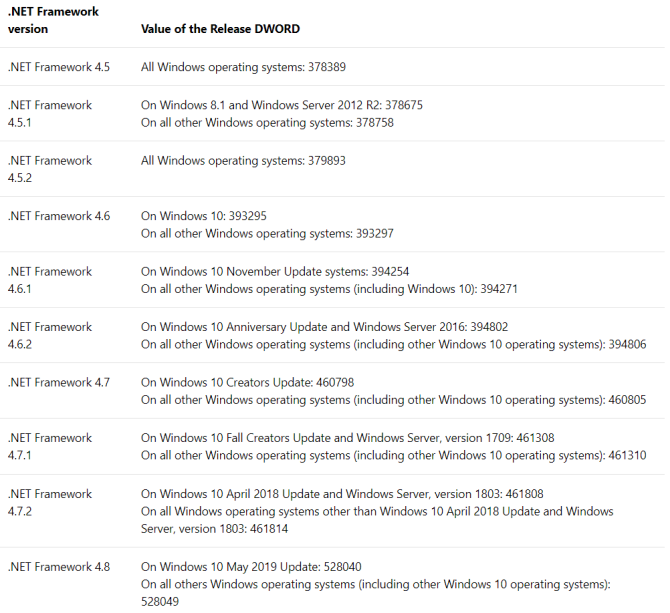
You can cross-check the DWORD value against the value table below to find out the exact .NET Framework version on your system.
2. Use the Command Prompt to Find the .NET Framework Version
Type command into your Start Menu search bar, right-click the Best Match and select Run as Administrator.
Now, copy and paste the following command into the Command Prompt:
reg query "HKLM\SOFTWARE\Microsoft\Net Framework Setup\NDP\v4" /s
The command lists the installed .NET Frameworks for version 4. .NET Framework version 4 and later display as «v4.x.xxxxx.»
3. Use PowerShell to Find the .Net Framework Version
Type powershell into your Start Menu search bar, right-click the Best Match and select Run as Administrator.
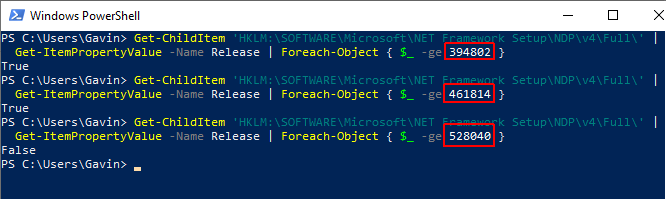
Now, you can use the following command to check the value of the .NET Framework Release DWORD:
Get-ChildItem 'HKLM:\SOFTWARE\Microsoft\NET Framework Setup\NDP\v4\Full\' | Get-ItemPropertyValue -Name Release | Foreach-Object { $_ -ge 394802 }
The command above returns True if the .NET Framework version is 4.6.2 or higher. Otherwise, it returns False. You can use the .NET Framework DWORD value table above to swap out the last six digits of the command for a different version. Check out my example:
The first command confirms that version 4.6.2 is present. The second confirms that version 4.7.2 is present. However, the third command checks for version 4.8, which I don’t have installed yet as the Windows 10 May Update hasn’t arrived on my system. Still, you get the gist of how the PowerShell command works with the DWORD value table.
Find an Older .NET Framework Version
You can find out which old .NET Framework versions are installed on your system using the registry. The Registry Editor holds all the answers.
- Press Ctrl + R to open Run, then input regedit.
- When the Registry Editor opens, find the following entry:HKEY_LOCAL_MACHINE\SOFTWARE\Microsoft\NET Framework Setup\NDP
- Check the NDP file in the registry for each .NET Framework version.
There are a couple of tools you can use to find the .NET Framework version on your system automatically. However, they’re not updated frequently, which is why knowing the manual method is handy, too.
1. Raymondcc .NET Detector
The Raymondcc .NET Detector is one of the fastest and easiest detection tools to use. You download the folder, extract it, then run the executable. When the program runs, it shows a list of .NET Framework versions. The versions in black are installed on your system, while the gray versions are not. If you click on a grayed-out .NET Framework version, the program takes you to the installer.
Download: Raymondcc .NET Detector for Windows (Free)
The archive password is raymondcc
2. ASoft .NET Version Detector
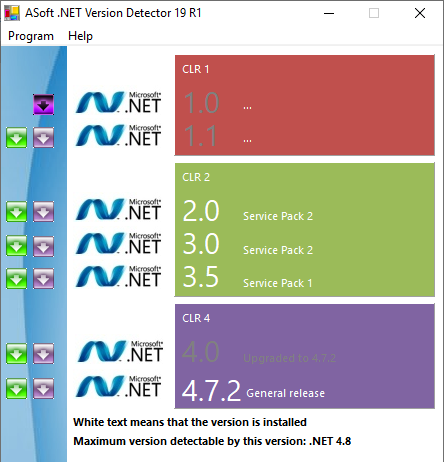
The ASoft .NET Version Detector works very similarly to the Raymondcc .NET Detector. Once you download and extract the program, run the executable. The program shows a list of currently installed .NET Framework versions. It also provides download links for those versions you do not have.
Download: ASoft .NET Version Detector for Windows (Free)
Simple Methods to Check Your .NET Framework Version
You now know several simple methods to check your .NET Framework version.
It isn’t always necessary to check your .NET Framework version. Many programs will check the version before installing and tell you if there is a program. Others will install the necessary version before commencing the installation, saving you the job of finding out the correct version and the hassle of downloading.
Still, it is always handy to know how to find the .NET Framework version manually. Want to find out more about the .NET Framework? Here’s why you need it and how you install it on Windows 10.