
Applies ToMicrosoft Defender для Android Microsoft Defender для Mac Microsoft Defender для Windows
Вы можете начать проверку на наличие вредоносных программ в любое время.
Примечание: в настоящее времяMicrosoft Defender предлагает защиту от вредоносных программ в Windows, Android и macOS.
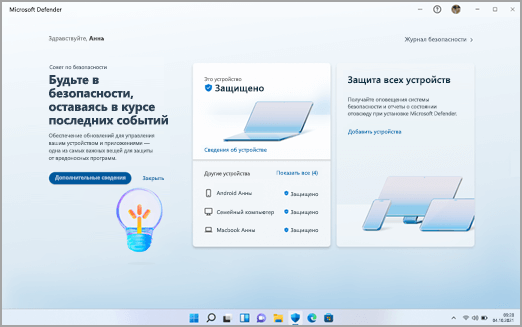
На панели мониторингаMicrosoft Defender
-
Выбор сведений об устройстве
-
Выберите Управление в Безопасность Windows
-
Выберите Быстрая проверка.
Советы:
-
Если вы хотите провести более глубокое сканирование, вместо того чтобы выбрать быструю проверку на шаге 3, выберите Параметры сканирования и выберите нужный тип сканирования.
-
Для наиболее полной проверки выполните Microsoft Defender в автономном режиме. Дополнительные сведения см. в статье Защита компьютера с помощью Microsoft Defender в автономном режиме.
-
Когда проверка завершится, Defender сообщит вам, нашли ли что-нибудь.
Когда нужно выполнить проверку?
Если вы подозреваете, что ваше устройство может быть заражено или хотите подтвердить, что предыдущая инфекция была очищена, необходимо запустить проверку в Defender.
Признаки того, что на вашем устройстве может быть вредоносное ПО:
-
Внезапно работает гораздо медленнее, чем обычно
-
Значительное уменьшение времени работы батареи
-
Непредвиденное увеличение использования данных
Любой из этих симптомов может указывать на то, что неизвестный процесс выполняется в фоновом режиме и потребляет ресурсы устройства.
Другие подсказки:
-
Непредвиденная реклама или всплывающие окна
-
Перенаправление на совершенно разные сайты при попытке просмотра веб-страниц
Подробнее
Как вредоносная программа может заразить ваше устройство
Справка и обучение по безопасности Майкрософт
Нужна дополнительная помощь?
Нужны дополнительные параметры?
Изучите преимущества подписки, просмотрите учебные курсы, узнайте, как защитить свое устройство и т. д.
Встроенный антивирус Windows 11/10 — Microsoft Defender, не плох, но не всегда может удалить или заблокировать найденные угрозы при штатной работе в запущенной ОС. В этом случае иногда может сработать дополнительная возможность — автономная проверка Microsoft Defender.
В этой простой инструкции подробно о способах запуска автономной проверки Microsoft Defender из запущенной ОС, а также с загрузочной флешки или диска.
Запуск автономной проверки Microsoft Defender
Для запуска автономной проверки Microsoft Defender в случае, если Windows 11/10 работает, можно использовать несколько методов. Первый — в окне «Безопасность Windows»:
- Откройте «Безопасность Windows», используя значок Microsoft Defender в области уведомлений.
- В разделе «Защита от вирусов и угроз» нажмите «Параметры сканирования».

- Выберите «Антивирусная программа в Microsoft Defender (автономная проверка)» и нажмите «Выполнить сканирование сейчас».

- Нажмите кнопку «Проверка» для подтверждения запуска проверки.

- Компьютер будет перезагружен, после чего автоматически начнется проверка компьютера на наличие угроз.

- По завершении компьютер загрузится в обычном режиме, а результаты вы сможете найти как обычно, в журнале защиты.


В ситуации, когда интерфейс «Безопасность Windows» недоступен, вы можете использовать следующие команды для запуска автономной проверки.
В Windows PowerShell (Терминале Windows) от имени администратора:
Start-MpWDOScan
В командной строке (от имени администратора):
wmic /namespace:\\root\Microsoft\Windows\Defender path MSFT_MpWDOScan call Start
Дальнейший процесс не будет отличаться от такового в случае запуска из окна «Безопасность Windows».
Загрузочный накопитель или образ ISO для автономной проверки Microsoft Defender
Автономную проверку Microsoft Defender можно использовать и с загрузочной флешки или диска, в том числе и на компьютерах с ОС более старыми, чем Windows 11 или 10. Достаточно загрузить утилиту для создания накопителя с защитником Windows в автономном режиме с официального сайта:
- 64-бит https://go.microsoft.com/fwlink/?LinkID=234124
- 32-бит https://go.microsoft.com/fwlink/?LinkID=234124
После загрузки и запуска утилиты вам будет предложено записать диск, USB-накопитель (данные с него будут удалены), либо создать ISO-образ с необходимыми файлами:

Создав загрузочный накопитель, загрузитесь с него (как поставить загрузку с флешки в БИОС/UEFI) и выполните проверку.
Однако, для последней ситуации (вход в Windows невозможен) я бы рекомендовал использовать Kaspersky Rescue Disk или аналогичный образ Dr.Web CureIt!
- To run a full virus scan on Windows 10, open Windows Security > Virus & threat protection > Scan options, select “Full scan,” and click “Scan now.”
- Alternatively, you can use Command Prompt and PowerShell commands to run a malware scan on your computer.
UPDATED 1/7/2025: On Windows 10, Microsoft Defender Antivirus automatically checks and scans your computer for threats such as viruses, spyware, ransomware, rootkits, and other malware and hackers. However, sometimes, you may still need to perform a scan manually to ensure that the installation and data have not been compromised.
If you suspect a virus or other malware has infected your computer (or you want to perform a maintenance scan), Microsoft Defender Antivirus allows you to perform three types of manual scans on Windows 10, including quick, custom, and full scans using the Windows Security app, Command Prompt, and PowerShell.
In this guide, I’ll teach you to perform a virus scan using the built-in anti-malware program on Windows 10.
- Run full virus scan from Windows Security
- Run full virus scan from Command Prompt
- Run full virus scan from PowerShell
Run full virus scan from Windows Security
To run a full virus scan on Windows 10, use these steps:
-
Open Start on Windows 10.
-
Search for Windows Security and click the top result to open the app.
-
Click on “Virus & threat protection” from the left navigation pane.
-
Click on Scan options under the “Current threats” section.

-
Select the Full scan option to check the entire system for viruses and any other type of malware.
-
Click the Scan now button.


Once you complete the steps, Microsoft Defender Antivirus will scan your device for viruses and other types of malware. If any threats are detected, the antivirus automatically removes (or quarantines) them.
Also, depending on the amount of data, this process can take a long time. If you have a lot of files, it is recommended to start the scan when you are done using the device for the day and let the scan run overnight.
Run full virus scan from Command Prompt
To run a Microsoft Defender Antivirus full scan from Command Prompt, use these steps:
-
Open Start.
-
Search for Command Prompt, right-click the top result, and select the Run as administrator option.
-
Type the following command to locate the latest version of Microsoft Defender Antivirus installation and press Enter:
cd C:\ProgramData\Microsoft\Windows Defender\Platform\4*
-
Type the following command to run a full virus scan and press Enter:
mpcmdrun -scan -scantype 2


After you complete the steps, the anti-malware solution will scan the device for malware. As you run the command, you will notice the “Start scanning” message. Once the scan is complete, you will see the “Scan finished” message.
Run full virus scan from PowerShell
To start a full scan with Microsoft Defender Antivirus from PowerShell, use these steps:
-
Open Start.
-
Search for PowerShell, right-click the top result, and select the Run as administrator option.
-
Type the following command to start a full malware scan and press Enter:
start-mpscan -scantype fullscan

Once you complete the steps, Microsoft Defender Antivirus will perform a full scan to check, detect, and remove viruses and any other type of malware it might be able to find.
Update January 7, 2025: This guide has been updated to ensure accuracy and reflect changes to the process.
,
If you want to learn, how to use Windows Defender to scan a specific file/folder, or your entire system for malware, continue reading below.
Windows Defender (or «Windows Security»), is a built-in security program in Windows 10 that offers real-time protection against viruses, malware and network attacks. In my opinion, Windows Defender is one of the best and most reliable free security programs because it offers all the necessary tools to protect your Windows system, including: Virus and threat protection, firewall and network protection, application and browser control, etc.
To keep Windows 10 safe and secure, it is recommended to periodically run a Full Scan of your system for viruses and always run a custom scan on storage devices or files from other sources. (For example, if you have inserted a USB disk belonging to another user, or downloaded a file from the Internet, or received by email.)
In this guide, we have demonstrated different ways to scan your system, or a specific file/folder for Malware using Windows Defender antivirus.
How to Scan Files or Folders for Viruses with Windows 10 Antivirus.
Method 1. Run Microsoft Defender Scan from Right-Click Menu.
Method 2. Perform a Custom or a Full Virus Scan with Defender.
Method 3. Scan for Viruses from Command Line.
Method 3. Scan for Viruses from PowerShell.
Method 1. How to Scan a certain Folder or File using by using the right-click menu.
The easiest way to scan a specific item (file, folder, drive) with Windows Defender, is by using the right-click menu:
1. Right-click on the item that you want to scan for threats.
2. Choose Scan with Microsoft Defender from the context menu.
3. You will see the Windows Security window open and the selected folder or file will be scanned for malware.

4. When the scan is completed:
a. If any threats are found, click on the Start actions button and let the system to take the necessary actions and to remove them.

b. If no threats are found, then the scanned item is clean and no any other action needed.
![clip_image004_thumb[1]](https://www.wintips.org/wp-content/uploads/2021/10/clip_image004_thumb1_thumb.png "clip_image004_thumb[1]")
Method 2. How to perform a CUSTOM Scan with Windows Defender security program.
Another way to scan a folder, file or an external USB drive, is by using the «Custom Scan» option in Windows 10 Security:
1. Open the Run command box by holding the Win and R keys at the same time.
2. Type the following and hit Enter:
- windowsdefender:
3. Click on Virus & threat protection and open the Scan Options.
4. Select Custom Scan* and click Scan Now. *
* Note: To scan your entire system for malware, select the Full scan option and then click Scan now.

5. In the «Select Folder» window, select the folder/file or drive that you want to scan for threats and click on the Select Folder button.
![clip_image011_thumb[1]](https://www.wintips.org/wp-content/uploads/2021/10/clip_image011_thumb1_thumb.jpg "clip_image011_thumb[1]")
Method 3: How to Perform a Virus Scan with Defender using Command Prompt
To scan your system from command line with Windows 10 Defender Antivirus:
1. Open Command prompt as Administrator. To do that:
1. Open the Run command box by holding the keys Win + R at the same time.
2. Type cmd & press the keys Ctrl+Shift+ Enter. ** Note: At «User Access control (UAC)» permission prompt click on Yes.
2. In the command prompt window, execute the below commands in order (press Enter after typing each command) .
- cd c:\ProgramData\Microsoft\Windows Defender\Platform\
- dir

3. From the listed folders, find the name of the most recently created folder which indicates the latest platform version of Defender . *
* Note: The folder names indicates which Windows Defender platform versions are installed on the system. The most recently created folder is the latest platform version of Windows Defender.
4. Now, type the following command & hit Enter:*
- cd Latest-Platform-Version
* Note: In this example the latest platform version is «4.18.2108.7-0», so the command will be:
- cd 4.18.2108.7-0

- mpcmdrun -Scan -ScanType 3 -File «<path_to_required_folder_or_file>«
Example: if you want to scan a folder named «Sample» located in the Desktop (C:\Users\admin\Desktop\Sample), the command to be used is:
- mpcmdrun -Scan -ScanType 3 -File «C:\Users\admin\Desktop\Sample»

* Notes.
1. To run a Quick Scan for viruses from command line give this command:
- MpCmdRun.exe -Scan -ScanType 1
2. To perform a Full Scan for viruses give the below command:
- MpCmdRun.exe -Scan -ScanType 2
Method 4: How to Scan for Viruses from PowerShell with Windows Defender.
To scan your system for threats from PowerShell:
1. Open PowerShell as Administrator. To do that:
1. Open the Run command box by holding the keys Win + R at the same time.
2. Type powershell & press the Ctrl+Shift+ Enter keys. ** Note: At «User Access control (UAC)» permission prompt click on Yes.
2. To scan for viruses a particular folder/file from PowerShell, give the following command: *
- Start-MpScan -ScanType CustomScan -ScanPath «<path_to_the_folder_or_file>«
Example: if you want to scan a folder named «Sample» located in the Desktop (C:\Users\admin\Desktop\Sample), the command will be:
- Start-MpScan -ScanType CustomScan -ScanPath «C:\Users\admin\Desktop\Sample»

* Notes:
1. To Quick Scan your PC from PowerShell, give this command
- Start-MpScan -ScanType QuickScan
2. To run a Full Scan from PowerShell give this command:
- Start-MpScan -ScanType FullScan

That’s it! Which method worked for you?
Let me know if this guide has helped you by leaving your comment about your experience. Please like and share this guide to help others.
If this article was useful for you, please consider supporting us by making a donation. Even $1 can a make a huge difference for us in our effort to continue to help others while keeping this site free:
- Author
- Recent Posts
Konstantinos is the founder and administrator of Wintips.org. Since 1995 he works and provides IT support as a computer and network expert to individuals and large companies. He is specialized in solving problems related to Windows or other Microsoft products (Windows Server, Office, Microsoft 365, etc.).
Вы можете запустить полную проверку антивирусом Microsoft Defender тремя способами: с помощью службы Безопасность Windows, PowerShell или командной строки.
В Windows 11 антивирус Microsoft Defender по умолчанию работает в фоновом режиме, что позволяет ему быстро определять и блокировать практически любые вредоносные программы, таких как вирусы, программы-вымогатели, шпионское ПО, руткиты и др. Также служба «Безопасность Windows» в реальном времени защищает ваше устройство от возможных угроз. Тем не менее, иногда вам все же может потребоваться выполнить полную проверку на вирусы вручную, чтобы убедиться, что ваше устройство с Windows 11 в безопасности.
Иногда, причиной для полной проверки Windows 11 антивирусом, может послужить медленная работа, большая сетевая активность, подозрение что было установлено вредоносное ПО. Встроенный антивирус с помощью приложения «Безопасность Windows» позволяет выполнять полное сканирование четырьмя различными типами сканирования, включая быстрое, настраиваемое, полное и автономное.
В этом руководстве рассмотрим, как Windows 11 запустить полное сканирование на вирусы с помощью встроенного приложения или с помощью Терминала используя командную строку или Power Shell.
Как запустить полное сканирование антивирусом Microsoft Defender в Windows 11 с помощью службы «Безопасность Windows»
Шаг 1: Чтобы запустить полную проверку на вирусы в Windows 11, выполните следующие действия:
Шаг 2: Откройте Пуск и перейдите в список «Все приложения».
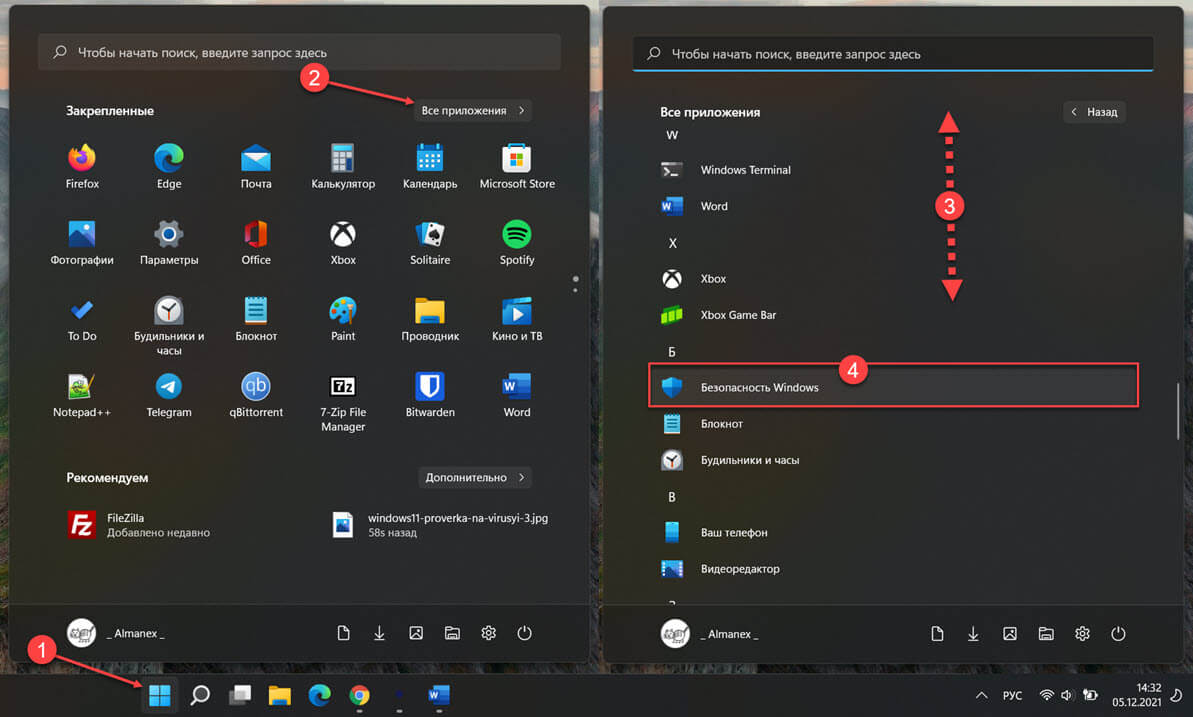
Шаг 3: Найдите пункт «Безопасность Windows» и откройте приложение.
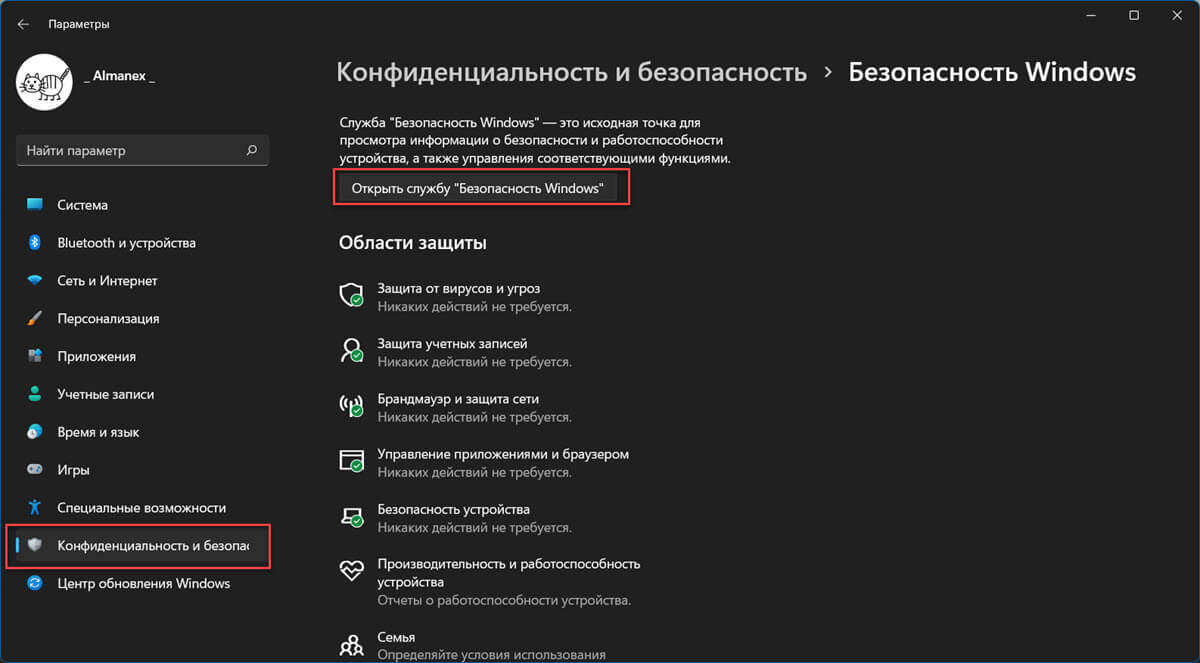
Или, откройте приложение «Параметры» перейдите в раздел «Конфиденциальность и безопасность» → «Безопасность Windows» и нажмите кнопку «Открыть службу безопасность Windows».
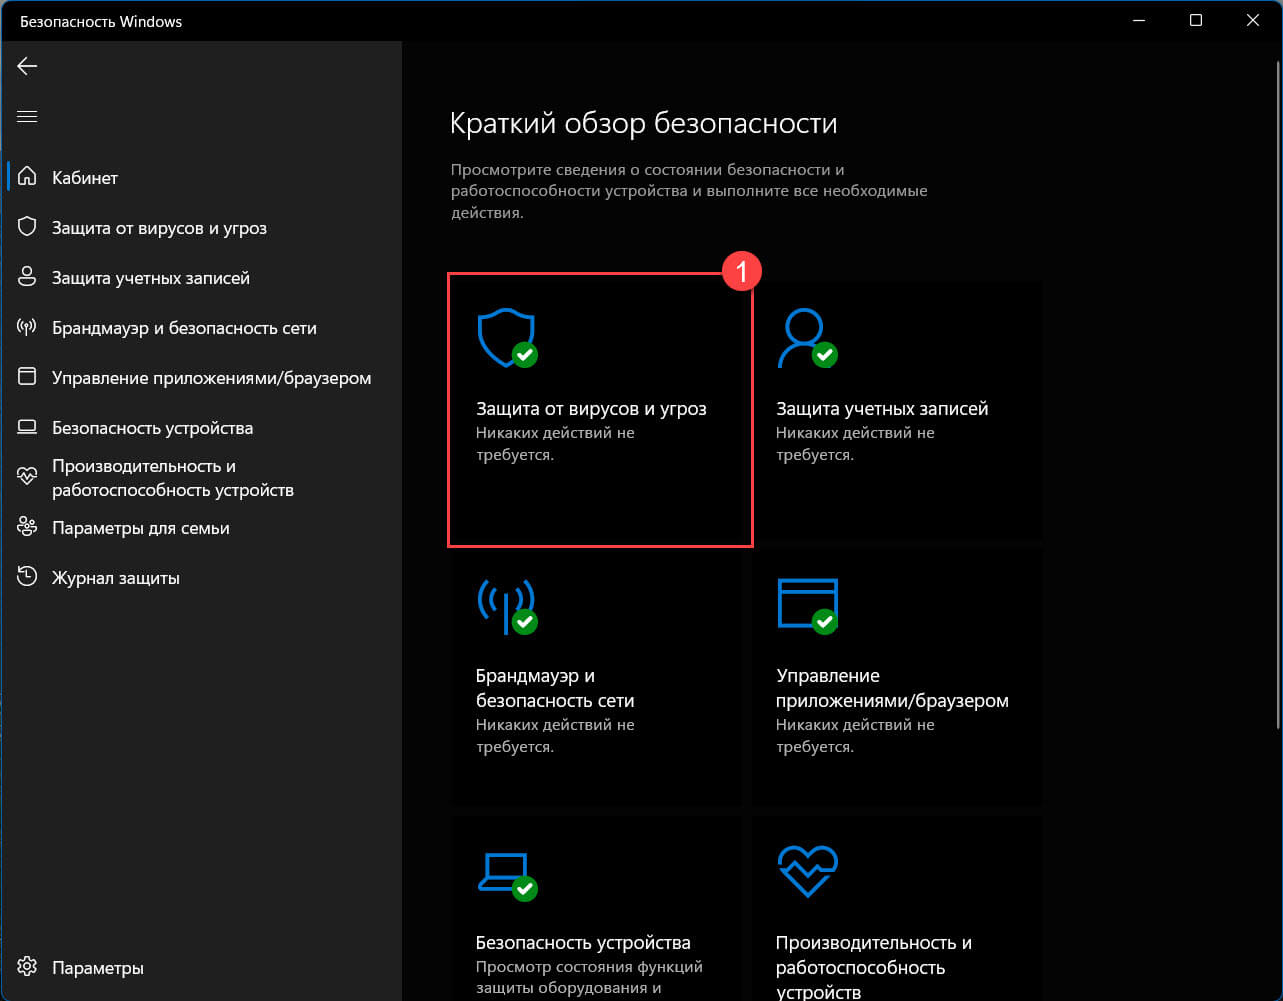
Шаг 4: В открывшемся приложении кликните плитку «Защита от вирусов и угроз».
Шаг 5: В разделе «Текущие угрозы» найдите и откройте ссылку «Параметры сканирования».
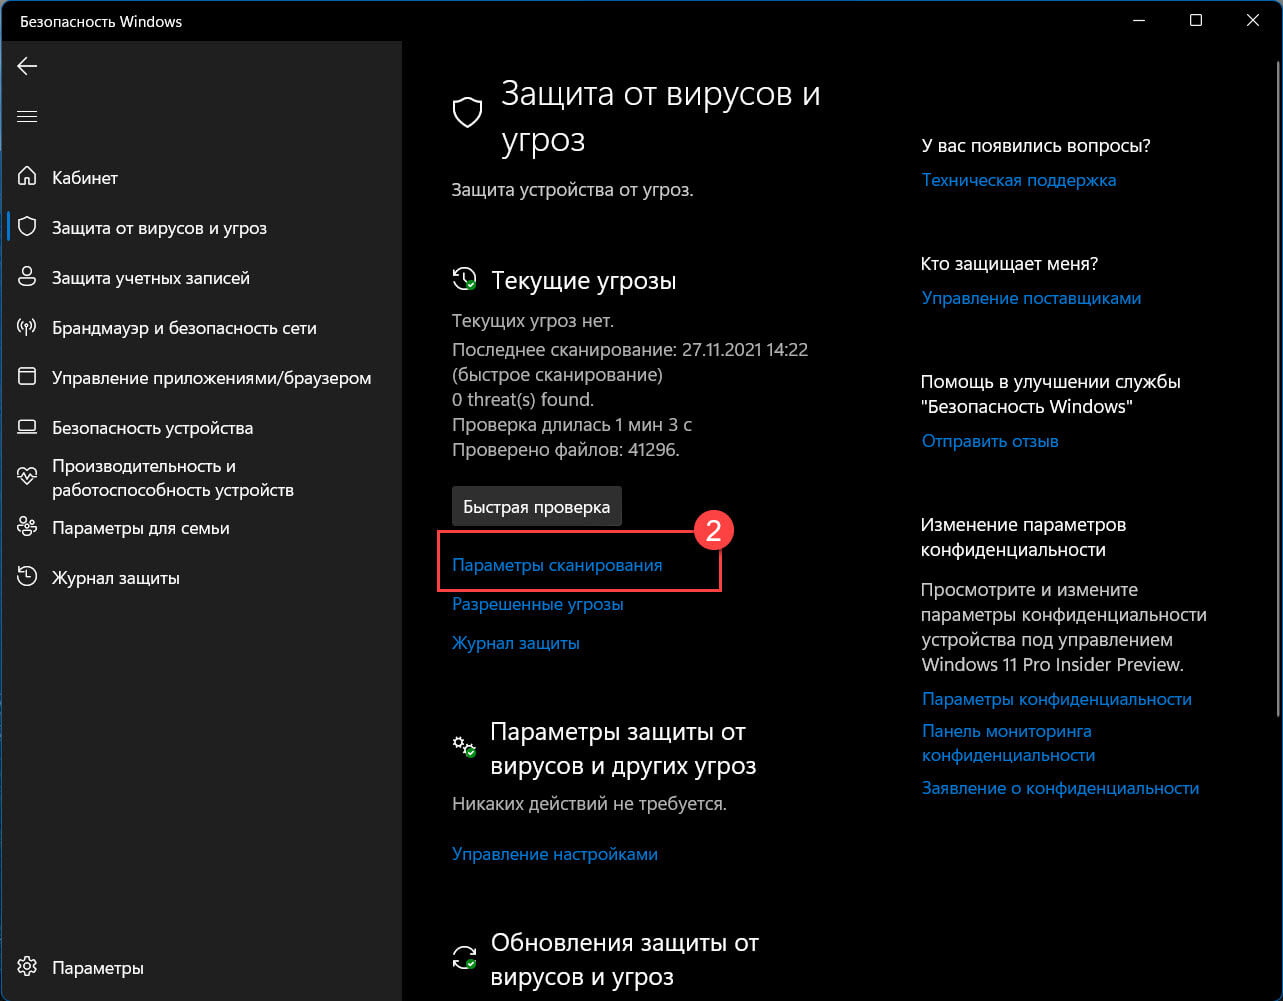
Здесь вы найдете все доступные варианты сканирования вашего устройства:
- Быстрая проверка
- Полное сканирование
- Настраиваемое сканирование
- Проверка автономным модулем Microsoft Defender
Шаг 6: Выберите параметр «Полное сканирование», чтобы проверить операционную систему на наличие вирусов и других вредоносных программ.
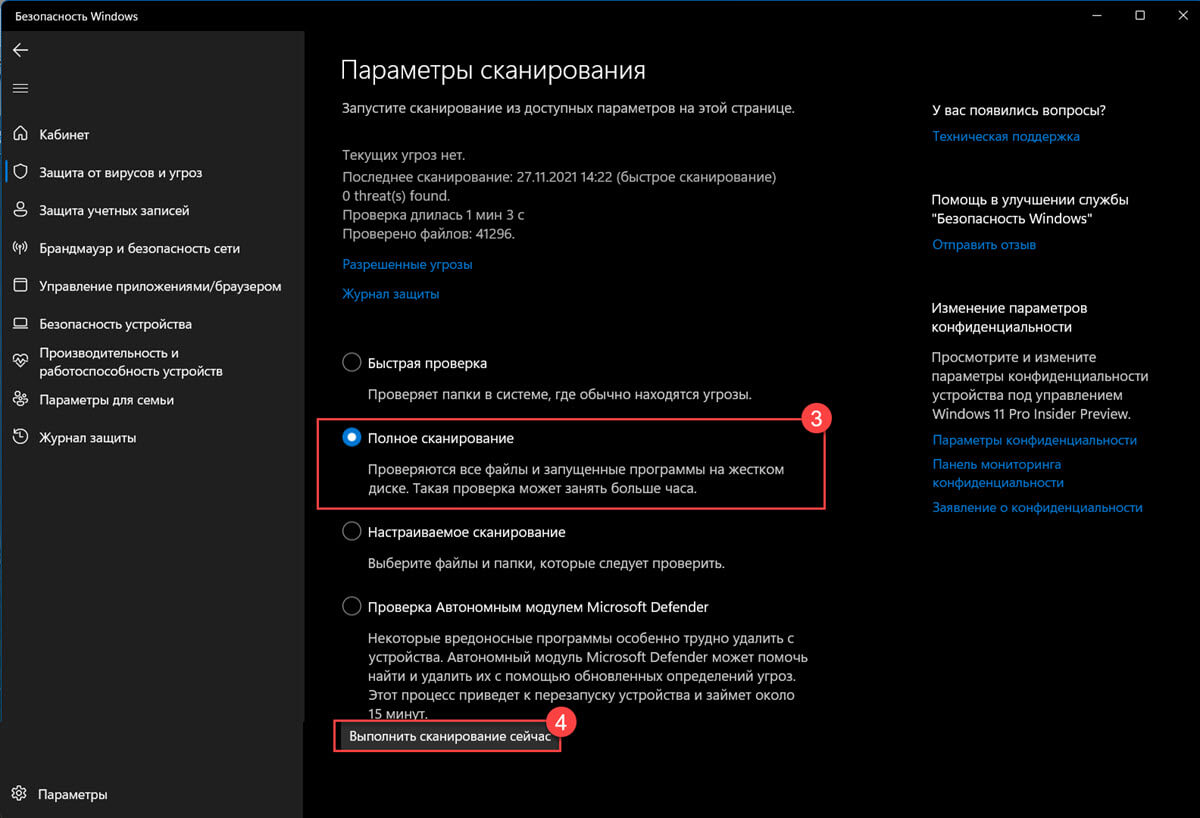
Шаг 7: Теперь нажмите кнопку «Выполнить сканирование сейчас».
Антивирус Microsoft Defender просканирует компьютер на наличие вирусов и других типов вредоносных программ. Если во время проверки будет обнаружены угрозы, антивирус удалит их автоматически или поместит зараженные файлы в карантин.
Как запустить полное сканирование Windows 11 используя Терминал – PowerShell или Командную строку
PowerShell
Шаг 1: Откройте любым удобным вам способом Терминал Windows от имени администратора. По умолчанию в терминале используется профиль «PowerShell».
Шаг 2: Чтобы запустить полную проверку на вирусы с помощью PowerShell введите следующую команду, и нажмите Enter:
start-mpscan -scantype fullscan
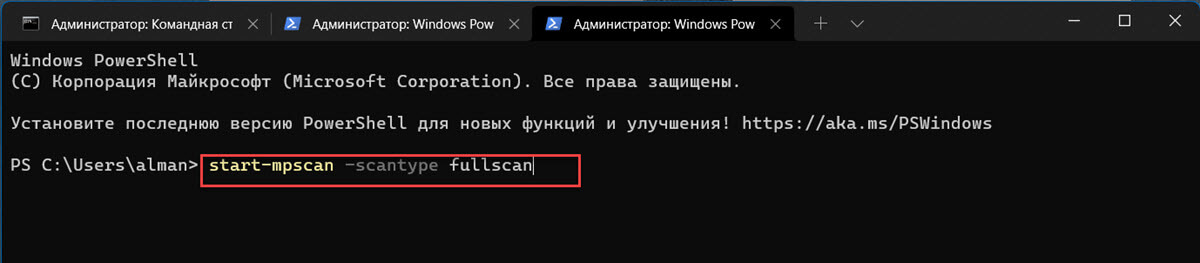
После того как вы нажмете клавишу Enter, антивирус выполнит полное сканирование вашего устройства с Windows 11, и удалит все вредоносные программы или обнаруженные угрозы.

Командная строка
Если в терминале по умолчанию вы используете профиль с Командной строкой,
Шаг 1: Введите следующие команды по очереди и нажмите Enter, чтобы перейти в папку с последней версией антивируса Microsoft Defender:
cd C:\ProgramData\Microsoft\Windows Defender\Platform\4*
Шаг 2: Введите или скопируйте и вставьте, следующую команду, нажмите Enter, чтобы выполнить полную проверку на вирусы:
mpcmdrun -scan -scantype 2
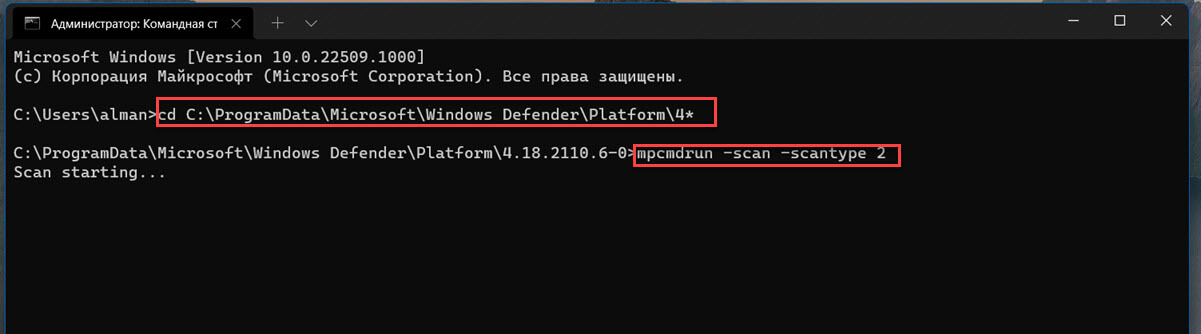
Вы увидите сообщение «Scan starting…», Microsoft Defender проверит на наличие, обнаружит и удалит угрозы и вредоносные программы на вашем устройстве. После завершения сканирования вы увидите сообщение что сканирование завершено.