
Шнур HDMI для ноутбука — вещь достаточно универсальная. С его помощью можно подключить устройство как к монитору, так и к телевизору, например, и наслаждаться любимым сериалом на большом экране. Это помогает, если телик устарел и не поддерживает Android TV. Автор статьи подключал ноутбук к телевизору, чтобы на дне рождения провести игры для вечеринок Jackbox. По итогу вы получаете высококачественное изображение на большом экране.
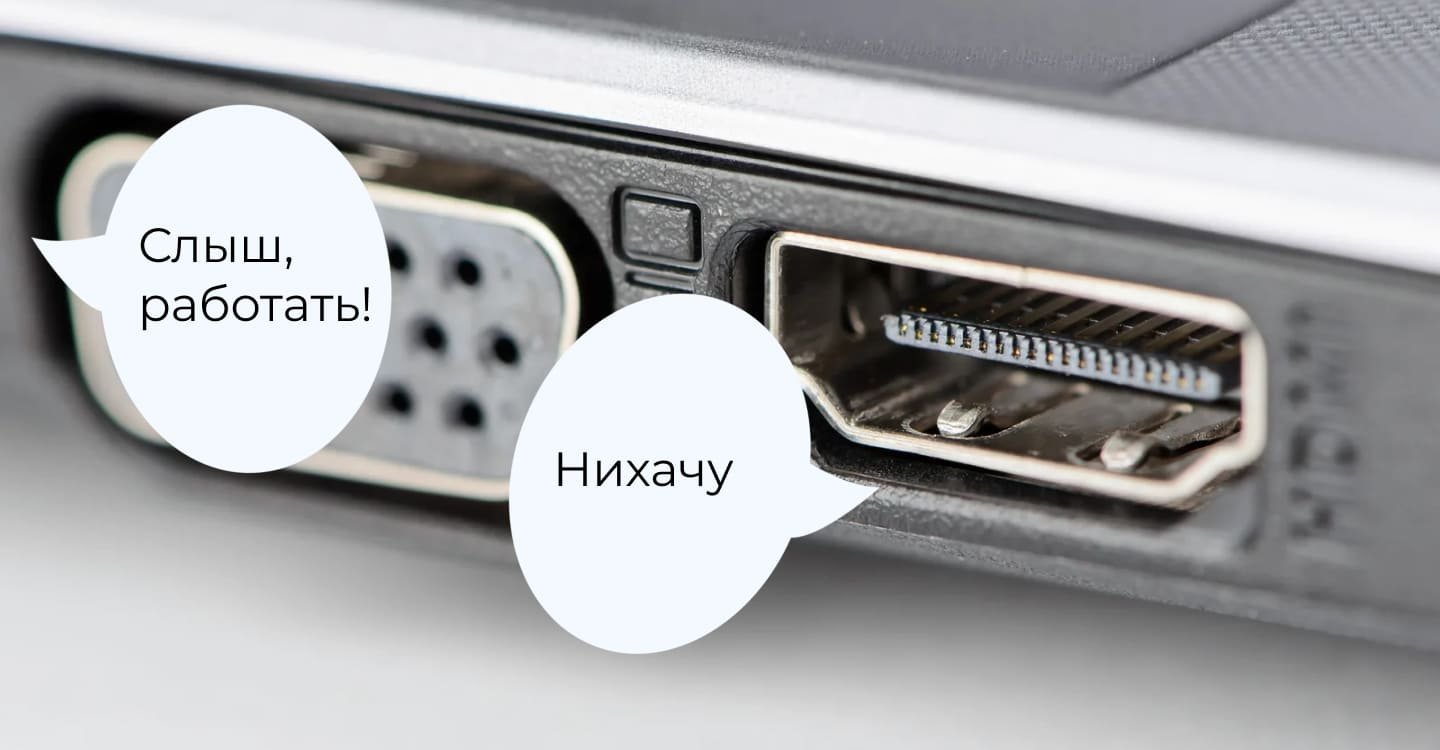
Источник: fauntleroy.net / Отказ разъема HDMI работать
Иногда ноутбуки на базе Windows 10 испытывают проблемы с тем, чтобы увидеть устройство, подключенное по HDMI. Если HDMI разъем на вашем ноутбуке перестал работать, существует несколько возможных причин и способов решения этой проблемы.
Этот гайд поможет вам разобраться в причинах неполадки и предложит ряд решений для случаев, когда ноутбук не видит HDMI. Следуйте пошаговой инструкции, чтобы диагностировать и устранить неисправность.
Проверка физического подключения
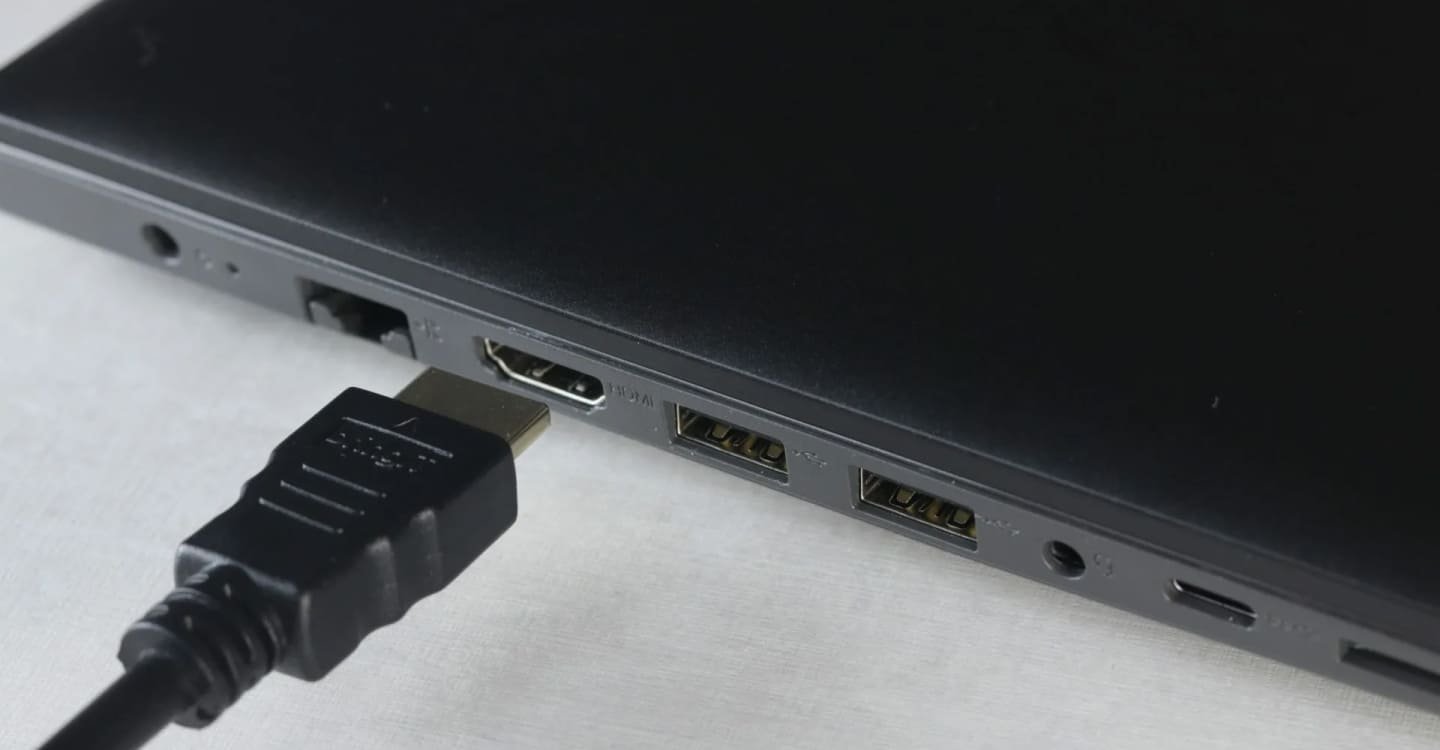
Источник: loftworks.ru / Кабель и разъем HDMI
Первое, что необходимо сделать убедиться, что кабель HDMI полностью вставлен в разъемы как ноутбука, так и внешнего устройства. Очень часто пользователи не до конца подключают кабель, из-за чего контакты не замыкаются должным образом. Постарайтесь аккуратно вытащить кабель и снова вставить его, проверив плотность подключения.
Если разъем кажется исправным, стоит обратить внимание на сам кабель. HDMI кабели могут со временем повреждаться, особенно если они часто подвергаются механическому напряжению или перегибам. Попробуйте использовать другой кабель или протестировать текущий на другом устройстве. Если кабель поврежден, его замена решит проблему.
Настройки системы и режим отображения

Источник: CQ.ru / Признак того, что разъем не обнаружил другое устройство
Если с физическим подключением все в порядке, но изображение или звук не передаются, проверьте настройки системы. Иногда ноутбук не переключается автоматически на внешнее устройство через HDMI.
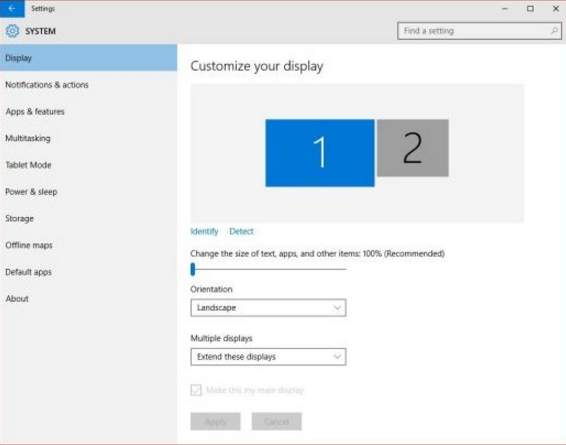
Откройте «Параметры» и перейдите в раздел «Система» и дальше в «Дисплей». Здесь можно увидеть, распознается ли внешнее устройство. Если оно не отображается, можно попробовать вручную переключиться между режимами отображения, используя комбинацию клавиш, например, «Fn» F4 (или другую клавишу, отвечающую за вывод на внешний экран).
Также следует убедиться, что режим вывода настроен правильно. Варианты могут включать дублирование экрана, расширение рабочего стола или использование только внешнего экрана. Если режим вывода выбран некорректно, HDMI может не функционировать.
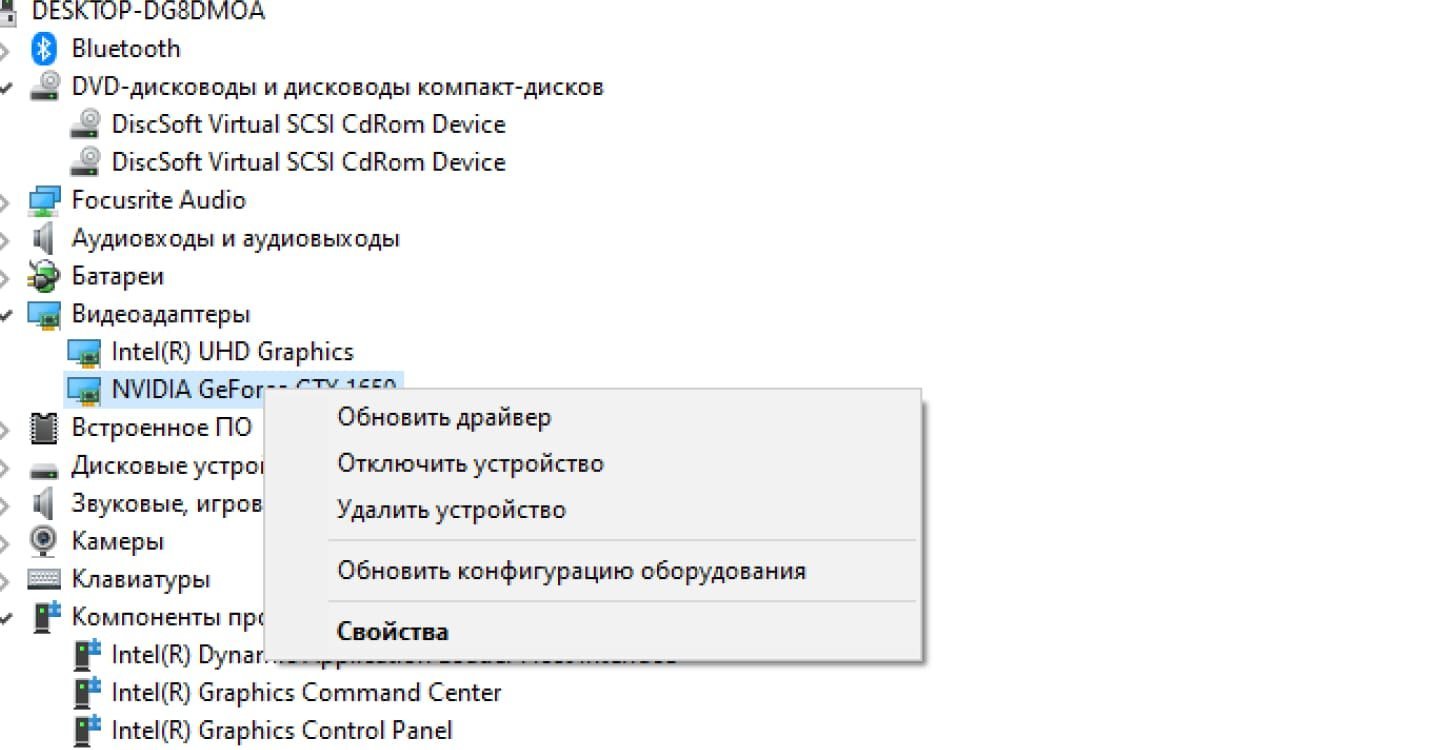
Обновление драйверов видеокарты

Источник: pinterest.com / Пакет драйверов, мем
Одна из частых причин того что не работает HDMI на ноутбуке — это устаревшие или поврежденные драйверы видеокарты. Для проверки этого откройте «Диспетчер устройств» и найдите раздел «Видеоадаптеры». Если рядом с видеокартой отображается значок ошибки, это указывает на проблемы с драйверами.
Чтобы устранить их, скачайте актуальные версии драйверов с официального сайта производителя видеокарты (например, NVIDIA, AMD). Также можно воспользоваться функцией автоматического обновления драйверов в Windows. Если после обновления драйверов проблема сохраняется, попробуйте переустановить их вручную, предварительно удалив старые версии.
Ручная установка предыдущей версии драйвера
Источник: CQ.ru / Путь до обновления драйвера видеокарты
Если после обновления драйверов видеокарты или системы HDMI перестал работать, можно попробовать откатить драйверы до предыдущей версии. Это особенно актуально, если проблема возникла сразу после автоматического обновления через Windows Update. В «Диспетчере устройств» выберите вашу видеокарту, откройте ее свойства и на вкладке «Драйвер» выберите опцию «Откатить драйвер».
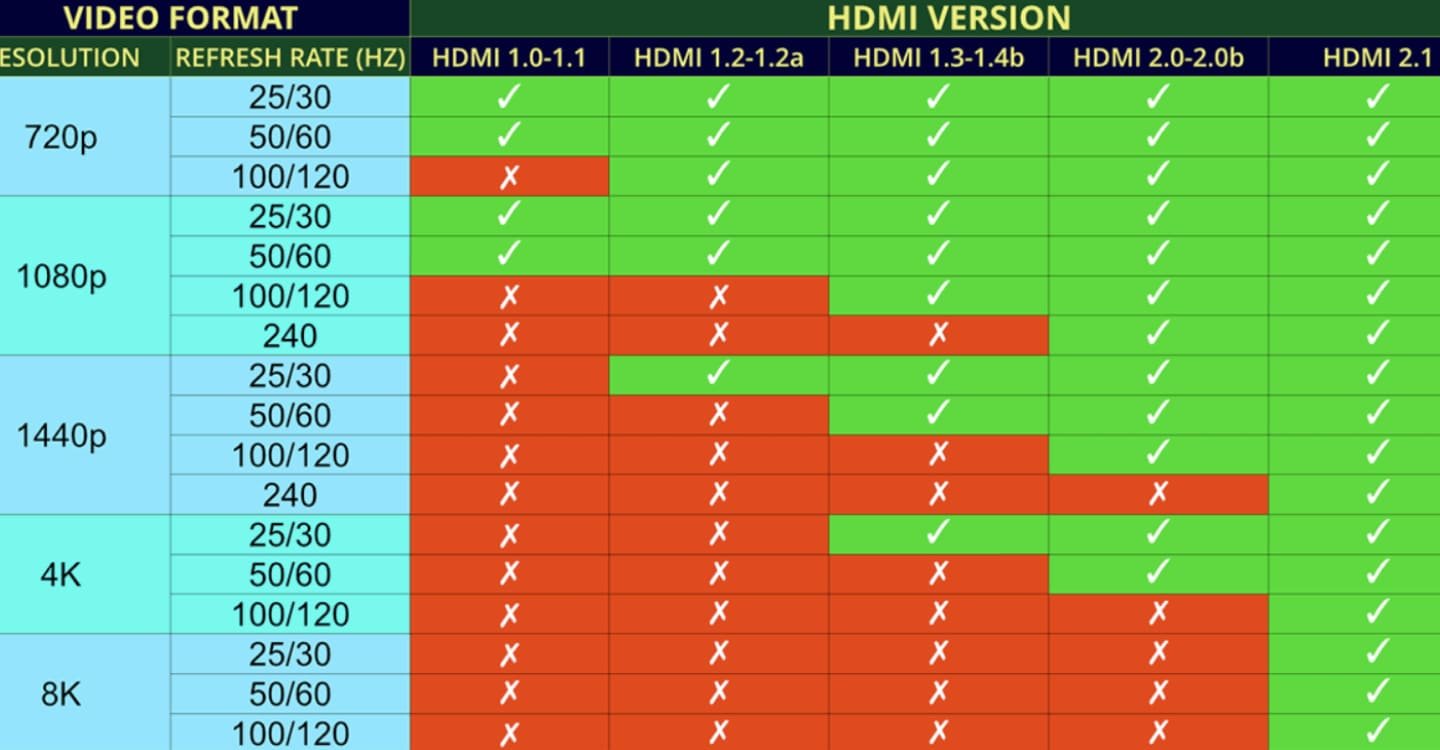
Источник: technopat.net / Таблица совместимости HDMI
Некоторые устройства могут поддерживать разные версии стандарта HDMI, что также может вызывать неполадки. Например, если ваш монитор поддерживает версию HDMI 2.0, а ноутбук HDMI 1.4, могут возникать проблемы с выводом сигнала. В таких случаях попробуйте снизить разрешение экрана на ноутбуке через настройки системы и проверьте, появляется ли изображение. Снижение разрешения иногда помогает устранить несовместимость между устройствами.
Переключение между интегрированной и дискретной видеокартой
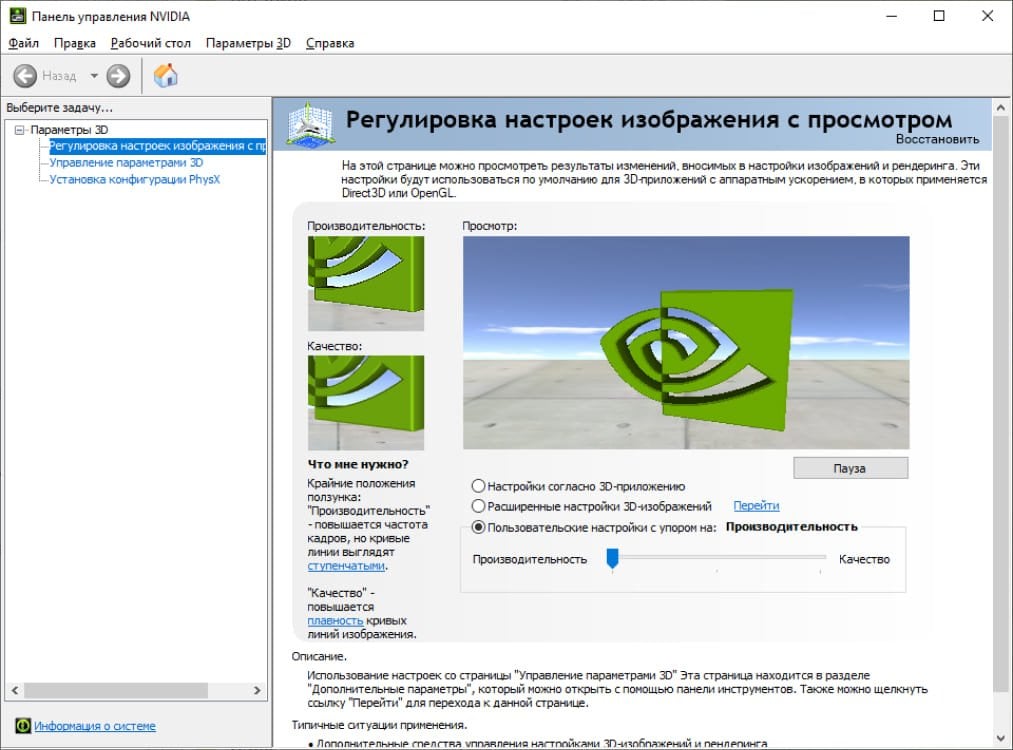
Источник: CQ.ru / NVIDIA Control Panel
Многие современные ноутбуки имеют две видеокарты: интегрированную (например, Intel) и дискретную (например, NVIDIA или AMD). Некоторые ноутбуки могут выводить изображение через HDMI только при использовании дискретной видеокарты. Для переключения между видеокартами откройте панель управления драйвером вашей видеокарты (например, NVIDIA Control Panel) и настройте предпочтительную видеокарту для конкретных приложений или в целом для системы.
Если настройка видеокарты не решает проблему, попробуйте проверить параметры в BIOS. Некоторые модели ноутбуков могут иметь настройки, позволяющие выбрать активную видеокарту для HDMI-выхода.
Использование адаптера или переходника
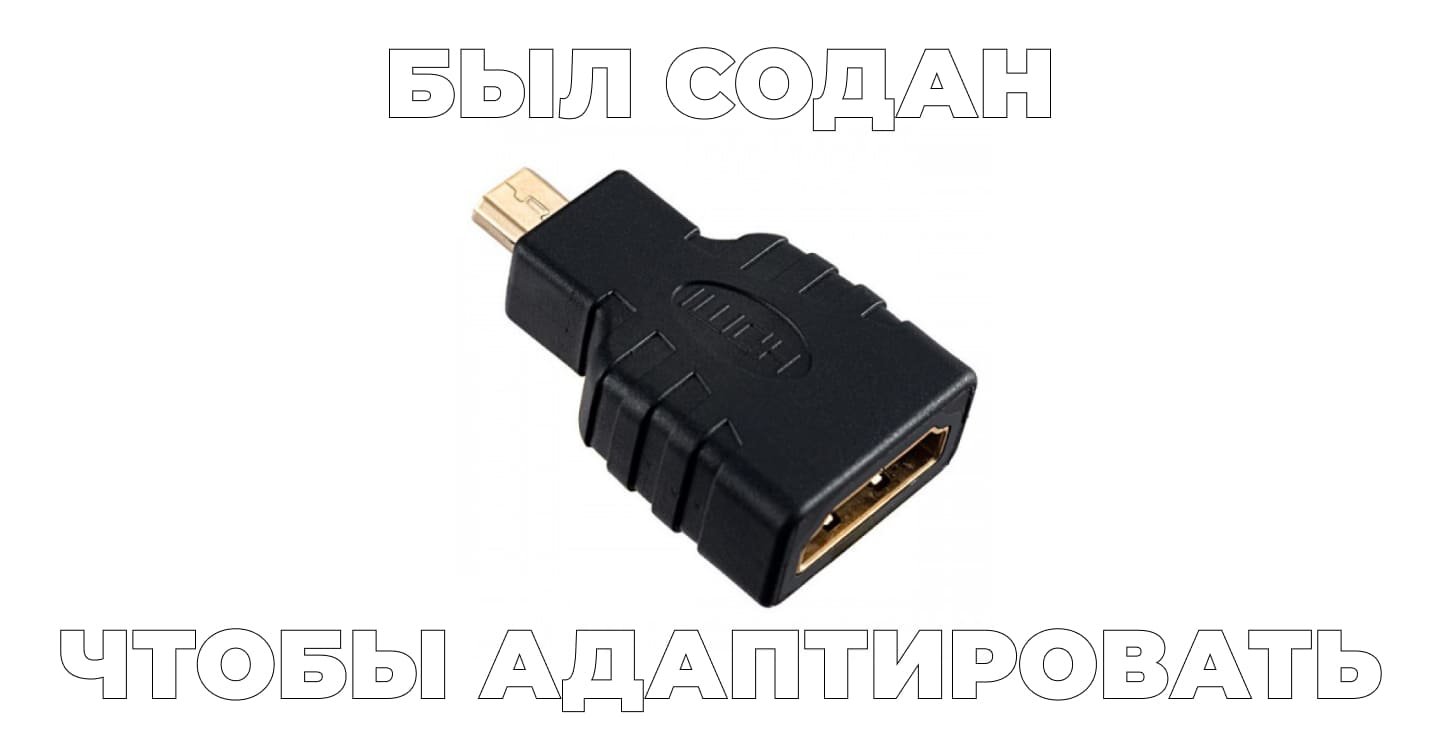
Источник: megacd.ru / Фото адаптера HDMI
Если ноутбук имеет ограниченное количество портов или если вы используете современные ультрабуки, у которых отсутствуют привычные разъемы HDMI, можно попробовать использовать адаптеры или переходники, например, USB-C HDMI. Однако не все адаптеры поддерживают полноценную передачу видео и аудио, поэтому при покупке нужно убедиться в их совместимости с вашим ноутбуком и версией HDMI.
Обновление BIOS
В некоторых случаях проблема с HDMI может быть связана с устаревшей версией BIOS на вашем ноутбуке. Если ни одно из предыдущих решений не сработало, попробуйте проверить, доступно ли обновление BIOS для вашей модели ноутбука. Это можно сделать на сайте производителя. Обновление BIOS может включать исправления, улучшающие совместимость с различными устройствами и разъемами.
Ремонт HDMI-разъема
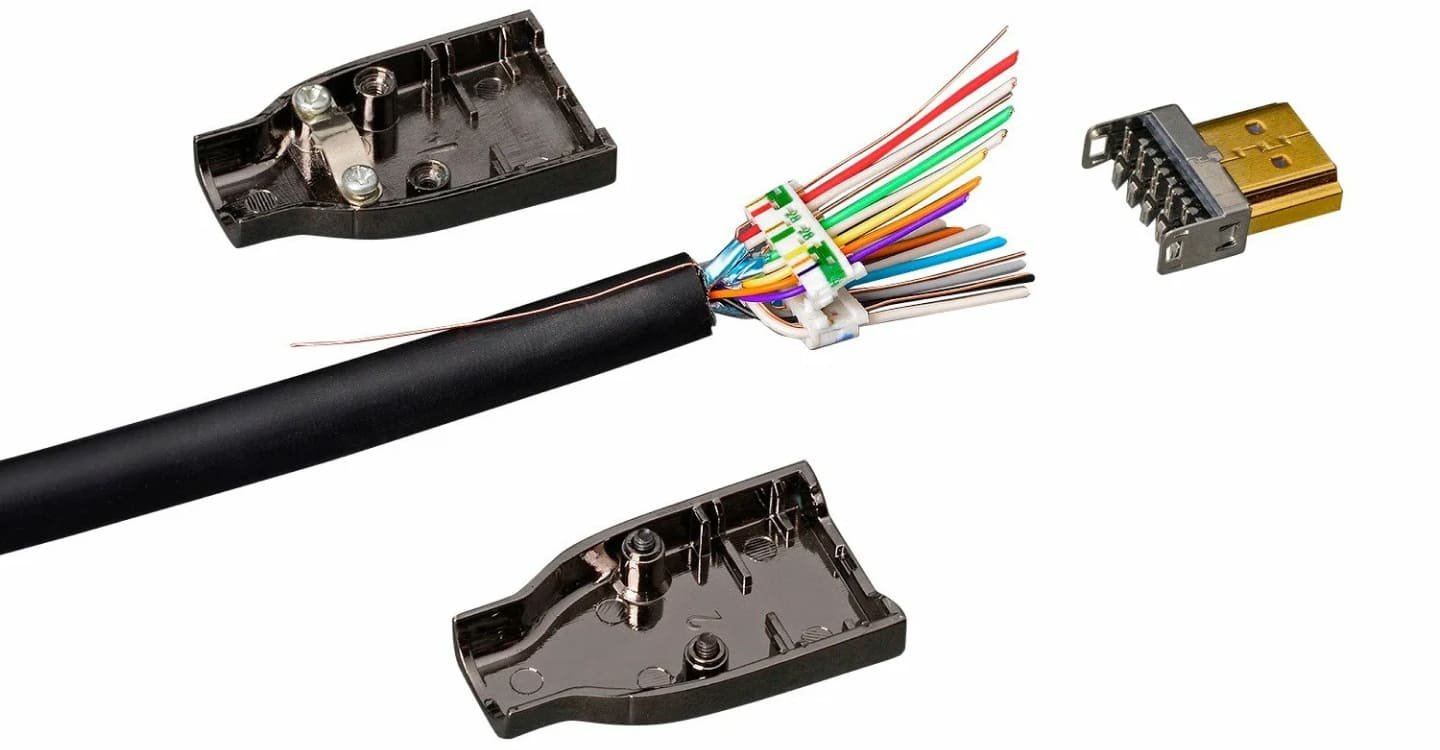
Источник: tmyr.ru / Составляющие HDMI
Если ни одно из программных решений не помогло, возможно, проблема кроется в аппаратной неисправности HDMI-разъема. Он может быть поврежден из-за падения ноутбука, резкого извлечения кабеля или просто со временем износиться. В таком случае рекомендуется обратиться в сервисный центр для диагностики и ремонта. Самостоятельный ремонт или замена разъема могут быть сложными и требуют специальных инструментов и навыков.
Проверка внешнего устройства (монитора или телевизора)
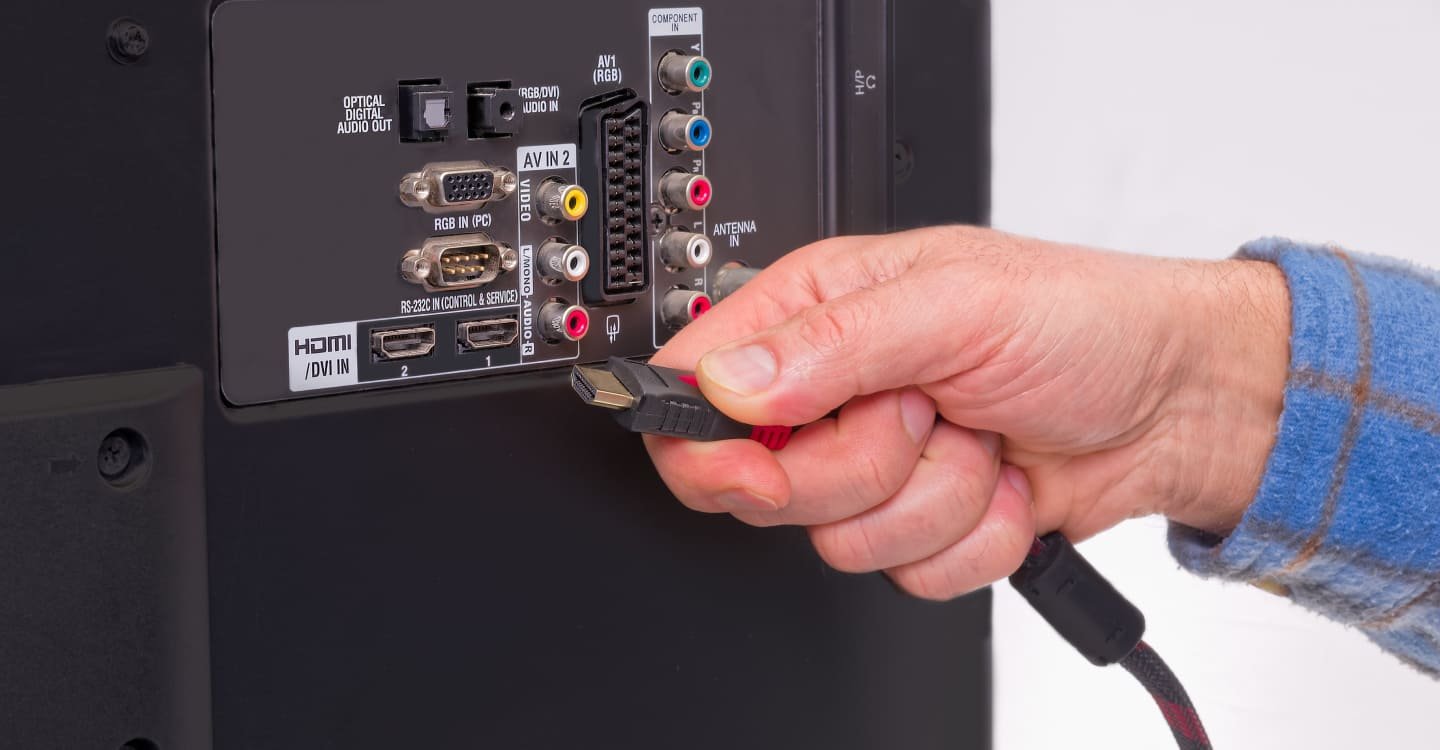
Источник: vivaldo-radiator.ru / Задняя поверхность телевизора
Проблема может быть не в ноутбуке, а в подключенном внешнем устройстве. Чтобы исключить такую возможность, подключите ваш ноутбук к другому монитору или телевизору с помощью того же HDMI-кабеля. Если ноутбук успешно передает изображение на другое устройство, то проблема, скорее всего, заключается в самом мониторе или телевизоре.
На внешнем устройстве также могут быть настройки, которые влияют на прием сигнала по HDMI. Например, на некоторых телевизорах или мониторах необходимо вручную выбрать входной источник сигнала (HDMI). Проверьте меню настроек вашего монитора или телевизора и убедитесь, что выбран правильный входной канал для HDMI.
Отключение режима энергосбережения
Источник: CQ.ru / Процесс отключения и настройки режима электропитания
Некоторые ноутбуки могут отключать HDMI-разъем, когда система работает в режиме энергосбережения или когда активированы другие энергосберегающие функции. Чтобы проверить это, откройте «Панель управления» и перейдите в раздел «Электропитание». В настройках текущего плана питания попробуйте изменить параметры для работы от сети и батареи. Убедитесь, что параметры для дисплея и видеоадаптера установлены на «максимальную производительность». Это может предотвратить отключение внешнего дисплея через HDMI при работе ноутбука от батареи.
Также можно попробовать отключить режим сна или гибернации, так как иногда после выхода из этих режимов ноутбук может не восстанавливать связь с внешним дисплеем через HDMI.
Отключение аппаратного ускорения
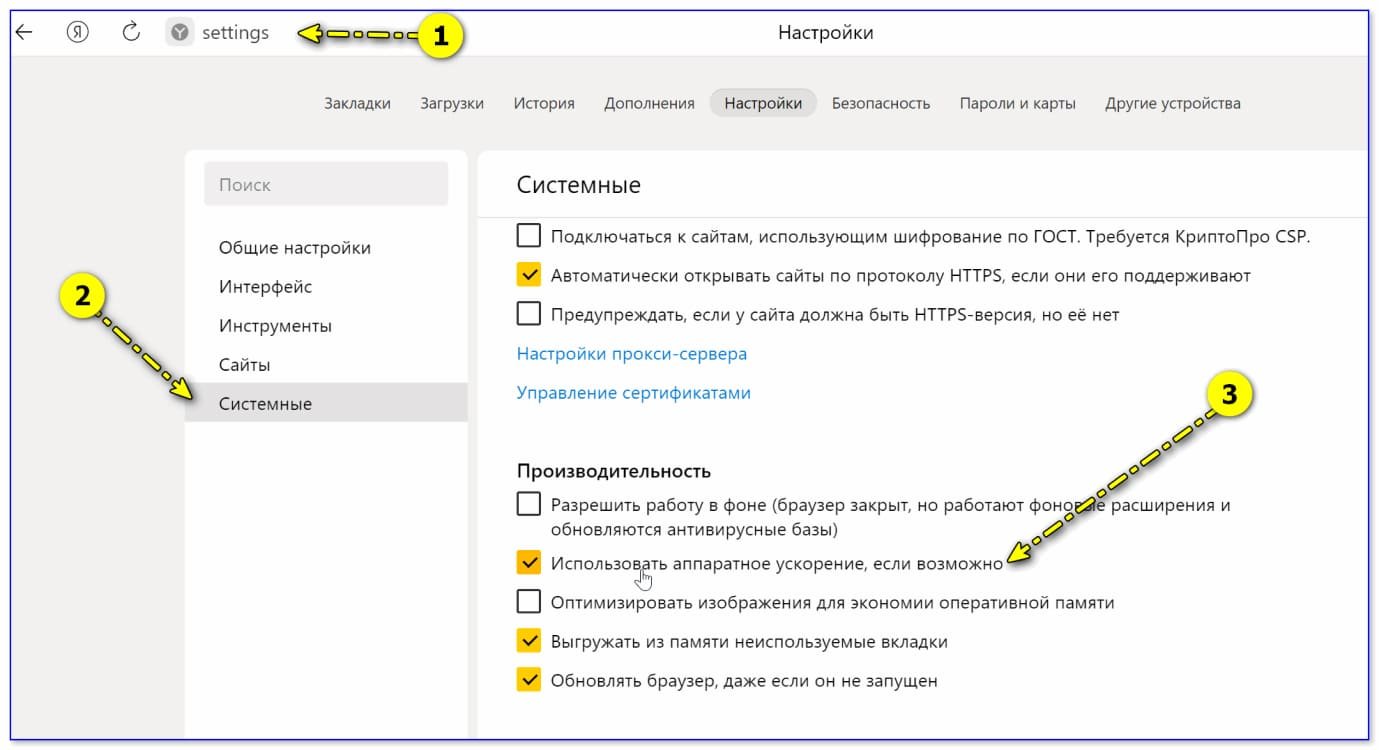
Источник: ocomp.info / Отключение аппаратного ускорения в Яндекс Браузере
Некоторые графические приложения и программы могут конфликтовать с HDMI-выходом из-за аппаратного ускорения графики. Это особенно актуально для браузеров, таких как Google Chrome или Mozilla Firefox, которые используют аппаратное ускорение для повышения производительности. Чтобы исключить этот фактор, попробуйте отключить аппаратное ускорение в настройках программ, где это возможно.
Например, в Chrome для этого нужно открыть меню «Настройки», найти раздел «Система» и снять галочку с опции «Использовать аппаратное ускорение, если доступно». После этого перезапустите браузер и проверьте, решена ли проблема.
Переустановка или восстановление операционной системы
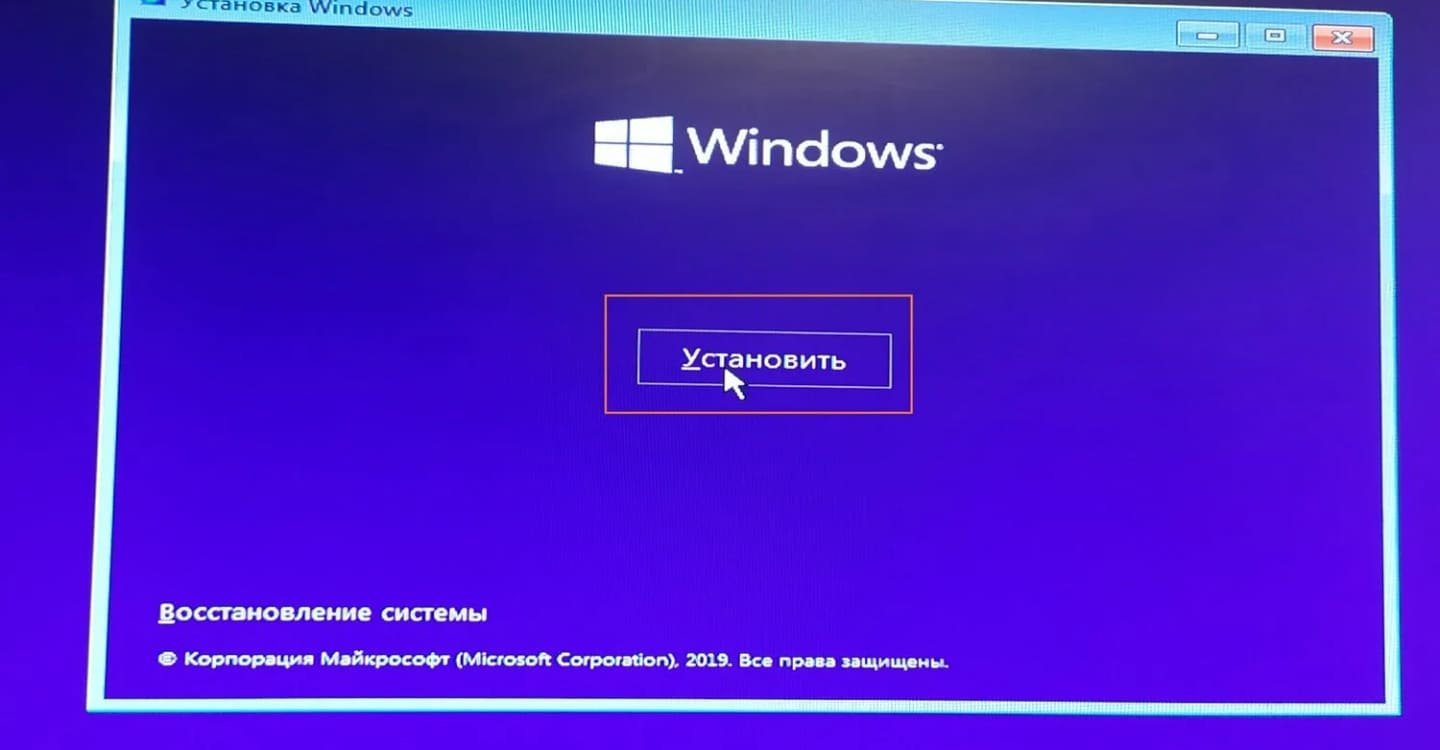
Источник: uslugi.yandex.ru / Установка операционной системы Windows
Если ни одно из предложенных решений не помогло, возможно, проблема кроется в системных файлах операционной системы. Операционная система может быть повреждена или некорректно настроена, что влияет на работу HDMI. В таком случае вы можете попробовать восстановить систему к более ранней точке восстановления, когда HDMI работал корректно.
Чтобы восстановить систему, откройте «Панель управления», выберите «Восстановление», а затем «Запуск восстановления системы». Выберите точку восстановления, созданную до возникновения проблемы с HDMI, и выполните восстановление.
Если точек восстановления нет или они не помогли, более радикальным шагом может быть переустановка операционной системы. Перед этим обязательно создайте резервные копии всех важных данных, так как переустановка системы может удалить их.
Использование внешней графической станции (eGPU)
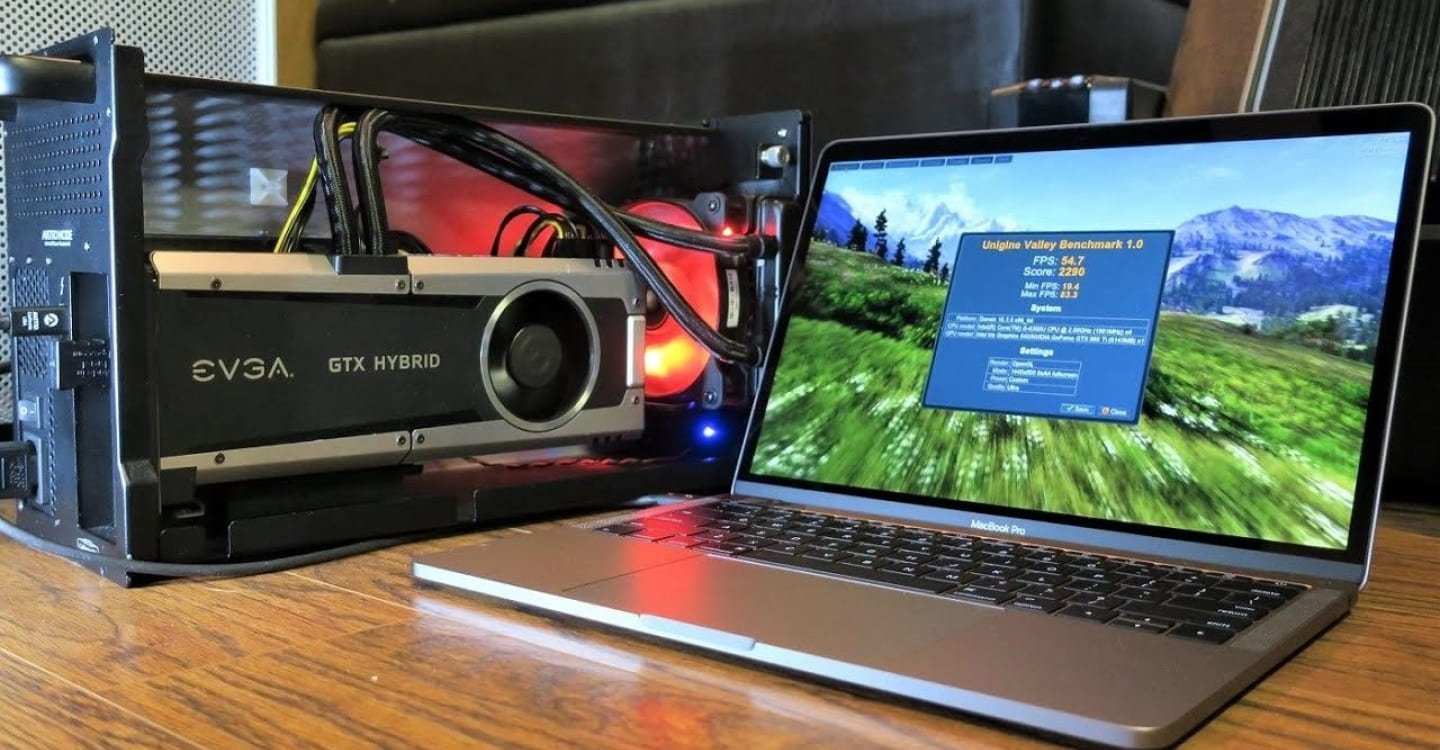
Источник: pinterest.com / Внешняя графическая станция
Если ваш ноутбук поддерживает подключение внешних графических станций через Thunderbolt или другие высокоскоростные интерфейсы, можно попробовать использовать eGPU для вывода изображения через HDMI. Внешняя видеокарта может заменить встроенный видеоадаптер ноутбука, обеспечив качественный вывод изображения на внешний дисплей. Это решение актуально для ноутбуков с ограниченной графической мощностью или для тех, кто часто сталкивается с проблемами работы встроенного видеоадаптера.
Диагностика через Linux
Если проблема сохраняется, и вам кажется, что она может быть связана с операционной системой Windows, попробуйте загрузить ноутбук с живого Linux-дистрибутива, например, Ubuntu. Это позволит вам проверить, работает ли HDMI разъем на уровне аппаратного обеспечения. Если HDMI работает в Linux, проблема, скорее всего, заключается в программном обеспечении Windows, и вы можете сосредоточиться на устранении неполадок в самой системе.
Если же HDMI не работает даже в Linux, это подтверждает аппаратную неисправность, и тогда потребуется обратиться в сервис для диагностики и ремонта.
Проверка на наличие вирусов и вредоносных программ

Источник: youtube.com / Нахождение вирусов
Вредоносные программы могут вносить изменения в системные настройки или драйверы, что может привести к проблемам с подключением внешних устройств, в том числе через HDMI. Рекомендуется провести полное сканирование системы с помощью антивирусного программного обеспечения, чтобы убедиться, что система не заражена. Если обнаружены угрозы, выполните их удаление и проверьте работу HDMI после очистки системы.
Таким образом разъем HDMI может отказывать в работе по совершенно разным причинам. И к каждой из них есть свой уникальный подход. Если ваших сил и умений недостаточно, то рекомендуем сдать устройство в сервисный центр, где ему окажут внимание профессионалы.
Заглавное фото: trustedreviews.com
HDMI or High Definition Multimedia Interface includes two parts – (i) the port that establishes the connection and (ii) the connector cable that transmits the data. HDMI ports act as an all-digital interface that receives and transmits audio and video output signals between two devices.
Using these ports, you can project HQ videos and audios onto HD-capable devices, like TVs and audio receivers. Additionally, you can convert devices into a powerful multimedia hub using these ports. The ability to identify and communicate media and devices is called ‘HDMI handshake.’ But when this handshake faces any interruption, the HDMI port stops working, and you may encounter different problems, including:
- Television fails to recognize the laptop
- Video plays but there is no audio
- The image appears too big on the screen
- Video seems choppy
Why is HDMI not working on the Laptop/PC?
There are multiple reasons that may lead to problems with your HDMI port. However, the most common causes include:
- Incompatible or faulty drivers
- Corrupted registry
- Incompatible or corrupted apps installed on your system
- Temporary files and folders
How to Fix HDMI not working on PC/Laptop Issue?
We’ve shared some quick fixes and troubleshooting methods below to fix the issue.
Quick Fixes
Let’s start with some quick solutions.
Fix 1: Check HDMI Cable Connection
The issue could occur due to a simple hardware problem. Check if your HDMI cable is in good condition and properly connected to both ends, i.e., Windows and HDMI devices.
Fix 2: Try a Different HDMI Input
Sometimes, damaged HDMI ports might restrict your HDMI device from working on your Windows system properly. Hence, change the HDMI port and see if the problem resolves.
Fix 3: Restart and Reconnect your Devices
The PC HDMI not working issue can also occur due to improper bootup error with the devices. If your system or HDMI device doesn’t boot properly and results in error, you may face issues with the video or audio output. You can try rebooting your laptop or PC and re-plug your devices with HDMI. Follow the below steps carefully to reboot and reconnect the devices:
- Turn on your HDMI device (Speaker, TV, etc.) and then turn on your PC/laptop.
- Now, turn off the HDMI devices but keep the Windows system on.
- Now, unplug all the HDMI connections and plug them again with your HDMI device and your system.
It will refresh the HDMI connection and may fix the problem.
Troubleshooting Methods to Fix HDMI not working on Laptop or PC
If the above fixes fail to solve the problem, follow the given methods to fix the issue.
Method 1: Set HDMI Device as Default Device
Check if the HDMI is set as the default device. Many users reported that HDMI not working on laptop problem occurred when the HDMI device was not selected as the default one. Follow the given steps to set HDMI as the default device:
- Open Control Panel and then go to Sound.
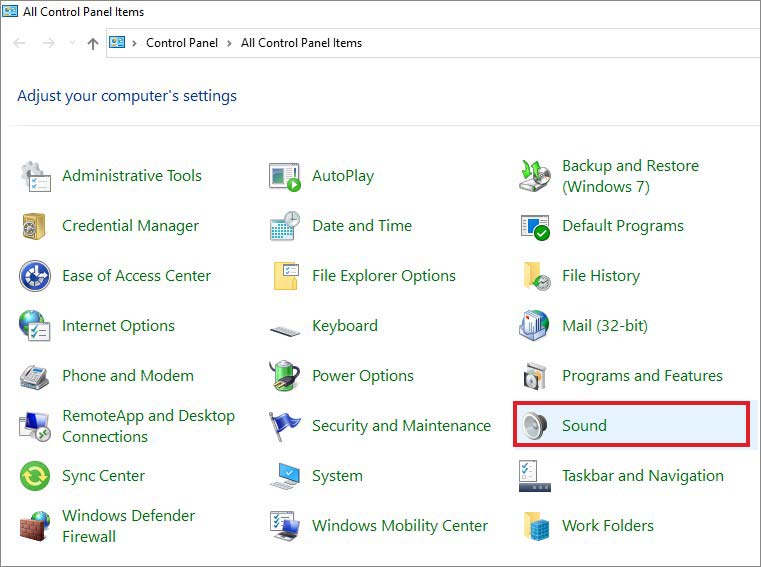
- Now, the sound window will open. Next, navigate to the Playback tab to see the default audio devices.
- Choose the HDMI device and click Set Default and then click OK.
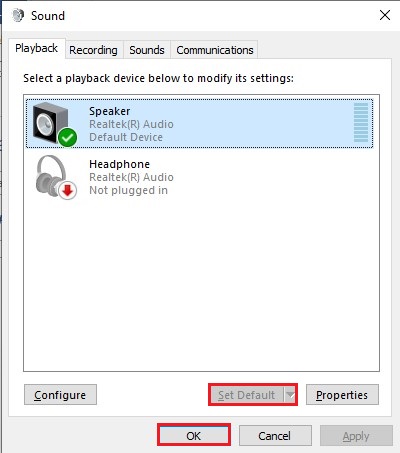
It will set the HDMI device as the default device for your system. Complete the process and check if this method works for you.
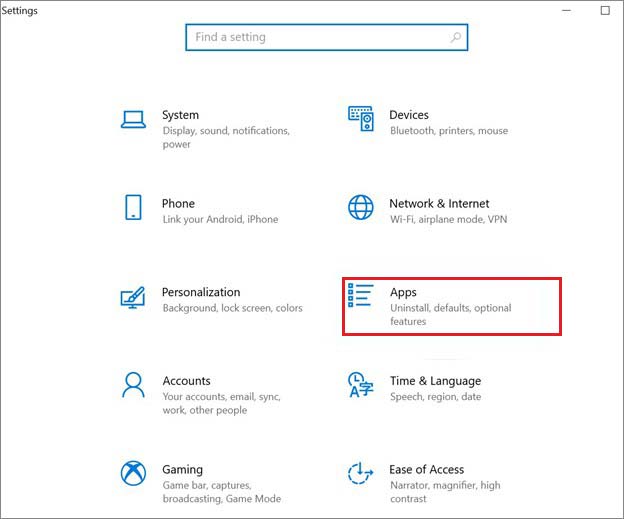
Method 2: Uninstall Recently Installed App/Software
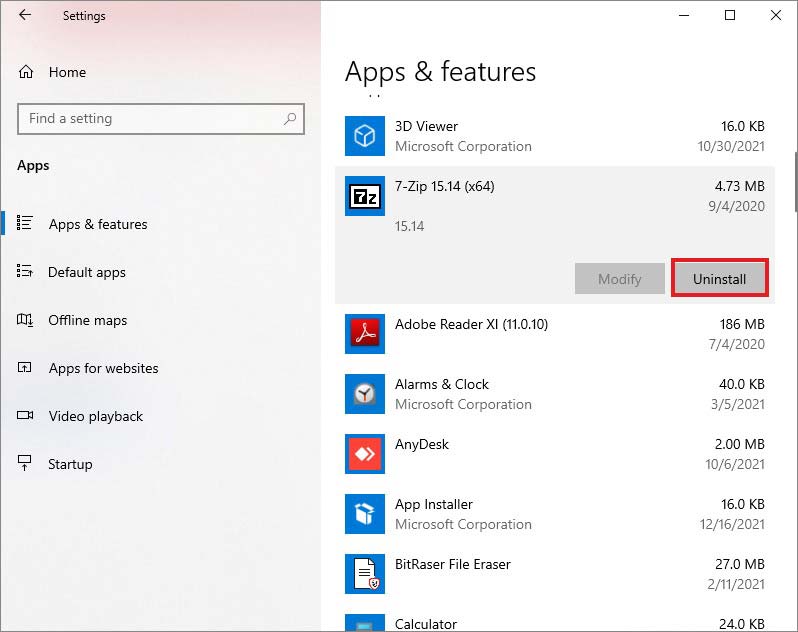
Sometimes, a recently installed application/software or program may cause problems with the HDMI connection. If the application is buggy or incompatible with your system, you may face the HDMI not working on a laptop or PC issue. You can try uninstalling the app/program and check if the problem gets solved. Follow these steps:
- Press Windows + I to open system Settings and then go to Apps.
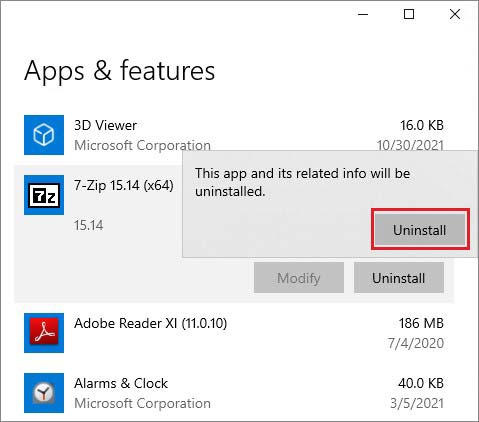
- In the Apps & features window, choose the application/program or software, click on it and click Uninstall.
- A pop-up will appear on the screen, stating that the app and its related information will be uninstalled. Click Uninstall to confirm the action.
- Once you’re done with the process, check if the problem is resolved.
Method 3: Configure your System’s Display Settings
The PC HDMI not working problem may also occur when your PC’s display settings are not properly configured. As a result, the content may fail to appear on the screen. Hence, try to configure the Display Settings of your Windows system. To do so, follow the given steps:
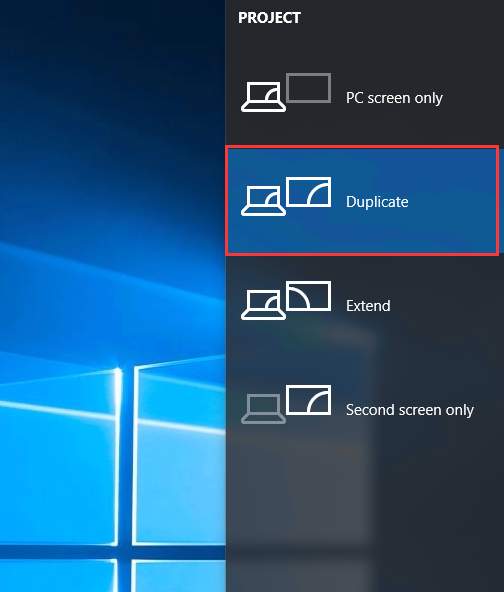
- Press Windows + P to open Display Settings.
- You’ll see the following options:
PC Screen Only – You can choose this option when you want your video/audio to be displayed only on 1st computer display.
Duplicate – This option lets you see the same content on the connected monitors (your PC monitor and another monitor connected via HDMI or other sources).
Extend – This option enables developing the content between two or more displays, including the PC display and other displays connected to HDMI or other sources.
Second Screen Only – This option helps you show content on the Secondary Display.
Now, choose the appropriate option and see if it fixes the HDMI port not working on the laptop issue.
Method 4: Update, Roll Back, or Uninstall Graphic Drivers
Graphic device drivers play a major role in displaying content on your system. Any problem with the graphic drivers may not only cause HDMI not working on PC or laptop error but also cause multiple system errors, including:
- New Hard Drive Not Showing Up
- Code 19 Error
- Faulty Hardware Corrupted Page Error
- Inaccessible Boot Device Error
- The Device is Not Ready
Hence first, try updating the graphic drivers. If the device drivers are already updated, then roll back or uninstall the drivers.
Follow the given steps:
A. Update Device Driver
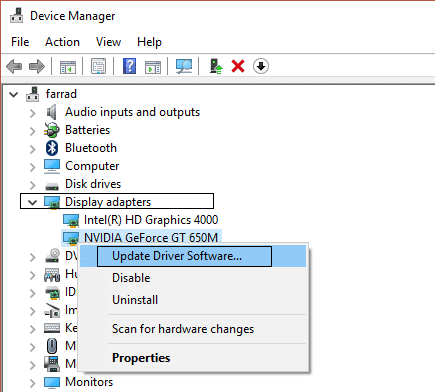
- Open Device Manager by pressing Windows + X and navigate to Display adapters.
- Then choose the driver, right-click on the driver, and click Update driver.
- On the next prompt, click Search automatically for drivers.
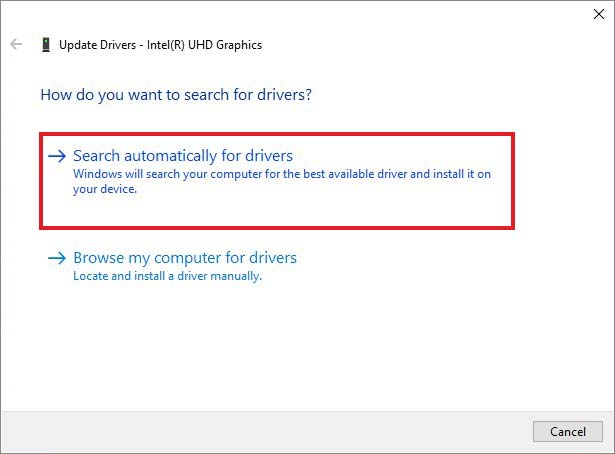
- Now, reboot your system and check if the error is fixed.
B. Roll Back Device Driver
- Open Device Manager, expand Display adapter category, right-click on it, and open Properties.
- Next, select the Driver tab, click Roll Back Driver, and click OK.
C. Uninstall Graphics Driver
- Open Device Manager, expand Display adapter category, right-click on the graphic driver that seems problematic, and click Uninstall Device.
- If you don’t find the ‘Uninstall’ option there, click Properties, select the Driver tab, and click Uninstall Device.
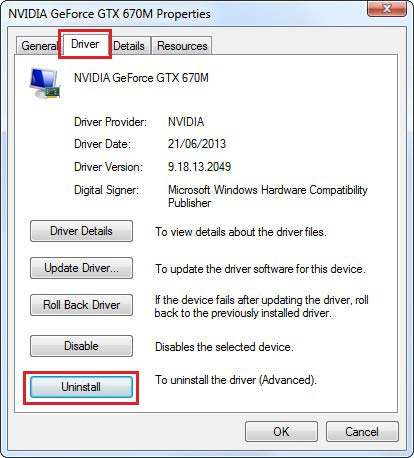
- Now, a confirmation box will appear. Click Delete to proceed with the uninstallation process.
- On the next prompt, go to the Action menu and click Scan for hardware changes > Reinstall driver.
- Once the driver is reinstalled, close the window and restart your system.
- Finally, check if the HDMI not working on the laptop/ PC issue has been resolved.
Method 5: Clean Temporary Files and Folders
The temporary and junk files stored on your system may affect your system’s processing speed, causing apps to respond very slowly and even sometimes may cause HDMI audio and video issues. To fix the problem, you can delete your temporary files and folders using Disk Cleanup. Follow the given steps:
- You can directly go to Windows Search Box and type Disk Cleanup to open this utility.
- Else, you can open File Explorer, go to This PC.
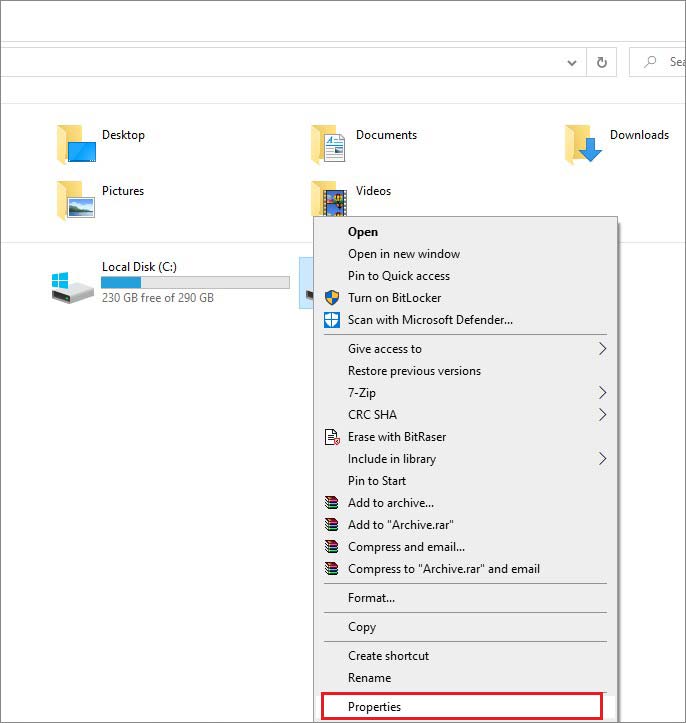
- Now, click Disk Cleanup.
- Choose files you want to remove and click OK.
- You can also proceed with the Clean up system files option.
- Delete the files. Once done, close the window, reboot the system, and see if the problem is resolved.
Method 6: Run SFC Scan
You can check for system file corruption which may also cause the HDMI port not working on laptop issue. Run the SFC scan with the following steps:
- Open Command Prompt (CMD) and run it as an administrator.
- In the elevated window, type SFC/scannow and press Enter.
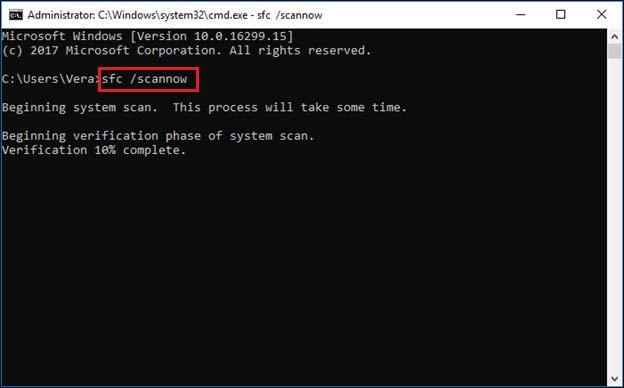
- Wait until the process completes. Once done, close the window and reboot your system.
Method 7: Perform System Restore
If none of the methods helps resolve the error, you can perform a system restore. To run System Restore, follow the given steps:
- If your system is on, turn it off. Now, reboot it, and the moment it starts showing you the Windows logo, forcefully shut it down with the POWER button.
- Repeat this thrice. It will interrupt the normal booting process and take you to the Windows recovery environment – Windows Automatic Repair.
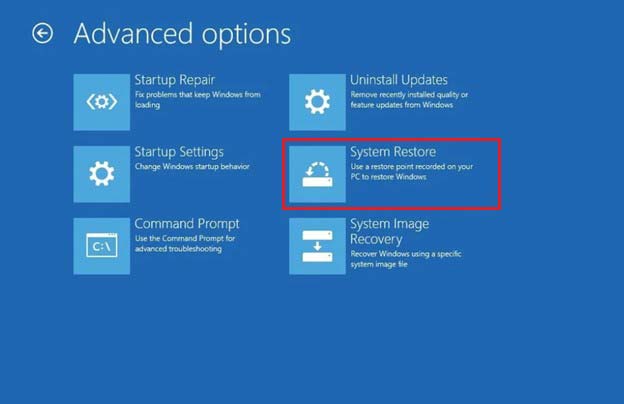
- On the Windows Automatic Repair screen, click Advanced options.
- Next, choose Troubleshoot and then go to Advanced options > System Restore.
- Click Next to proceed and choose a restore point from the available options.
- Click Scan for affected programs to check which system apps/programs are going to be affected due to this method.
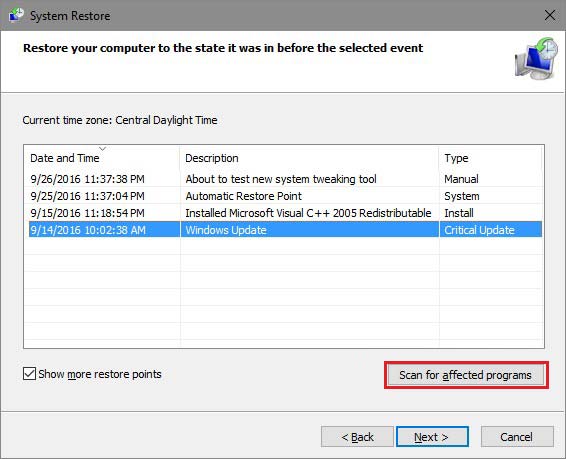
- Click Next and then click Finish on the next prompt.

Note: You may lose some essential files, folders, and programs during this process.
Hence, we’d suggest taking a backup of your system data before performing System Restore. Or, if you forgot to take backup, you may recover the data using a reliable data recovery tool, such as Stellar Data Recovery for Windows.
This DIY data recovery software supports recovery of almost all file types, including photos, videos, documents, audio files, excel, PDFs, etc. In addition, you can restore data lost due to deletion, drive formatting, corruption, or even malware attack. This Windows-supported tool also lets you retrieve files from BitLocker-encrypted storage drives, such as HDD, SSD, USB drive, and more.
Hope you found this blog useful! In case of any query or suggestion, please let us know in the comment section below.
FAQ
How do I enable my HDMI port on my computer?
You can enable the HDMI port on your PC by opening the Control Panel, navigating to Sound > Playback, clicking the ‘Digital Output Device (HDMI)’ option, and finally, clicking ‘Apply.’
How do I get my computer to recognize my HDMI cable?
To get your PC to identify the HDMI cable, you can do any of the following:
Run Hardware and Devices troubleshooter
Update Graphic Driver
Download the compatible driver and run it in compatibility mode
Why does my HDMI say no signal on PC?
If you’re facing no HDMI signal error on your PC, it could be due to the monitor ignoring the graphics output from your PC. In this case, make sure that the input source on your monitor is correctly set. If not, switch it to the correct source (HDMI) and check if the monitor works again.
Why is my PC on but no display?
The problem may occur when your monitor doesn’t turn on. To fix it, unplug the power adapter of the monitor and then plug it in again. If it doesn’t work, try changing the Power Outlet. If still, the problem doesn’t resolve, you may need to give away your monitor for repair.
Was this article helpful?
YES3
NO
Fix HDMI Port Not Working in Windows 10: HDMI is a standard audio and video cabling interface used to transmit uncompressed video data as well as compressed and uncompressed audio data (digital) from HDMI supported source devices to a compatible computer monitor, televisions, and video projectors. Through these HDMI cables, users can connect various components such as a home theatre setup that includes TVs or projectors, disc players, media streamers, or even cable or satellite boxes. When there is an issue with the HDMI connection, then you can perform some troubleshooting by yourself to mend things, which will fix the issue in most of the cases.

Many computer users have reported problems regarding the HDMI port. Some common issues that users encountered most of the time are receiving no image, the sound coming out of the devices even when the cable is properly connected to the port, etc. Basically, the purpose of HDMI is to connect different components together easily through this generic HDMI connector where one cable is meant for both audio and video. Though, there is another additional HDMI function for implementing ‘copy protection’ (which is also termed as HDCP or HDCP 2.2 for 4K). This copy protection typically needs the HDMI connected components to be able to look for as well as communicate with each other. This feature of recognizing & then communicating is commonly termed as the HDMI handshake. In case the ‘handshake’ didn’t work well at any time, the HDCP encryption (embedded within the HDMI signal) becomes unrecognized by one, or more connected components. This often leads to when you cannot see anything on your TV screen.
Table of Contents
Make sure to create a restore point just in case something goes wrong.
There are different ways to fix the HDMI connection problems, some of the techniques are explained below –
Method 1: Check Your HDMI Cable Connections
For Windows 10, unplug the power cable and then plug it back: If there is a case for Windows 10 users when all the HDMI ports stopped working, you can fix this HDMI port not working problem by first unplugging the power cable and then plug in it again. Then perform the following steps: –
Step 1. Try disconnecting all your HDMI cables from their respective inputs.
Step 2. For 10 minutes keep unplugging the power cable from TV.
Step 3. Then, plug back the TV in the power source and switch it o.
Step 4. Now take the HDMI cable to your PC for connecting.
Step 5. Turn on the PC.
Method 2: Run Hardware and Devices Troubleshooter
Run the troubleshooter of Windows 10: In general, the Windows 10 built-in troubleshooter will search for any problem related to HDMI ports and will automatically fix it. For this, you have to follow the steps mentioned below –
1.Press Windows Key + I to open Settings then click on Update & Security icon.
2.From the left-hand menu make sure to select Troubleshoot.
3.Now under “Find and fix other problems” section, click on “Hardware and Devices“.
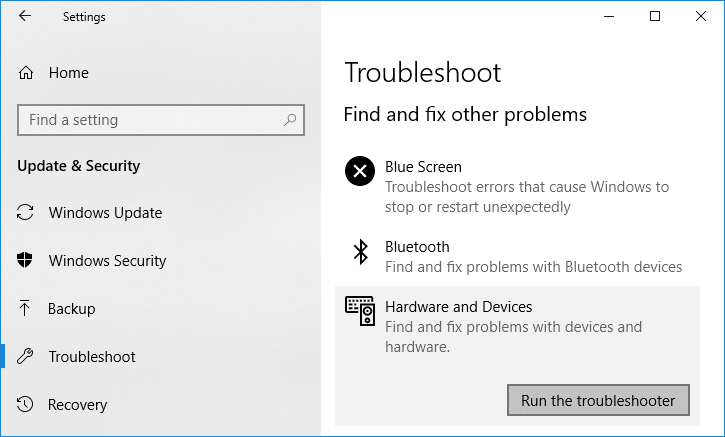
4.Next, click on Run the troubleshooter and follow on-screen instructions to fix HDMI Port Not Working in Windows 10.

Method 3: Reset Your Television to Factory Settings
There is an option to reset factory setting in your TV to get rid of HDMI port issue or any such problem in machines running Windows 10. As soon as you execute the factory reset, all settings will revert to factory default. You could reset your TV to factory settings using the ‘Menu’ key of your remote. And then again check if the HDMI Port Not Working in Windows 10 problem is resolved or not.
Method 4: Update Graphics Driver for Windows 10
Issues regarding HDMI may also arise if the graphics driver is outdated and not updated for quite a long time. This can bring glitches like HDMI not working. So, it is recommended to use a driver update which will automatically detect your graphics driver status and update it accordingly.
Manually Update Graphics Drivers using Device Manager
1.Press Windows Key + R then type devmgmt.msc and hit enter to open Device Manager.

2.Next, expand Display adapters and right-click on your Graphics Card and select Enable.
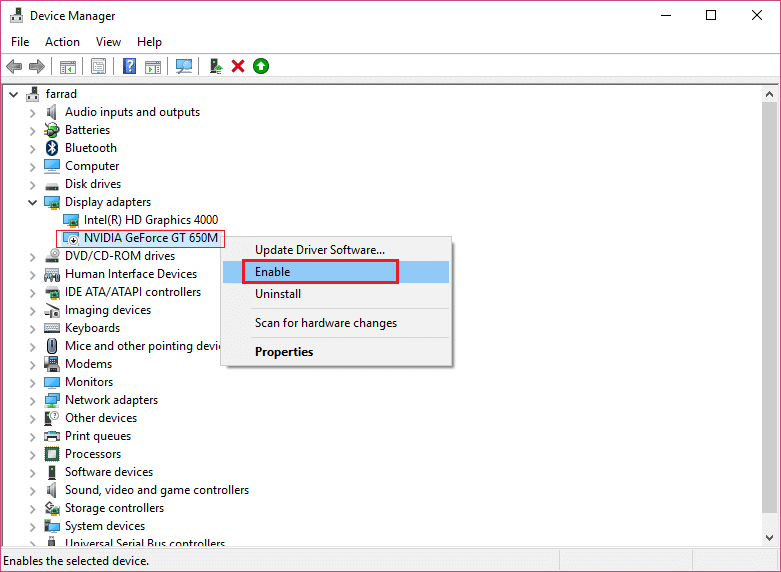
3.Once you have done this again right-click on your graphics card and select “Update Driver“.
4.Select “Search automatically for updated driver software” and let it finish the process.

5.If the above steps were helpful in fixing the issue then very good, if not then continue.
6.Again right-click on your graphics card and select “Update Driver” but this time on the next screen select “Browse my computer for driver software.“

7.Now select “Let me pick from a list of available drivers on my computer.”

8.Finally, select the latest driver from the list and click Next.
9.Let the above process finish and restart your PC to save changes.
Follow the same steps for the integrated graphics card (which is Intel in this case) to update its drivers. See if you’re able to Fix HDMI Port Not Working in Windows 10 issue, if not then continue with the next step.
Automatically Update Graphics Drivers from Manufacturer Website
1.Press Windows Key + R and in the dialog box type “dxdiag” and hit enter.
2.After that search for the display tab (there will be two display tabs one for the integrated graphics card and another one will be of Nvidia’s) click on the display tab and find out your graphics card.

3.Now go to the Nvidia driver download website and enter the product details which we just find out.
4.Search your drivers after inputting the information, click Agree and download the drivers.

5.After successful download, install the driver and you have successfully updated your Nvidia drivers manually.
Method 5: Configure the System’s Display Settings
HDMI port not working issue may also arise if there are multiple monitors connected to your system. The issue may pop up if there you are using wrong display settings. So, it is recommended to check for settings so that your displays are having the right settings. For this, you have to press Windows Key + P.

- PC screen/Computer only — For using the 1st
- Duplicate — To display the same content on both the connected monitors.
- Extend — To use both monitors for displaying the screen in extended mode.
- Second screen/Projector only — Is used for the second monitor.
Recommended:
- How to Setup Gmail in Windows 10
- Find GPS Coordinate for any Location
- How to Change IP address in Windows 10
- Keep Google Chrome History longer than 90 days?
I hope the above steps were helpful and now you can easily Fix HDMI Port Not Working in Windows 10, but if you still have any questions regarding this tutorial then feel free to ask them in the comment’s section.
When attempting to connect a laptop or PC to a larger TV or monitor using HDMI cables, hardware or software issues may often prevent cause a “no HDMI signal from device” error, resulting in no display on the screen.
Sometimes, the fault lies with the HDMI cable, OS issue, driver, etc. Therefore, in this article, we will talk more about different scenarios in which such a problem occurs and how to fix them.
When connecting a laptop or PC to a TV or monitor, an “HDMI no signal” message often appears, showing the display input can’t detect an incoming signal.
No HDMI Signal! Possible Reasons for HDMI not connecting:
- Faulty or unsupported HDMI cables, or slow data speed, often cause no signal errors.
- Outdated device drivers are another common issue; different displays need specific drivers for connection.
- Drivers act as a bridge for device connections. Using incorrect resolution drivers (like Full HD on a 4K device) results in no output.
- Matching drivers and correct I/O connectors are essential. Adjusting the TV’s or monitor’s resolution may help.
Knowing these issues, let’s explore solutions step by step.
How to fix HDMI no Signal from your device Issue:
- First and foremost, turn off the computer and place it near your TV.
- Leave the mouse and keyboard connected to the computer to manage the configuration.
- Refer to the TV or monitor manual to understand the type of supported cable to connect.
- Check the type and speed of the HDMI cable; any mismatch between the two may cause the problem. The different types of HDMI cables available in the market are Standard HDMI:720p/1080p, High-Speed HDMI: Up to 4K, and Ultra-High-Speed HDMI: Up to 10K resolution.

- It is recommended to connect the cable to the TV or monitor before turning on the computer because there is a situation where the system may fail to recognize the external display.
- Look for a different output device to test cable and display ports on TV or laptop/PC for compatibility issues.
- After turning on the computer, the screen looks stretched, or part of the screen is not visible; you need to adjust the screen resolution in Windows.
- The last option would be to check the drivers on the display and laptop/PC for any possible issues, and we will talk in detail about how to do this later in this article.
Verify Input Source:
Ensure the correct input source is selected on modern monitors and TVs, which often support multiple sources. ‘Auto mode’ automatically detects and switches the source. Change settings using the On-Screen Display (OSD) button or remote control, selecting from HDMI 1, 2, or VGA, depending on your connection.
Projection Setting:
If you are specially connecting your working desktop or laptop computer to 2nd or extended screen (like a monitor or TV), you must check the projection settings.
Windows OS has 4 options as below:
- PC Screen Only
- Duplicate
- Extend
- Secondary Screen Only
You need to ensure the correct option is selected to push the display to 2nd screen, which can consequently eliminate the HDMI no signal from your device error.
Windows users can use 'Windows key + P' to get this option. Also, you can use the system tray options to get this option in Windows 11/10.

Display Driver Setup in Windows 10/11
When connecting a new device to a PC or laptop, Windows searches for and tries to install necessary drivers. In cases where automatic updates fail, manual driver updates through display settings are needed.
- Right-click on desktop -> Select Properties or Personalize option
- Now select Display Settings from the list of preferences
- An icon with numbers will be displayed on it for attached monitors to connected devices. If there is only one device, then there will be no option to toggle between display screens

- In the same icon with numbers displaying screen, select the display monitor and select either extend your desktop or mirror your desktop option.
- The screen blinks for a second or two, connecting to the selected display.
In instances where single multiple screens connect to the same PC or laptop, graphics card-dependent displayed settings may require changes from the Windows 10 control panel.
Install or Update Display Drivers using Device Manager.
- To update the display drivers, go to Start -> Type device manager -> enter
- In the next screen, select display adapters -> Select “Intel UHD Graphics 620” or any other options that you see under “display adapters.”
- Right-click on “Intel UHD Graphics 620″-> update drivers -> two options will pop up on the screen: Manual update option as Browser for drivers on the computer and automatic update option would be listed as “Search automatically for updated drivers software.”

- Select Search automatically for updated drivers software option first and let Windows search and install appropriate drivers.

- If automatic driver updates fail, switch to manual updating: select “Browse for drivers on the computer,” find the driver file if available, and proceed to configure it.

- If the downloaded driver is not available, you can choose ‘let me pick from a list of available drivers on my computer,’ select an available driver, and click next to install.
- If a Graphics card is configured on the laptop or PC, then a different version of the display driver update is required. The latest display drivers can be downloaded from respective vendor portals like NVIDIA or AMD driver download page.
Check and Adjust Your Hardware Setup
If “no HDMI signal” persists, try these steps:
- Power cycle the monitor and TV to fix temporary issues: turn off, unplug HDMI and power cables, wait, then replug.
- Check cables and ports for damage or dirt; replace if necessary.
- Test with a different monitor or TV to check your laptop/desktop output.
- Reseat the display card on desktops using dedicated cards if the issue continues.
Stefan Richard is one of the folks who can’t have a life without technology, especially Microsoft products. He has more than 12+ experience in Information technology. He worked as IT trainer, network/system administrator and IT Infrastructure manager. Stefan is the co-founder of HecticGeek.
If you’ve upgraded to Windows 10 or performed a Windows 10 update, and Windows can’t detect your TV, don’t worry. You’re not the only one. Quite a number of Windows 10 users have reported this issue. Fortunately, you can fix the problem with one of the solutions below.
First of all, ensure there is no problem with the HDMI port and the cable:
1) Unplug the TV then plug it to the HDMI port again. Then check to see if the problem is resolved.
2) Try using a different HDMI cable
A broken HDMI cable can cause the problem. Try to use another cable, and see if the issue persists.
If there’s no problem with the HDMI port and the cable, you can try the two solutions below. Start with Solution 1, then try Solution 2 if it doesn’t solve the problem.
Solution 1: Check the display output settings
Incorrect display output settings could be preventing your TV from detecting your connected computer. Follow the steps below to check.
1) Right-click your desktop and click Personalize.
2) Click Display .
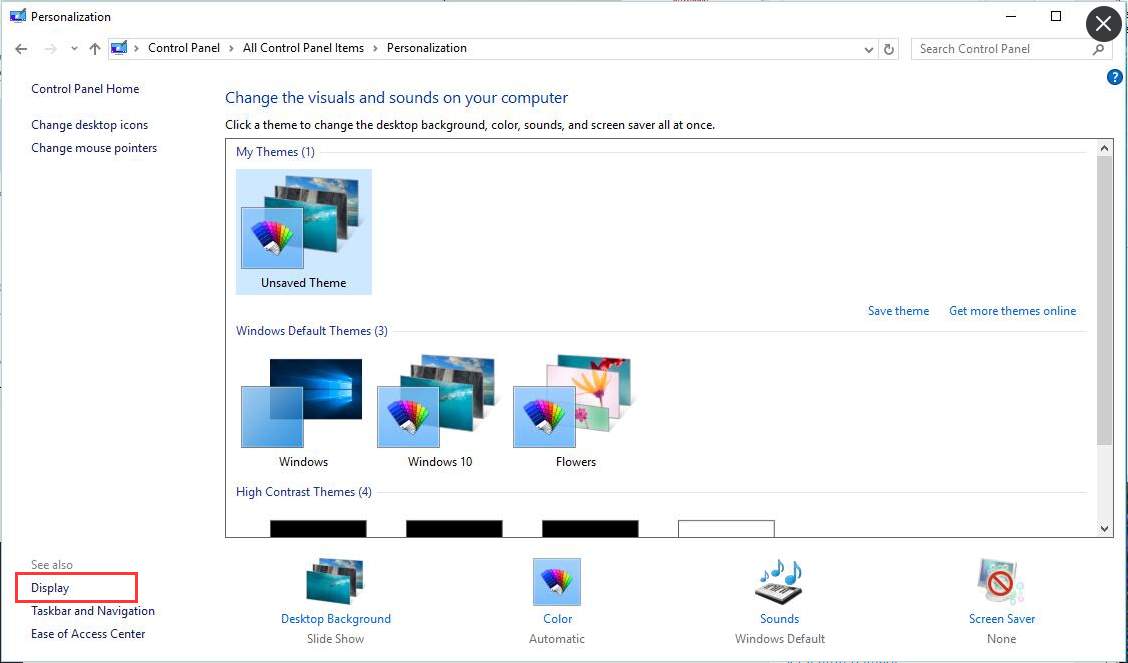
3) Check if you’re able to see the TV as a second monitor.
If you can’t see your TV on the screen, follow steps below:
1) On your keyboard, press the Windows logo key and P at the same time.
2) Click Duplicate.
If Duplicate doesn’t work, try switching to Extend.
After that, check to see if Windows can detect your TV.
Solution 2: Update the graphics driver
Your problem may be caused by a graphics driver issue. This can happen if the Windows basic video driver is installed but not the manufacturer’s driver. So try to update your graphics driver to fix the problem.
There are two ways you can get the right drivers for your video card: manually or automatically.
Manual driver update – You can update your video drivers manually by going to the manufacturer’s website for your video card, and searching for the most recent correct driver. Be sure to choose only drivers that are compatible with your variant of Windows 10.
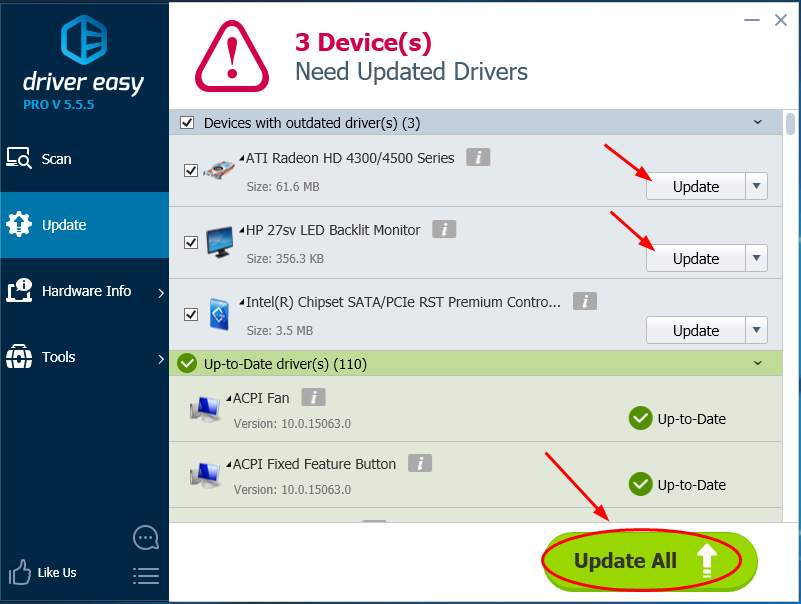
Automatic driver update – If you don’t have the time, patience or computer skills to update your video drivers manually, you can, instead, do it automatically with Driver Easy. Driver Easy will automatically recognize your system and find the correct drivers for your video card, and your variant of Windows 10, and it will download and install them correctly. Here;s what you need to do:
1) Download and install Driver Easy.
2) Run Driver Easy and click the Scan Now button. Driver Easy will then scan your computer and detect any problem drivers.
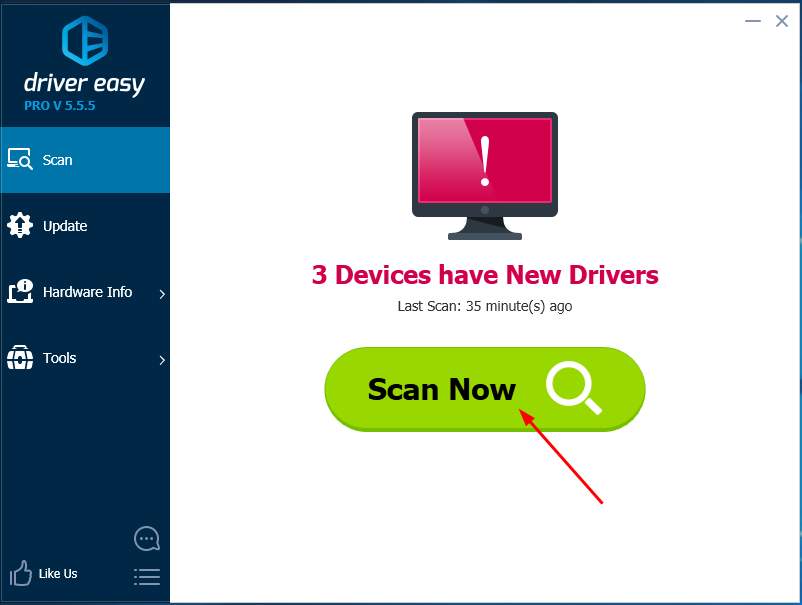
3) Click the Update button next to the flagged video driver driver to automatically download the correct version of that driver, then you can manually install it (you can do this with the FREE version).
Or click Update All to automatically download and install the correct version of all the drivers that are missing or out of date on your system. (This requires the Pro version which comes with full support and a 30-day money back guarantee. You’ll be prompted to upgrade when you click Update All.)
4) Restart your computer and check to see if Windows 10 can now detect your TV.
TIP: After connecting your TV via HDMI successfully, if you can’t hear sound from the output, go to Fix HDMI No Sound in Windows 10 for the solutions.
That’s all there is to it. Hopefully one of these methods resolves your problem. Please feel free to leave your comment below if you have any questions.
86
86 people found this helpful