
Learn how to easily check your mouse DPI in Windows.
Published
5 min read
How to Check Mouse DPI in Windows 11/10
When it comes to computer gaming, design work, or general navigation, one of the most frequently overlooked aspects can be the sensitivity of your mouse. DPI, or dots per inch, is a measurement that indicates how far your cursor will move on the screen relative to the movement of your mouse. Understanding how to check your DPI can greatly enhance your efficiency, precision, and overall experience with your computer. In this article, we will dive deep into the ways to check your mouse DPI in Windows 11 and 10, exploring several methods, tools, and concepts associated with DPI.
Understanding DPI: What Is It?
Before we explore how to check your mouse DPI, it’s essential to understand what DPI is and its significance. DPI stands for «dots per inch.» It’s a metric that measures how sensitive a mouse is—essentially, how many pixels your cursor will move across the screen for every inch of physical movement of the mouse.
-
Higher DPI: If a mouse has a higher DPI, it means that it is more sensitive. This means that small physical movements of the mouse will correspond to larger movements of the cursor on the screen. High DPI settings are often favored in competitive gaming, as they allow for fast reflexes and quick aiming.
-
Lower DPI: On the other hand, a mouse with a lower DPI is less sensitive, meaning that you’ll need to move the mouse further for the cursor to travel the same distance on the screen. This can be beneficial for tasks that require more precision, such as editing detailed graphics.
Why You Might Want to Check Your Mouse DPI
Knowing your mouse’s DPI can be important for several reasons:
-
Gaming Performance: If you are into gaming, having the right DPI can make a significant difference in your gameplay. Many gamers prefer a specific DPI setting for different types of games, whether they favor accuracy or quick movements.
-
Design and Graphic Work: For graphic designers or anyone working with detailed images, the DPI can greatly impact their precision and efficiency.
-
Ergonomics: Understanding DPI can also help prevent strain. Using an excessively low DPI may lead to more arm movements than necessary, while a DPI that is too high might lead to overshooting your target on the screen.
Checking Mouse DPI in Windows 10/11
There are multiple methods to check your mouse DPI in Windows 10 and 11. Here are some effective ways to do so:
Method 1: Check the Physical Mouse Specifications
One of the simplest ways to determine your mouse DPI is to check the specifications provided by the manufacturer. Most modern mice come equipped with a labeled DPI setting or a software interface to adjust DPI levels.
-
Look for the Model Name: Check your mouse for its model number, which can usually be found on the bottom or side.
-
Visit the Manufacturer’s Website: Once you have the model name, search for it on the manufacturer’s website. Often, you’ll find a dedicated page for that model detailing its DPI capabilities.
-
Download the Driver Software: In some cases, manufacturers offer software that allows you to customize DPI settings. Popular brands like Logitech, Razer, and Corsair usually provide user-friendly interfaces for managing mouse settings.
Method 2: Use Mouse Software
Various mouse software applications allow you to check and adjust DPI settings effectively.
-
Logitech G HUB: If you have a Logitech mouse, you can download the Logitech G HUB software. After installation, you can view and adjust the DPI settings under the ‘Pointer Settings’ section.
-
Razer Synapse: Similar to Logitech, Razer offers Synapse, which provides detailed information about DPI settings in addition to customization options.
-
Corsair Utility Engine (iCUE): Cordless mice like those from Corsair can be configured with the iCUE software. This tool allows you to view and change DPI settings easily.
Method 3: Windows Settings
While Windows doesn’t provide a direct way to check your mouse DPI, you can examine mouse sensitivity settings and sensitivities through the pointer options:
-
Open Control Panel: Press
Win + R, typecontrol, and hit Enter. -
Mouse Settings: Navigate to ‘Hardware and Sound’ and click on ‘Mouse.’
-
Pointer Options Tab: Check the settings in the “Pointer Options” tab. While this will not give you the exact DPI, adjusting the pointer speed can help you understand how sensitive you find your mouse.
Method 4: DPI Checker Tool
If you want a more precise measurement of your DPI, using a third-party DPI checker tool is an excellent option:
-
Download DPI Analyzer: This free tool allows you to check your mouse’s real DPI. You will need a ruler or measuring tape and a flat surface.
-
Measure Your Movement: With the tool running, follow the prompts to move your mouse while measuring the distance. The DPI Analyzer will calculate the DPI based on your movement.
-
Check Results: Cross-reference with your settings in the mouse software to see if the results match your expected DPI.
Testing Your DPI Settings
Once you have determined your mouse DPI, it can be beneficial to test how it feels when performing various tasks:
1. Mouse Movement Tests
Use a simple mouse movement test to check if your DPI settings feel intuitive for your tasks:
-
Draw Circles: Open paint or a drawing application and try drawing circles at different sizes. If you can create precise circles with minimal effort, your DPI is likely set correctly.
-
Target Practice: If you’re a gamer, practice moving your mouse across a target on the screen, adjusting your DPI settings as you go to see which feels the best for your gameplay style.
2. Sensitivity Testing
If you are unsure about what DPI feels optimal, try adjusting it up or down in small increments and testing your precision during activities like graphic design or gaming.
Conclusion
Ultimately, checking and adjusting your mouse DPI can profoundly affect your user experience, enhancing your gameplay, productivity, and ergonomics. There are many different ways to check DPI in Windows 10 and 11, ranging from software tools to physical examinations of your mouse’s specifications. Understanding how DPI functions, as well as its importance in various contexts, can help you choose the right settings for your needs.
For gamers, designers, and everyday users alike, fine-tuning mouse DPI can create a more streamlined and effective experience. Whether you prefer a high DPI for rapid movements or a lower setting for precision, knowing how to check and adjust DPI will put you in control of your computer interactions. So, take a moment to analyze your current setup, adjust your settings, and discover the benefits that come from a mouse tailored to your personal preferences.
You might have often heard about the word “DPI” when mouse sensitivity (mouse speed) was mentioned, especially in the gamers’ circle. But, what does mouse DPI mean and how to know what your mouse DPI is? In this write-up, we will explain what mouse DPI is and how to check mouse DPI in Windows 11.
Also see: How to Change Mouse DPI Settings in Windows 11/10
What is mouse DPI?
The DPI is the abbreviation for Dots Per Inch. It is a unit to measure how many dots, or more often known as pixels, the cursor can move on the screen if you move your mouse an inch by your hand.
For example, if you have a mouse DPI of 1600 and if you move your mouse an inch by your hand, the cursor on the screen would move approximately 1600 pixels. That’s how DPI is used to determine how fast your mouse is.
Some of the most commonly used mouse DPI for most games are 400, 800, 1200, 1600, 3200 and 6400 DPI. Mouse DPI is just part of the settings that affects the overall mouse speed in a game. The in-game mouse sensitivity settings also affect your mouse speed in addition to the mouse DPI. You may need to adjust both for optimal experience.
How to check your mouse DPI in Windows 11?
In Windows 11, there is no settings or information that shows your mouse DPI. The only available setting related to that is the mouse sensitivity setting, which is displayed as a multi-level slider in the general mouse settings (Settings > Bluetooth & devices > Mouse > Mouse pointer speed).
Mouse DPI can only be viewed if the mouse does have a DPI label or if it allows changing of the DPI. Not all mouses have the DPI feature, but most gaming mouses have it. Listed below are 3 methods on how to check your mouse DPI in Windows 11.
Related: How to Slow Down Your Mouse Speed
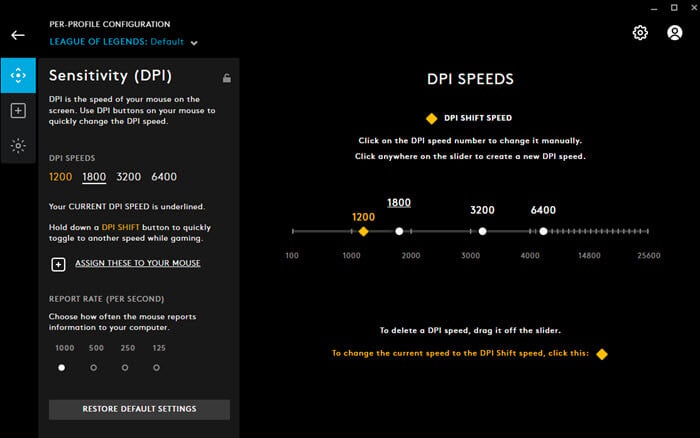
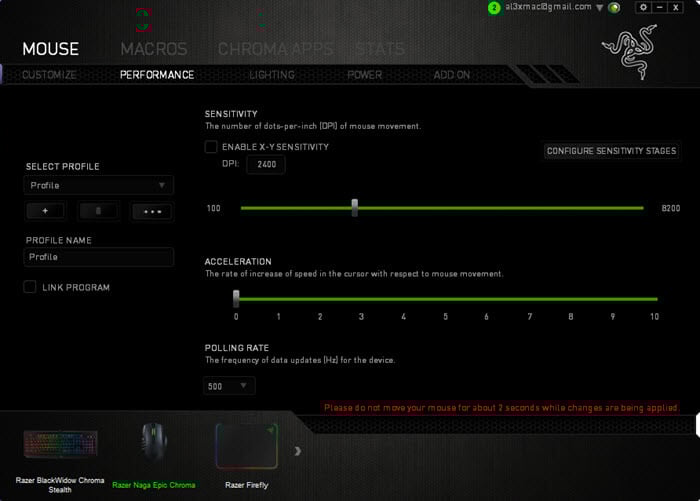
Check DPI via mouse driver software
A gaming mouse often comes with a companion software (driver software) as you install the mouse’s driver. A companion software is a configuration tool that allows you to configure various settings for your mouse such as the mouse’s DPI settings.
For instance, Logitech G hub is the driver software for Logitech gaming peripherals such as mouse, Razer Synapse for Razer hardware, SteelSeries Engine for SteelSeries mouse, etc.
If you do have a gaming mouse but not a driver software, try to identify what mouse you have and install its driver software accordingly.
If you have a gaming mouse and a driver software installed, you can easily check your mouse DPI through the configuration tool. Below are some screenshots that shows you how the mouse DPI settings look like in some of the most popular configuration software.
Check the specification of your mouse
Some mouses have a fixed DPI that cannot be changed. The DPI will be labeled as a specification of the mouse. Check the product specifications of your mouse and see if there is any label that states the DPI of the mouse.
Read the documentation that came with your mouse when you purchase it. Or, you can search online to find the specification of your mouse with your mouse brand and model as the keyword.
Measure the mouse DPI manually
If you don’t have a gaming mouse and there is no specification that states what your mouse’s DPI is, you can manually measure it by following the instructions below.
Related: How to Turn Off Mouse Acceleration in Windows
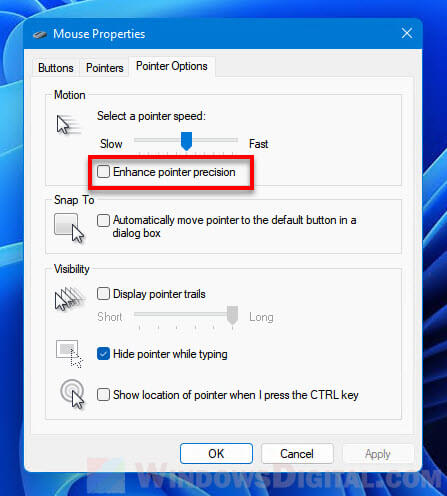
Step 1: Disable “Enhance pointer precision”
Enhance pointer precision (also known as mouse acceleration) is a Windows mouse-related setting that accelerate your mouse as you move your mouse faster. This means that your mouse sensitivity will change depending on how fast you move your mouse.
With this option enabled, you cannot get an accurate measurement of your mouse DPI because the mouse DPI would differ depending on how fast you move your mouse.
To disable this option, press Win + i to open Settings and navigate to Bluetooth & devices > Mouse > Additional mouse settings.
In the Mouse Properties window, select the Pointer Options tab and then disable the checkbox for “Enhance pointer precision“.
Step 2: Jot down the pointer speed
In the same Mouse Properties window as mentioned in the previous step, jot down the pointer speed in the motion section. There are 11 notches on the slider from “Slow” to “Fast”. If pointer speed is on the 6th notch, jot down 6/11 (you will need this later).
Anyway, the default and optimal setting for the pointer speed in Windows is the 6th notch, right in the middle of the slider. The 6/11 setting is the most common setting for most pro gamers.
Step 3: Measure your mouse DPI using DPI Analyzer
Firstly, prepare a piece of paper or cardboard big enough for you to move your mouse on it. Draw a 2 inches or 5.08 cm line on the paper.
Next, open this website: https://www.mouse-sensitivity.com/dpianalyzer/ on the computer your mouse is connected to. On the website, in the DPI Analyzer section at the bottom half of the page, enter 2 as the target distance and select Inches as the Units. Next to the WPS option, select the pointer speed you jotted down earlier. If your pointer speed is 6/11, select “10 (6/11)“.
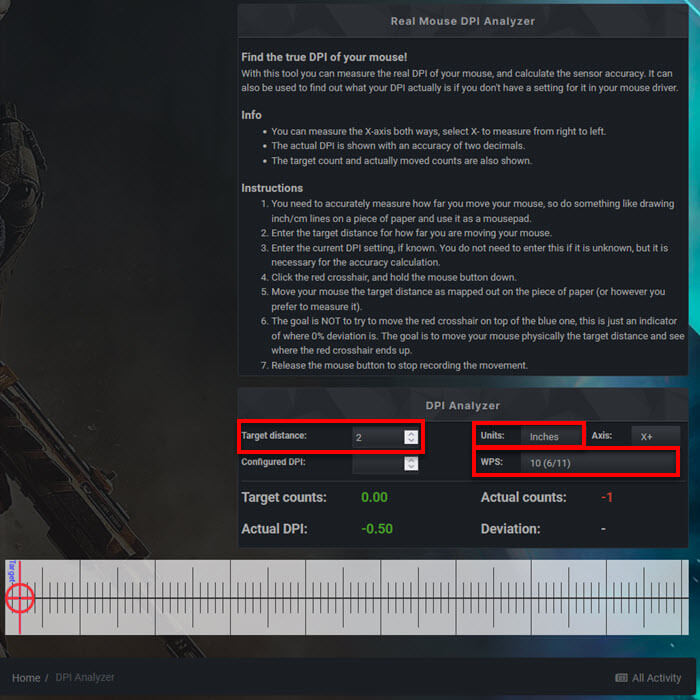
Now, move the mouse cursor to the center of the Red target on the ruler in the webpage. Then, lift your mouse and place it on the beginning of the line on the paper or cardboard you’ve prepared earlier. To start measuring your mouse DPI, click and hold the red target on the ruler, and then move your mouse towards the end of the line on the paper.
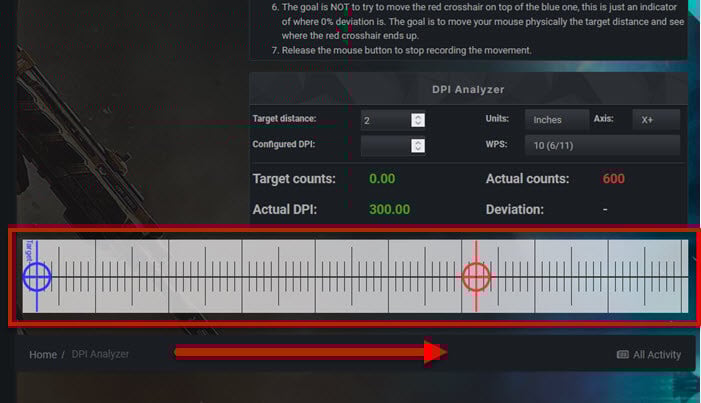
The Actual DPI value on the DPI Analyzer will then show you your mouse DPI. To help you better understand this, this tool helps you measure the dots or pixels your mouse cursor move as you move your mouse physically for 2 inches.
Optionally, you should record the Actual DPI value and repeat the process a few more times to obtain the average DPI. This way, you can get a more accurate calculation of your mouse DPI.
Have you ever wondered how to see mouse DPI on a Windows 11 computer? DPI stands for “dots per inch,” which describes the sensitivity of your mouse. DPI measures how many dots, or pixels, your mouse moves on your screen with a single inch of movement.
Knowing your mouse DPI can be useful for several reasons. It can help you customize your mouse settings for better precision, and it can also help you understand why your mouse behaves in certain ways. In this blog post, we’ll discuss some methods for seeing your mouse DPI in Windows 11.
Video Tutorial:
What’s Needed
To see your mouse DPI in Windows 11, you’ll need a few things:
– A Windows 11 computer
– A mouse
– Mouse software (if applicable)
– A mousepad (optional)
What Requires Your Focus?
Before we dive into the methods, there are several things to keep in mind when checking your mouse DPI:
– Different mice have different DPI settings, and some mice may not have customizable DPI settings.
– DPI is not the only factor that affects mouse sensitivity. Other factors, such as mouse acceleration, can also affect how your mouse behaves.
– The steps for checking your mouse DPI may vary depending on your mouse software.
Method 1: Using Windows Settings
This method works for most standard mice, without needing any additional software. Here are the steps:
1. Open Windows Settings by pressing Windows key + I.
2. Click on “Devices” in the left sidebar.
3. Click on “Mouse” in the left sidebar.
4. Under “Related settings,” click on “Additional mouse options.”
5. In the Mouse Properties window, click on the “Pointer Options” tab.
6. Under “Motion,” you’ll see a section labeled “Pointer speed” with a slider. Drag the slider all the way to the right to increase the DPI to its maximum setting.
7. Look at the “Enhance pointer precision” section directly below the “Pointer speed” slider. You should see a readout labeled “Mouse DPI” that shows your mouse’s current DPI setting.
Pros:
– Easy to follow steps that don’t require any additional software.
– Works for most standard mice.
Cons:
– Not all mice have customizable DPI settings.
– Doesn’t work for mice that use proprietary software.
Method 2: Using Mouse Software
This method works for mice that come with software that allows you to customize DPI settings. Here are the steps:
1. Check to see if your mouse came with software that can customize DPI settings. If it did, install the software and open it.
2. Find the section of the software that allows you to customize DPI settings. This may be labeled “DPI,” “Sensitivity,” or something similar.
3. Look for a readout that shows your current DPI setting. This may be labeled “Current DPI,” “DPI level,” or something similar.
4. If you want to change your DPI, use the software to adjust the setting and click “Apply” or “Save” to save the changes.
5. Test out your new DPI setting to see how it affects your mouse behavior.
Pros:
– Allows for more precise customization of DPI settings.
– Can work for proprietary mice with customized software.
Cons:
– Requires additional software to be installed.
– May not work for all mice.
Method 3: Using Online Tools
If you don’t have mouse software or your mouse doesn’t have customizable DPI settings, you can use an online tool to determine your mouse DPI. Here are the steps:
1. Open a web browser and navigate to any online DPI checker, such as mouse-sensitivity.com or DPI Analyzer.
2. Follow the instructions on the website to calibrate your mouse.
3. The website should provide a readout of your mouse’s current DPI setting.
Pros:
– Can work for most mice.
– Doesn’t require any additional software to be installed.
Cons:
– Accuracy may vary depending on the website you use.
– May not work for all mice.
Why Can’t I See My Mouse DPI?
There are several reasons why you might not be able to see your mouse DPI:
1. Your mouse doesn’t have customizable DPI settings.
2. Your mouse software is not installed or is not compatible with your computer.
3. Your mouse software doesn’t provide a readout of DPI settings.
4. Your DPI settings are hidden in an obscure location within your mouse software.
If you’re having trouble seeing your mouse DPI, try the methods above. If none of them work, it’s possible that your mouse simply doesn’t have customizable DPI settings.
Implications and Recommendations
Knowing your mouse DPI can help you customize your mouse settings for better precision. It can also help you understand why your mouse behaves in certain ways. If you’re an avid gamer or graphic designer, it’s especially important to know your mouse DPI so you can fine-tune your mouse settings.
If you’re having trouble seeing your mouse DPI, try the methods above. If you’re still having trouble, consider contacting your mouse manufacturer’s customer support for further assistance.
FAQs:
Q: What is mouse DPI?
A: DPI stands for “dots per inch,” which measures the sensitivity of your mouse. DPI measures how many dots, or pixels, your mouse moves on your screen with a single inch of movement.
Q: How do I adjust my mouse DPI settings?
A: The steps for adjusting your mouse DPI settings will depend on your mouse and software. Refer to the instructions that came with your mouse or check the manufacturer’s website for guidance.
Q: Can all mice have adjustable DPI?
A: No, not all mice have customizable DPI settings. Some standard mice may not have any DPI settings at all.
Q: What is mouse acceleration?
A: Mouse acceleration is a setting in some software that changes how fast your mouse moves relative to how fast you move your mouse. This can affect how precise your mouse movements are.
Q: Why is it important to know my mouse DPI?
A: Knowing your mouse DPI can help you customize your mouse settings for better precision and can also help you understand why your mouse behaves in certain ways.
In Conclusion
Checking your mouse DPI is a simple process that can help you customize your mouse settings for better precision. Whether you use Windows settings, mouse software, or online tools, knowing your mouse DPI can help you fine-tune your mouse behavior for optimal performance. If you’re having trouble seeing your mouse DPI, try the methods above, or contact your mouse manufacturer’s customer support for further assistance.
Checking the DPI (dots per inch) of your mouse in Windows 11 is a straightforward task that can help you adjust your mouse sensitivity for better precision in tasks like graphic design or gaming. By going through a few quick steps in your computer’s settings, you can easily find out your mouse’s DPI and make changes if necessary.
Before diving into the steps, it’s important to understand that following these instructions will help you access your mouse settings in Windows 11, where you can view and adjust your mouse’s DPI settings.
Step 1: Open Settings
Open the Settings app on your Windows 11 computer by pressing Win + I on your keyboard.
In the Settings app, you have access to a variety of system settings, including those for your mouse. It’s the central hub for making tweaks to your computer’s functionality.
Step 2: Navigate to Bluetooth & Devices
Click on ‘Bluetooth & Devices’ in the sidebar of the Settings app.
This section includes settings for all connected devices, such as your mouse, keyboard, and Bluetooth peripherals.
Step 3: Select Mouse
Find and click on ‘Mouse’ in the list of options.
This will bring you to the mouse settings page, where you can adjust various mouse properties.
Step 4: View Additional Mouse Settings
Scroll down and click on ‘Additional mouse settings’.
This link takes you out of the Settings app and opens the classic Mouse Properties window, where you can find more advanced settings.
Step 5: Check DPI in Pointer Options
Click on the ‘Pointer Options’ tab and look for DPI settings.
Not all mice will explicitly list DPI numbers here, but you can adjust the pointer speed, which is related to DPI.
After completing these steps, you’ll have accessed the settings related to your mouse’s DPI. You can now adjust the DPI or pointer speed to suit your preferences.
Tips for Checking Mouse DPI Windows 11
- If your mouse has dedicated DPI buttons, you can use them to adjust the DPI and then check the settings to see the changes.
- For gaming mice with software, check the manufacturer’s application for precise DPI adjustments.
- If you’re unsure about the ideal DPI, experiment with different settings to find what’s comfortable for you.
- Remember that higher DPI isn’t always better; it depends on your screen resolution and personal preferences.
- Keep in mind that Windows 11 settings may vary slightly depending on system updates and manufacturer customizations.
Frequently Asked Questions
What is DPI?
DPI stands for dots per inch, and it measures how sensitive a mouse is. The higher the DPI, the farther the cursor will move on the screen when you move the mouse.
Can I change the DPI from Windows 11 settings?
You can change the pointer speed from Windows 11 settings, which is similar to adjusting DPI. However, for precise DPI changes, you may need dedicated mouse software.
Why would I need to check or change my mouse DPI?
Adjusting your mouse DPI can improve precision in tasks that require accuracy, like graphic design or gaming. It can also make your mouse feel more comfortable to use.
Does a higher DPI mean a better mouse?
Not necessarily. A higher DPI can be beneficial, but it’s best to find a DPI setting that’s comfortable for you and suits the tasks you’re doing.
Will changing DPI affect my gaming performance?
Changing your DPI can affect gaming performance, as it alters how quickly the cursor moves. Finding the right DPI setting can improve your gaming precision and reaction time.
Summary
- Open Settings
- Navigate to Bluetooth & Devices
- Select Mouse
- View Additional Mouse Settings
- Check DPI in Pointer Options
Conclusion
Understanding how to check your mouse DPI in Windows 11 is essential for tailoring your mouse’s sensitivity to your specific needs. Whether you’re a hardcore gamer looking to optimize your in-game performance or a professional graphic designer striving for precision, knowing how to access and adjust your mouse’s DPI is key. Keep in mind that while a higher DPI can translate to greater sensitivity, it’s not a one-size-fits-all solution. Experimenting with different settings and considering the type of work you’re using your mouse for will help you find the sweet spot.
For those who find the perfect setting, it can feel like a game-changer. Not only can it affect the accuracy of your work, but it can also provide a more comfortable and efficient experience. And who doesn’t want to feel like they’re gliding across the screen with the grace of a digital ballet dancer?
In the ever-evolving world of technology, staying on top of simple tweaks like adjusting your mouse DPI can make a significant difference in your daily computer interactions. So, take a few moments to dive into your settings, check your mouse DPI on Windows 11, and make the necessary adjustments for a smoother, more precise computing experience.
Matt Jacobs has been working as an IT consultant for small businesses since receiving his Master’s degree in 2003. While he still does some consulting work, his primary focus now is on creating technology support content for SupportYourTech.com.
His work can be found on many websites and focuses on topics such as Microsoft Office, Apple devices, Android devices, Photoshop, and more.
How To Check Mouse DPI on Windows 11 (Easy Guide)
The world of computer peripherals has seen remarkable advancements, particularly in the realm of mice. As technology evolves, so do the needs of users who demand precision, speed, and comfort from their input devices. One vital specification that plays a pivotal role in a mouse’s performance is DPI, or dots per inch. Understanding how to check your mouse DPI on Windows 11 can significantly enhance your user experience, especially for gamers, graphic designers, and those who engage in precision work. This guide provides a detailed exploration of DPI, methods to check it, and tips for adjusting it to fit your needs.
Understanding DPI
DPI is a measure of a mouse’s sensitivity. Essentially, it indicates how many pixels the cursor moves on the screen for every inch the mouse is moved on a flat surface. A higher DPI means that smaller movements of the mouse can result in larger movements of the cursor, making it easier to navigate across high-resolution displays. Conversely, a lower DPI offers more precision but may require more significant movement to navigate the same distance on the screen.
Choosing the right DPI setting depends significantly on one’s use case. Gamers often prefer higher DPI settings for swift movements, while graphic designers might opt for lower DPI settings for fine-tuning their work.
Why You Should Check Your Mouse DPI
-
Performance Optimization: Knowing your DPI settings allows you to adjust your mouse’s performance to suit your tasks. A well-fitted DPI can enhance accuracy and speed in gaming and design tasks.
-
Personal Comfort: DPI impacts how quickly your cursor moves. A comfortable setting for browsing may differ from settings used while playing video games or performing graphic design.
-
Troubleshooting: If your mouse is acting erratically or not responding as expected, checking and adjusting the DPI can often remedy the situation.
-
Compatibility: Some software applications feature settings that rely on your DPI settings. Knowing your DPI ensures compatibility with these applications.
How to Check Mouse DPI on Windows 11
There are several methods to check your mouse’s DPI settings. Here, we will explore these methods step-by-step.
Method 1: Using Built-In Windows Settings
-
Open Settings: Click the Start menu (Windows icon) on the taskbar, then select Settings, or press
Windows + Ion your keyboard. -
Navigate to Devices: In the Settings window, click on Devices (this might be labeled as Bluetooth & devices in some versions).
-
Select Mouse: On the left side of the Devices menu, click on Mouse.
-
Adjust the Settings: While Windows 11 does not explicitly display DPI settings, you can adjust pointer speed under the «Related settings» section by clicking on Additional mouse options. This opens the Mouse Properties window where you can adjust the speed of the pointer, though it may not directly reflect the DPI.
-
Testing Your Mouse: To gauge the actual DPI, you can adjust the pointer speed slider and test it in an application or a game to see which settings feel comfortable and efficient for your needs.
Method 2: Checking Mouse DPI with Manufacturer Software
Most gaming mice and high-end peripherals come with dedicated software that allows users to view and modify DPI settings. Here’s how to check:
-
Identify Your Mouse Brand: Determine the brand of your mouse (e.g., Logitech, Razer, Corsair).
-
Download Manufacturer Software: Visit the official website of your mouse’s manufacturer, look for the drivers or software specifically made for your mouse model, and download it. Some popular software include:
- Logitech G Hub
- Razer Synapse
- Corsair iCUE
- SteelSeries Engine
-
Install and Open the Software: Follow the installation instructions and launch the application.
-
Locate DPI Settings: Most software will have a section for DPI settings where you can view the current DPI, adjust it, and create profiles for different activities.
-
Test Your Settings: Many of these software applications allow real-time testing to see how your adjustments feel immediately.
Method 3: Using Online DPI Calculators
If your mouse manufacturer does not provide dedicated software, you can use online DPI calculators to estimate its DPI. Here’s how to do so:
-
Prepare Your Mouse Pad: Make sure you have a ruler or measuring tape and a uniform surface on which to move your mouse.
-
Visit an Online DPI Calculator: Use a web browser to search for online DPI calculators. Websites like «Mouse DPI Analyzer» and others provide the functionality to determine DPI based on your input.
-
Measure and Move Your Mouse:
- Place the ruler on the perimeter of your mousepad.
- Move your mouse in a straight line while measuring the distance covered on the screen.
- Enter the distance moved and the distance of the mouse movement in the online tool to calculate DPI.
-
Analyze the Results: The calculator will give you an estimate of your mouse’s DPI based on your measurements.
Method 4: Use a DPI Analyzer
Specialized graphs or DPI analyzers offer a reliable way to check DPI.
-
Acquire a DPI Analyzer: Obtain a DPI analyzer—these devices can sometimes be found at local tech stores or online.
-
Connect the Analyzer: Follow the instructions provided to set up the DPI Analyzer. This often involves connecting it to your PC.
-
Run the Analyzer: The software will guide you through the testing process. It usually involves moving the mouse a specified distance while the analyzer records the cursor movement on the screen.
-
Review the Findings: The software will then provide a detailed report on your mouse DPI, including its accuracy.
Adjusting DPI: Customizing to Fit Your Needs
Once you’ve successfully checked your mouse’s DPI, it’s now time to adjust it to meet your needs better. Here are some strategies to ensure your setup is ideal:
-
Identify Your Use Case: Determine what you will use your mouse for most frequently—gaming, professional work, or casual browsing. Different tasks generally call for different DPI settings.
-
Experiment with Different Settings: Use the manufacturer software to create profiles with varying DPI settings. For instance, set a higher DPI for fast-paced gaming sessions and a lower DPI for detailed graphic design tasks.
-
Utilize On-the-Fly DPI Adjustments: Many mice feature DPI adjustment buttons on the device itself. Familiarize yourself with these buttons so you can switch DPI settings quickly as per your immediate needs.
-
Practice and Refine Your Skills: Once you’ve adjusted your mouse settings, spend some time practicing in the applications you use the most. This will help you become accustomed to the sensitivity and accuracy, fine-tuning it as necessary.
Conclusion
Understanding and checking your mouse DPI on Windows 11 is essential for optimizing your computing experience. The sensitivity of your mouse can significantly affect your performance, productivity, and overall comfort. Whether you are a gamer, designer, or everyday user, knowing how to check your mouse’s DPI settings can provide you with the insights necessary to make better adjustments.
By leveraging built-in Windows settings, manufacturer software, online calculators, or DPI analyzers, you can get a thorough understanding of your mouse’s capabilities. Remember to experiment with different settings and customize your experience accordingly—finding the right DPI for your needs can transform how you interact with your digital environment.
As technology continues to evolve, ensuring you are up-to-date with your peripheral settings will help you stay competitive and efficient in whatever tasks you undertake. Happy clicking!