
SNMP (
Simple Network Management Protocol
) — это классический протокол для мониторинга и сбора информации о сетевых устройствах (сервера, сетевое оборудование, рабочие станции, принтеры и т.д.). Протокол SNMP довольно легкий, быстрый, для передачи данных использует UDP порты 161 и 162. В этой статье мы рассмотрим, как установить и настроить службу SNMP в Windows Server 2022/2019 и Windows 10/11.
Содержание:
- Установка службы SNMP в Windows Server 2022/2019
- Установка SNMP агента в Windows Server Core
- Установка службы SNMP в Windows 10/11
- Настройка службы SNMP в Windows Server и Windows 10/11
Установка службы SNMP в Windows Server 2022/2019
В Windows Server службу SNMP можно установить с помощью Server Manager.
Выберите Add roles and features -> Features. Выберите SNMP Service (если нужно отметьте также SNMP WMI Providers).
Служба SNMP WMI Provider позволяет опрашивать SNMP устройство через WMI.
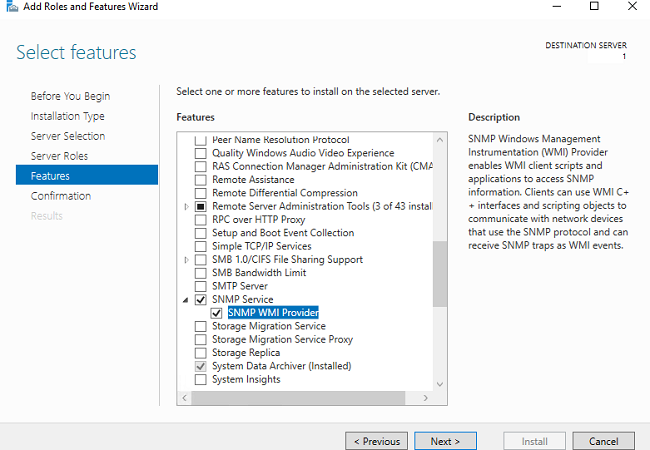
Нажмите Next -> Install и дождитесь окончания установки.
Установка SNMP агента в Windows Server Core
В Windows Server Core можно установить SNMP с помощью веб-интерфеса Windows Admin Center и PowerShell.
Если вы используете Windows Admin Center, подключитесь к хосту Windows Server, выберите Roles and Features -> SNMP Service.
Т.к. в Windows Server Core отсутствует графический интерфейс, а для его управления используется командная строка, вы можете установить службу SNMP из командной строки PowerShell.
Для установки ролей в Windows Server из PowerShell используется командлет Install-WindowsFeature.
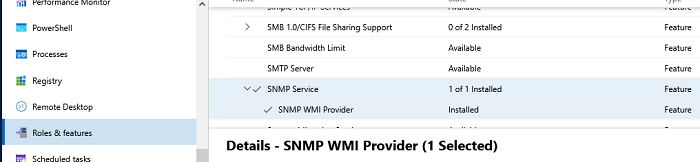
Проверьте, что служба SNMP не установлена:
Get-WindowsFeature SNMP*

Установите роль SNMP и WMI провайдер:
Install-WindowsFeature SNMP-Service,SNMP-WMI-Provider -IncludeManagementTools
Проверьте, что службы SNMP запущены:
Get-Service SNMP*
В нашем примере SNMP служба запущена, а SNMPTRAP остановлена.
Установка службы SNMP в Windows 10/11
Вы можете использовать службу SNMP не только в Windows Server, но и в десктопных редакциях Windows 10 и 11.
В Windows 10/11 служба SNMP, вынесена в отдельный компонент Feature On Demand (как RSAT и OpenSSH).
Вы можете установить SNMP через панель Settings. Перейдите в Apps -> Optional features -> Add an optional feature -> View features.
В списке доступных компонентов выберите Simple Network Management Protocol (SNMP) и WMI SNMP Provider. Для начала установки нажмите Next (понадобится интернет подключение к серверам Microsoft).

Для установки службы SNMP через PowerShell, используйте команду:
Add-WindowsCapability -Online -Name SNMP.Client~~~~0.0.1.0
Для установки службы SNMP без подключения к интернету, вам понадобится скачать ISO образ Windows 10/11 Features on Demand из личного кабинета на сайте лицензирования Volume Licensing Service Center (VLSC).
Для офлайн установки службы SNMP с такого ISO образа используется команда:
Add-WindowsCapability -Online -Name SNMP.Client~~~~0.0.1.0 -LimitAccess -Source \\msk-fs01\Distr\Windows-FOD\Win11\
Настройка службы SNMP в Windows Server и Windows 10/11
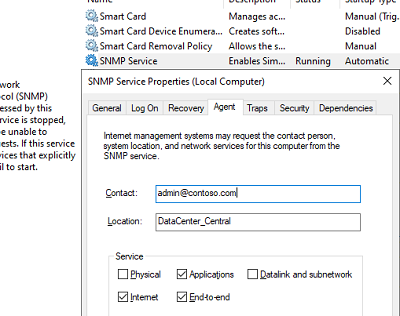
Вы можете настроить параметры службы SNMP в консоли services.msc. Найдите службу SNMP Services в списке и откройте ее свойства.
Обратите внимание, что у службы SNMP есть несколько дополнительных вкладок:
- Agent
- Traps
- Security
На вкладке Agent указывается базовая информация об устройстве (контакты администратора, местоположение). Здесь же можно указать тип информации, который может отправлять данное устройство при SNMP опросе.
В старых версиях протокола SNMP (SNMP v.1 и SNMP v.2) для авторизации пользователя используется строка сообщества (community string). На вкладке Security можно создать несколько строк подключения.
Можно выбрать один из пяти уровней доступа для сообщества:
- READ ONLY — позволяет получать данные с устройства;
- READ WRITE — позволяет получать данные и изменять конфигурацию устройства;
- NOTIFY — позволяет получать SNMP ловушки;
- READ CREATE – позволяет читать данные, изменять и создавать объекты;
- NONE
Вы можете создать несколько community string. Для этого нужно задать имя и выбрать права/ Для мониторинга состояние сервера достаточно выбрать READ ONLY.
В списке Accept SNMP packets from these hosts можно указать имена/IP адреса серверов, которым разрешено опрашивать данное устройство. Если вы не хотите ограничивать список разрешенных устройств, оставьте здесь Accept SNMP packets from any hosts.
На вкладке Traps указываются адрес серверов, на который SNMP агент должен отправлять SNMP-ловушка (SNMP trap). SNMP Trap это широковещательный USP пакет, используемый для асинхронного уведомления менеджера (например, сообщение о критическом событии).
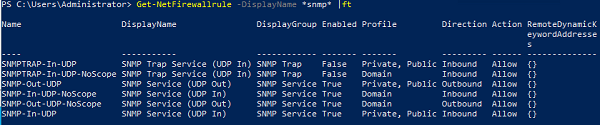
Не забудьте открыть в Windows Defender Firewall правила, разрешающие входящий и исходящий трафик для SNMP запросов и ловушек (TRAP). Нужные правила фаейрвола можно включить с помощью PowerShell.
В Windows Firewall есть несколько готовых правил для SNMP трафика:
Get-NetFirewallrule -DisplayName *snmp* |ft
- SNMPTRAP-In-UDP
- SNMPTRAP-In-UDP-NoScope
- SNMP-Out-UDP
- SNMP-In-UDP-NoScope
- SNMP-Out-UDP-NoScope
- SNMP-In-UDP
Можно включить все правила, или только определенное:
Get-NetFirewallrule -DisplayName *snmp* | Enable-NetFirewallRule
Get-NetFirewallrule SNMP-Out-UDP | Disable-NetFirewallRule
В списке служб Windows есть еще одна служба SNMP Trap. Она используется для получения сообщений от других SNMP агентов и пересылки на SNMP сервера (обычно это система мониторинга, опрашивающая устройства по SNMP, например PRTG или Zabbix).
Если вы настраиваете SNMP на Windows Server Core, вы не сможете использовать графический интерфейс службы SNMP для настройки ее параметров. Вместо этого придется вносить изменения в реестр с помощью PowerShell. Настройки службы SNMP хранятся в ветке реестра HKEY_LOCAL_MACHINE\SYSTEM\CurrentControlSet\Services\SNMP\Parameters.
Следующие команды зададут описание агента:
New-ItemProperty -Path "HKLM:\SYSTEM\CurrentControlSet\services\SNMP\Parameters\RFC1156Agent" -Name "sysContact" -Value "[email protected]" -PropertyType REG_SZ
New-ItemProperty -Path "HKLM:\SYSTEM\CurrentControlSet\services\SNMP\Parameters\RFC1156Agent" -Name "sysLocation" -Value "MSK_Datacenter1" -PropertyType REG_SZ
Для каждой ловушки SNMP придется создать отдельный ключ в HKLM\SYSTEM\CurrentControlSet\services\SNMP\Parameters\TrapConfiguration с именем community.
New-Item -Path "HKLM:\SYSTEM\CurrentControlSet\services\SNMP\Parameters\TrapConfiguration\public1"
Укажите разрешения для community:
New-ItemProperty -Path "HKLM:\SYSTEM\CurrentControlSet\Services\SNMP\Parameters\ValidCommunities" -Name "public1" -Value 4 -PropertyType DWord
Возможные значения:
- 1 — NONE
- 2 — NOTIFY
- 4 — READ ONLY
- 8 — READ WRITE
- 16 — READ CREATE
Для каждого community можно указать список серверов, с которых разрешено принимать запросы:
New-ItemProperty -Path "HKLM:\SYSTEM\CurrentControlSet\Services\SNMP\Parameters\PermittedManagers" -Name "1" -Value "server1.winitpro.ru" -PropertyType REG_SZ
Перезапустите службу SNMP для применения новых настроек из реестра:
Get-Service SNMP|Restart Service
Если нужно распространить эти SNMP настройки на множество компьютеров/серверов Windows в домене, используйте возможности внесения изменений в реестр через GPO.
Проверить работу службы SNMP можно с помощью утилиты snmpwalk (доступна в любом Linux дистрибутиве):
# snmpwalk -v 2c -c public1 -O e 192.168.13.122
В этом примере мы опросили наш Windows хост через версию протокола SNMPv2.
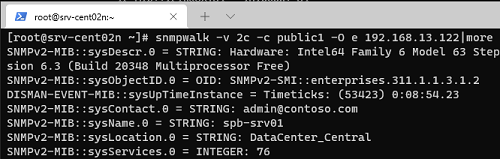
Утилита вернула базовыую информацию о хосте (syscontact, sysname, syslocation) и довольно большое количество информации о состоянии сервера Windows.
SNMP is a common and most used network protocol for monitoring SNMP-enabled network hosts; including Windows and Windows Servers. You can use it for monitoring different metrics, such as CPU load, RAM, Disk, system uptime, and much more.
It acts as a Windows service and it is prone to different problems. If it doesn’t work, you will not be able to use it for monitoring the performance of your Windows machines. The problem can occur on any Windows and Windows Server version or edition. Why does the problem occur?
For writing this article, I run my workloads on powerful mini PC - Intel NUC powered with the CPU i7 the latest generation, 64 GB RAM DDR4, 256 M.2 SSD. Intel® NUC Mini PCs are fully complete and ready to work out of the box. You can learn more here Intel® NUC Products.There are different reasons for that. In this article, I’ll cover common issues you might see and potential solutions to fix them.
And Yes…I’d love to hear your feedback. Please let me know if any, and what solution helped you to solve SNMP problems on your Windows. You can do it by adding your comment at the end of this article.
#1 Test SNMP connectivity
SNMP doesn’t work! Well, we know that, but it sounds generic. Firstly, we need to identify where is the root cause of the problem. Is there a problem with the destination Windows machine, network monitoring solution (NMS), or communication between Windows and NMS?
You can verify if the SNMP service is running using free SNMP Tester tools. The SNMP Tester tool can be run on the source (NMS) or destination machine (Windows). I’ll do it on the destination Windows machine which doesn’t respond to SNMP queries. You can do it on your NMS machine, as well. Based on the results we get, we can make some conclusions.
What tool should you use? I advocate for Paessler SNMP Tester.
- Download Paessler SNMP Tester from this LINK.
- Extract it, run Setup.exe to install it.
- Run the Paessler SNMP Tester.
- Under 1. Set SNMP Tester add the IP/Port, choose SNMP Version and Community. Under 2. Select Request Type select Read Device Uptime.
- Under 3. Run Test click Start. In the case below, you can see there is no response from Windows. Considering I use the correct paraments, my SNMP doesn’t work.
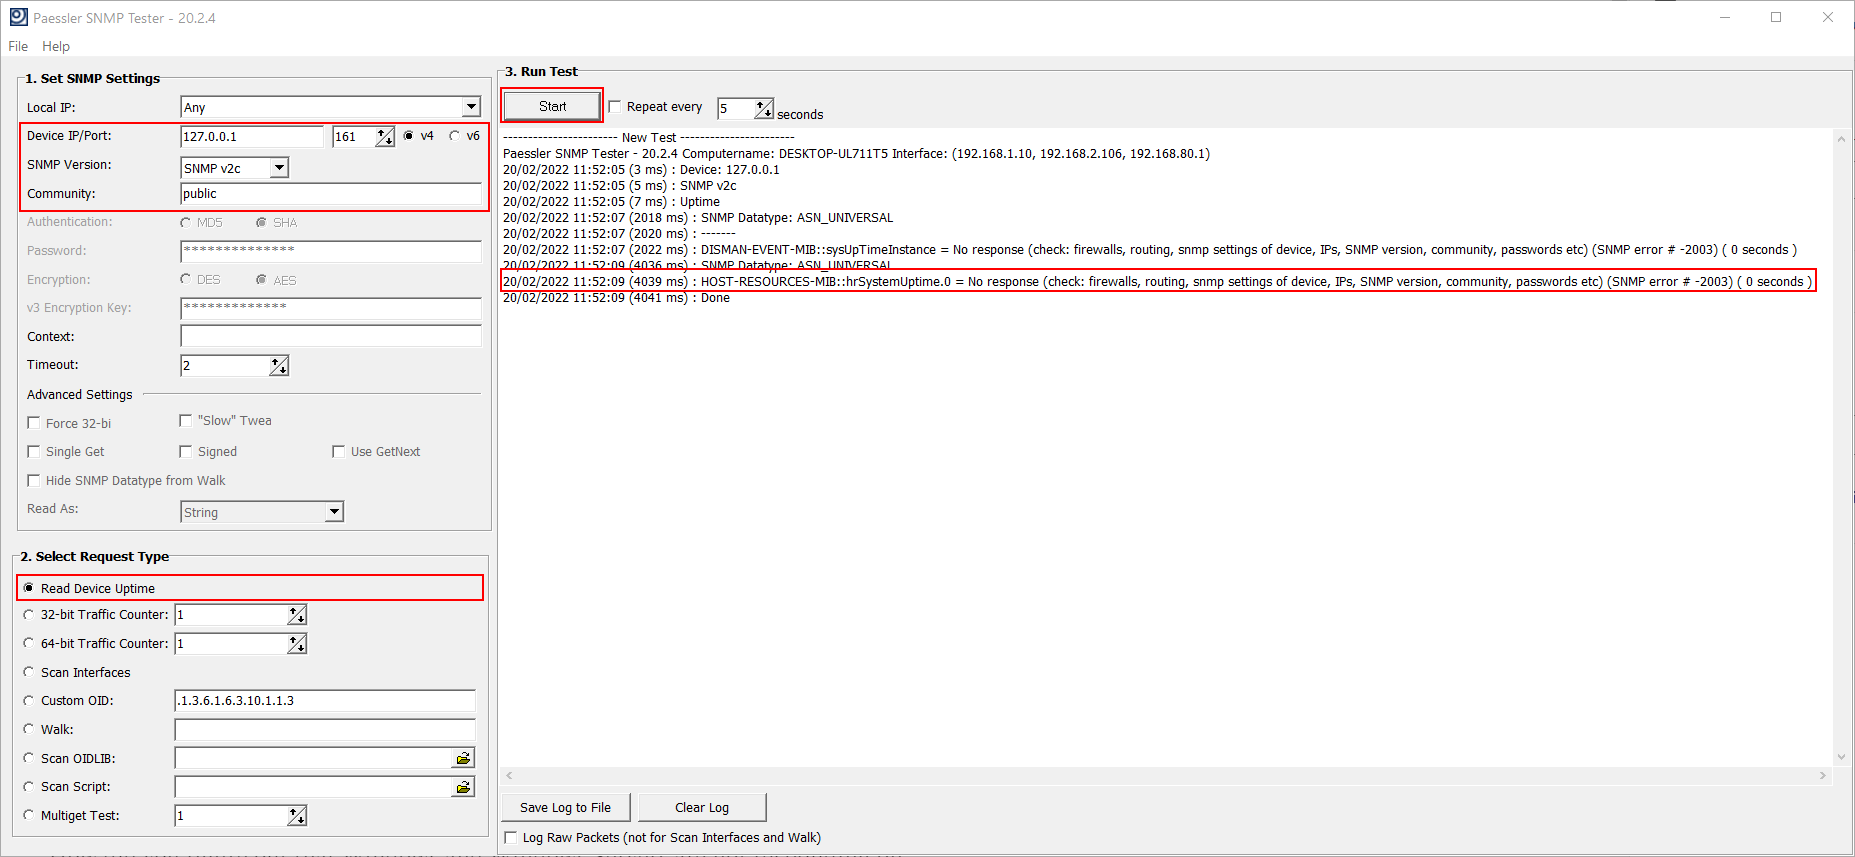
If you run SNMP Tester on the destination Windows machine, and it doesn’t respond to SNMP: SNMP is not enabled. Please check #2.
If you run SNMP Tester on the destination Windows machine, and it responds to SNMP but doesn’t respond to SNMP from NMS: you need to check if SNMP settings are matched with your NMS. Please check #3 and #4.
#2 Check SNMP service
SNMP service is not enabled by default. Regardless you are running Windows or Windows Server, you need to enable it. If you are unsure, you need to check the SNMP services status using the Services tool or PowerShell.
In Windows and Windows Server with Desktop Experience (GUI), you can check the SNMP status using Services.msc. Services is a tool in the Windows operating system to get a list of all the services on the computer. msc stands for the management console.
In order to do it, you need to open the Services tool and navigate to SNMP Service.
1. Hold Windows logo + R
2. Type services.msc and press Enter
Navigate to SNMP Service and check if it is running. If SNMP service is available, but not running, change the startup type and run it by clicking on Properties > General > Startup type > Start.

You don’t see SNMP service? That means it is disabled, and you need to enable it. You can check the details on how to do it on different operating systems in the following articles:
- How to install deprecated SNMP in Windows 10 1803 and onwards
- Can you still monitor your Windows 11 with SNMP
- Install and Configure SNMP in Windows Server 2019
- Can you still monitor your Windows Server 2022 with SNMP
What if you are running Windows Server Core or Hyper-V Server Core? In that case, you can check the status using PowerShell by executing the following command:
Get-WindowsFeature SNMP*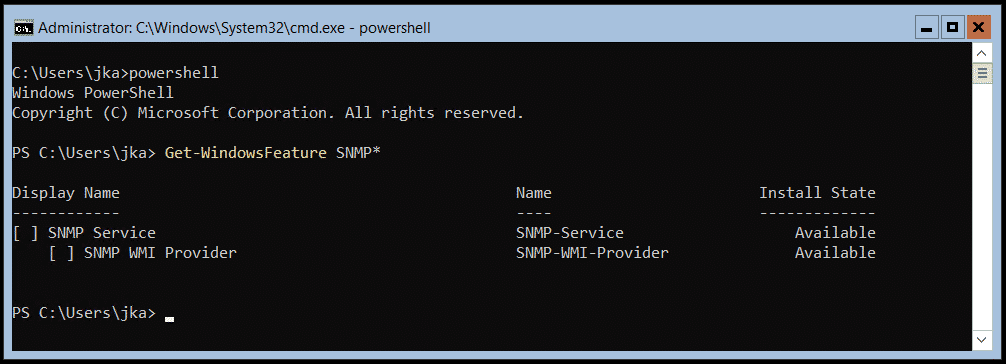
I’ve got you covered with the complete procedure in these two articles:
- Install and configure SNMP on Windows Server Core
- Install and configure SNMP on Hyper-V Server Core
SNMP service is enabled, but I still can’t monitor target Windows machines using SNMP. Well, check the next step(s).
#3 Check SNMP settings
It is not only enough to enable SNMP on your Windows, you also need to configure it. It could happen that settings are not matched, and Windows and NMS can’t exchange SNMP messages. It could also happen that someone intentionally and accidentally made some changes. So, it always makes sense to check if the settings are matched or not.
There are four important parameters you need to match. It is an SNMP version, community string, port (explained in #4), and SNMP access list.
What SNMP versions are available? Windows only supports v1 and v2c. You need to check if v1 or v2c are configured within your NMS. If in any case, you use v3 in your NMS; Windows will not be able to respond to it.
What is the community string? A community string is some kind of key that is shared between NMS and Windows machines. The default one is public. You can keep the default one or change it (recommended).
What is the default port? SNMP uses UDP ports 161 and 162. For more information please refer to #4.
What is an SNMP access list? It is a list of IP addresses that are allowed to send SNMP queries to target Windows machines. This setting can be only configured on Windows machines.
Both, the community string and SNMP access list can be configured within the SNMP service itself. In order to do it, you need to open the Services tool and navigate to SNMP Service.
1. Hold Windows logo + R
2. Type services.msc and press Enter
3. Right click on SNMP Service and click Properties
4. Click on Security tab
Check the community string and match it with the NMS. You can add, edit or remove it.
The second option you need to configure is the SNMP access list. There are two options available, Accept SNMP packets from any hosts or Accept SNMP Packets from these hosts. If you select Accept SNMP packets from any hosts or Accept SNMP Packets from these hosts, you also need to add the IP address of your NMS. In my case below, the community string is prtgnetworkmonitor and my Windows machines only accept SNMP queries from 192.168.88.21 which is PRTG Network Monitor.
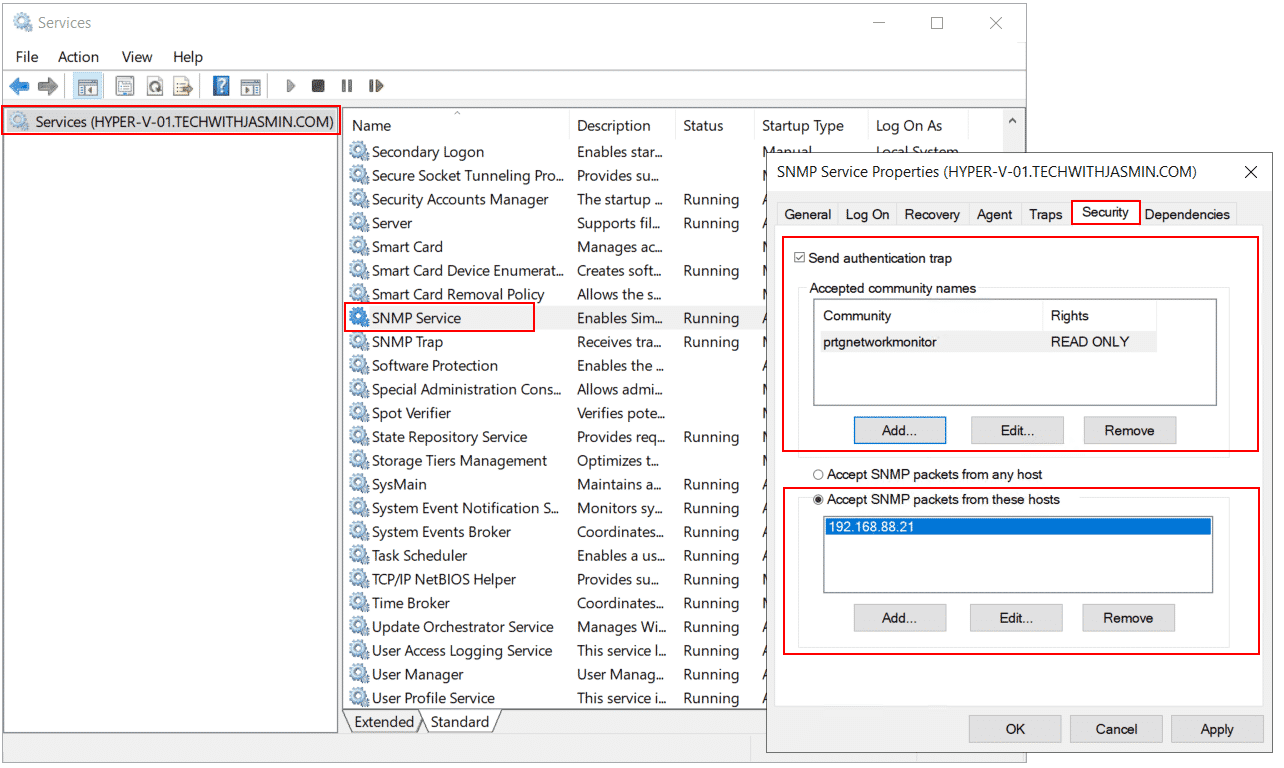
Navigate to your NMS, in my case PRTG Network Monitor and verify if the SNMP version and community string are matched. In my case, they are.

I know there is one thing missing, a port. Please refer to the next step.
#4 Check SNMP port(s)
SNMP uses the UDP port 161 for general SNMP messages. It uses UDP port 162 for SNMP Traps. These ports (if not changed on the Windows), must be matched with the port on your NMS.
If you are unsure what SNMP post is used, you can check it by navigating to your Windows machine and opening %systemroot%\System32\Drivers\Etc. Open file services with a text editor (e.g. Notepad++) and navigate to SNMP.
#5 Check firewall rules
This is not really a common situation, but it might be the case in certain situations. No harm to look at it. Windows provides you with a native firewall that can control inbound and outbound traffic. You can open Windows Firewall Advanced Settings and check if there are any rules blocking SNMP. The newest version of Windows and Windows Server, it is called Windows Defender Firewall with Advanced Security.
Once you open it, on the left side of the device tree, you can find Inbound and Outbound rules. Go through them and see if there are any rules that are blocking SNMP.
In my case, Windows 10 has the rule to block SNMP. What can I do in that case? I can disable the rule, modify it or delete it.

What can you do in your case? Please advise your IT department if you are allowed to modify it. In centralized environments dependent on the Active Directory, you can perform this change on hundreds or thousands of Windows machines by running a single group policy.
#6 SNMP stopped working after Windows Update
Well, this might happen with any Windows features. Windows Update is a must to do, but sometimes it just breaks things. We as IT professionals need to have a mechanism for how to mitigate or minimize potential problems.
If you noticed that SNMP stopped working after Windows Update, you can try to revert the update to the previous version (if possible). If you can’t do it, search for potential fixes on the Internet.
#7 Repair your Windows
Malware infected your Windows and SNMP files. You tried all of the potential solutions, but they didn’t work.
You can try to repair system files by running the sfc /scannow. The sfc /scannow command will scan all protected system files, and replace corrupted files with a cached copy that is located in a compressed folder at %WinDir%\System32\dllcache.
Open PowerShell or Command Prompt as Administrator and run the following command.
sfc /scannow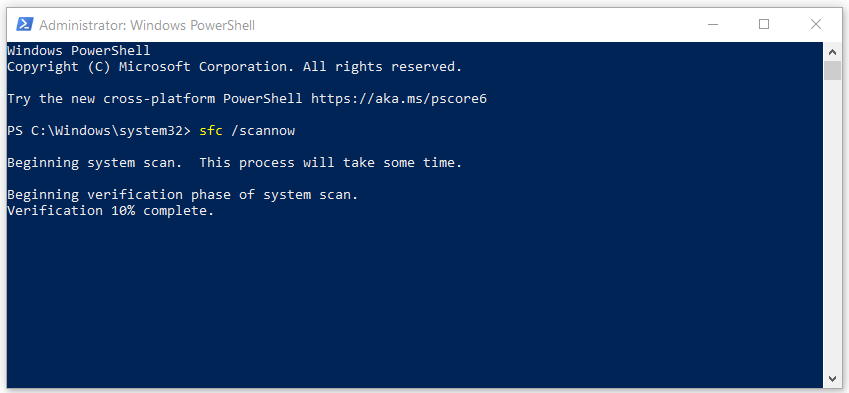
#8 Check your NMS
If SNMP works fine on your Windows machine, but NMS has some difficulties sending SNMP queries, you should check with the vendors if there are any known problems with SNMP. Open a ticket and read the release notes.
#9 Wireshark knows where the packet goes
Considering your Windows and NMS are working properly and your SNMP packets are somewhere lost; try to analyze your network traffic using Wireshark. Wireshark is a super powerful tool for that kind of job.
And Yes…I’d love to hear your feedback. Please let me know if any, and what solution helped you to solve SNMP problems on your Windows. You can do it by adding your comment at the end of this article.
If you find this article helpful, you can share it with your network by using the social media buttons below.
The Simple Network Management Protocol, or SNMP, started in the late ‘80s as a simple solution to managing network nodes easier. SNMP data has been used in network security ever since to measure the performance of devices across a variety of different vendors.
SNMP is among the most popular networking protocols, with snmpwalk becoming one of the most common methods for scanning more than one node simultaneously.
What Makes SNMP Tick?
Before we start working with the snmpwalk command, let’s examine precisely how SNMP works in the first place.
SNMP uses agents to collect information from devices on which it is enabled. This data is then stored in a MIB(Management Information Base), where it is left for easy access when the SNMP manager polls the agent to find it.
Whenever the SNMP Manager queries the agent, the agent will take the data from the MIB and send it to the manager; at this point, you’ll be able to see the data through a network monitoring tool.
Although different commands will let you query an SNMP agent, the GET and GET-Next commands most often; the GET command’s purpose is to take an OID or Object Identifier from the Management Information Database. The GET-Next command can be a bit harder to wrap your head around, as it goes through a MIB tree going from Object Identifier to Object Identifier to pull information. However, this is the process that snmpwalk makes a lot simpler.
What Is snmpwalk?
An SNMP application tasked with running multiple simultaneous GET-Next requests automatically is referred to as a snmpwalk. The most significant advantage of snmpwalk is that it lets you query Get-Next enabled devices simultaneously and pull data from them at once. Making a chain of Get-Next requests like this is extremely useful when you don’t have to write out a unique command for every single Object Identifier or node within a given sub-tree.
Snmpwalk starts its work at the root node of a sub-tree, this way, and it makes sure that it’ll gather information from all nodes connected to it. This makes collecting information from multiple devices(such as multiple switches or routers) a breeze. The data then gets to you as a set of Object Identifiers.
Install snmpwalk on Windows
If you’re on Windows, installing snmpwalk will be a walk in the park.
- First of all, you’ll need to download the snmpwalk.exe file here.
- Then, once you’ve got the file on your PC, press Start and search for cmd. This opens up the command line on Windows, and you can use Powershell or the like if you prefer.
Install snmpwalk on Linux
Snmpwalk isn’t difficult to install on Linux either, although it is a bit harder than Windows. The specifics of the process depend on quite a bit on what Linux distribution you’re using, so we’ll be covering a few of the main ones here. You’ll need to enter different commands depending on your distro, and then you’ll get the snmpwalk package ready to install.
For Fedora/CentOS or the like, type:
yum install net-snmp-utils
If you’re on Ubuntu, type:
apt-get install snmp
What Parameters and Options Are There?
Snmpwalk provides you with a variety of different options and parameters you can take advantage of, such as:
- Hostname: Gives you the SNMP agent name
- Community: Tells you what type of read community it is
- Object_id: This lets you specify a given object ID to return any SNMP objects under it. If NULL, that will lead to the root of the object being treated as the object_id.
- Timeout: Set a number(expressed in microseconds) before a timeout
- Retries: How many times a connection should be retried if it times out
- -Os: Displays the last symbolic element of an Object Identifier
- -c: Sets up a community string
- -v: Lets you specify what SNMP version you’d like to use
Making snmpwalk Information Parseable
Most people notice when they first run snmpwalk because it outputs way too many results for a person to reasonably read. So it wouldn’t be surprising if you netted thousands of results the first time.
To circumvent needing to read thousands of lines of text, many vendors will give you a MIB file. The purpose of which is to specify which Object Identifiers are available within the device. Usually, you’ll be given a MIB file for every device you’ve got. This lets you run queries specific to one of those files instead of having to sift through everything.
Most network monitoring tools will also have features to help you parse snmpwalk outputs.
What Does snmpwalk Look Like?
When you’re running snmpwalk on a device, you’ll get a range of different values from the SNMP agent. You’ll need to parse from the starting Object Identifier onwards. Once you’ve entered the snmpwalk command, you should see a result similar to this sample output:
$snmpwalk -v 1 -c public123 localhost .1.3.6.1
sysDescr.0 = STRING: Software: Whistler Version 5.1 Service Pack 2 (Build 2600)
sysObjectID.0 = OID: win32
sysUpTimeInstance = Timeticks: (15535) 0:02:35.35
sysContact.0 = STRING: unknown
sysName.0 = STRING: UDLDEV
sysLocation.0 = STRING: unknown
sysServices.0 = INTEGER: 72
sysORID.4 = OID: snmpMPDCompliance
Now that’s a lot of information to get from just one command. So most of what you see up there is made up of the info given to it by the MIB.
What If We Exclude The MIB?
In the following example, we’ll exclude the MIB. This means that we’ll ignore all of the data coming directly from it. The 2nd number in the 1st like, or .1.3.6.1.4.1.423 is the Object Identifier we’re starting from
$ snmpwalk -v1 -c public 10.10.1.224 .1.3.6.1.4.1.423
SNMPv2-SMI::enterprises.423.1.1.1.1.1.1.0 = STRING: “Sicon DP850E”
SNMPv2-SMI::enterprises.423.1.1.1.1.1.2.0 = STRING: “IPS_EDEN”
SNMPv2-SMI::enterprises.423.1.1.1.1.2.1.0 = STRING: “313.40.D
Pulling Specifically From The MIB
If you’re looking to pull data specifically from a MIB, then you can get in-depth info about the specific objects you’re interested in. In the following example, we use the -m command to tell snmpwalk what MIB it should query.
$ snmpwalk -v1 -c public -m “./IPS-POWERNET.txt” 10.10.1.224 apc
PowerNet-MIB::upsBasicIdentModel.0 = STRING: “Sicon DP850E”
PowerNet-MIB::upsBasicIdentName.0 = STRING: “IPS_EDEN”
PowerNet-MIB::upsAdvIdentFirmwareRevision.0 = STRING: “423.10.D”
How To Do It On Linux?
Snmpwalk functions quite similarly across Linux and Windows. As you can see in the example below, snmpwalk still goes through the Object Identifiers until it finds the system data that it’s looking for and then displays it.
# % snmpwalk-v 1 localhost public system # system.sysDescr.o = “SunOS name wildc”
# system.sysObjectID.o = OID: enterprises.ucdavis.ucdSnmpAgent.sunos4
# system.sys.UpTime.o = Timeticks (93242143) 85 days, 21:31:52
# system.sysContact.o = “sys_admin@stc.org>”
# system.sysName.o = “Wistari, MSA”
# system.sysLocation.o = “Wistari, MSA”
# system.sysServices.o = 82
Using snmpwalk To Increase Efficiency
Although snmpwalk can seem difficult and daunting at first, it’s a relatively simple concept. A snmpwalk command is a simple shorthand used to put out multiple GET-Next requests without forcing you to write dozens of commands. A single snmpwalk command can sometimes save you up to hours of writing commands and help you take a better look at the health of your infrastructure.
When using snmpwalk, you should remember that; you’ll get the most out of it; you’ll want to specialize the output it gives you and cut out all but the information you’re looking for. Specifying a given MIB lets you see more specific data rather than seeing information gathered from a whole database of Object_IDs.
Getting SNMP data like this from your network helps you ensure that you don’t gloss over any crucial aspects. Remember that the whole purpose of the snmpwalk command is to help you get SNMP data from your network devices while spending as little time on it as possible.
What’s The Best Tool To Use To Analyze MIB and snmpwalk?
We’ve gone over a variety of tools on the market, looking at MIB analyzers, and we’ve assembled some criteria based on which we’ve determined the best one:
- It needs to give a visualization of the entire OID tree
- There needs to be a view showing the OID value as well as a descriptor for any active nodes
- A graphical sign of whether or not an OID node has a value
- Intuitive GUI that doesn’t take long to learn
- A free trial so that you can decide if you like the tool before you purchase it
- Accurately priced for its functionality
Paessler SNMP, MIBs, and OIDs monitoring with PRTG
Paessler isn’t one of the biggest companies in network security for no reason. Using this tool, you can deploy SNMP, OIDs, and MIBS from one place. In addition, it has an excellent dashboard, showing you everything you need to know intuitively.
The PRTG takes advantage of SNMP to pay close attention to your entire network. From the moment you set the tool up, you’re ready to collect all of the data you need about your network devices.
It stores the information found within a tree with a branch structure, with one vendor being assigned one branch. This helps with troubleshooting, as you don’t need to guess to see what’s causing issues.
snmpwalk Frequently Asked Questions
Are There Any Good SNMP Alternatives?
Unfortunately, if you’re looking for a universally implemented reporting standard that isn’t SNMP, you’re out of luck. Although there are other reporting standards, like Netconf, which comes preinstalled on all Cisco devices, none are anywhere near as standard. There’s also WMI as a Windows-only option. So if you’re just looking for a reporting system, chances are your device manufacturer might have one of their own. On the other hand, if universal acceptance means something to you, you’re better off using SNMP.
What Is An OID?
An OID, or Object Identifier, is the code specific to a single node within the MIB tree.
How Do I Tell If SNMP Is Running On Linux?
To check if SNMP is currently running on Linux, you need to issue a standard SNMP command in the command line. For example, write “snmpget -v,” and if it shows you your SNMP version, it’s running.
How Do I Tell If SNMP Is Running On Windows?
To check if SNMP is running on your Windows device, go to your Start Menu and expand Windows Administrative Tools. After pressing “Services,” you should be able to scroll down the list to find your SNMP entry. In the “status” column, it should say “Running” if it is.
Closing Words
SNMP has drastically changed the network security landscape in the over 30 years it has been around. Today, there are various tools out there made to help you make your snmpwalk commands more efficient. Out of all of those, we think the Paessler PRTG shows the most promise with its modular approach to monitoring.
Although snmpwalk can seem quite daunting at first, it’s not so bad at all once you’ve got to grips with it.
Try it out yourself!
What is your favorite thing you’ve accomplished with snmpwalk?
Do you think there’ll be a true competitor to SNMP in the future?
Let us know in the comments below!
If you hear about SNMP everywhere and wondering what’s SNMP and the port functions. Then you are in the right place. Here we bring to you a composite article comprising of SNMP port status in Windows and Linux. This way you can learn how to check SNMP port open both in the Windows and Linux Operating Systems.

SNMP- a quick look!
SNMP stands for Simple Network Management Protocol. It is a protocol employed to manage and also monitor the connected devices in a network in an IP network. This protocol can be implanted in servers, routers, or firewalls.
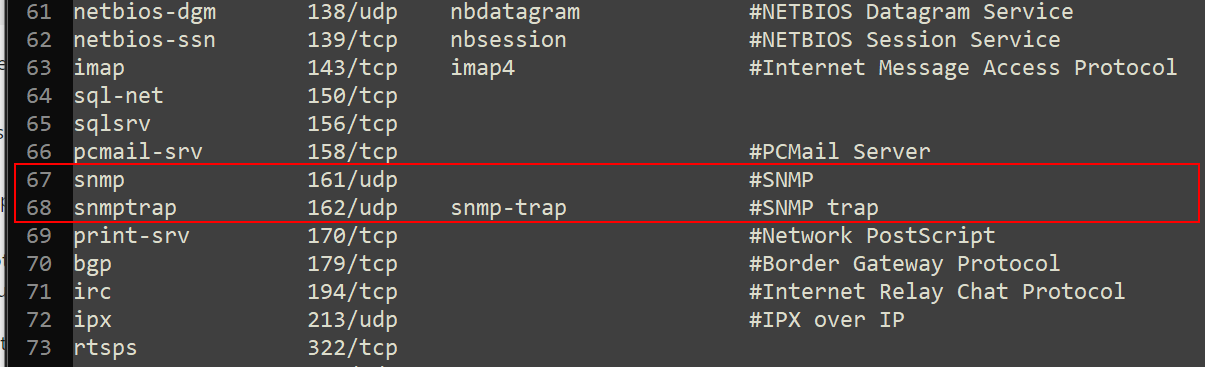
An SNMP port is a port that is employed through 161 UDP. This is primarily for the managers of SNMP to communicate with the agents.
To understand and check if the SNMP port is open, you need to Scan the ports. Use Nmap to scan the SNMP ports. If you have to scan networks, then there is no powerful tool like Nmap. The results of the Nmap show that the ports of SNMP are open. This means that the SNMP service is functioning.
How to check it for Windows?
To check the SNMP port status for windows. The first step is to go to settings. To go to settings, first, go to start and then settings. From the settings opt for a control panel. Then from the control panel go to administrative tools. And from the administrative tools go to services.
Once you reach the services window, it is time to check for SNMP port services. Find out if the SNMP services exist or not. In case, you find the services don’t exist, install SNMP immediately. Once you install it, the service of SNMP is immediately displayed. However, the status of the port is not displayed. In this case, you have to double-click on the SNMP service. Further, click on the start service option. You can opt to choose this service manually or automatically.
To install SNMP port services for Windows:
- Check if you are logged in as an administrator or as a member of the group of administrators.
- Start->settings->control panel->add/remove programs-> add/remove windows components.
- Component->management and monitoring tools.
- Click the checkbox of Simple Network Management Protocol
- Now click ok
- Click Next
- Specify the path to the file storage
- The services start automatically post-installation.
How to check if the port is open for Linux?
To check if the port is open in Linux you have to key in any of the following commands:
- $ /etc/rc.d/init.d/snmpd status
- $ service snmpd status
If SNMP is installed then you can follow any of the below commands to start the service
- $ service snmpd start
- $ /etc/rc.d/init.d/snmpd start
If you find that SNMP services are not installed, then you need to take the first step of installing it, before executing the above commands.
To install SNMP services in Linux:
- Check if you are logged in as a root user
- See that you execute the commands to trace the path to the C compiler.
- Execute the commands to install
- The services start functioning.
Протокол Simple Network Management Protocol (SNMP) используется для мониторинга, оповещения о событиях и управления устройствами в сети.
SNMP может получать различную информацию (время аптайма, счетчики производительности, параметры устройств и т.д.) от любых сетевых устройств: коммутаторов, серверов, маршрутизаторов или простых компьютеров, на которых установлен агент SNMP.
В Windows 10 служба SNMP доступна в виде отдельного компонента Windows и по умолчанию не устанавливается.
Проверка наличия SNMP
Проверить, установлена ли в системе служба SNMP можно с помощью PowerShell командой Get-Service:
Get-Service -Name snmp*Появится сообщение:

Установка SNMP
Службу SNMP можно установить через «Дополнительные компоненты». Перейдите в Параметры/Приложения/Дополнительные компоненты. Нажмите «Добавить компоненты» и в поиске введите «snmp». Далее их необходимо установить:

Также можно установить службы SNMP из командной строки PowerShell:
Enable-WindowsOptionalFeature -online -FeatureName SNMPНастройка службы SNMP
После установки службы SNMP должны запустится автоматически. Откройте консоль управления Services (services.msc). Для открытия нажимаем WIN + R и вводим имя консоли:

В списке службы должны появится две новые службы:
SNMP Service – это основная служба SNMP агента, которая отслеживают активность и отправляет информацию;
SNMP Trap — получает сообщения ловушки (trap messages) от локальных или удаленных агентов SNMP, и пересылает сообщения в управляющие программы SNMP, которые работают на этом компьютере.
Откройте свойства «Службы SNMP». Если она остановлена, запустите ее, нажав кнопку «Общие» и измените тип запуска на автоматический:

Переходим на вкладку «Агент SNMP». Заполняем поля «Контактное лицо» и «Размещение» (здесь можно указать контактное имя пользователя и местоположение компьютера), и выбираем список сервисов, данные которых нужно собирать и отправить устройству мониторинга:

На вкладке «Безопасность» можно настроить различные параметры безопасности для различных серверов SNMP:

В списке «Приемлемые имена сообществ» перечислены имена сообществ, чьи SNMP узлы проходят аутентификацию для отправки SNMP-запросов на этот компьютер.
Сообщество — это имя, которое обладает такими же функциями, как логин и пароль. При добавлении сообщества можно выбрать права из списка (None, Уведомление, READ ONLY, READ WRITE, READ CREATE).
В системах мониторинга обычно достаточно выбрать READ ONLY, при этом сервер мониторинга может только опрашивать систему, но не вносить изменения.
Далее можно добавить список серверов системы мониторинга (по DNS имени или по IP адресам), от которых необходимо разрешить получать SNMP пакеты.
Чтобы все настройки сохранились необходимо перезапустить службу SNMP.