
Значительная часть сбоев Windows, завершающаяся синим экраном бывает вызвана неправильной работой какого-то из драйверов. Какой именно драйвер вызвал синий экран обычно можно выяснить путем анализа дампа памяти, при условии, что он сохранен. Если это не так, или синий экран сложно отловить, помочь может встроенный диспетчер проверки драйверов Windows.
В этой инструкции о том, как использовать Driver Verifier для проверки драйверов и поиска драйвера, который вызывает сбой в Windows 11, Windows 10 и других версиях системы.
Запуск Driver Verifier и настройка проверки драйверов
Диспетчер проверки драйверов — встроенный инструмент Windows, в общем случае порядок использования которого состоит из следующих шагов:
- Перед тем как приступать, рекомендуется создать точку восстановления системы, также имеет смысл добавить безопасный режим в меню загрузки Windows (пример действий описан в инструкции Безопасный режим Windows 11, но подойдет и для предыдущих версий системы), а также убедиться, что сохранение дампов памяти включено, подробнее: Как включить сохранение дампов памяти в Windows при сбоях.
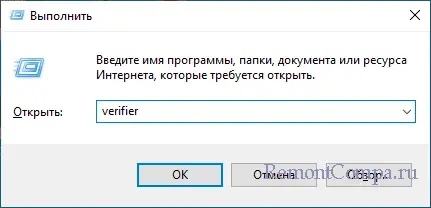
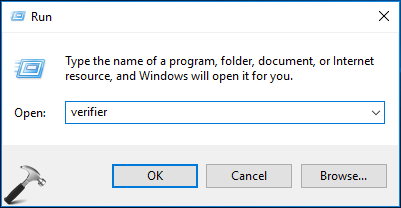
- Нажмите клавиши Win+R на клавиатуре, введите verifier и нажмите Enter.

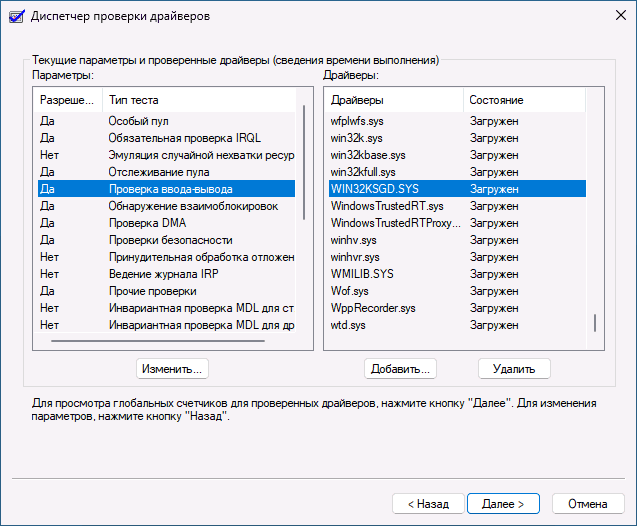
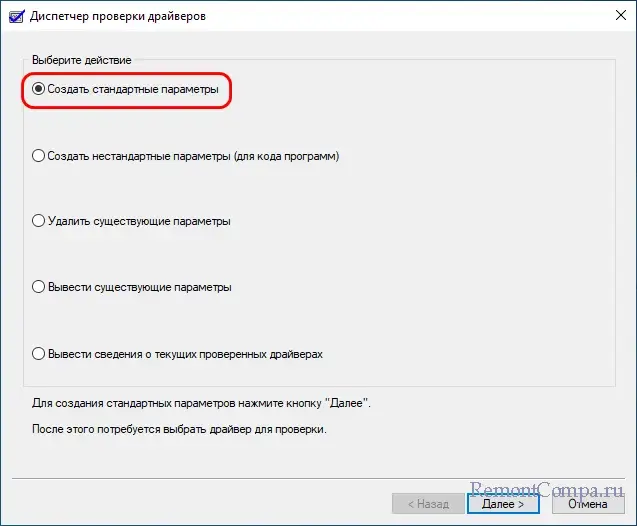
- Будет запущен диспетчер проверки драйверов. На первом экране вы можете задать какие параметры использовать при проверке драйверов, обычно достаточно использовать опцию «Стандартные параметры». При использовании опции «Создать нестандартные параметры» вы сможете вручную установить, какие именно тесты будут проводиться и включить дополнительные тесты в дополнение к стандартным.

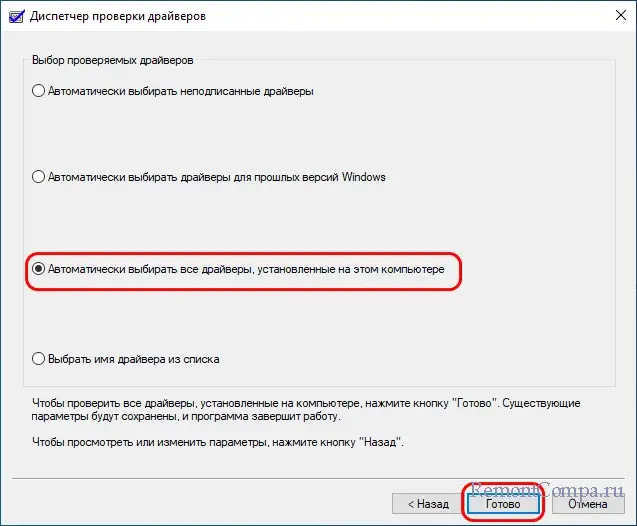
- Следующий этап — выбор какие драйверы следует проверить: можно выбрать только неподписанные драйверы, только для старых версий Windows, тестировать все драйверы или конкретный файл драйвера. В контексте этой инструкции выбираем «Автоматически выбирать все драйверы, установленные на этом компьютере».
- Вам будет предложено перезапустить компьютер — выполните перезагрузку.
- Также вы можете включить средство проверки драйверов для конкретного драйвера в командной строке, запущенной от имени администратора, например, команда для проверки всех драйверов в стандартном режиме выглядит следующим образом:
verifier /standard /all
а команда для проверки выбранных файлов драйверов имеет следующий синтаксис:
verifier /standard /driver driver1.sys driver2.sys


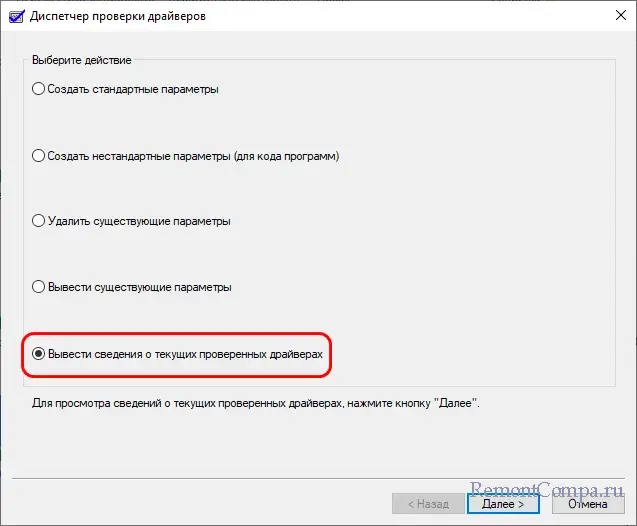
После перезагрузки драйверы будут тестироваться в фоновом режиме всё время, пока вы работаете с ОС. Каких-либо отчетов об этом не появится (но базовую информацию можно посмотреть в диспетчере проверки драйверов в пункте «Вывести сведения о текущих проверенных драйверах»), задача — проверить, при каких тестах и какой драйвер вызывает сбой.
При сбое какого-то из драйверов в ходе теста вы получите синий экран, обычно с одним из следующих кодов:
DRIVER_VERIFIER_DETECTED_VIOLATION
DRIVER_CAUGHT_MODIFIYING_FREED_POOL
DRIVER_VERIFIER_IOMANAGER_VIOLATION
DRIVER_VERIFIER_DMA_VIOLATION
SPECIAL_POOL_DETECTED_MEMORY_CORRUPTION
Возможны и иные варианты кодов ошибки. После таких сбоев вы можете использовать специальные средства для анализа дампов памяти, например, WinDbg (который поддерживает помимо стандартных команд анализа дампа, сбор статистики от Driver Verifier с помощью команды !verifier), чтобы выяснить, какой именно драйвер вызвал синий экран. Примечание: если из-за синих экранов не получается выполнять какие-либо действия на компьютере, используйте безопасный режим и отключение проверки драйверов с помощью Driver Verifier, о чем подробнее далее.
Кстати, если синие экраны с кодами DRIVER_VERIFIER появляются у вас без описанных действий, вероятно, диспетчер проверки драйверов был запущен вами (либо кем-то еще) когда-то ранее и в дальнейшем проверка не отключалась.
Проверить текущий статус проверки драйверов можно с помощью команды verifier /query в командной строке. При запущенной проверке вам будет предоставлен отчет о проверяемых драйверах, в случае остановленной проверки или если она не запускалась, вы увидите сообщение «No drivers are currently verified».
Остановка проверки драйверов в Driver Verifier
Проверка драйверов будет производиться до тех пор, пока вы не отключите её вручную: автоматически она не остановится ни после перезагрузки, ни после завершения работы.
Чтобы остановить диспетчер проверки драйверов и прекратить стресс-тесты драйверов, используйте один из способов:
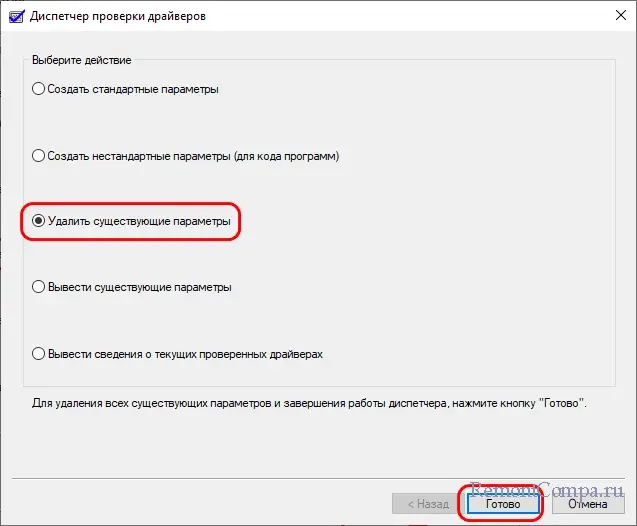
- Запустить диспетчер проверки и использовать опцию «Удалить существующие параметры».
- Использовать командную строку, запущенную от имени администратора и команду
verifier /reset
Проверка драйверов прекратится после выполнения одного из указанных действий и перезагрузки компьютера.
Если по какой-то причине зайти в безопасный режим не удается, либо действия в нём невозможны, вы можете отключить диспетчер проверки драйверов одним из следующих способов:
- Использовать точку восстановления системы на дату, когда проверка еще не была запущена. Это можно сделать в том числе из среды восстановления или с загрузочной флешки Windows, выбрав пункт «Восстановление системы» на втором экране программы установки.

- Загрузить куст реестра SYSTEM и удалить разделы
HKEY_LOCAL_MACHINE\SYSTEM\CurrentControlSet\Control\Session Manager\Memory Management\VerifyDrivers
и
HKEY_LOCAL_MACHINE\SYSTEM\CurrentControlSet\Control\Session Manager\Memory Management\VerifyDriverLevel

Завершая, необходимо упомянуть вторую по частоте причину синих экранов — ошибки оперативной памяти. И для проверки RAM на ошибки в Windows тоже есть встроенный инструмент — Средство проверки памяти Windows.
Большая часть так называемых синих экранов смерти вызывается сбоями в работе драйверов ядра, при этом идентификация проблемного драйвера может оказаться достаточно непростой задачей, поскольку экраны BSOD в Windows 8.1, 10 и 11 не отличаются особой информативностью. Для получения подробных сведений приходится анализировать файлы дампа MEMORY.DMP, если в системе включена опция их создания.
Однако, существует и другой способ выявления сбойных драйверов, который отчасти можно назвать превентивным. Заключается он в тестирование работы драйверов с помощью встроенной утилиты Driver Verifier, или иначе диспетчера проверки драйверов. Работая в фоновом режиме, инструмент выполняет набор тестов для всех или указанных драйверов, проверяя таким образом их слабые места и «провоцируя» их на аварийное завершение работы.
Прежде чем приступать к процедуре тестирования, рекомендуется выполнить следующие действия:
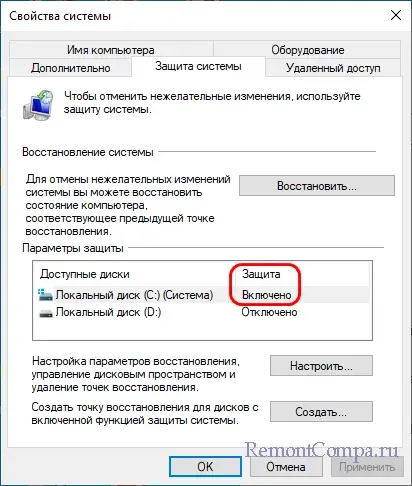
● В свойствах системы на вкладке «Защита системы» включить, если отключена, защиту для раздела C и создать точку восстановления.
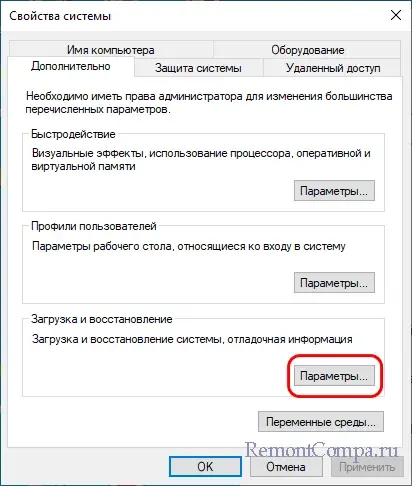
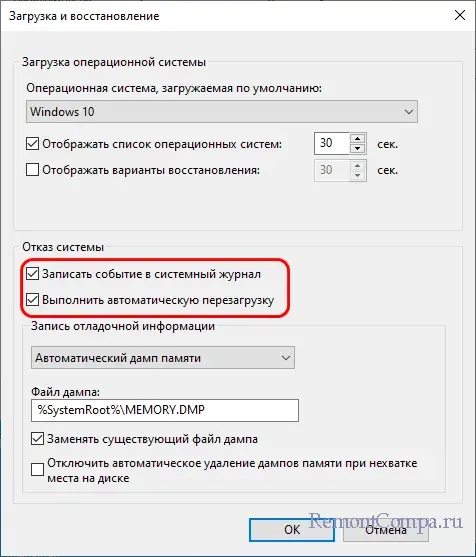
● Включить опцию создания дампов памяти. Для этого открываем свойства системы, переключаемся на вкладку «Дополнительно», жмем кнопку «Параметры» и в блоке «Отказ системы» активируем, если отключена, опцию записи события в системный журнал.
● Добавить опцию загрузки в безопасном режиме в загрузочное меню Windows. Сделать это можно в запущенной от имени администратора командной строке, выполнив одну за другой эти две команды:
1. bcdedit /copy {current} /d «Безопасный режим»
2. bcdedit /set {ID} safeboot minimal
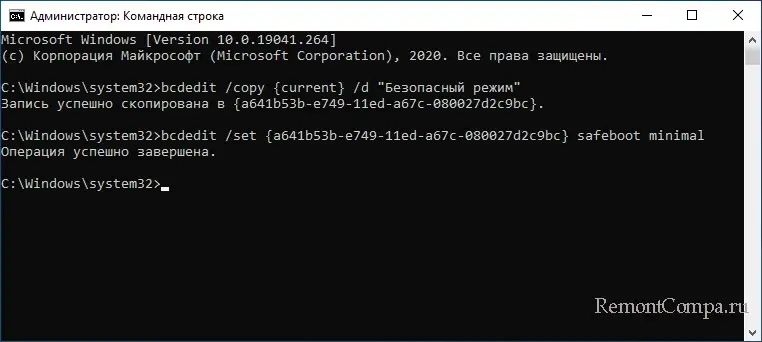
Первая команда вернёт сообщение «Запись успешно скопирована в {идентификатор}», – скопируйте полученный ID и подставьте его на место ID во второй команде.
Чтобы запустить диспетчер проверки драйверов, вызовите нажатием Win + R диалоговое окошко «Выполнить», введите в него команду verifier и нажмите ввод.
Откроется окно приложения, в котором вам будет предложено выбрать одно из пяти действий. На этом этапе ничего менять не нужно, оставьте «Создать стандартные параметры» и нажмите «Далее».
В следующем окне укажите группу проверяемых драйверов. Это могут быть только неподписанные драйвера, все драйвера, драйвера для прошлых версий Windows или вручную выбранные из списка. Нажмите «Готово», подтвердите действие и перезагрузите компьютер.
В результате Windows будет загружена в режиме тестирования драйверов. Внешне это никак не проявится, разве что несколько снизится общая производительность системы. Просмотреть текущий статус проверки можно запустив Driver Verifier и выбрав в меню опцию «Вывести сведения о текущих проверенных драйверах».
Но так как при этом вы получите только базовые сведения, будет лучше подождать появление BSOD. Если в течении 2-3 дней ничего не случится, можно будет сделать вывод, что драйвера работают стабильно. В противном случае в папке С:\Windows\minidump будет создан файл дампа, доступный для анализа с помощью WinDbg или аналогичной утилиты.
Единожды включенный диспетчер проверки драйверов будет работать до тех пор, пока вы его не отключите. Для этого снова откройте диспетчер, выберите опцию «Удалить существующие параметры», нажмите «Готово» и перезагрузите компьютер. Как вариант, воспользуйтесь PowerShell либо командной строкой, выполнив команду verifier /reset.
Вероятность невелика, но может статься, что после включения режима тестирования компьютер не сможет загрузиться. В этом случае для отключения режима тестирования используйте безопасный режим загрузки либо точки восстановления. Также вы можете загрузить ПК с установочного или спасательного диска на базе WinPE и удалить в реестре следующие ключи:
HKLM\SYSTEM\CurrentControlSet\Control\Session Manager\Memory Management\VerifyDriversHKLM\SYSTEM\CurrentControlSet\Control\Session Manager\Memory Management\VerifyDriverLevelВ результате все заданные параметры проверки Driver Verifier будут удалены, и Windows сможет благополучно загрузиться в штатном режиме.
Driver Verifier is an in-built tool in Windows operating systems, which helps you to test the drivers which you suspect to be corrupted. These corrupted drivers may contribute to crash your machine with Blue Screen of Death (BSOD) or stop errors. Using Driver Verifier, you can check your drivers and locate the fault which is causing stop errors on your system.
Please note that Driver Verifier feature is only for testing and debugging objectives and when it is enabled, your Windows will crash often. Also you should not run it for a very long time, say more than 24 hours and disable it as soon as you spot a stop error on system. It is advisable to verify lesser or minimum number of drivers in a single session.
Now, here is how to enable and then disable Driver Verifier:
Page Contents
How To Use Driver Verifier In Windows 10
Part 1 : How To Enable Driver Verifier
1. Press + R and type verifier in the Run dialog box. Click OK.
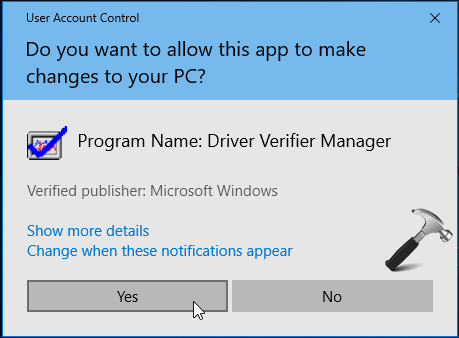
2. In User Account Control (UAC) prompt click Yes. Note the your account should belong to administrator’s group to open Driver Verifier.
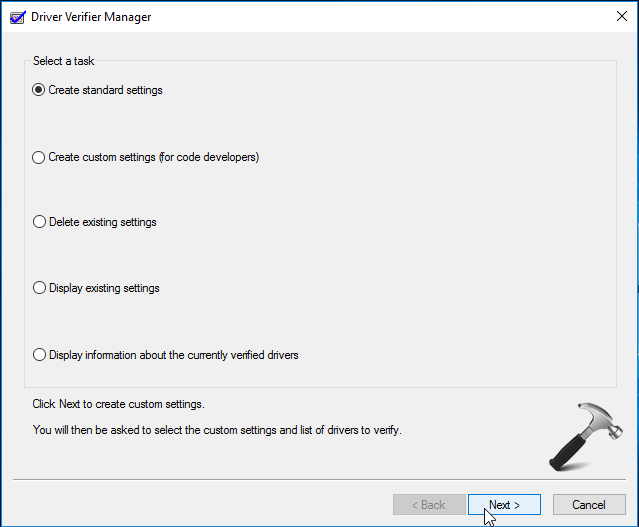
3. Now the Driver Verifier wizard will open, and you’ll see window shown below. Choose Create standard settings option under Select a task. Click Next.
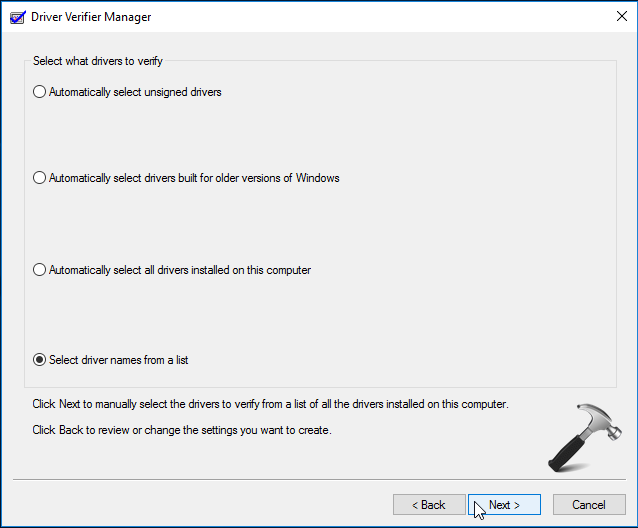
4. Then specify which drivers you want to verify. Here we’ll choose Select driver names from a list option. Click Next.
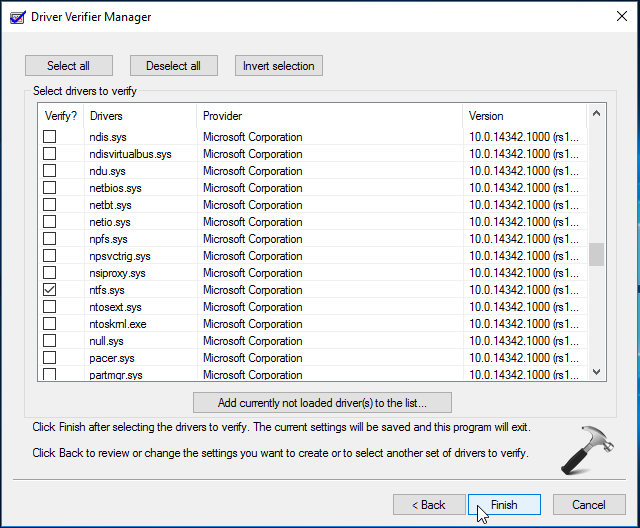
5. Next, from the driver list, you can select which specific driver you want to test/verify. For example, here we select ntfs.sys driver which is driver that allows system to read New Technology File System (NTFS) drives. Click Finish.
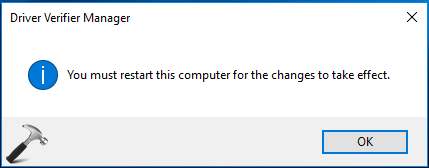
You’ll be asked to restart the machine. After reboot, the Driver Verifier will run in background.
INFO: When Driver Verifier is operating, it will cause stop error at some point. After this stop error you can either disable it or boot into Safe Mode. Whatever you choose, you can then check log file which contains all the details verifier found about the crash. This .DMP file is located inside C:\Windows\Minidump folder (assuming C: as system root drive). You can use this log file for crash analysis.
Part 2 : How To Disable Driver Verifier
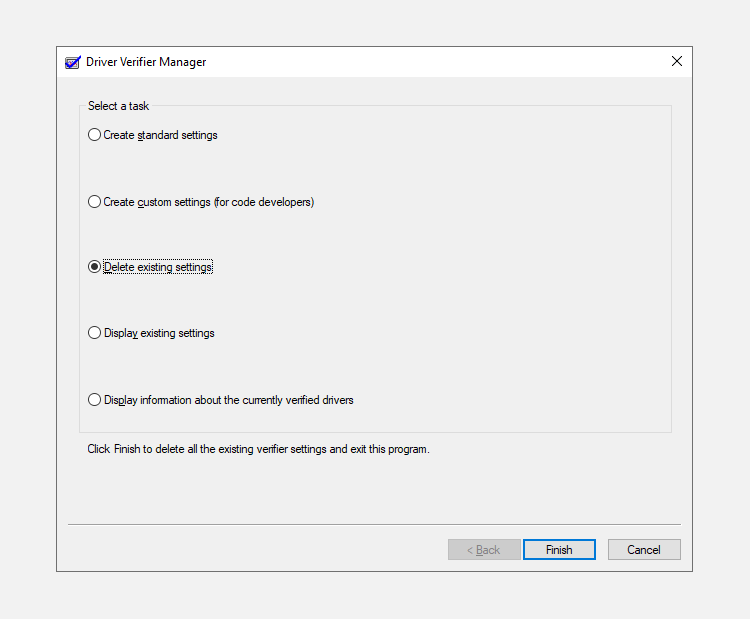
1. To disable Driver Verifier, open its wizard (follow Part 1; step 1 and 2). In the Driver Verifier Manager window, under Select a task heading, choose Delete existing settings option. Click Finish.
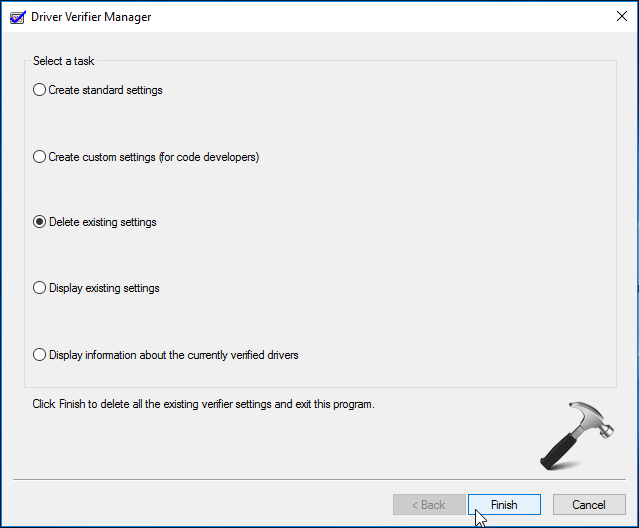
2. Click Yes for the warning message shown below:
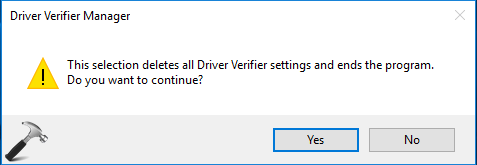
You’ll be asked to reboot to finally end the program. Click OK to restart the machine.
So that’s all about how you use Driver Verifier in Windows!
RELATED ARTICLES
Windows contains a slew of in-built tools that help to diagnose and fix common errors. While most people are aware of these troubleshooting techniques, there are some that can be swept under the rug. Driver Verifier is one of these lesser-known utilities.
Here’s how you fix your Windows 10 errors with Driver Verifier.
What is Driver Verifier?
Driver Verifier, just like the name suggests, is a utility that helps in figuring out which driver is malfunctioning. Unlike SFC, CHDSK, and other troubleshooting utilities, it doesn’t fix the problem but rather helps narrow down if and which driver is responsible for the error. This isn’t a new utility either, it has been around since Windows 2000.
The reason for its relative obscurity is that it’s mostly used as a tool by developers to test out new drivers.
Precautions to Take Before Running the Utility
Driver Verifier puts the computer through various stress checks. You should note that there have been reports of it bricking systems as well.
But there are some precautions users can take to prevent this from happening:
- Remember only to use it when you’ve exhausted ALL other options for diagnosing a blue screen error.
- It’s advisable to not use it in safe mode because Windows doesn’t load all drivers when in safe mode.
- We strongly suggest creating a Restore Point and backing-up important data in case things go south.
- Ensure you have administrator privileges before running the utility.
Enable Minidumps
Before running Driver Verifier, users should enable minidumps. Minidumps (.DMP) are files in which Windows stores information about a crash and the events leading to it. Since Driver Verifier doesn’t always display the driver which is malfunctioning, it does store all this information in a DMP file. This step is critical and shouldn’t be overlooked.
Here’s how users can enable minidumps:
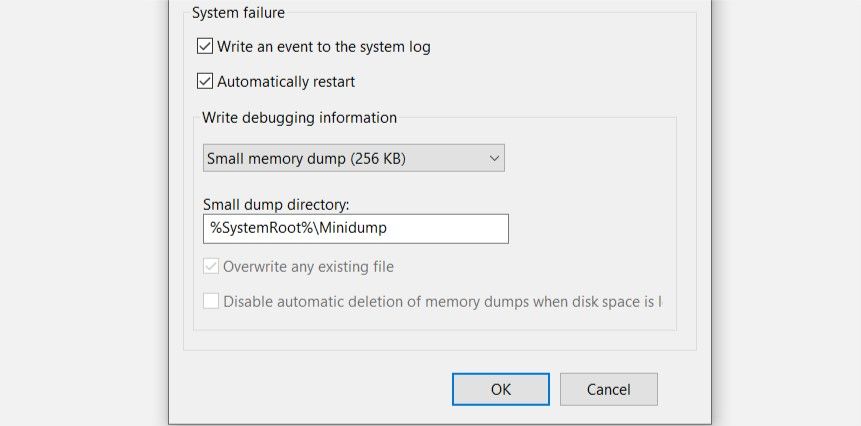
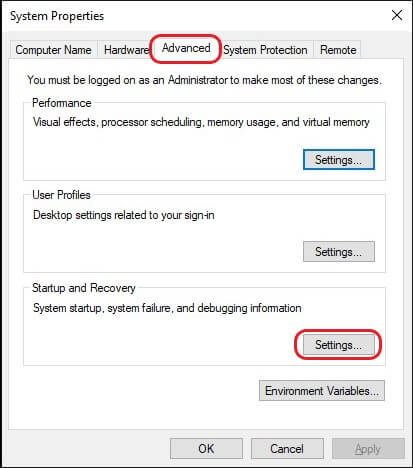
- Press Windows Key + R to launch the Run command. Type sysdm.cpl in the text box and hit Enter.
- In the Advanced tab, under Startup and Recovery, click on Settings
- Uncheck Automatically restart.
- Under the Write debugging information section, select Small memory dump (256 KB) from the drop-down menu.
- Ensure that the Small dump directory is set to %SystemRoot%\Minidump
- Click on OK and then restart your computer.
How to Run Driver Verifier
After enabling minidumps, users can safely run Driver Verifier and diagnose the BSOD. Running Driver Verifier is fairly simple, here’s how you can do it:
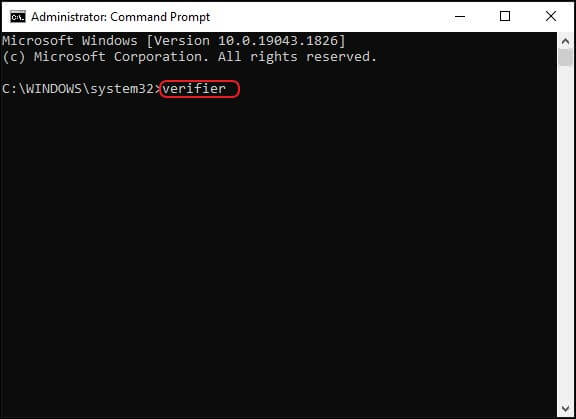
- In the Start menu search bar, type cmd and right-click on Command Prompt > Run as administrator.
- In the console type verifier and press Enter.
- The Driver Verifier application window will open.
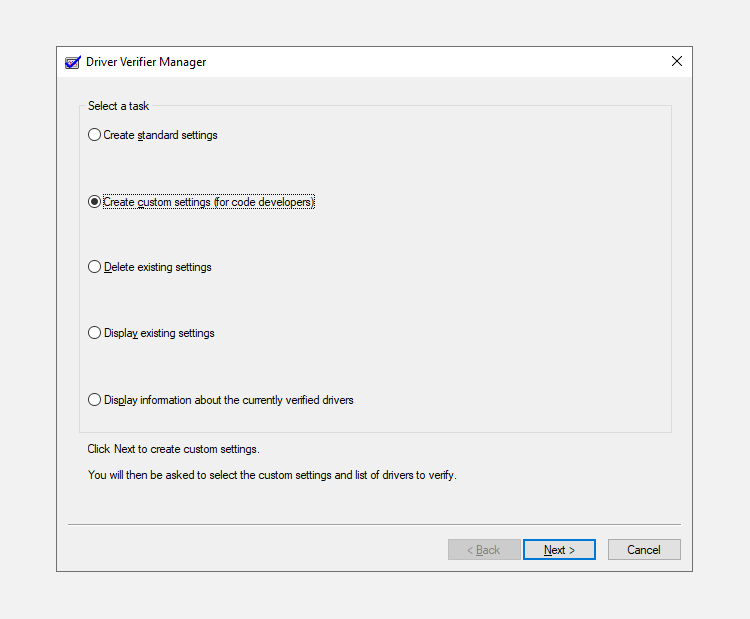
- Select the Create custom settings (for code developers) and click on Next.
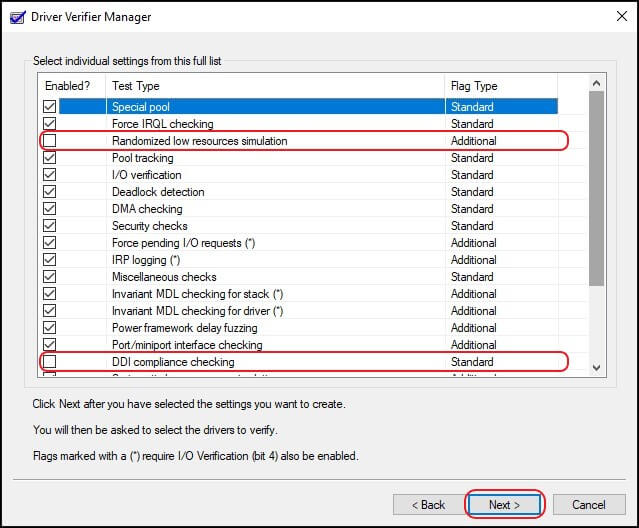
- In the next window, check all options from the list except Randomized low resources simulation and DDI compliance checking. Click on Next.
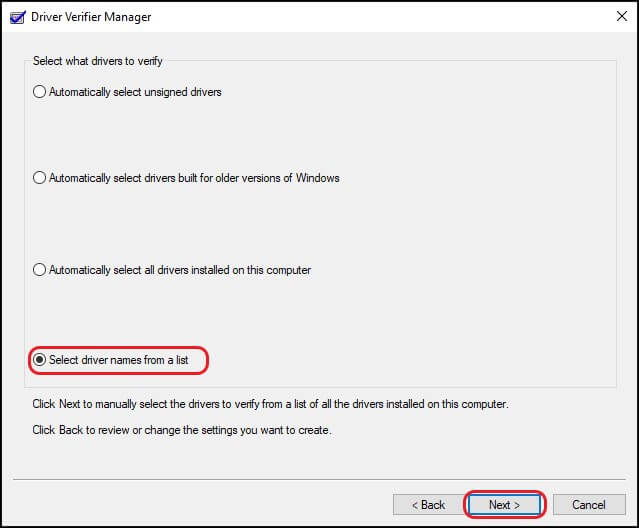
- Now click the Select driver names from a list option and click Next.
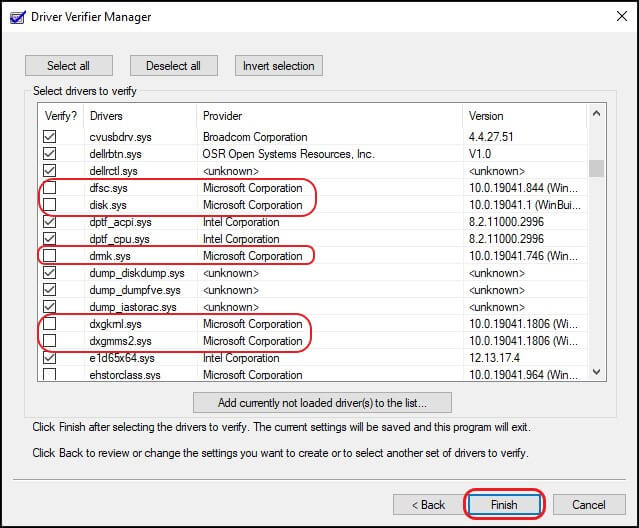
- From the driver list, select all drivers except the ones provided by Microsoft Corporation. Microsoft advises against selecting all drivers and running the Driver Verifier utility.
- Click on Finish.
After following the aforementioned steps, users need to reboot their computer and use it as they normally would.
Driver Verifier will run in the background and diagnose the drivers. Wait for your system to crash, or if there are some actions that triggered the blue screen earlier, repeat those. Driver Verifier needs to experience a crash in order to determine which driver failed and led to the crash. Sometimes this may take as long as seven hours, so hang in there.
You can also ensure whether Driver Verifier is running or not by entering the verifier /querysettings command in an elevated Command Prompt. If the utility is running, the Command Prompt will return a list of drivers and their status.
How to Read DMP Files
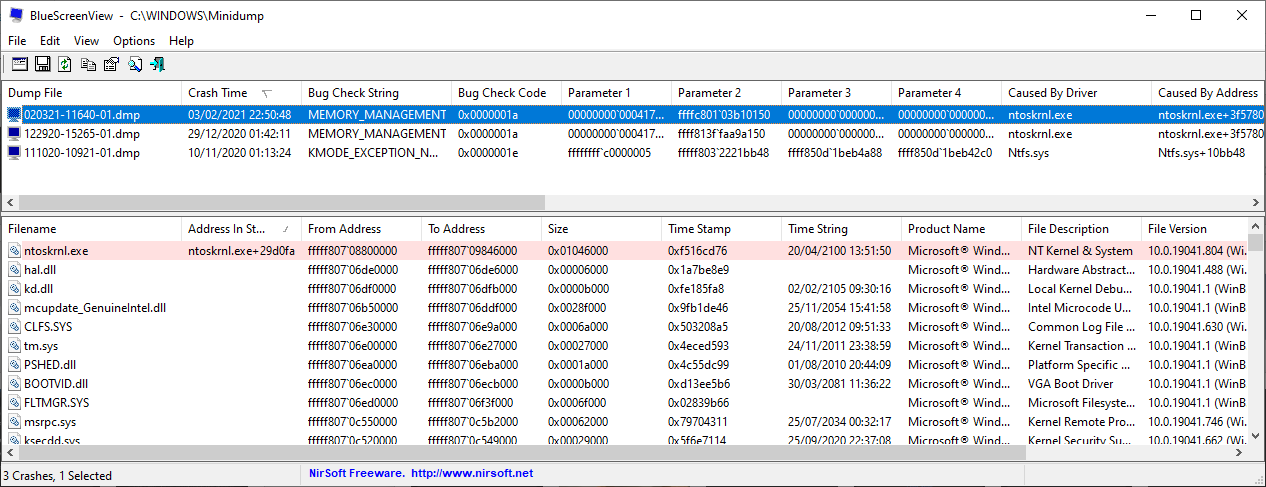
When your computer crashes, Driver Verifier will automatically store all information about the crash into a DMP file. You can either upload these files to the Microsoft forums and wait for their response, or you can read them yourselves using software called BlueScreenViewer.
This is how you can read the DMP files:
- Download BlueScreenView from here.
- Run the application and it will automatically load all DMP files from the C:\Windows\Minidump directory.
- Click on the most recent dump file and scroll sideways until you get to the Caused by driver section.
- Copy the filename and a quick internet search will reveal the device with which the driver is associated.
- You can accordingly update the driver or roll -back the changes.
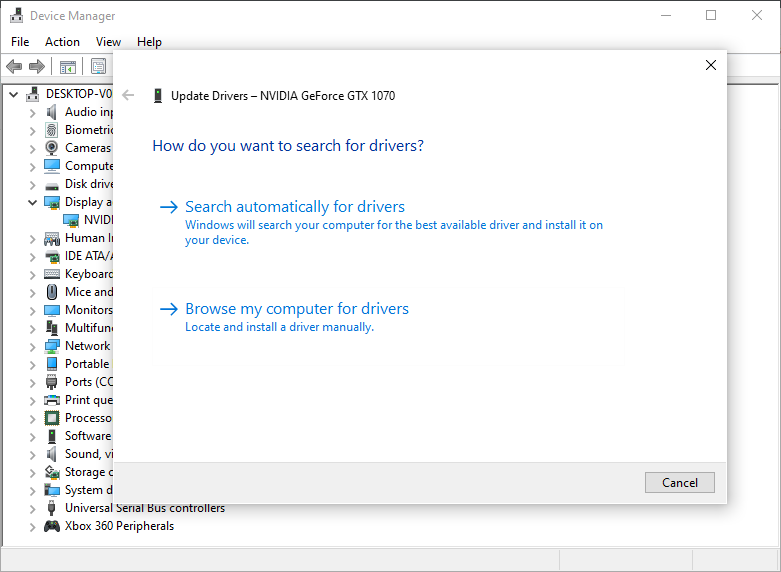
How to Update a Driver
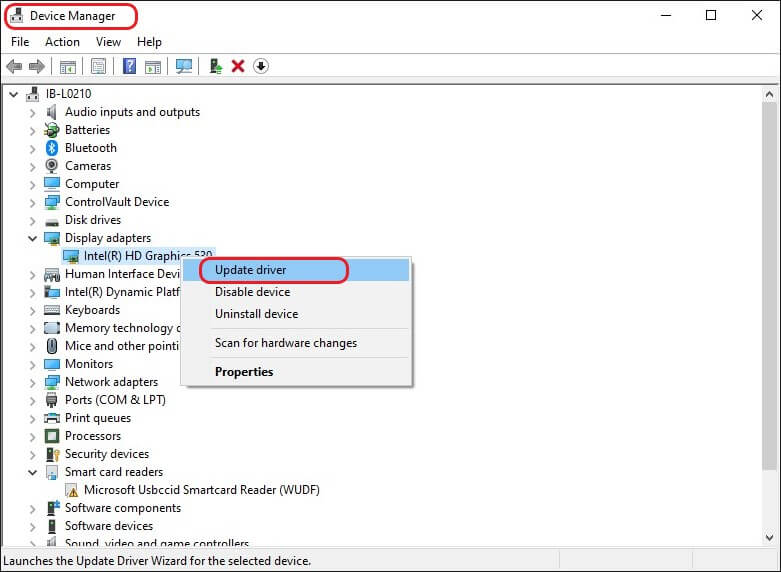
The first step users should take after finding out the culprit for the crash, is to update the driver. It’s fairly simple, just follow these steps:
- Press Windows Key + R and in the Run command, type devmgmt.msc and press Enter.
- In the Device Manager, navigate to the required device and expand the menu.
- Right-click on the driver and click on Update driver.
- Click on Search automatically for updated driver software and Windows will automatically download and install the latest drivers.
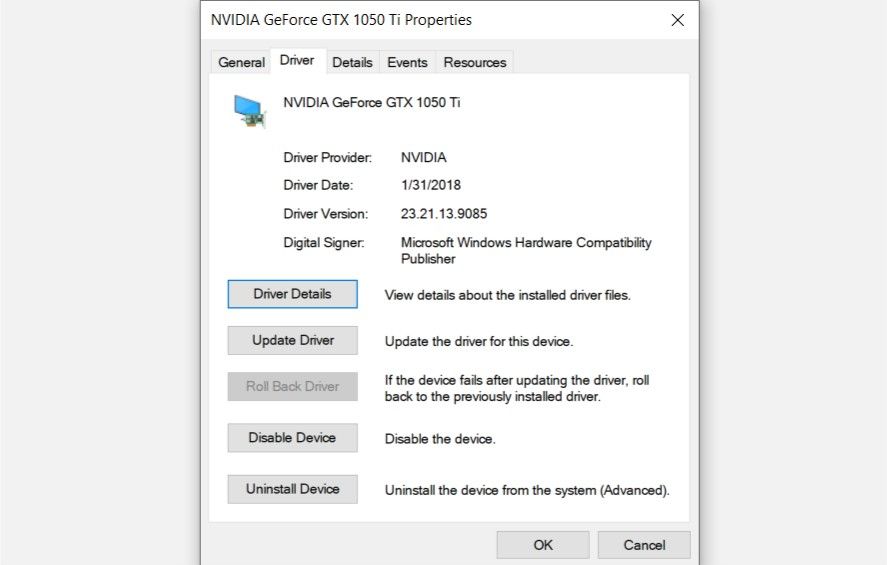
How to Roll Back a Driver
- Follow steps one and two mentioned in the section above to open Device Manager.
- Navigate to the required driver, right-click on it and click on Properties.
- Under the Driver tab, click on Roll Back Driver.
- Reboot your computer.
Alternatively, you can avoid this whole ordeal by already replacing outdated drivers before they cause a problem.
How to Stop Driver Verifier
Contrary to how you start Driver Verifier, it’s recommended that users stop it when their computer is booted into safe mode.
This is because safe mode disables all third-party drivers and earlier all Microsoft Drivers were unselected before running Driver Verifier. Thus, Driver Verifier will have minimal to no impact on your system in safe mode.
How to Boot Into Safe Mode

- Press Windows Key + R and enter msconfig in the run command.
- In the System Configuration window, click on the Boot tab.
- Check the Safe boot option and select your preferences.
- Apply the settings and reboot your computer.
There are various other ways of booting into safe mode as well.
After booting into safe mode, there are two ways to disable Driver Verifier. These are via the Command Prompt or the Driver Verifier Manager.
How to Disable Driver Verifier via Command Prompt
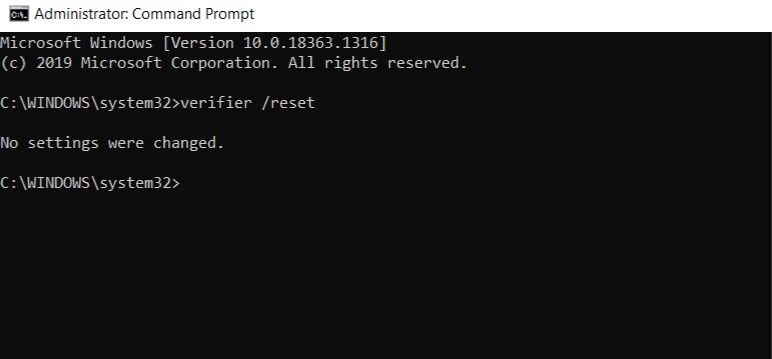
- In the Start menu search bar, type cmd and then right-click on Command Prompt > Run as administrator.
- In the console type verifier /reset and hit Enter.
- Reboot your computer normally.
How to Disable Driver Verifier via Driver Verifier Manager
- Run Driver Verifier. You can refer to the Running Driver Verifier section in this article for this.
- In the Driver Verifier window, select Delete Existing Settings and click on Finish.
- Reboot your computer.
You can use System Configuration to subsequently uncheck the Safe boot option and reboot your computer normally.
Checked and Verified
Driver Verifier is a nifty tool when a pesky blue screen error won’t go away and it’s difficult to narrow down the suspects. But users should always be wary of the risks that come with using a powerful developer tool. Remember to create a System Restore Point before running the Driver Verifier utility.
Windows Driver Verifier is a useful troubleshooting utility on Windows. It has been available on Windows since Windows 2000 and XP days and continued on Windows 10. This utility stress tests your PC for any unsigned and misbehaving device drivers that may be causing blue screen of death errors on your device.
Through this blog, we will discuss the Windows Driver Verifier in detail and learn how to fix blue screen errors on a Windows PC using the Driver Verifier tool.
What is Driver Verifier?
In plain words, Driver Verifier is a built-in utility on Windows to check and verify any malfunctioning drivers installed on your PC. Moreover, you can use it to identify the drivers that are not authentic and unsigned. However, this tool is meant for the developers who want to test the drivers they develop. General users can use it if they face any blue screen issue on their Windows 10 PC.
It is pertinent to understand that the Driver Verifier on Windows 10 doesn’t fix the error, but it only helps you narrow down the exact cause behind it. You mustn’t mistake this utility with other scanning utilities of Windows 10, such as SFC Scan, chkdsk command, etc.
Precautions you must take before using Driver Verifier
As the Driver Verifier is a developer’s tool, it is quite sophisticated. You must handle the tool with utmost care. The Driver Verifier can reportedly trigger serious issues if used wrongly. However, you don’t need to worry. If you follow the precautions suggested here, you can avoid any mishaps while using this tool.
- If your PC is running normally or has an issue caused due to something other than the drivers, strictly avoid running Driver Verifier.
- Never run the verifier utility in Windows Safe Mode.
- Make sure you have the Admin privileges for your PC.
- Create an updated backup and restore point to handle any mishap.
- Use the Windows Driver Verifier only if you have no other options left.
- Keep Stellar Data Recovery Professional for Windows handy to avoid data loss.
Enable Minidumps to access reports on misbehaving drivers
This is a critical precaution, as the Driver Verifier might not display the malfunctioning driver always. But it does store all the gathered information as a DMP file. Therefore, you must enable Minidumps before proceeding to run the verifier tool. Minidumps or .DMP files are created by Windows to store the information on a system crash and related events. Here is how you can enable Minidumps on your Windows 10 PC.
Step 1: Press Windows + R to open the Run utility.
Step 2: Type sysdm.cpl in the search tab and press Enter.
Step 3: Click the Advanced tab in the new System Properties window and click Settings under the Startup and Recovery section.
Step 4: Uncheck the Automatically Restart option and select Small Memory Dump (256 KB) under the Write Debugging Information section.
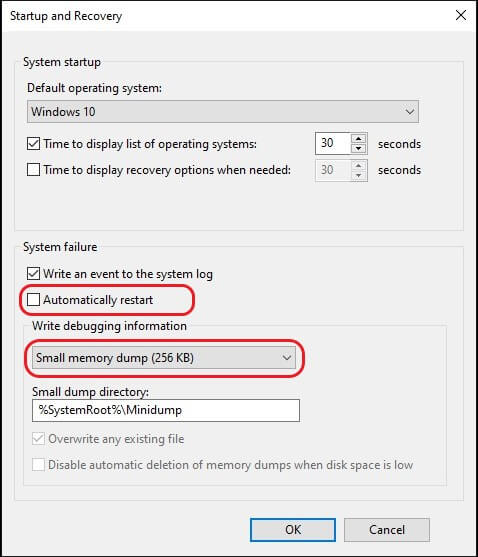
Step 5: Confirm that the Small Dump Directory has the value %SystemRoot%\Minidump and click OK.
Restart your PC for the changes to take effect.
How to diagnose PC using Driver Verifier?
As you have enabled the Minidumps, you can securely run the Windows Driver Verifier tool to diagnose your PC. Once initiated, the tool runs in the background and allows you to work while it completes the diagnosis. Here is how to run the verifier.
Step 1: Type cmd in the search bar and select Run as Administrator under the Command Prompt app.
Step 2: Type verifier in the command line and press Enter to open the Driver Verifier utility.
Step 3: In the Driver Verifier Manager, select Create custom settings (for code developers) and click Next.

Step 4: Select all the checkboxes except the ones in front of Randomized low resources simulation and DDI compliance checking and click Next.
Step 5: Click the Select driver names from a list option and click Next.
Step 6: Select all the drivers in the list except the ones signed by Microsoft. Click Finish.
Now, reboot your PC. Windows Driver Verifier will run in the background waiting for the system to crash or display a blue screen of death error. It may take several hours as the tool won’t be able to recognize the driver responsible for the error until it appears. So, be patient and keep using your PC normally.
Note: To check if the verifier is running in the background, open Command Prompt with Admin privileges, type verifier/querysettings, and press Enter. If the tool is running, you’ll receive a list of drivers with status in the Command Prompt window.
Read crash report DMP files
Once the system crashes, the Windows Driver Viewer will gather and save the information as a DMP file. The DMP files can’t be read like any other doc on your PC. You’ll need the Dumpchk.exe or Windows Debugger tools to read these files. Once you have installed any of these tools, you can use them to access the DMP file according to the directions on Microsoft’s official site. This method needs an understanding of the command lines to a developer’s level.
If you want an easier way to read the dump file, you can use the Blue Screen View app. Here is how to use it.
Step 1: Download and install the Blue Screen View app.
Step 2: Running the application will automatically load all the DMP files from your C:\ folder (system folder).
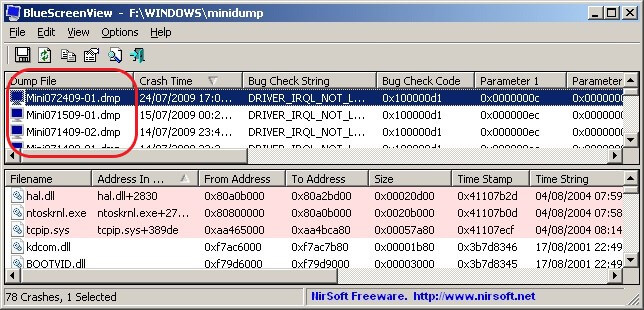
Step 3: Click on the most recent file and scroll horizontally to find the Caused by driver section.

Step 4: Copy the file name and get its details from an online search. You’ll know the device associated with the faulty driver.
Step 5: Go to the Device Manager on your PC and update or reinstall the culprit driver.
How to disable Driver Verifier on Windows 10?
Sometimes you realize that you don’t want to proceed with the Driver Verifier, but you’ve already got it running. In such a case, you can disable Driver Verifier using Command Prompt on Windows PC. Disabling Driver Verifier is easy, and you can do so by following the steps below.
Step 1: Type cmd in the search bar and click Run as Administrator under the Command Prompt app.
Step 2: Type verifier /reset in the command line and press Enter.
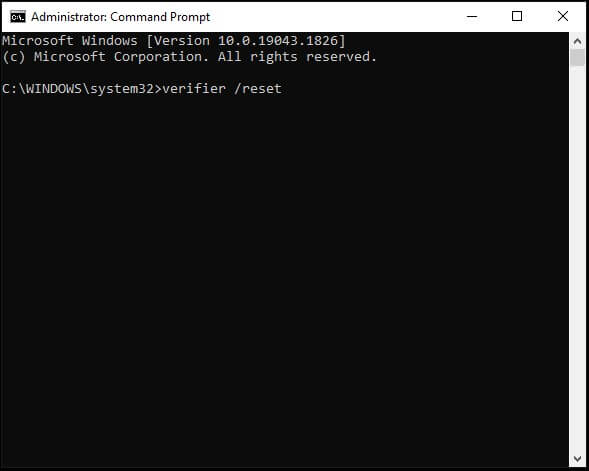
Step 3: Restart your PC to implement the changes.
Your PC will normally start without allowing the Windows Driver Verifier to run.
How to recover data in case of data loss?
You might be subject to serious data loss if you commit even a minor mistake. For example, any glitches in the Driver Verifier running procedure may cause failure of a random driver. In such a case, the data related to the concerned application or utility that runs with the support of the failed driver might be lost forever.
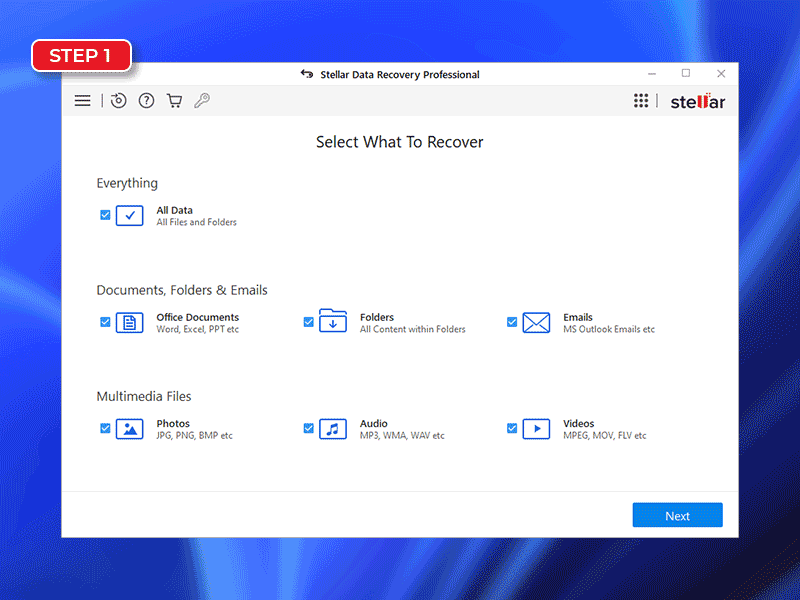
If you’ve created a backup, you can use it to get back your data. However, even if you haven’t backed up your data, you can easily recover any data lost on a Windows PC using Stellar Data Recovery Professional for Windows.
The professional data recovery tool is one of the most trusted and efficient solutions. It can retrieve data even from a crashed or non-booting device. Further, it supports Windows 11 and all the previous versions.
The following steps depict this DIY software’s easy yet effective data recovery process.
Conclusion
The Windows Driver Verifier is a highly useful utility, but due to its complexity, it shouldn’t be relied upon for every small error you face. It empowers you to work as a developer and allows you to identify the root cause for blue screen errors or BSODs on your Windows PC.
However, with great power comes great responsibility, and you must use utmost caution while using this tool. If you’ve other alternative methods available to resolve the BSOD on Windows, you should primarily use those methods. Driver Verifier should be the last resort to detect the root cause of blue screen error.
FAQ
Is it safe to use Driver Verifier?
The Driver Verifier is mainly a developer’s tool, and you need expertise and high precaution to use it safely. Any mistake could leave your PC in serious trouble. However, if used carefully, it could help identify the root cause of blue screen error on Windows 10.
What is the most common fix for a Windows blue screen error?
There are multiple solutions for BSOD or blue screen error, but the SFC scan and CHKDSK command line tool are most commonly used.
How long should I run Driver Verifier?
The objective of the Driver Verifier is to stress out the device drivers on your Windows PC to make it finally crash. It needs time to do so, and the approximate time suggested by Microsoft to run the Windows Driver Verifier is at least 36 hours.
Was this article helpful?
YES0
NO