
If you own an iPhone or a Mac, AirPods are the best wireless earbuds you can buy. What makes Apple’s wireless earphones better is that you can connect two pairs of AirPods to a Mac and even a Windows PC. This way, two pairs of AirPods can be used simultaneously, so you and your friends or spouse won’t have to share a pair when watching content together.
We’ll start out by connecting your AirPods to your Mac. However, before you begin, ensure the AirPods have different names; you may need to change your AirPods names first. This will cut down on any confusion during the pairing process.
If you want to connect two AirPods to a Mac, this is the first thing you should do:
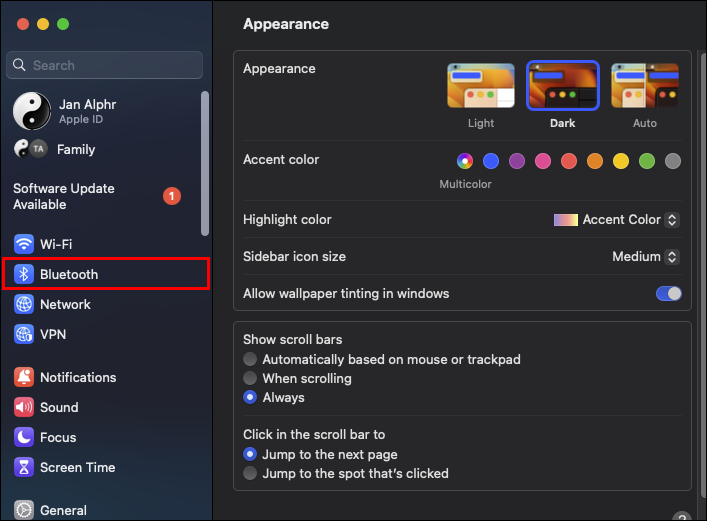
- In the far top left corner of the screen, select the Apple menu. Select System Settings (System Preferences on older macOS versions).
- Select Bluetooth and turn it on. Note that this window needs to remain open.

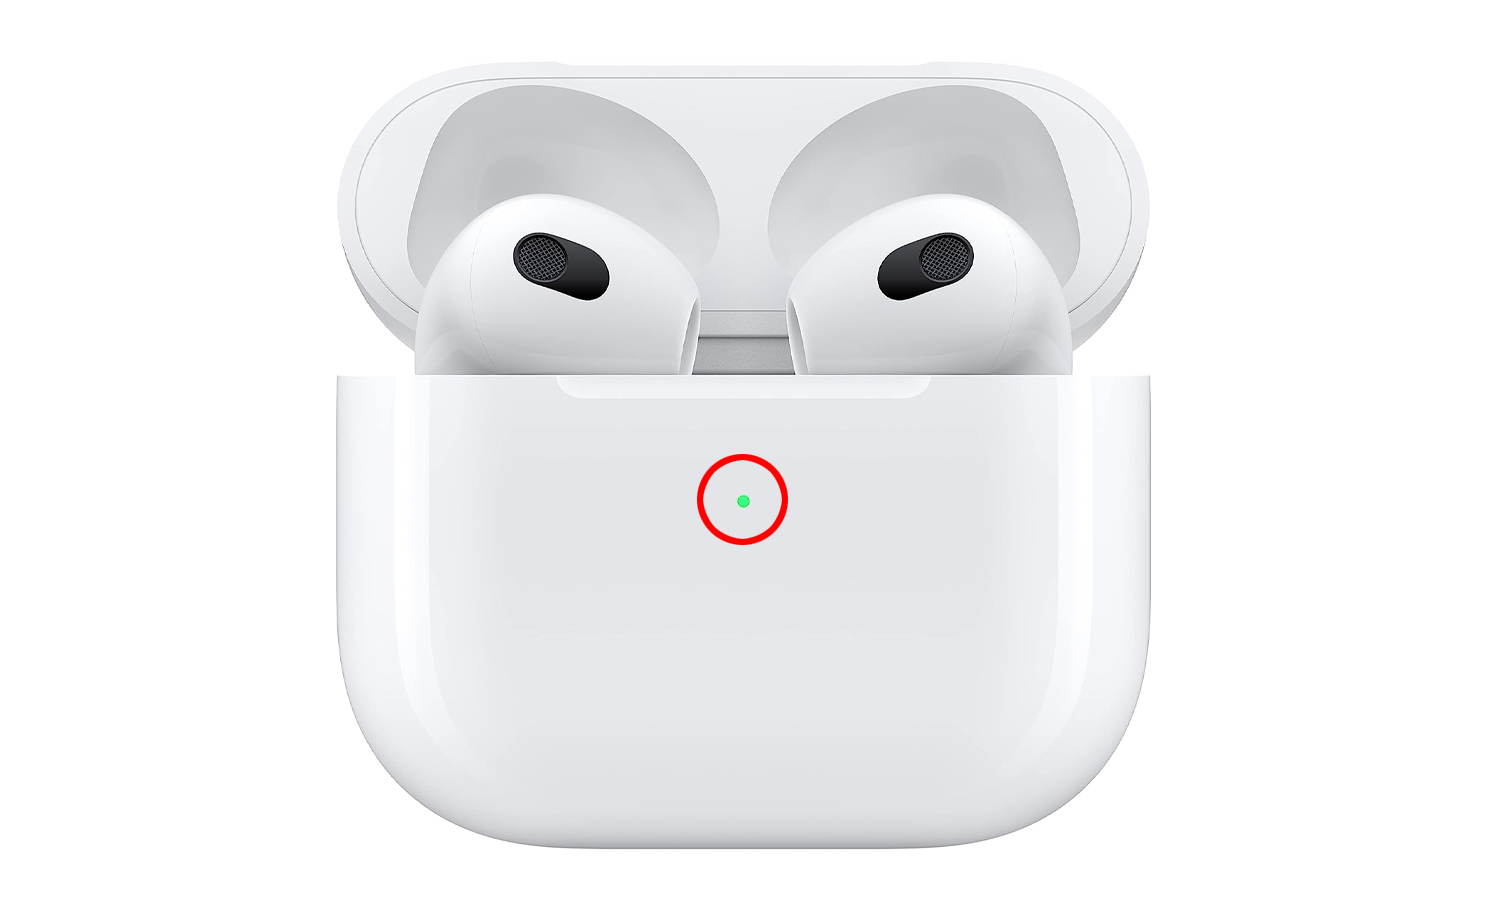
- Open the AirPods lid, but keep them in the case. At the back, press the button and wait for a white status light to begin blinking.

- Check under Bluetooth preferences to find the AirPods. Select Connect. This should prime your AirPods for use.
- Repeat the steps above for the other set of AirPods as well.

When you’re done setting up the two AirPods, things get a little tricky. MacOS doesn’t have a feature to share audio, so you would need an Audio MIDI setup.
You can follow some troubleshooting steps if you run into issues connecting your AirPods to your Mac.
Sharing Using Audio MIDI Setup
MacOS doesn’t have a share Audio feature like iPadOS and iOS to facilitate easy sharing of the audio output to multiple connected Bluetooth devices simultaneously. But you can still get sound to play on two AirPods paired to your Mac through the built-in Audio MIDI Setup app. This setup works for different audio devices regardless of whether they have Bluetooth.
- Connect either set of AirPods to your Mac, as laid out above. This works for Bluetooth headphones as well.
- Open a Finder window and select Applications in the sidebar.
- Open the Utilities folder. Alternatively, press the Shift + Command + U or select Utilities in Finder’s Go menu.
- Launch Audio MIDI Setup in the opened Utilities folder. You may use Spotlight to search for Audio MIDI Setup.

- Click the + icon in the Audio MIDI Setup Window. Select Create Multi-Output Device from the contextual menu.

- Find the two AirPods you intend to use on your right and tick the boxes next to each.

- Select Multi-Output Device, located in the left list. Name the setup as you prefer,
- Click the audio setup you just renamed and control-click it once more. Select Use This Device for Sound Output from the ensuing menu. Alternatively, go to the macOS menu bar and select the volume icon. Choose the new audio setup found under output.


Remember to unpair and disconnect the other set of AirPods when sharing audio with your friend.
The resulting setup doesn’t offer separate volume sliders for every pair of headphones. Each AirPods has physical controls present on the earbuds, which you can use to control the volume or use the Mac’s Control Center.
On MacBook, there is an alternative. In this case, ensure the two sets of AirPods are in the charging cases and that they’re charged.
- Open the case and have the AirPods close to the MacBook.
- The AirPods icon should appear on the screen of your MacBook. Select the AirPod icon.
- A window opens with a prompt: Use Both AirPods.
- Click Connect. Close the lid and follow the same steps for the other AirPods set.
This should set them up and play automatically once the audio is on your MacBook. To adjust the volume independently, visit the System Preferences on MacBook, select Sound, then Output. This should make it possible to control the volume.
How to Connect Two AirPods to a Windows PC
If you use a Windows computer and want to use two pairs of AirPods, you can connect them successfully using Bluetooth on your PC.
- Put the AirPods in their charging cases and leave the lid open.
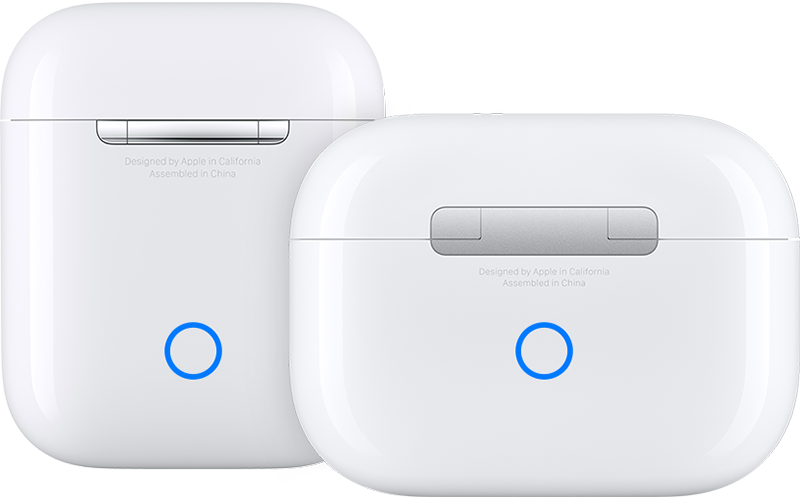
- Find the button at the bottom of the case. Press it and hold for a few seconds to see a white blinking light.
- Go to your PC and open Settings.

- Select Devices, then Bluetooth. Here, the AirPods should be listed in Devices. If not already listed, go back to the AirPods cases. Ensure they are still in their cases and repeat Step 2.

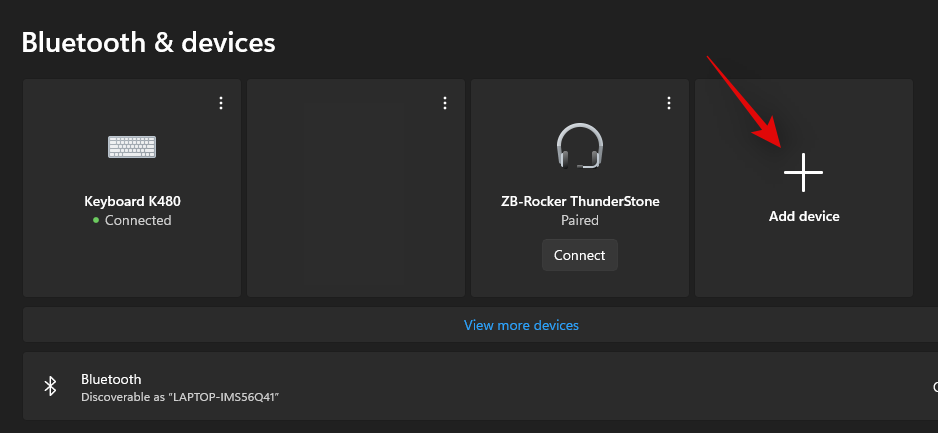
- Select + Add Device and select your AirPods in the menu. Note that the location of this option on the screen changes with the OS version you’re running.
- Repeat the steps for the second set of AirPods.
- Click on the AirPods on the list and choose Connect to allow them to pair.

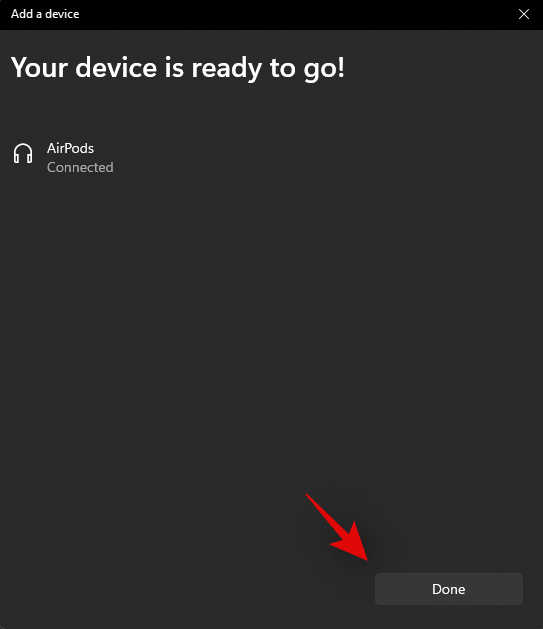
- Click Done. The AirPods can now be taken from their cases and used with a Windows PC.


If the above steps are problematic, you can try another option.
- Open iTunes and select the Airplay icon.
- Select AirPods from the available devices list.
- Turn off the Use for audio output option. This should allow you to hear audio from the AirPods.
Why Your AirPods Might Fail to Connect to a Mac or Windows PC?
There are various reasons why your AirPods may fail to connect to your PC:
- You don’t have the latest software version. You should update to the latest version if it’s available.
- Bluetooth could be off if you’re connecting using this method. You should ensure Bluetooth is on by checking the system settings and toggling Bluetooth on.
- The AirPods must be inside the case. You also need to press the setup button until the status light flashes white. This indicates that the AirPods are ready to connect.
- You did not follow the on-screen steps correctly. If you feel you missed a step, you can repeat the process to connect successfully.
- Failing to hold the AirPods close to the Mac with the lid open could cause issues if connecting to a Mac.
- If all else fails, you can hard reset your AirPods and try again.
There’s nothing better than listening to music you love with a friend. When there’s someone to share it with, it makes the music more enjoyable. You can boost that listening experience with AirPods and let a loved one join in.
FAQs
Why won’t my AirPods stay connected?
There are many reasons that your AirPods won’t stay connected. First, ensure you’ve followed the steps above. Otherwise, they may automatically pair to a different device. Next, you may need to reset them. You can delete your AirPods from your PC or Mac’s Bluetooth settings and re-pair them.
Can I charge two different AirPods in one case?
Yes! As long as they are the same model, you’ll have no trouble charging both, even though one has a different case. However, the AirPod’s name and connectivity will remain the same on your devices.
Can I connect one AirPod to one device and one to another?
No. If the AirPods you’re using are a pair, they will connect to the same device simultaneously.
Use the Bluetooth menu in the Settings app to pair Apple’s wireless headphones with your computer
Updated on November 29, 2023
What to Know
- Put your AirPods in their case, open it, then press-and-hold the button on the case until the light flashes white.
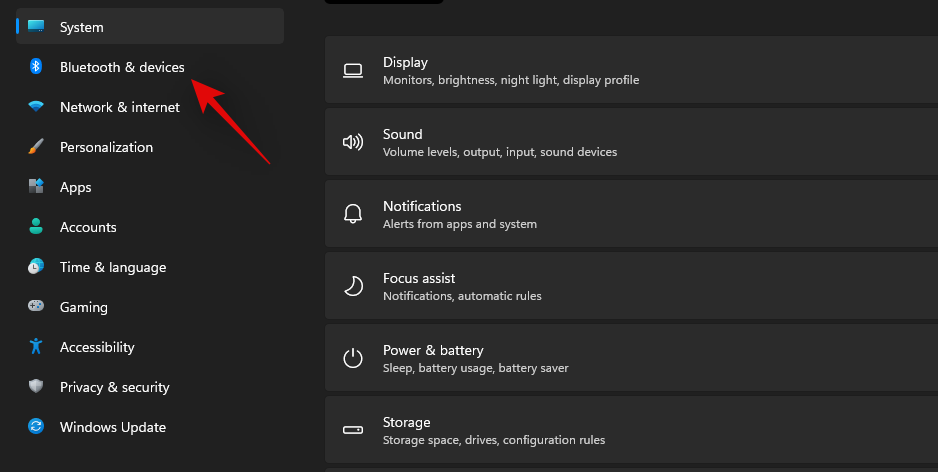
- Go to Settings > Bluetooth & devices > Add device > Bluetooth > select your AirPods.
- Your AirPods can be paired to other devices at the same time, but they can only work with one device at a time.
This article explains how to connect AirPods to a Windows 11 PC.
How to Connect AirPods to Windows 11
The Settings app is used to pair new Bluetooth devices. Here’s how it works:
-
Right click the Windows icon on the taskbar.
-
Select Settings.
-
Choose Bluetooth & devices.
-
Select the Bluetooth toggle if it isn’t already on.
-
Select Add device.
-
Place the AirPods in their case, and open the case.
Jeremy Laukkonen / Lifewire
-
Press and hold the button on the AirPods case.
Jeremy Laukkonen / Lifewire
-
When the light on the case flashes white, release the button.
Jeremy Laukkonen / Lifewire
The light may be inside the case or on the front of the case depending on the version of AirPods you have.
-
On your computer, select Bluetooth from the list of options.
-
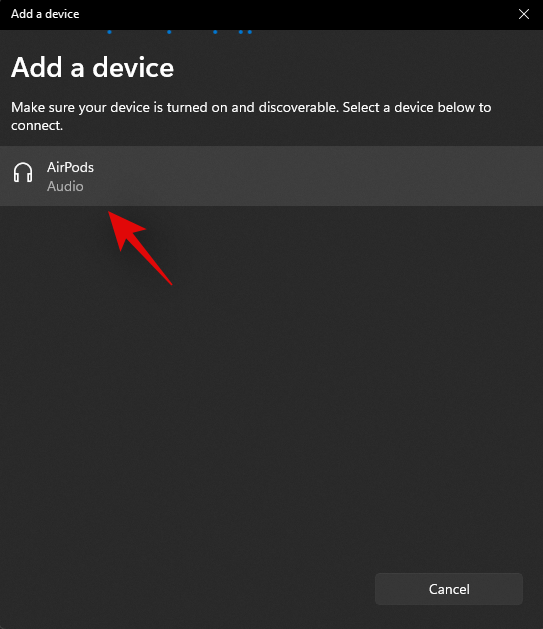
Wait for your PC to search for devices, then select your AirPods when they appear in the list.
-
Wait for the connection to be established, then select Done.
-
Your AirPods are now connected and ready to use. Your earbuds will remember the PC from now on, allowing you to reconnect whenever you want.
How to Use AirPods With Windows 11
AirPods will automatically connect to your iPhone when you open the case in close proximity to your phone, and you’ll also get an automatic popup on your Mac asking you to connect if your Mac senses the AirPods. Using AirPods with a Windows 11 PC is a little more complicated, but it’s easy to reestablish a connection and use them whenever you want.
If you’ve been using your AirPods with another device, here’s how to use them with your Windows 11 PC again:
-
Take your AirPods out of the case, and place them near your computer.
Jeremy Laukkonen / Lifewire
-
Select the Speaker icon on the taskbar.
-
Select the > icon to the right of the volume control.
If the Bluetooth button is grayed out, it means it’s been turned off. You’ll need to select the Bluetooth button first, before you press >.
-
Select Headphones (AirPods) in the list of devices.
-
When your AirPods are selected in this menu, it means they’re connected, ready to use, and set as the default audio source.
Do Apple AirPods Work With Windows 11 PCs?
AirPods are designed to work seamlessly with iPhones and other Apple devices, but you can pair and connect AirPods to any Windows PC with Bluetooth. Your AirPods can remember your computer, your iPhone, and other devices as well, allowing you to switch between them at any time.
FAQ
-
Select the Speaker icon in the taskbar and choose the default speakers to disable the headphones. To unpair your headphones from your PC, go to the Bluetooth settings, choose your Airpods, and select Disconnect.
-
Your AirPods might be going into power save mode when you pause audio playback. Open the Windows Device Manager, go to your AirPod’s Properties, and disable the power management feature.
-
You can’t turn off AirPods. They go into power save mode when not in use. To conserve battery life, keep your headphones in the case when you’re done using them.
Thanks for letting us know!
Get the Latest Tech News Delivered Every Day
Subscribe
Airpods have become the staple of True Wireless Airbuds since they were introduced by Apple back in 2016. Unlike many Apple features and accessories, Airpods do indeed work with Windows and Android devices.
There are a few caveats though and these can be pronounced if you are looking to get their true functionality and features working on either of the platforms.
Windows got a recent upgrade with the release of Windows 11 which has brought up many questions about Airpods’ compatibility with the new OS. If you own a pair and would like to connect them to Windows, then here is all you need to know about it.
Are Airpods compatible with Windows?
The true answer would be no, but can you get them working? Yes! Airpods are essentially Bluetooth wireless earbuds and Windows recognizes them as exactly that. This can be a problem or a huge benefit depending on how you see it. You get all the basic functionalities of any generic earbuds but that is as far as it goes.
If you’re looking for your Airpods to be fully compatible with Windows where you can control playback, trigger Cortana, and get the best possible audio input and output quality then sadly you’re out of luck. However, there are many workarounds to overcome these issues and you can refer to them in the guide below when setting up AirPods.
Related: Unknown Accessory Detected iPhone: What does it mean?
The truth about Airpods on Windows
As discussed above, Airpods do not have feature-specific drivers that can help provide further compatibility and functionality with Windows 11. This means that they are recognized as a pair of any other BlueTooth headset which brings along its fair share of issues. The first one would be the jank profile switching that Windows uses with Bluetooth headsets connected to any device. Whether you connect Airpods or any other pair of TWS, it will show up as two different devices: Headphones, and Headset.
These two profiles can be toggled and used based on your use but many Airpods features and mainly its high res audio input and output quality rely on smart switching between these profiles and using different protocols to communicate with the device. This in turn makes Airpods show up as a single device in Macs and other compatible devices where you can enjoy high res audio right out of the box.
This brings us to our next two drawbacks, which stem from this issue where you either have to choose between high audio quality but the loss of mic functionality or use the mic while getting manageable audio quality to say the best. There is a workaround to improve your audio quality with your mic active, but it works only occasionally and won’t give you the high res quality experience that you get with your mic disabled and using Stereo audio. Use the guide below to help you out through the entire process and set up your guide as it might be needed depending on your preferences.
Related: Can you use Airpods with Android? Is it worth it?
You can use the guide below to pair your Airpods to Windows. Once paired, you can use the next section to customize your experience depending on what you plan to use them for. Let’s get started.
Pair Airpods to Windows
Press Windows + i on your keyboard to open the Settings app. Click and select ‘Bluetooth & devices’ from the left.
Now open your Airpods case, wait for the light to flash green or orange, and then press and hold the setup button on the back of your Airpods. Once the light starts flashing white it means you have entered the pairing mode.
Click on ‘Add device’ on your PC now.
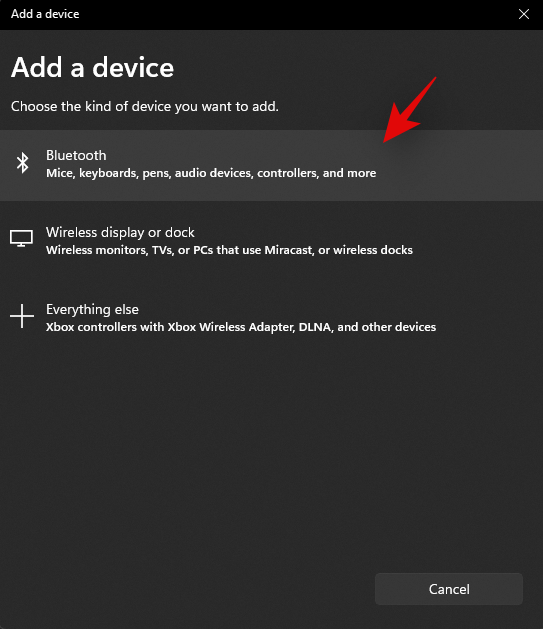
Click on ‘Bluetooth’.
Wait for Airpods to show up in the list and click on them once they show up.
Windows will now automatically pair with Airpods. Click on ‘Done’ once the process finishes.
How to get better Audio quality from Airpods on Windows 11
We can now customize your experience depending on the feature you prefer the most. If you’re looking to use both, high res audio quality and mic, then you will need to invest in a Bluetooth adapter. You can find out more about the same in the section below. Let’s get started.
1. For high-quality audio-only (No Mic)
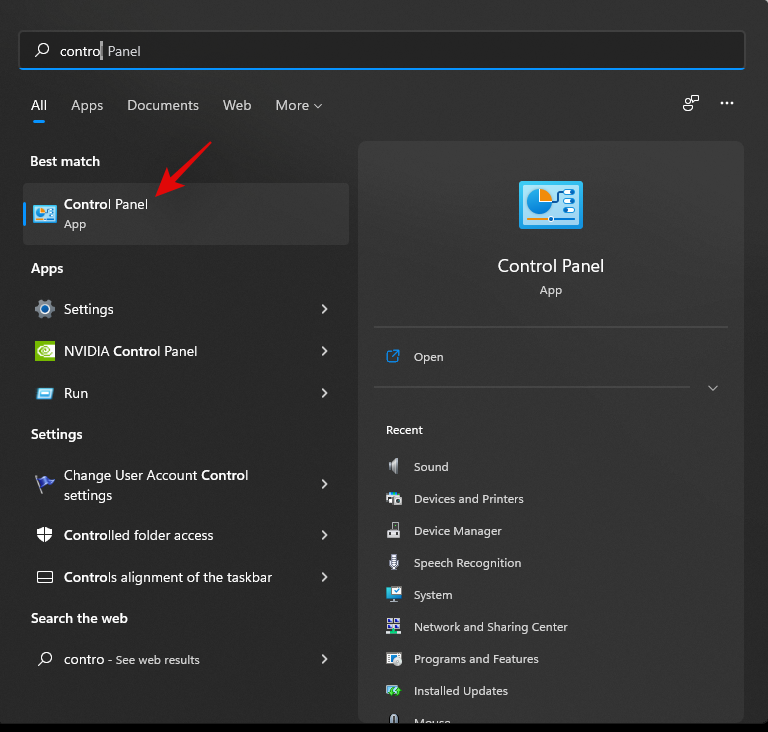
Now that you have paired Airpods with your PC, connect them and wear them for a while so that they appear connected in the Settings. Once done, launch the Start menu, search for ‘Control Panel’ and launch the same from your Search results.
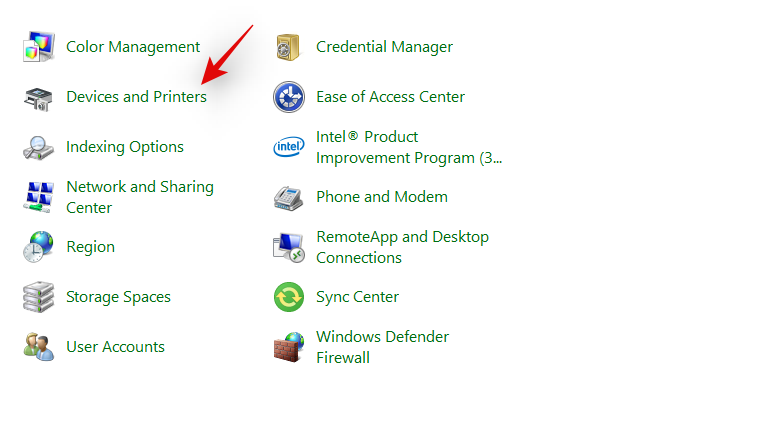
Click on the drop-down menu in the top right corner of your screen and select ‘Large icons’.

Click on ‘Devices and printers’.
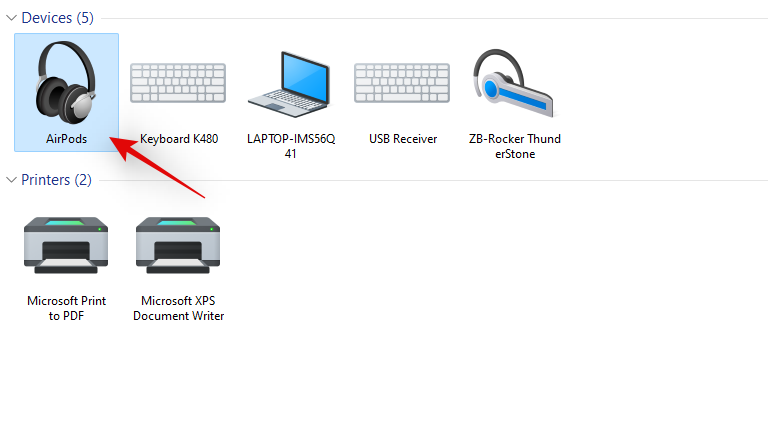
Click and select ‘Airpods’ from your devices and press Alt + Enter on your keyboard.
Switch to the ‘Services’ tab by clicking on the same at the top of your screen.
Uncheck the box for ‘Handsfree Telephony’.
Click on ‘Ok’ to save the changes.
The audio should now automatically switch and start using the Stereo audio which should help you get high-quality audio when using Airpods.
2. For Mic and audio (Bad audio)
You do not need to do much to get your mic and audio working in Windows. This is the default profile selected by Windows and if you haven’t disabled your mic within Windows settings then it should work by default. If not, you can use the guide below to set it as your default communications device which should get the mic working on your device.
Note: For some reason, the mic seems to fail the built-in test within Windows settings however it will work as intended in dedicated apps where you need the mic. The mic will also show up in apps like Google Meet and Microsoft Teams where you can select it as your input device.
Launch the Start menu, search for ‘Control Panel’ and launch the same from your search results.
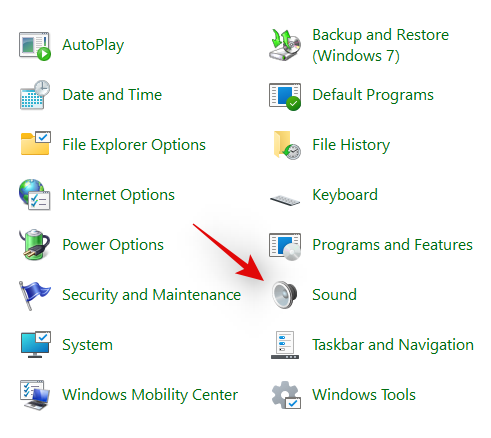
Click on the drop-down menu in the top right corner and then select ‘Large icons’.
Click on ‘Sound’.
Now switch to the ‘Recording’ tab by clicking on the same at the top of your screen.
Click on ‘Airpods’ from the devices list.
Now click on ‘Set default’ at the bottom of the window.
Click on ‘Ok’ to save your changes. Your Airpods should now work as intended with the mic and audio output.
3. For both high res stereo audio and mic functionality
If you wish to have both, high res stereo audio and mic functionality then you will need to invest in a Bluetooth 4.0 or 5.0 adapter. There is a workaround but it doesn’t seem to work for everyone running Windows 11. This might be due to different Bluetooth adapters, and PC specifications but you can try it nonetheless before investing in a Bluetooth adapter.
3.1 Buy a Bluetooth adapter
Bluetooth adapters are external devices that connect with your PC to provide high res Bluetooth connectivity that otherwise isn’t possible with in-built adapters. These adapters show up as a single device when connected to headsets and support high bandwidth connections which helps deliver high res audio output while having enough bandwidth to get your Mic working as well.
We recommend you refer to a few reviews before investing in an adapter to make sure that Airpods work as intended with the adapter that you plan on buying.
3.2 Disable BT service and Wireless iAP functionality
Disabling these two services seems to provide enough bandwidth on some Bluetooth adapters that can get high res audio output and mic working for your Airpods. Use the guide below to get you started.
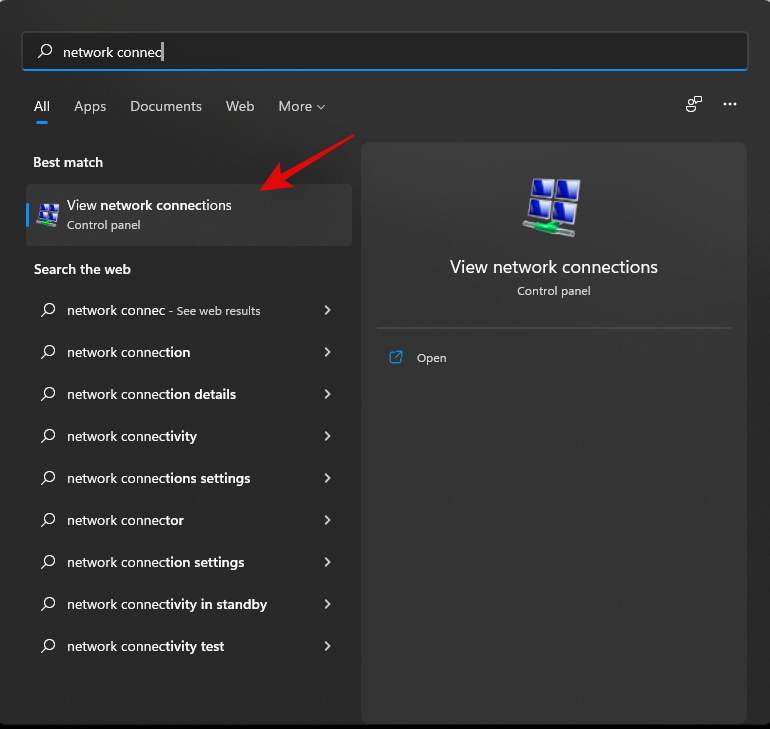
Launch the Start menu, search for ‘Network connections’ and launch the same from your search results.
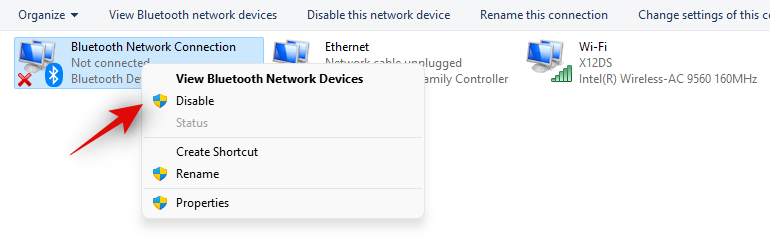
Right-click on your BT adapter from the list and select ‘Disable’.
Close the network connections window now and open the control panel instead. Launch the Start menu and search for the same to get you started.
Click on the drop-down menu in the top right corner and select ‘Large icons’.
Click on ‘Devices and printers’.
Select ‘Airpods’ and hit Alt + Enter on your keyboard.
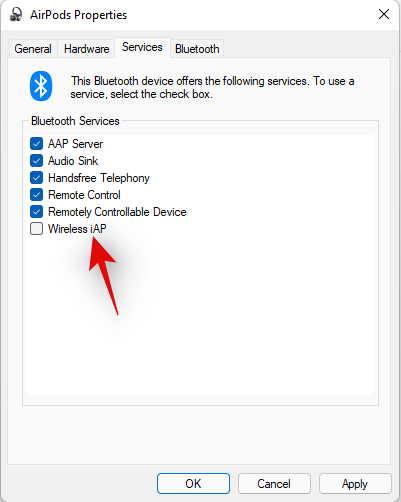
Switch to the ‘Services’ tab by clicking on the same at the top of the window.
Disable ‘Wireless iAP’ service by unchecking the same.
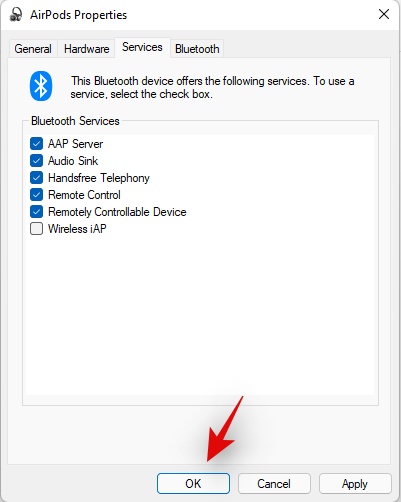
Click on ‘Ok’ once you are done.
And that’s it! Try testing the audio and mic now. If everything is working as intended then you managed to get both high res output and the mic working for Airpods with your PC.
Related: How to Turn Off Message Announce on Airpods [Announce Notifications]
How to reconnect Airpods
As you might have noticed, Airpods now efficiently reconnect to Windows 11 whenever the case is opened, however, this is only until you connect Airpods to another device. Once connected, Airpods will no longer connect with your Windows 11 device even if you have the case open and try to connect manually.
The trick here is that you need to enter pairing mode on your Airpods and then hit ‘Connect’ in the Settings app. Hold down the Setup button at the back of your Airpods with the lid open until you see a flashing white light. This means you have entered the pairing mode and you can now hit ‘Connect’ on your PC.
You won’t have to remove and re-pair Airpods every time on your PC when reconnecting, but you will have to enter pairing mode on Airpods to reconnect. In addition to this, if you do not connect Airpods to another device, then you can simply enjoy an automatic connection when you open the Airpods lid with Bluetooth turned on, on your PC.
Improving AirPods experience on Windows: What to know
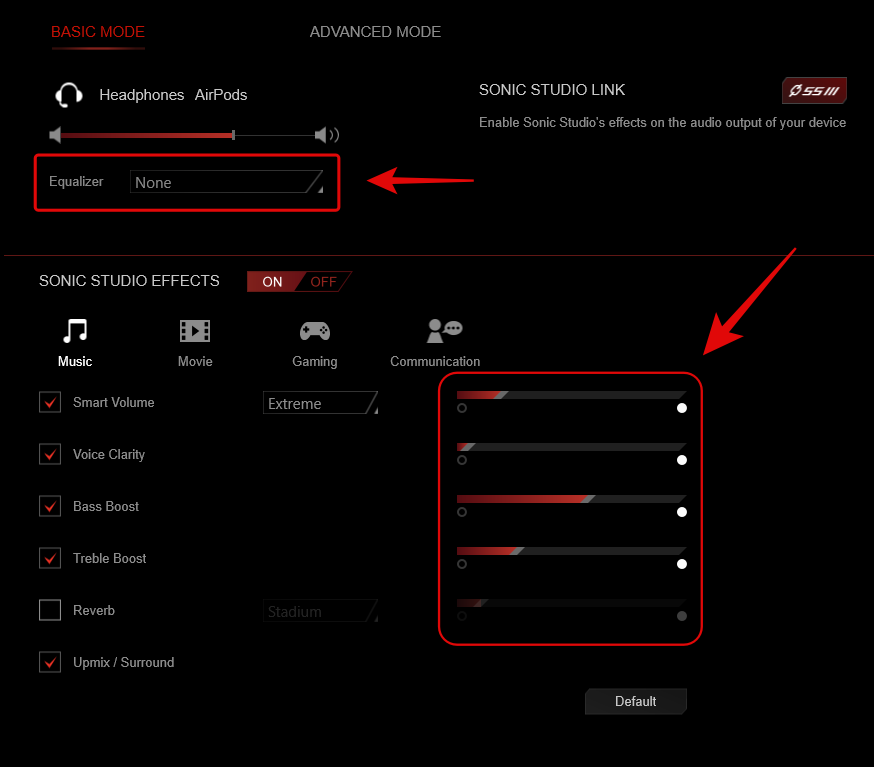
Another way in which you can enhance your experience is by using third-party OEM EQs and in-built apps to boost the volume and dynamic space of your audio signal. If you bought a laptop or a pre-built in the past 3 years then you likely have a dedicated audio app to control your audio experience.
This is not the ideal solution by miles but it should help you at least get a manageable experience when using Airpods with their default configuration. For example, if you have an Asus device then you likely have access to Sonic Studio 3. The configuration below helps deliver a fairly decent experience without pushing the Airpods drivers too much.
How to view the battery status for Airpods
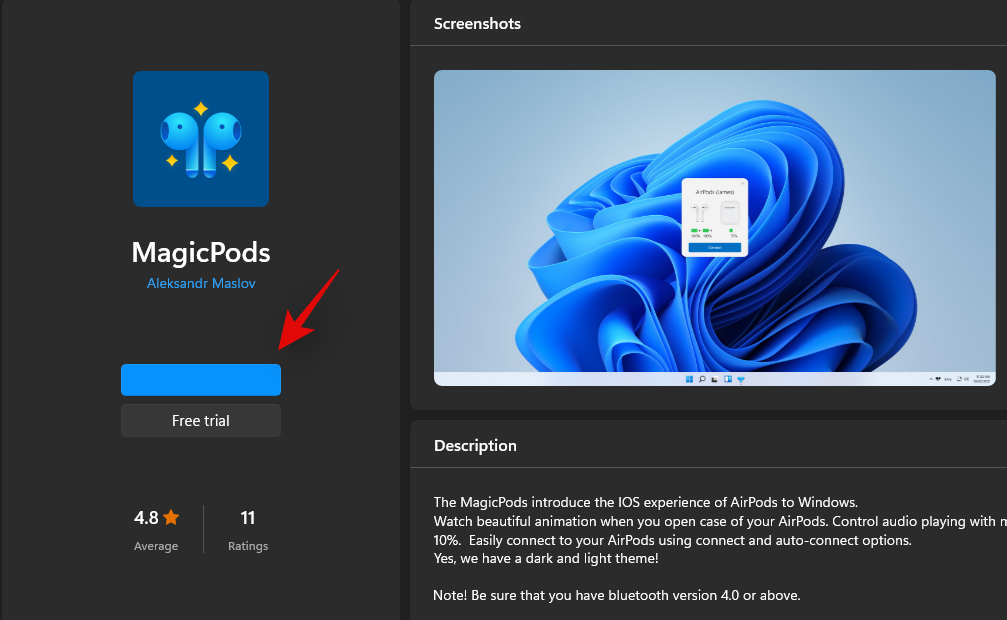
This is where you can use third-party apps to view the battery status of your Airpods. We recommend using Magicpods, a paid app that allows you to not only view your battery status but also avail ear detection, beautiful animations, and an onscreen windows tile. Magicpods also has a trial which can be availed at the Microsoft Store using this link.
Can you control playback in Windows 11?
Yes! This is one thing that seems to work right out of the box with Windows 11. We tried to control the playback in Spotify and YouTube (Microsoft Edge) and both seemed to work flawlessly with our pair of Airpods (Gen 1).
However, there is currently no way to customize the behavior of your taps and presses within Windows itself. You can, however, customize your pair of Airpods on an iOS or Mac device and the customizations should work within Windows 11 as well.
How to get the best possible audio quality
If you wish to get the maximum audio quality out of your Airpods, then we recommend you disable the following services using the guide below. You will lose the functionality to use your mic but get the best possible audio quality on your PC. Let’s get started.
Launch the Start menu, search for ‘Control Panel’ and launch the same from your search results.
Click on the drop-down menu in the top right corner and select ‘Large icons’.
Click on ‘Devices and printers’.
Click and select your pair of Airpods from the list and press Alt + Enter on your keyboard.
Click and switch to the ‘Services’ tab at the top of your screen.
Now disable the following services by unchecking the same from the list on your screen.
- Handsfree Telephony
- Wireless iAP
Click on ‘Ok’ to save your changes.
We now recommend you restart your PC. Once restarted, you should be able to enjoy 44Khz – 48KHz audio on your PC.
Problem connecting Airpods to Windows? Reset your Airpods first!
This can be inconvenient as you will have to re-pair your Airpods with every device you own however, this is a known fix for most issues that you might be having with Audio or Connection on Windows. Resetting your Airpods will allow you to start afresh and pairing them first with Windows should help get everything working as intended. Use the guide below to reset your pair and then connect it to Windows using the guide above.
Note: Make sure you remove Airpods from your PC as a device. We recommend you use the guides in this post to remove it from the Control Panel first and then subsequently from the Device Manager (if it shows up).
Resetting Airpods is a fairly simple process, place your Airpods in the case and leave it alone for a few minutes. Now come back, open the lid and hold down the Setup button at the back of your Airpods for around 15 seconds. You should then see the light flash Amber and then white in color. Now close the lid, enter pairing mode and try connecting them to your Windows 11 PC as a fresh device.
If everything goes correctly, you should have audio and connection working on your device. You can now use the guide above to configure your Airpods as intended.
How to use AirPods in video conferencing apps?
This depends on your BT driver version and whether you are using Windows 11 or Windows 10. If you are using Windows 10 then Airpods will show up as two different devices, one called ‘Airpods hands-free’ and the other called ‘Airpods stereo’. If you have the latest PC compatible with Windows 11 running the same, then in most cases Airpods will now show up as one device with smart switching already enabled. However, if you have an older BT adapter or older BT drivers then it will indeed show up as two devices on your system as well.
The trick here is to select ‘Airpods hands-free calling’ when trying to use Airpods in video conferencing apps if you have two devices. If you have one, then you re-enable the Telephony service if you had disabled it earlier. Subsequently, you will have to increase your Mic levels to get manageable audio quality on your system.
Lastly, some apps are notorious for having Audio issues with Airpods, namely, Microsoft Teams. Unfortunately, the only way to get the mic working in Microsoft Teams and other affected apps is to enable ‘Listening’ on the device in Audio properties. This however has the drawback of getting to hear your voice with listening enabled.
Why am I unable to control the volume in some apps?
Some apps that take exclusive control of audio output devices, will prevent you from adjusting your audio or volume when using the app. This is another issue that mainly plagues video conferencing services, especially when using their web apps.
If you are facing this issue then we recommend you either close the app, adjust your volume to the appropriate levels and restart it on your PC. If that is not an option, then you can use the desktop app instead of the web app to control your volume output as intended during the video calls.
We hope this guide helped you get familiar with Airpods on Windows 11. While not completely there, Windows 11 does bring some default connectivity and audio improvements when pairing with Airpods now. How was your experience? Did you face any issues? Feel free to share your thoughts in the comments section below.
RELATED:
- iOS 15 AirPods Not Working Fix
- How to Turn On Spatial Audio on iPhone
- My Airpods Are Connected But No Sound: Fix
- How to Turn Off Head Tracking on iPhone
- What is Wide Spectrum on iPhone?
- How To Get ‘Left Behind’ Alerts on iPhone
AirPods — это беспроводные наушники, разработанные компанией Apple, которые поддерживают Bluetooth-соединение и могут быть использованы со множеством устройств, включая ноутбуки под управлением Windows 10. Возможность подключить две пары AirPods к одному ноутбуку предоставляет возможность слушать музыку или прослушивать аудиоконтент с любимыми людьми, не ограничиваясь одной парой наушников.
Для подключения двух пар AirPods к ноутбуку Windows 10 следуйте этой подробной инструкции:
- Включите Bluetooth на ноутбуке Windows 10. Для этого щелкните правой кнопкой мыши на значке Bluetooth в системном трее (обычно он расположен в правом нижнем углу экрана) и выберите «Включить Bluetooth».
- Установите AirPods в режим «Режим пары». Для этого откройте крышку зарядного футляра AirPods и нажмите и удерживайте кнопку на задней стороне футляра до тех пор, пока индикатор наушников не начнет мигать белым светом.
- Добавьте первую пару AirPods к ноутбуку Windows 10. Для этого откройте меню Bluetooth на компьютере (щелчок правой кнопкой мыши на значке Bluetooth в системном трее и выбор «Добавить Bluetooth-устройство») и выберите AirPods из списка доступных устройств. Следуйте инструкциям на экране, чтобы завершить процесс подключения.
- Добавьте вторую пару AirPods к ноутбуку Windows 10. Процедура добавления второй пары AirPods аналогична добавлению первой пары. Откройте меню Bluetooth, выберите вторую пару AirPods из списка доступных устройств и следуйте инструкциям на экране для завершения процесса подключения.
- Теперь обе пары AirPods подключены к ноутбуку Windows 10. Вы можете наслаждаться прослушиванием музыки или аудиоконтента с любимыми людьми, используя две пары беспроводных наушников одновременно.
Удобство использования двух пар AirPods с ноутбуком Windows 10 позволяет разделить радость от прослушивания аудио с близкими людьми или включить режим общего просмотра фильма или презентации на большом экране, не ограничиваясь одной парой наушников.
Подключение двух пар AirPods к ноутбуку Windows 10 — простая процедура, которая занимает всего несколько минут. Следуя этой подробной инструкции, вы сможете наслаждаться прослушиванием аудио с двумя парами беспроводных наушников одновременно и делиться этим удовольствием с близкими людьми.
Шаг 1: Включите Bluetooth на ноутбуке Windows 10. Для этого откройте «Настройки», выберите «Устройства», затем перейдите в раздел «Bluetooth и другие устройства».
Шаг 2: Включите AirPods. Откройте крышку зарядного футляра, держа ее рядом с ноутбуком.
Шаг 3: На ноутбуке найдите раздел «Добавить Bluetooth или другое устройство» и нажмите на него.
Шаг 4: В открывшемся окне выберите пункт «Bluetooth».
Шаг 5: Активируйте режим пары на AirPods. На задней части зарядного футляра AirPods находится кнопка «Сопряжение». Нажмите и удерживайте ее, пока светодиодные индикаторы не начнут мигать белым цветом.
Шаг 6: В окне «Добавить устройство» выберите свои AirPods из списка доступных устройств.
Шаг 7: Дождитесь завершения процесса пары. Когда AirPods будут успешно подключены к ноутбуку, вы увидите соответствующее сообщение на экране и услышите звуковой сигнал.
Шаг 8: Проверьте подключение. Попробуйте воспроизвести звук на ноутбуке через AirPods и убедитесь, что все работает должным образом.
Теперь вы можете наслаждаться безпроводным звуком через свои AirPods на ноутбуке Windows 10. Повторите эти шаги, чтобы подключить и использовать вторую пару AirPods на том же ноутбуке.
Шаг 1: Установка последней версии драйвера Bluetooth
Для подключения двух пар AirPods к ноутбуку Windows 10 необходимо установить последнюю версию драйвера Bluetooth. Проверьте, что ваш ноутбук поддерживает Bluetooth. Если ваш ноутбук не имеет встроенного модуля Bluetooth, вам необходимо приобрести внешний Bluetooth адаптер.
- Откройте «Панель управления» на вашем ноутбуке Windows 10.
- Выберите «Устройства Bluetooth».
- Проверьте, чтобы Bluetooth был включен.
- Нажмите «Обновить драйвер».
- Далее, выберите «Автоматически обновить драйвер».
- Windows сам найдет и обновит драйвер Bluetooth до последней версии.
Установка последней версии драйвера Bluetooth обеспечит правильную работу подключения двух пар AirPods к ноутбуку Windows 10.
Шаг 2: Включение режима сопряжения на AirPods
Прежде чем подключить две пары AirPods к ноутбуку Windows 10, необходимо включить режим сопряжения на каждых наушниках. Вот как это сделать:
- Выньте AirPods из их зарядного футляра и убедитесь, что они полностью заряжены.
- Сначала вам понадобится включить режим сопряжения на первой паре AirPods. Для этого удерживайте кнопку на задней стороне зарядного футляра, пока не появится светодиодная индикация.
- После появления светового индикатора светодиода на корпусе зарядного футляра, вы можете отпустить кнопку.
- Теперь на первой паре AirPods должен мигать белый индикатор светодиода, указывая на то, что она находится в режиме сопряжения.
- Повторите те же самые действия для включения режима сопряжения на второй паре AirPods. Удерживайте кнопку на задней стороне зарядного футляра вторых наушников, пока не появится светодиодная индикация.
- После появления светового индикатора светодиода, отпустите кнопку, и вторая пара AirPods будет готова к сопряжению.
Теперь, когда обе пары AirPods находятся в режиме сопряжения, вы можете перейти к следующему шагу — понижению режима сопряжения на ноутбуке Windows 10.
Шаг 3: Поиск и подключение AirPods в настройках Bluetooth на ноутбуке
После того как вы убедились, что Bluetooth на вашем ноутбуке включен, можно приступить к поиску и подключению ваших AirPods.
1. Нажмите на значок «Пуск» в левом нижнем углу экрана и выберите «Настройки».
2. В открывшемся окне «Настройки» найдите и нажмите на раздел «Устройства».
3. В меню «Устройства» выберите «Bluetooth и другие устройства».
4. В разделе «Bluetooth и другие устройства» проверьте, что Bluetooth включен.
5. Нажмите на кнопку «Добавить Bluetooth или другое устройство».
6. В новом окне выберите опцию «Bluetooth».
7. Ваш ноутбук начнет автоматически искать доступные Bluetooth-устройства в окружающей среде, включая ваши AirPods.
8. В списке найденных устройств найдите название ваших AirPods и нажмите на него.
9. Подождите несколько секунд, пока ноутбук устанавливает соединение с AirPods.
10. После успешного подключения AirPods будут отображены в списке «Устройства» в разделе «Bluetooth и другие устройства».
11. Теперь ваш ноутбук Windows 10 подключен к двум парам AirPods и вы можете использовать их одновременно для прослушивания аудио и проведения голосовых вызовов.
Обратите внимание: если AirPods не отображаются в списке доступных устройств, убедитесь, что они находятся в режиме поиска Bluetooth-устройств. Чтобы включить режим поиска, удерживайте кнопку на задней панели AirPods включенной до тех пор, пока индикатор не начнет мигать белым.
Подключение второй пары AirPods
Если у вас есть две пары AirPods и вы хотите подключить обе пары к ноутбуку Windows 10 одновременно, вам потребуется использовать специальное приложение. Следуйте этим шагам, чтобы подключить вторую пару AirPods:
- Убедитесь, что первая пара AirPods уже подключена к ноутбуку Windows 10 и работает нормально.
- Откройте Windows Store на вашем ноутбуке и найдите приложение «Audio Routing».
- Установите приложение «Audio Routing» на ноутбук.
- Откройте приложение «Audio Routing» и найдите в нем опцию для подключения второй пары AirPods.
- Выберите вторую пару AirPods из списка доступных устройств.
- Дождитесь, пока вторая пара AirPods успешно подключится к ноутбуку Windows 10.
- Откройте настройки звука на ноутбуке и убедитесь, что обе пары AirPods отображаются в списке доступных устройств вывода звука.
Теперь вы можете наслаждаться одновременным подключением и использованием двух пар AirPods на вашем ноутбуке Windows 10. Обратите внимание, что вторая пара AirPods будет подключена только к приложениям, которые поддерживают множественные аудиоустройства. Некоторые приложения могут не поддерживать это функцию.
Шаг 1: Включение режима сопряжения на второй паре AirPods
Прежде чем подключить две пары AirPods к ноутбуку Windows 10, необходимо сопряжение с второй парой на первом устройстве. Следуйте этим шагам:
- Убедитесь, что оба набора AirPods находятся вне их зарядного кейса.
- Откройте крышку зарядного кейса у первой пары AirPods.
- Укажите на кнопку на задней части кейса и удерживайте ее до мигания светодиода.
- Держите кейс рядом с ноутбуком Windows 10.
- На ноутбуке откройте меню «Параметры Bluetooth».
- В разделе «Bluetooth и другие устройства» нажмите на кнопку «Добавить Bluetooth или другое устройство».
- В открывшемся окне выберите пункт «Bluetooth».
- Подождите, пока Windows 10 найдет вашу первую пару AirPods.
- Когда они появятся в списке доступных устройств, выберите их и подтвердите сопряжение.
Теперь первая пара AirPods успешно сопряжена с ноутбуком Windows 10. Продолжайте настройку второй пары AirPods:
- Закройте крышку зарядного кейса у первой пары AirPods.
- Откройте крышку зарядного кейса у второй пары AirPods.
- Удерживайте кнопку на задней части кейса вторых AirPods до тех пор, пока светодиод не начнет мигать белым.
- Держите кейс второй пары AirPods рядом с ноутбуком Windows 10.
- В меню «Параметры Bluetooth» нажмите на кнопку «Добавить Bluetooth или другое устройство».
- В открывшемся окне выберите пункт «Bluetooth».
- Подождите, пока Windows 10 найдет вашу вторую пару AirPods.
- Когда они появятся в списке доступных устройств, выберите их и подтвердите сопряжение.
Теперь и первая и вторая пары AirPods успешно сопряжены с ноутбуком Windows 10. Вы готовы наслаждаться звуком воспроизводимым на двух парах AirPods одновременно.
Шаг 2: Поиск и подключение второй пары AirPods в настройках Bluetooth на ноутбуке
1. На ноутбуке Windows 10 откройте меню «Параметры» путем нажатия на значок «Пуск» в левом нижнем углу экрана, а затем на значок «Настройки».
2. В меню «Параметры» выберите раздел «Устройства».
3. В левой части окна выберите вкладку «Bluetooth и другие устройства».
4. В разделе «Bluetooth» включите Bluetooth-адаптер, если он выключен. Для этого переместите переключатель в положение «Включено».
5. Нажмите на кнопку «Добавить Bluetooth- или другое устройство».
6. В открывшемся окне выберите пункт «AirPods» и нажмите «Готово».
7. На второй паре AirPods нажмите и удерживайте кнопку на задней панели зарядного футляра до тех пор, пока индикатор светодиода не начнет мигать белым светом.
8. В меню «Bluetooth и другие устройства» на ноутбуке появится список доступных устройств. Выберите вторую пару AirPods из списка.
9. Подождите, пока ноутбук установит соединение с выбранной второй парой AirPods.
10. После успешного подключения второй пары AirPods вы увидите соответствующее уведомление на экране ноутбука.
Теперь вы успешно подключили две пары AirPods к ноутбуку Windows 10. Вы можете наслаждаться прослушиванием аудио на разных парах AirPods с одного устройства.
Использование двух пар AirPods одновременно
Владение двумя парами AirPods дает возможность разделить музыку или видео с другим человеком, однако, по умолчанию, Windows 10 не позволяет подключить две пары беспроводных наушников одновременно. Однако, с помощью некоторых дополнительных инструментов вы можете обойти это ограничение и настроить совместное использование двух пар AirPods на ноутбуке с операционной системой Windows 10.
- Вам понадобятся две пары AirPods и дополнительное программное обеспечение под названием «Audio Router». Audio Router позволяет выбирать источник звука для каждого приложения.
- Сначала вам нужно скачать и установить Audio Router. Вы можете найти его на официальном сайте разработчика или на платформе загрузки программного обеспечения, такой как Github или Softonic.
- После установки, запустите Audio Router.
- Откройте меню «Воспроизведение звука» в Windows 10, нажав правой кнопкой мыши на значок динамика в панели задач и выбрав «Звуковые настройки».
- В меню «Воспроизведение», найдите свои две пары AirPods. Они должны появиться в списке доступных аудиоустройств.
- Щелкните правой кнопкой мыши на первой паре AirPods и выберите «Установить как устройство по умолчанию».
- Затем откройте Audio Router и выберите приложение, для которого вы хотите использовать вторую пару AirPods. В списке приложений выберите «Dоwntown Audio Device» и выберите вашу вторую пару AirPods.
- Повторите шаги 6-7 для всех приложений, которым вы хотите использовать вторую пару AirPods.
Примечание: Возможны сбои или несовместимость с некоторыми программами. Если возникают проблемы с использованием двух пар AirPods, вы можете попробовать использовать другие аудиотехнологии или поискать альтернативные приложения для работы с двумя парами наушников одновременно.
Следуя этим простым инструкциям, вы сможете настроить и использовать две пары AirPods одновременно на ноутбуке Windows 10. Это отличное решение для прослушивания музыки или просмотра видео вместе с другим человеком без необходимости использования проводов или разделения звука между одной парой наушников.
Шаг 1: Открытие настроек звука на ноутбуке
Для того чтобы подключить две пары AirPods к ноутбуку на операционной системе Windows 10, вам понадобится открыть настройки звука на вашем ноутбуке. Вот как это сделать:
- Нажмите на иконку громкости в правом нижнем углу экрана. Обычно она выглядит как динамик или звуковая волна.
- В появившемся меню выберите «Настройки звука».
Альтернативный способ открытия настроек звука:
- Кликните на кнопку «Пуск» в левом нижнем углу экрана.
- Начните вводить «Настройки звука» в поле поиска.
- В отображаемых результатах найдите и выберите «Настройки звука».
После того как вы откроете настройки звука, вы будете готовы к выполнению следующего шага — подключению вашей первой пары AirPods.
Шаг 2: Выбор обоих пар AirPods в качестве аудиоустройства
После успешного подключения обеих пар AirPods к ноутбуку Windows 10, вам необходимо выбрать оба устройства в качестве аудиоустройств для воспроизведения звука.
- Щелкните правой кнопкой мыши на иконке звука в системном лотке (рядом с часами в правом нижнем углу экрана).
- Выберите «Звуковые параметры» или «Звуковые настройки» в контекстном меню, чтобы открыть панель управления звуком.
- Во вкладке «Воспроизведение» вы увидите список доступных аудиоустройств.
- Обратите внимание на названия обоих пар AirPods в списке аудиоустройств.
- Выберите первую пару AirPods и щелкните на ней правой кнопкой мыши.
- В открывшемся контекстном меню выберите «Установить в качестве устройства по умолчанию».
- Повторите те же действия для второй пары AirPods, выбрав ее и установив в качестве устройства по умолчанию.
Теперь обе пары AirPods будут выбраны в качестве аудиоустройств для воспроизведения звука на вашем ноутбуке Windows 10. Вы можете использовать обе пары одновременно или переключаться между ними, в зависимости от ваших потребностей.
Вопрос-ответ:
Как подключить две пары AirPods к ноутбуку Windows 10?
Для подключения двух пар AirPods к ноутбуку Windows 10 вам понадобится использовать функцию Bluetooth на компьютере. Сначала включите режим Bluetooth на обоих своих парах AirPods. Затем откройте настройки Bluetooth на ноутбуке Windows 10, нажав на значок «Bluetooth» в системном трее. В разделе «Bluetooth и другие устройства» выберите «Добавить Bluetooth или другое устройство» и выберите «Bluetooth». После этого выберите одну из своих пар AirPods и подождите, пока пара устройств связывается между собой. Повторите этот процесс с другой парой AirPods. Теперь обе пары AirPods связаны с ноутбуком Windows 10 и готовы к использованию.
Можно ли подключить две пары AirPods к ноутбуку Windows 10 одновременно?
Да, можно подключить две пары AirPods к ноутбуку Windows 10 одновременно. Для этого вам просто нужно следовать инструкции по подключению каждой пары AirPods к компьютеру. Однако стоит отметить, что при использовании двух пар AirPods одновременно звук будет воспроизводиться только в одной паре, так как Windows 10 позволяет выводить звук только на одно устройство воспроизведения. Таким образом, чтобы слушать аудио в двух парах AirPods одновременно, вам придется использовать стороннее программное обеспечение или аудио-распределитель.
Могу ли я подключить две пары AirPods к ноутбуку Windows 10 без использования Bluetooth?
Нет, вы не можете подключить две пары AirPods к ноутбуку Windows 10 без использования Bluetooth. AirPods используют технологию Bluetooth для связи с устройствами, поэтому вам обязательно понадобится Bluetooth на вашем ноутбуке Windows 10, чтобы подключить их. Если ваш ноутбук не имеет встроенного модуля Bluetooth, вы можете приобрести отдельный адаптер Bluetooth и подключить его к компьютеру, чтобы использовать AirPods.
Какие версии AirPods поддерживают подключение к ноутбуку Windows 10?
Практически все версии AirPods поддерживают подключение к ноутбуку Windows 10. Начиная с первого поколения AirPods и заканчивая последней моделью AirPods Pro, они все совместимы с Windows 10. Для подключения AirPods к ноутбуку Windows 10 вам просто понадобится функция Bluetooth на вашем компьютере.