
How to Ping a Range of IP Addresses on Windows, Mac, Linux, and Cisco?
-
Fact-checked by Kevin Parker -
Updated on January 5, 2024
You can save time and resources by pinging multiple IP addresses simultaneously with the codes I’ll discuss in this guide.
This allows you to test the viability and reachability of these servers, audit the devices on a network, or identify devices that have a fixed DHCP address.
This guide takes a straightforward approach to successfully pinging a range of IP addresses on any network or server.
You can ping a range of IP addresses simultaneously instead of pinging one address per time. This helps save time and eliminates errors in covering the entire network.
Furthermore, you can customize your ping sweep to determine how many IP packets are sent to every address, the wait time for a response, and how many times the test should run, among other things.
However, you need to know the exact range of IP addresses within your subnet to shorten this process and have cleaner ping results.
Otherwise, you could start with the first three sets of octet values and leave the last octet to range between the values 1 and 255.

Ping vs. Ping Sweep: Why Ping an IP Range Instead of a Single IP Address?
Pinging an IP range instantly lets you determine whether the IP addresses within that range are available and reachable on the server.
It also shows you which IPs are connected to a device or what device is connected to thklat IP.
Typically, pinging a device or host allows you to determine whether that device or host exists or is reachable on a server.
Doing so relies on knowing the exact IP address of the device you’re pinging.

When this exact address is unknown, but you know the range within which the device’s IP address should lie, a ping sweep becomes more effective.
Rather than manually testing every IP by changing the decimal figures, pinging a range tests all IP addresses within that border to find the device/host you’re looking for.
Furthermore, pinging a range of IP addresses allows you to
- Improve and maintain network security by rooting out unauthorized devices on the same IP range or host.
- Find all the dead hosts on your network for troubleshooting or possible clean-up.
- Check that the IP addresses and their registered devices match the network documentation.
- Find anomalies in the host network.
While all of these are possible with a simple ping tool, it takes a lot of manual time and effort to get done. Besides saving a lot of time, ping sweeps also eliminate human errors when manually replacing IP address numbers over a host.
How Do I Ping Multiple Devices at Once?
The best way to ping multiple devices is to run a custom ping script if the devices are on the same subnet. This ensures they have identical octet states for the first three values with changing values for the last octet.
However, a cleaner approach is executing a successful script that only turns out successful results. Otherwise, the script returns up to 254 results, of which only a few could be the pinged devices.
Alternatively, multiple devices not on the same network subnet can be pinged simultaneously with a ping sweep tool.
These tools broaden the ping scope and eliminate time spent manually fetching and inputting each IP address. Ping sweep tools also work for multiple devices on the same subnet. Still, they’re better recommended for devices on multiple subnets or a large number of devices/hosts.
6 Methods to Ping a Range of IP Addresses
I’ve collated and described six of the most effective methods to perform a ping sweep on Mac, Windows, and Linux. I also include a guide on pinging a range of IP addresses via Cisco.

How to Ping IP Range Using CMD on Windows?
Requirements: Windows 7 or later.
Here’s how to ping an IP range using CMD on your Windows PC:
- Launch the Start Menu or press the Windows key.

- Search for “cmd” or “command prompt.”

- Hit “Enter” or navigate to the “Command Prompt” program and open it.
- First, we test that your CMD works fine. Type “ping [IP address]” without the quotation or brackets. I tried the IP addresses 192.168.1.101 (which I didn’t have access to on my network) and 192.168.0.1 (which is my router’s IP that I have access to).

- The above results show that your CMD works fine.
- Enter the following command into your Command Prompt. You can replace the IP address with the range you’re concerned with.

- This command pings all addresses between 192.168.0.1 and 192.168.0.254 once with a wait time of 10ms before determining whether that host/device is active on the IP range.
How to Ping an IP Range Using PowerShell on Windows?
Requirements: Windows 10
Windows PowerShell is also an interesting tool to ping a range of IP addresses. You’ll need a PC running Windows 10 for this. Here’s how to do it:
- Launch the start menu or press the Windows key.
- Search for “PowerShell” and launch the app.

- Let’s test if the ping function works with a single IP address you have access to. Use the function “ping [IP address]” without the quotes and brackets.

- If it works, enter the two-line code below into your Windows PowerShell:
- The script scans and tests all the IP addresses in this range.


How to Ping an IP Address Range on Linux?
Your command prompt portal is a good bet for pinging a range of IP addresses for users on the Linux operating system.
Do these:
- Sign in to your Linux server.
- Open a command prompt window.
- Enter the ping command below and hit enter.
- You should now have a list of all the valid IP addresses.
How to Ping a Range of IP Addresses on Mac?
Mac devices can ping a range of IP addresses using just the built-in terminal window. Here’s how I’d do that with a Mac.
- Open the Terminal Window on your Mac unit.
- Enter the command below and hit the Enter key.
- You’ll get successful responses from the live hosts, and IP addresses your computer was able to reach on the network.
Use Ping Sweep Tools to Ping a Range of IP Addresses
You can use ping tools to manage a range of IP addresses without writing any code. This is an acceptable option if you’re in charge of many devices on an IP range and don’t want to risk missing any.
Ping sweep tools are also great for when you don’t like to get into the technical aspect of writing code. Although, you only have to copy and paste the codes here – tweaking them where need be.
Some of the most effective ping sweep tools on the market are:
- SolarWinds IP Address Manager – Great for scanning through static and DHCP systems, setting up IP conflict alerts, and troubleshooting IP-related issues on a host.
- ManageEngine OpManager – Pings a range of IP addresses, tracking host accessibility, resolving hostname, and monitoring packet losses in real-time.
- Advanced IP Scanner – Scans a network range with detailed information on the hostname, MAC address, device’s presumed address, response time, and network interface vendor name of devices.
These tools do the same essential task of scanning and pinging a range of IP addresses, but they add some useful extras. Make sure to get one that’s better tailored to your network management needs for better overall value.
How to Ping a Range of IP Addresses in Cisco?
You can ping all the IP addresses on your router or internal network subnet on the Cisco operating system.
As I mentioned earlier, this is an excellent way to find all the inactive IP addresses and dead hosts and improve network allocation to each device on that host.
You can also root out rogue units connected to your router or network.
Here’s what to do in this case:
- Launch the Cisco Packet Tracker program.
- Click on the device you’d like to ping from and open its console. This could be a router, network switch, or other networking devices.
- Enter the code below.
tclsh
for {set i 1} {$i <= 254} {incr i} {
set var 190.168.0.
append var $i
ping $var rep 3 time 1}
- The console now pings all IP addresses within the 190.168.0.1 – 190.168.0.254 range and returns the values for each.
Frequently Asked Questions
Ping Any IP Range Successfully
Now that you can ping an IP range successfully, you can perform better diagnostics or obtain relevant information about your internal networks.
Interestingly, you don’t have to be connected to the network you want to ping before running this kind of diagnostics, allowing you to ping even a remote server.
Alternatively, you can connect to a remote server securely using a VPN that encrypts your IP data packets, so no one ever intercepts them.
If you find this piece helpful, I recommend you share it with your friends and colleagues who may also be having a hard time pinging an IP address range or would appreciate alternative (and more efficient) methods.
Please help us spread the word by sharing this article and telling your family, friends, and colleagues.
When you are a system or network administrator, you may need to ping multiple IP addresses on the same series/or different networks for monitoring and troubleshooting. Many free GUI tools and scripts are available to accomplish this task in Windows 10/11. Here I’m going to show my favorite methods and tools you can regularly use to ping multiple IP addresses simultaneously.
Basics:
Typing the below command in the command prompt will ping a device continuously.
Ping -t 10.10.16.16
-t: switch to ping continuously.
See the below example,

Opening several command prompt screens with separate IPs will help if you want to ping fewer IPs simultaneously. But it is not the ideal way if the IP range is huge.
Use the below command to ping multiple IPs at once from a Windows computer.
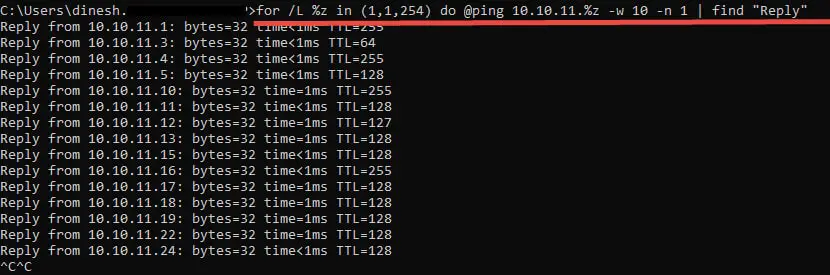
for /L %z in (1,1,254) do @ping 10.10.11.%z -w 10 -n 1 | find “Reply”
The above command works in the loop and pings the IP series you defined.
Variables:
- 1,254 defines the starting and ending number of the IP addresses. For example, if you want to ping IPs starting from 1 and ending at 25, change the value to 1,25.
- Change the primary IP address series after the @ping. In the above example, I’m going to ping IP series 10.10.11.x. Suppose your local network starts with 192.168.200.x, then change those values.
- -w 10 indicates the waiting time for the ping reply; it is 10 seconds in this case. It will wait 10 seconds to get a reply from one IP, then move to the next. If you want to extend the waiting time for some reason, increase the -w value.
The above command works on all Windows Operating Systems, including Windows 10/11, 8.1/7 and Server OS.
Here is the sample of pinging multiple IPs at once on a single command prompt screen.
To monitor the IP history and manage the IP addresses in your environment, you need to look for a few IP management or pinging GUI tools. Here are some of the tools I use daily basis.
Angry IP Scanner to Ping Multiple IPs from Windows PC
AngryIP scanner is a free, simple and fully compatible tool with Windows 11 and 10. You can set the start and end of the IPs to ping at the same time.
Download the latest version from the official site here. You can install it if you want to have it permanently on your Windows computer or download the executable version to carry with you as a portable tool.
Once you set the range, click Scan. It will scan and provide more details about the hosts/IPs.
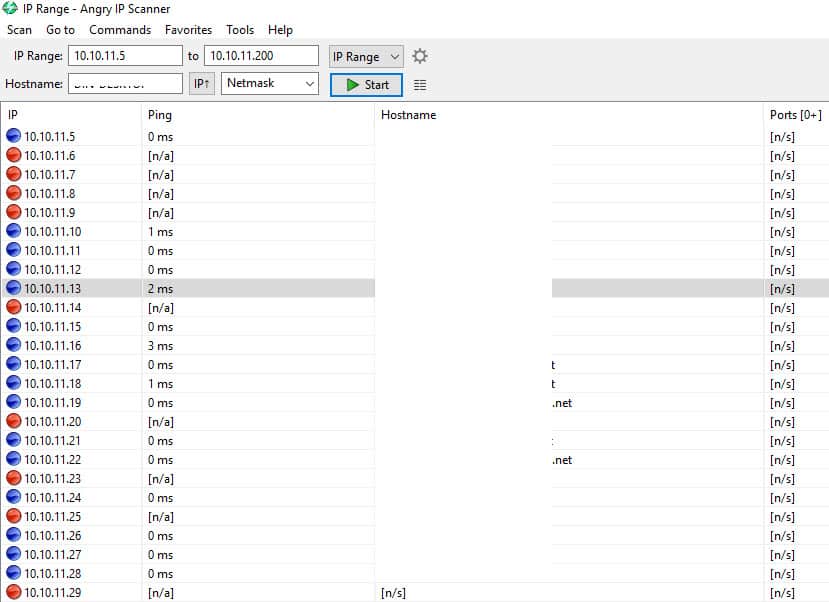
Here you can quickly identify which IP/devices are non-active (Red) and online devices (Blue). If you have multiple different IPs in a text file, you can also import and ping them at once.
Adding the IP series to Favourites will allow you to recall the series later and ping again.
The drawback of the tool is you can’t add IPs from different series together. For example, with this tool, you can’t ping 10.10.11.25 and 10.10.130.100 simultaneously.
Another Tool to Ping Multiple IPs – in Different Range
There is a free tool called ‘FREEping’; it is completely free and easy to use. In the below example, I’m monitoring 12 network devices, including the IP addresses shown in the earlier example. The FREEping tool can continuously communicate (ping) to each device. You can see the status by the color of each entry.

The good thing about this tool is that you can ping and monitor multiple IP addresses of different networks in a single window. Before starting different network monitoring, make sure your network can communicate with different networks (Routing and permissions)
Green indicates – the host is alive and can be communicated with.
Red indicates– the host cannot be contacted. You can see the error or reason under ‘Error’
Orange indicates (not in this example) – the host is coming up or communication is starting. After some time the orange colour will change to green.
How to Add Network Devices to FREEping
To add network devices to FREEping, follow the steps.
1) Click on Host and Add or the Host icon.
2) In Host, enter the IP address and give a description. The default data size for pinging is 32bytes, and you can increase the size to check the stability of the network.

You can set the destination and message to pop up when a host becomes unavailable. More information can be found in FREEping help.
Once pressed OK, the new host will be under monitoring.
If you want to know how to ping multiple IPs at once from PowerShell, watch the below video!
I hope these above methods and tools provide enough information on how to ping multiple IP addresses in CMD and other tools simultaneously.
Опрашивание компьютера в сети, хоста, маршрутизатора или любого другого устройства в сети в основном выполняется сетевыми администраторами, которые пытаются проверить, доступно ли устройство или несколько устройств. Обычно это делается в процессе поиска и устранения неисправностей.
При пинге нескольких устройств может быть неудобно использовать командную строку/терминал и пинговать каждый IP-адрес или устройство по очереди. Некоторые сторонние приложения позволяют автоматизировать процесс пинга и позволяют пинговать несколько IP-адресов и хостов одновременно. Но вы также можете пинговать несколько узлов в сети с помощью собственных инструментов на ПК с Windows включая командную строку и Windows PowerShell
В этом руководстве я покажу вам несколько способов пинга хостов, IP-адресов или маршрутизаторов в сети с помощью собственных и сторонних инструментов на компьютере с Windows.
Интересно: Как установить GitLab на Debian 11
Ping нескольких IP-адресов из командной строки одновременно
В командной строке Windows нужно использовать команду Ping, за которой следует имя хоста или IP-адрес, чтобы выполнить ping другого устройства и проверить, доступно оно или нет. Если устройство доступно, то при стандартном количестве пингов, равном 4, будет получен ответ от удаленного устройства.
По той же логике, если вы хотите проверить доступность нескольких устройств, необходимо выполнить команду Ping столько же раз, каждый раз указывая новый IP-адрес или имя хоста.
К счастью, с помощью следующей команды вы можете одновременно пинговать несколько устройств в одной IP-подсети.
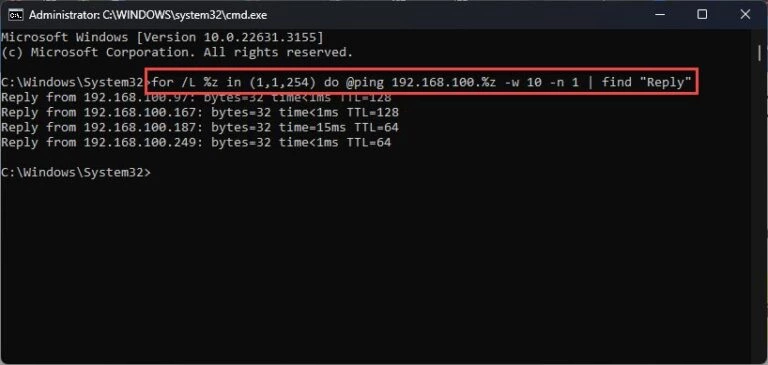
for /L %z in (1,1,254) do @ping 192.168.10.%z -w 10 -n 1 | find “Reply”
В приведенной выше команде (1,1,254) указаны значения для переменной «z» . Это означает, что переменная «z» будет начинаться с «1» и заканчиваться «254» с увеличением на 1 каждый раз. Это означает, что команда выше начнет пинговать устройства с IP-адресом «192.168.10.1», затем «192.168.10.2» и так далее, пока не достигнет «192.168.10.254».
Вы можете изменить диапазон IP-адресов для пинга, а также подсеть IP-адресов в команде выше.
Значение после «-w» указывает время ожидания ответа на пинг. В данном случае «10» означает 10 секунд, то есть 10 секунд ожидания ответа от устройства, после чего оно перейдет к следующему IP-адресу.
В итоге «find Reply» покажет результаты только от тех устройств, которые ответили на запрос ping.
Здесь приведен пример этой команды:
Одновременный пинг нескольких IP-адресов с помощью PowerShell
Windows PowerShell дает больше возможностей для управления командами при одновременном пинге нескольких IP-адресов и хостов. Чтобы пинговать несколько устройств с помощью PowerShell, используйте следующую команду:
Test-Connection -ComputerName [IP1], [IP2], [IP3] -Count 1
Вместо [IP1] и т. д. введите IP-адрес или имя хоста устройства, которое вы хотите пинговать. Число после -Count обозначает время пинга каждого устройства в команде.
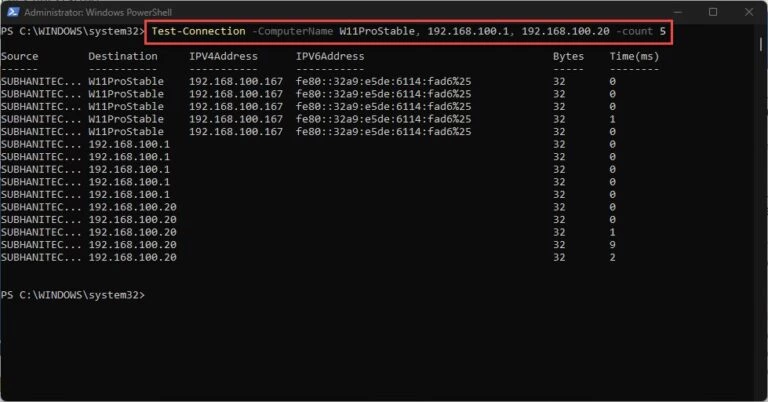
Как видно из примера выше, команда пинговала хост, а также IP-адреса по 5 раз каждый. Если ваш компьютер подключен к домену, вы можете пинговать все устройства в этом домене с помощью этой команды:
Test-Connection -ComputerName (Get-ADComputer -Filter * | Select-Object -ExpandProperty Name) -Count 1
Конечно, это будет работать только в том случае, если вы являетесь частью домена и находитесь в одной сети.
Далее, если вам часто нужно пинговать одни и те же хосты или IP-адреса, вы можете создать текстовый файл с информацией, а затем использовать этот файл для пинга устройств . Вот как это делается:
Откройте Блокнот и введите имя хоста или IP-адрес устройства, которое нужно пинговать. Обратите внимание, что каждая строка должна содержать только один элемент.
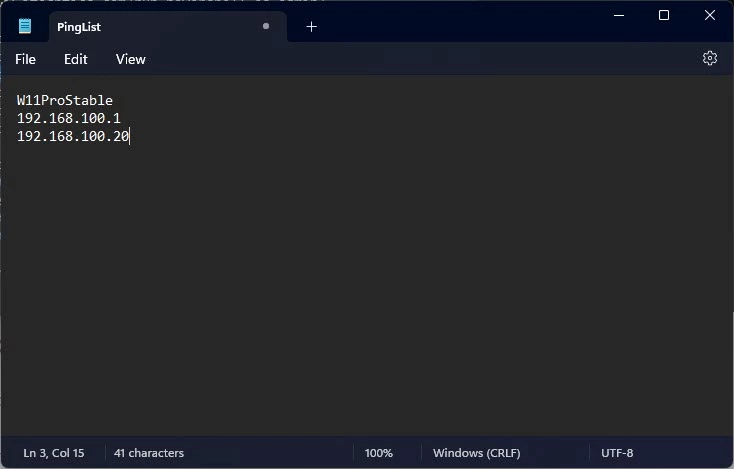
Сохраните файл в формате .TXT.
Откройте PowerShell и используйте следующую команду для пинга элементов внутри текстового файла, указав полный путь к файлу:
Test-Connection -ComputerName (Get-Content [PathToTextFile].txt) -Count 1
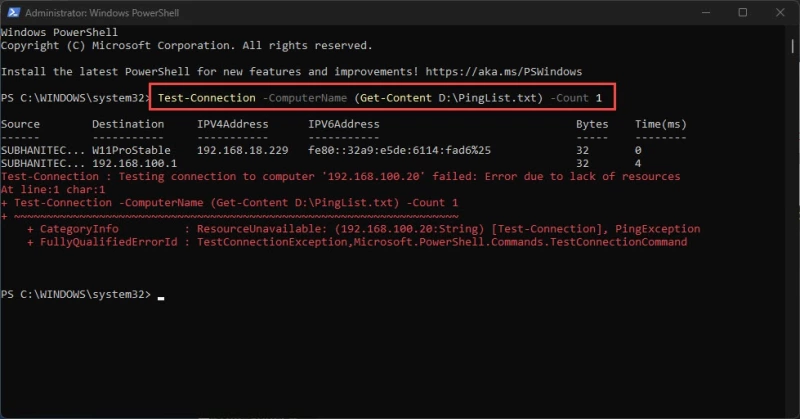
Примечание: Если вы видите ошибку «Error due to lack of resources», подобную той, что описана выше, это означает, что устройство недоступно.
Пинг нескольких IP-адресов одновременно с помощью NirSoft PingInfoView
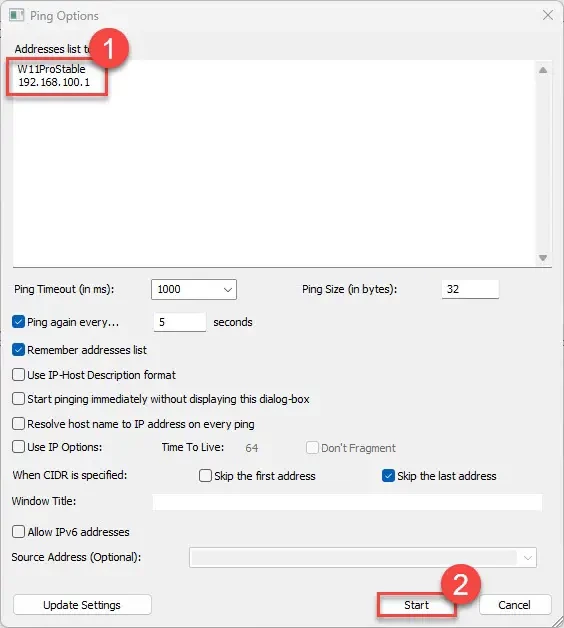
PingInfoView – это сторонний, бесплатный и портативный инструмент, позволяющий отслеживать подключение к сети путем пинга устройств. Все, что вам нужно сделать, это ввести имя хоста или IP-адрес машины, которую вы хотите пинговать, и настроить параметры, такие как интервалы, с которыми вы хотите пинговать ее.
Просто скачайте PingInfoView, извлеките инструмент и запустите приложение .EXE. Запустив инструмент, введите имя хоста или IP-адрес устройств, которые вы хотите пропинговать. Обратите внимание, что в каждой строке должно быть введено только одно устройство.
Вы также можете настроить конфигурацию пинга устройств, например временной интервал, параметры IPv4 и IPv6 и т. д.
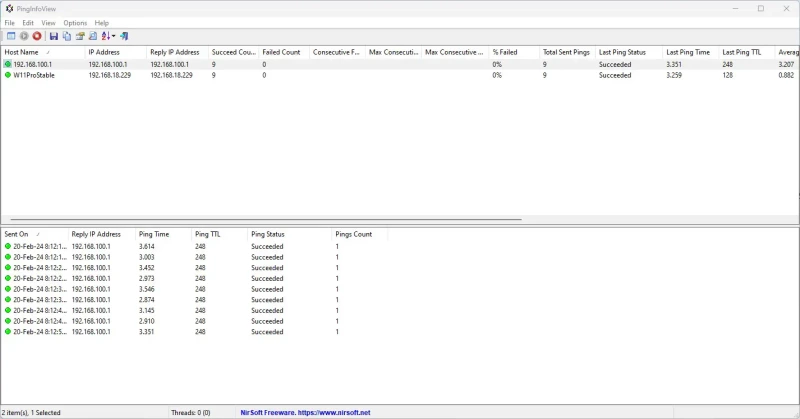
PingInfoView начнет пинговать введенные устройства одновременно через заданные интервалы времени и покажет вам результаты в отдельном разделе инструмента.
Заключение
Возможность одновременного пинга нескольких устройств может сэкономить много времени администраторам, которым часто приходится выполнять эту задачу. Вы даже можете создать текстовый файл с IP-адресами и именами хостов, которые вам часто приходится пинговать при устранении неполадок.
Как пинговать диапазон IP-адресов. Мастер-класс по работе с командой ping: от базовых принципов до тонких настроек 💻
😿Детали🤜Эта статья — ваш путеводитель в мир сетевого тестирования с помощью утилиты `ping`. Мы разберем все, от простейшего пинга до работы с диапазонами IP-адресов и анализа результатов. Приготовьтесь к глубокому погружению в мир сетевых технологий! 🚀
Для доступа к конкретному разделу перейдите по ссылке ниже:
✔️ Основы команды ping: проверка доступности и замер времени отклика
✔️ Расширенные возможности команды ping: управление интервалами и размером пакетов
✔️ Пингование диапазона IP-адресов: поиск активных устройств в сети
✔️ Работа с доменными именами и IP-адресами: основные моменты
✔️ Анализ результатов пинга: интерпретация данных
✔️ Заключение: ping — ваш верный помощник в сетевом мониторинге
✔️ Часто задаваемые вопросы (FAQ)
✋ Отзывы
Основы команды ping: проверка доступности и замер времени отклика
Команда `ping` — незаменимый инструмент для проверки доступности сетевых устройств и оценки качества связи. Она посылает ICMP-запросы (эхо-запросы) к указанному адресу (IP-адрес или доменное имя) и измеряет время, за которое пакет данных доходит до адресата и возвращается обратно. Результат отображается в виде списка ответов, содержащих время отклика (в миллисекундах), количество потерянных пакетов и другие параметры.
- Что показывает ping? Время отклика (ping) напрямую влияет на скорость загрузки веб-страниц, онлайн-игр и других сетевых приложений. Чем меньше пинг, тем быстрее работает сеть. Потеря пакетов свидетельствует о проблемах в сети.
- Как выполнить ping? Всё просто! Откройте командную строку (cmd на Windows, Terminal на macOS/Linux), введите `ping` , пробел, затем IP-адрес или доменное имя и нажмите Enter. Например: `ping 8.8.8.8` (Google Public DNS). Вы увидите статистику: время отклика, потери пакетов, количество отправленных/полученных пакетов. 📶
Расширенные возможности команды ping: управление интервалами и размером пакетов
Команда `ping` обладает мощными возможностями настройки. Вы можете управлять интервалом между отправкой пакетов и их размером. Это полезно для детального анализа сетевого соединения в различных условиях.
- Управление интервалом отправки пакетов (`-i`): Параметр `-i` позволяет задать интервал времени (в секундах) между отправкой пакетов. Например, `ping -i 2 8.8.8.8` будет отправлять пакеты каждые 2 секунды. Это полезно при мониторинге медленных соединений, чтобы не перегружать сеть. С другой стороны, `ping -i 0.1 8.8.8.8` отправляет пакеты каждые 100 миллисекунд — идеальный вариант для детального анализа. ⏱️
- Управление размером пакетов (`-s`): Параметр `-s` позволяет задать размер отправляемых пакетов (в байтах). Например, `ping -s 1000 8.8.8.8` отправляет пакеты размером 1000 байт. Это может быть полезно для тестирования пропускной способности сети и выявления узких мест. Экспериментируя с различными размерами пакетов, можно получить более полную картину состояния сети. 📦
Пингование диапазона IP-адресов: поиск активных устройств в сети
В отличие от распространенного заблуждения, стандартная команда `ping` не предназначена для непосредственного пингования диапазонов IP-адресов. Для этой задачи потребуются скрипты или специальные утилиты. Однако, можно использовать циклы в командной строке (например, с помощью `for` в Batch-скриптах на Windows или `for` в Bash на Linux/macOS) для последовательного пингования каждого адреса в заданном диапазоне. Это позволит определить, какие устройства активны в вашей сети. 🕵️♂️
Работа с доменными именами и IP-адресами: основные моменты
Команда `ping` одинаково успешно работает как с доменными именами (например, `google.com`), так и с IP-адресами (например, `8.8.8.8`). В первом случае, система сначала выполняет DNS-запрос, чтобы определить соответствующий IP-адрес, а затем уже отправляет ICMP-запросы. Во втором случае, процесс происходит напрямую. Важно понимать, что доменное имя может быть недоступно, даже если сам сервер работает, из-за проблем с DNS. Поэтому, в случае проблем с доменным именем, лучше использовать проверку по IP-адресу. 🌐
Анализ результатов пинга: интерпретация данных
Результат команды `ping` содержит важную информацию о качестве связи. Обратите внимание на следующие параметры:
- Время отклика (время жизни): Показывает время в миллисекундах, необходимое для отправки и получения пакета. Чем меньше, тем лучше.
- Потеря пакетов: Процент потерянных пакетов указывает на наличие проблем в сети, таких как перегрузка, повреждение кабелей или другие неполадки.
- Максимальное, минимальное и среднее время отклика: Эти значения дают более полную картину о стабильности соединения.
Заключение: ping — ваш верный помощник в сетевом мониторинге
Команда `ping` — простой, но мощный инструмент для диагностики сетевых проблем. Понимание её возможностей позволяет эффективно проверять доступность устройств, оценивать качество связи и выявлять потенциальные неполадки. Не бойтесь экспериментировать с различными параметрами и опциями, чтобы получить максимальную пользу от этого незаменимого инструмента сетевого администратора. 🎉
Часто задаваемые вопросы (FAQ)
- Что делать, если ping не работает? Проверьте сетевое соединение, убедитесь, что у вас есть доступ к интернету. Также проверьте правильность ввода IP-адреса или доменного имени.
- Как пинговать определенный порт? Команда `ping` сама по себе не может пинговать порты. Для этой цели используются другие утилиты, например, `telnet` или `nc` (netcat).
- Зачем нужны разные параметры в команде ping? Параметры позволяют настраивать поведение команды, например, задавать интервал между пакетами или их размер, что полезно для более детального анализа сети.
- Можно ли пинговать диапазон IP-адресов напрямую? Нет, для этого нужны скрипты или специализированные программы.
Вопросы и ответы
👉 Как пинговать диапазон IP-адресов 👈
Это делается с помощью команды «ping -i». Например, «ping -i 4 IP-адрес» увеличивает интервал до 4 секунд. А «ping -i 0.2 IP-адрес сокращает его до 2 миллисекунд.
👉 Как пропинговать список IP 👈
Команда ping на Windows:
Для пингования нужно ввести команду ping, а после пробела — IP-адрес сервера или имя домена. В качестве примера можно пропинговать доступ к DNS-серверу Google: ping 8.8.8.8.
👉 Как задать диапазон IP 👈
Чтобы включить диапазон IP-адресов в категорию, выберите категорию в раскрывающемся меню. Чтобы пометить действия с этих IP-адресов, введите тег. При вводе слова в поле создается тег. После того как у вас уже есть настроенный тег, его можно легко добавить в дополнительные диапазоны IP-адресов, выбрав его из списка.
👉 Как пинговать IP в локальной сети 👈
Введите слово ping, нажмите клавишу пробел, и далее введите доменное имя/IP-адрес (затем нажмите клавишу Enter для получения ответа). Результат: Если вы видите список ответов, это означает, что соединение работает. Время указывает вам, насколько быстрым является ваше соединение.
👉 Как пинговать сервер по IP 👈
Для пингования нужно ввести команду ping, а после пробела — IP-адрес сервера или имя домена. В качестве примера можно пропинговать доступ к DNS-серверу Google: ping 8.8.8.8.
👉 Как пропинговать порт через cmd 👈
Это достаточно просто. Зажимается сочетание клавиш Win + R, далее вводится команда CMD, нажимается Enter и затем вводится команда netstat -a. Повторно нажимается Enter. В командной строке будет предоставлен список занятых портов и служб, которые ими управляют.
👉 Какой пинг нормальный 👈
Как правило, приемлемый пинг должен быть не выше 40-60 мс. При пинге более 100 мс возникает заметная задержка, а при пинге более 170 мс некоторые игры отключают пользователя. Пинг менее 20 мс способен обеспечить игру с четкими визуальными эффектами, быстрыми действиями и отсутствием задержек.
🔶 Как активировать карту Freedom
🔶 Как открыть мультивалютный счет в Халык Банке
🔶 Как открыть казахскую карту фридом финанс
🔶 Как открыть банковскую карту нерезиденту
To ping a range of IP addresses in PowerShell, you can use a simple loop that iterates over the desired range and sends a ping request to each address. Here’s a code snippet to accomplish this:
$ipRange = 1..254; foreach ($i in $ipRange) { Test-Connection -ComputerName "192.168.1.$i" -Count 1 -ErrorAction SilentlyContinue }
Understanding the `Test-Connection` Cmdlet
What is `Test-Connection`?
The `Test-Connection` cmdlet is a built-in PowerShell command that serves as an alternative to the traditional ping command. It allows you to send ICMP echo request packets to one or more network hosts and receive echo response packets in return. This cmdlet is critical for network diagnostics, enabling users to check the reachability of hosts and measure round-trip times for packets.
Benefits of Using `Test-Connection`
Using `Test-Connection` comes with several benefits over the conventional ping command:
- Robustness: It’s designed to be more flexible, offering options for more detailed interactions with network devices.
- Scripting Ability: Being part of PowerShell, it can easily be integrated into scripts to automate network testing, making it invaluable for network administrators and IT professionals.
Set Primary SMTP Address in PowerShell: A Quick Guide
Preparing to Ping a Range of IP Addresses
What is a Range of IP Addresses?
An IP address range refers to a sequence of consecutive IP addresses, often defined for a subnet. For instance, you might have a range such as `192.168.1.1` to `192.168.1.255`. When diagnosing network connectivity, pinging a range of IPs allows you to efficiently ascertain which devices are online and responsive.
Setting Up PowerShell
Before you start using PowerShell, ensure it’s set up correctly on your Windows machine. To open PowerShell, you can search for it in the Start Menu. If you plan to run scripts that you or others create, you may need to enable script execution by typing the following command:
Set-ExecutionPolicy RemoteSigned
This command allows you to run your own scripts while still retaining security by requiring scripts downloaded from the internet to be signed by a trusted publisher.

Find Exchange Version PowerShell: A Quick Guide
Constructing the Basic Script
To ping a range of IP addresses in PowerShell, you can build a straightforward script that iterates through the desired range. Here is an example that demonstrates how to accomplish this:
$startIP = [System.Net.IPAddress]::Parse("192.168.1.1")
$endIP = [System.Net.IPAddress]::Parse("192.168.1.254")

$startBytes = $startIP.GetAddressBytes()
$endBytes = $endIP.GetAddressBytes()

for ($i = $startBytes[3]; $i -le $endBytes[3]; $i++) {
    $ip = "$($startBytes[0]).$($startBytes[1]).$($startBytes[2]).$i"
    Test-Connection -ComputerName $ip -Count 2 -ErrorAction SilentlyContinue |
    Select-Object Address, ResponseTime, StatusCode |
    Format-Table -AutoSize
}
Explanation of the Code
Let’s break down the script:
-
IP Address Setup: The `$startIP` and `$endIP` variables define the range of IP addresses. The `Parse` method converts string representations of the IP addresses into objects that PowerShell can manipulate.
-
Extracting Bytes: The `GetAddressBytes()` method retrieves the individual octets of the IP addresses, making it easier to work with the last octet (which is commonly sequentially assigned in local networks).
-
Iterating Through the Range: The `for` loop iterates through the last octet, assembling the full IP address for each iteration (e.g., 192.168.1.1, 192.168.1.2, etc.).
-
Executing the Ping: The `Test-Connection` cmdlet is invoked for each IP address, sending out two echo requests. The results are formatted into a readable table displaying the address, response time, and status code.
List Mapped Drives in PowerShell: A Quick Guide
Advanced Pinging Techniques
Adding Error Handling
In real network environments, issues like timeouts or unreachable hosts are common. Handling these errors gracefully increases the robustness of your script. Here’s how you can incorporate error handling:
if (-not (Test-Connection -ComputerName $ip -Count 1 -ErrorAction SilentlyContinue)) {
    Write-Host "Host $ip is unreachable." -ForegroundColor Red
}
In this additional snippet, we check if the host is reachable before attempting to collect response time, allowing you to output a clear message for hosts that are unresponsive.
Outputting Results to a CSV File
Documenting the results is essential for analyzing network conditions over time. You can easily output your results to a CSV file:
$result = @()

for ($i = $startBytes[3]; $i -le $endBytes[3]; $i++) {
    $ip = "$($startBytes[0]).$($startBytes[1]).$($startBytes[2]).$i"
    $ping = Test-Connection -ComputerName $ip -Count 2 -ErrorAction SilentlyContinue
    if ($ping) {
        $result += [PSCustomObject]@{ IPAddress = $ping.Address; ResponseTime = $ping.ResponseTime; Status = 'Online' }
    } else {
        $result += [PSCustomObject]@{ IPAddress = $ip; ResponseTime = 'N/A'; Status = 'Offline' }
    }
}

$result | Export-Csv -Path "PingResults.csv" -NoTypeInformation
Scheduling the Script
For continuous network monitoring, consider automating the process. Windows Task Scheduler allows you to run your PowerShell scripts at defined intervals. This is particularly useful if you need ongoing diagnostics without manual intervention.
Running Batch File From PowerShell: A Quick Guide
Troubleshooting Common Issues
Identifying Issues with Network Connectivity
Understanding network connectivity is crucial. If you receive a response from `Test-Connection`, it indicates the target is reachable; alternatively, timeouts or lost packets suggest connectivity problems. Use this information to drill down into specific issues with your network configuration.
Script Not Executing as Expected
If your script fails to run correctly, check for common issues such as incorrect permissions, syntax errors, or script execution policies. Always verify your PowerShell version is up to date, as syntax and cmdlet behavior can change between versions.
PowerShell Get IP Address From Hostname Made Easy
Conclusion
Utilizing PowerShell to ping a range of IP addresses is a powerful technique for network management and troubleshooting. By learning how to effectively use the `Test-Connection` cmdlet and incorporating advanced techniques like error handling and result logging, you can streamline your network diagnostics.
As you experiment and tailor these scripts to meet your needs, you’ll gain valuable insights into the health of your network environment. Feel free to share your experiences with PowerShell and let others know how you’ve benefited from its capabilities.

Mastering Write-Progress in PowerShell: A Quick Guide
Additional Resources
For further learning, consider visiting the official Microsoft documentation on PowerShell and the `Test-Connection` cmdlet. Various books and online resources can deepen your understanding and proficiency with PowerShell, allowing you to harness its full potential in your networking tasks.