

Привет, Хабр!
Сегодня я поделюсь своим опытом страданий установки языка программирования Swift под Windows в форме небольшого рассказа и постараюсь описать те проблемы, с которыми я столкнулся при попытке развернуть детище Apple на платформе конкурента.
Начну издалека. Я являюсь мобильным разработчиком под Андроид и периодически люблю развлекать себя различными экспериментами. Совсем недавно ко мне в руки попал Mac Mini на Apple Silicon — в офисе был бесхозный компьютер от яблочной корпорации и в один момент я захотел собрать свой пет-проект на KMP (бывш. КММ) под айос, посмотреть, как оно будет работать. (И будет ли работать вообще) Плюсом меня давно тянуло к макоси, было интересно за что ее кто-то обожает, а кто-то терпеть не может. Забавно, что нейтрального мнения я не встречал ни разу.
Установка Swift
В первую очередь, я решил зайти на официальный сайт Swift и посмотреть, поддерживает ли он ОС от Майкрософт. К моему счастью, добрые дяди (или тети) программисты уже попотели за меня и добавили поддержку ЯПа в винду, начиная с 10ки.

Переходим в инструкции для нужной нам ОС и видим это:

Нас просят изначально поставить некоторый список зависимостей. Ставим сначала Visual Studio (в моем случае 2022). При установке выбираем «Разработка классических приложений на С++». Как только поставилось, листаем чуть ниже.
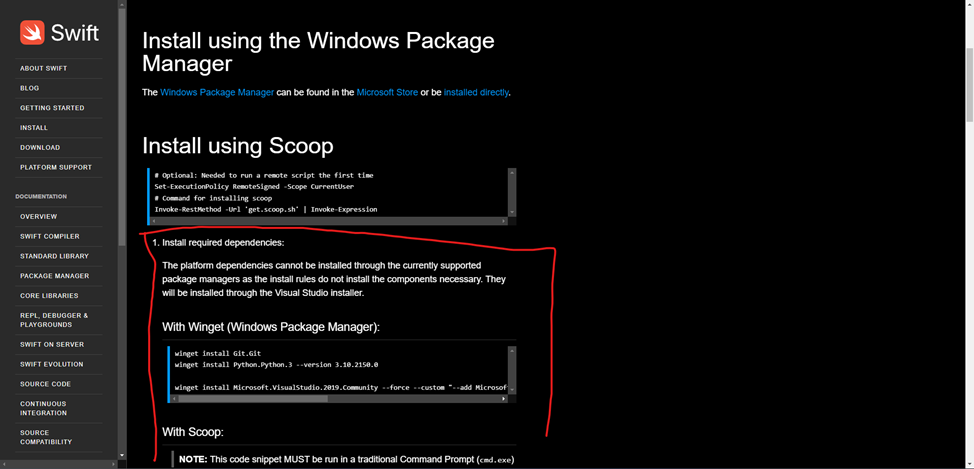
И вот тут лично у меня было некоторое смятение. К чему относиться блок ниже? К scoop? winget? Почему он так оформлен, будто является частью большого заголовка? Может, я придираюсь, но, честно говоря, это совсем неочевидно.
Хорошо. Будем действовать одним из самых древних методов познания – методом тыка.
Пробуем сначала поставить winget и запустить указанные скрипты, предварительно немного их изменив:
winget install Git.Git

winget install Python.Python.3 --version 3.10.2150.0

winget install Python.Python.3.9

winget install Microsoft.VisualStudio.2022.Community --force --custom "--add Microsoft.VisualStudio.Component.Windows10SDK.19041 --add Microsoft.VisualStudio.Component.VC.Tools.x86.x64"
В чем разница? Сразу же можно заметить, что мы устанавливаем кроме Python 3.10 еще и Python 3.9. Это потребуется нам, когда мы будем собирать наш проект. Так же я просто поменял версию студии, так как скрипт написан для 2019, а у меня 2022.
Будем считать, что первый шаг сделан. Листаем инструкцию дальше.
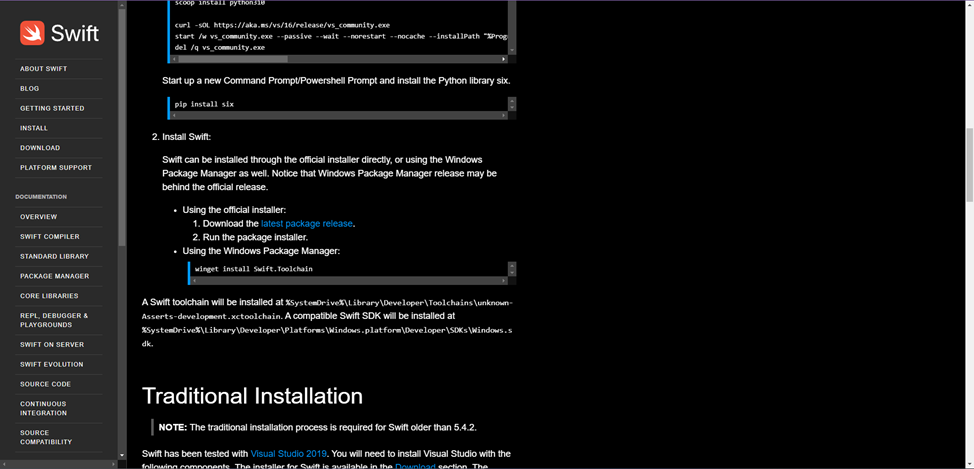
Видим, что теперь нас просят установить сам свифт, я предпочитаю скачать exe-шник, поэтому поставлю его.
На этом казалось бы все. Свифт стоит у вас на компьютере и можно даже что нибудь написать и запустить. Ведь можно же, да? Нет. На самом деле компилятор и все тулзы у вас действительно установлены, но вот нет никакой инфраструктуры, чтобы можно было хоть что то написать и запустить. Сейчас кто-то может возразить, мол, есть же Swift REPL, интерактивный редактор кода, который идет в комплекте со свифтом, в нем же тоже можно писать код. Безусловно можно, но лично у меня возникла такая проблема:
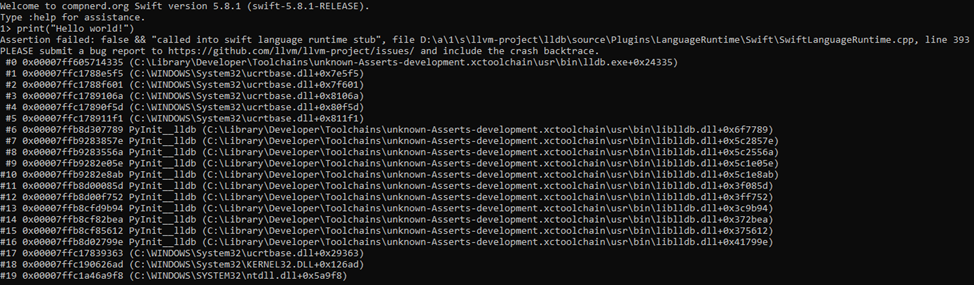
Это вынудило меня искать обходной путь.
Установка инструментов разработки
Буквально сразу в мою голову закралась мысль: «А что, если мы будем использовать VS Code?». Иногда мне кажется, что в этом простеньком редакторе можно или вскоре будет можно даже программировать ядерные реакторы, достаточно будет лишь доставить необходимые плагины для работы. Конкретно сейчас мы ядерные реакторы не программируем, но гибкость VS Code нам так же очень пригодится.
Ставим сначала редактор, после того как поставили ставим плагин для свифта. В нем есть: подсветка кода, дебаггинг, автодополнение, запуск .swift файлов (об этой функции мы поговорим чуть позже) и много чего еще, полный список можно найти в карточке плагина.
После того как поставили, пробуем наконец таки запустить наш простенький код на свифте:
print(“Hello world!!!”)Жмем Ctrl + Shift + P и выбираем «Swift: Run swift script». И тут лично меня ждало еще одно разочарование:

Пораскинув мозгами, я пришел к единственно верному решению – отобрать у VS Code его работу и собирать и компилировать скрипты самостоятельно, вводя команды в cmd. Не самый приятный исход, но вполне себе терпимый.
Создаем папку под на будущий проект, после чего, находясь внутри созданной нами директории, прописываем в cmd следущее:
swift package initДалее переходим в папку Sources/<PROJECT NAME> и создаем там файл с именем main и расширением .swift (Обязательно файл должен иметь имя main, так как пакету нужна входная точка для исполнения кода). Итого файл должен называться так: main.swift.
После всего этого открываем наш main.swift в VS Code и пробуем запустить все тот же код.
Кажется, что это все и теперь мы можем спокойно выполнить наш код, но не тут-то было:

Оказывается, у нас беды с конфигурацией пакета, поэтому, в первую очередь, необходимо устранить эту проблему. Поднимаемся наверх по директориям, пока не дойдем до корневой папки пакета, где лежит файл Package.swift. Открываем его.
Меняем
let package = Package(

    name: <PROJECT NAME>,

    products: [

        // Products define the executables and libraries a package produces, making them visible to other packages.

        .library(

            name: <PROJECT NAME>,

            targets: [<PROJECT NAME>,])

    ],

    targets: [

        // Targets are the basic building blocks of a package, defining a module or a test suite.

        // Targets can depend on other targets in this package and products from dependencies.

        .target(

            name: <PROJECT NAME>,),

        .testTarget(

            name: <PROJECT NAME TESTS>,

            dependencies: ["<PROJECT NAME>,"])

    ]

)
На
let package = Package(

    name: <PROJECT NAME>,

    products: [

        // Products define the executables and libraries a package produces, making them visible to other packages.

        .executable(

            name: "main",

            targets: ["<PROJECT NAME>"])

    ],

    targets: [

        // Targets are the basic building blocks of a package, defining a module or a test suite.

        // Targets can depend on other targets in this package and products from dependencies.

        .target(

            name: <PROJECT NAME>,

            dependencies: []),

        .testTarget(

            name: <PROJECT NAME TESTS>,

            dependencies: [<PROJECT NAME>])

    ]

)
Сохраняем изменения. Находясь в директории, где лежит файл main.swift запускаем команду:
swift runВуаля, код заработал, можно открывать шампанское.

Стоит отметить, что, возможно вы столкнетесь с такой проблемой, когда компилятор просто соберет готовый исполняемый файл, но не запустит его. Чтобы это решить перейдите сначала в корневую директорию проекта (папка .build/x86_64-unknown-windows-msvc\debug), там найдите файл main.exe и запустите его. Если он будет сразу же закрываться после запуска, то добавьте в конце всего кода функцию readLine() и тогда консоль не будет закрываться сразу же, а будет ждать ввод любой клавиши.
Когда я устанавливал все это дело в первый раз, я столкнулся с проблемой, которую не мог решить, после нескольких дней своих изысканий было решено забить на установку свифта прямо на винду и сделать все через WSL. Я проследовал всем инструкциям, что были указаны на сайте для установки свифт под Линукс, но опять забрел в тупик и решил бросить это дело в принципе. Но в тот же день я заметил, что ни один из установленных компиляторв C++ не может собрать простейший проект. Каждый как под копирку твердил, что не может найти необходимые файлы при линковке, естественно я начал свое расследование, что же послужило причиной выхода из строя линковщика. Искал я очень упорно, но результатов все не было, я удалил свифт с винды, переустановил начисто Visual Studio 3 раза, но ничего не помогало. И, наконец, на третий день я вспомнил про wsl и снес все пакеты, что я поставил во время той злосчастной установки. Каково же было мое счастье, что после всех попыток разобраться, я в кой то веке нашел ответ. Как уже стало ясно из рассказа, установка свифта из под wsl ломает линковщик компиляторов С++ (в частности, MSVC и GCC). Поэтому, никогда ни за что, ни при каких обстоятельствах, не совершайте этой ошибки. Она может стоить слишком дорого.
После этого, на удивление, я снова захотел поставить свифт, только теперь более основательно подойти к процессу. Результатом этого желания стала данная статья.
Заключение
Напоследок, хочу сказать, что это был крайне незабываемый опыт. Можно отметить, что документация в некоторых местах оставляет желать лучшего и хотелось бы более понятной инструкции к установке, так же, конечно, сказывается отсутствие нормального инструментария.
Надеюсь, эта ситуация изменится в лучшую сторону.
Manual Installation
Swift depends on a number of developer tools when running on Windows, including the C++ toolchain and the Windows SDK. On Windows, typically these components are installed with Visual Studio.
The following Visual Studio components should be installed:
| Name | Component ID |
|---|---|
| MSVC v143 — VS 2022 C++ x64/x86 build tools (Latest)1 | Microsoft.VisualStudio.Component.VC.Tools.x86.x64 |
| MSVC v143 — VS 2022 C++ ARM64/ARM64EC build tools (Latest)1 | Microsoft.VisualStudio.Component.VC.Tools.ARM64 |
| Windows 11 SDK (10.0.22000.0)2 | Microsoft.VisualStudio.Component.Windows11SDK.22000 |
You should also install the following dependencies:
- Python 3.9.x 3
- Git for Windows
Developer Mode enables debugging and other settings that are necessary for Swift development. Please see Microsoft’s documentation for instructions about how to enable developer mode.
After the above dependencies have been installed, download and run the installer for the latest Swift stable release (6.1).
Alternatively, you may prefer to install a development snapshot for access to features that are actively under development.
By default, the Swift binaries are installed to %LocalAppData%\Programs\Swift.
Пройдите тест, узнайте какой профессии подходите
Работать самостоятельно и не зависеть от других
Работать в команде и рассчитывать на помощь коллег
Организовывать и контролировать процесс работы
Введение
Swift — это мощный и интуитивно понятный язык программирования, разработанный Apple для создания приложений под iOS, macOS, watchOS и tvOS. Однако, несмотря на его популярность, официальная среда разработки Xcode доступна только для macOS. В этой статье мы рассмотрим, как настроить среду разработки для Swift на Windows, используя альтернативные инструменты и среды разработки. Мы подробно разберем каждый шаг, чтобы вы могли легко следовать инструкциям и начать писать код на Swift на своей Windows-машине.

Установка Swift на Windows
Шаг 1: Установка Windows Subsystem for Linux (WSL)
Для начала нам потребуется установить Windows Subsystem for Linux (WSL), который позволяет запускать Linux-дистрибутивы на Windows. Это необходимо для установки Swift, так как официальные сборки Swift поддерживаются только на Linux и macOS.
- Откройте PowerShell от имени администратора. Это можно сделать, нажав правой кнопкой мыши на значок меню «Пуск» и выбрав «Windows PowerShell (администратор)».
-
Введите команду для включения WSL:
Эта команда автоматически установит WSL и необходимые компоненты.
-
Перезагрузите компьютер, чтобы изменения вступили в силу.
Шаг 2: Установка дистрибутива Linux
После перезагрузки установите дистрибутив Linux из Microsoft Store. Рекомендуется использовать Ubuntu, так как это один из самых популярных и поддерживаемых дистрибутивов.
- Откройте Microsoft Store. Вы можете найти его в меню «Пуск» или использовать поиск.
- Найдите и установите Ubuntu. Просто введите «Ubuntu» в строку поиска и выберите последнюю версию.
- Запустите Ubuntu и следуйте инструкциям для завершения установки. Вам потребуется создать пользователя и задать пароль.
Шаг 3: Установка Swift
Теперь, когда у нас есть рабочая среда Linux, мы можем установить Swift. Убедитесь, что у вас есть стабильное интернет-соединение, так как потребуется скачать несколько пакетов.
-
Откройте Ubuntu и обновите пакеты:
Эта команда обновит список пакетов и установит последние обновления.
-
Установите необходимые зависимости:
Эти пакеты необходимы для компиляции и работы Swift.
-
Скачайте и установите Swift:
Эти команды загрузят архив с Swift, распакуют его и переместят в системную директорию.
-
Проверьте установку Swift:
Если все прошло успешно, вы увидите версию установленного Swift.
Настройка среды разработки с Visual Studio Code
Visual Studio Code (VS Code) — это мощный и настраиваемый редактор кода, который поддерживает множество языков программирования, включая Swift. Он бесплатен и имеет множество расширений, которые делают его идеальным выбором для разработки на Swift на Windows.
Шаг 1: Установка Visual Studio Code
- Скачайте и установите Visual Studio Code с официального сайта Visual Studio Code. Выберите версию для вашей операционной системы и следуйте инструкциям по установке.
- После установки запустите VS Code и ознакомьтесь с его интерфейсом. Вы можете настроить тему, шрифты и другие параметры по своему вкусу.
Шаг 2: Установка расширений для Swift
Для полноценной работы с Swift в VS Code потребуется установить несколько расширений. Эти расширения добавят поддержку синтаксиса Swift, автодополнение и отладку.
- Откройте VS Code.
- Перейдите в раздел расширений (Extensions), нажав на значок квадратного пазла на боковой панели.
- Найдите и установите следующие расширения:
– Swift Language — добавляет поддержку синтаксиса Swift.
– CodeLLDB — позволяет отлаживать Swift-код.
Эти расширения значительно упростят работу с кодом на Swift, предоставляя подсветку синтаксиса, автодополнение и инструменты для отладки.
Шаг 3: Настройка интеграции с WSL
Для работы с Swift через WSL потребуется настроить интеграцию VS Code с WSL. Это позволит вам редактировать и запускать код непосредственно в среде Linux.
- Установите расширение Remote – WSL. Это расширение позволяет VS Code подключаться к WSL и работать с файлами и процессами в Linux.
- Откройте папку проекта в WSL:
– НажмитеCtrl+Shift+Pи выберитеRemote-WSL: New Window. Это откроет новое окно VS Code, подключенное к WSL.
– Откройте папку проекта. Вы можете создать новую папку или открыть существующую.
Шаг 4: Создание и запуск проекта
Теперь можно создать и запустить первый проект на Swift. Мы создадим простой файл, который выведет сообщение «Hello, Swift on Windows!».
-
Создайте новый файл с расширением
.swift:Этот код выведет сообщение в консоль.
-
Откройте терминал в VS Code и выполните команду для запуска файла:
Замените
имя_файла.swiftна имя вашего файла. Если все сделано правильно, вы увидите сообщение «Hello, Swift on Windows!» в терминале.
Альтернативные среды разработки
JetBrains CLion
JetBrains CLion — это мощная IDE, которая поддерживает множество языков программирования, включая Swift. Она доступна на Windows и может быть настроена для работы с Swift через WSL. CLion предоставляет множество инструментов для разработки, включая мощный редактор кода, отладчик и интеграцию с системами контроля версий.
Repl.it
Repl.it — это онлайн-редактор кода, который поддерживает Swift. Это отличный вариант для быстрого тестирования кода без необходимости установки дополнительных инструментов. Вы можете просто открыть браузер, перейти на сайт Repl.it и начать писать код на Swift.
IBM Swift Sandbox
IBM Swift Sandbox — это еще один онлайн-редактор, который позволяет писать и запускать Swift-код прямо в браузере. Это удобный инструмент для экспериментов с кодом и быстрого тестирования идей.
Заключение и полезные ресурсы
Настройка среды разработки для Swift на Windows может показаться сложной задачей, но с помощью WSL и Visual Studio Code это становится вполне реальным. Дополнительно можно рассмотреть альтернативные среды разработки, такие как JetBrains CLion и онлайн-редакторы. Важно помнить, что, несмотря на некоторые ограничения, Swift можно успешно использовать на Windows для обучения и разработки.
Полезные ресурсы
Теперь вы готовы начать разработку на Swift на Windows! 😉
Читайте также
Swift is a powerful and popular programming language, especially for Mac and iOS app development. While it’s true that Swift is native to Apple’s ecosystem, you don’t necessarily need a Mac to learn and code in Swift. In this guide, we will explore how to program in Swift on a Windows 10 machine. We’ll cover the basics, including setting up an editor, writing a simple Swift program, and compiling it on Windows.
Understanding Swift
Before diving into Swift on Windows, let’s take a moment to understand what Swift is and why it’s worth learning.
What Is Swift?
Swift is a modern programming language developed by Apple. It draws inspiration from various programming languages like Objective-C, Rust, Haskell, Ruby, Python, C#, CLU, and more. Chris Lattner, the project originator, designed Swift to be efficient, easy to read, and versatile.
Despite being relatively young, Swift has gained widespread popularity since its public release in 2014. In fact, it rapidly climbed the ranks on the TIOBE Index, becoming one of the fastest-growing programming languages.
In essence, Swift is the language of choice for developers looking to create applications for Mac and iOS platforms.
Getting Started with Swift on Windows 10
To begin coding in Swift on Windows, you’ll need an editor to write your code. While you can use any Integrated Development Environment (IDE) you prefer, we’ll start with a straightforward option: Notepad++. It’s free, user-friendly, and suitable for our introductory purposes.
Setting Up Notepad++
- Download Notepad++: Visit the official Notepad++ website and download the application for Windows.
- Installation: Install Notepad++ by following the on-screen instructions.
With Notepad++ ready, let’s create a simple Swift program.
A Simple Swift for Windows Program
In this section, we will create a basic Swift program that runs in the Windows command line.
- Open Notepad++: Launch Notepad++.
- Writing the Program: Begin by writing the following code:
swift
// This will display when the program runs.

print("Hello! How's your day?")
This code prints a question to the screen.
- User Input: To gather user input, add the following lines:
swift
let response = readLine()
This code reads the user’s response and stores it in the
responsevariable. - Displaying the Response: Now, display a message based on the user’s input:
swift
print("Have a great day, \(response!)!")
Here, we use string interpolation to include the user’s response in the message.
Note: The
!afterresponsedenotes that it’s not an optional value, indicating that it must have a value. - Save Your Code: Go to “File” > “Save As” and select “Swift file” from the “Save As Type” menu. If “Swift file” isn’t available, choose “All files” and add the
.swiftextension to your chosen filename.
Compiling Swift in Windows 10
Now that you have a Swift program, you’ll need a way to compile and run it on Windows 10. While there is no native Swift support on Windows, there is a workaround.
Using the Swift for Windows Compiler
- Download the Compiler: Han Sangjin has developed a Swift compiler for Windows, available on GitHub. Download the Swift for Windows application following the provided instructions in the link.
- Installation: Install the Swift for Windows application on your system.
- Compile Your Program: Open the Swift for Windows application, click “Select File,” and choose the Swift program you created earlier. Click “Compile” and wait for the process to complete. For small programs, this should be nearly instant.
- Run Your Program: Once the compilation is successful, click “Run,” and your Swift program will execute in the Windows Command Line.
Conclusion
While Swift is primarily associated with macOS and iOS development, Windows users can still explore and learn the language with the right tools and setup. Notepad++ serves as a suitable text editor for writing Swift code on Windows, and the Swift for Windows compiler allows you to compile and run your programs seamlessly.
As you delve deeper into Swift, you’ll discover a wealth of resources and opportunities to enhance your coding skills. Whether you’re an aspiring developer or looking to expand your programming repertoire, Swift on Windows is a viable path to explore the world of app development.
So, why wait? Begin your Swift coding journey on Windows today, and who knows, you might soon be crafting innovative Mac and iOS applications of your own.
-
Tags
How to Program in Swift on Windows 10
Learn how to get started with the Swift Programming Language in Windows.
To be honest, although may not want to work totally with this language on this environment to create applications or something like that, you may find very useful the fact of programming in this language in a Windows environment just for learning purposes of the language itself and its syntax. It’s worth to mention that not everyone can afford the purchase of an apple device to work with this language, so if you are one of those that work in a windows environment and you may like to introduce yourself to the Swift Language, then you have found the correct article to get started with.
The Swift Language is a high-performance system programming language with a very clean and modern syntax, that offers seamless access to existing C and Objective-C code and frameworks, being memory safe by default. Although inspired by Objective-C and many other languages, Swift is not itself a C-derived language. As a complete and independent language, Swift packages core features like flow control, data structures, and functions, with high-level constructs like objects, protocols, closures, and generics. Swift embraces modules, eliminating the need for headers and the code duplication they entail. The open source SwiftForWindows project provides an easy-to-use development environment for Swift programming for Windows applications. The project works with the Swift compiler for Cygwin, MSVC, MinGW.
In this article, we’ll show you an easy way to get started with the programming with the Swift Language in a Windows Environment.
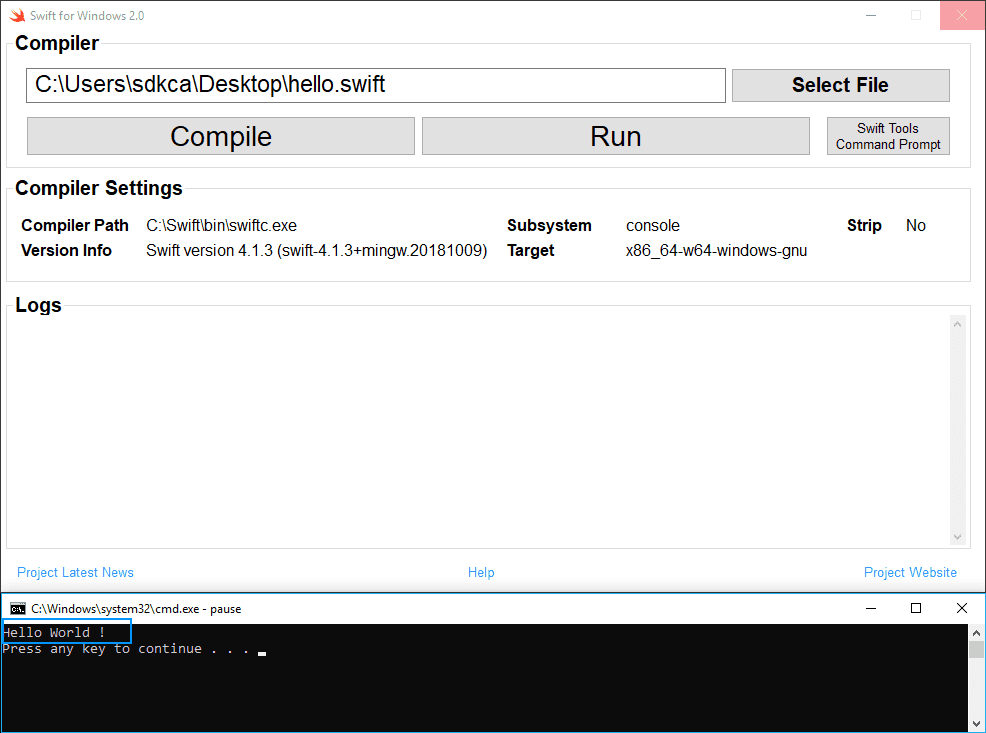
1. Download SwiftForWindows compiler
As first step, you need to download the installer of Swift For Windows from the releases page of the project at Github here. The installer file size is around 110MB and you will be the one who decides where to install it. By default, it’s installation path is at C:/Swift. Now you need to understand how the project works, after installing Swift For Windows, you will basically have at your disposition an executable that works as a compiler, it offers a graphical user interface that allows you to select the swift source file that you want to compile:

You need to compile the file before running it, so if your code is valid and you click on Compile, you will be able to run it with the Run button, which normally will open a command prompt with the output of your code if there’s any of course. For more information about this project, please visit the official repository at Github here.
2. Testing the compiler
To get started with the compiler, let’s write some code ! Create a file somewhere on your system namely hello.swift. This file will have the following code inside:
print("Hello World !")To define the file that the compiler should compile, click on Select File. This will open the system filebrowser and will allow you to select a file, select the file we’ve just created. The steps to run your Swift code on this environment is the following:
- Click on Compile
- If the compilation succeeds, click on Run
With the code that we wrote on our hello.swift file, the output will be:
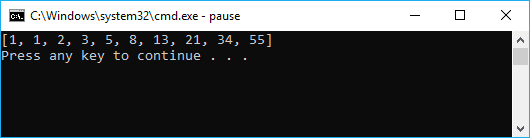
Note that while the command prompt with the output of your Swift Code is opened, the compiler tool will be blocked, so be sure to close the cmd window before trying to compile again. However, not everything in the life is printing hello world on every new programming language that you learn! You may want to get started with more complex code, for example the fibonacci series. Create a new file namely fibonacci.swift and paste the following code:
class FibIterator : IteratorProtocol {
    var (a, b) = (0, 1)

    func next() -> Int? {
        (a, b) = (b, a + b)
        return a
    }
}

let fibs = AnySequence{FibIterator()}

print(Array(fibs.prefix(10)))
Compile it and run it. As expected, the output will be:
About the logs
During the compilation, the compiler will have a log that is displayed directly in the application. This log contains the warnings, notes or errors of the code that is being compiled. You will not always get a Successfully compiled message in the output, so you will need to pay attention to the other kind of messages in the log. Note that once you Run the compiled code (which means your application compiled succesfully, as long as there’s not an older version of your program), the log will be removed, so check it immediately after trying to compile. As on every sane compiler, you will get the line and character where the exception/warning occurs.
Errors
The compiler will be able to deal with errors during the compilation, for example with the following code that should display the date in the output:
let date = Date()
let calendar = Calendar.current
let components = calendar.dateComponents([.year, .month, .day], from: date)

let year =  components.year
let month = components.month
let day = components.day

print(year)
print(month)
print(day)
Will throw the following errors (error: use of unresolved identifier 'Calendar' and 'Date'):
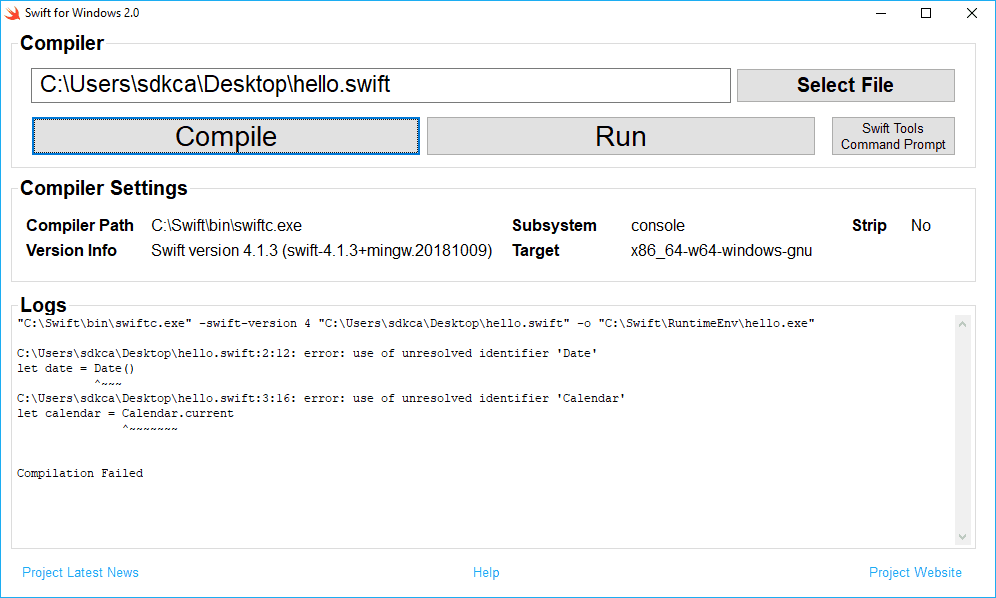
This error in our code is cause by the missing import statement at the beginning of our code ‘import Foundation‘, the functional snippet is shown in the warnings area.
Warnings
The compiler will display warnings as well, if we fix our previous snippet importing the Foundation namespace, our code will compile succesfully:
import Foundation

let date = Date()
let calendar = Calendar.current
let components = calendar.dateComponents([.year, .month, .day], from: date)

let year =  components.year
let month = components.month
let day = components.day

print(year)
print(month)
print(day)
However, we’ll get some warnings and notes:
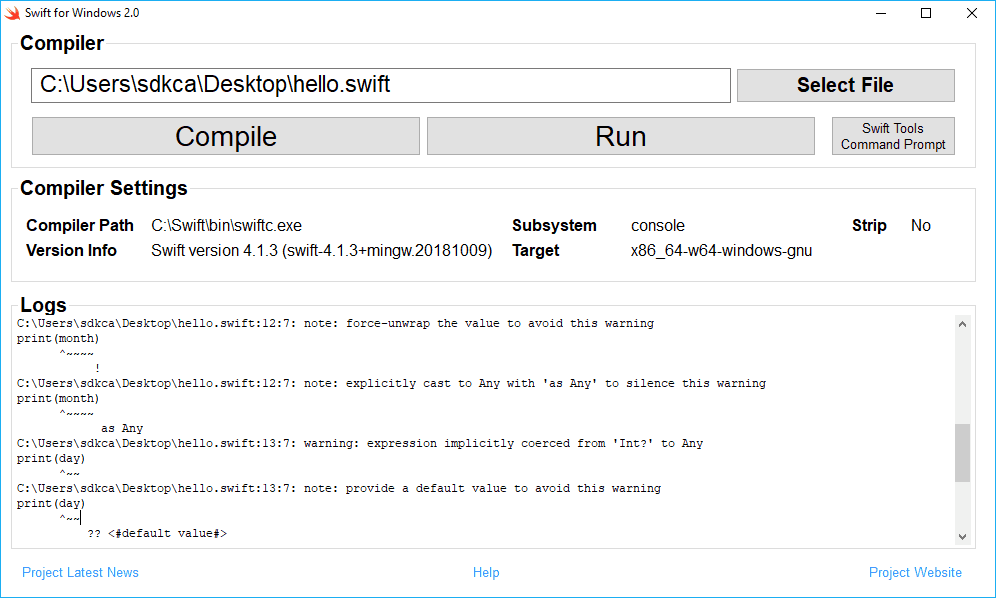
- warning: expression implicitly coerced from ‘Int?’ to Any. This warnings is triggered cause of the print function, that requires a set of Any parameters. String is a Any. In this case the compiler is telling you that it implicitly coerced the optional string into an Any object (by transforming the String value in Optional(value)).
- note: force-unwrap the value to avoid this warning. When an object is optional and you want to access one of its methods or properties, you will need to ‘unwrap’ it.
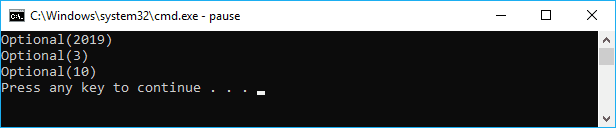
The output of our running code will be:
In conclusion, you can see how easily it is to get started with the Swift programming language or at least with its syntax in Windows. Notice that as there’s no official API that exposes how to do specific things in Windows, like opening a File browser, a program or related, this project is made entirely for strict learning purposes of the language in a different environment.
Happy coding !