
Из-за неправильных настроек сервера микрофон может не подключаться с локального компьютера на удалённый. В этой инструкции показано какие настройки нужно сделать.
Настройка службы перенаправления устройств
Сначала вам необходимо открыть редактор групповых политик на локальном компьютере, с которого вы будете подключаться к удалённому серверу
Нажимаем выполнить и в строке вводим gpedit.msc
Затем нажимаем CTRL+SHIFT+ENTER для запуска программы от имени «Администратора».
Внимание: Для производимых действий понадобятся привилегии «Администратора».
Как на рисунке 1
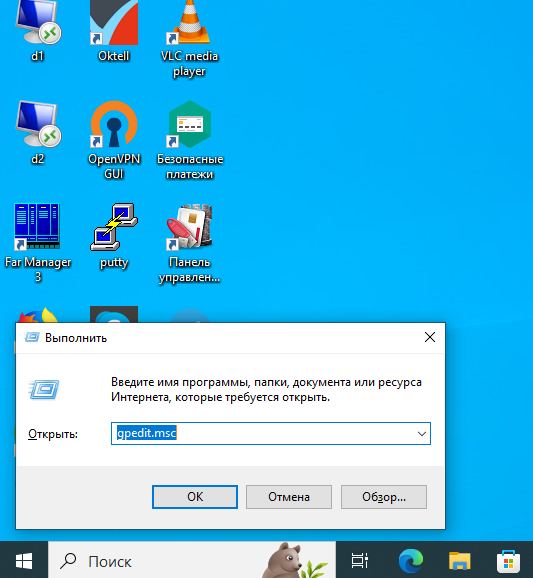
Рис. 1
Далее вам необходимо перейти по следующему пути:
Политика “Локальный компьютер” -> “Конфигурация компьютера” -> “Административные шаблоны” -> “Компоненты Windows” -> “Службы удалённых рабочих столов” -> “Узел сеансов удалённых рабочих столов” -> “Перенаправление устройств и ресурсов”
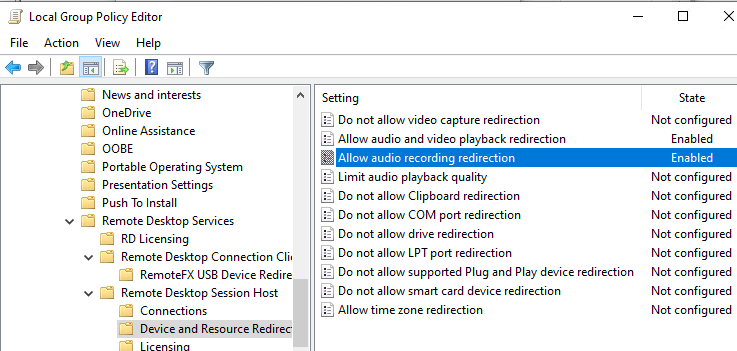
Включите «Разрешить перенаправление аудиозаписи» и «Разрешить перенаправление аудио и видео отдачи». Показано на рисунках 2 и 3.
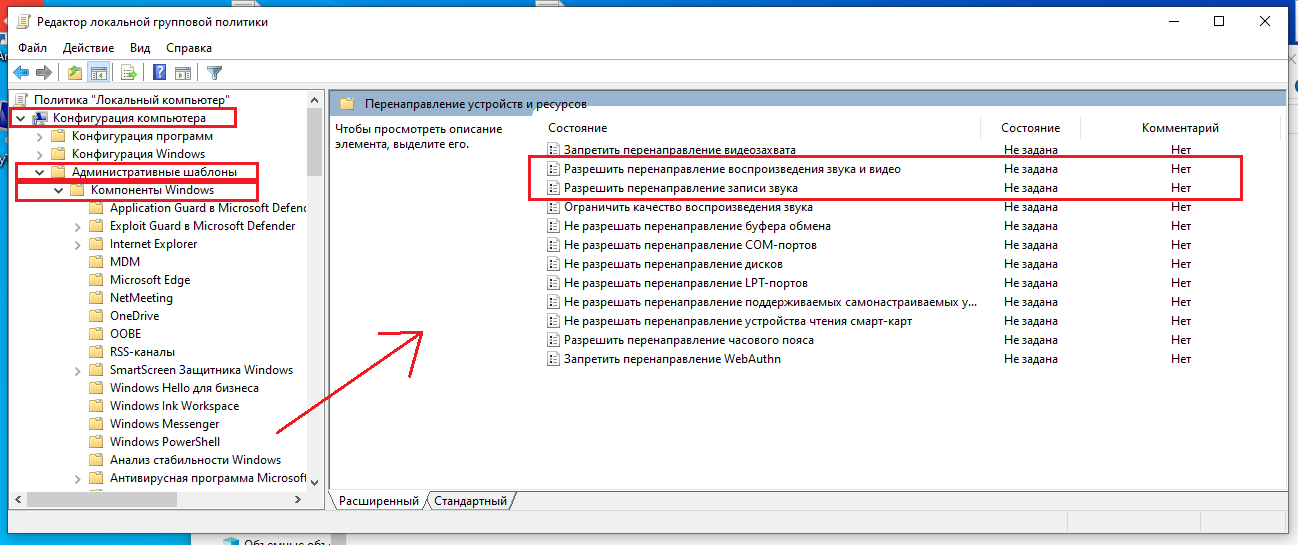
Рис. 2
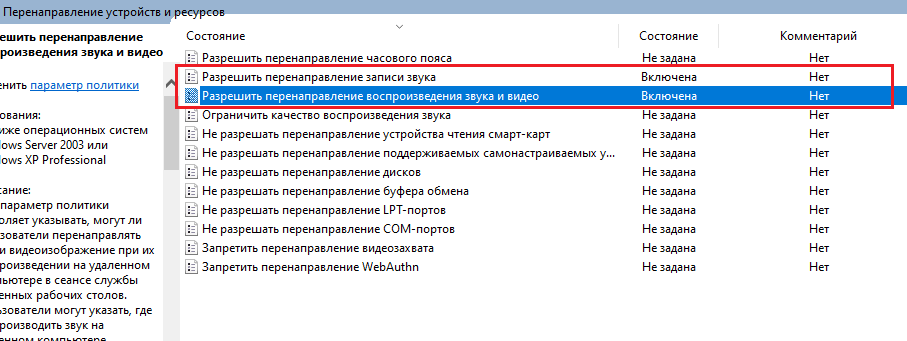
Рис. 3
Аналогичные настройки необходимо сделать на удалённом компьютере.
Внимание: Соответствующая служба должна быть включена на локальном и удалённом компьютере
Включение службы Windows Audio
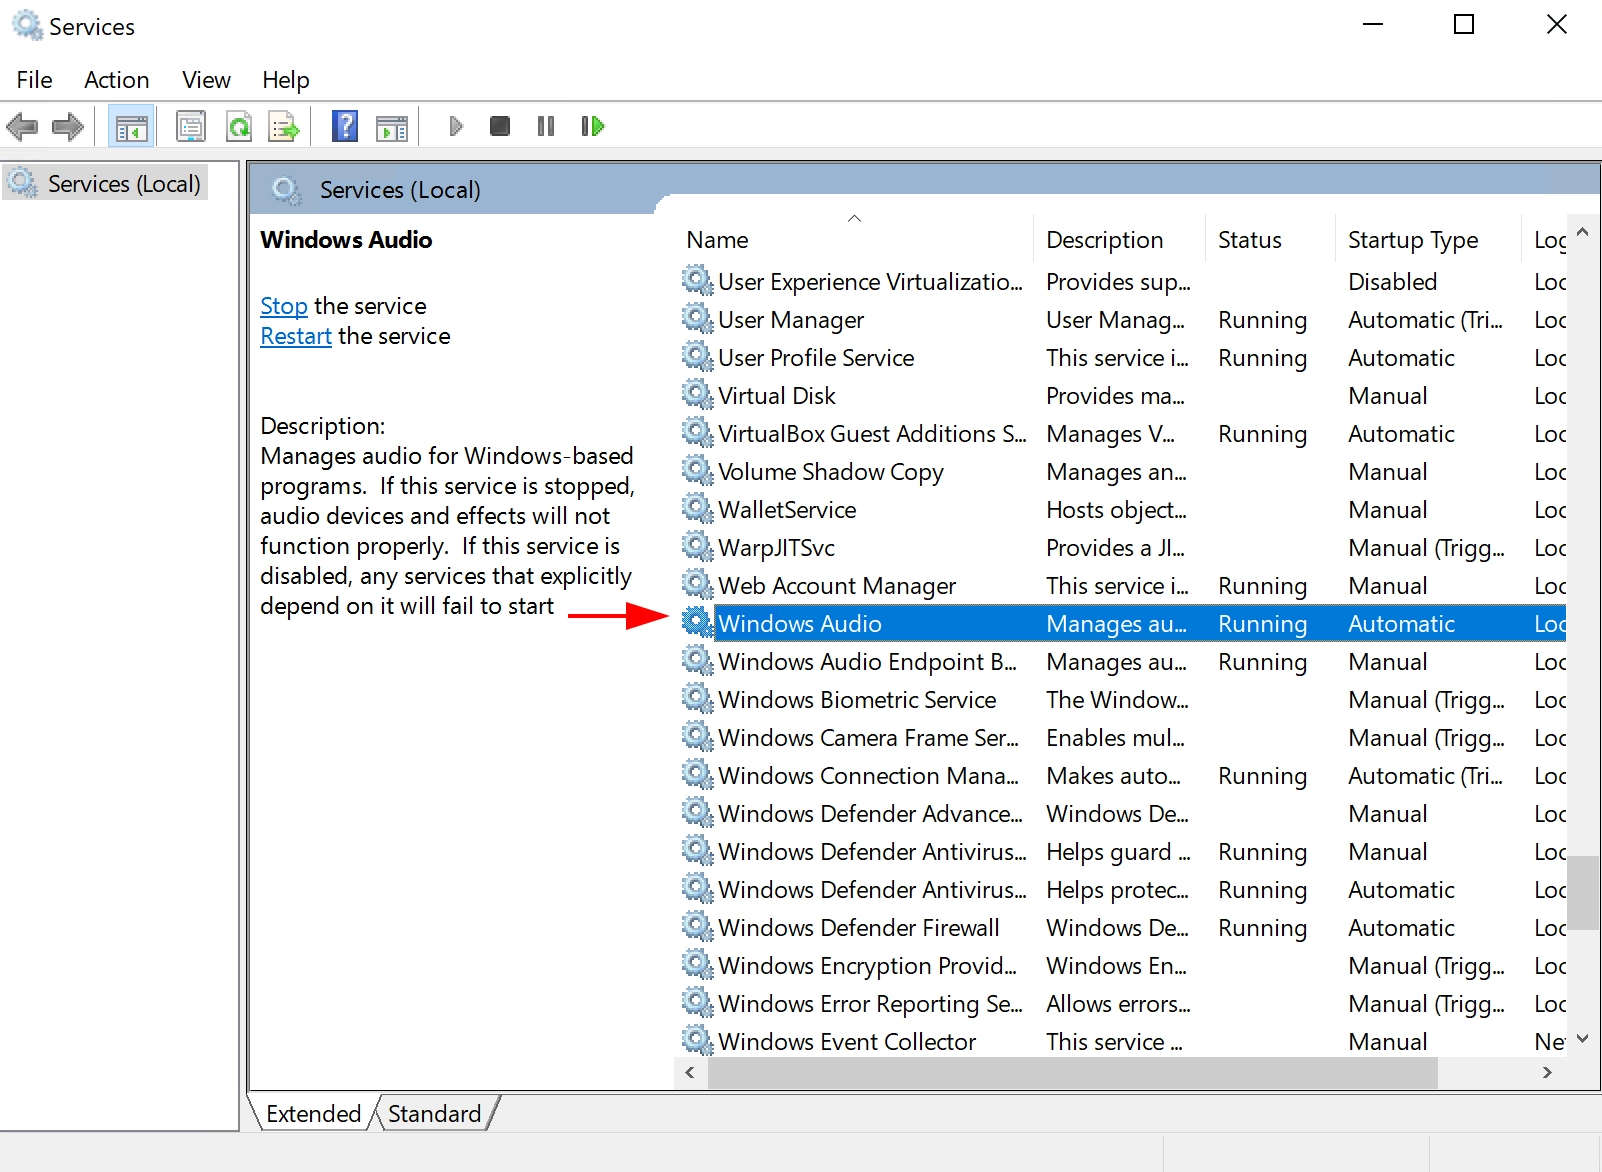
На локальном и удалённом компьютере должна быть включена служба Windows Audio
Для этого открываем меню пуск и в поиске вбиваем службы как на рисунке 4
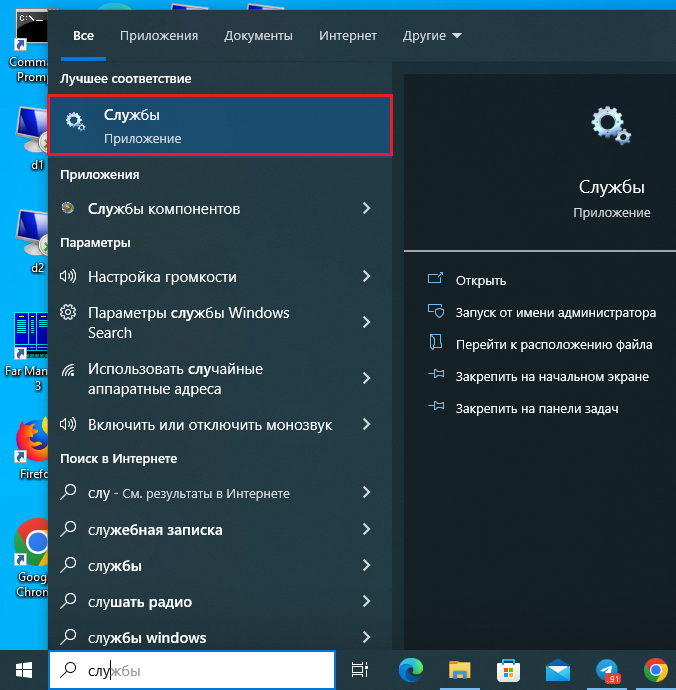
Рис. 4
Прокручиваем вниз и находим службу Windows Audio как на рисунке 5

Рис. 5
После этого нажмите правую кнопку мыши на службе и выберите свойства как на рисунке 6
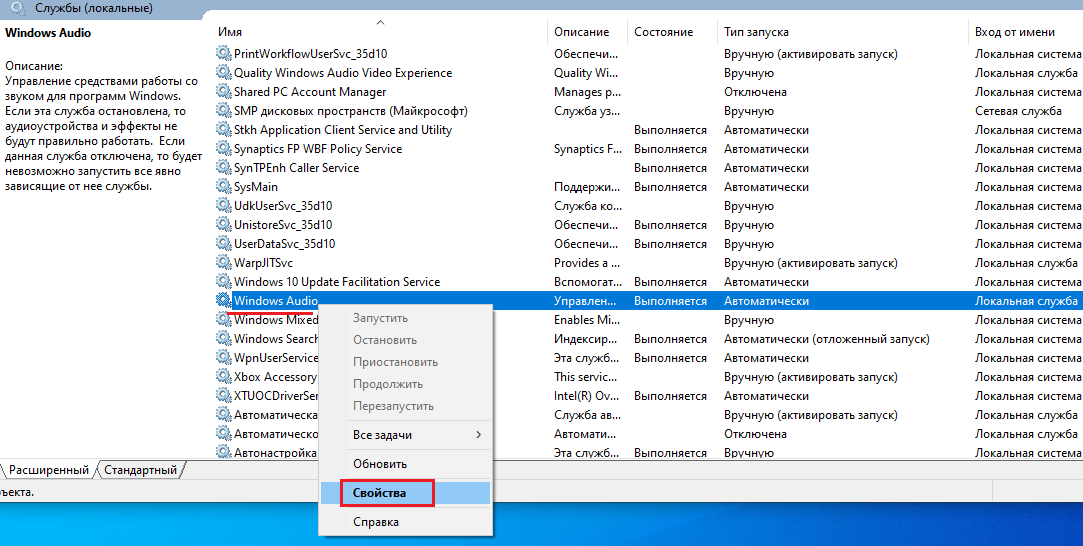
Рис. 6
Выбираем тип запуска автоматически чтобы служба запускалась вместе с системой. После этого запускаем службу.
Внесение настроек в реестр
В этом шаге внесём некоторые настройки реестра
Нажимаем win+R и вводим в строке regedit
И для запуска от имени администратора нажимаем CTRL+SHIFT+ENTER.
Затем переходим по пути HKEY_LOCAL_MACHINE\SYSTEM\CurrentControlSet\Control\Terminal Server\WinStations\RDP-Tcp и находим файл fDisavleAudioCapture: ,как показано на рисунке 7
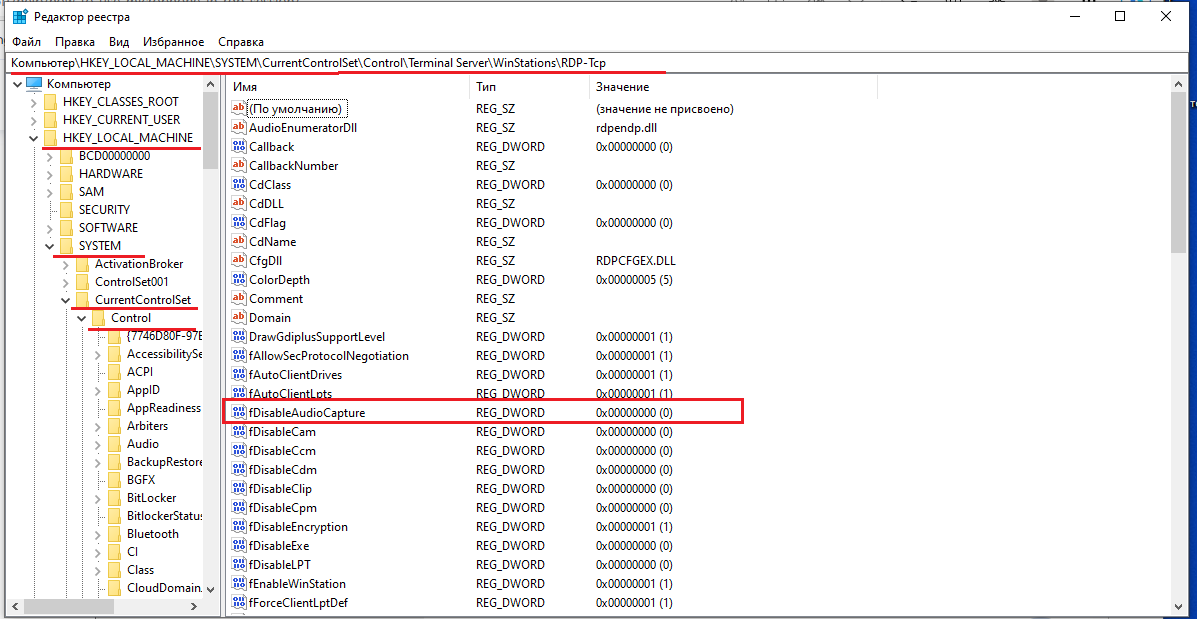
Рис. 7
Щёлкните два раза по этому файлу и в открывшемся окне измените значение на восемь нулей как на рисунке 8
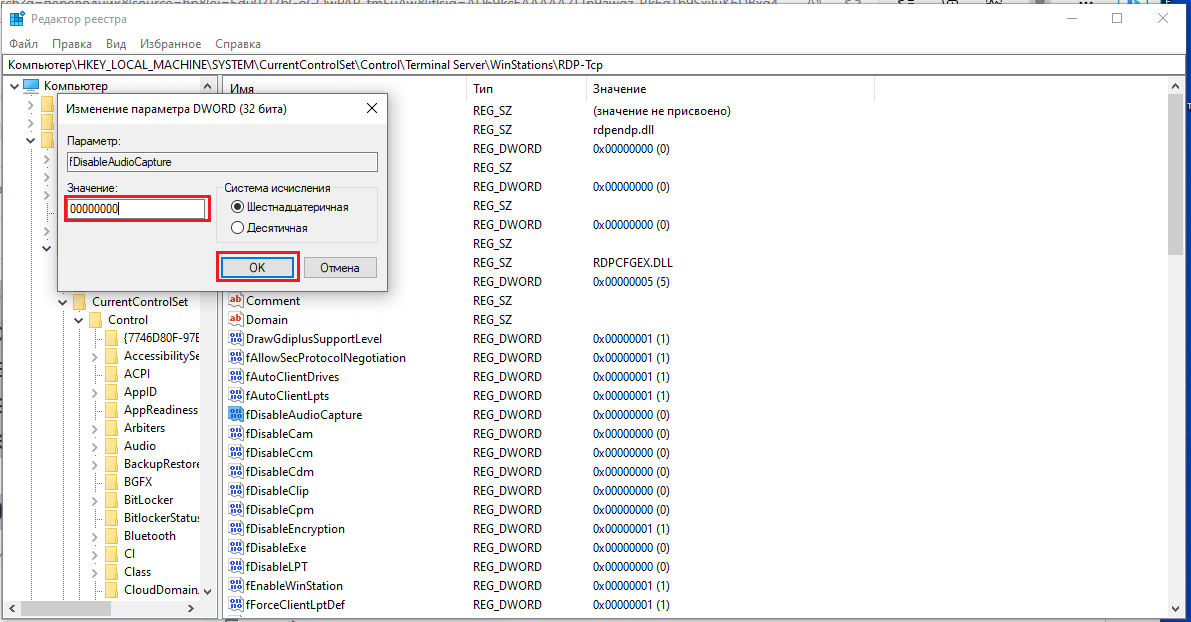
Рис. 8
Добавление роли “Служба удалённых рабочих столов” на сервер
Вбиваем диспетчер серверов в поисковой строке как на рисунке 9
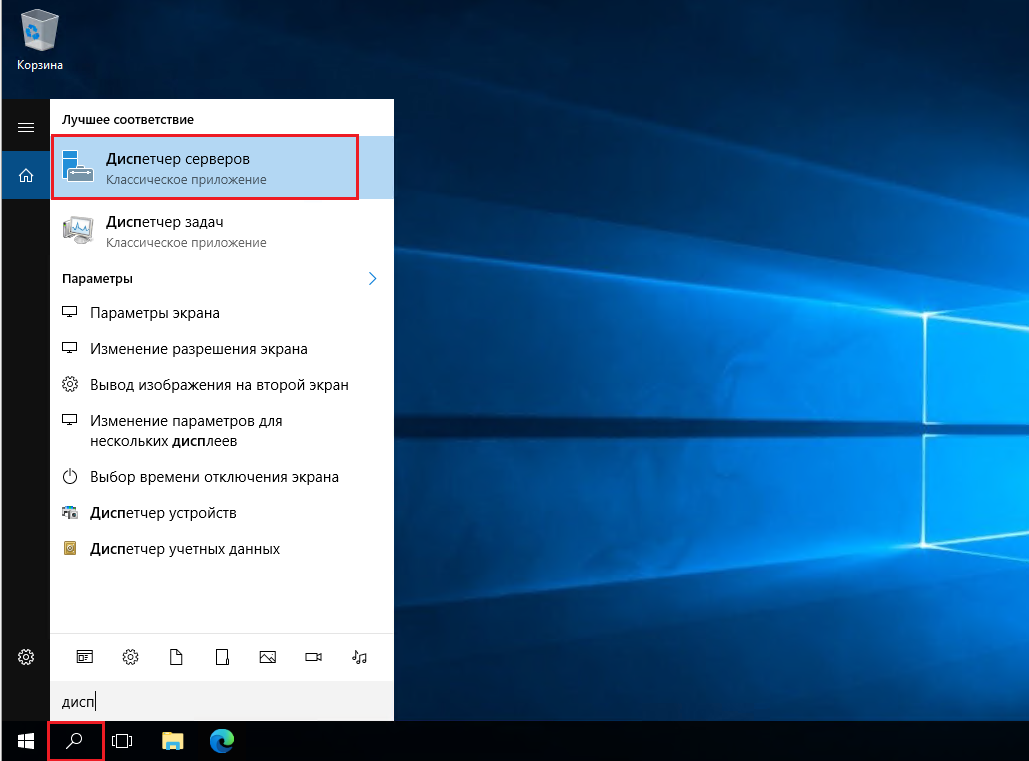
Рис. 9
Нажимаем управление и затем из раскрывшегося меню нажимаем добавить роли и компоненты. Показано на рисунке 10
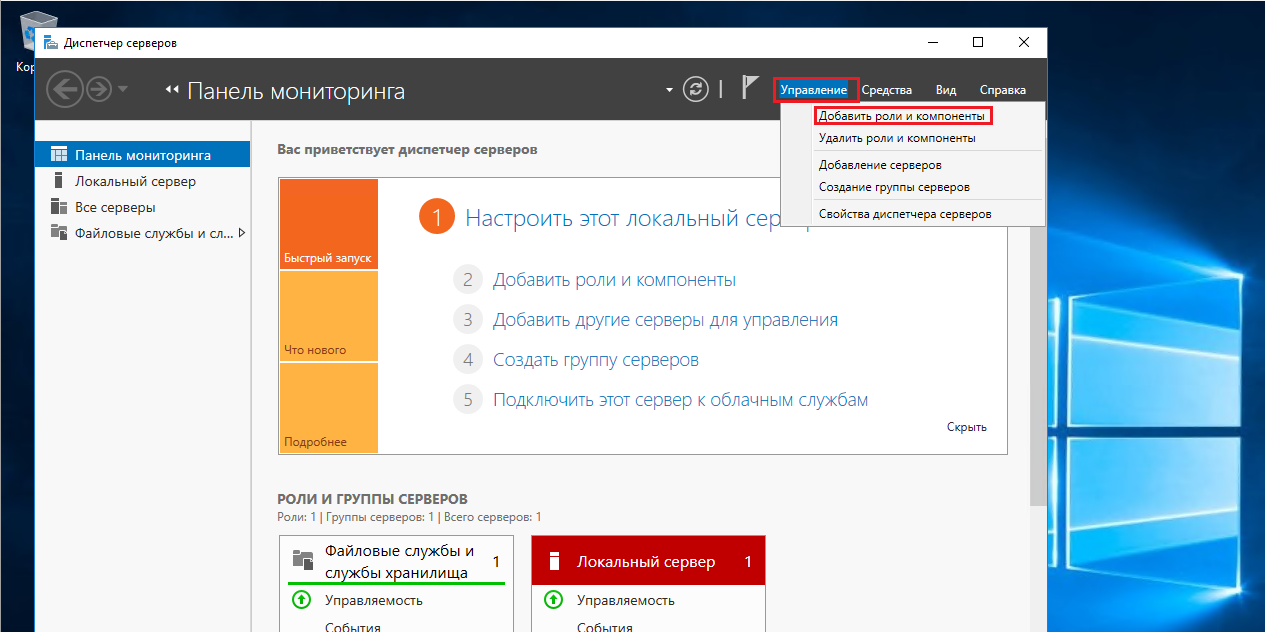
Рис. 10
В открывшемся окне нажимаем “Далее” как на рисунке 11
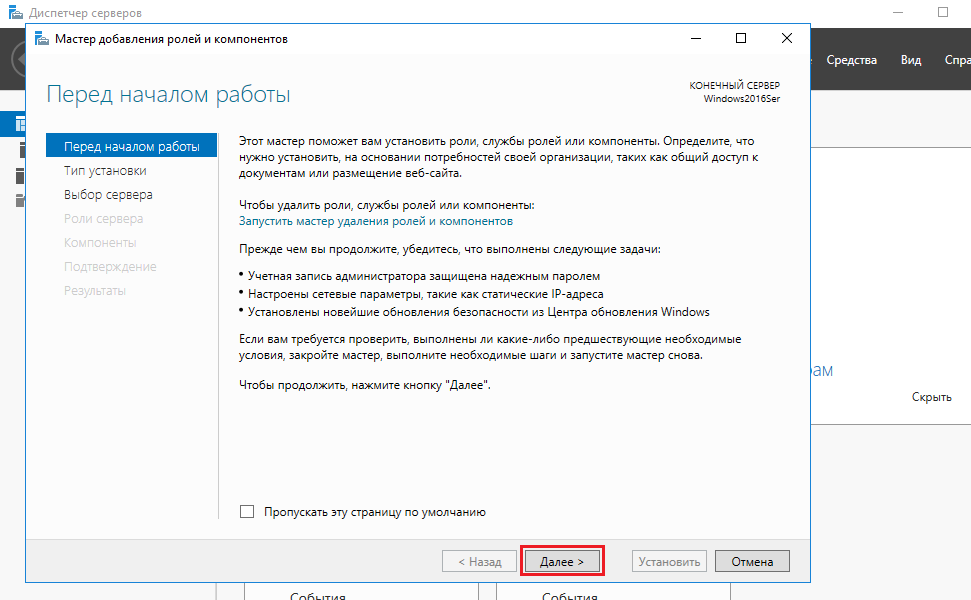
Рис. 11
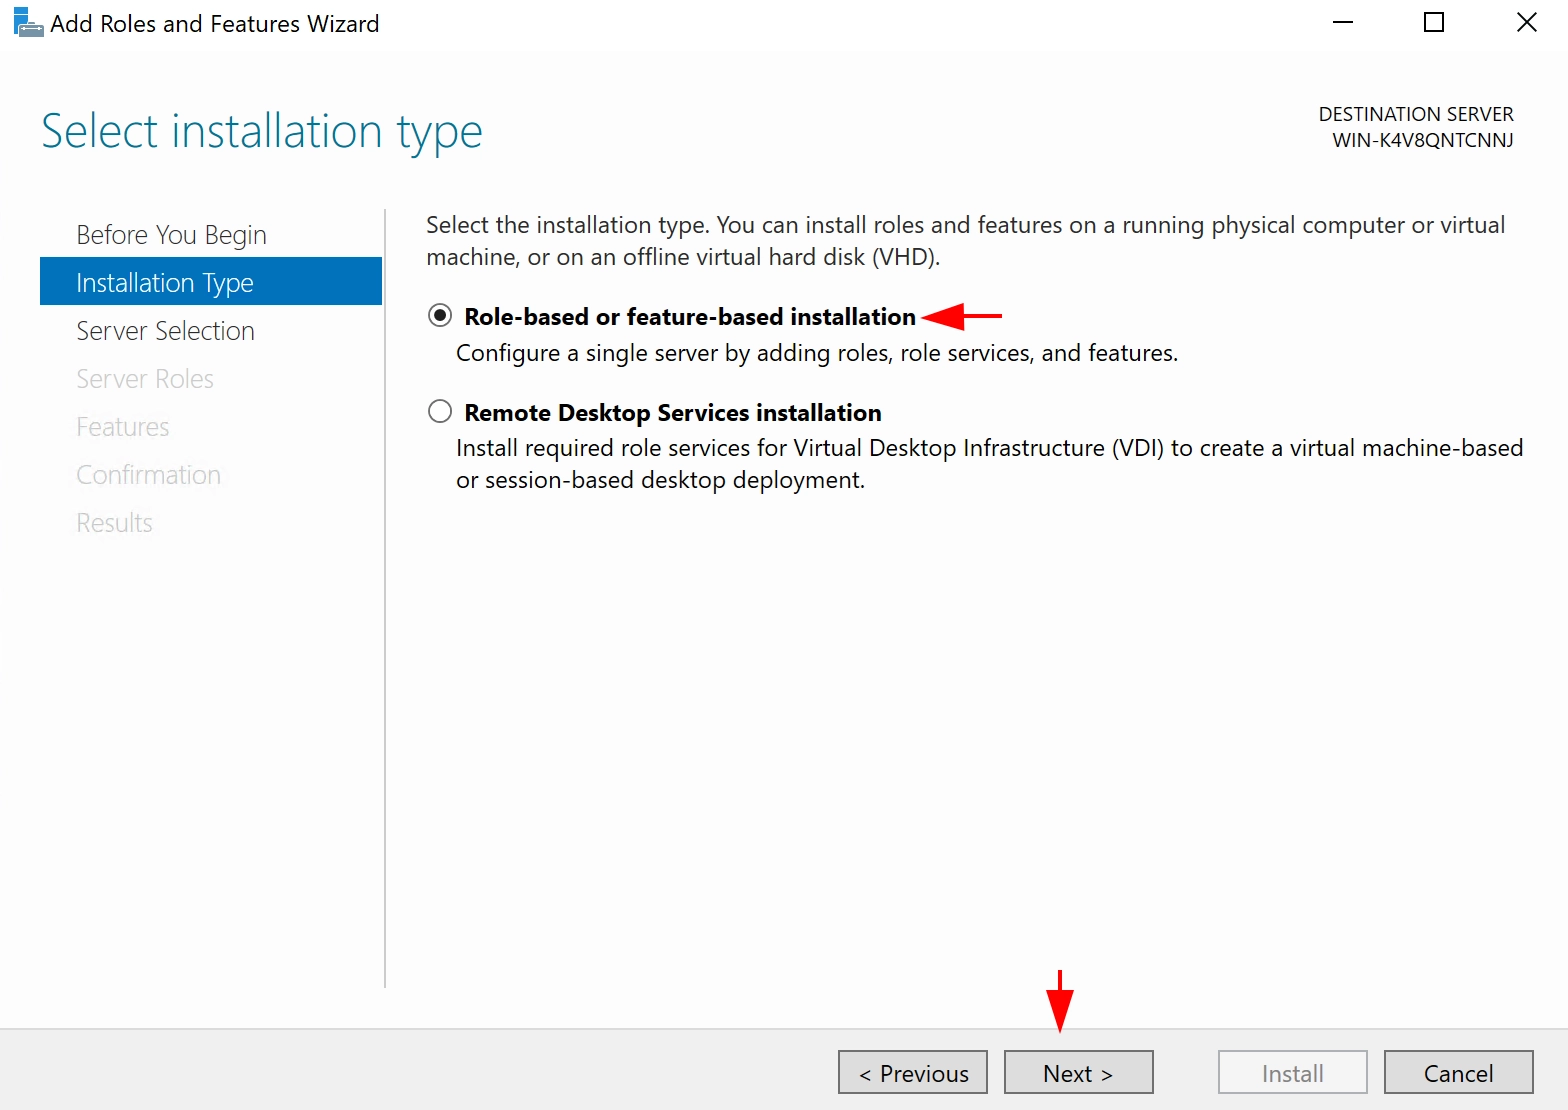
Выбираем “Установка ролей и компонентов” и нажимаем далее как на рисунке 12
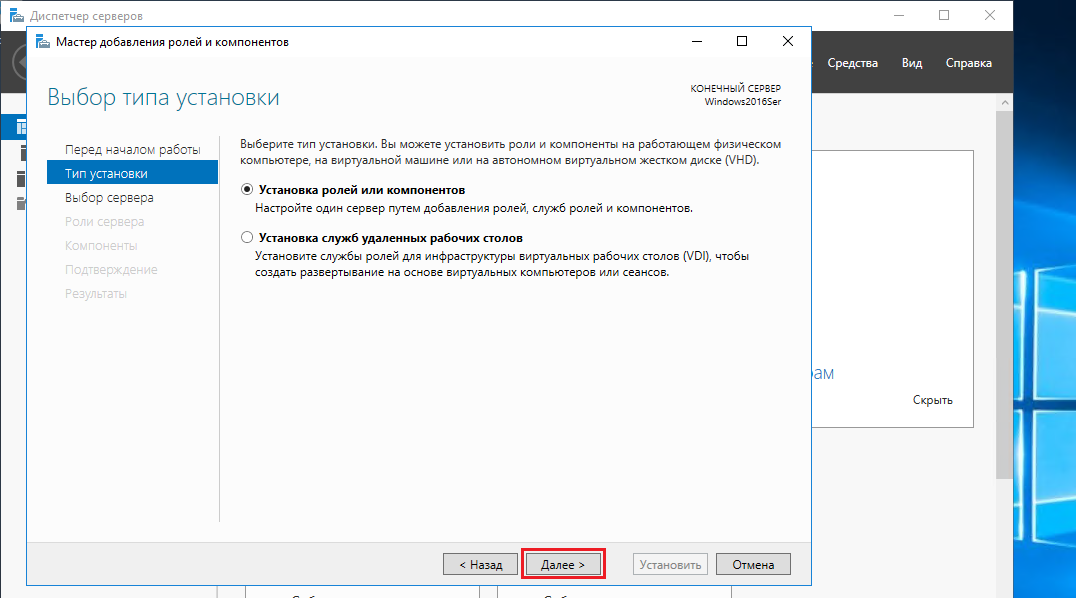
Рис. 12
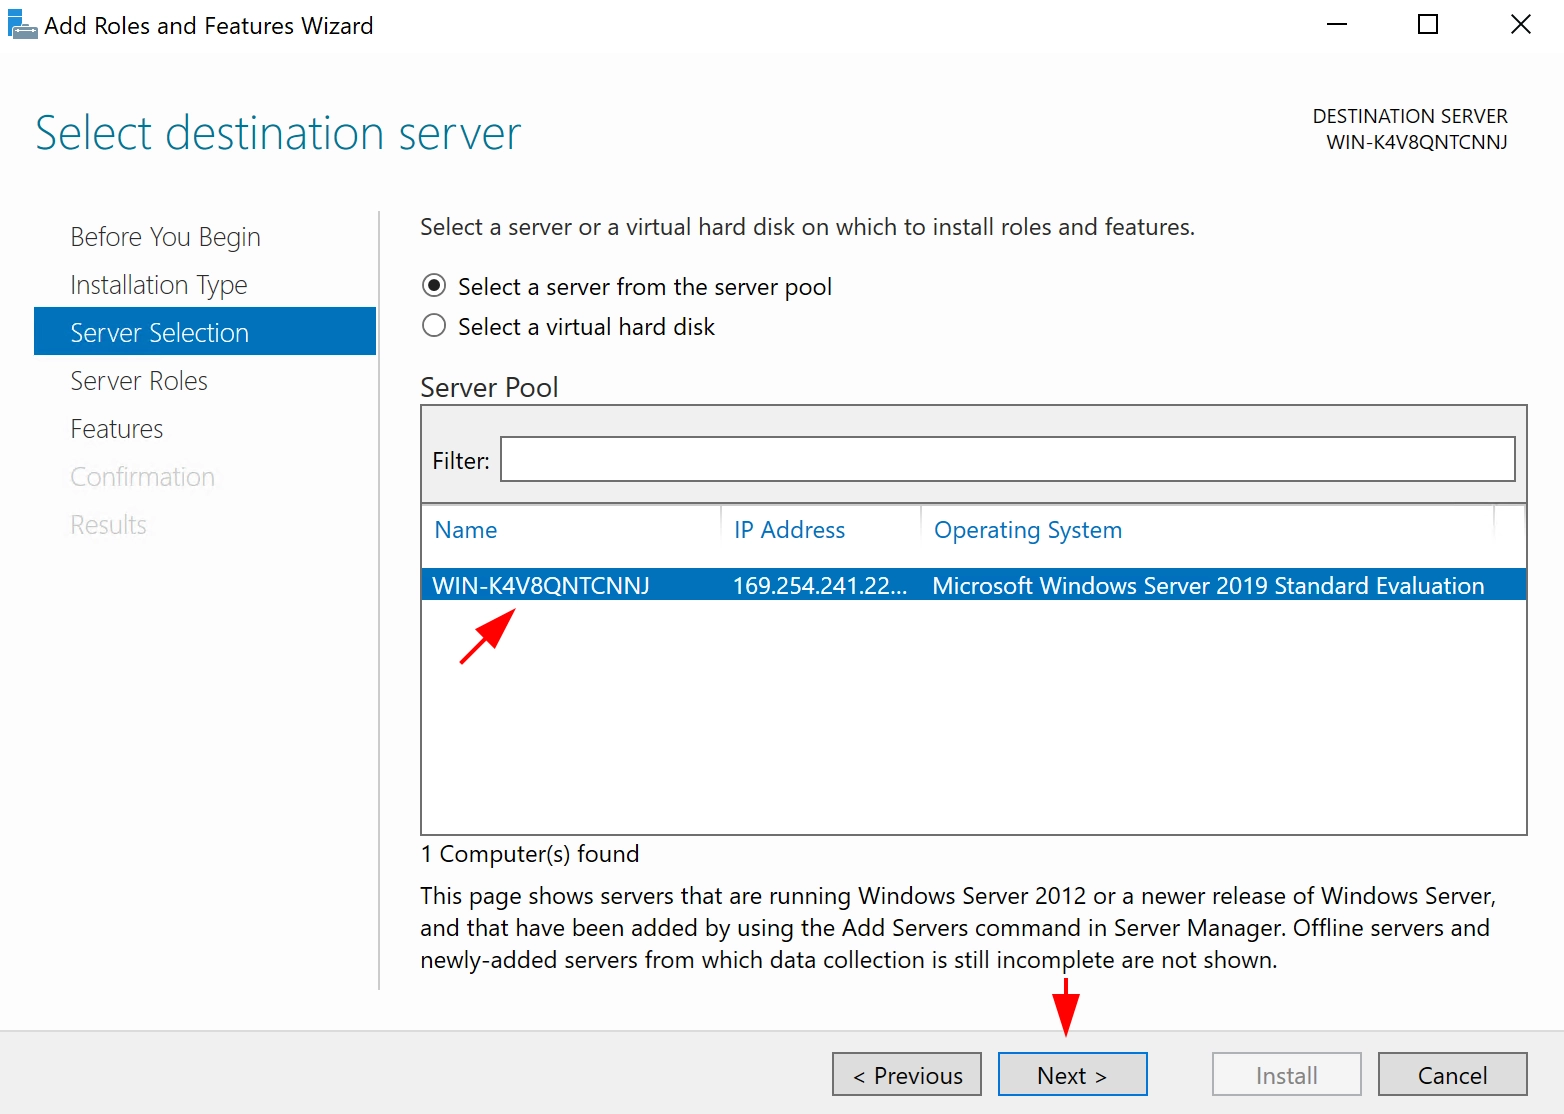
Выбираем наш сервер и нажимаем далее, как на рисунке 13
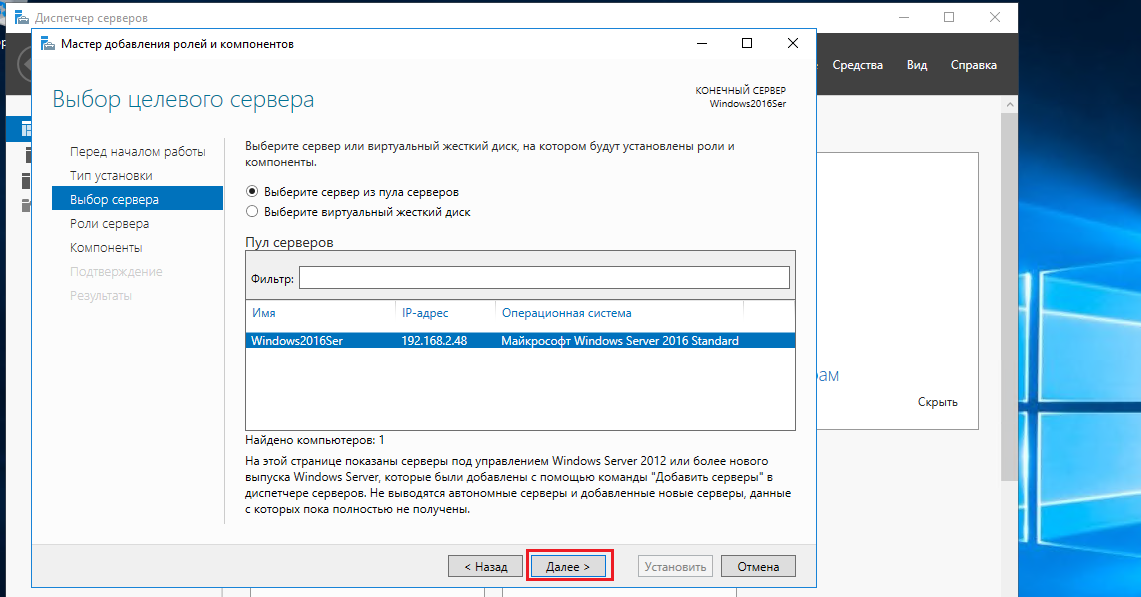
Рис. 13
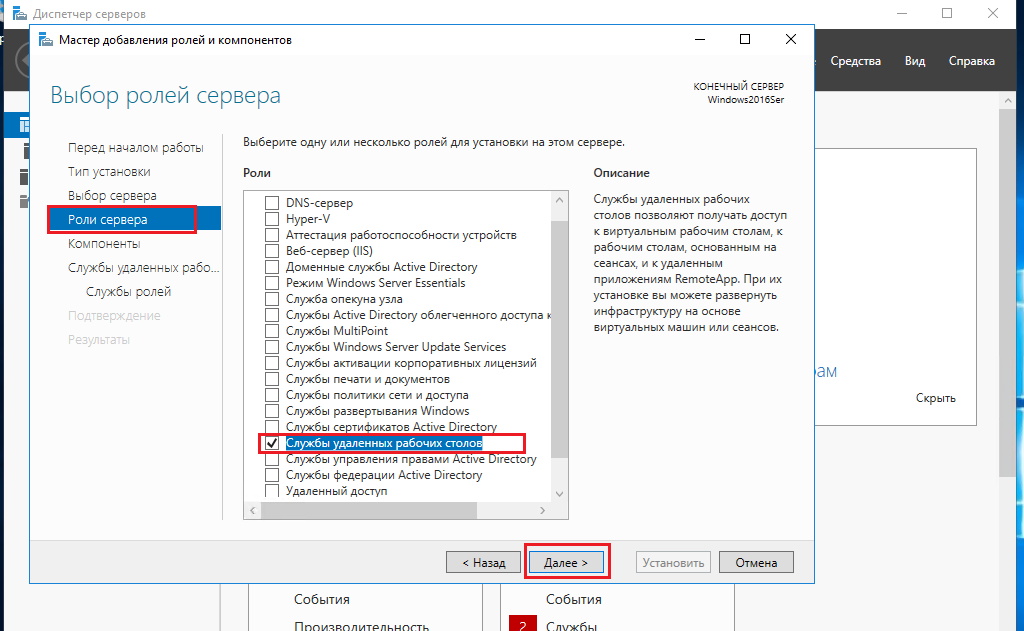
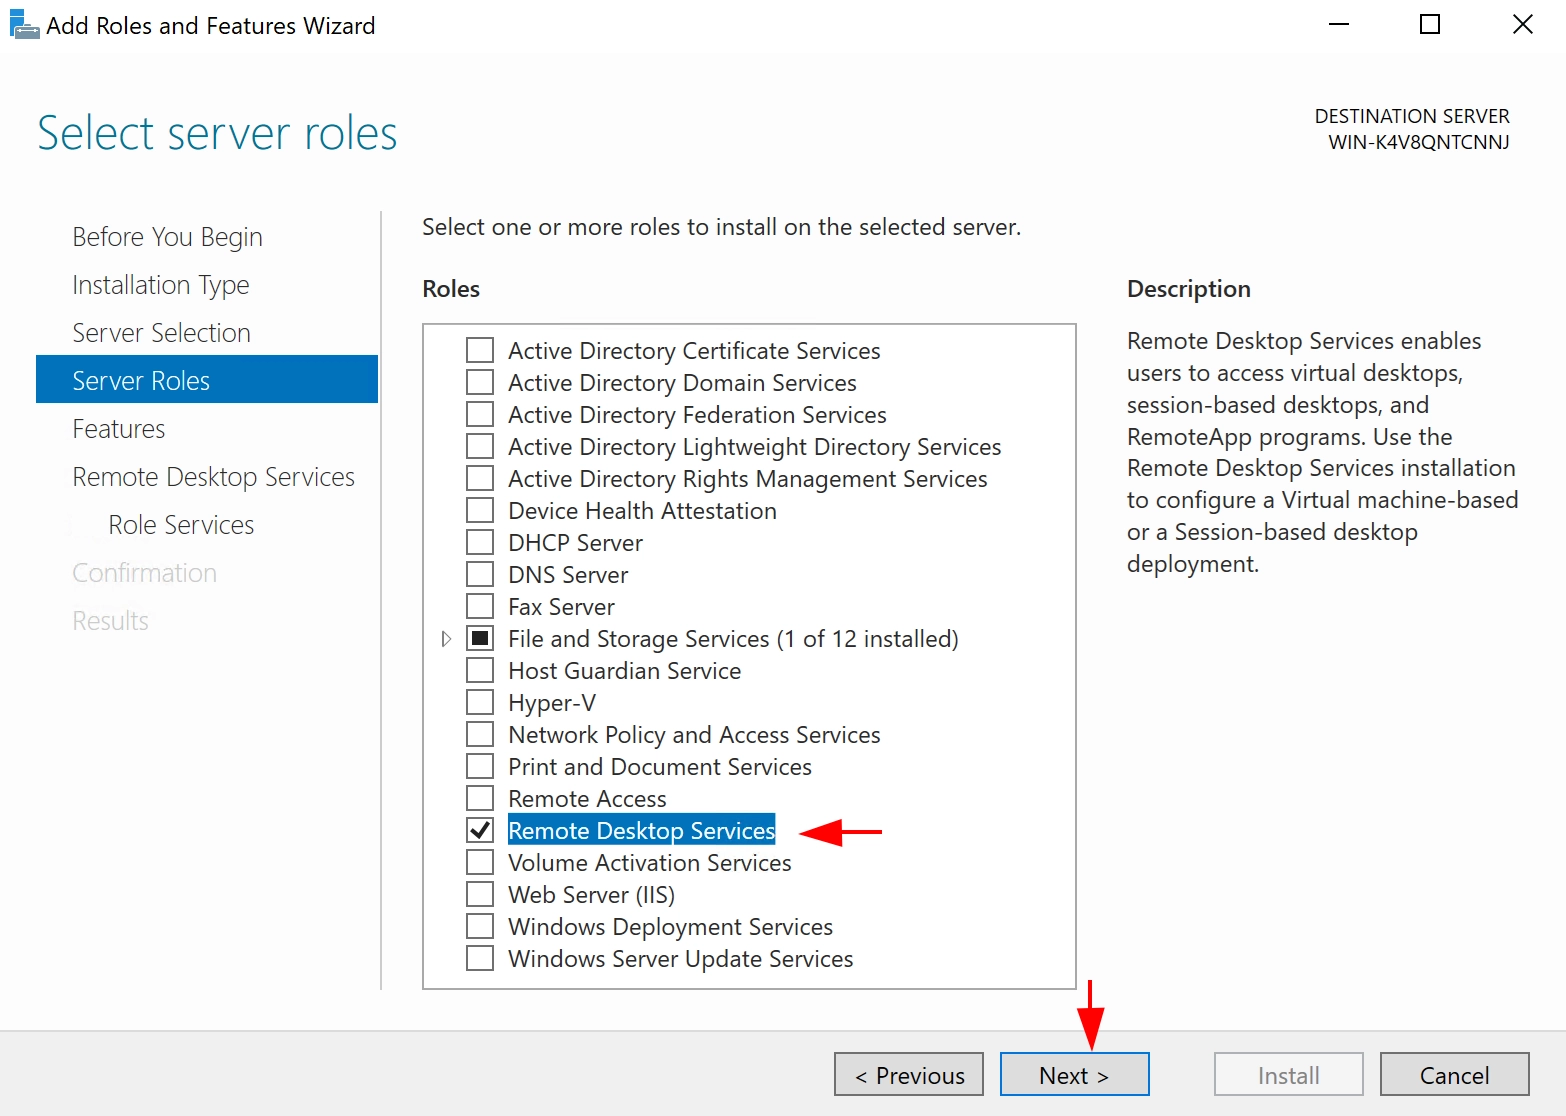
Выбираем роль “службы удалённых рабочих столов” и нажимаем “Далее” как на рисунке 14
Затем просто нажимаем далее, как на рисунке 15
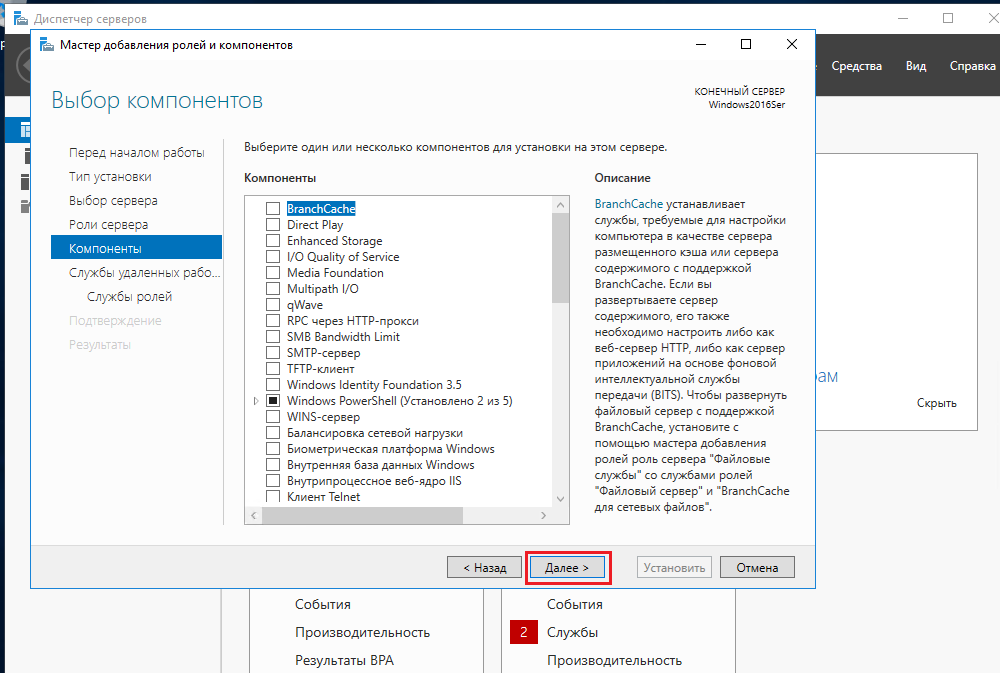
Рис. 15
В следующем окне нажимаем далее, как на рисунке 16
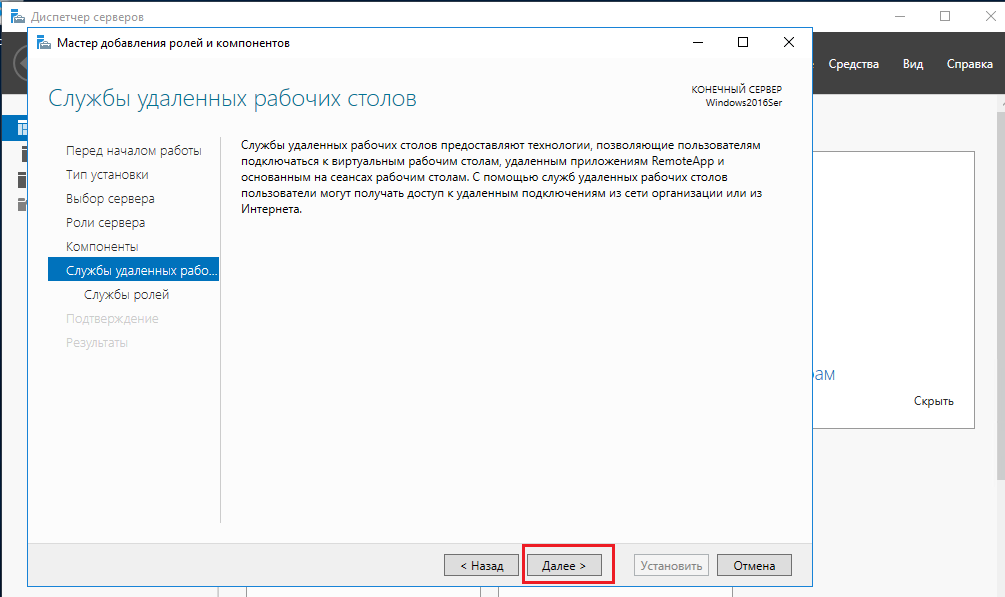
Рис. 16
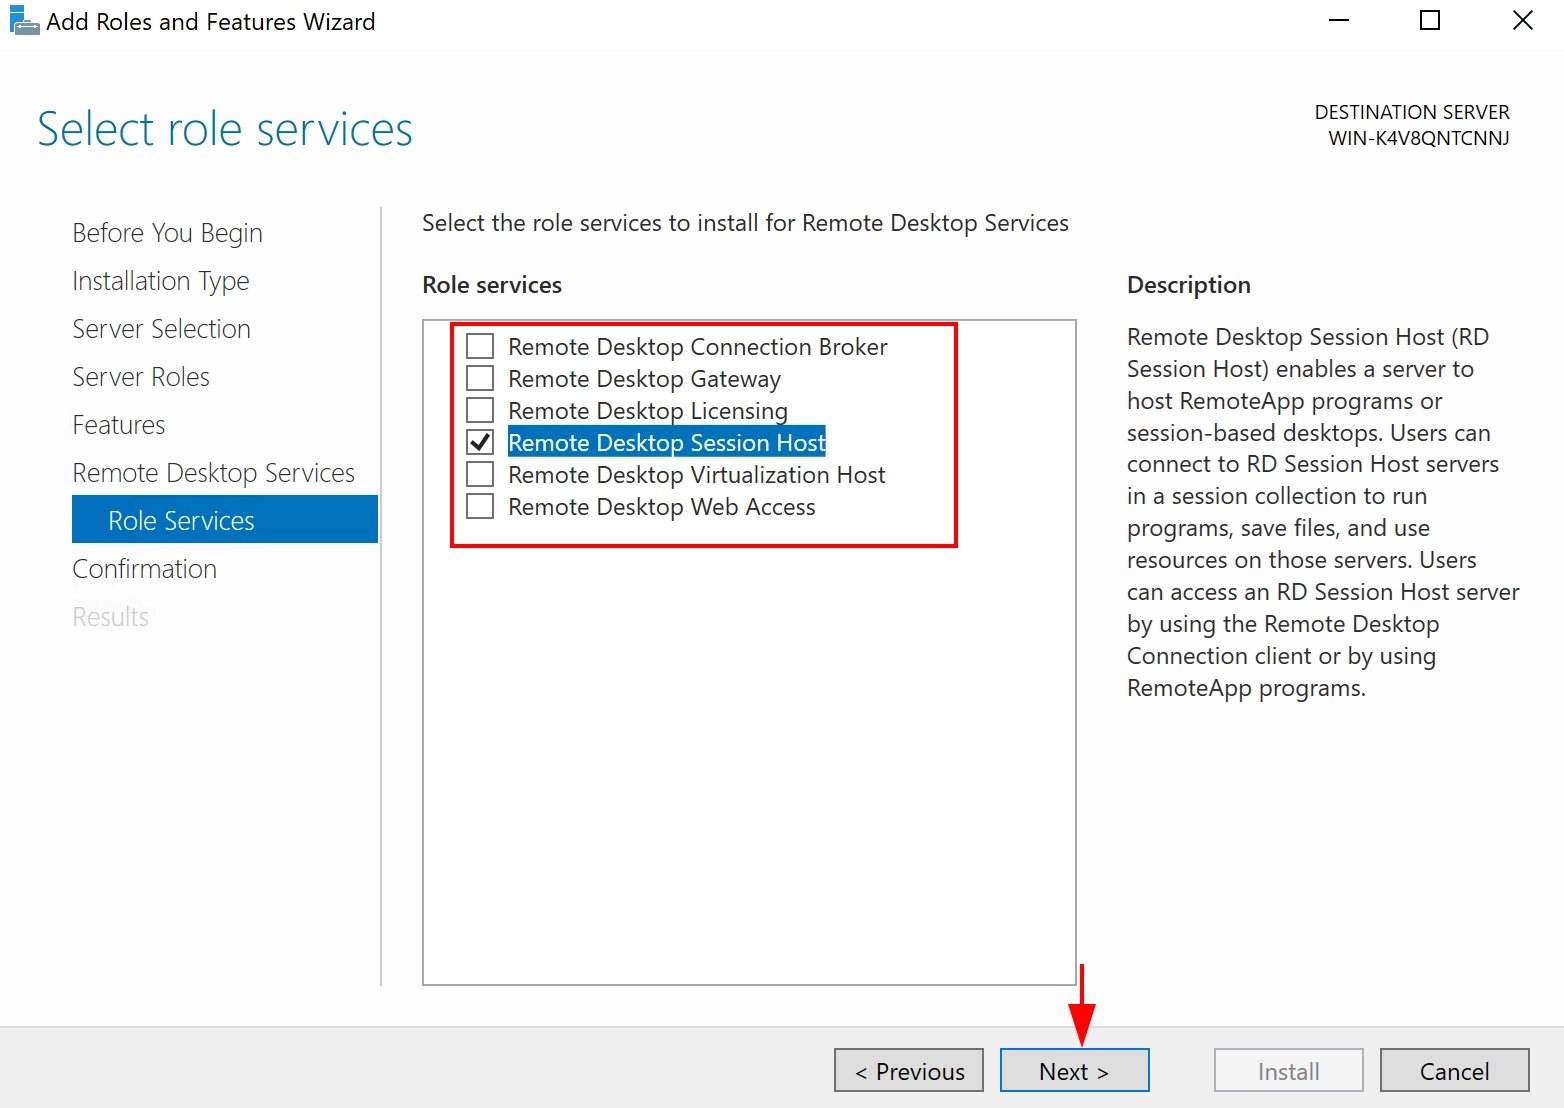
В следующем окне выбираем “Узел сеансов удалённых рабочих столов” и нажимаем “Добавить компоненты” как на рисунке 17
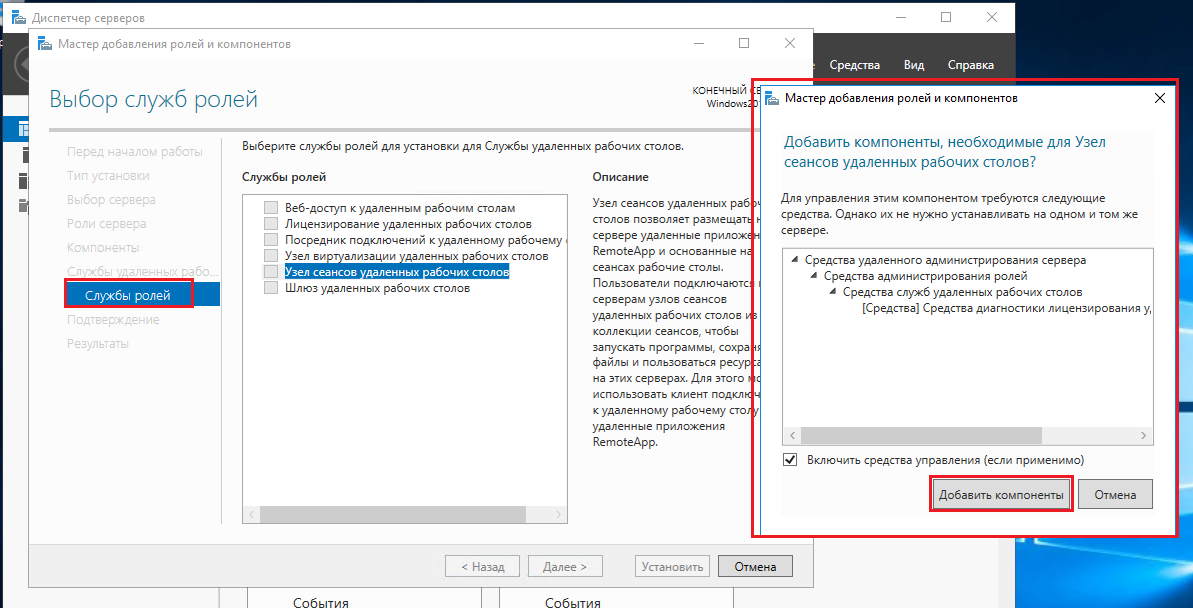
Рис. 17
Затем нажимаем далее, как на рисунке 18
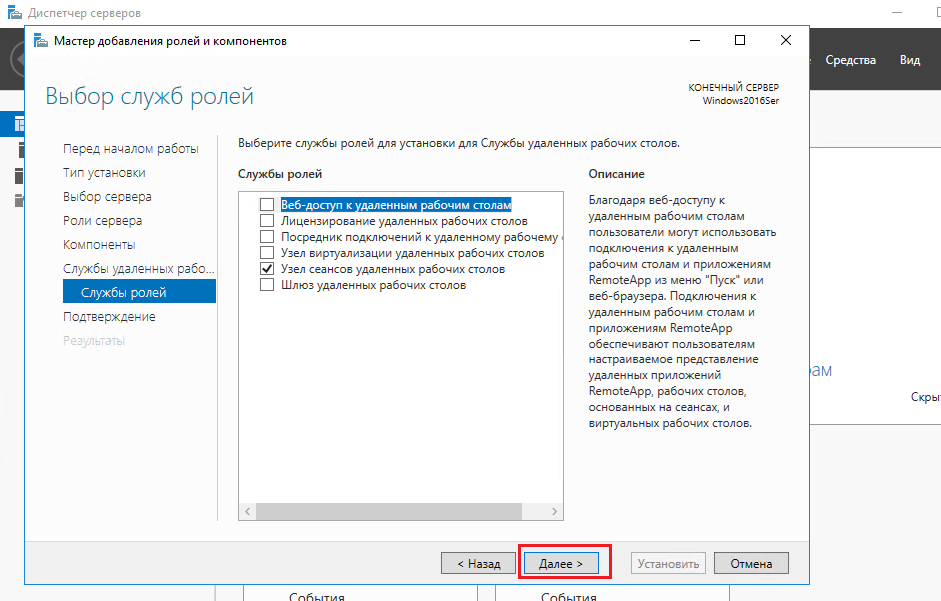
Рис. 18
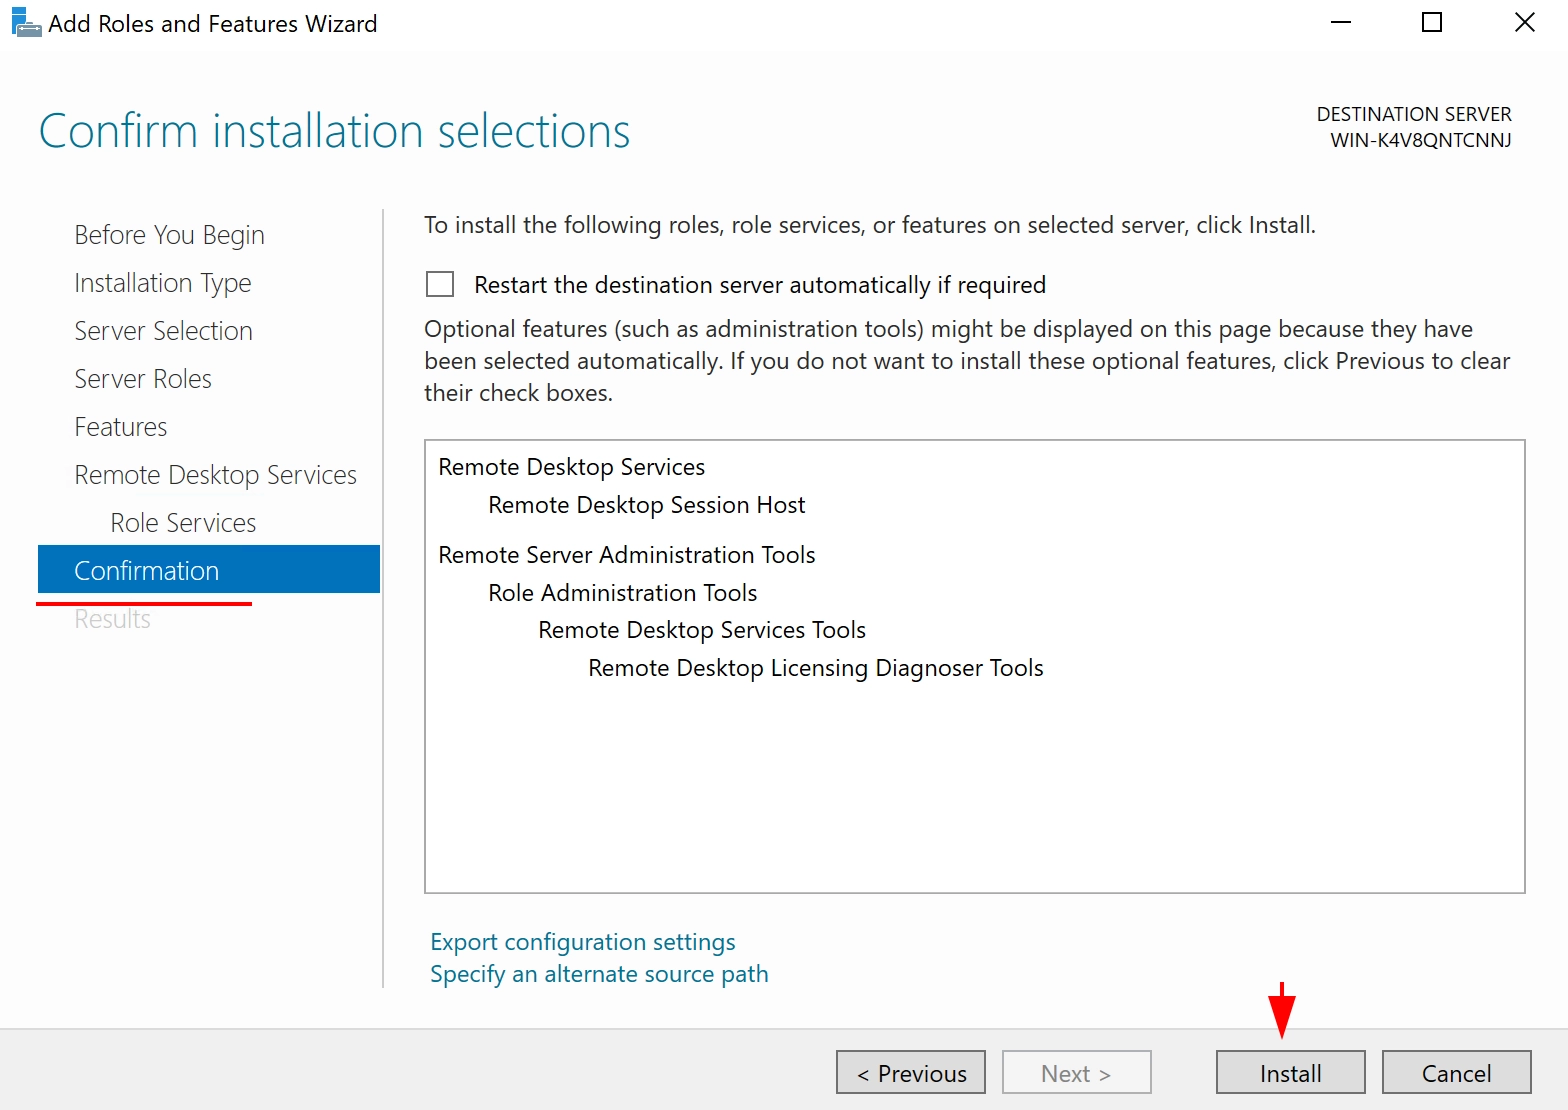
Затем ставим галочку напротив “Автоматический перезапуск сервера если требуется” и нажимаем установить. Показано на рисунке 19

Рис. 19
После этого установка начнётся и сервер перезагрузится сам если будет необходимо.
Настройки “Audio” в rdp.ini файле
Открываем меню пуск и в поиске вбиваем “Подключение к удалённому рабочему столу” как на рисунке 20
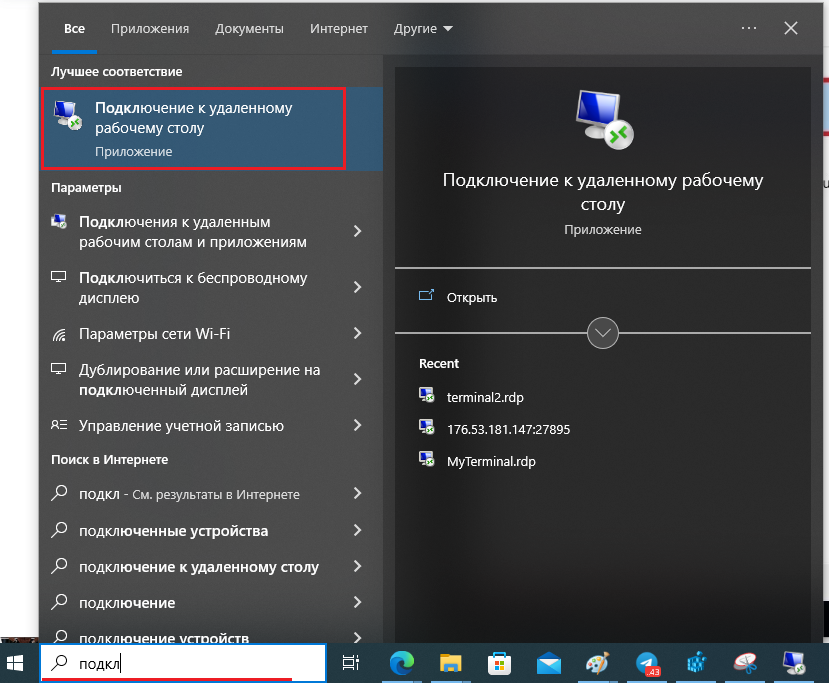
Рис. 20
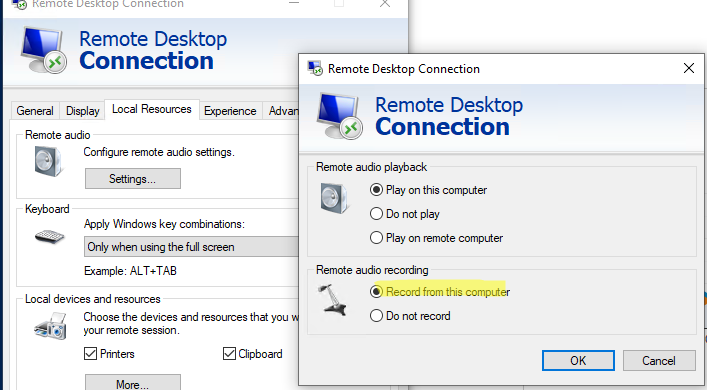
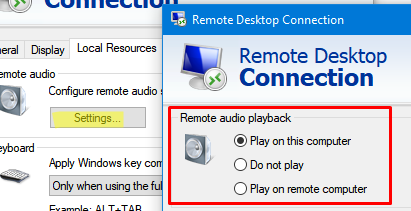
Нажимаем “Показать параметры”, нажимаем “Локальные ресурсы” и в пункте “Звук удалённого рабочего стола” нажимаем “Параметры” . Показано на рисунке 21
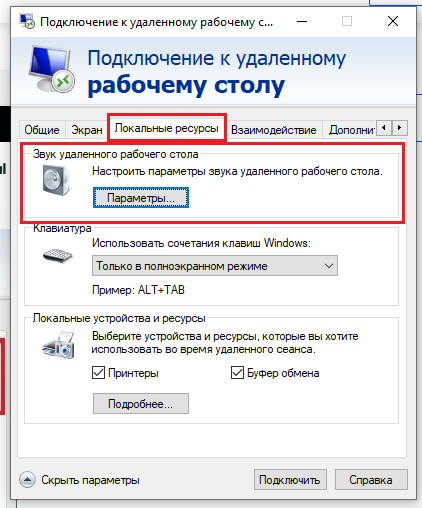
Рис. 21
Выбираем “проигрывать на этом компьютере” и “Записывать с этого компьютера” . Показано на рисунке 22
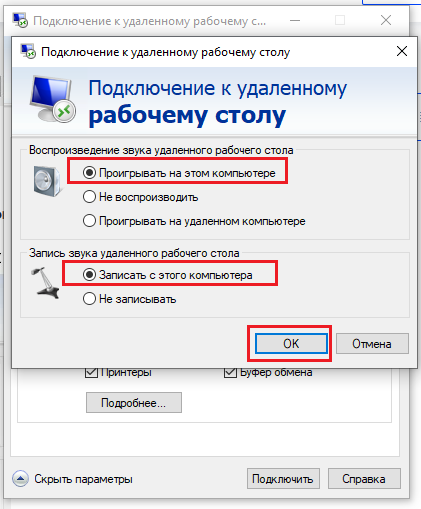
Рис. 22
Нажимаем подключиться и микрофон будет подключен с локального компьютера на удалённый.
Вы уже работаете с сервисами Cloud4Y?
Перейти на вебсайт
Попробовать бесплатно
В этой статье, мы покажем, как сконфигурировать перенаправление микрофона и аудио в RDP сессии.
По умолчанию при использовании удаленного рабочего стола Windows вы не можете использовать свой микрофон для записи звука в программах, запущенных на удаленном компьютере в терминальной (RDP/RDS) сессии. Если вам нужно, чтобы ваш микрофон мог передавать звук в приложение (Teams, Skype, и т.д.), установленное на удаленном хосте, вам нужно проверить настройки как на стороне клиента, так и сервера.
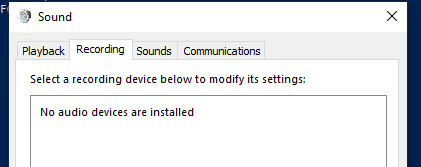
Если открыть вкладку Recording в настройках звука на удаленном рабочем столе, там скорее всего будет надпись:
No audio devices are installed

Включить поддержку проброса аудиоустройств на RDP/RDS сервере
Сначала нужно сконфигурировать удаленный компьютер Windows для корректной работы аудиоустройств в Remote Desktop сессии.
- Проверьте, что на RDP сервере и на клиенте установлена и запущена служба Windows Audio. Проверить что служба работает можно с помощью PowerShell:
get-service AudiosrvТакже проверьте, что запущена служба Remote Desktop Services UserMode Port Redirector (UmRdpService).В Windows Server служба Audiosrv по умолчанию отключена.
- Откройте редактор локальных групповых политик (
gpedit.msc), перейдите в раздел GPO Computer Configuration -> Administrative Templates -> Windows Components -> Remote Desktop Services -> Remote Desktop Session Host. Включите политики “Allow audio and video playback redirection” и “Allow audio recording redirection”.
Затем измените настройки параметра «Do not allow supported Plug and Play device redirection» на Disabled.Обновите настройки GPO командой:gpupdate /force. Перезапустите службу TermService (Remote Desktop Services);
Настраиваем проброс локального микрофона в RDP сессию
Теперь нужно проверить настройки RDP клиента и включить проброс микрофона.
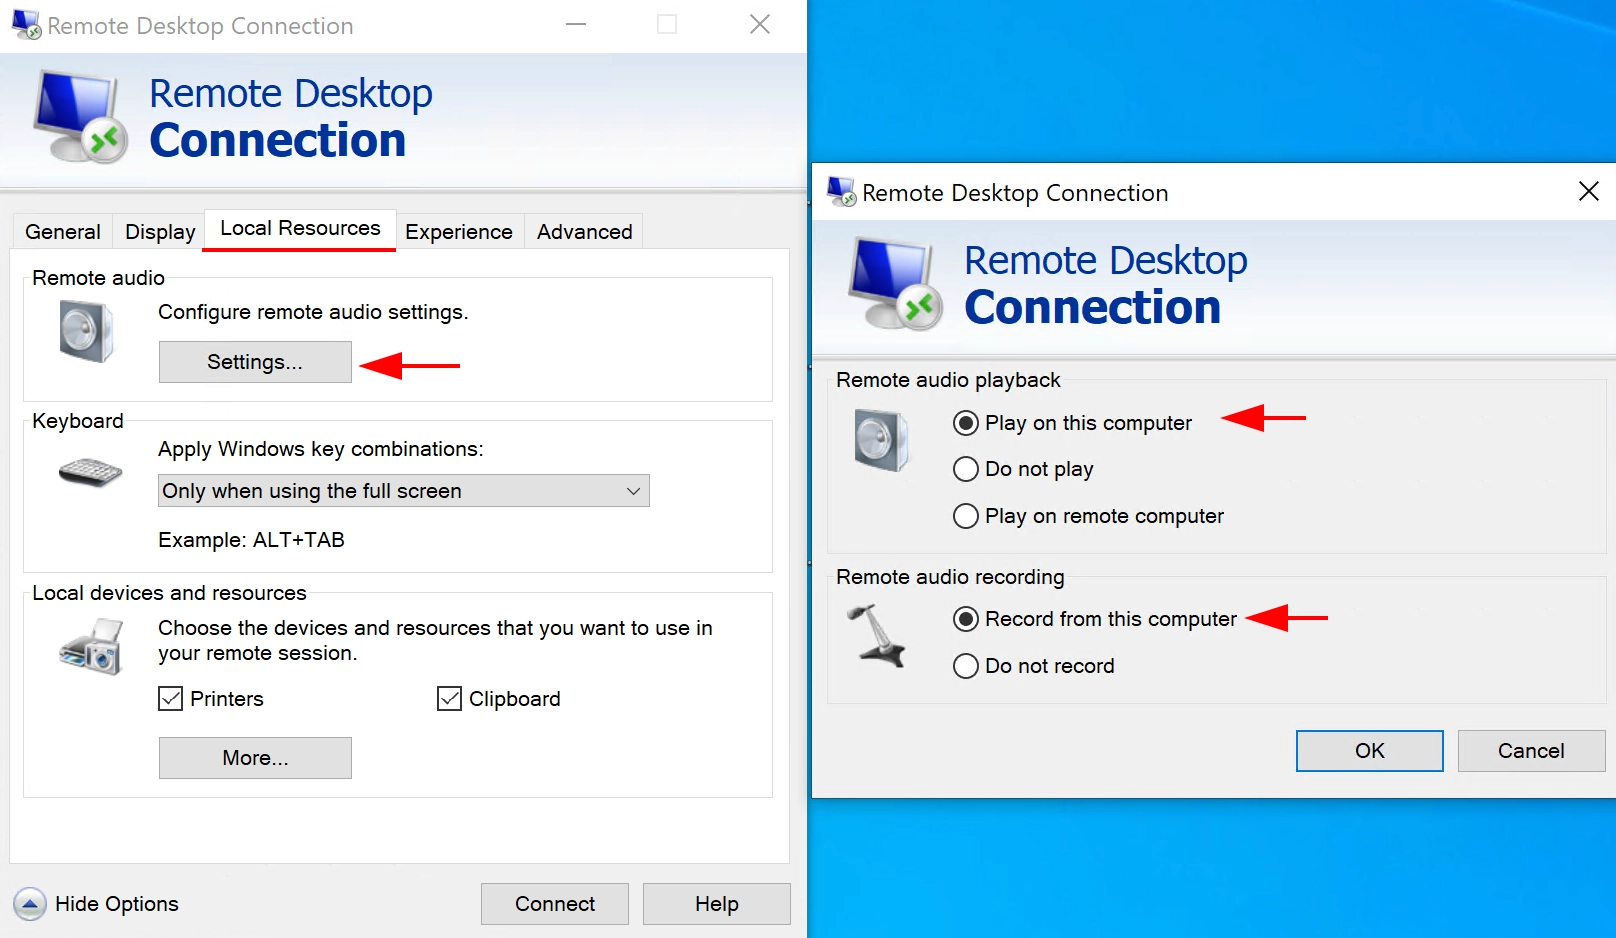
Если вы используется для подключения к RDP стандартный клиент mstsc.exe, проверьте его настройки. Нажмите на кнопку Show Options, перейдите на вкладку Local Resources, в секции Remote audio нажмите на кнопку Settings. В Remote audio recording измените настройки с Do not record на Record from this computer.
Если после этого в RDP сессии появился звук, но запись звука не работает, создайте в ветке реестра HKLM\SYSTEM\CurrentControlSet\Control\Terminal Server\WinStations\RDP-Tcp параметр типа DWORD с именем fDisableAudioCapture и значением 0.
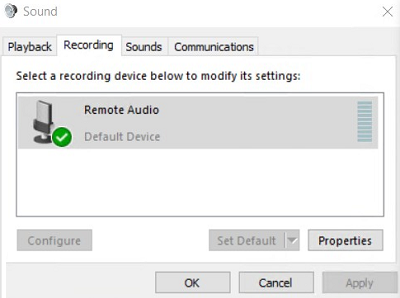
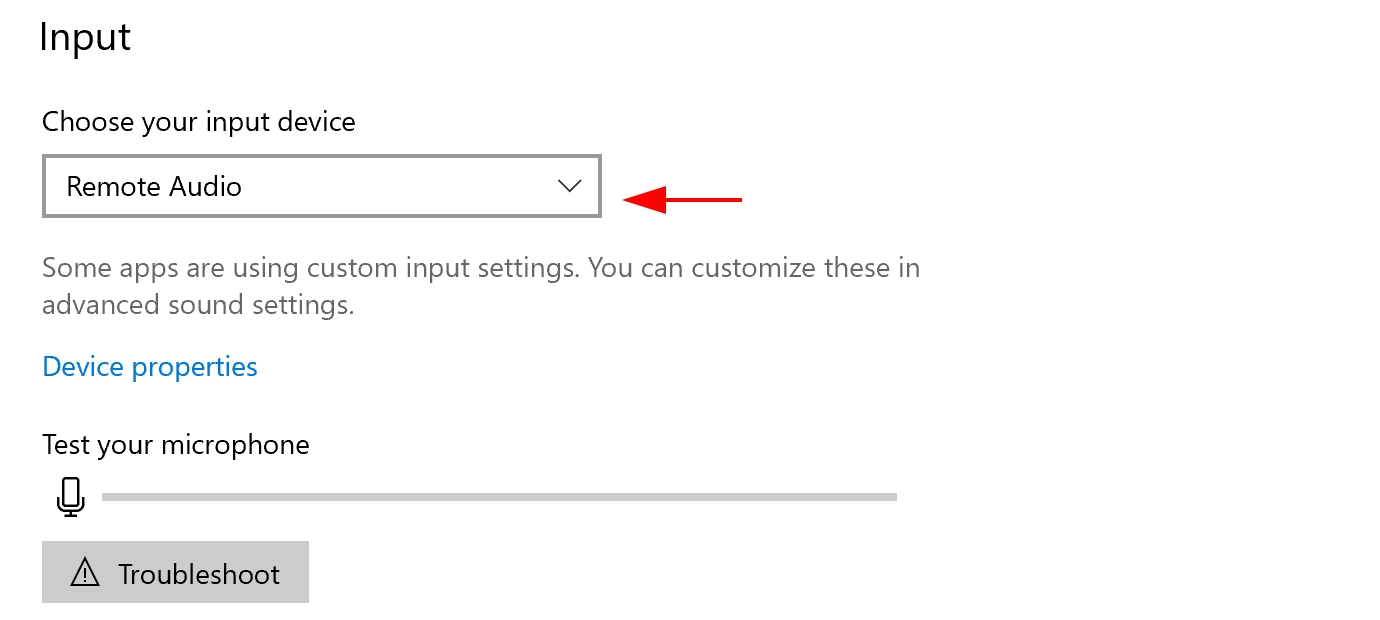
Теперь подключитесь к удаленному рабочему столу. Убедитесь, что в секции Sound панели управления на вкладке Recording указано, что устройство Remote Audio используется по умолчанию для записи звука.
При попытке открыть меню Sound Settings может появится уведомление:
Audio
Your privacy settings blocked access to the microphone.
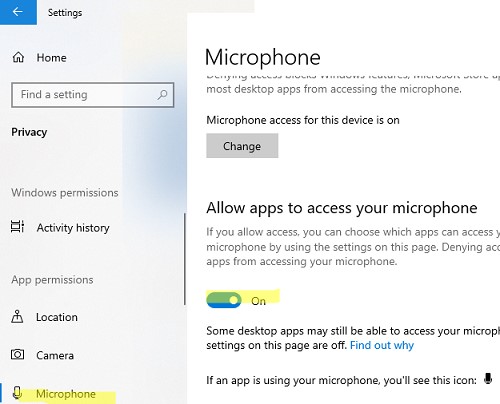
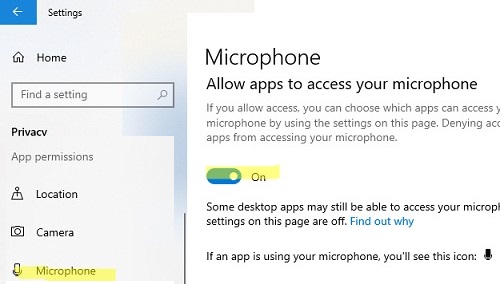
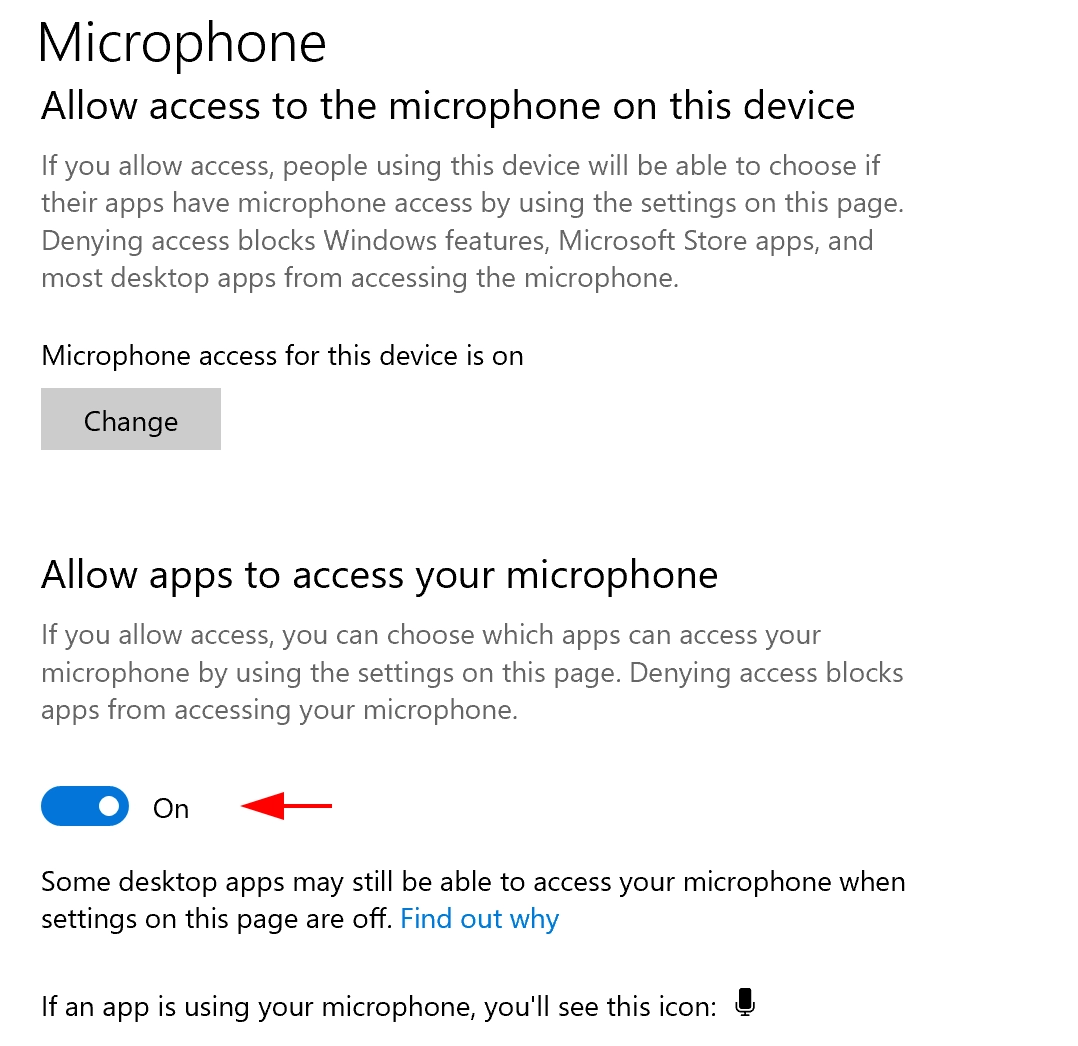
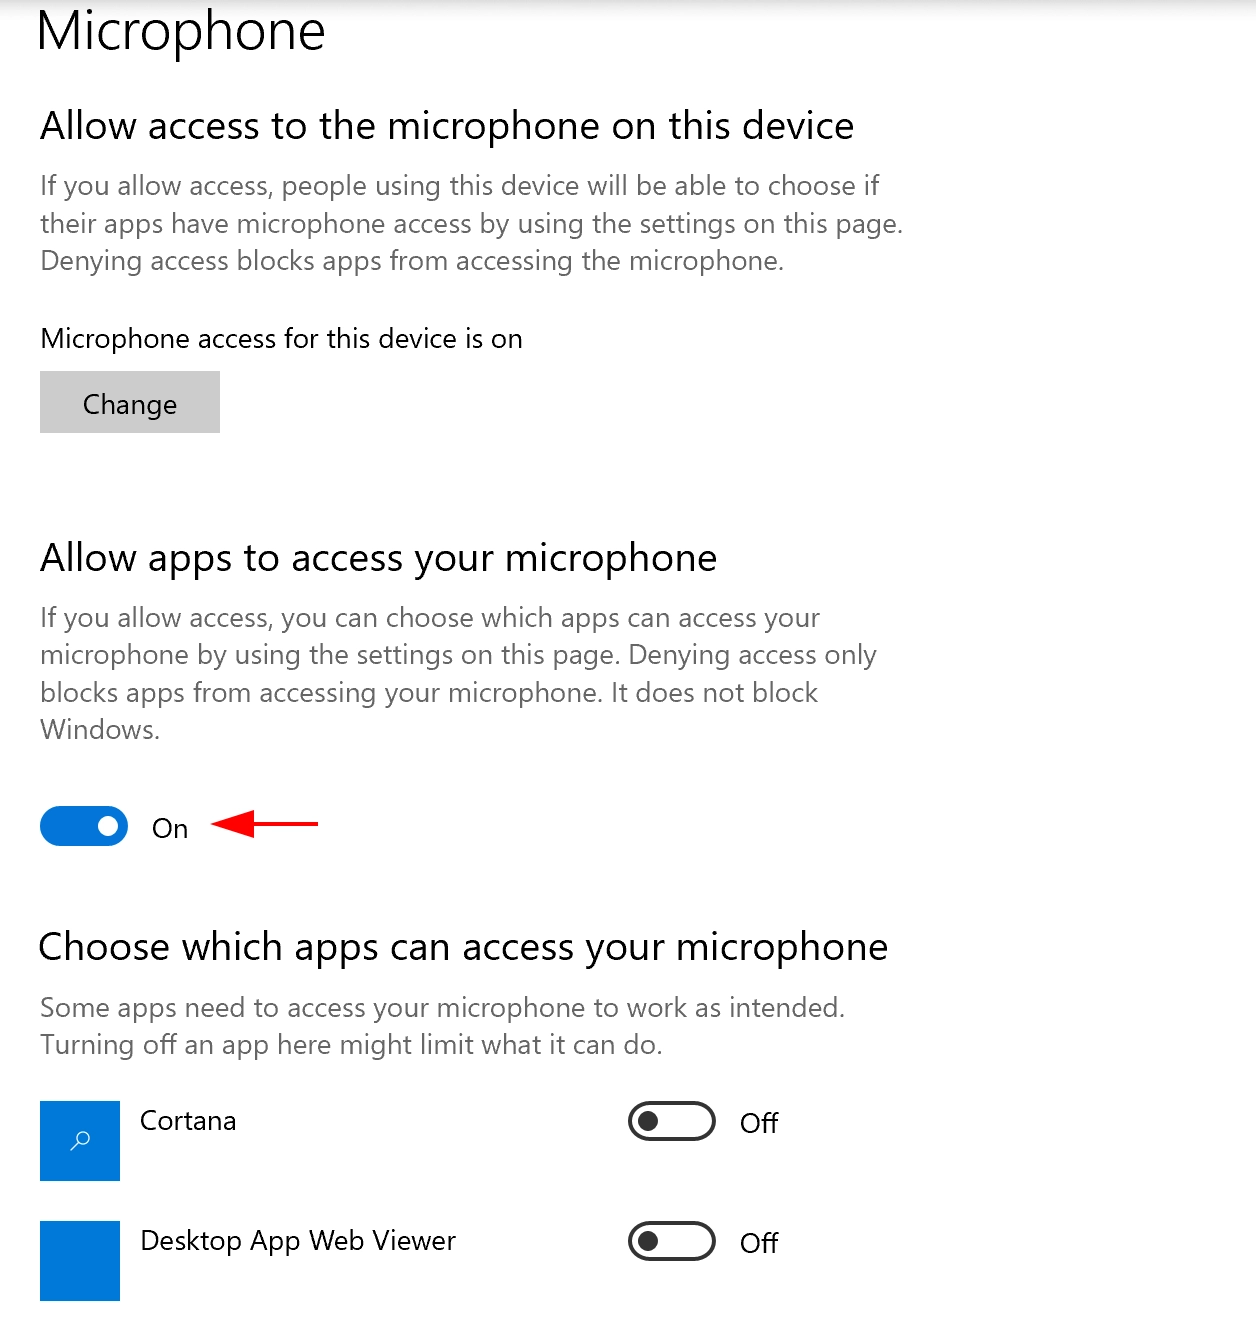
Это частая проблема на Windows Server 2019 RDS, когда звук есть, а устройство записи (микрофон) не работает. Это связано с тем, что настройках конфиденциальности профиля пользователя на сервере по умолчанию запрещают использование микрофона приложениями.
В этом случае откройте Settings -> Privacy -> Microphone и включите опцию Allow apps to access your microphone.
Если приложение опубликована на удаленном рабочем столе Windows Server RDS в виде RemoteApp, вам нужно отредактировать .rdp файл, использующийся для подключения. Добавьте в него следующие строки:
audiocapturemode:i:1
audiomode:i:0
Audiocapturemode = 1— включает запись звука с локального микрофона и передачу его в удаленный сеансAudiomode = 0– воспроизводить звуки из RDP сеанса на локальном компьютере
После этого проброс микрофона станет доступен как в полноценных RDP сессиях, так и в RDS RemoteApp. Не забудьте выбрать данный Remote Audio микрофон в качестве основного источника звука в ваших приложениях на RDP хосте.
Проброс звука с удаленного рабочего стола Windows
Запустите ваш RDP клиент (mstsc.exe), перейдите на вкладку Advanced -> Remote Audio -> Settings.
В секции Remote Audio Playback доступны три режима:
- Play on this computer
- Do not play
- Play on remote computer
Чтобы звук с RDS хоста воспроизводился на вашем локально компьютере, выберите первую опцию.
Подключитесь к RDP хосту. Откройте настройки звука (Панель управления -> Оборудование -> Звук).
Если на вкладке Playback указано No audio device installed, проверьте что на удаленном хосте запущена служба Windows Audio.
Откройте диспетчер устройств и проверьте, что в секции Audio inputs and outputs есть активное устройство Remote Audio. Устройство должно быть включено.
Если все, ОК по умолчанию в панели управление звука должно быть выбрано устройство Remote Audio.
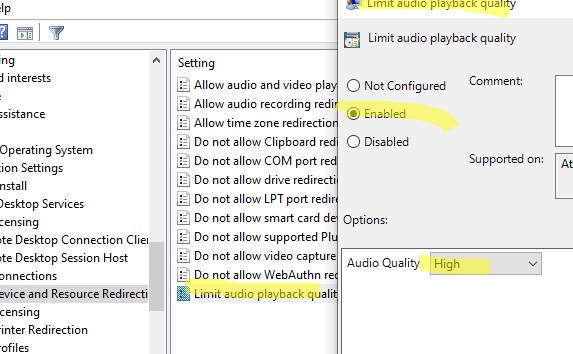
Чтобы улучшит качество звука, включите параметра GPO Limit audio playback quality и установите Audio Quality = High.
При использовании виртуальных машин, RDSH Remote Apps, терминальных решений VMware Horizon или Citrix ICA для корректной работы звука в браузере на основе движка Chromium нужно в реестре отключить параметр Audio Sandbox.
- Для Google Chrome:
[HKEY_LOCAL_MACHINE\SOFTWARE\Policies\Google\Chrome]
"AudioSandboxEnabled"=dword:00000000
- Для Microsoft Edge:
[HKEY_LOCAL_MACHINE\SOFTWARE\Policies\Microsoft\Edge]
"AudioSandboxEnabled"=dword:00000000
In this article, we’ll show you how to configure microphone and audio redirection in a Remote Desktop (RDP) session.
By default, when using Windows Remote Desktop, you cannot use your local microphone to record sound in programs running on the remote computer in a terminal session (RDP/RDS). If you need to redirect your local microphone device to an app (Teams, Skype, etc.) installed on a Remote Desktop host, you need to check the settings on both the client and server-side.
If you open the Recording tab in the Sound settings on the Remote Desktop computer, you will most likely see the caption:
No audio devices are installed
Enable Audio Device Redirecting on RDP (RDS) Computer
First, you need to configure the remote Windows computer so that redirected audio devices work correctly in a Remote Desktop session.
- Check that the Windows Audio service is installed and running on both the RDP server and client. Also, check that the Remote Desktop Services UserMode Port Redirector (UmRdpService) service is running. You can use PowerShell to check that the service is running:
Get-Service Audiosrv, UmRdpServiceAudiosrv service is disabled by default on Windows Server.
- Open the Local Group Policy Editor (
gpedit.msc), go to the following GPO section Computer Configuration -> Administrative Templates -> Windows Components -> Remote Desktop Services -> Remote Desktop Session Host. Enable two GPO options ‘Allow audio and video playback redirection‘ and ‘Allow audio recording redirection‘. Then change the ‘Do not allow redirection of supported Plug and Play devices‘ policy value to Disabled. Update the GPO settings with the command:gpupdate /forceRestart the TermService (Remote Desktop Services) service;

At this point, you will need to check the settings on your RDP client and enable the microphone redirection feature.
If you are using the built-in mstsc.exe client (Remote Desktop Connection) to connect to RDP, and check its settings. Click on the Show Options button, navigate to the Local Resources tab, and click on the Settings button in the Remote audio section. Change from “Do not record” to “Record from this computer” in Remote audio recording.

If after that sound appears in the RDP session, but the sound recording doesn’t work, create a DWORD parameter named fDisableAudioCapture with a value of 0 under the registry key HKLM\SYSTEM\CurrentControlSet\Control\Terminal Server\WinStations\RDP-Tcp
Now connect to the Remote Desktop. Open the Sound item in the Control Panel, go to the Recording tab, and make sure that the Remote Audio device is selected by default for sound recording.

A notification may appear when you try to open the Sound settings menu:
Audio

Your privacy settings blocked access to the microphone.
This is a known issue with Windows Server 2019 RDS where the remote audio works fine, but the recording device (microphone) does not work. This is because the server’s default user profile privacy settings prevent applications from using the microphone.
In this case, go to Settings -> Privacy -> Microphone and enable the “Allow applications to access your microphone” option.
If the application is published as a RemoteApp on Windows Server RDS, you will need to edit the .rdp file used to connect. Add the following lines to this file:
audiocapturemode:i:1

audiomode:i:0
- Audiocapturemode = 1 – enables audio recording from a local microphone and redirects it to the remote session
- Audiomode = 0 – play sounds from RDP session on local computer
After that, the redirected microphone device will become available both in RDP sessions and in RemoteApps. Don’t forget to select this Remote Audio microphone as the main audio source in your applications on the RDP host.
Enable Audio Redirection over Remote Desktop on Windows
Run your RDP client (mstsc.exe). Navigate to the Advanced -> Remote Audio -> Settings tab.
There are three modes available in the Remote Audio Playback section:
- Play on this computer
- Do not play
- Play on remote computer
If you want to play the audio from the RDS host on your local computer, select the first option.
Connect to your Remote Desktop host. Open the sound settings (Control Panel -> Hardware -> Sound).
If the Playback tab shows No audio device installed, check that the Windows Audio service is running on the remote host.
Open Device Manager and check that there is an active Remote Audio device in the Audio inputs and outputs section.
The Remote Audio device should be selected by default in the Sound Control Panel if everything is configured correctly.
To improve audio quality, enable the GPO option Limit audio playback quality and set Audio Quality = High.
If you are using virtual machines, RDSH Remote Apps, VMware Horizon, or Citrix ICA terminal solutions, you will need to disable the Audio Sandbox parameter in the registry for sound to work correctly in Chromium-based browsers.
- For Google Chrome:
[HKEY_LOCAL_MACHINE\SOFTWARE\Policies\Google\Chrome]"AudioSandboxEnabled"=dword:00000000 - For Microsoft Edge:
[HKEY_LOCAL_MACHINE\SOFTWARE\Policies\Microsoft\Edge]"AudioSandboxEnabled"=dword:00000000
Content
- Настройки на стороне клиента
- Настройки на стороне сервера
- Групповые политики, если микрофон по-прежнему не отображается
Настройки на стороне клиента
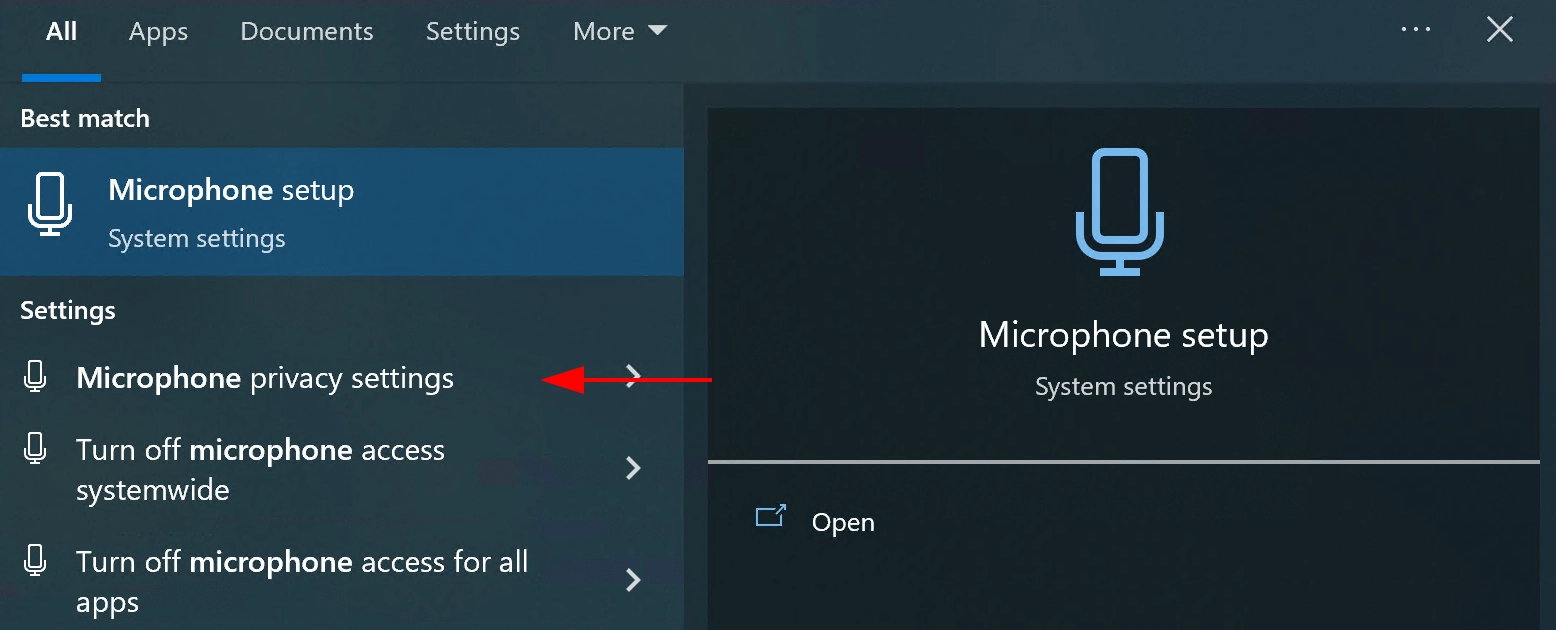
1. Проверьте настройки доступности микрофона на локальном компьютере. В строке поиска напишите Настройки конфиденциальности микрофона
2. Разрешите доступ к приложениям, если он запрещен
3. Включите воспроизведение звука и доступ к микрофону в приложении Remote Desktop Client — сохраните конфигурацию подключения:
Настройки на стороне сервера
1. Откройте Диспетчер сервера — Добавить роли и функции

2. Выберите пункт Установка на основе ролей или функций.
3. На этом этапе необходимо выбрать локальный сервер
4. Выберите роль Службы удаленных рабочих столов
5. Перейдите на вкладку » Службы роли » и выберите необходимые в соответствии со снимком экрана:
6. Перейдите в раздел » Подтверждение» и нажмите кнопку » Установить «.
7. Дождитесь завершения установки и перезагрузите сервер
8. После перезагрузки сервера необходимо включить службу Windows Audio, если она отключена (на вкладке «Поиск» введите services.msc и запустите утилиту, найдите службу и включите ее, если она не включена):
9. Проверьте наличие микрофона в свойствах звука«Открыть параметры звука». Должно появиться устройство ввода:
10. Также в свойствах микрофона может потребоваться разрешить приложениям доступ к микрофону (во вкладке поиска напишите Микрофон и выберите Настройки конфиденциальности микрофона).
После завершения всех настроек микрофон должен быть доступен в качестве устройства ввода на сервере.
Групповые политики, если микрофон по-прежнему не отображается
Если после выполнения этих настроек микрофон по-прежнему недоступен, необходимо внести изменения в групповые политики.
1. Запустите gpedit.msc
2. Разрешите переадресацию аудиоустройств по пути:
[Computer Configuration\Policies\Administrative Templates\Windows Components\Remote Desktop Services\Remote Desktop Session Host\Device and Resource Redirection].
Allow audio and video playback redirection
Allow audio recording redirection
И в реестре: [HKEY_LOCAL_MACHINE\SYSTEM\CurrentControlSet\Control\Terminal Server\WinStations\RDP-Tcp].
"fDisableAudioCapture"=dword:00000000
How to Enable and Use Microphone in RDP Session: Comprehensive Guide
Remote Desktop Protocol (RDP) is an important tool for accessing remote systems, but using a microphone during an RDP session can sometimes be difficult. Problems like audio redirection issues and setting up the right configuration can complicate the process.
This guide simplifies all you need to know about the best practices for enabling microphone in RDP sessions. You’ll understand its built-in methods, useful tips, and third-party tools, all with an easy-to-follow set of instructions for your different needs. By the end of this guide, you’ll know how to easily redirect and use the microphone in a remote desktop, making your remote work smoother and more productive.
- Native Methods for Microphone Redirection in RDP
- • Configuring RDP Client Settings
- • Group Policy Configuration
- • Registry Tweaks
- • Adjusting Sound Settings on Local and Remote Systems
- • Using RDP Enhanced Protocols
- USB Microphone Redirection via USB Network Gate
- • Enable a Microphone in an RDP Session via USB Network Gate
- • Benefits of Using UNG for RDP Microphone Passthrough
- Conclusion
Native Methods for Microphone Redirection in RDP
Regarding how to enable microphone redirection in RDP sessions, built-in Windows options are usually the easiest and most reliable options. These methods don’t require extra software, making them perfect for users who want a simple and seamless setup.
Before setting up your RDP microphone redirection, keep these points in mind:
- Hardware and Drivers: Ensure your microphone drivers are installed and working properly. Some USB microphones might require additional software.
- RDP Compatibility: Ensure your RDP version supports audio redirection, as older versions may not have this feature.
- Network Setup: Confirm your network allows RDP audio redirection and ensure no firewalls or restrictions are blocking it.
- Security: Use encrypted RDP sessions to keep your audio data safe from potential security threats.
Overall, closely monitoring these factors will help ensure a smoother and more secure remote desktop microphone setup process.
1. Configuring RDP Client Settings
This method lets you adjust settings directly in the RDP client (mstsc). It’s a simple, quick solution that doesn’t require administrative access, making it ideal for most users.
Pre-Tips:
- Ensure both the local and remote systems support audio redirection. Older RDP clients or restricted server settings may not allow it.
- Check that the microphone drivers are installed and working properly on your local system.
- Watch out for network restrictions, like blocked ports, that could prevent audio redirection from working.
Step-by-Step Instructions:
- Open the Remote Desktop Connection client (mstsc).
- Click «Show Options» at the bottom of the interface.
- Go to the «Local Resources» tab.

- Under «Remote audio,» click on «Settings.»
- Enable «Record from this computer.»
- Set «Remote audio playback» to «Play on this computer.»

- Click «OK» to save your settings.
- Connect to the remote desktop and check if the microphone is working.


Pros:
-
Easy to configure
-
Requires no administrative access or system changes
-
Works for most basic use cases
Cons:
-
Limited to basic RDP configurations
-
May not work for advanced setups or custom hardware
2. Group Policy Configuration
This method is great for IT administrators or users managing several systems. It involves using Group Policy to enable audio.
Pre-Tips:
- Ensure you have administrative privileges to access and modify Group Policy settings.
- Check for domain-level Group Policy overrides, as they might override local changes.
- Restart the Remote Desktop Services after making changes to apply the new settings.
Step-by-Step Instructions:
- Open the Local Group Policy Editor by typing gpedit.msc in the Start Menu search bar.

- Navigate to Computer Configuration > Administrative Templates > Windows Components > Remote Desktop Services > Remote Desktop Session Host > Device and Resource Redirection.

- Enable the following policies:
a. «Allow audio and video playback redirection.»
b. «Allow audio recording redirection.»
- Close the Group Policy Editor and restart the Remote Desktop Services to apply the changes.


Pros:
-
It’s Ideal for large-scale deployments or advanced configurations
-
It also provides detailed control over RDP settings
Cons:
-
It requires administrative privileges to make changes
-
Changes might not take effect until after a system restart
3. Registry Tweaks
Registry tweaks offer a powerful way to customize system settings. This method is best suited for advanced users who are comfortable editing the Windows Registry.
Pre-Tips:
- Back up your Registry before making any changes to avoid accidental misconfigurations.
- Ensure no conflicting Group Policy or session host restrictions block your RDP microphone redirection, as Registry tweaks alone may not resolve the issue.
- Editing the Registry requires advanced technical knowledge. If you’re unsure, it’s best to seek assistance to avoid causing system instability.
Step-by-Step Instructions:
- Press Win + R, type regedit, and press Enter to open the Registry Editor.

- Navigate to: HKEY_LOCAL_MACHINE > SYSTEM > CurrentControlSet > Control > Terminal Server > WinStations > RDP-Tcp

- Locate or create the key fDisableAudioCapture and set its value to 0 (this enables audio capture redirection).

- Restart the system to apply changes.


Pros:
-
It provides fine-tuned control over your RDP behavior
-
It’s also ideal for custom setups and advanced configurations
Cons:
-
There could be a risk of misconfiguration if not done correctly
-
It requires advanced technical knowledge to implement safely
4. Adjusting Sound Settings on Local and Remote Systems
Configuring sound settings on local and remote systems helps redirect audio devices in RDP, be it input or output. This method is great for troubleshooting and also for users dealing with occasional audio issues.
Pre-Tips:
- Use the “Listen to this device” option on the local system only for testing to avoid potential audio feedback loops.
- Ensure the microphone is selected as the default recording device on the remote system after redirection.
- If sound redirection doesn’t work, verify that the RDP audio settings in the client are correctly configured under the «Local Resources» tab.
Step-by-Step Instructions:
- On the local system, open the Sound settings.
- Go to the Recording tab, select your microphone, and click «Properties.»
- Enable the «Listen to this device» option to test your microphone redirection.
- On the remote system, check that the microphone is listed under input devices in the Sound settings.
- Select the redirected microphone as the default recording device.
Pros:
-
It’s great for troubleshooting microphone issues
-
It also offers a simple verification step to ensure proper redirection
Cons:
-
It involves extra steps for verification
-
It may not fix deeper system-level issues
5. Using RDP Enhanced Protocols
Enhanced RDP protocols, like RemoteFX, improve audio device redirection. This method is ideal for systems running legacy Windows Servers or specialized environments.
Pre-Tips:
- RemoteFX is deprecated in Windows Server 2019 and later versions, so only use this method on legacy systems like Windows Server 2016 or earlier.
- Be cautious of security vulnerabilities when enabling RemoteFX.
- Administrative privileges are needed to enable RemoteFX in Group Policy and launch the necessary services.
Step-by-Step Instructions:
- In Group Policy, enable RemoteFX:
- Navigate to: Computer Configuration > Administrative Templates > Windows Components > Remote Desktop Services > Remote Desktop Session Host > Remote Session Environment.
- Enable «Configure RemoteFX»

- Restart the system to apply the changes.
- In the RDP client, ensure that audio redirection is enabled under the «Local Resources» tab.

Pros:
-
It offers improved performance and compatibility
-
It’s also ideal for legacy systems that need enhanced audio redirection
Cons:
-
It’s not supported on all Windows versions
-
It also requires administrative privileges to enable configurations
NOTE
Issues with microphone in RDP sessions are common and can stem from unsupported hardware, misconfigurations, or network limitations. These problems can cause poor communication, delays, and frustration for you and other remote users. For a detailed instructions on fixing microphone problems in RDP, including common errors and solutions, check out our Microphone Issues in RDP troubleshooting guide.
USB Microphone Redirection via USB Network Gate
USB Network Gate is a software that redirects USB devices in Remote Desktop, including microphones, over the network. This method is ideal for:
- Need advanced microphone functionality in RDP
- Face limitations with native audio redirection methods
Enable a Microphone in an RDP Session via USB Network Gate:
Enable Microphone in RDP
14-day free trial
Benefits of Using UNG for RDP Microphone Passthrough
USB Network Gate offers several key benefits for sharing microphones in RDP sessions. Some of these include:
Supports virtually any USB microphone
USB Network Gate allows RDP access to USB microphones and other devices without any complex configuration, making it an easy-to-use solution for seamless device redirection.
Multiple-platform support
USB Network Gate is a flexible tool that allows cross-platform device sharing between Mac, Windows, and Linux systems. Any platform can act as a server or client, making it ideal for mixed environments.
Secure data transmission
USB Network Gate uses advanced encryption to ensure your data remains secure.
Conclusion
Choosing the right method for RDP microphone redirection depends on your specific requirements. Built-in RDP settings are great for quick and easy setups, while Group Policy and Registry edits offer more control. If you or your team need advanced functionality, tools like USB Network Gate provide seamless USB microphone redirection with added security and cross-platform support.
With this guide, you can choose the best method for RDP microphone redirection, ensuring smooth audio performance for remote work, conferencing, or professional IT management. Whether you need a quick fix, granular control, or advanced USB redirection, these solutions will help you achieve a seamless and efficient remote desktop experience.