
-
08.04.2016, 01:27
#1
Сброс настроек Windows XP
В некоторых ситуациях, в Windows XP необходимо выполнить сброс до заводских настроек. Вдруг, вы надумаете продавать компьютер и хотите полностью его очистить или вирусы одолели, с которыми справиться невозможно, да мало ли что. В общем, выполнить сброс настроек в Виндовс ХР не так сложно. Разумеется, для начала необходимо перекинуть все нужные документы, фотографии и прочие данные на съёмный носитель, а затем можно приступать к откату.
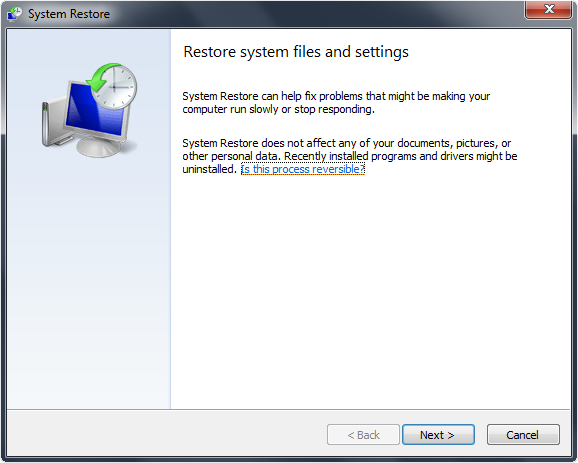
Нажав меню «Пуск» последовательно переходим по пунктам «Все программы» — «Стандартные» – «Служебные» – «Восстановление системы».

Пока не дойдём до выбора контрольной точки восстановления, в которой нужно указать максимально раннюю точку отката.
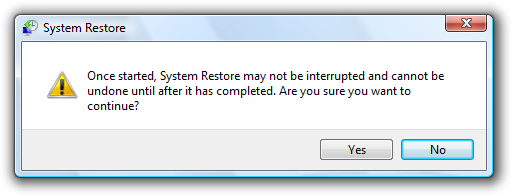
Подтверждаем своё решение «ок», и ждём, пока система сама восстановит все нужные настройки.
Последний раз редактировалось Master; 24.02.2019 в 14:13.
-
08.04.2016, 12:52
#2
Afox, а что делать если точки восстановления удалены, они ведь занимают достаточно места на жеском диске. И время от времени их нужно удалять.
-
08.04.2016, 13:01
#3
Master, тогда только вытащить батарейку из материнской платы на минутку, но я так не пробовала. Наверное это слишком жёсткий сброс.
-
09.04.2016, 16:13
#4
Сообщение от Afox
В некоторых ситуациях необходимо выполнить сброс настроек windows xp.
И что это даст?
Сообщение от Afox
Вдруг вы надумаете продавать компьютер, и хотите полностью его очистить
Для этого нужно просто удалить все свои личные документы и фотографии. А в этом никакой сброс настроек не поможет.
Сообщение от Afox
Пока не дойдём до выбора контрольной точки восстановления, в которой нужно указать максимально раннюю точку отката.
И что это нам даст? У нас просто перестанут работать все программы, которые были установлены на компьютер после этого момента – и все. А вся информация сохранится.
Сообщение от Afox
Master, тогда только вытащить батарейку из материнской платы на минутку
Сброс часов и настроек БИОСа в данной ситуации нам вообще ничего не даст, это никак не повлияет на операционную систему и файлы, записанные на жестком диске.
-
10.04.2016, 00:21
#5
Afox, я не понял фишку с точками восстановления.
-
29.10.2018, 23:43
#6
Сброс настроек в Виндовс ХР не поможет очистить компьютер при продаже. Это именно сброс настроек. А хотелось бы очистить его так, чтобы там не было ничего личного, чтобы можно было идентифицировать прежнего пользователя.
Есть ли такой способ?Quod licet Jovi non licet bovi
-
30.10.2018, 10:06
#7
AHAXOPET, есть. Отформатировать жесткий диск и заново установить ось.
-
30.10.2018, 11:09
#8
Сообщение от Afox
В некоторых ситуациях необходимо выполнить сброс настроек windows xp. Вдруг вы надумаете продавать компьютер, и хотите полностью его очистить, или вирусы одолели, с которыми справиться невозможно, да мало ли что. В общем выполнить сброс настроек в Виндовс ХР не так сложно.
Если я правильно понимаю, это что-то наподобие аналога сброса к заводским настройкам как на смартфонах? Или просто очистка памяти частичная? Или откат к точкам восстановления, которые создавались в начале установки системы? Разъясните если есть информация, интересно стало.
-
30.10.2018, 14:06
#9
macnaked, в ХР не было такой функции, как откат к заводским настройкам. Поэтому и использовали откат к самой ранней версии, чтобы не переустанавливать систему. Хотя, я почему то забыла о том, что диск можно просто отформатировать.
Если переустанавливать систему, то скорее всего нужен будет ключ активации, а если его нет?
-
03.11.2018, 16:51
#10
Сообщение от Afox
Если переустанавливать систему, то скорее всего нужен будет ключ активации, а если его нет?
Я понимаю, что то, что я сейчас посоветую, выходит за рамки одобряемых законом поступков, но тем не менее.
Сейчас очень и очень много раздач на торрент-треккерах, с образами операционных систем.
Любых, и уже взломанных.
Так что про отсутствие ключа активации, это вы зря.Quod licet Jovi non licet bovi
If you’re experiencing issues with your Windows XP machine and haven’t been able to resolve those with the standard fixes, you might want to wipe your Windows XP system to eliminate all your problems. There are other reasons why you may want to reset your computer.
Once you’ve reset your PC, it will work at its optimum performance, allowing you to perform your tasks faster.
| Workable Solutions | Step-by-step Troubleshooting |
|---|---|
| Fix 1. Restore to Factory Settings | Step 1. Start by inserting your XP disc into your computer and turning on your computer…Full steps |
| Fix 2. Use Data Wiper Software to Wipe OS or Data Drive |
Step 1. Click «Wipe Disk» from the panel. Step 2. Choose the OS drive you want to wipe…Full steps |
Can I Reset Windows XP?
While modern versions of the Windows operating system offer built-in reset options, that is not the case with Windows XP. If you don’t have access to System Restore or have already tried and it didn’t work, you’ll need to use your XP’s bootable CD to bring the system to factory settings.
If you’re experiencing severe issues with your system, such as your system getting frozen too often, or you can’t do specific tasks due to some reason, you’ll want to get an XP CD and format your machine. The other reasons for wiping off your computer include virus problems or the desire to configure everything from scratch.
Regardless of your reason, it’s possible to repair XP on your computer.
Part 1. How to Restore to Factory Settings
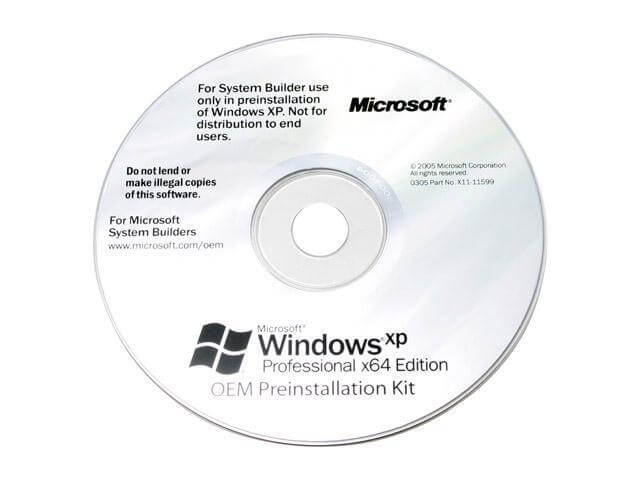
As mentioned earlier, you’ll need a bootable Windows XP CD that you can insert into your machine to reset it. You can either borrow one from your friends if they have one or make one for yourself using online instructions.
Once you’ve got the CD, follow the following steps to start the wiping process. Make sure to back up your important data, as you’ll lose everything as part of the reset process.
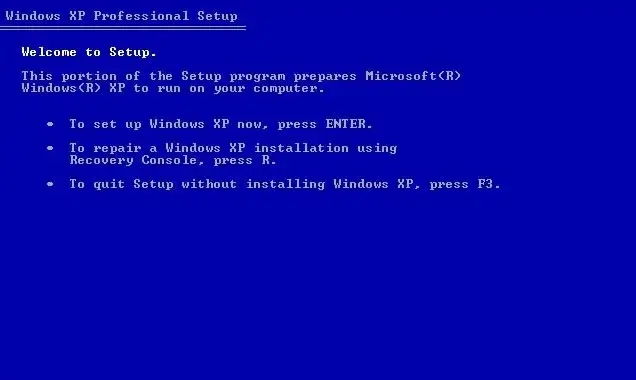
Step 1. Start by inserting your XP disc into your computer and turning on your computer. Press the button that your system asks you to boot from your CD.
Step 2. Select the «Repair Install» option on Windows XP’s welcome page by pressing the Enter key on your keyboard. Then, ensure you’ve selected the correct drive for your XP repair.
Step 3. Your system will now ask you to choose one of the two install options. You need to press the R key to repair your system. You don’t have to go for a complete reinstall at this point.
Step 4. Wait while the disc repairs and installs specific Windows XP files on your computer. Then, follow the instructions displayed on your screen to finish setting up the operating system.

Once you’ve done the above, you will reach your login screen and your desktop. From here on, you can configure and work with your PC however you want. You’ll probably want to set up certain things with your system, like your hardware devices before you start using it.
Part 2. Use Data Wiper Software to Wipe OS or Data Drive
Since most people don’t use Windows XP anymore, it’s hard to get your hands on a bootable XP disc. If you can’t fix your machine because of this reason, you may want to explore other available options to wipe off your XP-based PC.
One way to do the task is to use EaseUS BitWiper. Using this little utility, you can wipe off the data stored on your computer in no time. The app works like any other app on your machine and allows you to quickly and securely delete your saved data.
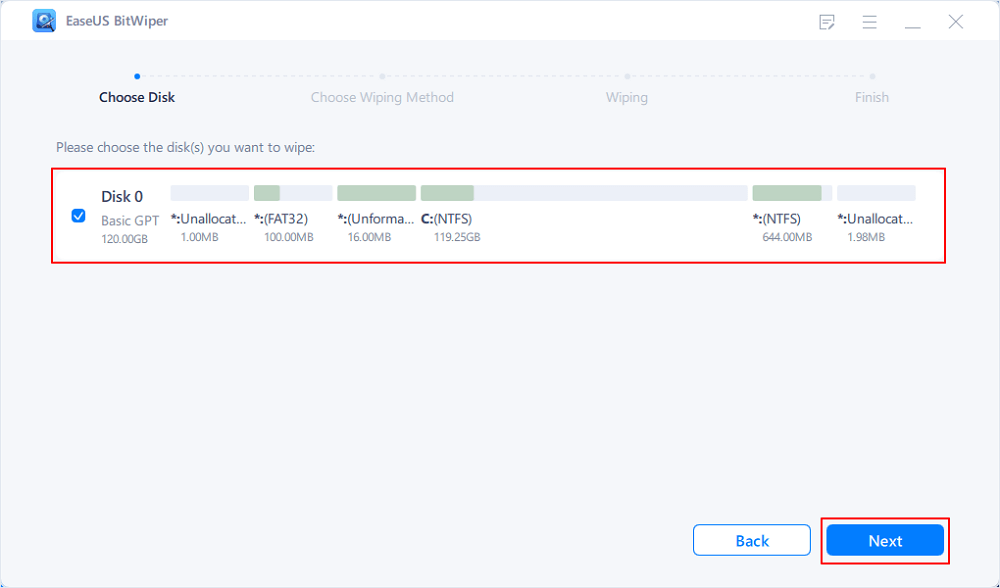
Since you’re looking to remove everything from your PC, use BitWiper’s disk erase option to delete everything from your operating system’s drive.
Step 1. Click «Wipe Disk» from the panel.

Step 2. Choose the OS drive you want to wipe and click «Next.»
Notice: Select the correct OS drive to erase. Otherwise, your data will lose permanently.
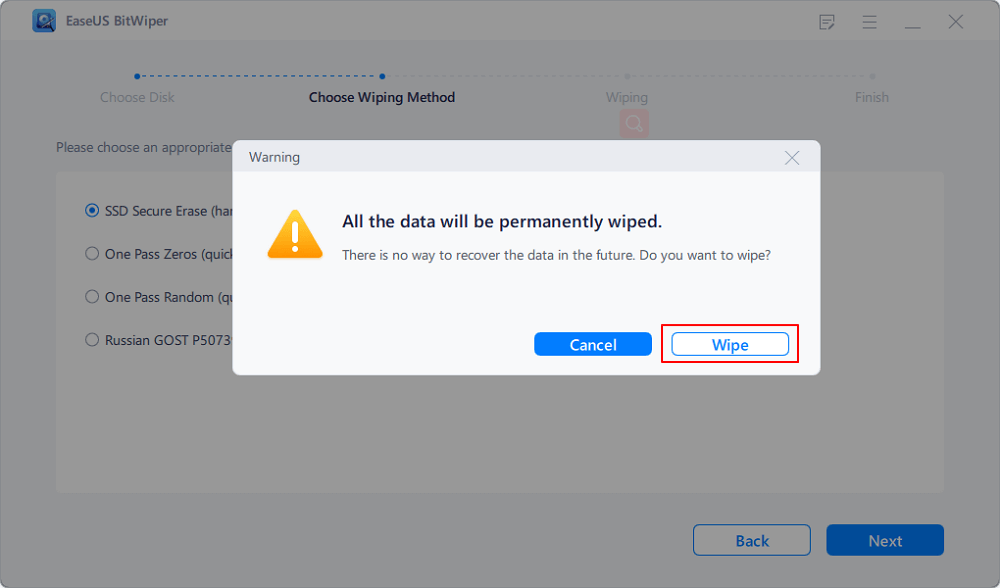
Step 3. Choose an appropriate wiping method and then click «Next.»
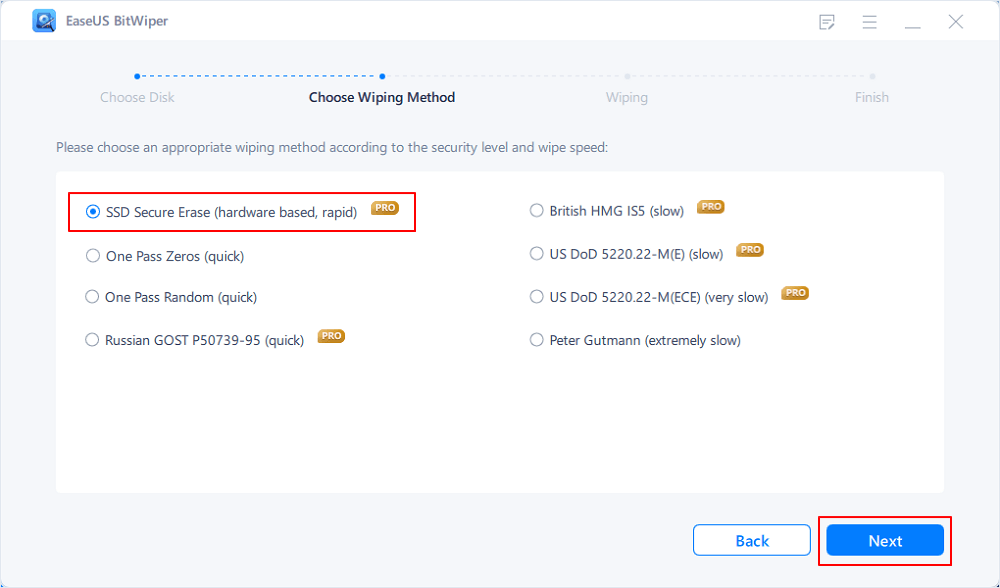
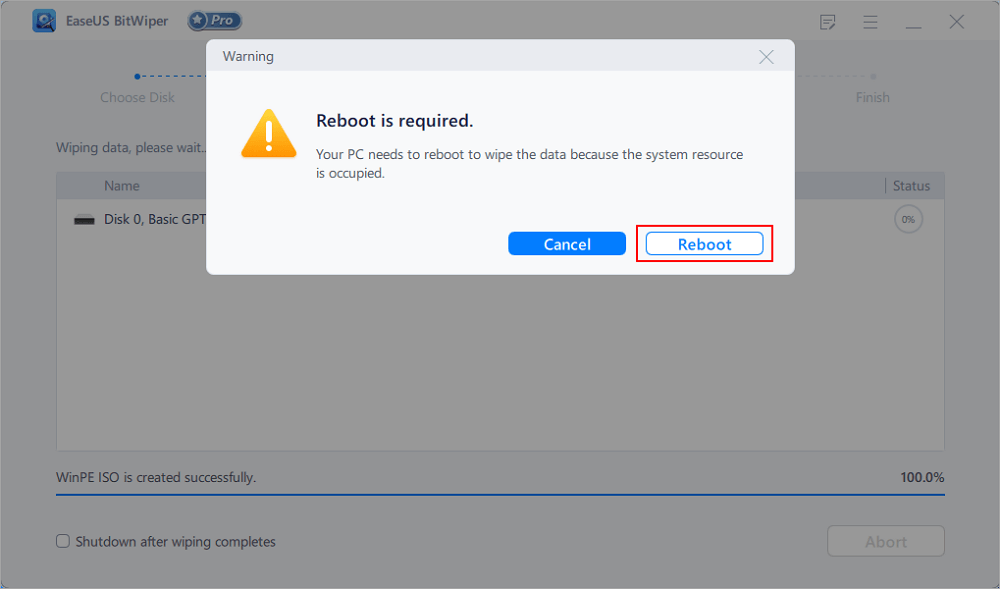
Step 4. Confirm the warning message and click «Wipe.»
Confirm the warning message again and click «Reboot.»
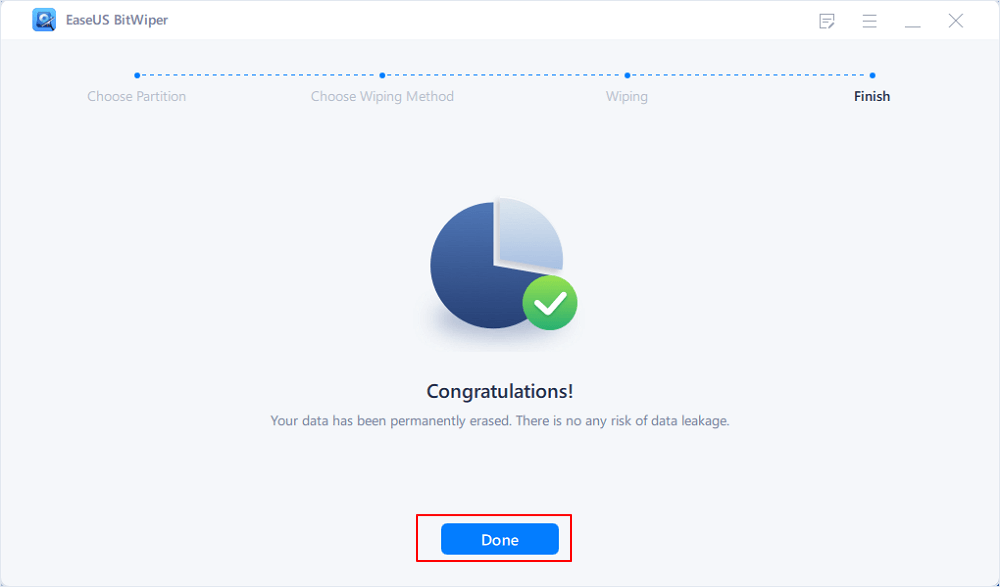
Step 5. Wait for wiping complete.
The other salient features of this tool include:
Wipe Data
With the app’s free version, you can wipe a disk, wipe multiple partitions on a disk, and securely shred up to five files. The app supports deleting data from both your partitions and drives simultaneously, saving your precious time.
Secure File Deletion
EaseUS BitWiper uses government-standard wiping functions, which means you rest assured that the people using your PC after you won’t have access to any of your data. It uses a series of DoD5220 algorithms to securely delete your data so any app can’t recover it.
It offers fast wiping performance, which means you don’t have to wait for hours to get your partitions or drives deleted. It destroys all the data on your drives at a faster rate.
In addition to drives and partitions, BitWiper offers a file shredder to help you get rid of your files forever. You can’t recover these shredded files using any tool on the market. These files are gone for good.
Conclusion
There are many reasons to factory reset your PC running Windows XP. You may be facing specific issues with it, you need to customize it from the beginning, or you want to boost its speed by removing everything from it.
While you do have an option to reset your XP system with a disc, it doesn’t always work, as getting the disc is difficult. In these cases, it’s worth trying out the EaseUS BitWiper tool as it offers pretty much the same features as the XP disc and lets you wipe off everything on your computer, including the operating system.
Even with the tool’s free version, you’re getting the option to wipe a single drive, which is all you need if you were initially only looking to remove your operating system.

How to Restore the Factory Settings in XP Without a CD
Image Credit:
GoodLifeStudio/E+/GettyImages
If you’re still rocking a system running Windows XP, don’t take any gaff from bleeding-edge techies. In its heyday, Windows XP sold over 600 million copies, according to web-based monitoring service NetApplications, and once held 44.85 percent of the operating system market. Even in 2017, by which point XP was already very long in the tooth, the sturdy old OS was still installed on 7.04 percent of the world’s computers, as per Netmarketshare.com data. At the time, it was more widely used than Windows 8.1, any version of Mac OS X or any version of Linux. Since XP had such a high proliferation rate, there’s plenty of info on how to factory reset Windows XP. While having an XP installation disc on hand is the best route, the CD-less among us still have options.
The State of XP
Twelve years after Windows XP hit the scene in 2002, Microsoft officially laid it to rest. The tech giant declared it would end support for the popular operating system on April 8, 2014. That means that, after that date, there were no more security updates from Microsoft. Likewise, update and patch support from third-party software and hardware makers saw a slow decline until becoming virtually nonexistent.
But if you’re an XP user who’s keen to restore your system to factory settings, there’s a silver lining in there for you. Because the dust has settled on all updates and support for Windows XP, we can be certain that all users are having the same baseline experience without having to worry about different versions of the operating system. Basically, we know exactly which version everyone has, and that’s precisely because we don’t have to worry about future updates. Without worrying about potential variations, we know that the process for getting back to those factory settings will be a fairly consistent experience for just about every XP user.
The Bad News
To completely restore a Windows XP computer (or any other Windows PC, for that matter) to its original, fresh-out-of-the-box factory settings, you’re looking for a process called «system reset» or «factory reset.» This wipes the hard drive clean of all your personal files, software and settings, leaving the computer with a fresh new install of Windows XP and the programs it natively includes.
The bad news is that, in order to perform a full factory reset on Windows XP as Microsoft intended, you’re going to need that Windows XP CD (meaning the CD used to install the Windows XP operating system). While Windows 8 and beyond made system reset a built-in software tool that you can use sans compact disc, this function was only made officially available via CD-ROM back in the XP days. But don’t panic yet.
Track Down a CD
If you’re bound and determined to party like it’s 2004, getting your hands on a shiny new (or shiny used) Windows XP CD isn’t too terribly difficult, and it won’t break the bank. In this case, eBay is probably your best bet.
Based on early 2019 listing prices, you can easily net a pre-owned Windows XP Home Edition CD-ROM starting at around $4.99, or around $30 for a brand new, still shrink-wrapped in the box copy. In either case, there are a few things you should be wary of before you start shopping if performing a factory reset is the name of the game:
- Make sure the CD is licensed.
- Make sure the CD includes a product key.
- Do not purchase a «reinstallation» CD branded with a particular PC manufacturer (such as Dell or HP), as this may not be compatible with your computer.
- Similarly, do not purchase a «service pack,» as this caters to existing installs.
- Be careful to avoid purchasing digital or «digital CD» versions of Windows XP. Though they may be cheaper, they won’t be able to perform the factory reset you’re looking for (not to mention, they may be legally dubious).
Perform a System Reset
About eleven bucks (with shipping) later, you’ve got your retro-chic Windows XP CD-ROM ready to roll. Now that you’ve saved that CD from its dark future as a coaster, it’s time to factory reset Windows XP the proper way. Here’s a step-by-step guide to the not-so-strenuous journey:
- Insert the Windows XP installation disc into your computer’s CD-ROM drive.
- Restart the PC.
- Press your favorite key in the world when the message «Press any key to boot from CD» appears onscreen.
- Hit «Enter» at the Windows XP setup welcome screen.
- Press «F8» to accept the terms and agreements (after you’ve thoroughly read them, of course).
- Follow the on-screen prompts and select the hard drive partition (i.e., section) of your choice on which to format and install Windows XP.
Formatting the drive erases all of its existing data (so make sure you’ve backed up everything you want to hold on to) and begins the installation process. You may have to click «Yes» or a similar option to officially kick it off, but once the OS is installed, it’ll have all the same features and settings of a factory-fresh Windows XP computer.
Try This CD Alternative
For the countless droves of Windows XP users who’ve misplaced their original installation disc or never had one in the first place, a software company called RecoveryEssence and the Western New York Computer Repair Service offer a solution.
Available for a little under $15, as of 2019 prices on Amazon, this unofficial software is called, fittingly enough, XP Reinstall. The DVD promises to reinstall the Windows XP operating system just like new. This fresh install includes the Microsoft-mandated Service Pack 1, Service Pack 2 and Service Pack 3, as well as the Internet Explorer 8 browser. It comes packed with the final Windows XP update so you won’t have to perform any manual updates yourself.
According to RecoveryEssence, the disc initializes a replacement of XP on any hard drive regardless of your computer’s brand. Though it’s not endorsed by Microsoft in an official capacity, the software has been endorsed by over 75 Amazon customers, who give it 3.6 out of 5 stars.
Other companies offer similar software, as well. Advanced Repair System’s Windows XP Reinstall, Repair, Restore, Recovery Disk also aims to be a factory-fresh XP experience. This alternative retails for about half the cost of the RecoveryEssence solution, but it only works on 32-bit versions of XP and requires you to use your original Windows XP product key to complete the reinstallation. While the RecoveryEssence software works across Windows XP Home and Business editions, Advanced Repair System’s disc is designed to work only with Windows XP Home.
Try These Software Alternatives
Fortunately, CDs aren’t the be-all, end-all option for restoring your Windows XP computer to its more stable prime. Various developers offer a slate of software that can help you back up and restore your XP PC in much the same way that System Restore works on more modern, post-XP operating systems, but often with a few more perks to boot. Let’s take a peek at just a few of them.
- EaseUS Todo Backup: You’ll need to install EaseUS Todo Backup before your XP computer crashes to take full advantage of its benefits, but once installed, it essentially gives you the ability to perform a customized System Restore, so you can restore your OS to working condition without having to do a full reinstallation. This free utility creates recovery backups with just one click and even lets you clone your hard drive to another destination for backup purposes.
- Paragon Drive Copy 14 Special Edition for XP: Available for free download, Paragon’s Drive Copy 14 Special Edition might not help you out of a virus-induced pinch, but it offers a no-cost backup solution for your XP computer if you’re planning to migrate from one XP system to another. Drive Copy 14 allows you to copy your full hard disk and even lets you migrate the OS from a regular hard drive to a smaller solid-state drive.
- Macrium Reflect: Though it comes at a cost of $69.95 for single license, Macrium Reflect 7 Home Edition packs more features than the competition and works on Windows XP, Vista, 7, 8 and 10 operating systems. This tool automatically backs up your files and folders to a compact, compressed archive file, allowing you to recover your entire disk with a few clicks. Additionally, Macrium helps you recover specific hard drive partitions, clone your hard drive, recover data on a per-item basis and protect your backups from malicious ransomware via Macrium Image Guardian. You can give it a shot for free with a 30-day trial.
What About System Restore?
Whether you still have your Windows XP disc in your CD binder, sold it at a yard sale with your Nintendo’s GameCube or never had one to begin with, System Restore can help restore your computer to an earlier state. It won’t get you to out-of-the-box factory settings, and the included system utility might not include all the bells and whistles of third-party software, but it does serve as a sort of mini time machine that can help you solve all sorts of pesky issues, provided those issues have recently appeared on your system.
Part of Windows’ suite of tools, System Restore usually works in the background of your computer. At regular intervals called Restore Points, System Restore basically «remembers» the state that computer is in, taking a sort of snapshot of your files and settings. When you perform a System Restore, you can return to that saved state without having to totally reinstall Windows XP.
Perform a System Restore
Though you can’t restore XP to factory settings without a CD, performing a System Restore is a fairly straightforward process if you’re still able to access your XP computer’s desktop:
- Head to the Start menu, then click «Help and Support.»
- Select «Undo changes to your computer with System Restore» under the «Pick a Task» section, then hit «Restore your computer to an earlier time» and «Next.»
- You’ll see a calendar that says «On this calendar, click a bold date.» Any of those bolded dates represent a Restore Point. Select the Restore Point you wish to return to, or click a restore time from the list below the calendar.
- Click «Next,» then verify that this is your desired Restore Point by clicking «Next» one more time.
- Wait for the computer to restart. When the «Restoration Complete» window appears upon restart, click that «OK» button.
If you can’t access your desktop, not all hope is lost. Use this trick to get System Restore rolling, sans Start menu:
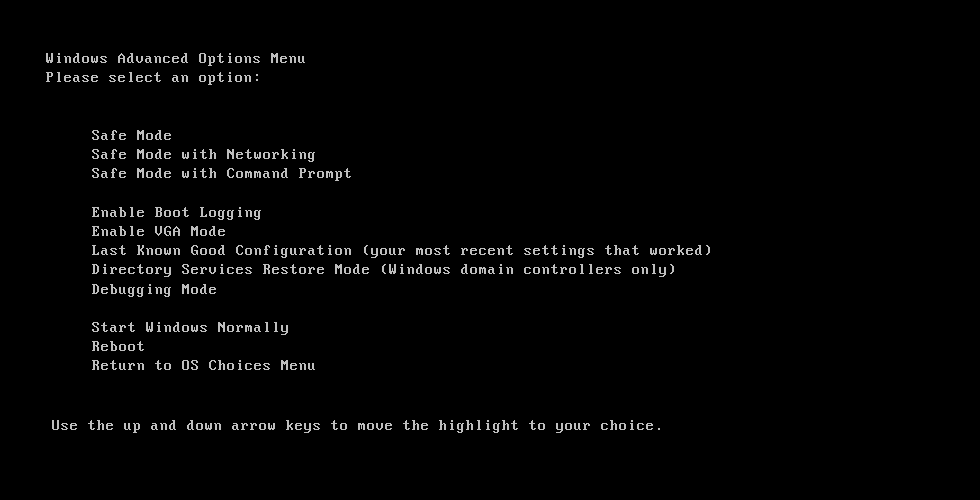
- Turn your computer off, then turn it back on. As it’s powering up, press «F8» once every other second until the Windows Advanced Options menu appears.
- Using the arrow keys, select «Safe Mode with Command Prompt» and hit Enter.
- Use your administrator credentials to log in as an administrator to make the blinking command prompt cursor appear. In the blank field, type «C:\Windows\system32\restore\rstrui.exe» and press the Enter key once again to launch System Restore.
Resetting Windows XP to its factory settings can be a daunting task, but it’s a useful skill to have when your computer starts acting up. By following the steps in this guide, you’ll be able to restore your Windows XP computer back to the way it was when you first bought it, fresh and ready for a new start.
Resetting Windows XP to its factory settings is a great way to fix major computer issues or clean out your system for a fresh start. This process will erase all data and restore the operating system to its original state. Before proceeding, make sure to back up all important files.
Step 1: Back up your files
Before resetting your computer, it’s crucial to back up all your important files to an external hard drive or cloud storage service.
Backing up your files ensures that you don’t lose any important documents, photos, or other data when you reset your computer. It’s always better to be safe than sorry!
Step 2: Access the recovery partition
Most Windows XP computers come with a recovery partition that you can access by restarting your computer and pressing a specific key combination during the boot process.
The key combination varies depending on your computer’s manufacturer, but it’s usually one of the function keys (F1, F2, F9, F10, etc.), or the «Ctrl» and «F11» keys. Check your computer’s manual or the manufacturer’s website for the correct combination.
Step 3: Begin the factory reset process
Once you’re in the recovery partition, look for an option to «restore» or «recover» your computer and follow the on-screen instructions to begin the reset process.
The recovery partition will guide you through the process, which usually involves confirming that you want to erase all data and restore the system to factory settings. Make sure you’re ready to proceed before confirming.
Step 4: Wait for the reset to complete
The factory reset process can take some time, often up to an hour, so be patient and wait for it to complete.
Don’t turn off your computer or interrupt the reset process, as this can cause serious issues and potentially leave your computer unusable.
Step 5: Set up Windows XP again
After the reset is complete, your computer will restart, and you’ll need to set up Windows XP again, just like when you first got your computer.
This involves setting your region and time zone, creating a user account, and going through the initial Windows XP setup process. Once you’re done, your computer will be like new!
After you complete these steps, your Windows XP computer will be reset to its factory settings, with all previous data erased and the system restored to its original state. You’ll have a clean slate to start over, install new applications, and set up your computer just the way you like it.
Tips for Resetting Windows XP to Factory Settings
- Ensure that you have all necessary installation discs and license keys for software you plan to reinstall after the reset.
- Disconnect any external hardware devices, such as printers or external hard drives, before starting the reset process.
- If your computer didn’t come with a recovery partition, you may need to use a Windows XP installation disc to perform the factory reset.
- Consider updating your Windows XP operating system to a newer version after the reset, as Microsoft no longer supports Windows XP.
- If you encounter any issues during the reset process, refer to your computer’s manual, the manufacturer’s website, or seek professional help.
Frequently Asked Questions
Can I reset Windows XP without a recovery partition or installation disc?
If you don’t have access to a recovery partition or an installation disc, resetting Windows XP to factory settings may not be possible. In this case, you may need to seek professional assistance.
Will resetting Windows XP to factory settings remove viruses or malware?
Yes, resetting Windows XP to factory settings will remove all data, including any viruses or malware, from your computer.
Can I choose what data to keep during the reset process?
No, the factory reset process will erase all data on your computer. Make sure to back up any files you want to keep before starting.
How often should I reset Windows XP to factory settings?
Resetting Windows XP to factory settings should only be done when necessary, such as when you’re experiencing significant system issues or want to clean out your computer for a fresh start.
What should I do after resetting Windows XP to factory settings?
After the reset, you’ll need to set up Windows XP again and reinstall any applications and drivers you need. It’s also important to restore any backed-up files to your computer.
Summary
- Back up your files.
- Access the recovery partition.
- Begin the factory reset process.
- Wait for the reset to complete.
- Set up Windows XP again.
Conclusion
Resetting Windows XP to factory settings is a powerful solution for fixing persistent computer issues or simply starting over with a clean system. While the process erases all data, it also provides the opportunity to set up your computer exactly as you want it, free from any previous errors or clutter. Always remember to back up important files before proceeding and follow the steps carefully to ensure a smooth reset. After the reset, you’ll enjoy a fresh, clean version of Windows XP, just like when you first bought your computer. If you’re unsure or encounter problems, don’t hesitate to seek professional help. Remember, a well-maintained computer is a happy computer!
Kermit Matthews is a freelance writer based in Philadelphia, Pennsylvania with more than a decade of experience writing technology guides. He has a Bachelor’s and Master’s degree in Computer Science and has spent much of his professional career in IT management.
He specializes in writing content about iPhones, Android devices, Microsoft Office, and many other popular applications and devices.
Read his full bio here.
Factory Settings or Factory Defaults usually refers to performing a restore or a reset of your computer to its original configuration as it first was when it was purchased.
A restore to factory settings is also known as a reset to factory settings or as a restore to factory defaults.
Restoring a computer to its factory settings will delete all personal files: music, movies, pictures and any installed software applications or drivers that were not included in the original configuration of that computer.
Your computer can be restored to its factory settings if any of the following are applicable to you:
- You have a recovery partition installed on your computer. This partition is usually installed by the PC manufacturer (examples: Dell or HP) and can be used to restore a computer.
- You have a set of recovery discs for your computer. These discs usually come with your computer purchase and can be used to perform a restore.
- You have the original Windows installation disc. This is the original disc that has Windows XP, Vista, 7, 8 or 10. You can use this media to reinstall Windows.
If none of the above are applicable to you, you still have these options to restore or repair your computer:
- Use System Restore. Windows XP-8 systems have the System Restore feature enabled by default which can be used to restore a PC to an earlier time. If System Restore wasn’t enabled, you won’t be able to use to restore the PC.
- Use Easy Recovery Essentials. Depending on the error your computer is showing, use the Automated Repair feature to automatically fix boot errors or its System Restore feature to restore your computer plus other useful features: access and backup your files, web browser, antivirus scanner etc.
Restore Windows XP to factory settings
If no tools are available from the PC manufacturer, e.g. recovery disc or recovery partition, use the following tools from Windows XP itself to reset a computer to its factory settings:
- The System Restore software (read instructions if you can boot into the system or instructions if you don’t have a Windows XP CD)
- The installation CD to perform a Repair Install or a reinstall of the system
- Easy Recovery Essentials
Restore with installation CD
If System Restore isn’t available for your Windows XP (turned off), use the original installation disc to perform a repair or reinstall Windows XP again.
To perform a Repair Install, follow these steps:
- Insert the original disc in the disc tray
- Start the computer
- Press any key when the computers shows the “Press any key to boot from CD” message
- Wait for the Windows XP CD to load
- At the Welcome to Setup screen, press Enter to access Repair Install.
Do not press R. You don’t need access to Recovery Console, but the Repair Install.
- You must agree to the End-Use License Agreement. Press F8 to agree.
- At the next screen, make sure that you have the drive where Windows XP is installed highlighted. This is usually presented as:
C:\Windows "Microsoft Windows XP Professional"
- Confirm that Setup presents you with these 2 choices:
To repair the selected Windows XP installation, press R.
and
To continue installing a fresh copy of Windows XP without repairing, press ESC.
If you don’t have the “press R” option, you can’t perform a Repair Install.
- Once highlighted, press R
- Wait for the process to perform Repair Install
- Windows XP Setup will begin to install the operating system again
- Continue with the steps of the wizard to setup the system again
For more information about System Restore on Windows XP systems, read the Windows System Restore: Windows XP guide.
If you can’t use the installation CD, you can use Easy Recovery Essentials:
- Download Easy Recovery Essentials
- Burn the ISO image. Follow these instructions on how to burn the bootable ISO image very carefully, as making a bootable CD can be tricky! Alternatively, these instructions explain how to create a bootable EasyRE recovery USB stick/drive.
- Boot Easy Recovery Essentials
- Select Windows XP from the list and click System Restore
- Choose a restore point
- Easy Recovery Essentials will now create a backup of your current system configuration and begin restoring the selected snapshot
- Once the process is complete, click Restart
- Done! Your Windows XP should now start again.


Restore without installation CD
If you don’t have the original Windows XP installation CD, you may be able to use System Restore in Safe Mode if this feature was enabled from the start.
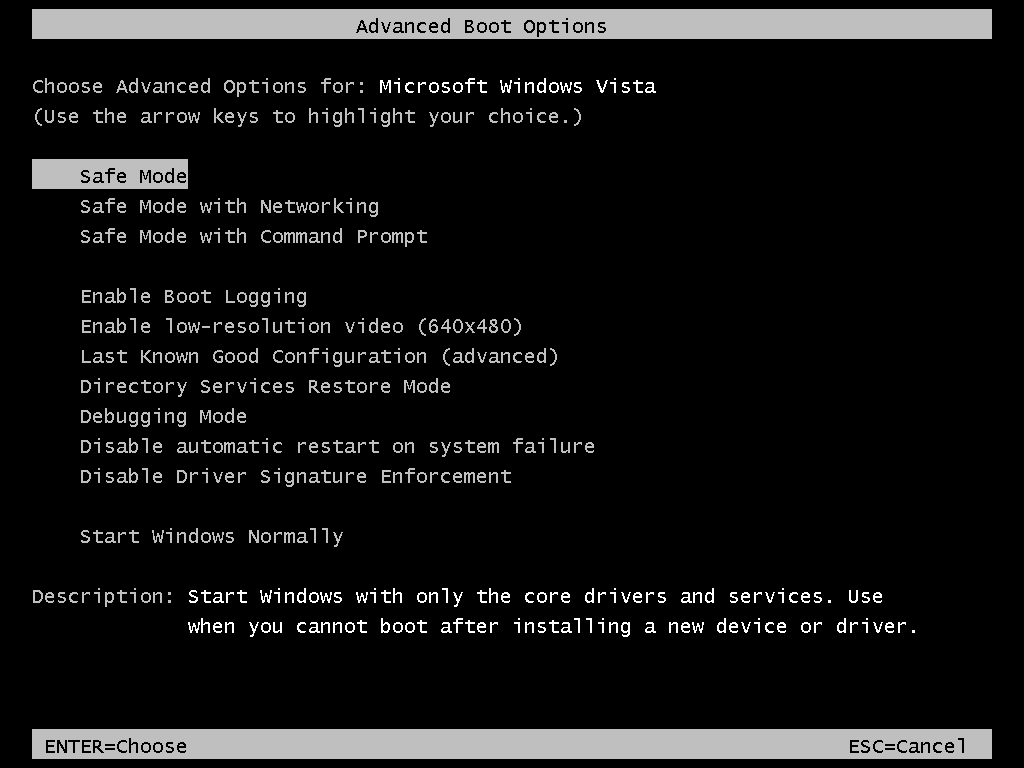
To access Safe Mode, follow these steps:
- Turn on the computer
- Press and hold the F8 key right after booting
- At the Windows Advanced Options screen, choose Safe mode with a Command prompt
- Once the option is highlighted, press Enter
- Login as Administrator or as any user with administrative rights to your PC
- When Command Prompt appears, type this command and hit Enter:
%systemroot%\system32\restore\rstrui.exe
- Follow the next of instructions to continue with System Restore.
If you can’t boot into Safe Mode, access System Restore from Easy Recovery Essentials:
- Download Easy Recovery Essentials
- Burn the ISO image. Follow these instructions on how to burn the bootable ISO image very carefully, as making a bootable CD can be tricky! Alternatively, these instructions explain how to create a bootable EasyRE recovery USB stick/drive.
- Boot Easy Recovery Essentials
- Select Windows XP from the list and click System Restore
- Choose a restore point
- Easy Recovery Essentials will now create a backup of your current system configuration and begin restoring the selected snapshot
- Once the process is complete, click Restart
- Done! Your Windows XP should now start again.
Other options for restore
Method #1: Reinstall Windows XP
If Fix #1 (Repair Install) explained above doesn’t fix the computer, you can also reinstall the system to have a hard reset of your system.
Reinstalling Windows XP will delete all personal files. Use Easy Recovery Essentials to backup your files before you proceed.
To do so, follow these steps:
- Insert the Windows XP CD in the tray
- Turn on the system
- Press any key to boot from the CD, when at the “Press any key to boot from CD” screen
- Wait for the CD to load the necessary library of files
- At the Welcome to Setup screen, press Enter to begin the installation
- Agree to the End-Use License Agreement. Press F8 to do so.
- Select where to install Windows XP. You can also use the D and C keys to delete and then create a new partition.
- Press Enter to install the system on the selected partition (highlighted)
- Press Enter to continue
- Choose to format the partition
- Wait for the process to finish
- Remove the CD from the disc tray when Setup mentions that your computer will restart
- Wait for the system to boot into the Windows XP
- Follow the instructions of the wizard to setup the system again
Method #2: Use Easy Recovery Essentials
Easy Recovery Essentials (or EasyRE) can be used to repair or restore a Windows XP system:
- Find and fix errors automatically with Automated Repair
- Recover your PC from infections with the built-in antivirus
- Restore your PC to a working state
- Access and backup your most important data (like documents, pictures, music, videos and so on)
Download Easy Recovery Essentials
Restore Windows Vista to factory settings
To restore a Windows Vista to factory settings, you can use:
- System Restore to restore the computer to an earlier working session
- An install CD to run System Restore, a Startup Repair or a reinstall to restore the computer
- Easy Recovery Essentials
If the above aren’t available for you, you can also boot into Safe Mode and attempt to run System Restore and Startup Repair.
To perform a hard reset of the computer, you need the installation disc to reinstall Windows Vista.
Restore with installation CD/DVD
If you still have the original Windows Vista CD/DVD and the CD has the Startup Repair feature installed, you can use it to either repair your computer or reinstall the system.
Fix #1: Run Startup Repair
Startup Repair won’t reset a computer to its original factory settings, but it can attempt to fix various errors.
To run Startup Repair follow these instructions:
- Boot the computer
- Insert the Windows Vista CD
- Press any key at the “Press any key to boot from CD or DVD” screen
- At the Install Windows window, select your language, time and currency and keyboard method
- Click Next
- Click Repair Your Computer
- Select the operating system from the list
- Click Next
- Wait for Startup Repair to search and fix for any issues it finds
- At the Restart your computer to complete the repairs screen, click Finish
Fix #2: Use Easy Recovery Essentials
Easy Recovery Essentials can access System Restore snapshots created on a Windows Vista computer. To do so, follow these steps:
- Download Easy Recovery Essentials
- Burn the ISO image. Follow these instructions on how to burn the bootable ISO image very carefully, as making a bootable CD can be tricky! Alternatively, these instructions explain how to create a bootable EasyRE recovery USB stick/drive.
- Boot Easy Recovery Essentials
- Select Windows Vista from the list and click System Restore
- Choose a restore point
- Easy Recovery Essentials will now create a backup of your current system configuration and begin restoring the selected snapshot
- Once the process is complete, click Restart
- Done! Your Windows Vista should now start again.

Restore without installation CD/DVD
Fix #1: Run System Restore from Safe Mode
System Restore may also be available via Safe Mode without a need for the original Windows Vista installation CD.
System Restore will not work if it has been turned off!
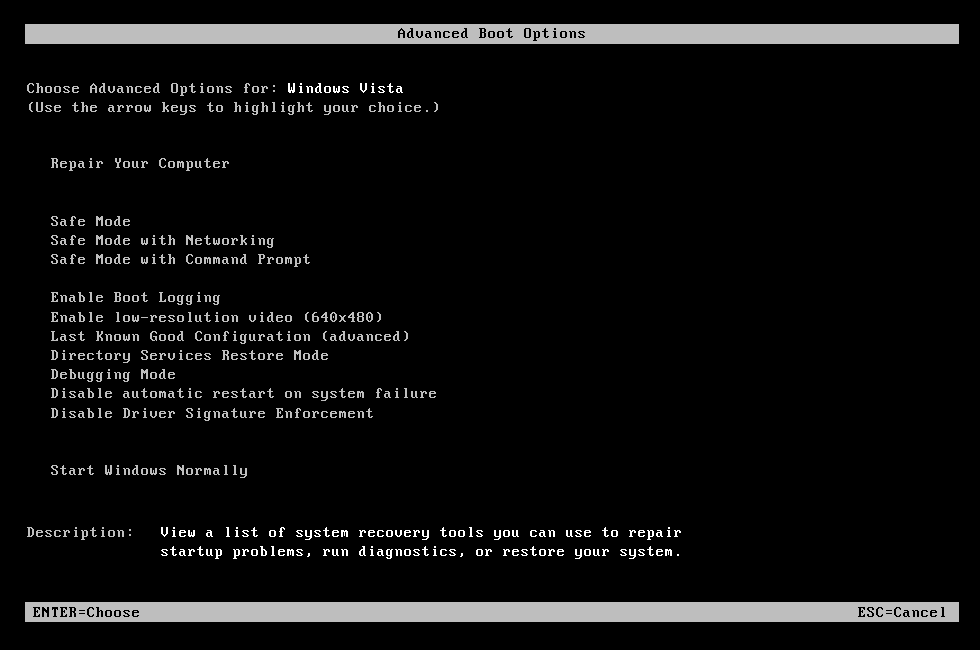
To access System Restore via Safe Mode, follow these steps:
- Start the PC
- Press and hold the F8 key before the Windows Vista logo appears on your monitor
- At the Advanced Boot Options, select Safe mode with Command Prompt
- Press Enter
- When Command Prompt is available, type the following command:
rstrui.exe
- Press Enter
- Enter the password for the Administrator and press Enter, if prompted to do so
- Follow the wizard instructions to choose a restore point
Fix #2: Run Startup Repair from Safe Mode
Startup Repair might also be installed on your hard disk. Startup Repair won’t reset your computer to its factory settings, but it can attempt to fix various errors.
To access it, follow these instructions:
- Boot the computer
- Press F8 and hold until your system boots into Windows Advanced Boot Options
- Select Repair Cour Computer
- Select a keyboard layout
- Click Next
- Login as an administrative user
- Click OK
- At the System Recovery Options window, select Startup Repair
Fix #3: Use Easy Recovery Essentials
Easy Recovery Essentials can access the snapshots created by System Restore on a Windows Vista computer. Follow these steps:
- Download Easy Recovery Essentials
- Burn the ISO image. Follow these instructions on how to burn the bootable ISO image very carefully, as making a bootable CD can be tricky! Alternatively, these instructions explain how to create a bootable EasyRE recovery USB stick/drive.
- Boot Easy Recovery Essentials
- Select Windows Vista and click System Restore
- Choose a restore point
- Easy Recovery Essentials will now create a backup of your current system configuration and begin restoring the selected snapshot
- Once the process is complete, click Restart
- Done! Your Windows Vista should now start again.
Other options for restore
Method #1: Run System Restore from Windows Vista
Windows Vista systems can be restored to an earlier time if System Restore was enabled and was able to create snapshots correctly.
If you can access System Restore on your Windows Vista system, follow these steps:
- Boot your computer
- Click Start
- Type
restorein the search bar - Select Backup and Restore Center from the search results list
- Select either to select a custom date for restore or a recommended date by Windows Vista
- Click Next
- Click Yes, at the warning message
- Wait for process to finish
- Your computer may restart
- When your computer boots back, click Close when presented with the success message: System Restore completed successfully
For more information about System Restore on Windows Vista systems, read the Windows System Restore: Windows Vista guide.
Method #2: Reinstall Windows Vista
To reinstall Windows Vista and perform a hard reset of your computer, follow these steps:
Reinstalling Windows Vista will delete all personal files. Use Easy Recovery Essentials to backup your files before you proceed.
- Insert the install CD
- Restart the computer
- Press any key to boot from the CD when prompted to do so
- At the Install Windows window, select a language, time and keyboard method
- Click Next
- Click Install Now
- Follow the wizard instructions to install Windows Vista on your computer
Method #3: Use Easy Recovery Essentials
Easy Recovery Essentials (or EasyRE) can be used to repair or restore a Windows Vista system:
- Find and fix errors automatically with Automated Repair
- Recover your PC from infections with the built-in antivirus
- Restore your PC to a working state
- Access and backup your most important data (like documents, pictures, music, videos and so on)
Download Easy Recovery Essentials
Restore Windows 7 to factory settings
Windows 7 systems can be restored to factory settings (or factory defaults) if you have the installation disc available to perform a reinstall or a complete new installation of Windows 7.
If a disc isn’t available, you can use System Restore or Startup Repair to either restore the computer to an earlier working time or to potentially repair errors.
You can also use Easy Recovery Essentials.
Restore with installation CD/DVD
If you have the Windows 7 installation disc available, you can use it to perform a repair of your computer (and attempt to fix potential issues), a restore if System Restore is enabled, or to reinstall Windows 7.
Fix #1: Run Startup Repair or System Restore from the disc
The steps are:
- Start the computer
- Press and hold the F8 key
- At Advanced Boot Options, choose Repair Your Computer
- Press Enter
- Select a keyboard language and click Next
- If prompted, login with an administrative account
- At the System Recovery Options, choose System Restore or Startup Repair (if this is available)
- Follow the wizard instructions to continue with any of the above

System Restore can restore your computer to an earlier date if it has been enabled and ran correctly, while Startup Repair can attempt to fix any found errors that may prevent you from starting Windows 7
Fix #2: Use Easy Recovery Essentials
Easy Recovery Essentials can access System Restore snapshots:
- Download Easy Recovery Essentials
- Burn the ISO image. Follow these instructions on how to burn the bootable ISO image very carefully, as making a bootable CD can be tricky! Alternatively, these instructions explain how to create a bootable EasyRE recovery USB stick/drive.
- Boot Easy Recovery Essentials
- Select Windows 7 and click System Restore
- Choose a restore point
- Easy Recovery Essentials will now create a backup of your current system configuration and begin restoring the selected snapshot
- Once the process is complete, click Restart
- Done! Your Windows 7 should now start again.
Restore without installation CD/DVD
If no install CD or DVD is available, you can boot into Safe Mode and run System Restore.
Fix #1: Run System Restore from Safe Mode
Before you begin, note that you can’t undo a restore if you run it from Safe Mode.
The instructions are:
- Turn on the computer
- Press and hold the F8 key
- At the Advanced Boot Options screen, choose Safe Mode with Command Prompt
- Press Enter
- Log in as Administrator
- When Command Prompt appears, type this command:
rstrui.exe
- Press Enter
- Follow the wizard instructions to continue with System Restore
Or, you can run System Restore via the System Recovery Options menu:
- Turn the computer and press the F8 key as above
- When you are at the Advanced Boot Options screen, choose Repair Your Computer
- Choose a keyboard layout
- Click Next
- At the System Recovery Options window, choose System Restore
- Follow the instructions to start the restore process

Fix #2: Run Startup Repair
Startup Repair can be included on your computer. You can run Startup Repair to perform a scan and fix potential issues.
Startup Repair doesn’t restore a computer to its factory settings, but it can potentially fix errors that prevent you from booting into the system.
The steps to access Startup Repair are:
- Start the computer
- Press the F8 key before the Windows 7 logo appears
- At Advanced Boot Options, choose Repair Your Computer
- Press Enter
- At the System Recovery Options window, choose Startup Repair
- Follow the instructions to start the repair process
Fix #3: Use Easy Recovery Essentials
Easy Recovery Essentials can access the snapshots created by Windows 7 System Restore. Follow these steps to access your computer’s restore snapshots:
- Download Easy Recovery Essentials
- Burn the ISO image. Follow these instructions on how to burn the bootable ISO image very carefully, as making a bootable CD can be tricky! Alternatively, these instructions explain how to create a bootable EasyRE recovery USB stick/drive.
- Boot Easy Recovery Essentials
- Select Windows 7 and click System Restore
- Choose a restore point
- Easy Recovery Essentials will now create a backup of your current system configuration and begin restoring the selected snapshot
- Once the process is complete, click Restart
- Done! Your Windows 7 should now start again.
Other options for restore
Method #1: Access System Restore from Windows 7
If you can access and boot into your Windows 7 system, you can use System Restore by following these steps:
- Boot the computer
- Click Start
- Type
system restorein the search bar - Select System Restore from the search result lists
- Type the password of an administrator, if prompted to do so
- Click Next
- Select Choose a different restore point
- Click Next
- Select a restore point from the list
- Click Next
- Click Finish
- Click Yes to confirm the process
- The process will now start
- Your computer may reboot
- Click Close when the System Restore completed successfully message appears
For more information about System Restore on Windows 7 system, read the Windows System Restore: Windows 7 guide.
Method #2: Install Windows 7 again
To perform a hard reset of your computer, you can install Windows 7 again on your computer.
This procedure erases everything on your computer. Backup your files before you continue! Use the Browse/Backup Files feature from Easy Recovery Essentials to backup your files. It works even if you can’t boot into Windows.
The steps to install Windows 7 are:
- Insert the CD or DVD in the disc tray
- Boot the computer
- At the Install Windows screen, select a language, time and keyboard
- Click Next
- Click Install Now
- Accept the license terms by clicking the “I accept the license terms” checkbox
- Click Next
- Select Custom (advanced) at the “Which type of installation do you want?” question screen
- Follow the instructions to install Windows 7

Method #3: Use Easy Recovery Essentials
Easy Recovery Essentials (or EasyRE) can be used to repair or restore a Windows 7 system:
- Find and fix errors automatically with Automated Repair
- Recover your PC from infections with the built-in antivirus
- Restore your PC to a working state
- Access and backup your most important data (like documents, pictures, music, videos and so on)
Download Easy Recovery Essentials
Restore Windows 8, 8.1 to factory settings
Windows 8 can be restored to factory settings by either performing a “refresh” of your PC (without affecting your files) or by performing a “reset” (this removes personal files).
Other options include a system restore if System Restore wasn’t turned off or using Easy Recovery Essentials.
Refresh Windows 8
Before you perform a “refresh” of your Windows 8, read the following notes:
- If your current version is 8.1, upgraded from 8.0, the refresh operation will restore Windows 8.0 back. After the restore you need to upgrade to Windows 8.1.
- Applications installed will be removed and a backup folder will be created for them. Applications that were originally installed with Windows 8 will be reinstalled.
To refresh Windows 8, follow these steps:
- Start Windows 8
- Go to Settings either by swiping in from the right edge of the screen or by pointing the mouse in the upper-right corner of the screen
- Click Change PC Settings
- Click Update and recovery
- Click Recovery
- At the Refresh your PC without affecting your files, click Get started
- Follow the instructions on the screen
If you can’t boot into Windows 8 to perform a Refresh, use the Automated Repair feature from Easy Recovery Essentials to fix any potential boot errors on your computer:
- Download Easy Recovery Essentials
- Burn the ISO image. Follow these instructions on how to burn the bootable ISO image very carefully, as making a bootable CD can be tricky! Alternatively, these instructions explain how to create a bootable EasyRE recovery USB stick/drive.
- Boot Easy Recovery Essentials
- Choose Automated Repair and click Continue
- Choose your Windows installation drive’s letter (usually C:\) and click Automated Repair
- Easy Recovery Essentials will now begin to fix errors automatically
- Once the process is complete, click Restart
- Done! Your Windows 8 should now start again.
Reset Windows 8
A “reset” of Windows 8 removes all personal files from your computer.
Similar to a refresh of the system, if you upgraded from Windows 8 to Windows 8.1, the reset will restore Windows 8.0. You will need to upgrade to Windows 8.1 afterwards.
The steps are:
- Start Windows 8
- Go to Settings either by swiping in from the right edge of the screen or by pointing the mouse in the upper-right corner of the screen
- Click Change PC Settings
- Click Update and recovery
- Click Recovery
- Under the Remove everything and reinstall Windows section, click Get started
- Follow the instructions on the screen
If you can’t boot into Windows 8 to perform the Reset, use the Easy Recovery Essentials and run Automated Repair to fix any potential boot errors:
- Download Easy Recovery Essentials
- Burn the ISO image. Follow these instructions on how to burn the bootable ISO image very carefully, as making a bootable CD can be tricky! Alternatively, these instructions explain how to create a bootable EasyRE recovery USB stick/drive.
- Boot Easy Recovery Essentials
- Choose Automated Repair and click Continue
- Choose your Windows installation drive’s letter (usually C:\) and click Automated Repair
- Easy Recovery Essentials will now begin to fix errors automatically
- Once the process is complete, click Restart
- Done! Your Windows 8 should now start again.
Restore with System Restore
System Restore can restore your Windows 8 or Windows 8.1 to a working condition. To access any of System Restore’s created snapshots, you must load the utility by any of these methods:
- Access it from within Windows 8, if you can boot into Windows 8
- Access it using the original Windows 8 installation DVD or Windows 8.1 installation USB
- Access the snapshots created by System Restore with Easy Recovery Essentials
Method #1: Access System Restore from within Windows 8/8.1
- Open Windows 8
- Type
system restorein the search bar - Select Create a restore point from the search results list
- Click System Restore from the System Protection tab
- Click Next
- Select any of the restore points available
- Click Next
- Confirm the action by clicking Yes
- Your computer will restart
- Continue with the restore process instructions by logging back and going to Desktop. A success message should appear: System Restore completed successfully.

Method #2: Access System Restore at boot using the installation media.
Windows Setup CD/DVD Required!
Some of the solutions below require the use of the Microsoft Windows setup CD or DVD. If your PC did not come with a Windows installation disc or if you no longer have your Windows setup media, you can use Easy Recovery Essentials for Windows instead. EasyRE will automatically find and fix many problems, and can also be used to solve this problem with the directions below.
To access the snapshots, you need the installation media: original Windows 8 DVD or original Windows 8.1 USB drive. It’s the media you used to install Windows.
The steps are:
- Insert the Windows 8/8.1 installation media
- Restart the computer
- At the Install screen, click Repair your computer
- Click Troubleshoot
- At the Advanced Options screen, click System Restore
- Login as Administrator
- Click Next
- Make sure that the Choose a different restore point option is selected
- Click Next
- Select a restore point
- Click Next
- Click Next again, at the Confirm your restore point screen
- Click Yes at the warning message to confirm the procedure
- Wait for the process to finish
- The PC may restart
- Login back and go to Desktop
- The success message should now appear: System Restore completed successfully.

Method #3: Access the snapshots with Easy Recovery Essentials
Easy Recovery Essentials can access the snapshots created by System Restore and restore your computer. To do so, follow these steps:
- Download Easy Recovery Essentials
- Burn the ISO image. Follow these instructions on how to burn the bootable ISO image very carefully, as making a bootable CD can be tricky! Alternatively, these instructions explain how to create a bootable EasyRE recovery USB stick/drive.
- Boot Easy Recovery Essentials
- Select Windows 8 and click System Restore
- Choose a restore point
- Easy Recovery Essentials will now create a backup of your current system configuration and begin restoring the selected snapshot
- Once the process is complete, click Restart
- Done! Your Windows 8 should now start again.
Restore Windows 10 to factory settings
Windows 10 can be restored to factory settings by either performing a “refresh” of your PC (without affecting your files) or by performing a “reset” (this removes personal files).
Other options include a system restore if System Restore wasn’t turned off or using Easy Recovery Essentials.
Refresh Windows 10
To refresh Windows 10, follow these steps:
- Start Windows 10
- Open the Start Menu, type Recovery and press Enter
- On the Recovery screen, click on the Get started button on the right side under Reset this PC
- If prompted to Insert Media, you will need to insert your Windows 10 installation media to continue
- Click on Keep my files
- If you have any apps that will be removed, then review the list, and click on Next when ready
- Click on Reset to begin.
If you can’t boot into Windows 10 to perform a Refresh, use the Automated Repair feature from Easy Recovery Essentials to fix any potential boot errors on your computer:
- Download Easy Recovery Essentials
- Burn the ISO image. Follow these instructions on how to burn the bootable ISO image very carefully, as making a bootable CD can be tricky! Alternatively, these instructions explain how to create a bootable EasyRE recovery USB stick/drive.
- Boot Easy Recovery Essentials
- Choose Automated Repair and click Continue
- Choose your Windows installation drive’s letter (usually C:\) and click Automated Repair
- Easy Recovery Essentials will now begin to fix errors automatically
- Once the process is complete, click Restart
- Done! Your Windows 10 should now start again.
Alternatively, you may also try to refresh your PC by booting into the Advanced Startup option, clicking Troubleshoot -> Reset this PC and then following the instructions on the screen.
Reset Windows 10
A “reset” of Windows 10 removes all personal files from your computer.
The steps are:
- Start Windows 10
- Open the Start Menu, type Recovery and press Enter
- On the Recovery screen, click on the Get started button on the right side under Reset this PC
- If prompted to Insert Media, you will need to insert your Windows 10 installation media to continue
- Click on Remove everything
- If your PC has more than one drive (partition) on the Windows 10 disk, then select to remove all files (delete) from only the Windows drive or from all drives. (see screenshots below)
- Click on either Just remove my files or Fully clean the drive for how you want to clean your drive.
- Click on Reset to begin.
If you can’t boot into Windows 10 to perform the Reset, use the Easy Recovery Essentials and run Automated Repair to fix any potential boot errors:
- Download Easy Recovery Essentials
- Burn the ISO image. Follow these instructions on how to burn the bootable ISO image very carefully, as making a bootable CD can be tricky! Alternatively, these instructions explain how to create a bootable EasyRE recovery USB stick/drive.
- Boot Easy Recovery Essentials
- Choose Automated Repair and click Continue
- Choose your Windows installation drive’s letter (usually C:\) and click Automated Repair
- Easy Recovery Essentials will now begin to fix errors automatically
- Once the process is complete, click Restart
- Done! Your Windows 8 should now start again.
Alternatively, you may also try to reset your PC by booting into the Advanced Startup option, clicking Troubleshoot -> Reset this PC and then following the instructions on the screen.
Restore with System Restore
System Restore can restore your Windows 10 to a working condition. To access any of System Restore’s created snapshots, you must load the utility by any of these methods:
- Access it from within Windows 10, if you can boot into Windows 10
- Access it using the original Windows 10 installation DVD or Windows 10 installation USB
- Access the snapshots created by System Restore with Easy Recovery Essentials
Method #1: Access System Restore from within Windows 10
- Open Windows 10
- Open the Control Panel
- Type
recoveryin the search bar and press Enter - Click Open System Restore from the Recovery screen
- Click Next
- Select any of the restore points available
- Click Next
- Confirm the action by clicking Yes
- Your computer will restart
- Continue with the restore process instructions by logging back and going to Desktop. A success message should appear: System Restore completed successfully.
Method #2: Access System Restore at boot using the installation media.
Windows Setup CD/DVD Required!
Some of the solutions below require the use of the Microsoft Windows setup CD or DVD. If your PC did not come with a Windows installation disc or if you no longer have your Windows setup media, you can use Easy Recovery Essentials for Windows instead. EasyRE will automatically find and fix many problems, and can also be used to solve this problem with the directions below.
To access the snapshots, you need the original Windows 10 installation media. It’s the media you used to install Windows.
The steps are:
- Insert the Windows 10 installation media
- Restart the computer
- At the Install screen, click Repair your computer

- Click Troubleshoot
- At the Advanced Options screen, click System Restore
- Choose the Operating System you want to restore
- Click Next
- Choose the Restore Point you want to use
- Click Next
- Click Next
- Click Yes at the warning message to confirm the procedure
- Wait for the process to finish
- The PC may restart
- Login back and go to Desktop
- The success message should now appear: System Restore completed successfully.

Method #3: Access the snapshots with Easy Recovery Essentials
Easy Recovery Essentials can access the snapshots created by System Restore and restore your computer. To do so, follow these steps:
- Download Easy Recovery Essentials
- Burn the ISO image. Follow these instructions on how to burn the bootable ISO image very carefully, as making a bootable CD can be tricky! Alternatively, these instructions explain how to create a bootable EasyRE recovery USB stick/drive.
- Boot Easy Recovery Essentials
- Select Windows 10 and click System Restore

- Choose a restore point
- Easy Recovery Essentials will now create a backup of your current system configuration and begin restoring the selected snapshot
- Once the process is complete, click Restart
- Done! Your Windows 10 should now start again.


More Information
Support Links
- Easy Recovery Essentials for Windows – our repair and recovery disk.
It’s an easy-to-use and automated diagnostics disk. It’s available for Windows 8, Windows 7 and Windows Vista. It’s also available for Windows XP and Windows Server.
Read more at Windows Recovery Disks.
- The NeoSmart Support Forums, member-to-member technical support and troubleshooting.
- Get a discounted price on replacement setup and installation discs: Windows XP, Windows Vista, Windows 7, Windows 8, Windows 10.
Applicable Systems
This Windows-related knowledgebase article applies to the following operating systems:
- Windows XP (all editions)
- Windows Vista (all editions)
- Windows 7 (all editions)
- Windows 8 (all editions)
- Windows 8.1 (all editions)
- Windows 10 (all editions)
- Windows Server 2003 (all editions)
- Windows Server 2008 (all editions)
- Windows Server 2012 (all editions)
Propose an edit