
- About
- Blog
- Projects
- Help
-
Donate
Donate icon
An illustration of a heart shape - Contact
- Jobs
- Volunteer
- People
Item Preview
There Is No Preview Available For This Item
This item does not appear to have any files that can be experienced on Archive.org.
Please download files in this item to interact with them on your computer.
Show all files
software
Win 10 To Win Vista
- Topics
- e
- Language
- English
- Item Size
- 89.2M
Windows 10 to look like windows vista. (I know but I can’t use github)
- Addeddate
- 2023-05-30 23:53:45
- Identifier
- win-10-to-win-vista
- Scanner
- Internet Archive HTML5 Uploader 1.7.0
comment
Reviews
There are no reviews yet. Be the first one to
write a review.
146
Views
DOWNLOAD OPTIONS
Uploaded by
Staffron
on
SIMILAR ITEMS (based on metadata)
В данной статье я хочу рассказать, как в Windows 10 установить тему Windows Vista.

Несмотря на то, что Windows Vista давно устарела технически, многие пользователи скучают по ее интерфейсу. В Windows 10 и 11 многим не нравится их убогий интерфейс. Сама Microsoft пока что не планирует дать пользователям операционной системы Windows возможность вернуться к старому любимому интерфейсу, поэтому энтузиасты вынуждены брать все в свои руки.
В сети интернет появился сайт https://r8p.teknixstuff.com/ на котором предлагается скачать и установить пакет стилизации Windows под названием Revert8Plus. На главной странице сайта нам обещают вернуть интерфейс Windows 7, эффекты стекла на границах окон, классические приложения Windows 7 (имеются в виду встроенные игры), классическую панель управления.

На момент написания этой статьи последняя версия пакета была 3.1.4, но авторы обещают вскоре выпустить более свежую версию, так как в установке еще не все проходит гладко и автоматически, кое-что еще приходится доделывать руками. Также многие компоненты уже устарели и имеют более свежие версии с очевидно исправленными ошибками и багами. Вероятно, когда вы будете читать эти строки уже выйдет новая версия, где будут исправлены найденные ошибки. В частности, данная версия у меня с ошибками установилась на Windows 11 – не было скругления в углах окон, не было новых/старых иконок. А на Windows 10 данная версия ставится отлично.
Установка начинается прямо с сайта при нажатии кнопки. Эта кнопка копирует в буфер обмена команду: powershell iex(irm r8p.teknixstuff.com). Эту команду нужно выполнить в одноименном окне, которое всплывает при нажатии клавиш Win+R.
После того, как вы ввели команду, произойдет скачивание установочного пакета и начнется установка. У вас спросят лишь о том, какой стиль вы хотите применить. На выбор есть несколько вариантов, среди которых есть тема Windows Vista Theme. Ее я и выберу.

Далее нужно немного подождать, пока все установится и перезагрузиться. Далее идут моменты, которые мне пришлось сделать руками, и возможно в будущем все эти манипуляции будут внедрены в пакет.

Я загрузился в среду WinPE Strelec. В загрузочной среде я скопировал в каталог Windows\system32 заранее скачанный скринсейвер Vista. Затем скопировал обои из Vista папки по умолчанию, переименовав оригинальные файлы.
Следующим шагом я решил заменить RetroBar на более свежую версию, так как в пакете идет более старая версия и она будет просить обновиться. RetroBar – это бесплатное приложение для тех, кто тоскует по «более простым временам». RetroBar телепортирует вас назад во времени, заменив современную панель задач Windows классическим стилем Windows 95, 98, Me, 2000, XP или Vista. Он может быть установлен на Windows 7 SP1, Windows 8.1, Windows 10 или Windows 11.
Далее я обновил до последней версии AeroGlass под названием DWMBlurGlass. Поскольку эта программа висит в памяти, ее не получится обновить из под загруженной системы, поэтому мне и понадобилось загрузиться в WinPE. DWMBlurGlass добавляет пользовательские эффекты в строку заголовка глобальной системы, и может быть установлен на Windows 10 и Windows 11.
Затем я загрузился в систему как обычно. Я выбрал в «Параметрах экранной заставки» – Vista Logo Screensaver. Быть может, кто-то из вас помнит этот фирменный скринсейвер. Заставка показывает логотип Windows Vista в случайном месте экрана, чередуясь с линейным узором, который может быть знаком пользователям Windows Vista, поскольку заставка изначально (и исключительно) распространялась вместе с Виста. Никаких настроек звука в ней нет.
Пакет не включил сам скругление углов окон, хотя должен был. Чтобы вернуть скругление я запустил программу Windows\Revert8Plus\applytheme.exe и стало красиво.

Следующее, что я сделал – переименовал «Computer» в «Мой компьютер».
Затем я решил изменить фото учетной записи, а ведь самое первое что предлагает Vista в конце установки – это выбрать аватар учетной записи. Я взял иконку из Vista. Следующим шагом в разделе «Персонализация – Цвета» я установил темную тему.

|

|

|

|

|

|
Затем я поменял Экран блокировки на тот, который был в Vista. Сравните как было и как стало.
Следующий шаг – это установить гаджеты 8GadgetPack. Приятные мини приложения впервые появились в Vista и исчезли в Windows 8. Жаль, что Revert8Plus не содержит в себе гаджеты. Я выбираю аналоговые часы, календарь, погоду и показ слайдов. 8GadgetPack – это бесплатный набор гаджетов. Цифра 8 в названии связана с тем, что пакет впервые появился вместе с выходом Windows 8. Сейчас доступна 37 версия пакета. В отличие от Metro-приложений, гаджеты могут получить доступ к полезной системной информации.
MS Office 2024 с черной темой не конфликтует с Aero, но и не показывает прозрачный заголовок. В итоге получилась вот такая красота.

К недостаткам пакета можно отнести то, что для его установки нужен доступ в интернет. Даже если вы скачаете установщик заранее все-равно при установке он скачивает всякие файлы.
После установки ежемесячных обновлений прозрачность может пропасть. Тогда нужно просто запустить файл C:\Windows\Revert8Plus\applytheme.exe
Полный процесс того, как я устанавливал Revert8Plus можно посмотреть на видео:
Telegram-канал @overclockers_news — теперь в новом формате. Подписывайся, чтобы быть в курсе всех новостей!
How to Change Windows 10 Layout to Vista Style: Easily Transform Your Windows 10 Interface to Look Like Vista
04/08
Are you nostalgic for the classic look of Windows Vista? Thankfully, you can change the layout of Windows 10 to resemble the Vista interface. This guide will walk you through the steps to achieve that vintage aesthetic while still enjoying the features of Windows 10. From tweaking settings to customizing themes, we’ll cover it all!
Understanding the Differences Between Windows 10 and Vista
Before diving into the modifications, it’s essential to understand the key differences in design between Windows 10 and Vista. Windows 10 offers a cleaner, more modern interface, while Vista is known for its rich colors and glassy effects. By customizing your settings, you can bring back that beloved look.
Steps to Customize Your Windows 10 to Vista Layout
1. **Change Your Theme**: Head to Settings > Personalization > Themes and select a classic theme that mimics Vista. You can find downloadable themes online that resemble the Vista style.2. **Adjust Taskbar Settings**: Right-click on the taskbar, go to Taskbar settings, and adjust the size of the taskbar to be smaller. You can also choose to use small taskbar buttons to save space.3. **Icon Customization**: Download Vista-style icons and replace your current ones. Right-click on the desktop, select Personalize, then go to Themes > Desktop icon settings to change your icons.
Common Issues and Fixes
While customizing your layout, you may encounter some issues. For instance, some themes may not apply correctly. If this happens, ensure you’re using compatible themes for Windows 10. Additionally, some icons may not display correctly; re-check the icon file formats you are using.
FAQ
Q: Can I fully revert to the Vista layout?A: While you can mimic the look, some Windows Vista features may not be available in Windows 10 due to system limitations.Q: Are there risks in downloading themes?A: Always ensure you download themes from reputable sources to avoid malware.
welcome to Coohom
Please check with customer service before testing new feature.
Hello there!
Welcome to Konsti’s Vista transformation guide. This will run you through the hands-on process of returning Vista era graphics to your Windows 10 install.
Before you begin, make sure you:
- Have a bit of time on your hands
- Have an affinity for Aero Glass
- Are comfortable with software tinkering
Hit ‘Next’ to begin! We’ll start off with the easy stuff.
To go back a step, hit the arrow in the top left.
Prerequisites
This guide is only made to work with Windows 10 64-bit! Please check your OS version before going forward.
To do this, check either of these:
Settings ▸ System ▸ About ▸ Windows specifications
Start Menu ▸ type in winver
Make sure you’re also an administrator account on your machine. You’ll be tinkering with the system after all.
Downloading Resources
To get started, download this bundle of contents, and extract them to somewhere you won’t be moving.
Windows will be looking for some of them on each start.
A good place to keep them would be C:\Vista Resources
Downloading Software
For the best results, you’ll also need a couple pieces of paid software from Stardock.
There’s a manual option for icon changing, but WindowBlinds is kind of irreplaceable for the proper look of everything.
Once you’ve installed the above, continue on!
Let’s get going! First off: Themes!
We’ll be following along with the archive you just downloaded.
Open its folder up, and start at step 1.
For the WindowBlinds version:
- Install and activate WindowBlinds
- Go to WindowBlinds Settings and tick the following:
- Disable ribbon in Explorer windows
- Force non acrylic blur on later Windows 10 versions
- Double click the Aero VistaX.wba file to install it
- To enable, double-click on the skin in WindowBlinds
For the MSStyle version:
- Copy the contents of the Theme folder
- Paste them into C:\Windows\Resources\Themes
- Install Ultra UxTheme Patcher
- Apply the theme by double-clicking on Vista Aero.theme or Vista Basic.theme
Wallpapers
These are pretty straightforward. Pick and choose one or a few that you like, select them, and from the right-click menu pick Set as desktop background. If you fancy a slidewhow, just select all. 
There’s extra wallpapers from betas avaiable in the 93. Extra Wallpapers folder, if you like that kind of thing.
Cursors
Installing mouse cursours is thankfully mostly automated. To install these:
- Choose the cursor size you’ll want (normal, large, xl)
- Right click on the specific .inf file and pick «Install»
- Open up the oldschool Mouse properties from Control Panel ▸ Hardware and Sound ▸ Mouse
- Go to the Pointers tab and from the Scheme dropdown, pick Windows Aero
- Hit Apply or OK
Sounds
I haven’t found a way to automate changing sounds, so this’ll have to be done by hand 
To get going:
- Copy the entire Windows Vista folder into C:\Windows\Media
- Pick a sound scheme you like (default, or glass/pearl/tinker)
- Open up the Sound control panel (right click your taskbar volume icon and pick Sounds
- Follow the list below to map each sound to its proper event
- Use the Save As… button to save this scheme for easier switching later on
- Hit Apply or OK
| Event name | Sound file |
|---|---|
| Asterisk | Windows Error.wav |
| Critical Battery Alarm | Windows Battery Critical.wav |
| Critical Stop | Windows Critical Stop.wav |
| Default Beep | Windows Ding.wav |
| Device Connect | Windows Hardware Insert.wav |
| Device Disonnect | Windows Hardware Remove.wav |
| Device Failed to Connect | Windows Hardware Fail.wav |
| Exclamation | Windows Exclamation.wav |
| Low Battery Alarm | Windows Battery Low.wav |
| Message Nudge | Windows Balloon.wav |
| New Mail Notification | Windows Notify.wav |
| New Text Message Notification | Windows Balloon.wav |
| Notification | Windows Balloon.wav |
| Print Complete | Windows Print Complete.wav |
| Program Error | Windows Critical Stop.wav |
| Question | Windows Exclamation.wav |
| System Notification | Windows Ding.wav |
| Windows User Account Control | Windows User Account Control.wav |
| Blocked Pop-up Window | Windows Pop-up Blocked.wav |
| Empty Recycle Bin | Windows Recycle.wav |
| Notification Bar | Windows Pop-up Blocked.wav |
| Start Navigation | Windows Navigation Start.wav |
User Images
Windows XP through Windows 7 came with a default set of user pictures you could pick from, as well as your own. While these are a minor touch, they’re also an easy one to change around.
To set a user image:
- Open Settings ▸ Accounts ▸ Your info ▸ Browse for one
- Locate the 5. User Pictures folder and pick one out
- Or just use what you already have!
There’s extra wallpapers from betas avaiable in the 92. Extras — HD User Icon Pack folder, if you like that kind of thing.
System Icons
Yet again, we’re going to have to use paid software to make our lives a little easier.
For the IconPackager version:
- Install and activate IconPackager
- Open IconPackager and go to: Icon Package Options ▸ Add Icon Package ▸ Install from disk
- Navigate to 6. Vista Icons Iconpackager Build\Vista Icons for 10.iconpackage
- Hit Apply icons to my desktop
For the manual version:
- Open CustomizerGod from 10. Optional Applications\8. CustomizerGod.exe
- Open the General Icons section on the left
- Manually replace each icon with the appropriate ones in 94., 95. Vista Icons
- For the desktop/downloads/games/links folder icons, use the icons you find in 95.1. Custom Vista Icons
Startup and Logon Sounds
Windows no longer gives you a user-facing way to set these sound events, so we have to do it kind of weirdly. To get started:
- Open the start menu and type in Task Scheduler
- On the pane on the right, pick Import Task
- Pick each of the .xml files, then hit OK
- On the user account information popup, type in your own username and password and hit OK
File Explorer + Taskbar
These are some of the apps that requires we keep stuff put in one place. OldNewExplorer does the heavy lifting of making Explorer look like it did in Vista, while ExplorerPatcher deals with essential small tweaks. They kind of complement each other. To get started:
- Open OldNewExplorerCfg.exe as administrator (right-click)
- Hit the Install button up top
- Open the OldNewExplorer Settings.png image and change over the settings to match
- Close out of the window. Any new Explorer windows will now follow these settings.
- Open ep_setup.exe to install ExplorerPatcher
- Once installed, open it via Start ▸ Properties (ExplorerPatcher)
- On the left, hit About, then pick the Import settings option
- Pick the ExplorerPatcher tweaks.reg file
- Click on the * Restart File Explorer option
OpenShell + Start Menu Skin
OpenShell is a great little start menu replacement we’re going to use, to bring back Vista’s lightweight and compact start menu.
- (Optional) Set your taskbar to the small size, and your buttons to never combine from Settings ▸ Personalization ▸ Taskbar
- Open OpenShell Setup.exe
- Uncheck the Classic Explorer and Classic IE items, we don’t need them
- Install as normal beyond that
- Install the invisible1.ttf font file (right-click ▸ install)
- Copy the VISTALIKE PowerButton Fix RevD.skin7 file
- Paste it into C:\Program Files\Open-Shell\Skins
- Open Open-Shell Menu settings (if active, right click on the start button and pick Settings. If not, search Open-Shell in the start menu
- Click on the Backup button in the bottom right, and pick Load from XML file
- Pick the 9. Open-Shell + Start Menu Skins\Menu Settings.xml file
- Under the Replace Start button section, click Pick image…
- If you’re using a small taskbar, pick the Accurate Start Orb.png file
- For a normal size taskbar, pick the Orb With Border.png file
- (Optional) Replace the StartMenuHelperL10N.ini file in C:\Program Files\Open-Shell\Skins with the one in the resources folder, if you plan on cleaning up your context menus. This changes its right-click option from «Pin to Start menu (Open-Shell)» to just «Pin to Start menu»
Logon Image
- Open Settings ▸ Personalization ▸ Lock screen
- Choose Background ▸ Picture
- Hit the Browse button and navigate to 10. Logon Backgrounds
- Pick the one with the closest resolution to yours
System Tweaks
From here on out, we’re staying in the 11. Optional Applications folder. While these are optional, I recommend going through with what you can to really get the look down.
- Install 1. WinAero Tweaker as normal
- Open WinAero Tweaker. Go to File ▸ Import/Export Tweaks
- From the popup, pick the Import option
- Navigate to the 11. Optional Applications\Winaero Tweaks.ini file
- Hit Finish
Windows Sidebar
- Install 2. 8GadgetPack — Sidebar.msi as normal
- Once installed, don’t start the sidebar application
- Navigate to C:\Program Files\Windows Sidebar and right-click ▸ Take Ownership of the entire folder
- Go to 11. Optional Applications\1.1. Vista Sidebar Files\Windows Sidebar and copy+replace everything within the folder you just took ownership of
- Now feel free to start up the sidebar app
Windows Photo Viewer
The old Windows Photo Viewer is much more lightweight and fast to open than the current Photos app, plus it fits the look we’re going for.
- Double-click and apply the 1. Restore Windows Photo Viewer.reg tweak
- Go to Settings ▸ Apps ▸ Default apps ▸ Photo viewer and pick Winodws Photo Viewer
- (Optional from here on out)
- Go to C:\Program Files\Windows Photo Viewer and take ownership of the folder
- Replace its contents with the ones in 2. Windows Photo Viewer
Screensavers
- Right click on each .scr file and pick Install
- Go to the Screen Saver control panel (Settings ▸ Personalization ▸ Lock screen ▸ Screen saver settings) and pick the one you like
Microsoft Paint
This part involves replacing the mspaint files in system32. I wouldn’t go for it unless you’re absolutely adamant about a Vista 1:1.
- Do this for these files one by one
- Go to C:\Windows\System32
- Rename mspaint.exe to something similar, like old_mspaint.exe
- Quickly paste in the mspaint.exe file from the 4. MSPaint Vista Version folder
- Do the same thing again for the mspaint.exe.mui file located in C:\Windows\System32\en-US
Extra Apps
These are all bundled as extra stuff you can install and use instead of modern counterparts. All of these are installed like any other app you’re used to.
- Classic Calc
- Windows Vista & 7 Games for 10
- Classic Sticky Notes
Notification Tray Icons
Finally, we’ll change our Network and Volume icons to match. I’ve only found a network indicator icon suitable for desktops, so if you’re on a laptop, I suggest skipping that.
For the volume icon:
- Go to Settings ▸ Personalization ▸ Taskbar ▸ Turn system icons on or off
- Disable the Volume icon
- Alternatively, tuck it away under the overflow arrow
- Install 3RVX
- Copy the Vista Aero folder into C:\Program Files(x86)\3RVX\Skins
- Launch 3RVX’s settings from the tray, or the start menu
- Under the General tab, enable Run on Windows startup, and pick the skin Vista Aero
- Under the Display tab, set the Position attributes to X:0, Y:-50
For the network icon:
- Run NetworkIndicator.exe
- Right-click on the tray icon
- Enable Load at Windows Startup
- Under the All Interfaces menu, pick the Vista style, and hit OK
|
WF4123 Freshman Member Posts: 69 OS: Windows 10 22H2 Theme: Vista CPU: Intel Core i7 11800H RAM: 16 GB GPU: Nvidia GeForce RTX 3050 Ti |
Post by WF4123 on Sept 10, 2023 4:15:55 GMT -8I’ve tried my best how accurate I can transform it into Vista, but here’s a shot. I only found some tools and stuffs that customize Windows easier with: Unfortunately, I couldn’t find anything changing elsewhere despite of accuracy I would demise, such as Vista. But I’m only using Windows 7 Icon Pack for Windows 10 by 2013Windows8.1, can’t find that Vista one. While I haven’t use some tools that supports 10 22H2, here’s what I found: Leave your reply if you want to know about the screenshot and my transformation. |
Post by ware_1234 on Nov 19, 2023 7:53:56 GMT -8As for the normal icons, you can try importing icons from a Vista version of imageres.dll (found in System32) then go to C:\Windows\SystemResources\imageres.dll.mun and edit the icons in there using CustomizerGod. As for the taskbar icons, those are stored in other .dll files found in System32. They probably have .mun versions inside the SystemResources folder. |
|
|
Last Edit: Nov 19, 2023 7:55:19 GMT -8 by ware_1234 |
|
10to7 New Member what does it feel to have 4 GB of ram in ur computer in 2024? Posts: 12 OS: Windows 10 22H2 Theme: Windows Vista Basic CPU: i5-3470 RAM: 4 GB GPU: Intel(R) HD Graphics |
Post by 10to7 on Feb 9, 2024 23:55:00 GMT -87tsp works on 22h2 tho. |
|
WF4123 Freshman Member Posts: 69 OS: Windows 10 22H2 Theme: Vista CPU: Intel Core i7 11800H RAM: 16 GB GPU: Nvidia GeForce RTX 3050 Ti |
Post by WF4123 on Feb 10, 2024 6:50:07 GMT -87tsp works on 22h2 tho. Yeah, I know, forget that CustomizerGod, 7tsp is better than this. |
|
WF4123 Freshman Member Posts: 69 OS: Windows 10 22H2 Theme: Vista CPU: Intel Core i7 11800H RAM: 16 GB GPU: Nvidia GeForce RTX 3050 Ti |
Post by WF4123 on Feb 10, 2024 7:00:38 GMT -8Revamped my transformation with tweaks and fixes. WindowBlinds was replaced with SecureUXTheme, because this was a paid software but still buggy, but SecureUXTheme is open-source software to use freely. |
|
Last Edit: Mar 16, 2024 6:57:52 GMT -8 by WF4123 |
|
10to7 New Member what does it feel to have 4 GB of ram in ur computer in 2024? Posts: 12 OS: Windows 10 22H2 Theme: Windows Vista Basic CPU: i5-3470 RAM: 4 GB GPU: Intel(R) HD Graphics |
Post by 10to7 on Feb 10, 2024 22:13:13 GMT -8Revamped my transformation with tweaks and fixes. WindowBlinds was replaced with SecureUXTheme, because this was a paid software but still buggy, but SecureUXTheme is open-source software to use freely. What about the Control Panel Applets? |
|
10to7 New Member what does it feel to have 4 GB of ram in ur computer in 2024? Posts: 12 OS: Windows 10 22H2 Theme: Windows Vista Basic CPU: i5-3470 RAM: 4 GB GPU: Intel(R) HD Graphics |
Post by 10to7 on Feb 21, 2024 4:31:07 GMT -8It’s still on. also 7tsp replaces x64 bit’s regedit to x32 bit ones!!! |
|
WF4123 Freshman Member Posts: 69 OS: Windows 10 22H2 Theme: Vista CPU: Intel Core i7 11800H RAM: 16 GB GPU: Nvidia GeForce RTX 3050 Ti |
Post by WF4123 on Feb 21, 2024 4:52:55 GMT -8It’s still on. also 7tsp replaces x64 bit’s regedit to x32 bit ones!!! Huh, I know. |
|
WF4123 Freshman Member Posts: 69 OS: Windows 10 22H2 Theme: Vista CPU: Intel Core i7 11800H RAM: 16 GB GPU: Nvidia GeForce RTX 3050 Ti |
Post by WF4123 on Mar 16, 2024 7:25:13 GMT -8Another improvement to mine. 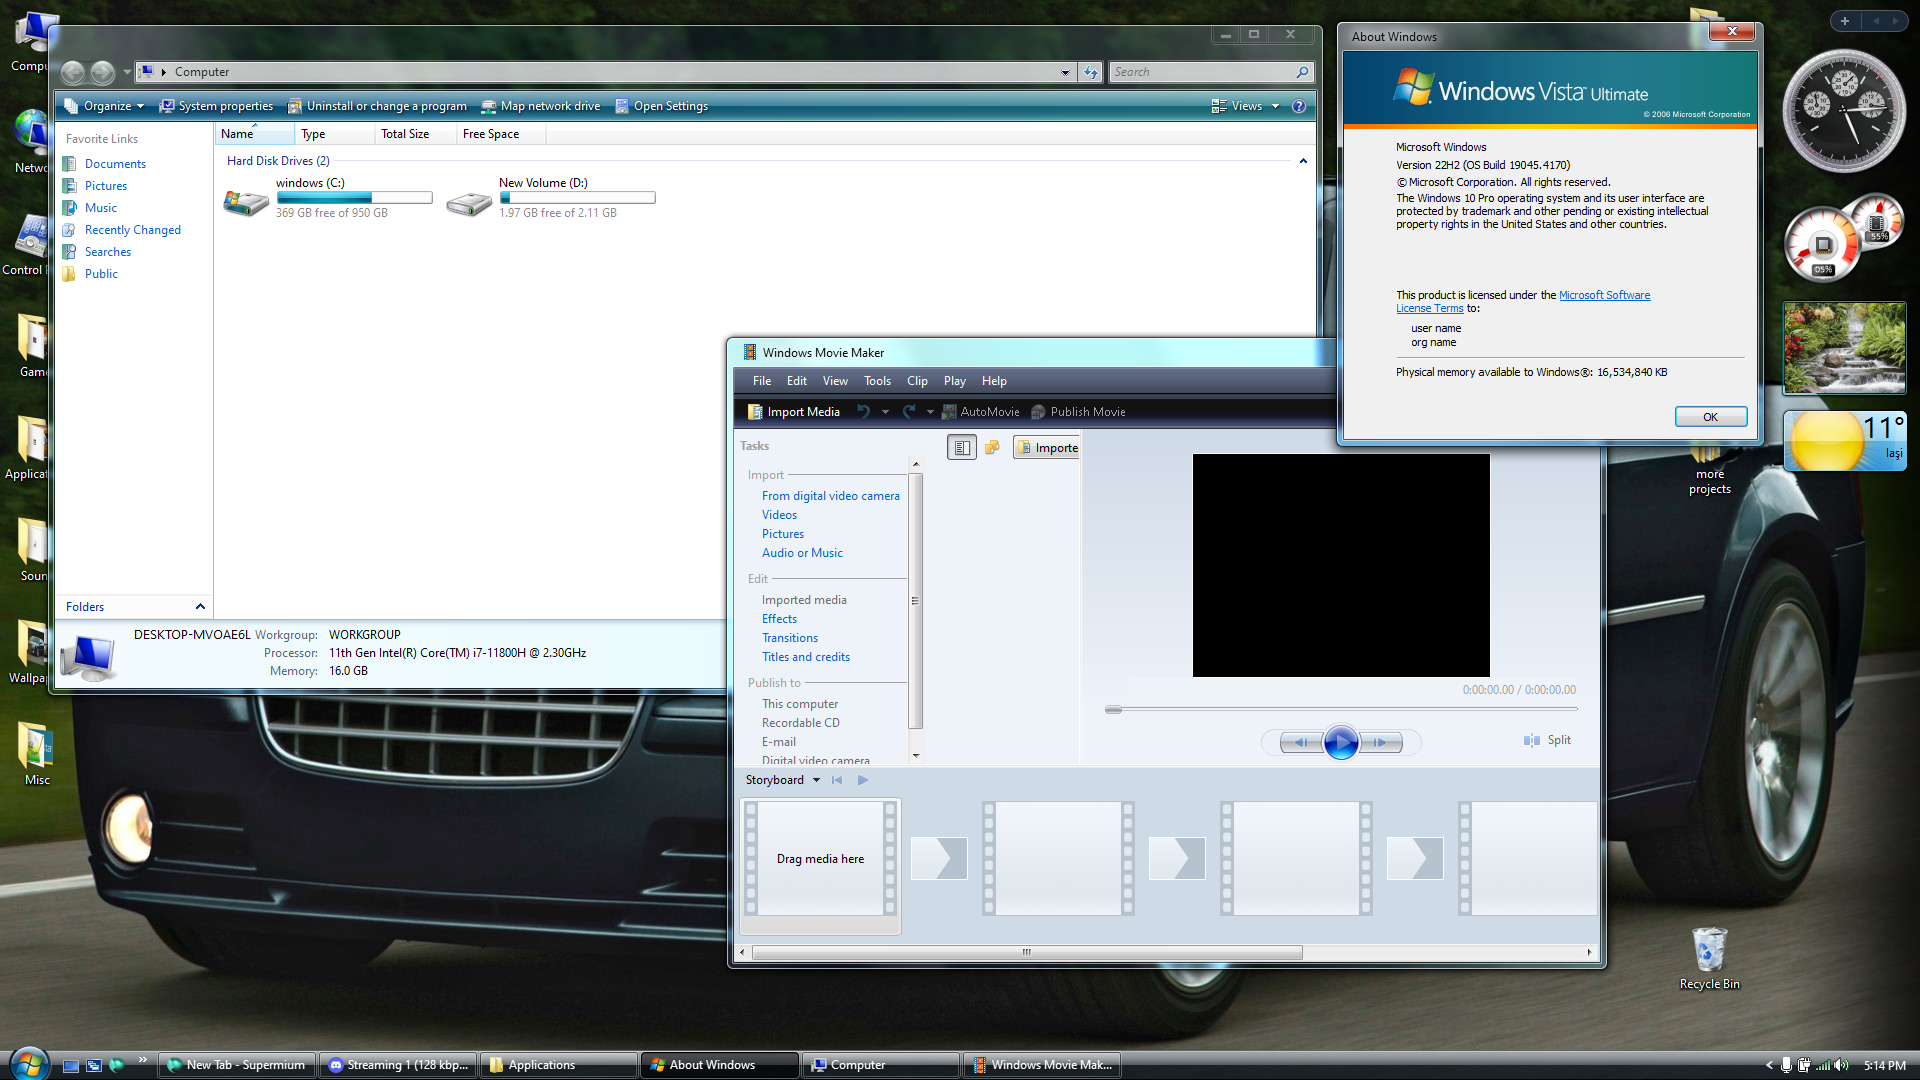
Open-Shell and RetroBar replaced with StartIsBack++ and 7+ Taskbar Tweaker to prevent clipping from start menu (+ Quick Launch) Windhawk mods used:
(not needed for latest version with Classic Winver) |
|
Last Edit: Mar 31, 2024 8:44:11 GMT -8 by WF4123 |
|
Deleted Deleted Member Posts: 0 |
Post by Deleted on Mar 16, 2024 7:55:27 GMT -8Another improvement to mine. Open-Shell and RetroBar replaced with StartIsBack++ and 7+ Taskbar Tweaker to prevent clipping from start menu (+ Quick Launch) Windhawk mods used: If you’re on Windhawk 1.4.1 you don’t need the symbols self fix mod. |
Post by soraliee on Apr 1, 2024 6:31:18 GMT -8Another improvement to mine.
Open-Shell and RetroBar replaced with StartIsBack++ and 7+ Taskbar Tweaker to prevent clipping from start menu (+ Quick Launch) Windhawk mods used:
(not needed for latest version with Classic Winver) can i get vruh’s DWMBlurGlass mod? |
|
|
arbestriagain Sophomore Member Posts: 143 OS: Windows 11 Home 23H2 Theme: Default CPU: Intel Core i7-10700F RAM: 32GB GPU: GeForce RTX 2060 SUPER Computer Make/Model: HP OMEN 25L Desktop GT12-0xxx |
Post by arbestriagain on Apr 1, 2024 18:24:52 GMT -8The new DWMBlurGlass release has much more accurate Aero backdrops like Vruh’s mod, no need to use the Vruh mod now. |
|
WF4123 Freshman Member Posts: 69 OS: Windows 10 22H2 Theme: Vista CPU: Intel Core i7 11800H RAM: 16 GB GPU: Nvidia GeForce RTX 3050 Ti |
Post by WF4123 on Apr 2, 2024 7:05:25 GMT -8The new DWMBlurGlass release has much more accurate Aero backdrops like Vruh’s mod, no need to use the Vruh mod now. I know, I’ll just leave using Vruh’s mod and using 2.1.1 right now. 
Refreshed improvements (also sorry about some minor mistake from Gadgets window on Sidebar and Win7 calculator) Vruh’s DWMBlurGlass was replaced with DWMBlurGlass 2.1.1 for accuracy |
|
Last Edit: Apr 4, 2024 5:09:17 GMT -8 by WF4123 |
|
travis Established Member Posts: 646 OS: Windows 10 21H2 Theme: Windows XP Royale CPU: Intel® Core™ i5-3570 CPU @ 3.40GHz RAM: 24GB GPU: Nvidia(R) Geforce GT 630 |
Post by travis on Apr 2, 2024 12:48:52 GMT -8The new DWMBlurGlass release has much more accurate Aero backdrops like Vruh’s mod, no need to use the Vruh mod now. The new DWMBlurGlass release includes Vruh’s modification to the Aero backdrops… which he opened a pull request for it to be even included. |
|
arbestriagain Sophomore Member Posts: 143 OS: Windows 11 Home 23H2 Theme: Default CPU: Intel Core i7-10700F RAM: 32GB GPU: GeForce RTX 2060 SUPER Computer Make/Model: HP OMEN 25L Desktop GT12-0xxx |
Post by arbestriagain on Apr 2, 2024 12:55:35 GMT -8The new DWMBlurGlass release has much more accurate Aero backdrops like Vruh’s mod, no need to use the Vruh mod now. I know, I’ll just leave using Vruh’s mod and using 2.1.1 right now. Refreshed improvements (also sorry about some minor mistake from Gadgets window on Sidebar and Win7 calculator) Vruh’s DWMBlurGlass was replaced with DWMBlurGlass 2.1.1 for accuracy The Vista caption button mod exists now? |
|
WF4123 Freshman Member Posts: 69 OS: Windows 10 22H2 Theme: Vista CPU: Intel Core i7 11800H RAM: 16 GB GPU: Nvidia GeForce RTX 3050 Ti |
Post by WF4123 on Apr 3, 2024 5:04:29 GMT -8I know, I’ll just leave using Vruh’s mod and using 2.1.1 right now. Refreshed improvements (also sorry about some minor mistake from Gadgets window on Sidebar and Win7 calculator) Vruh’s DWMBlurGlass was replaced with DWMBlurGlass 2.1.1 for accuracy The Vista caption button mod exists now? Scamdisk did it on Windows Legacy Server, however, it doesn’t look the same as Vista’s button height size. |
|
Last Edit: Apr 3, 2024 5:14:01 GMT -8 by WF4123 |