
Here’s a step-by-step guide for installing Windows 11 on a new SSD, perfect for beginners. Just relax and follow this tutorial, and you’ll complete the process like a pro:
| Duration:⏱️ | 5-8 minutes reading |
| Steps:? |
?#Step 1. Preparation ?#Step 2. Install Windows 11 on SSD ?#Step 3. Make SSD with Windows 11 Bootable |
| Supported OS:? |
Windows 11 Home, Windows 11 Pro, Windows 11 Enterprise |
| Requirements:? | SSD, Disk Management, Windows 11 ISO image, OS migration software, BIOS configuration |

Yes, you can install Windows 11 on an M.2 SSD. The process is similar to installing it on any other SSD. Ensure that your M.2 SSD meets the minimum system requirements for Windows 11 and follow these steps:
1. Create a Windows 11 installation media using a USB drive or download the ISO file.
2. Boot your computer from the installation media.
3. Follow the on-screen instructions in the Setup wizard.
4. During the installation process, choose «Custom: Install Windows only (advanced)».
5. Select your M.2 SSD as the installation location when prompted.
6. Complete the remaining steps in the wizard, and Windows 11 will be installed on your M.2 SSD.
Remember to back up your data before proceeding with the installation.
Indeed, installing Windows 11 isn’t a complex technical process that’s exclusive to experts. As long as you have a clear understanding of the steps required for the installation, you can now fully enjoy the features of Windows 11 on your computer.

On June 24th, 2022, Microsoft unveiled its first beta version of Windows 11, presenting its novel features and redesigned interface to global Windows users. Then, on July 8th, the second beta version was made available for Windows Insider program participants to update. What’s new in Windows 11?
Click to explore and learn all about Windows 11 here.
Sure, please provide the text that needs to be translated.
- Warning
- Windows 11 is currently available for Windows 10 and select Windows 8 users. If you are using Windows 7 or older systems and are concerned about potential bugs and known issues in Windows 11, it’s recommended to remain with your current operating system.
So how do you install Windows 11 and enjoy its fresh features on your device? This guide will provide you with a straightforward, step-by-step tutorial for safely updating and installing Windows 11 on your computer. Let’s begin.
Preparation: Prepare a New SSD/M.2/NVMe SSD for Windows 11 Installation
Since Windows 11 has more stringent requirements for hardware and software during installation, to ensure optimal performance on your computer, it is essential to choose a suitable SSD as the operating system drive.
Follow the guidelines provided here to prepare your new SSD drive for Windows 11:
#1. Choose a Suitable & New SSD — SATA, M.2, or NVMe SSD

If you haven’t gotten an SSD yet, here’s a comparison table between SATA, M.2, and NVMe SSDs to help you determine which one suits your needs best:
| Comparison | SATA SSD | M.2/NVMe SSD |
|---|---|---|
| Connector | SATA connector | SATA, PCI-Express (PCIe) |
| Reading & Writing Speed | 545~600MB/s | 3GB/s |
| Price | ~$.21/GB | ~$.50/GB |
Editor’s Choice: For a fast and reliable computer, the current M.2 SSD is ideal for installing Windows 11. You can also check the M.2 SSD performance using professional benchmark tools.

#2. Set Up Solid State Drive (SSD)
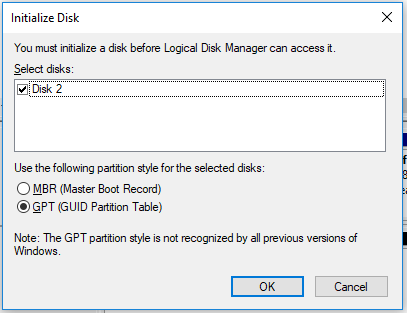
To ensure your new SSD is compatible with Windows 11 installation, you need to initialize it as a GPT disk. Here’s how to proceed:
< strong > Step 1. < /strong> Shut down the computer, open the computer case, connect the new SSD (M.2 or NVMe) into its slot, and secure it with screws.

Step 2. Close the computer case and restart the PC.
Step 3. Press the Windows + R keys, type diskmgmt.msc, and press Enter to open Disk Management.
Step 4. Right-click on the new SSD, choose Initialize Disk, and select GPT as the disk type.
Since Windows 11 requires GPT UEFI and Secure Boot mode, which are only available on a GPT disk, choose GPT as the target type to ensure a smooth installation of Windows 11.

How to Install Windows 11 on SSD (SATA/M.2/NVMe)? 2024 Tutorial
Essentially, there are three methods to install Windows 11 on your PC currently:
- 1. Upgrade to Windows 11 as an Insider
- 2. Upgrade to Windows 11 by Checking and Installing Updates on Windows 10
- 3. Download Windows 11 and Install it on an SSD from a USB Drive
请注意,前两种选项是在原始操作系统磁盘上免费升级Windows 11,这可能是硬盘驱动器。
What are the exact steps? How do you install Windows 11 on your target drive? Follow the next two methods for assistance. By the way, if these methods prove helpful, please don’t hesitate to share this article to assist others.
I apologize, but you haven’t provided any text to be translated. Please provide the text you would like me to translate into English.
Method 1: Upgrade to Windows 11 and Transfer Windows 11 to SSD
First, download and update to Windows 11.
#1. Receive the Windows 11 Update as an Insider:
- Open the Windows Insider Program page and sign in.

- 1. Go to **Settings** > **Update & Security** > **Windows Insider Program** > **Get Started**.
2. Select the «+» to connect your account and choose **Dev Channel**.
3. Review the Privacy Statement and program terms, then click **Restart Now** or **Restart Later**.
4. After the computer restarts, go to **Settings** > **Update & Security** > **Windows Update** > **Check for Updates**.
#2. Check and Get the Windows 11 Update on Your PC
- Navigate to Settings > Update & Security > Windows Update > Check for Updates.

This is an image link in HTML format. It points to a resource named «check-for-update.png» and has a target set to «_blank,» which means it will open in a new tab when clicked. The image has an alt text «Check for Windows update,» indicating its content, and dimensions of 500 pixels in width and 336 pixels in height. The actual translation would be:

Please note that the content within the HTML tags is not a direct text that needs translation but rather a markup language used for web development. If you want the text «Check for Windows update» translated, it would be:
«检查Windows更新» (Check for Windows update) in Chinese.
Step 2. When the new update is available, click Download and install.
Step 3. Follow the on-screen instructions and wait for Windows 11 to install on your computer.
Step 4. After installing Windows 11, you can now move or transfer the OS to a newly installed SSD.
- Sure, please provide the text that needs to be translated.
< strong >Second, Migrate Windows 11 OS to SSD
To accomplish this, you’ll require the assistance of professional partition management software — namely, Partition Master. This tool enables you to迁移操作系统到新的SSD而无需重新安装Windows 11. Here’s how to proceed:
Steps to migrate the operating system to an HDD/SSD:
- 1. Run tools Partition Master and choose «Clone» from the left-side menu.
2. Check «Migrate OS» and click «Next.»
3. Select the SSD or HDD as the destination disk and click «Next.»
4. Warning: The data and partitions on the target disk will be erased. Make sure you have backed up important data beforehand. If not, do so now.
5. Click «Yes» to proceed.
6. Preview the layout of your target disk, then click «Start» to initiate the OS migration to the new disk.
- After this, click «Reboot Now» or «Done» to choose whether you want to restart the computer from the new disk immediately.
«Reboot Now»意味着立即保存更改,而»Done»则表示您需要稍后手动重新启动计算机。

Note: When there’s insufficient unallocated space on the target disk, the OS migration operation will delete and remove existing partitions and data on it. If you have important data stored there, back it up to an external hard drive beforehand.
Following this, you can proceed to the next section (Stage 3) to configure the new SSD as the boot drive in BIOS to make Windows 11 bootable. This tool enables you to perform the Windows setup without an Internet connection:
Method 2: How to Install Windows 11 on SSD from USB without Removing HDD
The other viable option is to install Windows 11 directly to an SSD from a USB drive. Since Windows 11 is available for free download in ISO files, follow the instructions below:
#1. Download Windows 11 ISO from the Microsoft Official Site
#2. Next, burn the ISO file to USB as an installation media
#3. Install Windows 11 from USB
Step 1. Prepare an empty USB external drive with 8GB or more space.
Step 2. Go to the Windows 11 page and download its ISO file to your computer.
Step 3. Burn the ISO file to your USB drive.
Or you can download the Windows 11 creation media directly and install it onto your USB drive.
Step 4. Restart your PC and enter BIOS, setting the USB drive as the boot device.
Step 5. Once the computer boots from the USB drive, follow the on-screen instructions to install the new operating system.
Step 6. Choose the Language, Time and currency format, Keyboard or input method, and then click Next to proceed.

This image represents the screen where you set the language, time, and keyboard preferences for installing Windows 11 from a USB drive.
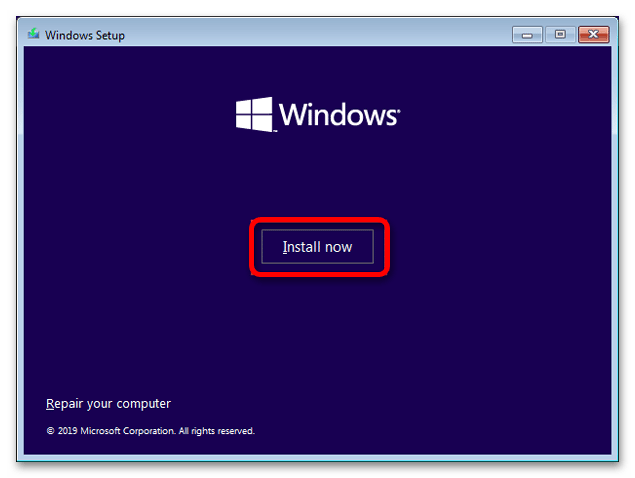
Step 7. Click Install Now to proceed to the next step.

Step 8. Click I don’t have a product key to proceed.
Step 9. Choose the edition of Windows 11 you wish to install, then click Next to proceed.

Step 10. Click to accept the Microsoft License Terms, then click Next.
Step 11. Click Custom: Install Windows only on the new disk.

Step 12. Choose the new SSD (SATA/M.2/NVMe) as the target disk and click Next to proceed.

或者,如果你要创建一个分区来安装 Windows 11,请先点击 新建 对 SSD 进行分区。
Step 13. Wait for the installation process to complete. The computer will restart automatically.

Then, follow the on-screen instructions to set up your computer. If your computer doesn’t start from the new drive, proceed to the next guide to enable it and configure it to boot from the new SSD.

- Notice:
- Regardless of the method you choose to install Windows 11 on a new SSD, the final step involves setting the new SSD with Windows 11 as the boot drive. We’ve provided detailed steps for you in the following section.
How Do I Make My (SATA/M.2/NVMe) SSD Bootable After Installing Windows 11
After installing Windows 11 on your new SSD, you need to take one additional step, which is to set the new SSD as the Boot Drive:
Step 1. Restart your PC and press the F2/F10/Delete key to enter BIOS settings.
Step 2. Access the Boot Menu and set the new SSD as the Boot Drive.

Step 3. Save the changes and exit, then restart Windows 11 again.
If you’d like to know how to install an M.2 SSD on Windows 10, please click the provided link:
How to Install Windows 10 on M.2 SSD
This guide offers a comprehensive solution for installing Windows 10 on an M.2 SSD. You’ll find two efficient methods to install Windows 10 on M.2 without data loss.
Windows 11 is new, and it’s time to get your new SSD ready to install the update now.
On this page, we guide you through the entire process of selecting a new SSD, preparing it, and installing Windows 11 on it.
- If you’re new to installing Windows or have no technical knowledge, follow this guide to install the new update on your computer.
- If your OS is installed on an HDD and you want to transfer Windows 11 to a new SSD, you can do it yourself using the tool Partition Master.
Currently, Windows 11 is only accessible for download and installation through the Insider channel. It’s fresh and if you’re keen to try it, prepare your new SSD and proceed with the installation on your computer right away.
Although Windows 11 still has known issues and bugs, Microsoft will update and fix them all for you.
Frequently Asked Questions About Installing Windows 11 on a New SSD
If you have more questions about installing Windows 11 on a new SSD, refer to and find solutions from the tips provided below:
< strong > 1. Which is easier: installing Windows 11 on a new SSD via a USB or migrating Windows 11 to an SSD?
It depends on your level of computing expertise. If you’re advanced in computing, directly installing Windows on a new SSD might be a straightforward and quick process for you. However, if you’re a beginner with Windows, migrating Windows 11 to a new SSD could be easier and more practical.
< strong > 2. Do I need to format a new SSD before installing Windows 11?
Not necessarily. As long as your new SSD is properly installed on your PC and initialized with the same disk partition style as GPT, you can directly install Windows 11 on the drive.
3. How do I get Windows 11 to recognize my new SSD?
- Scenario 1: If you’re installing or migrating Windows 11 to a new SSD, you’ll need to access the BIOS settings, set the new SSD as the primary boot device, and enable UEFI boot mode.
- Scenario 2: If the new SSD is intended as a data drive, ensure that it’s installed on your PC and initialized. Afterwards, create partitions on the SSD and format them to NTFS so that Windows 11 can recognize the drive.
Windows 11 / 10 / 8
Современные операционные системы от Microsoft не имеют проблем с установкой на твердотельные накопители (SSD), поэтому данную процедуру можно выполнить стандартным способом, воспользовавшись загрузочной флешкой или диском. На нашем сайте есть отдельные статьи, в которых детально рассказывается о решении этой задачи.
Подробнее: Как установить Windows 10 на SSD
Чтобы выполнить инсталляцию одиннадцатой версии операционной системы, можно воспользоваться руководством для Windows 10. Но прежде все равно придется создать загрузочную флешку, поэтому предварительно ознакомьтесь с соответствующим руководством, перейдя по ссылке ниже.
Подробнее: Как создать загрузочную флешку с Windows 11
Примечание! Есть вероятность, что последняя на момент написания статьи версия операционной системы не может быть установлена на ваш компьютер по причине высоких требований к железу. В таком случае, чтобы не выяснять это опытным путем, затрачивая время, рекомендуем ознакомиться с другой статьей на нашем сайте, в которой описывается процедура проверки ПК на совместимость с Windows 11.
Подробнее: Как проверить компьютер на совместимость с Windows 11
В некоторых случаях во время инсталляции операционной системы на твердотельный накопитель могут возникать разного рода ошибки и сбои. Выяснить их причину и устранить поможет специальная публикация, написанная другим автором. Для ознакомления с ней перейдите по ссылке ниже.
Подробнее: Причины, по которым Windows 10 не устанавливается на SSD
Обратите внимание! Если выполнить установку необходимо на внешнее устройство, стандартное руководство не поможет в решении этой задачи. Следует обратиться за помощью к другому материалу, опубликованному на нашем сайте. В нем подробно описываются все особенности проведения такой операции.
Подробнее: Установка Windows на внешний накопитель
Windows 7
При установке Windows 7 на SSD нередко возникают проблемы, так как эта версия операционной системы не содержит в инсталляторе специальных драйверов, которые обеспечивают поддержку твердотельных накопителей. Так это потому, что на момент ее выхода носители данного типа только начинали входить в обиход. Но проблему можно легко устранить, создав загрузочную флешку особым способом. Об этом подробно рассказывается в отдельной статье на нашем сайте, с которой и рекомендуем ознакомиться.
Подробнее: Поэтапная установка Windows 7 на SSD

Примечание! Если на компьютере Windows 7 уже инсталлирована на жесткий диск, но есть необходимость переустановить ее на твердотельный накопитель, можно воспользоваться специальными программами, которые помогают в решении этой задачи. Лучшие представители данной категории ПО рассматриваются в отдельном материале на нашем сайте, ссылка на который дана ниже.
Подробнее: Программы для переноса Windows на SSD
Windows XP
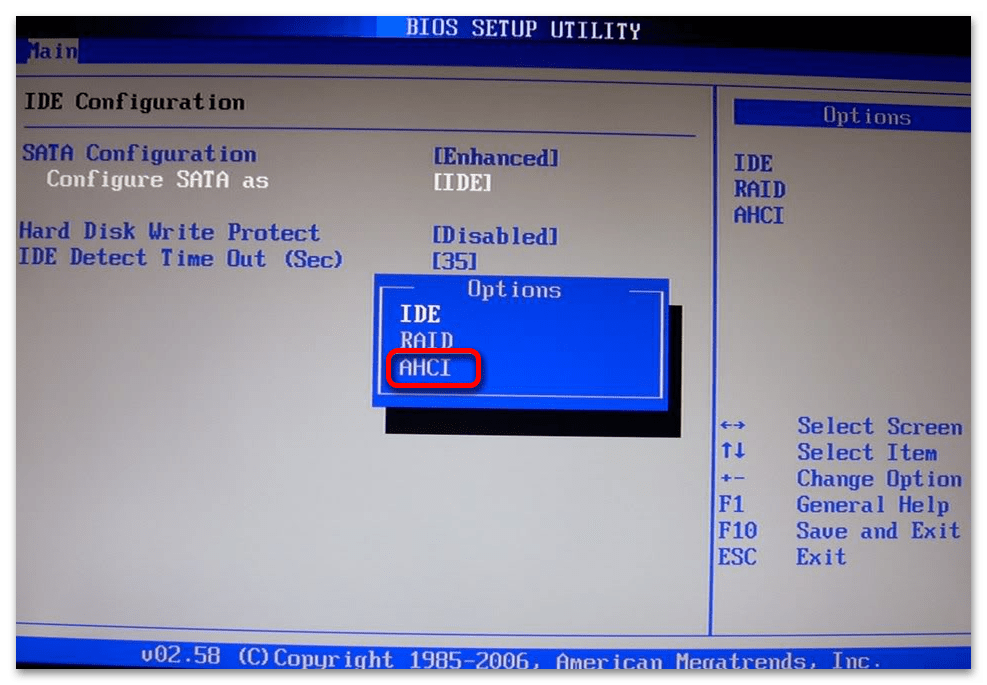
Если седьмая версия операционной системы от Microsoft имеет проблемы совместимости с SSD, то в Windows XP их еще больше. Но несмотря на это, выполнить процедуру инсталляции на твердотельный накопитель можно, хотя для этого придется внести изменения в BIOS компьютера и произвести дополнительные манипуляции по оптимизации системы. Все эти процессы подробно описаны в другой публикации на нашем сайте.
Подробнее: Установка Windows XP на SSD

Обратите внимание! Существует возможность перемещения операционной системы с одного SSD на другой без необходимости повторной установки Windows. Это позволяет не только ускорить процесс выполнения операции, но и сохранить все пользовательские данные, что в некоторых случаях очень важно. Если данная тема вас интересует, ознакомьтесь с соответствующей статьей на нашем сайте, перейдя по представленной ниже ссылке.
Подробнее: Перенос системы с одного SSD на другой
Наша группа в TelegramПолезные советы и помощь
Do you have any idea on how to install Windows 11 on SSD? To get a fast boot speed and better PC performance, installing Windows on an SSD is a good option. It is an easy thing if you follow these two methods given by MiniTool Solution in this post. Let’s see the following full guide now.
Microsoft released Windows 11, a brand new operating system, to the public on June 24, 2021. It brings brand new UI design, features, and improvements. Soon afterward, the first version of the Windows 11 preview build came. Nowadays, multiple build versions are available for Windows Insider users to install.
Tip: What’s new in Windows 11? You can refer to this post to learn more – What’s Next for Windows: What’s New in Windows 11.
Advantages – Install Windows 11 on SSD
With the release of Windows 11, you may want to experience this new OS. But compared to installing Windows on a traditional hard drive, it is a good option to install Windows 11 on a new SSD. The main reasons for this include:
- An SSD has a faster speed. It can greatly improve the system boot speed, shortening the time to seconds from a few minutes.
- Also, an SSD can let the whole system faster by speeding up the system when it is running.
Tip: There are many differences between HDD and SSD. To know more details, read our previous post – SSD VS HDD: What’s Difference? Which One Should You Use in PC.
Well then, do you have an idea of how to install Windows 11 on a new SSD? It is time-consuming and laborious but if you follow these two methods below, things will become easy.
Preparation: Get a New SSD Ready for Windows 11
Since Windows 11 has strict system requirements, to make sure that the PC has a great performance, it is necessary to choose a proper SSD as the system drive. Just get a new SSD ready for Windows 11 by following the tips here.
Note: Make sure your PC is compatible with Windows 11 (Related article: Compatibility Test: How to Check if Your PC Can Run Windows 11?) and then install Windows this new OS on your PC to have a try. Otherwise, Windows 11 on unsupported PCs could result in more BSODs or there are no updates.
Get an Appropriate SSD
There are multiple SSD types, including SATA SSD, PCIe SSD, M.2 SSD, NVME SSD, etc. To know more, refer to this post – Different Types of SSD: Which One Is More Suitable for You.
Related articles:
- Here Are Some Guides for You to Buy Right Solid State Drives
- How to Pick an SSD of the Right Form Factor for Your Device
To install Windows 11 on a new SSD for better performance, you should first buy a proper one. For a fast and endurable computer, an M.2 SSD is ideal for Windows 11. Of course, you can install an SSD in other form factors based on your computer.
Besides, make sure the SSD has a big storage space to store the new system and some files.
Set up SSD
As for Windows 11 system requirements, the new system requires the Secure Boot mode that is only available on a GPT disk. Thus, to make sure of a successful installation of Windows 11 on an SSD, initialize the SSD to GPT.
Just connect your SSD to your computer, then launch Disk Management and right-click on the SSD to choose Initialize Disk. Then, set the partition style to GPT.
After finishing the preparatory work, now it’s time to start Windows 11 installation on an SSD.
How to Install Windows 11 on M.2 SSD or Other SSD?
Method 1: Migrate Windows 11 to SSD
If you haven’t already installed Windows 11, you can upgrade to this new operating system from Windows 10. Currently, Windows 11 is in the test phase.
You can go to Windows Updates and check for updates. Then, download and install Windows 11 on your PC.
After installing Windows 11, now you can transfer the new operating system to your SSD. To achieve this aim, you need the help of professional cloning software. Here, MiniTool ShadowMaker can be your good assistant.
Use MiniTool ShadowMaker to Clone Windows 11 to SSD
At the first sight, you find MiniTool ShadowMaker is a computer backup software since it can back up files, folders, disks, partitions, and systems. It can be a file sync software since it supports file & folder sync. Besides, it can be a powerful disk cloning software. With its Clone Disk feature, you can easily clone a disk to another hard drive.
To install Windows 11 on SSD, you can use it to clone the entire system disk to your SSD and then boot the PC from the target disk. During the cloning process, everything including Windows 11 system files, settings, registries, your files, documents, and other data is transferred to the SSD.
Importantly, this software is free to you. Now, get it to have a try by clicking the following download button. Then, install it on your Windows 11 PC.
MiniTool ShadowMaker TrialClick to Download100%Clean & Safe
Step 1: Run MiniTool ShadowMaker in Windows 11.
Step 2: Under the Tools tab, choose Clone Disk to continue.
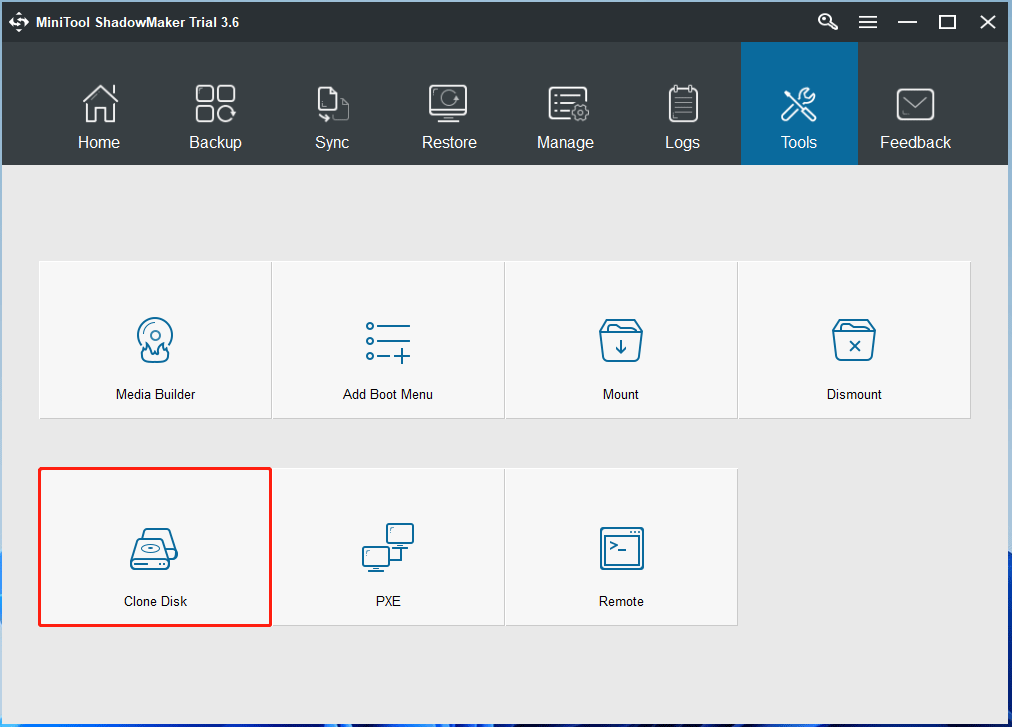
Step 3: Click the Source section and select the system disk as the source disk from the combo box in the pop-up window. Also, click Destination and choose the SSD as the target disk.

Step 4: Click OK and you will get a message that says the cloning process can destroy the content on the target disk. Click Yes to continue. Then, MiniTool ShadowMaker starts cloning Windows 11 disk to your SSD.
Step 5: After a few minutes, disk cloning finishes.

After finishing the disk cloning, it is better to convert the SSD to GPT with MiniTool Partition Wizard although you have initialized the disk to GPT. This is because GPT turns MBR after the cloning process.
Next, you can remove the original system disk from your computer and then put the SSD in the original place. Then, you can boot Windows 11 from an SSD at a fast speed.
Use MiniTool Partition Wizard to Clone Windows 11 to SSD
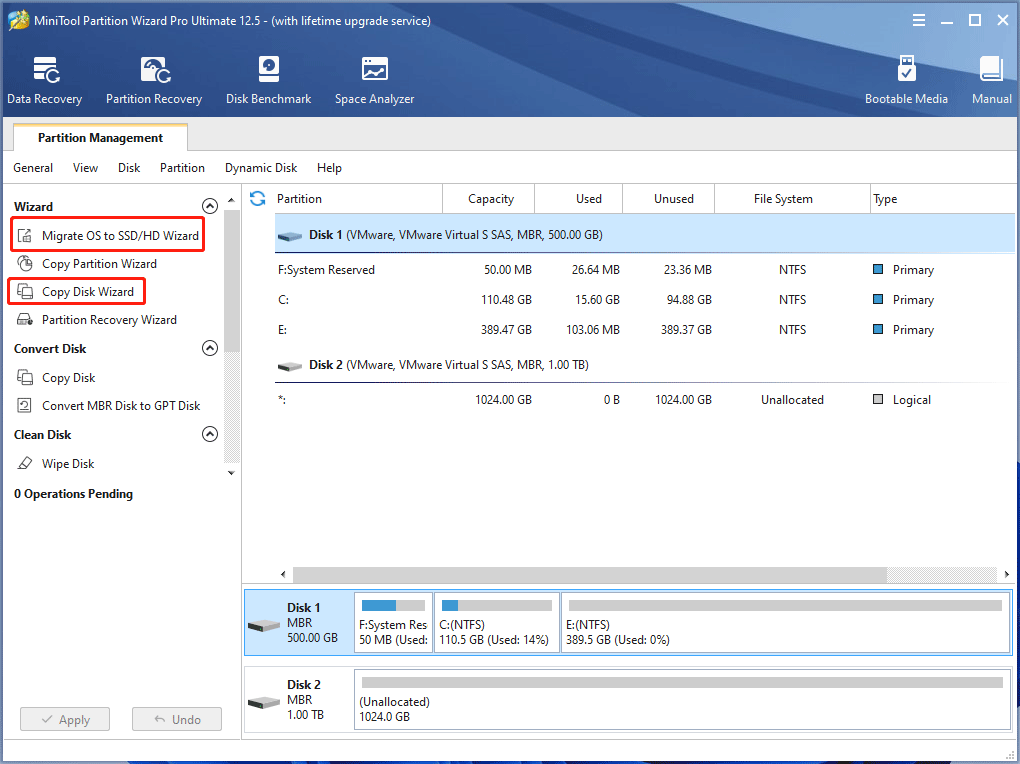
In addition to MiniTool ShadowMaker, you can use another PC cloning software to migrate Windows 11 to SSD. It is MiniTool Partition Wizard. This software offers two options to you
- Migrate OS to SSD/HD: Only transfer Windows 11 to an SSD or clone the entire system disk to an SSD.
- Copy Disk:Clone the entire disk to an SSD
These two features are helpful for you. If you only want to migrate Windows 11 to SSD, use the first feature and select the proper migration mode. To deal with the system disk, a paid edition of MiniTool Partition Wizard is required.
If you initialize the SSD to GPT in advance, after cloning, you won’t need to convert the disk to GPT again. You can also remove the original disk and put the SSD in the original place.
Related article: How to Install an M.2 SSD on Windows PC
If you want to keep both of these two disks on your computer, you need to take measures to make this SSD bootable.
How to Make NVMe/SATA/M.2 SSD Bootable after Windows 11 Installation
- First, restart your computer, press a specific key to load the PC to BIOS.
- Under the boot menu, set the SSD as the boot drive in BIOS.
- Save the change and reboot the PC again to Windows 11.
Method 2: Install Windows 11 on SSD from USB
This is the direct way to install Windows 11 on an SSD. There are two main situations:
- If you are running Windows on an HDD, you can directly install Windows 11 on a new SSD from a USB drive. After installation, boot the PC from the SSD and keep the original HDD as a data disk.
- Or you have an SSD on your PC and installed Windows on your PC’s SSD, and you want to reinstall Windows 11 due to some reason, this way is also available. Note that you had better back up your important files before the installation with the professional backup software – MiniTool ShadowMaker.
How to install Windows 11 on a new SSD from a USB drive? Follow these steps below.
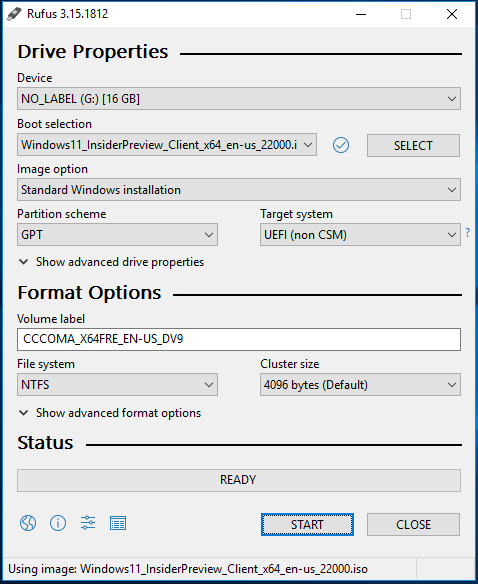
# 1. Create a Windows 11 Bootable USB Drive
Step 1: Prepare a USB flash drive that has up to 8GB or bigger space.
Step 2: Go to download an ISO file from the Microsoft page.
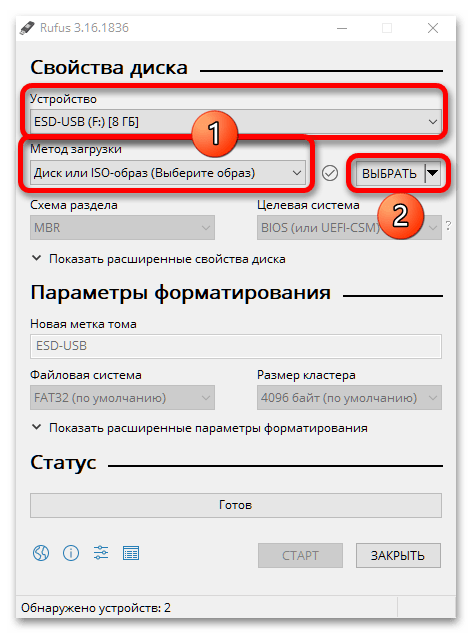
Step 3: Run Rufus to burn the Windows 11 ISO file to your USB flash drive.
#2. Install Windows 11 on SSD
Step 1: Restart your computer and press a specific key (Del, F2, F10, etc.) to enter BIOS.
Step 2: Change the boot sequence in BIOS – set the PC to boot from the USB drive.
Step 3: Configure your keyboard, language, time, and currency format.
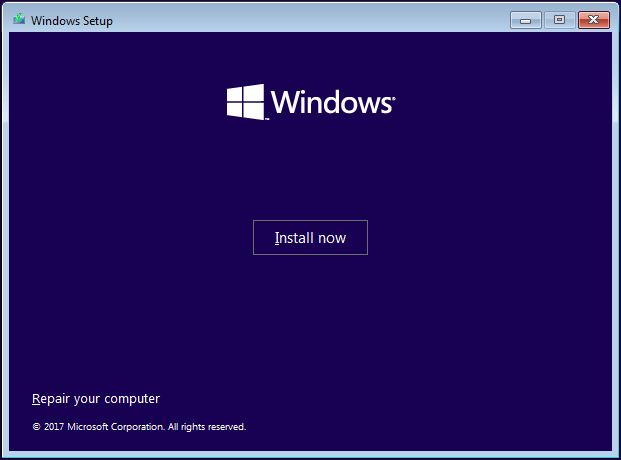
Step 4: Click the Install now button to continue.
Step 5: Windows setup will ask you to enter a license key. Just click I don’t have a product key.
Step 6 (Optional): You are asked to choose an edition of Windows 11 and then accept the license terms.
Step 7: Choose Custom: Install Windows only (advanced).
Step 8: Choose a location to install Windows 11 to.
Case 1: To install Windows 11 on a new SSD, you can see Drive 0 Unallocated Space. Click Next to start the installation.
Case 2: To reinstall Windows 11 on your original SSD, you can see Drive 0 Partition 1, Drive 0 Partition 2, etc. Choose the partition where the original system is saved and click Delete. Then, click Next to start the installation process.
This will take some time. After installing Windows 11 on your SSD, set up the new operating system based on your likes.
Bottom Line
On this page, we offer you a full guide to install Windows 11 on SSD – get an SSD ready and install Windows 11 on it. If you want to get a fast boot speed with Windows 11, try one method mentioned above.
Cloning is strongly recommended since everything including all your data, system files, settings, etc. is moved to the SSD, without reinstalling Windows operating system.
If you run into any questions when using MiniTool Software, or have any suggestions on how to install Windows 11 on external hard drive or SSD, leave your idea in the comment below or contact our support team via [email protected].
Для многих пользователей процесс установки Windows превратился в рутину, занимающую довольно много времени. Львиную часть которой занимает запись образа Windows на флешку, загрузка с нее и последующий первый этап установки. Даже если вы пользуетесь быстрым SSD и флешкой USB 3.0, это процесс займет довольно долгое время и потребует нескольких перезагрузок компьютера.

Вторая проблема при установке операционной системы на компьютер или ноутбук, в котором установлено несколько накопителей и уже есть установленная Windows — это возможность повредить загрузчик основной Windows. Есть и немаленькая вероятность установить Windows так, что загрузчики для обеих операционных систем установятся на один накопитель и при его поломке или замене вторая Windows перестанет загружаться.

Связано это с тем, что Windows всегда записывает загрузчик, по крайней мере для дисков MBR, на тот диск, который подключен в самый первый порт материнской платы и имеет обозначение «диск 0». Эта нумерация дисков не зависит от того, какой накопитель вы выбрали в качестве загрузочного, а установщик Windows довольно примитивен, в отличие от установщиков Linux, и не позволяет выбрать это пользователю.

Я несколько раз попадал в ситуацию со сбоем загрузчика при установке и теперь при каждой установке Windows на всякий случай отключаю питание у остальных накопителей, что довольно утомительно, требует открывать ПК, да и не добавляет долговечности разъемам SSD.
И вот недавно я наткнулся на утилиту, которая не только радикально ускоряет установку Windows, но и полностью решает проблему с загрузчиками ОС, а «дергать провода» с ней больше не придется.

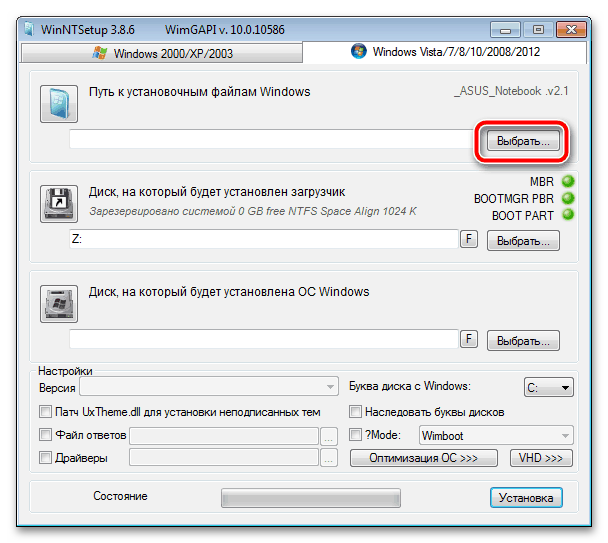
Это утилита WinNTSetup от разработчика JFX, уже давно известная опытным пользователям, но еще не получившая широкого распространения у обычных пользователей, самостоятельно занимающихся переустановкой Windows, таких, как мы с вами. Утилите уже более 10 лет, она постоянно обновляется и в 2021 году уже имеет версию v5.1.2 и поддержку Windows 11.
Скачать ее можно с популярного у западных пользователей сайта msfn.org, где на форуме сайта разработчик WinNTSetup выкладывает новые версии, рассказывает об изменениях и ведет поддержку пользователей.

Архив с утилитой занимает всего 1.4 МБ.

Программа русифицирована и после запуска вы увидите окно, где нажатие на значок «Windows» в правом верхнем углу вызовет меню с дополнительными встроенными утилитами.

Далее видно три поля, в первое из которых нужно указать путь к установочным файлам Windows 10 или Windows 11, для чего скачать iso файл с Windows, смонтировать его в системе в виртуальный привод или распаковать архиватором и указать путь до файла install.esd, который лежит в папке «sources».

Во втором поле следует указать путь до диска, где будет расположен загрузчик. И на этом следует остановиться поподробнее. В моем случае имеется второй SSD, с двумя разделами, на первый из которых ранее был установлен Linux Mint, а второй занимают игры и данные. После удаления разделов Linux осталось не распределенное место объемом 48.8 ГБ.

Если сейчас попробовать установить этот диск для загрузчика в утилите WinNTSetup, даже выделив под загрузчик отдельный небольшой раздел, то мы получим вот такую картину, где пункт EFI PART будет гореть желтым цветом. Это важно! В этом случае установка Windows завершится ошибкой.

Поэтому EFI раздел нам придется создать самим. Сделать это можно как с помощью утилиты Bootice, которая встроена в WinNTSetup, так и с помощью командной строки, запустив ее от Администратора и поочередно введя команды:
diskpart
lis disk
sel disk 1 (вместо 1 указываете тот номер, под которым выше значится нужный вам диск)
creat par efi size=100
format fs=FAT32
В моем случае это выглядело так:

В результате файловая система стала выглядеть вот так:

А выбор дисков в WinNTSetup — вот так, где зеленым подсвечены разделы, готовые для загрузчика.

Теперь осталось выбрать редакцию Windows в разделе «Параметры» и нажать установка. Стоит упомянуть, что в разделе «Оптимизация ОС» вы можете сразу сделать множество полезных настроек, которые сэкономят вам время при настройке Windows.

Есть и возможность интегрировать драйверы, твики реестра и файл ответов для установки Windows, что сделает ее установку еще быстрее.
Далее будет окно подтверждения, где нужно тщательно проверить назначение дисков, чтобы не установить систему не в то место.

И начинается первый этап установки, который как раз и заменит нам работу с загрузочной флешкой, и занимает он, внимание, всего одну минуту и 37 секунд! Неплохое ускорение установки, не правда ли?

Теперь после перезагрузки Windows и выбора нужного диска для загрузки вы сразу попадаете в режим, когда Windows устанавливает службы, делает настройку оборудования и буквально через пару минут вы попадаете в окно ее окончательной настройки по завершению установки.

На первый взгляд процесс, описанный выше, выглядит сложным и долгим, но это только в случае первого знакомства с утилитой WinNTSetup и в случае, если на диске для установки Windows нет EFI раздела, как в моем случае.
На этом возможности утилиты WinNTSetup не заканчиваются и главный ее плюс, по мнению опытных пользователей, легкая установка Windows на виртуальный диск VHD, который может быть расположен в любом месте вашего SSD или HDD.
Может утилита установить Windows и на флешку или даже внешний жесткий диск, что открывает просто безграничные возможности. Представьте, вы можете пользоваться одним ПК совместно с другим пользователями, совершенно не рискуя случайно удалить их или свои данные или заразить чужую ОС вирусами ли троянами.

Windows можно установить на флешку, выбрав быструю и производительную модель большого объема, например, Kingston DataTraveler Kyson объемом 128ГБ из Ситилинка, развивающую максимальную скорость чтения до 200 МБ/с, а максимальную скорость записи до 60 МБ/с.

Windows можно установить на внешний жесткий диск, например, WD Elements Portable WDBUZG0010BBK-WESN, объемом 1 ТБ.

Но максимальную скорость работы такой системы можно получить, установив Windows на внешний SSD-привод, например, Samsung T5 MU-PA500B/WW, объемом 500 ГБ.

Важное замечание
Любая работа с дисками и разделами на ПК имеет риск потери данных, поэтому при первой работе с WinNTSetup не помешает сделать бэкап вашего системного диска и важных данных. Займет это совсем немного времени, достаточно загрузится с загрузочной флешки и воспользоваться средством для бэкапа, например, от Acronis.
Итоги
Утилита WinNTSetup дает широчайшие возможности по установке Windows и позволяет устанавливать Windows на внешние носители, что невозможно сделать стандартными средствами. Поражает и скорость установки Windows в таком режиме, и для пользователей, у которых есть два SSD, это дает возможность полностью отказаться от стандартного способа установки Windows с флешки.
Из-под одной ОС с первого SSD устанавливаем вторую, а уже из-под нее, в случае надобности, переустанавливаем первую. А две операционные системы на одном ПК это не только удобно, но и обеспечивает дополнительную безопасность и надежность работы.
Пишите в комментарии, сталкивались ли вы с проблемами при установке Windows на ПК с несколькими накопителями, или при установке второй ОС?
Telegram-канал @overclockers_news — теперь в новом формате. Подписывайся, чтобы быть в курсе всех новостей!
Installing Windows 11 on an NVMe SSD is a fantastic way to turbocharge your computer’s performance. Here’s a quick rundown: You’ll need to back up your data, create a bootable USB with the Windows 11 installation media, change your boot settings, and install Windows 11 onto the NVMe SSD. Let’s dive into the step-by-step tutorial for a smooth installation process.
In this guide, we will cover how to back up your data, create a bootable USB, change BIOS settings, and install Windows 11 on your NVMe SSD.
Step 1: Back Up Your Data
Ensure you back up all important files before starting the installation process.
You don’t want to lose your precious photos, documents, or any other data. Use an external hard drive or cloud storage to safely store everything you need.
Step 2: Create a Bootable USB
Use the Windows Media Creation Tool to create a bootable USB drive with Windows 11 installation files.
Visit the Microsoft website, download the tool, and follow the easy instructions to get your USB drive ready. Make sure it’s at least 8GB in size.
Step 3: Change Boot Order in BIOS
Restart your computer and enter the BIOS/UEFI settings to set the USB drive as the primary boot device.
This usually involves pressing a key like F2, DEL, or ESC during startup. Look for the boot order settings and move the USB drive to the top.
Step 4: Install Windows 11
Insert the bootable USB into your computer and restart it to begin the Windows 11 installation process.
Follow the on-screen instructions. When asked, select «Custom: Install Windows only» and choose your NVMe SSD as the installation location.
Step 5: Complete the Installation
Once the installation process is complete, you’ll be prompted to set up Windows 11.
This includes setting up your user account, connecting to Wi-Fi, and configuring privacy settings. Follow the prompts to complete the setup.
After completing the installation, your computer will run Windows 11 from the NVMe SSD. You’ll notice faster boot times and overall improved performance.
Tips for Installing Windows 11 on NVMe SSD
- Check Compatibility: Ensure your motherboard supports NVMe SSDs and that you’re eligible for a Windows 11 upgrade.
- BIOS Update: Consider updating your BIOS to the latest version for better compatibility and performance.
- Partitioning: Use the custom installation option to partition your NVMe SSD as needed.
- Driver Updates: After installation, update all your drivers to ensure optimal performance.
- Backup Regularly: Even after installation, keep backing up your data regularly to avoid any data loss.
Frequently Asked Questions
Do I need a specific type of USB drive for creating bootable media?
Any USB drive with at least 8GB of storage will work. However, using a USB 3.0 drive will speed up the process.
Can I use the same Windows 11 license from my previous installation?
Yes, if you’re reinstalling Windows 11 on the same machine, you can use the same license key.
How do I know if my computer is compatible with Windows 11?
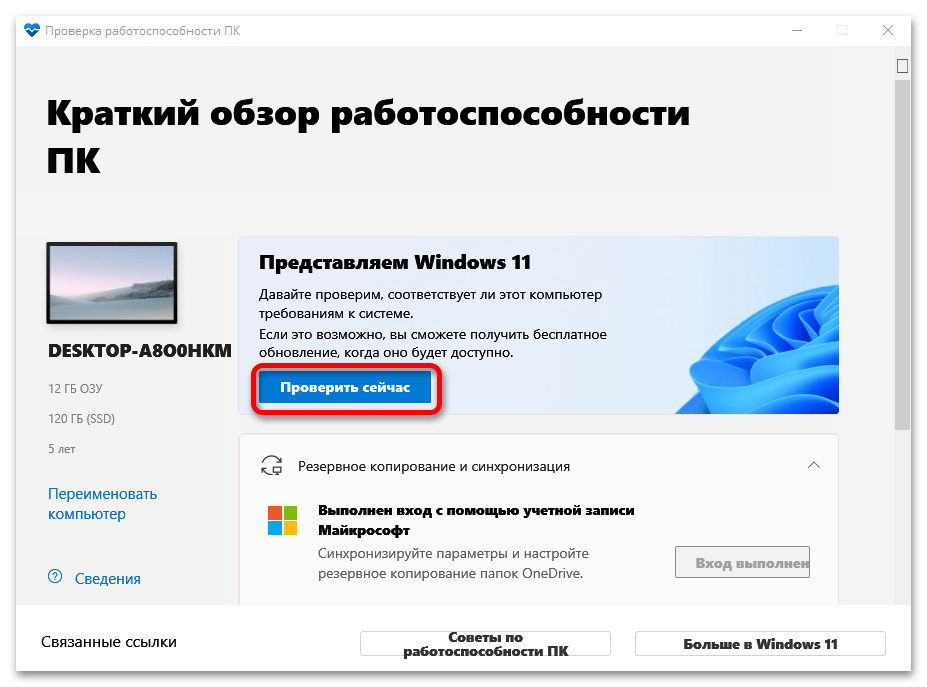
Use Microsoft’s PC Health Check tool to determine if your system meets the requirements for Windows 11.
What if my NVMe SSD is not detected during installation?
Ensure that your BIOS settings are configured correctly and that the NVMe SSD is properly connected.
Can I dual-boot Windows 11 with another operating system?
Yes, you can, but it requires careful partitioning and configuration to avoid data loss.
Summary
- Back up your data.
- Create a bootable USB with Windows 11.
- Change boot order in BIOS to prioritize the USB drive.
- Install Windows 11 on the NVMe SSD.
- Complete the installation process and set up Windows 11.
Conclusion
There you have it—a comprehensive guide on how to install Windows 11 on your NVMe SSD. By following these steps, you’re setting yourself up for a blazing-fast computing experience. Remember, the key to a smooth installation is preparation: back up your data, ensure your hardware is compatible, and follow the steps carefully.
If you run into any issues, don’t hesitate to revisit this guide or seek help from online forums. Once you’re up and running, you’ll truly appreciate the speed and efficiency that comes with running Windows 11 on an NVMe SSD. Happy computing!
For further reading, you might want to explore articles on optimizing Windows 11 settings or maintaining SSD health, ensuring your system stays in top shape. Enjoy your upgraded PC experience!
Kermit Matthews is a freelance writer based in Philadelphia, Pennsylvania with more than a decade of experience writing technology guides. He has a Bachelor’s and Master’s degree in Computer Science and has spent much of his professional career in IT management.
He specializes in writing content about iPhones, Android devices, Microsoft Office, and many other popular applications and devices.
Read his full bio here.