
When your computer runs slowly, you may want to reinstall the NVIDIA graphics driver. In this article, we’ll show you how to reinstall the NVIDIA graphics driver in Windows 11, 10, 7 & 8.1.
There are two steps you need to follow to reinstall the NVIDIA driver; just follow the instructions. Then you can reinstall the NVIDIA driver successfully.
- Step 1: Uninstall the NVIDIA driver
- Step 2: Install a new NVIDIA driver
Step 1: Uninstall the graphics driver
You can uninstall the driver via Device Manager. Device Manager is a Control Panel application that allows you to manage devices and drivers in your system. You can uninstall, update, or roll back drivers via Device Manager.
Follow these steps to uninstall the NVIDIA graphics driver via Device Manager:
- On your keyboard, press the Windows logo key and R keyat the same time to invoke the Run box.
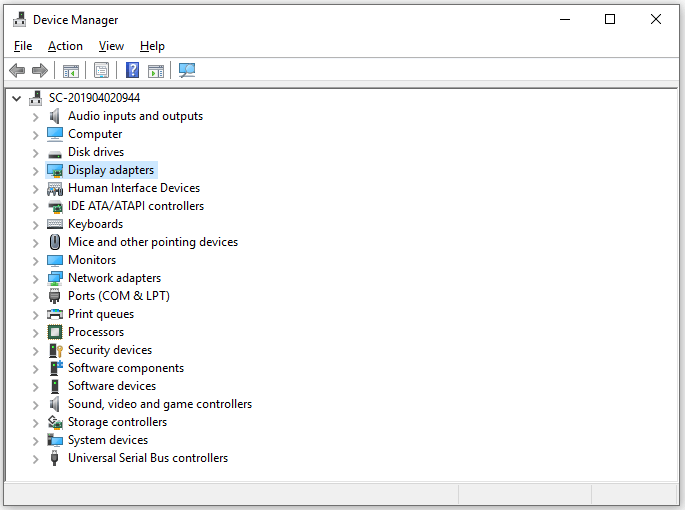
- Type devmgmt.msc and press Enter to open the Device Manager window.
- Double-click Display adapters, right-click your NVIDIA graphics card, then select Uninstall device.
- On the Uninstall confirm dialog box, select the Delete the driver software for this device check box, then click Uninstall.
- On Windows 11, the message is different, but still, you just need to tick the box for Attempt to remove the driver for this device and click Uninstall.
- Repeat the same to remove the driver for your other Nvidia display card if you have one.
The option Delete the driver software for this device allows you to delete the driver package from the Driver Store (For more information about Driver Store, please see here.)
If you don’t see this option on the Uninstall confirmation dialog box, the driver package probably has been removed. In this case, just click Uninstall to uninstall only the driver.
After uninstalling the driver, move on to Step 2 to install a new NVIDIA driver.
Step 2: Install a new NVIDIA driver
We’ve put together two methods below for you to install a new NVIDIA driver. You can pick the easier method for you.
Method 1: Download and install a new driver from NVIDIA
Method 2: Reinstall the NVIDIA driver with Driver Easy
Method 1: Download and install a new driver from NVIDIA
You can download and install a new NVIDIA graphics driver from their official website. To download the correct driver, you need to know what system version you have and what the graphics card model is, then you can refer the steps below to download a new NVIDIA driver manually.
- Go to NVIDIA’s driver download page.
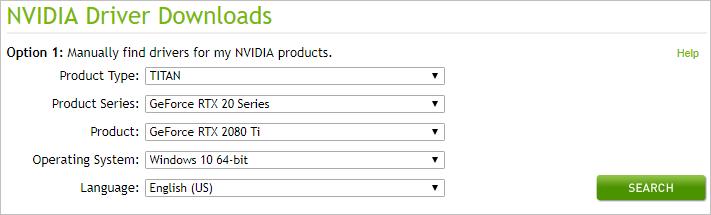
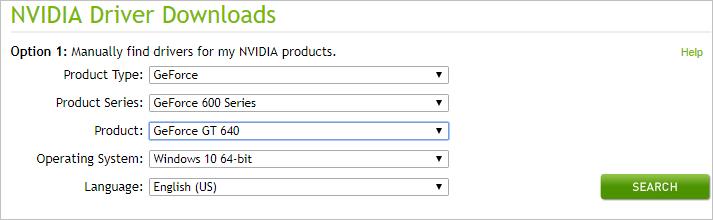
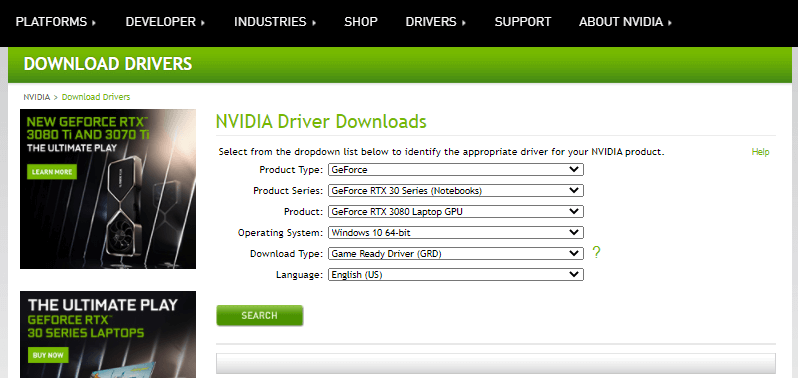
- Enter the information in the field according to your system version and your graphics card model.
In my case, my computer is running Windows 10 64-bit, and my graphic card is NVIDIA GeForce GT 640, so I enter the information in the field as follows:

- Follow the on-screen instructions to download the driver.
- Double-click on the downloaded file and follow the on-screen instructions to install the driver.
Method 2: Reinstall the graphics driver with Driver Easy
If you don’t have the time, patience or computer skills to reinstall the driver manually, you can do it automatically with Driver Easy.
Driver Easy will automatically recognize your system and find the correct drivers for it. You don’t need to know exactly what system your computer is running, you don’t need to risk downloading and installing the wrong driver, and you don’t need to worry about making a mistake when installing.
- Download and install Driver Easy.
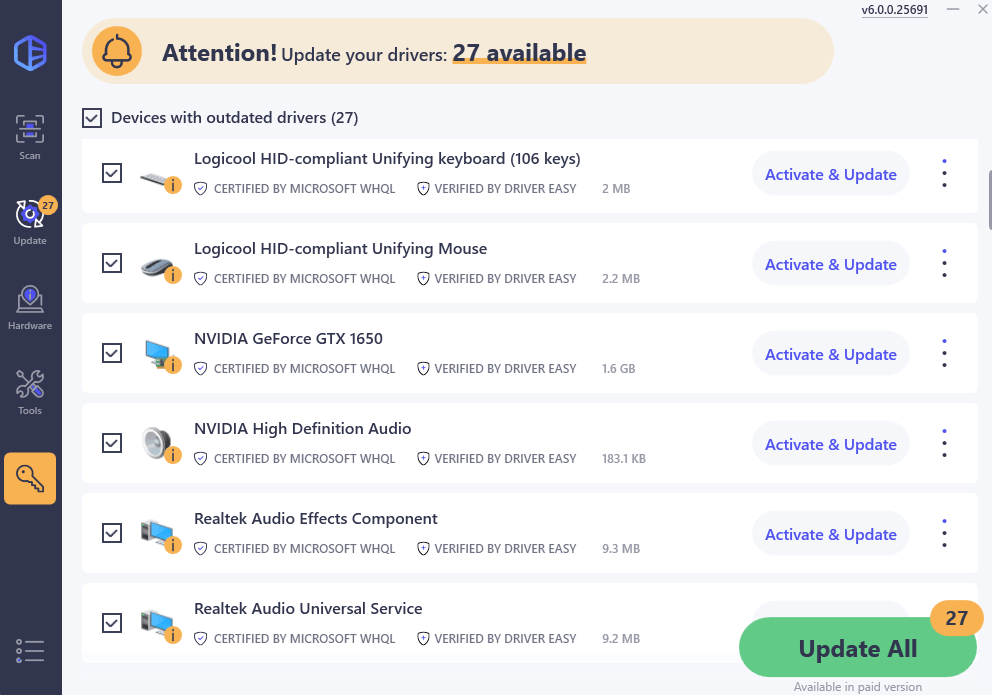
- Run Driver Easy and click the Scan Now button. Driver Easy will then scan your computer and detect any problem drivers.

- Click Update All to automatically download and install the correct version of all the drivers that are missing or out of date on your system.
(This requires the Pro version which comes with full support and a 30-day money-back guarantee. You’ll be prompted to upgrade when you click Update All. If you’re not ready to buy the Pro version, Driver Easy offers a 7-day free trial which includes access to all the Pro features such as high-speed download and one-click install. You won’t be charged anything until your 7-day trial has ended.)

- Restart your computer for the changes to take effect.

If you need assistance, please contact Driver Easy’s support team at support@drivereasy.com.
Hopefully you can reinstall the NVIDIA driver successfully with the instructions above. If you have any questions, ideas or suggestions, please feel free to leave your comments.
67
67 people found this helpful
Available in other languages
Das Neuinstallation von Ihrer NVIDIA-Grafikkarte kann die meisten NVIDIA-Grafikprobleme lösen. Hier leiten wir Ihnen durch den Prozess.
Votre carte graphique Nvidia ne fonctionne plus bien ? Suivez-nous, il est temps d’installer la dernière version du pilote de votre périphérique Nvidia !
Драйвера видеокарты обеспечивают стабильную и правильную работу ускорителя. Кроме того, они улучшают ее эффективность как в играх, так и в рабочих задачах. Своевременное обновление драйверов позволяет получить максимум пользы, однако не все знают, как их обновить.
Рассказываем, как правильно установить или переустановить драйвера на видеокартах Nvidia, AMD и Intel.
Зачем обновлять драйвера
Главная польза от обновления — повышение производительности и стабильности. Когда выходят новые крупные игры, разработчики выпускают обновление ПО для видеокарт, чтобы улучшить их эффективность и объяснить ускорителю, как правильно обрабатывать текстуры.
К тому же производители GPU периодически выпускают апдейты, которые:
- исправляют ранее возникшие ошибки в работе ускорителей;
- устраняют проблемы с совместимостью ПО;
- оптимизируют работу видеокарт.
Тем не менее время от времени возникают ситуации, когда драйвера работают некорректно. В таких случаях необходима их полная переустановка.
Подготовка к установке
Перед установкой или переустановкой убедитесь, что вы знаете модель своей видеокарты. Для этого нажмите на клавишу Windows, введите «Диспетчер устройств», откройте программу и раскройте пункт «Видеоадаптеры». Также проверить модель GPU можно, если перейти в Параметры — Система — Дисплей — Расширенные параметры дисплея.
Оба способа не требуют дополнительных программ, так как являются системными
Перед установкой драйверов убедитесь, что установлена программа для обновления драйверов:
- Nvidia — Nvidia App;
- AMD — AMD Software: Adrenalin Edition;
- Intel — Intel Driver & Support Assistant, для загрузки требуется зарубежный IP-адрес.
Удаление старых драйверов
Перед тем как устанавливать новые драйвера, важно удалить старые. Это необходимо во избежание конфликтов программного обеспечения. Чтобы их удалить, нажмите на клавишу Windows, введите в поиске «Установка и удаление программ» и откройте программу.
В поиске введите «Драйвер»
В случае видеокарты Nvidia нужно выбрать графический драйвер, нажать «Удалить» и подтвердить удаление.
Процесс простой и интуитивный
Далее откроется окно, в котором нужно еще раз подтвердить удаление.
После завершения процесса все настройки дисплея сбросятся, и потребуется установить ПО заново
После удаления NVIDIA рекомендует перезагрузить компьютер — сделайте это. В противном случае драйвера могут не установиться.
Если такой способ не сработал, есть альтернативный вариант: полное удаление через Display Driver Uninstaller (DDU). Это бесплатная программа, предназначенная для очистки системы от драйверов видеокарты и связанных с ними файлов. Она помогает устранить конфликты, возникающие из-за некорректной работы старого ПО, и подготовить систему к чистой установке нового.
Скачайте DDU с официального сайта — может потребоваться зарубежный IP-адрес.
Перезагрузите ПК в безопасном режиме. Для этого нажмите сочетание клавиш Win + R, введите msconfig и нажмите «ОК».
Опытные пользователи знают, что таким образом открывается конфигуратор системы
Перейдите в раздел «Загрузка», выберите «Безопасный режим», нажмите «Применить», затем «ОК» и перезагрузите ПК.
Другие галочки не устанавливайте, они нам ни к чему
Запустите DDU, выберите «Видеокарта» и название производителя, нажмите «Удалить и перезагрузить».
У меня процесс удаления занял три минуты
После перезагрузки снова откройте msconfig, отключите запуск безопасного режима и нажмите «ОК».
Делаем все то же самое, что и в начале, только в обратном порядке
Этот способ действенный, но неудобный — нужно постоянно перезагружать ПК. Он подойдет, если первый вариант удаления драйверов не сработает.
Установка драйверов видеокарты Nvidia
Запустите Nvidia App, если он установлен. В противном случае загрузите его с официального сайта или softportal и запустите.
В нем перейдите в раздел «Драйверы» и загрузите их актуальную версию. Они могут быть двух видов: Game Ready — для игр, Studio — для работы с программами Adobe и Autodesk. Меню расположено в правом верхнем углу, а что касается выбора — отдавайте предпочтение тому или иному варианту исходя из ваших задач.
Рекомендую установку драйверов Game Ready, они универсальные
После загрузки нажмите на клавишу «Установка» и запустите экспресс-установку.
Нажмите «Продолжить» и дождитесь завершения процесса
По завершении появится окно с информацией о том, какие драйвера были установлены: их версия и название.
Если какой-то компонент уже имеет актуальную версию ПО, он не будет установлен
Если не хочется ставить очередную программу на ПК, драйвера можно загрузить с официального сайта. Для этого выберите модель вашей видеокарты, версию операционной системы, тип драйверов и нажмите на «Поиск».
В моем случае это Game Ready для RTX 2070 Super на Windows 11
Nvidia предложит все доступные версии ПО — загружайте актуальную, она расположена сверху.
На момент написания актуальные — 566.36
Откройте загруженный файл и нажмите на пункт «Выборочная установка», затем «Далее». Это нужно, чтобы выполнить чистую установку, которая приведет к полному удалению остатков старого софта.
Также программа предложит установить Nvidia App, чтобы не приходилось загружать драйвера каждый раз вручную с сайта
В случае невозможности зайти на сайт с российского IP-адреса можно воспользоваться сторонним сервисом. Например, techpowerup. С его сайта тоже можно скачать и установить актуальные драйвера — процесс не отличается от ручной инсталляции, описанной выше.
Установка драйверов видеокарты AMD
Для установки драйверов на видеокарты AMD можно воспользоваться фирменным ПО AMD Software: Adrenalin Edition. Программа автоматически определит модель вашей видеокарты и предложит установить подходящую версию софта для GPU. А если этого не произошло, проверить наличие драйверов можно в разделе «Система».
Нажмите на красную кнопку «Загрузить» в разделе «Система»
Откроется окно программы установки. В нем можно выбрать тип установки, например, если нужно обновить только драйвера видеокарты без установки другого софта AMD. Рекомендую полную установку для более корректной работы системы.
Если не хотите разбираться — просто нажмите на «Установить»
Далее запустится процесс установки с примерным временем ожидания.
В этот момент компьютером лучше не пользоваться
Как и в случае с Nvidia, «красные» позволяют вручную загрузить драйверы с официального сайта. Для этого выберите Graphics, семейство видеокарты (например, Radeon RX) и ее серию. Далее найдите свою модель из списка доступных и нажмите «Submit», чтобы подтвердить поиск.
Главное проверьте, что выбрали свою видеокарту
Далее выберите версию своей операционной системы и загрузите AMD Software: Adrenalin Edition.
Драйвера доступны как для Windows, так и для различных дистрибутивов Linux
Запустите ее и следуйте инструкции по установке. Она ничем не отличается от того, что описано выше в апдейте ПО видеокарты с помощью AMD Software.
Если сайт AMD по каким-то причинам не работает, драйвера можно загрузить с techpowerup.
Установка драйверов видеокарты Intel
Запустите загруженный Intel Driver & Support Assistant, заранее обеспечив подключение к зарубежному IP-адресу, так как программа официально не работает в России. В новой вкладке в браузере откроется сайт Intel, где нужно нажать на клавишу «Download».
Если есть апдейт, желтая полоска просигнализирует об этом
После загрузки установите галочки в чек-боксе и запустите скачанный файл, нажав на «Install».
Без них установка не запустится
Далее откроется окно программы, в котором нужно начать установку.
Кнопка одна — не запутаетесь
Программа проанализирует конфигурацию системы и отобразит список апдейтов, которые будут установлены. После этого нажмите на «Запуск».
После запуска начнется удаление текущих драйверов видеокарты
После завершения установки программа предложит перезапустить компьютер для внесения изменений в работу системы.
Если все установлено верно, в программе Intel Graphics Software отобразятся зеленые галочки
Процесс инсталляции ничем не отличается от установки «дров» на Nvidia или AMD, за исключением обязательного наличия зарубежного IP-адреса. Если нет желания искать обходные пути, ПО также можно загрузить с сайта techpowerup.
После обновления до Windows 10 многие сталкиваются с проблемой: при попытке установить официальный драйвер NVidia происходит сбой и драйвера не устанавливаются. При чистой установке системы проблема обычно себя не проявляет, но в некоторых обстоятельствах может также оказаться, что драйвер не устанавливается. В результате, пользователи ищут, где скачать драйвер видеокарты NVidia для Windows 10, подчас используя сомнительные источники, а проблема не решается.
Если вы столкнулись с описанной ситуацией, ниже — простой путь решения, который срабатывает в большинстве случаев. Отмечу, что после чистой установки, Windows 10 автоматически устанавливает драйвера видеокарты (во всяком случае, для многих NVidia GeForce), причем официальные, однако — далеко не самые последние. А потому, даже если у вас нет проблем с драйверами после установки, может иметь смысл проделать описанную ниже процедуру и установить последние доступные драйвера видеокарты. См. также: Как узнать, какая видеокарта на компьютере или ноутбуке в Windows 10, 8 и Windows 7.
Прежде чем начать, рекомендую скачать драйвера для вашей модели видеокарты с официального сайта nvidia.ru в разделе драйверы — загрузка драйверов. Сохраните установщик у себя на компьютере, он понадобится позже.
Удаление имеющихся драйверов
Первый шаг при возникновении сбоев при установке драйверов видеокарт NVidia GeForce — удалить все имеющиеся драйвера и программы и не дать заодно Windows 10 заново их скачать и установить их из своих источников.
Можно попробовать удалить имеющиеся драйвера вручную, через панель управления — программы и компоненты (удалив в списке установленных программ все, что имеет отношение к NVidia). Затем перезагрузить компьютер.
Есть более надежный способ, полностью вычищающий все имеющиеся драйвера видеокарты с компьютера — Display Driver Uninstaller (DDU), представляющая собой бесплатную утилиту именно для этих целей. Скачать программу можно с официального сайта www.guru3d.com (представляет собой самораспаковывающийся архив, не требует установки). Подробнее: Как удалить драйвера видеокарты.
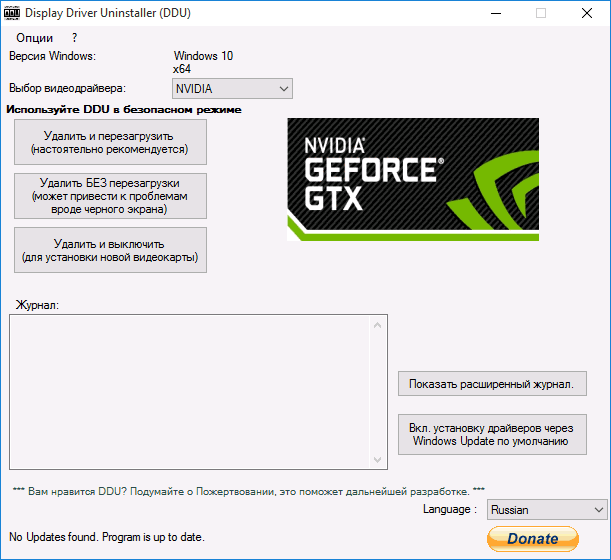
После запуска DDU (рекомендуется выполнять в безопасном режиме, см. Как зайти в безопасный режим Windows 10), просто выберите видеодрайвер NVIDIA, затем нажмите «Удалить и перезагрузить». Все драйвера NVidia GeForce и связанные программы будут удалены с компьютера.
Устанавливаем драйвера видеокарты NVidia GeForce в Windows 10
Дальнейшие шаги очевидны — после перезагрузки компьютера (лучше, с отключенным интернет-подключением), запустите загруженный ранее файл для установки драйверов на компьютер: в этот раз сбоя установки NVidia произойти не должно.

По завершении установки вам потребуется очередная перезагрузка Windows 10, после которой в системе будут установлены последние официальные драйвера видеокарты с автоматическим обновлением (если, конечно, вы его не отключили в настройках) и всем сопутствующим софтом, таким как GeForce Experience.
Внимание: если после установки драйвера ваш экран стал черным и ничего не отображается — подождите 5-10 минут, нажмите клавиши Windows + R и вслепую наберите (в английской раскладке) shutdown /r затем нажмите Enter, а через 10 секунд (или после звука) — еще раз Enter. Подождите минуту, компьютер должен будет перезагрузиться и все, вероятнее всего, заработает. Если перезагрузка не произошла, принудительно выключите компьютер или ноутбук, удерживая кнопку питания несколько секунд. После повторного включения все должно работать. Дополнительная информация по проблеме в статье Черный экран Windows 10.
You can download and install the latest drivers for Nvidia GeForce graphics card or other Nvidia products to get the best performance of them. Learn how to download newest Nvidia drivers on Windows 10 to improve the gaming experience and make apps run faster. MiniTool Software, a top software provider, offers you free MiniTool Power Data Recovery, MiniTool Partition Wizard, MiniTool ShadowMaker, etc.
Missing or outdated Nvidia drivers can cause crash or bug issues in your computer. Making sure your PC has the latest Nvidia drivers installed can keep your graphics card run smoothly. In this post, you can learn how to download Nvidia drivers and keep them update on Windows 10.
#1. How to Manually Download Nvidia Drivers from Nvidia Website
Step 1. At first, check what graphics card you have installed on your Windows 10 computer.
- Press Windows + X and click Device Manager from the list to open Device Manager on Windows 10.
- Expand Display adapters category in Device Manager.
- Now you can see all the graphics card on your computer. Check the name of your Nvidia graphics card. You can also right-click the GPU name and click Properties to check its detailed information like Nvidia driver version.
Tip: If you don’t see an Nvidia graphics card but see an Intel or AMD graphics card, then your computer doesn’t have an Nvidia video card.
Step 2. Then you can go to Nvidia official website, click Drivers tab at the top-right to go to Nvidia driver download and find page.
Under Nvidia Driver Downloads, you can choose the product type like GeForce, TITAN, Nvidia RTX / QUADRO, etc. product series, product name, operating system, download type, language. After selecting, you can click Search button to search for the target Nvidia driver.
Step 3. In the search result, click Download button to download Nvidia driver for your Windows 10 computer. After downloading, you can click the setup file to install the Nvidia driver on Windows 10.
Tip: If you often play games on PC, you can choose Game Ready / WHQL driver to download and install. This can help run games smoother and faster on your PC. If you don’t play games, you can choose Studio driver.
#2. How to Download Nvidia Drivers via Nvidia GeForce Experience App
If you have an Nvidia GeForce graphics card, Nvidia also offers a free GeForce Experience app to help download all needed Nvidia GeForce drivers automatically. Check how to do it below.
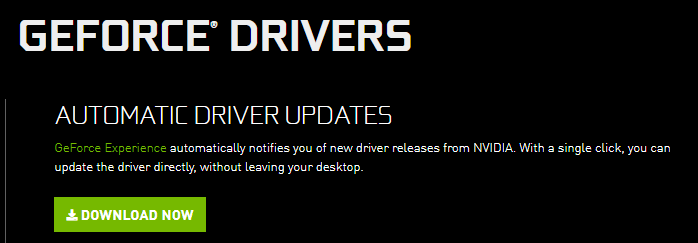
Step 1. Go to Nvidia website and click Drivers at the upper-right. Then click Drivers tab and click GeForce Drivers.
Step 2. Under Automatic Driver Updates, click Download Now button to download GeForce Experience app on your Windows 10 computer. After it completes downloading, you can install the application on your PC.
Step 3. Then you can open GeForce Experience app on your computer. It should automatically detect your graphics card and download newer available drivers of your GeForce graphics card. Usually, it lets you install and update Nvidia driver with a single click.
Alternatively, you can also click Drivers tab in GeForce Experience app to check if there are any updates of drivers to download and install.
#3. How to Update Nvidia Drivers on Windows 10
As for Nvidia driver update or GeForce drivers update, you can follow the steps below to update Nvidia drivers for your Windows 10 PC.
Step 1. Press Windows + X and select Device Manager. In Device Manager, expand Display Adapters.
Step 2. Right-click your graphics card and select Update driver.
Step 3. Select Search automatically for updated driver software, and follow the screen instructions to install the latest Nvidia driver.
Tip: If this way doesn’t work for the GeForce graphics driver update, you can use the other 3 ways in this post to install Nvidia driver updates on Windows 10.
#4. Update Windows 10
You can also run a Windows update to install the newly released Nvidia driver updates.
Step 1. Press Windows + I to open Windows Settings.
Step 2. Click Update & Security -> Windows Update -> Check for updates. Windows will automatically check if there are any Windows updates or Nvidia updates available.
To Sum Up
This post analyzes how to download Nvidia drivers for Windows 10 in 4 ways, hope it helps.
Since graphics card driver installing or updating may need to restart your PC several times, it’s highly advised you save your work and make a backup of your Windows OS before you do that. You can use free MiniTool ShadowMaker to create a backup image of your Windows OS, and select files to back up to an external hard drive, USB, etc. MiniTool ShadowMaker also lets you easily restore system from the image backup.
MiniTool ShadowMaker TrialClick to Download100%Clean & Safe
To recover lost/deleted data from Windows PC or laptop, external hard drive, USB, SD card, etc. you can turn to free MiniTool Power Data Recovery.
MiniTool Power Data Recovery FreeClick to Download100%Clean & Safe
If you want to ensure your graphics card runs as fast as possible with all the latest features, it’s important to install the latest GPU drivers. Graphics drivers optimize new games and fix bugs, and staying up to date with them can squeeze extra performance out of your card. In this guide, we have a simple two-step process for how to install and upgrade your GPU drivers in Windows 10.
We have steps below for the best graphics cards from Nvidia and AMD.
Before getting started: Identify your GPU
Before you can install or upgrade your GPU drivers, you need to know your GPU model. If you built your own computer or otherwise know what graphics card you have, you can skip down to the steps below. If you don’t know what card you have, don’t worry. It’s easy to find out which GPU you have.
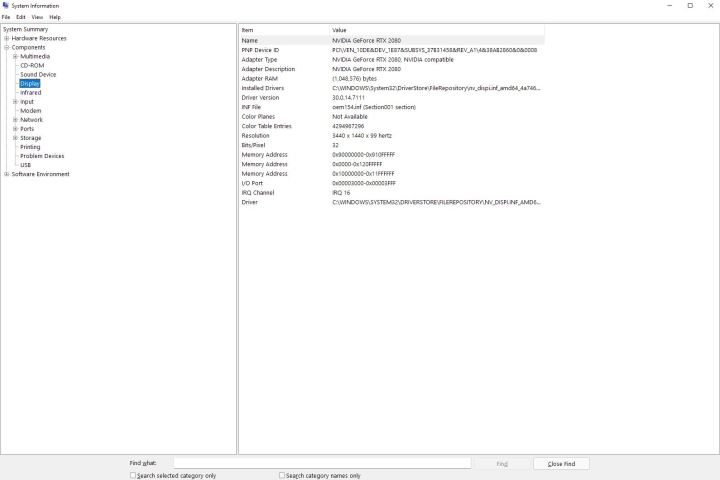
Press Windows Key + S and enter System Information. Select the top result to pull up a window with everything you need to know about your computer. In the left menu, expand the Components option and select Display. The main window will refresh with some information about your display and graphics card. You can find your graphics card model under the Name item.
You can also find your GPU driver version in this window if you want to manually check if you have the right version. You don’t need to, though. AMD and Nvidia offer software that can automatically detect if your driver is out of date.
Step 1: Install graphics card driver software
Nvidia and AMD have graphics driver software that can auto-detect your card and notify you of the latest updates. As far as these types of applications go, they’re unobtrusive, so we recommend installing them so you can easily upgrade your GPU drivers in the future.
Nvidia GeForce Experience
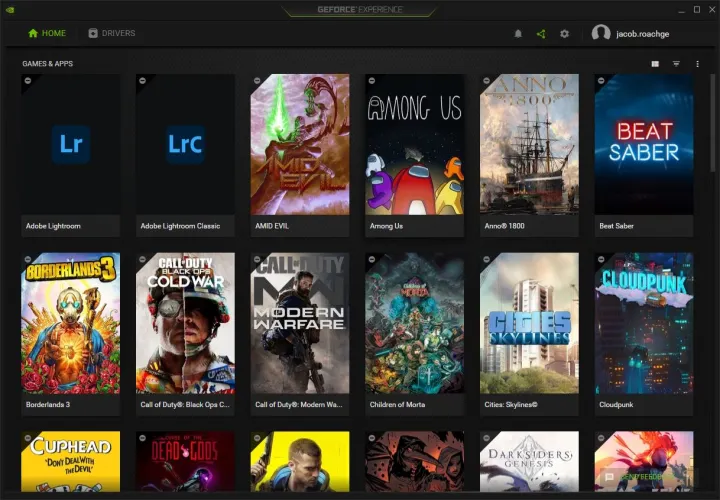
Nvidia’s graphics card drivers come from GeForce Experience, which also includes game capture through ShadowPlay and automatic game optimizations in supported titles. Download GeForce Experience from Nvidia’s website and follow the steps in the installer. Once it’s done, GeForce Experience will automatically open and attempt to detect the games installed on your PC.
If you don’t want GeForce Experience, you can update your graphics driver manually. You can use Nvidia’s product search page to find your graphics card. The search function speaks for itself, but make sure Download Type is set to Game Ready Driver (GRD) and Operating System is set to Windows 10. Otherwise, you just need to know your product series and the card you have (see above).
Run the installer for the latest driver, and you’re all set. During the installation, Nvidia will ask if you want to install GeForce Experience, but you can install the driver by itself if you want.
AMD Radeon Software
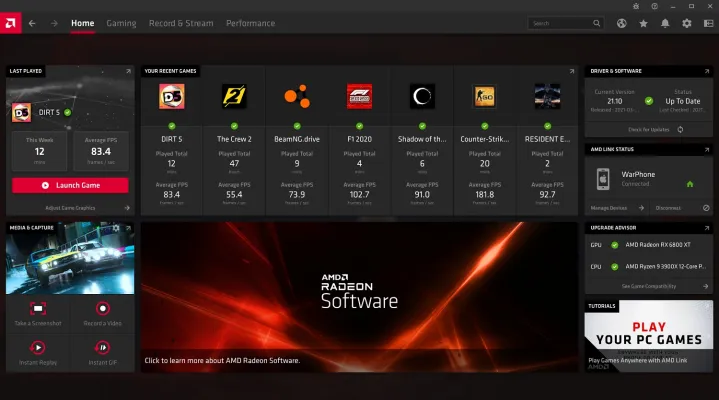
AMD’s drivers come from Radeon Software, which includes a bunch of useful features for AMD graphics cards. In addition to updating your driver, the software lets you monitor temperature and performance inside your computer, set up a livestream scene, and use features like Radeon Chill and Radeon Anti-Lag. Download the latest version of Radeon Software from AMD and follow the steps in the installer.
Alternatively, you can find your card manually, but you’ll need to still install the driver through Radeon Software. You can search for your card using AMD’s product search tool, which is easier to use than Nvidia’s. Just make sure to select Graphics as your category, then select the product series and the card you have.
On the next screen, expand the Windows 10 – 64-bit Edition dropdown to reveal the available drivers. Under the Revision Number, look for the driver with the Recommended tag. You’ll also see an option for an Optional driver, which includes upcoming features but may carry bugs or other issues. Click Download, follow the installer, and you’re good to go.
Step 2: Install the GPU driver
With the software installed, you can easily update your GPU driver. You don’t need to know what graphics card you have or what driver it needs. Both pieces of software will automatically detect your system and recommend the most recent driver.
Nvidia GeForce Experience
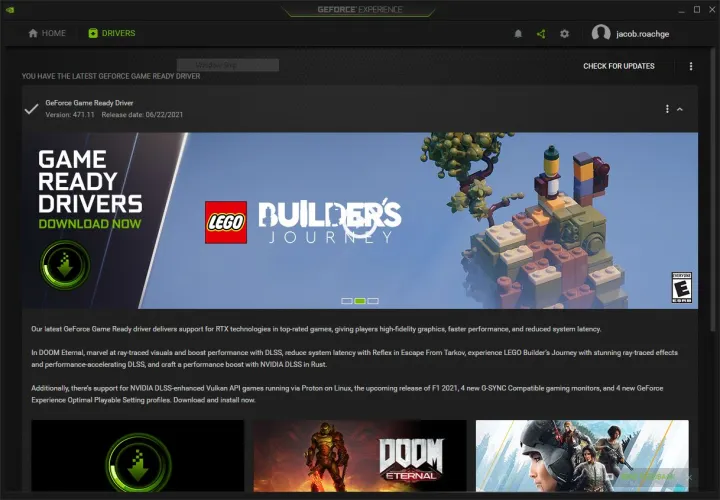
Open up GeForce Experience after it’s done installing and head to the Drivers tab. You should see the most recent driver available, which you can download. Just to make sure you’re getting what you need, though, click the three dots in the upper right corner and select Game Ready Driver, then select Check for Updates. Nvidia also offers studio drivers that are optimized for creative apps. You can have one or the other, not both. For most people, we recommend the Game Ready Driver.
After you’ve checked for updates, click the big green Download button. Installation only takes a few minutes, during which your screen will temporarily go black and your sound will cut out. Both will come back after the installation is done. When it’s finished, restart your computer and you’re all set.
Whenever there’s a new update, you’ll be able to see it by opening GeForce Experience from the taskbar.
AMD Radeon Software

AMD’s Radeon Software has a lot more going on, but it’s still easy to find the drivers you need. Even better, Radeon Software allows you to automatically install new updates, so you should only have to go through the process manually once.
Open the software and click the Settings icon in the right corner. Ensure you’re on the System tab on the next page and look under the Software & Driver section. Select Check for Updates to see if there’s a new driver available. If you’re installing a driver for the first time, Radeon Software will automatically detect your card and download the latest driver during the installation process.
Below this area, you can set up automatic installs. First, toggle the switch next to the Check for Updates section, which will automatically check for new driver versions. This option is enabled by default. Below that, you can toggle on Download Drivers & Software, which will install the latest driver and software versions automatically. Finally, make sure Preferred Software Version is set to Recommended.
Using Intel graphics?
As you will have noticed, this guide is aimed at Nvidia and AMD graphics card users. If you have integrated graphics from Intel, you can find the most recent graphics drivers on Intel’s software download page.