В Windows вы можете отслеживать использование принтеров пользователями с помощью журнала событий Windows. Все задания печати, которые отправляются на печать через Print Spooler оставляют след в логах Event Viewer. Если у вас развернут принт-сервер на Windows, вы можете использовать эти логи для организации простой системы аудита печати, которая позволяет понять кто, когда и сколько печатал на ваших принтерах.
В этой статье мы покажем, как включить и настроить логирование событий печати в Windows, как просматривать историю печати из Event Viewer, и как выполнять поиск и фильтрацию событий печати с помощью PowerShell
Содержание:
- Включить ведение логов печати в Windows
- Просмотр логов печати в Windows с помощью Event Viewer
- Анализ логов печати с помощью PowerShell
Включить ведение логов печати в Windows
В Windows есть отдельный журнал Event Viewer, в который должны записываться все события печати
SystemRoot%\System32\Winevt\Logs\Microsoft-Windows-PrintService%4Operational.evt
. Но по умолчанию это журнал отключен. Чтобы включить сохранение логов печати в журнал:
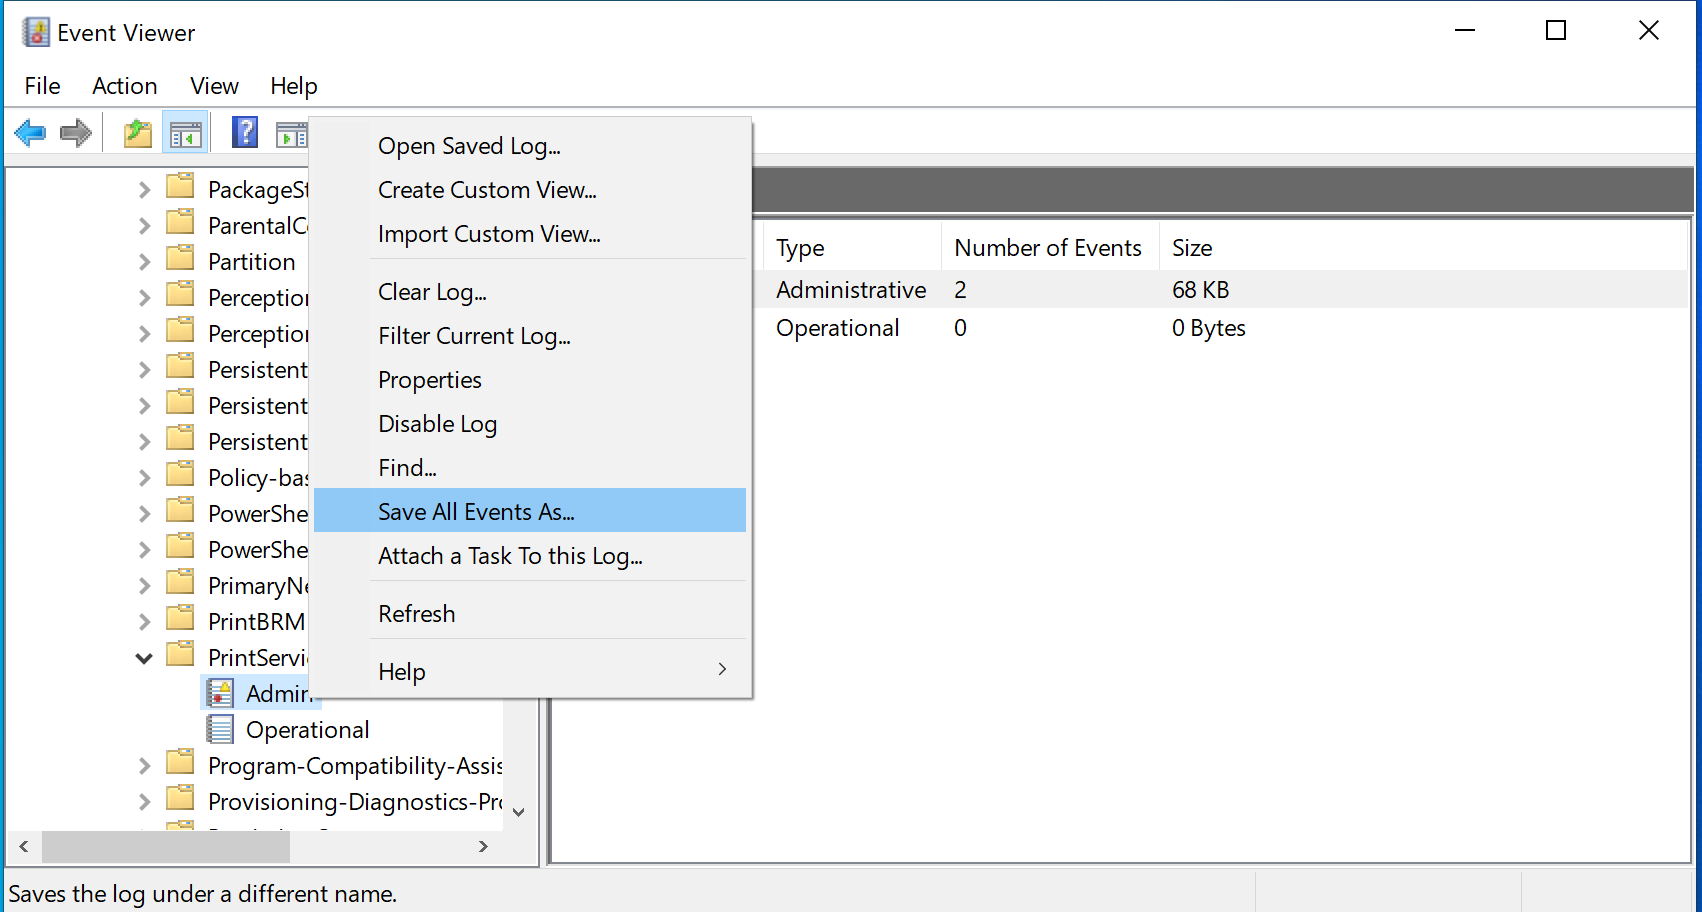
- Откройте консоль Event Viewer (
eventvwr.msc
); - Перейдите в раздел Applications and Services Logs -> Microsoft -> Windows -> PrintService;
- Щелкните правой кнопкой по журналу Operations и выберите Enable Log;
- Если данный хост используется как сервер печати, и вы хотите хранить логи печати за большой промежуток времени, нужно увеличить размер этого журнала событий (по умолчанию 1Мб). Откройте свойства журнала Operational и укажите максимальный размера журнала.
Также вы можете включить (отключить) определенный журнал событий в Windows с помощью команды:
wevtutil.exe sl Microsoft-Windows-PrintService/Operational /enabled:true
Если вы хотите, чтобы в журнале событий отображалось имя файла, который был отправлен на печать, нужно включить специальный параметр GPO.
- Откройте редактор локальной GPO (
gpedit.msc
); - Перейдите в раздел Computer Configuration -> Administrative Templates -> Printers;
- Включите параметр Allow job name in event logs;

- Обновите настройки политик с помощью команды
gpupdate /force
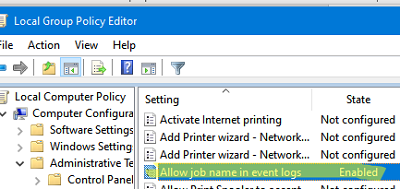
После жэтого информация о всех событиях печати будет сохраняться в этот журнал.
Просмотр логов печати в Windows с помощью Event Viewer
Теперь вы можете получить подробную информацию о всех событиях печати, которые выполнялись на этом компьютере.
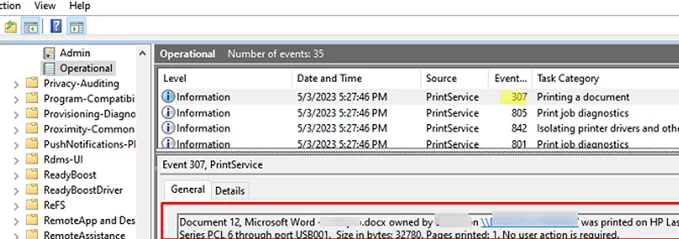
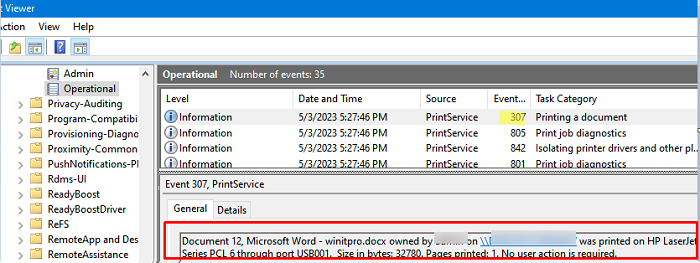
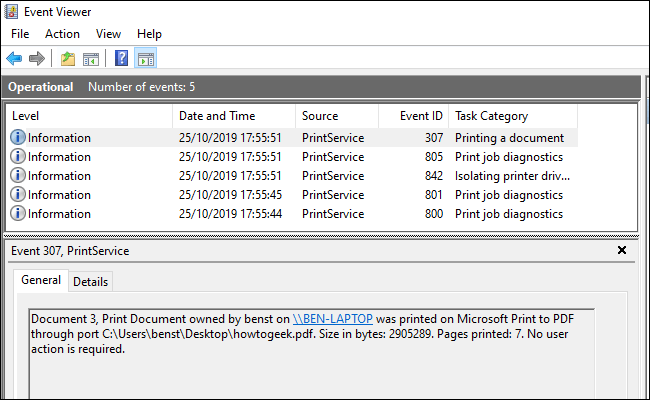
Откройте Event Viewer и перейдите в раздел Applications and Services Logs -> Microsoft -> Windows -> PrintService -> Operational. Наибольший интерес тут представляет собой событие с Event ID 307:
Printing a document
Откройте описание события:
Document 12, Microsoft Word - winitpro.docx owned by kbuldogov on \\DESKTOP-HOME607 was printed on HP LaserJet M1530 MFP Series PCL 6 through port USB001. Size in bytes: 32780. Pages printed: 1. No user action is required.
В описании события указано:
- Из какого приложения и какой файл был напечатан: Microsoft Word — winitpro.docx
- Имя пользователя, отправившего документ на печать: kbuldogov
- Имя принтера: HP LaserJet M1530 MFP Series PCL 6
- Количество страниц в документе: Pages printed: 1
- Размер документа: size in bytes
Таким образом, вы получите инструмент ведения и просмотра истории печати в Windows.
Анализ логов печати с помощью PowerShell
Журнал событий Event Viewer не позволяет получить удобную статистику истории печати в Windows или выполнять поиск по дате/пользователю/документу. Для обработки и фильтрации событий печати можно использовать PowerShell скрипты.
Для получения событий из журнала PrintService/Operational мы будем использовать PowerShell комнадлет Get-WinEvent.
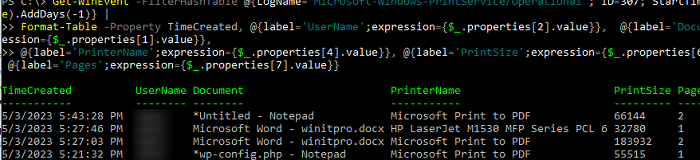
Следующий PowerShell скрипт выведет список всех документов, которые были напечатаны на этом компьютере за последние сутки (скрипт выбирает значения из атрибутов события с EventID 307):
$all2dayprint=Get-WinEvent -FilterHashTable @{LogName="Microsoft-Windows-PrintService/Operational"; ID=307; StartTime=(Get-Date).AddDays(-1)} | Select-object -Property TimeCreated, @{label='UserName';expression={$_.properties[2].value}}, @{label='Document';expression={$_.properties[1].value}}, @{label='PrinterName';expression={$_.properties[4].value}}, @{label='PrintSizeKb';expression={$_.properties[6].value/1024}}, @{label='Pages';expression={$_.properties[7].value}}
$all2dayprint|ft
Если вы хотите вывести только документы, которые распечатал определенный пользователь, используйте такой скрипт:
$PrintUsername='kbuldogov'
$all2dayprint| Where-Object -Property UserName -like $PrintUsername|ft
Можно выгрузить список напечатанных документов в CSV файл с помощью Export-CSV:
$all2dayprint | Export-Csv -Path "c:\ps\Print Audit.csv" –NoTypeInformation -Encoding UTF8
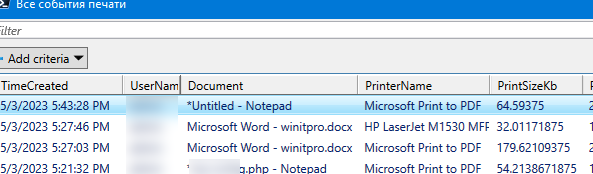
Или представить его в виде графической формы Out-GridView:
$all2dayprint| Out-GridView -Title "Все события печати"
Можно запланировать этот PowerShell скрипт на ежедневный запуск и писать информацию об использовании принтеров во внешнюю базу данных.
This post explains how to check Print History in Windows 11. When you print a document using your Windows 11/10 laptop or PC, it doesn’t keep track of it by default. However, if you want, you can enable Windows to save the print history so that you may refer to it later. This can be done by enabling the printer’s print queue to remember printed documents, or by configuring the Event Viewer to record all print events. A few third-party software also allow you to monitor the print activity on your system and view the list of documents that have been printed in the past. In this article, we will explain in detail how you can keep a log of the printed documents and check the print history in Windows 11.

You can check the Print History to know which documents or files have been printed from your system with or without your knowledge. You can also use it to crosscheck if you’ve already printed a document, or how many documents you print on monthly basis to keep a track of the inventory.
In Windows 11, you can check the Print History using the following methods:
- Using Printer Settings
- Using Event Viewer
- Using third-party print logging software
Let us see these in detail.
1] Check Print History using Printer Settings

You can check the print queue to see which documents are currently being printed and what are the upcoming print jobs. However, once the document is printed, its record gets deleted from the printer’s print queue. In order to save this record and see which documents have been printed in past, you need to manually enable the ‘Keep printed documents’ option in Windows 11.
- Click on the Start button icon in your taskbar area.
- Select Settings.
- Click on Bluetooth & devices in the left panel.
- Then click on Printers & scanners in the right panel.
- Select a printer from the list of available devices.
- Open Printer properties.
- Within the Printer properties window, switch to the Advanced tab.
- Select the checkbox corresponding to the Keep printed documents option.
- Click on the OK button.
This will enable the Printer’s print queue to remember the print history. If your system is connected to multiple printers on a local or shared network, you will have to enable this option separately for each of the connected printers.
To view the print history, select Start > Settings > Bluetooth & devices >Printers & scanners and then select the printer in the list of available devices. Then click on the Open print queue option. You will be able to view your print history in the printer’s print queue.

A printer’s print queue has limited space, so it keeps replacing the existing records with new records whenever the data of the print log goes beyond its capacity. By using this method, you will be able to see the history of print jobs for a limited period of time. If you want to maintain a long-term log of your print history, you should use the next method.
Read: How to enable Print Logging in Event Viewer on Windows
2] Check Print History using Event Viewer

Event Viewer is a Windows application that keeps a log of everything that happens on your system right from the moment it starts till it shuts down. You may use it as a troubleshooting tool to see errors and warnings generated by different apps and software installed on your system. If you want, you can configure it to remember the print history on your Windows 11 device.
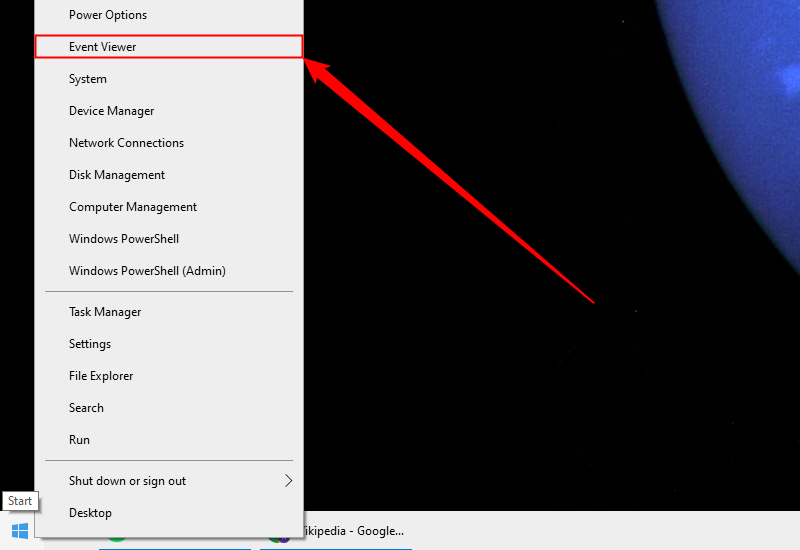
- Right-click on the Start button icon to open the WinX menu.
- Select the Event Viewer option.
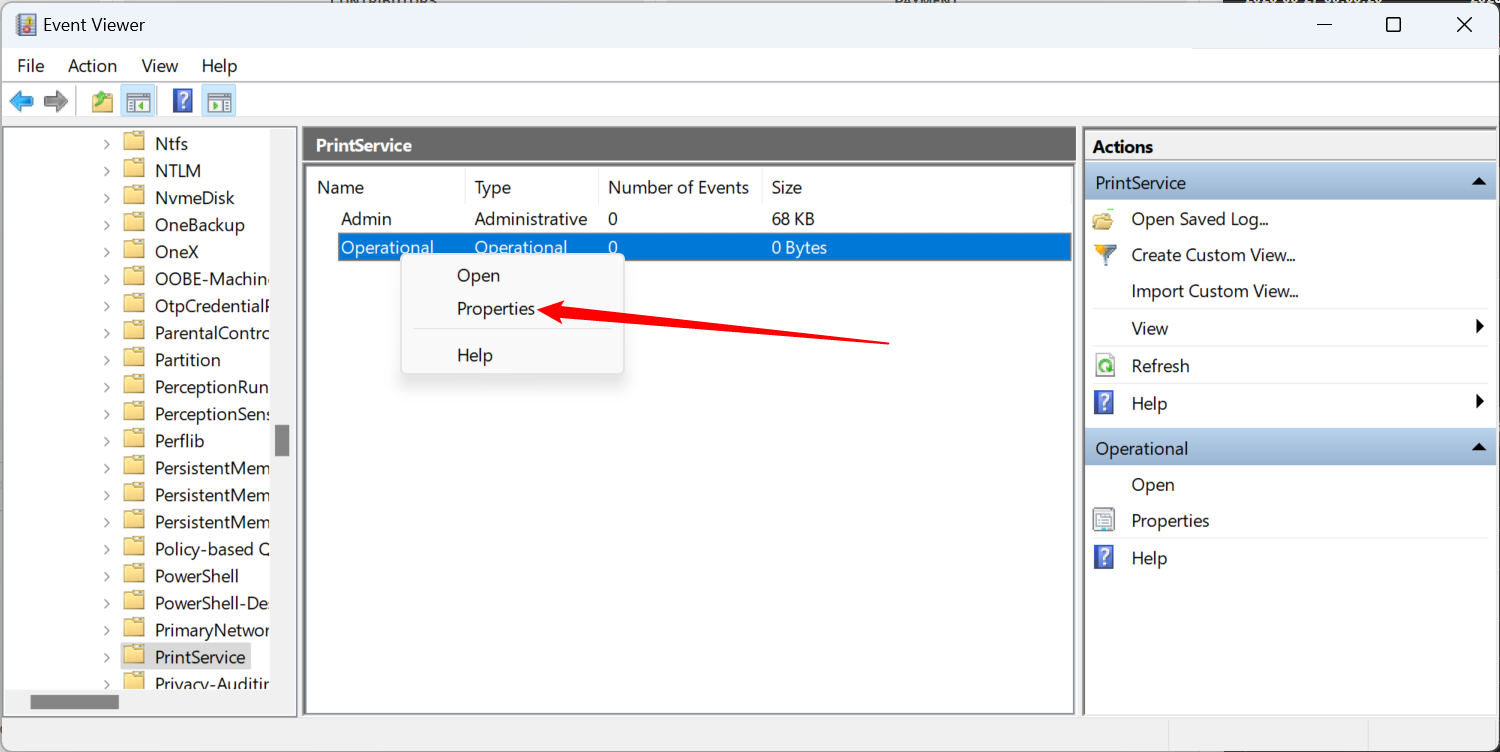
- In the Event Viewer window, navigate to the following path: Applications and Services Logs\Microsoft\Windows\PrintService.
- In the right panel, right-click on the Operational option.
- Then select the Properties option from the context menu.
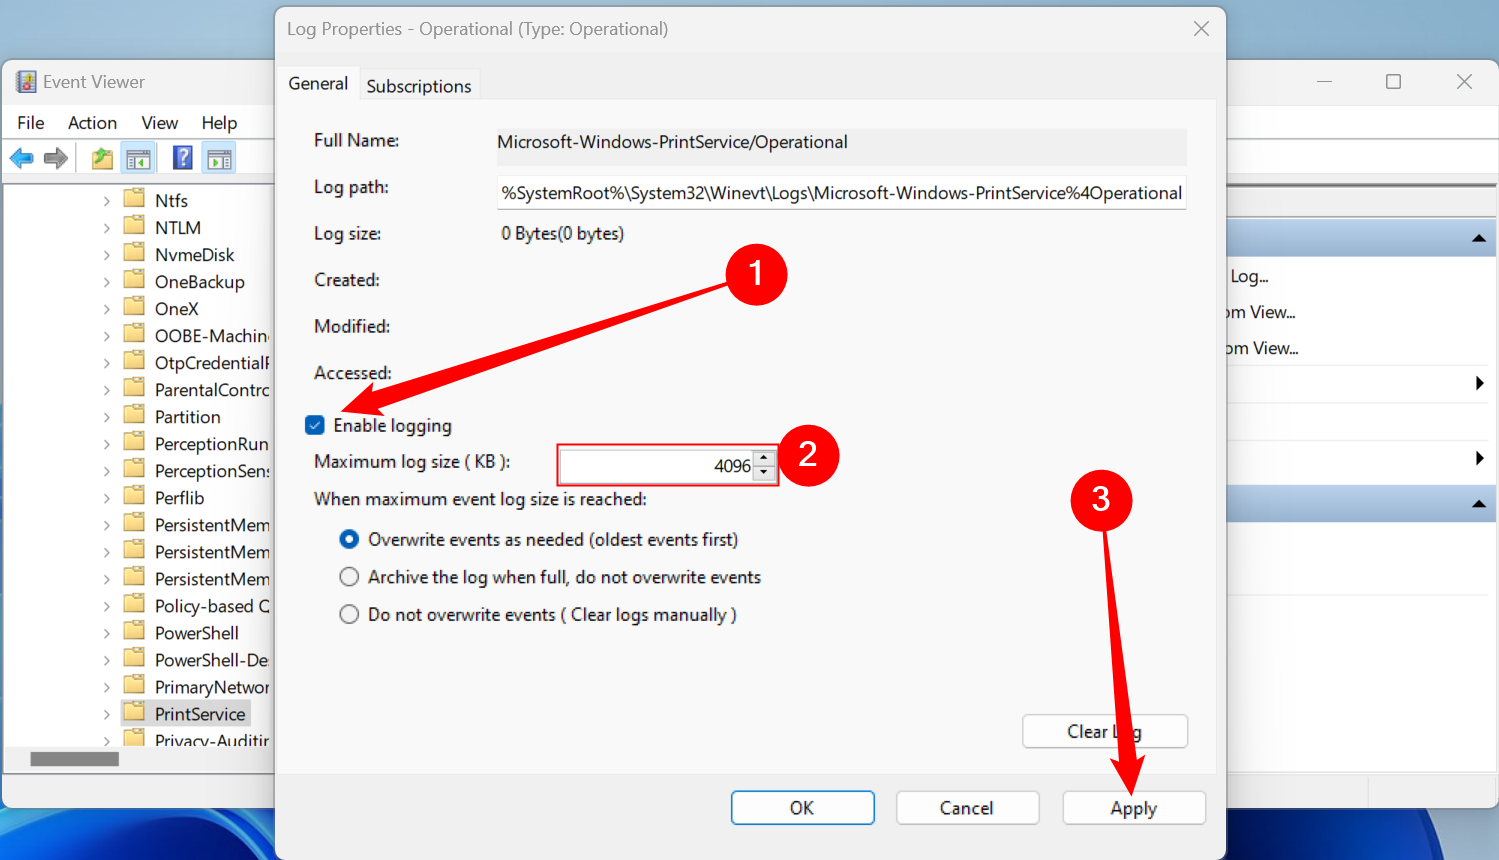
- In the Log Properties window that appears, select the checkbox corresponding to the Enable logging option. You may also specify the maximum log size and choose what your system should do when the maximum event log size is reached (overwrite events, archive log, clear logs manually).
- Click on the Apply button.
- Then click on the OK button.
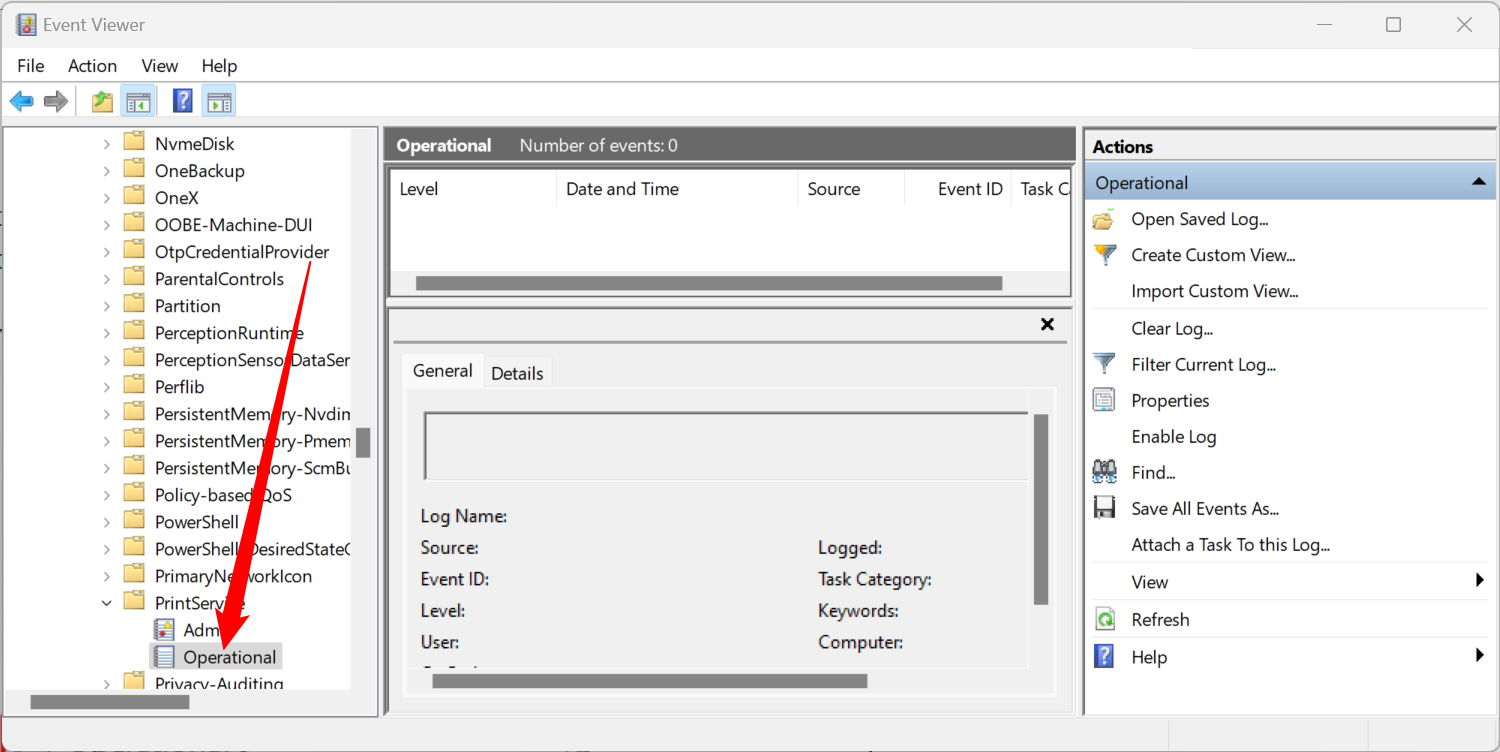
From now onwards, Windows Event Viewer will keep a log of your printed documents. To view this log, navigate to Applications and Services Logs/Microsoft/Windows/PrintService. Then in the right panel, double-click on the Operational option. Now you will be able to see the event log for print jobs issued from your system.
Also Read: Deleted Printer keeps reappearing & coming back in Windows.
3] Check Print History using third-party print logging software

A few third-party tools also allow you to view print history on Windows 11. PaperCut Print Logger is one such free tool that you may install in your system to keep a track of the documents printed from your system. It shows useful information such as the time of print, the user who issued the print command, the document name or title, the total number of pages in the document, and other print job attributes such as paper size, print mode, etc.
Download PaperCut Print Logger free. Double-click on the downloaded file to run the installer. Follow the on-screen instructions to install the software.
Once Print Logger is installed, it will sit in the background and monitor all the print activities on your Windows 11 PC. It can also monitor printing on network printers if it is installed on a server that hosts the print queues.
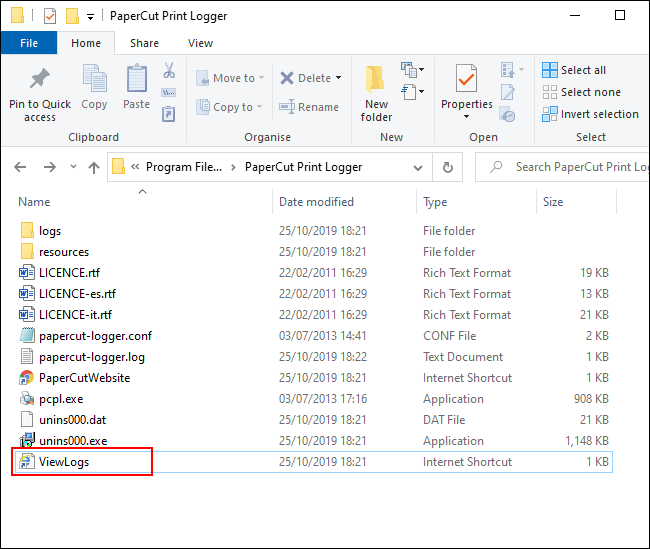
To check the Print History, open File Explorer and navigate to the location where you’ve installed the software. By default, it is C:\Program Files (x86)\PaperCut Print Logger. Now double-click on the ViewLogs shortcut. This will open a webpage in your preferred web browser detailing all the print activities that have occurred in your system since Print Logger was installed. You can also create a desktop shortcut for easy access to the print log.
If you want, you can prevent Print Logger from monitoring a specific printer by adding the printer’s name in the IgnoredPrinters setting in its configuration file, which is located at C:\Program Files (x86)\PaperCut Print Logger\papercut-logger.conf.
Apart from Print Logger, there are several other third-party software that you may install to view Print History in Windows 11.
I hope you find this useful.
Read Next: How to see Recently Opened Files in Windows.
Quick Links
-
Enable Printer History Logging for Recently Printed Documents on Windows 10
-
Enable Printer History Logging for Recently Printed Documents on Windows 11
-
Enable Long-Term Print History in Event Viewer.
-
View Print History in Event Viewer
-
Use Third-Party Print Logging Software
Checking the history of a printer to see what was printed can be somewhat difficult to monitor. As your toner level doesn’t convey how much the accessory has been used, you’ll need to enable logging within Windows 10 or Windows 11. Here are a few ways to do that.
Enable Printer History Logging for Recently Printed Documents on Windows 10
By default, your printed document history will be wiped after each document has finished printing. You can change this setting to enable you to see a list of your recently printed documents from the print queue for your printer. You’ll need to change this setting for each printer you have installed.
Access Your Print Queue to Enable Logging
To access your print queue, right-click the Windows Start menu button and select the «Settings» option. From here, click Devices > Printers & Scanners.
Find your printer in the «Printers & Scanners» list, click on it, and then click «Open Queue» to open the print queue.
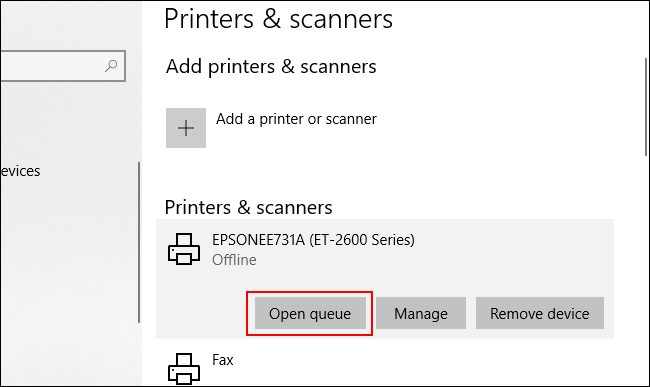
Your printer queue with current and queued printed items will be listed. Documents you’ve previously printed will not be shown, which is why you’ll need to enable logging.
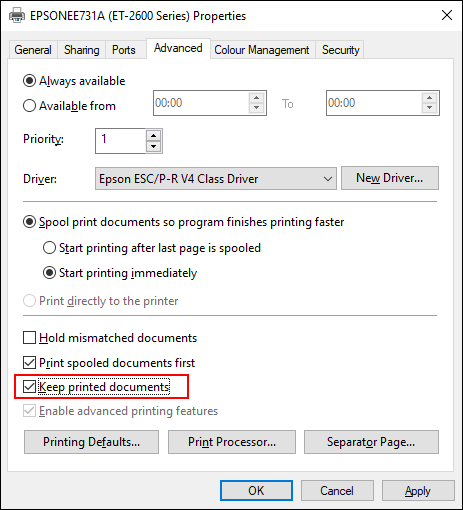
In the print queue window for your printer, click Printer > Properties. Alternatively, select your printer and click «Manage» in the «Printers & Scanners» settings menu.
In your printer properties, click on the «Advanced» tab and then select the «Keep Printed Documents» checkbox.
Click «OK» to save your settings.
Once your document history is enabled, your documents will no longer disappear from your print queue after the printing process has completed.
Enable Printer History Logging for Recently Printed Documents on Windows 11
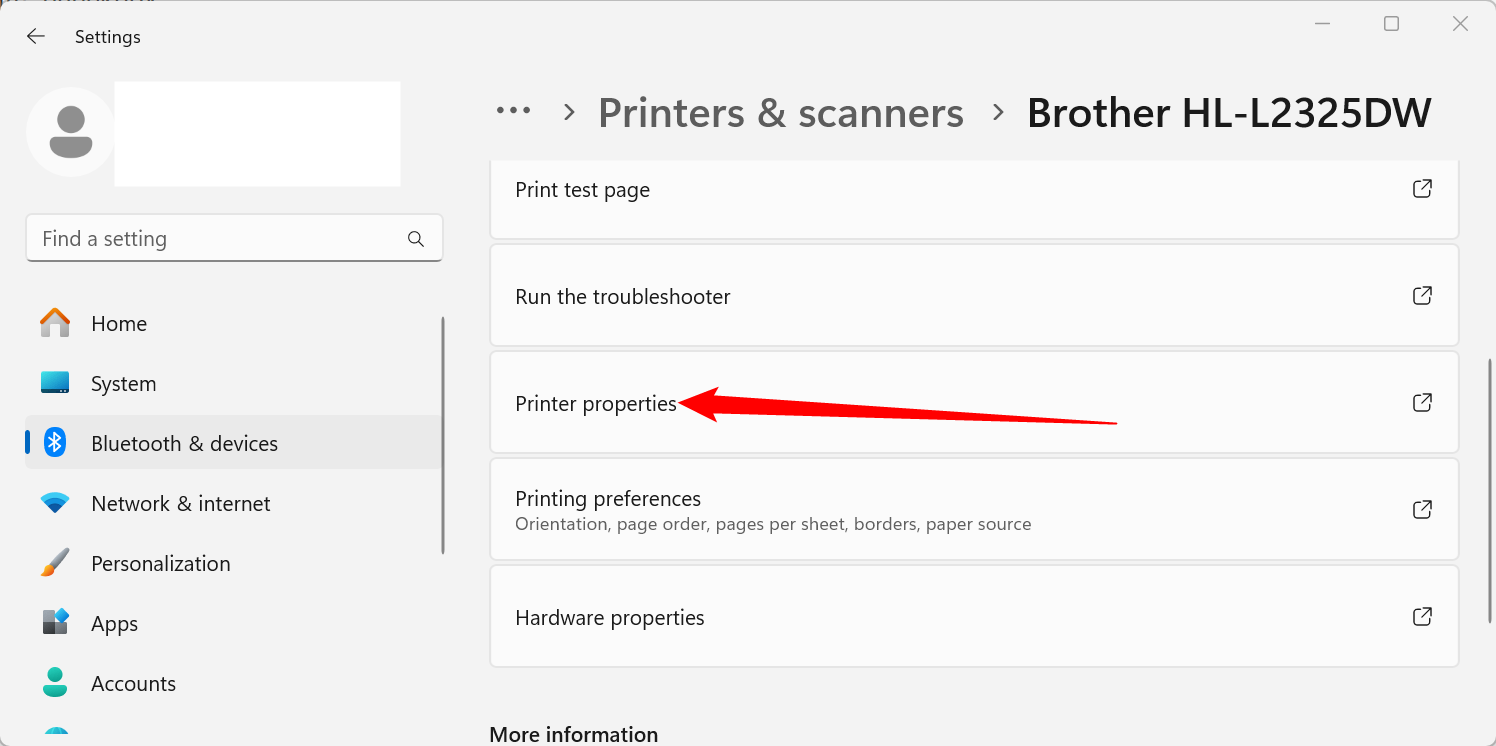
Windows 11 doesn’t enable a print history by default, much like its predecessor. To enable a short-term print history, press Windows+i or otherwise open the Settings app, then navigate to Bluetooth & Devices > Printers & Scanners, then select your printer.
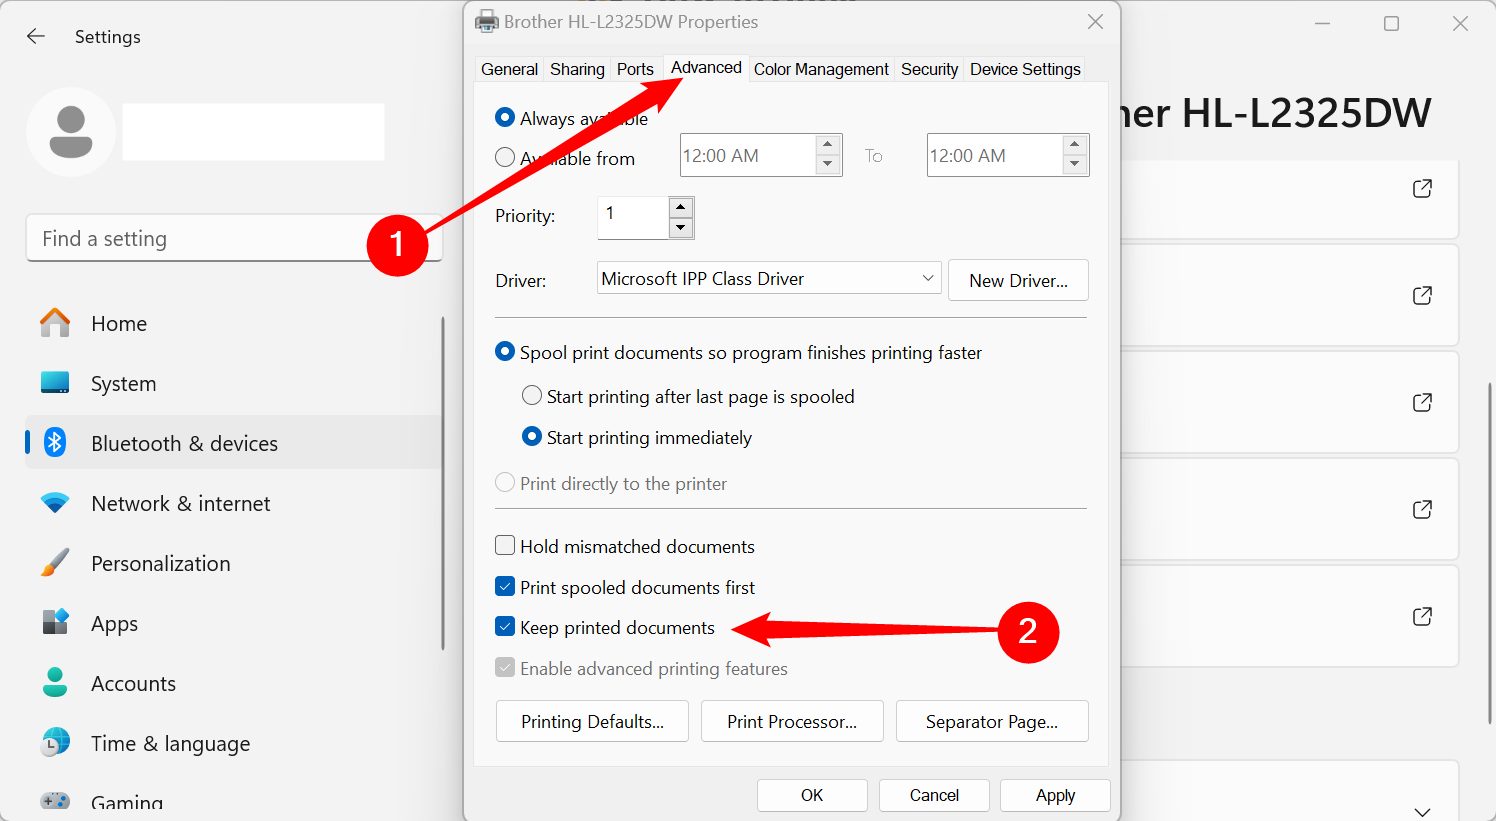
Scroll down and then click «Printer Properties.»
Select the «Advanced» tab, tick the box next to «Keep Printed Documents,» then click «Apply.» You can then close all the windows.
Whenever you want to review your print history, all you need to do is open to Settings > Bluetooth & Devices > Printers & Scanners, select your Printer, then click «Open Print Queue.»
Enable Long-Term Print History in Event Viewer.
The print queue will provide a short-term overview of your previously printed documents. If you want to view a long-term list, you’ll need to use the Windows Event Viewer.
To start, right-click your Windows Start menu button and click the «Event Viewer» option.
The Event Viewer will allow you to view a list of previously printed files, but you’ll need to set Windows to begin logging your long-term printer history first. In the Windows Event Viewer, click Applications and Services Logs > Microsoft > Windows in the «Event Viewer (Local)» menu on the left.

This will reveal a significant number of Windows services. Scroll down to find the «PrintService» category.
From here, right-click the «Operational» log and then click the «Properties» button.
Click to enable the «Enable Logging» checkbox and then set a maximum size for the log. The larger the size, the longer Windows will record your printed document history.
Click the «Apply» button to save the setting.
Windows will now automatically save the printer history for all of your installed printers to a log file that you can access within Event Viewer.
View Print History in Event Viewer
Once your printer history is enabled, you can access it at any time from the Event Viewer. To do so, find and open the «PrintService» category and then click on the «Operational» log.
A history of all Windows printer events will be listed, from initial printer spooling to completed or failed prints.
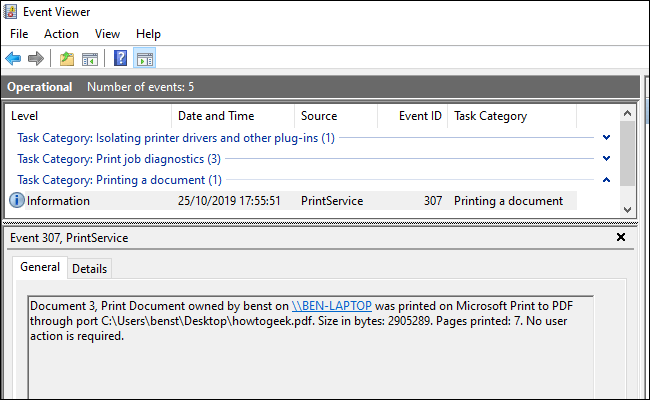
Under the «Task Category» section, items listed as «Printing a Document» are documents that have been successfully printed. Failed prints will also appear in this category.
To make it easier to sort, you can group your print log by categories, making it easy to separate the «Printing a Document» events into their own section. To do so, right-click the «Task Category» heading and then click the «Group Events by This Column» button.
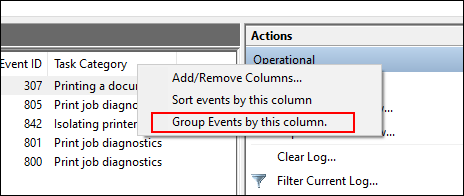
Your items will now be separated by category.
You can minimize the other categories, leaving the «Printing a Document» category to display only a list of your previously printed documents.
Use Third-Party Print Logging Software
While the Event Viewer is functional, it doesn’t provide the clearest view of your printed documents. You can use third-party print logging software like PaperCut Print Logger to view your long-term printer history instead.
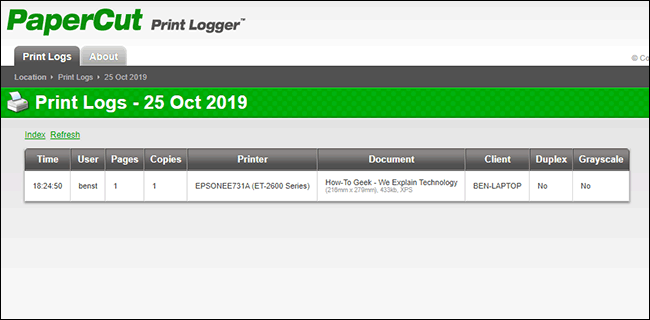
PaperCut Print Logger provides you with a time-stamped list of your printed documents, including information on the Windows user who printed the document, the document name, and the number of pages and copies.
The admin page can be accessed from the default PaperCut Print Logger directory.
On Windows 10, this is usually C:\Program Files (x86)\PaperCut Print Logger . Double-click the «ViewLogs» shortcut to open the admin panel, where a list of your printed documents will be available, separated by date.
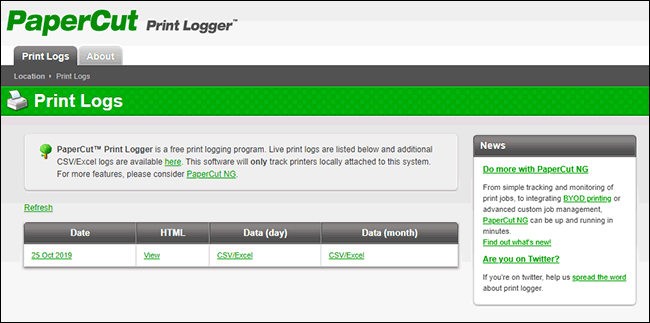
Once you’ve opened the PaperCut Print Logger admin page, under the «View» category, click the «HTML» button to access your print history for that date within the panel.
You can also click the «CSV/Excel» button under the «Date (Day)» or «Date (Month)» categories to export your daily or monthly print history as a Microsoft Excel XLS file.
You can also access these logs from the Logs > CSV folder inside your PaperCut Print Logger installation directory.