
Applies ToWindows 10 Windows 11
В этой статье рассказывается о том, как включить режим высокой контрастности и создать собственную тему с высокой контрастностью.
Для пользователей со слабым зрением чтение текста с низкой контрастностью может оказаться затруднительным. Существуют веб-сайты, которые имеют, например, плохие сочетания цветов, такие как синие ссылки на черном фоне. Их не могут читать даже пользователи без нарушения зрения, и они могут быть практически недоступны людям с нарушениями зрения. Цвета с высокой контрастностью ускоряют и упрощают чтение с компьютера.
Включение и отключение контрастных тем
-
Нажмите кнопку Пуск , а затем выберите Параметры > Специальные возможности > Темы контрастности.
-
Чтобы включить контрастные темы, выберите нужную тему в раскрывающемся меню Контрастные темы и нажмите кнопку Применить . Windows может отображать экран «Подождите» в течение нескольких секунд, после чего цвета на экране меняются.
-
Чтобы отключить контрастные темы, выберите параметр Нет в раскрывающемся меню Контрастные темы и нажмите кнопку Применить . Windows может снова отобразить экран «Подождите» в течение нескольких секунд, после чего цвета на экране снова меняется на значение по умолчанию.
Совет: Чтобы быстро включить или отключить режим высокой контрастности, нажмите левую клавишу Alt + левую клавишу SHIFT + PRINT SCREEN (Print Scrn на некоторых клавиатурах).

Создание собственной темы с высокой контрастностью
Если ни одна из тем по умолчанию не подходит для вас, вы можете дополнительно настроить цвета различных элементов экрана. Например, если у вас определенная форма дальтонизма, вы можете поменять соответствующие цвета.
-
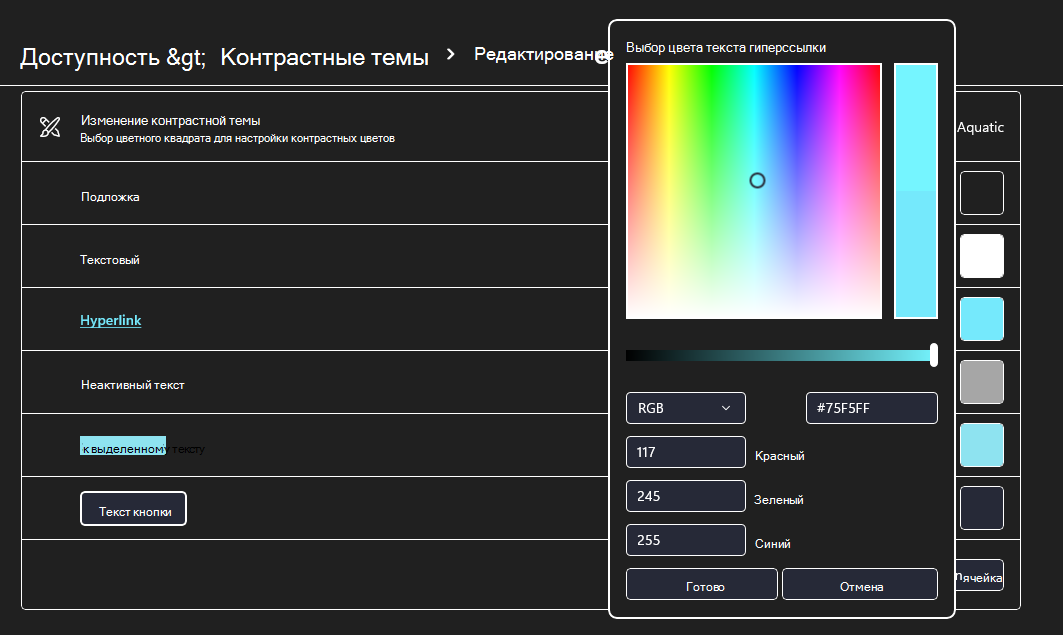
Выбрав тему, нажмите кнопку Изменить в раскрывающемся меню Контрастные темы . Вы можете изменить цвет следующих элементов экрана.
-
Текст: почти весь текст, отображаемый в Windows или, например, на веб-странице.
-
Гиперссылки: все гиперссылки, отображаемые в Windows или, например, на веб-странице.
-
Отключенный текст: текст, который обычно не активен, например если невозможно выбрать определенный параметр или кнопку.
-
Выбранный текст: любой выбранный элемент меню или параметр. Например, выравнивание выбранного абзаца в Word обозначается с помощью этого цвета на ленте инструментов.
-
Текст кнопки: текст на всех кнопках, содержащих текст.
-
Фон: фон почти любого текста, отображаемого в Windows или, например, на веб-странице.
-
-
Выберите новый цвет, щелкнув палитру цветов, отрегулируйте яркость выбранного цвета с помощью ползунка под палитрой и нажмите кнопку Готово.

-
Чтобы сохранить все изменения цвета, внесенные в тему, выберите Сохранить как и введите имя настраиваемой темы. Затем выберите Сохранить и применить.
Нужна дополнительная помощь?
Нужны дополнительные параметры?
Изучите преимущества подписки, просмотрите учебные курсы, узнайте, как защитить свое устройство и т. д.
Все способы:
- Способ 1: Стандартное средство ОС
- Способ 2: Стороннее программное обеспечение
- Способ 3: Меню управления монитором
- Способ 4: Использование калибратора
- Вопросы и ответы: 0
Способ 1: Стандартное средство ОС
Основной метод настройки экрана монитора в Windows 11 будет оптимальным практически для всех пользователей, поскольку подразумевает использование только системного средства. В нем вы увидите наглядные инструкции и параметры, позволяющие изменить передачу цветов, их баланс, яркость и контраст до такого уровня, чтобы использовать монитор было комфортно.
- Сначала понадобится найти соответствующий инструмент для калибровки. Для этого откройте «Параметры» через меню «Пуск».
- В новом окне выберите раздел «Система» и перейдите к категории «Дисплей».
- Внизу вы найдете блок с названием «Сопутствующие параметры», в котором следует кликнуть по пункту «Расширенные параметры дисплея».
- Далее вас интересует ссылка «Свойства видеоадаптера для дисплея». По ней и нужно нажать в блоке с названием нужного для калибровки монитора, если их к компьютеру подключено несколько.
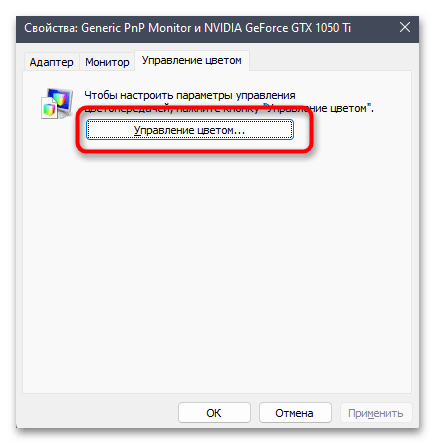
- Отобразится окно свойств монитора, в котором на вкладке «Управление цветом» понадобится нажать кнопку с одноименным названием.
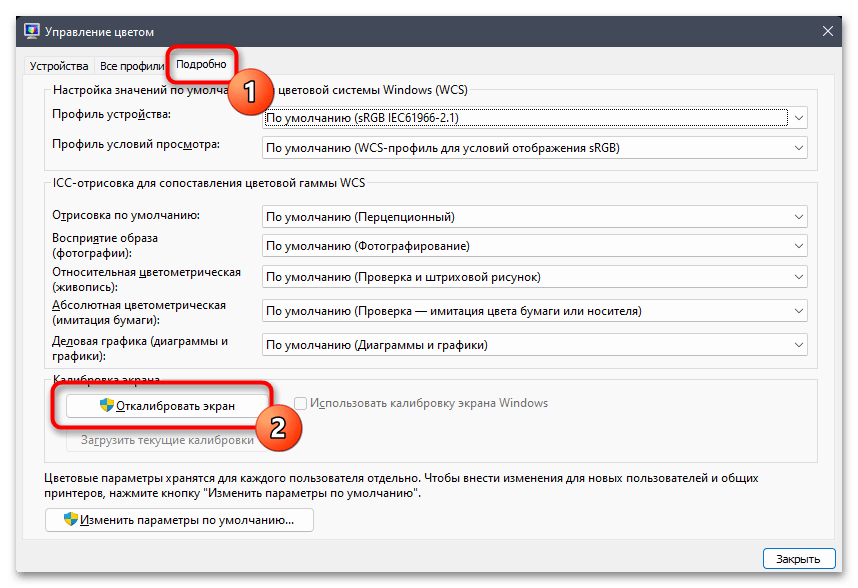
- Перейдите на вкладку «Подробно» и запустите инструмент «Откалибровать экран».
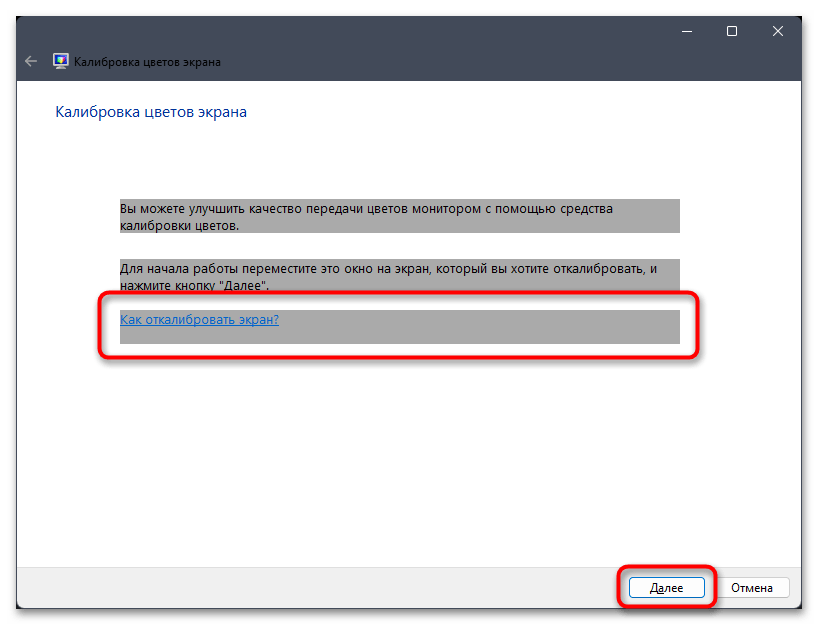
- На этом моменте и начинается сам процесс параметров дисплея. Если вы еще не знаете, какие настройки будете задавать, в новом окне нажмите «Как откалибровать экран?», чтобы получить развернутую инструкцию от разработчиков. Для перехода к следующему шагу кликните по «Далее».
- Прочитайте справку о первоначальных действиях. Их необходимо осуществить в том случае, если ваш монитор поддерживает внутренние настройки. О таких более детально мы еще расскажем в Способе 3.
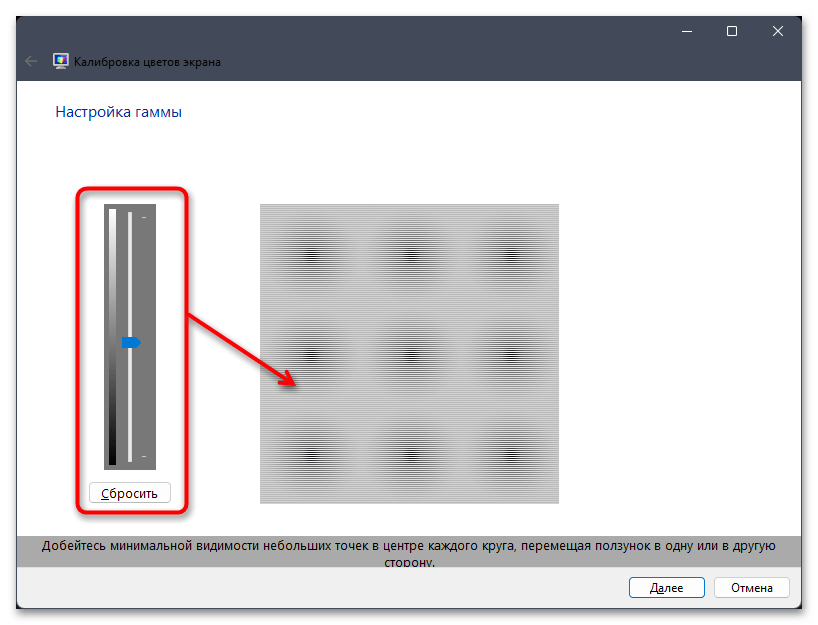
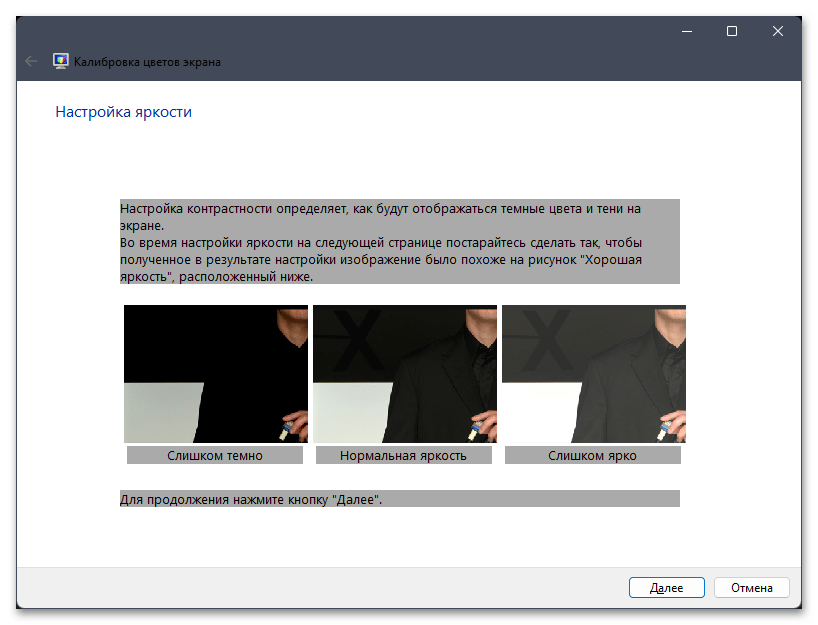
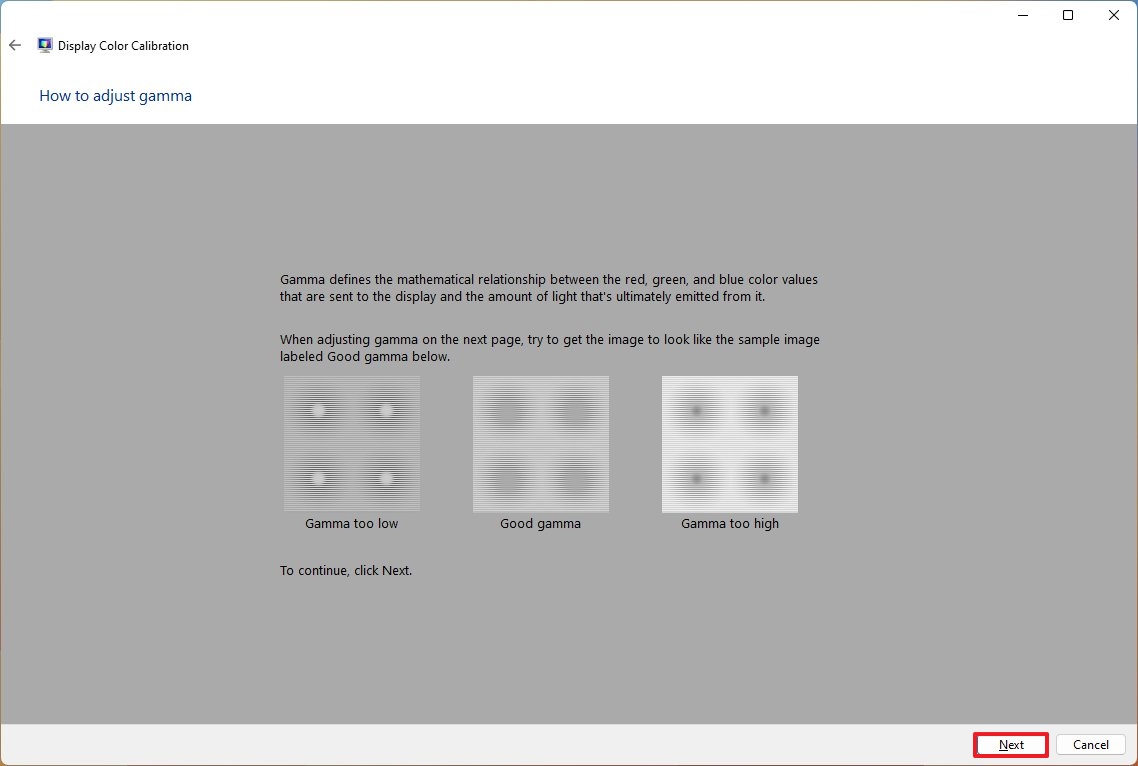
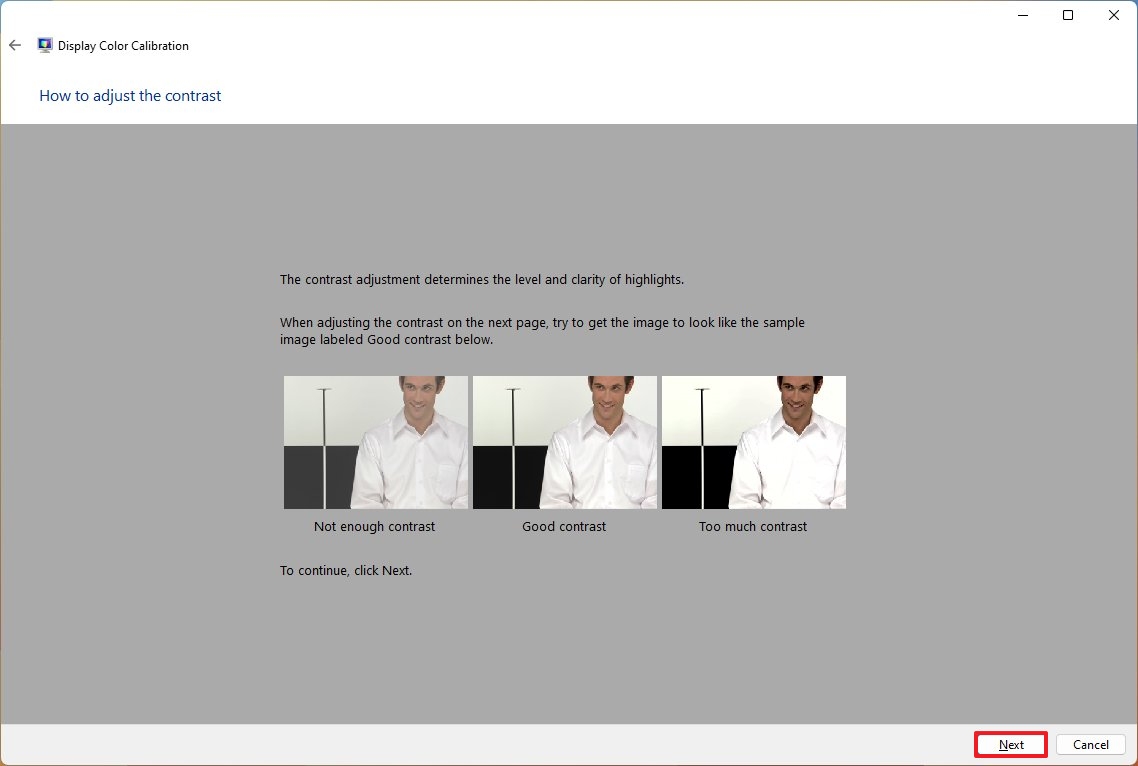
- В следующем шаге отображается информация о правильной настройке гаммы. Сравните три изображения и запомните состояние нормальной гаммы, поскольку примерно такого эффекта и придется достичь при дальнейшей настройке.
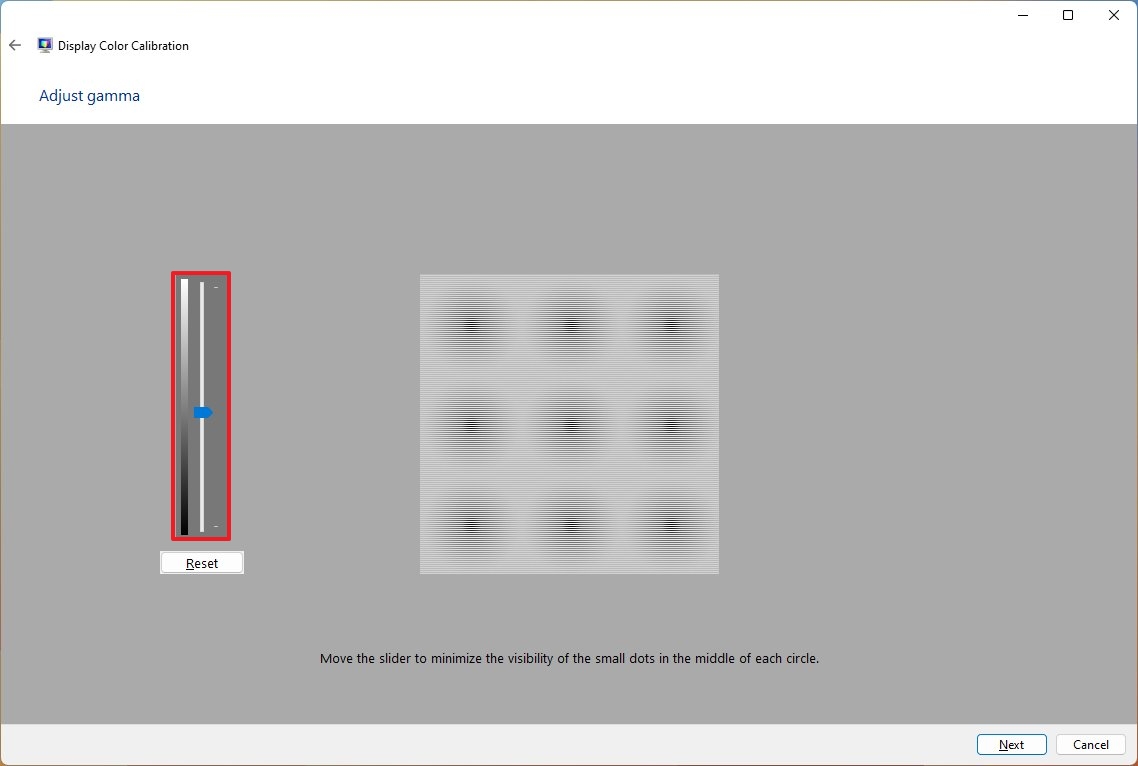
- Вы видите описанные выше изображения и имеете доступ к ползунку, который и отвечает за настройку гаммы. Регулируйте его до того момента, пока результат не будет вас устраивает или не станет таким, как было показано в предыдущей инструкции.
- Следующий этап подразумевает настройку яркости и контраста. Данные параметры можно изменить исключительно через панель управления самим монитором, поэтому если у вас нет кнопки вызова меню, этот этап стоит пропустить.
- Если настройка яркости дисплея поддерживается через меню вашего монитора, приступайте к чтению инструкции об этом и приготовьтесь при помощи кнопок на мониторе изменять значение, достигая подходящей для вас яркости.
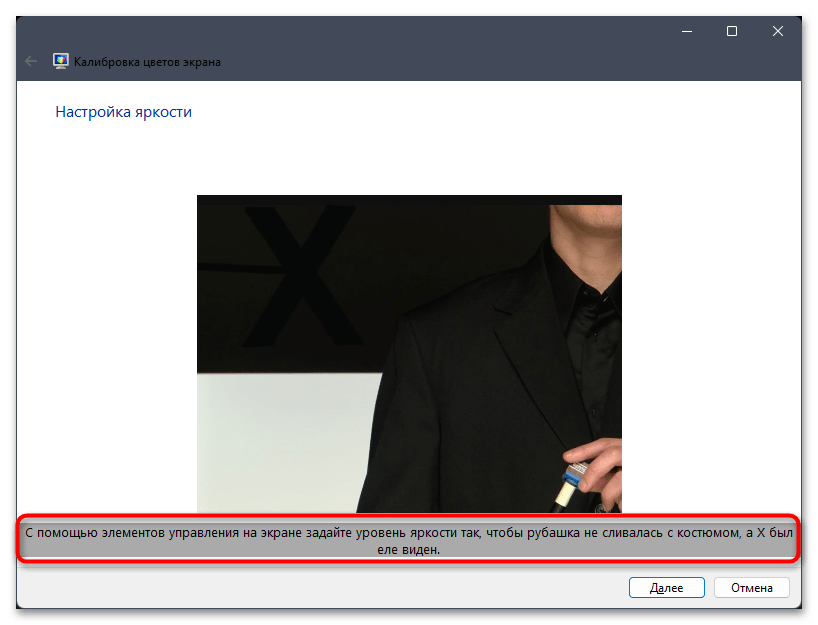
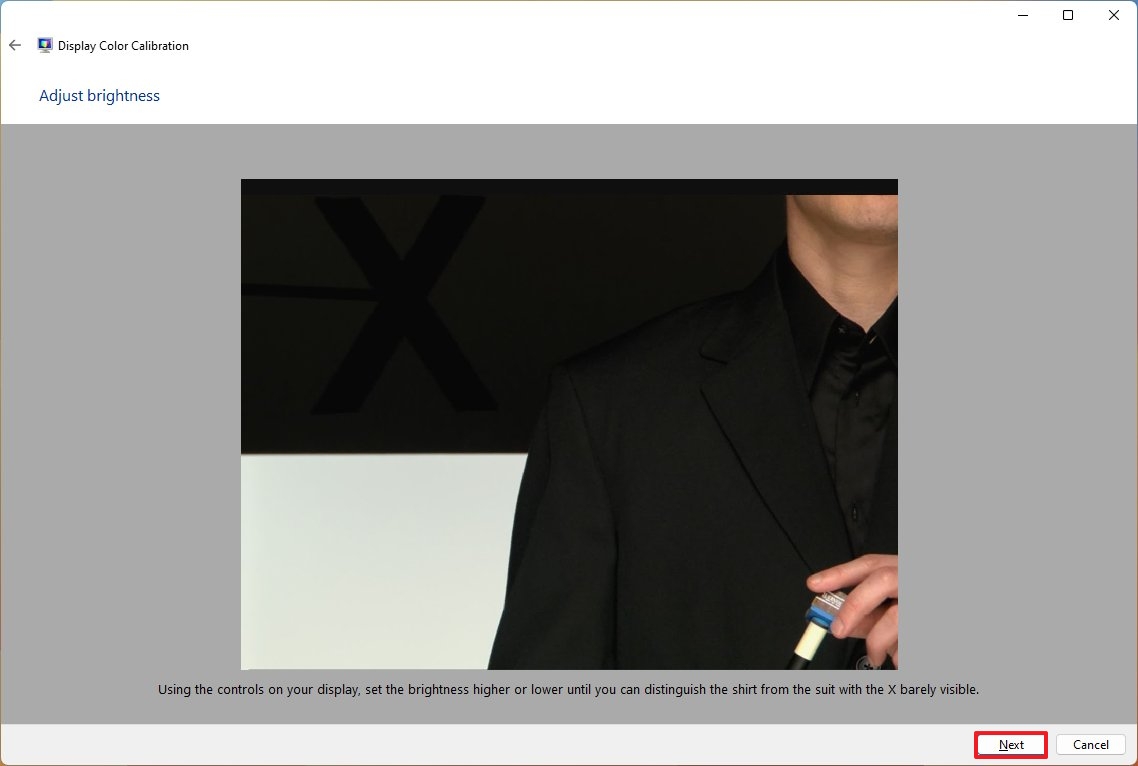
- Прочитайте информацию о том, какой из элементов на картинке должен быть еле виден при настройке яркости. Регулируйте значение через меню монитора, сохраните изменения и переходите далее.
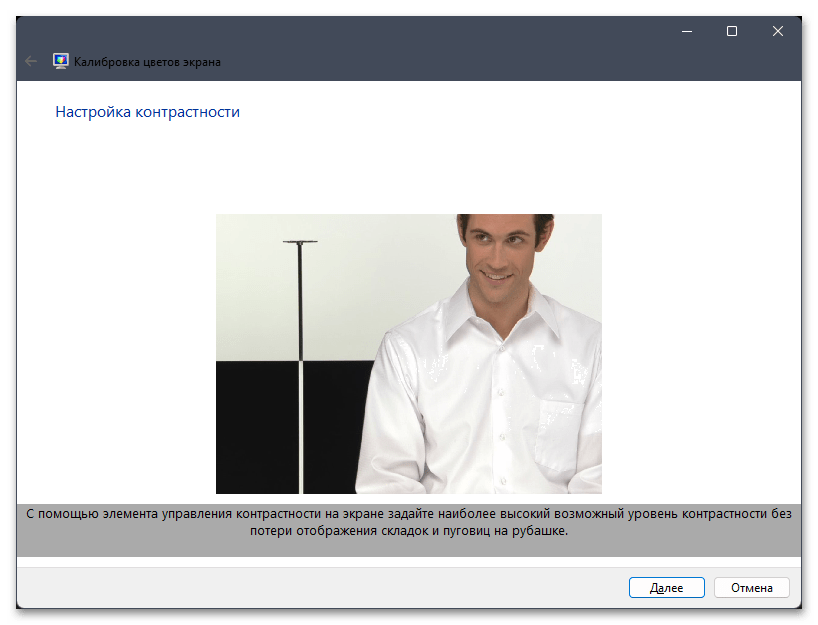
- То же самое необходимо осуществить и с контрастностью. Если ваша модель монитора не поддерживает изменение этого параметра, просто оставьте значение по умолчанию и приступайте к следующей настройке.
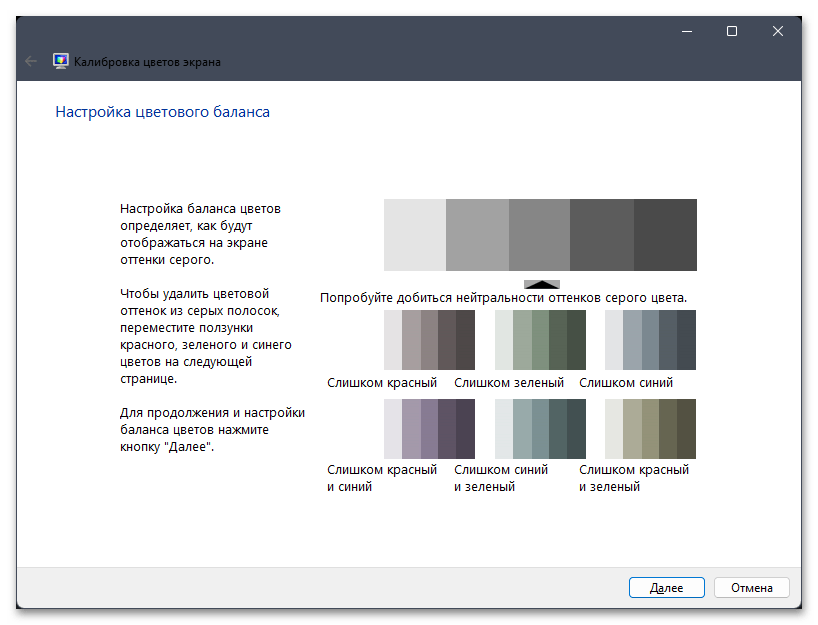
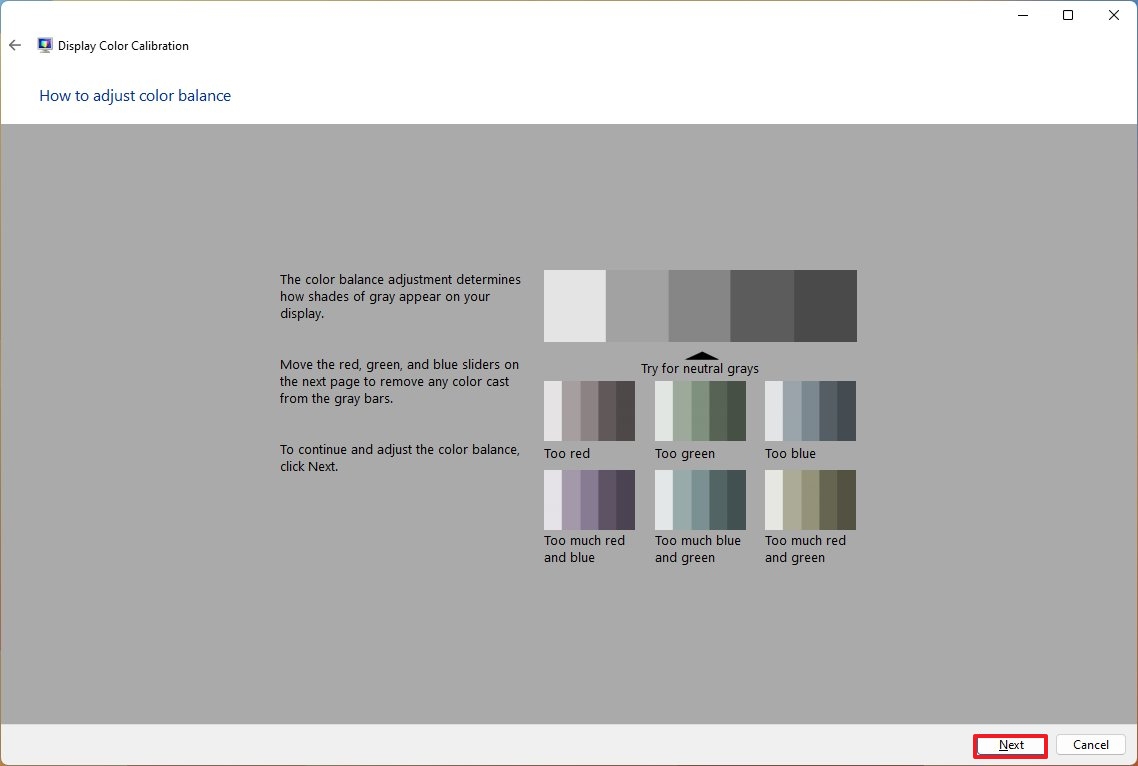
- На экране появится информация о настройке цветового баланса. В этом шаге тоже необходимо сравнить разные картинки и подобрать тот вариант, который будет вас устраивать.
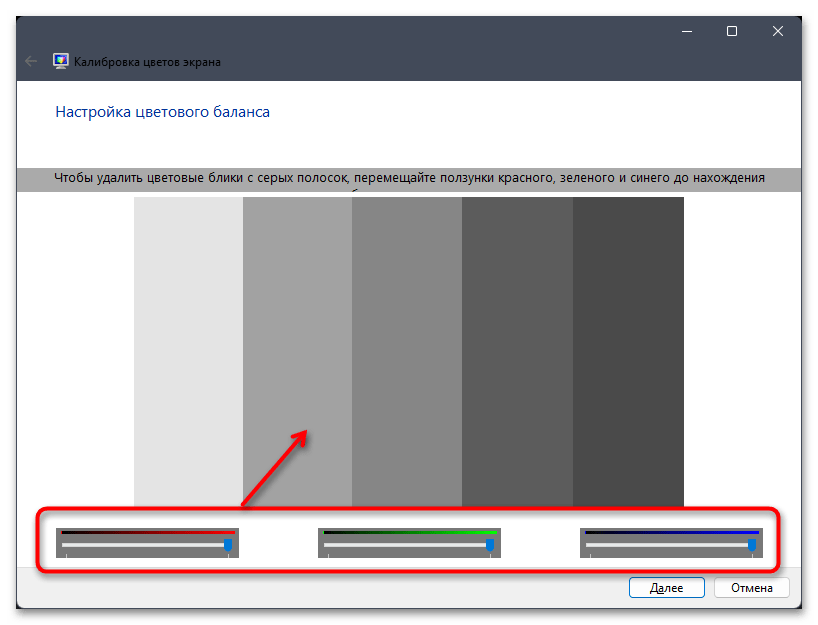
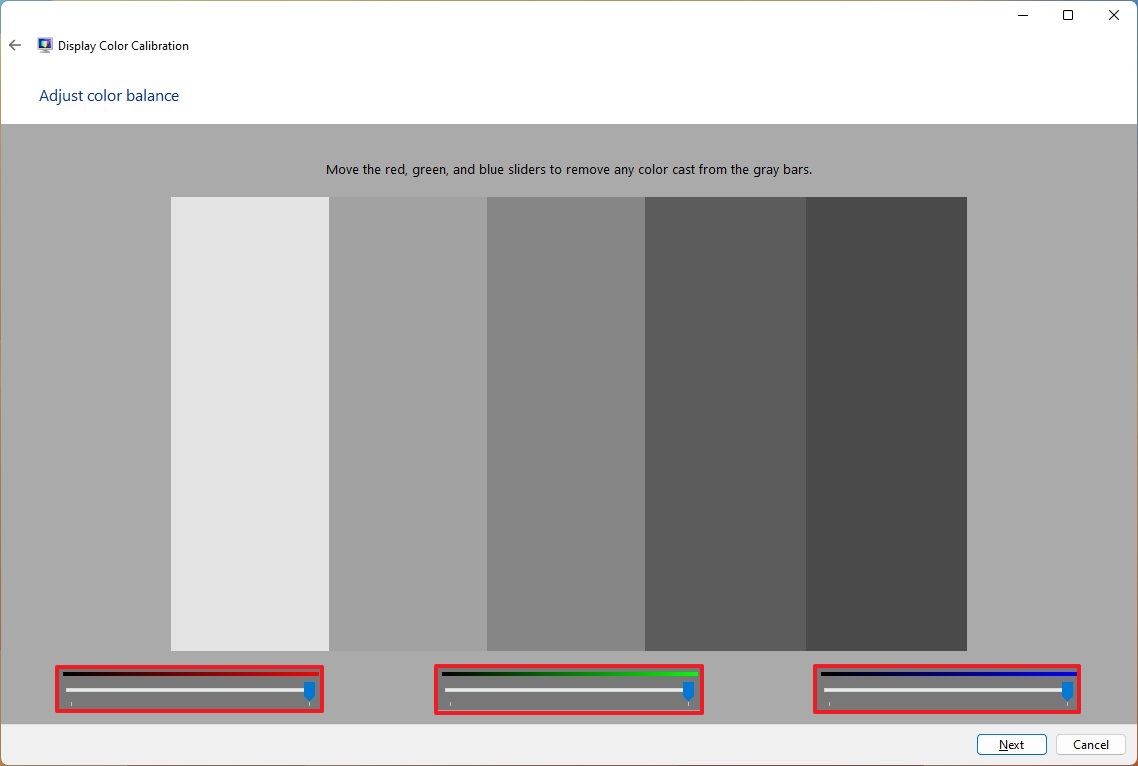
- Начните регулирование отобразившихся на экране ползунков для удаления цветных бликов и серых полосок. Если у вас нет соответствующих знаний о правильной настройке цветового баланса, то лучше старайтесь максимально приблизиться к примеру от разработчиков.
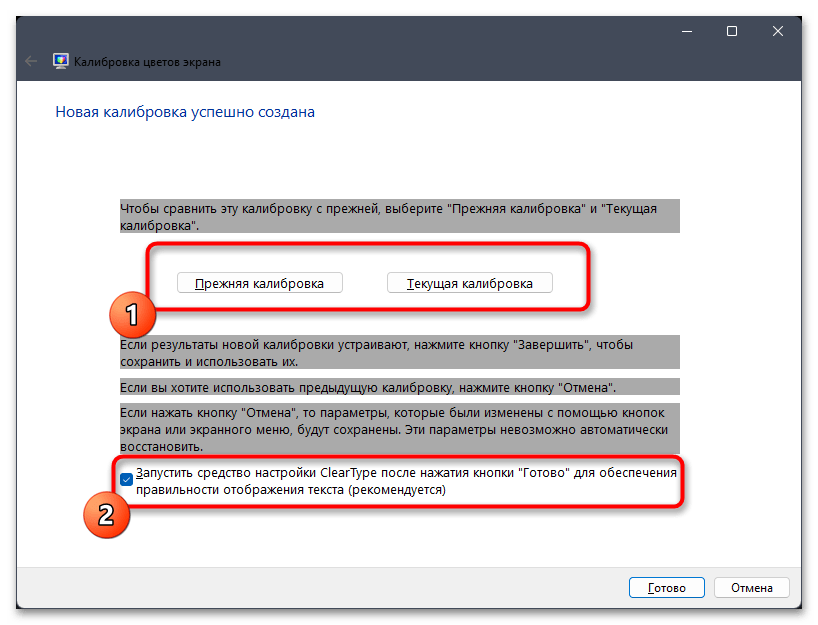
- На этом калибровка экрана при помощи стандартного средства Windows 11 завершена. В следующем окне вы увидите кнопки для сохранения изменений или возвращения к прежней калибровке. Ниже появится опция для запуска ClearType, если помимо калибровки нужно настроить и правильное отображение текста.


Способ 2: Стороннее программное обеспечение
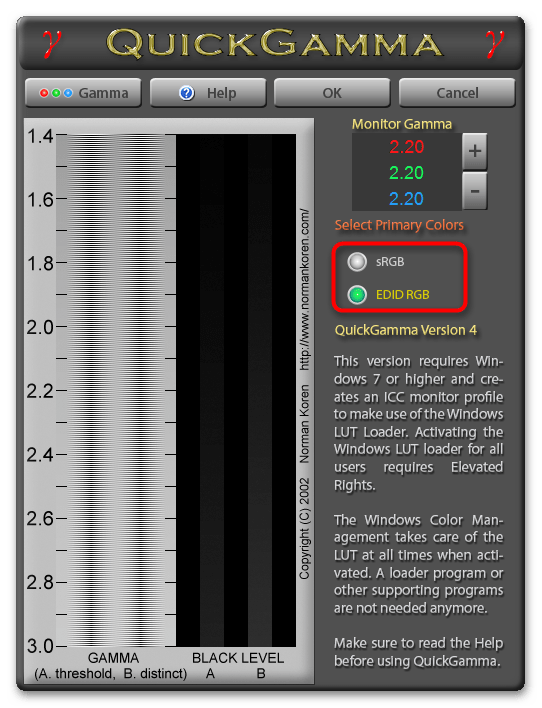
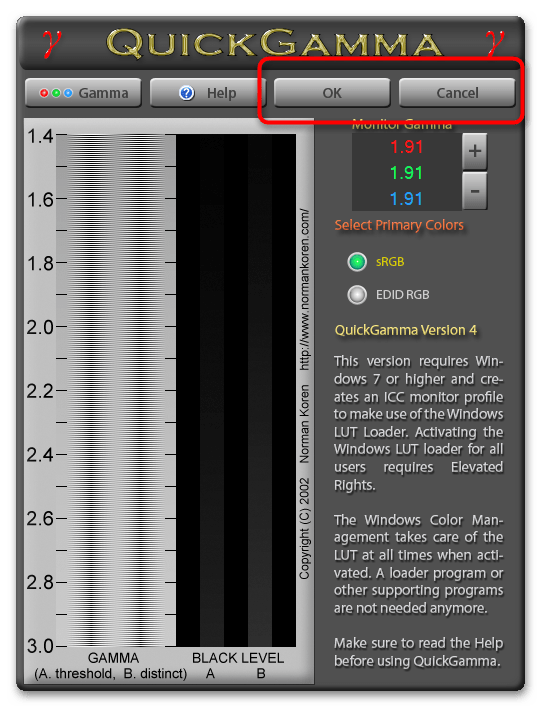
Существует не так много программ, которые подходят для калибровки экрана монитора без использования дополнительной аппаратуры. Однако несколько подходящих вариантов все же есть, а в рамках этой статьи мы предлагаем остановиться на решении под названием QuickGamma. Эта бесплатная программа предназначена для быстрого регулирования гаммы на ПК и выбора основных цветов, что немного влияет на их баланс.
Скачать QuickGamma
- В главном экране слева вы видите текущее значение гаммы и уровень черного. При помощи кнопок на «Monitor Gamma» осуществляется регулировка сразу трех основных цветов. Это позволит вам понизить или повысить общую гамму. Как раз эта настройка и является основной в данной программе.
- Мониторы, работающие в режиме EDID RGB, тоже поддерживаются, поэтому в случае необходимости всегда можно переключиться на другой тип предпочтительных цветов.
- Помимо общих кнопок с настройками, QuickGamma поддерживает работу с каждым цветом отдельно. Для этого на верхней панели нажмите кнопку «Gamma», чтобы перейти к соответствующему меню.
- Управление в нем максимально простое и понятное: слева отображаются три основных цвета, а справа — регуляторы для каждого из них. Увеличивайте или уменьшайте гамму до тех пор, пока не достигнете желаемого результата.
- По завершении работы с QuickGamma в главном окне нажмите «OK» для сохранения настроек или «Cancel», чтобы сбросить их до состояния по умолчанию.


На нашем сайте есть отдельная статья с обзором всех программ, подходящих для калибровки монитора. Мы рекомендуем обратить внимание на нее, если приведенный выше пример показался не совсем актуальным для вашей модели монитора.
Подробнее: Программы для калибровки монитора
Способ 3: Меню управления монитором
Вкратце остановимся на методе, который подразумевает исключительно использование меню монитора с его настройками для калибровки. Если такое поддерживается, значит, на самом мониторе сбоку или снизу должны быть кнопки, при помощи которых открывается это меню и осуществляется переключение пунктов. Значение каждой кнопки очевидно, поскольку рядом всегда есть иконка, отображающая действие.
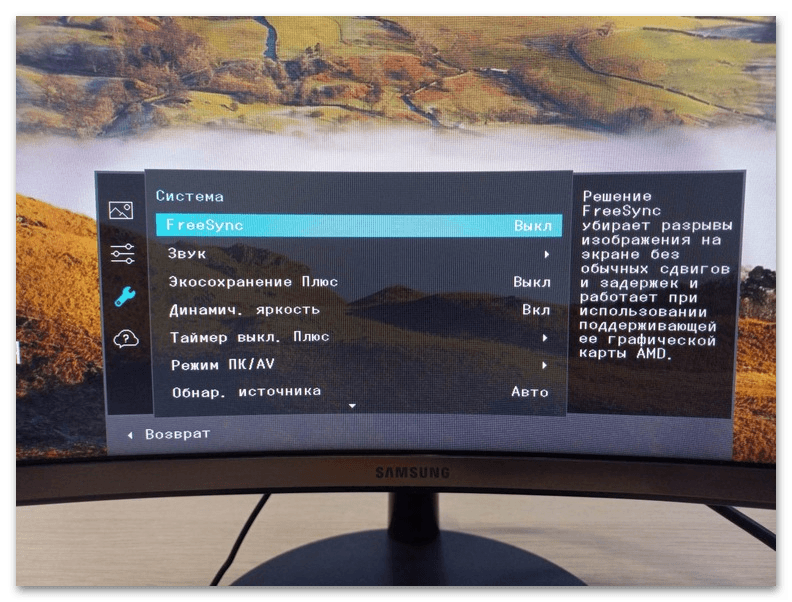
Предварительно можете открыть любое изображение для калибровки яркости, контраста, баланса цветов или гаммы, отыскав его в открытых источниках. Далее перемещайтесь по меню и находите нужные ползунки. Изменяйте их значения до тех пор, пока не добьетесь подходящего отображения. Кстати, для настройки яркости и контраста как раз можно использовать средства калибровки из Windows 11 с его примерами и инструкциями, о чем уже было рассказано выше.
Способ 4: Использование калибратора
Калибровка экрана монитора при помощи специальных аппаратных средств — дорогостоящая процедура, подходящая исключительно профессионалам. На картинке ниже вы видите пример того, как выглядит одна из моделей такого устройства. Обычно оно подключается к компьютеру по USB, далее крепится к монитору и считывает цвета.
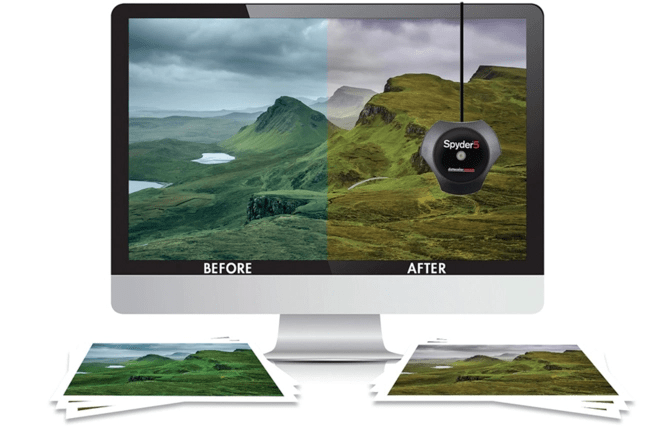
Сама калибровка происходит через фирменное программное обеспечение калибратора, соответственно, от каждого производителя оно будет разное. Мы не будем надолго останавливаться на данном методе, но примерно продемонстрируем, как выглядит взаимодействие с подобным ПО на примере DisplayCAL.
Скачать DisplayCAL с официального сайта
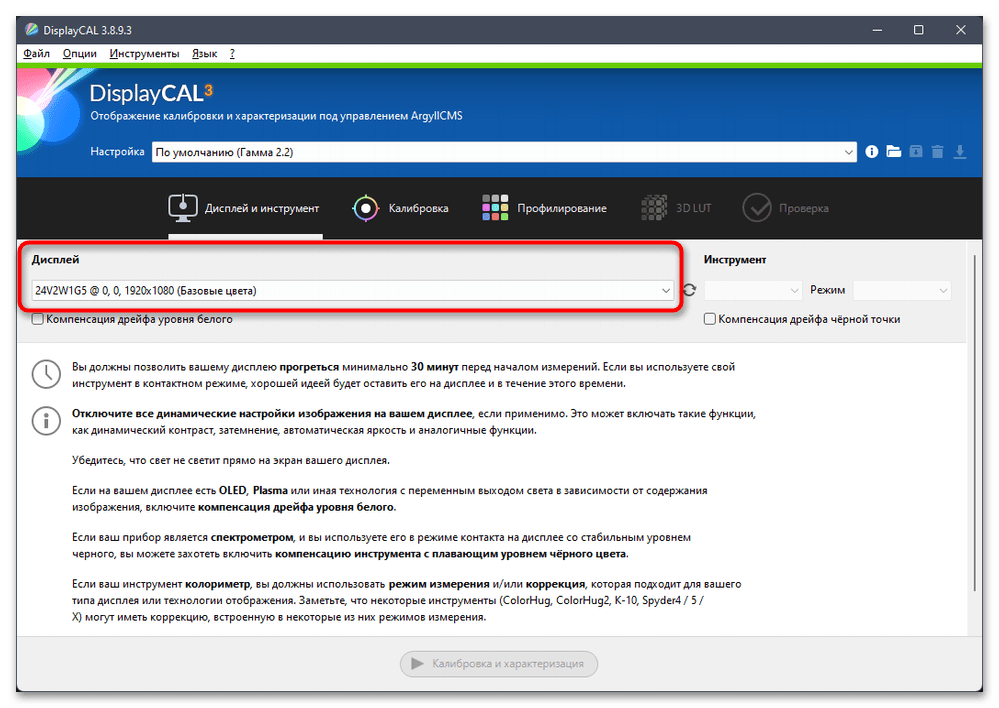
- Для работы с DisplayCAL вам понадобится приобрести калибратор от данного производителя и подключить его к компьютеру. Без устройства никакие настройки сохранены не будут. При запуске софта выберите дисплей для работы, если их подключено несколько.
- Далее прочитайте небольшую инструкцию от разработчиков о том, как происходит калибровка и что делать в случае появления различных неполадок или неточностей в считывании цветов.
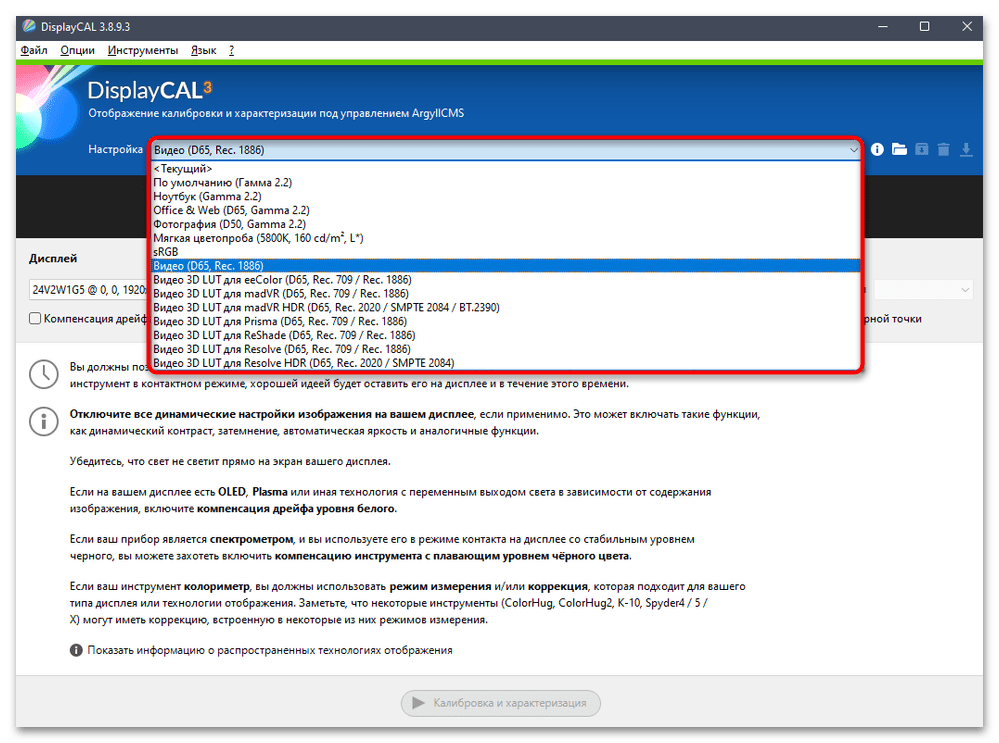
- На панели сверху будет список «Настройки», из которого вы уже можете выбрать разные заготовленные параметры цветов для разных задач. Это подходит тем юзерам, кто уже знает, для каких целей используется монитор и какие значения передачи цветов нужно выставить.
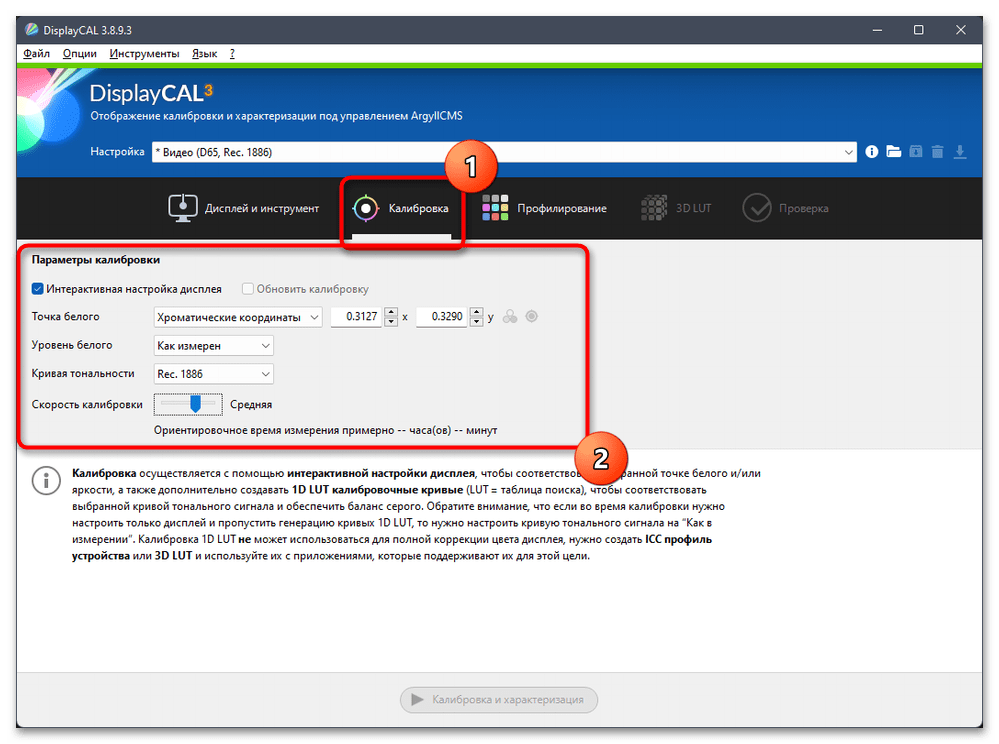
- Если шаблон найден не был, происходит переход на вкладку «Калибровка», где уже осуществляется ручная настройка точки белого, уровня белого, кривой тональности и скорости калибровки. Дополнительные настройки будут на вкладке «Профилирование».
- Как только вы завершите настройку, понадобится щелкнуть по «Калибровка и характеризация», чтобы настройки вступили в силу. Иногда это может занять до часа времени.


Это был только общий пример, демонстрирующий возможности подобного программного обеспечения. Работа с таким софтом напрямую зависит от приобретенного калибратора, поэтому обязательно читайте инструкции от производителей и еще перед покупкой ознакомьтесь с тем, для каких целей предназначен тот или иной калибратор.
Наша группа в TelegramПолезные советы и помощь
(Image credit: Future)
On Windows 11, when connecting a monitor, the system can automatically detect and determine the optimal configuration. However, since every monitor is different, it’s up to you to use calibration tools to ensure that the photos, videos, and games render on the screen with the most accurate color representation.
You can find many third-party tools on the internet to calibrate your monitor. However, you can also use the tool that comes as part of the operating system that comes with basic features that help you control the brightness, contrast, and color levels of any display.
This how-to guide will walk you through the easy steps to calibrate your computer monitor on Windows 11.
How to calibrate display on Windows 11
To calibrate your computer’s monitor on Windows 11, use these steps:
- Open Start.
- Search for Display Color Calibration and click the top result to open the app.
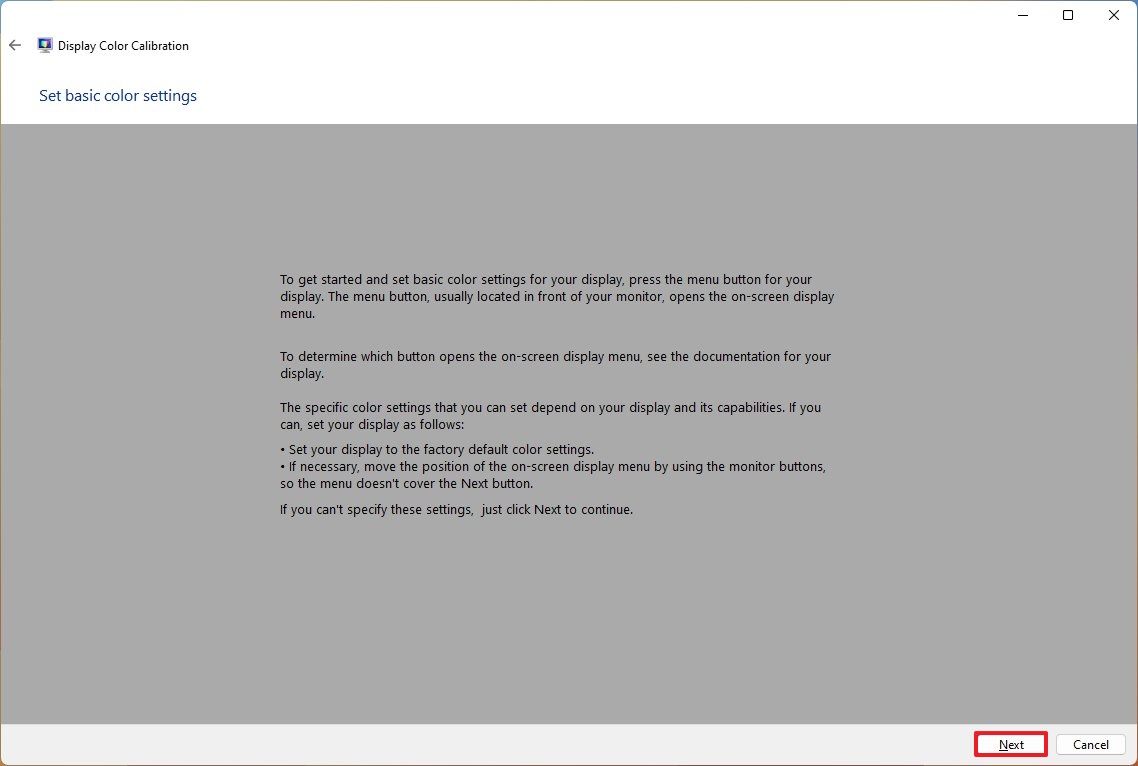
- Click the Next button.
- Quick note: It’s recommended to access the display menu and set the device to the default color settings. If you have a custom configuration, remember to note those settings in the event you need to apply them back. If you don’t know how to access the monitor’s menu, check your manufacturer support website for more specific details.
- Click the Next button again.
- Click the Next button one more time to continue.
- Change the gamma settings with the slider until the small dots are barely visible.
- Click the Next button one more time to continue.
- Change the gamma settings with the slider until the small dots are barely visible.
- Click the Next button.
- Click the Next button again.
- Click the Next button one more time to continue.
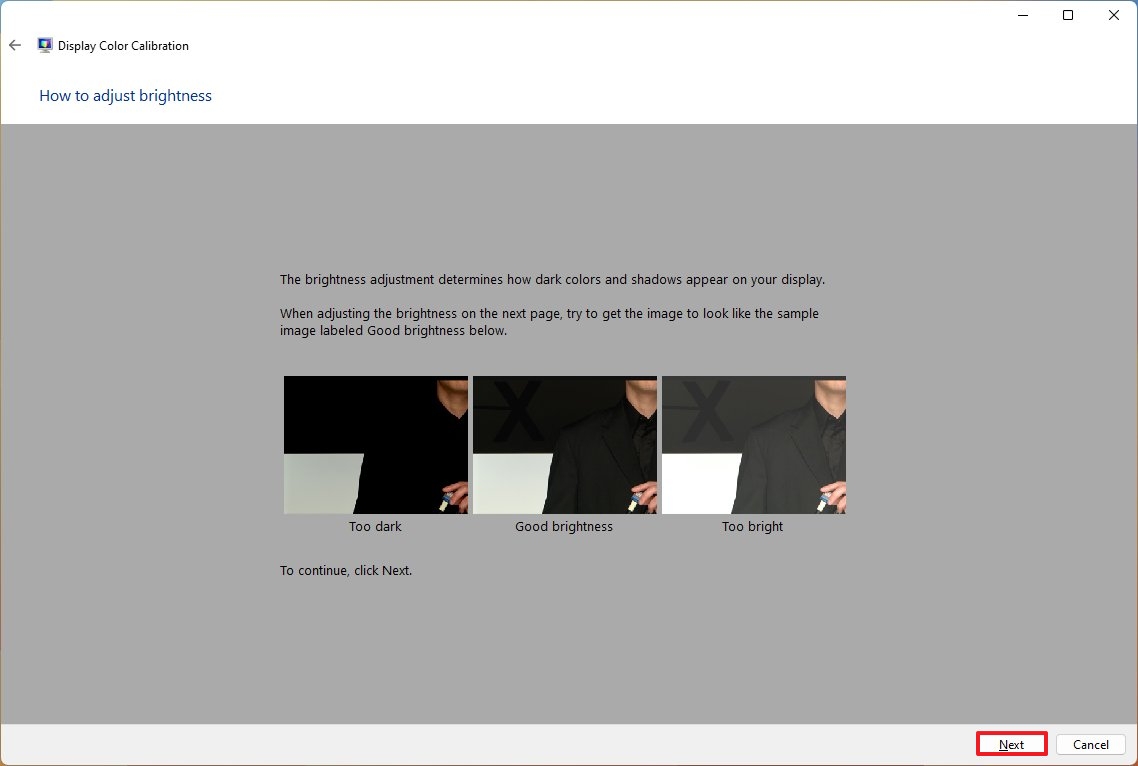
- Adjust the brightness level as noted in the description using the monitor’s hardware controls.
- Click the Next button.
- Click the Next button again.
- Click the Next button one more time to continue.
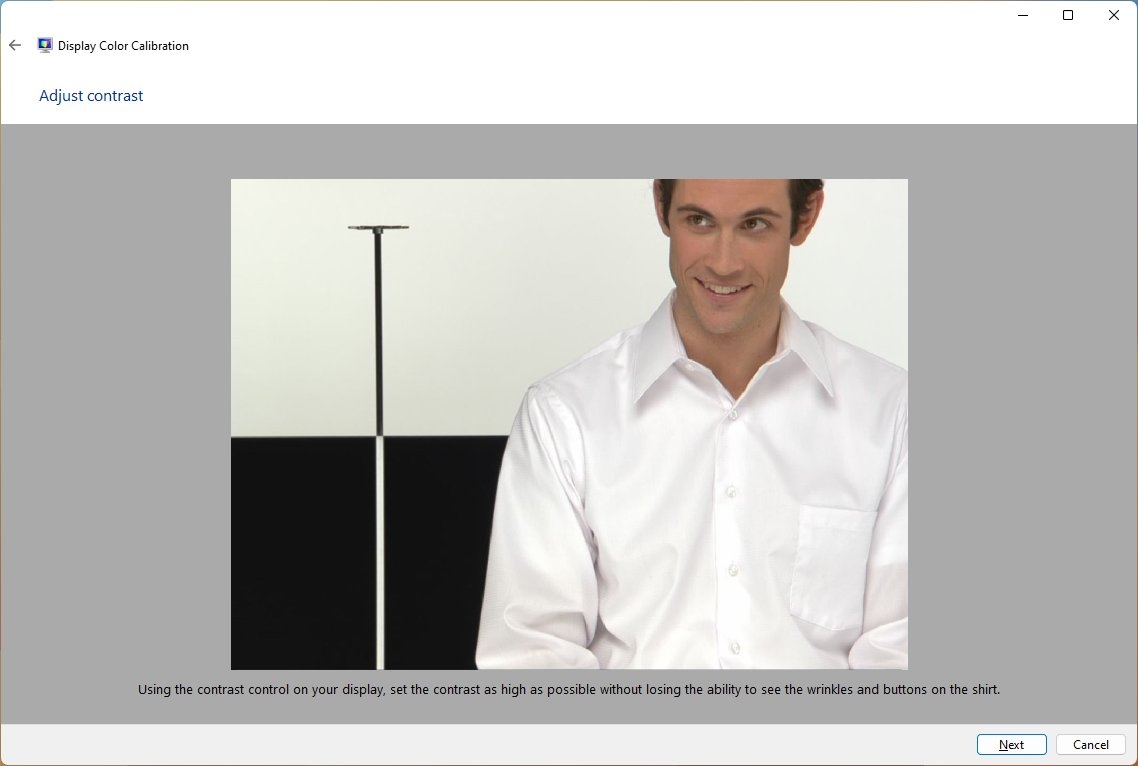
- Adjust the contrast level as noted in the description using the monitor’s hardware controls.
- Click the Next button.
- Click the Next button again.
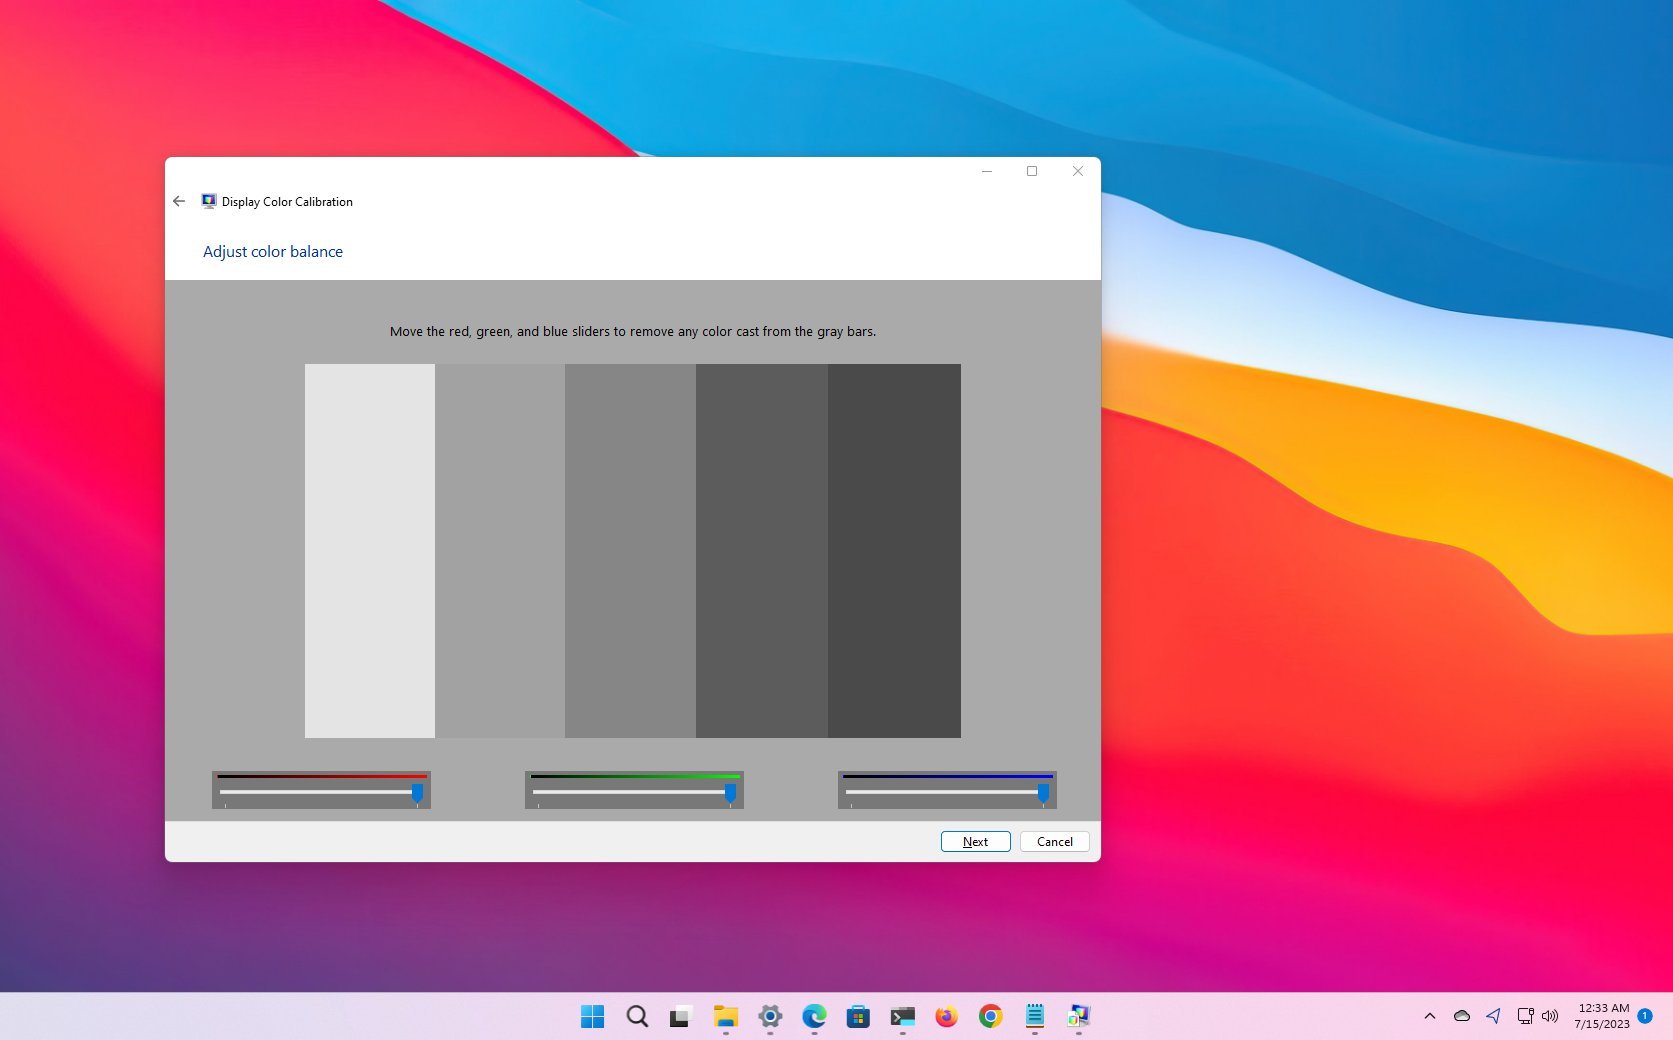
- Adjust the color balance using the red, green, and blue color sliders until removing any color cast from the gray bars.
- Click the Next button.
- (Optional) Check the «Start ClearType Tuner» option to launch the calibration tool to adjust text rendering on the screen.
- Click the Finish button.
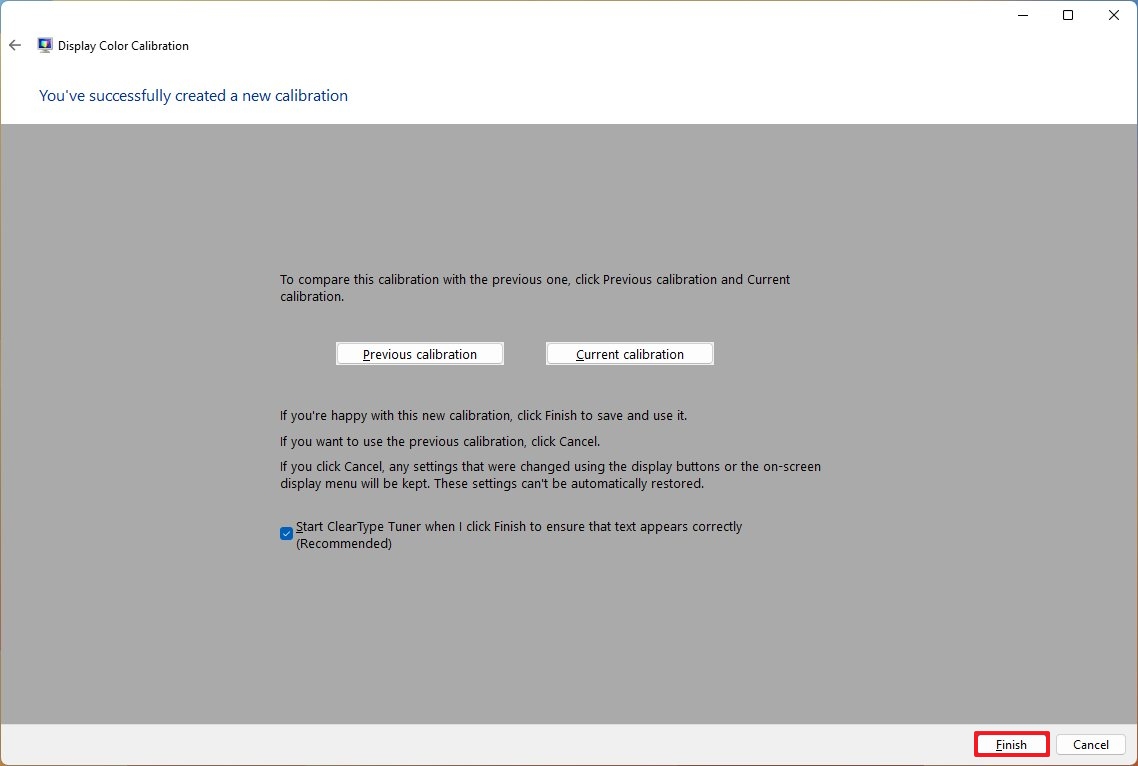
Once you complete the steps, you can start using the device with the new color calibration.
Since you’re changing the settings on the monitor itself, the new configuration will apply even if you click the «Cancel» button. If you want to revert the settings, open the monitor’s menu and use the reset option.
Although the Display Color Calibration tool should be more than enough for everyday users, if your job depends on color accuracy and you have a professional display, you may want to use third-party calibration tools instead of the tools available on Windows 11.
All the latest news, reviews, and guides for Windows and Xbox diehards.
More resources
For more helpful articles, coverage, and answers to common questions about Windows 10 and Windows 11, visit the following resources:
- Windows 11 on Windows Central — All you need to know
- Windows 10 on Windows Central — All you need to know
Mauro Huculak has been a Windows How-To Expert contributor for WindowsCentral.com for nearly a decade and has over 15 years of experience writing comprehensive guides. He also has an IT background and has achieved different professional certifications from Microsoft, Cisco, VMware, and CompTIA. He has been recognized as a Microsoft MVP for many years.
High Contrast mode in Windows 11 is a useful part of the Ease of Access options. It allows people with low vision to conveniently read the screen. Some of the apps and websites may have design issues, such as a gray text on a dark background, which are hardly readable for people with vision disabilities. The built-in High Contrast aims to solve this issue.
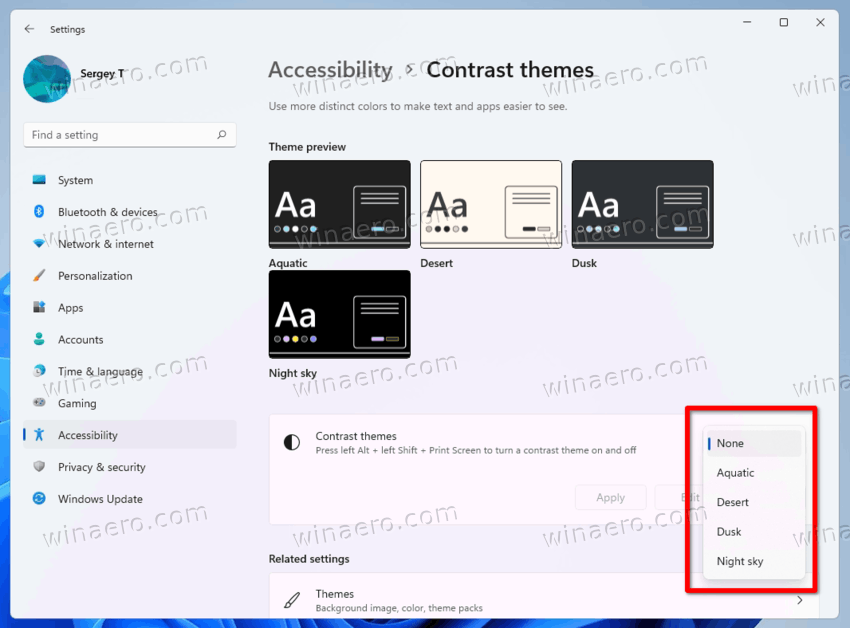
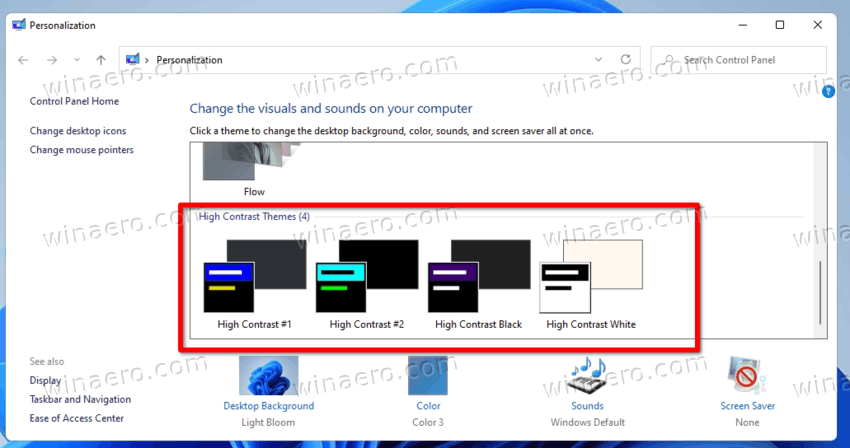
High contrast themes use brighter colors to make text and apps more visible. Window 11 includes four of them, Aquatic, Desert, Dusk, and Night sky.
Each of the themes includes its unique variation of colors to satisfy as many users as possible. All the themes don’t include any wallpaper. They set the desktop background to a solid color, but you can change it manually to anything you want.
To enable High Contrast mode, you can use the Settings app, the legacy Control Panel, and a special keyboard shortcut. Additionally, you can turn it on right from the sign-in screen, and from File Explorer. Let’s review these options in detail.
Enable High Contrast Mode in Windows 11 Settings
- Open the Settings app with the Win + I keyboard shortcut.
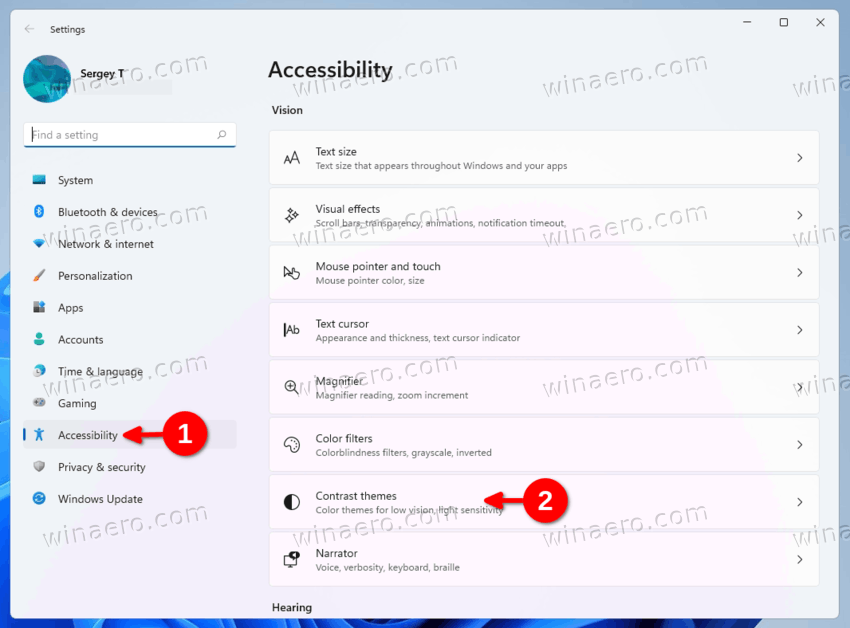
- Select the Accessibility item in the left pane.
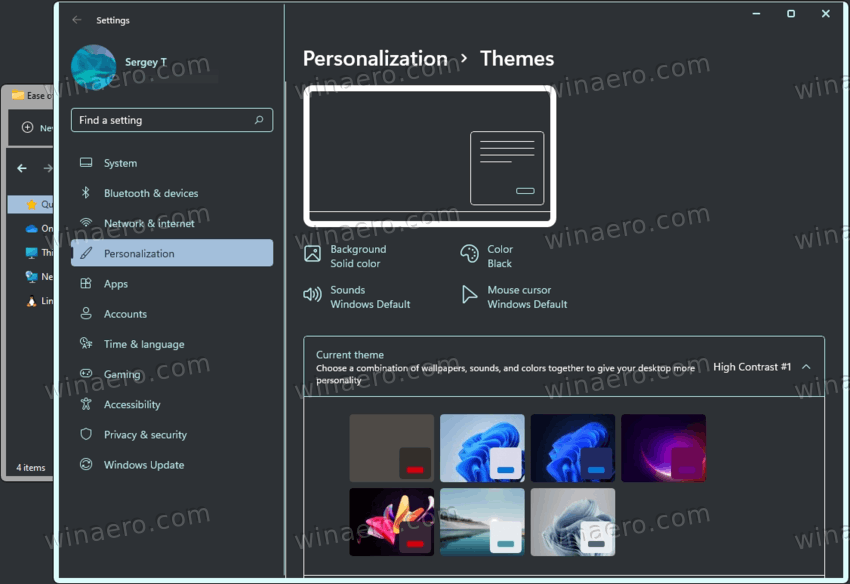
- On the right, click on Contrast themes.

- In the Contrast themes drop-down menu select a theme you want to apply. The «None» option disables the high contrast mode and restores the colorful style of Windows 11.
You are done.
Alternatively, you can apply a high-contrast theme from the legacy Control Panel. It still includes the classic Personalizaton page, but it is hidden well in inside system files. You need to use a special command to open it.
Using the legacy Control Panel
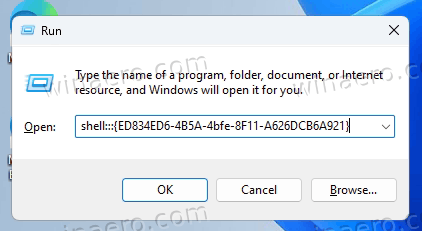
- Press Win + R to open the Run dialog.
- Type the following command into the Run box:
shell:::{ED834ED6-4B5A-4bfe-8F11-A626DCB6A921}. This will open the classic Personalization window directly.
- Under the High Contrast Themes section, pick a theme you want to apply.

- Selecting a theme from any other section will disable high contrast mode.
You are done.
Enable High Contrast Mode in Windows 11 with a hotkey
The easiest way to enable High Contrast Mode in Windows 11 is to press Left Alt + Left Shift + Print Screen. Pressing this key sequence will open a confirmation dialog titled «High Contrast».
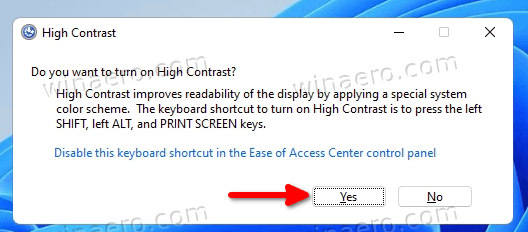
Read the text and click Yes to turn on the High Contrast mode.
Finally, you can switch to one of these themes using File Explorer. All you need to do is to click the appropriate *.theme file.
Apply a High Contrast Theme from File Explorer
- If you have the Settings app open, then close it.
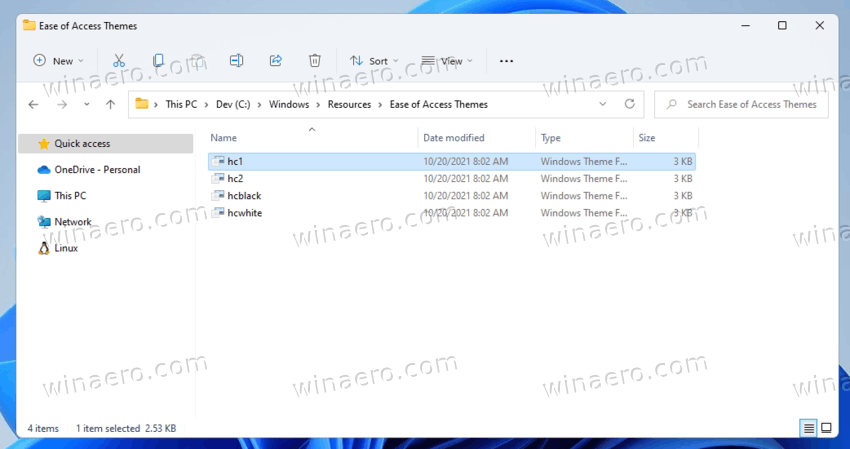
- Open File Explorer (Win + E), and head over the following folder: C:\Windows\Resources\Ease of Access Themes.

- Click on one of the following files to apply the theme.
- hc1.theme
- hc2.theme
- hcblack.theme
- hcwhite.theme
- Once you click it, Windows 11 will set the high contrast theme, and open the Settings app. Close the latter.

Done!
If the above methods is not enough, you can apply any of the high contract themes from the command prompt of powershell.
Turn on High Contrast Mode from Command Prompt or PowerShell
- Open Windows Terminal.
- Open it to the command prompt tab (Ctrl + Shift + 2).
- Type the following command:
start "" "C:\Windows\Resources\Ease of Access Themes\hc1.theme" & timeout /t 3 & taskkill /im "systemsettings.exe" /f. Instead of the hc1.theme, you can use hc2.theme, hcblack.theme, or hcwhite.theme if they suit you better.
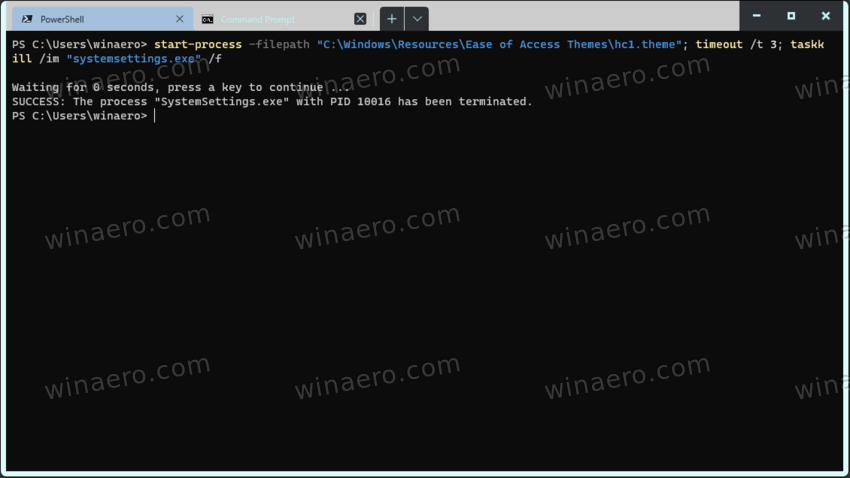
- If you use PowerShell (Ctrl + Shift + 1), type or copy & paste the following command:
start-process -filepath "C:\Windows\Resources\Ease of Access Themes\hc1.theme"; timeout /t 3; taskkill /im "systemsettings.exe" /f. Correct the high contrast theme file name if required.
- Windows 11 will enable High Contrast mode and close the Settings app that automatically opens.

Done!
Note: These commands, along with the Theme Switcher app mentioned in the next chapter, have been reviewed in this post.
Using Theme Switcher
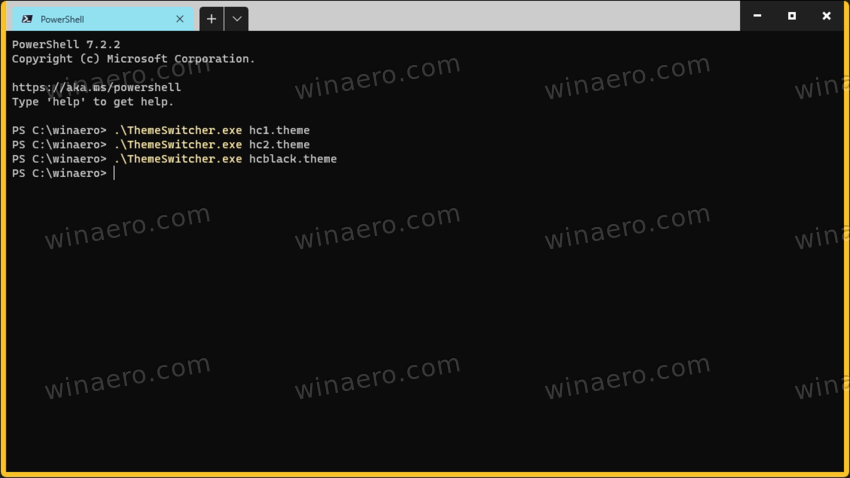
A freeware app, Theme Switcher, is a handy alternative to the command prompt or PowerShell. It doesn’t open the Settings app, so it doesn’t need a workaround to close it.
Download Theme Switcher using this link. Unpack the ZIP archive to any folder of your choice.
Open Windows Terminal to that folder, and run one of the following commands:
ThemeSwitcher.exe hc1.themeThemeSwitcher.exe hc2.themeThemeSwitcher.exe hcblack.themeThemeSwitcher.exe hcwhite.theme
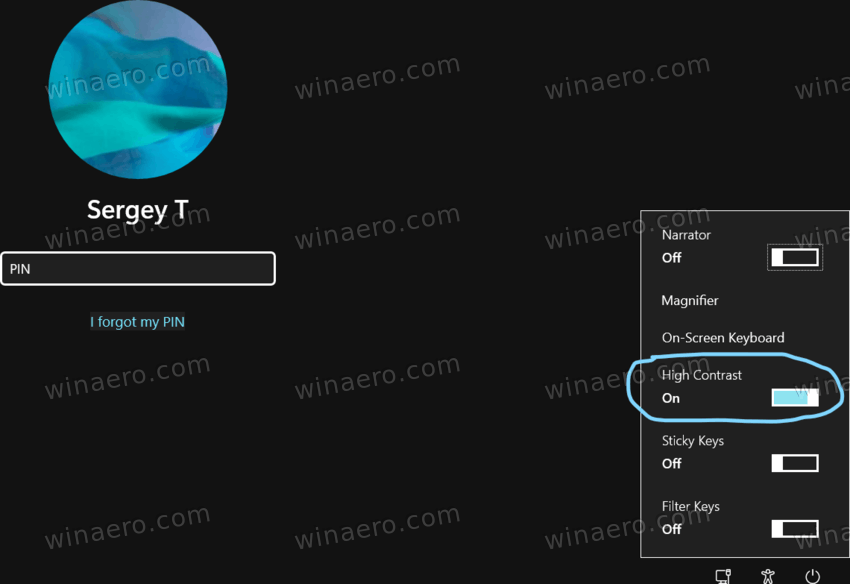
Finally, you can apply a high-contrast theme right from the sign-in screen, before you log in to your user account. Here’s how it can be done.
Enable High Contrast Mode from Sign-in Screen
- On the sign-in screen, select your user account.
- Click the Accessibility button in the bottom right corner.
- Enable the High Contrast option from the menu that opens.
- You can now continue signing in to Windows 11 with High Contrast enabled.
That’s it.
Support us
Winaero greatly relies on your support. You can help the site keep bringing you interesting and useful content and software by using these options:
If you like this article, please share it using the buttons below. It won’t take a lot from you, but it will help us grow. Thanks for your support!
Are you struggling to adjust the contrast on your laptop running Windows 11? Don’t worry, you’re not alone. Many users find it challenging to achieve the ideal display settings for their device. However, with a few simple adjustments, you can customize the contrast to your preference and enhance your viewing experience. Let’s explore how to adjust contrast on laptop Windows 11!
To adjust the contrast on your laptop running Windows 11, you can follow these straightforward steps. First, open the Settings menu by clicking on the Start button and selecting the gear icon. Then, choose the System option from the left-hand sidebar, followed by the Display tab. Here, you’ll find a variety of display settings, including the option to adjust the contrast. By sliding the Contrast bar to the left or right, you can decrease or increase the contrast level respectively. Finding the balance that suits your eyes and preferences is essential, so feel free to experiment until you achieve the desired results. With these easy steps, you can optimize the contrast on your laptop and enjoy a visually pleasing experience while using Windows 11.
To adjust the contrast on your Windows 11 laptop, follow these steps:
- Open the «Settings» menu by clicking on the Start button and selecting the gear icon.
- In the Settings window, click on «System» and then «Display.»
- Under the «Scale and layout» section, you’ll find the «Contrast» slider.
- Drag the slider towards the right to increase contrast or towards the left to decrease it.
- Check the preview window to see the changes, and once you’re satisfied, close the Settings menu.
Adjusting Contrast on Laptop Windows 11: Understanding the Basics
Windows 11 offers a range of customization options to enhance the visual experience on your laptop, and one such feature is adjusting contrast. Understanding how to adjust contrast on your laptop can help you optimize the display to suit your preferences and improve visibility. Whether you want to make the colors more vibrant, reduce eye strain, or adjust the contrast for specific tasks, Windows 11 provides several methods to achieve the desired results. In this article, we will explore different ways to adjust contrast on a laptop running Windows 11, making your viewing experience more enjoyable and comfortable.
Method 1: Using Display Settings
Windows 11 offers a user-friendly interface for adjusting contrast through the Display settings. This method allows you to fine-tune the contrast levels according to your preferences. Here’s how:
- Open the Start Menu and click on the «Settings» icon.
- In the Settings window, select the «System» category.
- Choose «Display» from the left pane.
- Scroll down to find the «Contrast» section and adjust the slider according to your preference.
By sliding the contrast adjuster, you can make the display darker or lighter, depending on your needs. Monitor calibration tools can also be used in conjunction with the Display settings to achieve greater accuracy in adjusting contrast.
Method 1.1: Using Night Light
Windows 11 also offers a built-in feature called Night Light, which enables you to adjust the contrast specifically for nighttime viewing or reduce blue light emission to prevent eye strain. Here’s how to enable Night Light:
- Go to the «Display» settings as mentioned in the previous method.
- In the «Contrast» section, click on the «Night Light settings» link.
- Toggle on the Night Light switch.
- You can further customize Night Light settings, such as the color temperature, schedule, and brightness, according to your preference.
Method 2: Adjusting Contrast Using Graphics Control Panel
If you have a dedicated graphics card or integrated graphics, you can use the graphics control panel provided by the manufacturer to adjust the contrast settings. Follow these steps to access the graphics control panel:
- Right-click on your desktop and select «Graphics Options» or «Graphics Properties» from the context menu. The exact option might vary depending on your graphics card.
- In the graphics control panel, navigate to the «Display» or «Color» section.
- Look for the contrast adjustment option and modify it according to your preference.
Make sure to save any changes made in the graphics control panel for them to take effect. It’s worth noting that not all laptops have graphics control panels, especially those with integrated graphics.
Method 2.1: Adjusting Contrast with Intel Graphics Control Panel
If your laptop has an Intel graphics card, you can adjust the contrast settings through the Intel Graphics Control Panel. Here’s how:
- Right-click on your desktop and select «Graphics Options» or «Intel Graphics Control Panel» from the context menu.
- In the control panel, navigate to the «Display» or «Color» section.
- Adjust the contrast slider to your desired level.
Method 3: Using Keyboard Shortcuts
Windows 11 also provides keyboard shortcuts that allow you to adjust the contrast quickly without navigating through settings menus. Here are the commonly used keyboard shortcuts:
| Windows key + + | Increases contrast |
| Windows key + — | Decreases contrast |
| Windows key + Esc | Resets contrast to default |
These keyboard shortcuts provide a quick and convenient way to adjust the contrast levels on your laptop. Simply press the appropriate key combination to achieve the desired contrast.
Exploring Advanced Contrast Settings on Windows 11
In addition to the methods mentioned above, Windows 11 provides advanced contrast settings that allow you to further tailor the display to your liking. These advanced settings can help you enhance picture quality, improve visibility in different lighting conditions, and optimize contrast for specific tasks. Let’s explore some of these advanced contrast settings:
Advanced Contrast Settings in Display Properties
Windows 11 allows you to access additional contrast settings through the Display Properties menu. These settings provide more granular control over contrast and can be useful when working with specific applications or content. Here’s how to access them:
- Right-click on your desktop and select «Display settings» from the context menu.
- In the Display settings window, scroll down and click on the «Advanced display settings» link.
- Under the «Related settings» section, click on the «Display adapter properties» link. This will open the Display Properties window.
- In the Display Properties window, navigate to the «Color Management» or «Color» tab, depending on your graphics card.
- Here, you can adjust advanced contrast settings such as gamma, color calibration, and color profiles.
These advanced contrast settings can help you achieve precise adjustments to suit your specific requirements, such as professional photo editing or graphic design work.
Using Third-Party Software
If the built-in methods and settings are not sufficient for your needs, you can explore third-party software solutions that offer advanced contrast adjustments. These software applications often provide additional features, customization options, and real-time adjustments for contrast and other visual settings. Some popular third-party software options for adjusting contrast include:
- Adobe Photoshop
- GIMP
- DaVinci Resolve
- DisplayCAL
- ColorMunki
These software applications are predominantly used for professional editing and calibration purposes, providing professional-grade contrast adjustment tools.
Enhancing Your Viewing Experience with Custom Contrast Settings
Adjusting contrast on your laptop running Windows 11 can significantly enhance your overall viewing experience. Whether you prefer a high-contrast display for gaming, a softer contrast for reading or editing documents, or optimized settings for multimedia consumption, Windows 11 offers a range of options to meet your needs. By following the methods and utilizing advanced settings discussed in this article, you can customize the contrast settings to create a visually pleasing environment tailored to your preferences. Experiment with different combinations of contrast settings to find what suits you best and enjoy an enhanced visual experience on your Windows 11 laptop.

Adjusting Contrast on Laptop Windows 11
If you are using Windows 11 on your laptop and want to adjust the contrast levels, follow these steps:
Using Display Settings
- Right-click on the desktop and select «Display settings.»
- Scroll down and click on «Advanced display settings.»
- Under the «Color and high contrast» section, click on «Color calibration.»
- Follow the on-screen instructions and adjust the contrast levels according to your preference.
Using Intel Graphics Control Panel
- Right-click on the desktop and select «Intel Graphics Control Panel.»
- Navigate to «Display» and select «Color Enhancement.»
- Adjust the contrast slider to your desired level.
- Click «Apply» to save the changes.
By following these simple steps, you can easily adjust the contrast levels on your Windows 11 laptop. Experiment with different settings until you find the one that suits your preferences and enhances your viewing experience.
Key Takeaways:
- Adjusting contrast on Windows 11 laptop can enhance visual clarity.
- Go to the Display settings to access the contrast options.
- Use the slider to adjust the contrast level according to your preference.
- Experiment with different contrast settings to find the optimal balance.
- Monitor calibration tools can help you fine-tune the contrast settings.
Frequently Asked Questions
In this section, we will answer some common questions related to adjusting contrast on laptops running Windows 11.
1. How can I adjust contrast on my laptop running Windows 11?
To adjust the contrast on your laptop running Windows 11, follow these steps:
1. Open the Settings menu by clicking on the Start button and selecting «Settings» (the gear icon).
2. In the Settings menu, click on «System» and then choose «Display» in the left sidebar.
3. Scroll down to the «Appearance» section and click on «Advanced display settings.»
4. Under the «Advanced display settings» section, you will find the «Contrast» slider. Adjust the slider to increase or decrease the contrast level according to your preference. Moving the slider to the right increases the contrast, while moving it to the left decreases the contrast.
2. Can I adjust the contrast on my laptop based on the lighting conditions?
Yes, you can adjust the contrast on your laptop based on the lighting conditions.
Windows 11 offers an «Adaptive Contrast» feature that automatically adjusts the contrast settings based on the lighting conditions detected by your laptop’s ambient light sensor.
To enable the Adaptive Contrast feature, follow these steps:
1. Open the Settings menu and click on «System.»
2. In the «System» menu, select «Display» from the left sidebar.
3. Scroll down to the «Appearance» section and click on «Advanced display settings.»
4. Under the «Advanced display settings,» you will find the «Adaptive Contrast» option. Toggle the switch to enable it.
3. What if my laptop doesn’t have an ambient light sensor to adjust contrast automatically?
If your laptop doesn’t have an ambient light sensor to adjust contrast automatically, you can still manually adjust the contrast settings.
Follow the steps mentioned in the first question to manually adjust the contrast using the «Contrast» slider in the «Advanced display settings» section.
4. Are there any keyboard shortcuts to adjust contrast on Windows 11 laptops?
No, Windows 11 doesn’t offer any built-in keyboard shortcuts to directly adjust the contrast on laptops. However, you can often find keyboard shortcuts specific to your laptop’s manufacturer that may allow you to adjust the contrast.
Check your laptop’s user manual or the manufacturer’s website for any specific keyboard shortcuts related to display settings.
5. Can I adjust the contrast of specific applications or windows on my laptop?
No, adjusting the contrast on Windows 11 applies to the entire display of your laptop. You cannot adjust the contrast of specific applications or windows.
However, most applications have their own settings that allow you to adjust the appearance and color settings within the application itself.
In summary, adjusting the contrast on a laptop running Windows 11 is a straightforward process that can greatly enhance your viewing experience. By following these simple steps, you can easily customize the contrast settings to your preference.
First, access the Windows Settings by clicking on the Start button and selecting the gear icon. Then, navigate to the Display section and locate the Contrast slider. By moving the slider left or right, you can decrease or increase the contrast level respectively. Make sure to observe the changes on your screen as you adjust the slider until you achieve the desired contrast.