
Are your screenshots always blurry (both text and pictures) and low quality in Windows 11 regardless of what screenshot app you use and how fine it looks on the actual monitor screen?
Do the screenshots look low resolution, pixelated and sometimes high-contrast or overexposed (over-exposure), causing the text to be almost unreadable? This post is intended to help you resolve the issue.
Also see: Why did all my Screenshots come out Black in Windows 11?
Why are my screenshots blurry in Windows 11?
If the screenshots you take in Windows 11 always come out blurry, poor quality, and do not match what you see on the screen, try the following solutions to resolve the problem.

Turn off HDR in Windows 11
In most cases, the blurry screenshots issue in Windows 11 is caused by a display settings called HDR. HDR, shorts for High Dynamic Range, is a feature in Windows that can provide you a brighter, more vibrant, and more detailed picture compared to a standard dynamic range (SDR) display.
If your monitor or TV supports HDR display, Windows 11 will automatically enable the HDR feature. This may be the reason why your screenshots come out blurry and different than what you actually see on the screen.
Try turning off the HDR feature and see if that fixes the blurry screenshot problem. To turn off HDR in Windows 11, follow the steps below.
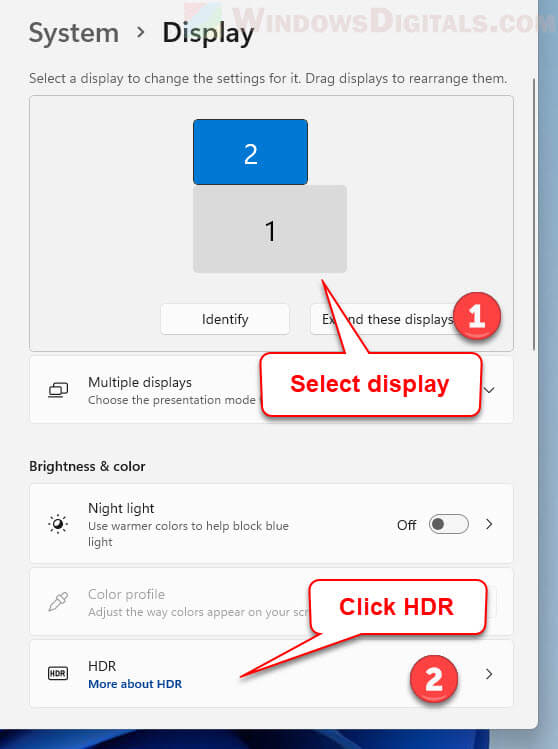
- In Windows 11, press Win + i keys to open Settings.
- Select System from the left pane.
- Next, select Display on the right.
- Select the display (if you have multiple displays) you would like to change the settings for.
- Then, select the HDR (More about HDR) settings.

- In the HDR settings, click the toggle next to “Use HDR” to turn it off.

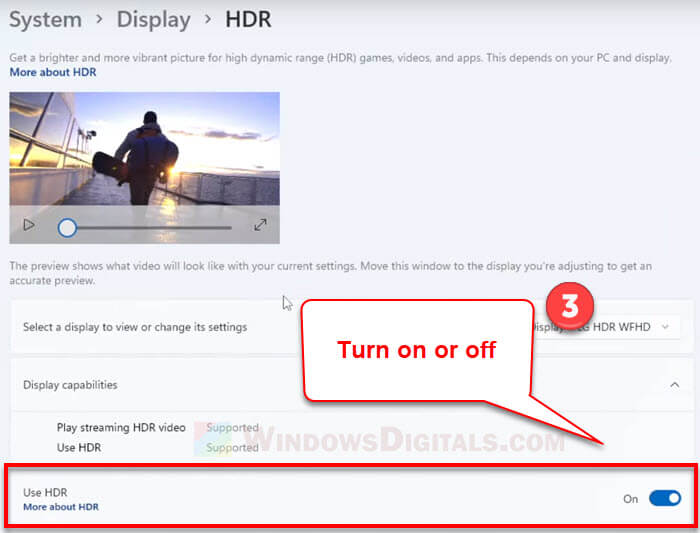
After turning off the HDR, retry taking a screenshot again and see if the blurry screenshot problem persists.
Read next: How to Screenshot Only One Monitor on Windows 11
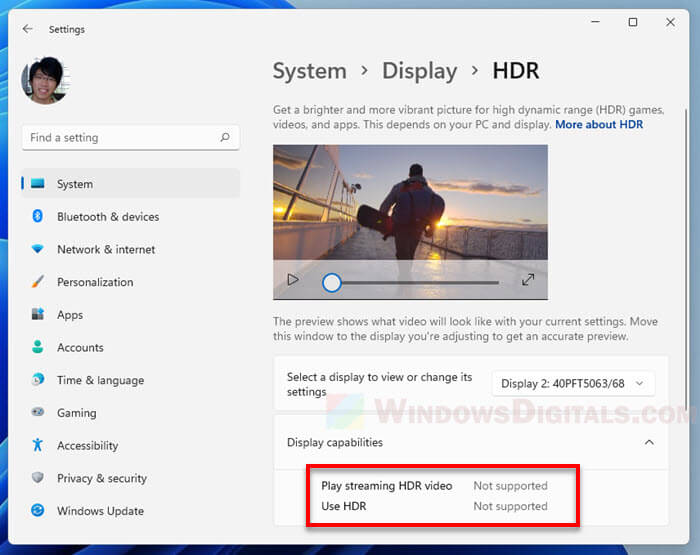
If your monitor doesn’t support HDR, the “Display capabilities” section in the HDR settings will show you that “Use HDR” is not supported by the display you selected. If so, the problem of blurred screenshots may be caused by other reasons.
Check display scaling setting
Check the display scale setting to see if it is causing screenshot to be blurry. If you have a display scaling that is not 100%, Windows will try to change the size of objects such as text and app’s windows so that they fit the scaling.
For this reason, screenshots you take may come out blurry and different. Try to change the scaling back to 100% and if that resolves the issue.
You can change the display scaling setting by opening Settings (press Win + i) and navigate to System > Display. Under “Scale & layout“, click the drop-down menu next to “Scale” to change the display scaling percentage.
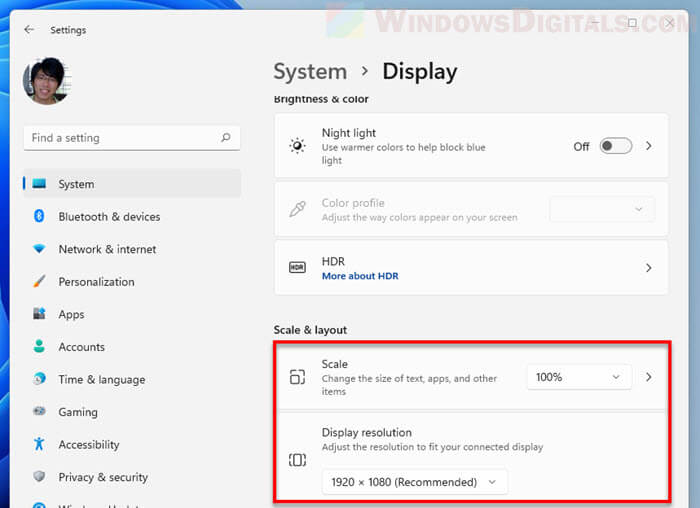
In the meantime, also check that if you have the correct display resolution that fit your monitor or TV. You can adjust the screen resolution in the same settings page under “Scale & layout”.
Related: How to Screenshot Games on Windows 11
Adjust ClearType Text Tuner
Due to how certain monitors work, text and fonts may look blurry and pixelated on some monitors. For this reason, Windows introduces a feature called ClearType to help user adjust the text and make them easier to read.
To learn how to use ClearType in Windows 11, see: How to Make Text Darker And Easier to Read in Windows 11.
If the text in screenshots you took is so blurry that they are difficult to read, you can try to use the ClearType feature to smooth the text and make them darker and easier to read in Windows 11.
Use a different screenshot taking app
If you haven’t already done so, try using a different screenshot taking approach and see if the results are the same. There are plenty of ways to take a screenshot in Windows 11:
- Try the Win + PrtScn method. Screenshots taken this way can be found from the This PC > Pictures > Screenshots folder.
- Use Snipping Tool – a built-in screenshot taking app in Windows 11 and Windows 10. You can find Snipping Tool by searching for it via the Start menu.
- Use the classic PrtScn + Paint method. After pressing the PrtScn key, open Paint in Windows and press Ctrl + V to paste the screenshot into Paint.
- If you have NVIDIA GeForce Experience, use the NVIDIA Share (Shadowplay) screenshot feature to take screenshot. You can open the NVIDIA Share interface by pressing Alt + Z.
- Use a third-party screenshot app such as Greenshot or Fraps.
4 способа делать снимки экрана с высоким разрешением на Windows/Mac
Хорошая картинка с четким содержанием помогает привлечь больше читателей к вашим статьям или презентациям, особенно при написании сложного руководства или демонстрации профессиональной техники. Следовательно, качественные изображения важны для учебных материалов. Но ваши скриншоты для статей всегда выглядят размытыми или пикселизированными. В этой статье подробно рассматриваются факты, которые будут влиять на качество вашего снимка экрана, и мы поможем вам решить эту проблему размытости. Вы также можете ознакомиться с подробным руководством о том, как делать снимки экрана с высоким разрешением на компьютере. Продолжайте читать, чтобы увидеть полное содержание.
Часть 1. Важные факторы для скриншотов с высоким разрешением
Три основных фактора будут влиять на разрешение вашего снимка экрана. Ознакомьтесь с кратким объяснением ниже и узнайте, можете ли вы что-нибудь сделать, чтобы сохранить размытые снимки экрана и сделать снимки экрана с высоким разрешением на своем компьютере.
Разрешение экрана: Одним из наиболее важных факторов, влияющих на создание скриншотов с высоким разрешением, является разрешение экрана вашего компьютера. Если ваш экран имеет лучшее разрешение, на дюйм приходится больше пикселей. Таким образом, экран может отображать больше деталей, и ваши скриншоты будут выглядеть четче.
Инструменты для обрезки: Инструмент, который вы использовали для захвата экрана, также имеет значение. Плохие инструменты для обрезки могут сжимать скриншоты и сохранять их в паршивом качестве.
Формат скриншота: По умолчанию большинство инструментов захвата сохраняют скриншоты в формате PNG, что хорошо, поскольку PNG использует сжатие без потерь. Особенно, когда вы захватываете область, заполненную текстом, PNG намного лучше, чем формат JPEG или JPG.
Изменить размер скриншотов: Если вы увеличите скриншот после того, как сделаете его, вы растянете пиксели и будете выглядеть пикселизированными. Следовательно, лучший способ избежать этого — делать скриншоты того размера, который вы хотите использовать позже.
Методы передачи: Способ отправки скриншотов на разные устройства также приведет к потере качества. Например, если вы отправляете снимки экрана по электронной почте с одного компьютера на другой, качество вашего снимка экрана ухудшится.
Часть 2: Как делать скриншоты с высоким разрешением на ПК и Mac
Основываясь на приведенных выше факторах, вы можете легко изменить их, чтобы сделать снимок экрана с высоким разрешением на своем компьютере. Поэтому следующий контент позволяет вам узнать, как делать снимки экрана с высоким разрешением с помощью лучших инструментов для обрезки и разрешения экрана.
Методы по умолчанию
Прежде чем использовать методы по умолчанию для захвата окон на вашем компьютере, вы можете настроить разрешение экрана, чтобы захватывать маленькие значки на экране с наилучшим качеством.
Окна: Перейдите в «Настройки», найдите «Система» и нажмите «Дисплей». Затем выберите 300% в раскрывающемся списке «Масштаб». Это временно увеличит все на вашем рабочем столе. Затем вернитесь в «Дисплей» и нажмите «Дополнительные параметры масштабирования», включите параметр «Исправить масштабирование для приложений», и ваши скриншоты будут выглядеть намного лучше.
Как делать скриншоты с высоким разрешением в Windows
Шаг 1.
Шаг 2.Вы можете сделать снимок экрана с помощью Free-from Snip, Rectangular Snip, Window Snip и Full-Screen Snip.
Шаг 3.После захвата вы можете обрезать снимок экрана в Windows с краской.
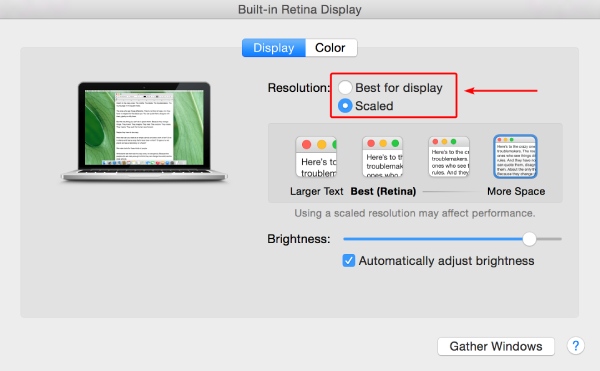
Мак: Перейдите в «Системные настройки» на своем Mac и найдите опцию «Экран». Затем выберите «Крупный текст» для разрешения вашего экрана. Или вы можете использовать рекомендуемый вариант «Лучший».
Как делать скриншоты с высоким разрешением на Mac
Шаг 1.Используйте следующие сочетания клавиш для создания моментальных снимков на компьютерах MacBook Air и Pro.
- Command, Shift и 3: захват всего экрана.
- Command, Shift и 4: захват случайной области экрана.
- Command, Shift и пробел: захват активного окна.
- Command, Shift и 5: активировать панель инструментов захвата.
Шаг 2.По умолчанию Mac сохраняет ваши скриншоты на рабочем столе. Вы также можете щелкнуть миниатюру, чтобы отредактировать снимок экрана после его захвата. Затем сохраните его на своем Mac в формате PNG.

AnyRec Screen Recorder [Рекомендуемые]
AnyRec Screen Recorder является более мощной альтернативой стандартным инструментам для обрезки в Windows и Mac. Благодаря большему количеству функций для скриншотов, этот инструмент для обрезки также прост в использовании. Вы можете настроить горячие клавиши для быстрого снимка, захвата всей веб-страницы в режиме прокрутки и записи вашего компьютера или телефона.
С помощью этого программного обеспечения легко сделать снимок экрана с высоким разрешением. Вы можете предварительно просмотреть и отредактировать снимок экрана, а затем сохранить его в форматах, включая PNG, JPEG, BMP, TIFF и т. д.
AnyRec Screen Recorder
Делайте аннотации на экране во время записи.
Записывайте экраны телефонов удаленно на Windows и Mac.
Продолжите предыдущую задачу записи с Last Recorder.
Прокрутите окно, чтобы захватить все содержимое на экране.
Как сделать снимок экрана с высоким разрешением с помощью AnyRec Screen Recorder
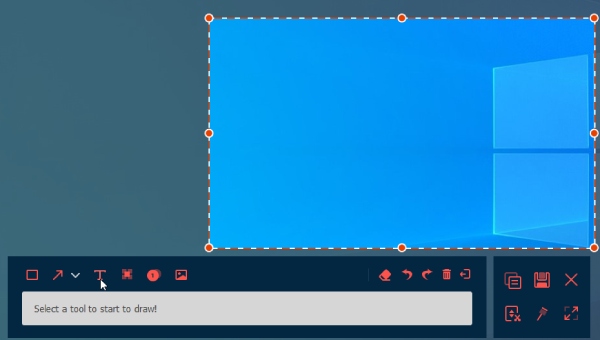
Шаг 1.Загрузите и установите этот рекордер на свой компьютер. Затем запустите его, и вы сможете использовать горячие клавиши по умолчанию (Ctrl, Shift и C) для захвата экрана. Или щелкните значок камеры в главном интерфейсе, чтобы захватить случайную область.
Шаг 2.После захвата вы увидите панель инструментов и сможете использовать инструменты, чтобы размыть личную информацию, добавить текст, сделать пометки или ничего не делать. Затем вы можете сделать снимок экрана с высоким разрешением и нажать кнопку «Сохранить», чтобы сохранить его на своем компьютере.
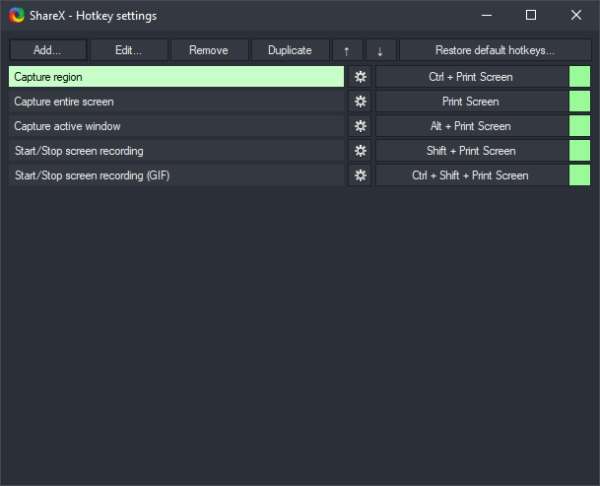
ShareX [Windows]
ПоделитьсяX — еще один альтернативный инструмент для Windows. Самым большим преимуществом ShareX является то, что он бесплатный. Хотя это стоит не копейки, но все же есть различные отличные функции. Например, инструмент ORC позволяет захватывать текст с изображения с помощью снимка экрана. Вы можете захватить случайную область; этот инструмент для обрезки извлечет текст. Вы также можете загружать скриншоты на онлайн-серверы, такие как Imgur, Google Photos, Twitter и т. д. Самое главное, что в ShareX нет потери качества при захвате экрана.
- Плюсы
- Выберите и скопируйте цвета с других скриншотов.
- Объединяйте скриншоты по горизонтали или по вертикали.
- Совместная работа с поиском изображений Google и визуальным поиском Bing.
- Минусы
- Захват прокрутки паршивый и сложный.
- По умолчанию вы не можете изменить размер снимка экрана во время захвата.
Как сделать снимок экрана с высоким разрешением с помощью ShareX
Шаг 1.Скачайте ShareX с официального сайта. Установите и запустите инструмент на своем компьютере. Горячие клавиши по умолчанию для скриншот части экрана «Ctrl» и «Print Screen». Нажмите две клавиши, чтобы сделать снимок экрана.
Шаг 2.ShareX автоматически сохраняет ваши снимки экрана в папке «Документы». Между тем, вы также можете отредактировать снимок экрана после его захвата. Вы можете наклеивать стикеры, стирать конфиденциальную информацию, выделять контент и т. д.
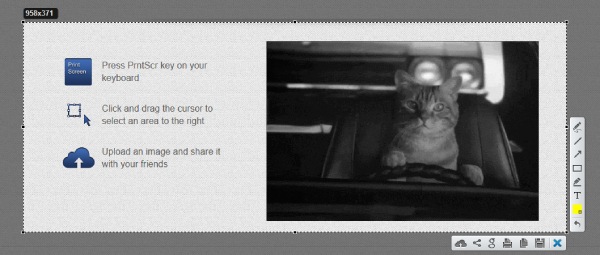
Lightshot [Windows и Mac]
Lightshot — еще один бесплатный инструмент для обрезки изображений, который может делать снимки экрана с высоким разрешением на Windows и Mac. Этот бесплатный инструмент для обрезки предлагает вам несколько инструментов после захвата, включая загрузку на онлайн-серверы, поиск похожих изображений, обмен в социальных сетях, печать и т. д. Как универсальная программа для создания скриншотов, Lightshot позволяет легко и быстро редактировать скриншоты.
- Плюсы
- Красочные инструменты для редактирования изображений.
- Сохраняйте историю скриншотов для удобного просмотра.
- Делайте скриншоты в браузерах с надстройкой/расширением.
- Минусы
- Интерфейса нет, только маленькая иконка.
- Нельзя делать длинные скриншоты.
Как сделать снимок экрана с высоким разрешением с помощью Lightshot
Шаг 1.Загрузите, установите и запустите Lightshot на своем компьютере.
Шаг 2.Чтобы сделать снимок экрана с высоким разрешением, нажмите клавишу Print Screen в Windows (клавиши Command и L на Mac).
Шаг 3.Выберите область, которую хотите захватить, и нажмите «Ввод», чтобы сделать снимок экрана.
Часть 3. Часто задаваемые вопросы о создании снимков экрана с высоким разрешением
-
Как делать скриншоты веб-сайтов в высоком разрешении в Chrome?
Да, ты можешь. Используя инструменты разработчика и ярлыки для снимков экрана, вы можете легко получить снимок экрана с высоким разрешением в Chrome. Выберите режим «Устройство», выберите «Адаптивный» в «Предустановке», установите DPR на 3.0 и нажмите Ctrl, Shift и P. Затем выберите «Сделать полноразмерный снимок экрана».
-
Могу ли я сделать скриншот 4K на компьютере?
Разрешение скриншота в основном такое же, как разрешение вашего экрана. Если на вашем компьютере нет экрана 4K, вы не сможете сделать снимок экрана 4K на компьютерах с более низким разрешением экрана.
-
Как я могу сделать свой экран 4K?
Вы можете зайти в настройки «Дисплей» и изменить «Разрешение экрана» на 3840×2160, то есть 4K. Затем, когда вы сделаете снимок экрана на экране, вы получите скриншот 4K.
Заключение
С правильными настройками, правильными инструментами для обрезки и высококачественными экранами вы, несомненно, будете делать скриншоты с высоким разрешением на Windows и Mac. Все вышеперечисленные инструменты для обрезки предлагают функции редактирования. Но если вы хотите захватить всю веб-страницу или длинный документ, AnyRec Screen Recorder — лучший выбор благодаря своей простоте и эффективности.
Статьи по Теме
Taking high-quality screenshots on Windows 11 is a piece of cake! You can use built-in tools like Snipping Tool and Snip & Sketch, or simply press a combination of keys on your keyboard. Whether you need the entire screen or just a part of it, Windows 11 has got you covered. Follow these easy steps to become a screenshot pro.
You can also check out this article about how to take a screenshot on Windows 11 for additional information on this topic.
In this section, we’ll walk you through the precise steps to capture high-quality screenshots on Windows 11. By the end of this guide, you’ll be able to take clear, sharp screenshots effortlessly.
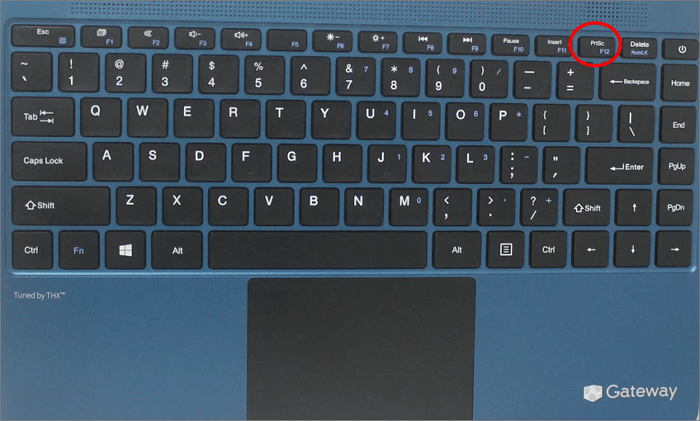
Step 1: Press the PrtScn (Print Screen) Key
The simplest method to capture your entire screen is by pressing the PrtScn key on your keyboard.
Once you press this key, the screenshot is copied to your clipboard. You can then paste it into an image editor or document using Ctrl + V.
Step 2: Use the Snipping Tool
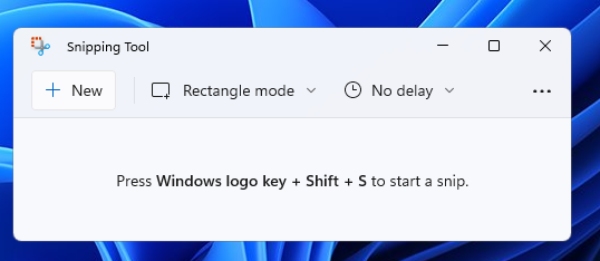
Open the Snipping Tool by typing “Snipping Tool” in the Start menu search bar and clicking on the app.
The Snipping Tool allows you to capture different types of screenshots: free-form, rectangular, window, and full-screen snips. Simply select the mode you want and snip away!
Step 3: Press Win + Shift + S
This key combination opens the Snip & Sketch tool directly.
When you press Win + Shift + S, your screen dims, and you can select an area to capture. The screenshot is copied to your clipboard and can be accessed from the Snip & Sketch app.
Step 4: Use the Game Bar
Press Win + G to open the Xbox Game Bar, then click the camera icon.
The Game Bar not only captures screenshots but also records gameplay. It’s a versatile tool for gamers and casual users alike.
Step 5: Use Third-Party Apps
Download and install third-party apps like Greenshot or Lightshot from their respective websites.
These apps often offer advanced features like annotated screenshots, cloud storage, and sharing options, making them ideal for more complex tasks.
After completing these steps, you will have a variety of high-quality screenshots saved on your computer, ready to be used for any purpose you need.
Tips for Taking High-Quality Screenshots on Windows 11
- Use High Resolution: Ensure your screen resolution is set to the highest possible setting for the best quality.
- Clean Your Screen: Close unnecessary windows and clean up your desktop to avoid clutter in your screenshots.
- Use Annotation Tools: Utilize tools that allow you to annotate your screenshots for better clarity.
- Save in the Right Format: Save your screenshots in PNG format for the best quality.
- Practice: The more you practice, the better you’ll get at capturing the perfect screenshot.
Frequently Asked Questions
How do I take a screenshot of just one window?
Press Alt + PrtScn to capture only the active window. This is useful for capturing specific apps without background clutter.
Can I take a delayed screenshot?
Yes, the Snip & Sketch tool allows you to set a delay of 3 or 10 seconds, giving you time to prepare your screen.
Where are my screenshots saved?
By default, screenshots taken with Win + PrtScn are saved in the Screenshots folder within the Pictures directory.
How can I edit my screenshots?
You can use built-in apps like Paint or Snip & Sketch to edit screenshots quickly.
Can I capture scrolling screenshots?
For capturing scrolling windows, you’ll need third-party software like Greenshot or ShareX, as built-in tools don’t support this feature.
Summary
- Press the PrtScn key.
- Use the Snipping Tool.
- Press Win + Shift + S to open Snip & Sketch.
- Use the Game Bar with Win + G.
- Download and install third-party apps.
Conclusion
Capturing high-quality screenshots on Windows 11 is straightforward and versatile. With various built-in tools and keyboard shortcuts, you can easily capture anything from the entire screen to a specific window. And if you need more advanced features, there are plenty of third-party applications available.
Remember, practice makes perfect. The more you use these tools, the more efficient you’ll become. Whether you’re a professional needing high-quality images for presentations or a gamer wanting to capture epic moments, Windows 11 has got you covered.
If you found this guide helpful, why not explore more tips and tricks to supercharge your Windows experience? Happy screenshotting!
Matt Jacobs has been working as an IT consultant for small businesses since receiving his Master’s degree in 2003. While he still does some consulting work, his primary focus now is on creating technology support content for SupportYourTech.com.
His work can be found on many websites and focuses on topics such as Microsoft Office, Apple devices, Android devices, Photoshop, and more.
Changing the print screen settings in Windows 11 allows you to customize how screenshots are taken and saved on your computer. This guide will walk you through the entire process, showing you how to modify the print screen key behavior, change where screenshots are saved, and more. By the end of this, you’ll be a screenshot wizard.
Step-by-Step Tutorial on Changing Print Screen Settings Windows 11
In this section, we’ll adjust the print screen settings to better suit your needs. Whether you want to change the default behavior of the print screen key or adjust where your screenshots are saved, follow these steps.
Step 1: Open Settings
To get started, open the Settings app by pressing Win + I.
This will bring up the Settings window, where you can access all the configuration options for your device. The Settings app is your control center.
Step 2: Navigate to Ease of Access
Click on «Ease of Access» in the Settings menu.
Ease of Access is where you’ll find options to customize how your keyboard works, including the print screen key. This section is designed to make your computer more usable.
Step 3: Modify Keyboard Settings
Scroll down and click on «Keyboard.»
Here, you’ll find a variety of settings related to your keyboard. Look for the option that says «Use the PrtScn button to open screen snipping.» This is the setting that will change what happens when you press the print screen key.
Step 4: Toggle Print Screen Key
Toggle the switch to enable or disable the «Use the PrtScn button to open screen snipping» option.
Enabling this option will make your PrtScn key open the Snip & Sketch tool, giving you more options for taking screenshots. Disabling it reverts to the traditional behavior.
Step 5: Change Screenshot Save Location
Open File Explorer and navigate to «This PC > Pictures > Screenshots.»
Right-click on the Screenshots folder, select «Properties,» go to the «Location» tab, and click on «Move» to choose a new folder. This changes where your screenshots will be saved from now on.
Step 6: Apply Changes
Click «Apply» and then «OK» to confirm your new settings.
Clicking «Apply» will save your changes. Your screenshots will now be saved in the new location you selected, making them easier to find.
Once you’ve completed these steps, your print screen settings will be updated. Pressing the print screen key will either take a screenshot or open the Snip & Sketch tool, depending on your chosen settings, and your screenshots will be saved in the location you specified.
Tips for Changing Print Screen Settings Windows 11
- Use the Snip & Sketch tool for more flexibility in capturing screenshots.
- Regularly back up your Screenshots folder to avoid losing important images.
- Customize keyboard shortcuts within the Snip & Sketch tool for even quicker access.
- If you share your computer, inform other users about the new print screen settings.
- Check for Windows updates regularly to see if new screenshot features have been added.
Frequently Asked Questions
How do I take a screenshot without the print screen key?
You can use the Snip & Sketch tool by pressing Win + Shift + S.
Can I revert the print screen key to its default behavior?
Yes, you can toggle off the «Use the PrtScn button to open screen snipping» option in the Ease of Access settings.
How do I save screenshots directly to OneDrive?
Enable «Automatically save screenshots I capture to OneDrive» in the OneDrive settings.
What if my screenshots are not saving?
Check the save location settings and ensure you have write permissions to that folder.
Can I customize the screenshot file format?
By default, screenshots are saved as PNG files, but you can convert them using an image editor.
Summary
- Open Settings
- Navigate to Ease of Access
- Modify Keyboard Settings
- Toggle Print Screen Key
- Change Screenshot Save Location
- Apply Changes
Conclusion
Changing print screen settings in Windows 11 is a quick way to customize how you capture and save screenshots. Whether you want to make the PrtScn key open the Snip & Sketch tool or simply change the save location for your screenshots, the steps outlined above will help you achieve that with ease.
Screenshots are more than just a way to capture your screen; they can be an essential tool for work, study, and play. By customizing your print screen settings, you make capturing and organizing screenshots more efficient.
Feel free to explore additional features within the Snip & Sketch tool and other Windows 11 settings to further enhance your experience. The more you tailor your system to your needs, the more productive and enjoyable your computer usage will be. Happy screenshotting!
Kermit Matthews is a freelance writer based in Philadelphia, Pennsylvania with more than a decade of experience writing technology guides. He has a Bachelor’s and Master’s degree in Computer Science and has spent much of his professional career in IT management.
He specializes in writing content about iPhones, Android devices, Microsoft Office, and many other popular applications and devices.
Read his full bio here.
If you always take screenshots on Windows 10 and then end up with blurry or low-quality images, you might be eager to know how to take high-resolution screenshots on Windows 10. And that’s what we are going to discuss here. This blog provides some practical ways to help you take HD screenshots on Windows 10/11 hassle-free. Moreover, you will also learn some tips to improve the quality of your screenshots in the end. Now, let’s get started!
Take High-Quality Screenshots on Windows 10/11 with Professional Tool
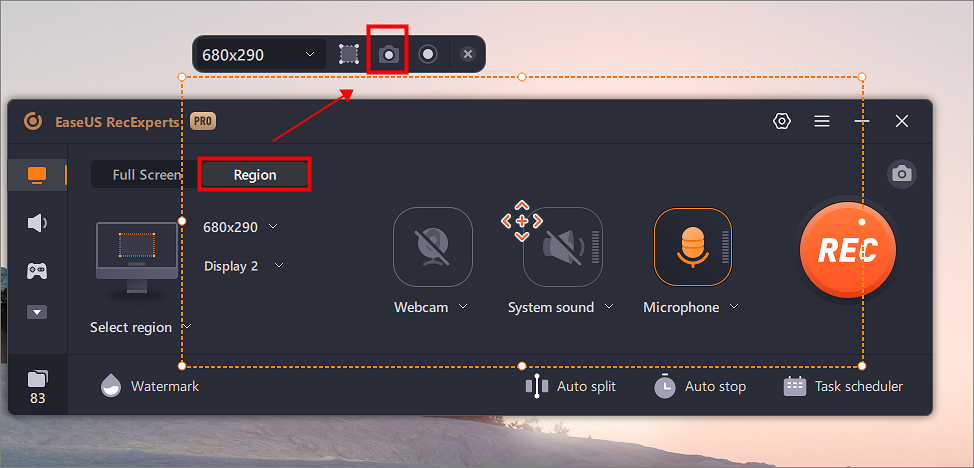
Whether you want to take high-resolution screenshots on Windows 10, 11, or other OS, the easiest way is to use professional screen capture software, like EaseUS RecExperts.
This tool supports taking quick screenshots on your Windows or Mac with one simple click and then exporting the screenshots in PNG format. With its aid, you can choose to take full or partial screenshots flexibly. Moreover, you can use this tool to take HD and even 4K images on your devices. If needed, you can use it to create GIFs on your desktop, as it is also an excellent GIF recorder.
In addition, it is a versatile screen recorder, which supports capturing your screen in up to 8K video resolution without a watermark. To conclude, you cannot miss such a multifunctional program whether you want to take screenshots or screen record on your computer!
Here’s how to take high-quality screenshots on Windows 10/11 with EaseUS RecExperts:
Step 1. Launch this tool and choose your desired area to take a screenshot on your screen. If you want to take a full-screen snapshot, click «Full Screen» and select Display (if there is more than one monitor). Then, click the camera icon in the upper right to start your task.
Step 2. (Optional) If you are going to take a partial screen, choose the Region option. Next, left-click and hold your mouse to select the target region. Once selected, choose the camera icon to snapshot your screen.
Step 3. Finally, you can click Recordings >Pictures to find and view your screenshots.
Share this post with others if you find it worth reading!
Take High-Resolution Screenshots on Windows 10 Directly
Actually, you can directly take high-quality screenshots on your Windows computer without installing other software, but it will be time-consuming, as you need to change some settings. In the following, we will walk you through the steps in detail.
Preparation Before Taking Screenshots on Windows Computers
To ensure you get a high-quality screenshot, you first need to adjust the settings on your PC. Follow the below steps:
Step 1. Click Settings > System > Display.
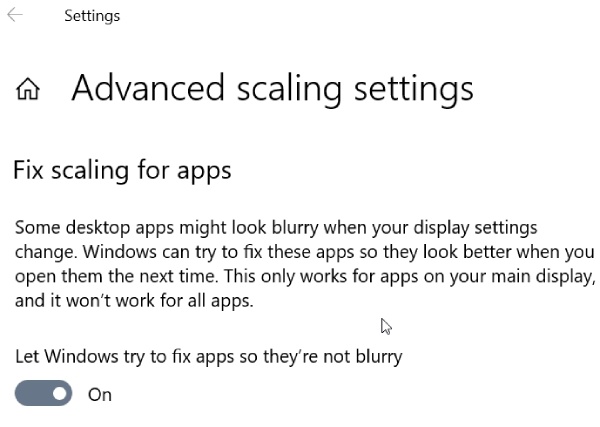
Step 2. Next, choose the Advanced scaling settings under the Scale and layout section.
Step 3. Then, toggle the button next to Let Windows try to fix apps, so they’re not blurry. Enabling this feature will make apps on your main display look better.
Step 4. (Optional) Also, you can enter a custom scaling size between 100 — 500. Once done, click Apply to allow the changes to take effect.
- Notice:
- It might cause some texts, apps, or items to be unreadable if your display doesn’t support the size.
Begin Taking High-Resolution Screenshots on Windows 10
Once the settings change, you can start taking screenshots on your Windows 10 PC. There are various ways you can adopt in the following:
Method 1. Use Shortcut
Press the PrtScn or PrintScreen key on your keyboard to take full, high-quality screenshots.
Method 2. Use Snipping Tool
Another way is to use the built-in Snipping Tool on your Windows computers.
Step 1. Enter the snipping tool in the search box to open it.
Step 2. Choose the mode in which you want to take screenshots, including rectangular, whole window, or full screen.

Method 3. Use the Xbox Game Bar
We all know that it is the built-in Windows 10 screen recorder. However, apart from that, it is also can be used as a screen capture tool:
Step 1. Press the Windows key + G to open it.
Step 2. Click Capture (a camera icon) to take screenshots.
Learn More: What Affects The Screenshots’ Quality
After learning how to take high-quality screenshots on Windows, it is also necessary to know the factors that will affect the quality of your screenshots. If you need to take high-resolution screenshots on your Mac or mobile devices, you can get the task done easily.
| Factors | Explanation |
| Resolution | The resolution of the device or computer screen where the screenshot is taken will impact its quality. Higher-resolution screens generally produce better-quality screenshots. |
| Display settings | The color accuracy and contrast settings of the display device can impact the quality of the screenshot. |
| File format | Lossless file formats like PNG or TIFF preserve more detail and result in better quality screenshots than compressed formats like JPEG. |
| Hardware capabilities | The performance and capabilities of the device or computer used to capture the screenshot can influence its quality. Higher-end devices with better graphics processing units (GPUs) may produce higher quality screenshots. |
Final Words
This page provides some workable ways to help you take high-quality screenshots on a Windows 10 computer. Among those solutions, we highly recommend EaseUS RecExperts. This professional tool lets you take screenshots in one simple click without losing quality! Download it and have a try now.
Take High-Resolution Screenshots on Windows 10 FAQs
1. How do you get higher-quality screenshots?
To get higher-quality screenshots, you need to make sure your device’s display resolution is set to the highest level and avoid zooming in while taking screenshots. Besides, you can also choose some professional screenshots apps to enhance your images.
2. How do I take a high-resolution screenshot in Chrome?
You can check out the following steps to take high-resolution screenshots in Chrome:
- Open Chrome dev tools and device mode.
- Choose preset Resonsive and set DPR to 3.0
- Then press Ctrl + Shift + P and type Capture Fullsize Screenshot
3. Why are Windows screenshots blurry?
- The display settings on your computer aren’t calibrated correctly.
- Windows saves screenshots in a compressed format,
- The content on the screen is scaled or zoomed in
- Low screen resolution
- Outdated or incompatible graphics card drivers