
В предыдущих версиях Windows пользователь мог изменить системные звуки в «Панель управления» — «Звук» на вкладке «Звуки». Точно так же этом можно сделать и в Windows 10, но в списке доступных для изменения звуков отсутствуют «Вход в Windows», «Выход из Windows», «Завершение работы Windows».
В этой краткой инструкции — о том, как вернуть возможность изменять звуки входа (мелодию запуска) Windows 10, выхода из системы и выключения компьютера (а также разблокировки компьютера), если по какой-то причине стандартные звуки для этих событий вас не устраивают. Возможно также пригодится инструкция: Что делать, если не работает звук в Windows 10 (или работает неправильно).
Включение отображения отсутствующих системных звуков в настройке звуковой схемы
Для того, чтобы появилась возможность изменять звуки входа, выхода и выключения Windows 10, потребуется воспользоваться редактором реестра. Для его запуска либо начните вводить regedit в поиске на панели задач, либо нажмите клавиши Win+R, введите regedit и нажмите Enter. После этого выполните следующие простые шаги.
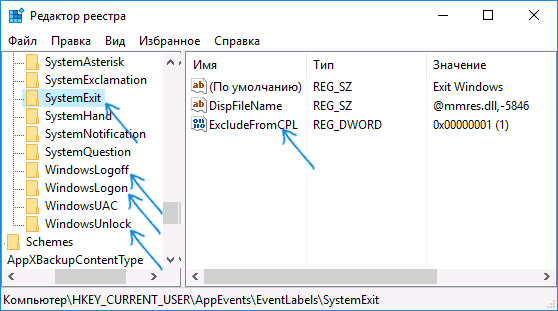
- В редакторе реестра перейдите к разделу (папки слева) HKEY_CURRENT_USER\ AppEvents\ EventLabels.

- Внутри этого раздела обратите внимание на подразделы SystemExit, WindowsLogoff, WindowsLogon и WindowsUnlock. Они соответствуют завершению работы (хоть это здесь и называется SystemExit), выходу из Windows, входу в Windows и разблокировке системы.
- Для того, чтобы включить отображение любого из этих пунктов в настройке звуков Windows 10, выберите соответствующий раздел и обратите внимание на значение ExcleudeFromCPL в правой части редактора реестра.
- Кликните по значению дважды и измените его значение с 1 на 0.
После того, как вы выполните действие для каждого из нужных вам системных звуков и зайдете в настройки звуковой схемы Windows 10 (это можно сделать не только через панель управления, но и через правый клик по значку динамика в области уведомлений — «Звуки», а в Windows 10 1803 — правый клик по динамику — параметры звука — открыть панель управления звуком).

Там вы увидите необходимые пункты с возможностью изменять звук для включения (не забудьте отметить пункт Проигрывать мелодию запуска Windows), выключения, выхода и разблокировки Windows 10. Обновление: для изменения мелодии запуска в Windows 10 последних версий потребуется выполнить шаги, описанные в этой инструкции.
Вот и всё, готово. Инструкция получилась действительно компактной, но, если что-то не получается или работает не так, как ожидается — задавайте вопросы в комментариях, будем искать решение.
Older Windows versions were able to play a startup sound, a separate logon sound. A sound could also play when Windows logs off or when it shuts down. The user could assign all these sounds from Control Panel -> Sound. Starting with Windows 8, sounds for these events have been eliminated almost entirely. Let’s see how to play the shutdown sound in Windows 10.
In Windows 10, Microsoft focused on making Windows boot and shut down faster. Developers of the OS had completely removed the sounds which play at logon, log off and shutdown. Even if you assign sounds to the events for ‘Exit Windows’, ‘Windows Logon’ and ‘Windows Logoff’ or try to restore these events using the Registry, they will not play. There is the official statement from Microsoft which explains the situation.
«We removed these sound events for performance reasons. We pay a lot of attention to how quickly the machine powers on, powers off, goes to sleep, resumes from sleep, etc. As part of speeding this up, we experiment a lot with what process is in control of the startup and shutdown sounds. In an interim build of Windows 8 while it was under development, we were able to speed things up considerably by moving the shutdown sound from Explorer.exe (which is running while you’re still logged on) to Logonui.exe (which is the process that shows the «Shutting down» circle.)
However moving the shutdown sound this late started running into other problems. The code we use to play the sound (the PlaySound API) needs to read from the registry (to see what the preferences for this sound were) and from the disk (to read the .wav file), and we ran into issues where the sound was unable to play (or got cutoff halfway) because we had shut down the registry or the disk already! We could have spent time rewriting the API but we decided the safest and most performant thing to do was to eliminate the sound altogether.»
Note: The startup sound remained in Windows 10 but it is disabled by default. You need to enable it manually if required. See the following article:
Enable startup sound in Windows 10
Additionally, Windows 10 comes with a fast startup/hybrid boot feature. Due to this feature, when you click Shut down, it logs you out and hibernates the kernel and powers off; it doesn’t really exit Windows. When you turn on your Windows 10 device again, it resumes from hibernate and logs in again. This is different from booting after a full shut down.
In a previous article, I’ve covered how to play a sound at logon. See
How to Play the Logon Sound in Windows 10
Here are instructions to revive the Shutdown sound. The solution is to simply use the Windows event log system to play the sound.
The Shut Down event
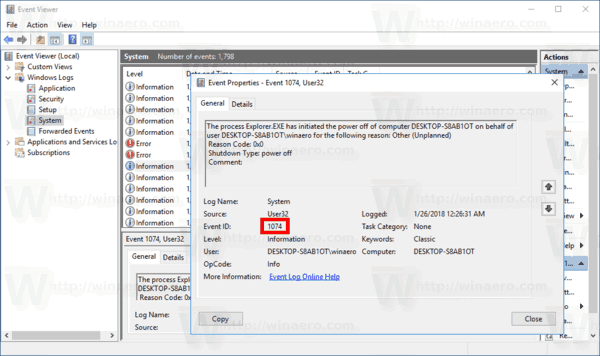
We need to create a task in Task Scheduler attached to a special Shut Down event. The event we need has ID 1074 = User Initiated Shutdown, as shown in the following screenshot.
Task Scheduler is able to run tasks attached to any event, so specifying our script as the task’s action will make it play the sound every time you shut down the OS. To play the sound, we have to use PowerShell.
Method limitations
- This method only works when you know and can use credentials for an administrative user account.
- It doesn’t work if your user account has no password.
- It might not work if you have Fast Startup disabled.
Unfortunately, there is no way to bypass these limitations. The method is very tricky and doesn’t work reliable. You’ve been warned.
Play the Shutdown Sound in Windows 10
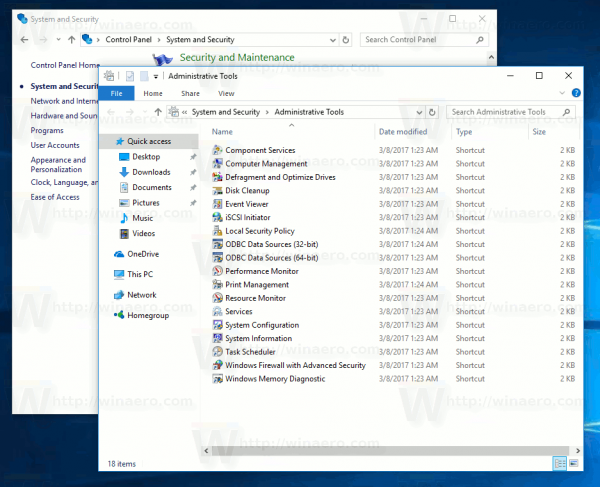
- Open Administrative Tools.
- Click the Task Scheduler icon.

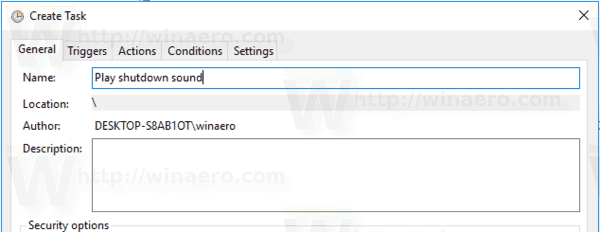
- In the Task Scheduler library, click on the Create Task… link on the right.

- In Create Task dialog, fill in the Name box some meaningful text like «Play shutdown sound».

- Set the options as follows:
— Configure for Windows 10.
— Run whether user is logged on or not
— Run with highest privileges box
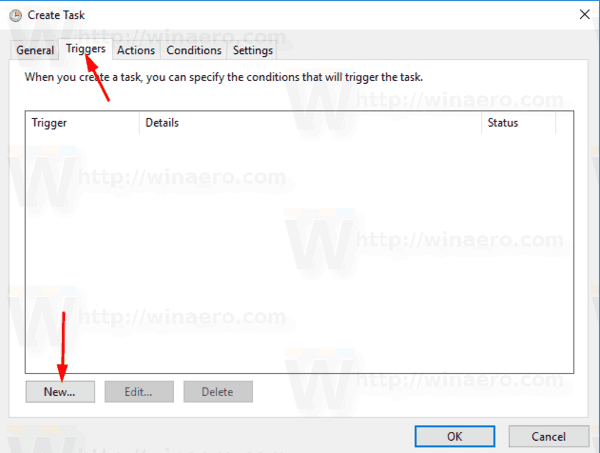
- Switch to the Triggers tab and click on the New… button.

- Set the event for the trigger to On an event.
- Select System in the drop down list under Log.
- Enter the value 1074 in the Event ID text box.

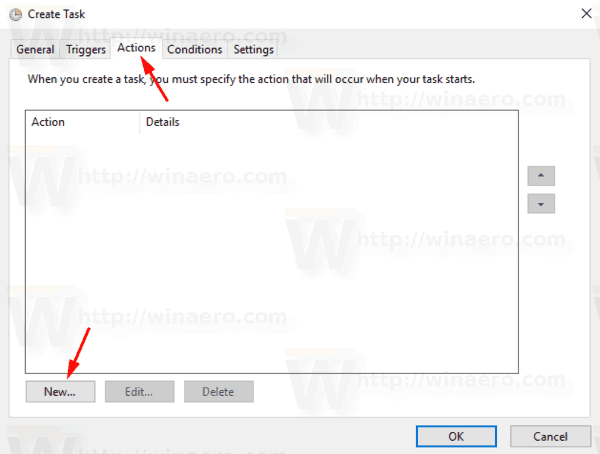
- Switch to the Actions tab and click on the New… button.

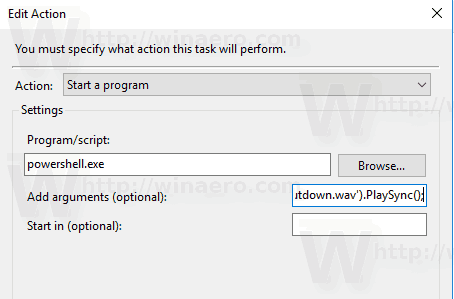
- In the next dialog, set the action type to Start a program.
- In the Program box, specify powershell.exe as the program.
- Type the next text into the Add arguments text box:
-c (New-Object Media.SoundPlayer 'C:\Windows\Media\Windows Shutdown.wav').PlaySync();
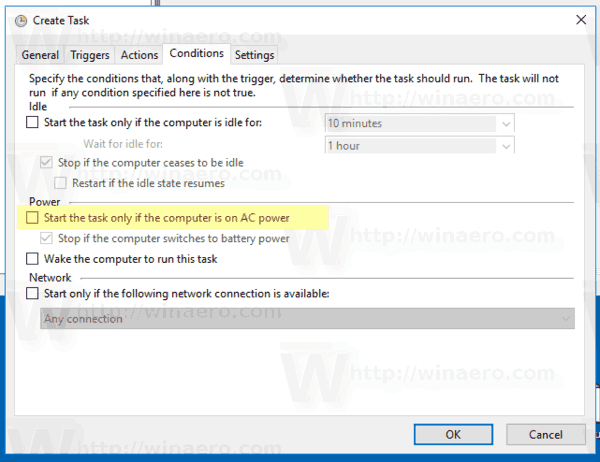
- Switch to the Conditions tab and disable the option Start the task only if the computer is on AC power.

- Click on the OK button to create the task.
- Type your user account password (or other administrative user account credentials).

You are done!
This newly assigned sound will play when you shut down the device. For extra sound files, check out the WinSounds.com web site. It comes with a large collection of sounds for Windows.
Note: I am using the default shutdown sound file which comes with Windows 10. It is short and nice. You can use any WAV file you want. Just provide the correct path in the task.
This trick also applicable to Windows 8 and Windows 8.1.
In the comments, please tell if this method works for you or not. Please specify which Windows 10 version and build number you are running, and if you have the Fast Startup feature disabled or enabled.
Support us
Winaero greatly relies on your support. You can help the site keep bringing you interesting and useful content and software by using these options:
If you like this article, please share it using the buttons below. It won’t take a lot from you, but it will help us grow. Thanks for your support!
If you want to play a sound when you shut down, lock, or unlock your Windows 11/10 computer, then this article will show you how to do it. Although Microsoft removed this functionality to improve the performance and user experience, you can use the Task Scheduler to perform this task.

To create an automated task to play a shutdown sound, you must sign in as an administrator. Also, if you want to play custom audio, you need to convert your regular .mp3 file to .wav format.
To play a sound when you Shutdown, Lock, or Unlock Windows 11/10, follow these steps:
- Open the Task Scheduler app.
- Create a new task.
- Configure system shutdown as the ‘trigger’
- Configure an action to play custom sound using a PowerShell script.
- Save the task.
Let us have a detailed look at these steps.
1] Open the Task Scheduler app
Type ‘task scheduler’ in the Windows Search bar and click Open next to the Task Scheduler app that appears on top of the search results.
2] Create a new task

Now, you need to select Task Scheduler Library on the left side and click on the Create Task button on your right side.
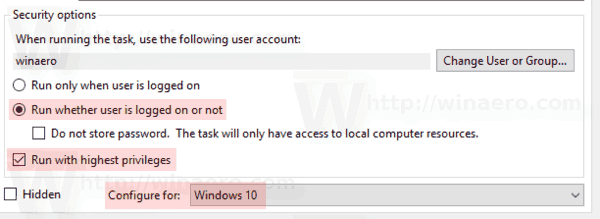
In the General tab, write the name of your task in the Name field on top. Then under the Security options section, select the ‘Run whether user is logged on or not‘ option, and select the Run with highest privileges checkbox.

After that, expand the Configure for drop-down list at the bottom and select Windows 10. Windows 11 users should also select the ‘Windows 10’ option. This option works with both Windows 11/10.
3] Configure system shutdown as the ‘trigger’

Next, you need to switch to the Triggers tab and click the New button.
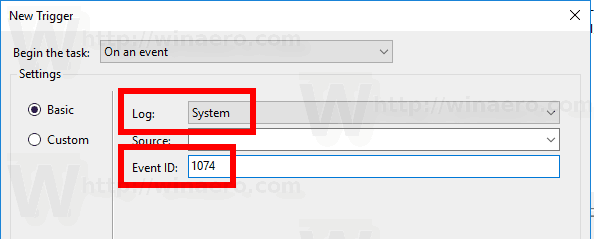
In the New Trigger window, select On an event from Begin the task drop-down list, System from the Log drop-down list, and enter 1074 as the Event ID. 1074 represents user-initiated shutdown.
Click OK to continue.
4] Configure an action to play custom sound using a PowerShell script

Next, you need to switch to the Actions tab and click the New button.
In the New Action window, select Start a program from Action drop-down list, write PowerShell in the Program/Script box, and enter the following argument in the Add arguments box-
-c (New-Object Media.SoundPlayer 'C:\Windows\Media\Windows Shutdown.wav').PlaySync();
C:\Windows\Media\Windows Shutdown.wav is the default shutdown sound.
If you want to use custom audio, you need to place the audio file in the C:\Windows\Media\ folder and select the path in the argument.
After clicking the OK button, you need to go to the Conditions tab. From here, you need to uncheck the Start the task only if the computer is on AC power option.

5] Save the task
Click OK to save the task. Now you should see a prompt where you have to enter the user account password. Enter the password and click OK.

If you do that successfully, a new task will be created and your Windows 11/10 system will play the set sound when you shut down the PC.
If you want to play a sound when you Lock or Unlock your Windows 11/10 computer, you can follow the same steps. The only difference is that you need to select On workstation lock or On workstation unlock under the Begin the task dropdown in the New Trigger window.
That’s all! I hope you find this useful.
Read: How to disable System Beep in Windows.
How do I play Windows startup sound?
Click the Start button icon on your Windows 11/10 PC and select Settings. The Settings window will appear. Navigate to Personalisation > Themes. Then click the Sounds option on top. The Sound dialogue will appear. Check the ‘Play Windows Startup sound‘ option to enable the Windows startup sound.
Does Windows 11 have a shutdown sound?
Microsoft has removed the logon, logoff, and shutdown sound in newer versions of Windows to make it boot or shutdown faster. However, there are workarounds to enable the shutdown sound in Windows 11. You can create an automated task in the Task Scheduler app to play a custom sound when you shut down Windows. Alternatively, you can create a PowerShell script to play a shutdown sound and set it up for your Windows 11 PC using the Group Policy Editor.
Read Next: Make Windows greet you with a custom Welcome Voice Message & Sound.
Readers help support Windows Report. We may get a commission if you buy through our links.
Read our disclosure page to find out how can you help Windows Report sustain the editorial team. Read more
In earlier Windows editions, users could change Windows 10 shutdown sound easily. However, Microsoft sacrificed the sound settings for faster shutdown and the Fast Startup feature in Windows 10.
In the following section, we’ll walk you through the steps for changing your Windows 10 startup/shutdown sound.
Is there a Windows 10 startup sound?
No, Windows 10 doesn’t have a startup or shutdown sound. This is a design choice by Microsoft, and there are a few reasons for it:
- Focus on mobility – Microsoft is focused on developing portable devices, such as Surface Book 3. With devices that you frequently start or wake up, the shutdown or startup sound could become irritating rather quickly.
- Faster startup – In order to optimize startup speed, Microsoft removed certain functionality, including the one in charge of playing sounds.
How do I change the Windows 10 startup & shutdown sound?
1. Disable fast startup
- Right-click on the battery icon on your taskbar and select Power Options.

- Now, from the right window pane, click on Additional power settings.

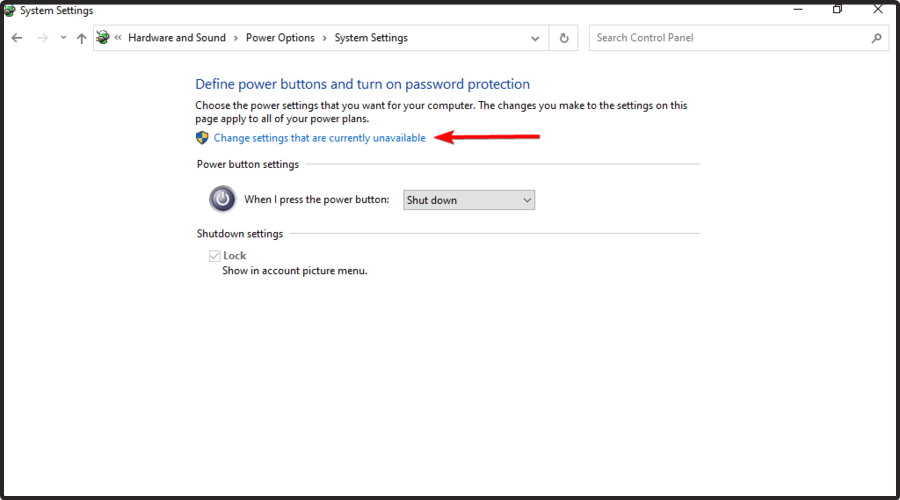
- Select the Choose what the power button does option on the left.
- Click on Change settings that are currently unavailable.
- In Shutdown settings, unmark the checkbox beside Turn on fast startup (recommended).
- Hit the Save changes button below.


2. Turn on the startup sound
- Press the Windows + I keys combination.
- Go to Personalization.
- Select Themes from the left panel.
- Click on Sounds.
- Check the box beside Play Windows Start-up sound.

- Click on the OK button.


3. Enable the startup and shutdown sounds from Windows Registry
- Press the Windows + R to open the Run dialog box.
- There, type regedit and press Enter.

- Navigate to:
HKEY_CURRENT_USER/AppEvents/EventLabels

At this point, the next step is to activate the startup and shutdown sounds.
3.1 Enable the startup sound
- Find WindowsLogon and double-click on ExcludeFromCPL.

- Modify the Value data from 1 to 0.

- Hit the OK button to save it.


- Microsoft releases Windows 10 (KB5058379/ KB5058392 / KB5058383/ KB5058387) May 2025 Patch Tuesday
- Microsoft extends Microsoft 365 apps support on Windows 10 to 2028
- Microsoft pushes Windows 11, but this project wants you to switch to Linux instead
- Microsoft addresses Windows 10 broken jump lists and says it’s now fixed
- Microsoft updates Copilot app with guided tour for new users
3.2 Enable the shutdown sound
- Return to EventLabels.
- Click on the SystemExit subkey, then double-click on ExcludeFromCPL.

- Change the Value data from 1 to 0.

- Click on OK.


After doing that, check if your sounds are working properly.
4. Change the startup and shutdown sounds
- Press the Windows + I keys combination to open Settings.
- Navigate to Personalization.
- Go to Themes.
- Click on the Sounds option.
- Find the sound you want to customize from the Program Events list.
- For the startup sound, click on Windows Logon.
- If you need the option for the shutdown sound, click on Exit Windows.
- Pick the music that you want to set as your new startup sound.
- Hit Apply and then the OK button.

5. Create a batch file
- Create a new folder on your Desktop or any other location. You can use any name you want for it.
- Locate sndrec32.exe file and copy it to that directory. This file is available on older versions of Windows, such as Windows XP, so you’ll need a Windows XP or a reliable third-party source.
- Right-click the file and choose Properties.
- Go to the Compatibility tab. Check Run this program as an administrator and click OK to save changes.
- In the same directory, create a new Notepad file and paste the following lines:
C:\PowerOff\sndrec32.exe /embedding /play /close “C:\Windows\Media\Windows Shutdown.wav”
C:\Windows\System32\shutdown.exe /s /t 2 - Go to File and select Save as.
- Choose the save location. Set the Save as type to All files. Next, enter script.bat as the name. Lastly, save the file.

- Use the script.bat file to turn off your PC or create a shortcut on your Desktop for quick access.


So, these are the steps you can use to change the Windows 10 startup sound. Do not hesitate to save them somewhere to access the process whenever you feel like it easily.
Keep in mind that some users reported that sound is not working in Windows 10, and if you ever face the same issue, make sure you check our dedicated fixing guide.
Do you have any related questions? Feel free to share them with us by leaving a comment in the section below.
Vlad Turiceanu
Windows Editor
Passionate about technology, Windows, and everything that has a power button, he spent most of his time developing new skills and learning more about the tech world.
Coming from a solid background in PC building and software development, with a complete expertise in touch-based devices, he is constantly keeping an eye out for the latest and greatest!
Quick Links
-
Add the Actions Back to the Sound Control Panel by Editing the Registry
-
Download Our One-Click Registry Hacks
Before Windows 10 came along, we were free to change the sounds that played when we shut down, logged off, or logged on to Windows. For some reason, Microsoft hid those sound actions from being modified in Windows 10. Here’s how to get them back.
Windows has always been pretty good about letting you customize every nook and cranny of the OS, including what sounds played for all kinds of different system events. You can even make Windows play a sound when you toggle your Caps Lock, Scroll Lock, and Num Lock keys. While you can still customize what sounds sounds play for most OS events, Windows 10 hid shut down, logoff, and logon from view. They’re still around, though. You just need to make a few mild changes in the Windows Registry to get them back.
Add the Actions Back to the Sound Control Panel by Editing the Registry
To add the shutdown, logoff, and logon actions back to the menu in the Sound Control Panel app, you just need to make a few little tweaks in the Windows Registry.
Standard warning: Registry Editor is a powerful tool and misusing it can render your system unstable or even inoperable. This is a pretty simple hack and as long as you stick to the instructions, you shouldn’t have any problems. That said, if you’ve never worked with it before, consider reading about how to use the Registry Editor before you get started. And definitely back up the Registry (and your computer!) before making changes.
Open the Registry Editor by hitting Start and typing “regedit.” Press Enter to open Registry Editor and then give it permission to make changes to your PC.
In the Registry Editor, use the left sidebar to navigate to the following key:
HKEY_CURRENT_USER\AppEvents\EventLabels
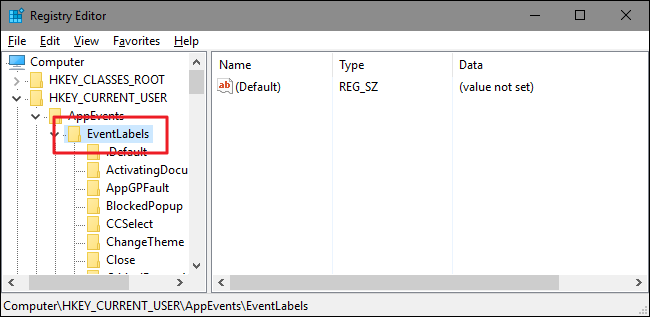
You’re going to be making one small change in each of three different subkeys inside that EventLabels key. First, we’ll tackle the shutdown sound or, as Windows likes to call it, System Exit. Under the EventLabels key on the left side of Registry Editor, select the SystemExit subkey. On the right side, double-click the ExcludeFromCPL value.
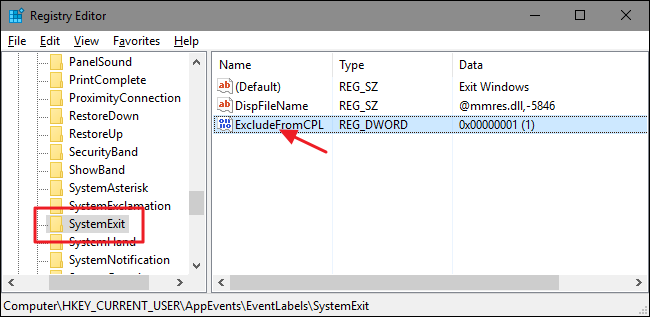
Note that by default, the value is 1, meaning that the action is excluded from the Control Panel. Change the value to 0 and then click «OK.»
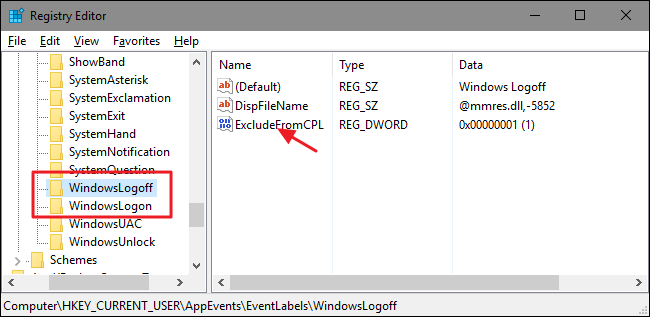
Next, you’re going to make exactly the same change in two other subkeys inside the EventLabels key: WindowsLogoff and WindowsLogon . Head into each of those folders, open the ExcludeFromCPL value inside, and change the value from 1 to 0.
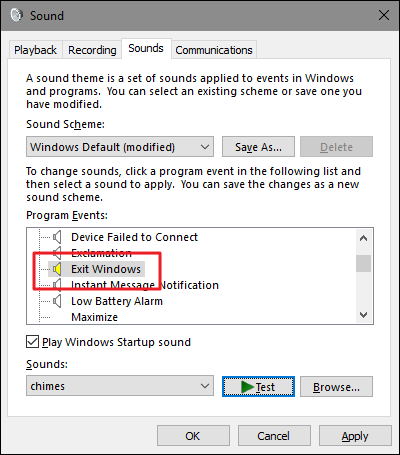
No need to restart Windows. You can go ahead and test your changes right away. Open up the Sound Control Panel app by right-clicking the speaker icon in your Notification Area and selecting «Sounds.»
You should now see the new actions (Exit Windows, Windows Logoff, and Windows Logon) available in the selection window and you can assign whatever sounds you like to those actions.
If, for whatever reason, you want to hide those actions from the Control Panel again, just head back into Registry Editor and change each of those ExcludeFromCPL values back to 1.
Download Our One-Click Registry Hacks

If you don’t feel like diving into the Registry yourself, we’ve created some registry hacks you can use. Download and unzip them first. Inside, you’ll find three folders named «System Exit Sound Hacks,» «Windows Logon Sound Hacks,» and «Windows Logoff Sound Hacks.» Inside each of those folders, you’ll find two hacks: one for adding the action to the Sounds Control Panel and one for removing the action again. Double-click the hack you want to use and click through the prompts. When you’ve applied the hack you want, the changes will take place immediately. No need to restart Windows.
Shutdown-Logoff-Logon Sound Hacks
These hacks are really just the individual SystemExit, WindowsLogoff, and WindowsLogon subkeys, stripped down to the ExcludeFromCPL values we talked about in the previous section and then exported to a .REG file. Running either of the hacks sets that value to the appropriate number. And if you enjoy fiddling with the Registry, it’s worth taking the time to learn how to make your own Registry hacks.