
Applies ToWindows 11 Windows 10
Эта статья поможет использовать Редактор метода ввода (IME) (Майкрософт), включая параметры, функции и сочетания клавиш.
Совет: В этой статье используются ссылки, которые напрямую открывают параметры IME в приложении «Параметры». Сведения о том, как вручную получить доступ к параметрам IME в приложении «Параметры», см. в разделе Параметры Microsoft IME в этой статье.
Пользовательский интерфейс
В окне Прогнозирование кандидатов предлагаются кандидаты typeahead.
Общие операции
|
В этом состоянии |
Клавиши |
Действие |
|---|---|---|
|
Перед тем как фокус попадет в окно кандидатов |
TAB |
Введите окно кандидата прогноза. |
|
SHIFT+TAB |
Введите окно кандидата прогноза. |
|
|
СТРЕЛКА ВНИЗ |
Введите окно кандидата прогноза. |
|
|
СТРЕЛКА ВВЕРХ |
Введите окно кандидата прогноза. |
|
|
С фокусом внутри окна кандидатов |
TAB |
Переместите выбранное вниз. |
|
SHIFT+TAB |
Переместите выбранное вверх. |
|
|
СТРЕЛКА ВНИЗ |
Переместите выбранное вниз. |
|
|
СТРЕЛКА ВВЕРХ |
Переместить выбранное вверх. |
|
|
Число |
Выбор соответствующего кандидата. |
|
|
ВВОД |
Выбор кандидата, на котором фокус. |
Другие функции
-
Предлагаемые кандидаты можно настроить в параметрах Microsoft IME > общие > прогнозные входные данные.
-
Используйте журнал входных данных.
-
Используйте системный словарь.
-
Использование служб предложений. Если этот параметр включен, все написанное шифруется и отправляется в корпорацию Майкрософт для получения текстовых предложений от Bing.
-
-
Щелкните значок крестика или нажмите клавиши CTRL + DELETE , чтобы удалить выбранного кандидата.
Примечание: Некоторые кандидаты не могут быть удалены, например даты.
-
Чтобы выполнить поиск выбранного кандидата в Интернете, щелкните значок лупы или нажмите клавиши CTRL + B.
В окне Преобразование кандидата предлагаются кандидаты, чтение которых соответствует типизированному.
Общие операции
|
В этом состоянии |
Клавиши |
Действие |
|---|---|---|
|
Перед тем как фокус попадет в окно кандидатов |
Космос |
Первое нажатие: Преобразование того, что вы вводите. 2-е нажатие: откройте окно кандидата на преобразование. |
|
SHIFT+ПРОБЕЛ |
Первое нажатие: Преобразование того, что вы вводите. 2-е нажатие: откройте окно кандидата на преобразование. |
|
|
С фокусом внутри окна кандидатов |
Космос |
Переместите выбранное вниз. |
|
SHIFT+ПРОБЕЛ |
Перемещение выбранного вверх (шаблон Microsoft IME) или вниз (шаблон ATOK). |
|
|
СТРЕЛКА ВНИЗ |
Перемещение выделенного фрагмента вниз (шаблон Microsoft IME) или выбор кандидата с фокусом (шаблон ATOK). |
|
|
СТРЕЛКА ВВЕРХ |
Переместите выбранное вверх. |
|
|
TAB |
Развернуть до представления таблицы. |
|
|
Номер |
Выбор соответствующего кандидата. |
|
|
ВВОД |
Выбор кандидата, на котором фокус. |
Другие функции
-
IME может повысить точность ввода в зависимости от типа. Эту функцию можно включить ивыключить с помощью параметра Повышение точности ввода в зависимости от того, что я вводю на этом компьютере в параметрах Microsoft IME > обучение и словарь.
-
Новое слово можно добавить в словарь IME вручную с помощью одного из следующих методов:
-
Откройте средство пользовательского словаря в параметрах Microsoft IME > Обучение и словарь.
-
Щелкните правой кнопкой мыши значок параметров IME в области панели задач и выберите Добавить Word.
-
-
Системные словари можно включить ивыключить в разделе Системные словари в параметрах Microsoft IME > обучение и словарь.
Сочетания клавиш
IME предлагает ключи или сочетания клавиш для использования функций IME.
|
Клавиши |
Действие |
|---|---|
|
Ханаку/Дзенкаку |
Включение или отключение ввода на японском языке. |
|
Eisu (CAPS LOCK) |
Переключение между хираганой и буквенно-цифровым режимом. |
|
Хирагана |
Переход в режим хираганы. |
|
ALT+Хирагана |
Переключение между вводом Кана и вводом Ромадзи. Необходимый компонент: Включите параметр Переключить входные данные Кана/Ромаджи с помощью клавиш ALT+ Катакана Хирагана Ромаджи в параметрах Microsoft IME > Общие. |
|
SHIFT+Хирагана |
Переход в режим Катаканы. |
|
CONVERT |
Рековерсия. |
|
CTRL+Преобразовать |
Откройте контекстное меню IME (контекстное меню). |
|
NONCONVERT |
Переключение между хираганой, полноширинной катаканой и полуширинной катаканой. |
|
SHIFT+NonConvert |
Переключение между полуширинным буквенно-цифровым режимом и полноширинным буквенно-цифровым режимом. |
|
ImeOn (あ ключ) *1 |
Переход в режим хираганы. |
|
ALT + ImeOn (あ клавиша) *1 |
Переключение между вводом Кана и вводом Ромадзи. Необходимый компонент: Включите параметр Переключить входные данные Кана/Ромаджи с помощью клавиш ALT+ Катакана Хирагана Ромаджи в параметрах Microsoft IME > Общие. |
|
CTRL +ImeOn (あ клавиша) *1 |
Рековерсия. |
|
SHIFT + ImeOn (あ клавиша) *1 |
Переход в полноширинный режим катаканы. |
|
ImeOff (ключ A ) *1 |
Переход в полуширинный буквенно-цифровой режим. |
|
CTRL+ImeOff (клавиша A ) *1 |
Переключение между хираганой, полноширинной катаканой и полуширинной катаканой. |
|
SHIFT + ImeOff (клавиша A ) *1 |
Переключение между полноширинными буквенно-цифровыми символами, начинающимися с заглавной буквы, заглавными буквами и первыми заглавными буквами. |
*1: клавиши ImeOn (あ) и ImeOff (A) доступны на определенных японских аппаратных клавиатурах.
Дополнительные сведения для разработчиков см. в статье Keyboard Japan — ImeOn / Реализация ImeOff.
|
Клавиши |
Действие |
|---|---|
|
Ханаку/Дзенкаку |
Включение или отключение ввода на японском языке. |
|
Eisu (CAPS LOCK) |
Переключение между хираганой и буквенно-цифровым режимом. |
|
Хирагана |
Переключение между хираганой и буквенно-цифровым режимом. |
|
ALT+Хирагана |
Переключение между вводом Кана и вводом Ромадзи. Необходимый компонент: Включите параметр Переключить входные данные Кана/Ромаджи с помощью клавиш ALT+ Катакана Хирагана Ромаджи в параметрах Microsoft IME > Общие. |
|
SHIFT+Хирагана |
Переход в режим Катаканы. |
|
Преобразование |
Включение или отключение ввода на японском языке. |
|
SHIFT+ПРЕОБРАЗОВАНИЕ |
Рековерсия. |
|
NONCONVERT |
Переключение между хираганой и полуширинным буквенно-цифровым режимом. |
|
CTRL+NonConvert |
Переключение между хираганой, полноширинной катаканой и полуширинной катаканой. |
|
SHIFT+NonConvert |
Переключение между хираганой, полноширинным буквенно-цифровым режимом и полуширинным буквенно-цифровым режимом. |
|
ImeOn (あ ключ) *1 |
Переход в режим хираганы. |
|
ALT + ImeOn (あ клавиша) *1 |
Переключение между вводом Кана и вводом Ромадзи. Необходимый компонент: Включите параметр Переключить входные данные Кана/Ромаджи с помощью клавиш ALT+ Катакана Хирагана Ромаджи в параметрах Microsoft IME > Общие. |
|
CTRL +ImeOn (あ клавиша) *1 |
Рековерсия. |
|
SHIFT + ImeOn (あ клавиша) *1 |
Переход в полноширинный режим катаканы. |
|
ImeOff (ключ A ) *1 |
Переход в полуширинный буквенно-цифровой режим. |
|
CTRL+ImeOff (клавиша A ) *1 |
Переключение между хираганой, полноширинной катаканой и полуширинной катаканой. |
|
SHIFT + ImeOff (клавиша A ) *1 |
Переключение между полноширинными буквенно-цифровыми символами, начинающимися с заглавной буквы, заглавными буквами и первыми заглавными буквами. |
*1. Клавиши ImeOn (あ) и ImeOff (A) доступны на определенных японских аппаратных клавиатурах.
Дополнительные сведения для разработчиков см. в статье Keyboard Japan — ImeOn / Реализация ImeOff.
|
Клавиши |
Действие |
|---|---|
|
CTRL+DELETE |
Удалите выбранного кандидата из окна кандидата прогноза. |
|
CTRL+B |
Выполните поиск выбранного кандидата в окне прогнозирующего кандидата. |
|
TAB |
Разверните или свернуть представление таблицы в окне кандидата преобразования. |
|
Клавиша Windows +точка (.) |
Открытие средство выбора эмодзи. |
|
CTRL+SHIFT+F10 |
Включение или отключение частного режима IME. |
|
F6 |
Преобразование вводной строки в хирагану. |
|
F7 |
Преобразование вводной строки в полноширинную катакану. |
|
F8 |
Преобразование вводной строки в полуширинную катакану. |
|
F9 |
Преобразование вводной строки в полноширинный буквенно-цифровой режим. |
|
F10 |
Преобразование вводной строки в полуширинный буквенно-цифровой режим. |
Настройка клавиш
С помощью IME можно изменить определенную функцию ключей в параметрах Microsoft IME > настройке ключа и сенсорного ввода.
-
Шаблон ключа. Шаблон ключа — это набор конфигураций ключей. IME предлагает следующие шаблоны:
-
Microsoft IME.
-
ATOK.
Дополнительные сведения см. в разделе сочетаний клавиш этой статьи.
-
-
Назначение ключа. Если вы хотите настроить определенную функцию ключа в выбранном шаблоне, можно настроить несколько ключей в разделе Назначение ключа.
Параметры Microsoft IME
Для открытия параметров Microsoft IME можно использовать следующие методы:
Щелкните правой кнопкой мыши значок параметров IME в области панели задач и выберите Параметры.
Перейдите к параметрам Microsoft IME в приложении Параметры :
-
Нажмите кнопку Пуск , а затем выберите Параметры > время & язык > язык & регион .
Или
Выберите следующий ярлык «Язык > & время & язык &»:
«Время & язык > язык & регион
-
В окне Время & язык > язык & регионе в разделе Язык выберите многоточие рядом с пунктом Японский , а затем выберите Параметры языка.
-
В окне & язык > язык & регион > параметры в разделе Клавиатуры выберите многоточие рядом с элементом Microsoft IME , а затем выберите Параметры клавиатуры.
Используйте следующий ярлык Microsoft IME , чтобы напрямую открыть параметры Microsoft IME в приложении Параметры :
Открыть Microsoft IME
Совместимость
Microsoft Японский IME доступен в поддерживаемых в настоящее время версиях Windows. Если возникают проблемы с текущей версией IME, IME поддерживает параметр совместимости, который позволяет использовать предыдущую версию IME. Предыдущую версию IME можно включить, включив в параметрах Microsoft IME > Общие > Использовать предыдущую версию Microsoft IME. IME продолжает улучшаться, поэтому рассмотрите возможность отправки отзывов , чтобы помочь нам предоставить вам отличный опыт ввода.
Как оставить отзыв?
Если у вас возникли проблемы или есть предложения, касающиеся Microsoft IME, оставьте отзыв через Центр отзывов. Выберите один из следующих параметров, чтобы открыть Центр отзывов:
-
Щелкните правой кнопкой мыши значок параметров IME в области области панели задач и выберите отправить отзыв.
Ваш отзыв отправляется непосредственно нашим инженерам, работающим над улучшением IME. Дополнительные сведения о том, как предоставить отзыв, см. в статье Отправка отзывов с помощью приложения центра отзывов.
Нужна дополнительная помощь?
Нужны дополнительные параметры?
Изучите преимущества подписки, просмотрите учебные курсы, узнайте, как защитить свое устройство и т. д.
-
Home
-
Partition Magic
- How to Install and Use Japanese Keyboard on Windows 11/10
By Sherry |
Last Updated
Have you upgraded your Windows 10 to Windows 11? Are you wondering how to install Japanese keyboard on Windows 11 or Windows 10? Don’t worry if you have no idea. You can find a detailed guide in this post from the MiniTool Partition Wizard.
Windows 11 is a new operating system provided by Microsoft. As the successor of Windows 10, Windows 11 comes with many new features and a fresh outlook. The good news is that Windows 11 is free to upgrade.
Whether you are using Windows 10 or Windows 11, if you want to use Japanese keyboard, this post can help.
How to Install Japanese Keyboard on Windows 11
Windows 11 supports a huge number of languages. If you need to type with a second language, you just need to go to Windows Settings to install it. Now, let’s see how to install Japanese keyboard on Windows 11.
Step 1: Press Win + I to open Windows Settings quickly.
Step 2: In the left pane, select Time & language.
Step 3: In the right pane, choose Language & region.
Step 4: Click the Add a language button for the Preferred languages setting.
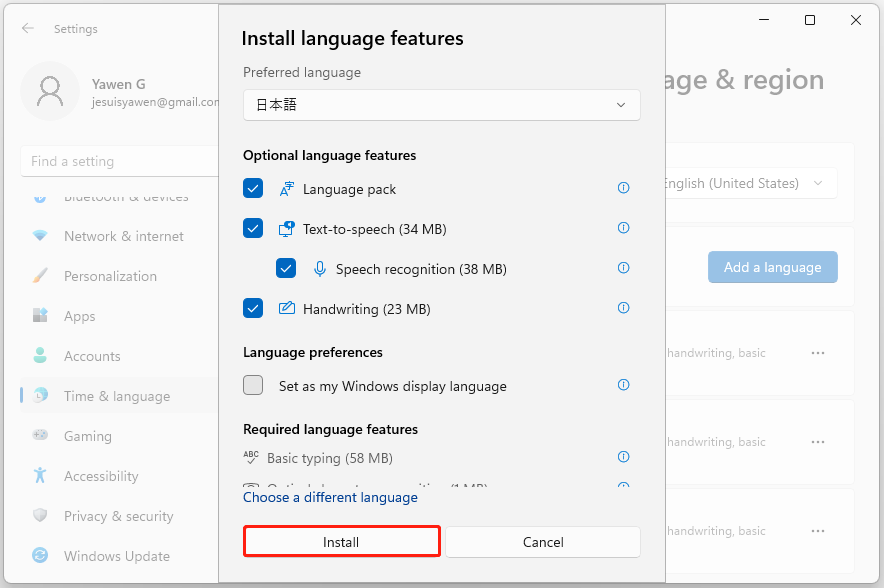
Step 5: In the pop-up window, search for Japanese and select it. Then click Next. On the next page, configure the optional language features and click Install.
Tip: If you want to set Japanese as the system language, you should check Set as my Windows display language here. For more details, you can refer to this post: How to Change the Default System Language in Windows 11?
The installation might take a few minutes. Please wait patiently. Once it the Japanese is installed, you can use the Japanese keyboard.
How to Get Japanese Keyboard on Windows 10
As for how to install Japanese keyboard on Windows 10, you can follow the steps below.
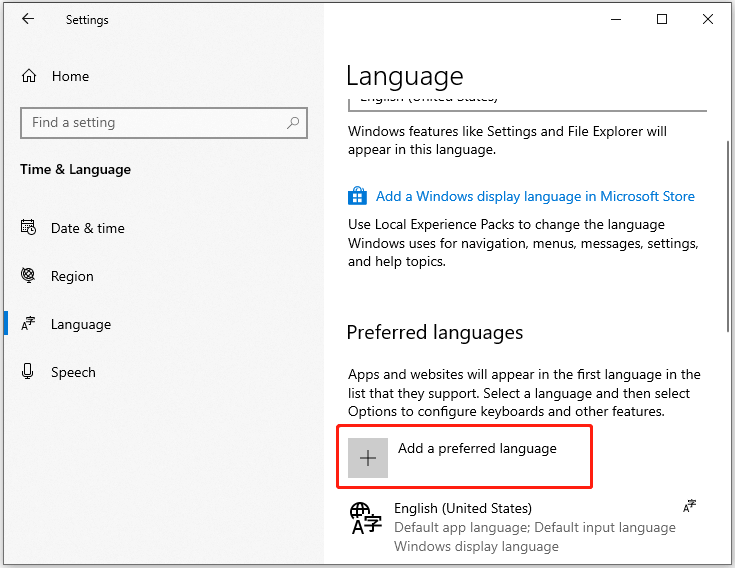
Step 1: Go to Settings > Time & Language > Language.
Step 2: Click the Add a preferred language.
Step 3: Select Japanese and click Next, then configure the optional language features and click Install.
When Japanese is installed successfully, you can move to the next part to see how to use Japanese keyboard.
How to Use Japanese Keyboard
On Windows 10 and 11, you can switch the installed keyboard languages by pressing Win + Space. Just press the keyboard shortcut and select Japanese. Then you can start to use it.
Alternatively, you can click the language icon on the taskbar to change the keyboard language to Japanese.
Now, you might see the alphabet A next to the Japanese input icon, which indicates you are still typing in English. Click the A icon and it will change to Japanese.
If you want to change the Japanese keyboard to different variants, you can right-click the A icon and choose the one you prefer. To use the Japanese keyboard, you can choose the Hiragana option.
Now, you can type Japanese with the English keyboard.
Further Tip: Use a Physical Japanese Keyboard
In addition to installing Japanese keyboard on Windows 10/11, you can also use a physical Japanese keyboard to meet your demands. Just connect the keyboard to your computer and go to Settings > Time & Language. Then select Japanese and click Options > Change hardware keyboard layout to add your keyboard.
About The Author
Position: Columnist
Sherry has been a staff editor of MiniTool for a year. She has received rigorous training about computer and digital data in company. Her articles focus on solutions to various problems that many Windows users might encounter and she is excellent at disk partitioning. She has a wide range of hobbies, including listening to music, playing video games, roller skating, reading, and so on. By the way, she is patient and serious.
Время чтения: 2 мин.
См. также: Windows Vista/7, Windows 8
Настроить Windows 10 так, что бы можно было печатать на японском, крайне просто.
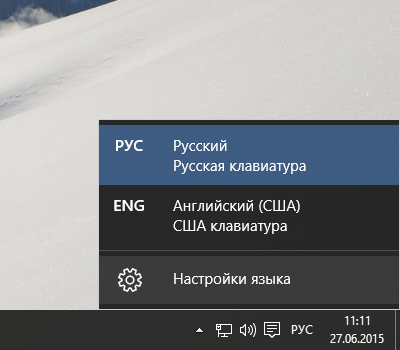
- В панели задач щелкаем левой кнопкой мыши по языковой панели (индикатор текущей раскладки клавиатуры) и выбираем «Настройки языка».

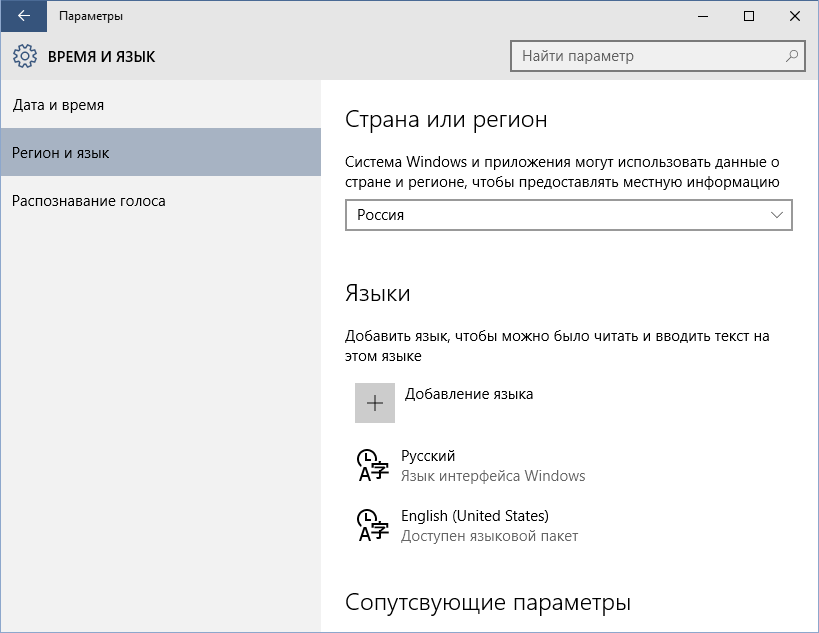
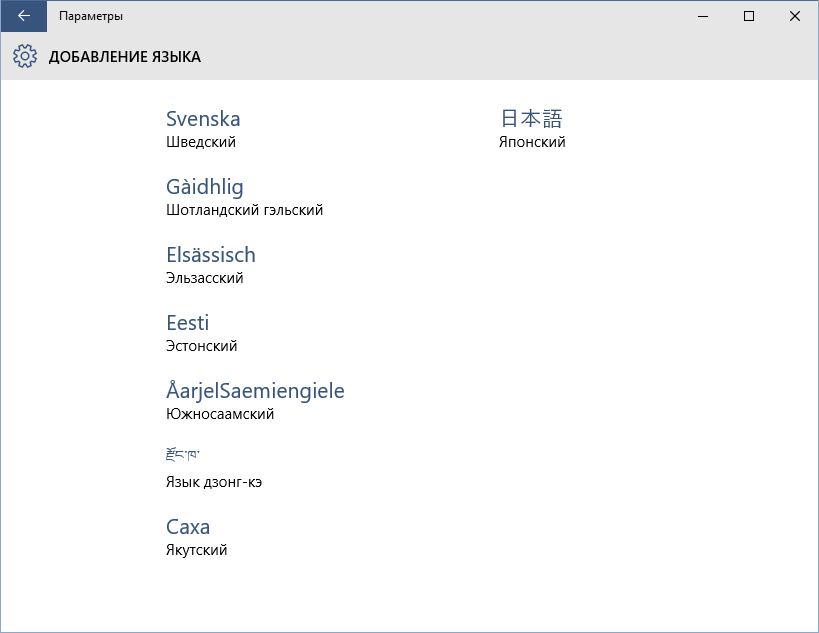
- В открывшемся окне нажимаем «Добавление языка».
- Находим в списке языков японский и щелкаем на него.
- Японский язык должен появиться в списке. Закройте окно.
-
Теперь вы можете переключаться на японскую раскладку как обычно переключаетесь между английской и русской раскладками, используя клавишу Windows+Пробел. Не удивляйтесь: по умолчанию в японской раскладке вводятся те же латинские буквы. Переключение на ввод каны и обратно происходит по нажатию на Alt+~ (тильда).
If you’re wondering how to change the language on your PC, read on for instructions on how to change the Japanese locale in Windows 10. If you want to play Japanese games on your PC, you’ll need to switch the system locale to Japan, since many games don’t display the text in Japanese unless the game’s language is set to Japanese. To change the system locale, you need to log in as an administrator.
Start by going to Start > Control Panel. Click on Regional and Language Options. Double-click on the Regional and Language Options icon. Choose the Administrative language settings. Then, click on Change system locale. You may be prompted to enter your administrator password. Once you’ve made the change, restart your computer. Your changes should take effect soon. If you’re not sure how to change the locale, refer to your Windows documentation.
How Do I Enable Japanese Locale in Windows 10?
To enable Japanese localization on your computer, open Control Panel and click the Regional and Language Options icon. Then, click the language that you prefer. Choose Japanese in the drop-down list. Then, click OK. Then, click OK again. The Japanese Locale will now be set. Now, you should be able to see the Japanese text on your PC. In this article, we will show you how to enable Japanese Locale in Windows 10.
Changing your keyboard layout is as easy as setting up the Japanese input language. To switch from English to Japanese, open the keyboard and click the “A” icon. You should now see the Hiragana character on the keyboard. This is an important step, as typing in Japanese is not easy. Once you’re done, restart your computer. After the restart, you’ll be able to type in Japanese.
To change the system locale of your PC, go to Control Panel. Then, find the Language for non-Unicode programs. Look for the drop-down list under “Change system locale.” You should find the Language of Non-Unicode Programs” and click on it. Then, click on “Change system locale” and select Japanese. After you click the “Change” button, you’ll be able to see the language that Windows uses.
How Do I Change My System Locale in Windows 10?
To change the system locale, open the Control Panel and click on the Language, Region, and time settings. You will then see the Language drop-down menu. Click the Change system locale option and select the Japanese language. This setting will also change the language of programs that don’t support Unicode. After selecting the Japanese language, click OK to save the changes. You can then restart your computer to make the changes take effect.
In the lower right corner of the desktop, click the Language icon and then select “Change system locale.” You will then see the Japanese keyboard. To select it, click the Japanese IME icon that has a stylized “J” in a circle. To type in Japanese, click the “a” icon, which will display Romaji or kana. If you are not logged in as an administrator, click the Windows Update button.
The system locale is an important setting that affects the way your computer interprets non-Unicode text. It can cause problems with non-Unicode applications, like browsers, and even files. In such cases, you should check the BETA option to use Unicode UTF-8 for worldwide language support. Once you’ve done this, the Japanese language will be supported by Windows 10.
How Do I Change My Windows Language to Japanese?
If you have recently moved to Japan and want to learn Japanese, you can change your Windows language to Japanese. Japanese is supported by Windows 10, but it doesn’t come with instructions for setting up the Japanese input method. As a result, users assume that they can use Japanese input in the same way they would any other language. The fact is, though, that switching your Windows language to Japanese might not be as straightforward as it looks.
To change the language of Windows, go to your system’s settings and find the “Language” setting. Click on this link and choose “Japanese” as the language. If you select “Japanese”, you will have to log out of your current account and sign in as the user you’ve changed your language to. After this, your PC will display everything in Japanese. To switch back to English, simply log out and sign in again.
How Do I Change My Locale to Japan?
How do I change the language on Windows 10? The system locale allows non-Unicode programs to use the language that the user has selected. By default, the operating system sets the locale to the default en-US locale, so Japanese text in a game will not appear. To change the system locale, start by logging in to your computer as an administrator. Note that changing the system locale will not affect the language that appears on menus or dialog boxes, nor will it affect programs that use Unicode.
In addition to Windows’ system locale, the Japanese keyboard layout can be set in the start menu. In addition, you can also change the language of Windows programs using the Shift-JIS keyboard shortcut. Switching the locale does not harm your PC, but you may experience a few inconveniences. The Japanese keyboard layout will change, but the start menu will still be displayed in English. Although this can be frustrating, many programs are now Unicode-aware and will continue to work properly.
How Do I Run a Japanese Locale?
If you have a game that is in Japanese, you might be wondering how to run it on Windows 10. First, you need to install the Japanese language. This will install the corresponding system locale (also known as the non-Unicode program configuration) on your system. Once installed, you should be able to change the system locale to Japanese (Japan). Once this is complete, restart your system. The game should now run without any problems. If not, you may break your system.
Once the installer has completed, a dialog box should appear asking you if you want to run the program in a different locale. Type Japan in the search box to find it. Uncheck the box to save space. The installer will take a few seconds to install. Once installed, the Japanese locale is enabled on your system. If you don’t want to use this language on Windows 10, you can use a program that is available in Japanese.
What is Japanese Locale?
You may be wondering “What is Japanese Locale Windows 10?” If so, you may want to download the application. It is a free download that lets you play games in a specific language. However, there are some disadvantages to using this program. Using it will cause your games to have text errors, or they might even crash. It is not recommended for playing Visual Novels. You can find a free version of this program at the Microsoft Download Center.
If you’re not familiar with the process, you can change your system’s locale to Japanese using the Region and Language Options icon in the Control Panel. After choosing the locale, click on the “Change region and language settings” tab. Select “Japanese.”
Is Changing System Locale Safe?
If you want to change the language on your computer, you can do this easily. Open the Regional and Language Options (RLO) in the Control Panel and double-click on the Regional and Language Options icon. Once you are in the Regional and Language Options pane, click on the Administrative tab, then click on Change system locale. Then, choose the new language in the drop-down menu and click Change. After doing this, restart your computer.
It’s not a bad idea to change your system locale. If you’re switching from one language to another, you’ll be able to access the same program as long as you change your system locale. To do this, first log into Windows as the user who needs to change the system locale. After this, click the Change language button on the System Settings menu. Once you click the Change language button, the new language will be displayed on your PC.
You can also change the language on your computer by modifying the language settings in the Control Panel. If you’re not using Unicode, it’s worth checking if the language you’re using is supported by the system. By default, the operating system will translate all the text on your computer as UTF-8, but you can change the language settings to your preferences. It’s a good idea to check this before you change it because the result might not be what you expected.
Learn More Here:
1.) Windows Help Center
2.) Windows – Wikipedia
3.) Windows Blog
4.) Windows Central
Want to type in Japanese on your Windows PC? You can do it by adding the Japanese keyboard layout. Here’s how.
If you are learning or already know how to read and write Japanese, typing in Japanese on your Windows 11 or Windows 10 system might be a necessity. For example, I started learning Japanese a few months back. As part of the learning process, I regularly chat with native speakers and fellow learners to cement my understanding of Japanese vocabulary and grammar.
To type Japanese in Windows, you need to install the Japanese keyboard layout and language pack via the Settings. Once installed, you can switch the keyboard layout to type in Japanese on Windows. In this quick and straightforward tutorial, I will show you how to do it in simple steps. Let’s get started.
Before You Start
- Internet connection is required to install the Japanese keyboard layout and language pack.
On Windows 11
- Press “Windows key + I” to open “Settings“.
- Go to the “Time & Language” tab on the sidebar.
- Click the “Language & Region” option on the right page.
- Click the “Add a language” button.
- Search for “Japanese” in the top search bar.
- Select the “Japanese” language from the list.
- Click “Next“.
- Let the default option be as is and click “Install“.
- Let Windows 11 install the Japanese language pack.
- Once the language pack is installed, you can start typing in Japanese by switching the keyboard layout via the taskbar (instructions below).

On Windows 10
Follow the steps below to install the Japanese language and start typing in Japanese in Windows 10.
- Open Settings with the “Windows Key + I” shortcut.
- Go to “Time & Language“.
- Go to the “Language” tab.
- On the right page, click the “Add a language” button under the “Preferred Languages” section.
- Type “Japanese” in the search bar.
- Select the language and click “Next“.
- Select the optional features you want to install and click “Install“.
- Windows 10 will install the Japanese keyboard layout and language pack.
- From now on, you can type in Japanese by switching the keyboard layout via the taskbar (instructions below).


Switch Keyboard Layout to Type in Japanese (Windows 11 & 10)
After installing the Japanese keyboard layout, you need to change the keyboard layout to it to start typing in Japanese. Here’s how.
Note: The steps below work in both Windows 11 and Windows 10.
- Click the input language indicator icon on the taskbar or press the “Windows key + Space” shortcut.
- Select the “Japanese Microsoft IME” keyboard layout.
- By default, the Japanese keyboard layout is set to type in English. To change that, click the “A” icon appearing before the “Language” icon.
- The above action changes the icon to a Hiragana character “あ“, signifying the ability to type in Japanese.
- You can now start typing in Japanese.


As you type in Japanese, Windows will show suggestions and relevant Kanji characters and vocabulary in a drop-down list. By selecting the suggestions, you can type in Kanji.
If you want to keep the Japanese keyboard layout but want to type in English, click on the “あ” icon. This action will change the input mode to English.
To change the keyboard layout, click on the language icon and select the “English” keyboard layout.
Troubleshooting – Input Indicator Icon Is Not Visible on the Taskbar
If you are not seeing the input indicator icon on the taskbar, it might be hidden. To unhide it, follow one of the methods below.
Note: Even if the input indicator icon is not visible, you can use the “Windows key + Space” shortcut to activate it.
Show Input Indicator Language Icon on Taskbar (Windows 11 & 10)
- Press “Windows key + I” to open Settings.
- Go to “Time & Language” > “Typing” page.
- Click the “Advanced Keyboard Settings” option.
- Uncheck the “Use the desktop language bar when it’s available” checkbox.
- With that, you will see the “input language indicator” icon

Using Taskbar Settings (Works only on Windows 10)
- Open Settings using the “Windows key + I” shortcut.
- Go to “Personalization” > “Taskbar“.
- Click the “Turn system icons on or off” option.
- Turn ON the “Input Indicator” toggle.

That is it. As soon as you turn on the option, you will see the language icon appear on the taskbar.
Uninstall the Japanese Keyboard Layout and Language Pack in Windows
Just as you can install it, when you no longer need it, you can easily uninstall the Japanese language pack and keyboard layout. Here’s how.
On Windows 11
- Open Settings using the “Windows key + I” shortcut.
- Go to “Time & Language” > “Language & region“.
- Click the “…” icon next to the Japanese language pack.
- Select the “Remove” option.
- With that, Windows 11 uninstalls the Japanese language pack.

On Windows 10
- Open Settings using the “Windows key + I” shortcut.
- Go to “Time & Language” > “Language“.
- On the right page, click on the “Japanese” language option.
- Click “Remove“.

That is it. As soon as you click the button, Windows will uninstall the language pack and its associated features.
Wrapping Up — Installing Japanese Language Pack and Keyboard Layout to Type in Japanese in Windows 11 and 10
Whether you are a student, a professional, or a native speaker, you can easily type in Japanese by installing the Japanese language pack and keyboard layout in Windows 11 and Windows 10. Once installed, switch to the Japanese layout using the input language indicator icon on the taskbar or by pressing the “Windows key + Space” shortcut to start typing in Japanese.
If you have any questions or need help, comment below. I’ll be happy to assist.
Good to know: how to change the display language from Chinese to English.
Update: This tutorial is updated to be compatible with Windows 11 and Windows 10.