
Table of contents
- How to Set Microsoft Word as My Default Document Program
- Method 1: Set Defaults by App
- Method 2: Choose Default Apps by File Type
- Method 3: Setting Word as the Default Program from the Context Menu
- Method 4: Using the control panel
- Conclusion
- FAQ
Setting Microsoft Office Word as your default word processor on Windows 10 is a straightforward process. This ensures that Word automatically opens your documents.In the following guide, we’ll walk you through the simple steps to make Microsoft Word your go-to application for all word processing tasks on Windows 10. Whether you’re dealing with DOCX files, RTF documents, or even plain text files, setting Word as your default means smoother, more consistent handling of all your documents. Discover how to streamline your document management and enhance your productivity with this easy setup.
How to Set Microsoft Word as My Default Document Program
After adding Microsoft Word to your computer, its installer will automatically set it as the default program for certain types of files. However, even if it supports other file types, Word will not be set as the default program for them. For example, Word can process PDF files, but Microsoft Edge is likely the program that automatically opens them. If you want to know how to set Microsoft Word as the default program for launching certain types of files, check out our tips below.
Download Auslogics BoostSpeed
Your one-stop PC maintenance and optimization tool, this program will clean, speed up, repair and tweak your system to ensure maximum speed and efficiency.
Method 1: Set Defaults by App
- Go to the taskbar and right-click the Windows icon.
- Select Settings from the list.
- Click Apps.
- Go to the left pane, then choose Default apps from the list.
- Click the Set defaults by app link. Doing so will allow you to see all the installed programs and apps on your computer.
- Scroll down until you see Microsoft Word. Select the software program, then click the Manage button.
- You will be directed to another page where you’ll see all the file extensions that Word supports. You will also see the default program for each file type.
- To change the default program for a file extension, click the program name beside it. Choose Word from the options, then set it as the default program.
Method 2: Choose Default Apps by File Type
- On your keyboard, press
Windows Key + S. - Now, inside the Search box, type Settings, then hit
Enter. - Select Apps.
- Click Default apps on the left-pane menu, then go to the right pane and click the Choose default apps by file type link.
- On the new page, you will see the file types and the programs associated with them. To select Word as the default program for a specific file type, click the program’s icon or the + sign next to it. Choose Word from the options.
Also read: [EASY GUIDE] How to Change the Default Font in Microsoft Word?
- Right-click the file you wish to use Word as the default program for.
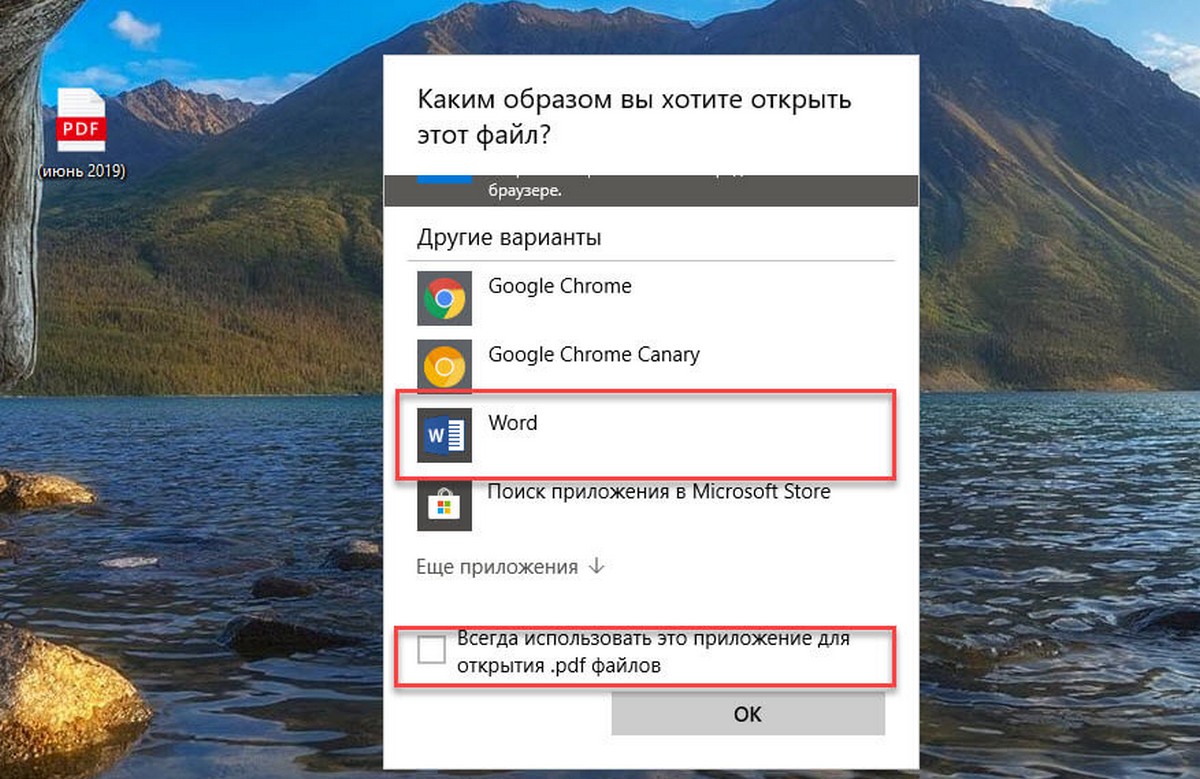
- Select Open with from the options, then click Choose another app.
- Remember to select the box beside Always use this app to open this file type.
- Choose Word if you can see it in the available options. If you do not see it, click More apps. Click OK to set Word as the default program for the file type you chose.
Also read: How to Change Default Program to Open File in Windows 10
Method 4: Using the control panel
- Press
Windows Key + Rto open the Run dialog box. - Type
controland pressEnterto open Control Panel. - In Control Panel, go to Programs, then click on Default Programs.
- Select Set your default programs.
- In the list of programs, scroll to find Microsoft Word. Click on it to see the options.
- Click on Set this program as default to set Microsoft Word as the default for all file types it can open. Alternatively, you can click on Choose defaults for this program to manually select the specific file types you want Word to open by default.
- Confirm your choices and close Control Panel.
By following the steps in one of the methods above, you should be able to easily set Microsoft Word as default.
PRO TIP
If you’ve tried our methods and noticed that it’s taking a while for your files to load, we suggest installing Auslogics BoostSpeed.
This tool will regularly maintain your PC, fully clean up your system, remove all unnecessary files including temporary internet files, and will check if your system components, such as HDD and SSD, are working properly.
So, the next time you try loading a document via Microsoft Word, you won’t spend over a minute waiting.
Related:SSD vs. HDD: What’s the Difference and What to Choose?
Conclusion
Setting Microsoft Office Word as your default word processor in Windows 10 can significantly streamline your document handling experience. Whether you choose to set defaults by app, select default apps by file type, adjust settings from the context menu, or utilize Control Panel, each method offers a straightforward path to making Word your primary tool for opening and editing documents. Remember, personalizing your default settings is key to a more efficient and tailored computing experience, especially for frequent Word users. Did you find the solutions above useful? Perhaps, there are a few more things you would like to tweak to improve your Microsoft Word experience. Please share in the comments below – we are always happy to hear from you!
FAQ
How Can I Check My Installed Office Version in Windows 10?
- Open any Office application, like Word or Excel.
- Click on “File” in the top-left corner, then select “Account” or “Help” from the menu.
- Under “Product Information,” you’ll see the version number and license status of your Office installation.
What if I Can’t Find Microsoft Word in the List of Default Apps?
- Ensure Microsoft Office is correctly installed on your computer.
- If recently installed, try restarting your PC.
- If Word is still missing, you might need to repair your Office installation via Control Panel > Programs > Programs and Features > Microsoft Office > Change > Repair.
Download Article
Open text-based documents on Windows in Word instead of Wordpad
Download Article
Oh no! Your .dox or .txt document is opening in WordPad, so what do you do? Since WordPad can open these and other file formats (like .rtf), you just need to change some default app settings to change Word as your default. This wikiHow article will teach you how to change the default app from WordPad to Word in Windows 10.
Things You Should Know
- Open your Windows settings and navigate to Apps > Default Apps.[1]
- Select Choose default apps by file type.
- Change the app next to .docx, .rtf, and .txt to Word.
-

Press Win + I on your keyboard to open the Settings window. Alternatively, you can click the gear icon in the Start menu.
-
It’s next to a list icon.[2]
Advertisement
-
You’ll see this menu option in the menu on the left side of the window next to a list icon with an arrow on it.[3]
-
This menu option is at the bottom of the menu under «Reset.»[4]
- You’ll see file types listed on the left side of the window next to the default app used to open them.
-
docx, .rtf, and .txt» to Word. If the default is WordPad, click it, then select Word from the drop-down list.
- If you don’t have an active Microsoft 365 subscription, you’ll see a prompt to open the store.
- If there’s no default listed, click Choose a default and select Word from the list.[5]


Advertisement
Ask a Question
200 characters left
Include your email address to get a message when this question is answered.
Submit
Advertisement
Video
-
The file types are automatically changed when you don’t have an active subscription to Word on your computer. If you have an active subscription, but all your defaults changed and you can’t open the document in Word, you will have to uninstall and reinstall Office.[6]
Thanks for submitting a tip for review!
Advertisement
About This Article
Article SummaryX
1. Open Settings.
2. Click Apps.
3. Click Default Apps.
4. Click Choose default apps by file type.
5. Change the app next to «.docx, .rtf, and .txt» to Word.
Did this summary help you?
Thanks to all authors for creating a page that has been read 42,617 times.
Is this article up to date?
Applicable to the following Office versions: 2019, 2016, 2013, 365; on Windows 7, 8 and Windows 10.
Here’s a question we received from one of our readers:
“I’ve just installed a new version of Office 365 in my system but it’s clearly not defined as the default program for viewing and editing of Microsoft Office files. After the installation, all my documents, workbooks and presentations are showing up in the Windows File Explorer as unknown file types. Can you help me to define Office 365 as the default file opener for Word, Excel, PowerPoint and Visio files over older Office versions?”
Set Office 365 / 2019 /2021 as default
If you are using Office 365 on your Windows 10 computer, you can define it as the default version as following:
- Hit the Windows button at the left hand side of your taskbar.
- Type Control Panel and hit Enter.
- Then select Programs.
- Then Select Programs and Features.
- Then go ahead and highlight the Microsoft 365 entry as shown below.

- Now hit Change.
- Then hit Repair.
- Wait that the repair process is over, your files should now be opening with Office 365 by default.
Setting defaults in Windows 10
Note: You can execute the steps above in Windows 10 using the Default apps screen. Here’s how you do it:
- Hit the Search Windows magnifying glass icon (located at the left hand side of your task bar).
- In the search box, type ‘Default’; and select Choose a default app…
- Then for each known/relevant file type, select the default opening app.
If all the above mentioned techniques didn’t help, you might need to try the manual method specified below.
Office 2016 as default program instead of older versions
Windows allows us to associate the newer Office version to all relevant files by executing a Quick Repair action from the Control panel. Steps are described below:
- Open the Control Panel in your system and click Programs and Features.
- Search and check on Microsoft Office 2016.
- Click on it and hit Change present at the top.

- Hit Quick repair to fix the issues and select Repair.
Set your default programs/apps manually
Setting Excel 365 as default spreadsheet program:
- Right click on any Excel .xlsx file in your computer
- Select Open with and select Choose another app.

- Click on Excel 2016 and check on Always use this app to open .xlsx files.
- Now you can see that all .xlsx files default program is set to Excel 2016.
Note: In case that you are using Office 365, you’ll have the following option available in right hand button menu:
Note: Using a similar procedure, will allow you to make Excel the default program for csv, Google Sheets, Open Office files.
Word 2016 / 365
If Microsoft Word 2016 is not your default program for opening documents proceed as following:
- Right click on the .docx file, move over open with and select Choose another app.

- Click on Word 2016 and check on Always use this app to open .docx files.
- Now you can see that all .docx files default program is set to Word 2016.
PowerPoint
If PowerPoint 2016 doesn’t open your presentations, proceed as following:
- Right click on the .pptx file, move over open with and select Choose another app.

- Click on PowerPoint 2016 and check on Always use this app to open .pptx files.
- That’s it , You are all set.
Additional notes:
- There might be cases, mainly around compatibility with older file formats, in which you might want to leaver the older Office versions (2010 and older) as default.
- There might be cases in which Word, PowerPoint or Excel 2016, will not be listed in the default program list. If that’s the case immediately after you have installed the new version, you might want to restart your computer and re-check. If there is still an issue, you might need to re-run the installation program.
- Compatibility issues might arise when trying to open Microsoft Office files in Open Office, Libre and Google Docs.
FAQ
How to make Office 2016 default on mac?
- In your macOS device, open the Finder application.
- Navigate to any office file.
- Right click the file and choose Get Info.
- Under Open With, select the Microsoft Office 2016 entry.
- Hit Change All to apply the settings to that file extension.
What to do if Office 365 is kept as default after defining 2019 as default?
- Run the Office 2019 setup and repair your installation.
- Restart your computer.
- If this is not helpful you might need to consider a Windows user profile. Make sure to consult an IT professional before switching to a new profile.
Вы хотите установить приложение Microsoft Office Word по умолчанию в Windows 10? Хотите установить Word по умолчанию для определенного типа файла в Windows 10? В этом руководстве мы увидим четыре способа установить Office Word как текстовый редактор по умолчанию в Windows 10.
Когда вы устанавливаете MS Office на свой компьютер, программа установки автоматически устанавливает Word как программу по умолчанию для определенных типов файлов. Но не для всех типов файлов, которые он поддерживает. Например, он поддерживает PDF из коробки, но не установлен как приложение для просмотра и редактирования по умолчанию.
Если вы хотите, чтобы Word по умолчанию использовался для открытия других типов файлов, вы можете сделать это, выполнив рекомендации в одном из приведенных ниже способов.
Способ 1 из 4
Установите Word по умолчанию в Windows 10 с помощью приложения «Параметры»
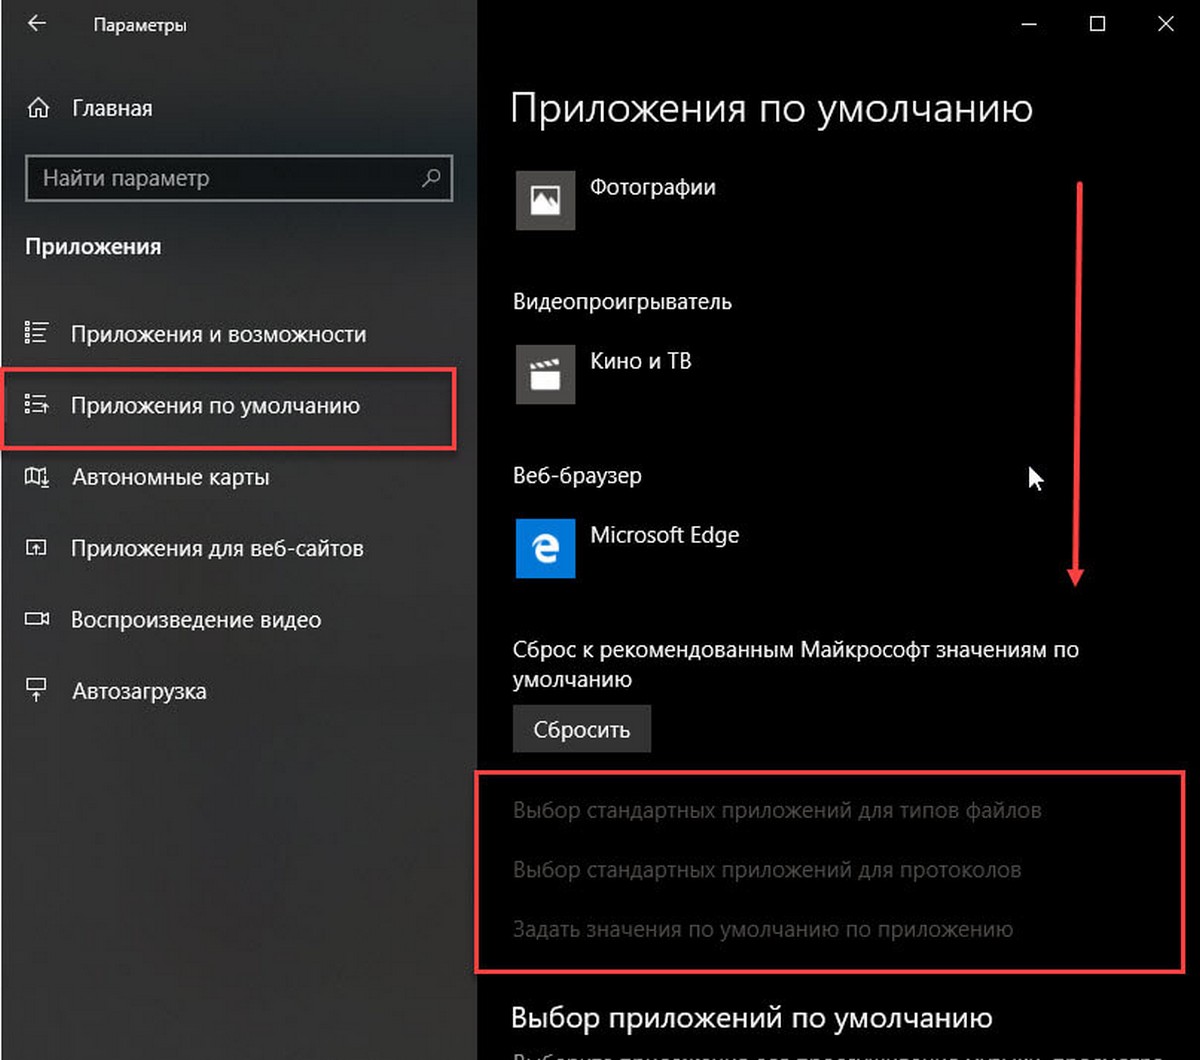
Шаг 1. Откройте приложение «Параметры», для этого просто нажмите одновременно две клавиши – клавишу с логотипом Windows и букву I. Перейдите в группу настроек «Приложения» → «Приложения по умолчанию». Нажмите ссылку «Задать значения по умолчанию по приложению», чтобы открыть страницу, со всеми установленными приложениями и программами в Windows 10.
Шаг 2. Прокрутите страницу вниз, пока не найдете запись Word. Нажмите на нее, чтобы открыть скрытую кнопку «Управление». Нажмите кнопку «Управление».

Шаг 3. На открывшейся странице вы найдете все расширения файлов (типы файлов), поддерживаемые редактором Word, и установленным как программа по умолчанию для всех этих расширений.
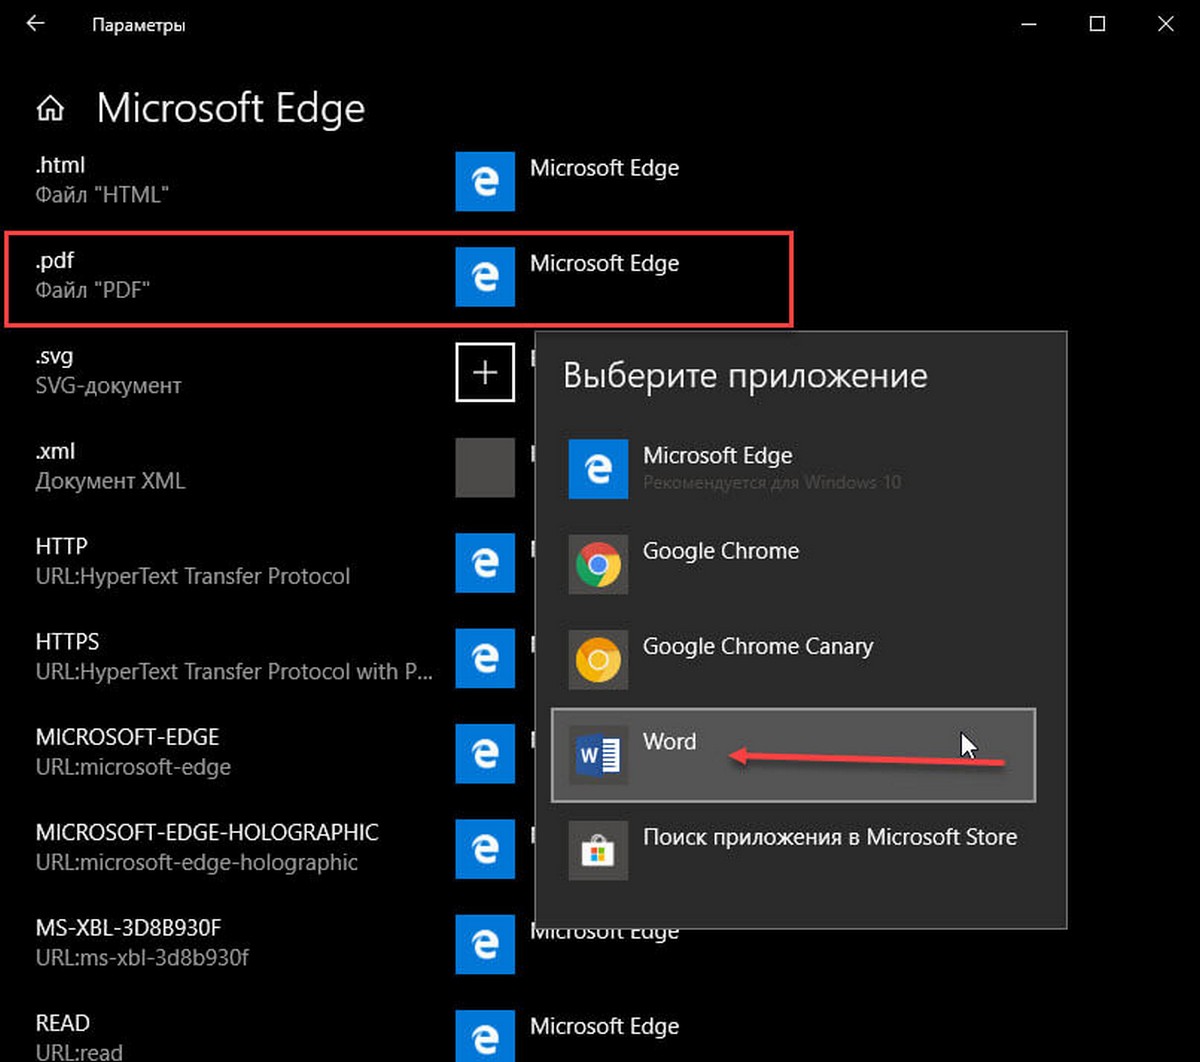
Чтобы установить Word по умолчанию для типа файла, кликните на значке программы рядом с ним, а затем кликните по программе Word из списка, чтобы установить программу по умолчанию.
Способ 2 из 4
Другой способ установить Word как редактор тестовых файлов по умолчанию в Windows 10
Шаг 1. Перейдите на страницу «Приложения» → «Приложения по умолчанию», а затем нажмите «Выбор стандартных приложений для типов файлов».
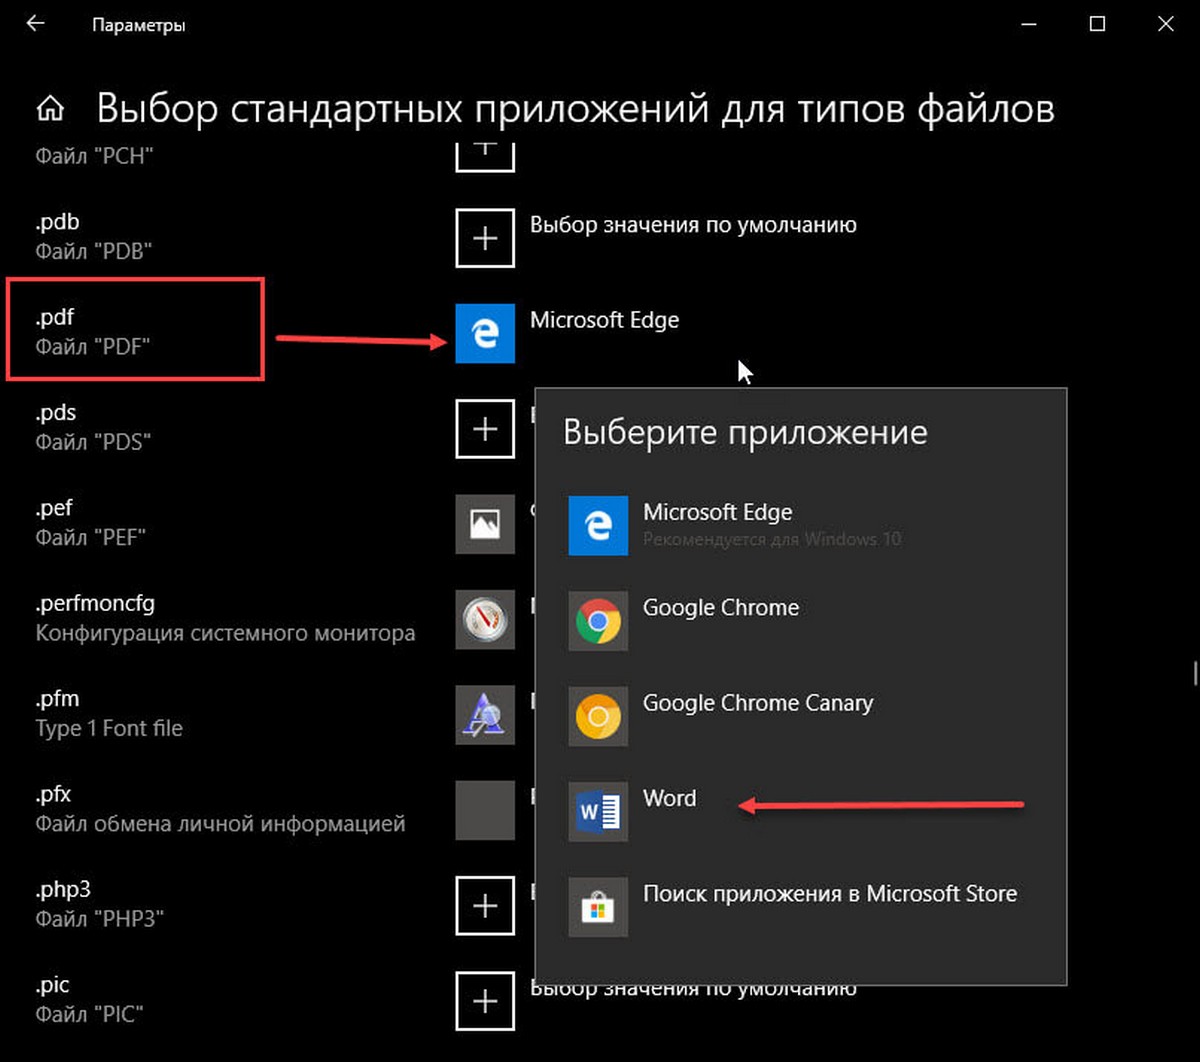
Шаг 2. Как вы можете видеть, на странице отображаются типы файлов и связанные с ними программы. Чтобы установить Word по умолчанию для определенного типа, кликните значок + или значок программы рядом с типом файла, а затем выберите из списка Word.
Способ 3 из 4
Установите Word по умолчанию с помощью контекстного меню
Шаг 1. Кликните правой кнопкой мыши файл (тип файла), для которого вы хотите, чтобы он открывался в Ворде в качестве программы по умолчанию, нажмите «Открыть с помощью» и нажмите «Выбрать другое приложение».
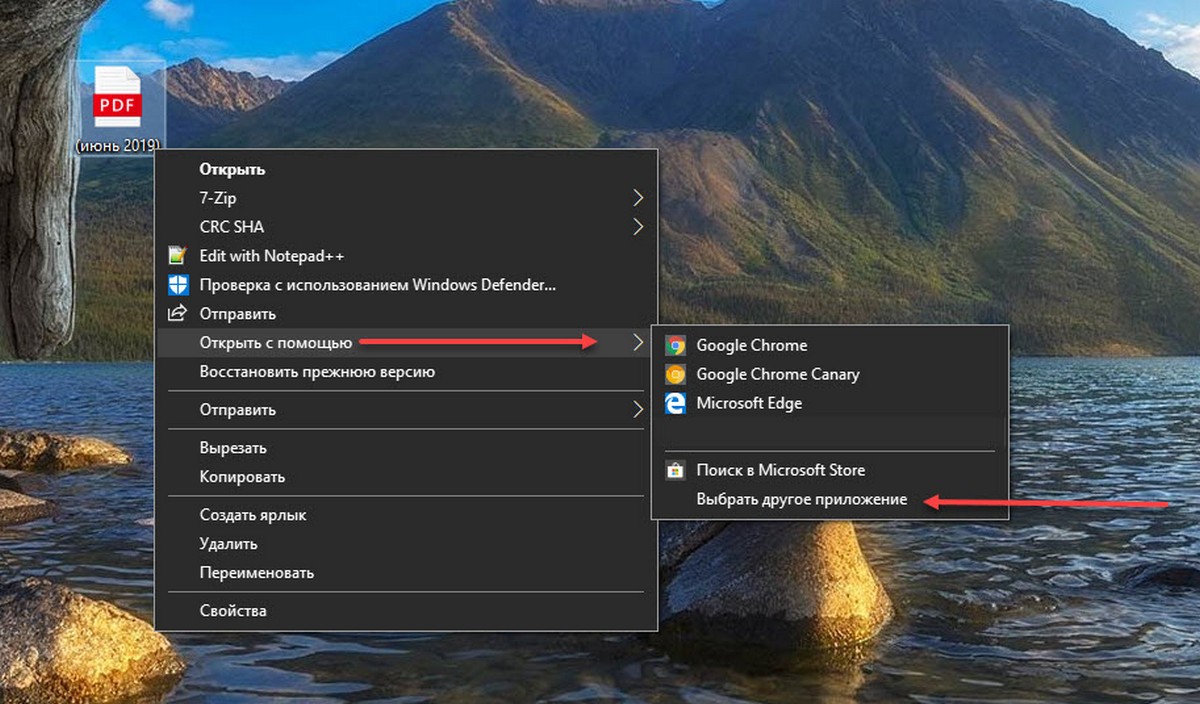
Шаг 2. Установите отметку — «Всегда использовать это приложение, для открытия типа файла». Выберите Word, если он отображается. Если нет, в низу списка нажмите ссылку «Еще приложения», чтобы увидеть программу Word в списке. Нажмите на запись Word, чтобы установить программу по умолчанию для выбранного типа файла.
Способ 4 из 4
Используйте «DefaultProgramsEditor», чтобы установить Word по умолчанию.
Существует бесплатная сторонняя утилита под названием «DefaultProgramsEditor», позволяющая вам легко изменять ассоциации файлов в Windows 10. В программе реализовано классическое встроенное окно «Программы по умолчанию», которое было удалено из текущей версии системы.
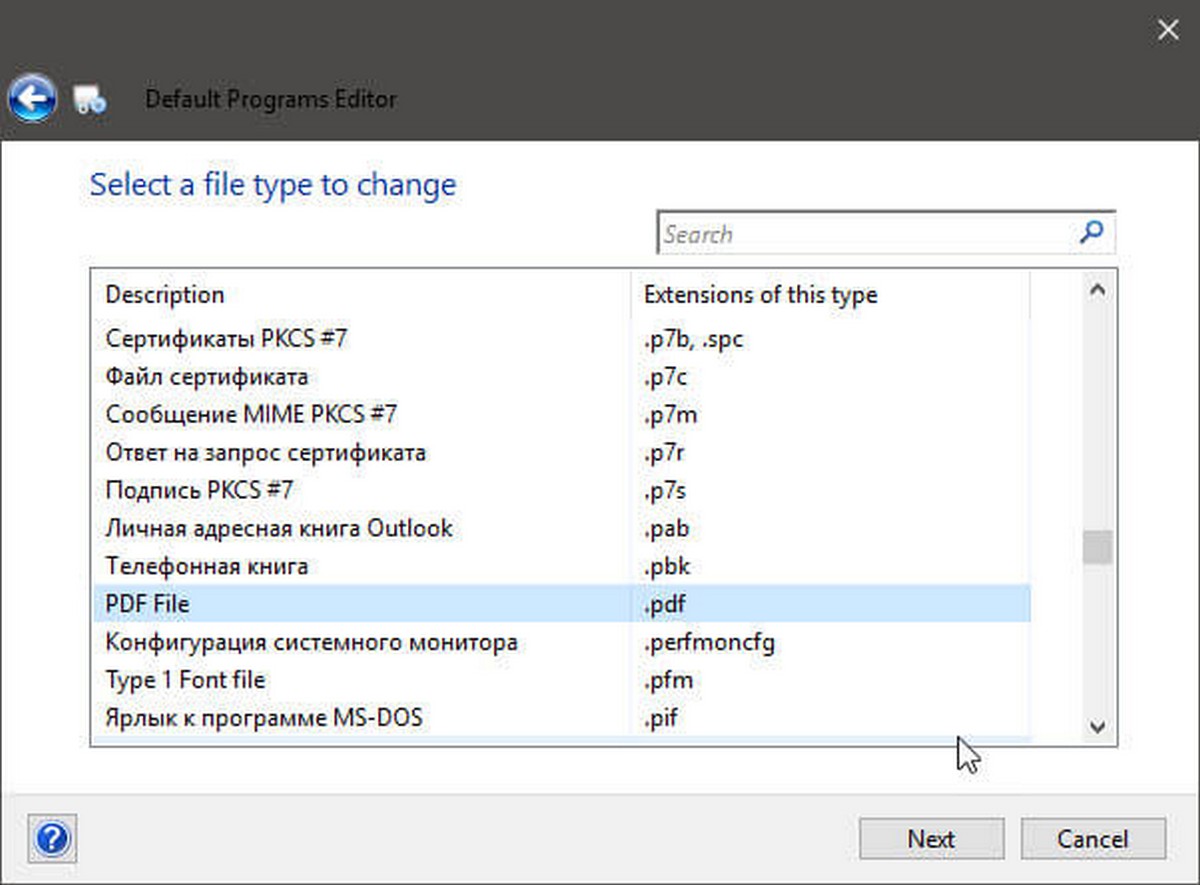
Утилита доступна на сайте — defaultprogramseditor.com
В этой статье мы намерены показать вам 3 способа установить Word в качестве программы по умолчанию, связанной с вашим текстовым документом.
Иногда некоторые из вас могут обнаружить, что ваш документ Word связан с неправильной программой или даже без таковой. Следовательно, ваши файлы могут иметь неправильный значок программы. И что еще хуже, вы не можете сделать это правильно, даже подключив файл к нужной программе.
Чтобы помочь вам решить эту проблему, мы предложим вам 3 способа в следующем тексте. Эти методы будут tarдобрался до Word 2010 в среде Windows 7.
Способ 1: связать файлы с нужной программой
- Во-первых, щелкните правой кнопкой мыши файл Word, который будет связан с нужной программой, и выберите «Открыть с помощью» в меню.
- Затем нажмите «Выбрать программу по умолчанию» в раскрывающемся меню.
Картинка с сайта: www.datanumen.com
- В окне следуйте по пути:
C: \ Program Files \ Microsoft Office \ Office14 \ WINWORD.EXE
И найдите и выберите «WINWORD.EXE» и нажмите «Открыть».

- Затем вернитесь в диалоговое окно «Открыть с помощью», установите флажок «Всегда использовать выбранную программу для открытия файлов такого типа».
- Наконец, нажмите «ОК».
Картинка с сайта: www.datanumen.com
Способ 2: изменить тип файла для открытия в той же программе
- К start с, нажмите «Starт ».
- Далее нажмите «Панель управления».
- Затем нажмите «Программы».
- В разделе «Программа по умолчанию» нажмите «Сделать тип файла всегда открытым в определенной программе».

- Затем в новом открытом окне найдите и выберите файл «.docx» и нажмите кнопку «Изменить программу…» в правом верхнем углу.
Картинка с сайта: www.datanumen.com


