
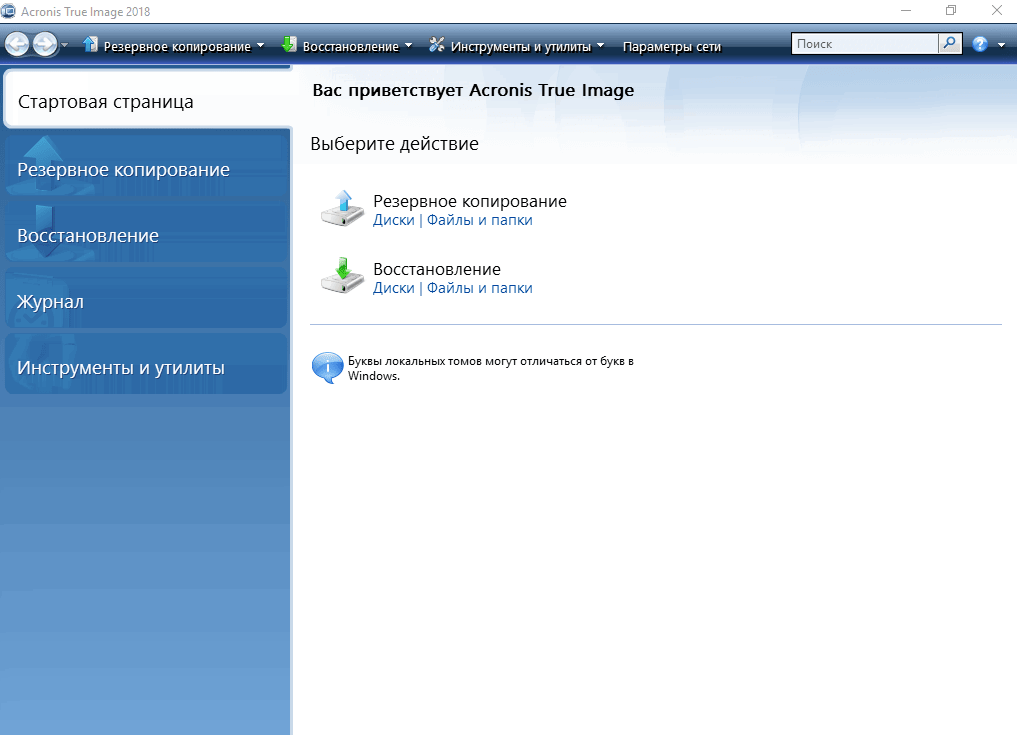
Здравствуйте, господа! Это инструкция по установке Windows 10 на iMac 2011 года. Ввиду окончания поддержки, актуальность этих моноблоков сходит на нет. А это значит, что свежие программы не поставить, а скоро так вообще — никакие 🤨
Статья основана на опыте наших инженеров с iMac 21.5″ 2011, а инструкция рассчитана на уверенного пользователя. Скорее всего точная модель iMac роли не играет, главное 2011 год выпуска.
Главные проблемы
- Продать его выгодно уже не выйдет. Ок! Сделаем Upgrade и он снова будет в строю. Хорошо, но какой смысл в быстрой работе без программ?
- Свежую macOS официально не поставишь. Ок! Пропатчим установщик macOS и установим систему насильно, но драйверов на видеокарты (у нас 6700M) AMD Radeon этих лет нет и, видимо, не предвидится. Вывод: через костыли ставить macOS смысла нет;
- Windows 10 официально не поддерживается (только iMac с 2012 года). Ок! Установить таки винду можно, но BootCamp (драйвера Apple) не существует для десятки, но через командную строку можно поставить «родной» BootCamp;
- Нет звука в Windows 10. Никакие драйвера ситуацию не выправляют, так как звуковое устройство неправильно определяется в системе, либо вообще отсутствует в списках. Эта печаль вытекает из проблемы совместимости в режиме EFI (UEFI на обычных ПК). Беда оказалась одна из самых сложных и с ней борются владельцы iMac 2011 года по всему миру, а на GitHub даже есть отдельная ветка! Адекватного лекарства не было, пока наши мастера не разгадали загадку! 😎
P.S. Скорее всего мы не первые, но внятной инструкции не нашли.
Как мы побороли гадость со звуком
Собака оказалась зарыта в инициализации устройств прошивкой EFI (BIOS iMac). iMac умеет грузиться в обычный и режим совместимости. Кстати, для Windows 10 «родной» режим тоже EFI\UEFI и загрузка с диска с таблицей GPT. Но так как в обычном режиме устройства определяются неправильно, надо заставить iMac установить Windows в режиме совместимости на диск с MBR. А iMac упорно грузится через EFI.
Мы прошли первый этап установки десятки на виртуальной машине c простым BIOS и MBR-диском. Не дав начаться после перезагрузки второму этапу (установка основных устройств), сняли образ с виртуалки и вуаля — осталось лишь продолжить установку на реальном iMac 🤓
Upgrade
Чтобы iMac не тупил на Windows 10, как последняя скотина, мы заменили старый и медленный HDD диск на новый SanDisk SSD Plus на 480 Гб. Также расширили оперативную память до 16 гигов. Мини-апгрейд 😊
А как же Windows 7?
Возможность официально установить Windows 7 есть, но её поддержка закончилась в начале 2020 года, а это значит тихо-мирно кончатся и программы, как это было с Windows XP. Ставить хорошую, но заведомо устаревшую систему 2009 года рождения, не хотелось бы.
Установка Windows 10
Стандартно Windows 10 ставится с флешки, но это не наш случай.
Простой метод
Установка Windows 10 с DVD-диска. Загрузка с болванки заставит iMac использовать Legacy BIOS Boot Mode. К сожалению, по каким-то причинам работает 50 на 50. Если у вас таки получился этот трюк, то переходите сразу к установке BootCamp 😏
Второй метод. Как делали мы
Мы подготовили готовый образ с Windows 10 Home для iMac 2011. Система чистая неломаная с сайта Microsoft с обновлениями по 2020 год.
Качаем с нашего яндекс-google диска:
- Образ Windows 10 для iMac 2011
- BootCamp для iMac 2011
Образ необходимо распаковать на диск iMac через прогу Acronis True Image (образ создан в версии 2018 года). Проще всего это сделать, загрузившись в какой-нибудь LiveCD\LiveUSB. К примеру, WinPE 10-8 Sergei Strelec содержит всё необходимое и грузится с флешки.
Если вы тоже делаете апгрейд и ставите SSD, то образ можно залить заранее (при наличии ПК) и пропустить часть с LiveCD 😉
Важно!
После запуска LiveCD на iMac, в диспетчере дисков убедитесь, что диск со схемой разделов MBR, а не GPT. Заходим в свойства диска -> Тома -> Стиль раздела. Если тут GPT, то жмём правой кнопкой на диск и конвертируем его в MBR. Можно использовать любую другую прогу для работы с дисками.
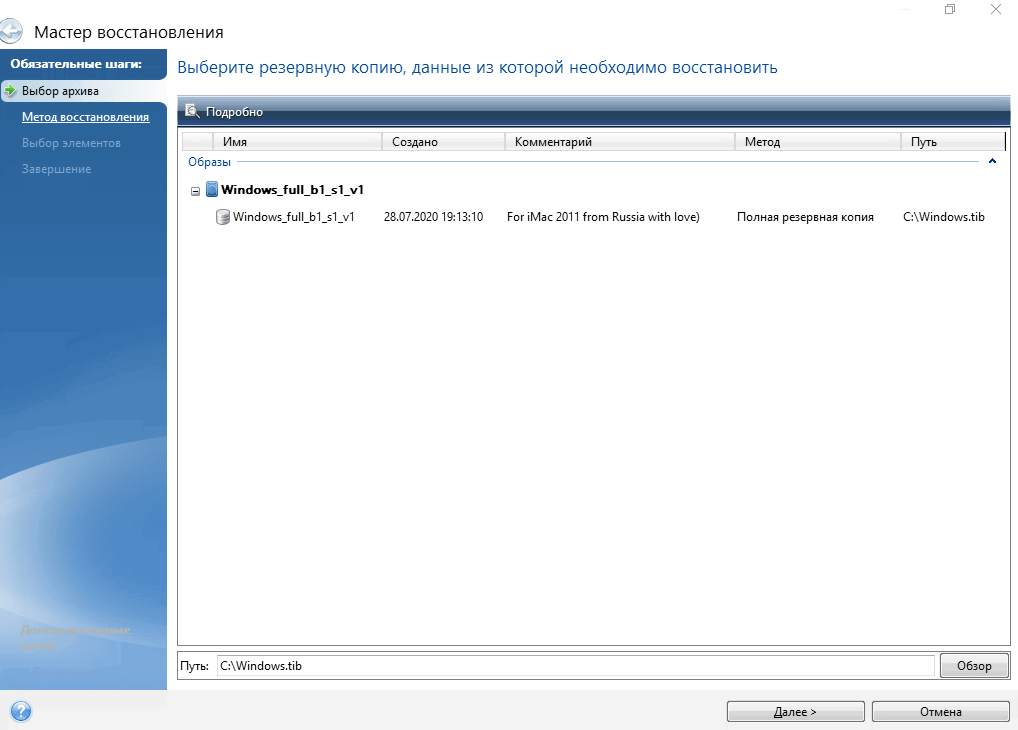
Инструкция по развёртыванию образа
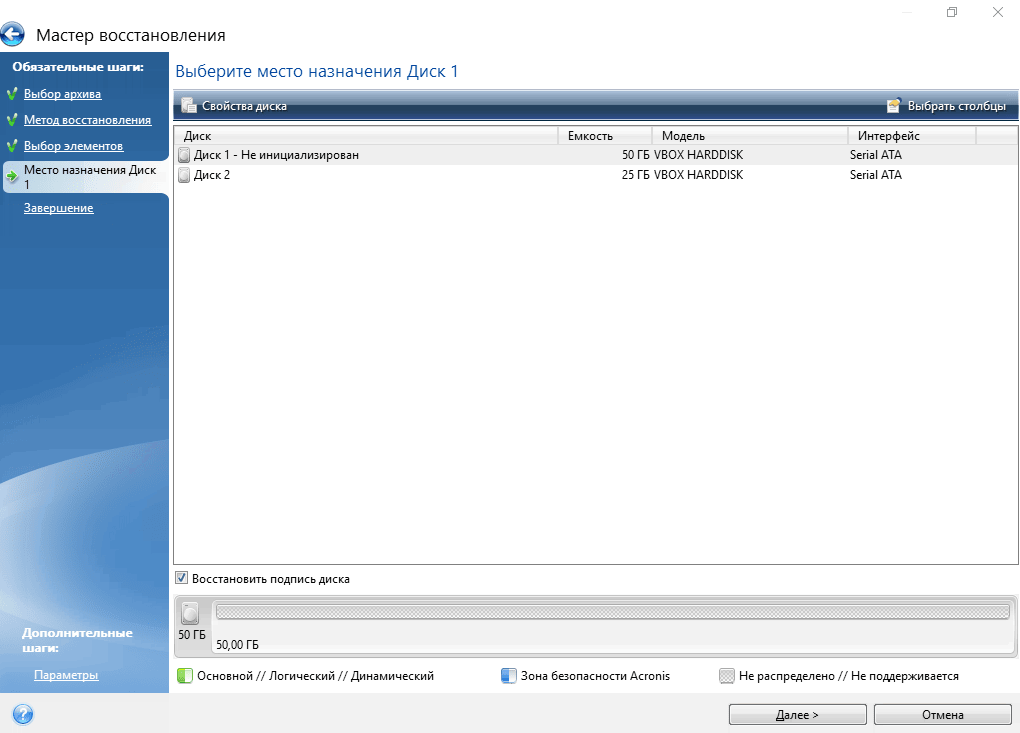
- В Acronis True Image выбираем действие «Восстановление -> Диски»

- Выбираем наш образ-архив
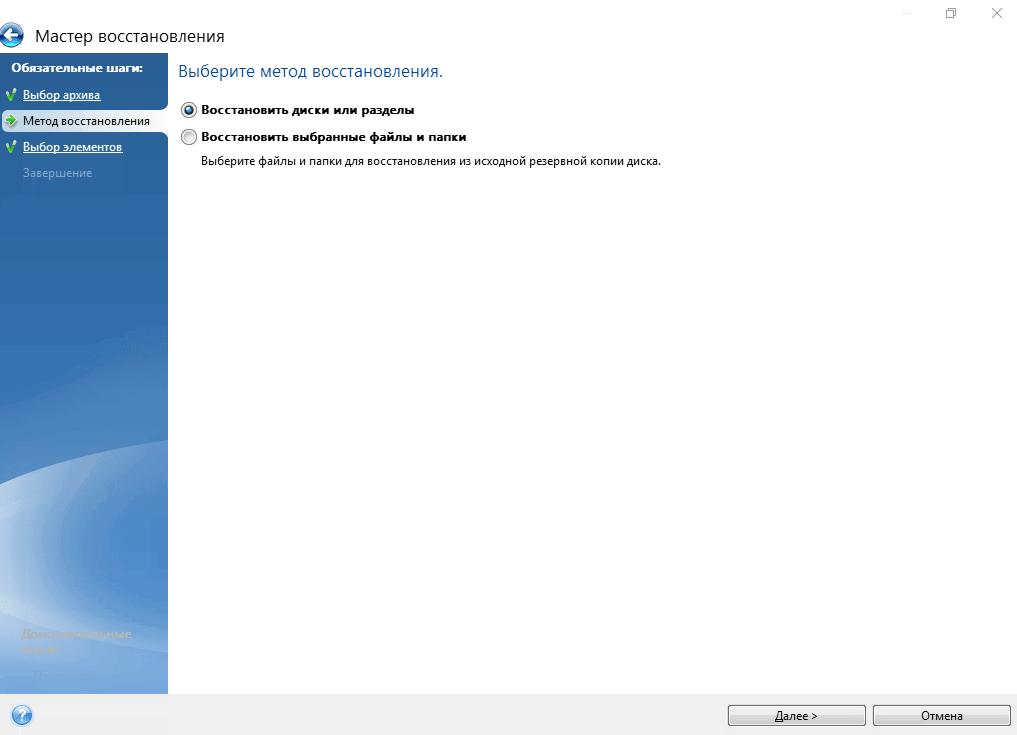
- Метод восстановления «Восстановить диски и разделы»
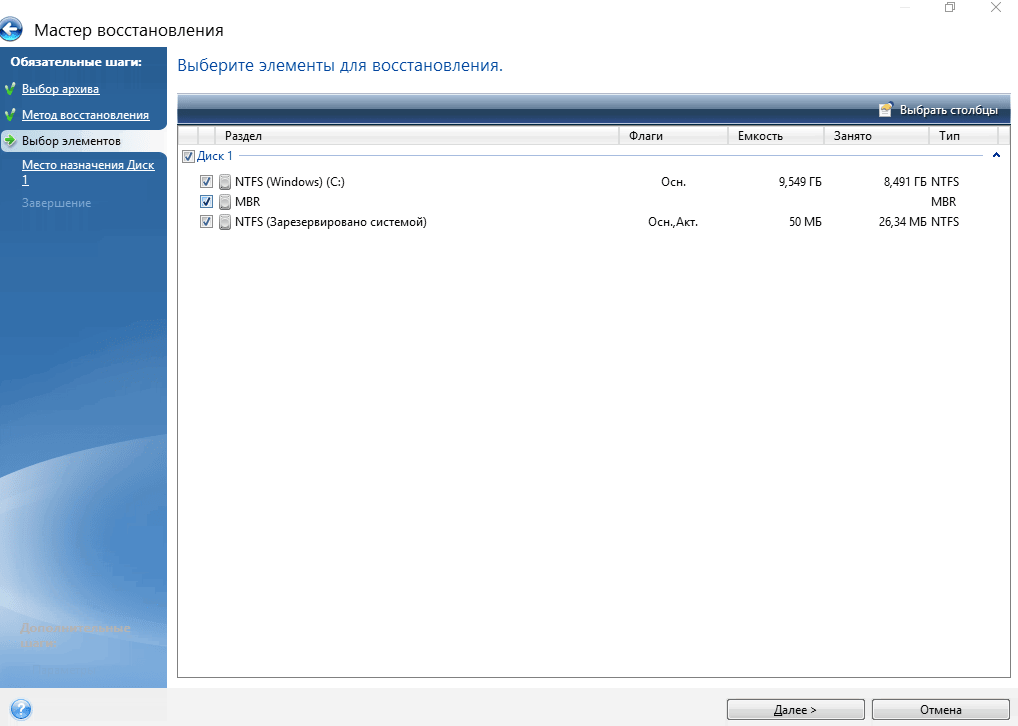
- Ставим галочку на «Диск 1», чтобы выбрались все галочки
- Выбираем целевой диск iMac. В нашем случае это SSD. Скриншот для примера
- Проверяем, всё ли правильно выбрали и жмём «Приступить»
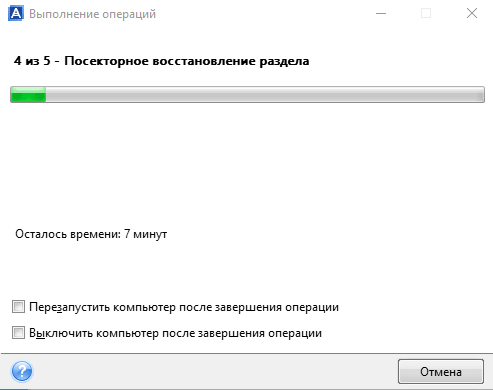
- Ждём окончания операции. Обычно 5-10 минут 🤓

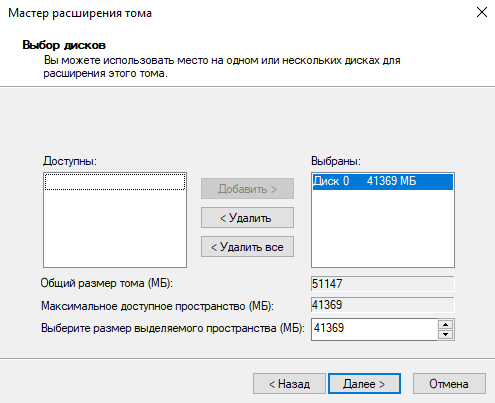
Далее убеждаемся в диспетчере дисков, что диск не изменился на GPT, должен быть MBR! Объединяем диск С и свободное пространство через пункт меню «Расширить том…»

В правой колонке выбираем всё свободное пространство и жмём далее
На диске должно остаться два раздела, как на картинке:

Выключаем iMac и отключаем его от электросети на 30 секунд. Отключаем все носители. Включаем iMac. Должна начаться (продолжиться) установка Windows 10.
Дожидаемся окончания установки Windows, всё как обычно.
Важное дополнение о разделе GPT
Многие столкнулись с проблемой, когда после перезагрузки диск превращается формат GPT и установка проходит неправильно. Один из посетителей блога поборол эту гадость и скинул нам видео в группу ВК, за что ему огромная благодарность 😘
Установка BootCamp
BootCamp устанавливается через командную строку. Распаковываем архив в удобное место, к примеру на диск С. Запускаем командную строку от имени администратора и стартуем файл по пути:
C:\BootCamp\Drivers\Apple\BootCamp.msi
Далее последует обычная установка драйверов и предложение перезагрузить iMac. Первый запуск может быть долгим! Если в течение 5 минут красуется чёрный экран, то выключите-включите iMac. Такое может быть.
Подробная инструкция по установке BootCamp
При успешном исходе, звук, регулировка яркости и горячие клавиши на клавиатуре должны работать.
В видео присутствует мат, а ещё оно вертикальное, простите 😳
Wi-Fi и звук! BlueTooth мышь и клавиатура, горячие клавиши и регулировка яркости
Косяки
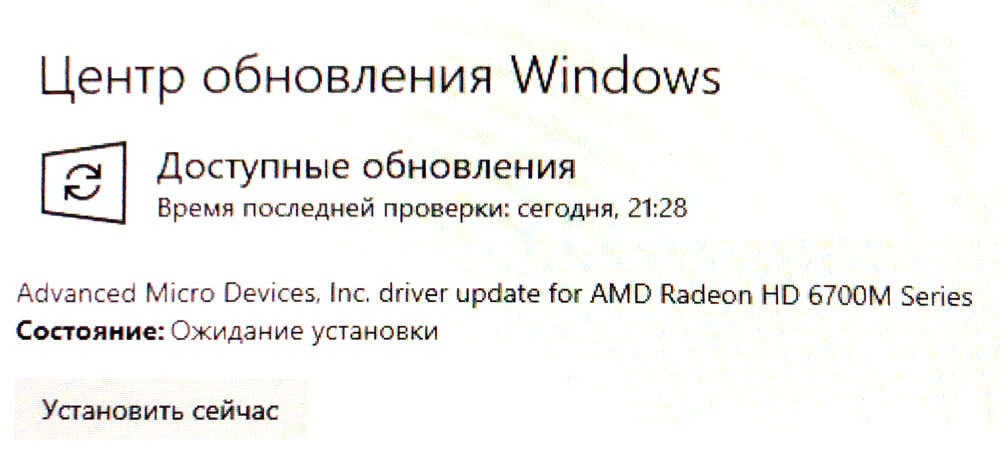
- При первом обновлении Windows скорее всего обновит драйвера на видеоадаптер, в итоге экран может потемнеть и не вернуться обратно.
Подождите 10 минут. Если iMac не отдуплится, то жёcтко выключите-включите его. В дальнейшем таких траблов замечено не было 😋
- Если у вас беспроводные мышь и клавиатура от Apple, то Bluetooth выключать нельзя! Отвалятся и придётся искать проводную мышь, чтобы включить Bluetooth). Изредка мышь и клава глючат. Как вылечить мы не нашли, с чем связано непонятно, происходит редко и жить не мешает
Нюансы
- Не только Apple, но и Microsoft нормально не поддерживают устройства, выпущенные в 2011 году. Это касается не только iMac, но и обычных компов и ноутбуков. На них можно встретить отвал тачпада или USB портов, отсутствие звука, глюки видеокарты и т.п. неприятности. Это связано с переходом на новый тип прошивки в 2012 году — UEFI;
- Microsoft может в любой момент выпустить обновление и всё обгадить весь мёд;
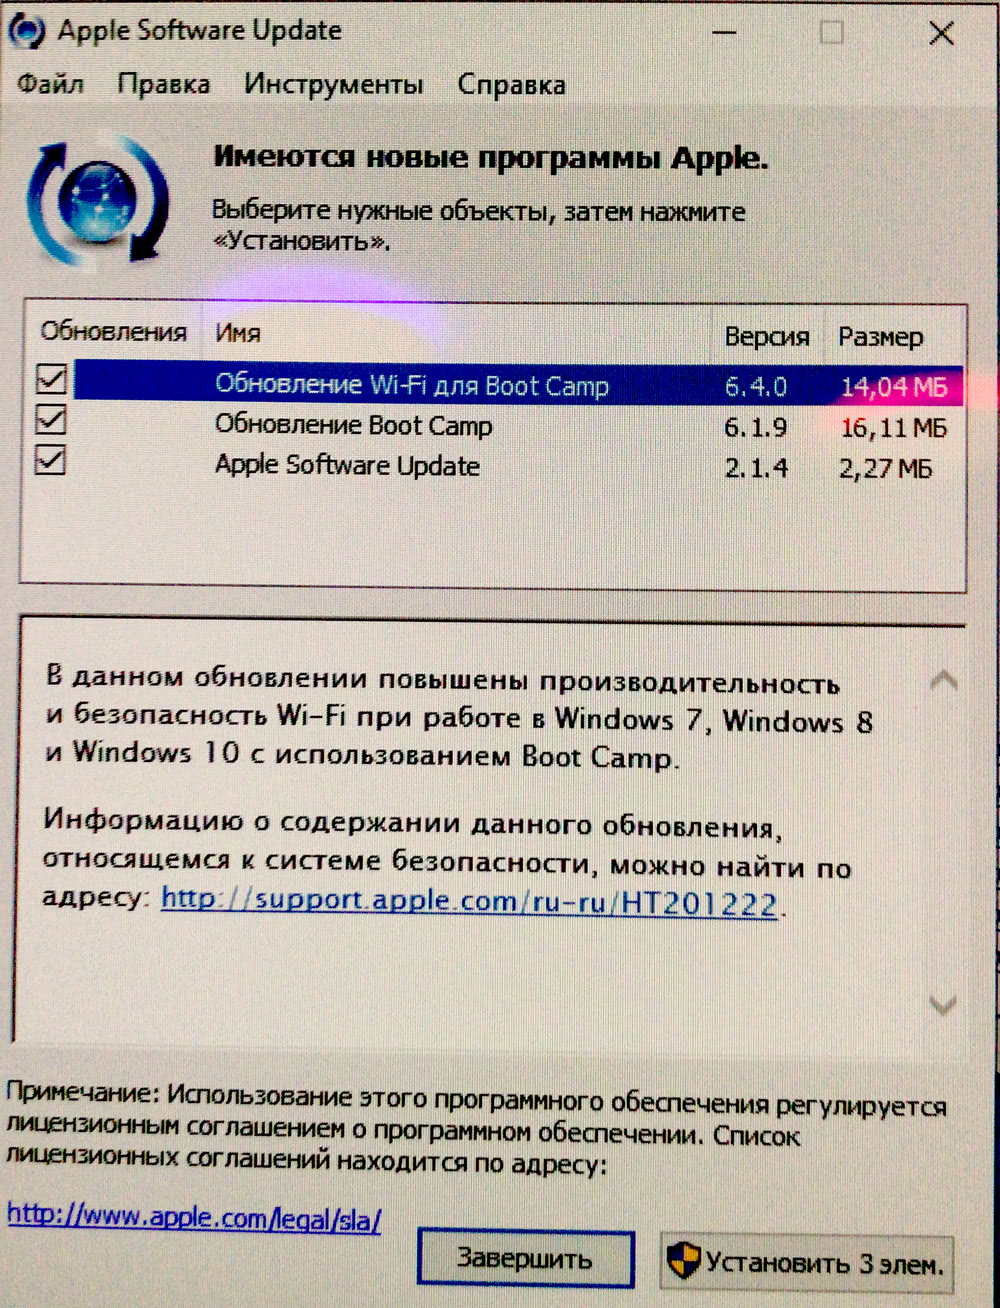
- В состав BootCamp входит утилита Apple Software Update. Через неё обновляются ПО и драйвера от Apple. Прога нашла обновления, но мы не рискнули 🙄
Итого
Считаем, что Upgrade и установка свежей Windows 10 — единственно верное решение, если хотите продлить жизнь iMac ещё на 3-5 лет. Да, это не новый iMac, но работает шустро и не тупит, а цена затеи несоизмеримо меньше 😊
Можем всё сделать за вас! 😎 Выезд на дом или в сервисе -> Установка Windows на Mac
Если у вас уже стоит Windows 10, можете переходить к шагу 8!
Шаг 1:
Загрузите программное обеспечение поддержки Windows через Boot Camp Assistant
Шаг 2:
Создайте загрузочный USB-диск с установщиком Windows 10: Несколько ссылок и руководств:
https://www.microsoft.com/en-us/software-download/windows10
https://taig.medium.com/create-a-bootable-windows-10-usb-from-macos-395773d4782e
https://www.freecodecamp.org/news/how-make-a-windows-10-usb-using-your-mac-build-a-bootable-iso-from-your-macs-terminal/
https://rufus.ie/ru/
Шаг 3:
Создайте новый раздел для Windows (Exfat) через Disk Utility.
Шаг 4:
Отключите проверку целостности: «csrutil disable» на Терминале в режиме восстановления.
Шаг 5:
Установите GPT-диск: https://sourceforge.net/projects/gptfdisk/
Шаг 6:
Установите Windows 10, нажав «Alt» при запуске, чтобы загрузиться с загрузочного USB-диска установщика Windows 10. Отформатируйте раздел как NTFS.
Шаг 7:
Установите драйвер Cirrus, загруженный из программы поддержки Windows. Установите драйвер AMD и другие драйверы, подключившись через интернет. Нажмите Настройки — Обновить.
Шаг 8:
Устранение отсутствия звука на Windows 10 (Macbook Pro) где расписаны все шаги по решению этой проблемы
Ссылка на форум: https://egpu.io/forums/pc-setup/fix-dsdt-override-to-correct-error-12/
Перевод статьи:
[РУКОВОДСТВО] DSDT переопределяет исправление ошибки 12 eGPU (только для Windows)
Введение
Определение корневого моста таблицы DSDT системы Windows (ACPI PNP0A08 или PNP0A03) обычно ограничивается зарезервированным 32-битным пространством (менее 4 ГБ), которое должно быть достаточно большим для размещения устройств PCIe ноутбука. Затем устанавливается значение водяного знака TOLUD и фиксируется в системной прошивке. Windows OS уважает определение корневого моста и будет выделять PCIe-устройства в его пределах. macOS игнорирует ограничения корневого моста, как и Linux при загрузке с параметром ‘pci=noCRS’. Ни одна из этих ОС не требует переопределения DSDT и может свободно распределять устройства в огромном 64-битном адресном пространстве PCIe.
При установке eGPU в диспетчере устройств Windows может возникнуть ошибка 12 (Это устройство не может найти достаточно свободных ресурсов, которые оно может использовать), делающая eGPU неработоспособным. Это может указывать на недостаток 32-битного адресного пространства для размещения eGPU. eGPU требуется относительно большое конфигурационное пространство PCIe для распределения. Уменьшение TOLUD путем уменьшения объема оперативной памяти до 2 ГБ является несколько непрактичным обходным решением. Окончательное решение приведено ниже.
Это трехшаговое решение устраняет ограничение Window на 32-битное распределение PCIe, чтобы устранить ошибку eGPU 12:
Шаг 1. Создайте файл dsdt-modified.aml DSDT с 36-битным корневым мостом
Шаг 2. Загрузите файл dsdt-modified.aml в качестве переопределения реестра или замены в памяти
Шаг 3. Подтвердите успех с помощью области ‘Large Memory’ в диспетчере устройствПользователи macOS: вместо этого обратитесь к статье Mikeal, в которой описаны эти шаги, под названием Windows 10 — Clover DSDT memory override [UEFI Windows только на Macbooks].
Шаг 1. Создайте файл dsdt-modified.aml DSDT с 36-битным корневым мостом
i. Загрузите и установите необходимые инструменты:
Windows Binary Tools (WBT — Dec 2016) извлечены в каталог c:\dsdt. [ более новая версия WBT имеет ошибки разбора].
Windows Driver Kit (WDK), который содержит Windows ASL Compiler (asl.exe).
Текстовый редактор Notepad++ с меню Search->Goto (line) для быстрого редактирования строк в случае сбоя компиляции asl или iasl ниже
ii. Скопируйте ASL-компилятор WDK в каталог c:\dsdt. Для этого откройте Command Prompt (запустите от имени администратора), а затем скопируйте и вставьте команды, приведенные ниже.
mkdir c:\dsdt
c: & cd \dsdt
set 64bit_OS_asl="C:\Program Files (x86)\Windows Kits\10\Tools\x64\ACPIVerify\asl.exe"
set 32bit_OS_asl="C:\Program Files (x86)\Windows Kits\10\Tools\x86\ACPIVerify\asl.exe"
copy /y %32bit_OS_asl% c:\dsdt > nul & copy /y %64bit_OS_asl% c:\dsdt > nul
if not exist c:\dsdt\asl.exe echo ERROR: Failed to copy asl.exe to c:\dsdt
iii. Сделайте дамп таблиц ACPI в дисковые файлы (dsdt.asl и dsdt.dat) с помощью этих команд в Command Prompt (запуск от имени администратора). Созданный dsdt.asl копируется сюда как dsdt-modified.asl, который в дальнейшем будет использоваться для внесения необходимых изменений.
c: & cd \dsdt
acpidump -b -z
asl /u dsdt.dat
copy dsdt.asl dsdt-modified.asl
iv. Теперь вы можете выбрать либо метод Intel, либо метод Microsoft (с синим рабочим файлом dsdt-modified.dsl или пурпурным dsdt-modified.asl соответственно) для генерации файла dsdt-modified.aml, даже попробовать оба метода для достижения максимального успеха. Рассмотрим:
— Для систем, отличных от Lenovo, используйте метод Intel, поскольку их DSDT обычно имеет сигнатуру создания Intel.
— Известно, что для Lenovo Thinkpad X220, T420, W530, T540P и, вероятно, других систем Lenovo Thinkpad с i-ядрами 2-4-го поколения требуется метод Microsoft. Метод Intel вызывает ошибку «ACPI BIOS ERROR» при загрузке Windows.
ВАРИАНТ 1: Используйте метод Intel
i. Сохраните этот файл >refs.txt< в папке c:\dsdt. Для чего он используется?
От tonymacx86: Дизассемблер iasl пытается определить количество аргументов [для неразрешенных символов, не определенных ни в одном файле], но часто делает это неправильно. Вы можете исправить это, предоставив внешние объявления в текстовом файле refs.txt. Он содержит некоторые распространенные (и не очень распространенные) недостающие символы. …
ii. Из командной строки (admin) декомпилируйте dsdt.dat в dsdt.dsl . Здесь используется файл refs.txt. dsdt.dsl затем копируется как dsdt-modified.dsl, в который мы внесем необходимые изменения.
c: & cd \dsdt
iasl -da -dl -fe refs.txt dsdt.dat
copy dsdt.dsl dsdt-modified.dsl
iii. С помощью Notepad++ откройте полученный файл c:\dsdt\dsdt-modified.dsl и найдите ResourceProducer. Под ним будет ряд записей ресурсов «DWordMemory». Под последней записью DWordMemory в этой области, обычно над методом _CRS, добавьте запись ‘QWordMemory’ (64-битную), как показано ниже. Диапазон выбран в 36-битном диапазоне (< 64GB) для поддержания совместимости с PAE-совместимыми 32-битными Windows. Место выше 48GB было выбрано для облегчения проблем с системами, оснащенными 32GB. Здесь мы используем диапазон от 48,5 ГБ до 56,25 ГБ. Когда системы начнут поставляться с 64 ГБ оперативной памяти, этот параметр необходимо будет изменить, чтобы использовать 64-битный адрес.
DWordMemory (ResourceProducer, PosDecode, MinFixed, MaxFixed, Cacheable, ReadWrite,
   0x00000000,         // Granularity
   0x000A0000,         // Range Minimum
   0x000BFFFF,         // Range Maximum
   0x00000000,         // Translation Offset
   0x00020000,         // Length
   ,, , AddressRangeMemory, TypeStatic)
// - ДОБАВЬТЕ ВОТ ЭТОТ ВОТ КУСОК ВОТ СЮДА: ---------------------------------------------------------------------------
QWordMemory (ResourceProducer, PosDecode, MinFixed, MaxFixed, Cacheable, ReadWrite,
   0x0000000000000000, // Granularity
   0x0000000C20000000, // Range Minimum,  set it to 48.5GB
   0x0000000E0FFFFFFF, // Range Maximum,  set it to 56.25GB
   0x0000000000000000, // Translation Offset
   0x00000001F0000000, // Length calculated by Range Max - Range Min.
   ,, , AddressRangeMemory, TypeStatic)
// ----------------------------------------------------------------------------------------------
})
   Method (_CRS, 0, Serialized)  // _CRS: Current Resource Settings
iv. Создайте файл dsdt-modified.aml . Параметр ‘-ve’ отключает предупреждающие сообщения.
c: & cd \dsdt
iasl -ve dsdt-modified.dsl
Маловероятно, что это получится с первого раза, так как компилятор очень строг. Сообщения об ошибках нужно будет просмотреть в Notepad++ в той строке, в которой они возникли. Найдите уникальное ключевое слово ошибки в строке ошибки dsdt-modified.dsl в файле dsdt-modified.asl (он может выглядеть немного иначе) и просто поменяйте местами строки выше/ниже в файле dsdt-modified.dsl и скомпилируйте. Этого было достаточно, чтобы получить Dell XPS 9350, Dell E6540, 2016 15″ Macbook Pro DSDT override, все было сделано идеально.
Если вы застряли, посмотрите публичный репозиторий eGPU.io с предварительно скомпилированными DSDT для различных систем. Если он существует для вашей системы, то можно загрузить его вместе с Winmerge для объединения изменений файла в рабочий файл dsdt-modified.dsl. Есть и другие исправления, описанные в [Guide] Patching LAPTOP DSDT/SSDTs (tonymacx86). Также попробуйте обратиться за советом на форумах DSDT-центров tonymacx86.com . Затем попробуйте скомпилировать DSDT снова.
Затем….
ii. В командной строке (admin) скомпилируйте файл dsdt-modified.asl, чтобы создать файл dsdt-modified.aml:
c: & cd \dsdt
asl /Fo=dsdt-modified.aml dsdt-modified.asl
Шаг 2. Загрузите файл dsdt-modified.aml в качестве переопределения реестра или замены в памяти
ВАРИАНТ 1: Загрузите dsdt-modified.aml в качестве переопределения реестра с включенным режимом тестовой подписи Windows
Здесь мы загрузим ваш dsdt-modified.aml в качестве DSDT-оверрайда реестра Windows. Обратите внимание, что недействительный dsdt-modified.aml, загруженный таким образом, может вызвать BSOD при загрузке. Кроме того, режим тестовой подписи Windows может быть проблематичным для совместимости приложений. Обе эти проблемы можно избежать, используя ВАРИАНТ 2: Избегайте режима тестовой подписи — загрузите свой dsdt-modified.aml в качестве подстановки DSDT в память.
i. В командной строке (администратор) введите следующее. Для работы программы WDK, содержащая файл asl.exe, должна быть установлена в соответствии с шагами 1 (i) и (ii).
c: & cd \dsdt
asl /loadtable dsdt-modified.aml
ii. Включите режим TESTSIGNING для применения переопределения реестра. В командной строке (администратор) введите:
bcdedit -set TESTSIGNING ON
Если при выполнении этого действия вы получите ошибку, как показано ниже, отключите SECURE BOOT в BIOS.
ВСе. Перезагружаем компьютер. Звук должен появиться. Если не заработал — нужно дальше колдовать 😎
ЗЫ: Внизу справа в Винде будет маячить надпись типа Режим тестировщика.
Данная инструкция протестирована и написана по видосам (где подробно все разжевывают):
Инструкция на английском тут: https://www.youtube.com/watch?v=LbmLVOUpVOA
И тут: https://www.youtube.com/watch?v=6foOrPapEFg
How to Install Windows 10 Legacy on a 2009-2011 iMac
Apple has released UEFI based support for BootCamp only for 2012+ machines. While it is possible to install UEFI Windows 10 OS in pre 2012 iMacs, these installations are sometimes met with hardware level incompatibilites due mainly to the early nature of EFI implementation in these machines. Here I present a way to install Windows 10 OS in LEGACY mode with full compatibilty and reliablility for all vbios upgraded Nvidia and AMD video cards.
Compatibility list:
- iMac mid-2011 (iMac12,2 & iMac12,1)
- iMac mid-2010 (iMac11,3 & iMac11,2)
- iMac late-2009 (iMac11,1)
IMPORTANT: Unplug all external hard drives to avoid accidental erasure. It will be important to keep track of Drives and Partitions throughout this process. Please note this process involves partition rewrites to the main disk and could potentially cause corruption; Please make a backup. I take no responsibility for accidental erasure.
Requirements
- A 2009-2011 iMac running MacOS High Sierra and above (as my base system, I am starting with Catalina 10.5.7 — Dosdude1 patched)
- A Metal-GPU capable video card, Nvidia or AMD will work (Native or Upgraded)
- An 8GB or larger USB drive (only for the BootCamp support software you will need to download)
- An ISO file containing Windows 10. I used Windows 10 Home Edition
- An functional OEM 8X DL «SuperDrive» slot-loading DVD reader in your iMac 2011.
- 45GB+ free disk space for Windows OS.
Step 1: Disable MacOS System Integrity Protection (SIP)
High Sierra and Catalina ship with System Integrity Protection (SIP), also known as «rootless» mode.
- Check to see if you have it enabled:
csrtuil status. If already disabled skip Step 1. - Restart your Mac.
- Hold down Command ⌘-R and keep it held down until you see an Apple logo & progress bar. This boots you into Recovery mode.
- From the Utilities menu, select Terminal.
- At the prompt type exactly the following and then press Return:
csrutil disable - Terminal should display a message that SIP was disabled.
- From the top menu, select Restart.
- For Catalina, you will need Hackintool V3.05, go to tools menu and select the ‘house’ icon at the bottom to ‘Disable Gatekeeper’ and mount the disk in read/write mode.
- To re-enable SIP protection, repeat steps above but instead type:
csrutil enable
Step 2: Download the Bootcamp Windows Support Software
This download will contain the Windows drivers you will need to run Windows on your Mac. Allow the computer to do this for you via the Boot Camp Assistant application:
- Open Boot Camp Assistant from Applications -> Utilities
- Click continue at the introduction, you may see 2 or 3 options, unclick these options, we will not use them:
- Instead, from the Action menu select Download Windows Support Software
- Select your Macs Desktop or Downloads folder as the destination for the download
- Press Quit once you are done. The download is 1.35GB, drag it to a USB drive to use later when we’ve booted into the newly installed Win10 Desktop


Step 3: Obtain a bootable Windows 10 Legacy DVD .iso
Premable:
The .iso needs to be <4.7GB in total size to fit on the DVD. The .iso images have grown over the years as they incorporate more and more updates. Furthermore, the install.wim file must be <4Gb to fit in a FAT partition for copying.
In another segment I will show you how to reduce the size of the install.wim to only carry the actual version of Windows that you want and therefore adhere to the <4Gb file limitation size of FAT.
- I used Win10_1803_English_x64.iso. The download is slow, but it will complete successfully.
- This .iso represents the absolute latest one that can perfectly fit on a 4.7GB DVD-R disc without a hastle.
- In MacOS, you can right click the .iso file and choose «Burn to Disc…»
Step 4: Create the Win10 MS-DOS FAT partition (in MacOS)
- Launch Disk Utility; On the Internal drive, under the ‘View’ drop down, make sure ‘Show All Devices’ is selected.
- Click the Partition button, and then the «+» sign, adjust the size of the partition you want to dedicate for Windows.
- Select MS-DOS (FAT) for the Format and name it «win10», click Apply. It will format it under the GUID scheme.
- Now you have a Windows FAT/GUID partition.
- Note: you may get a final partition name of «10» instead of «win10», this is a known bug of Disk Utility, ignore it, the name won’t matter.

Step 5: Create the Hybrid MBR (in MacOS)
Premable:
A conventional GPT disk contains a protective MBR with a single partition, of type 0xEE (EFI GPT). This can span the entire size of the disk. Our Legacy Windows 10 will not install on a GPT formated partition. In operating systems that support GPT-based boot through BIOS services rather than EFI, the first sector may also still be used to store the first stage of the bootloader code, but modified to recognize GPT partitions.
This is a little dangerous because Hybrid MBRs are not part of Intel’s EFI GPT standard. In fact, beginning with Windows 8, Microsoft’s OS installs on most Intel-based Macs in EFI mode, so a hybrid MBR is not required. Unfortunately if you try to install Windows 10 in EFI mode in a 2011 iMac, you will face random reboots, Cirrus Logic Audio not working (internal speakers) and possibly video problems involving igdkmd64.sys (Intel HD3000 internal GPU incompatibilities). As I’ve stated, these issues were sorted out with the introduction of proper efi drivers starting in 2012. So for us, Windows 10 will never have full Protected MBR status like a normal PC; it will have to exist in a hybrid MBR environment.
If this step is not completed you will get this error when installing Windows 10:
Windows cannot be installed to this disk. The selected disk is not of the GPT partition style
Let’s begin:
This gets us to a Hybrid MBR (see below) which Windows 10 will use to format over to NTFS, and finally install windows 10 in.

Step 6: Install Windows 10 Legacy using the DVD ROM Drive:
- Reboot your Mac with the bootable Windows 10 Installer DVD inserted in the SuperDrive.
- Press and hold down the Option (⌥ alt) until you see the boot selection options.
- You should see an option with 2 DVD icons, one is a Windows and the other is EFI Boot, choose the «Windows» one.
- The Windows 10 installation will now start, follow the steps, selecting Custom Installation.
- «Press any key to boot from CD or DVD…..» make sure to press a key!
- At the «Windows Setup» screen select Next, then Install now
- Put in your product code or select «I don’t have a product key»
- Select the version of Windows you want to install, I selected «Windows 10 Home»
- Select Custom: Install Windows only (advanced)
- Select your partition but be careful, and ensure you select the «win10» («W10») partition created earlier before proceeding:
- You will see a warning: «⚠ Windows can’t be installed on drive 0 partition 2. (Show details)«. This is expected because up to this point, you only have a FAT-32 partition present.
- Select Format, and the installer will format the partition to NTFS file system:
- The error message is now cleared and the Next button will now be highlighted. Press it:
- Windows will restart ~4 times during installation. Be ready to hold down the Option (⌥ alt) key after each reboot, but instead of selecting the DVD device 📀 named «Windows» select the newly created Hard Disk 🖴 named «Windows» instead to ensure the installation continues
- This time, ignore: «Press any key to boot from CD or DVD…..» since you want to continue the installation from within the hard disk now.
- Finish installing Windows until you get to the desktop.


Step 7: Install ‘Bootcamp Windows Support Software’ (in Windows 10)
These drivers are installed as part of the Bootcamp Windows Support Software and will allow Windows 10 to work with the Mac specific devices: WiFi, Graphics, External Monitors, Webcam, Bluetooth and Audio.
The Bootcamp Windows Support Software should be on the Windows 10 installer USB you created earlier.
- Insert your USB drive
- Open WindowsSupport -> Bootcamp -> setup.exe.
- This will install all the required drivers and the bootcamp utility for Windows.
- Reboot the system, and get back into Windows.
- This is a good time to go into Windows Update and allow multiple security and feature installs to bring you up to Version 21H2
- You may wish to allow ‘other device updates’ in Win10, as this will ensure you are using the latest video drivers as well
Step 8: ‘Regedit’ patches to allow for brightness control (Upgraded Nvidia Metal video cards)
- run the Registry Editor, regedit
- navigate to:
HKEY_LOCAL_MACHINE\SYSTEM\CurrentControlSet\Control\Video\{**UUID**}\0002 - The
UUIDidentifier may be different for your video card. Check each entry for theHardwareInformation.AdapterStringthat matches your hardware. - The entries will be clustered in groups of 4 numbers, eg: 0000, 0001, 0002, 0003, 0004.
- Right click, Add a REG_DWORD labelled
EnableBrightnessControland set it to1 - Right click, Add a REG_DWORD labelled
RMBrightnessControlFlagsand set it to400in Hex, or1024in Decimal.
- Reboot, you should now have a slider for brightness control back.


Step 9: Verify «Legacy» Installation
- run msinfo32 via the Windows panel, you should see verification of your install:

Step 10: Re-Enable SIP protection
see Step 1, type: csrutil enable, reboot
Issues
Separate SSD for Windows 10
If you want to install Windows 10 on separate SSD, it can be done. The SSD needs to be part of the SATA chain and not a USB device.
You will need to create an MS-DOS FAT, GUID formatting as we did with our partitioned drive; You will need to also transform the PMBR to Hybrid MBR.
The rest of the procedure is similar.
Opencore (OCLP):
Opencore does not yet allow for MBR or Hybrid-MBR bootup recognition as far as I know. If you are using OpenCore (>Catalina OS), you will need to subload the REFInd manager from within Opencore to finally see the Windows icon and load it. I use an SD card with Opencore on it to achieve this for my computers that have higher than Catalina Os installs.
Sources & Acknowledgements
- Oznu, How to install windows 10 EFI on imac 2011
- Dual Booting on an iMac 27″ Mid 2011
- Repair Bootcamp partition boot entry missing after disk resize
Опубликовано: Рубрика: Windows
Как за 10 минут установить чистый Windows 11 23H2 Pro на старый Macbook Air A1370 2011 года с 2 ГБ RAM, чтобы все работало без тормозов, включая звук и видео? Четкий пошаговый план, который позволит избежать всех ошибок и проблем, описанных ранее в подробной статье: Как установить современный Windows 10 или 11 на старый Macbook?
Также рекомендую использовать актуальную версию Windows 11 24H2 Pro с файлом autounattend: Как быстро установить чистую Windows 11 Pro 24H2 на неподдерживаемом железе?
Пошаговое руководство установки Windows 11 23H2 Pro на древние Macbook Air или Pro 2009 — 2013 годов
- Готовим Tiny Windows 11 23H2 Pro с помощью Rufus, выбираем MBR, далее в настройках выбираем все галочки, указываем локальную уч.запись, докидываем на флешку драйвера для Macbook Air, вставляем готовую флешку в USB Macbook Air. Вынимаем все остальные флешки (кроме мышки). Почему выбираем MBR, а также все остальные инструкции по операциям с Макбук вы найдете в этой статье Как установить современный Windows 10 или 11 на старый Macbook?
- Сбрасываем SMC и NVRAM по инструкции. После сброса SMC сразу выключаем компьютер, не давая загрузиться с EFI
- После сброса NVRAM (компьютер несколько раз делал нечто похожее на перезагрузку) и отпускании всех клавиш сразу жмем на alt (option) и держим ее (так мы загружаем меню выбора загрузочного раздела или устройства).
- Внимание! Если в промежутке между сбросами произошла загрузка ОС с EFI, рекомендую сразу повторить сброс сначала
- После удерживания alt (option) возникает загрузочное меню, выбираем usb флешку с подписью Windows
- Начинается быстрая установка Tiny Windows 11 23H2 Pro. На этапе выбора раздела я удаляю все разделы и ставлю Windows в свободное пространство. Компьютер несколько раз перезагрузится. На этом экране выбора оставляю выбор по умолчанию
- Выбираю раскладку US и добавляю свою раскладку RU, пропускаю подключение к интернету (I don’t have the internet / Continue with limited setup). Все обновления и подключения к уч.записи Microsoft можно сделать позднее.
- Далее в настройках Privacy оставляю только Location, все остальные пункты отключаю
- Итого — всего через 10 минут на древний Macbook Air A1370 mid-2011 установлен новый, чистый, быстрый Windows 11 Pro 23H2, занимающий 0,8 — 0,9 Гб оперативной памяти в простое.
- (ОПЦИОНАЛЬНО) Далее щелкаем правой кнопкой по Панели задач и выбираем Taskbar settings.
Отключаем Search — Hide, отключаем Task view и Widgets. Прокручиваем ниже и включаем Tray icons. - После установки заходим в Диспетчер Устройств и видим неустановленные драйвера.
Я захожу в папку с драйверами MacNewDrv, захожу в папки по очереди и по правой кнопки мыши на файле INF, ставлю
sandybridge
heci 1
heci 2
applebtbc
appleenu - Также можно ставить драйвера с восклицательным знаком по правой кнопке мыши (Update driver) с заранее подготовленного места (Browse files…).
- Итак, у нас остаются неустановленными только видео и звук.
Видео я ставлю из папки MacVid3000x64, отключаю галку на первом экране (что-то Aero) и дальше все ставится на автомате, включая звук. Видеодрайверы ставятся, экран несколько раз моргает… Звуковое устройство появляется и … не работает ) Ничего страшного, перезагружаем. - После перезагрузки ставим драйвер звука CirrusAudioCS4206x64. Перезагружаемся и звук работает!
- Итого еще около 5-10 минут, и получаем полностью настроенный Win11 Pro на MacAir 2011. Кстати, все очень шустро работает, не считая некоторой задержки при включении компьютера.
- (ОПЦИОНАЛЬНО) Далее, если Ваш компьютер уже был активирован ранее с Windows 10 или 11 Pro, и данные о цифровой лицензии хранятся в аккаунте Microsoft, то переходим в Edge, заходим на сайт microsoft.com, и заходим в свою учетную запись. После этого проверяем, что Активация активна.
- Важное замечание — все ссылки на все программы и все загрузки, а также пояснения, почему именно MBR а не EFI/UEFI и прочие инструкции приведены в этой статье: Как установить современный Windows 10 или 11 на старый Macbook?
- В конце запускаем Windows Update и обновляем Windows 11 23H2 Pro до актуального состояния.
- Теперь можно поставить CPU-Z и посмотреть параметры оборудования и производительность CPU:
Драйвера на мак, использованные в данной статье
- п.11: https://disk.yandex.ru/d/zBp2zHmBMqgwkw MacNewDrv
- п.14: https://disk.yandex.ru/d/l8hGdprOGanSkQ CirrusAudioCS4206x64
- п.13: https://disk.yandex.ru/d/AcP64N3mf42VMw MacVid3000x64
Параметры драйвера видеокарты MacVid3000x64
Version: 15.28.24.64.4459 Release Date: May 19, 2016
The 2011 iMac was one of the best Apple computers to be released in its class. It featured a compelling design, and decent specs at the time, and it could be repaired and upgraded easily.
Apple discontinued support for the 2011 iMac after macOS 10.13 High Sierra, leading to compatibility issues with newer software. As a result, users were forced to rely on outdated software, posing significant security risks, or upgrade to a new Mac. However, by installing Windows 10 or 11, the 2011 iMac receives a significant performance boost, greatly extending its lifespan. This is why installing Windows on your older iMac is a great option.
(If you have a Mac with Apple Sillicon, learn how to install Windows 11 here)
Many have tried; Many have failed.

Many issues arise when installing Windows on this computer. Some of the most common problems include; lack of sound, random reboots, driver issues, and BSOD errors.
These are some of the most common BSOD errors that people encounter.
- Page Fault In
- Nonpaged Area
- igdkmd64.sys
- atikmpag.sys error.
- Kernel Security Check Failure
These issues happen when Windows is installed in EFI boot mode. For Windows to correctly work with this Mac, it has to be installed in legacy mode (Master boot record). Nevertheless, there is a proven way to get Windows running correctly with all drivers working. Read more to find out!
What you’ll need
- 16GB flash drive
- A fresh copy of Windows 10/8.1 iso (You can download a copy of Windows from here
- Rufus app (download here)
- Tuxera app (download here)
- Refit (download here)
- Bootcamp drivers

1) Open the disk utility app and partition the hard drive
This process will not use Bootcamp assistance.
- Once Disk Utility is opened, partition your hard drive and format it in MS-DOS.
- It’s important to format it in MS-DOS as the system will create it in MBR (Master Boot Record), which is needed to successfully boot Windows. NOTE: Mac OS will create a hybrid GPT/MBR partition.
- If the partition is formatted in GPT; Windows will install, but you will face all those issues and BSOD errors. However, if the setup installation is meant to target an MBR partition and the partition was formatted in GPT, Windows installation will say ”Windows cannot be installed to this disk. The selected disk is not of the GPT partition style”.
- If you’re confused don’t worry. In simple terms; the flash drive and the partition you made with disk utility have to both be in the same partition style. Either MBR or GPT. In our case, MBR is our target.
2) Use any Windows computer and install Rufus
If you don’t have a Windows computer, install parallels and run it in a virtual environment.
- Rufus is crucial for this process because it allows you to create a Windows bootable flash drive in either MBR or UEFI.
3) Open the Rufus app and select the Windows 10 iso
- Make sure to change the partition scheme to MBR (This is very important).
- Double-check that the flash drive is connected to Rufus.
- Click start and let Rufus create a bootable disk.
4) Format partition with Tuxera
Open the Tuxera app that you downloaded earlier. Tuxera might prompt you to restart after installation.
- Once Tuxera is opened, locate the partitioned drive that you created earlier with disk utility.
- Format the partition as NTFS (It’s important to use Tuxera for the NTFS format)
5) Copy Windows 10 installation folders to the partition
Once the partition is formatted, insert the flash drive that contains Windows 10 installation folders.
- Copy the contents from that flash drive to the newly formatted NTFS partition that was created with Tuxera.
6) Install Refit
Download and install Refit from here. If you don’t see the Refit menu on boot, use this command on terminal to bless it.
cd /efi/refit ./enable.sh
7) Restart Mac
Restart your Mac and hold down the option key (Alt key). You might want to use a wired keyboard as a Bluetooth one might not be recognized.
Navigate through Refit and click on Windows
 Navigate through Refit and click on Windows
Once the Refit menu shows, navigate toward the internal hard drive partition that has Windows installation files (Make sure the flash drive is also connected. It might or might not work without it.)
9) Start Windows installation
Windows installation will start and you will have successfully booted in MBR mode
10) Follow setup instructions
Follow Windows 10 instructions and install as usual. You can also safely format the partition that has Windows files in it while doing the installation. Just make sure the flash drive is connected.
11) Keep an eye on reboots
Windows installation might restart your computer a couple of times. Make sure you’re there to click the option/ALT button, or else it will boot to Mac OS.
12) Install Bootcamp drivers
Once Windows is installed, do a quick Google search and install Bootcamp drivers. Windows 10 will also automatically detect and install drivers for you.
This is a guaranteed method that works. But just in case it doesn’t, there’s another solution.
Guaranteed solution! Install Windows with a DVD CD
If the steps above are too confusing or will take too much of your time. Windows can be installed in MBR mode through a bootable DVD (MBR is on by default when using a CD). To do this, open the Bootcamp app on Mac OS and follow the instructions. Create a bootable CD from the Windows 11 ISO and the rest should be straightforward.
But for those that want to use a USB to install Windows 11 in MBR, the tutorial above should suffice.
Why install Windows on a Mac?

- Access to current software (especially if your Mac is no longer supported by Apple)
- Windows is the best operating system for gaming
- Apple makes amazing hardware. Windows 10 really shines with some of these old Macs.
Disclosure: Vividbay is a participant in the Amazon Associates Program. We may earn a commission from qualifying purchases.
Kenyon Ndezi is a tech enthusiast, active developer, and the founder of NeonBuild.com, a platform that enables users to create apps without any coding knowledge. Residing in Newfoundland, Canada, Kenyon delves into the latest in gadgets, science, and technology on VividBay.com, offering in-depth tech reviews and analyses. His minor in computer science, paired with a degree in economics, provides a well-rounded perspective to his content. With expertise in mobile app development, web development, server management, and WordPress, Kenyon ensures VividBay.com is a hub for tech-savvy readers seeking reliable information and innovative insights. Kenyon also runs Kenyonndez.com, where he shares personal experiences, travel adventures, and lifestyle tips. His extensive experience in creating websites for various organizations and educational institutions further enriches his content, blending practical knowledge with forward-thinking technology trends.