

We talked about Freedos in our previous article. You can look from here. Now we will show you how to install Windows 10 on a computer with Freedos. If the following screen appears when you turn on the computer, it means that the Freedos operating system has been installed on your computer. Freedos is actually an operating system. It is an operating system published by some developers as a continuation of the DOS operating system that Windows used to be no longer developed. It is not considered an operating system that can be used on today’s computers.

Installing Windows 10 on a Freedos Computer
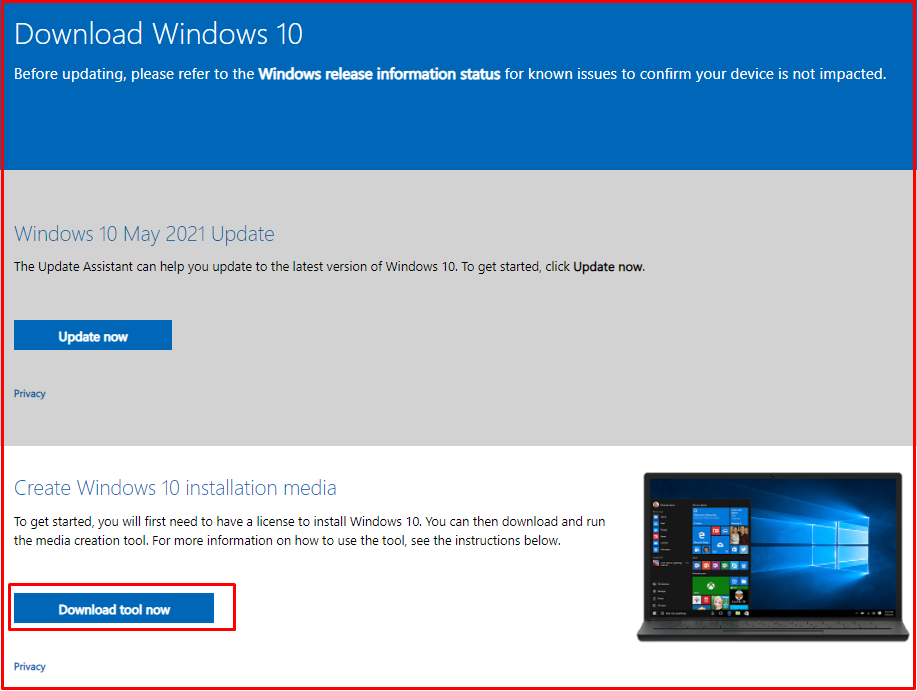
We recommend that you first download the Windows 10 operating system from a reliable source before proceeding to install Windows 10 on a FreeDOS computer. The most reliable source for this is Microsoft’s own site. Click on the link HERE to go to the required download page. Then you can download the Windows 10 download tool to your computer by clicking the blue button we showed above.
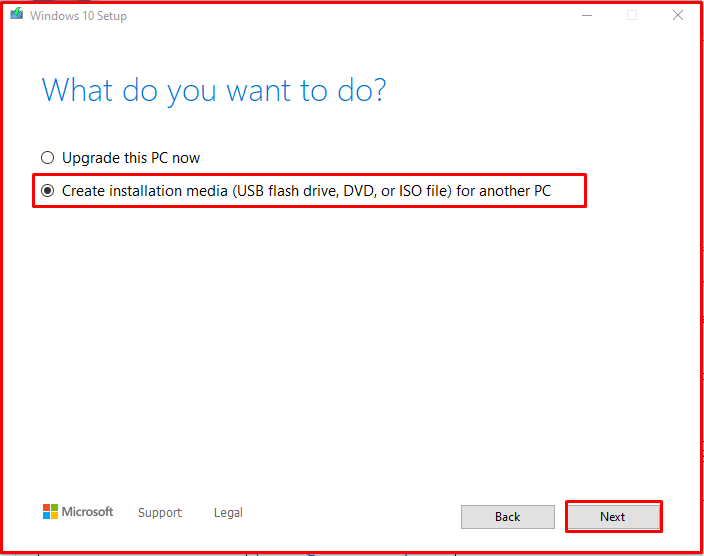
Then open this program you downloaded, when you click the “Accept” button, a page like the one below will open. Select the section we have shown as selected below and click the “Next” button.
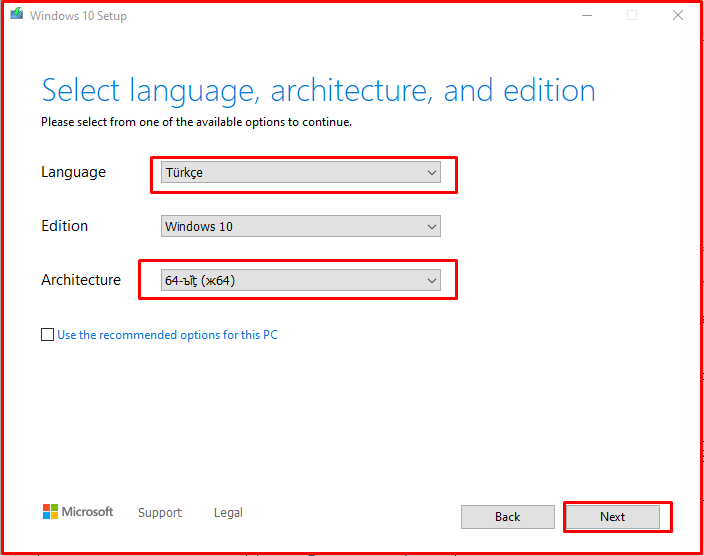
After clicking Next, you will see a screen like the one below. From here, choose the language and architecture that suits you. 64 bit is used for current computers. Then click the “Next” button.
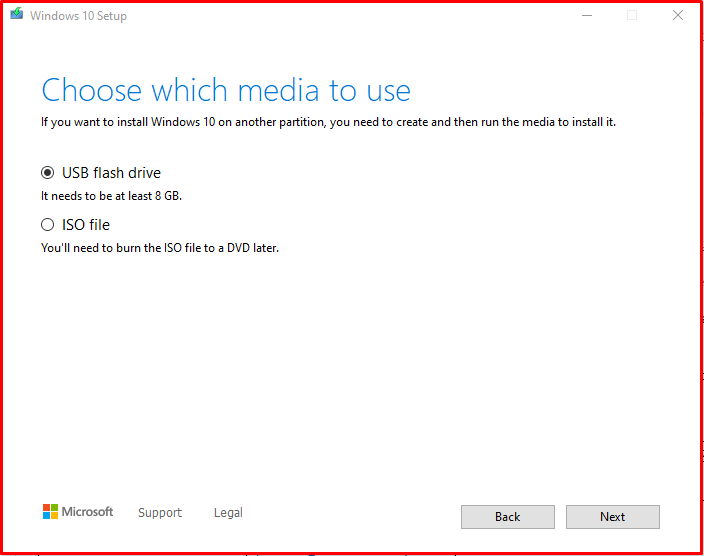
You will then see a screen like the one below. If you use the first option, Windows 10 will be automatically downloaded and written to a USB stick plugged into your computer. In the second option, only one ISO file is downloaded and you have to burn it to your USB stick with software like Rufus. In our previous article, we explained how to install Windows 10 from the Rufus program to USB. You can read the article by clicking the link HERE. You can use the first option if you want. Just remember that there must be at least 8 GB capacity and as a result of this process, the data in your flash memory will be deleted. The duration of this process may vary depending on the speed of your internet and flash memory.
After printing Windows 10 to USB, start your Freedos computer and enter the BIOS screen. (To go to the BIOS, press f2 or delete while the computer is booting.)
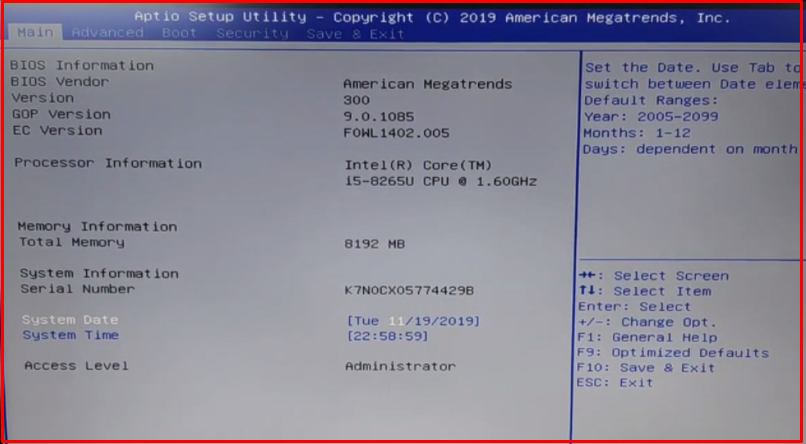
Under the “Boot” menu, set the “Fast Boot” option to “Enabled“.

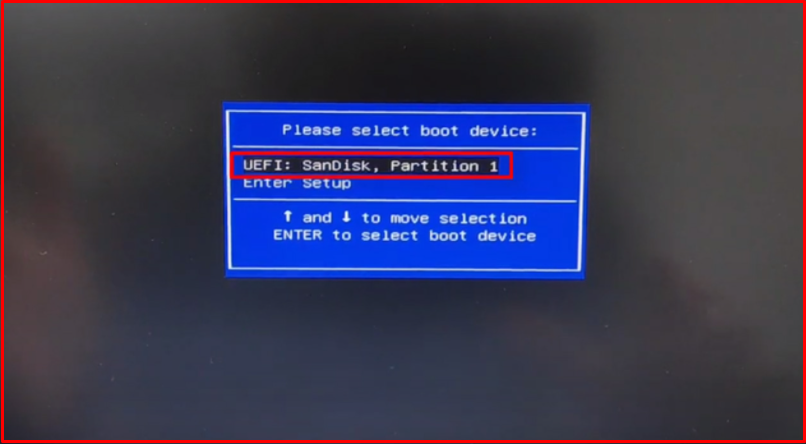
We save the changes we have made and exit the “BIOS” screen. Plug your USB memory into your Freedos computer and restart the system. While the computer is booting, press the “Boot” menu button repeatedly depending on your model. (The boot menu key is usually F12). In the Boot menu that opens, select your USB memory and the Windows installation will begin. The important point you should pay attention to in this menu is that there is the phrase “UEFI” next to the USB memory. If you have a computer manufactured around 2013 or newer, the “UEFI” option will be activated directly. If this phrase still does not appear, you can go back to the BIOS screen and change the “Boot Mode” to “UEFI” from the “Boot” menu.
After following all the steps, you will be able to complete the Windows installation on your Freedos computer without any problems. You can follow these steps in our previous article about installing Windows from USB. You can read the article by clicking the link HERE.
Имеется ноутбук lenovo idepad s340 с freedos на борту. Возникла проблема с установкой windows 10. Пробовал: менять приоритет загрузки в БИОС и заходить через f12 в меню boot, выбирал там флешку и снова загружалась freedos. Флешка на других пк распознается и загрузка с нее идет, так что видимо не битая.
-
Вопрос задан
-
76213 просмотров
Купил ноут с фреедос
Скачал образ винды
Создал загрузочную флешку через rufus
Зашел в биос, включил uefi (без legacy), отключил safe boot (на всякий)
Нашел опции boot from usb, включил
Usb legacy тоже включил
Зашел в boot menu f11 (f12)
Поставил винду
Мб поможет обновление bios
Так же стоит попробовать поставить винду через legacy, диск придется конвертировать в mbr
И надо будет включить режим legacy bios
Флешку пихать в порты usb 2.0 (черные, вместо синих)
Также стоит попробовать другой образ
Пригласить эксперта
2 недели назад столкнулся с такой же проблемой но в десктопе HP Desktop Pro A 5JP27ES FreeDOS. Купили Win 10 Pro, с родной, в буквальном смысле из коробки, флешки не мог установить, какое бы шаманство не перепробовал. Решение: скачал и создал с помощью Media Creation Tool, тогда всё завелось без каких-либо дополнительных телодвижений.
Причины так и не понял, но вывод сделал: больше никаких «белых сборок»!
-
Показать ещё
Загружается…
Минуточку внимания
Installing Windows on a system that initially uses FreeDOS involves several steps. FreeDOS is a free operating system that is compatible with MS-DOS, and it can be used to prepare your system for a Windows installation. Below are the detailed steps to install Windows on a FreeDOS system.
Step 1: Prepare Installation Media
-
Obtain Windows Installation Media: You’ll need a valid copy of the Windows installation files. This could be an ISO file for Windows 10, Windows 11, or any other version you wish to install.
-
Create Bootable USB Drive:
- Use a tool like Rufus, UNetbootin, or the Windows Media Creation Tool to create a bootable USB drive from the Windows ISO file.
- Insert a USB drive, run the tool, select the ISO, and follow the prompts to create the bootable drive.
Step 2: Backup Important Data
- Before proceeding with the installation, ensure to back up any important data from your FreeDOS installation, as the process may overwrite existing data.
Step 3: Boot from the USB Drive
-
Access BIOS/UEFI settings:
- Restart your computer and enter the BIOS/UEFI setup. This often requires pressing a key during startup (like F2, F10, F12, DEL, or ESC, depending on your system).
-
Change Boot Order:
- In the BIOS/UEFI settings, look for the boot order settings.
- Set your USB drive as the first boot device.
-
Save Changes and Exit:
- Save the settings and exit the BIOS/UEFI. Your computer should now boot from the USB drive.
Step 4: Install Windows
-
Windows Setup:
- When the system boots from the USB drive, the Windows Setup screen will appear.
- Follow the on-screen prompts to start the installation.
-
Select Installation Type:
- Choose «Custom: Install Windows only (advanced)» when prompted for the installation type.
-
Partitioning:
- You may see the existing FreeDOS partitions. If you want to install Windows on the same partition, you can delete these partitions (make sure you have backups of any important data).
- Create a new partition for Windows if necessary. Windows will typically need at least 20 GB of space, but more is recommended for updates and applications.
-
Format the Partition:
- Select the partition where you want to install Windows and format it. Windows will usually handle this during the installation process.
-
Complete Installation:
- Follow the remaining prompts to complete the installation. This will involve setting up your region, keyboard layout, and user account.
Step 5: Final Setup
-
Install Drivers:
- After Windows installation, make sure to install necessary drivers for your hardware. You can usually find these on the manufacturer’s website.
-
Update Windows:
- Run Windows Update to ensure your system is up to date with the latest patches and features.
-
Restore Data:
- If you backed up data earlier, you can now restore it to your new Windows installation.
Conclusion
You have now successfully installed Windows on a system that was previously using FreeDOS. Make sure to keep your system updated and secure after the installation. If you encounter any issues during the installation, consult the official Microsoft support documentation or forums for troubleshooting tips.
This question has been answered using artificial intelligence. If there is any problem please contact us.
Did you like this answer?
Similar Questions
- Can I install Windows on a FreeDOS laptop?
- Should I install Windows 11 22H2 or stay on Windows 10?
- Is it possible to install Windows 10 on a Windows 7 computer?
- Is Windows Defender automatically installed on Windows 11?
- Can I install Windows 10 on Windows 7?
- Do I have to uninstall Windows 7 to install Windows 10?
- How to install Windows 10 from Windows 7?

Открытие того, что ноутбук ASUS в одной и той же конфигурации стоит на 1000 рублей дешевле и подвигло меня на подвиги по приобретению ноутбука для своего друга, ну а дальше спортивный интерес повел меня на трудовые подвиги закончившиеся… не буду забегать, начнем по порядку.
Был приобретен ноутбук Asus, модель X551MA с установленной DOS. Продавец в магазине на мое «Бери Жека — не прогадаешь, на эту штуку лучше меня пивом угостишь, а я Винду и офис тебе установлю», покосился, ухмыльнулся и ничего не сказал. Дело в том, что после того, как он продал нам мышь с разъемом PS/2, я вообще думаю что он по любому поводу ухмыляется, а не от большого ума.
С ноутбуком, пивом, программным обеспечением, соленой рыбкой и другом Евгением мы собрались культурно провести вечер, ну и разумеется установить вражеское ПО (виндовс 7 и офис 2013) на свежекупленный ноут.
Вставляем диск, лезем в биос, ставим загрузку с компакт диска, стартуем и начинаем установку, вернее начинаем собирать сюрпризы…
Сюрприз 1. Установка заканчивается синим экраном не успев толком начаться. Смысл надписи — установка невозможна, поскольку БИОС не поддерживает чего то там. Свяжитесь с поставщиком и т.д. и т.п.
Лезем в Инет и узнаем следующее, ноутбуки с Asus с FreeDOS, комплектуются старыми прошивками, и для установки любой версии Windows необходимо обновить прошивку. Употребляем, закусываем, лезем в БИОС, видим, что версия 402… и скачиваем с сайта Asus 506 версию прошивки на флешку.
Заодно делаем флешку загрузочной, и качаем на неё программу, для прошивки БИОСа из под ДОС.
Перезагрузка, БИОС, грузиться с флешки, грузимся, запускаем прошивку и экран заливается белым цветом, ноут останавливается…
Сюрприз 2. Программы для прошивки БИОСа из под ДОС на Asus не работают, они просто виснут и ничего не делают.
Употребляем, закусываем, перезагружаем ноутбук принудительно выключив его и лезем изучать БИОС и вот есть же приятные сюрпризы.
Сюрприз 3. БИОС ноутбуков Asus содержит возможность самообновления через утилиту bios ez flash.
Запускаем утилиту, она обращается в флешке, указываем ей на файл с прошивкой, программа считывает его, проверяет и обновляет БИОС. Перезагружается ноут, видим версию 506 и возможность выбора версии Windows прямо в БИОСе.
Дальнейший процесс описывать не буду, поскольку мы просто пили пиво, болтали и наблюдали, как четырехядерное чудо на 15 т.р. устанавливает Windows 7, захоти мы поставить Windows 8, то поставили бы точно так же. Следом поставили офис.
Так что если кому интересно сэкономить 1000 рублей и попробовать себя в роли компьютерного техника, можете смело браться за дело и у вас всё получится. Возможно похожие проблемы у всех ноутбуков с установленной ДОС, поэтому следует рассматривать этот материал, как общий подход к проблеме, содержащий пути для успешного решения.
- IT
- Компьютеры
- Cancel
Купили матери ноутбук Lenovo с FreeDOS (то бишь, можно сказать, чистый). Если честно, не думала, что с установкой оси будет столько проблем!
Сначала пыталась зайти в BIOS, но кидало все время на командную строку Фридоса. Оказалось, нужно было зажать Fn+F2, а дальше — возиться в биосе, которые, блин, заметно друг от друга отличаются. Сделала запуск с флешки, запустили флешку, ставим. Все поставилось, ура! НО! После загрузки бука стало появляться сообщение «Windows boot manager has been blocked by the current security policy». Гуглила форумы, запускалась с LiveCD, Grub4dos, и что только не делала… Оказалось, все намного проще… Ответ нашла на форуме линуксоидов, которые советовали в данной ситуации в биосе отрубить UEFI и поставить ось заново. Вуаля! Несколько часов еботни и одно маленькое сообщение маленьким шрифтом…
Не знаю вот теперь, стоит ли отращивать бороду или остаться скромным дизайнером? xD