
Еще никогда не было более подходящего момента для перехода на Linux. В то время как систему обновления Windows 10 сложно назвать удобной, и пользователи по-прежнему вынуждены подчиняться воле Microsoft, жизнь с компьютерами под Ubuntu протекает по одному простому принципу: несложно и безопасно.
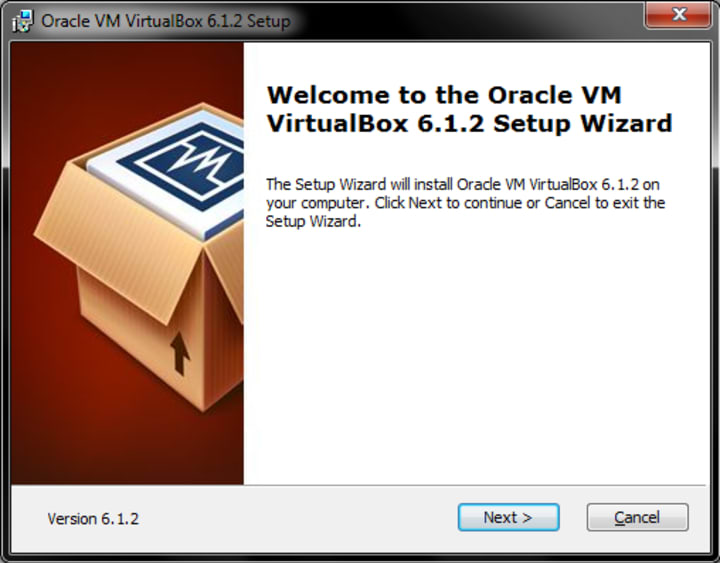
Свежая версия Ubuntu 18.04 — это хороший повод распрощаться с Windows. Финальный релиз под кодовым именем «Bionic Beaver» («Бионический бобр») был запланирован на 26 апреля этого года. Мы попробовали новую версию на стадии Beta 1; она содержит все основные функции и при тестировании работала стабильно.
Особенностью версии 18.04 является сокращение «LTS» (Long Term Support) в названии. Это значит, что разработчик Canonical будет выпускать обновления для нее в течение примерно пяти лет. Версии без «LTS» в названии поддерживаются всего девять месяцев. Новая версия Ubuntu выпускается дважды в год — как правило, в апреле и октябре, и номера версий представляют год и месяц релиза. Например, Ubuntu 17.10 выпущена в октябре 2017 года, но будет получать регулярные обновления только до лета 2018 года.
Версии с долгосрочной поддержкой ориентированы на предприятия и предназначены для обеспечения надежной работы серверов и рабочих станций. Однако рядовым пользователям, ценящим высокий уровень стабильности, тоже очень удобно ими пользоваться.
Новые функции
Еще в прошлой версии Ubuntu 17.10 компания Canonical решила пойти на серьезные изменения в некоторых ключевых компонентах системы. Так, ушла в прошлое собственная оболочка Unity и вернулась Gnome, на смену графическому серверу Mir пришел Wayland, а вместо дисплейного менеджера LightDM в ней задействован Gnome Display Manager (GDM).
Значки на рабочем столе Gnome
Однако Canonical не полностью придерживается традиций Gnome. В частности, в Gnome теперь нет возможности размещать значки на рабочем столе, но разработчики Ubuntu не стали мучить пользователей и позаботились о том, чтобы эта опция в Ubuntu 18.04 все-таки была доступна. В новой версии, вместо того чтобы продолжать использовать Wayland, разработчики решили вернуться к графическому серверу Xorg, при котором сбой оболочки не приведет к завершению всего сеанса. Кроме того, Wayland не предусматривает возможности удаленного управления рабочим столом.
Расширенная интеграция Snap-пакетов
Для установки программ в Ubuntu до сих пор преимущественно использовался формат DEB на базе Debian. В Ubuntu 18.04 впервые будут включены пакеты в новом формате Snap, который должен облегчить процесс установки программ и компонентов.
Snap-пакет содержит не только программу, но и все ее зависимости, то есть все необходимые исполняемые и конфигурационные файлы и библиотеки. Они сохраняются в отдельном каталоге, и при обновлении просто создается новая папка, так что при желании можно оставить старые данные. Одним из первых приложений в формате Snap является предустановленный калькулятор.
Больше скорости и безопасности
Разработчики немало потрудились над тем, чтобы ускорить процесс загрузки Ubuntu. Точные измерения имеет смысл проводить только для финальной версии, но, судя по бета-версии, запуск системы будет занимать ощутимо меньше времени. Нагрузка на процессор Ubuntu 18.04 также должна быть более щадящей. И это несмотря на то, что версия изначально содержит патчи для закрытия уязвимости, эксплуатируемой вирусами Spectre и Meltdown, которые в некоторых случаях снижают вычислительную мощность.
Новым в Ubuntu 18.04 является также полезное приложение Gnome To Do — менеджер задач, позволяющий планировать дела. Также стоит отметить анонсированную ранее телеметрию, которая должна собирать анонимные данные об использовании компьютера. В ранней бета-версии этой функциональности не было.
Установка на ПК и ноутбук
Существует несколько вариантов установки Ubuntu. Можно отформатировать жесткий диск и установить Ubuntu единственной операционной системой. В таком случае, конечно, будет уничтожено все содержимое диска. Можно урезать раздел Windows и установить Ubuntu второй операционной системой — с этим поможет справиться установщик.
Можно установить Ubuntu на виртуальную машину, чтобы попробовать ее на вкус. Можно, наконец, использовать Live-систему и загрузиться с нее. Этот вариант позволяет совершенно спокойно опробовать Ubuntu, перед тем как окончательно перейти на нее, установив ее на жесткий диск.
На этой странице выкладываются все тестовые сборки; если необходимо, скачайте оттуда файл «bionicdesktop-amd64.iso».
Как безопасно попробовать Ubuntu
Тестирование в VirtualBox
Если вы хотите спокойно и без всяких проблем потестировать новую Ubuntu, рекомендуем установить ее в бесплатном инструменте VirtualBox. Программа создает виртуальные машины, которые работают в окне полностью под Windows. На оперативной памяти при этом экономить не стоит. VirtualBox советует для Ubuntu всего 1 Гбайт, но для лучшей производительности лучше выделить половину реальной оперативной памяти.
Виртуальный диск тоже не должен быть слишком маленьким: лучше перестараться и предоставить больше объема, чем пожадничать. Благодаря динамическому распределению виртуальному диску тоже требуется только фактически используемое пространство на физическом диске.
Чтобы впервые попробовать Ubuntu, вставьте загрузочный диск с ОС в оптический привод и перезагрузите компьютер. Если по-прежнему запускается Windows, еще раз перезагрузитесь и с самого начала процесса несколько раз нажимайте одну из клавиш: «F2», «F8», «F10» или «F11». На большинстве компьютеров они открывают меню загрузки, в котором можно выбрать загрузочный диск. Если ни одна из клавиш не срабатывает, почитайте руководство по эксплуатации.
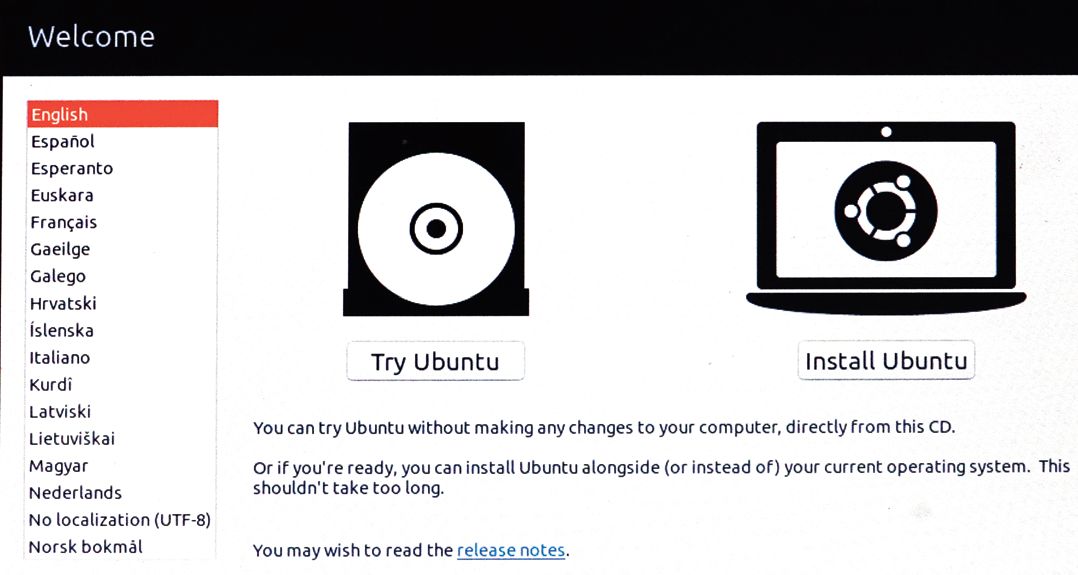
Через некоторое время появится окно приветствия. В его левой области устанавливается язык системы, по умолчанию это английский. Далее нажмите «Try Ubuntu» («Запустить Ubuntu»), чтобы вся операционная система загрузилась только в оперативную память. Жесткого диска это не коснется. Однако в таком случае все изменения, которые вы внесете под Ubuntu, не будут сохранены.
Как установить Ubuntu
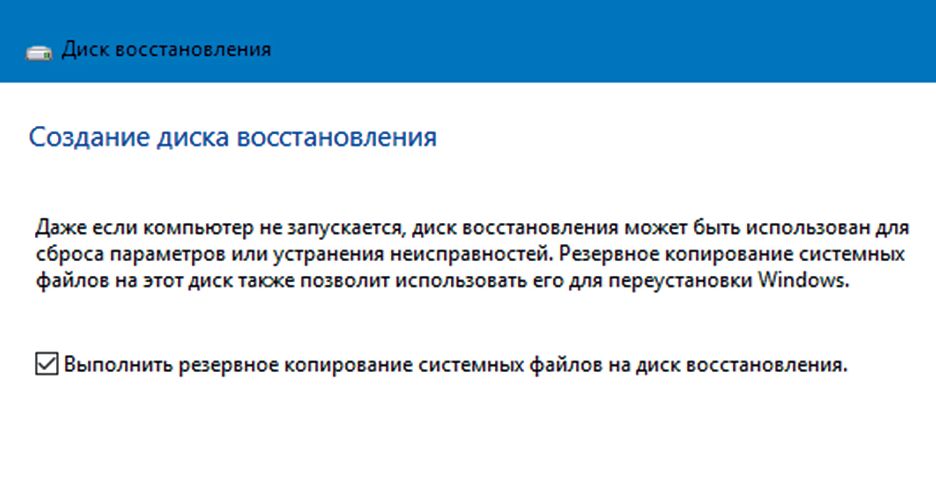
Перед установкой Ubuntu на ПК создайте резервные копии всех важных файлов, которые вы хранили в Windows (например, при помощи стандартного инструмента Диск восстановления). Вместе с программой запустится помощник, который пошагово проведет вас через весь процесс резервного копирования. Обязательно отведите для копирования достаточно времени и перед тем, как приступить к установке Ubuntu, дважды, а то и трижды проверьте, все ли сохранилось, так как потом назад пути не будет.
Вставьте диск с ОС и перезагрузите компьютер. Снова выберите «English» и в этот раз уже выберите «Install Ubuntu» («Установить Ubuntu»). Теперь для «Keyboard layout» («Раскладка клавиатуры») выберите нужный язык и попробуйте ввести различные символы в поле для проверки выбранной раскладки ниже. Затем нажмите «Continue» («Продолжить»).
На ноутбуках, подключенных к Интернету только по беспроводной сети, теперь можно выбрать сеть и ввести пароль к ней. В заключение укажите, должна ли Ubuntu устанавливать сейчас программы от других разработчиков — для этого нужно установить флажок «Install third-party software…» («Установить стороннее программное обеспечение…»). Второй флажок снимать не нужно, чтобы сразу во время установки Ubuntu загружались и свежие обновления. Подтвердите нажатием «Continue» («Продолжить»).
Теперь вам нужно решить, оставить ли Windows или полностью ее заменить. Обычно пользователи выбирают «Install Ubuntu alongside Windows 10» («Установить Ubuntu рядом с Windows 10») или «Install Ubuntu alongside Windows Boot Manager» («Установить Ubuntu рядом с менеджером загрузки»). Так раздел с Windows уменьшится, чтобы освободить место для второго раздела, и в дальнейшем при каждом запуске компьютера вы будете указывать, какую систему загружать — Windows или Ubuntu.
В следующем окне вам предлагается задать размеры обоих разделов. Чтобы изменить размеры, курсором перетаскивайте вправо или влево ползунок между полями. Нажав «Install Now | Continue» («Установить сейчас | Продолжить»), вы запустите собственно процесс установки; в зависимости от системы он займет некоторое время. Пока файлы устанавливаются, можете указать часовой пояс и создать пользовательский аккаунт, из-под которого будете заходить в свежеустановленную систему Ubuntu.
Установка на ПК с UEFI
Если вы хотите установить Ubuntu рядом с Windows на ПК с UEFI, вам следует быть внимательным во время установки. Если для запроса «Installation type» («Тип установки») не отображается вариант с Windows, то, по всей вероятности, вы загрузились в режиме BIOS. Если вы сейчас выберете «Erase disc and install Ubuntu» («Стереть диск и установить Ubuntu»), вы удалите вашу систему и замените ее на Ubuntu. Прервите процесс установки и перезагрузитесь. В меню загрузки выберите «UEFI» и заново запустите процесс установки. Теперь в окне «Installation type» («Тип установки») должен появиться вариант «Install Ubuntu alongside Windows 10» («Установить Ubuntu рядом с Windows 10»).
Читайте также:
- Топ-10 сборок Linux: выбирай на вкус
- Привет, пингвин: обзор ноутбука с Linux для новичков
Фото: компании-производители
Редактор направлений «Мобильные устройства» и «Техника для дома»
Installing an operating system is not an easy task. For most people, this is something they will never have done. The vast majority of people buy computers with the operating system already installed, so they never have to manually run through the system setup. The process can be intimidating, but we will try to make it as simple as possible.
In this article, we’d like to continue the journey we started last week – how to successfully migrate from Windows 7 to Ubuntu. In the first article, we talked about the preparation steps – the differences between Windows and Ubuntu, software parity, hardware support, and data backup ahead of the change. Here, we will show you how to safely install Ubuntu. In the last tutorial of this series, we will tour the Ubuntu desktop, install popular applications, and learn how to use Ubuntu.
Terminology
Let’s start with the phrases we will use in this tutorial. Some of the terms can seem vague at this point, but they will make more sense as we go along.
The setup of a new operating system is broadly called installation. The installation has several stages:
- You need to download the installation media (think an exe file in Windows for an application setup). The installation media will usually come in the form of ISO files. For instance, if you download Ubuntu, then you will find a file called something like ubuntu-18.04.3-desktop-amd64.iso in your download folder location.
- You need to copy the contents of the installation media to an external device, DVD or thumb drive. This is done with a dedicated tool, which will correctly prepare the external device for use, and store the contents of the installation media on it.
- You need to boot (start) the external device on your computer. Typically, this means connecting the external media (placing a DVD into the tray or inserting a thumb drive into a USB port). Next, you need to instruct your computer to boot from the external media. Some computers are configured to do this automatically. In other cases, you will need to access your computer’s setup (usually by pressing F2 or Del keys early on when the computer is powered on or rebooted), and then change a setting called boot order. We will cover this in more detail later on.
- Once the computer correctly identifies the external media, it will boot the operating system on this media. What this means, Ubuntu will now start. Do not worry, the installation will not begin right away. If left with no user interaction, Ubuntu will launch into the live mode, which means your underlying hardware (disks) will not be touched, and you can safely test and experiment with Ubuntu before you decide to make any changes.
- In the live environment, you can play around to get the sense of how Ubuntu works, try applications, and verify your hardware is correctly initialized. Once you’re happy and confident with the overall look & feel, you can proceed to install the operating system.
- The actual installation is the next step. At this point, the operating system will warn you that changes are going to be written to your hard disk, so you can back out if you are unsure or do not want to proceed, for any reason. Once the installation completes, the next time you reboot your computer, it will start Ubuntu.
| Phrase | Windows | Linux |
|---|---|---|
| Installation media | ISO file | ISO file |
| Boot sequence | The startup of a computer | The startup of a computer |
| Live session | N/A | A session in which the operating system runs in memory only and does not touch the hard disks; it is great for non-destructive testing of the operating system and software |
| Installation | Copy of the installation media to hard drive and user setup | Copy of the installation media to hard drive and user setup |
| Partitioning | The installation sub-step during which the hard disk is configured | The installation sub-step during which the hard disk is configured |
| Partition | A logical slice of the hard disk. In Windows, these are identified by drive letters, like C:\, D:\ | Partitions in Linux use the following notation: /dev/sdXyX – letter (a, b, c, etc) that denotes which the hard disk number. If you have only one hard disk, it will be a.Y – number that denotes the partition on a particular hard disk. For instance, /dev/sda3 denotes the third partition on the first hard disk. |
| Filesystem | The logical structure used to store files on a drive. By default, Windows uses NTFS. | By default, Linux uses Ext4. Linux supports many other filesystems, and can also read/write Windows filesystems. |
| Mountpoint | The logical endpoint by which the filesystem on a particular partition is made accessible to the user. Synonymous with how partitions are shown to the user through Window Explorer (C:\, D:\, etc). | In Linux, there is a single tree that contains all mount points to all filesystems. The top-tree element is called root, and it is identified by the forward-slash character (/). Entries under the root will then point to different folders/files. For example: /usr – folder that contains application data. It can be mapped to any partition/filesystem (e.g.: /dev/sda5)/home – folder that contains user data, like application settings and documents. It can be mapped to any partition/filesystem (e.g.: /dev/sdb6) |
| Formatting | The process of initialization of a partition with a new filesystem. This is a destructive process. | The process of initialization of a partition with a new filesystem. This is a destructive process. |
Installation types
There are multiple ways operating systems can be configured – this is not unique to Ubuntu; this is true for all operating systems out there.
- A Single operating system on a computer – the most typical and common scenario. A hard disk contains a single operating system. It is relatively simple to configure and maintain. Most Windows 7 users will have PCs or laptops set up this way.
- Dual boot – This is a configuration where there are two operating systems installed on the same computer. Each operating system could reside on a separate hard disk, or they could both be installed on one hard disk, on different partitions. In a dual-boot setup, usually there will be a menu displayed early on in the boot sequence of the computer, allowing the user to choose which operating system they want to run. On physical systems, only one operating system can run at one time. A dual-boot setup could be Windows 7 and Ubuntu, side by side. You can then alternate between the two and use them as you see fit, with a reboot in between each use.
- Multi boot – Like dual-boot, but there are three or more operating systems.
- Virtualization – This is a concept that allows one to run an entire operating system on top of another operating system. This is done using a dedicated piece of software called hypervisor. The hypervisor software runs on your host operating system, and it allows you to create virtual machines that emulate hardware. You can then install a guest operating system on top of this emulated hardware, and use them side by side. Virtualization isn’t trivial, but it is a good way to test new operating systems without trying them on your physical hardware. This way, you can practice using Linux, get comfortable with the installation steps before you do anything on your actual PC or laptop.
If you decide to install Ubuntu, the sequence of steps will be slightly different based on your choice of the configuration (single boot, dual boot, etc).
If you want to replace Windows 7 with Ubuntu, you will need to:
- Format your C:\ drive (with the Linux Ext4 filesystem) as part of the Ubuntu setup. This will delete all your data on that particular hard disk or partition, so you must have a data backup in place first.
- Install Ubuntu on the newly formatted partition.
If you want to dual-boot Windows with Ubuntu – even as a transition step until you get accustomed to using Ubuntu, you will need to choose one of the two options below:
- Allow Ubuntu installer to configure things automatically – most likely, it will be able to set up the two operating systems side by side.
- Alternatively, you will need to change the hard disk and/or partition layout so there’s at least one new partition that can accommodate the installation of Ubuntu. This may require changing the size of existing partitions (shrinking) to create space for a new partition. In some cases, this may not be possible, or you may not have sufficient disk space. The management of partitions can be done in the Ubuntu live session using a tool called Gparted partition manager (available by default in Ubuntu). You will need to be comfortable with the Linux hard disk and partition notation to use this software. You also must be careful, because most operations are destructive, so if you delete or format partitions, you could lose your data or render your computer unbootable. Then, you can install Ubuntu on the newly created and formatted partition.
Practice: Ubuntu installation as a virtual machine
Please note: This scenario will not actually migrate you from Windows 7 to Ubuntu. However, it is a very useful exercise, as it will help you get familiar and comfortable with the new operating system, so you can then commit to a setup on physical hardware – and actually replace Windows 7.
Let’s start with the simplest and safest of scenarios – we will install VirtualBox, a free virtualization software, create an Ubuntu virtual machine template, and then run through the installation.
- Download Ubuntu ISO. You can either download the LTS image, which comes with five years of support, or one of the interim releases, which have a 9-month support timeframe and ship with some of the newer features and applications than what you get by default in an LTS version. It’s a trade-off between stability and support on one end and using the latest software on the other.
- Download VirtualBox and install it in Windows. You are not limited to where you install the software. This can be done in any version of Windows, or even other operating systems.
- Start VirtualBox, and create a new Ubuntu virtual machine.
- Create a virtual hard disk for Ubuntu.
- Create a virtual optical storage device (this will be the virtual DVD drive). We will “run” the ISO file from it. Effectively, when the virtual machine starts, it will treat the optical storage device with the ISO attached to it as though you had copied the ISO contents to a DVD or a USB thumb drive, and booted this on a physical computer.
- Follow the guided wizard to install Ubuntu. Pay attention to the hard disk setup.
VirtualBox configuration
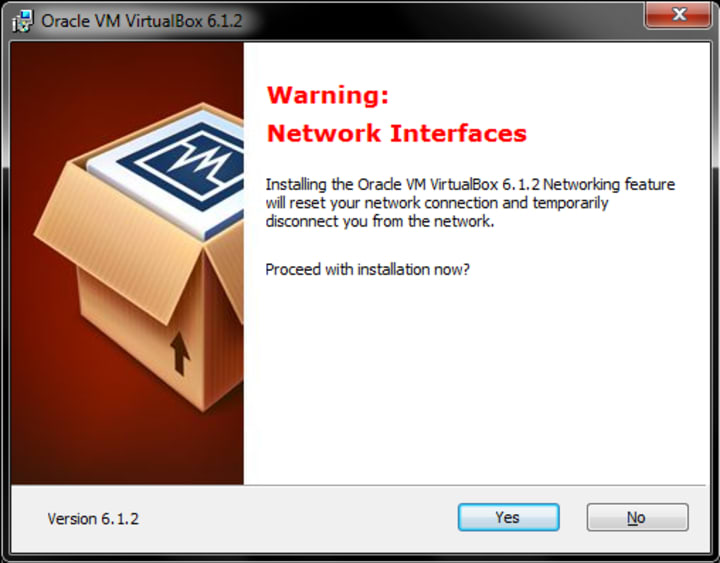
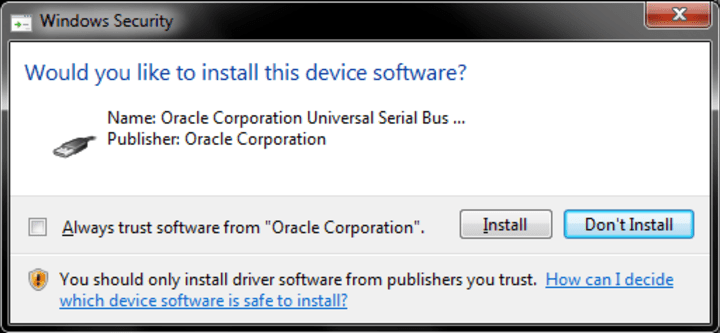
Run the downloaded VirtualBox setup exe, and follow the instructions. The one part where you need to pay attention is the configuration of network adapters. By design, virtualization products create virtual machines (computers), with their own virtual hardware, including network. You will need to approve the installation of VirtualBox network drivers (signed by Oracle).

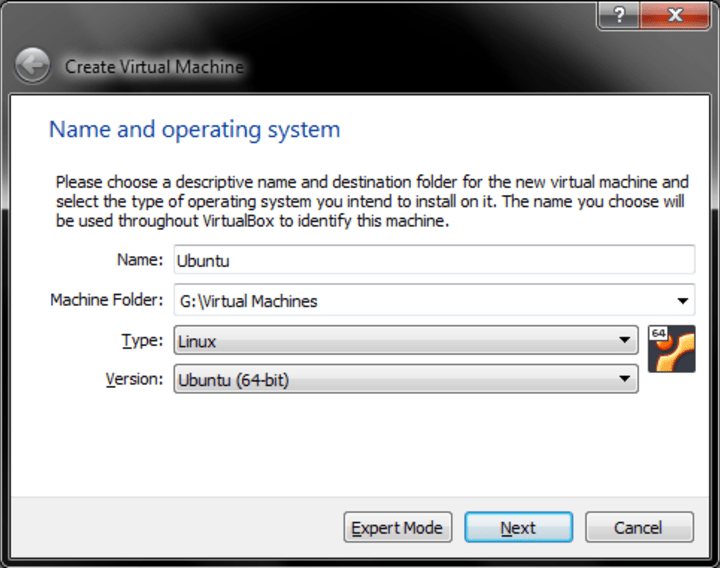
New virtual machine setup
Once VirtualBox is installed and configured, start the application. Click on the New button. You will now be asked several questions. You will need to provide the name for your virtual machine (VM). You can use anything, like John or Jane, but it is best to use the exact operating system version. If you type in Ubuntu, VirtualBox will automatically detect what you’re trying to do.

The next step is decide how much RAM you want to give your VM. Then, you need to configure a virtual hard disk. Once these steps are complete, the VM is ready to start. However, we also need to attach the Ubuntu ISO to it.
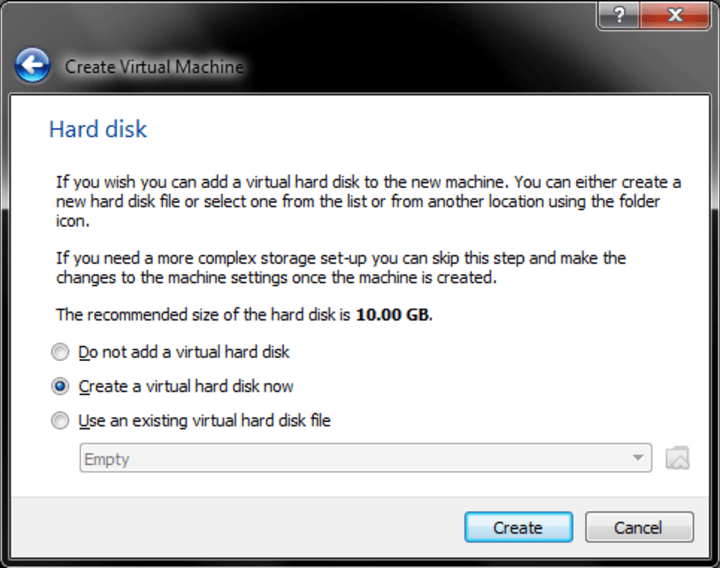
Click on Settings. In the new window, click on Storage. In the right panel, there will be multiple Storage Devices listed – think hard disks and DVD trays on a physical computer. You will have your hard disk there (in the .vdi format), and an empty IDE controller with a virtual optical drive attached to it. Select it, and then, from the drop down menu, select Choose a disk file… and navigate to where you downloaded the Ubuntu ISO (called something like ubuntu-18.04.3-desktop-amd64.iso). After you complete this step, you can start the VM, and it should boot from the “external” media (in this case the virtual DVD tray).
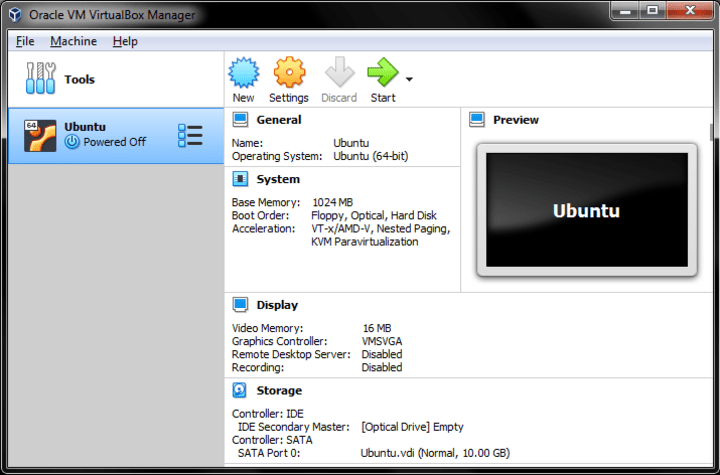

Once you start the virtual machine, you will see Ubuntu launch.

Ubuntu live session
On startup, Ubuntu will ask you what you want to do – Try Ubuntu or Install Ubuntu.
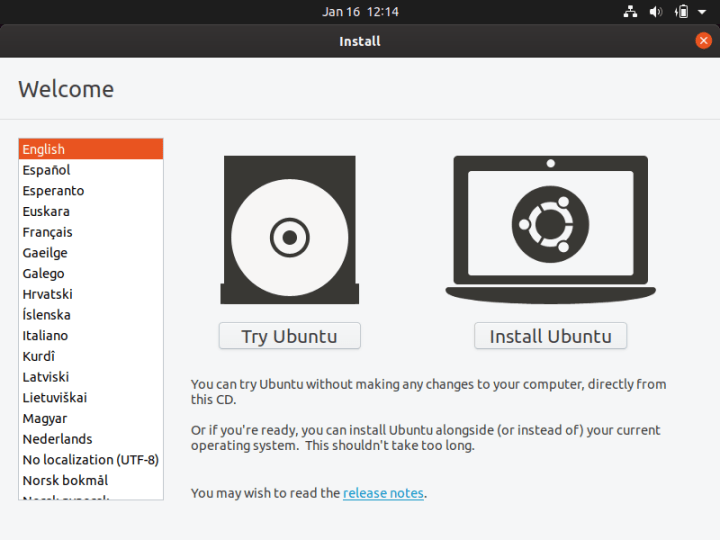
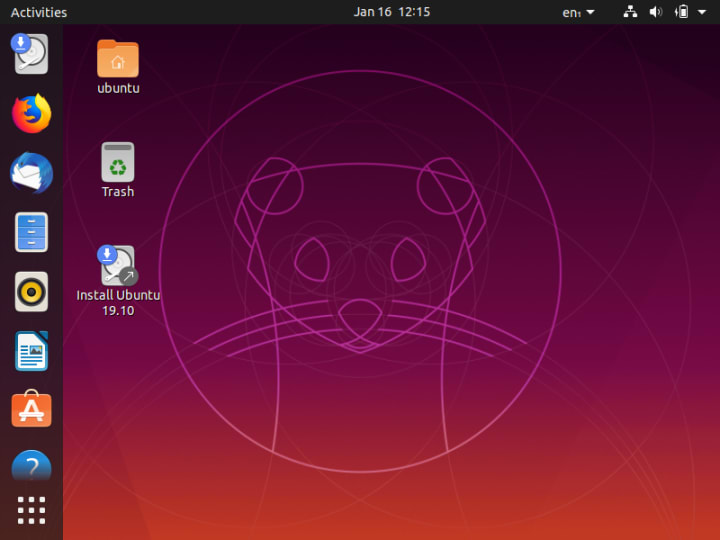
If you select Try Ubuntu, the operating system will launch into a live session, running from memory. Your disks are untouched at this stage. You can play around, get the feel for the operating system and its desktop layout, try network connectivity, test applications, and more. Once you’re ready to install Ubuntu, click on the desktop icon, or the installer shortcut in the vertical taskbar on the left.
Ubuntu installation wizard
The installation process is done with a step-by-step wizard. The first step is just a Welcome note and installer language selection.

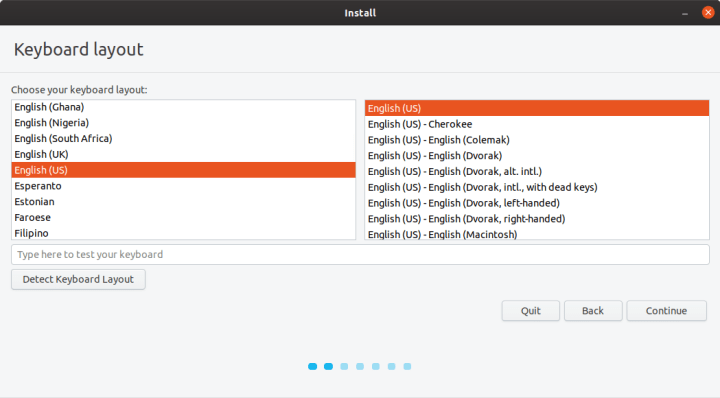
Keyboard layout
The second step is to choose your keyboard layout. You can always add more layouts (and languages) after the installation.
Connect to the Internet
The optional third step is network. If you’re using a desktop and have a wired connection, you probably won’t see this step in the installer. If you’re on a laptop with a wireless connection, the installer will ask you if you want to connect to an access point. This is not mandatory, but it does allow you to install updates before you get to the desktop. Alternatively, you can connect to the network from the top taskbar (panel), via a drop-down menu in the right corner.
Updates and other software
The fourth step is to decide what setup you like. Most people want the normal installation, which comes with a complete desktop and a set of productivity applications. You can also choose to install third-party software, graphics drivers and media codecs (last checkbox). This is recommended, as it will give you access to a wider range of applications and use cases.

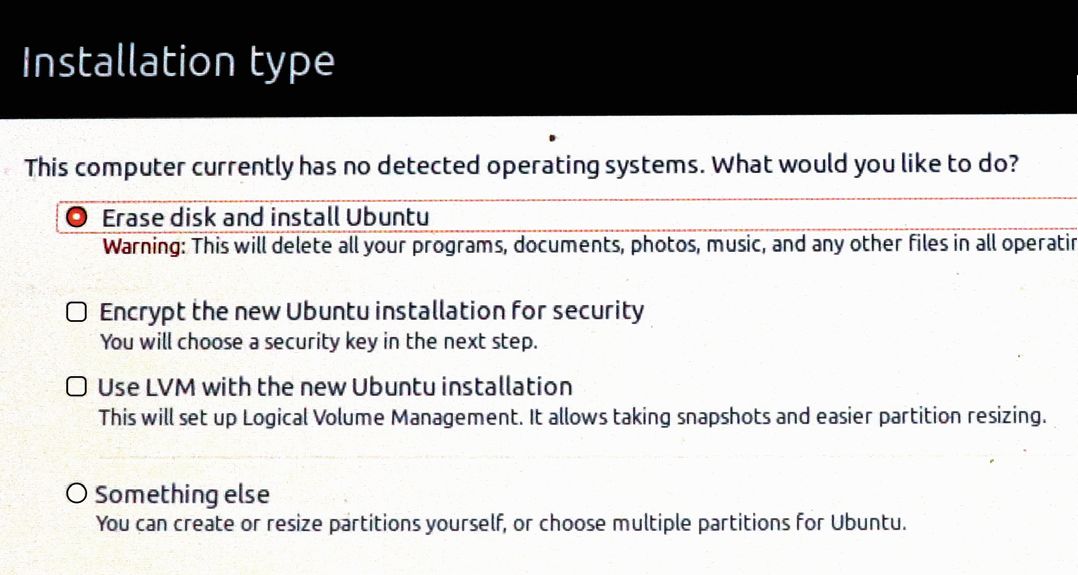
Installation type
In the virtual machine, your hard disk will contain no data. This is why the installer will notify you that it cannot detect any operating systems. It also makes the first option – Erase disk and install Ubuntu – perfectly safe to run.

Timezone and user setup
The installation will begin now in the background. You will be able to configure your timezone and your user. The choice of the timezone will determine your language locale. For instance, if you’ve selected English (US) as your keyboard layout and choose London, UK as your timezone, Ubuntu will be configured with British English as the desktop interface language. You will be able to change this after the installation if you like.
The user setup is self-explanatory – choose your name, computer name and your password. You can auto-login into the desktop, or have the system ask you for your credentials to allow you to login.
Ubuntu installation on a physical machine with an existing Windows 7 operating system
Here, we will configure a dual-boot setup. Once again, we are not getting rid of Windows 7 just yet. But this scenario allows us to test Ubuntu on physical hardware without altering the Windows 7 data. This way we will gain additional knowledge and practice ahead of the actual migration.
After you have mastered this step, you can then re-run the installation and replace Windows 7 with Ubuntu (on the same PC or a different computer, if you like). Alternatively, you can simply reuse the Windows 7 partition(s) inside Ubuntu as additional storage space.
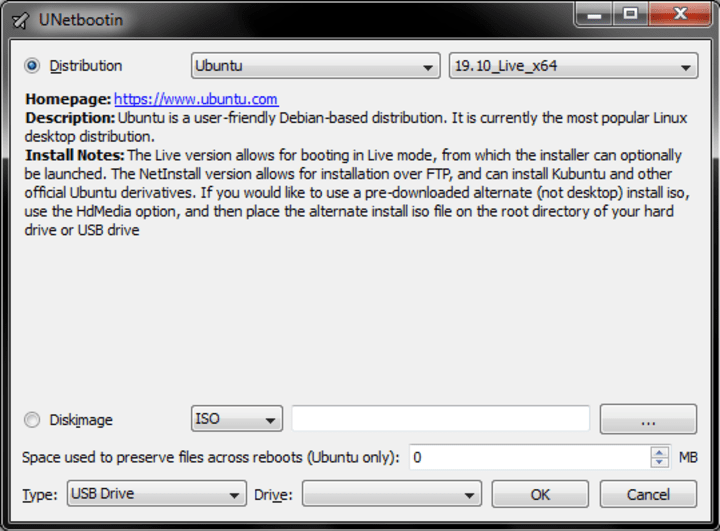
- Download Ubuntu ISO.
- Download UNetbootin and burn the Ubuntu ISO to a DVD, or download unetbootin and use it to copy the Ubuntu ISO to a USB thumb drive.
- Insert the installation media into the computer (DVD tray or USB port), access the BIOS of your computer, choose the installation media, and boot it. This will launch the Ubuntu live session.
Prepare external media
Launch the UNetbootin tool. You have two options available: 1) download Ubuntu from the tool directly and then copy it to the USB drive 2) load a previously downloaded ISO image. Either option will work fine. Since we’ve downloaded the ISO already, check the Diskimage button, locate the ISO file on your disk.
Boot Ubuntu
Once the USB drive is ready, insert it into your computer, and power it on. Some computers are automatically configured to boot from external media first. In that case, you won’t need to do anything. Other computers require a manual change to the startup order. This is done by editing the BIOS boot menu. Each hardware manufacturer uses its own BIOS implementation, so there is no uniform way to do this. Typically, you will need to press a key (F2 or Del or alike) to access BIOS, and then you will need to change the Boot order or Boot options so that your system starts from the external device containing the Ubuntu operating system.
Ubuntu installation wizard (physical hardware)
The first four steps in the installer are identical to the virtual machine. The real difference is whether there is any information stored on the hard disk(s). In a virtual machine, the hard disk was empty, and it did not contain any partitions (like a new computer). On a computer that has Windows 7 installed, the installer will show different options.
Installation type
Most likely, the installer will inform you it has found Windows 7 and will suggest installing Ubuntu alongside it. Effectively, the installer will try to find the most suitable partition, allow you to shrink it, create a new partition in the free space after the resizing, and install Ubuntu on it.
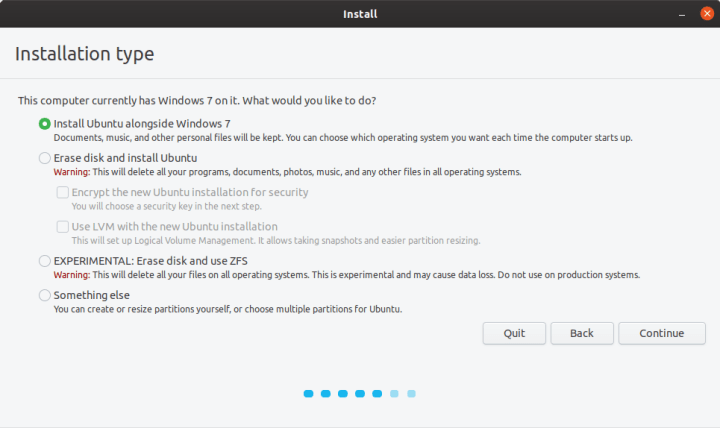
Alternatively, if you do not care about anything on your hard disk – or feel comfortable with completely removing Windows 7 – you can use the second option, erase everything, and setup Ubuntu as the only operating system. If you have safely backed up your data from Windows 7, you can use this option. If you’re not sure, the best way is to start with the dual-boot option, and then eventually fully replace Windows 7 once you’re confident with using Ubuntu.
If you select the first option (Ubuntu alongside Windows 7), the next step in the installer allows you to allocate drive space. You can drag the divider to decide how much you want to resize the Windows partition – Ubuntu will be installed in the remainder.
If you are familiar with the concepts of disk and partition management, you can also use the last option – Something else, where you can make changes manually to partitions as you see fit. These are non-trivial steps, and not recommended for new users.
Advanced: Manual partitioning
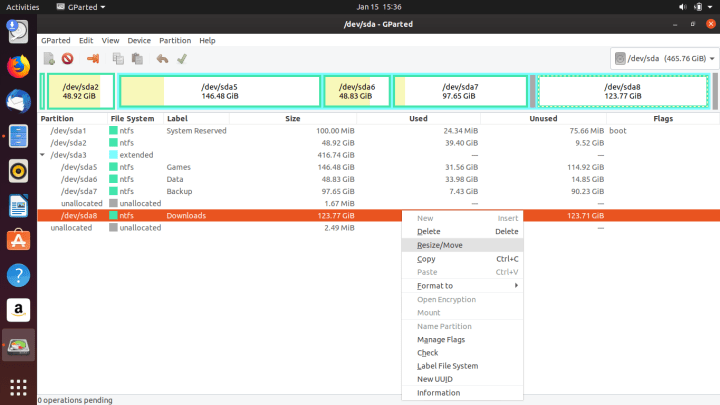
If you do not want to use the dual-boot option, or the installer cannot set it up automatically for you, you will need to manually configure the partitions. In the Ubuntu desktop, click on Activities, type Gparted in the search box, launch the application. It will scan your hard disks and show you a table of results.

The image above is from a laptop with a Windows 7 installation. It has a single 500GB hard disk, shown as /dev/sda (465.76 GiB). It has a total of eight partitions:
- /dev/sda1 is the Windows hidden system/boot partition.
- /dev/sda2 is the actual C:\ drive – this is not immediately obvious from this list, but you can deduce it from the rest of the information, and also by comparing size to what it should be in Windows 7.
- /dev/sda3 is a special type of partition. Without going into too many technical details, it is an extended partition – a special type of primary partition that can nest logical partitions. On computer systems that use the ms-dos type of partition table, there is a limitation of four (primary) partitions. To work around this limitation, you can create the extended one to span a large part of the hard disk space, and then create logical partitions inside it. Newer systems using the gpt type do not have this limitation.
- /dev/sda5 is the first logical partition. There is no /dev/sda4, and logical partitions will always be numbered 5 and above. This partition has NTFS filesystem and even carries a label – Games, so you know what type of data it contains. The label can help you prevent damage by trying to modify partitions that contain important data.
- /dev/sda6, /dev/sda7 and /dev/sda8 are logical partitions, with labels, containing additional user data.
From the data presented by GParted, we do not have sufficient free space, so we will need to change the partition layout. We can either delete one of the non-C:\ partitions, or resize them. The last partition, dev/sds8 (labeled Downloads) looks like a good candidate. It is a large partition, and most likely contains less critical data. Click on a partition and select Resize from the menu. Gparted will attempt to run this operating, and if successful, you will have free space available to set up Ubuntu.
In the Ubuntu alongside Windows 7 option, the installer automatically selected/dev/sda8 as the candidate for the installation. If your computer only has one partition (essentially the C:\ drive), you will need to resize it. This means you do need sufficient free space, and you must safely back up your data, as hard disk operations can be risky.
User setup
The remaining steps in the installation are identical. After the setup completes, and you restart your computer, you will see a text menu on startup, and you can select which operating system to boot into – Ubuntu or Windows 7.
Our installation setup is now complete.
Summary
We have completed the most complex and difficult part of the journey. When you need to manage your storage, there is always some risk involved, but since we have safely backed up our data in the first article, the chances of data loss are low. The installation requires knowledge that most computer users won’t readily have, but hopefully, you have now gained the necessary skills and practice to do this with relative ease. The next step is to explore the Ubuntu desktop – and even have some fun. We will do this in the third installment of this series.
Photo by Jonatan Pie on Unsplash.
Загрузить PDF
Загрузить PDF
При переходе с Windows на Ubuntu необходимо знать, как установить новую систему, какие программы использовать и как перенести нужные файлы в новую систему.
Советы
- Прежде всего убедитесь, что в Ubuntu вы сможете делать то, что вы обычно делаете в Windows. Для этого скачайте LiveCD Ubuntu, запишите скачанный образ (ISO файл) на компакт-диск, вставьте его в оптический привод и перезагрузитесь (в BIOS первым загрузочным устройством должен быть указан CD/DVD-ROM). Загрузив Ubuntu с диска (без установки системы), вы сможете протестировать новую систему (новый интерфейс и новое программное обеспечение). Попробуйте отредактировать документы, видео и аудио файлы, то есть поработайте в Ubuntu так, как вы обычно работаете в Windows.
- Если у вас нетбук (ноутбук без оптического привода), скачайте Wubi. Это установщик Ubuntu из-под Windows в виде EXE файла (для установки системы просто дважды щелкните по нему).
Реклама
-

Скачайте и установите Mozilla Thunderbird (в Windows), а затем скачайте и установите плагин ImportExportTools.
-
Если вы пользуетесь Outlook Express или Microsoft Outlook, запустите Mozilla Thunderbird и в панели меню нажмите «Tools» — «Import». В открывшемся окне выберите опции «Import everything», «Mail», «Address Books», «Settings», «Filters». Нажмите «Next» и выберите используемый вами почтовый клиент (Outlook Express, Microsoft Outlook или Seamonkey). Для импортирования информации с аккаунта почтового сервиса, создайте учетную запись, откройте настройки учетной записи и введите имя, почтовый адрес и пароль аккаунта почтового сервиса.
-
Щелкните правой кнопкой мыши по папке, которую вы импортировали (она, вероятно, называется «ххх import», где ххх — название почтового клиента, из которого вы импортировали данные) и нажмите «Import/export» — «Export all messages in the folder» — «EML format». Вам будет предложено выбрать носитель для копирования данных. Выберите съемный носитель, например, флешку. В качестве альтернативы нажмите «Import/export» — «Copy folder path on disk», вставьте путь к папке в приложении «Run» и скопируйте папку на съемный носитель.
-
Скачайте и установите Mozilla Thunderbird (в Ubuntu; этот почтовый клиент можно найти и установить через Ubuntu Software Center). Запустите Thunderbird и установите ImportExportTools. Подключите флешку с папками электронной почты, щелкните правой кнопкой мыши по пустому пространству окна почтового клиента и нажмите «Import/export» — «Import all eml files from directory» — «Also from its subdirectories».
Реклама


-
Если в Windows вы пользуетесь Mozilla Firefox, вы можете добавить в закладки нужные вам веб-сайты и экспортировать их в HTML файлы (для добавления сайта в закладки нажмите Ctrl + D). Нажмите «Bookmarks» — «Organize bookmarks». В открывшемся окне нажмите «Import and backup» — «Export HTML». Сохраните HTML файл на флешке (или внешнем жестком диске).
- Аналогично вы можете экспортировать историю посещенных страниц.
- Аналогично вы можете экспортировать историю посещенных страниц.
-
Реклама


-
- Совет: перед копированием файлов поместите их в папки по категориям, например, «Фильмы», «Музыка, «Документы» и т.п.
- Еще один совет: не всякий файл Windows можно открыть в Ubuntu. Поэтому начните перенос с мультимедийных файлов. Если у вас очень много музыки, фильмов и фотографий, сожмите эти файлы, отправив их в архив.
- Совет: перед копированием файлов поместите их в папки по категориям, например, «Фильмы», «Музыка, «Документы» и т.п.


-
Включите компьютер, откройте меню загрузки и выберите носитель с установщиком Ubuntu. Если вы не можете открыть меню загрузки, выполните следующие действия.
-
Включите компьютер и войдите в BIOS, нажав на соответствующую кнопку (см. руководство пользователя от материнской платы; как правило, это кнопка F1, F2, F10, DEL). Если вы устанавливаете систему с внешнего накопителя, убедитесь, что он подключен к компьютеру.
-
Установите CD/DVD-ROM или внешний USB накопитель первым загрузочным устройством.
-
Для этого нажмите F10 или откройте соответствующую опцию в главном меню.
-
Загрузите компьютер с установочного диска/флешки и установите систему. Это довольно легкий процесс — просто следуйте инструкциям на экране.
Реклама


Примечание: большинство описанных ниже программ можно найти и скачать через Ubuntu Software Center.
-
Составьте список необходимого программного обеспечения, которым вы пользуетесь в Windows.
-
Некоторые программы поддерживают несколько систем, например, VLC Media Player.
-
Для редактирования документов используйте офисный пакет OpenOffice/LibreOffice, который предустанавливается на все современные версии Ubuntu и может открывать документы Microsoft Office.
-
Для редактирования изображений используйте Shotwell, который предустановлен в Ubuntu. Также вы можете работать с Sumo Paint или GIMP (аналог Photoshop).
-
-
Для редактирования видео файлов используйте Pitivi (предустановлена), Lives, Kdenlive или Avidemux.
-
Если какие-либо программы вас не устраивают, установите в Ubuntu программу VirtualBox, создайте в ней виртуальную машину, установите в ней Windows и работайте в этой системе с нужными вам программами. (Для установки Windows в виртуальной машине понадобится образ установочного диска Windows, который можно сделать при помощи программы k3b или Brasero.)
-
С программами Windows также можно работать через приложение Wine, в котором создается виртуальный локальный диск C:, на который можно установить программы Windows. Тем не менее, в приложении Wine нельзя запускать мощные программы, например, Sony Vegas или CyberLink PowerDirector. В Wine диск с Ubuntu обозначается как Z:
Реклама


-
- Кнопка выключения компьютера расположена в верхнем правом углу экрана (на панели серого цвета вместе с другими кнопками). При нажатии на эту кнопку открывается меню с различными опциями (выключение, перезагрузка, спящий режим, настройка системы и т.д.).
- Кнопка выключения компьютера расположена в верхнем правом углу экрана (на панели серого цвета вместе с другими кнопками). При нажатии на эту кнопку открывается меню с различными опциями (выключение, перезагрузка, спящий режим, настройка системы и т.д.).
-
Вы не можете использовать программное обеспечение, с которым вы работали в Windows (за некоторым исключением). Поэтому вы должны либо найти аналогичные программы через Ubuntu Software Center, либо настроить виртуальную машину.
- В Ubuntu терминал — это аналог командной строки Windows. Новичку не обязательно работать с терминалом, но если вы научитесь это делать, вы будете управлять системой Ubuntu намного быстрее (и легче). Графический интерфейс пользователя Ubuntu отличается от такового в Windows 7/XP, но с ним легко работать.
Реклама
- В Ubuntu терминал — это аналог командной строки Windows. Новичку не обязательно работать с терминалом, но если вы научитесь это делать, вы будете управлять системой Ubuntu намного быстрее (и легче). Графический интерфейс пользователя Ubuntu отличается от такового в Windows 7/XP, но с ним легко работать.


Что вам понадобится
- USB-флеш-накопитель/внешний жесткий диск/перезаписываемый CD или DVD
- Компьютер с Windows и компьютер с Ubuntu (если вы не собираетесь менять Windows на Ubuntu).
Об этой статье
Эту страницу просматривали 7715 раз.
Была ли эта статья полезной?
Теперь каждый справится с установкой Mint, Ubuntu и других дистрибутивов на компьютеры с Windows и macOS или без ОС.
Linux может пригодиться вам по многим причинам. Например, ваш старый компьютер нельзя обновить до новых версий Windows или macOS, или вам нужны специфические приложения для Linux, или же вам просто любопытно попробовать новое. А может быть, вы просто приобрели новый компьютер без операционной системы и хотите сэкономить, выбрав бесплатную Linux.
Установить Linux несложно. Конечно, есть такие дистрибутивы, как Arch, установка которого довольно трудна для новичка. Но большинство современных дистрибутивов устанавливается очень просто. Пожалуй, даже проще и быстрее, чем Windows.
Прежде чем устанавливать Linux на свой основной компьютер, сделайте копию важных данных. Работая с разделами жёсткого диска, вы можете по небрежности стереть что-нибудь важное. Конечно, если вы будете следовать инструкциям и внимательно читать, что делаете, то ничего непредвиденного не произойдёт. Но бэкап — нелишняя штука в любом случае.
Установить Linux можно на компьютеры под управлением Windows и macOS или на пустой жёсткий диск. Вы можете выбрать Linux своей основной системой либо пользоваться ей параллельно с вашей старой системой.
1. Загрузите дистрибутив Linux

Прежде всего нужно выбрать дистрибутив. Определиться вам поможет наш топ лучших дистибутивов Linux.
Затем нужно загрузить выбранный дистрибутив. Сделать это проще простого: откройте сайт нужного дистрибутива, отыщите раздел загрузок и выберите то, что подходит по разрядности вашему процессору.
Как правило, дистрибутивы Linux на официальных сайтах предлагается скачать двумя способами. Первый способ — обычная загрузка. Второй — через P2P посредством торрент-клиента. Второй способ, естественно, быстрее. Так что выбирайте его, если хотите сэкономить время.
2. Запишите дистрибутив на носитель

Когда дистрибутив в формате ISO скачан, нужно записать его на CD или обычную USB-флешку.
Запись на CD можно осуществлять стандартными средствами системы: «Запись образа диска» Windows или «Дисковая утилита» macOS. Достаточно щёлкнуть по загруженному образу правой кнопкой мыши и выбрать соответствующий пункт в меню.
Для записи ISO на флешку вам понадобятся специальные утилиты. Для Windows лучше выбрать Rufus, а для macOS — Etcher. У этих программ очень простой интерфейс, в них довольно сложно запутаться.

Ещё один вариант — просто распаковать содержимое ISO-архива на флешку. Это, правда, сработает только с более-менее современными компьютерами, у которых вместо традиционного BIOS новая UEFI.
3. Подготовьте раздел диска
Этот пункт следует выполнять в том случае, если вы хотите сохранить установленную у вас систему и использовать Linux одновременно с ней. Если вы решили перевести свой компьютер на Linux полностью или устанавливаете ОС на пустой жёсткий диск, пропустите параграф.
Windows

Откройте «Средство управления дисками» Windows. Выберите диск или раздел, от которого вы планируете отрезать немного места для установки Linux. Большинству дистрибутивов с лихвой хватит 15 ГБ. Но если вы планируете устанавливать много приложений, возьмите больше. Щёлкните по разделу правой кнопкой мыши и выберите «Сжать том». Введите размер и нажмите ОК.
Процесс может занять довольно много времени, так что запаситесь терпением.
Когда «Средство управления дисками» закончит изменять размеры разделов, на диске появится пустое неразмеченное пространство, отмеченное чёрным цветом. Туда мы и установим Linux.
Позже, если Linux вам не понадобится, можно будет удалить разделы с ним и отдать освободившееся место обратно Windows при помощи всё того же «Средства управления дисками».
macOS

Выделить место для установки Linux можно через «Дисковую утилиту» macOS. Выберите ваш диск и щёлкните по значку «+», чтобы создать раздел для Linux. Создание нового раздела может занять некоторое время.
4. Подготовьте загрузчик
Windows
Этот пункт касается только новых компьютеров под управлением предустановленной Windows 10, 8.1 или 8. На таких компьютерах используется загрузчик UEFI, который не позволит вам загрузить какую бы то ни было систему, кроме Windows.
Чтобы это исправить, зайдите в настройки BIOS вашего компьютера и отключите опцию Secure Boot. Затем перезагрузитесь. Готово, теперь вы можете загружать и устанавливать другие системы рядом со своей Windows.
macOS
В отличие от большинства компьютеров, Mac требует пары дополнительных действий для того, чтобы установить Linux в дуалбуте с macOS.
Прежде всего отключите SIP. Перезагрузите Mac и нажмите Cmd + R. Появится меню Recovery. Выберите в нём «Терминал» и введите csrutil disable.
Перезагрузите Mac ещё раз. SIP отключён.
Загрузите и установите rEFInd. Встроенная утилита Boot Camp может помочь вам установить только Windows. rEFInd умеет загружать и macOS, и Windows, и Linux. Так что вы сможете выбирать, какая система будет загружаться при старте.
Распакуйте rEFInd. Затем откройте «Терминал» и введите diskutil list. Найдите в появившемся списке, как называется ваш загрузчик EFI. Чаще всего это /dev/disk0s1.
Введите mount /dev/disk0s1 и запустите установку rEFInd, перетащив install.sh из распакованной папки в окно «Терминала».
5. Загрузите Linux с носителя
Перезагрузитесь и выберите флешку или CD с Linux в качестве загрузочного носителя. На разных компьютерах это делается по-разному. На устройствах с Windows порядок загрузки можно определить с помощью Esc, F9 или меню BIOS. На Mac это делается долгим нажатием клавиши Option.
6. Начните установку Linux
Нас приветствует установщик Linux. Для примера возьмём дистрибутив Linux Mint за его популярность. Но процессы установки Ubuntu, openSUSE, Fedora, Debian, Manjaro и большинства других дистрибутивов практически идентичны.
Исключение — дистрибутивы, использующие псевдографический установщик. Единственное серьёзное отличие такого установщика в том, что выбирать опции в нём придётся при помощи клавиш. В остальном всё одинаково.
Выберите язык, который хотите использовать в системе, и нажмите «Продолжить».

Укажите, какую раскладку клавиатуры хотите использовать в дополнение к английскому.

Отметьте пункт «Установить стороннее программное обеспечение» или «Установка мультимедиа кодеков», чтобы Linux смогла использовать проприетарные драйверы и кодеки.

Опцию «Загрузить обновления во время установки», если она есть, можно включить, чтобы система скачала все самые свежие патчи, пока устанавливается. Или оставить её выключенной, если у вас не очень быстрое интернет-соединение, и обновиться потом.
7. Разметьте диск
Это ответственный этап, на котором вы должны быть очень внимательны.
Далее действия различаются в зависимости от того, хотите ли вы установить Linux рядом со своей системой или заменить систему. Не сотрите случайно диск, если хотите оставить систему.
Как установить Linux вместо текущей системы
Итак, вы решили установить Linux вместо вашей текущей системы (либо на пустой жёсткий диск). Есть два варианта.
Автоматически

Установщик сотрёт все данные с вашего диска, создаст новые разделы и установит систему, не утруждая вас лишними вопросами. Для этого выберите «Стереть диск и установить Linux». Прежде чем выполнять чистую установку, сохраните свои файлы на другой жёсткий диск или в облачное хранилище.
Вручную
Способ подойдёт, если вы хотите сами задать размеры для ваших разделов или, например, создать отдельный раздел для ваших файлов. Для этого выберите «Другой вариант» и нажмите «Продолжить».

Linux отобразит, какие разделы есть у вас на компьютере. Вы можете удалять их, форматировать или, наоборот, не трогать разделы с той информацией, которую хотите сохранить.
Чтобы установить Linux вместо вашей системы, выберите раздел с установленной ОС и удалите его кнопкой «–». Затем на освободившемся месте создайте новые разделы.

- Корневой раздел для системных файлов Linux. Выберите файловую систему Ext4 и точку монтирования /.
- Swap-раздел, или раздел подкачки. Пригодится, если у вас не хватает оперативной памяти, но зато быстрый SSD-диск. В списке файловых систем выберите «Раздел подкачки».
- Home-раздел, где будут храниться ваши файлы. Выберите файловую систему Ext4 и точку монтирования / home.
Нажмите «Продолжить» и подтвердите изменения. Установщик сотрёт выбранные вами разделы и создаст новые на освободившемся месте.
Как установить Linux рядом с текущей системой
Установить Linux рядом с вашей системой можно двумя способами.
Автоматически

Большинство установщиков Linux сразу обнаруживают установленные у вас системы. Если вы не создавали отдельное пространство на диске для Linux, то можете попробовать выбрать пункт «Установить рядом с Windows». Установщик самостоятельно создаст нужные разделы, и вам не придётся ничего делать вручную. В дальнейшем вы сможете выбирать нужную систему при загрузке компьютера.
Вручную

Если же вы хотите сами определить, сколько места выделять системе, и выполнили указания в пункте 3, щёлкните «Другой вариант» и нажмите «Продолжить». Вы увидите разделы своего диска и пустое место, которое мы приготовили для Linux. Создайте там корневой раздел (точка монтирования /), как описано выше. Домашний раздел в таком случае не обязателен: вы сможете копировать и изменять файлы в своей основной системе.
Нажмите «Продолжить». Установщик оставит ваши файлы на своих местах. Он просто создаст новые разделы на свободном месте. Вы сможете выбирать, какую систему хотите загрузить при запуске.
8. Завершите установку Linux

Дальше всё просто. Установщик может спросить вас, где вы находитесь, чтобы определить часовой пояс, и предложит выбрать предпочитаемый язык ввода.

Затем вам будет предложено представиться. Введите своё имя и придумайте пароль. Не забудьте его, поскольку он будет постоянно нужен вам для выполнения задач от имени всех. При желании можете зашифровать свою домашнюю папку.

Начнётся установка системы. Подождите, пока Linux скопирует свои файлы.

Когда процесс завершится, вам будет предложено вытащить установочный диск и перезагрузиться. Не забудьте отключить в BIOS загрузку с внешних дисков, если вы включали её.
Когда вы перезагрузитесь и перед вами появится рабочий стол вашей Linux, вы сможете делать всё то же, что и в Windows и macOS: сёрфить в интернете, редактировать документы и слушать музыку. Но перед этим в первую очередь следует обновиться — соответствующий пункт обычно можно найти в главном меню системы.
Затем вы можете заглянуть в «Магазин приложений» (или его аналог в зависимости от дистрибутива), чтобы доустановить нужные вам приложения. И напоследок выбрать обои посимпатичнее.
Попробуйте Linux, и вы увидите, что в повседневной жизни она ничуть не сложнее Windows или macOS.
Текст статьи был обновлён 11 марта 2021 года.
Computer users today are more concerned about privacy, work efficiency, and desktop customization. More and more people are realizing that Windows isn’t very private, efficient, or customizable. Add this to the fact that a genuine copy of Windows comes with a pretty hefty price tag, and in the end, you’ll be tired of running the same old operating system.
That is why more desktop users are looking for alternatives like Ubuntu.
Ubuntu is a free and open-source distribution or operating system based on Linux. Linux itself is a kernel base for many free and open-source operating systems. The majority of server computers worldwide use Linux, while the number of Linux desktop users is on a steady rise. Many new Linux users are flocking to Ubuntu as their distribution of choice.
Ubuntu has dominated the Linux desktop space for years. Because of this, the distribution is home to a large community of users and developers. Now on version 22.04, Ubuntu still brings a stable Linux experience, long-term support from its developers, and ease of use for beginners. It is as easy to use as it is to install, especially for those who want to make the switch from Windows to Ubuntu.
This guide will help you make the switch to free and open-source software an easier task.
- Pre-installation
To prepare for installing Ubuntu, you will need these devices:
- A USB drive with at least 8 GB of storage. This USB drive will serve as your installer device for the Ubuntu operating system. Make sure that your drive is empty beforehand! All data on the USB drive will be lost when you install the Ubuntu image on it.
- A laptop or desktop PC with the following minimum hardware specifications:
- 2 GHz processor
- 4 GB of RAM
- At least 25 GB of hard drive storage space
- Internet access is also recommended when installing Ubuntu. Besides your computer’s Wifi connection, you may need to prepare a wired Ethernet connection to your computer. You can also share your phone’s internet connection to your computer with a USB cable.
You will also need to backup the data on your Windows system. Installing Ubuntu on your hard drive will erase your entire Windows system, along with all the files in it! Making a backup beforehand will allow you to move your files to your Ubuntu system once it’s installed.
Backing up your personal files can be done manually. You can transfer the necessary files to a separate USB drive or external hard drive. You may also transfer your personal data to a separate hard drive within your computer.
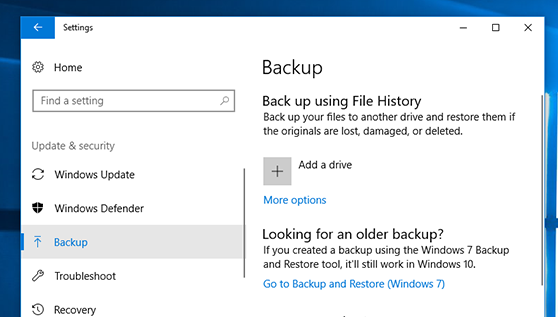
Windows 10 also has a file backup utility to make backing up your files simpler. All you need to do is:
- Open Settings on Windows 10.
- Search for “Backup” under Update and Security.
- Click “Add a drive“, then choose your external USB or hard drive for your backup.
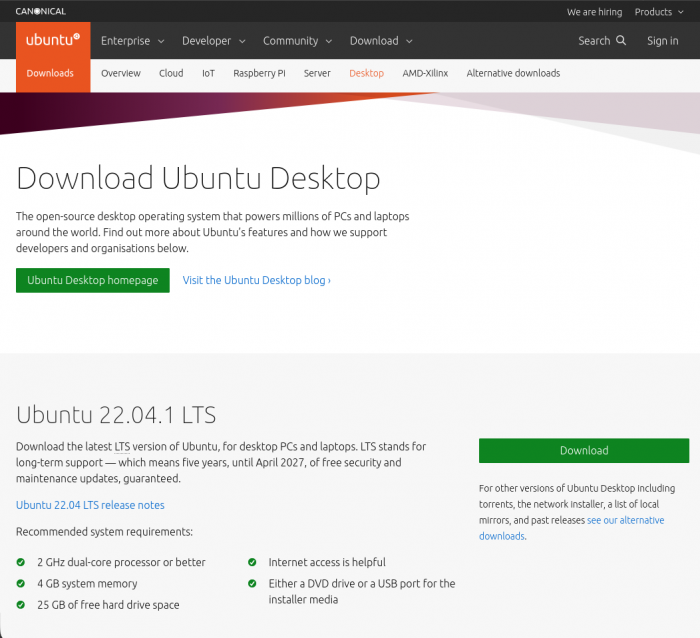
2. Creating a bootable Ubuntu USB drive
First, you will need to download an Ubuntu Desktop image. All you need to do is open Ubuntu’s download page and download Ubuntu 22.04.1 LTS.
There are many image-flashing apps that you can use to install Ubuntu on your
USB drive. For this tutorial, we will be using balenaEtcher. balenaEtcher is a free and open-source program that is very user-friendly. Just open balenaEtcher’s download page and download Etcher for Windows.
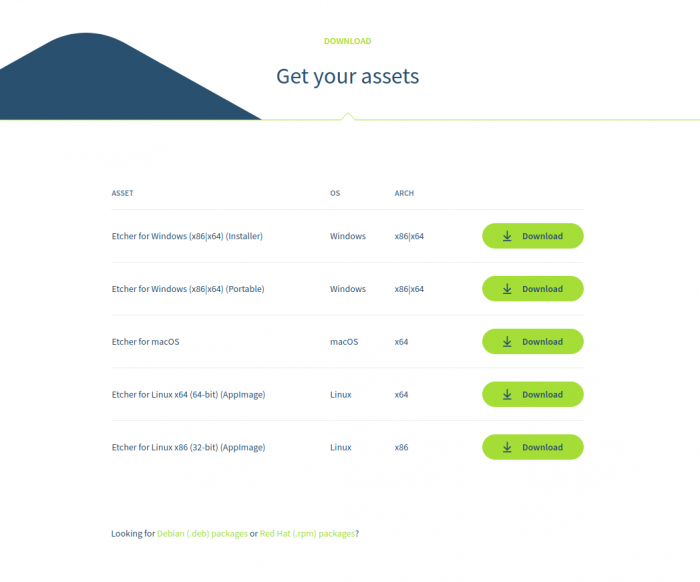
With your Ubuntu image downloaded and balenaEtcher installed, it’s time to flash Ubuntu onto your USB. Plug in your USB drive and follow these instructions:
- Open balenaEtcher.
- Select your downloaded Ubuntu image.
- Select your USB drive for installing Ubuntu.
- Click Flash!
You now have a bootable Ubuntu USB drive that is ready to use for installation.
3. Booting Ubuntu from the USB drive
Option 1: Booting Ubuntu through Windows
To begin booting your Ubuntu USB drive through Windows, unplug and plug in the drive and follow these steps:
- Click on the Start button.
- Press and hold the Shift key while you click Power > Restart on your Start Menu.
Once your computer has rebooted, you should see a blue screen with options to choose from.
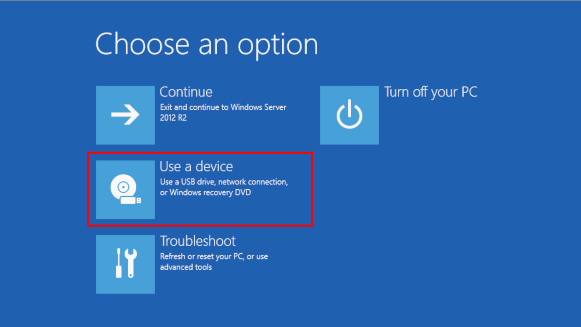
In the Choose an option screen, follow these instructions:
- Click Use a device.
- In the Use a device screen, choose Boot Menu.
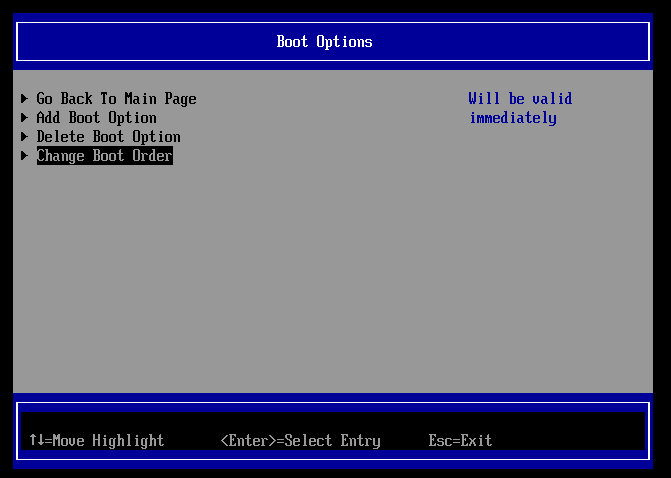
Windows will shut down. Your computer will restart and show a Boot Menu. The Boot Menu is a list of possible drive devices to start from. Select your Ubuntu USB stick and press Enter. This will start your computer through your Ubuntu USB drive.
If your Boot Menu is a full BIOS Menu with multiple options, navigate to the Boot Options and change your computer’s boot order. Set your USB drive as the first position on the booting order. Save and exit the Boot Menu. This will start your computer through your Ubuntu USB drive.
Option 2: Starting with the Boot Menu key to boot Ubuntu
Your machine may reboot straight to your regular Windows system instead of showing the Choose an option screen. In that case, you will need to manually access the Boot Menu. Follow these steps from your Windows system:
- Click on the Start button.
- Press and hold the Shift key while you click Power > Shutdown on your Start Menu.
- Unplug and plug in your Ubuntu USB drive.
- Start up your computer.
- Before your computer boots up Windows, immediately press your Boot Menu key several times.
F12 is the most common key for bringing up a computer’s Boot Menu. Escape, F2, and F10 are also common alternatives. Your computer’s Boot Menu key may also depend on the manufacturer. Identify your computer’s possible Boot Menu key in the following list:
Your computer should now show the Boot Menu. Follow the instructions on using the Boot Menu in Option 1, then start your computer through your Ubuntu USB drive.
4. Testing Ubuntu before installing
When your computer boots into your Ubuntu USB drive, you will enter the Ubuntu live environment and be greeted by a welcome screen. A live environment is a USB-based operating system that you can use without making changes to your computer until installed.
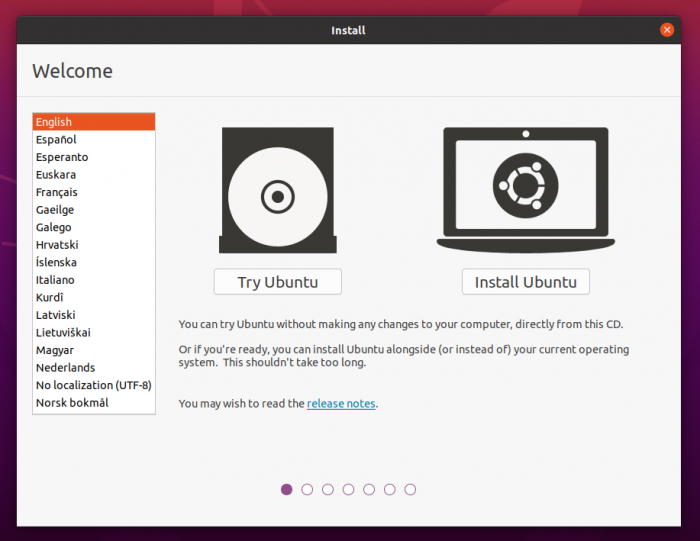
Before installing, click Try Ubuntu to preview Ubuntu through the live environment. You can proceed to install Ubuntu at any time by clicking the Install Ubuntu shortcut on the desktop. Get your very first look and feel of the operating system. Take Ubuntu’s default suite of applications for a test run.
This is also the time to test if your computer’s hardware functions are working properly. Check if your keyboard, mouse, sound, Wifi, Bluetooth, and graphics components are all functioning. Many new Ubuntu users will find their devices to be compatible with the operating system.
5. Installing Ubuntu on your hard drive
After testing Ubuntu on the live environment, you can begin the installation process. Click the Install Ubuntu 22.04 LTS shortcut on the desktop.
You will be asked to select a keyboard layout. You can manually select your computer’s keyboard layout. You can also click Detect Keyboard Layout to let Ubuntu find your keyboard layout for you. You can still add and change languages and keyboard layouts after installation. When you are ready, click Continue.

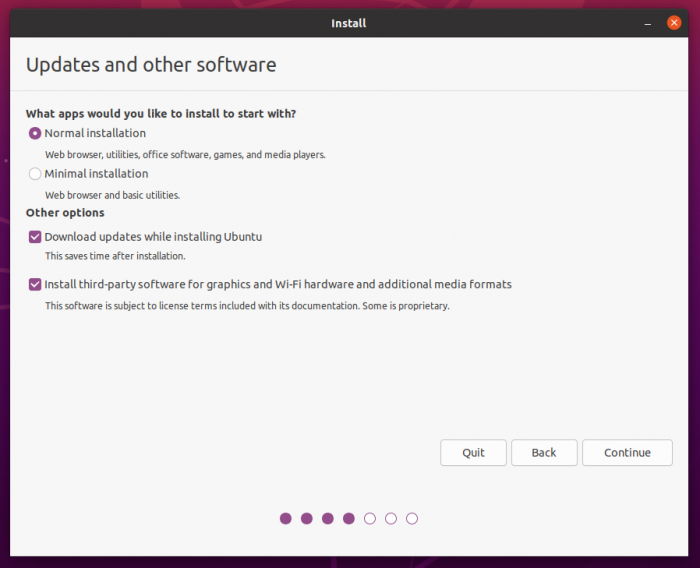
Next, you will be asked to choose your preferred type of installation. A Normal installation includes all the apps that a regular computer user will need. The Ubuntu live environment gives you the time to test out these apps for yourself.
A Minimal installation will only include a web browser and basic utilities. You may need to apply a minimal installation if you have less hard drive space. Either way, you are free to remove and install any Linux apps that you want after installing Ubuntu.
Other options are also present in this step. A stable internet connection is required if you choose to download updates while installing Ubuntu. Installing third-party software to improve device compatibility is also recommended.
On the next screen, you will choose the hard drive disk for your Ubuntu installation. For this tutorial, we will be erasing our old Windows install and completely switching to Ubuntu. Select Erase disk and install Ubuntu.
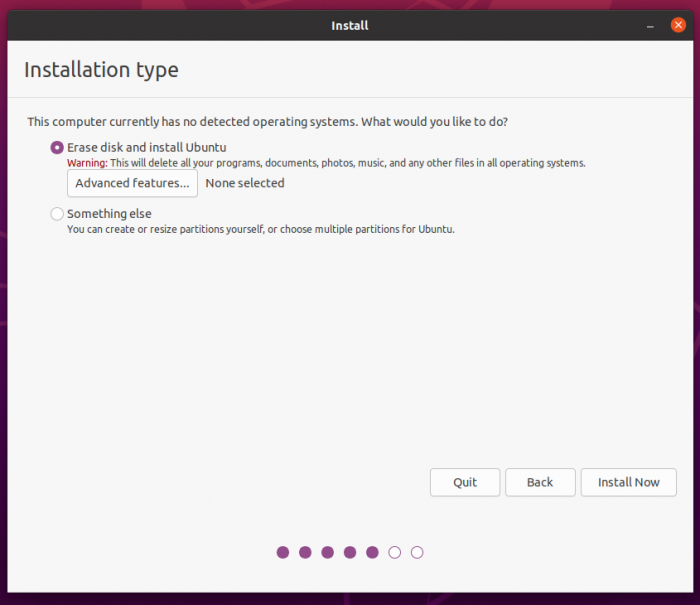
The Advanced features button gives you the option to encrypt your new Ubuntu install. Encrypting your Ubuntu system on your hard drive will make it more private and secure. This protects you from any malicious actors who might want to access and abuse your system.
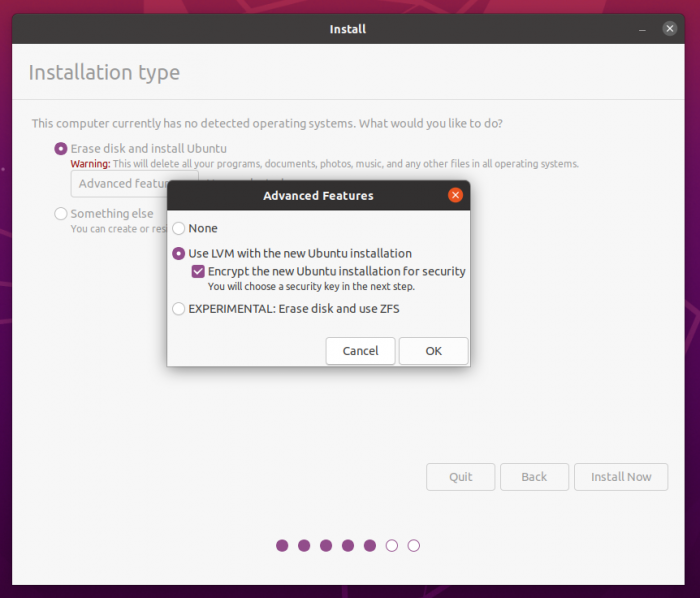
If you choose to encrypt your Ubuntu installation, you will be prompted to create a security key. You will have to enter this security key every time you open your computer so that you can decrypt and access your Ubuntu system.
Your security key should be strong, complicated, and memorable to you. It should contain lowercase uppercase letters, numbers, and symbols. Write your security key down and keep it in a safe place outside of your Ubuntu system. You will not be able to access and recover your data if you lose your security and recovery keys!
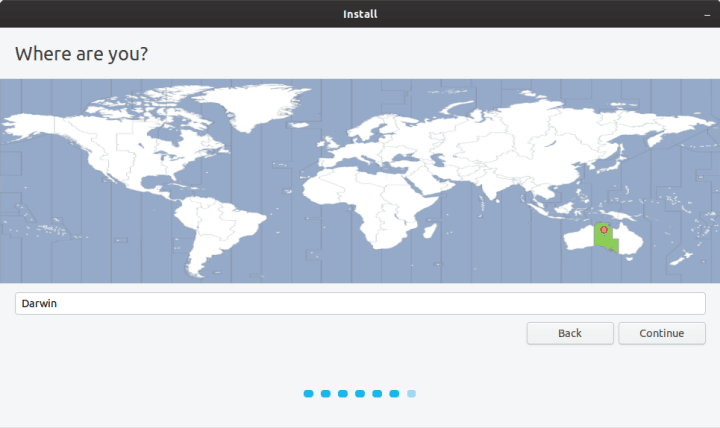
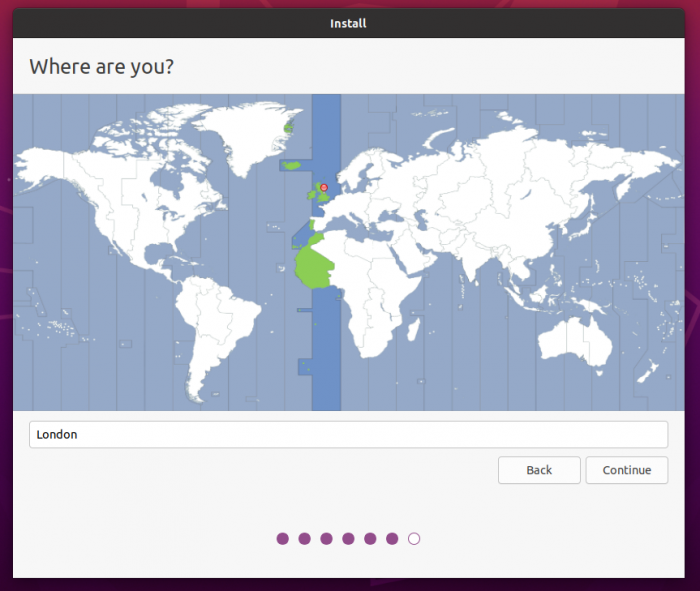
After choosing your installation drive, you will be prompted to select your location and timezone. It will be detected automatically if you are connected to the internet. Click Continue when you are done.
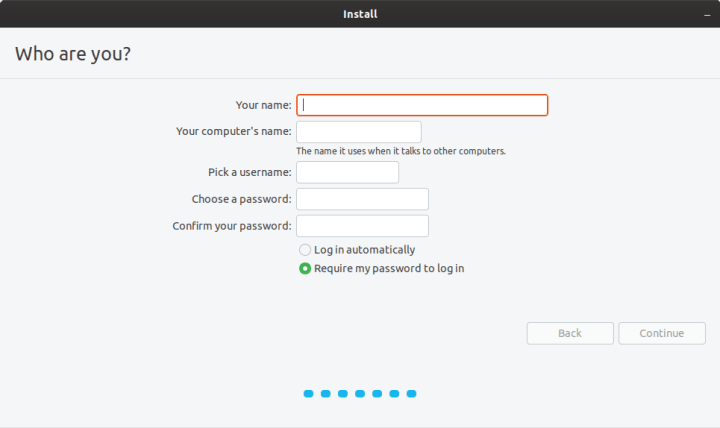
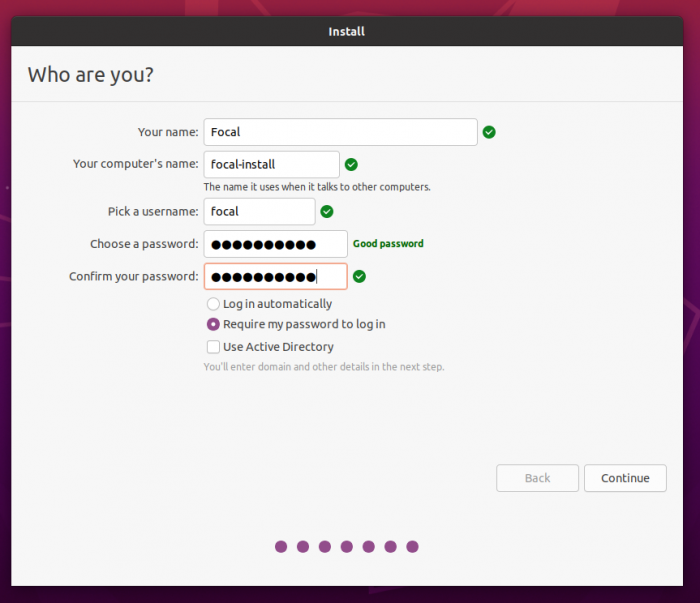
Finally, you will be asked to create your login details for Ubuntu. Enter your name, your computer’s name, and your username. Make sure to create a password that is strong, complicated, and memorable to you. If you chose to encrypt your Ubuntu install, your login password should differ from your security key.
When you click Continue, the installation process will begin in the background. Get ready to sit back and relax, because the background installation will take some time.
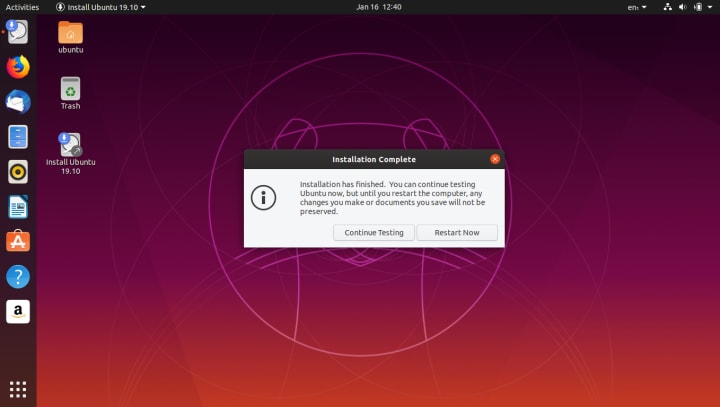
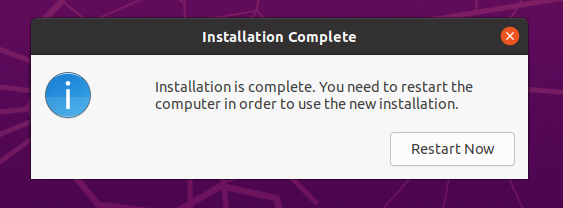
Once the installation is complete, click Restart Now.
- Opening your Ubuntu install for the first time
Once you restart your device, unplug your USB install drive and press Enter.
Enter your password on the login screen and enjoy your new desktop operating system!