
Перейти к основному контенту
Поддержка
Поддержка
Войти
Войдите с помощью учетной записи Майкрософт
Войдите или создайте учетную запись.
Здравствуйте,
Выберите другую учетную запись.
У вас несколько учетных записей
Выберите учетную запись, с помощью которой нужно войти.
Applies ToWindows 11 Windows 10
Чтобы настроить параметры питания и спящего режима в Windows 11, выберите Пуск > Параметры > система > питание & батареи > экран, спящий режим & время ожидания в режиме гибернации.
-
Выключите экран после: Выберите время ожидания устройства перед выключением экрана, когда вы не используете устройство, как при его подключении, так и при включении батареи.
-
Перенесите устройство в спящий режим после: Выберите время ожидания устройства перед переходом в спящий режим, когда вы не используете его, когда оно подключено к сети и когда оно подключено к аккумулятору.
См. дополнительные сведения о том, как завершить работу компьютера, включить его в спящий режим или гибернировать.
Открытие параметров спящего режима Power &
ПОДПИСКА НА RSS-КАНАЛЫ
Нужна дополнительная помощь?
Нужны дополнительные параметры?
Изучите преимущества подписки, просмотрите учебные курсы, узнайте, как защитить свое устройство и т. д.
Преимущества подписки на Microsoft 365

Обучение работе с Microsoft 365

Microsoft Security

Центр специальных возможностей
Были ли сведения полезными?
(Отправьте отзыв в корпорацию Майкрософт, чтобы мы могли помочь.)
Насколько вы удовлетворены качеством перевода?
Что повлияло на вашу оценку?
Моя проблема решена
Понятные инструкции
Понятные сведения
Без профессиональной лексики
Полезные изображения
Качество перевода
Не соответствует интерфейсу
Неверные инструкции
Слишком техническая информация
Недостаточно информации
Недостаточно изображений
Качество перевода
Добавите что-нибудь? Это необязательно
После нажатия кнопки «Отправить» ваш отзыв будет использован для улучшения продуктов и служб Майкрософт.
Эти данные будут доступны для сбора ИТ-администратору.
Заявление о конфиденциальности.
Спасибо за ваш отзыв!
×
Do you remember the last time when you fell asleep, and your system remained switched on overnight? I am sure everyone is guilty of this. But, if it happens frequently, then the health and battery performance of your system degrades day by day. Soon, the efficiency factors will be affected. No worries, Windows 10 sleep timer could help you to get rid of this problem. We bring to you a perfect guide that will help you enable Windows 10 sleep timer.

Table of Contents
How to Set a Shutdown Timer in Windows 10
Method 1: Use Command Prompt to Create Windows 10 Sleep Timer
You can time your system to shut down after a particular period of time by setting a shutdown timer on your Windows 10 computer. The easiest way to do so is using Command Prompt. Windows 10 sleep command will help you to create Windows 10 sleep timer. Here’s how to do it:
1. Type cmd in the Windows search bar as depicted.

2. Type the following command in Command Prompt window, as shown below, and hit Enter:
Shutdown –s –t 7200

3. Here, -s denotes that this command should shut down the computer, and the parameter –t 7200 denotes the delay of 7200 seconds. This implies that if your system is inactive for 2 hours, it will shut down automatically.
4. A warning notification will be prompted titled ‘You’re about to be signed out. Windows will shut down in (value) minutes,‘ along with the date and time of the shutdown process.

Method 2: Use Windows Powershell to Create Windows 10 Sleep Timer
You can perform the same task in PowerShell to shut down your PC after a specified period of time.
1. Launch the Windows Powershell by searching for it in the Windows search box.

2. Type shutdown –s –t value to achieve the same result.
3. Like we explained above, replace the value with the specific number of seconds after which your PC should shut down.
Also Read: Fix Computer Won’t Go to Sleep Mode In Windows 10
Method 3: Create Windows 10 Sleep Timer Desktop Shortcut
If you want to create Windows 10 sleep timer without using Command Prompt or Windows Powershell, you can create a desktop shortcut that opens the sleep timer on your system. When you double-click on this shortcut, Windows 10 sleep command will be activated automatically. Here is how to create this shortcut on your Windows PC:
1. Right-click on the blank space on the home screen.
2. Click on New and select Shortcut as depicted below.

3. Now, copy-paste the given command in the Type the location of the item field.
Shutdown -s -t 7200

4. If you want to turn off your system and force close any open programs, use the following command:
shutdown.exe -s -t 00 –f
5. Or, if you want to create a sleep shortcut, use the following command:
rundll32.exe powrprof.dll, SetSuspendState 0,1,0
6. Now, type a name in Type a name for this shortcut field.
7. Click Finish to create the shortcut.

8. Now, the shortcut will be displayed on the desktop as follows.
Note: Steps 9 to 14 are optional. If you want to change the display icon, you can follow them.
9. Right-click on the shortcut you just created.
10. Next, click on Properties and switch to the Shortcut tab.
11. Here, click on Change Icon… as highlighted.
12. You may receive a prompt as depicted below. Click on OK and proceed.

13. Select an icon from the list and click on OK.
14. Click on Apply followed by OK.
Your icon for the shutdown timer will be updated on the screen, as depicted below.
>OK. Your icon for the shutdown timer will be updated on the screen”>
Now, when you are away from your system for 2 hours, the system will shut down automatically.
How to Disable Windows 10 Sleep Timer Desktop Shortcut
Maybe you no longer require Windows 10 sleep timer. In this case, you should disable the sleep timer desktop shortcut on your system. This can be accomplished when you create a new shortcut with a new command. When you click twice on this shortcut, the Windows 10 sleep timer desktop shortcut will be disabled automatically. Here is how to do it:
1. Right-click on the desktop and create a new shortcut by navigating to New > Shortcut as you did earlier.
2. Now, switch to the Shortcut tab and paste the given command in the Type the location of the item field.
shutdown –a

3. Now, type a name in Type a name for this shortcut field.
4. Lastly, click Finish to create the shortcut.
You can also change the icon (Steps 8-14) for this disable sleep timer shortcut and place it near the previously created enable sleep timer shortcut so that you can access them easily.
Also Read: 7 Ways to Quickly Turn Your Windows Screen Off
How to Create a Keyboard Shortcut to the Sleep Command
If you want to create a keyboard shortcut to the Sleep Timer command, follow the below-mentioned steps:
1. Right-click on the sleep timer shortcut and navigate to Properties.
2. Now, switch to the Shortcut tab and assign a key combination (like Ctrl + Shift +=) in the Shortcut key field.
Note: Make sure you do not use any previously assigned key combinations.

3. Finally, click on Apply > OK to save the changes.
Now, your Windows keyboard shortcut to the sleep timer command is activated. In case you decide not to use the shortcut anymore, simply delete the shortcut file.
How to Schedule a Shutdown Using Task Scheduler
You can use Task Scheduler to auto shut down your system. Implement the given instructions to do the same:
1. To launch the Run dialog box, press Windows key +R keys together.
2. After entering this command: taskschd.msc, click the OK button, as shown.
3. Now, the Task Scheduler window will open on the screen. Click on Create Basic Task… as highlighted below.

4. Now, type the Name and Description of your choice; then, click on Next.

Note: You can use the Create a Basic Task wizard to quickly schedule a common task.
For more advanced options such as multiple task actions or triggers, use the Create Task command from the Actions pane.
5. Next, select when should the task begin by choosing one of the following:
- Daily
- Weekly
- Monthly
- One time
- When the computer starts
- When I log on
- When a specific event is logged.
6. After making your selection, click on Next.
7. The following window will ask you to set the Start date and time.
8. Fill the Recur every field and click on Next as depicted below.

9. Now, select Start a program on the Action screen. Click on Next.

10. Under Program/script, either type C:\Windows\System32\shutdown.exe or browse the shutdown.exe under the above directory.

11. On the same window, under Add arguments (optional), type the following:
/s /f /t 0
12. Click Next.
Note: If you want to shut down the computer, say after 1 minute, then type 60 in place of 0; This is an optional step as you have already selected the date & time to start the program, so you can leave it as it is.
13. Review all the changes you have made until now, then checkmark Open the Properties dialog for this task when I click Finish. And then, click Finish.
14. Under the General tab, tick the box titled Run with the highest privileges.
15. Navigate to the Conditions tab and deselect ‘Start the task only if the computer is on AC power under the Power section.‘

16. Similarly, switch to the Settings tab and check the option titled ‘Run task as soon as possible after a scheduled start is missed.‘
Hereon, your computer will shut down at the date & time you have selected.
Use Third-Party Software
If you do not want to use any of the methods mentioned above and prefer to use a third-party application for this functionality, continue reading to know more.
1. SleepTimer Ultimate
The Users can benefit from a heap of functionality offered by the free application, SleepTimer Ultimate. A wide variety of sleep timers are available here, each with unique features. Some of its advantages are:
- You can fix a future date and time to shut down the system then.
- If the CPU has reached a specified level in performance characteristics, then the system will log out of accounts automatically.
- You can also enable a program to launch after a certain time period elapses.
This app supports various versions ranging from Windows XP to Windows 10. The features of SleepTimer Ultimate will depend on the version of Windows you use.
2. Adios
The User Interface of Adios is very simple and easy to use. It is free to download, and you can enjoy the following features:
- You can run a program on a timer.
- You can set a program or application to be downloaded at a particular date & time.
- You can switch the monitor to an OFF state.
- You can enjoy the timed shutdown feature along with user logoff functions.
Recommended:
- Fix Screen Goes to Sleep when Computer Turned ON
- 7 Ways To Fix Windows 10 Slow Shutdown
- How to Fix Audio Stuttering in Windows 10
- Fix Windows 10 Apps Not Working
We hope that this guide was helpful and you were able to create Windows 10 sleep timer on your PC. Let us know which method or app worked for you the best. If you have any queries/comments regarding this article, then feel free to drop them in the comments section.
Все способы:
- Активация спящего режима в Виндовс 10
- Способ 1: Автоматический переход
- Способ 2: Настройка действий при закрытии крышки (только для ноутбуков)
- Способ 3: Настройка действий кнопок питания
- Способ 4: Использование гибридного спящего режима
- Проблемы, связанные с переходом в спящий режим
- Вопросы и ответы: 13
Спящий режим обеспечивает сниженное потребление энергии компьютера или ноутбука и быстро возобновляет последний сеанс. Он удобен, если не планируется пользоваться устройством в течение нескольких часов, однако по умолчанию у некоторых пользователей этот режим бывает отключен. В этой статье мы разберемся, как активировать его на Windows 10.
Активация спящего режима в Виндовс 10
Юзер может без труда произвести данную настройку разными способами, а также заменить классический спящий режим относительно новым — гибридным спящим.
У большинства спящий режим уже включен и компьютер можно мгновенно в него перевести, открыв «Пуск», перейдя в раздел «Выключение» и выбрав соответствующий пункт.
Иногда даже после настройки нужный вариант может не появиться в меню «Пуск» — эта проблема нечастая, но существующая. Далее рассмотрим не только включение сна, но и проблемы, при которых активировать его не удается.
Способ 1: Автоматический переход
Компьютер умеет автоматически переходить на сниженное энергопотребление, если в течение определенного срока вы им не пользуетесь. Это позволяет не думать о необходимости ручного перевода в ждущий режим — достаточно выставить таймер в минутах, по истечении которого ПК сам заснет. Он включится в тот момент, когда человек вернется за рабочее место.
Пока что в Виндовс 10 включение и детальная настройка рассматриваемого режима не объединены в один раздел, но основные настройки доступны уже через «Параметры».
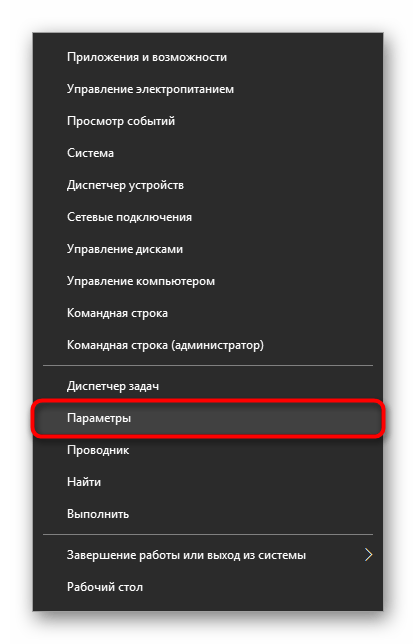
- Откройте меню «Параметры», вызвав его кликом правой кнопкой мыши по «Пуск».
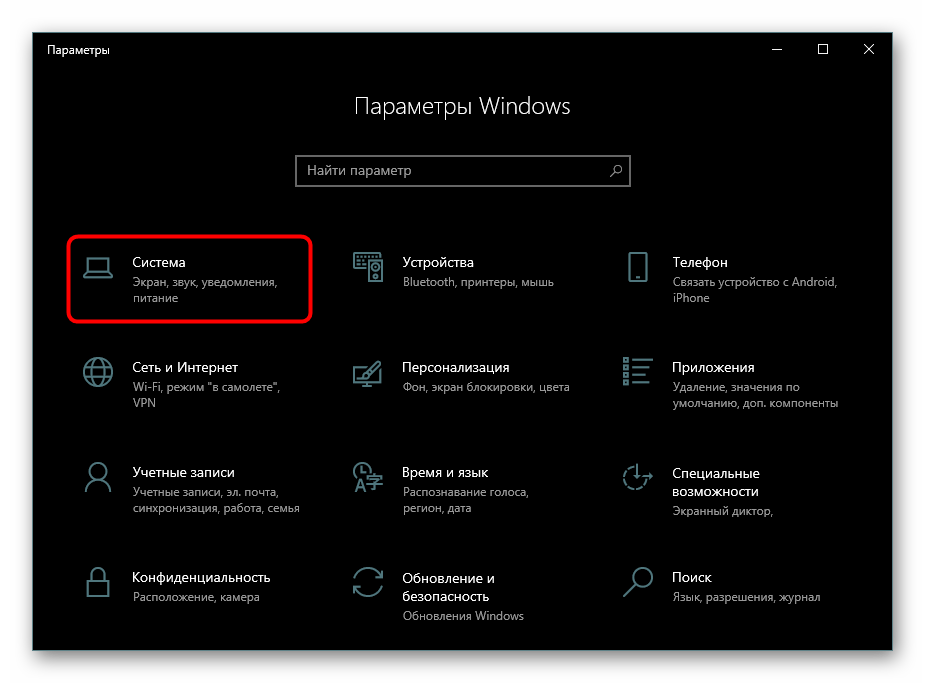
- Перейдите в раздел «Система».
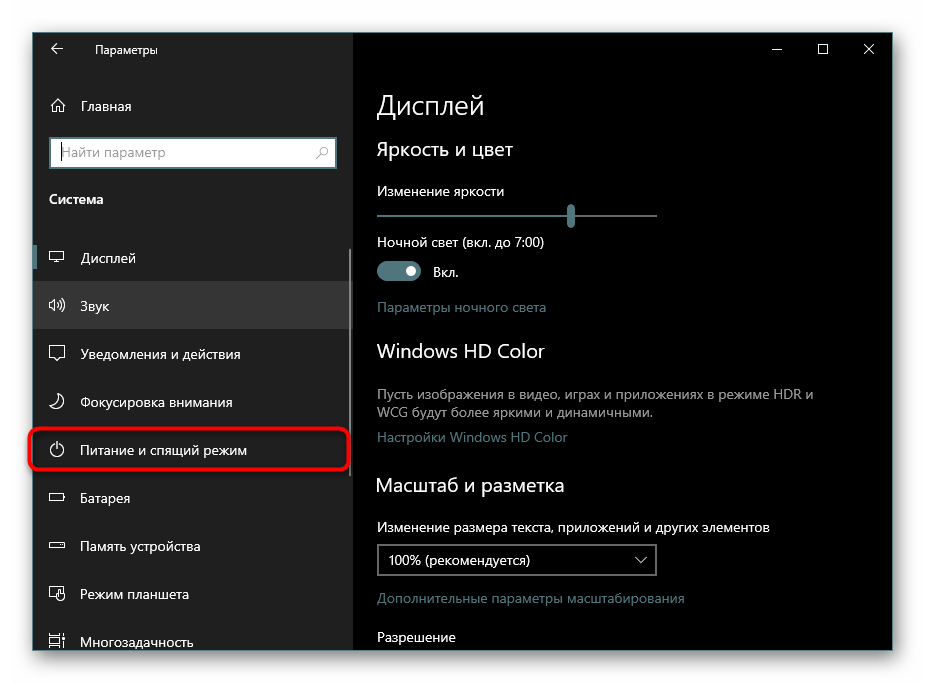
- На панели слева отыщите пункт «Питание и спящий режим».
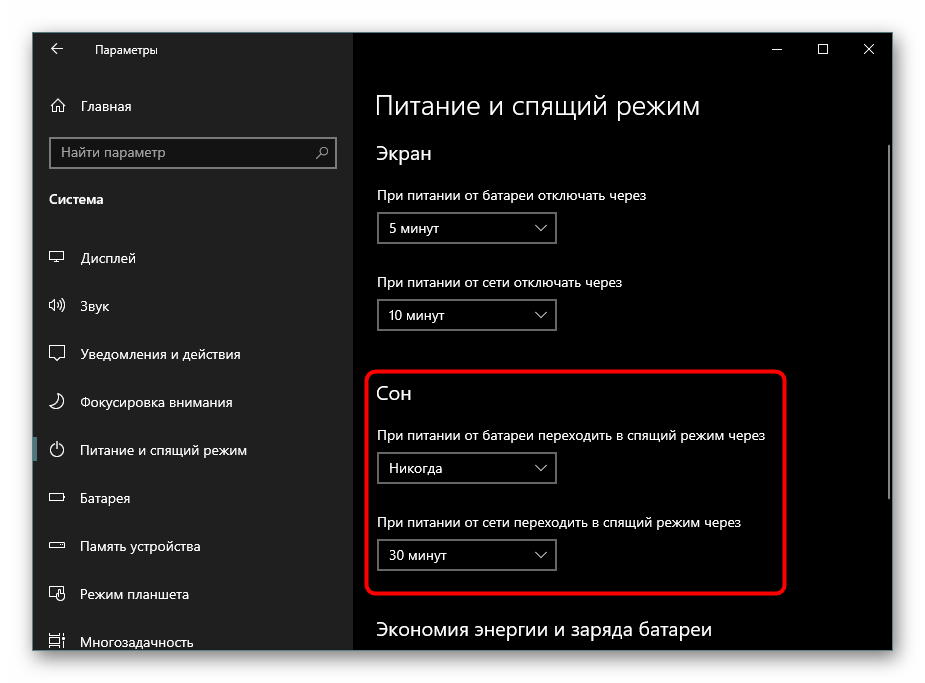
- В блоке «Сон» есть две настройки. Пользователям настольных компьютеров, соответственно, надо настраивать только одну — «При питании от сети…». Выберите время, через которое ПК будет засыпать.

Каждый самостоятельно решает, через какой период ПК должен переводиться в сон, но минимальные промежутки времени лучше не ставить, чтобы он не засыпал сразу, как только пользователь ненадолго отлучится. Если у вас ноутбук, поставьте в режиме «При питании от батареи…» значение меньше, чтобы сохранить больше заряда аккумулятора.
Способ 2: Настройка действий при закрытии крышки (только для ноутбуков)
Владельцы лэптопов могут вообще ничего не нажимать и не ждать, пока их портативный ПК сам заснет — достаточно настроить на это действие крышку. Обычно во многих ноутбуках переход в сон при закрытии крышки уже активирован по умолчанию, но если вы или кто-то другой раньше это отключили, ноутбук не будет реагировать на закрытие и продолжит работать.
Подробнее: Настройка действий при закрытии крышки ноутбука на Windows 10
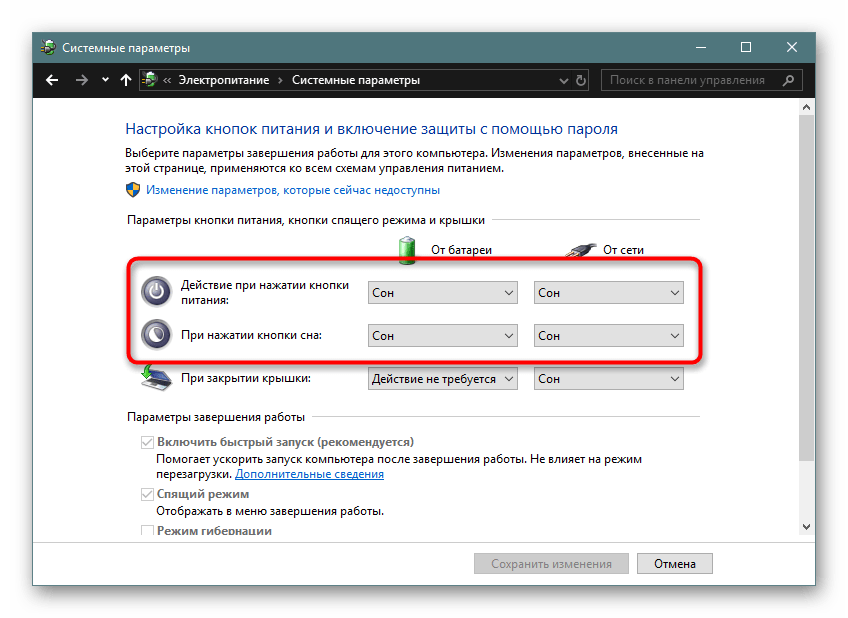
Способ 3: Настройка действий кнопок питания
Вариант, полностью аналогичный предыдущему за исключением одного: менять будем не поведение устройства при закрытии крышки, а при нажатии кнопки питания и/или сна. Способ подходит и для настольных компьютеров, и для ноутбуков.
Перейдите по ссылке выше и соблюдайте все инструкции. Разница будет лишь в том, что вместо параметра «При закрытии крышки» вы будете настраивать один из этих (или оба): «Действие при нажатии кнопки питания», «При нажатии кнопки сна». Первый отвечает за кнопку «Power» (вкл/выкл ПК), второй — за клавишу на некоторых клавиатурах и специальную кнопку на системных блоках, переводящих устройство в ждущий режим. Наличие такой клавиши и кнопки есть не у всех, и тогда настраивать соответствующий пункт нет смысла.
Способ 4: Использование гибридного спящего режима
Данный режим считается относительно новым, но актуален он в большей степени для настольных компьютеров, чем для ноутбуков. Сперва расскажем о их разнице и предназначении, а затем покажем, как его включить.
Итак, гибридный режим совмещает в себе гибернацию и режим сна. Это означает, что ваш последний сеанс сохраняется в оперативной памяти (как в спящем режиме) и дополнительно сбрасывается на жесткий диск (как в гибернации). Почему это бесполезно для ноутбуков?
Дело в том, что предназначение данного режима — возобновление сеанса без потери информации даже при внезапном отключении электричества. Как известно, этого очень боятся настольные ПК, не защищенные даже от перепадов энергии. Владельцев ноутбуков страхует аккумулятор, на питание от которого мгновенно переключится само устройство и заснет, когда он разрядится. Однако если в ноутбуке отсутствует батарея ввиду ее изношенности и от внезапного отключения электричества лэптоп не застрахован, гибридный режим также будет актуален.
Гибридный спящий режим нежелателен для тех компьютеров и ноутбуков, где установлен SSD, — запись сеанса на накопитель при переходе в ожидание отрицательно сказывается на его сроке службы.
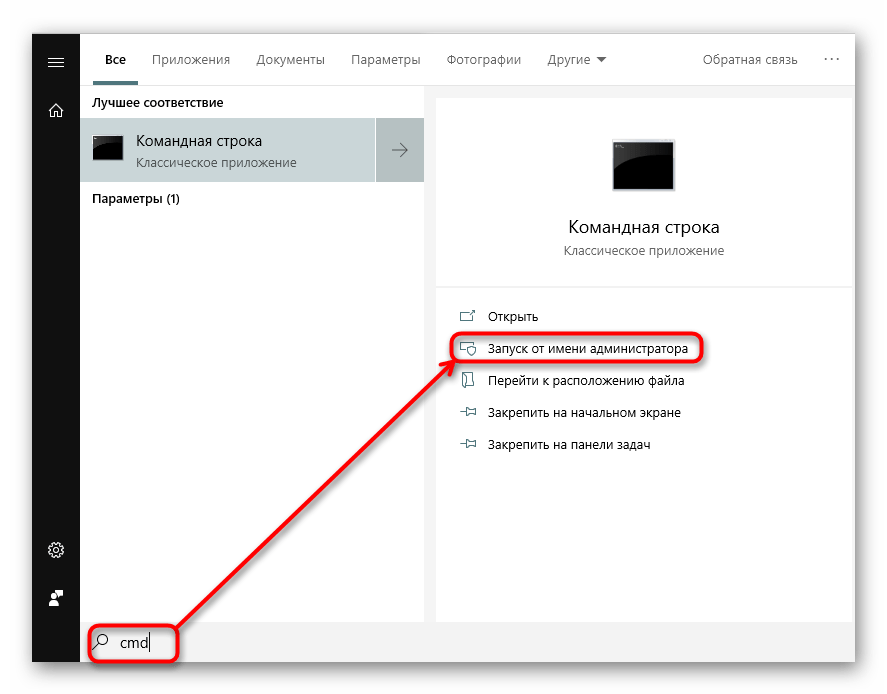
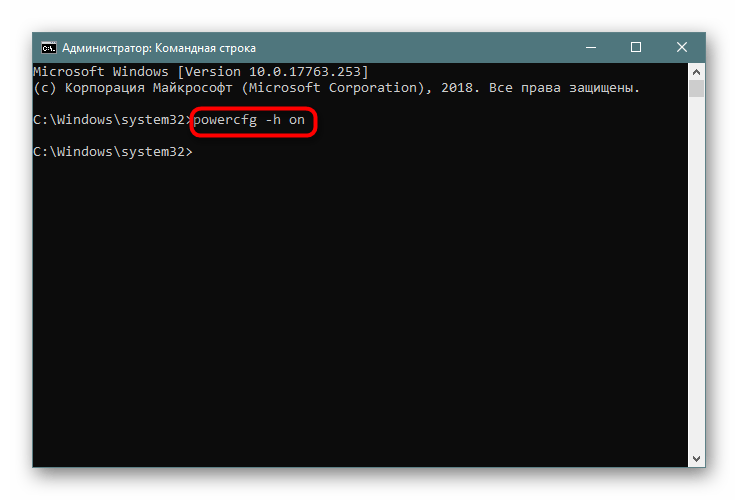
- Для задействования гибридного варианта понадобится включенная гибернация. Поэтому открываем «Командную строку» или «PowerShell» от имени администратора через «Пуск».
- Вписываем команду
powercfg -h onи жмем Enter. - К слову, после этого шага сам режим гибернации не появится в меню «Пуск». Если вы захотите им пользоваться в будущем, ознакомьтесь с этим материалом:
Подробнее: Включение и настройка гибернации на компьютере с Windows 10
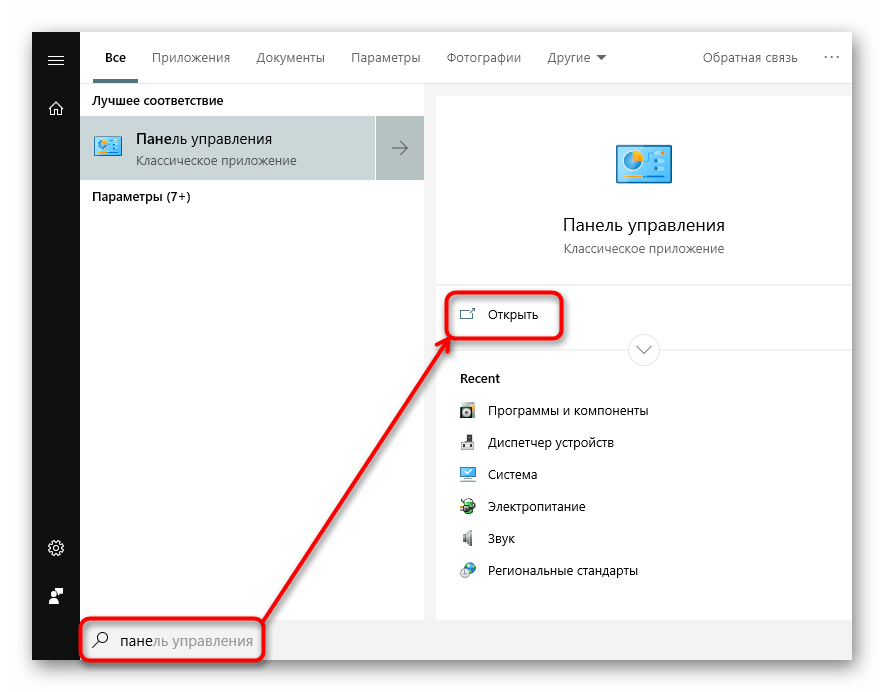
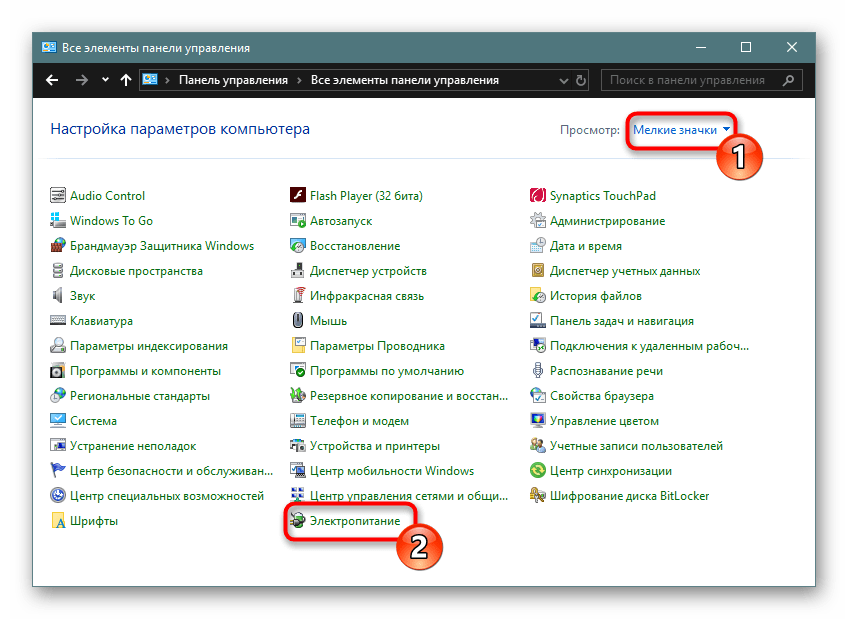
- Теперь через «Пуск» открываем «Панель управления».
- Измените тип просмотра, найдите и перейдите в «Электропитание».
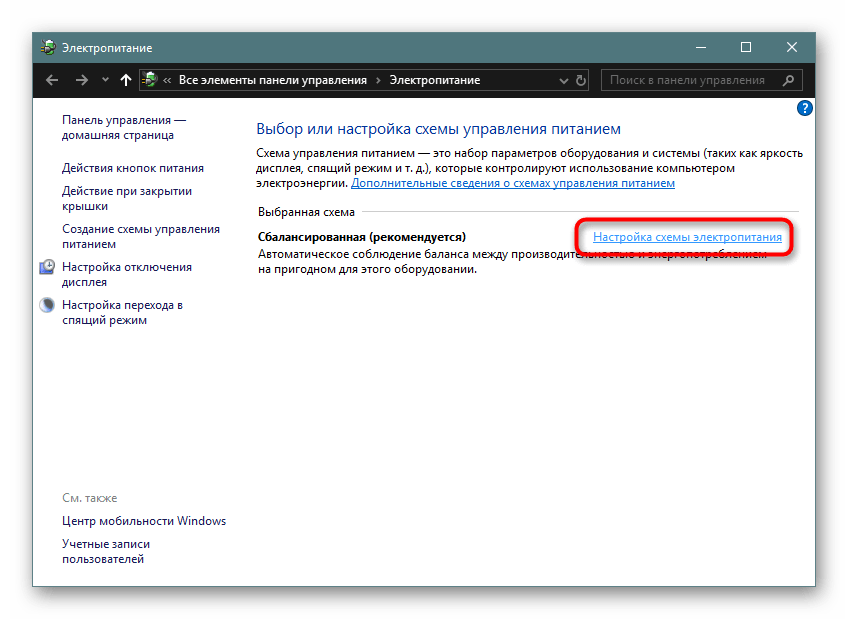
- Напротив выбранной схемы кликните по ссылке «Настройка схемы электропитания».
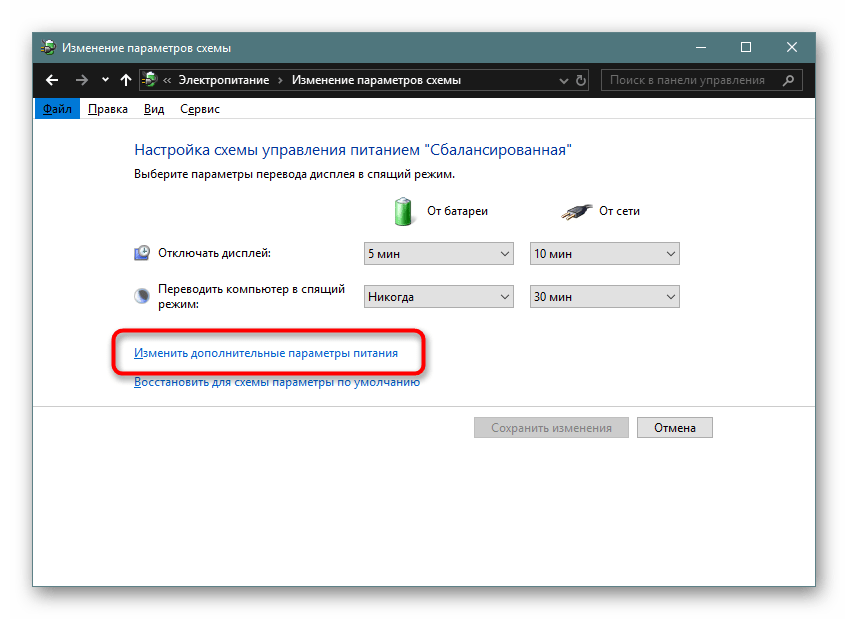
- Выберите «Изменить дополнительные параметры питания».
- Разверните параметр «Сон» и вы увидите подпункт «Разрешить гибридный спящий режим». Разверните и его тоже, чтобы настроить время перехода в него от батареи и от сети. Не забудьте сохранить настройки.

Проблемы, связанные с переходом в спящий режим
Нередко попытка использования режима сна заканчивается неудачей, и она может заключаться в его отсутствии в «Пуске», зависаниях ПК при попытке включиться или иных проявлениях.
Компьютер включается самостоятельно
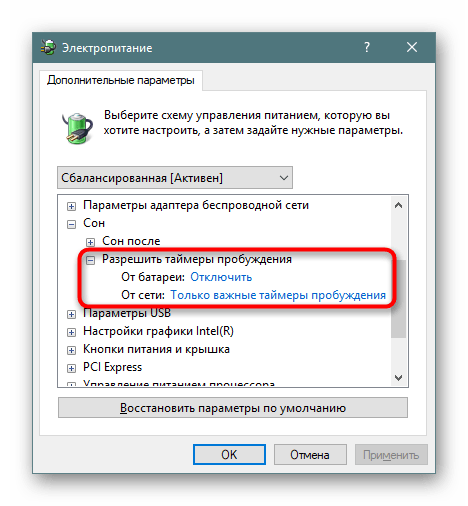
Разные уведомления и сообщения, приходящие в Виндовс, могут пробуждать устройство и оно само будет выходить из сна, даже если пользователь вообще ничего не нажимал. За это отвечают таймеры пробуждения, которые и надо настроить.
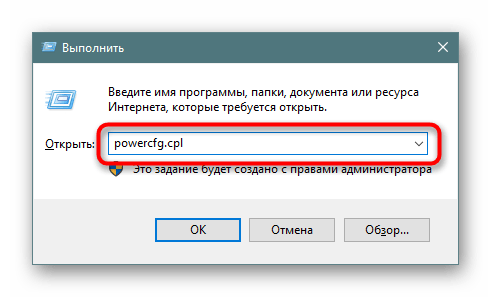
- Сочетанием клавиш Win + R вызовите окно «Выполнить», вбейте туда
powercfg.cplи нажмите Enter. - Откройте ссылку с настройкой схемы электропитания.
- Теперь переходите в редактирование дополнительных параметров питания.
- Разверните параметр «Сон» и найдите настройку «Разрешить таймеры пробуждения».

Укажите один из подходящих вариантов: «Отключить» или «Только важные таймеры пробуждения». Жмите на «ОК», чтобы сохранить изменения.
Мышка или клавиатура выводят компьютер из режима сна
Случайное нажатие кнопки мыши или клавиши на клавиатуре обычно приводит к тому, что ПК просыпается. Это не очень удобно для многих пользователей, но ситуация поправима настройкой внешних девайсов.
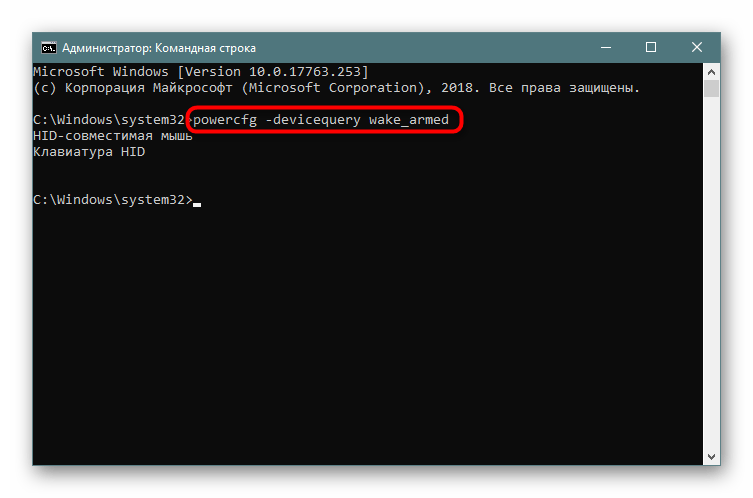
- Открываем «Командную строку» с правами администратора, написав ее название или «cmd» в меню «Пуск».
- Вставляем команду
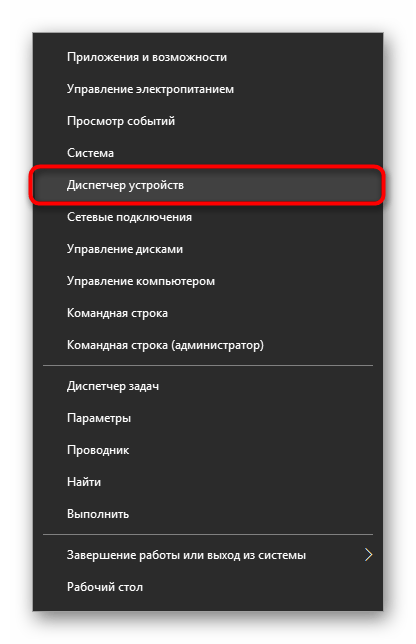
powercfg -devicequery wake_armedи жмем Enter. Мы узнали список девайсов, которые имеют право пробуждать компьютер. - Теперь жмем по «Пуск» ПКМ и переходим в «Диспетчер устройств».
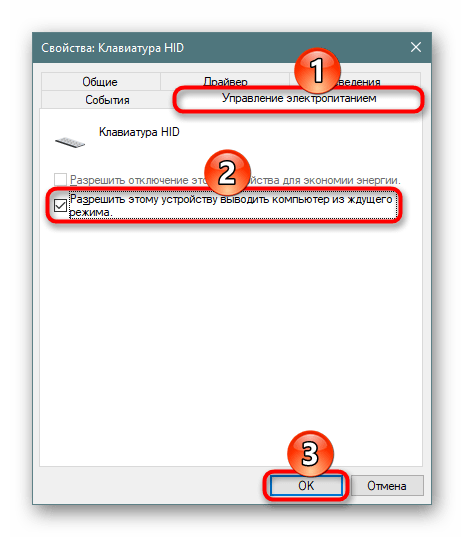
- Ищем первое из устройств, будящих ПК, и двойным левым кликом мыши попадаем в его «Свойства».
- Переключаемся на вкладку «Управление электропитанием», снимаем галочку с пункта «Разрешить этому устройству выводить компьютер из ждущего режима». Жмем «ОК».
- То же самое проделываем с остальными девайсами, перечисленными в перечне «Командной строки».
Спящий режим отсутствует в настройках
Частая проблема, связанная обычно с ноутбуками — кнопки «Спящий режим» нет ни в «Пуск», ни в настройках «Электропитания». В большинстве случаев всему виной не установленный видеодрайвер. В Win 10 установка собственных базовых версий драйверов для всех необходимых компонентов происходит автоматически, поэтому часто юзеры и не обращают внимания на то, что драйвер от производителя не был инсталлирован.
Решение здесь достаточно простое — самостоятельно установить драйвер для видеокарты. Если вы знаете ее название и умеете находить нужное ПО на официальных сайтах производителя комплектующих, значит, не нуждаетесь в дальнейших инструкциях. Менее продвинутым пользователям пригодится следующая статья:
Подробнее: Установка драйверов на видеокарту
После установки обязательно перезагрузите компьютер и приступайте к настройкам спящего режима.
Изредка пропажа режима сна может быть, наоборот, связана с установкой новой версии драйвера. Если раньше кнопка перехода в сон была в Windows, но теперь исчезла, скорее всего, виновато обновление ПО видеокарты. Рекомендуется дождаться выхода обновления драйвера с исправлениями.
Вы также можете удалить текущую версию драйвера и установить предыдущую. Если инсталлятор не сохранился, его придется искать по ID устройства, так как на официальных сайтах архивных версий обычно нет. Как это сделать, рассмотрено в «Способе 4» статьи об установке драйвера для видеокарты по ссылке выше.
Читайте также: Удаляем драйвера видеокарты
Помимо всего, этот режим может отсутствовать в некоторых любительских сборках ОС. Следовательно, рекомендуется скачать и установить чистую Виндовс, чтобы иметь возможность пользоваться всеми ее функциями.
Компьютер не выходит из режима сна
Есть сразу ряд причин, почему ПК не выходит из режима сна, и связаны они чаще всего с ошибками системы.
Подробнее: Устранение проблем с выводом Windows 10 из спящего режима
Мы разобрали доступные варианты включения, настройки режима сна, а также перечислили неполадки, которые нередко сопутствуют его использованию.
Наша группа в TelegramПолезные советы и помощь
If you are working on your laptop and have to move away for a while, you should put it to sleep ideally. This way you can pick up your work from where you left it, also, it saves electricity and your laptop’s battery. However, if you have to leave your PC for a long duration, it’s not advisable to put it to sleep, in that case, you can schedule a sleep timer shutdown.
Well, in today’s post, we will learn about how you can set a Windows sleep timer to shut down your computer automatically after a certain period. but first, let’s talk about what is sleep mode on Windows 11 PC.
What is Sleep mode in Windows 11 PC
Putting your PC into Sleep mode is similar to pausing a playing DVD. When you put your PC into sleep mode, all the actions happening on your computer stop and move to your RAM, which means your system memory. Your computer is still on but it uses less power in this state. Your work will be resumed once you touch or move your cursor. So, if you are moving away for a longer duration keeping your PC to sleep, it’s better to schedule a sleep timer shutdown. You can read about the different System Sleep States here.
You can create a Windows Sleep timer shutdown in your Windows 11/10 PC using the Command Prompt or by creating a Desktop shortcut as follows.
1] Using Command Prompt

- Press Win+R to run the dialog box and type CMD to run Command Prompt.
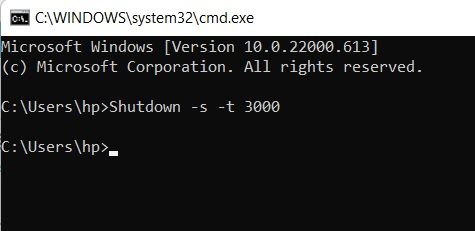
- Type in the command,
Shutdown -s -t 3000and hit Enter. - Here, -s is giving the command to shut down and -t is the number of seconds, you want it to wait.
- Of course, you can change the timings as per your own requirements.
2] Create a Desktop Shortcut
This method is for someone who wants to use this sleep timer shut down regularly. You can do this simply by creating a desktop shortcut without even opening the Command Prompt.
- This is again a very simple and quick way of creating a sleep timer for your Windows 11 PC.
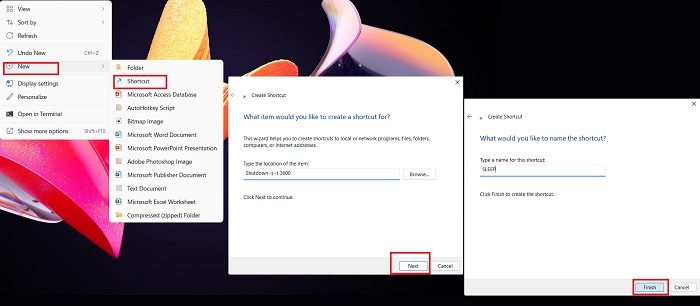
- Go to your Desktop and right-click anywhere.
- Select New–>Shortcut.
- This will open a new window, type in the command, “Shutdown -s -t 3600″ and click on Next.
- Give the shortcut a name and click on Finish.
- You will get a shortcut on your Desktop as shown in the screenshot below.
You can cancel this sleep shutdown command anytime you want.
- Go to the Desktop and right-click.
- Select New -> Shortcut
- Type in the command below-
- Shutdown -a
- Type the name for this shortcut and click on Finish.
Related tip: If you are using a laptop, make sure to thoroughly understand the Pros and Cons of each Power plan, and then change the Sleep settings.
3] Create Windows Sleep Timer Shutdown using Run Command in Windows 11/10

You can also use the Run Command box to create a sleep timer shutdown for your Windows 11/10 computer. These are the steps:
- Press Win+R hotkey. This will open the Run Command box
- Type
shutdown -s -t -1000command. While the s parameter is for shutdown and the t parameter is for the timer. You can change 1000 with any other value you want to set the timer - Press the OK button or use the Enter key.
You will get a desktop notification or Windows logon reminder (like visible in the screenshot above) that You’re about to be signed out and your Windows will shut down at the time set by you.
In case you changed your mind and want to cancel the shutdown, then open the Run Command box, type shutdown -a command, and hit the OK button.
4] Schedule Windows Shutdown using Task Scheduler in Windows 11/10
You can also follow a manual process and schedule shutdown using Task Scheduler in Windows 11/10. For this, you need to create a new basic task in Task Scheduler, give it a name, set the date and time for the task to trigger, and set the shutdown command. Once the task is scheduled, it will automatically trigger at the scheduled time and shut down your system.
5] Use a third-party tool like SleepTimer Ultimate or Sleep Timer
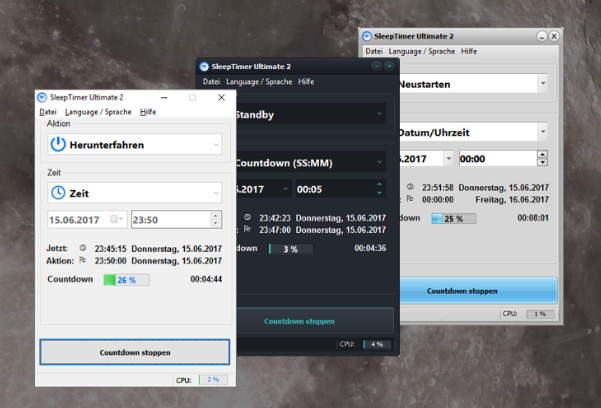
SleepTimer Ultimate is a free sleep timer program that allows you to shut down, restart, power off, Lock screen, Log out, Hibernate, Standby, Wake up, Start computers, etc.
You can also use other free shutdown scheduler tools or computer shutdown timer software to create a Windows sleep timer shutdown without any hassle. Simple Shutdown Timer, Windows Reboot, Adios Shutdown Timer, Sleep Timer, etc., are some good options to use. These tools let you set a timer in hours, minutes, and seconds to shut down or restart the system.
How do I change Sleep settings on Windows 11?
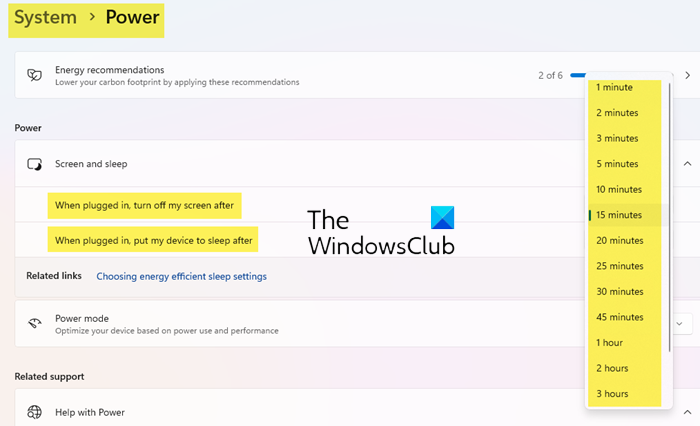
To change Power & sleep settings in Windows 11 do the following:
- Press Win+I key together to open the settings.
- Click the System entry under the side panel on the left.
- Switch to the right and scroll down to Power & battery option.
- Expand the menu and go to the Screen and sleep heading under Power section.
Here, you can choose how long you want the computer to wait before going to sleep. You can also change Sleep Timeout using PowerCFG command line.
How do I set a shutdown timer in Windows 11/10?
If you want to set a shutdown timer in your Windows 11/10 computer, then you can do it using Task Scheduler, Command Prompt, Run Command box, third-party tools, etc. All these options are covered in this post. Check these options and use any option you want to schedule a shutdown timer in Windows 11/10.
Does Windows 11 have a sleep timer?
You have to do that manually in Windows 11. Go to Settings > Power & Battery and customize your sleep settings. Alternatively, you can use the shortcut ALT+F4 and select the Sleep option from the menu.
Where is the Sleep button in Windows 11
Click on the Start, go to the power button in the bottom right corner, select Sleep and you are done. Also, you can press Alt+F4 and select the Sleep option from the menu.
Scheduling a shut down on Windows 10 is simple but you’ll be surprised to learn that it is just as difficult to schedule sleep on Windows 10. The command-line argument that claims to sleep a system actually hibernates it. The common method around this is to first disable/turn off hibernate on Windows 10, and then run the sleep command with time parameters. For a simpler solution, one that end users can modify per their own needs, we’re going to use a batch script and a scheduled task.
Sleep system script
This script has been written by SuperUser user AveYo. Open Notepad and paste the following in it. Save the file with the BAT file extension. If you want, you can test it out by running just the script. It should put your system to sleep.
@echo off &mode 32,2 &color cf &title Power Sleep
set "s1=$m='[DllImport ("Powrprof.dll", SetLastError = true)]"
set "s2=static extern bool SetSuspendState(bool hibernate, bool forceCritical, bool disableWakeEvent);"
set "s3=public static void PowerSleep(){ SetSuspendState(false, false, false); }';"
set "s4=add-type -name Import -member $m -namespace Dll; [Dll.Import]::PowerSleep();"
set "ps_powersleep=%s1%%s2%%s3%%s4%"
call powershell.exe -NoProfile -NonInteractive -NoLogo -ExecutionPolicy Bypass -Command "%ps_powersleep:"=\"%"
exit
With a reliable way to sleep your system now available, you need a simple way to schedule when it will be put to sleep. Task Scheduler gives you a very simple GUI for scheduling when a script (or app) runs so we’re going to use it.
Open Task Scheduler and create a new task. Name it something that will tell you it is for scheduling sleep. Go to the Triggers tab and add a new trigger. The trigger should be set to ‘On a schedule’. You’ll find plenty of options for scheduling i.e., how frequently the task should be run so use it to schedule sleep as flexibly as you need to. Once you’ve added the trigger, go to the Actions tab.
Add a new action, and set it to run the sleep script that you created earlier, and you’re done.
The task will be enabled automatically and at the given time, it will run the script that will sleep your system.
Sleep will lock your system and put it in a low power mode. Your apps will remain open and you will still be signed in. You will have to wake the system by pressing the power or sleep button on your laptop/PC, and then unlocking it like you normally do. Since no apps will be closed, you don’t have to worry about losing work.

Fatima Wahab
Fatima has been writing for AddictiveTips for six years. She began as a junior writer and has been working as the Editor in Chief since 2014.
Fatima gets an adrenaline rush from figuring out how technology works, and how to manipulate it. A well-designed app, something that solves a common everyday problem and looks