
Several Windows users have been getting the 0x80244007 error code when trying to install certain updates using the WU (Windows Update) function. In most cases, affected users are seeing the ‘There were some problems installing updates, but we’ll try again later’ error message. As it turns out, this error code is more common on Windows 10, but there are some occurrences of it occurring on Windows 8.1.

What’s causing the 0x80244007 error code?
We investigated this particular issue by looking at various user reports and testing out different repair strategies that are commonly recommended by other affected users. As it turns out, several different causes might trigger the 0x80244007 error code. Here’s a list of potential culprits:
- Generic WU Glitch – As it turns out, this particular issue can happen due to a Windows Update inconsistency that is already documented by Microsoft. In this case, you might be able to resolve the issue automatically by scanning your system with the Windows Update Troubleshooter and applying the recommended repair strategy.
- System File corruption – System file corruption can also be responsible for this error code. WU (Windows Update) works closely with a lot of dependencies, a lot of different files might be triggering this error code. The most efficient way of investigating and fixing them in bulk is to run utilities capable of fixing logical errors and system file corruption (like DISM and SFC).
- 3rd party AV interference – An overprotective AV suite can also be responsible for the apparition of this error code. Several 3rd party scanners including Avast, McAfee, and Sophos are known to cause issues with the Windows Update component. If this scenario is applicable, you should be able to resolve the issue by disabling the real-time protection or by uninstalling the overprotective AV suite.
- Windows Update inconsistency – Another potential culprit that might end up triggering this error message is an inconsistency with the files involved in the WU process. If one of those is hindering your PC’s ability to update, you should be able to resolve the issue by resetting every Windows Update component from an elevated Command Prompt.
- Underlying OS corruption issue – In more severe cases, this problem can occur due to a widespread corruption issue that cannot be resolved conventionally. In scenarios like this one, the only viable fix is to refresh every component of your OS (either by doing a clean install or a repair install).
Method 1: Running the Windows Update Troubleshooter
Before you try out different repair strategies, let’s see if your operating system is not capable of resolving the issue automatically. If the issue you’re encountering is happening due to an inconsistency that’s already documented by Microsoft, chances are the fix is as simple as running the Windows Update troubleshooter.
The Windows Update Troubleshooter is a utility that contains a selection of repair strategies that can be automatically applied in case a covered scenario is uncovered. Several Windows users that were also encountering the 0x80244007 error code have reported that the issue was resolved after they ran this troubleshooter and restarted their computer.
Here’s a quick guide on running the Windows Update Troubleshooter to fix the 0x80244007 error:
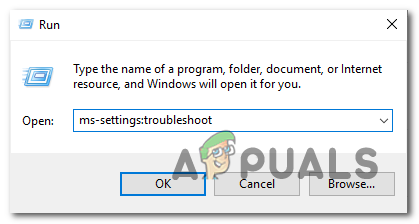
- Press Windows key + R to open up a Run dialog box. Next, type “ms-settings-troubleshoot” inside the text box and press Enter to open up the Troubleshooting tab of the Settings app.

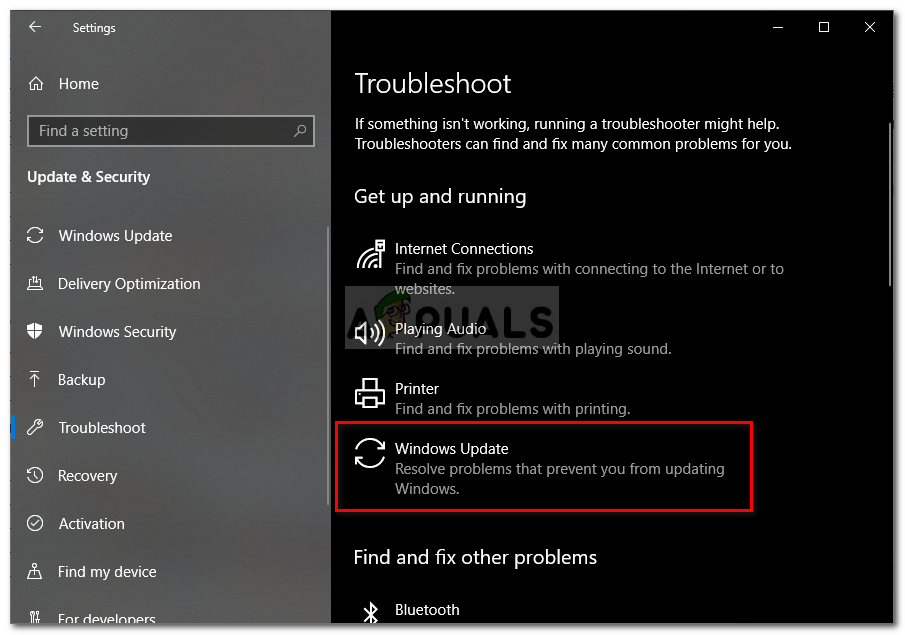
Opening the Troubleshooting tab of the Settings app via a Run box - Once you’re inside the Troubleshooting tab, move over to the right-hand pane of the Settings screen. Next, move down to the Get up and running section. After you get there, click on Windows Update, then click on Run the troubleshooter from the newly appeared context menu.

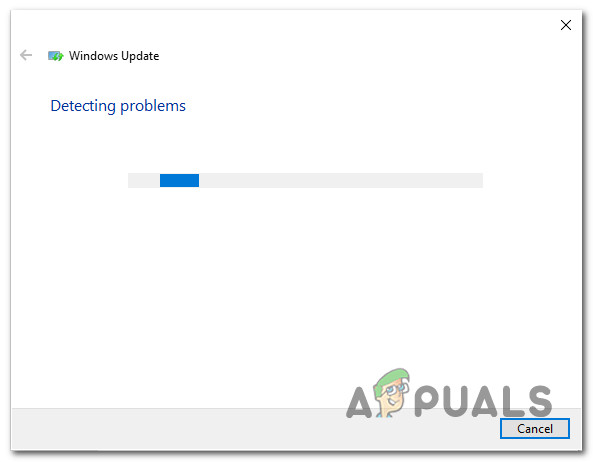
Running Windows Update Troubleshooter - After you manage to start the utility, wait patiently until the initial scan is complete. This procedure will determine whether any of the repair strategies included with this utility apply to your current scenario.

Detecting problem with Windows Update - If a viable fix is identified, you’ll see a different window and you will have the option to click on Apply this fix. Click it and then follow the on-screen instructions to enforce the fix. Keep in mind that depending on the issue that you’re encountering, you might be prompted to do some additional steps.

Apply this fix - After the fix is successfully applied, restart your computer and see if the 0x80244007 error is resolved by trying to install the update that was previously failing once the next startup is complete.

If you’re still encountering the same error code as the update fails, move down to the next method below.
Method 2: Running DISM and SFC Scans
If the first method didn’t work for you, the issue is likely facilitated by some kind of System File corruption. Since WU (Windows Update) works closely with a lot of dependencies, a lot of different files might be triggering this error code.
If this scenario is applicable, the most efficient way of resolving the problem is to run a couple of utilities capable of fixing both logical errors and system file corruption. SFC (System File Checker) and DISM (Deployment Image Servicing and Management) are both capable of doing this.
DISM uses a sub-component of WU to replace corrupted instances with healthy copies, while SFC makes use of a locally stored copy to do the same thing.
Since both utilities go about fixing corrupted instances in different ways, we recommend that you run both to fix the 0x80244007 error. Here’s a quick guide on doing this:
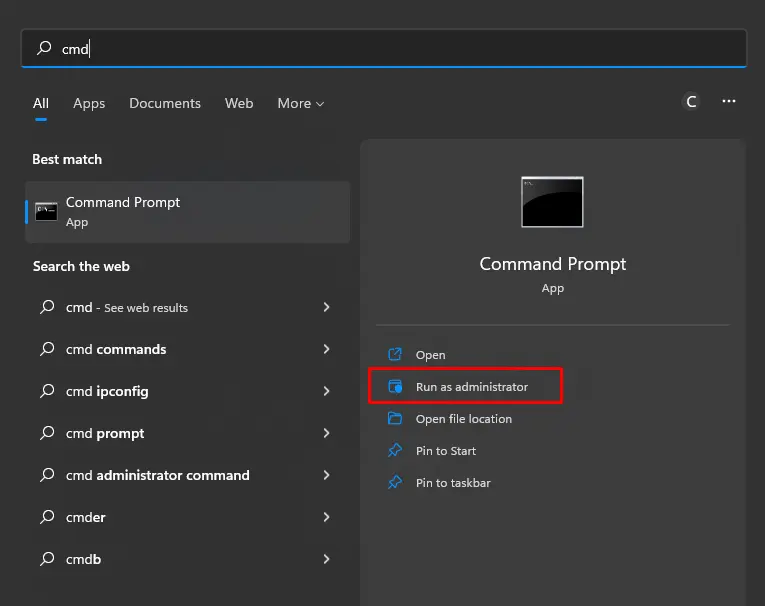
- Open up a Run dialog box by pressing Windows key + R. Then, type ‘cmd’ inside the newly opened text box and press Ctrl + Shift + Enter to open up a Command Prompt with admin access. When you’re prompted by the UAC (User Account Control) prompt, click Yes to grant administrative privileges.
Running Command Prompt - Once you’re inside the CMD window, type the following command and press Enter after each one to initiate a DISM scan:
Dism.exe /online /cleanup-image /scanhealth
Dism.exe /online /cleanup-image /restorehealth
Note: This utility needs a reliable Internet connection to replace corrupted instances with healthy copies. The first command will scan your system, while the second will replace inconsistencies found with the first scan.
- After the scan is complete, restart your computer and continue with the next steps below.
Note: Even if no errors we’re reported in the final stage, you should still proceed with the next steps. - Once the next startup sequence is complete, follow step 1 again to open up another elevated CMD prompt, but this time, type the following command instead and press Enter to initiate an SFC scan:
sfc /scannow
Note: Do not interrupt this process after the initial scan is started. Doing so might expose your system to other logical errors that might trigger other similar issues in the future.
- As soon as the SFC scan is finished, restart your computer and see if the issue is resolved at the next system startup.
If the same issue 0x80244007 error is still occurring, move down to the next method below.
Method 3: Uninstalling overprotective 3rd party suite
As it turns out, another potential cause that might trigger the 0x80244007 error when you’re trying to install a pending Windows Update is an overprotective AV suite. According to several user reports, several 3rd party security suites have the potential of blocking the connection between the WU component and the external server. Sophos, McAffee, AVAST, Comodo and a few others are commonly reported for the facilitation of the apparition of this issue.
If you’re currently using a security scanner that you think might be responsible for this error code, you should be able to circumvent the problem either by disabling the real-time protection while the update is installed or by uninstalling the AV suite altogether and moving towards the built-in solution (Windows Defender).
First things first, you should start by trying to disable the real-time protection of your AV. This procedure will be different depending on the 3rd party client that you’re using. But, in most cases, you can do this by making use of the taskbar icon. Right-click on it and look for an option that will disable the real-time protection.

As soon as the real-time protection is disabled, attempt to install the update again and see if you can install the update without seeing the 0x80244007 error.
If the same issue is still occurring, you should uninstall the AV completely, remove any remnant files and restart your computer to see if the issue has been resolved. If you decide to do this, follow this article (here). Use it as a walk-through through the steps of installing your security program without leaving behind any leftover files that might still trigger the same issue.
If this method is not applicable or you’ve already followed the steps below to no avail, move down to the next method below.
Method 4: Resetting all Windows Update components
If the first 3 methods didn’t provide you with a breakthrough that allowed you to install the Windows Update without issues, likely, you’re dealing with a WU system file inconsistency that’s hindering your machine’s ability to update. If multiple updates are failing with the same error code, it’s even more evidence that this scenario is applicable.
In this case, you should be able to resolve the issue by resetting all Windows components and dependencies that are involved in this process. A few users that were also encountering this problem have confirmed that the steps below have allowed them to resolve the 0x80244007 error.
Here’s a step-by-step guide on resetting all Windows Update components manually via an elevated Command Prompt:
- Press Windows key + R to open up a Run dialog box. Once you’re inside the run window, type “cmd” inside the text box and press Ctrl + Shift + Enter to open up a Run dialog box. Once you’re prompted by the UAC (User Account Prompt), click Yes to grant admin access.
Running Command Prompt - Once you manage to get inside an elevated CMD prompt, type the following commands and press Enter after each command to stop all relevant WU services:
net stop wuauserv
net stop cryptSvc
net stop bits
net stop msiserver
Note: Once you run the commands above, you will have effectively stopped the Windows Update service, the MSI Installer, the Cryptographic service, and the BITS service.
- Once the services are disabled, run the following commands in the very same CMD window and press Enter after each command to rename the two folders responsible for storing temporary WU files:
ren C:\Windows\SoftwareDistribution SoftwareDistribution.old
ren C:\Windows\System32\catroot2 Catroot2.old
Note: By renaming these two crucial Windows Update folders, you’re essentially forcing your OS to create new folders that are not being touched by corruption. This procedure will end up resolving most instances of system file corruption that can be responsible for this problem.
- Once the two folders above have been renamed, type these final commands to re-enable the services that you previously disabled at step 2. But make sure to press Enter after each command (don’t run them all in bulk):
net start wuauserv
net start cryptSvc
net start bits
net start msiserver
- Attempt to re-install the update that was previously triggering the 0x80244007 error and see if the issue is now resolved.
If the same error code is still showing and you’re still unable to complete the installation of the update, move down to the final method below.
Method 5: Perform a repair install
If none of the potential fixes above have worked for you, you’re likely dealing with an underlying system file corruption issue that cannot be resolved with standard recovery procedures. In situations like this one, your best hope of resolving the issue is to reset every Windows component to ensure that your OS is free of corruption.
When it comes to refreshing every OS component, the easiest way is to perform a clean install. But keep in mind that this operation will also delete most of your files including app & game installation, user preferences and any personal media stored on the Windows drive.
If you want the damage-controlled approach, you should go for a repair install (in-place repair) instead. This procedure is a little more tedious, but it will allow you to reset every component of your Windows installation while allowing you to keep all your files (including apps, games, user preferences, personal media, etc.).
Did you recently get the update error 0x80244007 while attempting to upgrade the existing operating system to its next available version? Well, in this tutorial, we have analyzed the most probable causes behind this bug including a few fixes that can resolve this problem.
When users encounter this bug on their computers, they also get an error message that reads the following –
“
SOAP client failed because there was a SOAP fault for reasons of WU_E_PT_SOAP_* error codes.”
Let’s explore the solutions in detail –

Update Error 0x80244007 Solutions
Here’s how to get rid of the update error code 0x80244007 on Windows 10 PC –
1] Troubleshoot Windows Update
The best way to solve an update-related issue on the computer is by running the Windows Update Troubleshooter. Running this tool will look for the current status of all services that might cause this bug in the first place. In case this finds any problem with these services, it will provide a resolution to this. To run this troubleshooter, follow the below-outlined steps –
- Reach out to the following location first –
Settings (Win + I) > Update & Security > Troubleshoot
- Jump to the right side and click the “Additional troubleshooters” link.
- Click to expand Windows Update and hit the
Run the troubleshooterbutton.

- Now, wait patiently as this troubleshooter starts scanning for the underlying issues.
- When the scanning completes, this tool might provide a resolution on how to fix this problem. Just follow the resolution as provided by the troubleshooter.
If running this tool doesn’t provide a solution, follow the next set of solutions –
2] Run Disk Cleanup to fix update error 0x80244007
The presence of excess temporary or junk files on the computer may also prevent Windows from being upgraded to the next build version. These files mostly include Browser cache and cookies. In order to fix this, you must run the Disk Cleanup tool deleting all such files –
- Press Win + S.
- Type “disk cleanup” in the text field, and press Enter.
- Using the drop-down menu, select the root drive i.e. (C:) on the drive selection pop-up window.
- Pressing the OK button will take you to the Disk Cleanup for C: drive.
- Click Clean up system files and re-select the root drive.
- Hit OK and wait for the system to scan the entire PC for possible temporary files.
- Mark each one of the checkboxes, and hit OK again.
- Do restart your PC when the above process finishes clearing all temporary or junk files.
3] Perform SFC Scan to solve update error 0x80244007
There are numerous things that might be preventing Windows 10 from being updated to the next available version. It’s quite impossible to search for the exact cause behind this issue. So, instead of finding the prime reason, we suggest performing an SFC scan. This way, your PC will automatically patch corrupted, damaged, or missing files as well. Here’s how to do an SFC scan on your device –
- Launch Command Prompt having Admin rights.
- Type “sfc/scannow” and press Enter.

- Now, wait for a couple of minutes while this command scans/repairs the corrupted files.
- You will see a percentage of fixes performed as time passes by.
- When this percentage reaches 100%, close all running apps in Windows 10, and reboot your device.
From the next logon, I hope you are now able to update Windows 10 error-free. If not, see the next set of workarounds –
4] Rename the Windows Cache folders
In case you haven’t cleared the update folders i.e. SoftwareDistribution and Catrrot2 folders since a long back, we suggest doing so in order to fix the 0x80244007 error. Renaming these folders is even more powerful as the folders don’t get deleted meanwhile.
Before proceeding ahead, make sure to stop a few essential services using the below steps –
- Press WinKey + R.
- In the run dialog, type “
services.msc“, and hit OK. - Locate and right-click on each one of the below services, and select the Stop button.
BITS
Cryptographic service
Windows Update service
Now, that you have already stopped these services, rename the update folders visiting the below path locations –
C:\Windows\SoftwareDistribution
C:\Windows\System32\Catroot2
Once you have renamed the update folders, make sure to reboot Windows 10 so as to incorporate the above changes.
Sign back into your device and restart all the services that you had stopped previously.
5] Download and Install Standalone Package
If none of the above workarounds resolve the update error code 0x80244007, you should update Windows 10 via downloading and installing the latest standalone package. Following this way not only upgrades your operating system but also fixes any update-related issues on the computer.
I hope you are now able to update Windows 10 without getting into any trouble. Let us know which solution works exactly in your case in the comment section.
How do I disable Windows 11 or 10 Updates?
If for any reason, you want to disable auto-updates of Windows 11 or 10, do the following –
Windows 11:
Go to Settings > Windows Update and hit Pause Updates. You may use the drop-down available next to it and extend this time frame to 5 weeks. When the chosen timeframe exceeds, Windows 11 will automatically upgrade to the next available security patch update.
Windows 10:
Press Win + I, select Update & Security > Windows Update. After reaching there, click Pause Updates. And, again you can prevent auto-updates from ever occurring only for 5 weeks maximum. Beyond that, your device will upgrade automatically.
Applies ToWindows 8 Windows 8 Pro Windows 8 Enterprise Windows RT Windows Server 2012 Datacenter Windows Server 2012 Datacenter Windows Server 2012 Essentials Windows Server 2012 Foundation Windows Server 2012 Foundation Windows Server 2012 Standard Windows Server 2012 Standard
Симптомы
Рассмотрим следующий сценарий:
-
Развертывание Windows Server Update Service (WSUS) в среде.
-
Windows 8, Windows RT или компьютер под управлением Windows Server 2012 в среде пытается выполнить поиск обновлений на сервере WSUS.
-
Срок действия файлов cookie для центра обновления Windows на компьютере.
В этом случае Windows не может проверить наличие обновлений. Кроме того генерируется код ошибки 0x80244007.
Причина
Эта проблема возникает, поскольку Windows не удается обновить файлы cookie для центра обновления Windows.
Решение
Сведения об обновлении
Для решения этой проблемы установите набор обновлений 2883201. Для получения дополнительных сведений о том, как получить этот накопительный пакет обновления, щелкните следующий номер статьи, чтобы перейти к статье базы знаний Майкрософт:
2883201 Windows Server 2012, Windows 8 и Windows RT накопительный пакет обновления: октября 2013
Статус
Корпорация Майкрософт подтверждает, что это проблема продуктов Майкрософт, перечисленных в разделе «Относится к».
Дополнительные сведения
Для получения дополнительных сведений о терминологии обновлений программного обеспечения щелкните следующий номер статьи базы знаний Майкрософт:
Описание 824684 Стандартные термины, используемые при описании обновлений программных продуктов Майкрософт
Нужна дополнительная помощь?
Нужны дополнительные параметры?
Изучите преимущества подписки, просмотрите учебные курсы, узнайте, как защитить свое устройство и т. д.
Ошибка, где фигурирует код 0x80244007 возникает в результате неудачного поиска обновлений для операционной системы. Чаще всего это затрагивает пользователей Windows 10, но только в силу ее популярности. На практике она затрагивает и другие операционные системы. Ошибка слабо исследована, но о ней все же кое-что известно.
При установке обновлений возникли проблемы, но мы попробуем позже. Если вы продолжаете видеть это сообщение и хотите найти информацию в Интернете или обратиться в службу поддержки, это может помочь: (0x80244007)
Как исправить 0x80244007 в Windows 10?
Если речь о домашней версии Windows 10, не состоящей в корпорации, то единственным решением будет последовательная установка обновлений в ручном режиме. Есть некоторые апдейты, которые зависят от других обновлений. Пока первое из них в хронологическом порядке не будет установлено, не удастся добавить и остальные. Актуально для систем, которые давно не обновлялись. Все, что остается – скачивать обновления по очереди с официального сайта и устанавливать вручную. Периодически пробуем установить обновления вручную.
Как исправить ошибку 0x80244007 в Windows Server?
Конкретно для устройств с серверными Windows, проблема заключается немного в другом. А именно, в превышении количества синхронизируемых обновлений число установленных обязательных компонентов, доступных для передачи.
Для решения проблемы на сервере WSUS нужно выполнить следующее:
- Через консоль с административными полномочиями вводим %programfiles%\Update Services\WebServices\ClientWebService.
- Вводим такие команды: takeown /f web.config, icacls web.config /grant administrator:(F), notepad.exe web.config. Здесь 3 команды.
- Ищем в файле web.config строку <add key=»maxInstalledPrerequisites» value=»400″/>.
- Меняем значение на 800 и сохраняем файл.
- Запускаем IISReset.
Кстати, ошибка 0x80244007 может быть связана и с настройками прокси-сервера или внутренних IP-адресов. Если нарушены какие-то параметры сети, их нужно тоже восстановить. Например, сбросить к заводским настройкам роутер.
Ваши отчеты, мысли, замечания и т. п. вы можете высказать в комментариях.
The Windows update 0x80244007 error code seems to be pretty common, so we want to make sure that you know exactly how to fix it in Windows 10/11. Luckily, once you’ve read this article, you will definitely be able to handle the problem without any problems!
There are different ways to fix this error code, depending on what’s causing it and what version of Windows 10/11 you have. We go through all of these in this in-depth article.
What Causes the Windows Update Download Error 0x80244007?
So, what causes the download error – 0x80244007 to happen on your Windows device?
A Windows update could be interrupted by many possible things. However, one of the most common culprits is a network disconnection or an internet connectivity problem. And most of the time, the process for downloading updates for Windows computers that are set up as metered connections may be paused, but other devices cannot afford this luxury.
Other potential factors are running an overly sensitive antivirus software program, which can limit internet speed and various kinds of DNS errors. An antivirus software program can also cause all sorts of connectivity issues if it is not compatible with Windows 10 because it could cause an unsupported driver error that blocks any external traffic and subsequently interrupts Windows update downloads.
There are plenty of ways to fix the problem, so have a look at our list below!
Method 1: Restart your PC
The first thing you should do when you get any Windows Update error is to restart your PC. By doing so, your device could have a fresh start, run an automatic update, and reinstall the appropriate file. Restarting will also clear out any possible issues that may be causing the problem.
To reboot your device:
- Go to Start and then select Restart.
- Choose the option Give up all of my work and stop all applications (if necessary).
- Select OK.
- After your PC reboots, check for new updates again.
Method 2: Reset TCP settings
If you’re experiencing the error 0x80244007 on Windows 10/11 and you don’t know how to fix it, you may want to try resetting your TCP settings.
TCP stands for Transmission Control Protocol. It is a protocol used by all modern-day internet connections and servers.
To reset your TCP settings, you’ll need to open up a Command Prompt in Administrator Mode. Follow these steps for a step-by-step guide:
- Press Ctrl + Shift + Esc simultaneously on your keyboard, and then type cmd in the Search box to find the Command Prompt application.
- Select the most relevant result and right-click on it.
- Choose Run as Administrator to open Command Prompt with administrator rights.
- When it opens, enter the netsh int tcp set global autotuninglevel=disabled command without quotes and press Enter or Return on your keyboard.
- After doing this, restart your Windows 10 computer and try connecting to the internet again.
Method 3: Stop unwanted processes
Before you consider performing this fix, it is also important to know why you need to stop unwanted processes.
One major reason is that these processes may be interfering with processes, causing other programs not to run correctly. This does not exempt the Windows update process.
Now, if you do not take care of these issues, it could lead to further problems down the line. As such, it is important to know how to stop these processes in order for your computer’s performance and speed to not suffer.
To stop these unwanted processes, you will have to open up Task Manager by pressing Ctrl + Shift + Esc or Ctrl + Alt + Delete. You should then see all of the running processes at the top with a list of their names below.
Once this opens up, go ahead and click on the Processes tab at the top. You should now see all running tasks in detail below with all the details, including their location, description, status and more, which includes whether they are running (running) or stopped (not running).
For those that are running, select them one by one until you find the process that is troubling your system. The best way to find it would be through its name, so go ahead and start typing into the search bar under Name until you find what you need.
Once found, right-click on it and choose End Process Tree from the drop-down menu. Then hit Apply followed by OK when asked if you want to end all processes within a folder as well.
It has been shown through various tests across many different operating systems that taking some time out each day to stop unwanted processes does make a difference when it comes to fixing errors like this as well as maintaining the overall health of your system.
Method 4: Update device drivers
It’s likely that you need to update a device driver. That is why you are seeing the 0x80244007 Windows Update error. You can find instructions on how to update your device drivers below:
- Double-click your device icon in Control Panel and go to Device Manager.
- Click View > Show Hidden Devices and navigate to Display Adapters. Right-click on it.
- Select Update Driver Software from the list of options that appear and follow these steps:
- If a User Account Control window appears, click Yes or Allow.
- Choose to search automatically for an updated driver software package.
- Click Next until you reach a final dialog box asking if you want to install a driver software package.
- Select Install this driver software anyway and click Finish when done with steps 1-3.
- A pop-up window should then appear, informing you that a new driver has been installed successfully. Restart your computer and try to connect to the internet again to download the update.
Alternatively, you can use a device driver updater tool, so you don’t need to worry about device driver updater compatibility issues. Simply download and install a device driver updater software program of your choice, launch it, and then let it do its job. All you have to do now is perhaps wait until the update error is fixed.
Method 5: Change hardware settings
Some drivers and hardware settings can cause this Windows update error message. For example, if you have a Bluetooth mouse or other peripheral turned on that was not originally paired with your computer, you might be getting an error message because it is not an authorized device.
To fix Windows errors associated with your hardware settings, use Device Manager to remove the device or delete the driver software. And then restart your computer and try to activate Windows again.
Here’s how:
- Restart your computer.
- Press the Windows key and R simultaneously.
- Type msconfig and hit Enter or click Enter.
- Next, find Startup Items.
- Uncheck everything except for Automatic Reset of Internet Connection.
- Click OK.
Method 6: Use a PC Repair Tool
You can use a PC repair tool to fix any error code, including the 0x80244007 error. All you need to do is use your PC repair tool and follow the instructions it gives you for repairing your Windows update error.
The best thing about using a PC repair tool is that all of these tools come with their own set of tutorials to help walk you through fixing your problem step by step. So, don’t worry if you are not tech-savvy because there are plenty of guides available for beginners just like yourself!
A PC repair tool can also offer valuable maintenance advice for users of all experience levels by diagnosing their system, detecting memory problems and running performance tests, among other things.
Method 7: Rename the SoftwareDistribution Folder
There is another way to fix this Windows update error code: rename the SoftwareDistribution folder.
To do this:
- Open File Explorer and search for the folder named SoftwareDistribution.
- Right-click it and select Rename.
- Rename it SoftwareDistribution-old.
- Reboot your computer, then check if you still see the error code.
- You may need to update some software that got reverted by the process manually.
Method 8: Delete temporary files
What are temporary files, and how do you delete them?
Temporary files are temporary in that they exist for a set amount of time and do not have an inherent effect once the program that uses themis closed. They are often cached in order to provide smoother transitions for those navigating to your site or for further development.
You may also notice them as files associated with larger sites like Google Maps, Yahoo Maps, and Bing Maps (due to this type of caching), where they are used to reduce bandwidth while keeping faster responses.
To remove temporary files, follow these steps:
- In Settings, click System > Storage > Temporary Files.
- Click Clear now and wait for a minute before restarting your computer.
You may also use a PC repair tool for this. Some PC repair tools are designed to eliminate any unwanted files that only trigger issues on your Windows device.
Method 9: Run the Windows Update Troubleshooter
The Microsoft Windows Update Troubleshooter may be able to help fix this error code issue. This is a free program from Microsoft that will scan your system for any possible errors with your PC and offer solutions for fixing those errors.
Here is how to quickly run the Windows 10 update troubleshooter:
- Download the latest version of the Windows Update Troubleshooter.
- Open or run the troubleshooter program after it finishes downloading.
- Follow the steps in the troubleshooter.
- Reboot your computer when you’re done and see if the Windows update error is gone.
Method 10: Temporarily disable your firewall and antivirus
Firewalls and antivirus programs may be blocking access to a port, causing the Windows update error 0x80244007. Your antivirus program is meant to keep you safe, but it can also cause a conflict with processes like the Windows Update process.
To fix this issue, disable your firewall and antivirus temporarily while you update Windows. Re-enable them when finished.
Method 11: Perform a malware scan
The error 0x80244007 on Windows can also be caused by malware entities. And locating and removing malware from your system is not always easy. Follow the steps below to do the malware scan correctly:
- Install an antivirus or antimalware software suite.
- Run a full scan and remove any threats you find.
- And then, reboot your computer into Safe Mode with Networking (this option can be accessed through the Advanced Startup options) by following these steps:
- Restart your computer, but as it starts booting up, press F8 multiple times and select Safe Mode with Networking.
- Once you reach a command prompt type in sfc /scannow to ensure that there are no integrity violations present (read this guide if you are unsure of what an integrity violation is).
- Perform a disk cleanup operation.
- Reboot your computer back into Normal mode.
- Scan for additional threats using Windows Defender Offline.
- Update your virus definitions for the software suites you installed.
Method 12: Restart the Windows Update service
At times, you can also restart the Windows Update service itself to fix the error. Here’s how:
- Open a new command prompt by tapping the Start button.
- Type cmd directly into the Cortana search box then hit Enter.
- Type this line and press Enter: net stop wuauserv. This will put Windows Update into an offline state that you can work with.
- Then type this next line in and press Enter: fsutil.exe compact /y C:\Windows\SoftwareDistribution\Download.
- Next, input this command and press Enter: net start wuauserv.
- Once that’s done, try updating your PC again and see if it fixes the problem.
Summary
The 0x80244007 error code can happen to anyone and not just on Windows 10/11 as the 0x80244007 error message suggests. And it can occur in various ways and there are different methods to fix it, depending on the cause of the problem.
In this guide, we have gone oversolutions to fix the 0x80244007 error code on your Windows 10/11 system. While some can be easily done and can be completed in a matter of minutes, others may require technical expertise. Nevertheless, as long as you follow the instructions carefully, you should get rid of the update error once and for all.
Which one of the fixes resolved the update error for you? Let us know!
Give us some love and rate our post!