
Многие ноутбуки, моноблоки и ПК оснащаются двумя видеоадаптерами: менее производительная интегрированная видеокарта, например, Intel HD Graphics и дискретный GPU — NVIDIA GeForce или AMD Radeon. При этом на ноутбуках, а иногда и на других типах компьютерах переключение используемой видеокарты производится автоматически: как правило, в обычных приложениях рабочего стола используется встроенное видео, в играх и «тяжелых» программах для работы с графикой — дискретное.
В Windows 10 (а также в ПО от производителей видеокарт) есть возможность изменить видеокарту по умолчанию для конкретной игры или программы и отключить её автоматический выбор. О том, как выбрать используемую видеокарту для конкретных игр и программ средствами Windows 10 и пойдёт речь далее в инструкции. При желании, то же самое можно сделать в утилитах наподобие Панель управления NVIDIA (в разделе Управление параметрами 3D).
Для чего это может быть нужно? — например, для каких-то программ может не требоваться «раскочегаривать» дискретный GPU, получая в результате повышенный нагрев и расход заряда аккумулятора ноутбука, в некоторых случаях, наоборот, нужно принудительно запустить игру с использованием дискретной видеокарты.
Настройка используемой видеокарты для конкретной игры и программы средствами Windows 10
Необходимые настройки можно найти в параметрах дисплея Windows 10, порядок действий будет следующим:
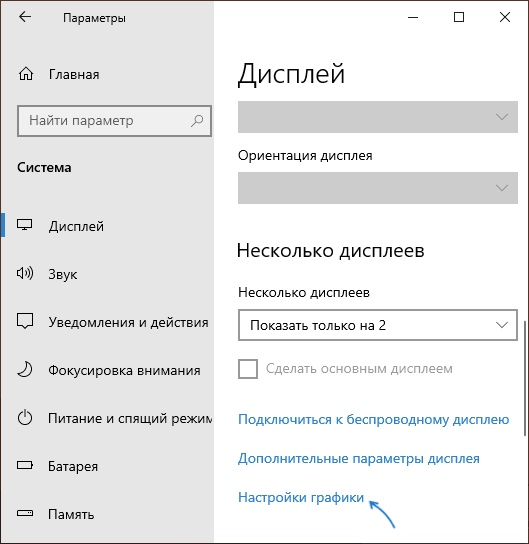
- Зайдите в параметры экрана: через контекстное меню рабочего стола или через Пуск — Параметры — Система — Дисплей.
- В параметрах дисплея найдите пункт «Настройки графики» и перейдите по нему.

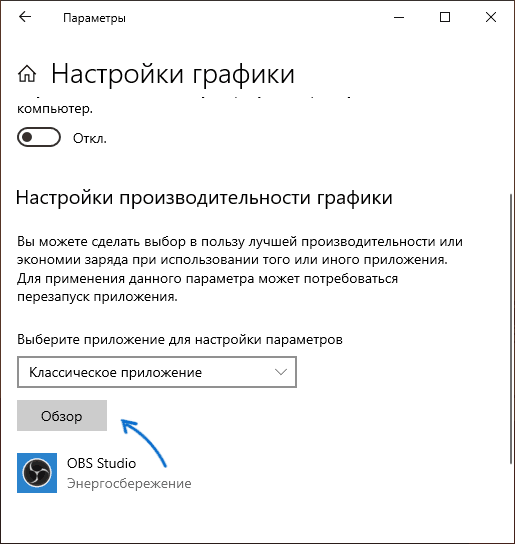
- В следующем окне, в разделе «Настройки производительности графики», выберите, для какого типа программы вы хотите изменить настройки — классическое приложение (обычная игра или программа, запускаемая файлом .exe) или приложение из Microsoft Store, а затем нажмите кнопку «Обзор». Внимание: опция может быть недоступна на некоторых системах без возможности переключения видеокарты или без установленных драйверов на оба видеоадаптера.

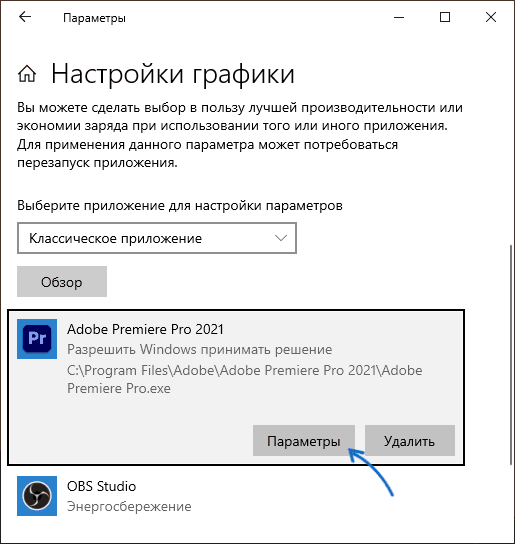
- Укажите путь к исполняемому файлу программы, для которой требуется изменить видеокарту по умолчанию и нажмите кнопку «Добавить».
- После добавления программа появится в списке «Настройки производительности графики». Нажмите по кнопке «Параметры».
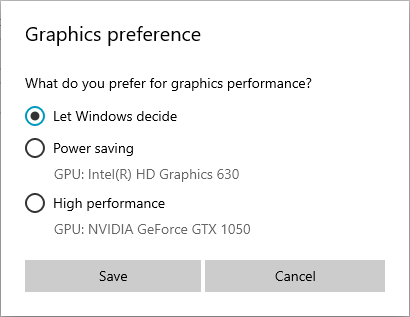
- Выберите предпочитаемую видеокарту: «Высокая производительность» для дискретной и «Энергосбережение» для интегрированной, нажмите «Сохранить» для сохранения настроек.


После этого можно закрыть окно параметров и перезапустить вашу игру или программу: с большой вероятностью она будет запущена с использованием выбранной вами видеокарты.
Видео инструкция
Примечания по теме:
- Некоторые программы могут использовать собственные механизмы и задействовать нужный им GPU в обход сделанных настроек.
- Для настольных компьютеров, если вам требуется использовать только дискретный GPU самым верным способом будет: отключить интегрированное видео (обычно доступно в БИОС), убедиться, что монитор подключен к выходам дискретной видеокарты.
- Для сброса сделанных настроек, зайдите в то же окно настроек производительности графики и удалите программу из списка или переключите параметр выбора видеокарты на «Разрешить Windows принимать решение».
The majority of PCs will have the ability to generate graphics through an ‘integrated graphics chip’. This is housed in the CPU (central processing unit) which is the brain of your computer. However, if you’ve bought yourself a dedicated graphics card for gaming or video editing, you’re probably going to want it to do the heavy lifting when it comes to graphical tasks.
We show you how to set your dedicated graphics card as the primary resource for your computer’s graphical needs.
Your computer should, in theory, be switching between integrated graphics and your dedicated graphics card depending on how strenuous the demands of the current task. This does have a tendency to go wrong occasionally so for the most consistent performance, and to really be sure your expensive graphics card is doing its job, setting it as the default graphics provider is usually the best course of action.
How to set a default graphics card
Step One
Open the Nvidia Control Panel. You can do this by right-clicking on the desktop or you can find the option within the notification area of the Taskbar.

Step Two
Select Manage 3D Settings under 3D Settings.

Step Three
Click on the Program Settings tab and select the program you want to choose a graphics card for from the drop down list.

Step Four
Now select the ‘preferred graphics processor’ in the drop down list (you can see what the automatic option is listed as global setting). If you want to use the dedicated graphics card, select High-performance Nvidia processor.
Note: For ATI/AMD graphics cards the process varies. Open the control center in the same way as above. You may need to open graphics then PowerPlay and set plugged in and/or battery to maximize performance. You can also try going to graphics then 3D and move the slider to performance. Your computer may also have a switchable graphics tab where you can change the settings for individual programs.

Many computers use processors with built-in integrated graphics that help them provide basic video features. However, some PCs also have dedicated video cards that are used for more demanding apps and games. Usually, Windows 10 automatically switches between graphics cards, depending on the apps you are using and the games you’re playing. However, sometimes, you might want to force a particular app or game to use the discrete video card or the built-in integrated graphics. So how do you force a game to use a dedicated graphics card? In Windows 10, you can do this directly from the Settings app without having to search through Nvidia’s or AMD’s apps for the right settings. Here’s how:
Why would you want to change what graphics card a game uses? Why change the GPU used by specific apps?
Some desktop PCs and most laptops have integrated graphics cards, which is a short way of saying that their processors have built-in video chips. However, integrated graphics are not powerful enough to manage demanding apps and games that require a lot of graphical power. That’s why many computers also have dedicated video cards, which use graphics chips usually manufactured by either Nvidia or AMD. The dedicated video cards are a lot more powerful, but they are also more power-hungry than the integrated graphics.
Graphics preference: Power saving or High performance
To balance performance versus power usage, computers must be able to use the right graphics option for every app and game you run. If the integrated graphics is powerful enough for Paint 3D, that is what your computer should use. However, if you want to play the latest 3D video game on Steam, it should switch to using the much more powerful Nvidia or AMD video card.
Usually, the switch between the two graphics options is done automatically by your graphics drivers. However, sometimes, you might want to specify by yourself whether an app or game should use the integrated graphics or the discrete video card on your computer.
Now let’s see how to change what graphics card a game uses (or an app):
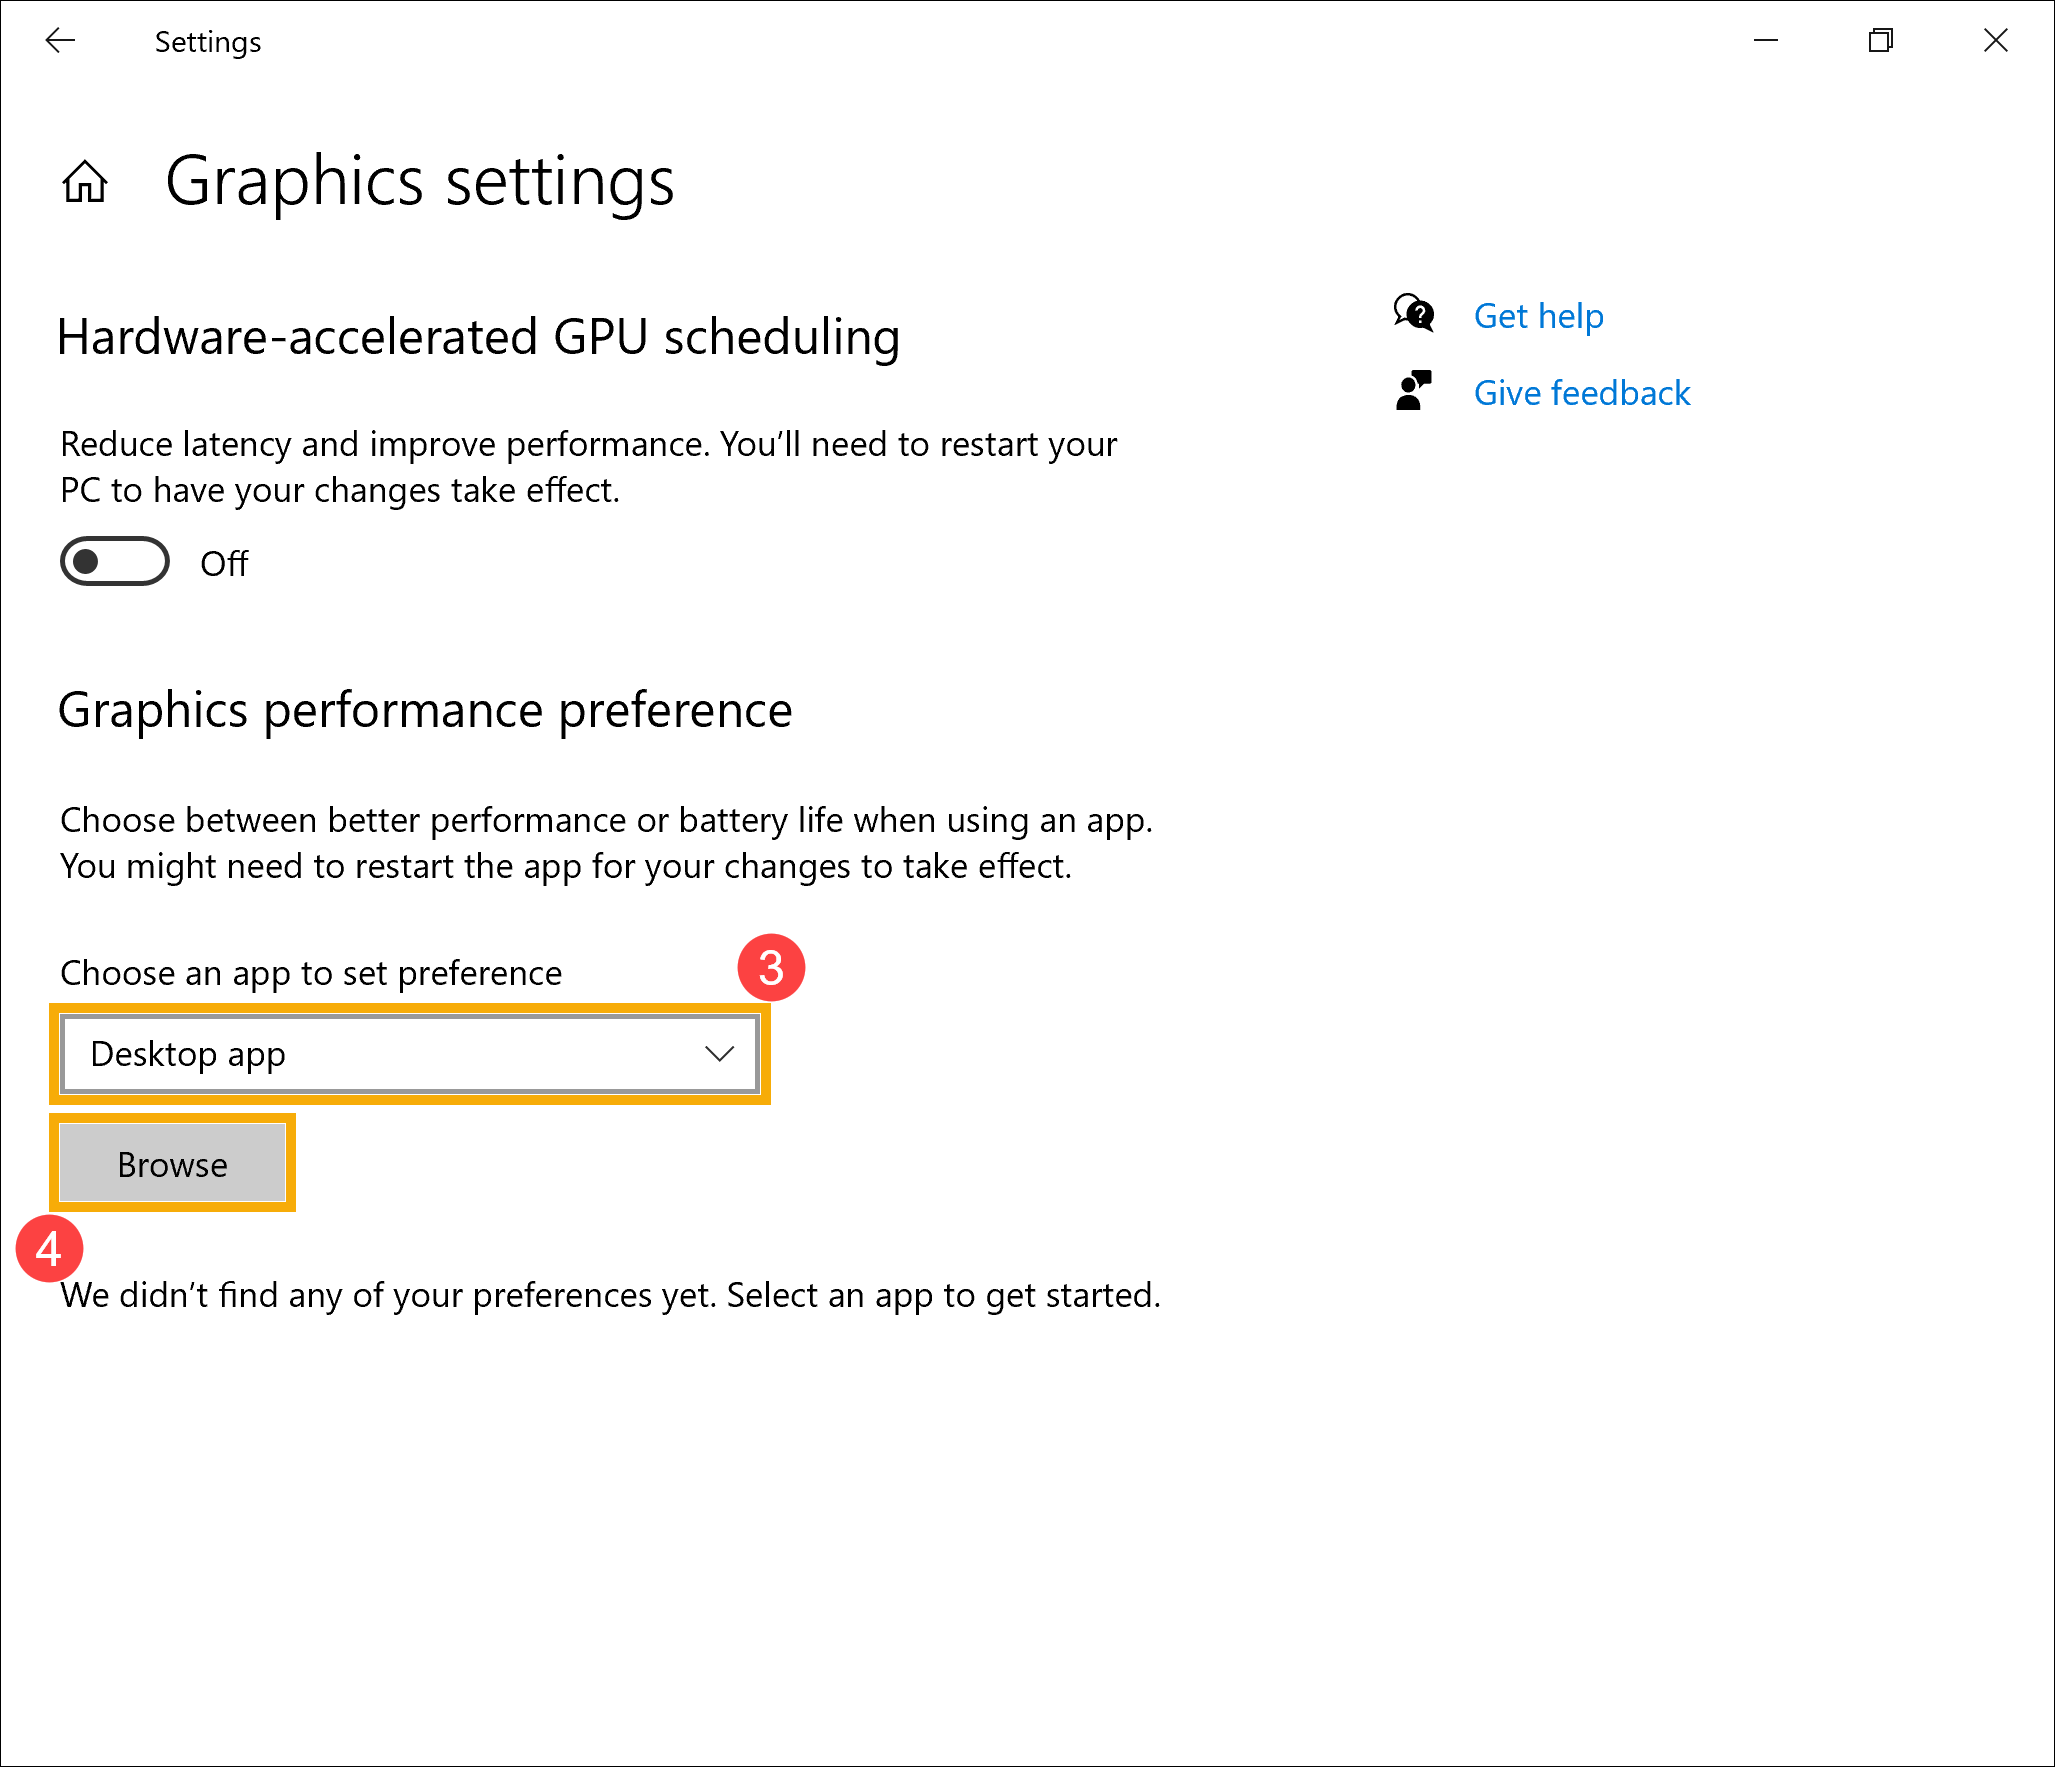
Step 1. Open the graphics settings in Windows 10
Start by opening the Settings app. A quick way to do that is to click or tap on its button on the Start Menu.
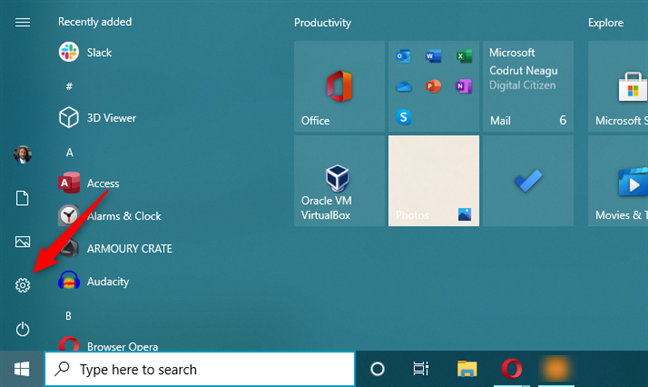
Open Settings in Windows 10
In the Settings app, click or tap on System.
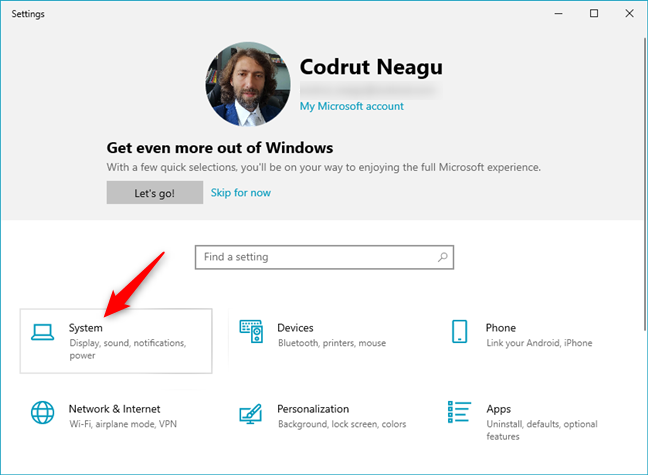
The System category in Windows 10’s Settings
If the Display page is not already shown, make sure you open it by selecting it on the left side of the window.
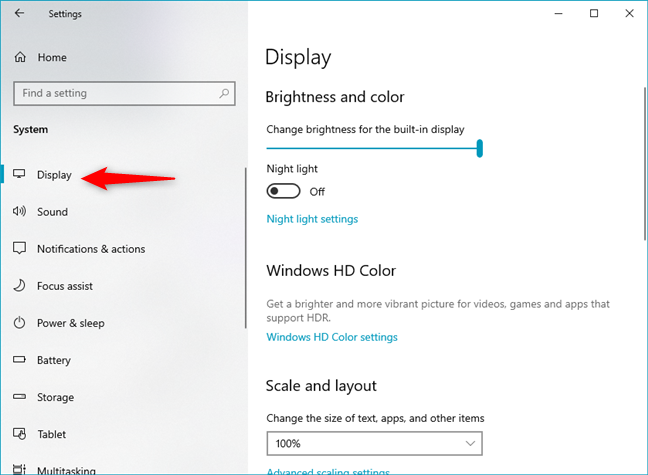
The Display settings from Windows 10
On the right side, scroll until you see a link called “Graphics settings.” You should find it between “Multiple displays” and “Sleep better.” Then, click or tap on “Graphics settings.”
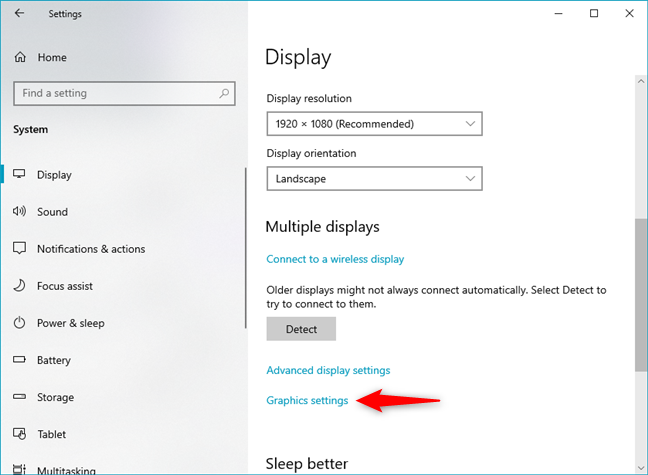
Open Graphics settings
Now the “Graphics settings” page should be displayed. On it, Microsoft explains what you can do in a clear manner: “Choose between better performance or battery life when using an app. You might need to restart the app for your changes to take effect.”
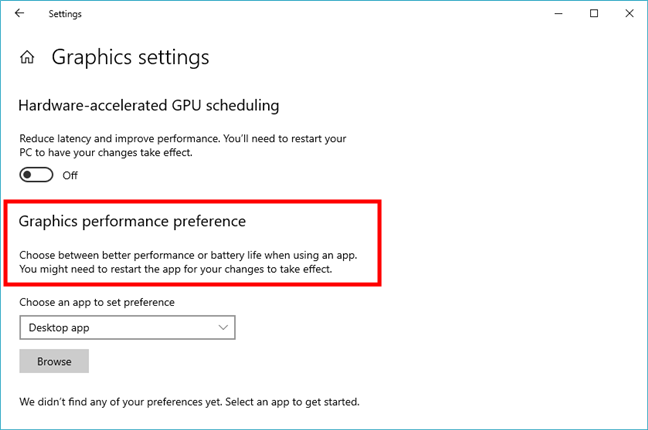
Graphics performance preference
TIP: If you don’t know which video cards you have inside your laptop or PC read: 2 ways to find your exact graphics card model without opening your PC.
Step 2. Select the type of application or game for which you want to change the graphics card that’s being used
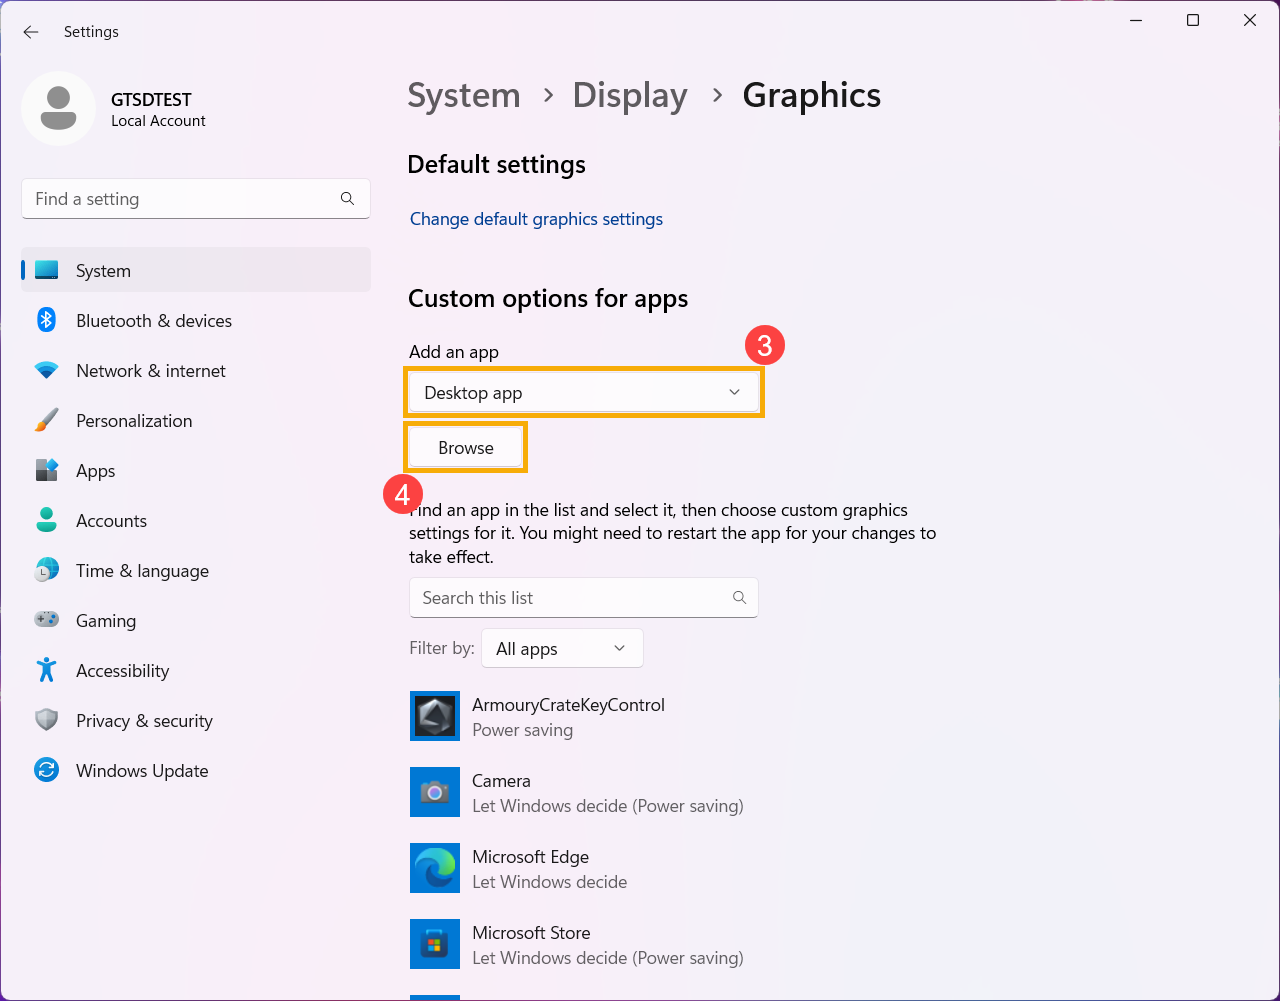
To configure a particular application or game, you must first choose its type: “Desktop app” or “Microsoft Store app.” If you want to configure an application or game that you installed from the Microsoft Store, choose the “Microsoft Store app.” Otherwise, choose the “Desktop app” option. If you want to change what graphics card a game uses, the latter option (Desktop app) is usually the one you need to select.

Choose the type of game or app that you want to configure
Step 3. Choose the app or game for which you want to change the graphics card
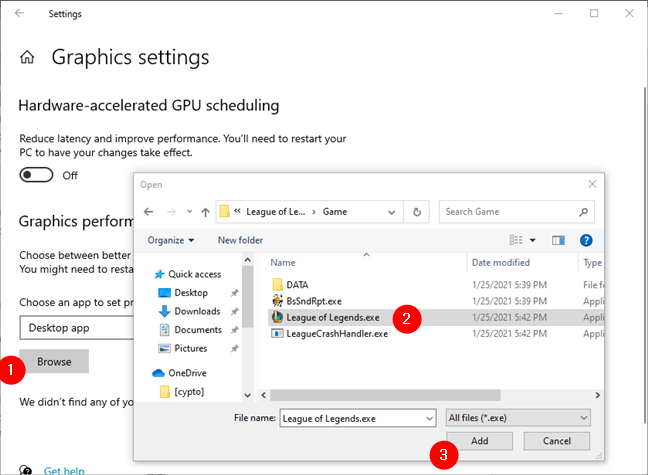
If you chose to configure a “Desktop app,” you should see a Browse button. Click or tap on it to navigate through your Windows 10 computer and select the executable file of the app or game.
Selecting a game for which to force the graphics card used
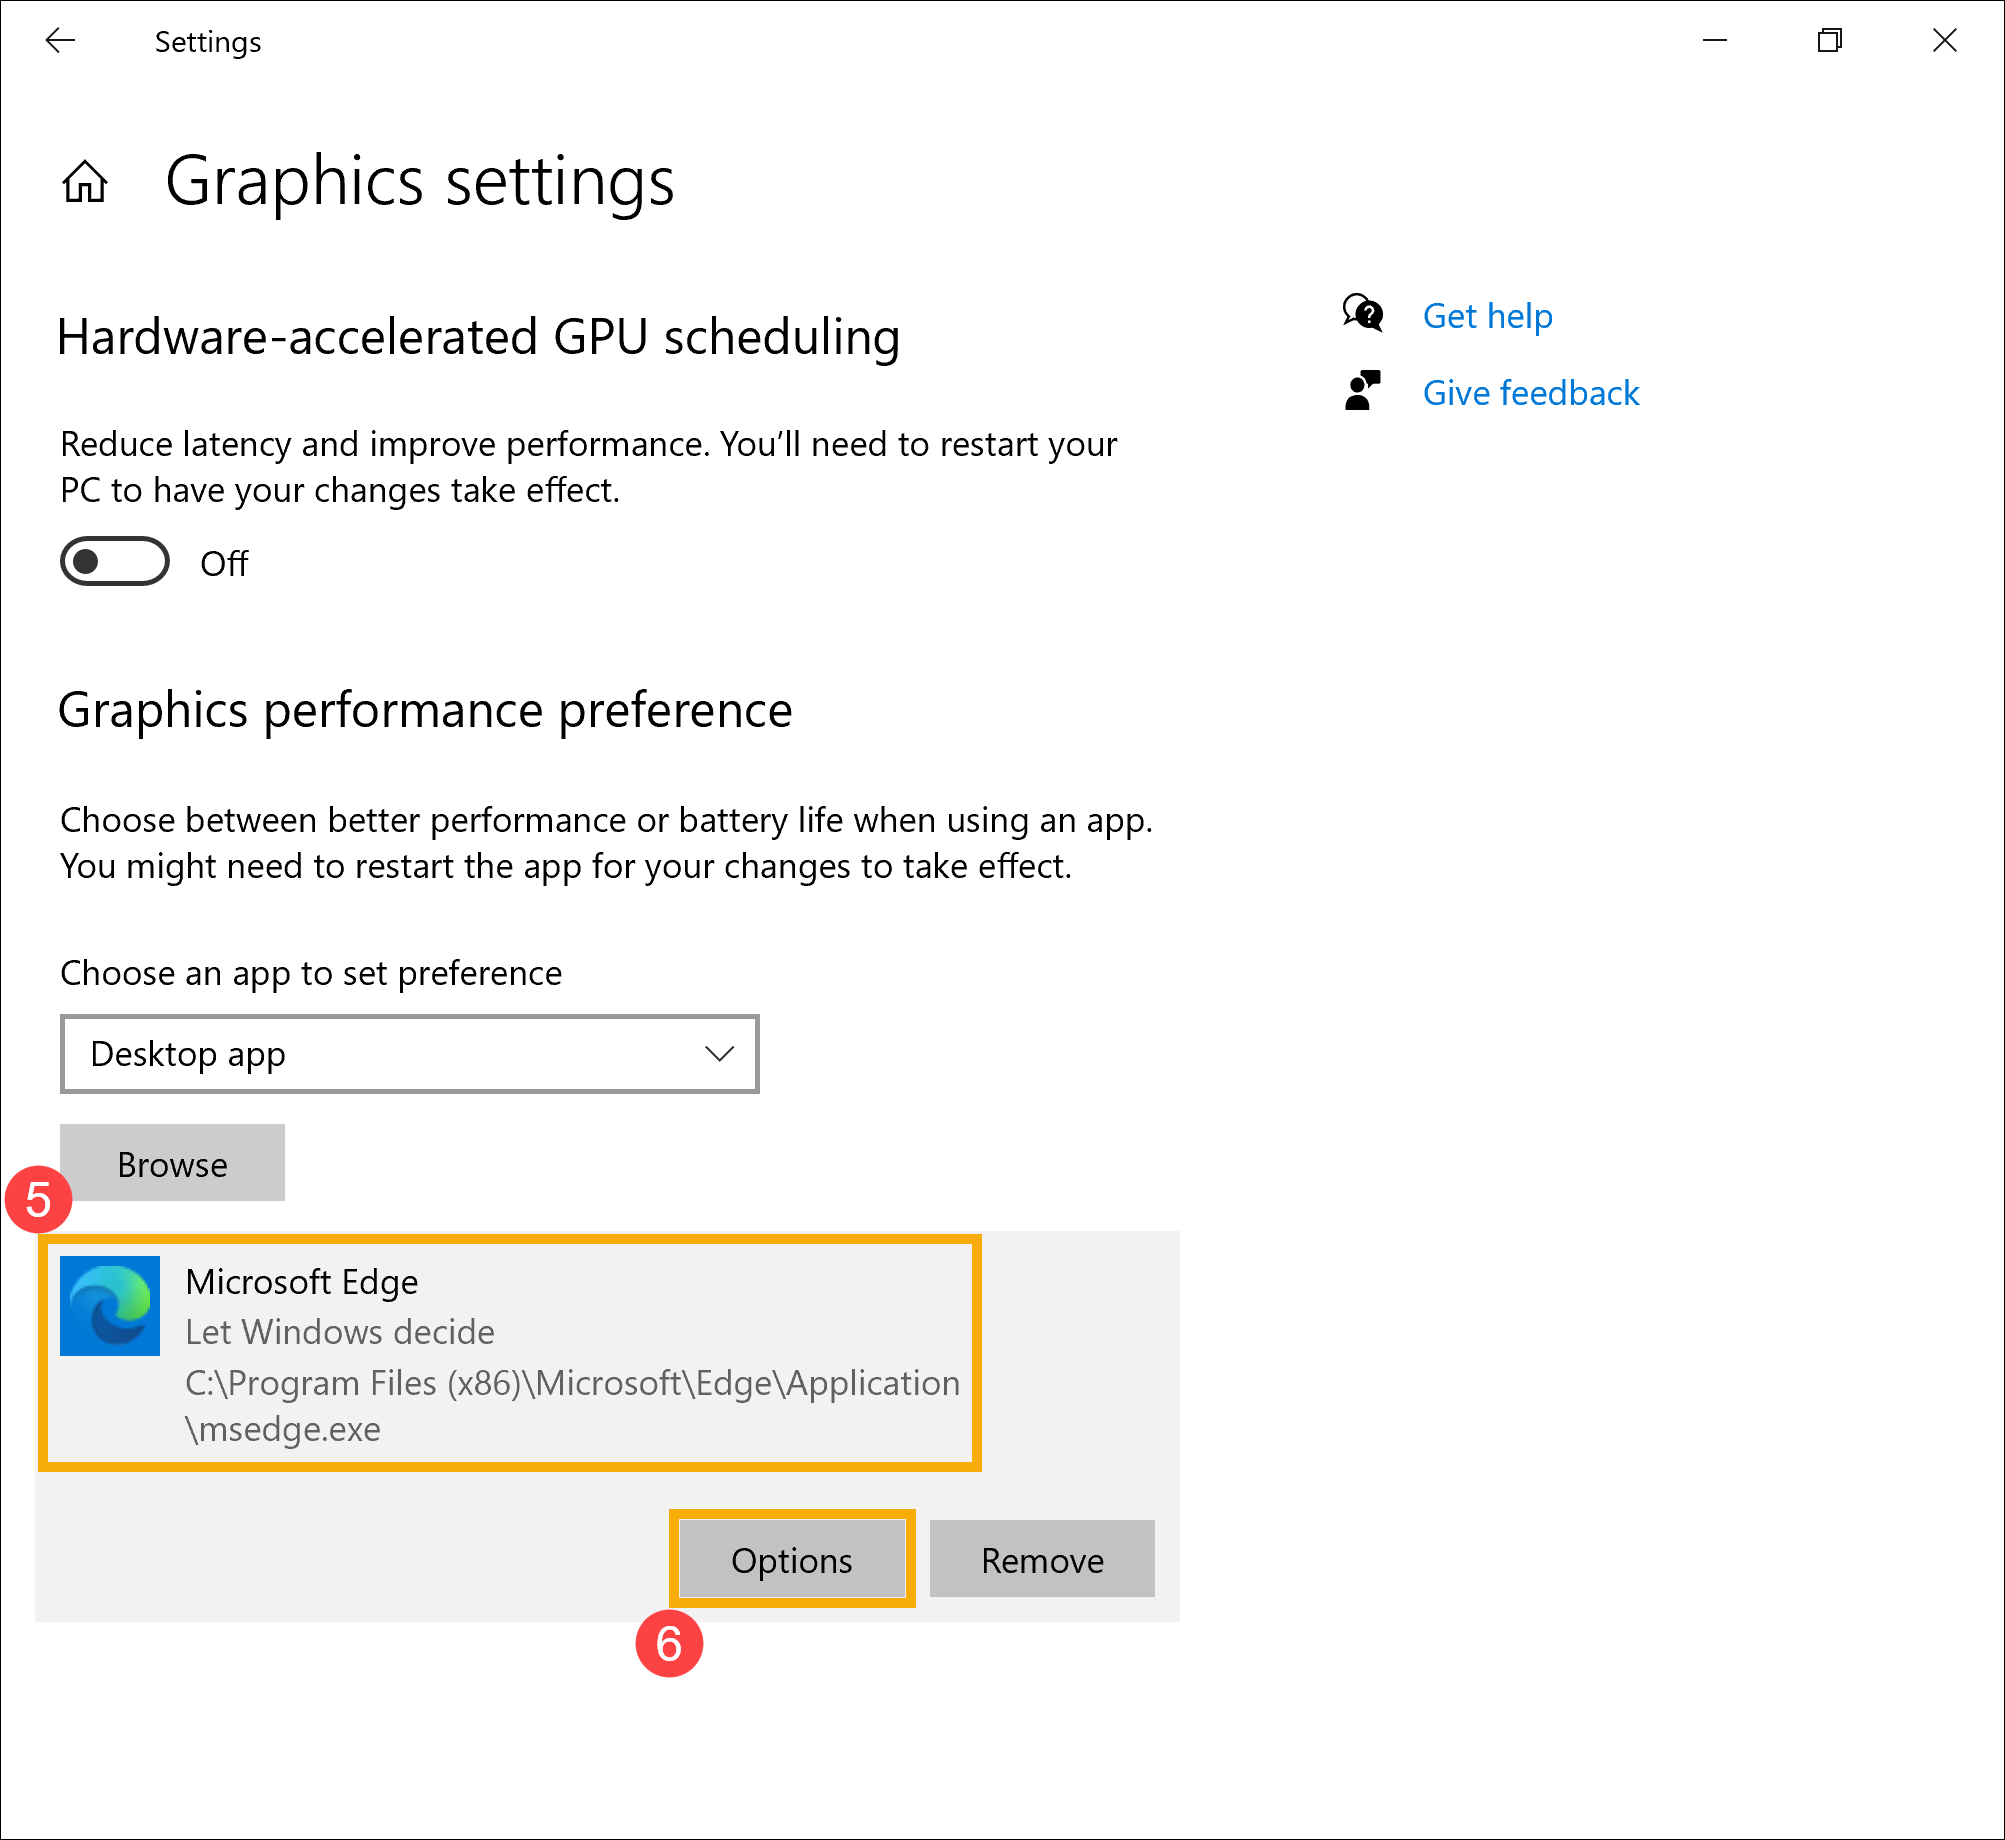
After you press the Add button, the application or game is added to the list of apps for which you can set what graphics card is used.
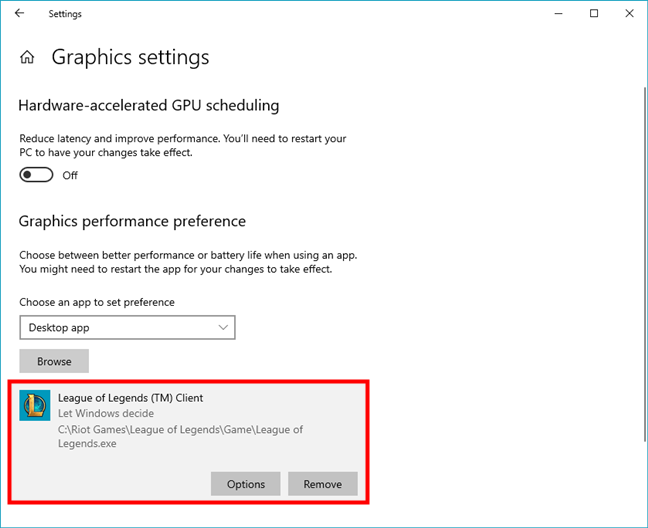
The game was added to the list
If you chose to configure a “Microsoft Store app,” you get a second selection field called “Select an app.” Click or tap on it.

Select an app
You can now see a list of all the apps and games you have installed from the Microsoft Store.
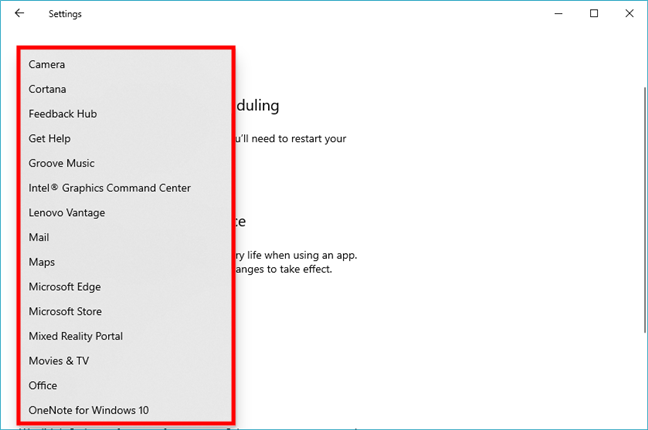
List of Microsoft Store apps
Click or tap on the Microsoft Store app that you want to configure, and then press the Add button beneath it.
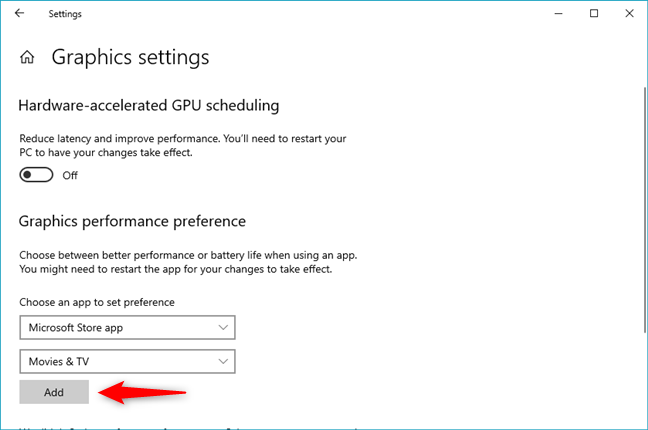
Add a Microsoft Store app for which to force the graphics card used
After you press the Add button, the app or game you selected is added to the list of apps for which you can manage graphics preferences.
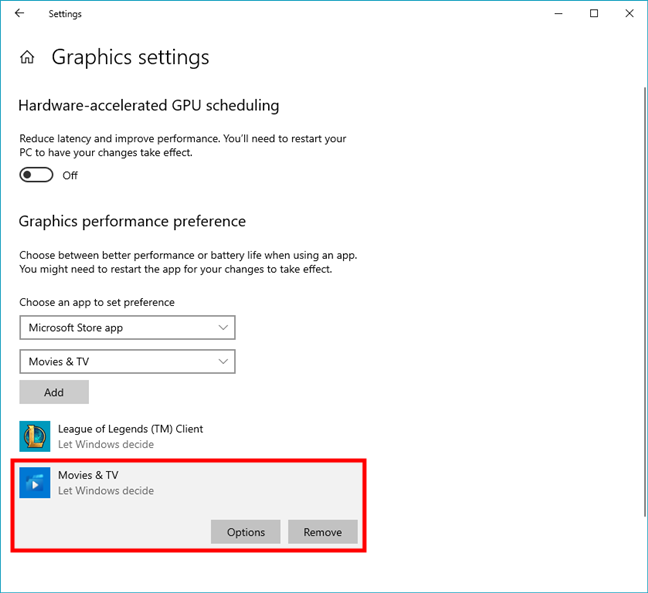
The Microsoft Store app was included in the list
Step 4. How to change what graphics card a game or app uses
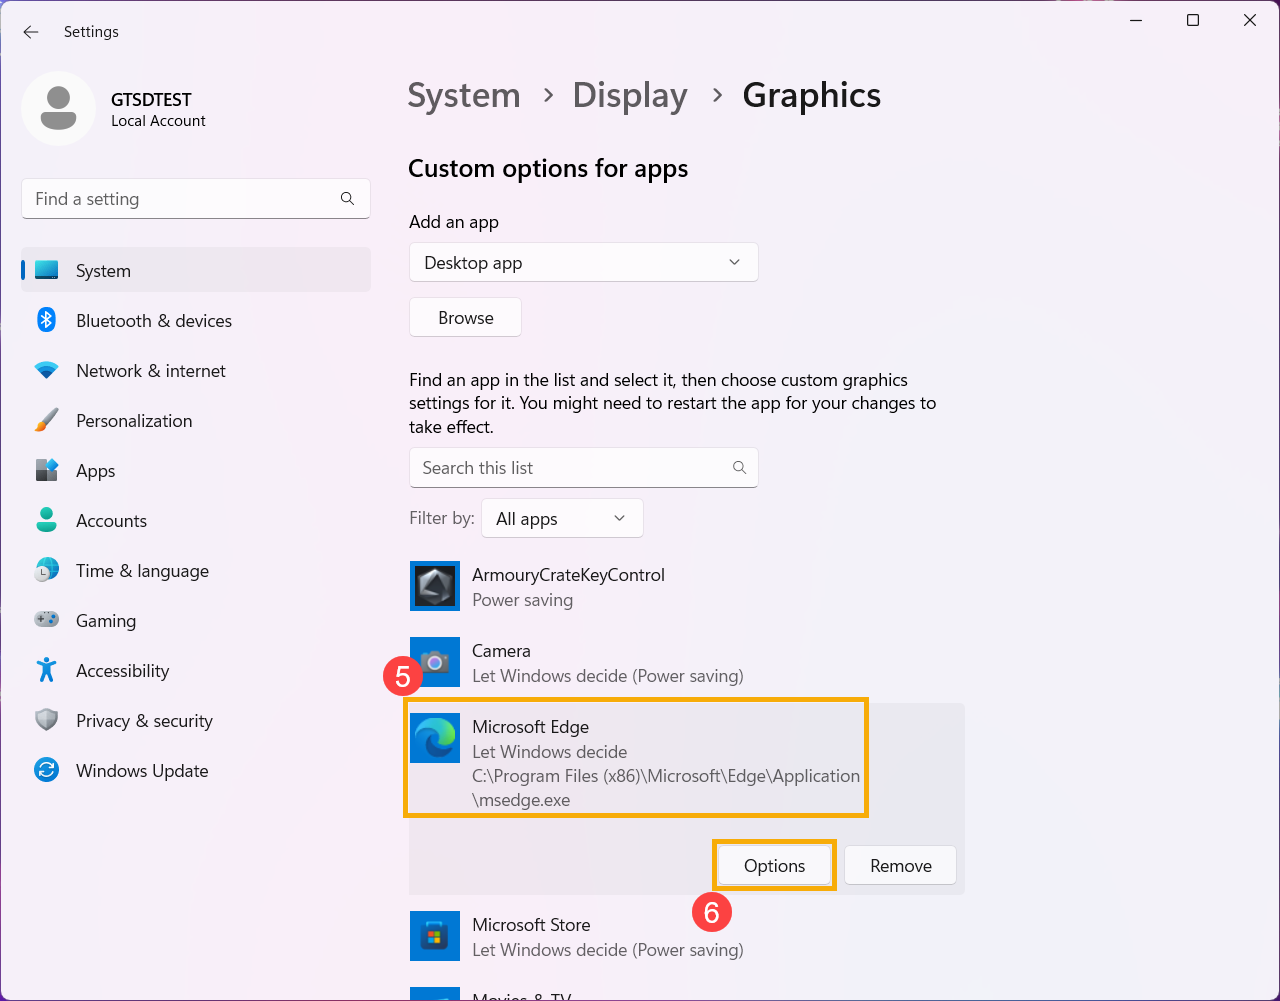
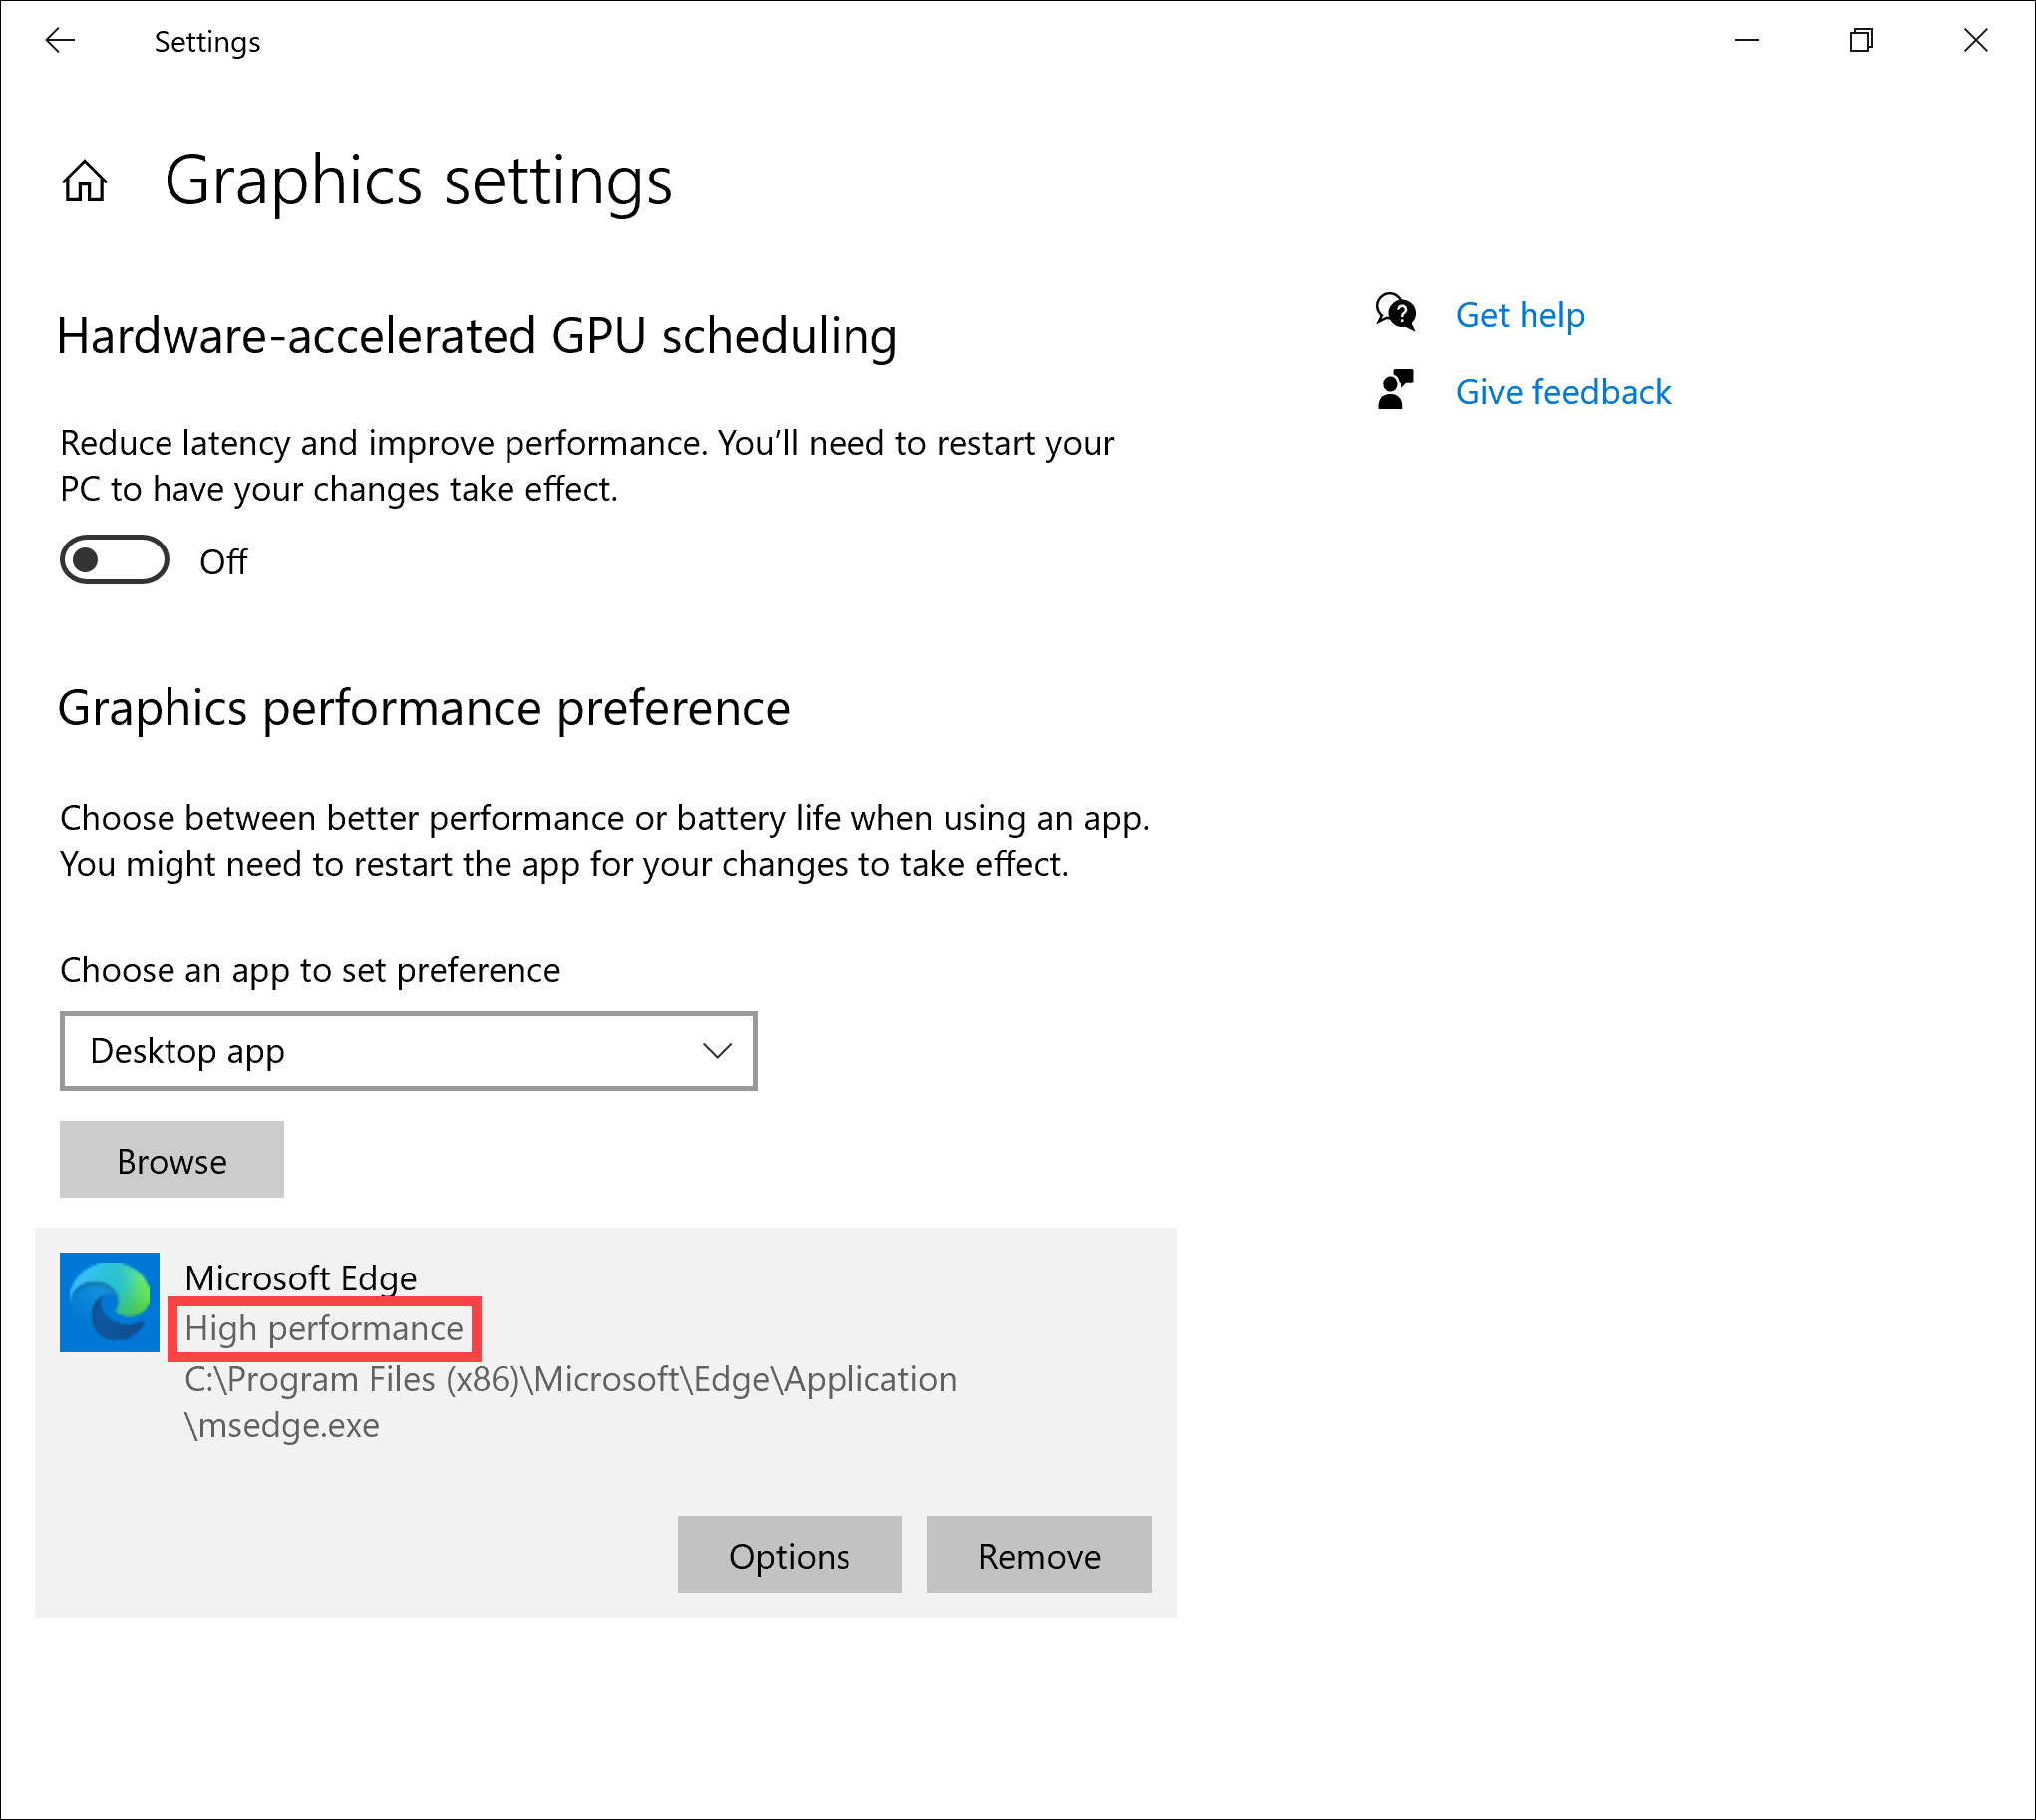
In the list of manageable apps and games, click or tap on the app or game that you want to configure. Then, click or tap on its Options button.
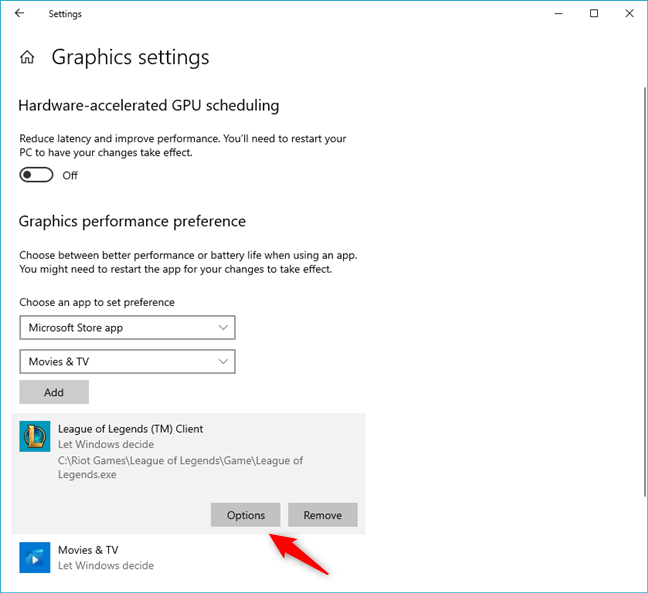
To force the use of a specific graphics card for a game, press Options
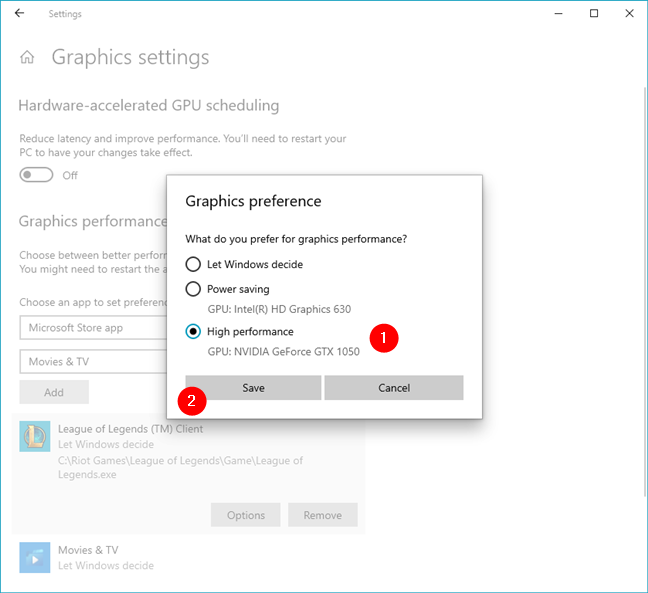
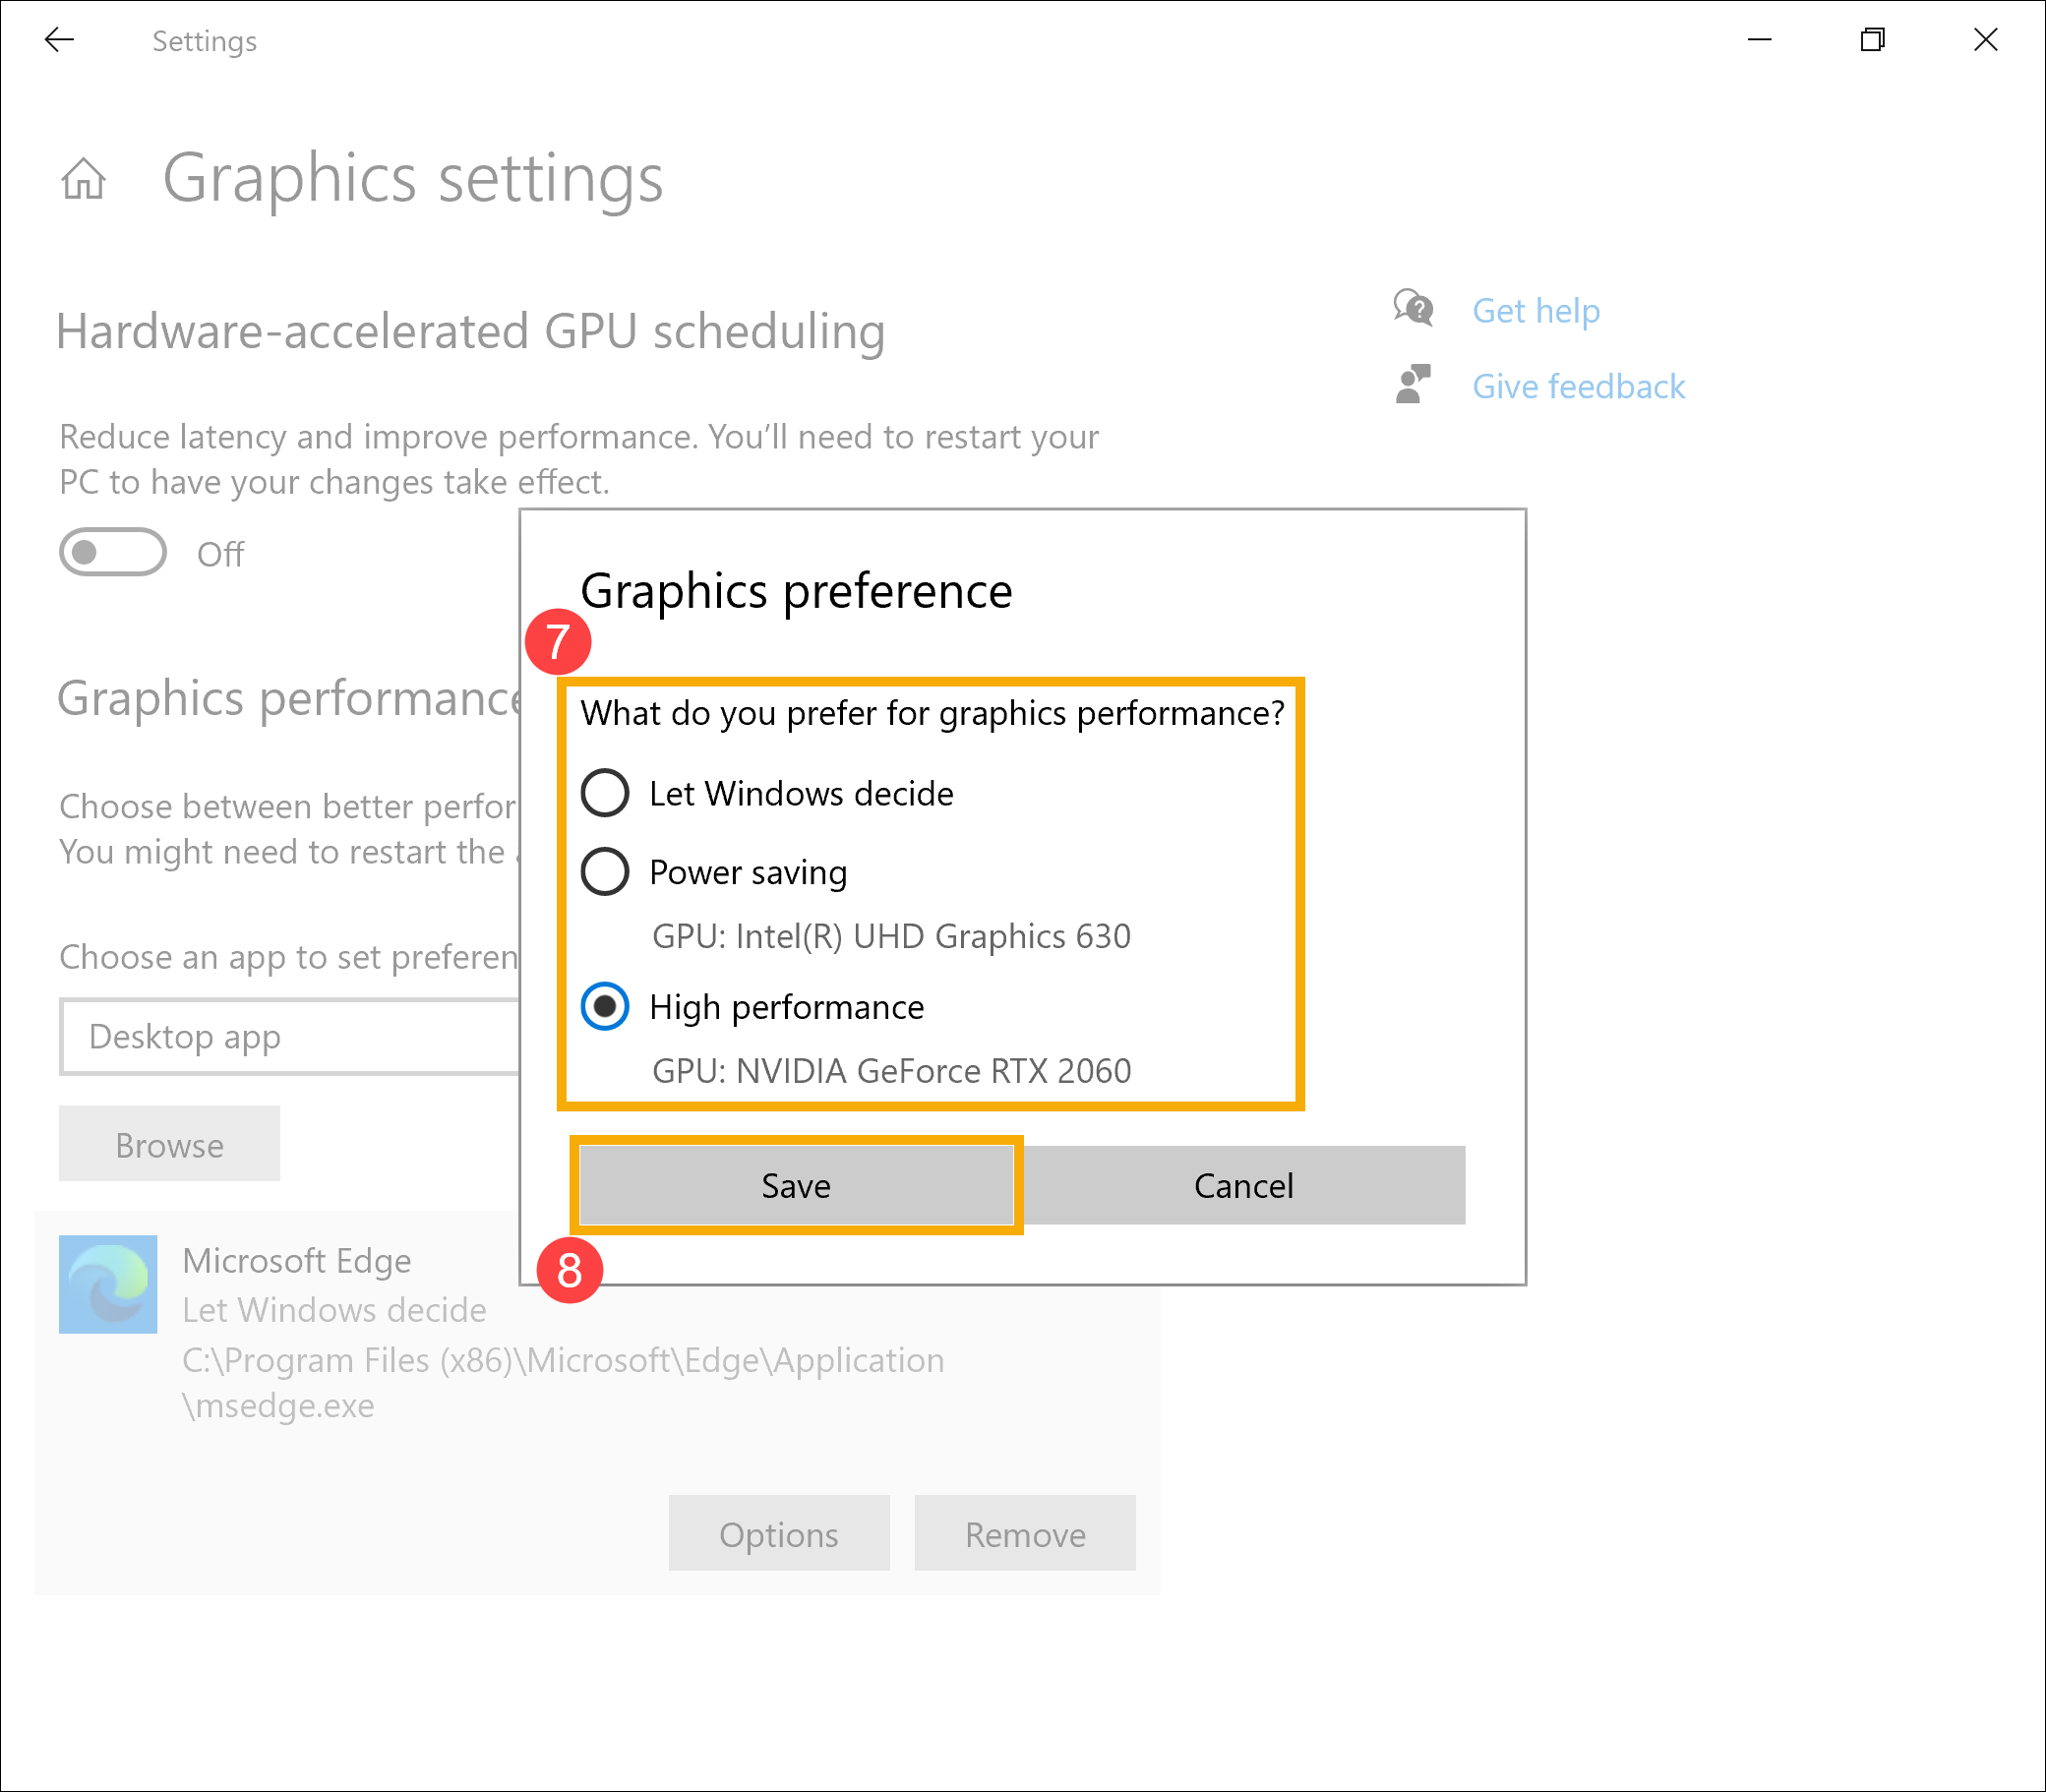
A new dialog called “Graphics preference” opens up. You can see the graphics cards that you can use on your computer, and which one saves power or offers better graphical performance. For instance, on our gaming laptop, we can “Let Windows decide,” or we can choose between:
- “Power saving” — the laptop’s integrated graphics Intel HD Graphics 630 chip found inside the Intel Core i7 7700HQ processor, and
- “High performance” — the much more powerful NVIDIA discrete graphics card found inside the laptop.
Make the selection you prefer and click or tap Save.
How to change what graphics card a game uses
Repeat the process for every app or game that you want to configure and, the next time you launch them, Windows 10 will use the video card you chose, offering you either higher performance or longer battery time, depending on your preferences.
How to remove an app or game graphics performance profile
If you change your mind and no longer want to manage what video card is used by an app or game using the “Graphics performance” feature, you can. In the list of managed apps and games, click or tap on the one that you want to stop managing and then press the Remove button.
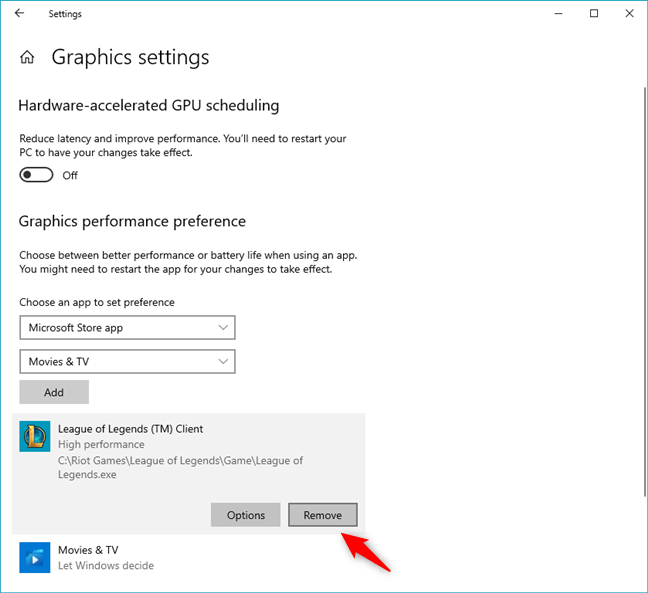
Removing the GPU preference for a game in Windows 10
The graphics performance profile for that app or game is deleted immediately and is no longer used.
Did you force a game to use your dedicated graphics card? Or maybe a Microsoft Store app?
…or do you prefer leaving Windows 10 to automatically choose the best option? Either way, now you know how to get a game (or app) to run on a specific graphics card in Windows 10. We are curious to know whether you like making choices on your own or if it’s too much of a hassle. Also, do you think that this Windows 10 feature is better than making the same settings in Nvidia’s or AMD’s video drivers? Use the comments below to let us know.
To set your NVIDIA graphics card as the default graphics card in Windows 10, please follow these steps:
1. Right-click anywhere on the desktop and select «NVIDIA Control Panel.«
2. In the left pane, click on «Manage 3D Settings» under 3D Settings.
3. In the right pane, click on the Global Settings tab and then select the “High-performance NVIDIA processor” from the drop-down menu under Preferred Graphics Processor.
4. Click Apply and then restart your computer to save changes.
5. You should now have your NVIDIA graphics card set as default for all applications in Windows 10.
If you experience any issues or need additional assistance with setting up your graphics card, please contact NVIDIA’s customer support team for further assistance.
How do I change my default graphics card in Windows 10?
How do I choose my NVIDIA graphics card instead of Intel Windows 10?
To choose an NVIDIA graphics card instead of Intel on Windows 10, you will need to make sure your computer is compatible with the new card and that the driver is updated. First, check if your system meets the minimum requirements for the NVIDIA graphics card by consulting its manual or website. Once confirmed, you can purchase a compatible GPU from a reputable retailer. Next, install and update the necessary drivers and restart your computer to complete installation. Finally, open Device Manager in Windows 10 and check under Display Adapters to see if both cards are present. If so, you can then set up your preferred option as the default device in NVIDIA Control Panel or Intel Graphics Settings. For more detailed instructions on configuring your GPU settings, please refer to NVIDIA or Intel’s official documentation.
How do I use my GPU instead of integrated graphics Windows 10?
To use your GPU instead of integrated graphics in Windows 10, you should first check if your system is compatible with the type of GPU you have. You can do this by going to the manufacturer’s website and looking up your computer model or checking the documentation that came with the system.
Next, make sure that your GPU drivers are up to date by downloading them from the manufacturer’s website. Once you have done this, open Device Manager and expand Display Adapters. If your GPU appears there then it is already enabled and ready for use.
Finally, open the NVIDIA Control Panel and select Manage 3D Settings from the left-hand menu. Here you can choose which applications should be using your dedicated GPU and which ones should be using integrated graphics instead.
I hope this helps!
How do I switch from AMD graphics to NVIDIA Windows 10 laptop?
To switch from AMD graphics to NVIDIA on a Windows 10 laptop, you will need to make sure that the laptop has an available slot for the NVIDIA graphics card. If it does not have such a slot, then you will need to purchase an external GPU enclosure. Once you have the necessary hardware and firmware updates installed, follow these steps:
1. Download and install the latest drivers for your specific NVIDIA graphics card from the manufacturer’s website.
2. Open Device Manager in Windows 10 by typing «Device Manager» into the search bar.
3. Expand Display adapters and then right-click on your AMD graphic device and select Uninstall Device.
4. Insert your new NVIDIA Graphics Card into your PC or plug in your external GPU enclosure if using one.
5. Reboot your computer when prompted so that Windows can detect the new hardware automatically and install its drivers accordingly.
6. After reboot, open Device Manager again and check under Display Adapters to make sure that both devices have been detected correctly (your AMD device should be marked as inactive).
7 Install any additional software from NVIDIA’s website if needed (eg GeForce Experience) before testing out games or applications which require dedicated graphics performance from NVIDIA cards only
If you find yourself having trouble with any of these steps, please contact either customer support for help with updating drivers or technical support for more complex issues such as troubleshooting hardware installation errors etc
How do I make my NVIDIA GPU primary?
To make your NVIDIA GPU primary, you will need to open the Nvidia Control Panel. To do this, right-click the desktop and select «NVIDIA Control Panel» from the pop-up menu. Once you are in the control panel, navigate to Manage 3D Settings. Under this tab, click on «Preferred graphics processor,» then select your NVIDIA GPU from the drop-down menu. Finally, click Apply and restart your computer for changes to take effect. Additionally, as part of best practices you should always ensure that your GPU drivers are updated to the latest version available for optimal performance and compatibility with other hardware components on your system.
How do I enable NVIDIA graphics card in BIOS?
To enable an NVIDIA graphics card in BIOS, you will need to follow these steps:
1. Reboot your computer and press the appropriate key to enter the BIOS/UEFI setup (usually Delete, F2 or Esc).
2. Use the arrow keys on your keyboard to navigate through the menus until you locate «Integrated Peripherals«.
3. Select the option for «Onboard GPU» or similar and set it to Enabled.
4. Save your changes using either F10 or a similar command and reboot once more when prompted.
5. When Windows loads, make sure your NVIDIA graphics card is properly installed and recognized by checking Device Manager under Display Adapters section of the System tab..
If you are having trouble finding an option for enabling onboard GPU, please contact your motherboard’s manufacturer for further assistance as different motherboards may have slightly different settings for enabling onboard GPU in BIOS/UEFI setup menu.
How do I disable integrated graphics card?
If you would like to disable your integrated graphics card, the steps will depend on the type of computer that you have. Generally, however, you can follow these steps:
1. Go to your Control Panel and open up System Settings.
2. Select the Display tab or Advanced Settings option (depending on your specific setup).
3. Look for an option labeled «Graphics Options,» «Integrated Graphics,» or something similar and select it.
4. Choose your desired settings (such as disabling or enabling the integrated graphics) and then save changes and exit if necessary.
5. Restart your computer for the changes to take effect.
It’s important to note that some computers may not provide access to graphics settings through the Control Panel, so in those cases you may need to look for a BIOS setting related to graphics or use a third-party application such as AMD Catalyst Control Center or Nvidia Control Panel instead.
How do I force my computer to use Nvidia GPU?
In order to force your computer to use the Nvidia GPU, you will first need to ensure that the correct drivers are installed and up-to-date. You can do this by going into your device manager, right clicking on the Nvidia GPU, selecting «Update Driver,» and following the instructions provided.
Once you have ensured that the drivers are updated, you can then open up your Nvidia Control Panel. Here, you will find an option under “Manage 3D Settings” called “Preferred Graphics Processor.” From here, select «High Performance NVIDIA processor» from the dropdown menu and click apply. This should now force your computer to use your Nvidia GPU for any graphically intensive tasks or applications.
Why is my PC using integrated graphics instead of Nvidia?
It’s possible that your PC is using the integrated graphics instead of Nvidia because the drivers for your Nvidia card may not be installed or configured correctly. I recommend trying the following steps to troubleshoot this issue:
1. Check Device Manager and make sure that there are no errors with your Nvidia graphics card.
2. Download and install the latest drivers for your Nvidia graphics card from their website.
3. Right-click on your desktop and select “Nvidia Control Panel” to open it, then make sure that the correct graphics processor is selected in the dropdown menu under “Manage 3D Settings” tab.
4. If you have multiple monitors connected, try disabling one of them to see if it helps resolve the issue with integrated graphics being used instead of Nvidia’s dedicated GPU.
5If none of these steps resolve the issue, you may need to contact technical support for assistance as it could be a hardware issue or something else causing this problem to occur.
How do I make my Nvidia GPU primary?
To make your Nvidia GPU the primary device for graphics processing, you will need to adjust the settings in Windows. To do this, go to Start > Settings > System > Display and then select Advanced display settings. Understanding the Multiple Displays option, select “Nvidia Graphics” from the list of available devices. This should set your Nvidia GPU as the primary device for graphics processing.
If you have any trouble with this process or if you are still having issues after making these changes, I recommend contacting Nvidia Support directly for further assistance.
FAQ
[Windows 11/10] Как установить предпочтительный графический процессор для приложений
Применимо для продуктов: Ноутбук, Настольный компьютер, Моноблочный компьютер, Игровая консоль, Мини-компьютер.
Microsoft изменила настройки приоритета выбора графического процессора в Windows 10 (версия 2004) и более поздних версиях. Если у Вас используется операционная система — Windows 10 (версия 2004) или новее, обратитесь к следующим инструкциям и решениям.
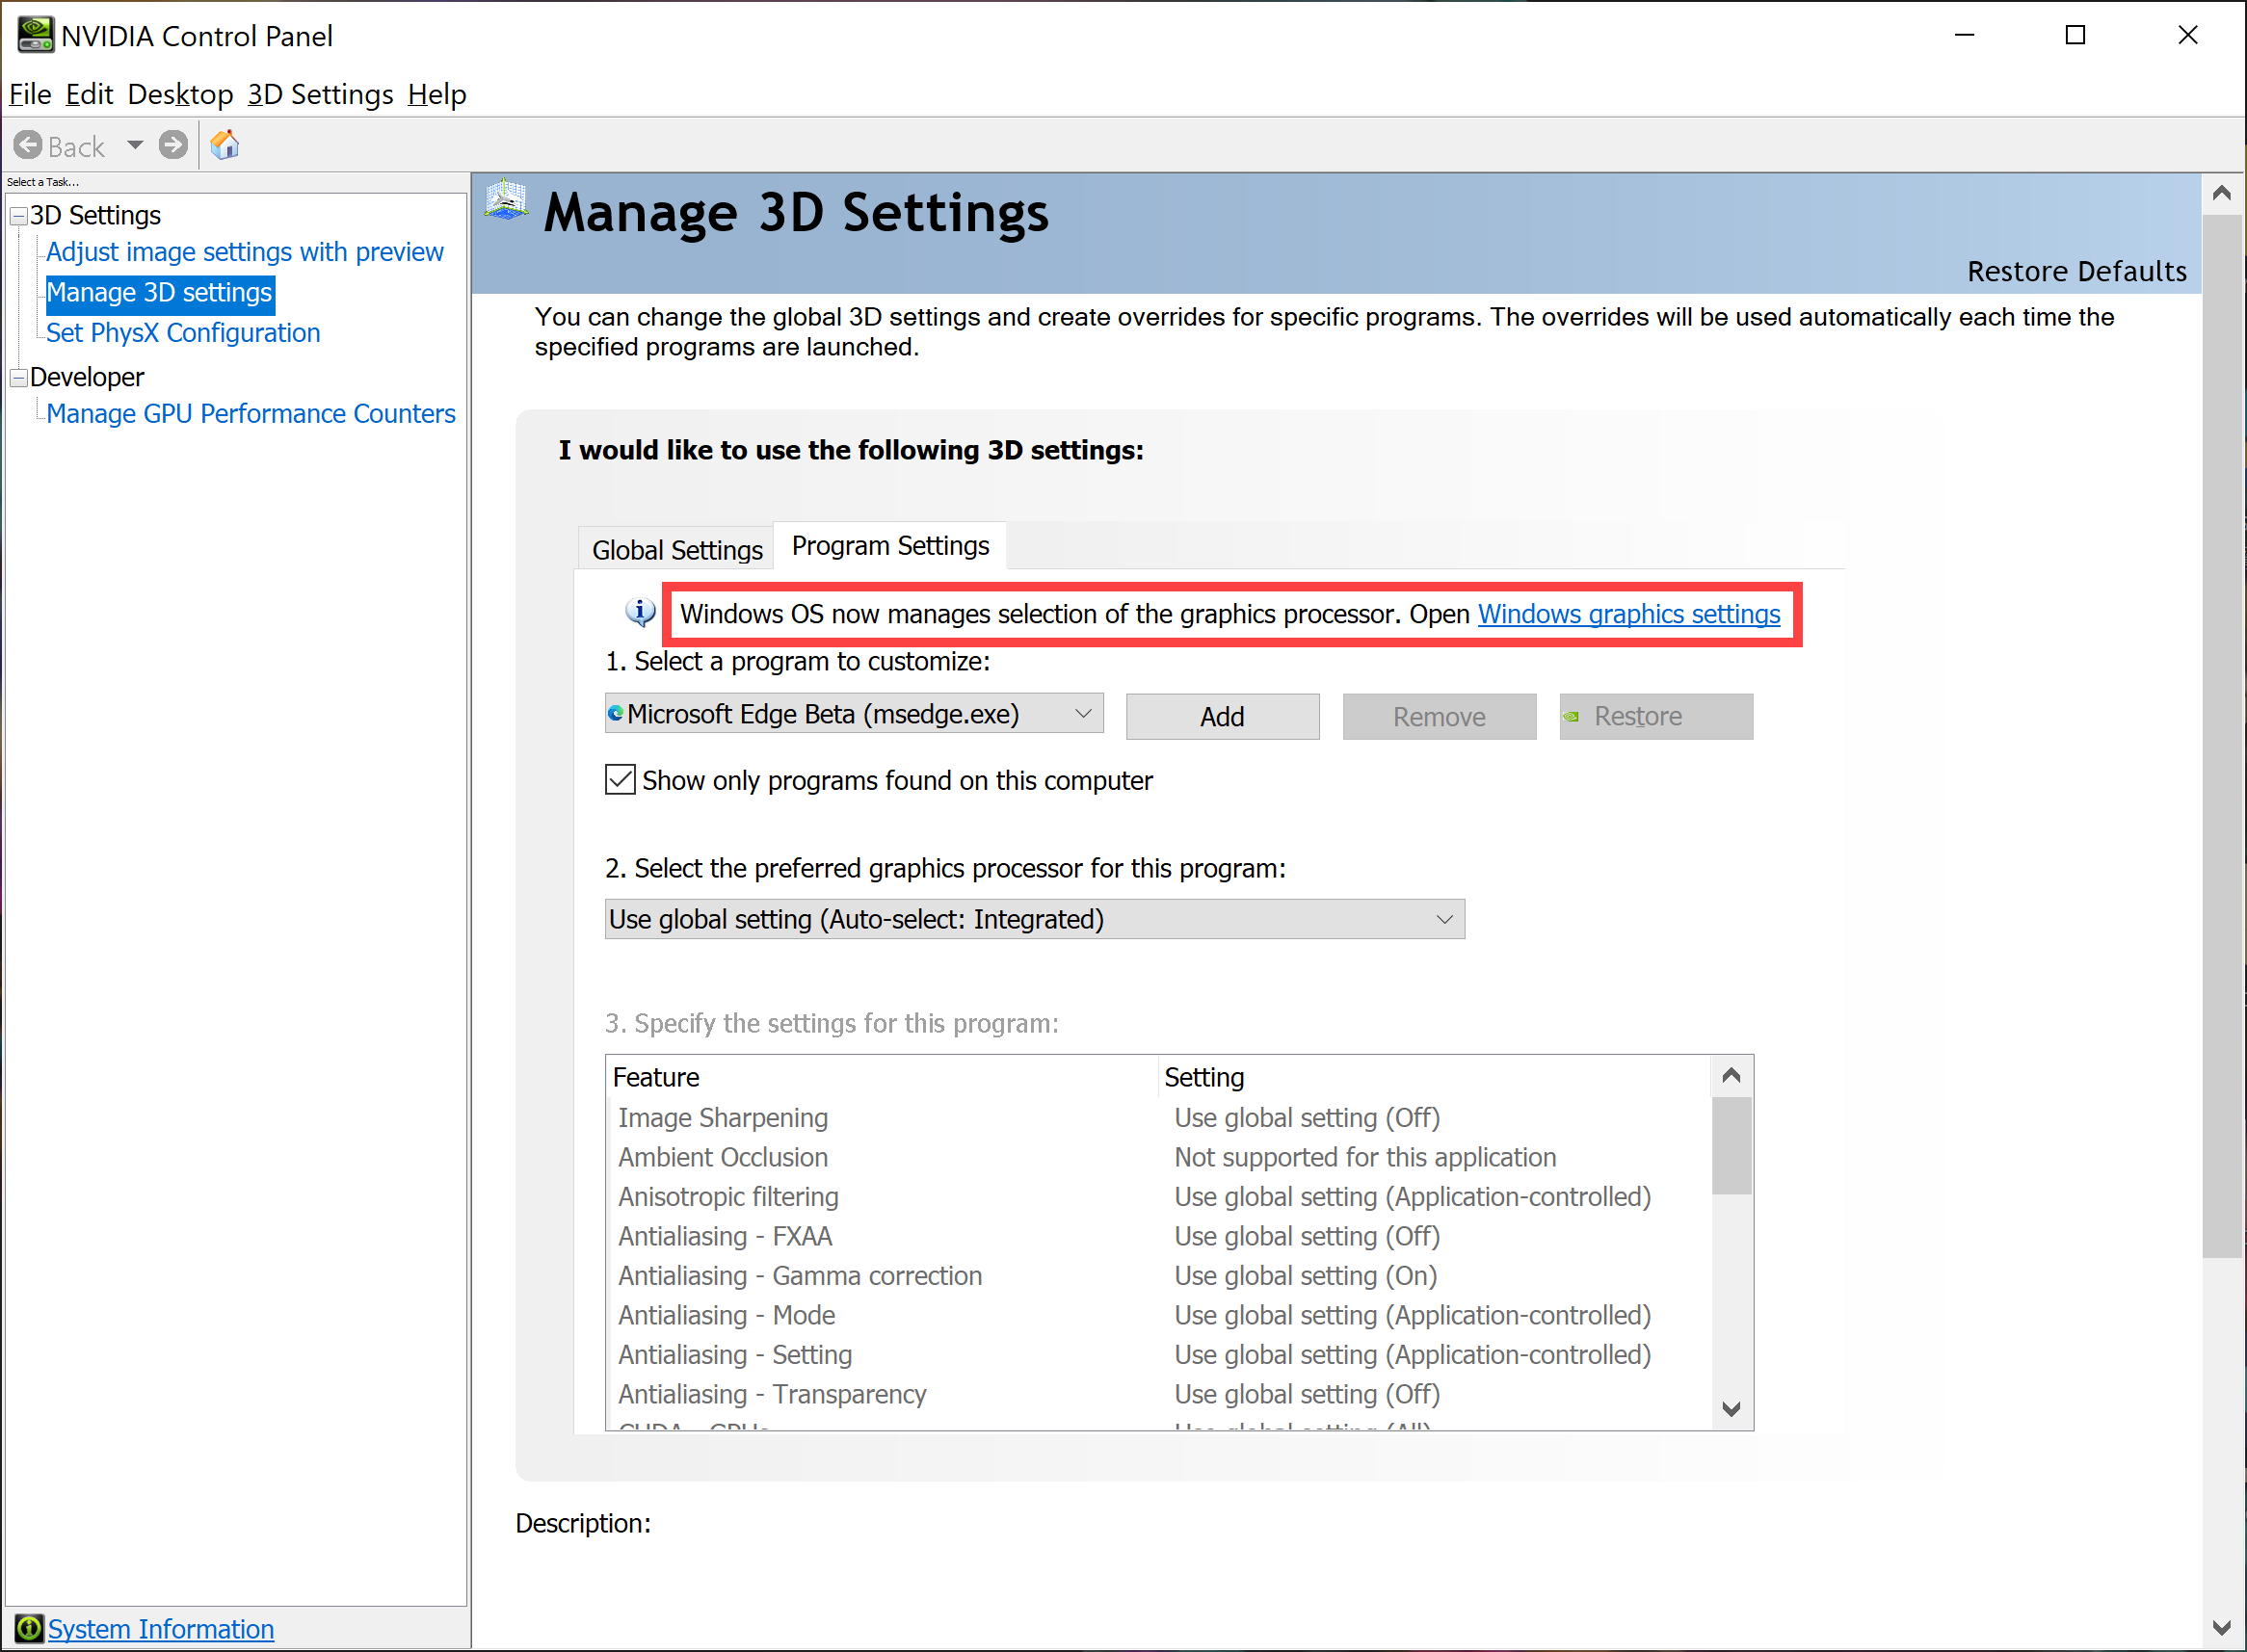
В операционной системе Windows 10 (версия 2004) или новее, некоторые приложения отдают приоритет настройкам производительности графики в Windows по сравнению с настройками выбора по умолчанию на панели управления производителя видеокарты (например, Панель управления NVIDIA и программное обеспечение AMD Radeon). Например, если Вы настроили конкретное приложение на использование видеокарты NVIDIA в качестве предпочтительного графического процессора в Панели управления NVIDIA, но Windows по умолчанию использует встроенную видеокарту, приложение будет использовать встроенную видеокарту в качестве предпочтительного графического процессора на основе настроек системы Windows.
Примечание: Microsoft может продолжать добавлять приложения в списки серверной части Windows и применять настройки графического процессора по умолчанию. Если Вам необходимо изменить параметры выбора графического дисплея для конкретного приложения, рекомендуется синхронизировать настройки как в настройках Windows, так и в панели управления производителя видеокарты.
Панель управления NVIDIA также отображает сообщение о том, что ОС Windows теперь управляет выбором графических процессоров. Если Вы не видите это сообщение, рекомендуется обновить драйверы NVIDIA до последней версии.
Следуйте инструкциям, соответствующим текущей версии операционной системы Windows на Вашем устройстве:
Windows 11 операционная система
Как установить предпочтительный графический процессор для приложений в системе Windows OS
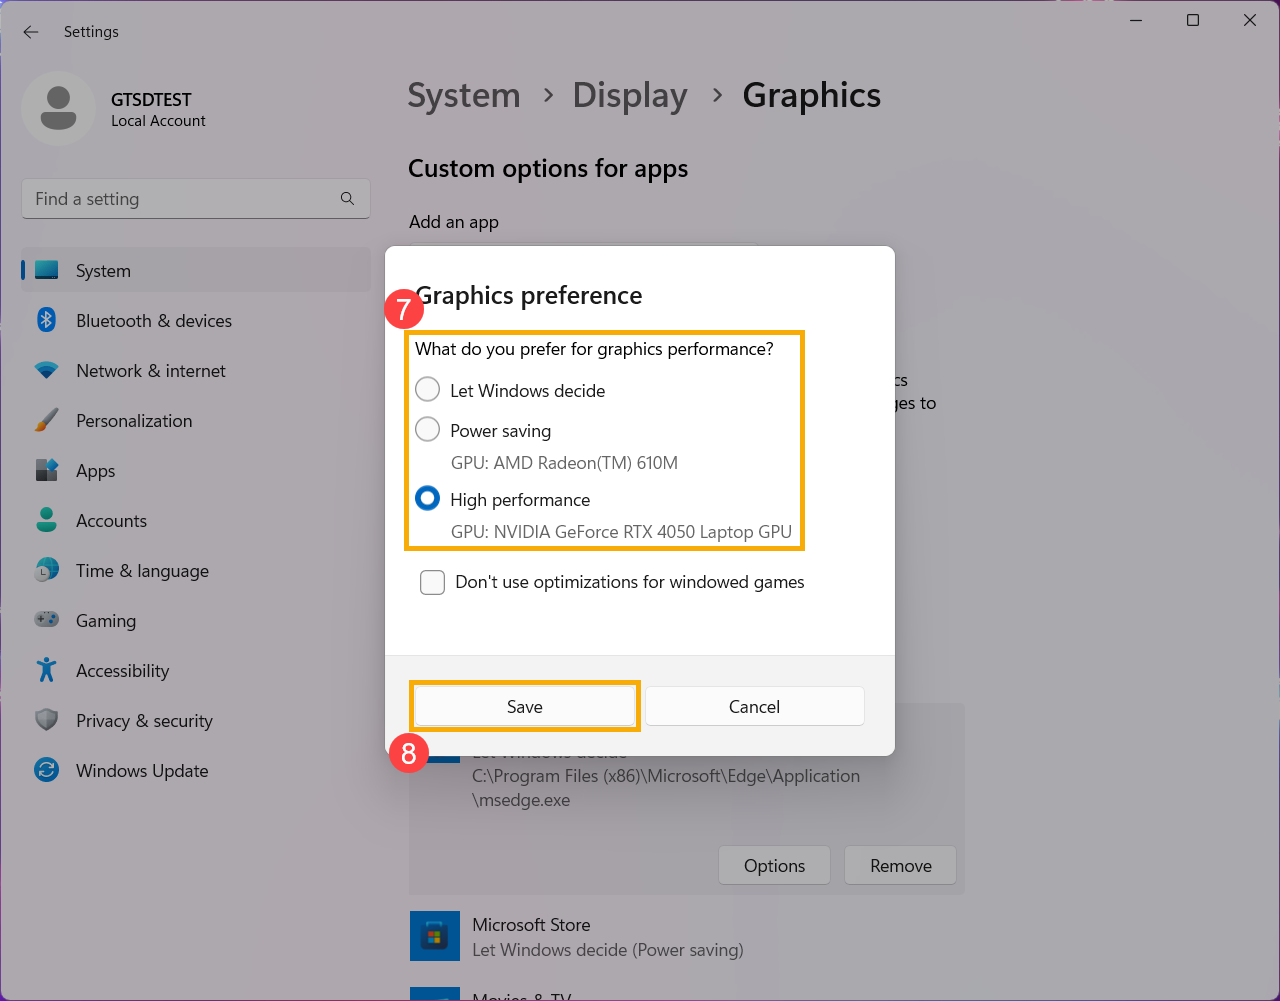
- Введите в строку поиска Windows [Настройки графики]①, потом нажмите [Открыть]②.

- В разделе Пользовательские настройки приложений откройте раскрывающееся меню, чтобы выбрать Классическое приложение или Универсальное приложение для поиска приложения, для которого Вы хотите установить предпочтение③. Если вы не можете найти приложение, пожалуйста, нажмите [Обзор]④ для его выбора.
- Выбранное или добавленное приложение отобразится в списке ниже. Нажмите на приложение в списке, для которого Вы хотите установить приоритет⑤, и нажмите [Параметры]⑥.
- Выберите графический процессор, который Вы хотите использовать в качестве приоритетного для приложения⑦, затем нажмите [Сохранить]⑧.
- Теперь приложение настроено на использование с предпочтительным графическим процессором.


Windows 10 операционная система
Как установить предпочтительный графический процессор для приложений в системе Windows OS
- Введите в строку поиска Windows [Настройки графики]①, потом нажмите [Открыть]②.
- В Настройках производительности графики откройте раскрывающееся меню, чтобы выбрать Классическое приложение или Универсальное приложение для поиска приложения, для которого Вы хотите установить предпочтение③. Если вы не можете найти приложение, пожалуйста, нажмите [Обзор]④ для его выбора.
- Выбранное или добавленное приложение отобразится в списке ниже. Нажмите на приложение в списке, для которого Вы хотите установить приоритет⑤, и нажмите [Параметры]⑥.
- Выберите графический процессор, который Вы хотите использовать в качестве приоритетного⑦, затем нажмите [Сохранить]⑧.
- Теперь приложение настроено на использование с предпочтительным графическим процессором.

Эта информация была полезной?
Yes
No
- Приведенная выше информация может быть частично или полностью процитирована с внешних веб-сайтов или источников. Пожалуйста, обратитесь к информации на основе источника, который мы отметили. Пожалуйста, свяжитесь напрямую или спросите у источников, если есть какие-либо дополнительные вопросы, и обратите внимание, что ASUS не имеет отношения к данному контенту / услуге и не несет ответственности за него.
- Эта информация может не подходить для всех продуктов из той же категории / серии. Некоторые снимки экрана и операции могут отличаться от версий программного обеспечения.
- ASUS предоставляет вышеуказанную информацию только для справки. Если у вас есть какие-либо вопросы о содержании, пожалуйста, свяжитесь напрямую с поставщиком вышеуказанного продукта. Обратите внимание, что ASUS не несет ответственности за контент или услуги, предоставляемые вышеуказанным поставщиком продукта.