
Applies ToWindows 11 Windows 10
Support for Windows 10 will end in October 2025
After October 14, 2025, Microsoft will no longer provide free software updates from Windows Update, technical assistance, or security fixes for Windows 10. Your PC will still work, but we recommend moving to Windows 11.
Learn more
Screen savers have been a staple feature in Windows for decades. Originally designed to prevent burn-in on CRT monitors, they have evolved into a customizable feature that adds a personal touch to your Windows device. However, with modern advancements, it’s now recommended to put your display to sleep to save energy.
What’s a screen saver?
A screen saver is an animated image or pattern that appears on your screen when your computer is idle for a specified period. While modern LCD and LED monitors are less susceptible to burn-in, screen savers remain a popular way to personalize your device and add an extra layer of security.
Why use a screen saver?
While screen savers are no longer essential for preventing burn-in, they offer several benefits:
-
Personalization: Customize your screen with animations or photos that reflect your style
-
Security: Automatically lock your computer when you’re away, protecting your data
-
Aesthetics: Add a visually pleasing element to your idle screen
-
Prevent Burn-In on OLED Displays: Screen savers can help prevent burn-in on OLED displays by ensuring that static images are not displayed for prolonged periods
Tip: To save energy and reduce wear on your display, it’s recommended to put your computer into sleep mode when it’s idle. Sleep mode consumes significantly less power than running a screen saver and allows your computer to quickly resume where you left off. To learn more, see How to adjust power and sleep settings in Windows.
Configure a screen saver
-
In the Settings app on your Windows device, open Personalization > Lock screen or use the following shortcut:
Lock screen
-
Select Screen saver
-
In the Screen Saver Settings window, select a screen saver from the drop-down list. Options include 3D Text, Blank, Bubbles, Mystify, Photos, and Ribbons
-
Customize Your Screen Saver: if available, select Settings… to customize the selected screen saver. For example, you can create a custom message in the 3D Text screen saver or choose a folder of pictures for the Photos screen saver
-
Set the Wait Time: use the Wait option to specify the number of minutes of inactivity before the screen saver activates
-
Enable Security: (Optional) Check the On resume, display logon screen option to require a password when resuming from the screen saver
Need more help?
Want more options?
Explore subscription benefits, browse training courses, learn how to secure your device, and more.
Все способы:
- Способ 1: Параметры персонализации
- Способ 2: «Панель управления»
- Редактирование реестра
- Вопросы и ответы: 0
Способ 1: Параметры персонализации
По умолчанию заставка в Windows 10 отключена и, в отличие от предыдущих ОС, способ ее включения неочевиден, что вызывает трудности у новых пользователей «десятки». Если под заставкой вы подразумеваете изменение скринсейвера при простое компьютера, то читайте нашу инструкцию.
Если же нужно поменять обои рабочего стола или фон приветствия при загрузке системы, то переходите по ссылкам ниже, чтобы узнать, как это сделать.
Подробнее:
Изменение фонового изображения в Windows 10
Изменение приветственного окна в Windows 10
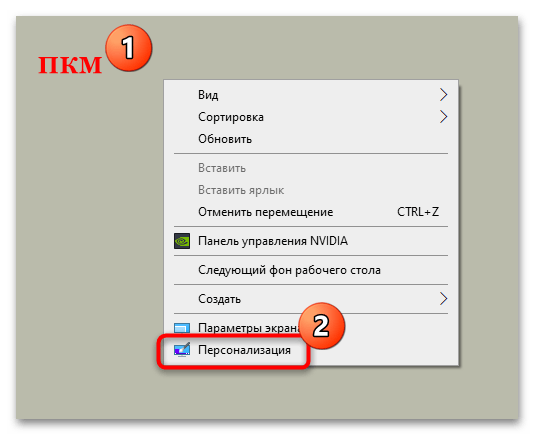
Включить заставку в Windows 10 можно через раздел с настройкой персонализации приложения «Параметры». Попасть в него можно двумя способами. Первый предполагает вызов контекстного меню рабочего стола щелчком правой кнопки мыши по свободной области. В меню нужно выбрать пункт «Персонализация».
Во втором случае действовать нужно немного иначе:
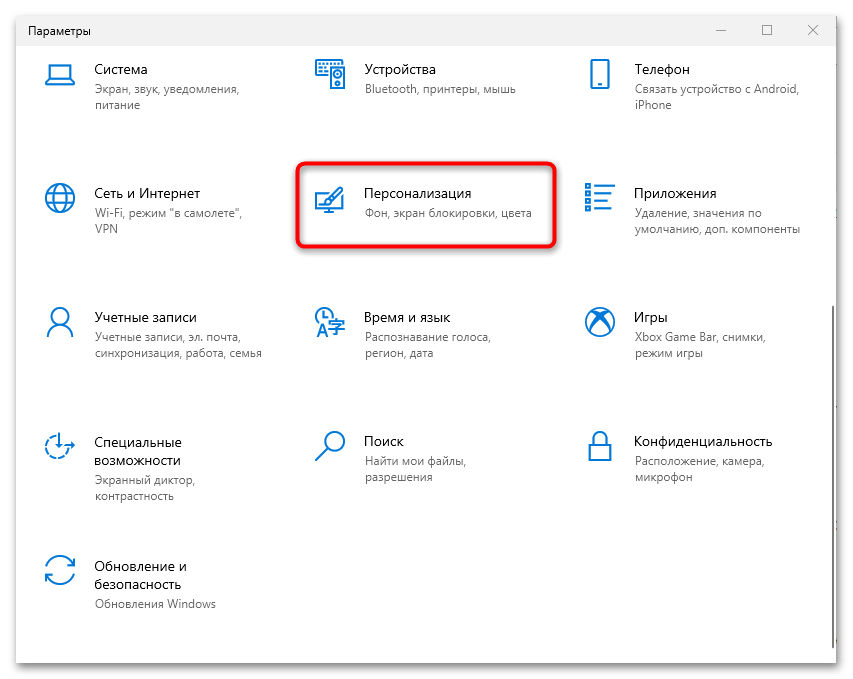
- Нажмите на кнопку «Пуск» и выберите приложение «Параметры».
- В новом окне перейдите в раздел «Персонализация».
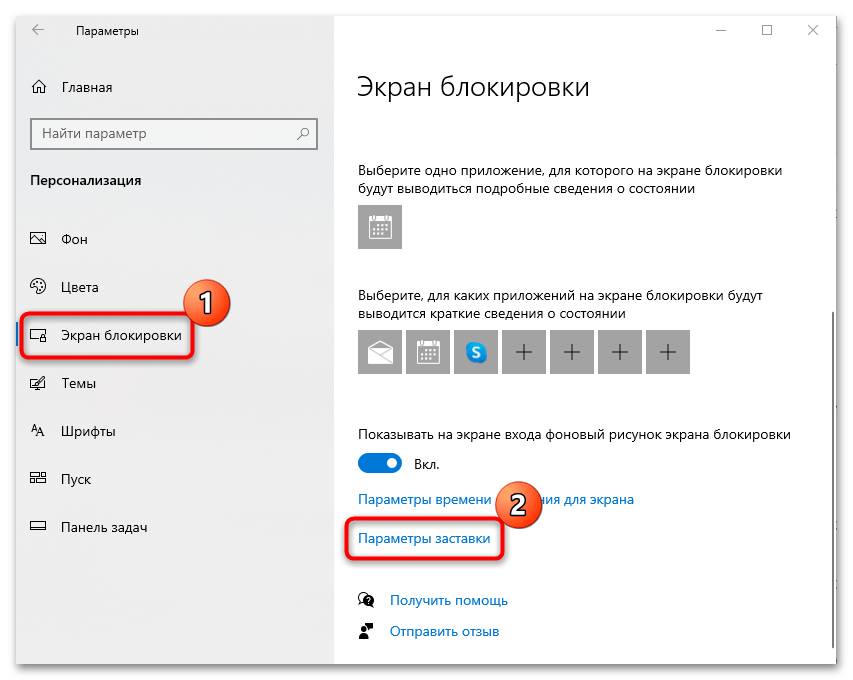
- Нажмите на вкладку «Экран блокировки» слева. В центральной части найдите ссылку «Параметры заставки» и кликните по ней.
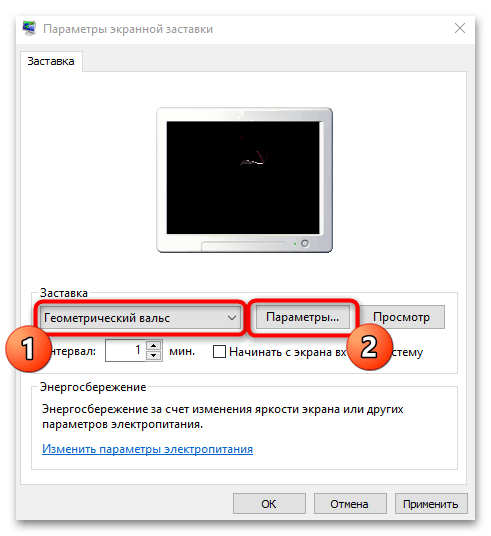
- Запустится системное окно с настройками заставки, где из выпадающего меню выберите нужную. Всего доступно несколько вариантов, а чтобы перейти в настройки каждой заставки, нажмите на кнопку «Параметры», однако учтите, что они доступны не для всех скринсейверов.
- Нажмите на кнопки «Применить» и «ОК», чтобы настройки вступили в силу.
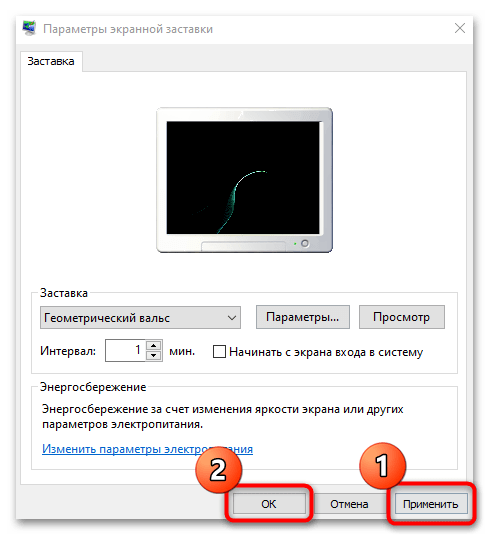
При необходимости можно отметить пункт «Начинать с экрана входа в систему» и выставить интервал времени, через который появится заставка.
Следует отметить, что настройки персонализации в Windows 10, которая не активирована, недоступны.
Способ 2: «Панель управления»
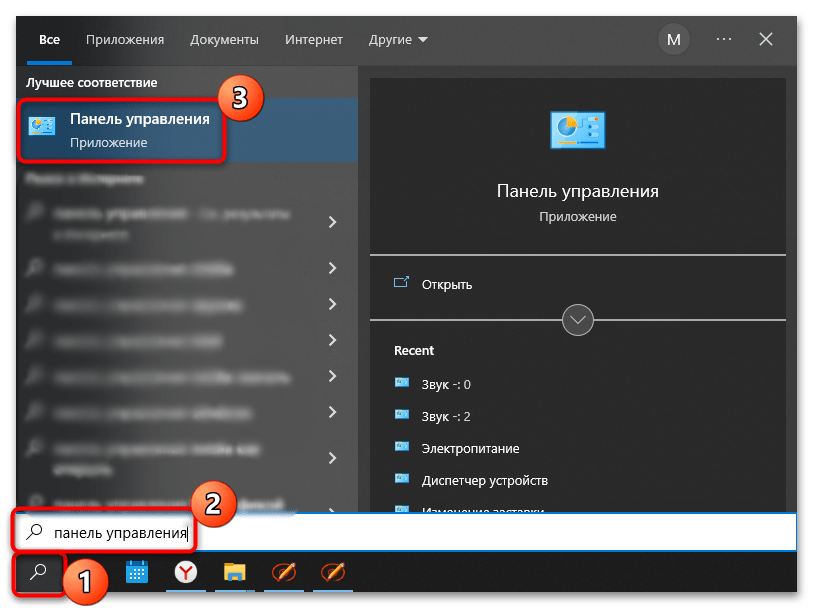
Попасть в окно с выбором заставки Windows 10 и включить ее можно с помощью классической «Панели управления», более привычной для недавних пользователей предыдущих операционных систем:
- Запустите «Панель управления», отыскав ее в меню «Пуск» через системный поиск.
- В поисковой строке элементов панели, расположенной в верхнем правом углу, наберите запрос «Изменение заставки». В результате отобразится ссылка для перехода в окно с выбором заставки из раздела «Электропитание». Кликните по ней.
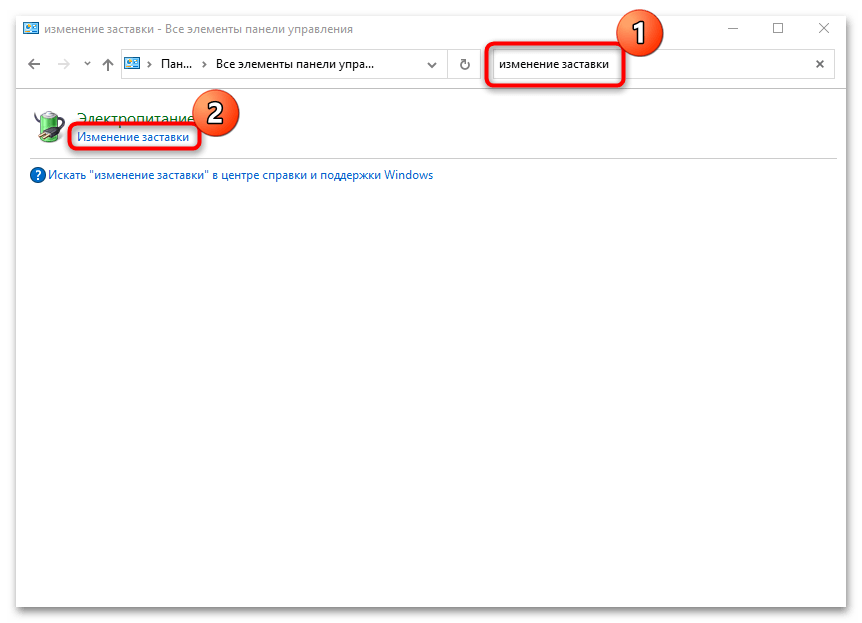
После этого откроется системное окно «Параметры экранной заставки». Включить ее можно так же, как описано в Способе 1, Шагах 4 и 5.
Редактирование реестра
Включать или отключать некоторые функции и возможности операционной системы можно через системный реестр, если знать, где располагаются те или иные параметры. Прежде чем вносить любые изменения, рекомендуется создать точку восстановления. Это поможет вернуть ОС к предыдущему состоянию, если в реестр были внесены ошибочные данные.
Подробнее: Инструкция по созданию точки восстановления Windows 10
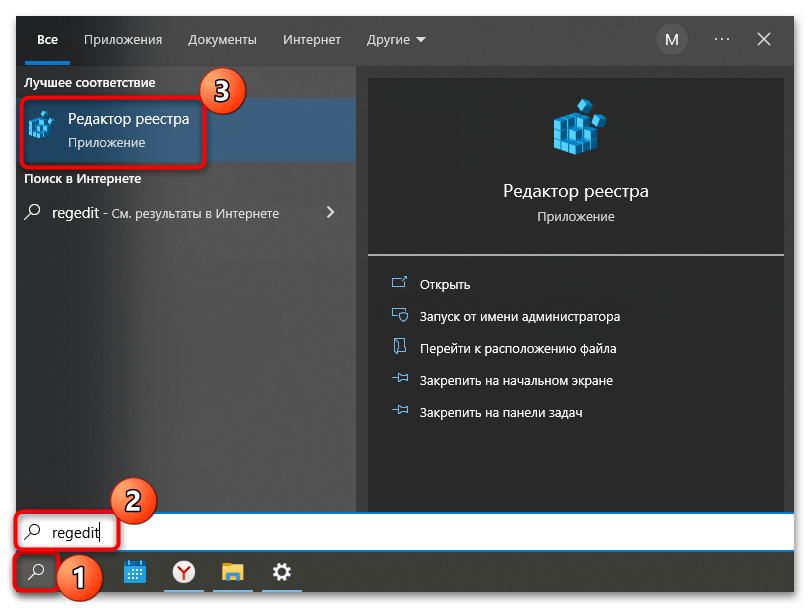
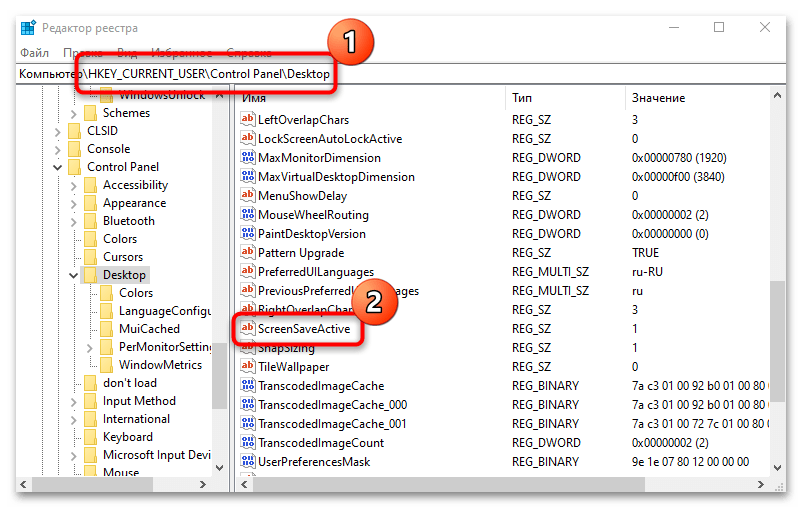
- Запустите «Редактор реестра». Для этого можно использовать строку системного поиска и соответствующий запрос или
regedit. - Перейдите по пути
HKEY_CURRENT_USER\Control Panel\Desktopчерез левую панель. В центральном окне найдите параметр с названием «ScreenSaveActive» и дважды щелкните по нему левой кнопкой мыши. - В строке параметра введите «1», чтобы включить экранную заставку. Нажмите на кнопку «ОК», чтобы сохранить изменения.
Этот вариант не активирует картинку при бездействии системы, а позволяет ее настроить через «Панель управления» в случае, когда искомый раздел там отсутствует. Так, если следуя инструкции из Способа 2, вы переходите только в настройки электропитания (то есть не находите окно изменения заставки), то прежде придется выполнить алгоритм действий, описанный ниже, благодаря чему отобразится окно «Параметры экранной заставки».
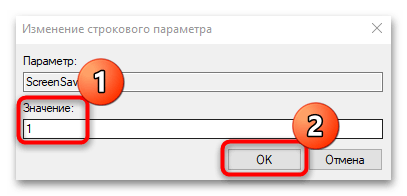
После этого можно закрыть окно «Редактора реестра». Для выключения заставки в качестве значения параметра «ScreenSaveActive» выбирайте «0».
Помимо стандартных заставок в Windows 10, можно использовать и другие скринсейверы. В этом случае нужно скачать файл с расширением SCR с проверенного и надежного ресурса. Потом вызывается контекстное меню скачанной заставки и выбирается функция установки, после чего скринсейвер можно будет выбрать в меню окна «Параметры экранной заставки» среди стандартных.
Читайте также: Как убрать экранную заставку в Windows 10
Наша группа в TelegramПолезные советы и помощь
Guide to Setting Live Wallpapers in Windows 10
Published
5 min read
How to Set Live Wallpapers & Animated Desktop Backgrounds in Windows 10
In the era of personalization, making your operating system look and feel unique has become more crucial than ever. For Windows 10 users, live wallpapers and animated desktop backgrounds can add an extra layer of charm and aesthetics to your workspace. In this comprehensive guide, we’ll explore how to set live wallpapers and animated desktop backgrounds in Windows 10, along with some tools and tips to make your experience seamless.
Understanding Live Wallpapers and Animated Backgrounds
Before diving into the ‘how-to’ section, let’s clarify what live wallpapers and animated backgrounds are. Live wallpapers are animated backgrounds that make your desktop more dynamic compared to static images. These wallpapers can change based on system events or time, and they can react to user interactions. Animated backgrounds may not always be as interactive but still bring life to your desktop by including moving elements.
Benefits of Live Wallpapers
- Personalization: A live wallpaper allows you to express your personality or mood through your desktop.
- Dynamic Environment: Unlike a static image, live wallpapers can create an engaging and ever-changing workspace.
- Unique Features: Many live wallpaper apps come with special features like weather updates, clocks, or calendars integrated into the wallpaper.
Limitations to Consider
- System Resources: Live wallpapers can use more CPU and GPU resources compared to static wallpapers. This can detract from performance, particularly on lower-end machines.
- Distraction: While some users find live wallpapers engaging, others may find them distracting, affecting workflow and productivity.
- Compatibility Issues: Many live wallpaper applications can have varying levels of compatibility, so it’s essential to choose trusted sources.
Setting Up Live Wallpapers
Method 1: Using Third-Party Applications
Windows 10 does not support live wallpapers natively, so the easiest way to set live wallpapers is through third-party applications. Here are some popular options:
1. Wallpaper Engine
Overview: Wallpaper Engine is a highly popular paid application available on Steam that enables users to use live wallpapers created by the community or create their own.
Steps to Install and Use Wallpaper Engine:
-
Purchase and Download:
- Visit the Steam Store.
- Search for «Wallpaper Engine.»
- Purchase the software and install it.
-
Launch the Application:
- After installation, launch Wallpaper Engine from the Steam Library.
-
Browse for Wallpapers:
- You will find a plethora of live wallpapers available in the app.
- Use the search function or categories to filter the wallpapers you want.
-
Set the Wallpaper:
- Click on a wallpaper to preview it.
- Click the «Apply» button to set it as your desktop background.
-
Customization:
- Many wallpapers come with customizable settings, allowing you to adjust animations, color, and other features. Right-click on the wallpaper icon in the Wallpaper Engine app for more options.
2. DeskScapes
Overview: DeskScapes is another powerful tool for setting live wallpapers in Windows 10. It offers both animated and video wallpapers, allowing complete customization.
Steps to Install and Use DeskScapes:
-
Purchase and Download:
- Go to the DeskScapes official website.
- Download and install the software.
-
Open DeskScapes:
- Launch DeskScapes after installation.
-
Choose a Wallpaper:
- Browse through the collection of wallpapers available in the app.
- You can also create your own animated wallpapers using video files.
-
Apply the Wallpaper:
- Select the wallpaper you want and click on «Apply» to set it as your background.
-
Customization:
- You can adjust effects like brightness, contrast, and animation speed from the DeskScapes settings.
Method 2: Using Video Wallpapers
Another interesting alternative for live wallpapers includes using video files as your background. You can set a video as your wallpaper through different applications.
VLC Media Player
While primarily a media player, VLC can also be used to set a video as your wallpaper. Here’s how:
-
Download VLC:
- If you haven’t already, download and install VLC Media Player from its official website.
-
Open a Video:
- Launch VLC and play the video you want to use as your wallpaper.
-
Set Video as Wallpaper:
- Right-click on the video, go to «Video,» and select «Set as Wallpaper.»
Method 3: Using Windows Themes
For users who prefer a more traditional approach but still want some visual interest, using Windows themes can be a great option. While themes won’t offer live wallpaper functionality, they can provide a varied and colorful static experience.
-
Settings:
- Open the «Settings» app (Windows + I).
- Click on «Personalization» then «Themes.»
-
Choose a Theme:
- You can select a pre-installed theme or download new themes from the Microsoft Store. Choose one that reflects your personal style.
-
Apply:
- Once you find a theme you like, click on it to apply it to your desktop.
Tips for Choosing the Right Live Wallpaper
-
Performance Check: Ensure that your system can handle live wallpapers without affecting performance. Check your CPU and RAM usage when using live wallpapers.
-
Relevance: Choose wallpapers that resonate with you personally. If you love nature, find animated backgrounds depicting landscapes or animals.
-
Aspect Ratio: Ensure that the wallpaper aspect ratio matches your display resolution to avoid distortion.
-
Regular Update: Regularly change your live wallpapers to keep the desktop fresh and exciting.
-
Usage Consideration: If you are using your system for productivity or work, be mindful of how distracting a live wallpaper might be.
Troubleshooting Live Wallpapers Issues
-
Performance Issues:
- If you experience lag or performance issues with live wallpapers, consider lowering the graphic settings in the wallpaper application or switching to static images.
-
Wallpaper Not Applying:
- Ensure the application is running and configured to apply wallpapers correctly. Restart the application or your computer if the wallpaper fails to display.
-
Compatibility:
- If you face issues with a specific application, check if there are updates available or look for alternative applications that offer similar functionality.
Conclusion
Setting live wallpapers and animated backgrounds in Windows 10 brings a new level of personalization to your desktop experience. Through the use of third-party applications like Wallpaper Engine and DeskScapes, you can select from a wide range of engaging and dynamic wallpapers. While there are benefits, it’s essential to consider system performance and potential distractions.
Whether you choose to apply vibrant live wallpapers or simply explore Windows themes, take the time to find the right fit for your workflow and aesthetic. Your operating system should not only be a tool but also a reflection of your personality and creativity. Happy customizing!
The Windows 10 screensaver is displayed on your computer or device when you haven’t been active for a certain amount of time. Do you need to set a screensaver in Windows 10? Are you sick of your Windows 10 screen saver and want a new one? The Windows 10 screensaver settings let you customize several aspects about what you see on your display when your PC goes idle. Read this tutorial to find out how to change screen saver in Windows 10:
NOTE: To learn if a screen saver is necessary on your Windows 10 computer or device, check out: What is a screensaver and should you use one?
How to access the Windows 10 screensaver settings
The fastest and easiest way to open the Windows 10 screensaver settings is to use the Search feature. Type “screen saver” in the Windows 10 Search bar and then click or tap on either of the two results, “Change screen saver” and “Turn screen saver on or off.”
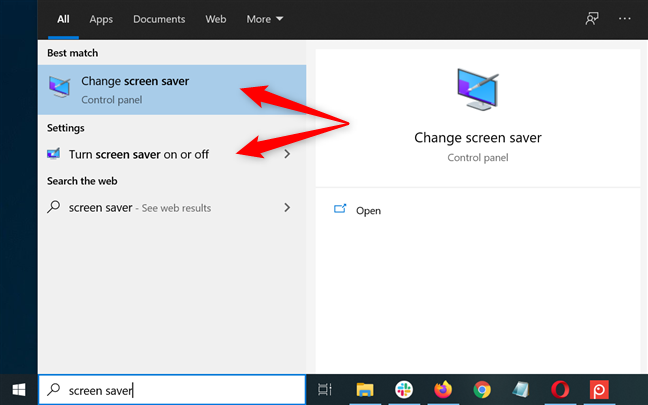
Open the Windows 10 screensaver settings using Search
Alternatively, you can also launch the Control Panel and use it to search for “screen saver.” Then, click or tap on either of the top two results displayed under Power Options.
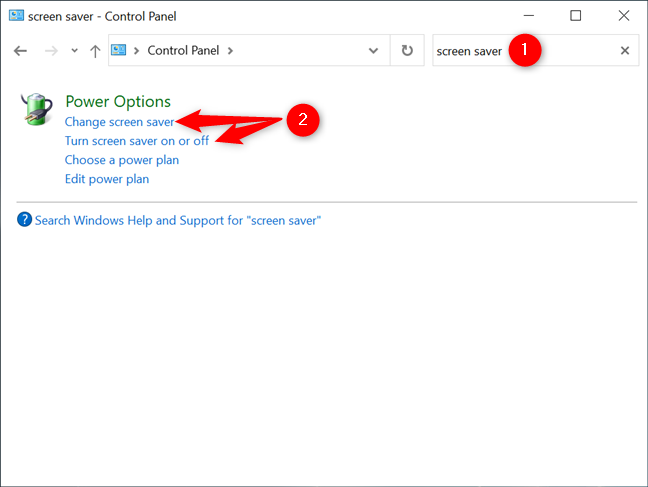
Open the Windows 10 screensaver settings from the Control Panel
If you want to use the long way around, right-click or press-and-hold on a free area on your desktop to open a contextual menu. Click or tap the last option, Personalize.
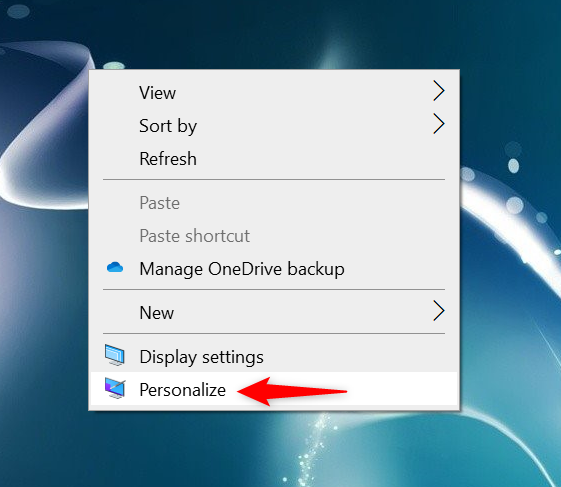
Press Personalize in the contextual menu
You can also reach this page by opening the Settings app and accessing Personalization.
Then, select the Lock screen tab from the column on the left, and, on the right-hand side of the window, scroll down to find the “Screen saver settings” link. Click or tap on it.
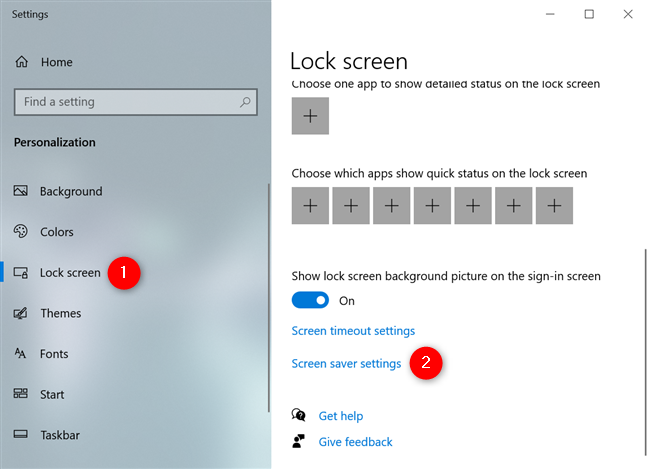
Access the Screen saver settings link from the Lock screen tab
No matter which option you use, the “Screen Saver Settings” utility window opens on your Windows 10 computer or device in all its basic glory.
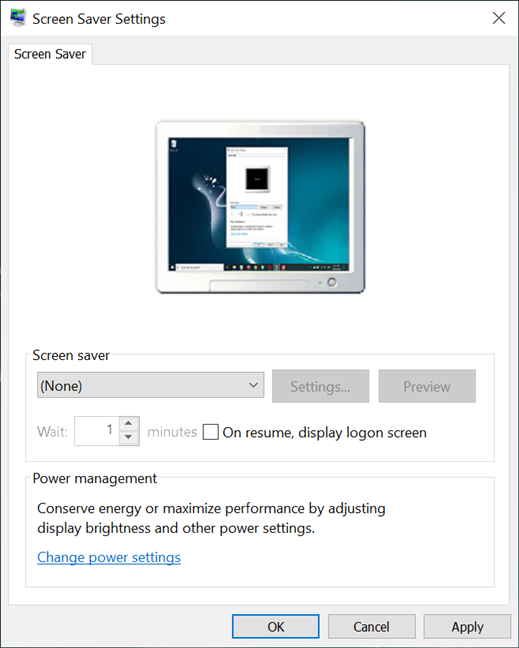
The Windows 10 Screen Saver Settings window
How to change screen saver in Windows 10
While there is no active screensaver in Windows 10 by default, it’s easy to set one from the “Screen Saver Settings” window. Click or tap on the field directly under Screen saver to open a drop-down menu.

Access the Screen saver drop-down menu to see the options available in Windows 10
Next, click or tap on any of the available options to select and use that screensaver in Windows 10. There are six built-in screensavers: 3D Text, Blank — choose this if you want a black screensaver, Bubbles, Mystify, Photos, and Ribbons.
NOTE: If you don’t want to use a screensaver, Windows 10 includes the (None) option, which disables the screensaver for the active Windows theme.
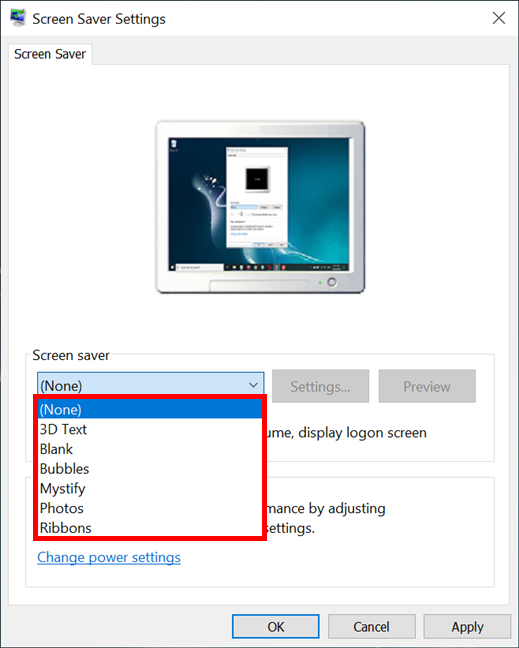
Select the Windows 10 screensaver option you want to use
The small computer screen at the top of the window shows a preview for every screen saver option. However, to get a better idea of what a screensaver looks like, click or tap on the Preview button.
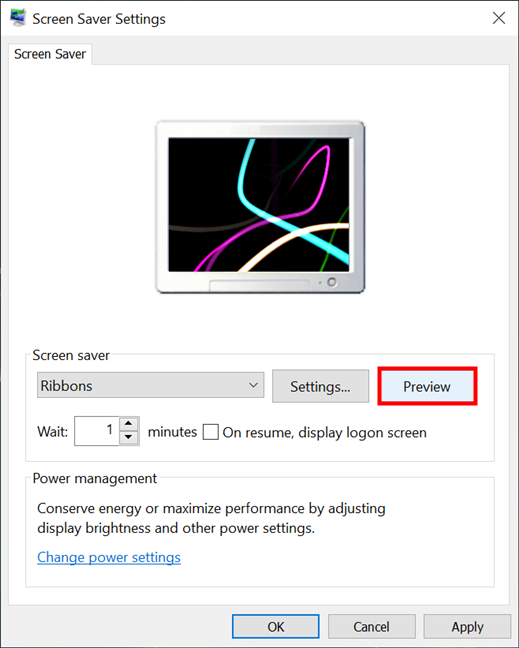
Press Preview to experience the Windows 10 screensaver
If you pressed Preview, the selected screensaver is now launched in full-screen. Don’t press anything and do not move the mouse, because your screensaver only runs as long as Windows 10 records no user input. When you are done viewing the screensaver, move the mouse, press a button, or touch the screen, and the screensaver disappears.
Feel free to preview as many options as you want. When you are happy with your choice, head on to the next chapter to configure different parameters for how the selected screensaver works.
TIP: If you don’t like any of the six default options, you can try these 12 free screensavers for Windows.
How to configure the active screensaver in Windows 10
The “Screen Saver Settings” window offers several customization options. The Wait box lets you insert for how many minutes you should be idle before the Windows 10 screen saver kicks in.
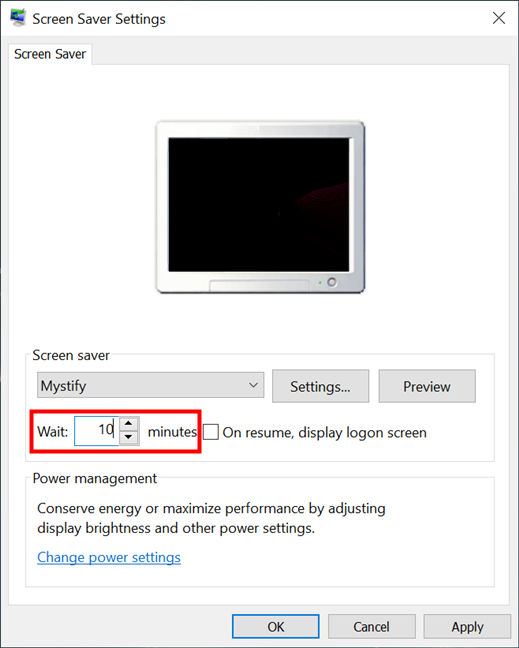
Set how long until the screen saver starts in Windows 10
Check the box next to “On resume, display logon screen” to automatically lock your PC when the screensaver starts. Windows 10 asks for credentials when you want to use it again, which can be a good way to protect your data but might become inconvenient if you often step away from your PC.
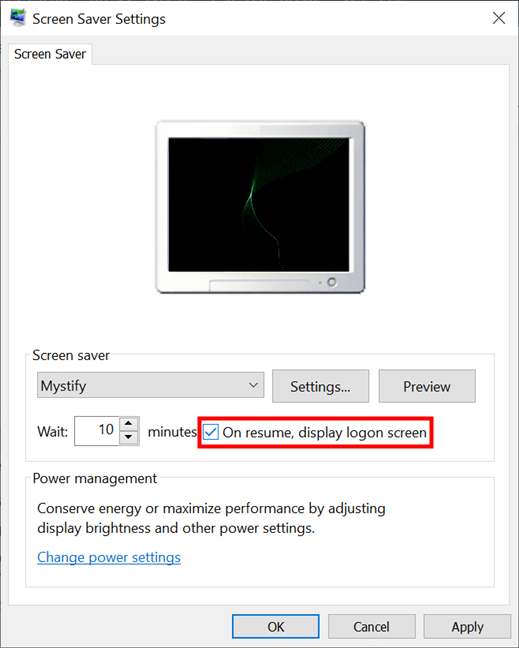
Decide if Windows 10 asks for a password when resuming
Press the Settings button to access additional configurations for the selected screensaver, if available. Only two of the default Windows 10 screensavers can be configured further: 3D Text and Photos.
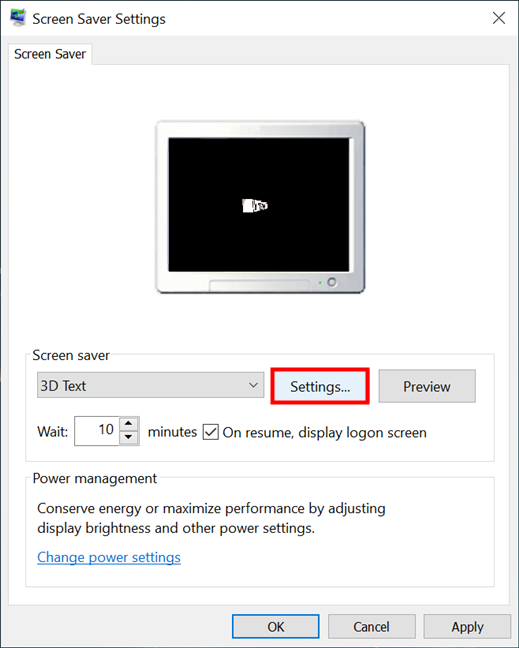
Press Settings to access additional options for your Windows 10 screen saver
The “3D Text Settings” window gives you the option to display the Time or a Custom Text as your screensaver. You can Choose Font, select the desired Rotation Type and Surface Style, as well as adjust the Resolution, Size, and Rotation Speed. Experiment with the available options until you like the result, and then press OK.
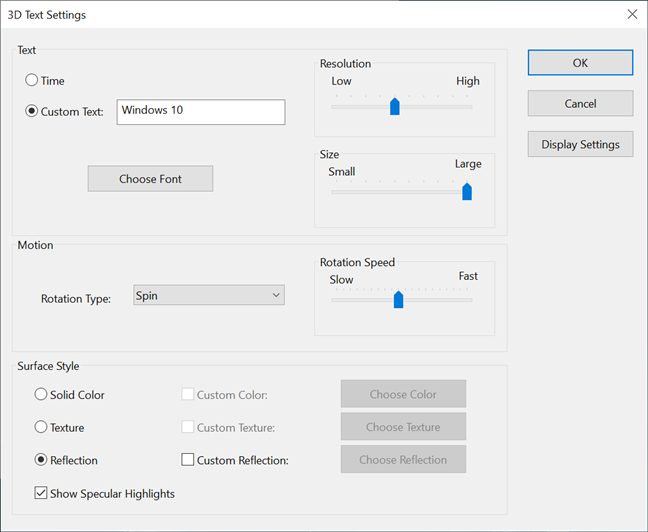
Choose what gets displayed in 3D Text and click or tap OK
With the Photos screen saver, you see a slideshow of pictures instead of an animation. In the “Photos Screen Saver Settings,” you can choose which folder is used to create the displayed slideshow, as well as the “Slide show speed” and whether the photos are shuffled. Press Save when you are done adjusting everything.
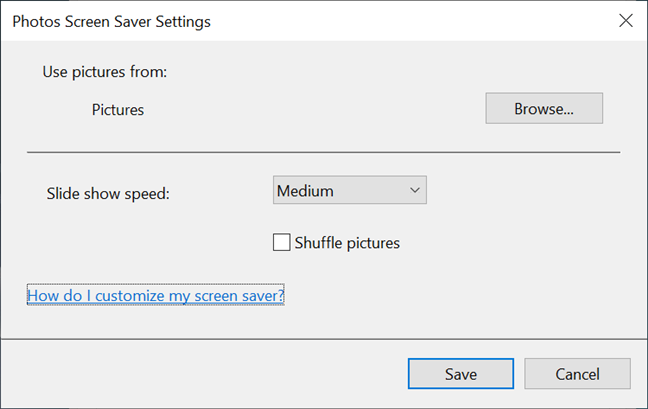
Choose the screen saver images that are shown and the Slide show details
When you return to the Screen Saver Settings window, preview our choices before deciding, and don’t forget to press OK or Apply to save everything.
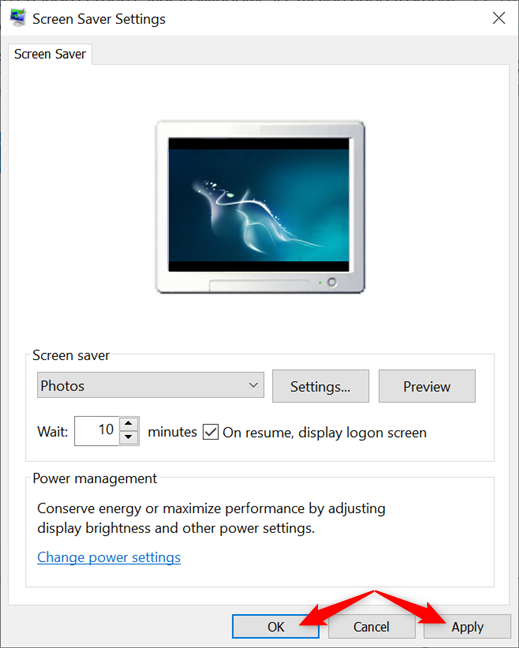
Save the Windows 10 screensaver settings
TIP: If you want complete control over what’s shown on your Windows 10 screen when you’re idle, you can create a screensaver to your liking with IrfanView.
Do you use a screensaver in Windows 10? What about screen saver images?
Even if it’s not as helpful as it used to be, it can still be fun to use a screen saver in Windows 10. Do you have a screensaver on your Windows 10 PC, or do you feel like screensavers are a bit out of date? What about screensaver pictures? Corny, or a nice way to remember favorite moments? Let us know what you think in the comments section.