
The object-oriented programming language Java offers advantages such as platform independence, security and multithreading, which you can also use in Windows 10. But, first, clarify whether you need a 32-bit or 64-bit version before installing Java on Windows 10.
Java is one of the most widely used Internet programming languages and is also suitable for users who are just learning programming-learning. In Windows it was already supported since the update 51 for Windows 8. Those who want to use Java on Windows 10 or also on Linux and macOS can download the installation files free of charge from the website of the Java developer Oracle Corporation.
Attention! The Edge browser does not support Java plug-ins, so Java cannot be used in Edge. Browser like Firefox or Safari again require a Java plugin or applet. In addition, you need to clarify whether you need Java as 32-bit or 64-bit for Windows, depending on your operating system.
If you want to get the most out of Java, you should get an overview of the most important Java commands and Java operators. Particularly handy is the comprehensive software development kit (SDK), which includes the Java Development Kit with a collection of utilities, tools and runtime environments.
Is Java already installed?
Before installing Java, you can check if Java is already on your system. This way you save the installation steps and can use Java directly. You can find out whether Java is already present via the display for installed software on the Windows system. To do this, enter “Control Panel” in the Windows search line and click on the corresponding result. Then go to “Programs” > “Programs and Features”. There you will find all installed programs listed alphabetically. If Java is installed, there is also an entry for Java.
You can check whether you need the 64-bit version of Java by pressing the Windows-Shortcut [Windows] + [i] for the Windows settings. In the opened settings you get to the “Device specifications” via “System” > “About”. If it says “64-bit” in the “System Type” section, you can use both the 32-bit and 64-bit versions.
Java has stopped supporting 32-bit systems, so Java only runs on 64-bit operating systems. However, both the 32-bit and 64-bit versions will work fine in these. Therefore, both Java versions are recommended if you alternate between using a 32-bit and 64-bit browser. On the other hand, Oracle Corporation advises using a standard 32-bit browser and the 32-bit Java version for best performance.
Download Java for users
Follow the steps below to install the latest version of Java in Windows 10:
Step 1: In your default browser, open the Java download page from Oracle Corporation java.com. Here you will find the appropriate latest Java version for operating systems such as Windows, macOS, Linux or Solaris.
Step 2: Download the latest Java version for the applicable operating system.
Step 3: Decide whether you want to perform an online download using an executable IFTW file (“Install from the Web”) or as an offline download using an executable file. In the Java setup prompt, confirm that you really want to install Java. By doing so, you automatically agree to Java’s license agreement.
Step 4: With the Java download, you also get the Java Runtime Environment (JRE), which allows you to use Java plug-ins and run Java applets in a compatible browser. The JRE also includes the Java Virtual Machine, the Java main classes and Java libraries.
Have you upgraded your Windows operating system to Windows 11 and wondered if Java can be used with it? Then don’t worry: You can easily install Java on Windows 11.
Download Java: For developers
If you would like to use Java not only in the browser, but also as a programming language including tools, you can download the Java Development Kit (JDK) from the Java website. The JDK includes helpful tools and programs such as a Java editor, a compiler and interpreter, a debugger as well as documentation tools, API classes, archivers, signing programs, tools for applets and performance monitoring, and a web service importer. The Java Runtime Environment (JRE) is also included in the JDK.
Follow these steps to install Java in Windows 10 as a developer:
Step 1: Open the Developer website of Java. On the landing page, you will already see the download button for the current version of Java (as of 2022: Java 18). If you want to use the Java Development Kit, go to the Oracle website for Java downloads.
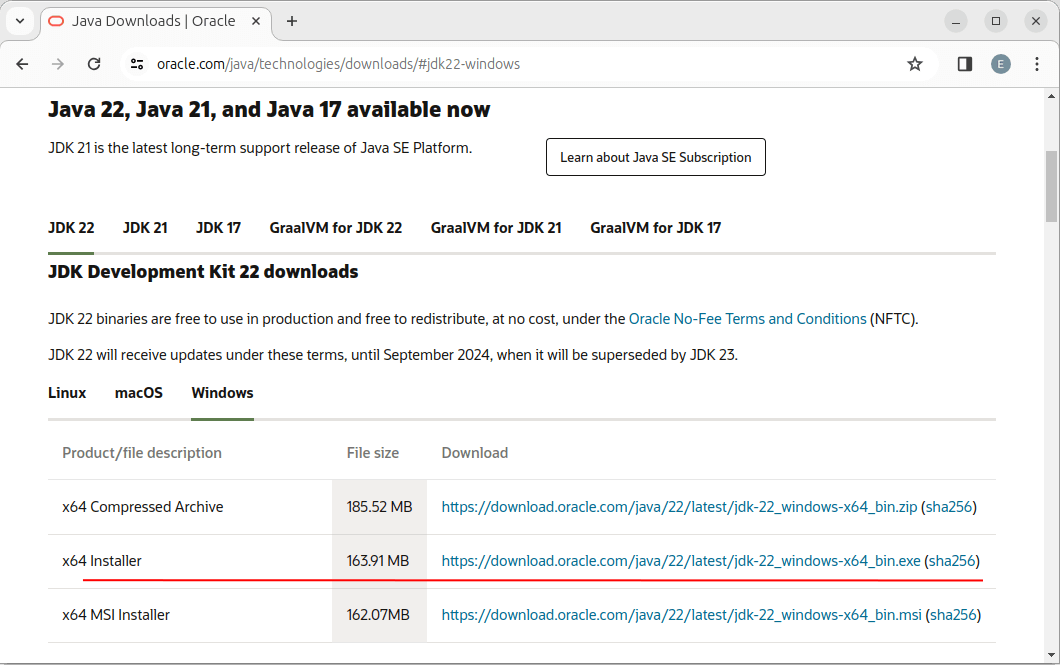
Step 2: Choose between options like “x64 Compressed Archive” as ZIP file, “x64 Installer” as EXE file or “x64 MSI Installer” as MSI file for the download. Confirm the Oracle Java license agreement for the download.
Step 3: Open the downloaded file and extract the ZIP files first or double-click on the installation file. The installation wizard will now guide you through the simple installation steps. The installation itself takes only a few minutes.
Was this article helpful?
#База знаний
-
0
Начинаем разрабатывать на Java: где взять, как установить и настроить всё, что нужно.
vlada_maestro / shutterstock
Пишет на Java. Верит в Agile. Пьёт много кофе и не любит грязный код.
Чтобы начать программировать на Java, нужно установить комплект разработчика приложений (SDK). Он позволит запускать, отлаживать и исполнять наши первые программы. Также нам понадобится среда разработки (IDE), где мы и будем писать код.
Пройдём через это вместе. Установим JDK в Windows, Ubuntu и macOS, и IntelliJ IDEA тоже в Windows, Ubuntu и macOS. Поехали!
Java Development Kit (JDK) — это комплект ПО для разработчиков приложений на Java. Стандартная установка включает в себя интерпретатор, облегчённый интерпретатор JRE, компилятор, библиотеку Java-классов, отладчик, средства архивации и сжатия jar и другое.
Чтобы установить JDK в Windows, нужно:
- загрузить актуальную версию пакета,
- установить его,
- настроить переменные окружения.
Нам нужна бесплатная версия — AdoptOpenJDK (она есть под Windows, macOS, Ubuntu и другие платформы).
Идём сюда и выбираем версию JDK (актуальны версии 8+), виртуальную Java-машину (JVM) и свою платформу.
Я выбрал OpenJDK 11 (LTS), HotSpot и Windows x64 jdk соответственно:
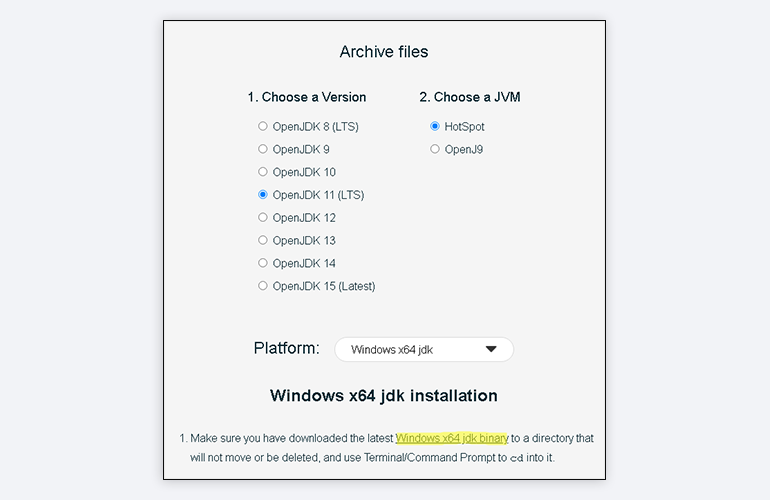
Скачиваем файл по появившейся ссылке (я выделил её жёлтым на скрине выше).
Извлекаем скачанный архив в папку C:\Program Files\Java\
При этом будет создана подпапка jdk-*номер версии*, а внутри неё появится папка bin.
В результате полный путь до папки bin у меня выглядит так:
C:\Program Files\Java\jdk-11.0.2\bin
Нам нужно создать системную переменную JAVA_HOME, которая будет хранить путь до нашей версии JDK. Это понадобится программам для работы с проектами Java.
Заходим в Панель управления → Система → Дополнительные параметры системы → Дополнительно
А можно и прямо в Панели управления вбить в поиск слово «переменных» (без кавычек). ОС предложит варианты, из которых выбирайте «Изменение системных переменных среды».
У вас откроется окно:
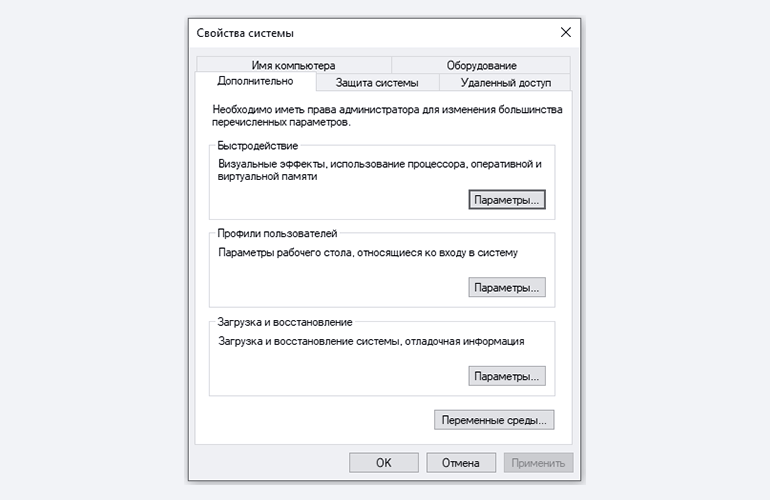
Здесь жмём на кнопку «Переменные среды».
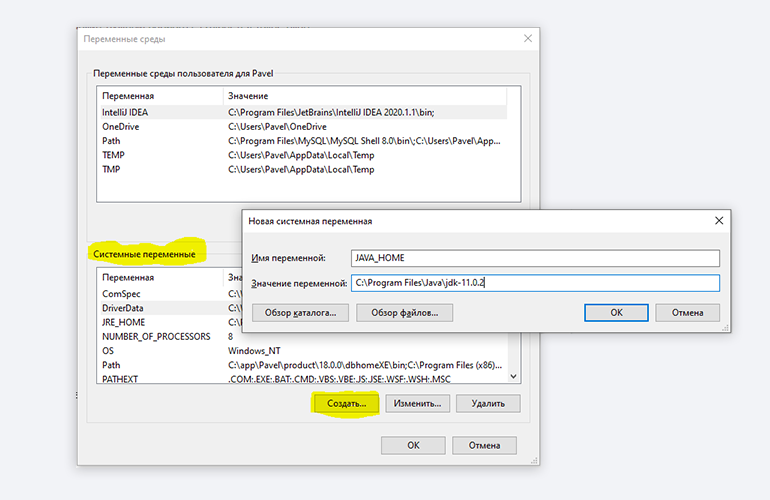
В новом окне для раздела «Системные переменные» кликаем «Создать». В «Имя переменной» вводим JAVA_HOME (именно так, латиницей в верхнем регистре), а в поле «Значение переменной» подставляем наш путь C:\Program Files\Java\jdk-*номер версии*:
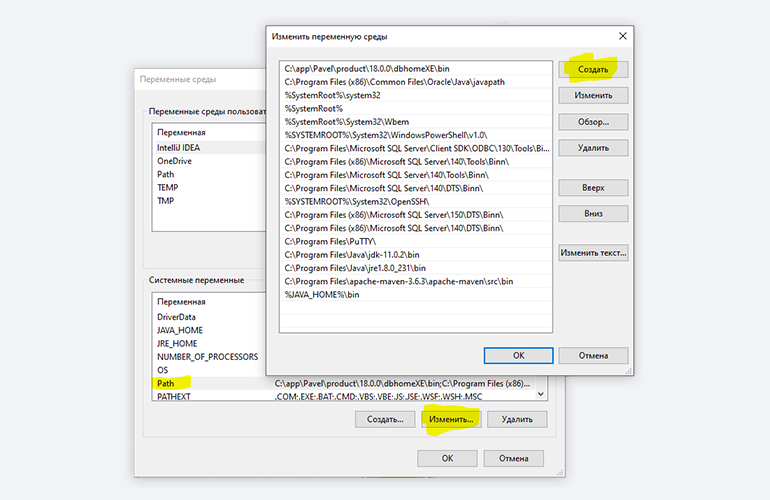
Далее в разделе «Переменные среды…» редактируем системную переменную Path. Нужно добавить в неё путь к папке с исполняемыми файлами Java, а именно: %JAVA_HOME%\bin (соблюдайте регистр символов):
Перезагружаем Windows.
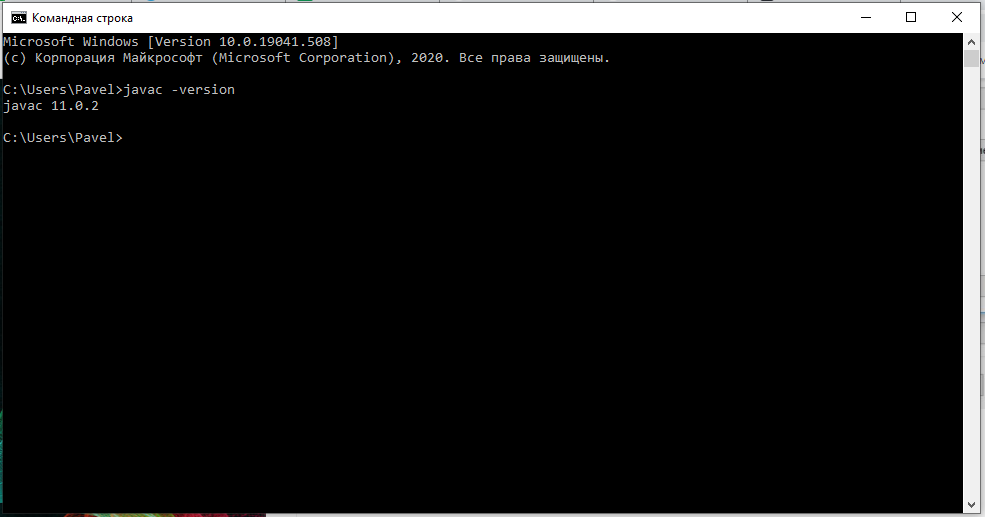
Запускаем Командную строку Windows. Для этого нажимаем Win + R, а в появившемся окне вводим cmd.exe и жмём на Enter.
В открывшейся консоли набираем javac -version и жмём ввод.
Если установка прошла успешно, то ответ покажет версию вашего компилятора:
Рассмотрим установку JDK на одном из самых популярных дистрибутивов Linux — Ubuntu 20.04 (LTS).
Проще всего установить версию, которая входит в пакет Ubuntu. По умолчанию в Ubuntu 20.04 входит версия Open JDK 11.
Открываем терминал сочетанием клавиш Ctrl + Alt + T и обновляем базу данных пакетов с помощью APT:
Проверяем ранее установленные версии командой:
Если установка уже выполнялась, то мы увидим что-то такое:

Для запуска любых приложений Java нужна JRE (Java Runtime Environment — среда выполнения для языка Java). Но для компиляции и разработки программ требуется JDK (Java Development Kit).
Чтобы установить JRE, вводим в консоль:
$ sudo apt install default-jre
Для установки JDK — команду:
$ sudo apt install default-jdk
Вводим команду:
Ответ должен выглядеть примерно так:
Этот способ установки использует HomeBrew (менеджер недостающих пакетов для macOS).
Прежде всего нужно добавить репозиторий в HomeBrew. Для этого открываем терминал (Cmd + N) и вводим:
$ brew tap AdoptOpenJDK/openjdk
Устанавливаем OpenJDK 11 командой:
$ brew cask install adoptopenjdk11
Вводим:
Ответ должен выглядеть примерно так:
openjdk version "11.0.2" 2019-01-15
OpenJDK Runtime Environment AdoptOpenJDK (build 11.0.2+9)
OpenJDK 64-Bit Server VM AdoptOpenJDK (build 11.0.2+9, mixed mode)
IntelliJ IDEA — это интегрированная среда разработки (IDE), то есть система программных средств для создания проектов на разных языках программирования.
Сегодня это самая популярная IDE для языка Java. А ещё есть Eclipse, NetBeans и немало других, но мы рекомендуем именно IDEA, потому что даже её бесплатная версия обладает широкой функциональностью, подходит для профессиональной разработки и вообще делает Java проще в использовании.
В IDE обязательно входят:
- текстовый редактор для написания кода (он знает синтаксис нужных языков);
- компилятор;
- отладчик.
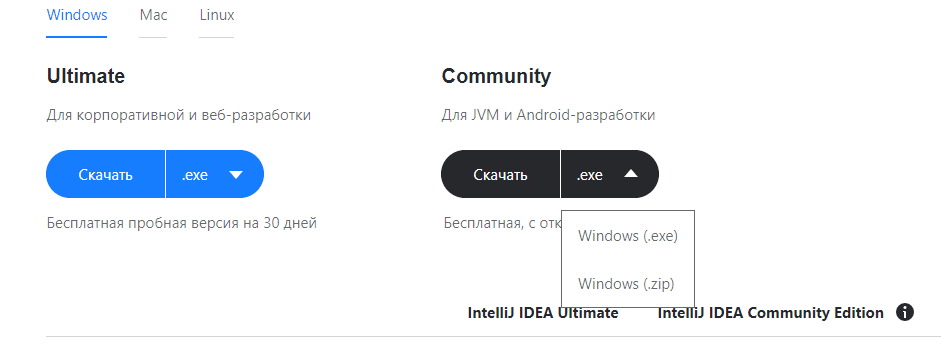
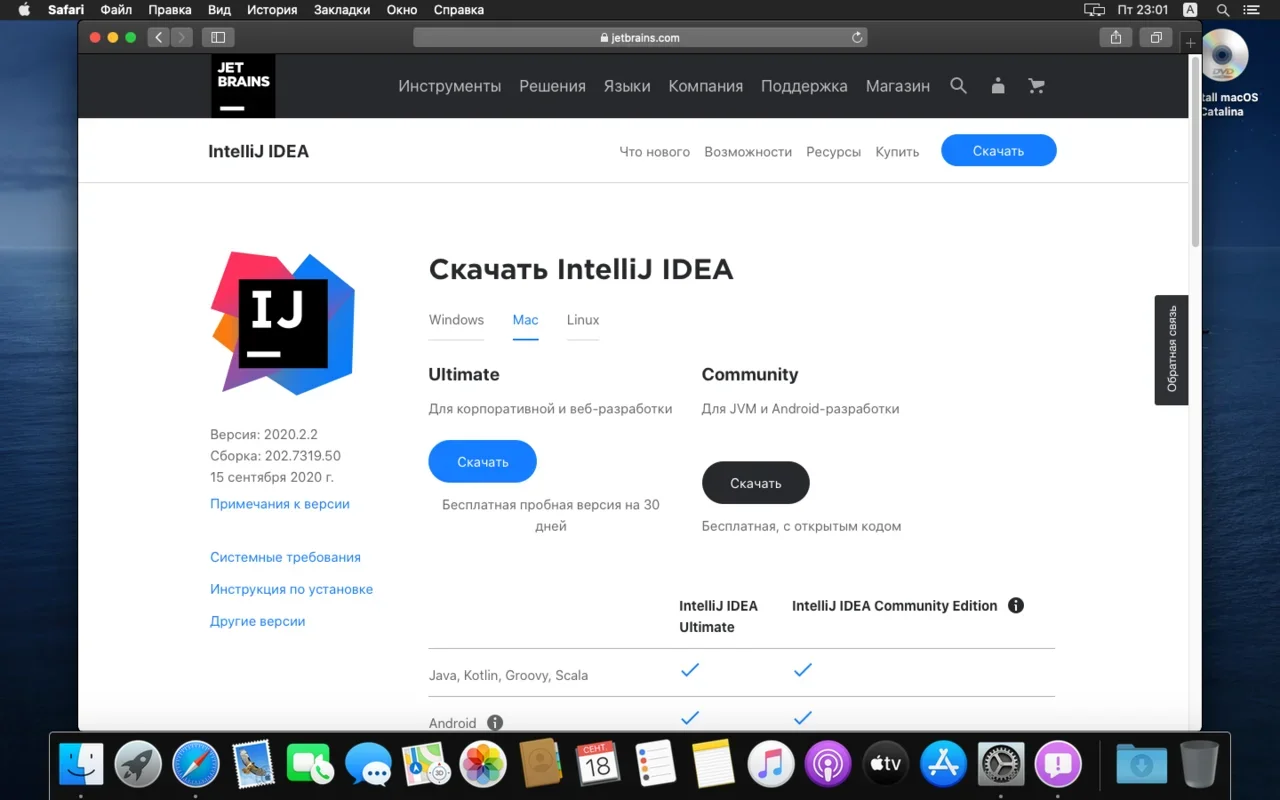
IntelliJ IDEA доступна в бесплатной (Community) и платной (Ultimate) версиях. Чем они различаются, видно на скрине ниже:

Пока что нам хватит возможностей бесплатной версии.
На заметку: IntelliJ предлагает студентам и преподавателям свободный доступ к своим продуктам.
Заходим сюда и качаем версию для Windows.
Запускаем скачанный файл .exe:
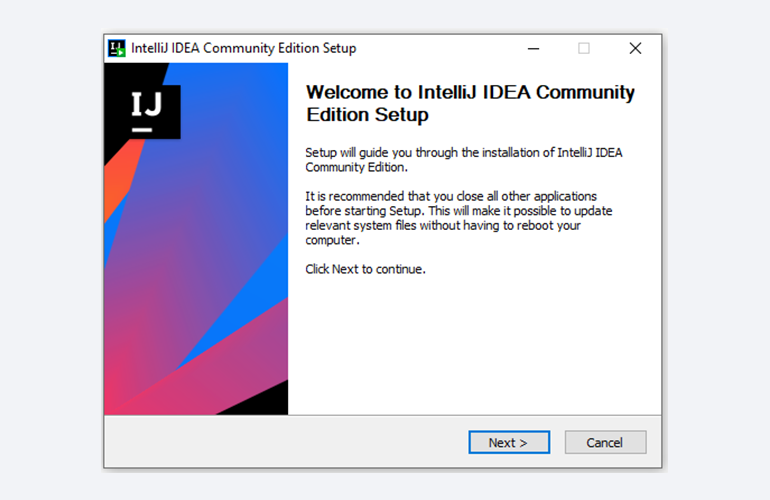
Жмём Next (Далее) и выбираем путь для установки:
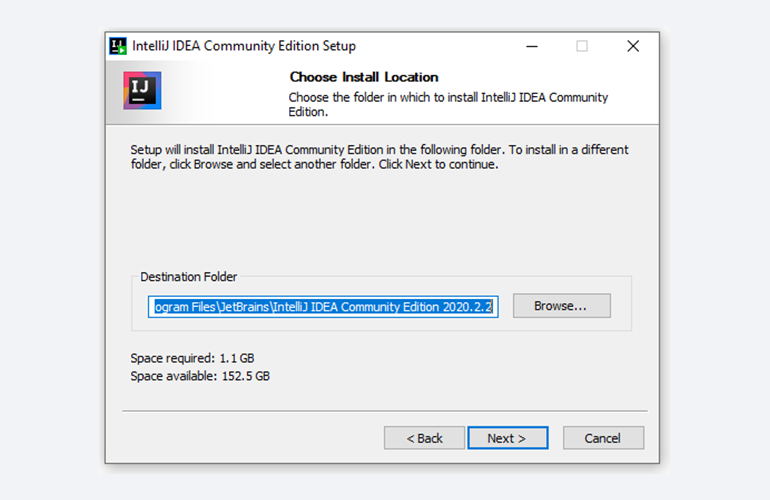
Снова Next, и настраиваем параметры установки:
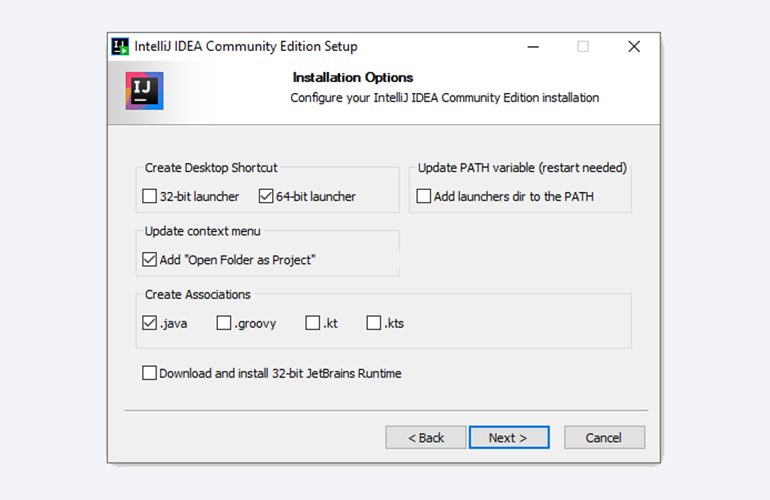
В общем случае это:
- 64-bit launcher — для запуска 64-разрядной версии приложения (будет создан ярлык на рабочем столе);
- Add ”Open Folder as Project“» — позволяет открывать папки с исходниками как проекты прямо через контекстное меню;
- .java — файлы такого типа (с таким расширением) будет открывать IDEA (по умолчанию и через контекстное меню).
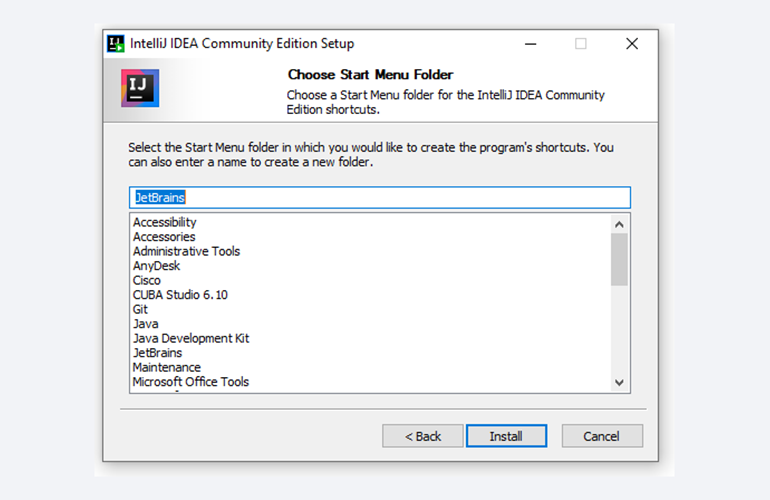
Кликаем Next (Далее) и выбираем папку для ярлыков IDEA (оставляем по умолчанию):
Нажимаем Install (Установить), после чего стартует установка:

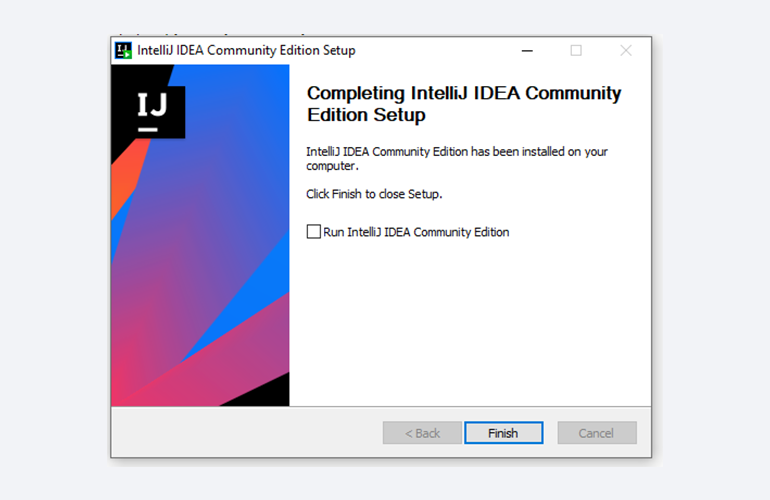
Дожидаемся её окончания и жмём Finish (Завершить):
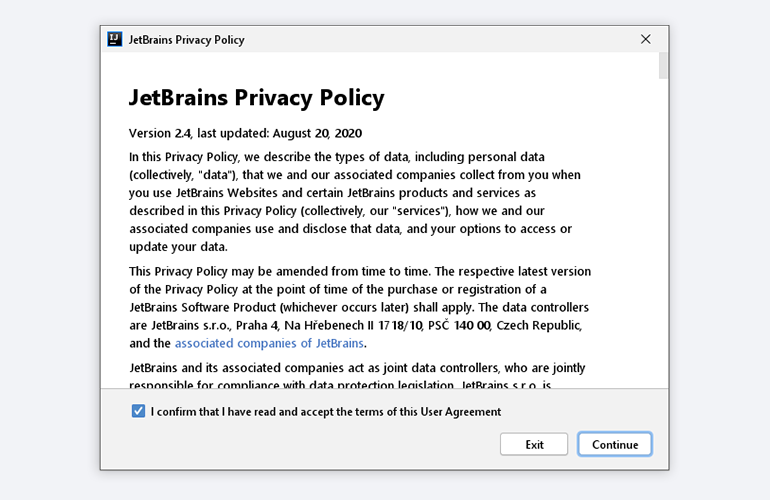
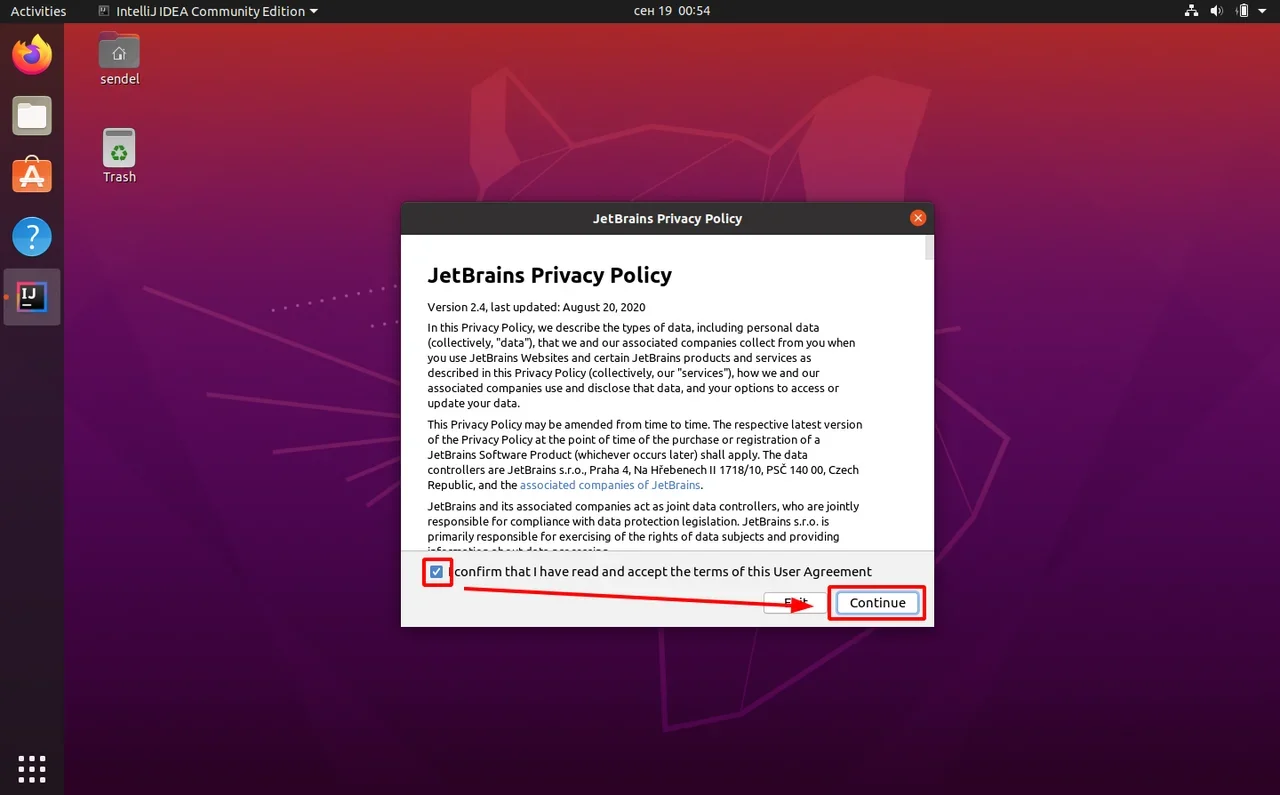
При первом запуске принимаем пользовательское соглашение и нажимаем Continue (Продолжить):
Далее выбираем тему оформления (доступны тёмная и светлая):
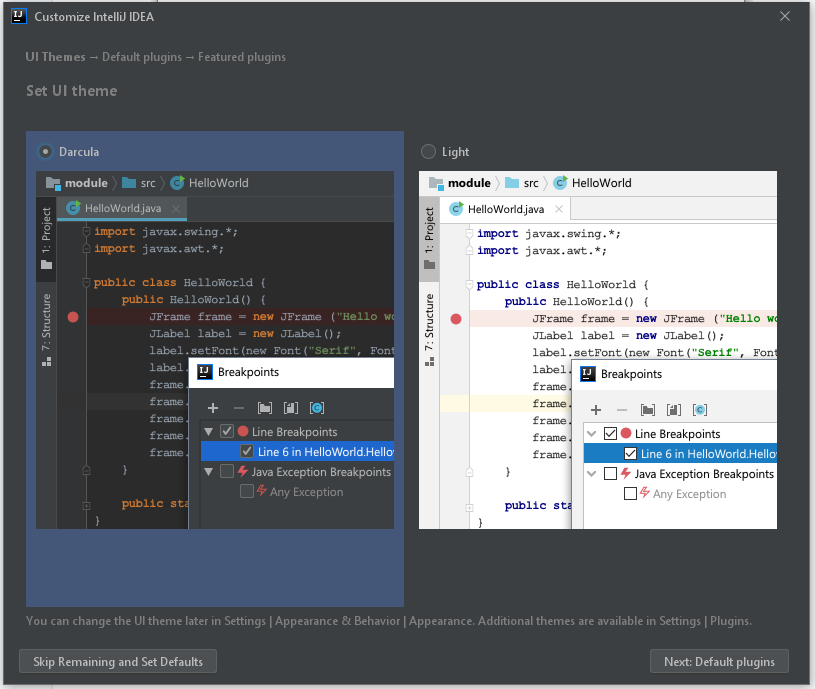
Жмём Next: Default plugins и переходим к выбору устанавливаемых плагинов:
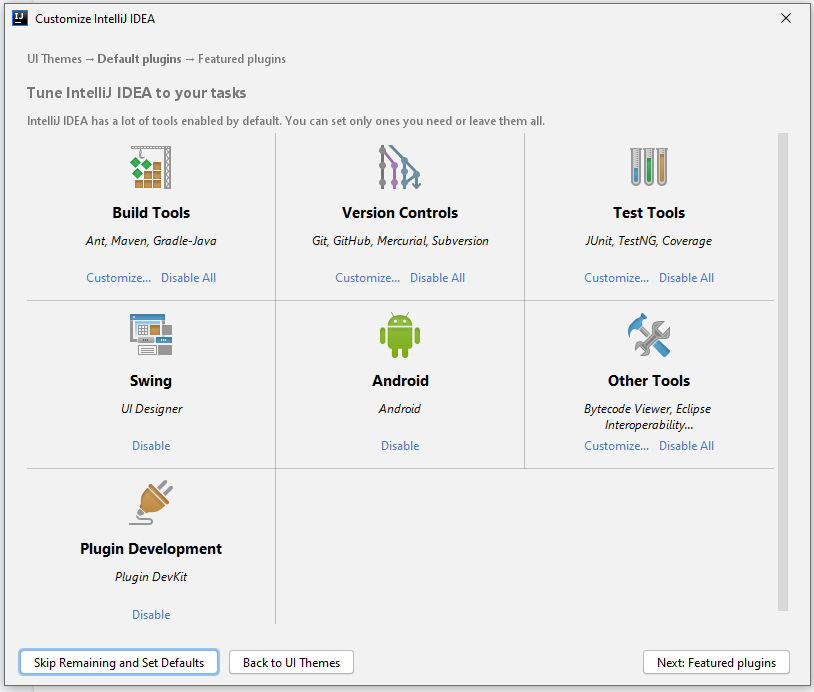
Если не знаете, что вам точно пригодится, — оставляйте всё как есть. А если, например, с Андроидом вам не работать — выключите соответствующий пункт.
Не волнуйтесь, если надобавляете лишнего или о чём-то забудете. Всё можно будет переиграть — в настройках среды.
После чего нажмите на кнопку Next: featured plugins и выберите другие нужные плагины (или оставляйте всё по умолчанию):
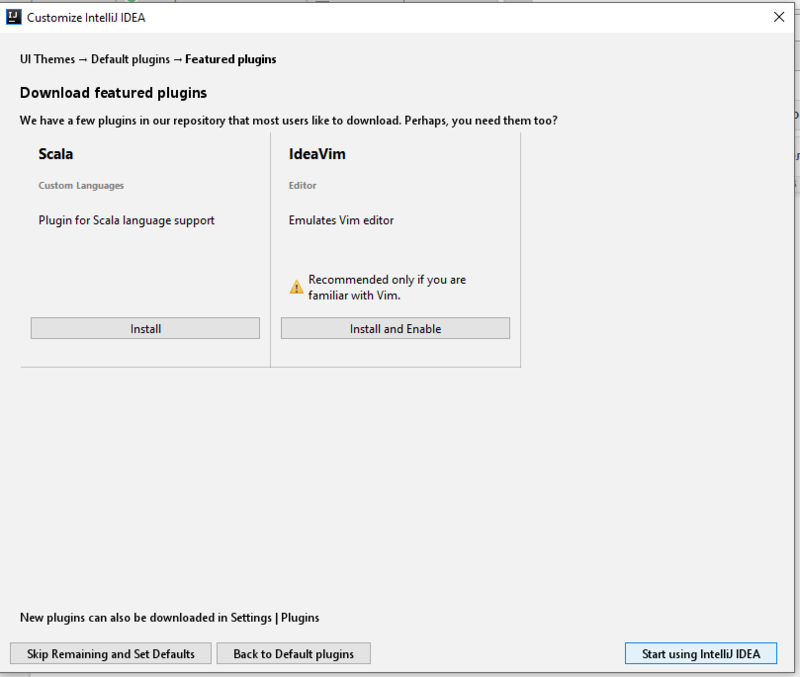
И наконец, нажимаем Start using IntelliJ IDEA.
Вас встретит начальный экран среды разработки (Welcome screen). Здесь можно создать новый проект, открыть или импортировать существующий, а также скачать проект из системы контроля версий:
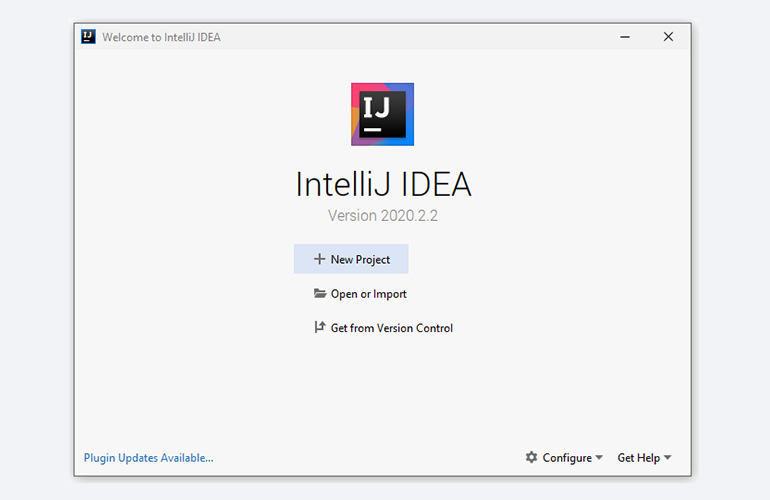
Если вы видите такой же экран — поздравляю, установка и настройка прошли успешно! Приятного обучения!
Здесь всё даже легче, чем в Windows. Для начала качаем версию для macOS отсюда (о различии между редакциями Community и Ultimate читайте выше — в пункте про установку на Windows):
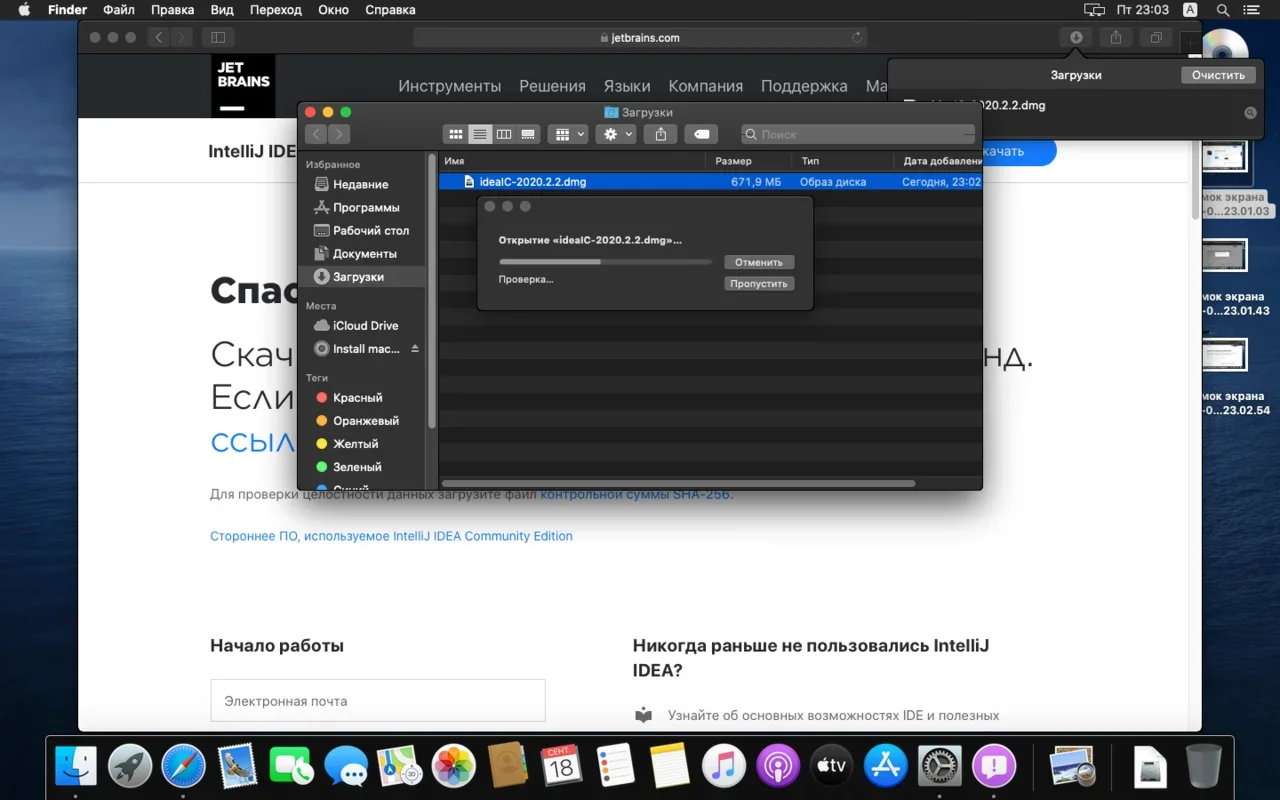
Открываем скачанный файл .dmg:
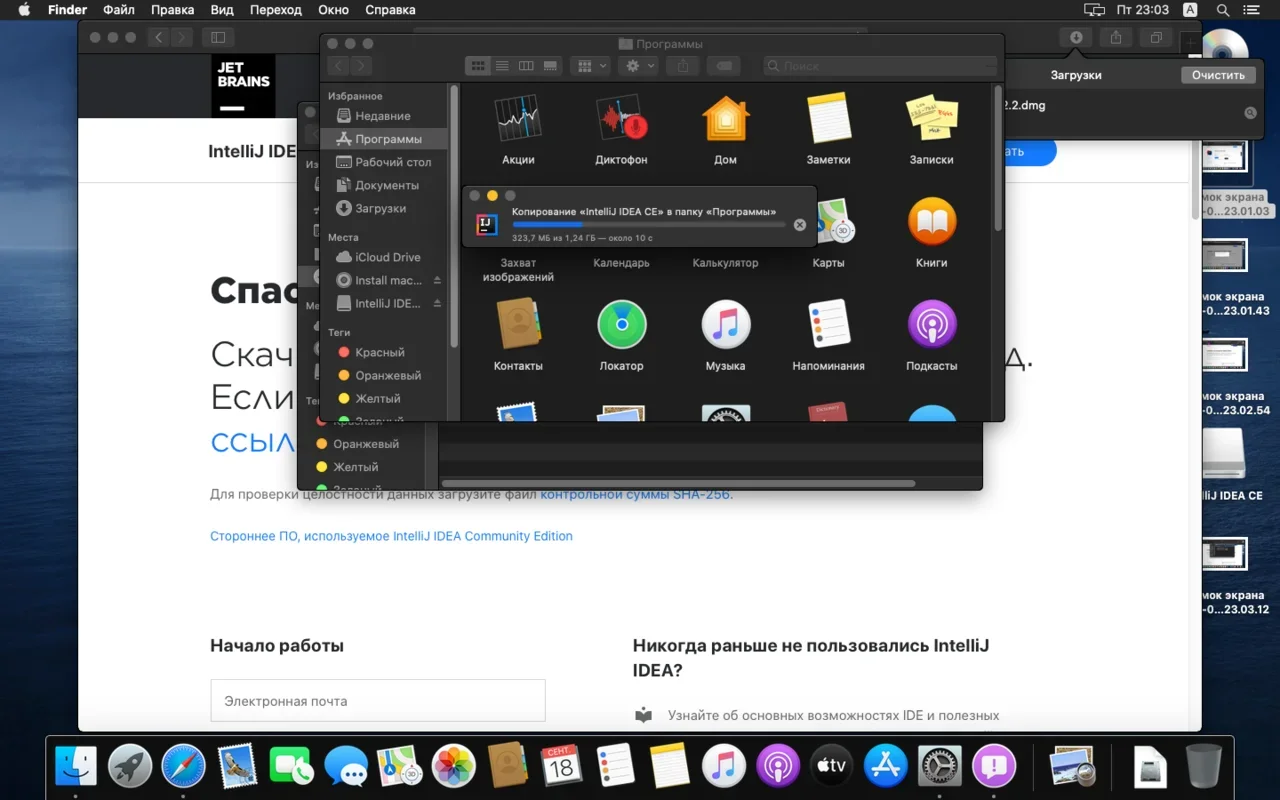
Копируем файл в «Программы»:
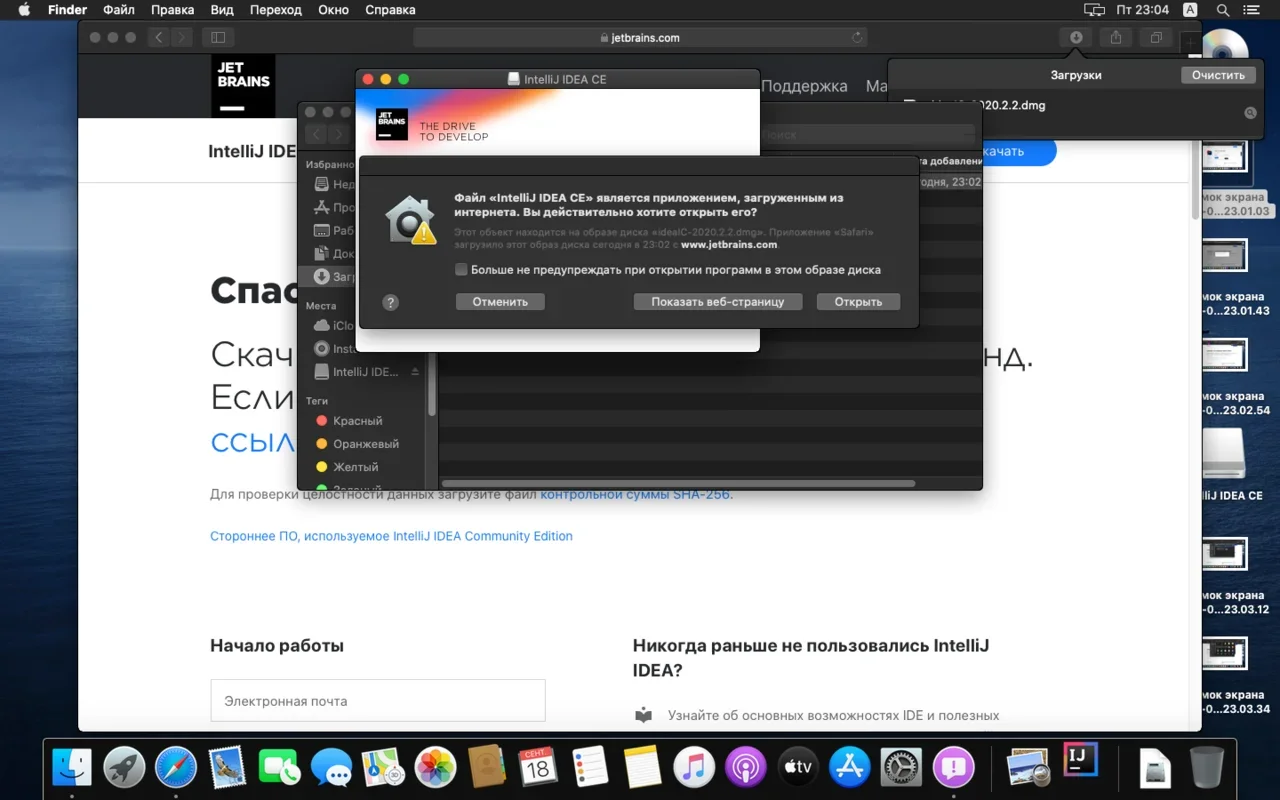
Читаем предупреждение ОС и жмём «Открыть»:
Принимаем пользовательское соглашение и жмём кнопку Continue (Продолжить):

Теперь приложением можно пользоваться. Приятного обучения!
Для установки IntelliJ IDEA открываем Центр приложений Ubuntu:
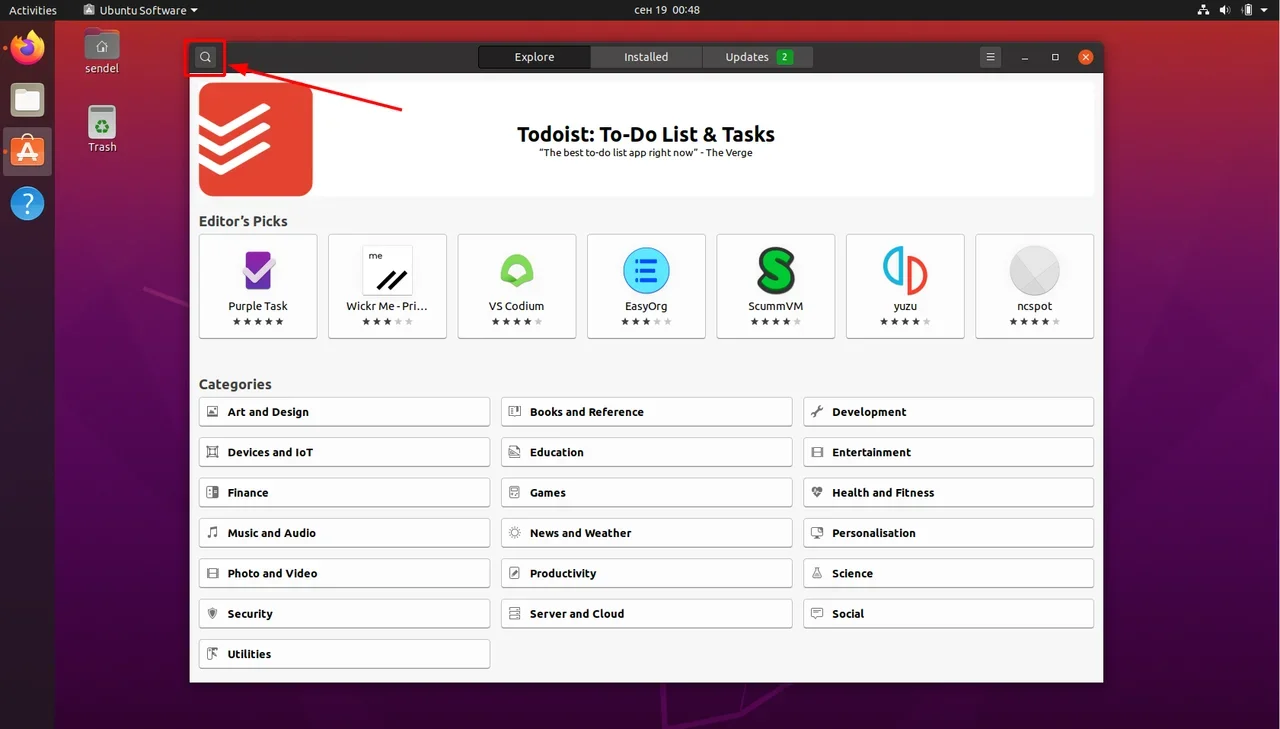
Вводим в поиск слово «Intellij» (без кавычек). Нам нужна IDEA Community (о различии между редакциями Community и Ultimate читайте выше — в пункте про установку на Windows):
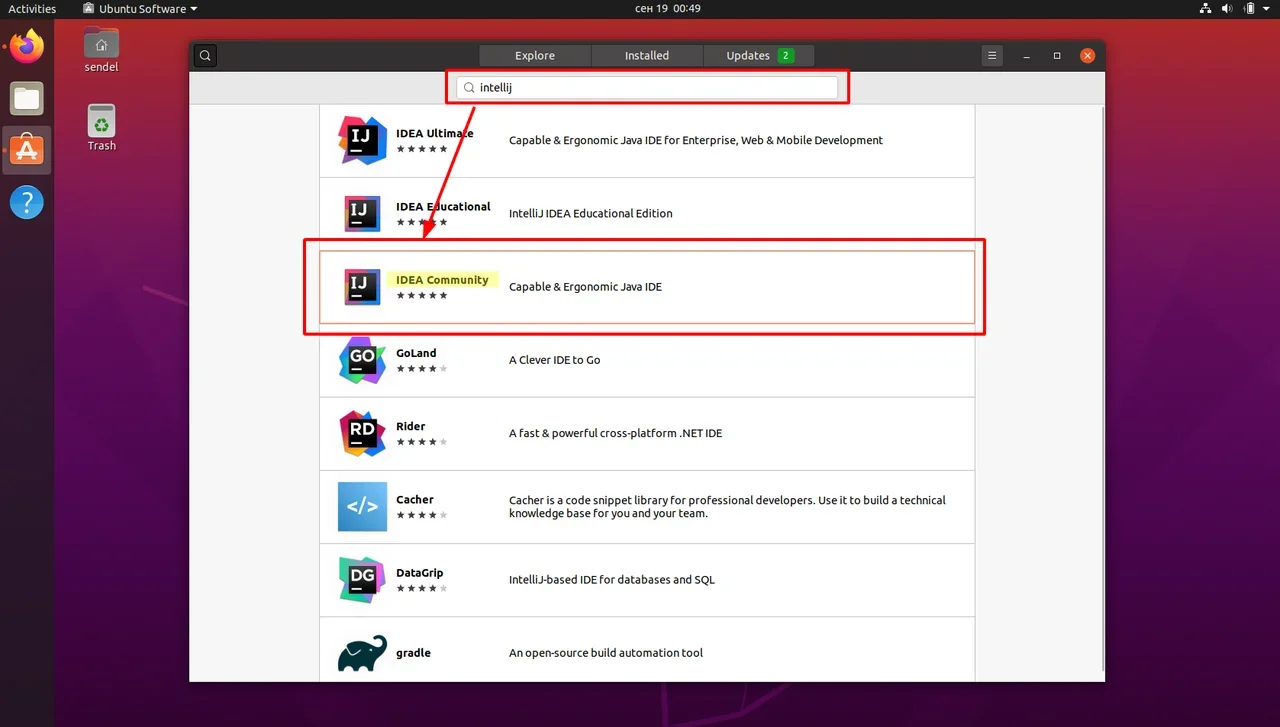
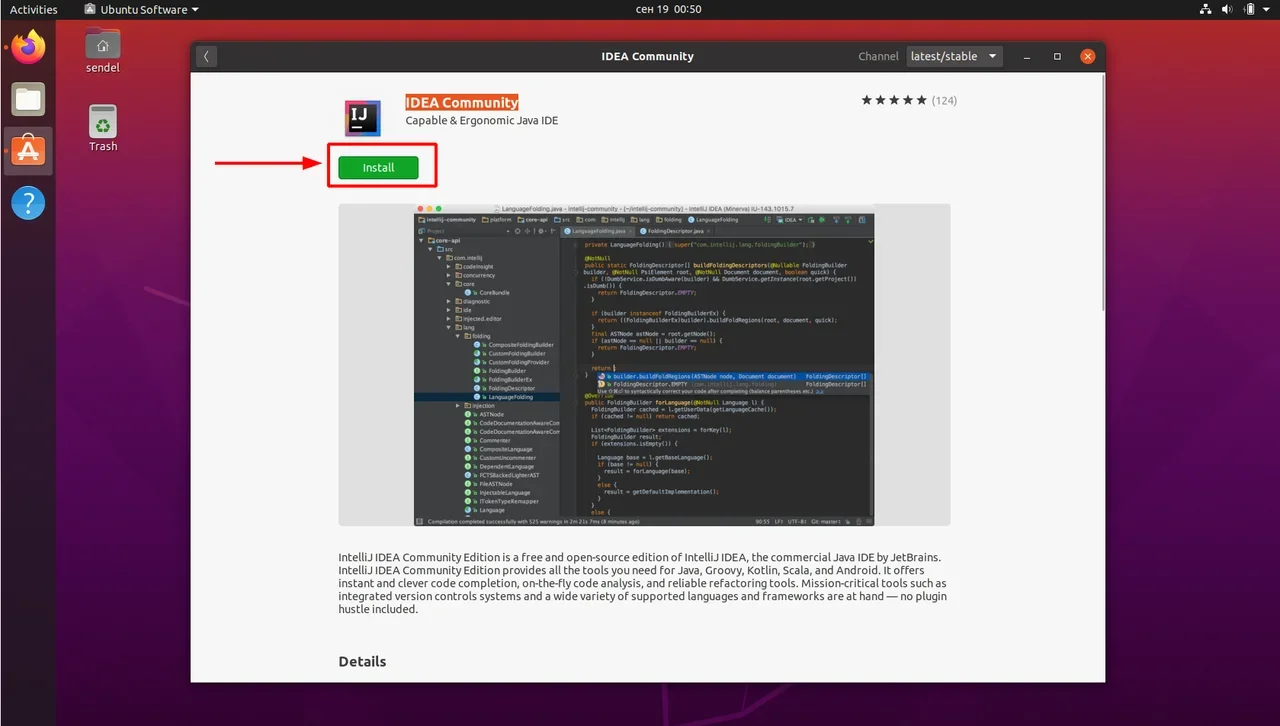
Выбираем версию и нажимаем кнопку Install (Установить):
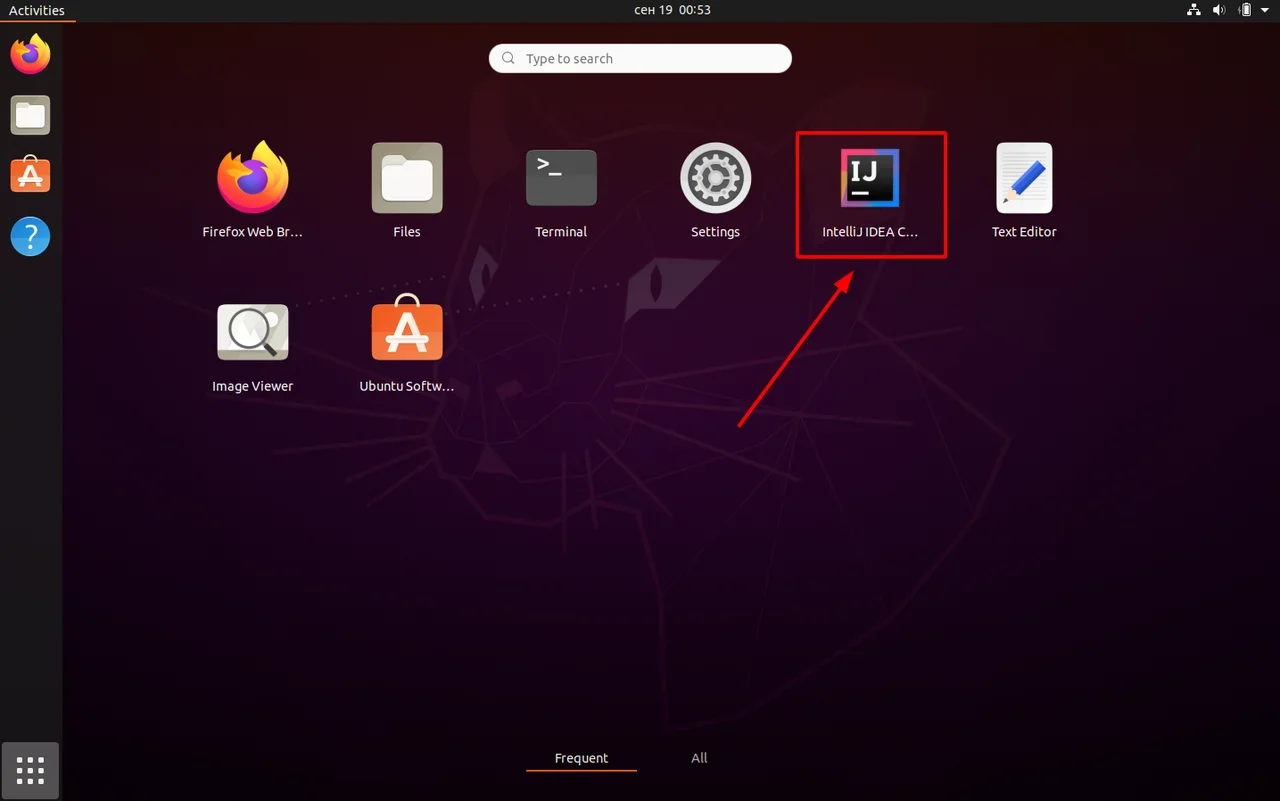
После установки видим IDEA в меню программ:
Запускаем, принимаем пользовательское соглашение и нажимаем кнопку Continue (Продолжить):
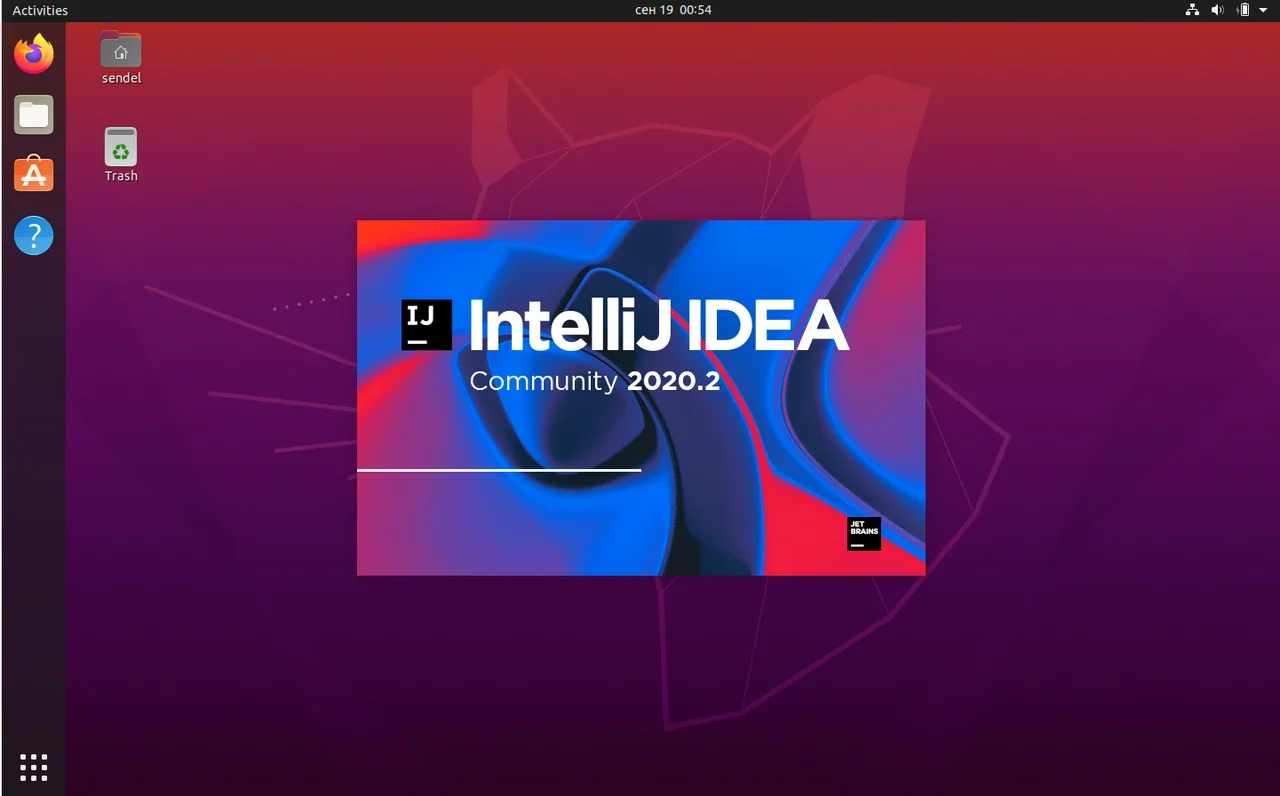
Вы увидите экран загрузки:
Далее вас встретит начальный экран (Welcome screen). Здесь можно создать новый проект, открыть или импортировать существующий, а также скачать проект из системы контроля версий.
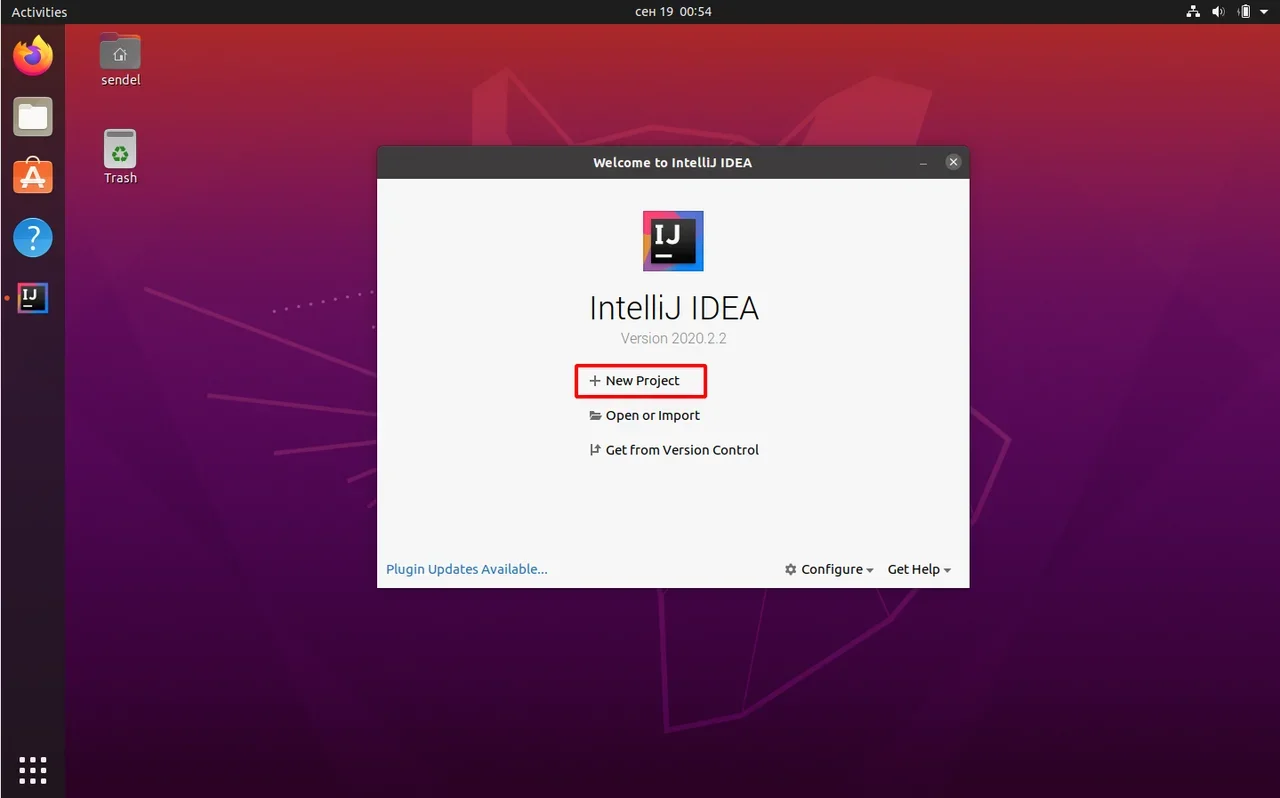
Если вы видите такой же экран — поздравляю, установка и настройка прошли успешно! Приятного обучения!

Курс с трудоустройством: «Профессия Java-разработчик»
Узнать о курсе
The Java Development Kit (JDK) is a set of software tools for developing Java applications. The toolkit includes a compiler for converting Java code into bytecode, a collection of class libraries, documentation for integrating Java APIs, and the Java Runtime Environment (JDE) for executing Java code.
The JDK provides developers the resources they need to create Java applications and applets in one neat package.
Find out how to install the Java Development Kit on Windows.
Prerequisites
- A system running Windows 10.
- A network connection.
- Administrator privileges.
Note: Develop your core app services on PNAP’s Bare Metal Cloud servers to ensure superior performance. It is cloud native and the perfect environment for the entire SDLC.
Check if Java Is Installed
Multiple Java versions on the same system can cause conflicts, as applications may attempt to use different versions. Additionally, outdated versions can pose significant security risks over time.
Before installing the latest Java Development Kit, check if a Java version is already installed on Windows:
1. Type cmd in the Windows search bar.
2. Open the command prompt.
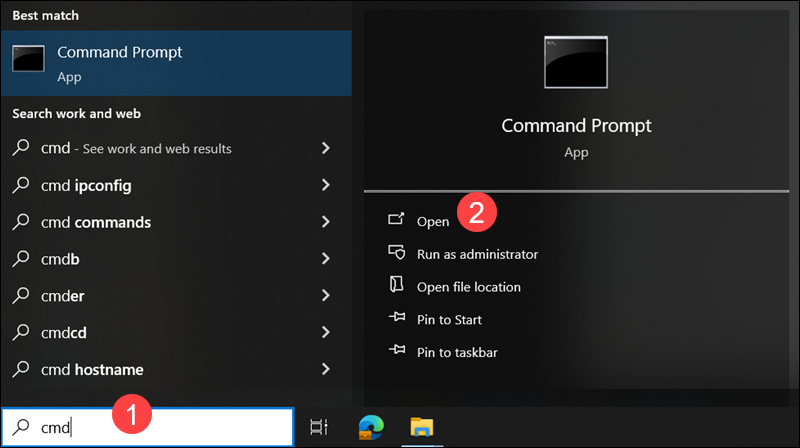
3. Enter the following command to check the Java version in Windows:
java -version
In this example, the message states that Java is not recognized as an internal or external command, which indicates that Java is not installed. If the system displays a Java version number, remove the old Java installation before proceeding.
Download Java for Windows 10
OpenJDK is an open-source project that provides source code for implementing the Java platform. Many companies, including Oracle, offer distributions of OpenJDK in the form of installers or binaries.
Note: While OpenJDK and Oracle JDK are similar in build, keep in mind that Oracle JDK is a commercial product and that Oracle offers paid support plans.
To download the latest Java Development Kit installation file for Windows 10:
1. Open a web browser and navigate to the Oracle Java Downloads page.
2. Select the latest JDK version. In this example, the latest available version is JDK 21.
3. Access the Windows tab.
4. Click the x64 Installer download link.
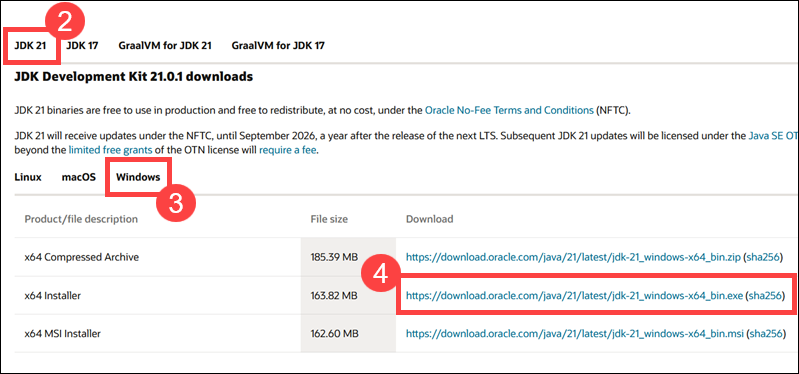
Wait for the download to complete.
Install Java on Windows 10
To install Java on your Windows system:
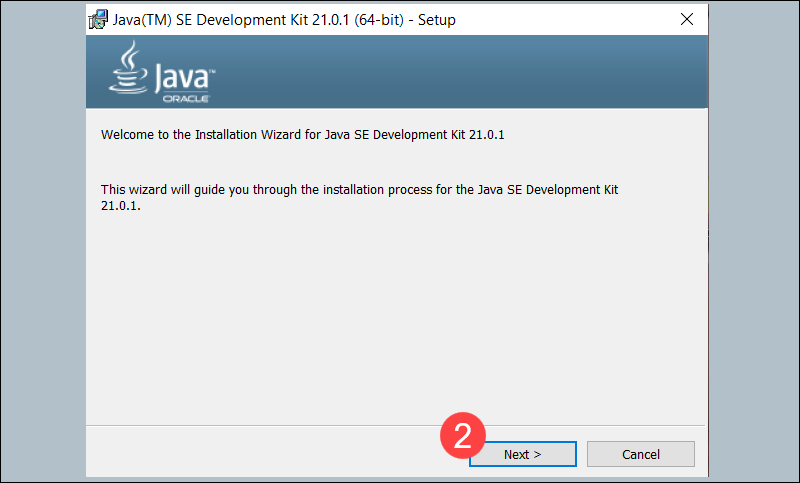
1. Double-click the downloaded Java file to start the installation.
2. Once the installation wizard welcome screen appears, select Next to proceed.
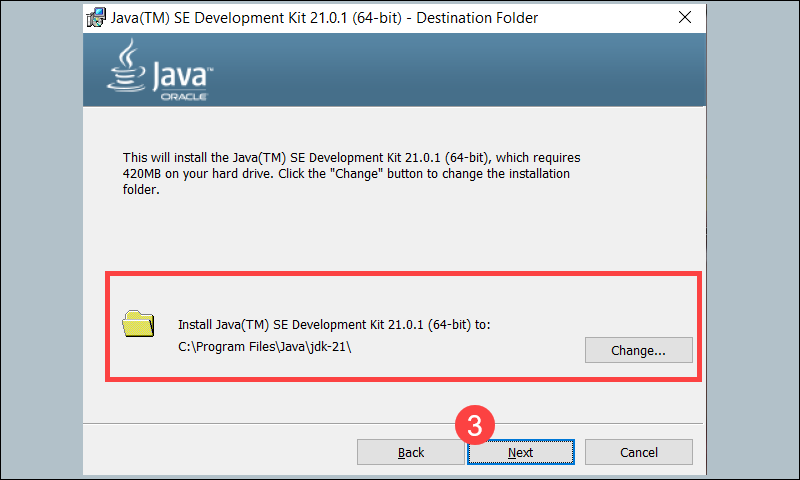
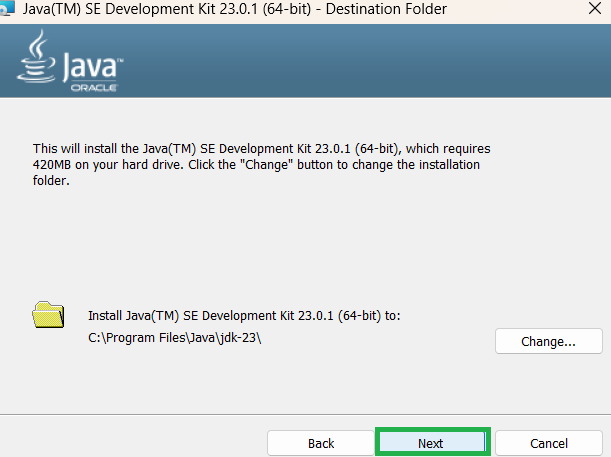
3. Choose the destination folder for the Java installation files, or stick to the default path and click Next.
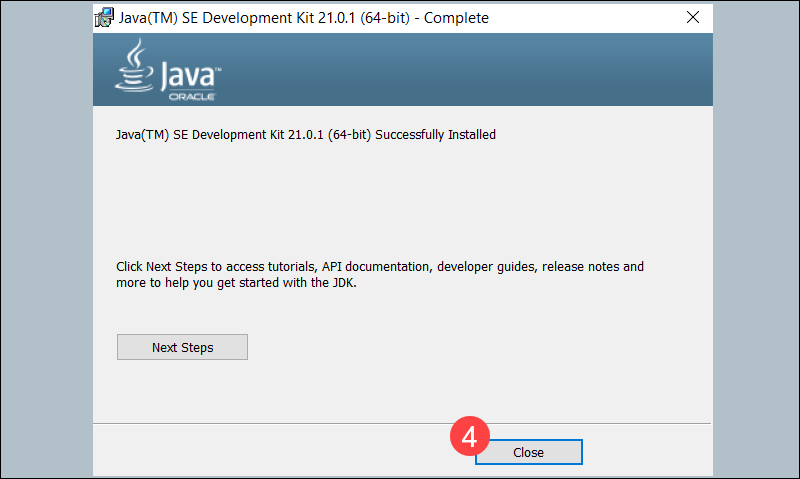
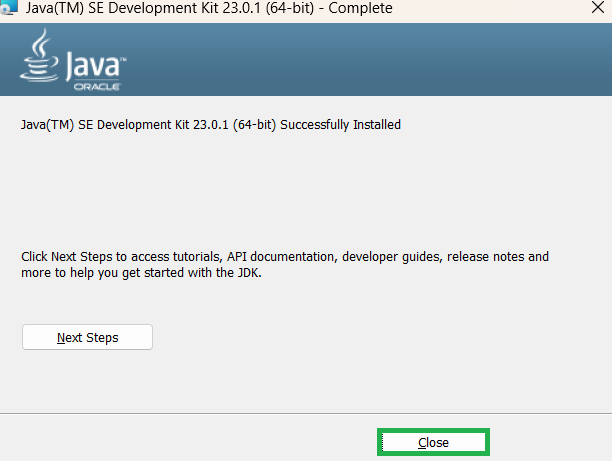
4. The installation process is complete when the Successfully Installed message appears. Click Close to exit the wizard.
You have successfully installed JDK 21 on your Windows system. To enable program compiling from any directory, you must set up Java environment variables.
Set Environmental Variables in Java
Follow the steps in the sections below to configure Java environment variables in Windows.
Step 1: Add Java to System Variables
This step ensures that Java is accessible from the command line in any directory.
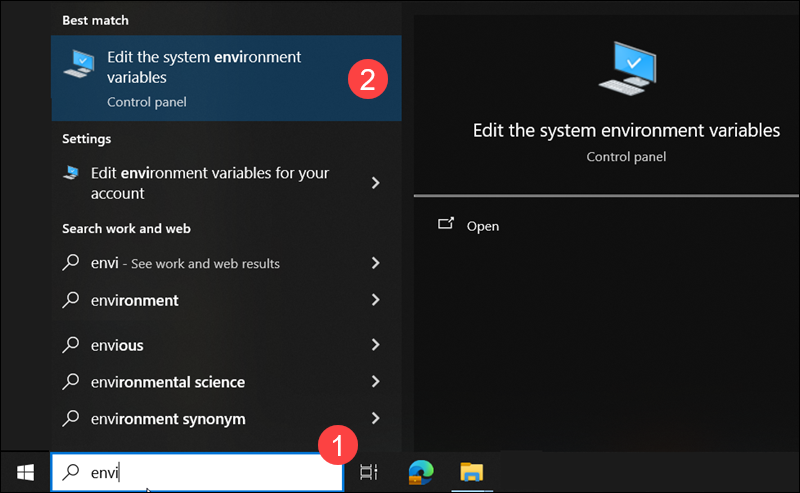
1. Open the Start menu and search for environment variables.
2. Select Edit the system environment variables.
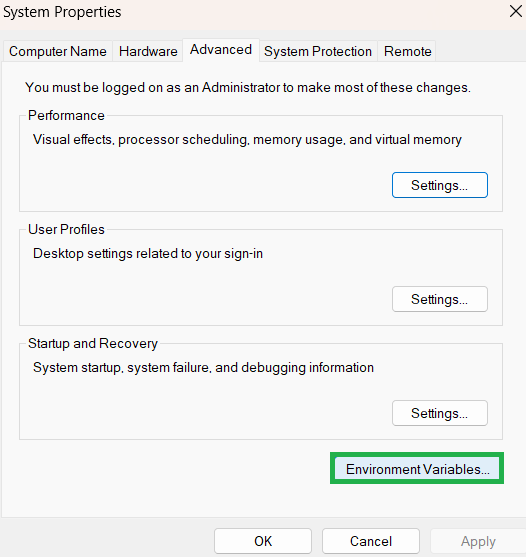
3. Select Advanced in the System Properties window.
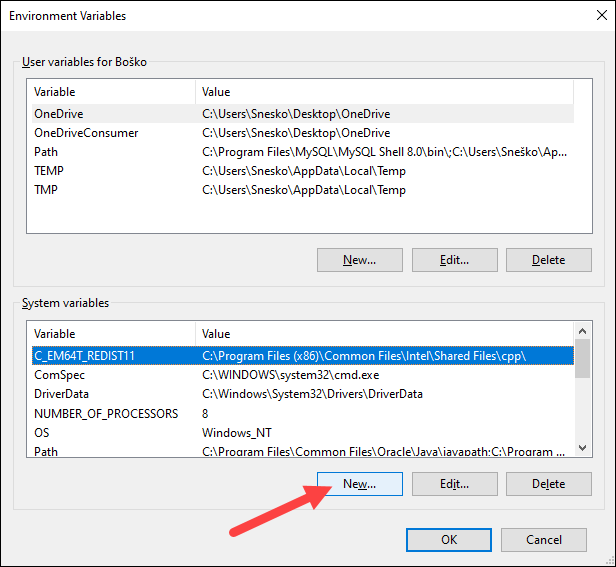
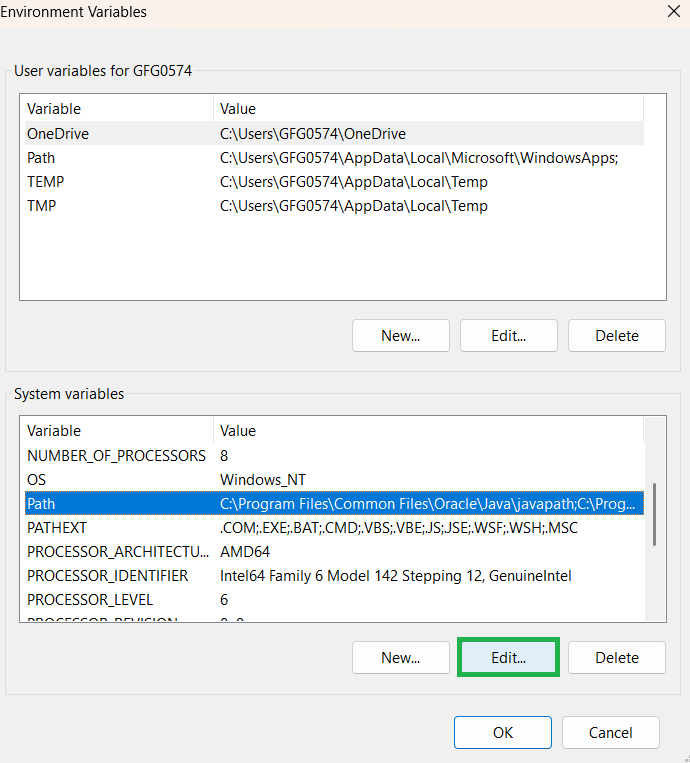
4. Click Environment Variables.

5. Select the Path variable in the System variables category and click Edit.

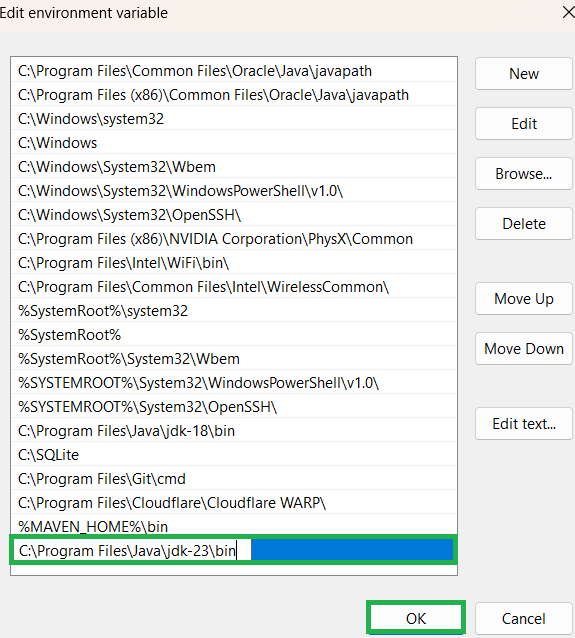
6. Click New.
7. Enter the path to the Java bin directory.
8. Click OK to save the changes and exit the variable editing window.
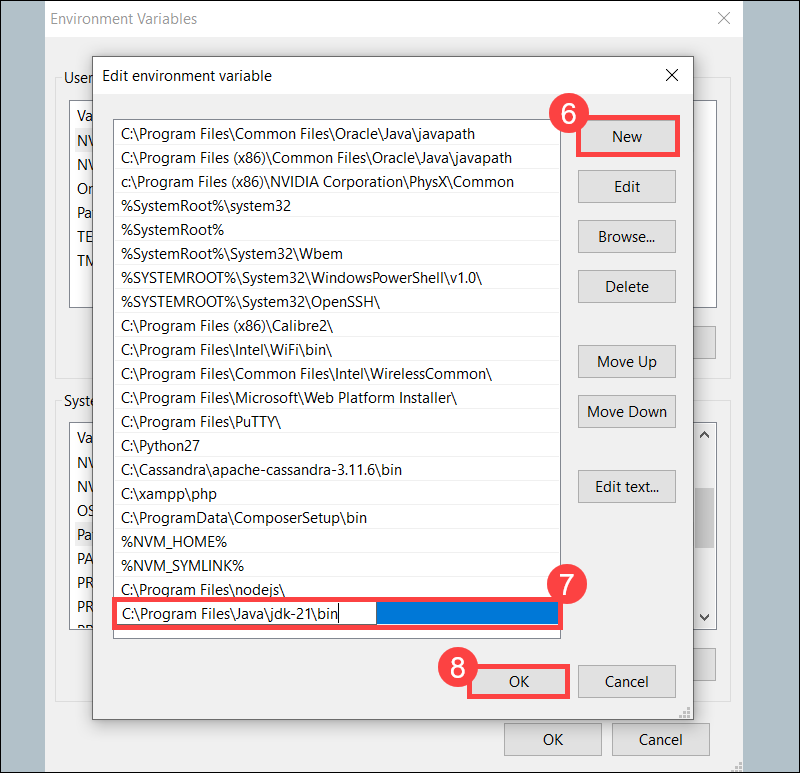
Note: The default path for JDK 21 is C:\Program Files\Java\jdk-21\bin.
Step 2: Add JAVA_HOME Variable
Some applications require the JAVA_HOME variable to point to the JDK installation directory. Follow the steps below to create the variable:
1. Click New under the System variables category to create a new variable.
2. Name the variable JAVA_HOME.
3. Enter the path to your Java JDK directory in the variable value field.
4. Click OK.

Confirm the changes by clicking OK in the Environment Variables and System properties windows.
Test Java Installation
Verify that Java is installed by entering the java -version command in the command prompt:

If installed correctly, the command outputs the Java version. To ensure everything works, write and compile a simple Java program by following the steps in the sections below.
Step 1: Write Test Java Script
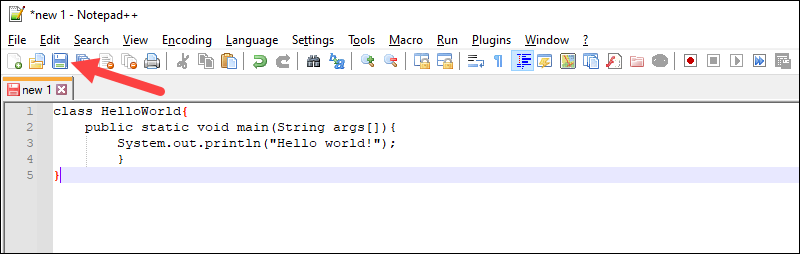
1. Open a text editor like Notepad or Notepad++ and create a new file.
2. Enter the following code and click Save:
class HelloWorld{
	public static void main(String args[]){
		System.out.println("Hello world!");
		}
}
3. Name the file and save it as a Java source file (*.java).
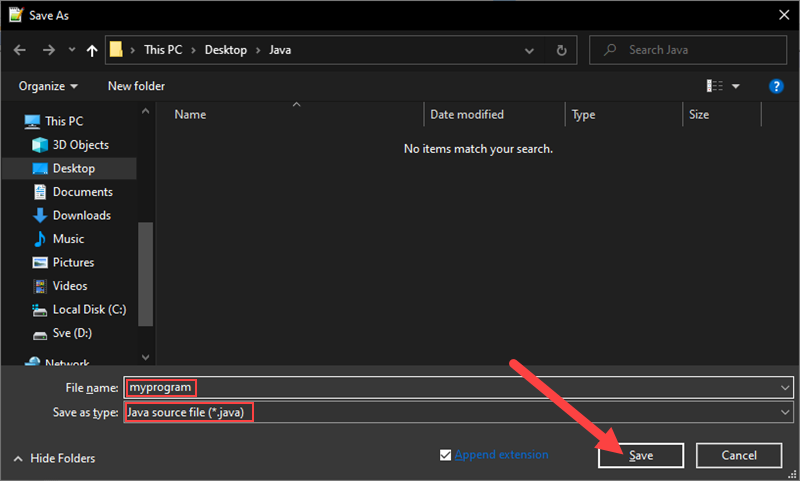
Note: When using Notepad, select All files for the Save as type option and add the .java extension to the file name.
Step 2: Compile Test Java Script
Access the Windows command prompt and complete the following steps:
1. Navigate to the directory where your Java file is saved.
2. Use the following command to compile the program:
javac myprogram.javaReplace myprogram.java with your file name.

After a successful compilation, the program generates a .class file in the same directory.
2. Run the program using the following syntax:
java HelloWorld
The output shows that the program runs correctly, displaying the Hello world! message.
Conclusion
This tutorial showed how to install the Java Development Kit on a Windows system and provided an example Java sricpt.
To learn more about Java, read our list of best Java IDEs or learn how to convert string to integer in Java.
Was this article helpful?
YesNo
Java is a versatile programming language widely used for building applications. To start coding in Java, you first need to install the Java Development Kit (JDK) on your system. This article provides detailed steps for installing Java on Windows 7, 8, 10, 11, Linux Ubuntu, and macOS.
Download and Install Java – Windows Operating System
Here, we will discuss how to download and install Java on a Windows 64-bit Machine and set up the environment to run the first Java program on the command prompt. The process is the same for all Windows i.e. 7, 8, 10, and 11.
Step 1: Visit the official Oracle website https://www.oracle.com/in/java/. Click on the “Download Java” icon as shown in the below image.

Step 2: Now you can see the latest version is JDK 23 and there are options for Linux, macOS, and Windows. Click on the Windows option and then click the x64 Installer option to download the .exe file for 64-bit Windows OS.
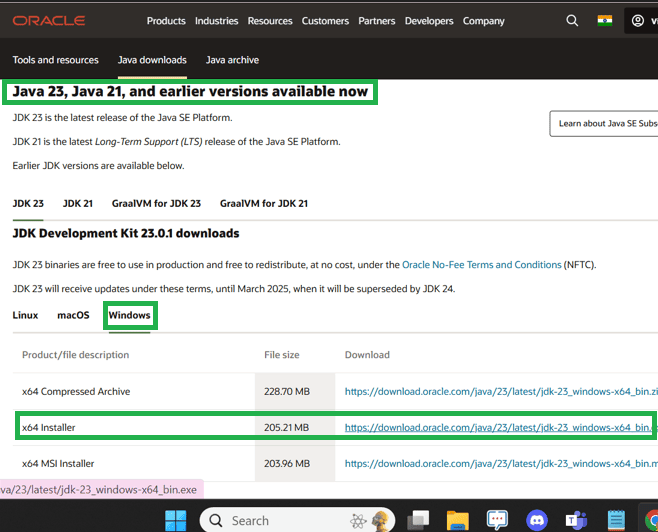
You can simply use this link to download Java for Windows 64 Bit. After successfully downloading JDK 23, now we need to install the Java on our Windows System.
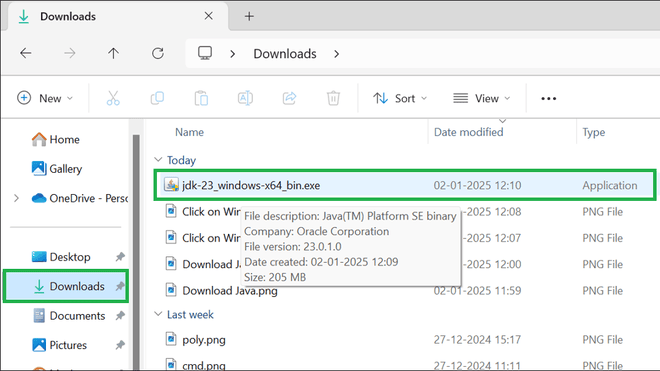
Step 3: Go to Downloads and double-click on that downloaded jdk-23_windows-x64_bin.exe file. So now Java Installation Wizard get open and then click Next button.
Again click on the Next button to install JDK.
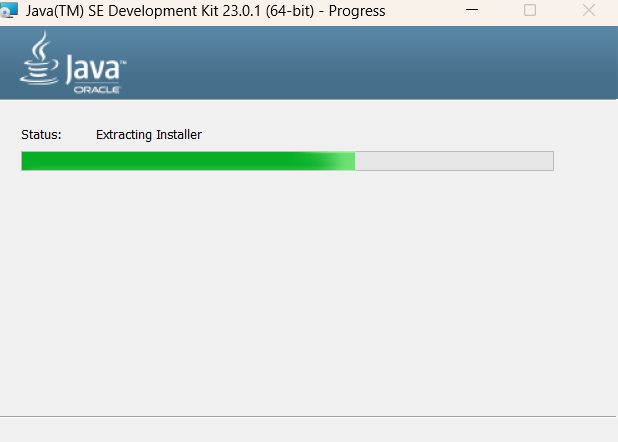
The installation will begin as shown below:
The Java installation is successfully completed as shown below. Now click on “close” to finish.
Step 4: Now we will set the environment variables for Windows OS. Open the C drive, go to Program Files > Java > jdk-23 (or your installed version) > bin folder. Now, copy the path and we will use this path when configuring the environment variables.

Search for environment variable on your system, then click on the Environment Variables button.
In the system variable section, select the path variable and then click the option Edit.
Paste the path that copied earlier, and click OK to save the changes.
Step 5: Verify the Installation. Open command prompt and type the below command to verify the Java version that is installed in the system.
java –version

Now let us run our first Java program, to do this, follow the below steps:
Step 1: Open any Drive, and in the drive, create a text file and then change the file name with .java extension as shown below:
file.java
Step 2: Now, write a simple Java code in notepad.
- Right-click on the
file.javaand then select open with > Notepad. - Inside the file, write the Java code.
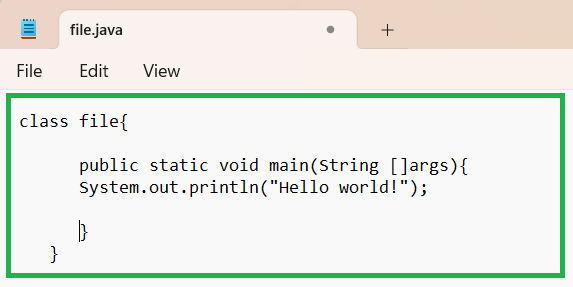
Important Point: In Java, the class name should be equivalent to the file name. In this case, the file name is
file.java, so the class name inside the file should befile.
Step 3: Now, go to the directory where your Java file is saved.
Open command prompt and navigate to the D drive, where the file.java is located. To do this, type “dir” as shown below:
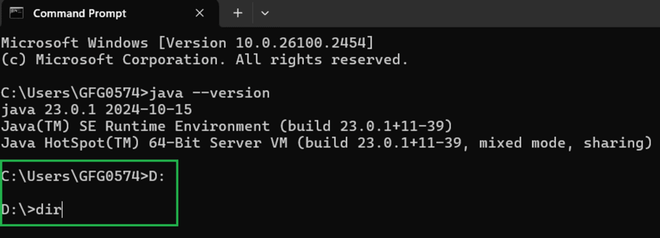
Step 4: The dir command display all the contents of the directory.
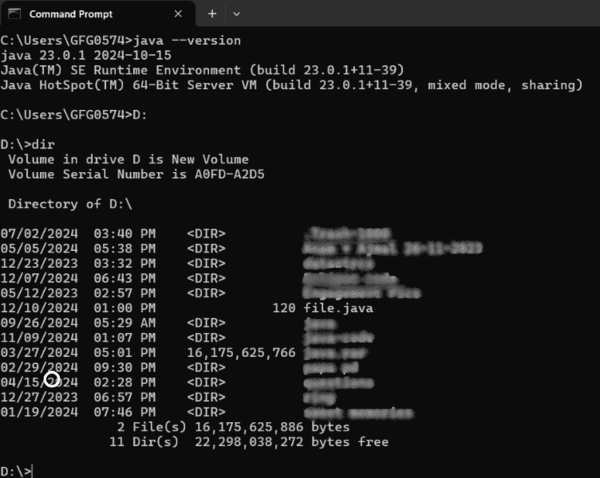
Step 5: Compile the Java program. The javac command is used to compile the Java program.
Syntax:
javac filename.java
To run the program use the below command:
java filename
Here, in this case the filename is file.
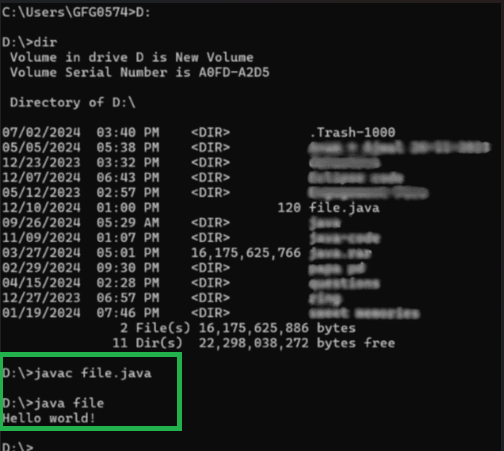
We have successfully run our first Java program on Windows OS.
Download and Install Java – Linux
Step 1: Visit the official oracle website https://www.oracle.com/in/java/.
- You will need to accept the terms of Oracle’s license agreement before downloading.
- On the download page, accept the Oracle Binary Code License Agreement for Java SE.
- Select the Linux version.
- If you are using a standard 64-bit system, select the file for
x64architecture. If you are using an ARM-based system, select the file forarm64. - Download the
.tar.gzfile for Linux.
This is the format used for installing Java on most Linux systems.
Step 2: Now, open the terminal on your Linux system and navigate to the folder where you downloaded the file.
cd ~/Downloads
Use the below command to extract the contents of the .tar.gz file.
tar -xvzf jdk-23_linux-x64_bin.tar.gz
Move the extracted folder to the /opt directory:
sudo mv jdk-23 /opt/
Step 3: After Installation, you need to set up the environment variable for Linux.
Open the terminal and type the below command to open the shell configuration file.
nano ~/.bashrc
Add the following lines at the end of the file.
export JAVA_HOME=/opt/jdk-23
export PATH=$JAVA_HOME/bin:$PATH
Apply the changes by running the below command:
source ~/.bashrc
Step 4: Now, verify the installation on Linux by running the below command:
java –version
The installed Java version on Linux will be displayed.
Download and Install Java – macOS
Step 1: Visit the official oracle website https://www.oracle.com/in/java/. Select the macOS version and download the .dmg file.
Step 2: Now open the .dmg file and double-click the installer package (.pkg) to begin the installation process. Then follow the instructions to complete the installation.
Step 3: Setting the environment variable on macOS is optional, but it is recommended, if you want to use Java for development purposes (e.g., running Java-based applications, using tools like Maven or Gradle).
To set the environment variable foe macOS, open the Terminal and edit the shell configuration file (e.g., .zshrc):
nano ~/.zshrc
Add the following lines at the end of the file to set the Java_Home.
export JAVA_HOME=$(/usr/libexec/java_home)
export PATH=$JAVA_HOME/bin:$PATH
Save and close. To apply the changes, run the following command:
source ~/.zshrc
After these steps, Java should be installed and ready to use on your macOS system.
Step 4: Now open the terminal and run the below command to verify the Java version on macOS:
java –version
You will see an output showing the latest Java version that you have installed on your macOS system.
Последнее обновление: 23.03.2024
Для разработки программ на Java нам потребуется специальный комплект для разработки JDK
(Java Development Kit). JDK включает ряд программ и утилит, которые позволяют компилировать, запускать программы на Java,
а также выполнять ряд других функций.
JDK от Oracle для Windows (x64), Linux (x64, ARM64) и MacOS (x64, ARM64) доступны по адресу https://www.oracle.com/java/technologies/downloads/
OpenJDK для Windows (x64), Linux (x64, ARM64) и MacOS (x64, ARM64) доступны по адресу https://jdk.java.net/21/
OpenJDK предоставляет только архивы, Oracle также предоставляет установочные пакеты. Рассмотрим установку JDK для различных систем.
Установка на Windows
Установка с помощью установщика
Наиболее распространенный вариант установки JDK на Windows — это применение установщика с официального сайта Oracle. В частности, перейдем на страницу:
https://www.oracle.com/java/technologies/downloads/#jdk22-windows
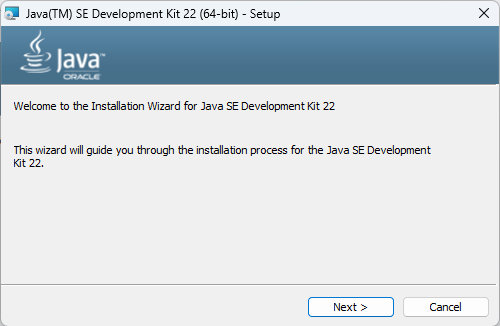
Нажмем на кнопку Next. На следующем экране необходимо указать, в какую папку будет производиться установка:
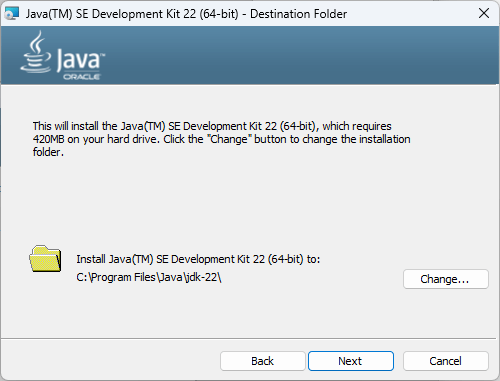
Оставим выбор папки по умолчанию и нажмем на Next для выполнения установки.
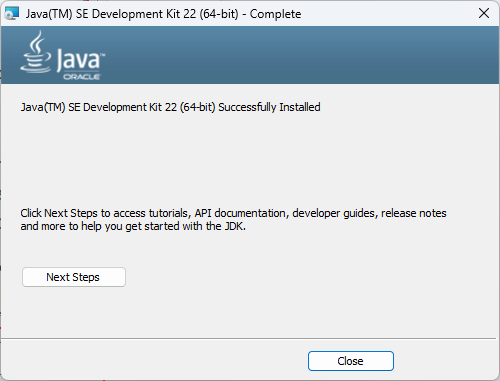
После завершения установки JDK мы увидим вот такое окно:
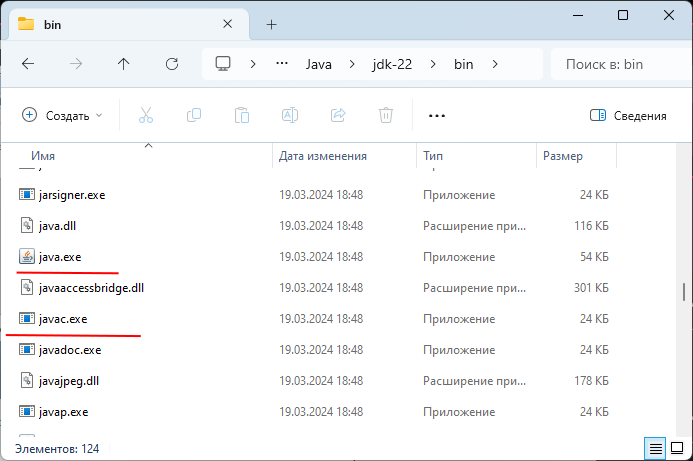
При установке JDK все файлы по умолчанию помещаются в каталог C:\Program Files\Java\jdk-[номер_версии] (если при установке не было изменено расположение).
Так, если мы откроем в нем подкаталог bin, то мы сможем увидеть в нем ряд утилит.
Нас прежде всего интересует утилита компилятора javac и утилита java.exe. javac компилирует код на языке Java в бинарный файл, а
java.exe позволяет запускать скомпилированный файл:
Установка через пакетный менеджер
Через пакетный менеджер winget также можно установить OpenJDK от Microsoft. Для этого в командной строке/PowerShell надо выполнить команду:
winget install Microsoft.OpenJDK.21
В данном случае устанавливается 21-версия JDK.
Установка на Linux
Если мы используем JDK от Oracle, то в данном случае нам доступен ряд вариантов установки. В частности, перейдем на страницу:
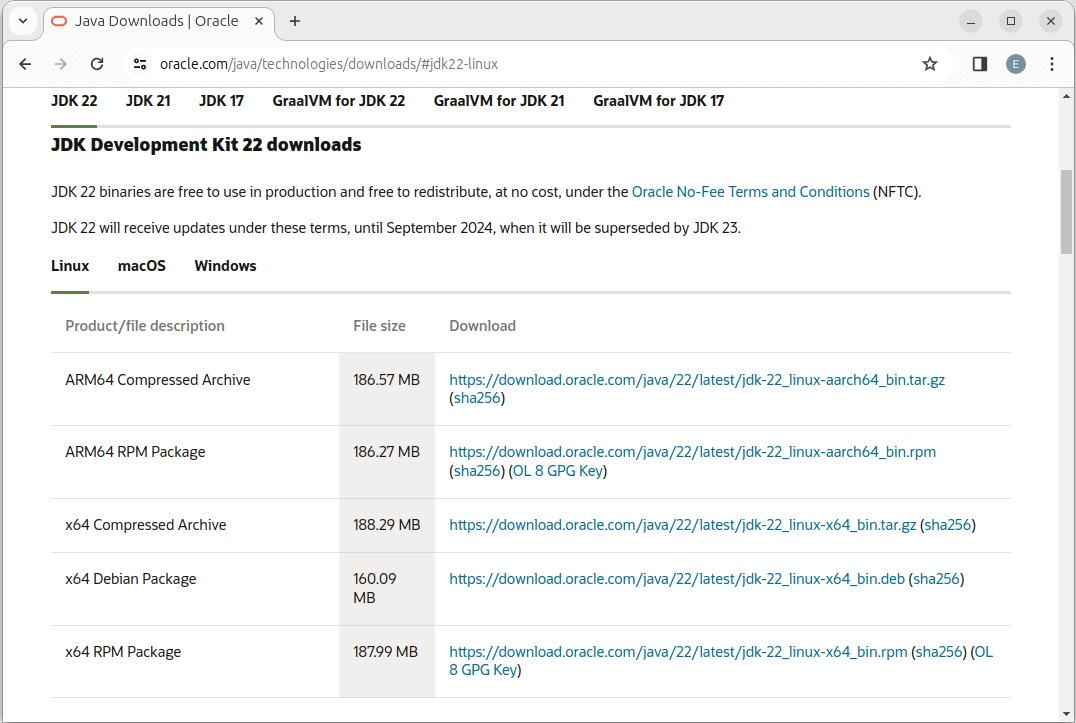
https://www.oracle.com/java/technologies/downloads/#jdk22-linux
-
ARM64 Compressed Archive: архив для систем на архитектуре ARM64
-
ARM64 RPM Package: RPM-пакет для систем на архитектуре ARM64, которые для управления пакетами применяют RPM (например, Fedora, Suse и т.д.)
-
x64 Compressed Archive: архив для систем на архитектуре Intel x86-64
-
x64 Debian Package: Debian-пакет для систем на архитектуре Intel x86-64 (например, Ubuntu, Debian и т.д.)
-
x64 RPM Package: RPM-пакет для систем на архитектуре Intel x86-64, которые для управления пакетами применяют RPM (например, Fedora, Suse и т.д.)
Если наша операционная система Ubuntu (на платформе Intel x86-64), то выберем пункт x64 Debian Package, и нам загрузится debian-пакет (в моем случае файл «jdk-22_linux-x64_bin.deb»).
Для его установки выполним команду
sudo dpkg -i jdk-22_linux-x64_bin.deb
Если у нас операционная система, которая для управления пакетами применяет RPM, например, Fedora, Suse и др, на платформе Intel x86-64,
то необходимо выбрать пункт x64 RPM Package. И затем установить загруженный пакет командой
sudo rpm -ivh jdk-22_linux-x64_bin.rpm
Если у нас ОС Fedora, Suse и др, на платформе ARM64, то необходимо выбрать пункт ARM64 RPM Package. И затем установить загруженный пакет командой
sudo rpm -ivh jdk-22_linux-aarch64_bin.rpm
Также для различных операционных систем в репозиториях могут быть доступны пакеты JDK для установки. Например, установка с помощью пакетного менеджера snap:
sudo snap install openjdk
Установка с помощью пакетного менеджера apt:
sudo apt install default-jdk
Установка определенной версии JDK с помощью пакетного менеджера apt:
sudo apt install openjdk-22-jdk-headless
В случае с установкой архивов все идентично для всех основных систем на базе Linux — загружается архив, распаковывается в определенное место. Затем в переменные среды добавляется путь к папке bin распакованного архива.
Установка Java на MacOS
Для установки Java на MacOS перейдем на страницу загрузок на сайте Oracle по адресу https://www.oracle.com/java/technologies/downloads/#jdk21-mac:
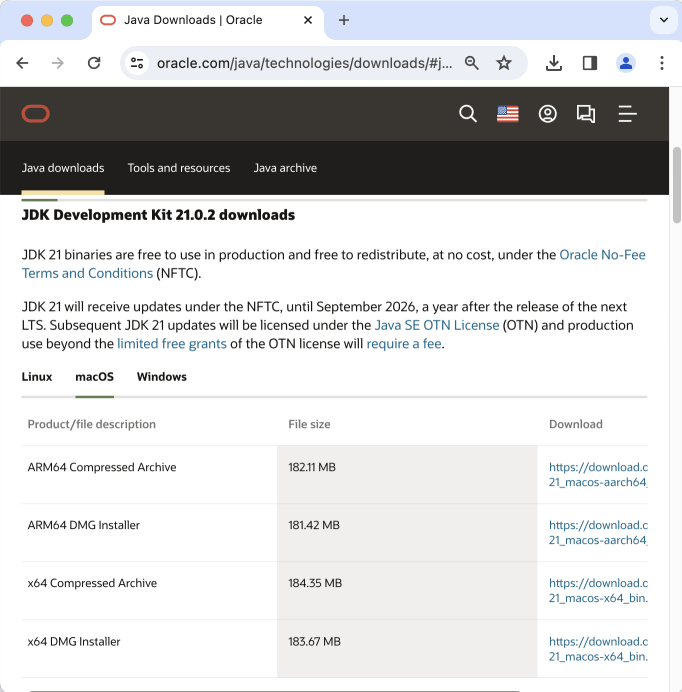
Здесь нам доступно 4 варианта пакетов:
-
ARM64 Compressed Archive: архивный пакет для MacOS на ARM
-
ARM64 DMG Installer: установщик для MacOS на архитектуре ARM
-
x64 Compressed Archive: архивный пакет для MacOS на архитектуре Intel x86-64
-
x64 DMG Installer: установщик для MacOS на архитектуре Intel x86-64
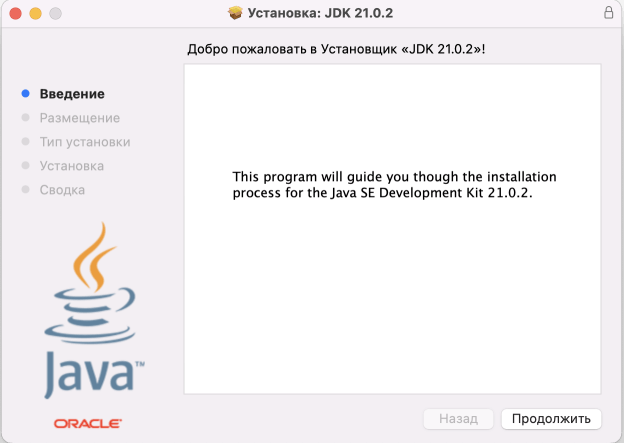
Загрузим и после загрузки запустим пакет установщика. Вначале нам отобразится приветственное окно.
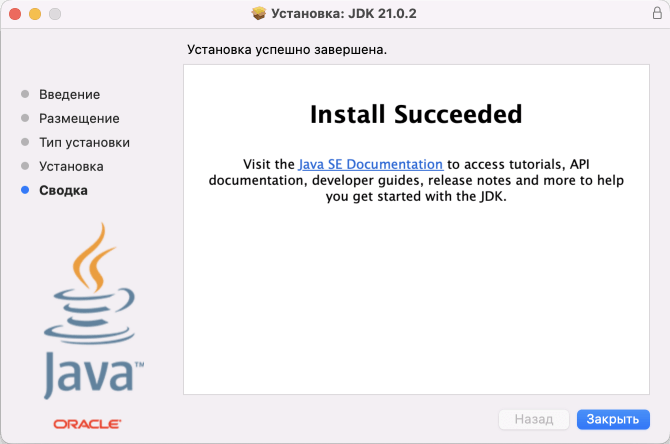
Далее на всех последующих шагах оставим все опции по умолчанию. И после установки нам отобразится окно об ее успешном окончании:
Проверка установки
После установки Java перейдем к командной строке/терминалу и для проверки версии введем команду
java -version
Консоль нам должна в ответ ввести номер только что установленной версии JDK (в моем случае 22-й версии):
java 22 2024-03-19
Java(TM) SE Runtime Environment (build 22+36-2370)
Java HotSpot(TM) 64-Bit Server VM (build 22+36-2370, mixed mode, sharing)
Итак, после установки JDK создадим первую программу на Java.