
Have a need to upgrade Windows to 64 bit from 32 bit in Windows 10/8/7 since your memory is not used? How to upgrade 32 bit to 64 bit? This post shows you some things that you should check out, as well as the way to perform Windows 64 bit upgrade.
Why Upgrade 32 Bit to 64 Bit in Windows 10/8/7
Microsoft offers both 32-bit and 64-bit versions of Windows 10/8/7. The 32-bit version is also known as the x86 version while the 64-bit version is known as the x64 version.
When installing Windows 7, 8 or Windows 10, you can choose to install 32-bit or 64-bit version of Windows. But most of you may choose to install the 64-bit version instead of the 32-bit version. If you have installed a 32-bit operating system, you may change it to a 64-bit system.
Why change 32 bit to 64 bit of Windows OS? This is because the 32-bit version is limited to 4GB of RAM (Ramdon Access Memory), which is a small amount these days when PCs usually have 8GB or more. If you installed many applications at the same time, “your computer is low on memory” error message may appear.
If you want to actually use more than 4GB of RAM resources, probably you need a 64-bit version of Windows. With the additional access to memory, you can run more apps simultaneously and improve performance. And the system improves productivity with memory-intensive tasks, such as virtual machines, video editing, Office-working, and web browsing when dealing with a lot of open tabs.
What’s more, 64-CPU may have backward compatibility, allowing it to run 32-bit programs and may also support running 32-bit operating systems. In this aspects, 64-bit version of Windows may have more benefits than 32-bit.
Besides, it’s not surprising that many applications now require a 64-bit operating system due to that limitation. Moreover, you can run x64 and x86 applications on a 64-bit OS, but that is not possible on a 32-bit OS.
Related article: Is My Computer 64 Bit or 32 Bit? Try the 5 Ways to Judge out
How to Convert 32 Bit to 64 Bit Windows 7/8/10 without Data Loss
In the following paragraphs, we will walk you through four steps to upgrade Windows to 64 bit.
- Make Sure Your Processor Is 64-Bit Capable
- Ensure Your PC Hardware Has 64-Bit Drivers Available
- Back up Your PC
- Upgrade 32 Bit to 64 Bit
Tip: The ways to upgrade Windows 7 32 bit to 64 bit free, change 32 bit to 64 bit in Windows 8 and update Windows 10 32 bit to 64 bit are similar. So here we take Windows 10 64 bit upgrade process as an example. Besides, if you have a need to downgrade Windows 10 64 bit to 32 bit, the steps are similar.
Move 1: Make Sure Your Processor Is 64-Bit Capable
Note: You can only install the 64-bit (x64) version of Windows 10/8/7 on compatible hardware, that is to say, you have to determine if your computer has a 64-bit processor. This is the first step you must note.
To do this work, go to Settings > Systems > About. On the right-hand side of the interface, navigate to the System type entry.
Then, you will see one of the following system type:
- 64-bit operating system, x64-based processor: Your CPU support 64-bit and you have already installed the 64-bit edition of Windows 10. So, you don’t need to upgrade to 64 bit.
- 32-bit operating system, x64-based processor: Your CPU supports 64-bit, but you have installed the 32-bit version of Windows.
- 32-bit operating system, x86-based processor: Your CPU supports 32-bit and you have installed the 32-bit version of Windows.
To be specific, if you see the second entry, you are in luck and you can move on to the next section to continue Windows 10 64 bit upgrade since your 64-bit Central Processing Unit can run a 64-bit version. But if you see the third entry, you cannot install a 64-bit OS since your CPU doesn’t support 64-bit.
Move 2: Ensure Your PC Hardware Has 64-Bit Drivers Available
In addition, you should check whether other components, for example, video and sound cards, can work properly with a 64-bit version of Windows 10. Simply speaking, 64-bit OS requires 64-bit hardware drivers and the 32-bit drivers won’t work.
Modern hardware should certainly offer 64-bit drivers but some old hardware may no longer support and manufacturers may haven’t offered 64-bit drivers. To check for this, please go to your manufacturer support website to see if 64-bit drivers are available for download.
Move 3: Back up Your PC
Tip: Unlike upgrading from Home Edition to Pro Edition of Windows, there is no need for purchasing a new license when switching 32-bit to 64-bit. But, the in-place upgrade path to switch also doesn’t exist. This means that you must perform a clean install of the Windows OS if you are planning to change the architecture.
Since you are making major changes to your operating system, it is indispensable to make a full backup of Windows 10. When you upgrade 32 bit to 64 bit in Windows 10/8/7, your personal files, settings, and applications will be deleted. And the best thing is to back up all the affected files to your external storage devices or USB drive to avoid data loss.
To back up your important files, you need a free backup program to help you. Which one is worth recommending? MiniTool ShadowMaker, a piece of professional file backup software, will be a good option, coming with many powerful features.
With the help of this freeware, you can create an image file for files & folders, Windows operating system, disk or partition. Besides, it can help you to sync files to other locations for backup. Above all, automatic file backup, differential & incremental backup can be created.
Right now, before you free change 32 bit to 64 bit of Windows 10/8/7, get MiniTool ShadowMaker Trial Edition from the following button to back up your crucial files. Note that this edition only allows you to free use for 30 days. If you want to keep this software all the time, get its Pro Edition.
MiniTool ShadowMaker TrialClick to Download100%Clean & Safe
Step 1: Double-click on this program to open it.
Step 2: Which feature should you use to back up files, Backup or Sync? Both are available. And here, you take the first feature as an example.
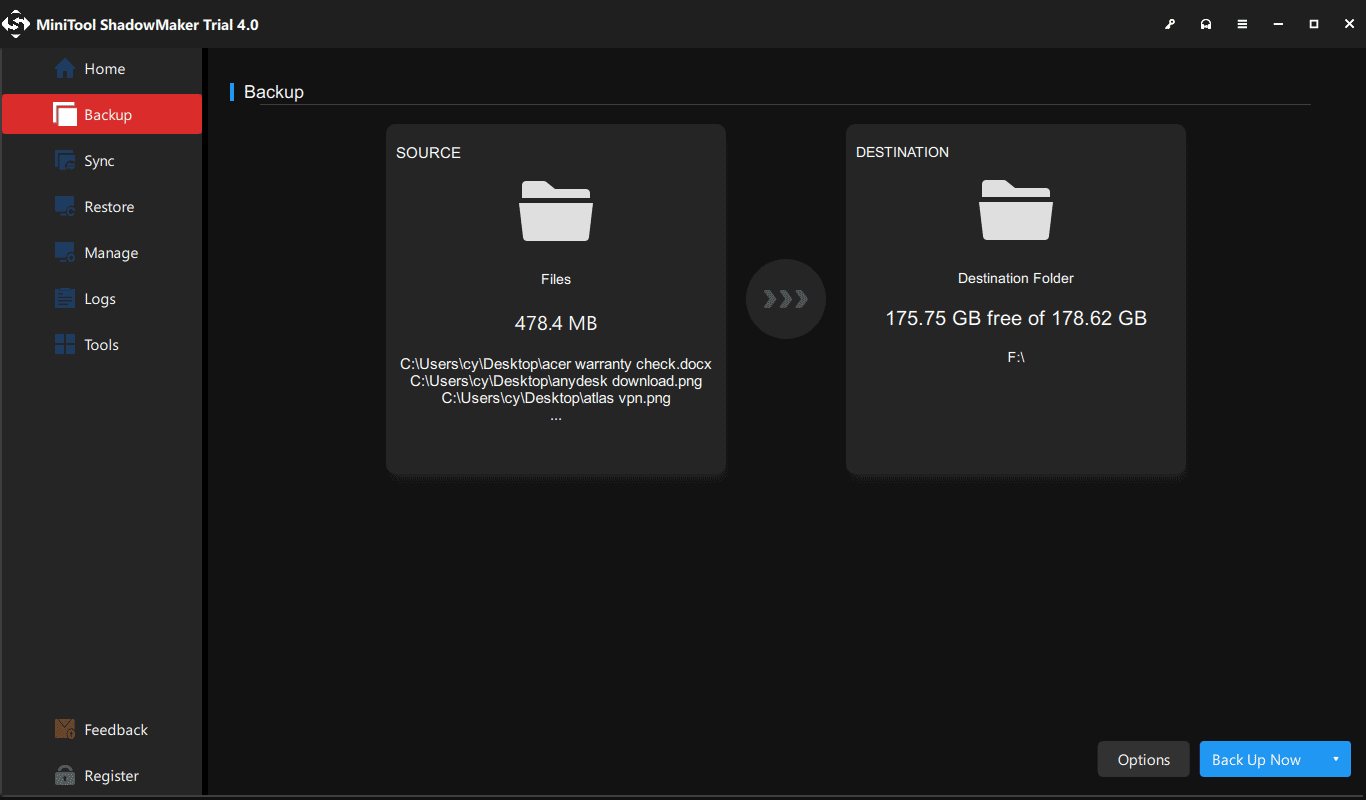
In the Backup window, you need to decide which files to back up and where to save the backup image file. Just go to the Source section and choose personal files you want to back up.
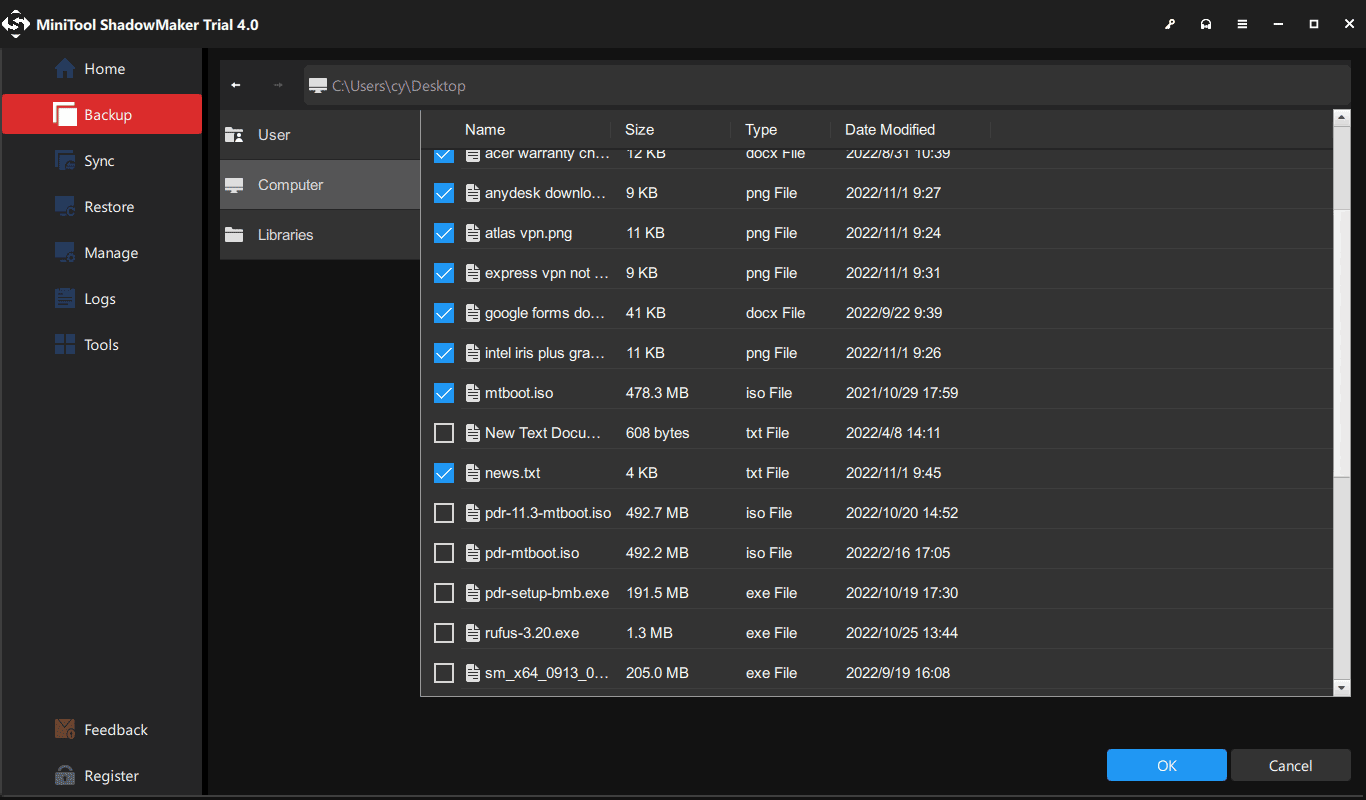
Then, go to the Destination section and choose an external hard drive, USB flash drive, or NAS as the storage path.
Step 3: Finally, start the full backup process of your important files by hitting the Back Up Now button.
Tip: Of course, in addition to file backup via imaging, there is another choice. You can choose to sync files for backup. This post – The Best File Synchronization Software – MiniTool ShadowMaker shows you many details.
Now, all operations to back up files are told to you. If you are planning to convert 32 bit to 64 bit of Windows 10/8/7 operating system, don’t hesitate to free download this backup software to prevent your data from losing after upgrading to the 64-bit version of Windows.
MiniTool ShadowMaker TrialClick to Download100%Clean & Safe
“I want to upgrade Windows 7 32 bit to 64 bit. After checking my CPU and drivers, I decide to back up files. Thankfully, MiniTool ShadowMaker helps a lot before the upgrade.” Click to tweet
Right now, the previous three steps are told to you. Reading here, it is time for you to take action to upgrade Windows 10 32 bit to 64 bit. Just go to the next move to follow the corresponding steps for Windows 10 64-bit version upgrade.
Move 4: Upgrade Windows to 64 Bit
How to convert 32 bit to 64 bit Windows 7/8/10? As mentioned above, performing an upgrade from 32-bit to 64-bit version of Windows is actually clean install. Now, follow the steps below to make a reinstallation.
Create a Bootable USB Drive
Tip: To upgrade Windows 7 32 bit to 64 bit or upgrade Windows 10 32 bit to 64 bit, you need to create a 64-bit installation media. But the tools that you need are different in various systems. For Windows 7, you can get an ISO file by following the guide – Windows 7 ISO File Safe Download: All Editions (32 & 64 Bit). For Windows 10, Media Creation Tool is useful.
Here, take Windows 10 64 bit upgrade as an example and we will show you the step-by-step instructions. Right now, insert your USB flash drive with at least 4GB of storage space to your device and to create the 64-bit Windows 10 installation media.
Step 1: Open the official web page to download Windows 10 Media CreationTool.
Step 2: Click Download tool now under Create Windows 10 installation media.
Step 3: Double-click on the MediaCreationTool.exe to run this utility and then accept the Microsoft terms.
Step 4: There are two options. Check the option Create installation media (USB flash drive, DVD or ISO file) for another PC.
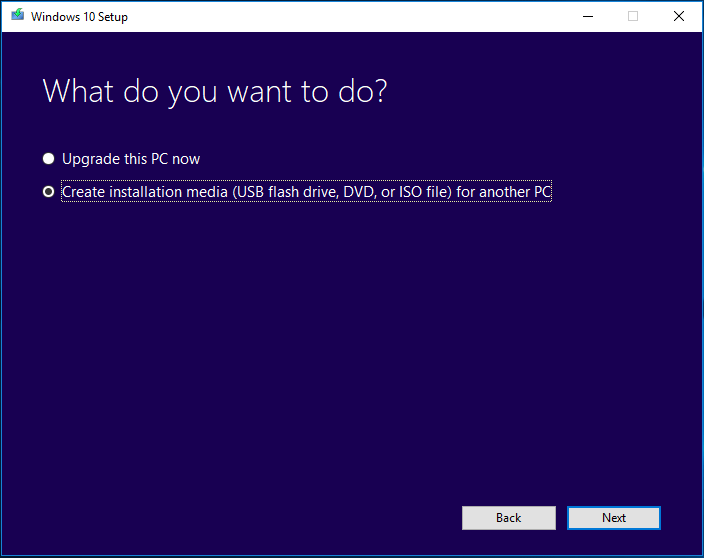
Tip: According to users, if you choose Upgrade this PC now, choosing the same partition as on previous Windows while installing 64-bit version, you will have the Windows.old folder after upgrade where your old data is located. This method do not wipe your hard drive.
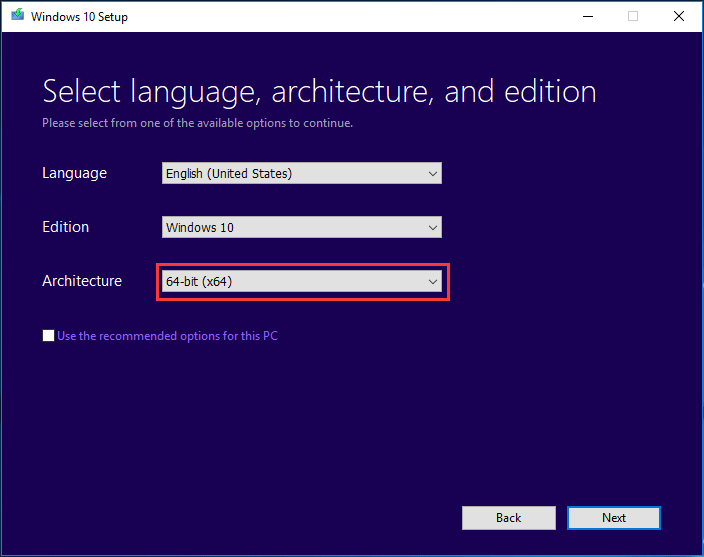
Step 5: Please choose language and edition. To upgrade Windows 10 to 64 bit, here please specify the 64-bit (x64) option for 64-bit Architecture.
Step 6: Choose the USB flash drive option so as to create a bootable USB drive. Additionally, you can also check the option ISO file but you need to burn the file to a USB drive or CD/DVD. Here, we recommend the first one.
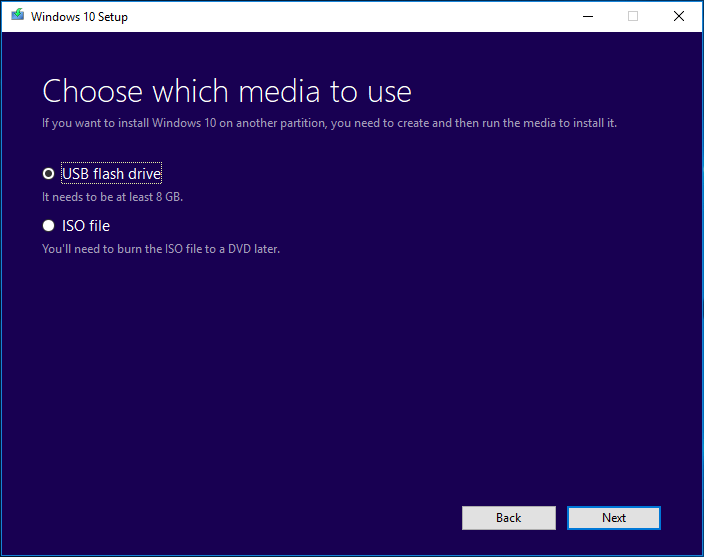
Step 7: Next, all your drives on your computer will be listed. Just choose the USB flash drive from the list to continue.
Step 8: Then, this tool will start downloading needed files and creating a bootable drive from ISO file that is compatible with Windows 10 64 bit. Wait for the process to be finished.
Install Windows 10 64 Bit from Scratch
How to upgrade Windows 7 32 bit to 64 bit without CD or upgrade Windows 8/10 to 64 bit without disk? Now, restart your computer with the bootable USB drive and then follow these steps:
Tip: To upgrade Windows 7 32 bit to 64 bit or change 32 bit to 64 bit in Windows 8, you also need to get the 64-bit installation file and create a bootable USB drive, as mentioned above. Then, boot the 32-bit Windows from the created bootable drive, and start a clean install.
Step 1: After booting your PC from the USB drive, choose language, time and currency format and keyboard.
Step 2: Click Install now to continue.

Step 3: Your purpose is to upgrade 32 bit to 64 bit for Windows 10, so you should click the I don’t have a product key link (assuming your PC has been already properly activated).
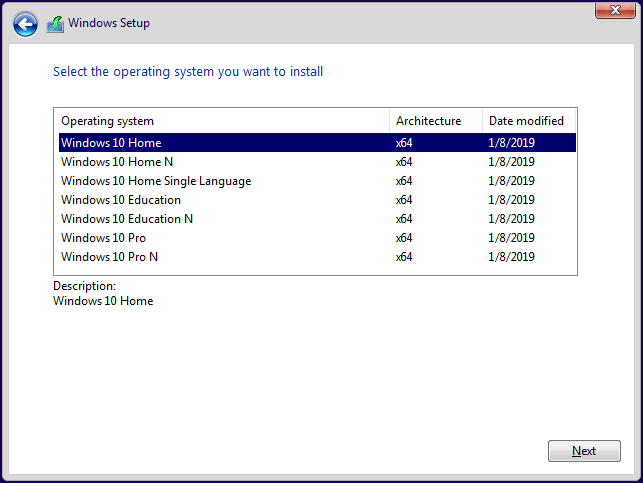
Step 4: Choose the edition of Windows 10 to go on.
Tip: The operating system that you choose must match the edition your license activates.
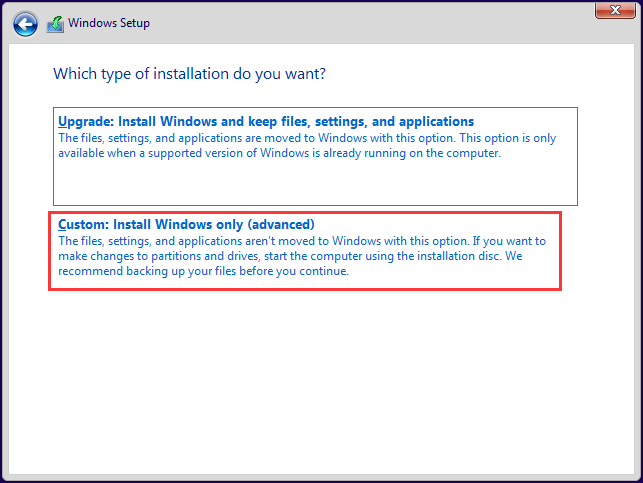
Step 5: Accept the license terms. To upgrade Windows 10 32 bit to 64 bit, please choose Custom: Install Windows only (advanced).
Step 6: You may ask: how to upgrade 32 bit to 64 bit Windows 7/8/10 without formatting? Actually, it is easy. In the following drive list option page, choose the partition(s) with the current installation of Windows, and click the Delete button instead of formatting operation to remove it from the hard drive.
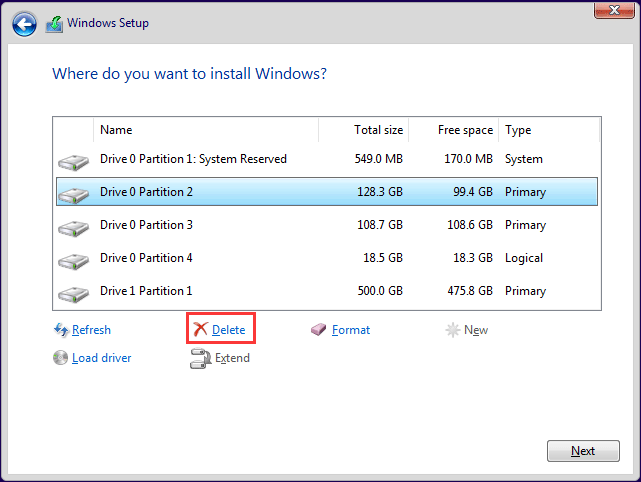
Tip: In addition to system partitions, you can also choose to delete all the data partitions on Drive 0 based on your needs.
Step 7: Then, click the unallocated space to continue. Then, the setup will install the 64-bit version of Windows 10 on your computer. Later, you need to complete the Out-of-box experience (OOBE) setup the OS with your preferences by following the on-screen directions.
More information feel free to watch this video guide:
“It is quite easy to upgrade 32-bit to 64-bit version of Windows 10/8/7. Just share the way with your friends on Twitter.” Click to tweet
Bottom Line
Want to upgrade 32 bit to 64 bit? Here is the overview that you should do before the upgrade and how to convert 32 bit to 64 bit Windows 7/8/10. Just follow the above guides to start the upgrade operation. Remember to leave a comment below or contact [email protected] if you have any different idea or question when you change 32 bit to 64 bit.
Upgrade Windows 10 32 Bit to 64 Bit FAQ
Can I change from 32 bit to 64 bit?
If you are running the 32-bit version of Windows 10/8/7, you can upgrade to the 64-bit version and no new license is required. But you should ensure the processor is compatible and memory is enough. To do this upgrade, a clean install should be performed and there is no direct upgrade path.
Is there a 32-bit version of Windows 10?
If you upgrade to Windows 10 from the 32-bit version of Windows 7 or 8.1, Microsoft automatically gives you the 32-bit version of Windows 10.
Is 32 bit obsolete?
The 32-bit versions of the Windows operating system are already out-of-date in the field of traditional desktops and laptops. New computers almost always come with a 64-bit processor, even with a 64-bit Intel’s Core M processors. But for smartphones or tablets, 32-bit systems have held out longer.
Which is better 32 bit or 64 bit?
In short, 64-bit is better than 32-bit since it can handle more data at once while the 32-bit version is limited to 4GB of RAM.
Readers help support Windows Report. We may get a commission if you buy through our links.
Read our disclosure page to find out how can you help Windows Report sustain the editorial team. Read more
If you find yourself using a 32-bit version of Windows 7, 8, or even an older Windows version, you might have noticed that your memory is getting used up faster than you’d like. Due to how most software is created nowadays, upgrading to a 64-bit system will help you with these issues.
A 64-bit operating system is a more advanced version that can access more than 4GB of RAM on your computer, offering improved performance and efficiency. Before diving into the upgrade process, it’s crucial to verify whether your current OS is 32-bit or 64-bit to ensure a seamless transition.
I know what you might think, such a change most certainly would require a wipeout of your entire system, let me assure you that you can upgrade from 32-bit to 64-bit without formatting.
I’ll walk you through the steps to make this transition smooth, so you can enjoy the benefits of a 64-bit OS without the hassle of reformatting your machine. Let’s get started on enhancing your system’s capabilities without the headache of a full reinstall.
Can I upgrade from 32-bit to 64-bit?
To upgrade from 32-bit to 64-bit, you need to make sure that your system meets the minimum requirements for the 64-bit version of Windows. According to the official Microsoft support website, these are:
- 1 gigahertz (GHz) or faster 64-bit processor
- 2 gigabyte (GB) RAM
- 20 GB available hard disk space
- DirectX 9 graphics device with WDDM 1.0 or higher driver
Among other questions you should ask yourself include:
- Do I have more than 4GB of RAM and do I use more than 4GB of RAM?
- Am I using high-resolution monitors or virtual machines?
- Do I use applications that make use of multiple cores?
To check for compatibility, follow the steps below:
- Click on the Start menu and search for System Information.
- Locate System Type and if it reads x64-based PC, you can upgrade to 64-bit.


You also need to ensure that your CPU and drivers are compatible with the 64-bit. For drivers, check your manufacturer’s website and look for the 64-bit driver versions.
To check CPU compatibility:
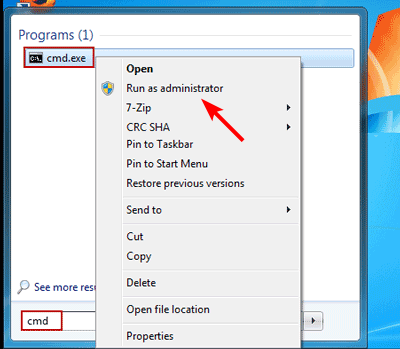
- Hit the Start icon, type cmd, and select Run as administrator.

- Type in set pro and click Enter.
- You should now be able to tell whether your processor is compatible.
If everything checks out, proceed to the guide below.
How can I upgrade Windows 7 from 32-bit to 64-bit?
- You can either download Windows 7 ISO files or insert the 64-bit windows installation disk in the DVD ROM then Restart the PC.
- Press any key to boot from the DVD.

- Windows 7 installation files will load. Click to select your preferred language and other preferences then click Install Now in the next window.

- Accept the license terms and click Next.

- Select Upgrade installation.

- Choose a Disk partition where you want to install Windows and click Next.

- Wait for Windows to finish installing.


You can also follow the same steps only this time perform a clean install and reuse the same Product Key you used for the 32-bit version to upgrade to the 64-bit.
- Mozilla renewed Firefox support on Windows 7 by six more months
- Advanced System Settings on Windows 7: How to View Them
- DirectX 12 For Windows 7: Can You Install it?
Can I install 64-bit Windows on 32-bit?
Yes, you can install 64-bit Windows on a 32-bit system but you shouldn’t. While it’s possible to install a 64-bit version of Windows on a 32-bit machine, it’s not recommended because of compatibility issues with some software and hardware.
This isn’t a supported configuration and may cause problems down the line. 64-bit software can’t run in 32-bit mode, so if you try to run 64-bit apps on your computer, they’ll crash.
There are also some important limitations to keep in mind:
- You can’t run 32-bit applications on the 64-bit version of Windows. It’s easy to differentiate a 32-bit app from a 64 bit.
- Some drivers will only work with the 32-bit version of Windows.
- The 64-bit version of Windows may not support all hardware components of your computer’s hardware configuration such as video cards or network adapters.
And that’s how to easily upgrade from a 32-bit version to a 64-bit in Windows 7. We also have a trick up our sleeves on how you can continue using Windows 7 forever if you are not a fan of the latest iterations from Microsoft.
If you’re still on the fence, we have a comprehensive comparison of Windows 11 vs Windows 7 to help you make an informed decision.
We also have a great guide on how to download the Windows 7 KB4474419 update. This update is crucial for security, so don’t miss it.
Why should I upgrade from 32-bit to 64-bit?
There are good reasons to upgrade from 32-bit to 64-bit Windows. For example;
- More memory – A 64-bit operating system is capable of addressing much more memory than a 32-bit system, thus allowing you to work with large files without having to worry about running out of memory.
- Faster processing – With the 32-bit version, you are limited to 4GB of RAM, but with the 64-bit version, you can use up to 16 exabytes of RAM. This means that your computer will be able to run programs faster and more efficiently.
- Greater stability – Upgrading from 32-bit to 64-bit actually makes your system more stable because it uses less memory than before.
- Improved compatibility – Most modern hardware is designed for 64-bit platforms, so upgrading from 32-bit to 64-bit will allow your system to take full advantage of the newer technology available today.
- More security – Because a 64-bit operating system can use more than 4GB of RAM, it is less vulnerable to attacks from malware that exploits memory holes or other vulnerabilities.
- Better performance – You’ll see an overall improvement in how quickly your computer responds to your input because programs will run faster and use less CPU capacity while they’re running.
Let us know of any problems you may have encountered during the upgrade in the comment section below.
Claire Moraa
Windows Software Expert
Claire has a knack for solving problems and improving the quality of life for those around her. She’s driven by rationality, curiosity, and simplicity, and always eager to learn more about Microsoft’s products.
With a background in teaching and reviewing, she breaks down complex topics into easily understandable articles, focusing mostly on Windows 11, errors, and software.
Если возникла необходимость, вы можете переключиться с 32-разрядной версии Windows на 64-разрядную. Если речь идет о той же версии Windows 7, 8 или 10, ваша лицензия действительна для обоих вариантов разрядности.
Требуется ли изменение разрядности с 32 до 64 бит?
В первую очередь необходимо определить, есть ли необходимость в переходе на 64 разряда и удовлетворяет ли ваш ПК минимальным требованиям. И поможет в этом набор программ, который расскажет о том, какое оборудование установлено в системном блоке и определит его предел возможностей. Почитать об этих утилитах и скачать их с ресурсов производителей вы можете воспользовавшись нашей статьей Проверь работу компьютера: лучшие бесплатные утилиты для теста ПК=»content_internal_link»>
32-битная или 64-битная версия Windows?
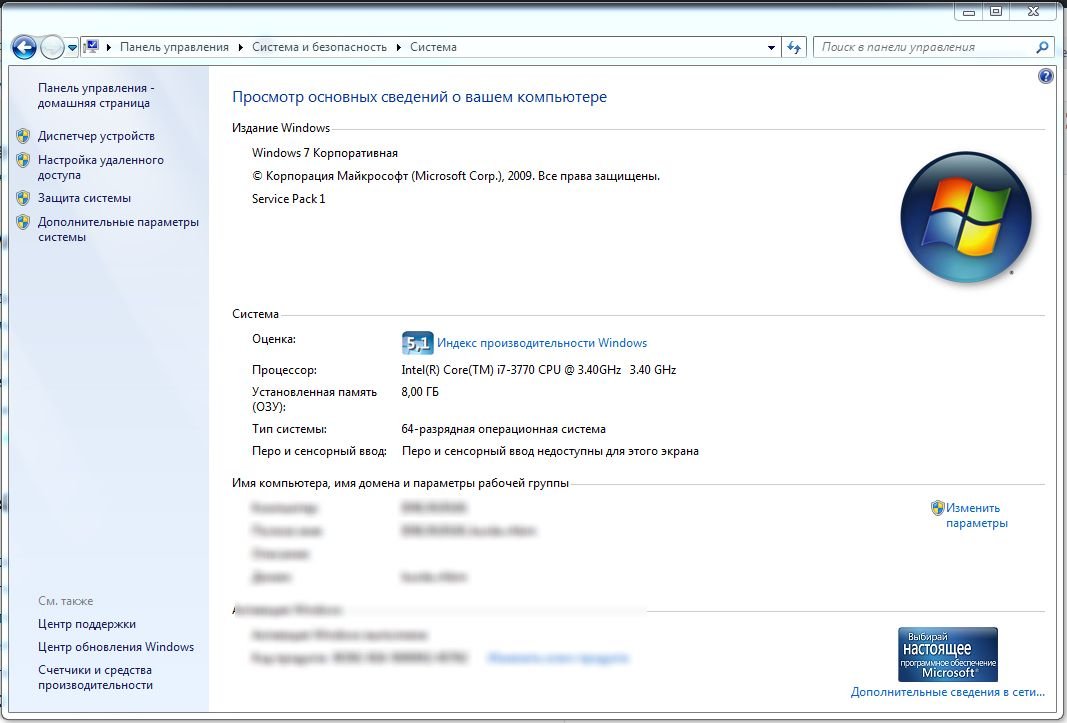
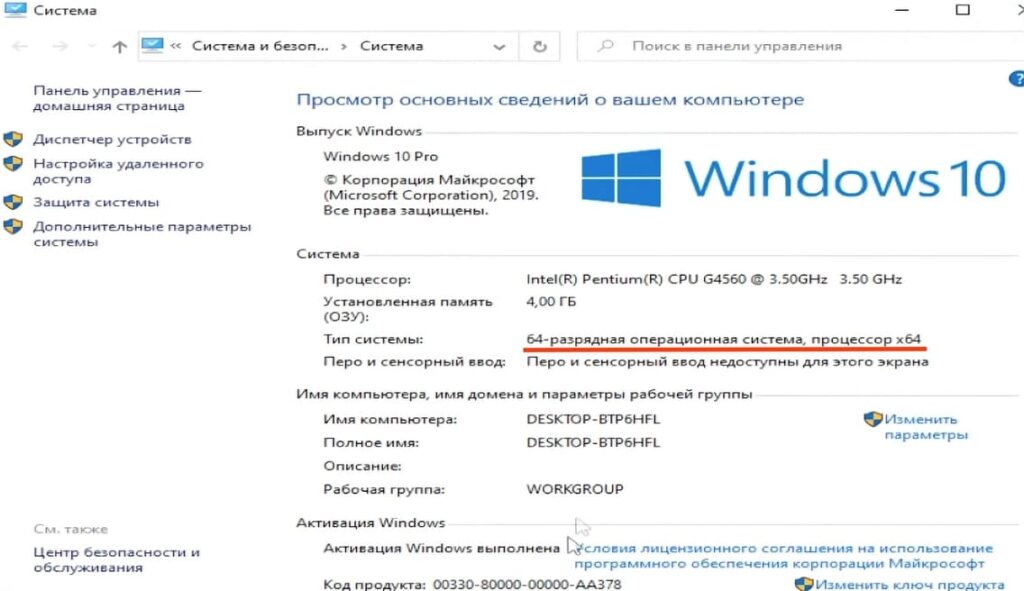
Итак, попробуем узнать, какая версия системы установлена на вашем компьютере: 32 или 64-битная. Разрядность может быть важна, например, если необходимо установить новую программу, предлагающую разные версии. Для начала откройте меню «Пуск», кликните по строке «Панель управления» и перейдите к пункту «Система и безопасность», а затем к пункту «Система». Здесь вы найдете информацию о типе операционной системы: 32 или 64-разрядная операционная система.
Если выясняется, что все-таки Windows 64-разрядная, это еще не значит, что все программы у вас работают в 64-bit режиме. Многие программы имеют только 32-разрядные версии и могут без проблем работать в 64-bit системе.
Если вы хотите перейти от разрядности в 32 бита на разрядность а 64 бита, вам нужно переустановить Windows, полностью перестроив систему. Имеет ли смысл изменять разрядность Windows с 32-битного до 64-битного варианта, во многом зависит от того, какое оборудование и программное обеспечение вы используете или планируете приобрести:
- В операционных системах Windows разрядность описывает длину слова, используемую для адресации к вашей RAM и памяти вашего GPU.
- Если у вас нет технических данных установленной в ПК видеокарты, можно использовать наш практический совет, чтобы узнать, какая память у вашего GPU.
- Используйте наше советы выше, чтобы узнать, какая разрядность у вашего Windows: 32 или 64 бита. Кроме того, вы также можете ознакомиться с нашей статьей по этой теме.
- Только когда объем памяти RAM и GPU превышает 4 гигабайта, Вам стоит переходить от разрядности 32 до 64 бит.
- При определенных обстоятельствах изменение разрядности не стоит приложенных усилий, если вы, например, никогда не используете неадресуемую память. Если вы, к примеру, просто занимаетесь Интернет-серфингом или выполняете базовую офисную работу, вы в большинстве случаев редко используете более одного гигабайта оперативной памяти. Узнайте в нашем практическом совете, сколько оперативной памяти вам нужно.
- И даже если вы временно превысите возможности памяти, например, играя в 3D-игры с большим объемом памяти, занимаясь видеомонтажом или моделированием, переключение разрядности не обязательно станет лучшим решением. В зависимости от программного обеспечения покупка быстрого SSD-накопителя для хранения больших объемов данных может быть значительно более выгодной альтернативой. Например, вам можно будет просто прописать новый путь хранения для программного обеспечения, не настраивая при этом совершенно новую систему.
- С помощью наших инструкций вы все равно можете использовать оперативную память, с непосредственной адресацией, используя ее в качестве энергозависимого пространства на жестком диске, например, для временных файлов.
Возможно ли сменить разрядность?
Можно ли вообще ли даже изменение версии Windows с 32 до 64 бит, зависит от аппаратного обеспечения вашего компьютера:
- Ваш процессор должен иметь возможность обрабатывать 64-разрядные адреса. Самый простой способ узнать, установлен ли у вас 64-разрядный процессор — прочитать эту информацию в руководстве к CPU.
- С помощью советов выше вы можете и без мануала узнать, поддерживает ли ваш компьютер 64-битную разрядность.
- Если ваш процессор не поддерживает более высокую разрядность, одной лишь заменой процессора не обойтись. Прочитайте в мануале к установленной в вашем системном блоке материнской плате, совместима ли она с 64-битными процессорами, и если да, то с какими именно. Это вопрос сокетов.
- Имейте в виду: если ваш процессор совместим с 64-битной версией, в принципе возможно изменение разрядности. НО: с 64-битной операционной системой вам придется неизбежно переустановить все драйверы всех своих аппаратных компонентов. Если вы не найдете 64-битные драйверы для вашего картридера, устройство может перестать работать после внесения изменений.
Как изменить разрядность на более высокую
Чтобы переключиться с 32-битной версии на 64-битную версию Windows, вам нужно сделать некоторые приготовления и выполнить следующие действия:
- Во-первых, найдите драйверы для всего вашего оборудования, подходящие для 64-битных систем. Сохраните их на USB-накопителе или на другом носителе данных.
- Проверьте или получите заново свой текущий ключ Windows. Вы можете найти его на установочном DVD-диске. Как создать загрузочный диск с полезными программами и драйверами или установочный диск Windows, вы можете узнать из отдельной статьи.
- Внимание: вы не можете установить 64-битную систему поверх старой 32-й версии, не удаляя старую систему. Обязательно создайте резервные копии всех важных данных из раздела жесткого диска, на который вы будете устанавливать свою 64-битную систему.
- Мы расскажем вам больше о том, что нужно учитывать при переустановке операционной системы.
- Установите 64-разрядную операционную систему, например, используя наши статьи об установке Windows 7 и Windows 8.
- После установки операционной систему установите все драйверы. Теперь имеет смысл создать резервную копию Windows, чтобы при необходимости воспользоваться «чистой» версией для быстрой переустановки системы.
Как на новой 64-битной системе запустить программы в режиме совместимости, мы расскажем в следующей статье.
Читайте также:
- Чистая установка Windows 10 с помощью загрузочного носителя
- Поиск и установка драйверов периферийных устройств в Windows 8
Фото: компании-производители, pexels.com
В этом руководстве мы расскажем, как перейти с 32-битной версии Windows на 64-битную, сохранив ваши файлы. Приложения при этом придется переустановить, но все данные останутся на месте.
Приобрести оригинальные ключи активации Windows всегда можно у нас в каталоге:
Windows 11 — от 1690 ₽
Windows 10 — от 1490 ₽
Прежде чем начать, важно отметить, что в России в данный момент недоступны официальные инструменты Media Creation Tool для загрузки дистрибутивов Windows. Поэтому вместо этого, для загрузки дистрибутивов Windows 11 или Windows 10, воспользуйтесь ссылками на нашем сайте. Для создания загрузочной флешки, используйте приложение Rufus согласно инструкции.
Проверка совместимости
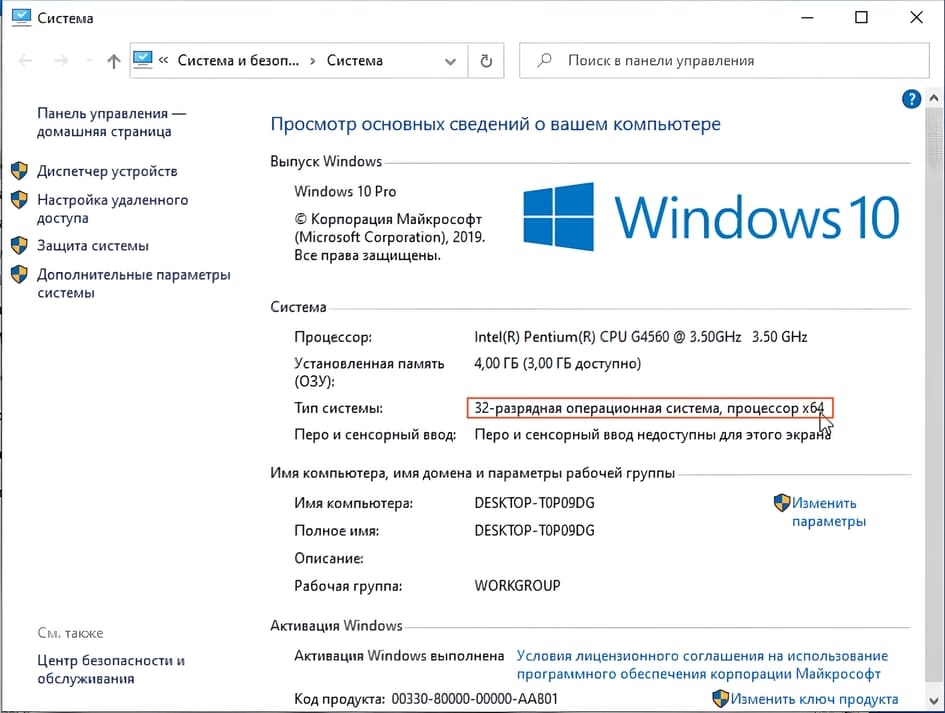
Перед тем как перейти на 64-битную версию Windows, убедитесь, что ваш процессор поддерживает 64-битную архитектуру. Для этого:
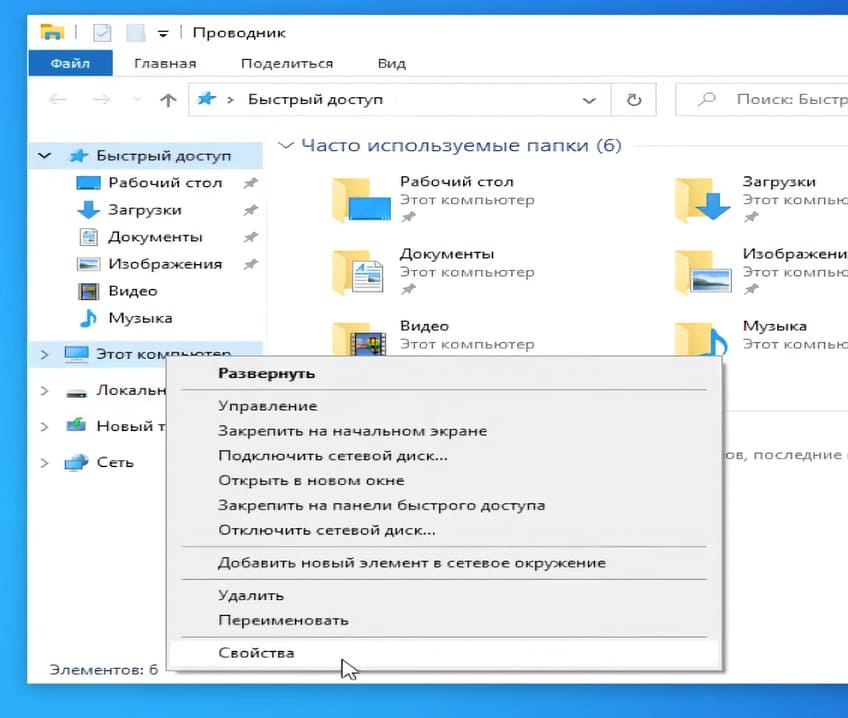
1. Откройте Пуск и найдите Свойства системы.
2. Убедитесь, что указано «Разрядность процессора: x64».
Шаги для перехода на 64-битную систему
1. Скачивание дистрибутива Windows
— Скачайте 64-битный дистрибутив Windows 10 или Windows 11.
— Создайте загрузочную флешку с помощью утилиты Rufus, следуя этой инструкции.
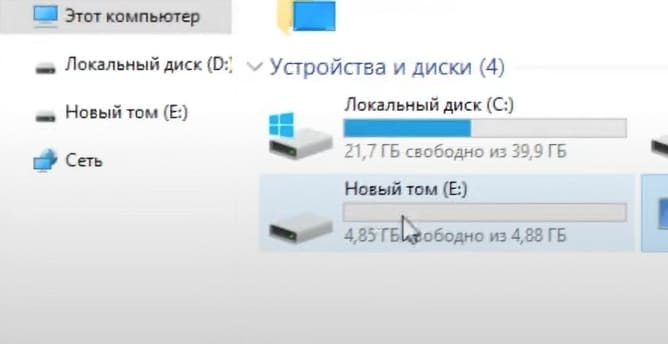
2. Создание раздела на диске
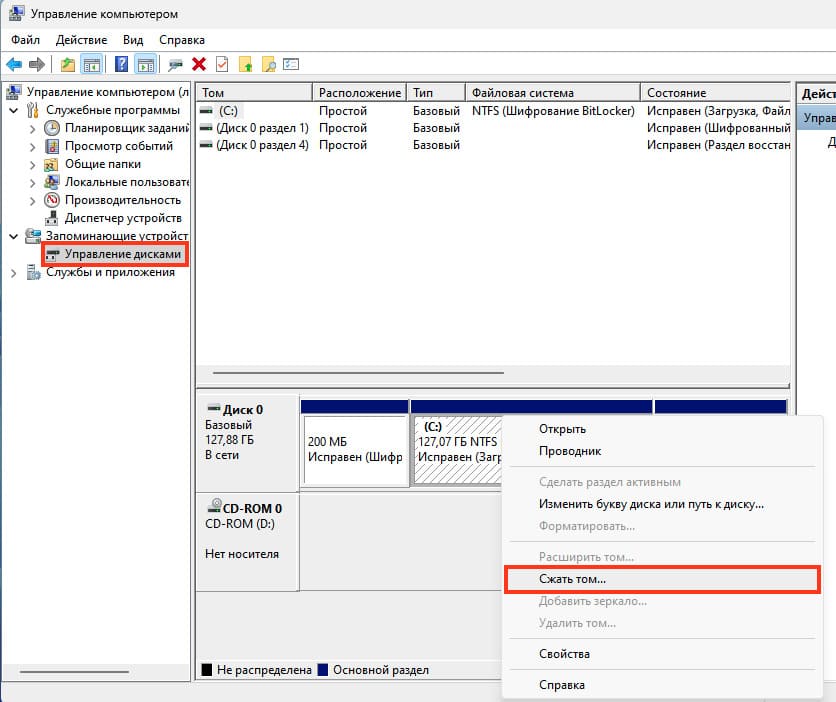
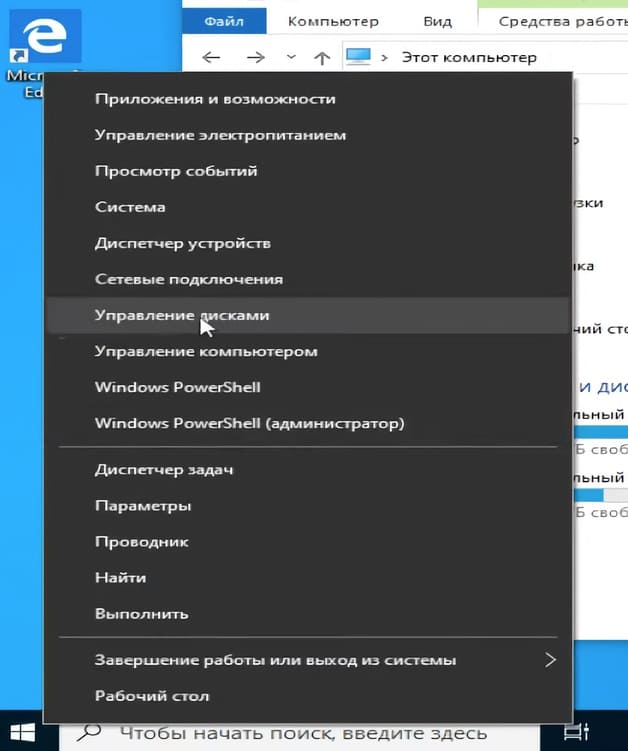
— Откройте Пуск, введите Управление компьютером, и найдите подраздел Управление дисками.
— Либо просто введите в поиске Управление дисками (На Windows 10).
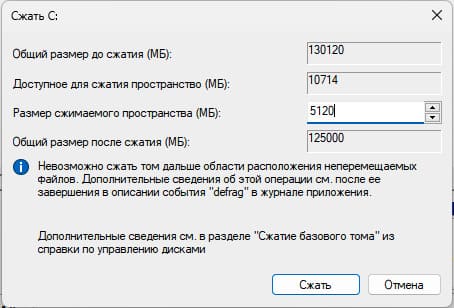
— Щелкните правой кнопкой мыши на диск D (или C, если второго диска нет) и выберите Сжать том.
— Уменьшите размер диска примерно на 5 ГБ (5120 Мб).
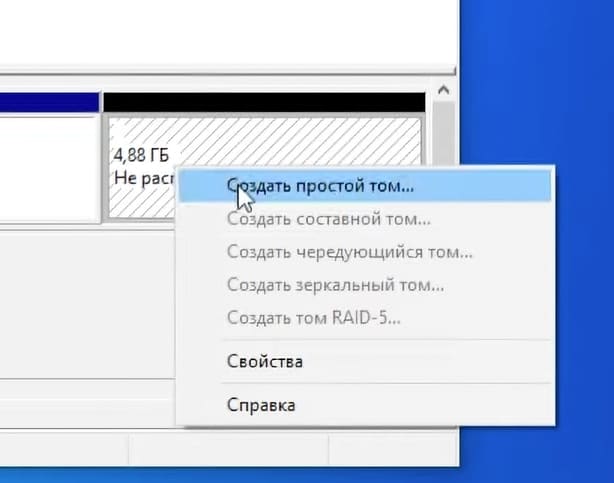
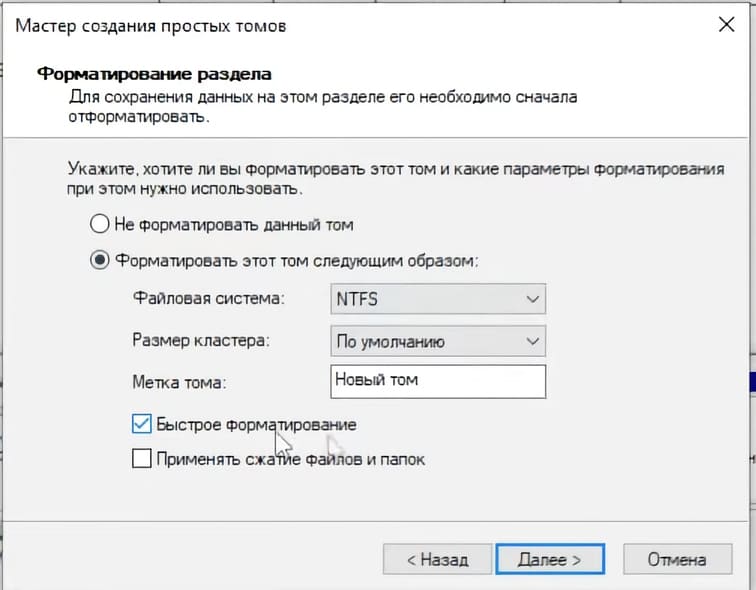
— Создайте новый простой том и отформатируйте его (в процессе создания, поставьте галочку на Быстрое форматирование).
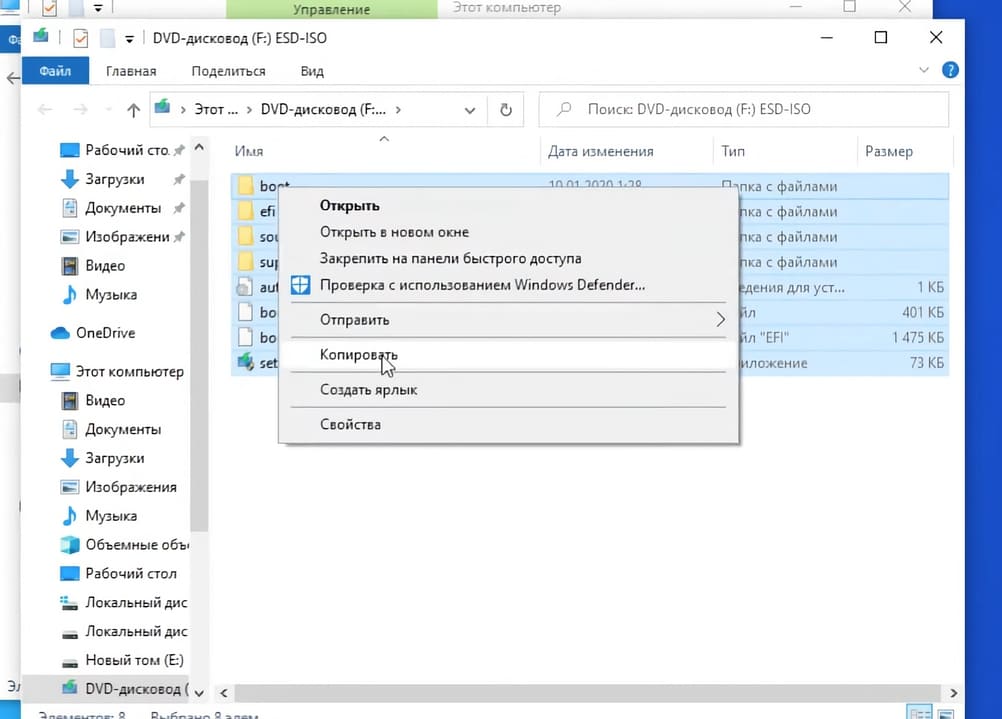
3. Подключение ISO-образа
— Подключите ранее загруженный образ Windows как виртуальный диск (нажмите правой кнопкой мыши и выберите Подключить).
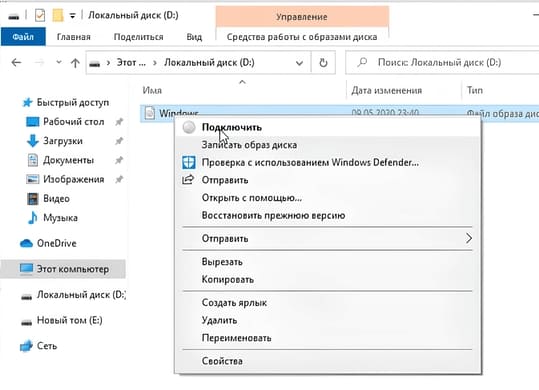
— Скопируйте все файлы с образа на новый созданный раздел.
4. Настройка загрузки с образа
— Скачайте и установите приложение EasyBCD c официального сайта или с нашего сервера.
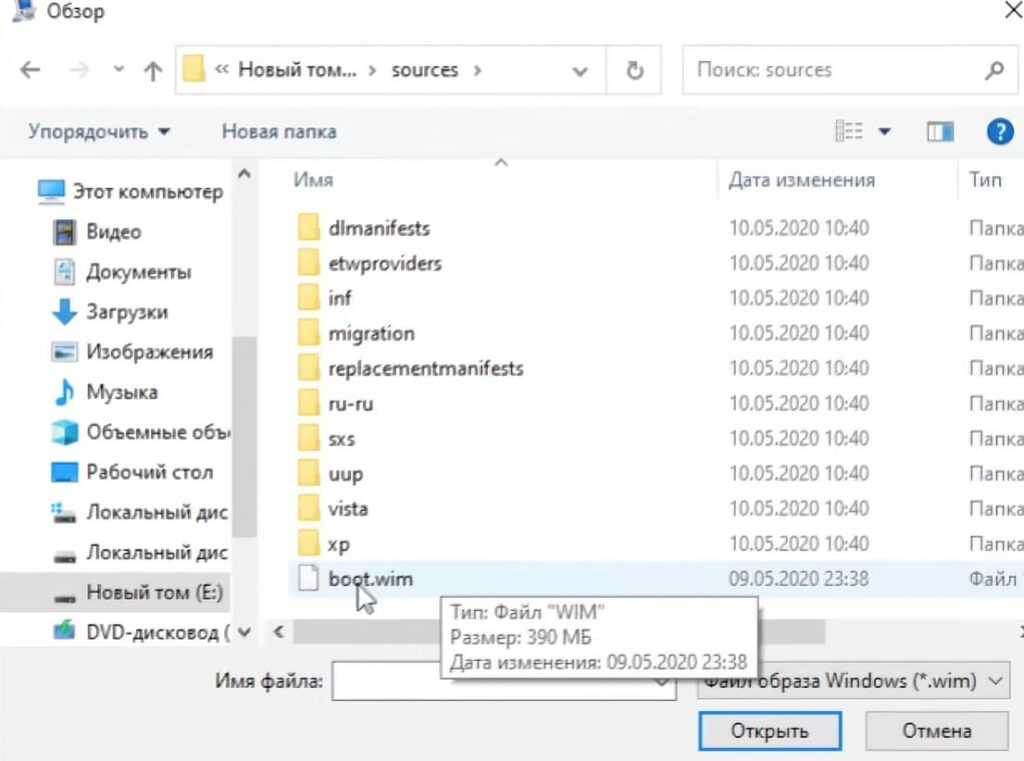
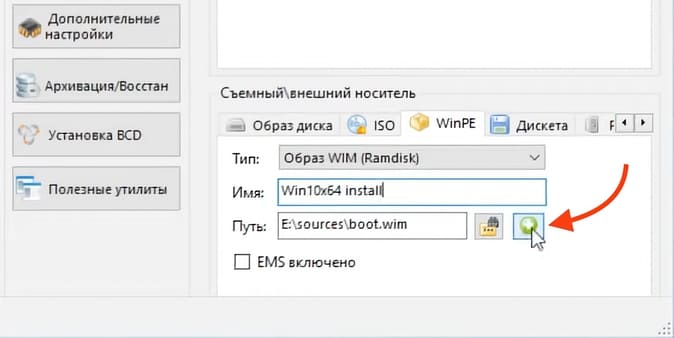
— Откройте EasyBCD, выберите вкладку Добавить запись, затем выберите WinPE и укажите путь к файлу boot.wim в папке sources.
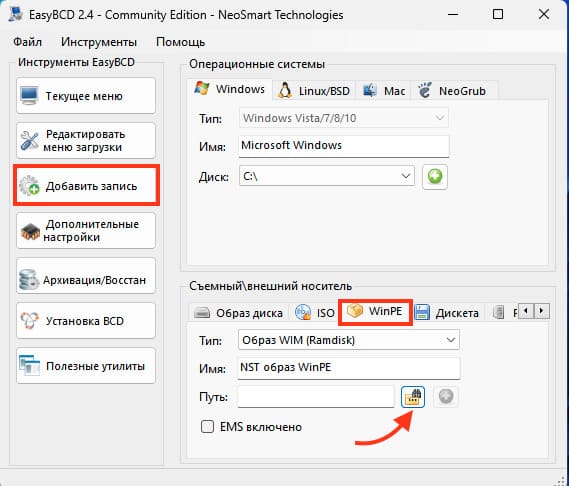
— Так же можете переименовать образ, в нашем случае мы ввели Win10x64 Install.
— После чего сохраните изменения нажав на зеленый плюсик и перезагрузите компьютер.
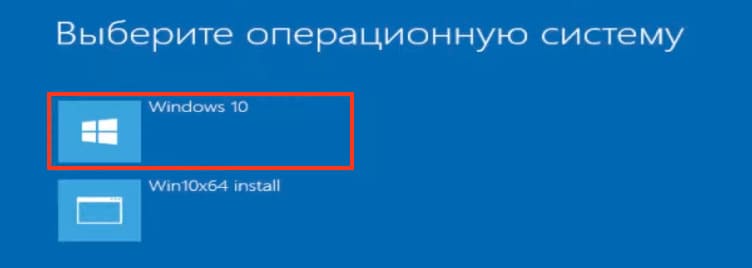
5. Запуск установки
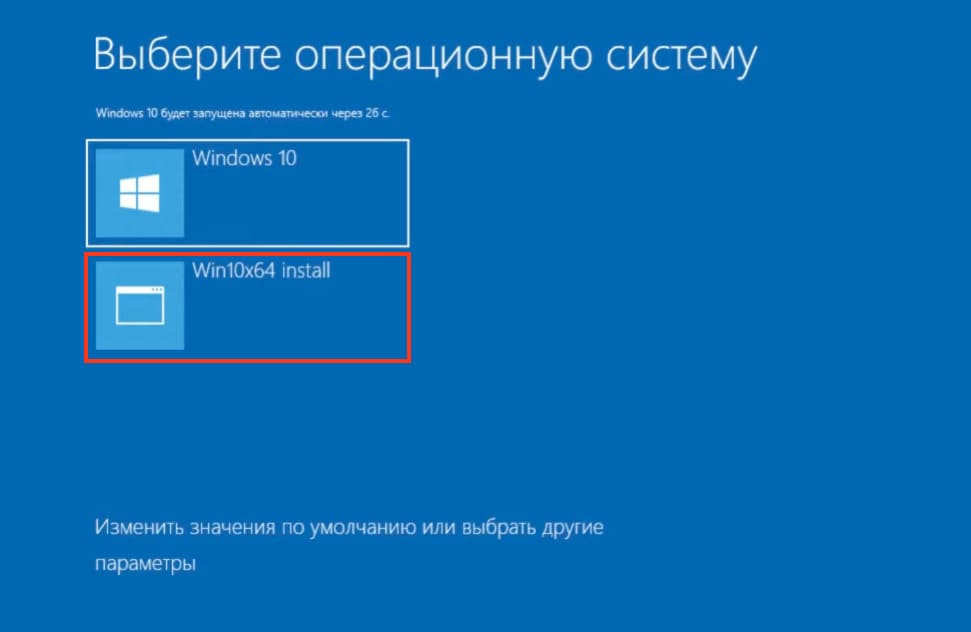
— При перезагрузке появится меню выбора операционной системы. Выберите созданную вами запись (в нашем случае это «Win10x64 Install»).

— После загрузки начнется классическая установка Windows.

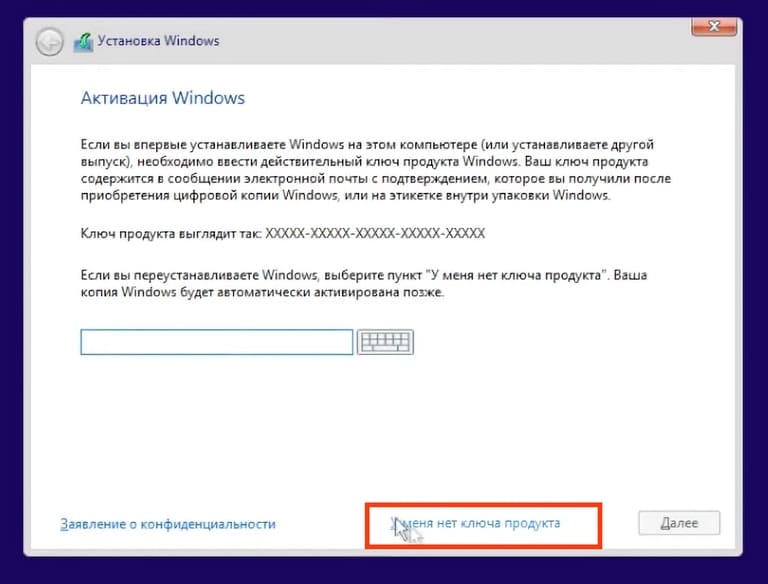
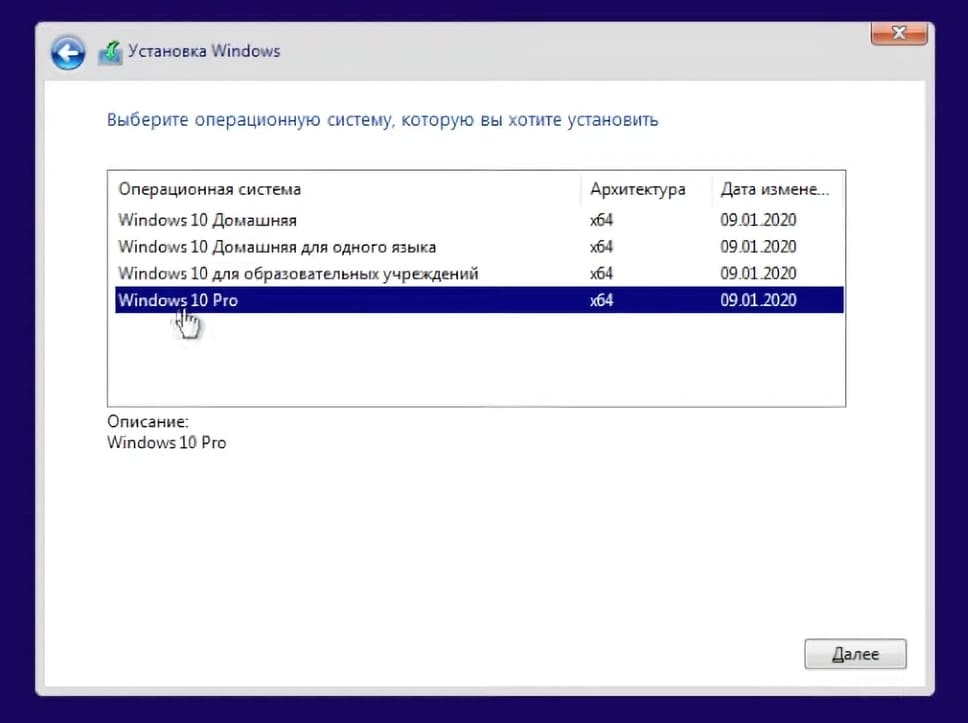
— В разделе с вводом ключа активации, выберите — У меня нет ключа продукта.
— Выберите ту же версию Windows которая у вас была (в нашем случае это Pro версия)
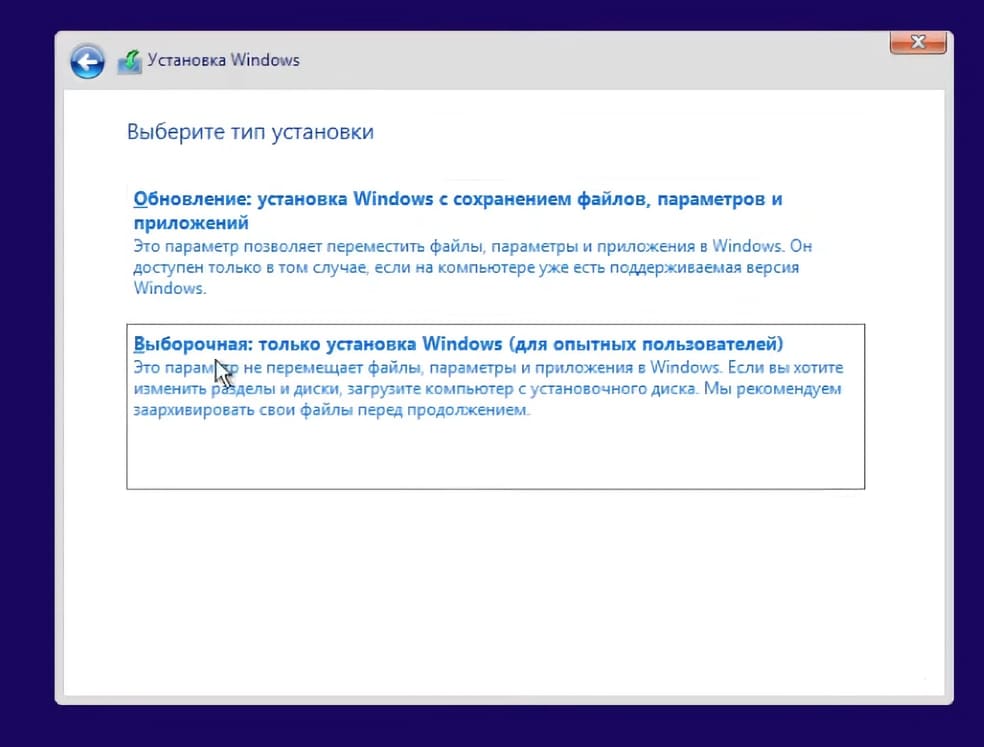
— Перейдите в «Выборочную установку»
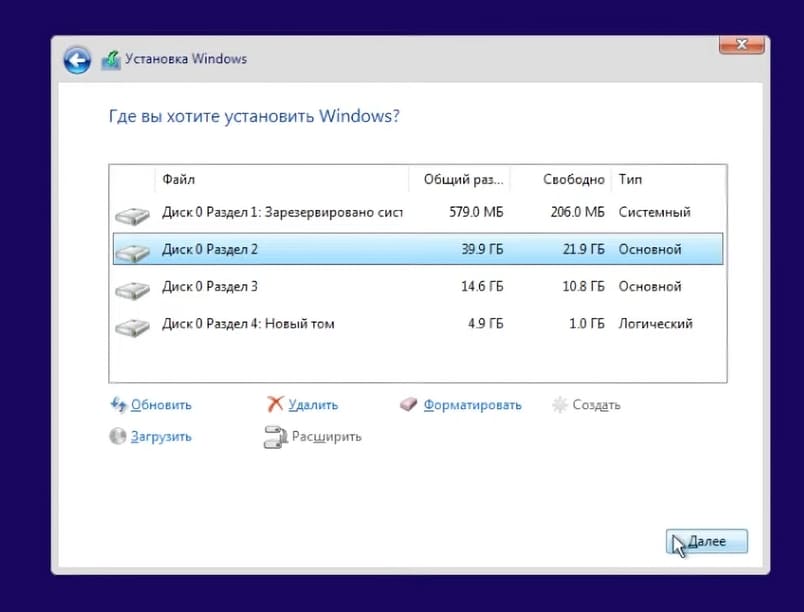
— Далее выберите диск на котором у вас расположен ваш Windows и нажмите далее.
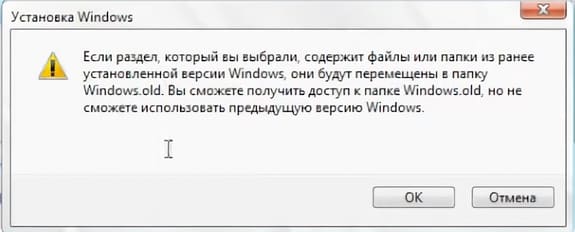
— Появится окно с предупреждение, что на этом диске содержатся файлы и папки из ранее установленной Windows и все они будут перемещены в папку Windows.old, жмем «ОК».
— После чего начнется установка новой x64 версии Windows с сохранением всех ваших старых файлов (приложения и драйвера придется переустановить).
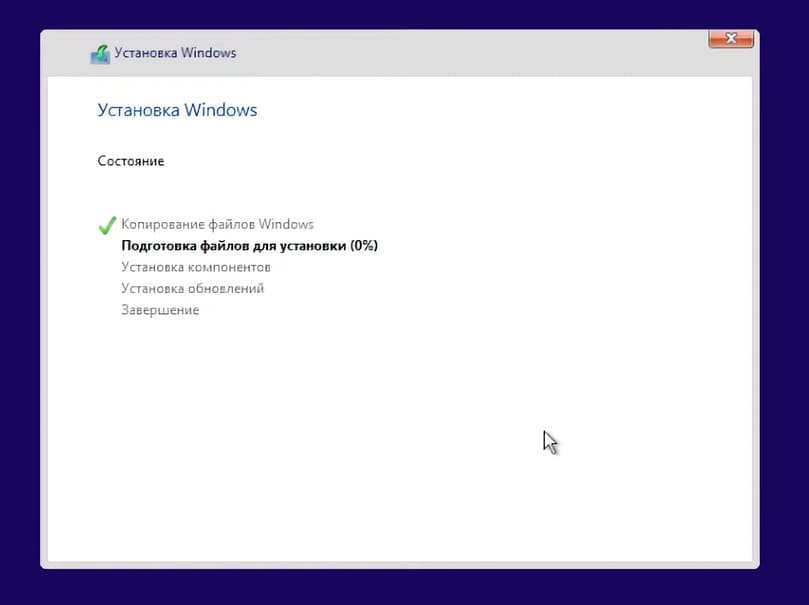
— Дожидаемся установки, в моменте система может несколько раз перезагрузиться.
— Если появится выбор с какого загрузочного диска запуститься, выбираем теперь изначальный. (В конце статьи расскажем как убрать этот выбор если он появляется при каждом запуске системы)
— Так же после установки, скорее всего вам потребуется сделать классическую настройку Windows перед ее запуском.
Выбрать язык, раскладу клавиатуры, зайти в учетную запись и тому подобное. Пробегаемся по всем пунктам и запускаем систему.
6. Настройка после установки
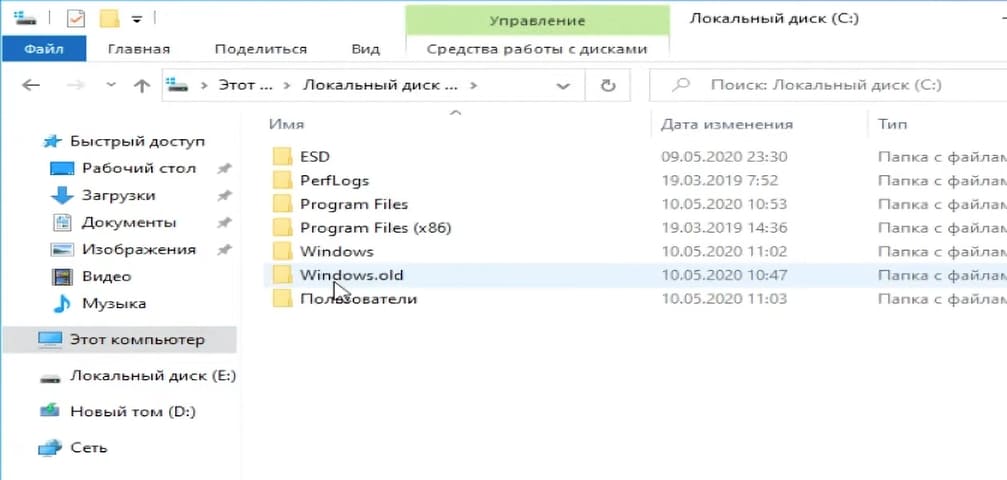
— После установки зайдите в папку Windows.old на диске C и убедитесь, что ваши файлы сохранены.
— Зайдите в Свойства компьютера и убедитесь, что ваш Windows — x64.
— Теперь откройте Управление дисками и удалите временный раздел, созданный на этапе подготовки.
— Выберите Удалить том
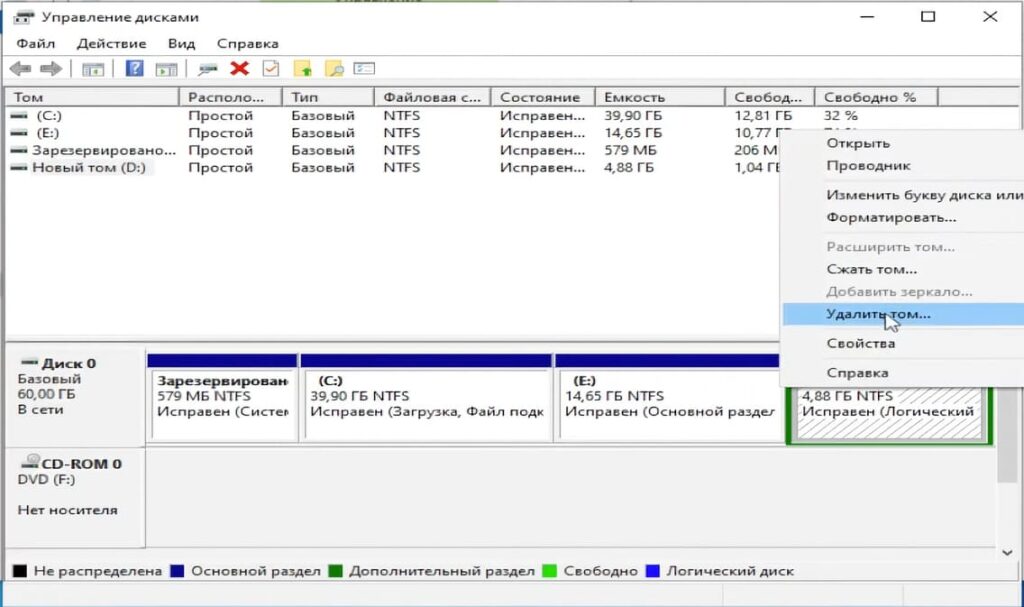
— После чего Удалить раздел
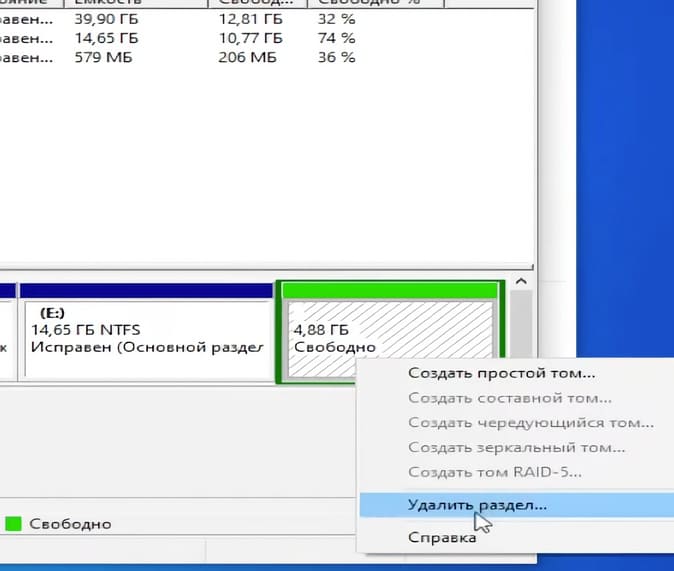
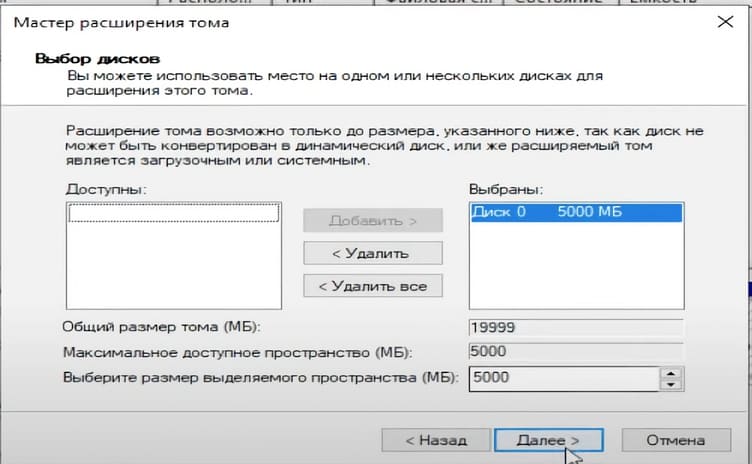
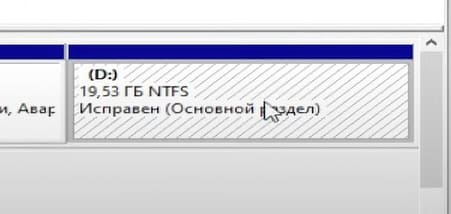
— И в конце выберите Расширить том, чтобы вернуть эти 5 Гб обратно жесткому диску.
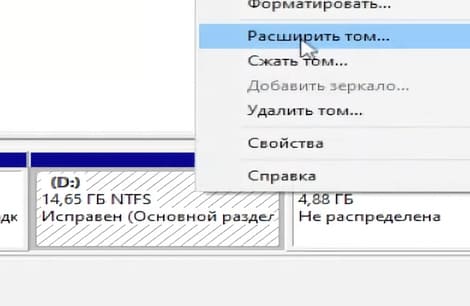
— Везде нажмите «Далее» и завершите расширение
8. Очистка загрузчика
— Если после установки в меню загрузки осталась старая запись, которая появляется при каждом запуске Windows, откройте Конфигурацию системы (просто пропишите в поиске — msconfig).
— Перейдите во вкладку Загрузка и удалите старую запись.
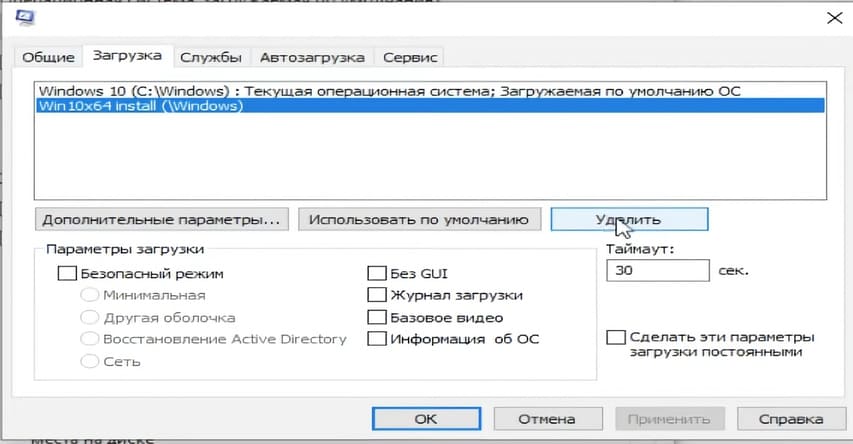
— После чего вас попросят перезагрузить Windows. Нажимаем Перезагрузка и теперь ваша система будет запускаться как и раньше.

После выполнения всех шагов, вы будете работать на 64-битной версии Windows, и ваша система будет полностью готова к использованию.
«Перейти» с одной операционной системы (32-разрядной) на другую (64-разрядную) — это уже значит переустановить. То есть поверх ОС установить другую. Это не апгрейд старой, они просто разные.
Но вы можете сохранить свои папки и файлы, находящиеся на системном разделе, чтобы потом не начинать всё с нуля. Например, ваши достижения в играх. Если игровые сохранения («сейвы») хранятся по пути C:\Documents and Settings\Имя пользователя\Мои документы\My Games, то вы можете их просто скопировать до переустановки системы, а потом положить в такую же папку по новому пути C:\Users\Имя пользователя\Documents\My Games (C:\Пользователи\Имя пользователя\Мои документы\My Games)
Я привел пример для игр, но если вы будете устанавливать те же самые программы, то можете скопировать и восстановить по новому пути всю папку Мои документы. Не все, но какие-то настройки восстановятся. Не все, потому что многие программы сохраняют настройки в файлах *.ini в собственных директориях.
Если аппаратная часть («железо») вашего компьютера поддерживает 64-разрядную ОС, то вы почувствуете положительную разницу в работе ПО. Да и все больше программ, поддерживающих только х64-режим. Они не будут запускаться на 32-разрядной Widows, а вот наоборот дела обстоят лучше — практически все х32-программы (они же х86) будут работать на ОС х64. Для них новой системой даже создается отдельная папка — C:\Program Files (x86).
В общем, резюмируя все вышесказанное, конкретный ответ на ваш вопрос: БЕЗ ПЕРЕУСТАНОВКИ НИКАК.
Вот можете почитать на официальном сайте:
