
При выполнении анализа процедуры загрузки иногда бывает очень важно получить полный список загружающихся и незагружающихся драйверов и библиотек. Использовать для этих целей специальные утилиты необязательно, получить список загружаемых программных компонентов можно средствами самой операционной системы. Список представляет собой обычный текстовый файл ntbtlog.tхt, сохраняемый в корневой системной папке Windows.
Как в Windows 10 включить лог загрузки
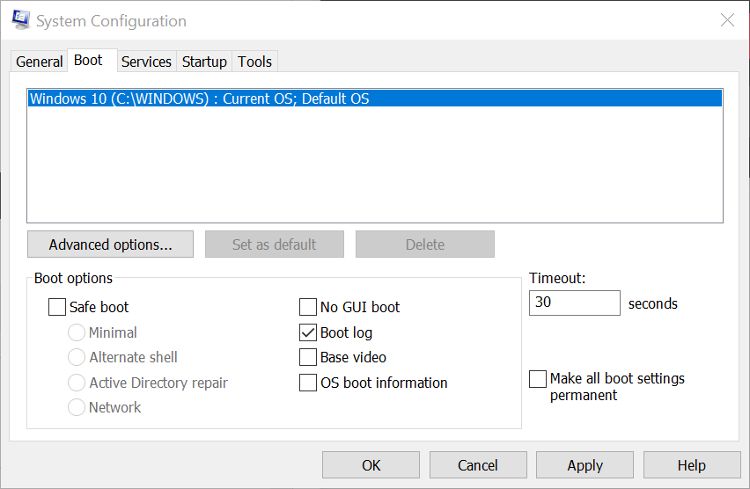
Есть два способа создания журнала загрузки Windows. Сначала самый простой. Нажатием Win + R вызовите диалоговое окошко запуска и выполните в нём команду msconfig. В открывшемся окне конфигурации системы переключитесь на вкладку «Загрузка» и установите птичку в чекбоксе «Журнал загрузки». Теперь нажмите «Применить» и «OK».

При этом появится окошко с предложением перезагрузить компьютер. Соглашаемся, выполняем перезагрузку,

после чего идём в расположение C:/Windows, находим там текстовый файл ntbtlog

и открываем его Блокнотом или иным редактором.

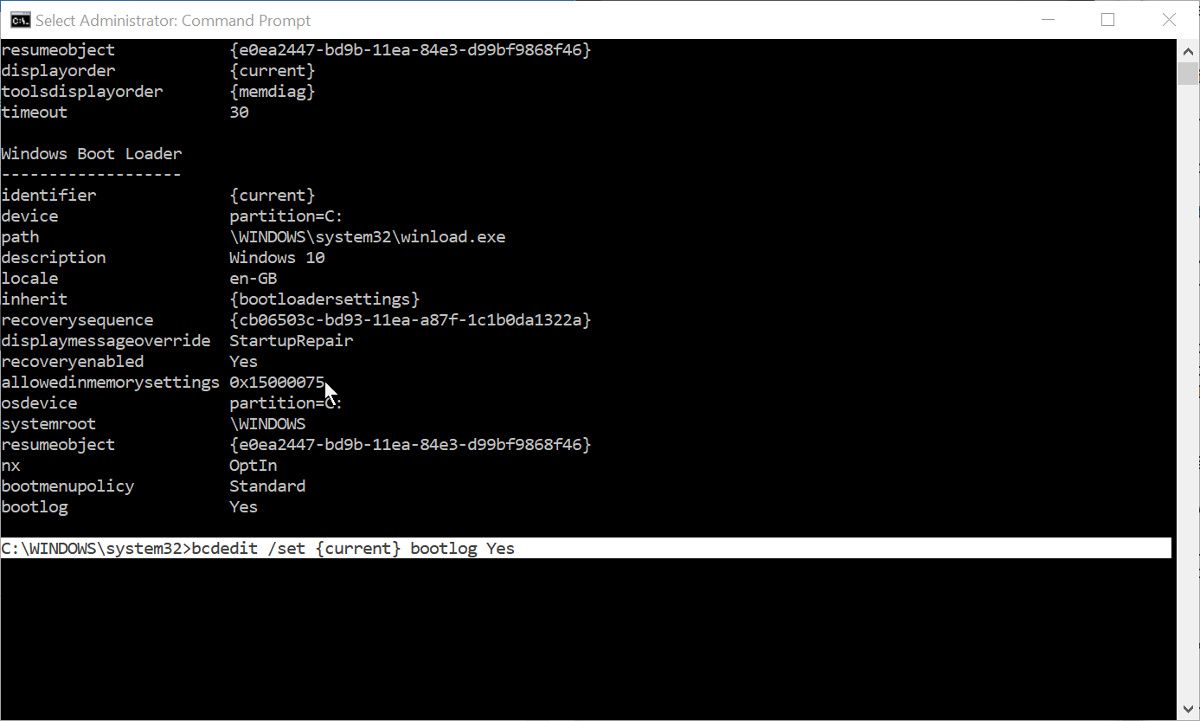
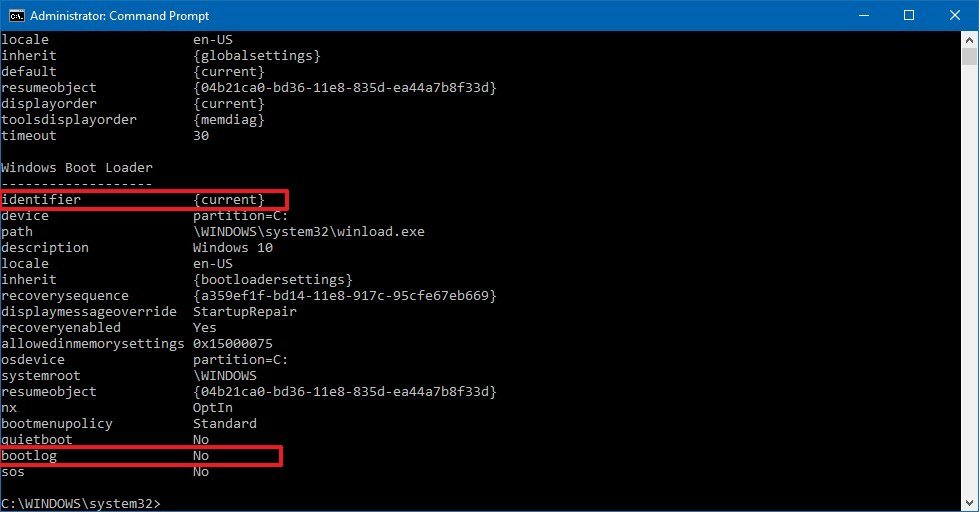
Второй способ чуть сложнее. Запустите от имени администратора командную строку и выполните в ней команду bcdedit. В консоли появится список всех ваших операционных систем и их загрузочных записей. У нас установлена только одна Windows 10, поэтому элементов списка будет два — диспетчер загрузки и загрузка Windows. Нам нужна вторая запись, а именно её идентификатор со значением {current}.

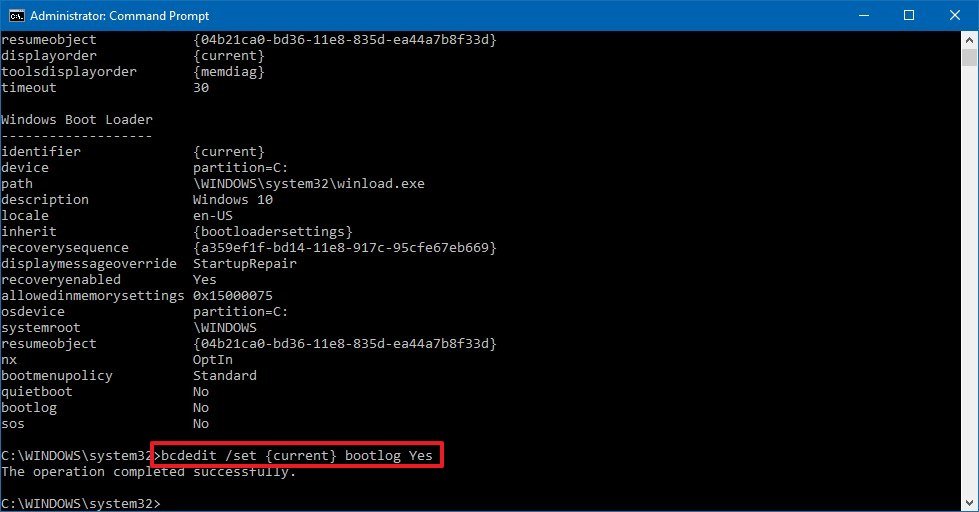
Тут же в командной строке выполните команду такого вида:
bcdedit /set {Идентификатор} bootlog Yes

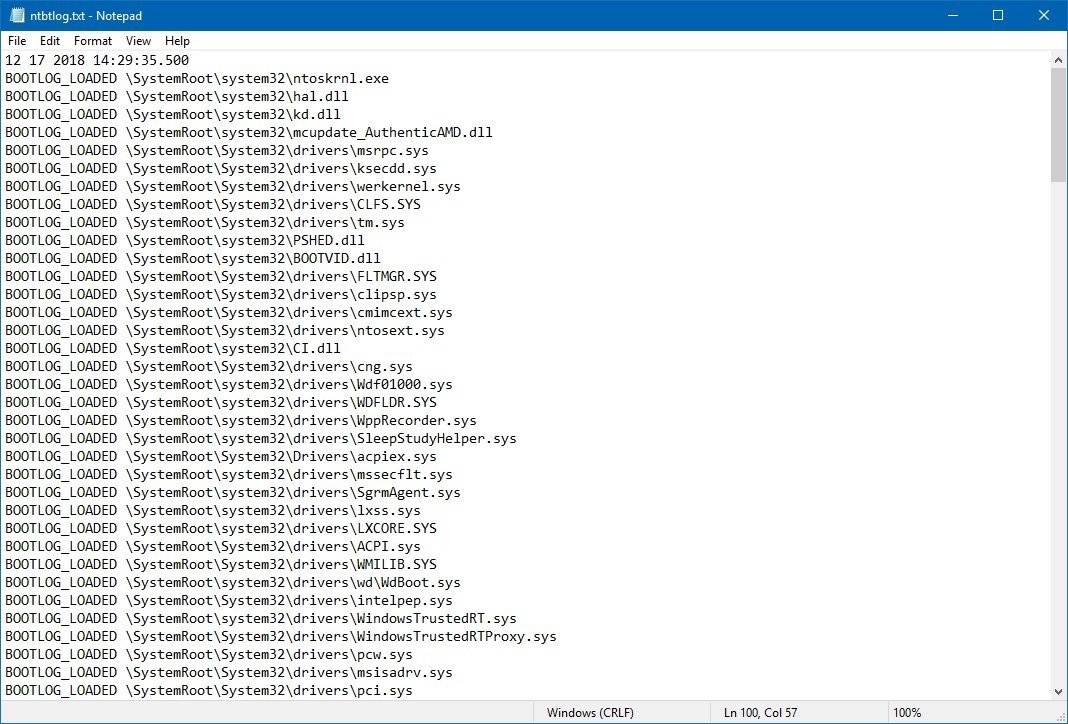
На место идентификатора подставьте его значение. В нашем примере это current (смотрите скриншот). Теперь выполните перезагрузку. Как и в предыдущем случае, журнал загрузки будет создан в папке Windows. Как понять из содержимого журнала, был ли загружен драйвер или нет? Очень просто. Запись BOOTLOG_LOADED указывает, что драйвер загрузился, запись BOOTLOG_NOT_LOADED будет указывать, что во время старта операционной системы загрузка драйвера была пропущена.
When troubleshooting problems with your Windows computer, it is useful to have as much system information as possible. There are several ways to generate information about what is going on underneath the hood of your PC. And if you are experiencing startup issues, one of the most useful things to check is the boot log.
Here’s how to enable the boot log and where to find it on your Windows computer.
What Is the Windows Boot Log?
The Boot Log or System Initialization Log is a text file that can be generated during your computer’s boot sequence. It contains a list of all the drivers that are loaded during boot, as well as any expected drivers that are not loaded.
The boot log feature is disabled by default. There are two ways to enable or disable the boot log, both of which are explored below. Because you are making changes to an important part of Windows, both methods require you to be signed in as an administrator. If you do not have elevated privileges, you won’t be permitted to enable the boot log.
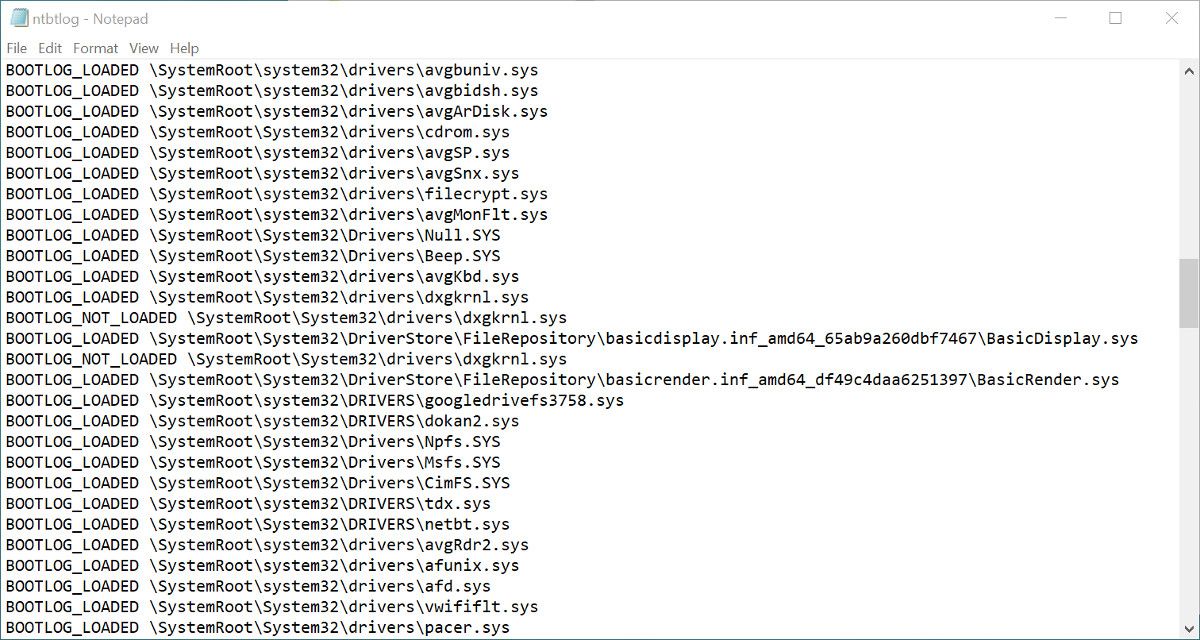
The text file generated after you enable boot logging can be opened and read in a text editor such as Notepad. Each driver is listed separately, and either labeled as LOADED or NOT_LOADED. The folder path to each driver is also shown.
How to Enable the Boot Log With MSConfig
Using the MSConfig tool, also known as the System Configuration tool, is probably the easiest of the two methods for enabling the boot log.
- Open the Run dialog by searching for Run in Windows Search, or by using the Win + R shortcut.
- In the Run app, type msconfig and press Return. If prompted, confirm your administrator privileges.
- Select the Boot tab in the System Configuration app. The default OS should already be selected.
- Check the box next to Boot log in the Boot options section, then click Apply.
You will be prompted to restart your computer. Doing so will immediately generate the boot log. You can also exit without restarting if you need to save and close any unfinished files. In this case, the boot log will be created the next time you restart the PC.
How to Modify Boot Settings With BitLocker Enabled
Enabling the boot log is seen by Windows as editing boot settings. This will be an issue if you have BitLocker Encryption turned on for the disk where the OS is installed. Enabling the boot log and then restarting will activate BitLocker protections.
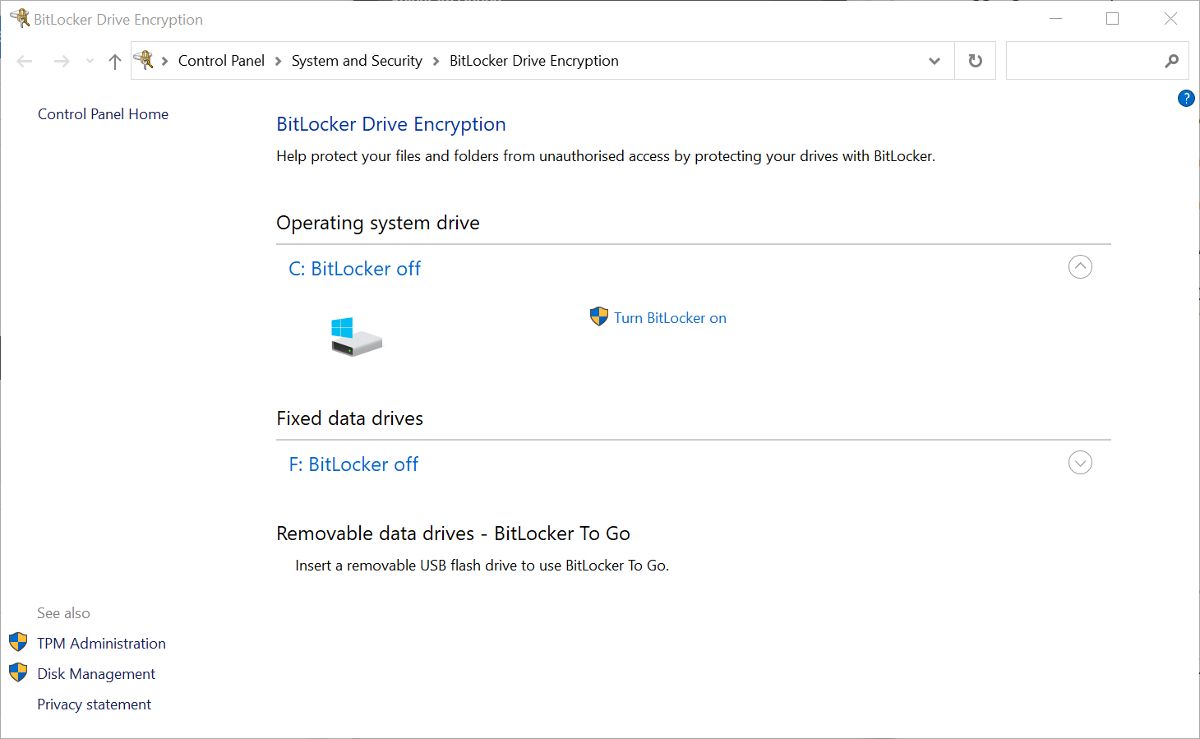
If BitLocker is enabled, you will see a message when you apply the boot settings changes in MSConfig. The message will remind you that when you restart after making changes to boot settings, your computer will enter recovery mode. You will be required to enter a BitLocker Recovery Key or Recovery Password to continue startup.
If you see the message and do not have a BitLocker recovery key or password, do not proceed with the changes to the boot options. If you don’t know where to find it, our guide will help you locate your BitLocker Recovery Key.
How to Enable the Boot Log With Command Prompt
If you cannot access MSConfig for some reason, you can enable the boot log using Command Prompt (Elevated). This method requires a bit more work but is still simple to do if you follow the steps here.
- In Windows Search, type Command Prompt. Right-click on it in the results and select Run as Administrator.
- In the Elevated Command Prompt, type bcdedit and press Return. This generates a list of boot details.
- Make a note of the Identifier in the Windows Boot Loader section. This will usually be {current}.
- To enable the boot log, type the following: bcdedit /set {identifier} bootlog Yes. Replace identifier with the value you noted in the previous step.
- Type bcdedit again to check if the boot log has been enabled. It will be shown at the bottom of the list of boot information.
- You can then close Command Prompt and restart your PC to generate the log.
Using the Command Prompt can be a little daunting for new Windows users, or if you have never used the tool before. It really isn’t anything to be scared of, as long as you follow the command instructions from a trusted information source like MakeUseOf. If you want to become more familiar with this useful Windows tool, check out our beginner’s guide to the Command Prompt.
Where Is the Windows Boot Log Saved?
The generated boot log file will be called ntbtlog.txt. You can find it at C:\Windows\ntbtlog.txt. If you don’t see the file at that location, ensure you have restarted the computer at least once since you enabled the boot log.
There will only be one version of the file, and each time you start up your computer with boot logging enabled, it will be overwritten. To prevent this, you can move a generated log to your desktop or elsewhere on your computer. This allows you to compare boot logs from different times. You will need to confirm administrator privileges before you can move the boot log out of the Windows folder.
How to Disable the Boot Log
After completing your troubleshooting with the boot log, there is no need to keep it enabled. You can disable the boot log by simply reversing the processes shown above.
- Run MSConfig and select the Boot tab. Uncheck the box next to Boot log in the Boot options section. Then click Apply.
- Open an Elevated Command Prompt, and then type: bcdedit /set {identifier} bootlog No. Replacing identifier with the one you used previously, e.g. {current}.
You can use either method to disable the boot log, even if it is a different method from the one you used to enable it.
Troubleshoot Startup Issues With the Windows Boot Log
Enabling the boot log in Windows allows you to see a text list of every driver that is loaded and not loaded during the boot process. This can be very useful for troubleshooting startup issues and also problems with apps and services not working properly after startup.

On Windows 10, when you’re having driver issues, you can enable the «Boot Log» option to create a special ntbtlog.txt file that includes a detailed list of the loaded and unloaded drivers during boot.
The option won’t fix any problems your device may be experiencing, but you can analyze this information to understand what might be preventing Windows 10 from loading correctly to find an appropriate fix.
In this Windows 10 guide, we walk you through the steps to enable «Boot Log» to collect information about the loaded and not loaded drivers during startup using System Configuration and Command Prompt.
- How to enable ‘Boot log’ using System Configuration
- How to enable ‘Boot log’ using Command Prompt
How to enable ‘Boot log’ using System Configuration
To log driver information during boot using System Configuration, use these steps:
- Open Start.
- Search for System Configuration and click the top result to open the experience.(Quick Tip: You can also use the Windows key + R keyboard shortcut to open the Run command, enter the msconfig command, and click OK to open System Information.)
- Click on the Boot tab.
- Check the Boot log option.
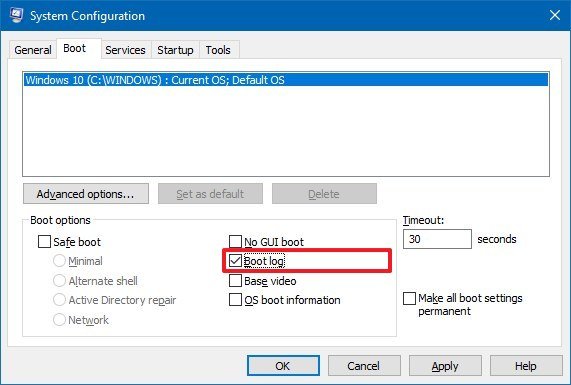
- Click the Apply button.
- Click the OK button.
- Click the Restart button.
Once you complete these steps, a special log file will be created with the drivers that were loaded, including those that were omitted.
Viewing the ntbtlog text file
To find and view the ntbtlog.txt file, use these steps:
- Use the Windows key + R keyboard shortcut to open the Run command.
- Type the following file path:
c:\Windows\ntbtlog.txt - Click the OK button.
In the text file, you can see a list of loaded and unloaded drivers during boot, which you can now use in your troubleshooting process to fix a related issue.
All the latest news, reviews, and guides for Windows and Xbox diehards.
If you no longer need the «Boot Log,» you can disable the feature using the same instructions mentioned above, but on step No. 4, make sure to clear the option.
How to enable ‘Boot log’ using Command Prompt
To log driver information during boot using Command Prompt, use these steps:
- Open Start.
- Search for Command Prompt, right-click the top result, and select the Run as administrator option.
- Type the following command and press Enter:
bcdedit - Under the «Windows Boot Loader» section, note the «identifier» and «bootlog» information. For example:
- identifier — {current}.
- bootlog — No.
- Type the following command to enable logs during boot and press Enter:
bcdedit /set {current} bootlog YesIn the command, make sure to replace {current} with the information in your identifier.
After completing the steps, a log file will be created in the Windows folder with the drivers that were loaded, including those that were not loaded.
Viewing the ntbtlog text file
To find and view the «Boot Log» file, use these steps:
- Use the Windows key + R keyboard shortcut to open the Run command.
- Type the following file path:
c:\Windows\ntbtlog.txt - Click the OK button.
In the text file, you can see information about drivers that Windows 10 loaded and didn’t load during the boot process, which you can now use in your troubleshooting process to resolve a related problem.
You can always revert the changes using the same instructions outlined above, but on step No. 5, make sure to use this command:
bcdedit /set {current} bootlog No.
Although this guide is focused on Windows 10, the «Boot Log» option has been available for years, and you can also use the same instructions on Windows 8.1 and Windows 7.
More Windows 10 resources
For more helpful articles, coverage, and answers to common questions about Windows 10, visit the following resources:
- Windows 10 on Windows Central – All you need to know
- Windows 10 help, tips, and tricks
- Windows 10 forums on Windows Central
Mauro Huculak has been a Windows How-To Expert contributor for WindowsCentral.com for nearly a decade and has over 15 years of experience writing comprehensive guides. He also has an IT background and has achieved different professional certifications from Microsoft, Cisco, VMware, and CompTIA. He has been recognized as a Microsoft MVP for many years.
Want to see your PC Startup and Shutdown History? Finding out the last time the PC was correctly turned off or booted up is the way to start troubleshooting many Windows issues. Another scenario is a public system. Thanks to the Event Viewer, administrators can view and monitor unauthorized use of the computer.
Whatever the reason, you can find out when your PC was last turned on and shut down directly from Windows. You don’t need a third-party app for this; the Windows Event Viewer can handle it perfectly.
What is the Windows Event Viewer?

The Windows Event Viewer is a Microsoft Management Console (MCC) – a core service of Windows that cannot be stopped or disabled. It keeps track of every activity that takes place on your PC.
The Event Viewer logs entries during every event. It also logs the start and stop times of the event log service (Windows), giving the correct date, time, and user details of every shutdown process.
How to use the Event Viewer?
Aside from keeping a log of when your Windows start and stop, you can use the Event Viewer for the following:
- Create custom views by saving useful event filters.
- You can see events from different event logs.
- You can also create and manage different event subscriptions.
- Create and schedule a task to run when triggered by another event.
Types of events in Windows related to shutting down and restarting
They are more than four events related to shutting down and restarting the Windows 11/10 operating system; we will list the important five. They are:
- Event ID 41: This event indicates that Windows rebooted without a complete shutdown.
- Event ID 1074: This event is written down when an application is responsible for the system shutdown or restart. It also indicates when a user restarted or shut down the system by using the Start menu or by pressing CTRL+ALT+DEL.
- Event ID 6006: This event indicates that Windows was adequately turned off.
- Event ID 6008: This Event indicates an improper or dirty shutdown. It shows up when the most recent shutdown was unexpected.
There are different ways to access any of the events listed above. The traditional way is through the Event Viewer app itself. As you will see below, most events can be accessed with the Command Prompt.
See PC Startup and Shutdown History
1] View shutdown and restart events from Event Viewer
Open the Run dialogue box and input eventvwr.msc then hit OK. In Event Viewer, select Windows Logs > System from the left pane. From the right, click on the Filter Current Log link.
Type in 41,1074,6006,6008 into the box below Includes/Exclude Event IDs... Hit Ok. Windows then displays all shutdown-related events.
The Event Viewer shows detailed information on every operation carried out on the system. Learn how to view full event viewer logs in this article.
2] See the last shutdown time using Command Prompt
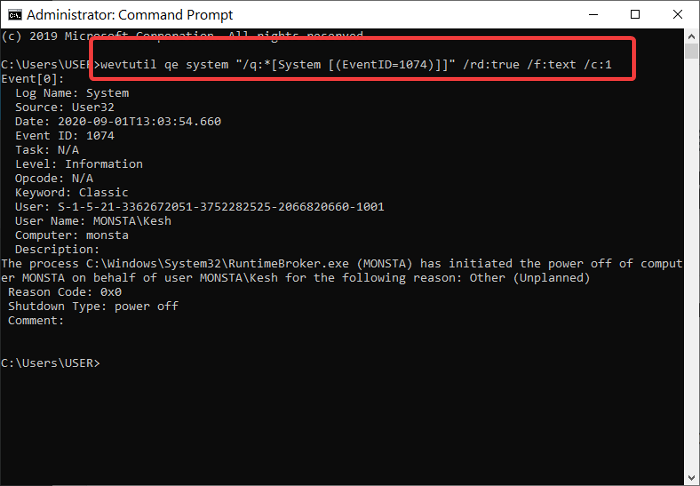
Open the Command Prompt, copy and paste the following code in the window, and hit Enter:
wevtutil qe system "/q:*[System [(EventID=1074)]]" /rd:true /f:text /c:1
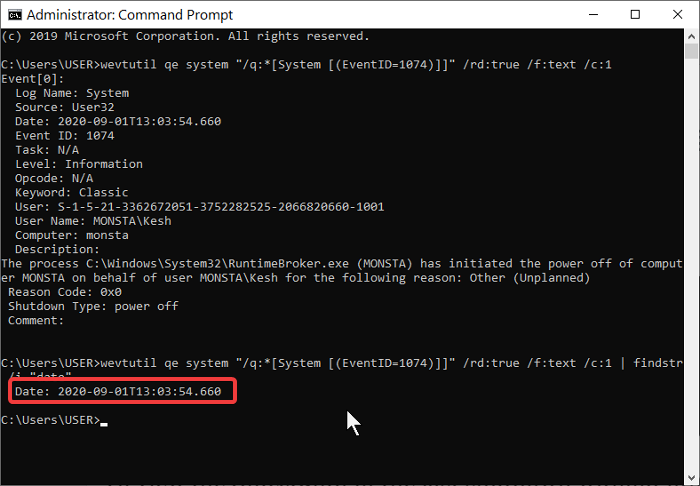
To view the timestamp of the last shutdown without other details, copy and paste the code below then hit Enter:
wevtutil qe system "/q:*[System [(EventID=1074)]]" /rd:true /f:text /c:1 | findstr /i "date"
As much as this method gets the job done, we often suggest you use method one, which is the Event Viewer. Not only is it more straightforward, but it also doesn’t involve copying and pasting commands.
We hope you find this post useful.
Read: How to export Event Viewer logs in Windows
How to see PC startup and shutdown history in Windows 11?
To set PC startup and shutdown history in Windows 11, you can use Event Viewer, Command Prompt, or Terminal. In the Command Prompt, enter this command: wevtutil qe system "/q:*[System [(EventID=1074)]]" /rd:true /f:text /c:1. It displays the complete shutdown timing along with some other descriptions.
How do I see restart logs in Windows 11?
To see the restart logs in Windows 11, you need to open the Event Viewer. Then, go to Windows Logs > System and try looking for Kernel-Power and/or Kernel-Boot. It denotes the reboot and startup. From here, you can see all the entries made by a restart.
Related read: How to find out Windows Downtime, Uptime and Last Shutdown Time.
Вы тут: Главная → Windows → Диагностика медленной загрузки Windows с помощью журнала событий
Сегодня в моем блоге авторский дебют участника конференции OSZone в серию материалов об ускорении загрузки Windows и ее диагностике.
Иногда мы замечаем, что операционная система стала загружаться дольше обычного. Если это эпизодический случай, повода для беспокойства нет. Но когда данное явление приобретает систематический характер или прогрессирует, тут уже стоит задуматься о причинах такого «странного» поведения системы. В этой статье мы рассмотрим один из способов диагностики причин длительной загрузки Windows, используя ее штатное средство – журнал «Просмотр событий». Быстрый доступ к этому инструменту обеспечивает нажатие сочетания клавиш Win+R и последующий ввод команды: eventvwr.msc /s.
На этой странице:
- Фильтруем журнал событий
- Узнаем продолжительность загрузки
- Диагностируем медленную загрузку
Фильтруем журнал событий
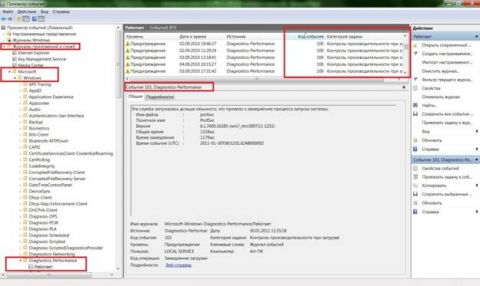
В разделе «Microsoft Windows» имеется подкатегория «Diagnostics-Performance», а в ней — операционный журнал, в котором есть категория задачи «Контроль производительности при загрузке» (рис. 1).
Увеличить рисунок
Рисунок 1
Коды событий (Event ID ) в этой категории варьируются от 100 до 110. Просмотрев все события с кодом 100, можно выяснить, сколько времени требуется Windows на загрузку, начиная с самого первого запуска после установки. А проанализировав события в диапазоне от 101 до 110, можно узнать, в каких случаях загрузка замедлялась и почему.
Можно, конечно, просматривать журнал «Diagnostics-Performance» вручную (например, отсортировать по возрастанию столбец «Код события»), но гораздо удобнее создать собственное настраиваемое представление. Это фильтр, который можно сохранить и использовать в дальнейшем для облегчения работы.
Для этого:
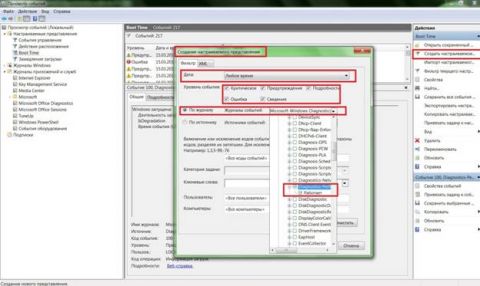
- Выберите опцию «Создать настраиваемое представление» из меню «Действие».
- В открывшемся диалоговом окне оставьте значение «Любое время» в поле «Дата» и отметьте флажками все опции в поле «Уровень события». Выберите опцию «По журналу», если она еще не выбрана, и раскройте список. В дереве разделов найдите категорию «Журналы приложений и служб — Microsoft — Windows – «Diagnostics-Performance» и поставьте флажок «Работает» (рис. 2).
- В поле «Включение или исключение кодов событий» введите 100 и нажмите «OK» – (рис. 3). События с кодом 100 показывают, сколько времени уходит на загрузку системы.
- В диалоговом окне «Сохранить фильтр в настраиваемое представление», введите подходящее имя (например, «Boot Time» — Время загрузки) и нажмите «OK» — (см. рисунок 4).
- Далее нам нужно точно таким же образом создать еще одно настраиваемое представление, но в поле «Включение или исключение кодов событий» ввести на этот раз значения 101-110 и сохранить фильтр, например с именем «Замедление загрузки».
Увеличить рисунок
Рисунок 2
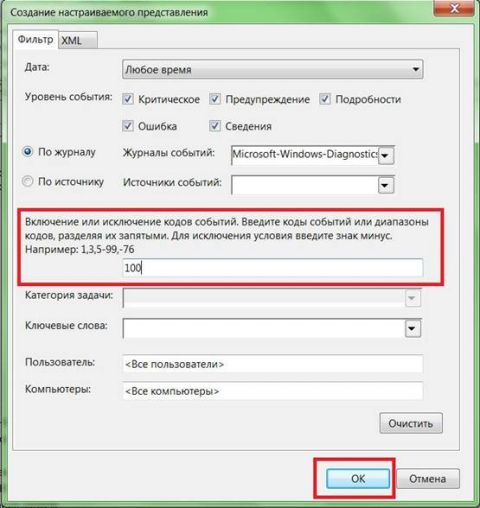
Рисунок 3
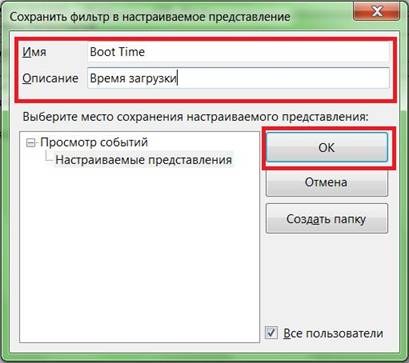
Рисунок 4
Узнаем продолжительность загрузки
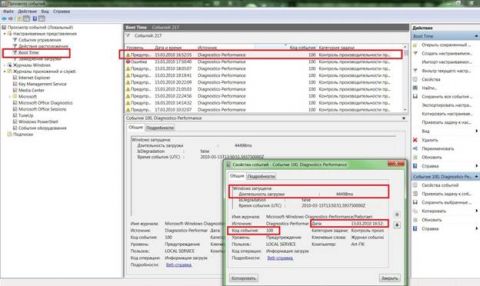
Чтобы выяснить, сколько Windows требуется времени на загрузку на вашем компьютере, выберите в левой части окна, созданный ранее фильтр Boot Time (Время загрузки) в разделе «Настраиваемые представления» и отсортируйте столбец «Дата и время» по возрастанию. Так вы сможете посмотреть, как изменялась продолжительность загрузки системы со дня ее установки (рис. 5).
Увеличить рисунок
Рисунок 5
Из рисунка видно, что длительность самой первой загрузки моей Windows (дата ее установки) по состоянию на 15 марта 2010 года составила 44 498 миллисекунд — или, если разделить на 1000, примерно 45 секунд. Для первого запуска этот показатель нормальный, поскольку после установки система выполняет целый ряд задач: устанавливает драйверы, инициализирует программы в автозагрузке, настраивает профиль пользователя и так далее.
По состоянию на 30 января 2011 года время загрузки возросло, и составило 115652 ms, т.е. почти 2 минуты. Это много.
Настраиваемое представление «Время загрузки» предоставляет информацию обо всех случаях загрузки системы за время ее существования. Иногда загрузка затягивается по вполне объяснимым причинам — из-за установки обновлений, драйверов или программного обеспечения.
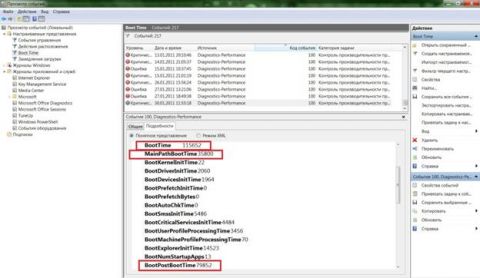
На вкладке «Подробности» процесс загрузки описывается во всех деталях, однако для анализа продолжительности загрузки достаточно будет только трех параметров на вкладке «Подробности» (рис 6).
Увеличить рисунок
Рисунок 6
Рассмотрим суть значений этих параметров подробнее.
- Параметр «MainPathBootTime » обозначает временной интервал между возникновением на экране анимированного логотипа Windows и появлением рабочего стола. В этот момент систему уже можно использовать, но в фоновом режиме продолжается загрузка низкоприоритетных задач.
- Параметр «BootPostBootTime » указывает, через какой промежуток времени после появления рабочего стола системой можно начинать пользоваться в полном объеме.
- Параметр «BootTime » — это та же самая величина, что и на вкладке «Общие» обозначена как «Время загрузки». Она представляет собой сумму параметров «MainPathBootTime» и «BootPostBootTime».
И наконец, мы подошли к самому важному и интересному.
Диагностируем медленную загрузку
Чтобы выяснить причину замедления загрузки Windows, выделите фильтр «Замедление загрузки» в левой части окна в разделе «Настраиваемые представления» и отсортируйте столбец «Код события» (Event ID) по возрастающей. Каждый код соответствует определенному событию, увеличивающему продолжительность загрузки.
Всего существует десять кодов событий такого рода, мы же в этой статье рассмотрим только некоторые из них.
- Код события 101. Событие 101 возникает, когда приложение загружается дольше обычного. Это часто связано с установкой обновлений. Если замедление загрузки наблюдается эпизодически, ничего страшного в этом нет. Но если какое-то приложение всякий раз загружается слишком долго или время замедления оказывается ненормально большим, тут нужно уже задуматься.
- Код события 102. Событие 102 свидетельствует о замедлении инициализации драйвера. Это, опять же, может быть вызвано обновлением, но если ситуация возникает регулярно или замедление оказывается серьезным, стоит установить более свежую версию драйвера. Если таковой не имеется, попробуйте удалить и переустановить драйвер.
- Код события 103. Событие 103 возникает при замедлении загрузки служб. Иногда это случается, но если это происходит регулярно, попробуйте изменить тип запуска службы на «Автоматически отложенный запуск» или «Вручную» в консоли «Службы».
- Код события 106. Событие 106 свидетельствует о том, что выполнение фоновой операции по оптимизации затянулось. Поскольку оптимизация — операция продолжительная, ничего страшного в этом нет.
- Код события 109. Событие 109 возникает при замедлении инициализации устройства. Если это явление редкое, беспокоиться не стоит. Но если инициализация затягивается всякий раз, не забывайте регулярно делать резервное копирование и будьте готовы к замене проблемного устройства.
У меня, например, обнаружились два события. Одно с кодом ID 108 :
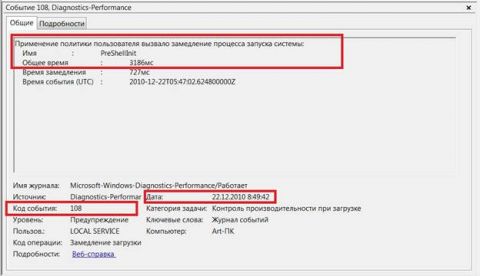
Увеличить рисунок
Рисунок 7
Другое с кодом 109:
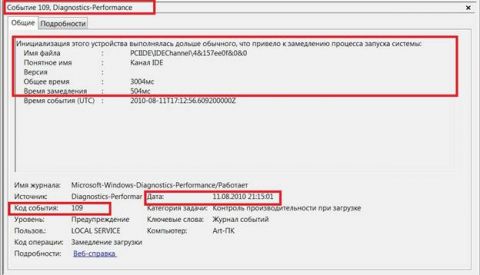
Увеличить рисунок
Рисунок 8
Столь маленькое время задержки на рисунках 7 и 8 не трагично, они приведены тут лишь для наглядности.
Проведенный таким образом анализ и элементарные навыки пользования поиском в сети Интернет, позволят вам составить представление о причинах увеличения времени загрузки операционной системы.