
Having server Load problems and confusing how to check server load in Windows servers?
Windows Task Manager helps to analyze the server load issues on the Windows servers.
At Bobcares, we often get requests to fix server load in Windows servers issues as part of our Server Management Services.
Today, let’s get into the details and see how our Support Engineers check server load in Windows servers.
How to check server load in Windows servers in different methods
The evaluation of server load is necessary to have an idea about resources and confirm they are sufficient for any running application. It helps to find reasons for slow performance and reliably pinpoint any server resource that may need attention.
While there are many options available to check the server load. For example, Windows VPS Task Manager, it helps to check what is going on, and interact with applications, processes, and services to identify the load. Also, resource Monitor can be opened from Task Manager.
How to Start the Windows Task Manager,
- Click the Start menu and type task > then choose Task Manager.
- Right-click the Taskbar area> choose Task Manager from the menu.
- Press Ctrl+Alt+End keys on the keyboard when in a Remote Desktop session.
- Execute the command taskmgr.
While click More details to discover the treasure trove of information it is hiding.
Further, The Task Manager provides details such as Processes, Performance, Users, Details, and Services.

1. Processes
The Processes tab gives everything that is currently running in the system and the amount of CPU and memory resources that are using by them. In addition, we can see the total CPU and memory utilization.
There, we can see If any particular application is using a high amount of the CPU or memory, if so, this will be a potential source of performance issues.
2. Performance
The performance tab provides lots of information and allows to select from CPU, Memory, and Ethernet views to show activity over a 60-second period. With the help of the performance tab view, we can identify spikes or see the trend over time to determine if a condition is temporary or sustained.
3. CPU Performance
CPU performance information shows the following details,
- The type of CPU and speed.
- Number of processes, threads, and handles in use.
- The number of virtual CPUs, in most cases.
- uptime.
4. Memory Performance
Usually, the Memory Performance tab describes the total amount of memory in the system as well as what is in use and available. In addition,
- Committed represents virtual memory and the pagefile (an extension of RAM) on disk.
- Cached represents memory used by Windows.
- The Paged pool represents memory used by Windows that can be paged out to the pagefile on disk if memory starts running low. Non-paged cannot be paged to the pagefile.
5. Ethernet Performance
Ethernet performance information gives the type of network adapter and the number of resources it is using with a graphed line for both outbound and inbound traffic, it also gives numeric values for the data being sent.
Further, we can also see the Adapter name, Connection type, and the IP addresses assigned. Moreover, Right-clicking on the graph will provide the network details including network utilization, link speed, state, bytes send and received, etc.
6. Users
The Users tab shows us a list of all the users connected to the server now. Also, it tells how much CPU and memory resources the user is utilizing.
Importantly, we can determine if any specific user is consuming high resources or has disconnected from a session, leaving it running in memory, and choose whether to log the user out to free up resources.
7. Details
The Details tab describes a list of all the running programs and processes along with their Process ID number. Also, it shows whether the program is running or suspended, the user name it is running under, the amount of CPU and memory it is using, and a description of the process.
8. Services
The Services tab gives a list of service names, their PID (Process ID) numbers, details of the service, the status as either stopped or running, and the Group the service is running under.
Normally, right-clicking on service allows you to start, stop, restart, and access additional options.
[Need assistance to check the server load? We’ll help you.]
Conclusion
In short, Windows Task Manager allows users to analyze the server load issues on the Windows servers. Today, we saw how to check server load in windows.
PREVENT YOUR SERVER FROM CRASHING!
Never again lose customers to poor server speed! Let us help you.
Our server experts will monitor & maintain your server 24/7 so that it remains lightning fast and secure.
GET STARTED
var google_conversion_label = «owonCMyG5nEQ0aD71QM»;
How to Check Server Load on a Windows Server. One of the important tasks for server management in hosting companies is monitoring the server load. Server load monitoring and ensuring that the server load is not too high ensures hosting managers that the hardware is in good condition and prevents downtime.
In this article, we examine how to find the load on the server and, while familiar with this concept, provide solutions for managing it.
While there are many tools and options available, we focus on our Windows VPS Task Manager as a means to help us quickly see what is going on, and interact with applications, processes, and services to identify the load.
Table of Contents
How to Start the Windows Task Manager
– The first way: Click the Start menu and type task manager then choose it.
– The second way: Right-click the Taskbar area and choose Task Manager from the menu.
– The third way: Press Ctrl+Alt+End keys on the keyboard when in a Remote Desktop session.
– The fourth way: Run the command taskmgr.
How to Check Server Load on a Windows Server
Let’s look at what the Task Manager has to offer.
You can click More details to discover more information on this window.
The Task Manager provides quick access to Processes, Performance, Users, Details, and Services.
We’ll go through each tab to see what they have to offer and discover what to look for when checking server load.
1) Processes Tab
The Processes tab shows us everything that is running in the system and the amount of CPU and memory resources it is using.
At the top, you can see the total CPU and memory utilization.
By clicking the CPU or Memory column headings, you can sort the processes list by that criteria. You can also use the sort arrow to determine whether to sort from highest to lowest usage or the opposite.
You can click on any individual process and end the task, see resource usage, and more.
2) Performance Tab
The performance tab has the most visual display of information and allows you to select from CPU, Memory, and Ethernet views to show activity over a 60-second period.
With this view, you can identify spikes or see the trend over time to determine if a condition is temporary or sustained.
CPU Performance
CPU performance information shows you the type of CPU and speed, the number of processes, threads, and handles in use, as well as the number of virtual CPUs, in most cases.
You can also see how long the system has been up (uptime).
This last bit of information can tell you how long the server has been running, confirm if it successfully completed a restart, or if it rebooted unexpectedly due to running out of resources.
Memory Performance
Memory Performance information shows you the total amount of memory in the system as well as what is in use and available.
Committed represents virtual memory and the pagefile (an extension of RAM) on disk.
Cached represents memory used by Windows, and the Paged pool represents memory used by Windows that can be paged out to the pagefile on disk if memory starts running low.
Non-paged cannot be paged to the pagefile.
Ethernet Performance
Ethernet performance information shows you the type of network adapter as well as the number of resources it is using with a graphed line for both outbound and inbound traffic, as well as numeric values for the data being sent.
You can also see the Adapter name, Connection type, and the IP address(es) assigned.
Right-clicking on the graph will allow you to see network details including network utilization, link speed, state, bytes send and received, etc.
On the Performance tab, you also have the option to launch Resource Monitor to see even more detail.
3) Users Tab
The Users tab shows you a list of all the users connected to the server and how much CPU and memory resources the user is utilizing.
You can click on a specific user to Disconnect them, send them a message, or take over their session if we have Administrator rights.
In the context of checking for load, you can determine if a specific user is consuming too many resources or has disconnected from a session, leaving it running in memory, and choose whether to log the user out to free up resources.
4) Details Tab
The Details tab shows you a list of all the running programs and processes along with their PID (Process ID) number, whether the program is running or suspended, the user name it is running under, the amount of CPU and memory it is using, and a description of the process.
You can click any of the column names to sort by that column in highest to lowest or the opposite order.
The PID number can be very helpful to track down a specific process that is referenced in event logs.
Right-clicking an item allows you to choose options including:
– ending a process or process tree
– set a priority for the running process
– establish affinity to a specific processor or all processors
– additional options
5) Services Tab
The Services tab shows you a list of service names, their PID (Process ID) numbers, a description of the service, the status as either stopped or running, and the Group the service is running under.
Right-clicking on service allows you to start, stop, restart, and access additional options.
You should be careful not to change the status of some services as they depend on others, and stopping the wrong one could have unintended consequences on the system or devices.
To learn more about a service, you can right-click it and choose Search Online.
How to Check Server Load on a Windows Server
Ways to start Resource Monitor
– Click the Start menu and type resource monitor then choose it.
– Right-click the Taskbar area and choose Task Manager from the menu.
Then from Performance tab choose Open Resource Monitor.
– Run the command resmon.
The overview provides you with data on CPU, Memory, Disk, and Network options and graphs all on one page with the option to expand or collapse each section.
It will also show the current usage of a resource as well as the highest active time.
Clicking individual sections provides more detail.
A. CPU shows processes, services, associated handles, and modules, and will show individual CPUs and their load in addition to total CPU.
B. Memory shows processes in addition to a breakdown of the physical memory and graphs to show commit charge which relates to the use of the pagefile and the number of hard faults per second which can be an indicator of how many times Windows has to access the swap file.
Note: If your system is showing hundreds of hard faults per second, this indicates a need for more physical memory.
C. Disk shows the processes in addition to a breakdown of how much each task is reading and writing to disk.
The graphs show total disk activity in addition to Queue Length.
Disk Queue length indicates how many disk I/O operations are queued up waiting for their turn to be processed by the disk.
If you find that the highest active time is above 80% and the disk queue length is 2 or higher, it means processes are waiting, and the performance of the disk is affecting the overall performance of the system.
In many cases, this number will be high due to a system that lacks sufficient physical memory and is constantly paging information to disk or relying too heavily on virtual memory. It will often be accompanied by a CPU running above 90% for sustained periods.
D. Network shows the processes with network activity, in addition to TCP connections and listening ports, and graphs to show network transfer and TCP connections.
Sustained high network utilization can indicate congestion issues and a need for more capacity.
Windows Virtual Private Server Packages in Eldernode
How to Check Server Load on a Windows Server.
Goodluck.
Если виртуальный или выделенный сервер не справляется с нагрузкой, сайты открываются медленно, а вместо контента появляются неприветливые ошибки. Всё это раздражает посетителей, и они уходят к конкурентам.
Чтобы этого не произошло, нужно следить за параметрами сервера. За какими и как – расскажем в этой статье.
- Как посмотреть общую нагрузку на сервер
- Как посмотреть нагрузку детально
- Дисковая память
- Оперативная память
- Сетевой канал
- Как увидеть нагрузку через браузер
- Когда нагрузку создают Apache и Mysql
Как посмотреть общую нагрузку на сервер
Отслеживать нагрузку на ОС Windows позволяет «Диспетчер задач», в Linux свои инструменты.
Самая распространённая утилита мониторинга – top.
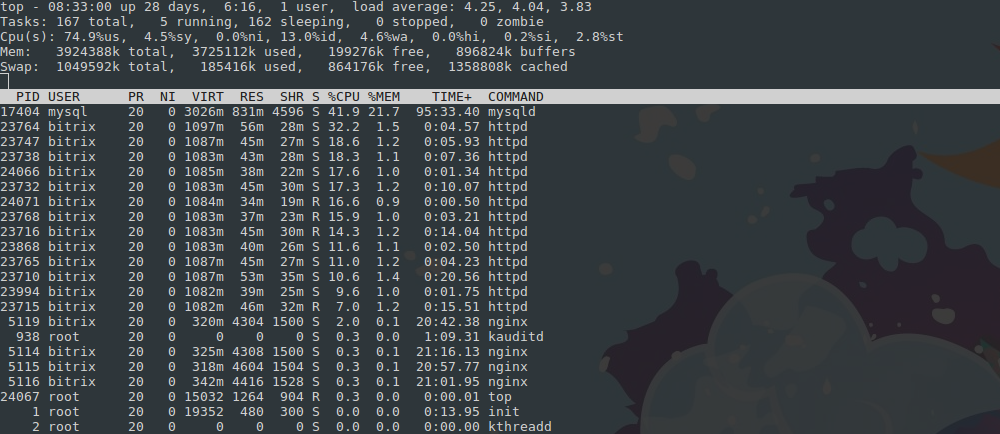
Top показывает среднюю нагрузку на сервер (Load Average) в течение 1, 5 и 15 минут. В идеале она должна быть меньше, чем количество ядер процессора. Например, LA 4 при четырёх ядрах означает: каждое ядро загружено на 100% — стоит снизить нагрузку.
Далее последовательно указаны самые «тяжёлые» процессы, сколько они потребляют оперативной памяти и CPU.
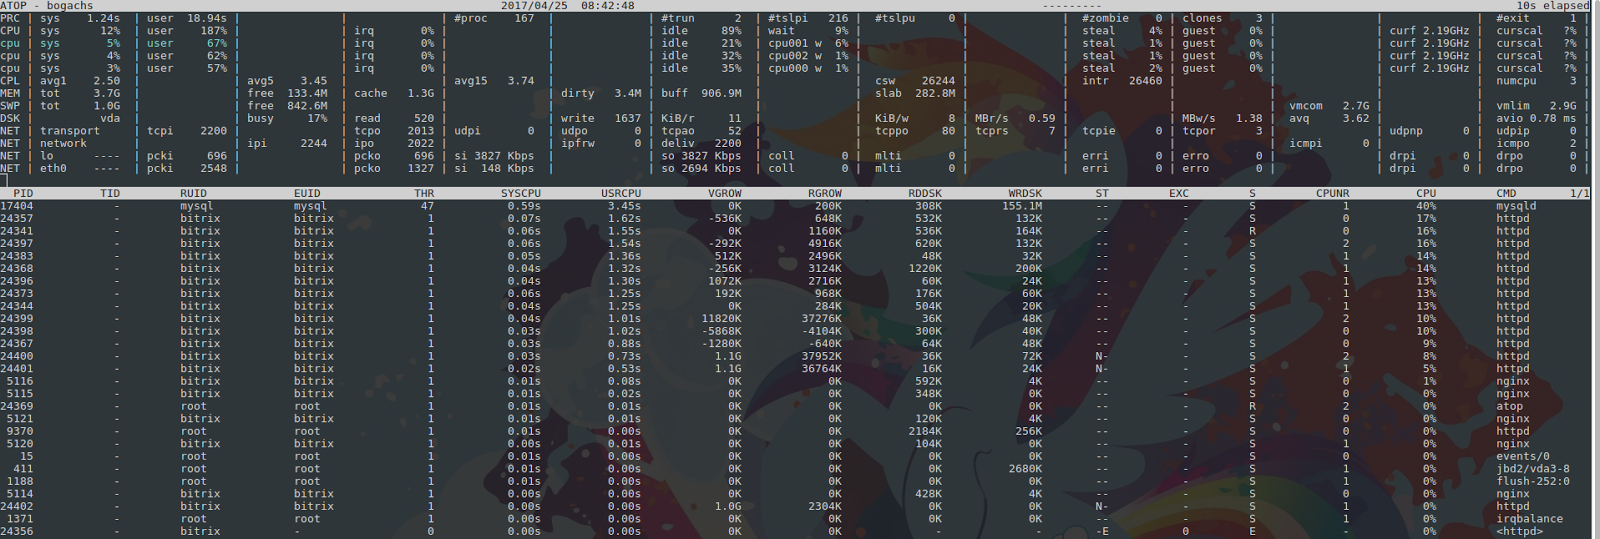
Другая утилита – atop – подсвечивает высокую нагрузку красным.
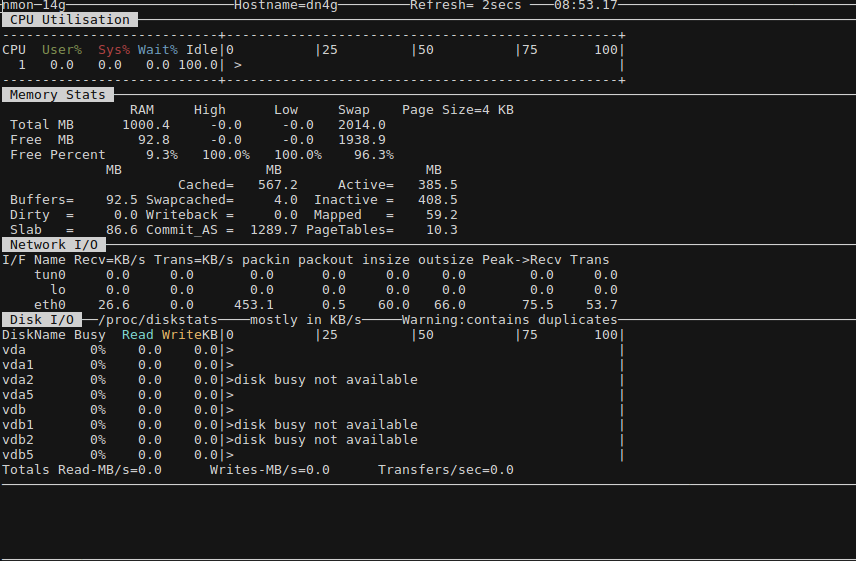
Схожий функционал предоставляет nmon – при нажатии определённых клавиш выдаёт графики нагрузки: процессор (с), чтение/запись диска (d), сеть (n) и память (m) и т. д. Список нужных клавиш будет отражен при запуске программы — в приветственном окне.
Как посмотреть нагрузку детально
Начнём с дисковой памяти — её не покажут перечисленные утилиты.
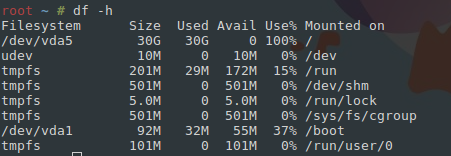
Ispmanager не открывается, а на сайтах возникает ошибка (например, Unable to connect to the database: Could not connect to MySQL), однако сам сервер доступен и пингуется. Скорее всего, закончилось место на диске, проверить это легко:
Команда df -h покажет все примонтированные разделы и сообщит, сколько места занято, а сколько свободно. Картина на скрине сигнализирует – место на диске нужно срочно освобождать:
du -hs /* отобразит размер всех директорий:
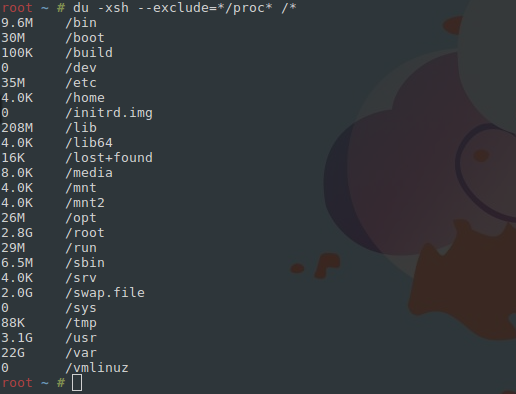
Последовательный переход в каждую директорию позволит выявить виновника нагрузки. В нашем случае это архив с любимым сериалом, просмотренным два года назад:

Также можно освободить место через очистку временных файлов – логов, кеша, php-сессий.
С оперативной памятью по-другому – она динамична. Процессы запускаются, отработав, умирают, и показатели меняются ежесекундно. Оценить обстановку поможет free -m.
В строке -/+ buffers/cache увидим показатели used и free – использованная и свободная память.
По первой строке можно определить объем доступной пользователю памяти. Для этого сложите параметры free и cached, так как закешированая память также может быть использована приложениями.

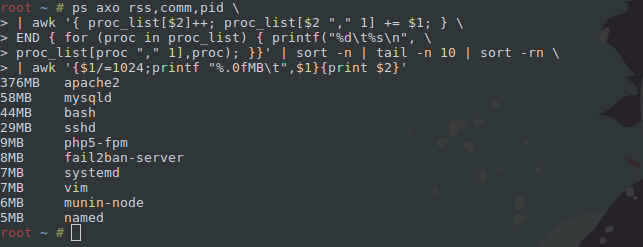
Определить, какие процессы занимают память, поможет такой однострочник:
ps axo rss,comm,pid \| awk '{ proc_list[$2]++; proc_list[$2 "," 1] += $1; } \END { for (proc in proc_list) { printf("%d\t%s\n", \proc_list[proc "," 1],proc); }}' | sort -n | tail -n 10 | sort -rn \| awk '{$1/=1024;printf "%.0fMB\t",$1}{print $2}'
Если на первый взгляд ресурсов сервера хватает, но все равно чувствуются задержки, проверьте сетевой канал.
Всем VDS на хостинге предоставлен минимум стомегабитный канал, хватает его или нет покажет iftop, запущенный с ключом -m 100M.

На скриншоте видна белая полоса — это доступная ширина канала. Больше, чем наполовину, она занята процессом загрузки с серверов Яндекс. Когда полоса доходит до правой части экрана, весь доступный канал забит — необходимо увеличить пропускную способность сервера.
Также показатели трафика на VDS покажет VMmanager.
Если вы используете VMmanager 5, перейдите в раздел «Использование канала». На графиках видно, сколько трафика прошло через сервер за определённый период времени.
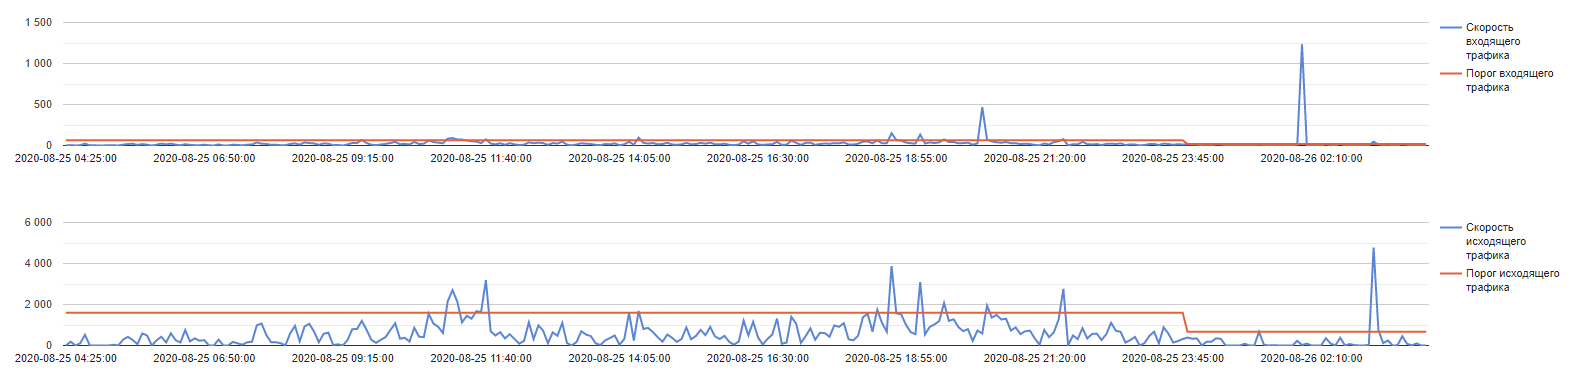
Если вы используете VMmanager 6, в разделе «Виртуальные машины» нажмите на ваш сервер и выберите пункт «Статистика».
.png)
В этом разделе вы увидите графики нагрузки на разные ресурсы сервера. Трафик будет внизу.
.png)
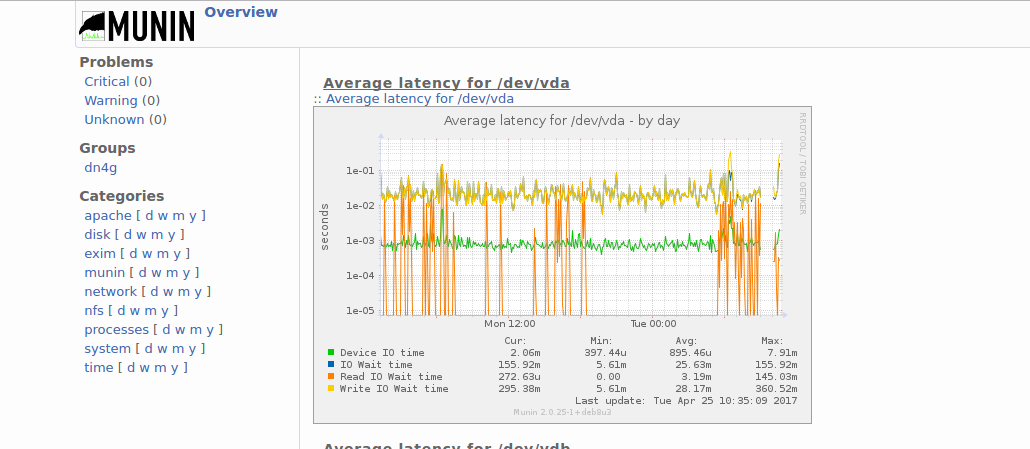
Как увидеть нагрузку через браузер
Есть мониторинги нагрузки, например, Munin:
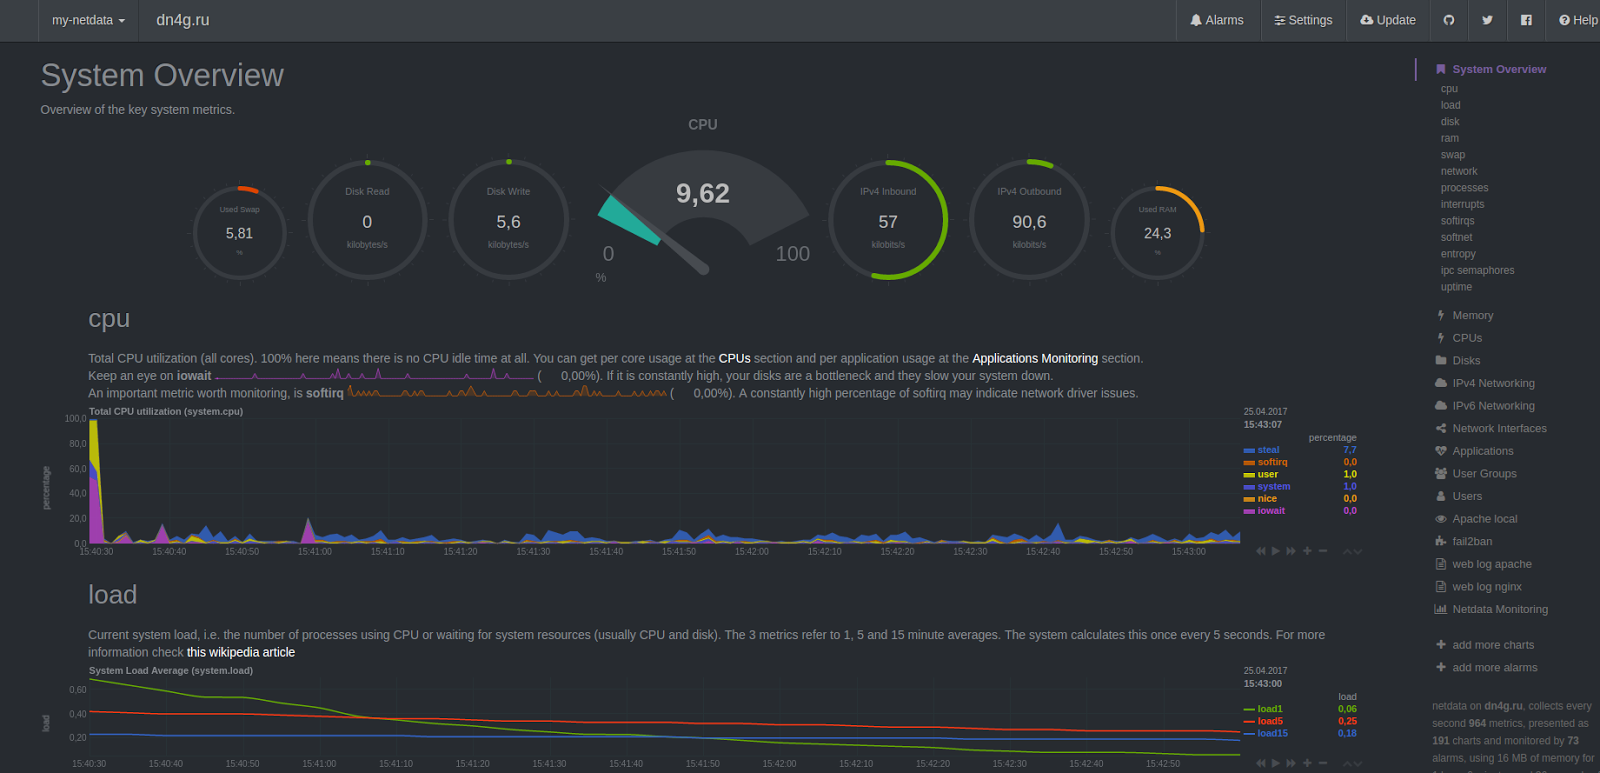
Или NetData:
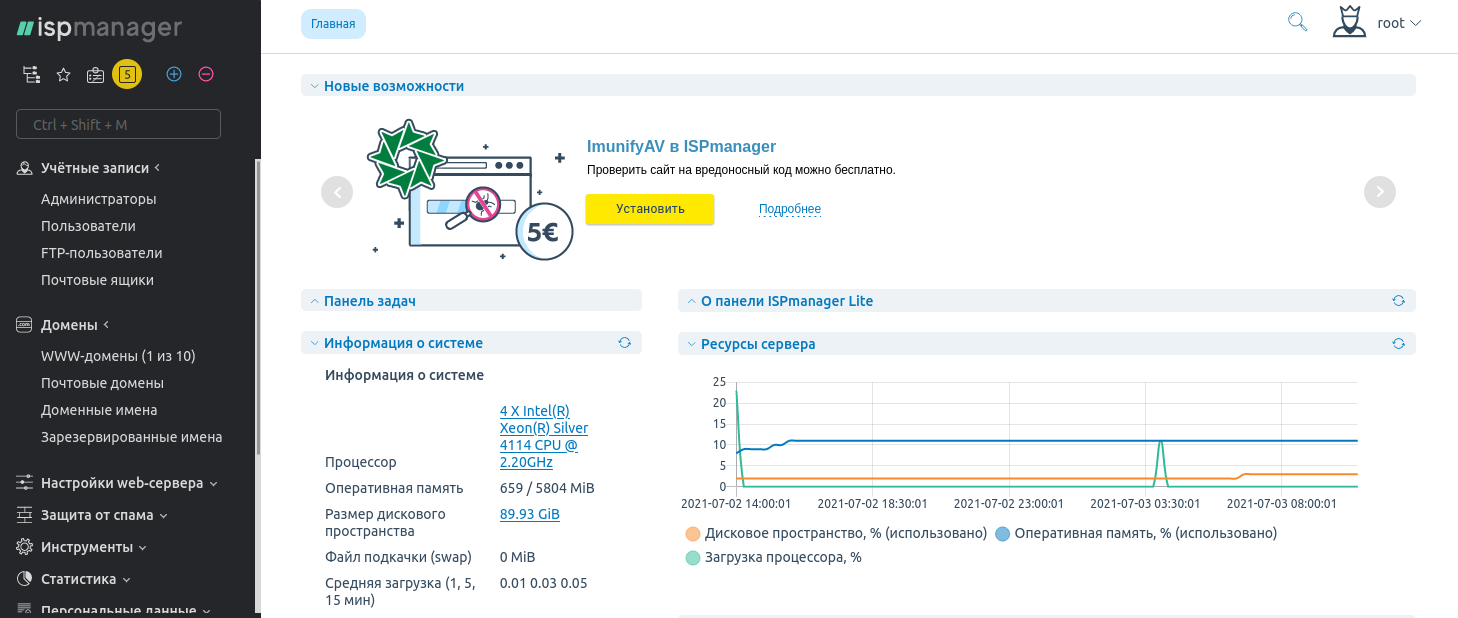
Если на сервере установлена панель ispmanager, в ней также можно анализировать нагрузку по процессору, памяти, занимаемому дисковому пространству:
В списке самых прожорливых процессов Apache и Mysql
Если нагрузку создаёт Apache, то на сервер приходит множество запросов по 80, 443 портам. Для снижения нагрузки рекомендуется использовать на сервере Nginx, включить сжатие и кэширование статичных ресурсов.
Возможно, это легитимная посещаемость, поисковые боты или DDOS-атака. В случае поисковых ботов можно сократить время между запросами к серверу в учетной записи Яндекс.Вебмастер и Google Webmasters Tool. В случае атаки настройками не обойтись — необходимо подключить дополнительную защиту.
Ресурсы потребляет Mysql – проведите оптимизацию настроек службы с помощью Mysqltuner.
Также стоит по возможности оптимизировать SQL-запросы к базам данных. Проверьте их через отображения списка текущих операций Mysql — команда show full processlist.
И обратите внимание на показатель WA в top: значение больше 20 говорит о том, что информация не успевает записываться на диск – необходимы диски SSD или NVMe.
В этой статье мы рассмотрим особенности использования встроенных счетчиков производительности Performance Monitor для мониторинга состояния Windows Server. Счетчики PerfMon можно использовать для отслеживания изменений определенных параметров производительности сервера (алертов) и оповещать администратора в случае возникновения высокой загрузки или других нештатных состояниях.
Чаще всего для мониторинга работоспособности, доступности, загруженности серверов используются сторонние продукты. Если вам нужно получать информацию о производительности приложений либо железа только с одного-двух Windows-серверов, либо когда это нужно на непостоянной основе, либо возник более сложный случай, требующий глубокого траблшутинга производительности, то можно воспользоваться встроенным функционалом Windows Performance Monitor.
Performance Monitor имеет огромное количество счётчиков для получения информации о железе, операционной системе, установленном ПО в виде конкретных цифр. Performance Monitor может вести наблюдение за показателями производительности сервера в реальном времени или записывать историю.
Основные возможности Performance Monitor, которые можно использовать отдельно или совместно с другими сторонними системами мониторинга (типа Zabbix, Nagios, Cacti и другие):
- cистема мониторинга при выводе информации о производительности сначала обращается к Performance Monitor;
- главной задачей системы мониторинга является оповещение о наступлении тревожного момента, аварии, а у Performance Monitor – собрать и предоставить диагностические данные.
Текущие значения производительности Windows можно получить из Task Manager, но Performance Monitor умеет несколько больше:
- Task Manager работает только в реальном времени и только на конкретном (локальном) хосте;
- в Performance Monitor можно подключать счётчики с разных серверов, вести наблюдение длительное время и собранную информацию сохранять в файл;
- в Task Manager очень мало показателей производительности.
Мониторинг производительности процессора с Perfomance Monitor
Для снятия данных о производительности процессора воспользуемся несколькими основными счётчиками:
- \Processor\% Processor Time — определяет уровень загрузки ЦП, и отслеживает время, которое ЦП затрачивает на работу процесса. Уровень загрузки ЦП в диапазоне в пределах 80-90 % может указывать на необходимость добавления процессорной мощности.
- \Processor\%Privileged Time — соответствует проценту процессорного времени, затраченного на выполнение команд ядра операционной системы Windows, таких как обработка запросов ввода-вывода SQL Server. Если значение этого счетчика постоянно высокое, и счетчики для объекта Физический диск также имеют высокие значения, то необходимо рассмотреть вопрос об установке более быстрой и более эффективной дисковой подсистемы (см. более подробную статью об анализе производительности дисков с помощью PerfMon).
- \Processor\%User Time — соответствует проценту времени работы CPU, которое он затрачивает на выполнение пользовательских приложений.
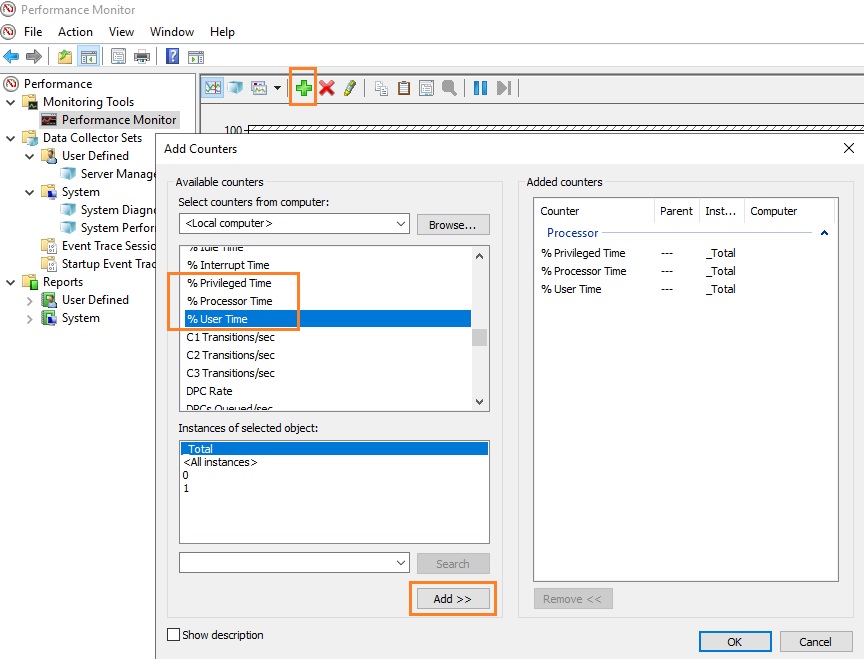
Запустите Performance Monitor с помощью команды perfmon. В разделе Performance Monitor отображается загрузкой CPU в реальном времени с помощью графика (параметр Line), с помощью цифр (параметр Report), с помощью столбчатой гистограммы (параметр Histogram bar) (вид выбирается в панели инструментов). Чтобы добавить счетчики, нажмите кнопку “+” (Add Counters).
Слева направо двигается линия в реальном времени и отображает график загрузки процессора, на котором можно увидеть, как всплески, так и постоянную нагрузку.
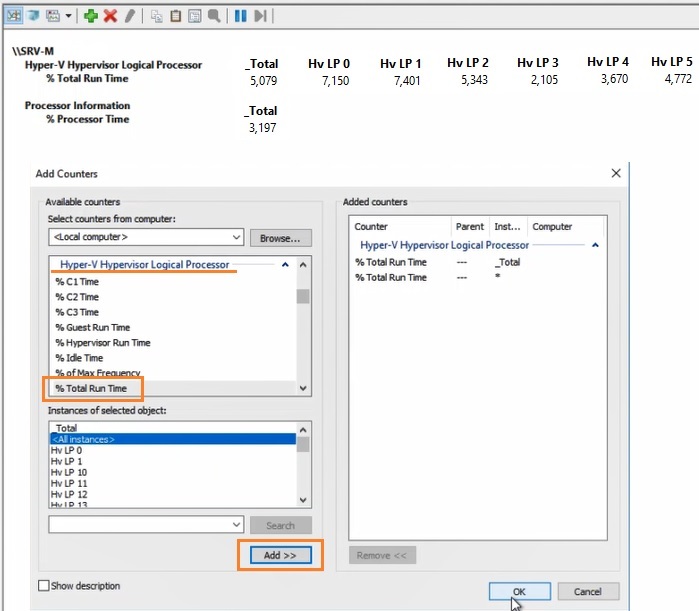
Например, вам нужно посмотреть загрузку процессора виртуальными машинами и самим Hyper-V. Выберите группу счетчиков Hyper-V Hypervisor Logical Processor, выберите счетчик % Total Run Time. Вы можете показывать нагрузку по всем ядрам CPU (Total), либо по конкретным (HV LP №), либо всё сразу (All Instances). Выберем Total и All Instances.
Группы сборщиков данных в PerfMon
Чтобы не сидеть целый за наблюдением движения линии, создаются группы сбор данных (Data Collector Set), задаются для них параметры и периодически просматриваются.
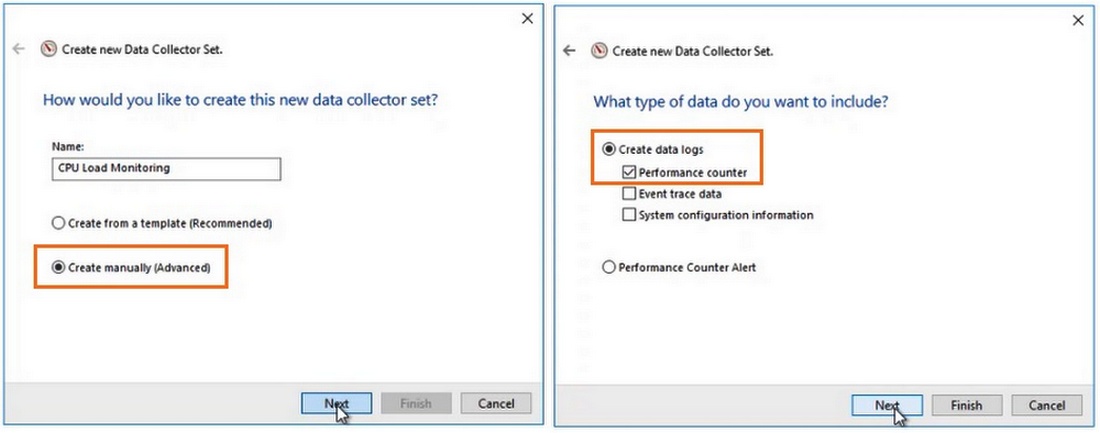
Чтобы создать группу сбора данных, нужно нажать на разделе User Defined правой кнопкой мыши, в меню выбрать New -> Data Collector Set. Выберите Create manually (Advanced) -> Create Data Logs и включите опцию Performance Counter. Нажмите Add и добавите счётчики. В нашем примере % Total Run Time из группы Hyper-V Hypervisor Logical Processor и Available MBytes из Memory. Установите интервал опроса счётчиков в 3 секунды.
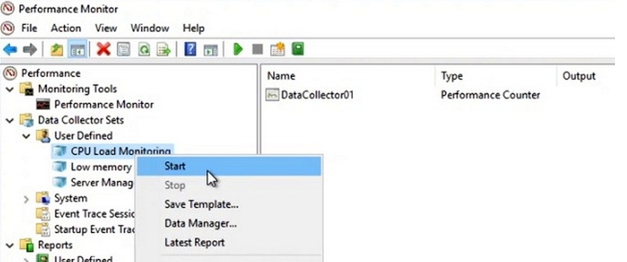
Далее вручную запустите созданный Data Collector Set, нажав на нём правой кнопкой мыши и выбрав в меню пункт Start.
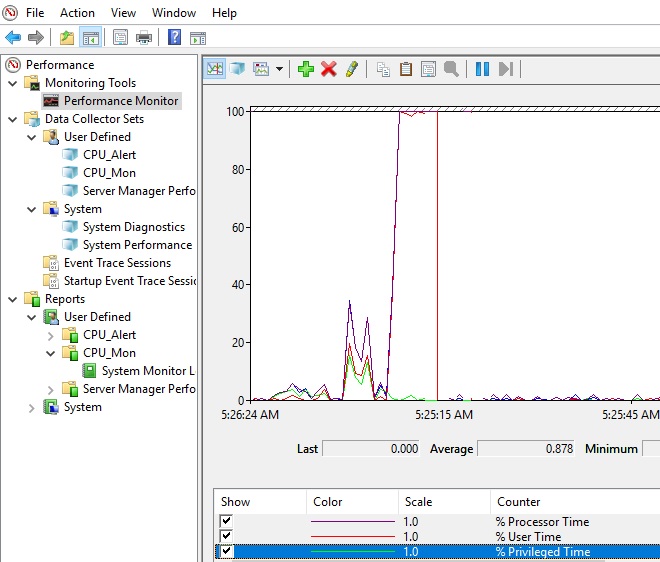
Через некоторое время можно просмотреть отчёт. Для этого в контекстном меню группы сбора данных нужно выбрать пункт Latest Report. Вы можете посмотреть и проанализировать отчёт производительности в виде графика. Отчёт можно скопировать и переслать. Он хранится в C:\PerfLogs\Admin\CPU_Mon и имеет расширение .blg.
Если нужно на другом сервере запустить такой же набор счётчиков, как на первом, то их можно переносить экспортом. Для этого в контекстном меню группы сбора данных выберите пункт Save Template, укажите имя файла (расширение .xml). Скопируйте xml файл на другой сервер, создайте новую группу сбора данных, выберите пункт Create from a template и укажите готовый шаблон.
Создание Alert для мониторинга загрузки CPU
В определённый критический момент в Performance Monitor могут срабатывать алерты, которые помогают ИТ-специалисту прояснить суть проблемы. В первом случае алерт может отправить оповещение, а во втором – запустить другую группу сбора данных.
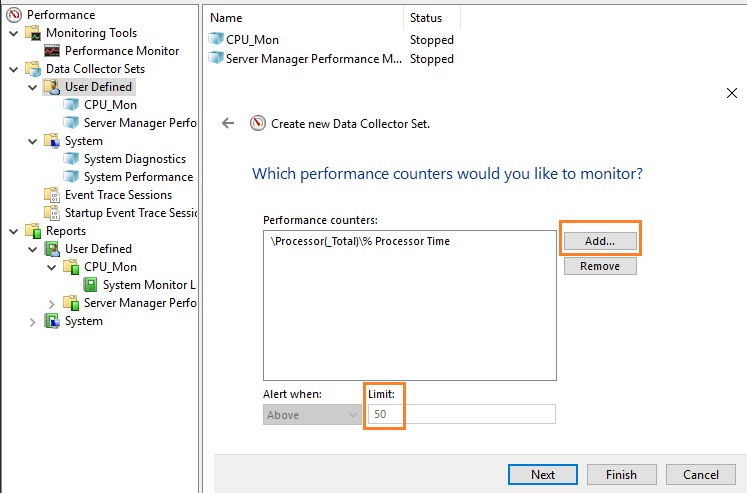
Чтобы создать алерт в PerfMon, нужно создать ещё один Data Collector Set. Укажите его имя CPU_Alert, выберите опцию Create manually (Advanced), а затем — Performance Counter Alert. Добавьте счётчик % Total Run Time из Hyper-V Hypervisor Logical Processor, укажите границу загрузки 50 %, при превышении которой будет срабатывать алерт, установите интервал опроса счётчика в 3 секунды.
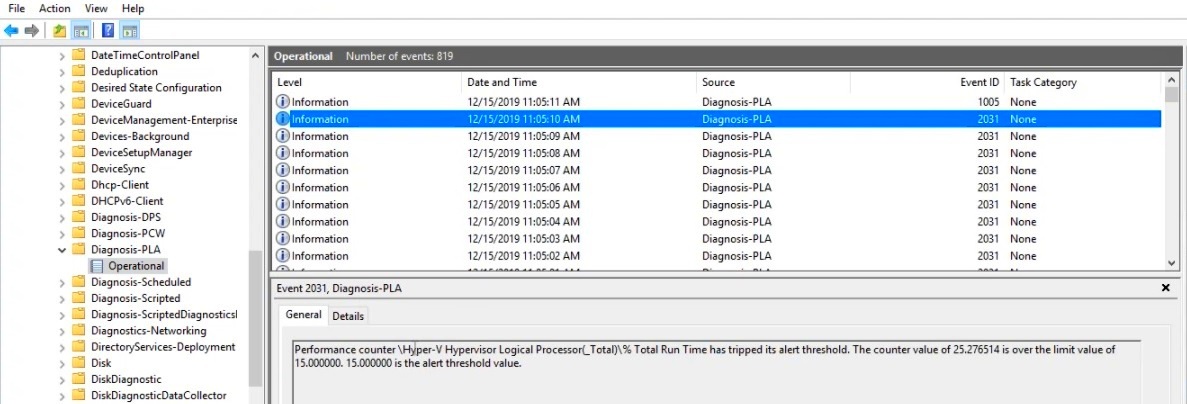
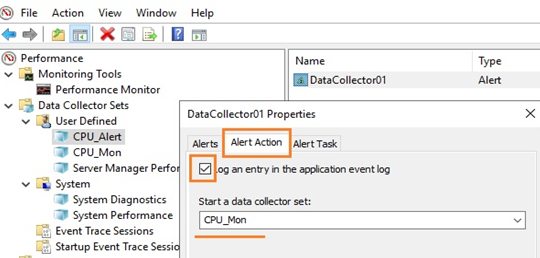
Далее нужно зайти в свойства данной группы сбора информации, перейти на вкладку Alert Action, включить опцию Log an entry in the application event log и запустить группу сбора данных. Когда сработает алерт, в журнале (в консоли Event Viewer в разделе Applications and Services Logs\Microsoft\Windows\Diagnosis-PLA\Operational) появится запись:
“Performance counter \Processor(_Total)\% Processor Time has tripped its alert threshold. The counter value of 100.000000 is over the limit value of 50.000000. 50.000000 is the alert threshold value”.
Здесь же рассмотрим и второй случай, когда нужно запустить другую группу сбора данных. Например, алерт срабатывает при достижении высокой загрузки CPU, делает запись в лог, но вы хотите включить сбор данных с других счётчиков для получения дополнительной информации. Для этого необходимо в свойствах алерта в меню Alert Action в выпадающем списке Start a data collector set выбрать ранее созданную группу сбора, например, CPU_Mon. Рядом находится вкладка Alert Task, в которой можно указать разные аргументы либо подключить готовую задачу из консоли Task Scheduler, указав её имя в поле Run this task when an alert is triggered. Будем использовать второй вариант.
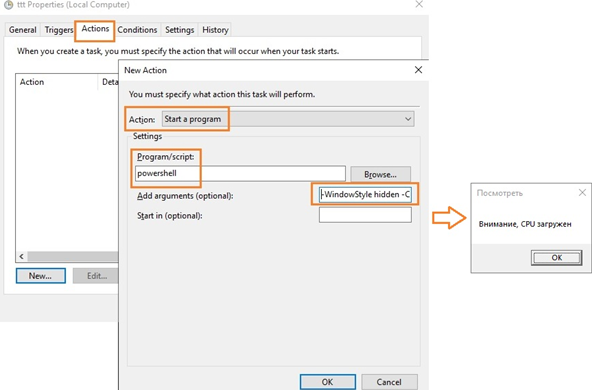
С помощью Task Scheduler можно выполнить какие-то действия: выполнить команду, отправить письмо или вывести сообщение на экран (сейчас последниед ве функции не поддерживаются, считаются устаревшими (deprecated)). Для вывода на уведомления на экран можно использовать скриптом PowerShell. Для этого в консоли Task Scheduler создайте новую задачу, на вкладке Triggers выберите One time, на вкладке Actions в выпадающем поле Action выбирите параметр Start a program, в поле Program/Script укажите powershell.exe, а в поле Add arguments (optional) следующий код:
-WindowStyle hidden -Command "& {[System.Reflection.Assembly]::LoadWithPartialName('System.Windows.Forms'); [System.Windows.Forms.MessageBox]::Show('Внимание, CPU загружен', 'Посмотреть')}"
Для отправки письма вы можете воспользоваться командлетом PowerShell Send-MailMessage или стороннюю утилиту mailsend.exe.. Для этого создайте аналогичное задание в Task Scheduler, в поле Program/Script укажите полный путь к утилите (у нас C:\Scripts\Mail\mailsend.exe), а в поле Add arguments (optional) через параметры нужно передать значения: электронный адрес, адрес и номер порта SMTP-сервера, текст письма и заголовка, пароль:
-to [email protected] -from [email protected] -ssl -port 465 -auth -smtp smtp.ddd.com -sub Alarm -v -user [email protected] +cc +bc -M "Alarm, CPU, Alarm" -pass "it12345"
где +cc означает не запрашивать копию письма, +bc — не запрашивать скрытую копию письма.
Like many things in the Microsoft Windows universe, there are several ways to check Up Time of your systems.
Fortunately, they are all easy and quick!
How to Check Windows Uptime via Command Line
There are several really simple ways to check uptime in Windows Server and Windows 10 or Windows 11 using Command Prompt or PowerShell.
Rather than bore you with the details lets jump into each of them starting with the easiest.
Check Windows Uptime with Net Statistics
This one is super simple. You just need to open command prompt or PowerShell and type either:
net statistics server
or
net statistics workstation
If you’re on a server OS such as Server 2019 or Server 2022 then use the command ending in Server. If you’re using a workstation OS such as Windows 10 or Windows 11 use the command ending in workstation.
The output will look like this:
C:\WINDOWS\system32>net statistics workstation
Workstation Statistics for \\DOMCON1


Statistics since 9/17/2018 4:40:11 PM


  Bytes received                               6094
  Server Message Blocks (SMBs) received        12
  Bytes transmitted                            5164
  Server Message Blocks (SMBs) transmitted     0
  Read operations                              0
  Write operations                             0
  Raw reads denied                             0
  Raw writes denied                            0

  Network errors                               0
  Connections made                             0
  Reconnections made                           0
  Server disconnects                           0

  Sessions started                             0
  Hung sessions                                0
  Failed sessions                              0
  Failed operations                            0
  Use count                                    8
  Failed use count                             0
The line starting with “Statistics since …” displays the last time your computer was booted up.
How to Check Uptime in Windows with SystemInfo
Another way to see the the last boot time of your machine using a simple command prompt command is to use:
systeminfo
You can cut down the output to just the system boot time line by using a pipe and the find operator like so:
systeminfo | find “System Boot Time”
Which outputs:
C:\WINDOWS\system32>systeminfo | find "System Boot Time"
System Boot Time:          9/17/2018, 4:40:10 PM
If you want to check the boot time on a remote server you can either use the this command:
systeminfo /s remoteservername | find “System Boot Time”
or use a utility like PSExec from Microsoft PSTools to enter a remote command line.
Use the Windows Uptime Command (Uptime.exe)
The original Windows Server Uptime command was part of a program released by Microsoft called Uptime.exe. You used to be able to download it via KB232243. Now you have resort to downloading it from the Internet Archive URL or our website here.
Simply download the .exe and place inside your C:\Windows\System32 folder.
You can then run the following command to find the system uptime:
uptime
Or you can use this command to see the uptime on a remote server or workstation:
uptime remoteservername
Which results in:
C:\WINDOWS\system32>uptime
\\DOMCON1 has been up for: 1 day(s), 12 hour(s), 6 minutes(s), 58 seconds(s)
Now I did say original Uptime command earlier. That is because a new uptime.exe was developed under the open source project uptimeEXE which you can download here at Codeplex.
The command syntax is nearly identical to the original Uptime.exe as you can see here:
C:\WINDOWS\system32>uptime
 08:20:14 uptime 08:48:27
The only drawback to this updated version is that it doesn’t contain the extra options such as checking windows uptime on a remote computer.
Use Task Manager to Check Server Uptime
If you’re more of a GUI type person then you’ll be happy to know that you can use Task Manager to view system uptime.
All you have to do is open Task Manager (can search start menu for Task Manager, right click the task bar and click on Task Manager, or search for taskmgr.exe) and open the Performance tab.

Inside the CPU window, in the bottom left hand corner, you’ll find the Up time.
Recommended Tool: ManageEngine OpManager

- Multi-vendor Network Monitoring
- Simple Installation & Setup
- Intuitive UI
- Complete Visibility
- Intelligent Detections
- Easy Resolutions
Network Engineer III
I am a Senior Network Engineer who has spent the last decade elbow deep in enterprise System Administration and Networking in the local government and energy sectors. I can usually be found trying to warm up behind the storage arrays in the datacenter.