
The Windows Firewall is an integral part of the Windows Operating System. It manages the traffic flowing through the network ports on your machine to ensure unnoticed packets do not enter your machine and keep it safe.
It is also responsible for opening and closing or listening to networking ports. Network ports are used by Windows services and applications to send and receive data over a network. It is likely that your application may not be receiving any data through a specified port because the Windows Firewall is blocking that particular port.
In this article, we are going to be discussing how you can check which ports your device is listening to, and which ones are being blocked by the Firewall. Once it is determined, you may then use that information to open a specific port.
Table of Contents
What does listening on port mean
Before we begin to check which ports are being blocked and which ones are listening, let us discuss what listening means for a computer.
By definition, a listening port is a networking port on which a process or an application listens. By listening, it means receiving information through packets. A listening port is an open port that accepts incoming packets and forwards them to the desired destination application/process.
A listening port does not mean that it is being allowed by the firewall. A listening port simply means that it is receiving some sort of traffic. However, that traffic can still be blocked by the firewall.
Check listening ports
Before checking for blocked ports, let us find out which ports your Windows device is listening to. This is because it could be possible that your application is not receiving any packets since the port that you think is being blocked by the Firewall is not listening at all.
To check for the listening ports on a Windows machine, launch the Command Prompt and then type in the following command:
netstat -a -n

The ports that have their State listed as Listening are the ones listening to the network traffic. You can scroll down the list and look for the port you are interested in. Alternatively, you can also use the command below to look for a specific network port and check if it is listening or not. Replace PortNumber with the number of the port you are interested in.
netstat -ano | find "PortNumber" | find "LISTENING"
Here is an example of the command above:

If you find any listings below the command, it means that the port you specified is listening. If the space is empty, it means that it could not find the port you mentioned, or if it did find it, it was not in the listening state.
Check if Windows Firewall is blocking ports
Check for blocked ports using Firewall logs
One way to check for any blocked ports is through the Windows Firewall logs. Logs are an important factor in determining the behavior of the Firewall. However, logging in for the dropped packets, which are the packets blocked by the Firewall, is disabled by default in Windows. These need to be active and then you can check the generated logs for the ports blocked.
Note that only those packets will be dropped if the port is listening, which can be checked using the method discussed earlier in the article.
To generate logs for the dropped packets, you must first determine the network profile you are currently on. To do so, open the Network & Internet page in the Settings app (Run -> ms-settings:network-status) and then click on Properties below the network you are connected to.

In the Properties page, you will see whether the selected profile is Public, Private, or Domain.

Now that you know your working network profile, you must now enable logging in for the dropped packets. To do so, open Windows Firewall in the Control Panel by typing in firewall.cpl in Run. From there, click on Advanced Settings on the left.

On the Windows Defender Firewall with Advanced Security page, click on Properties in the right pane.

In the Properties pop-up, switch to the profile tab that you noticed earlier from the Settings app, and then click Customize under Logging.

In the Customize window, select Yes from the drop-down menu in front of “Log dropped packets” and then click OK.

Close the Properties window as well by clicking OK. Now, navigate to the following location using File Explorer to check out the generated logs for the blocked ports.
C Drive -> Windows -> System32 -> LogFiles -> Firewall
From there, open the text file named pfirewall.txt and then look for any ports blocked. If there is none, then the file will be empty.

Check for blocked ports using Command Prompt
Command Prompt can display the ports your machine is currently listening to. Any ports not displayed simply means that they are being blocked by the Firewall, or are not listening.
Run the Command Prompt with administrative privileges and then type in the following cmdlet:
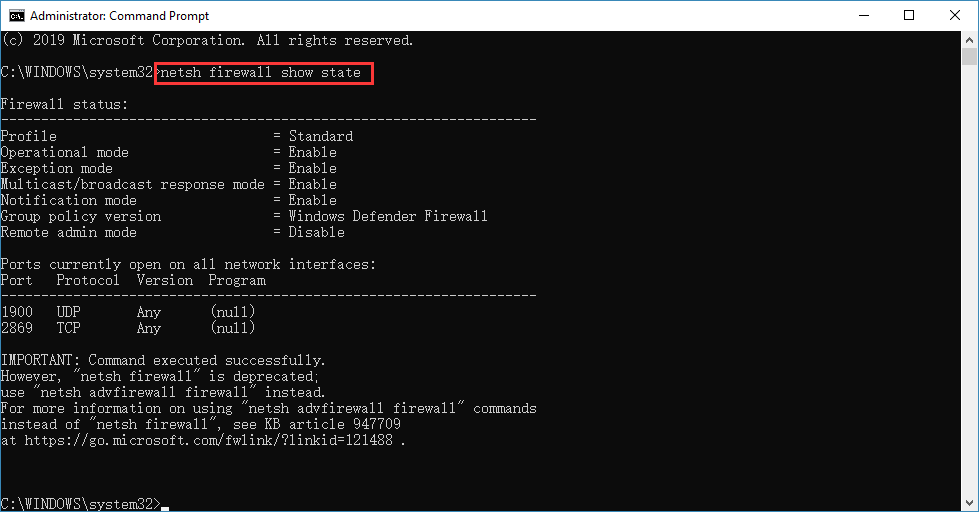
netsh firewall show state
Although netsh firewall has been deprecated, it still works to give out the required information.

The open ports will be given in the highlighted area. From here you can determine whether the port you are looking for is open or not.
How to open a closed port
If you find that the port is being blocked by the Windows Firewall, you can allow it by using the steps given below.
- Open Windows Firewall by navigating to the following:
Control Panel -> System and Security -> Windows Defender Firewall -> Advanced Settings - Click on Inbound Rules in the left pane, and then click New rule in the right pane.

- On the Rule type screen in the New inbound rule wizard, select Port and then click Next.

- On the next screen, select the type of port and then enter the port number you want to open in front of Specific local ports. Click Next when done.

- On the next screen, select Allow the connection and then click Next.

- On the Profile screen, select All Profiles and click Next.

- Now set a name for the rule and click Finish.


You have now successfully unblocked the port you needed. You can repeat the steps to allow additional ports or delete this one by navigating to the Inbound rules and removing the respective rules.
Closing words
Having your Windows Firewall enabled all the time is important if you are connected directly to the internet. Firewall protects your system and your entire network from outside threats.
However, users that have a dedicated Firewall in place often tend to disable their Windows Firewall for free-flowing packets. This way they do not need to allow each port through the Firewall individually. However, this is only recommended for devices that are either not connected to the internet and are only accessible on the Local Area Network (LAN), or devices that are secured through dedicated Firewalls.
-
Home
-
News
- How to Check if Firewall Is Blocking a Port or a Program?
By Stella | Follow |
Last Updated
Windows Firewall is a very useful tool that comes with your Windows system. It can help you find and block some suspected ports and programs that can be harmful to your computer. For some reason, you may want to know if your Firewall is blocking something. In this MiniTool post, we will show you how to check if Firewall is blocking a port.
Windows Firewall is a Windows built-in tool that can be used to filter network data transmission to and from on your Windows computer. It can also be used to block suspicious and harmful programs. At times, the Firewall may block some ports or programs accidentally.
When you encounter some issues like high ping in games, you can go to check whether the game is blocked by Firewall or whether Firewall is blocking a port.
But how to check if Firewall is blocking a port or a program? In this post, we will show you some guides on how to check if your Firewall is blocking something.
How to Check if a Port Is Blocked by Firewall?
You can check your Firewall blocks which ports by using Run or Command Prompt. Here are two guides:
Check Blocked Ports in Firewall via Run
1. Press Win+R to open Run.
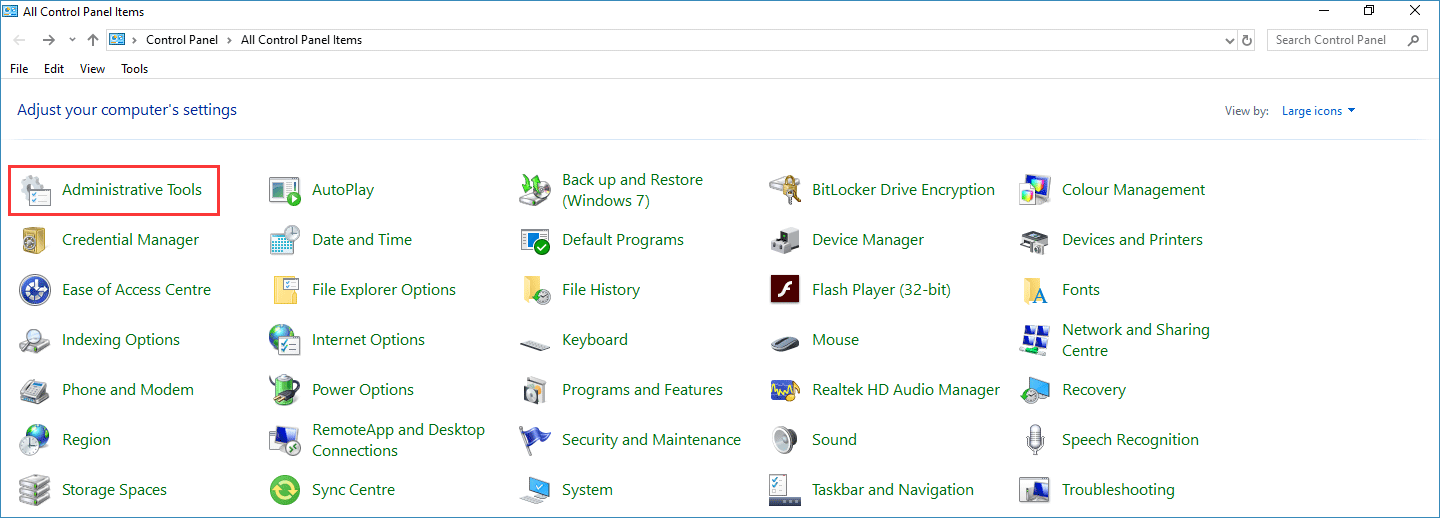
2. Type control and press Enter to open Control Panel.
3. Click Administrative Tools.
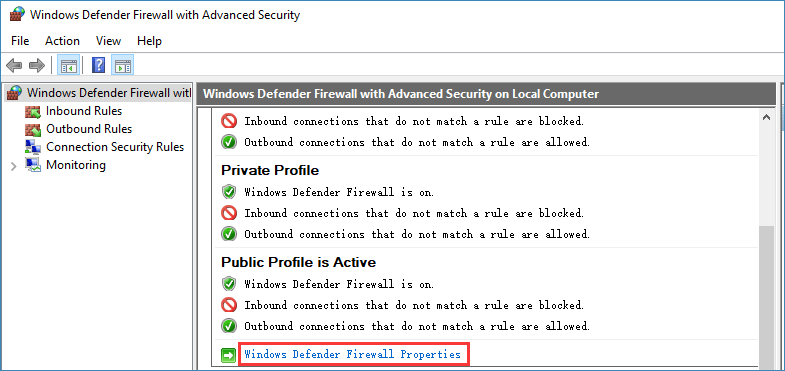
4. Double click Windows Defender Firewall with Advanced Security to open it.
5. Go to Action > Properties.
6. Click the Windows Defender Firewall Properties link.
7. Switch to your preferred profile (here is Domain Profile in this example) and then click Customize in the Logging section.
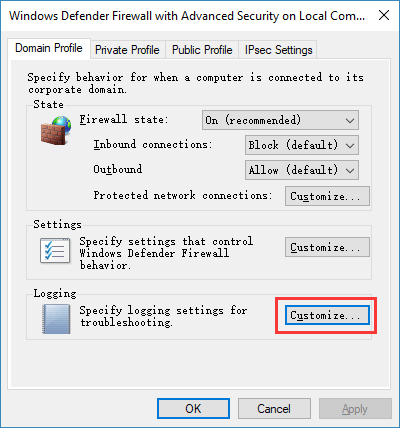
8. Open the dropdown menu for Log dropped packets and select Yes.
9. Remember the path in the Name section. Or you can directly copy the path.
10. Click OK to save the change.
11. Open File Explorer and then go to that path. The path looks like %systemroot%system32LogFilesFirewall.
12. Open the log file which is named as log. Then, you can check for the blocked ports in the log file.
Check Blocked Ports in Firewall via Command Prompt
- Use Windows Search to search for cmd.
- Right-click the first result and then select Run as administrator.
- Type netsh firewall show state and press Enter.
- Then, you can see all the blocked and active ports in your Firewall.
Then, how to see if your Firewall is blocking a program? We will introduce one method in the next part.
How to Check if Windows Firewall Is Blocking a Program?
You can check which program is blocked by your Windows Firewall in the tool itself. It is very simple to do this job:
1. Use Windows Search to search for Windows Firewall and then select Windows Defender Firewall from the search result.
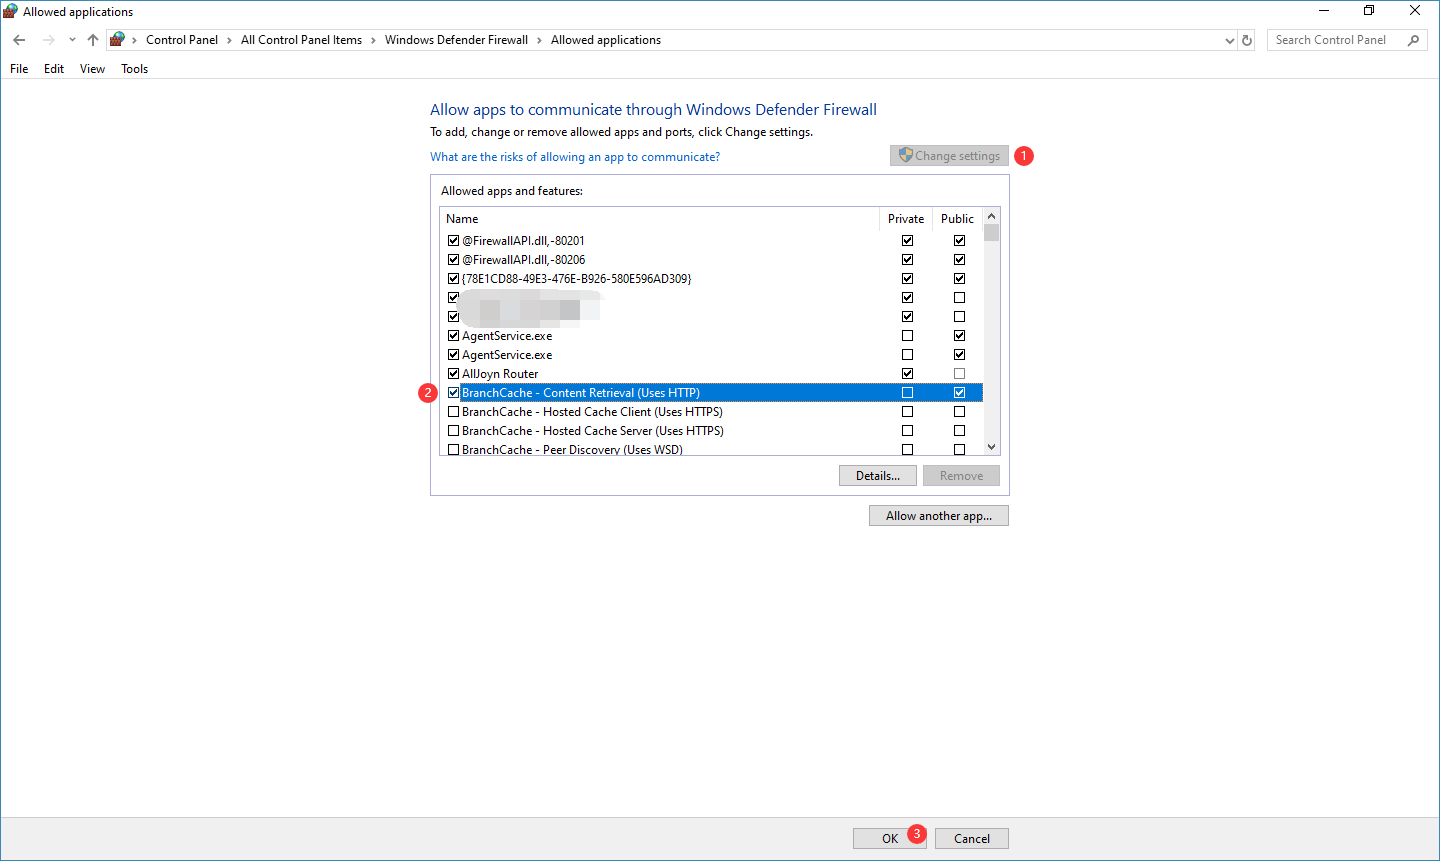
2. Click Allow an app or feature through Windows Defender Firewall from the left list.
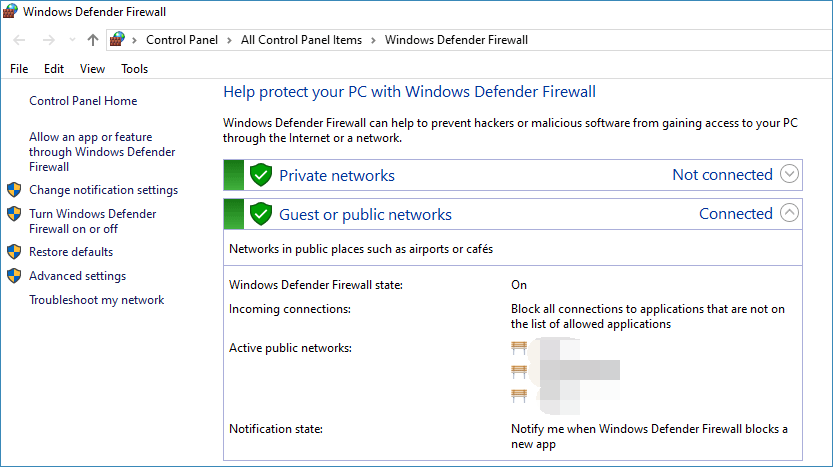
3. In Allow applications, you can see the allowed programs are checked and the unchecked ones are blocked by Windows Firewall. If you want to unblock an application, you can click the Change settings button in the top-right side and then check your wanted application. After that, you can click the OK button on the bottom to save the change.
Those are the methods on how to check if Firewall is blocking a port or a program. You can just use one way to help you out.
About The Author
Position: Columnist
Stella has been working in MiniTool Software as an English Editor for more than 8 years. Her articles mainly cover the fields of data recovery including storage media data recovery, phone data recovery, and photo recovery, videos download, partition management, and video & audio format conversions.
There’s a good chance you’ve happened upon this article because an application you’re trying to run is complaining about a “port” being blocked or you’ve read about how leaving certain “ports” open on your network can be a security problem.
Either way, by the end of this piece you’ll not only know what these ports everyone is going on about are, but how to check your computer to find open or closed ports.

What Is a Network Port?
The first thing you should know is that the ports we’re referring to here are virtual. It has nothing to do with the physical network hardware ports on your router, TV, consoles or computers. Ports are simply a way for your network hardware and software to organize information traffic.
Think of reserved lanes on a road. The sidewalk is for pedestrians. There might be a dedicated bike lane. Carpool vehicles and buses have their own lanes too. Ports serve the same function. One port might be used for receiving emails, while another carries file transfer requests, or website traffic.

There are two common types of ports, which need a brief explanation before we move on to checking which ports on your system are open and which aren’t.
What Are TCP & UDP Ports?
The two common types of ports on modern networks are known as TCP and UDP ports. That is Transmission Control Protocol and User Datagram Protocol respectively. So these two port types use different network protocols.
Which you can think of as distinctive sets of rules for how bits of information should be sent and received. Both port types are built on the fundamental Internet Protocol (IP) that makes the internet and home networks, well, work. However, they are suitable for different applications.

The big difference is that when you send information over UDP, the sender doesn’t first have to establish a connection with the receiver before starting the conversation. It’s a bit like sending a letter. You don’t know if the other person received your message and you have no guarantee that you’ll get any feedback.
TCP, on the other hand, is more like making a phone call. The receiver has to “pick up” the connection and there’s a back-and-forth flow of information until someone deliberately hangs up.
UDP messages are generally broadcast over a network to anyone who is listening on the specified UDP port. This makes it perfect for housekeeping type messages that relate to running the network itself. It’s also perfect for voice-over-IP streaming, online video games and streaming broadcasts.

Why? These applications benefit from UDP’s low latency and constant stream of information that doesn’t have to be perfect to be useful. A little corruption in your Skype chat is far less important than low amounts of lag, after all.
TCP is much more common than UDP and absolutely makes sure that all data is received free from errors. Just about everything that doesn’t need the specific advantages of UDP, uses TCP instead.
Which Ports Are Usually Open By Default?
There are a LOT of ports. A port number can be anything from 0 to 65535! That doesn’t mean any application can just pick any port. There are established standards and ranges, which helps us make sense of the noise.

Ports 0-1023 are associated with some of the most important and fundamental network services. This makes sense, since the lower-numbered ports were assigned first. The SMTP protocol for email, for example, is exclusively used by port 25.
Ports 1024-49151 are known as “registered ports” and are assigned to important common services such as OpenVPN on port 1194 or Microsoft SQL on ports 1433 and 1434.
The rest of the port numbers are known as “dynamic” or “private” ports. These ports aren’t reserved and anyone can use them on a network to support a particular service. The only problem crops up when two or more services on the same network are using the same port.

While it’s impossible to list every single important port, these common ports are useful to know by heart:
- 20 – FTP (File Transfer Protocol)
- 22 – Secure Shell (SSH)
- 25 – Simple Mail Transfer Protocol (SMTP)
- 53 – Domain Name System (DNS)
- 80 – Hypertext Transfer Protocol (HTTP)
- 110 – Post Office Protocol (POP3)
- 143 – Internet Message Access Protocol (IMAP)
- 443 – HTTP Secure (HTTPS)
Since there are so many thousands of common port numbers, the easiest approach is to remember the ranges. Which will tell you if a given port is reserved or not. Thanks to Google, you can also look up which services use a specific port in no time at all.
Find Open Ports In Windows

Now that we’ve got all the basic knowledge about TCP and UDP ports out of the way, it’s time to get down to the process of finding which ports are open and in use on your computer.
The good news is that Windows has a pretty useful command built into it that will show you what ports are currently being used on your computer by various applications and services.
- The first thing you want to do is open the Start Menu and search for CMD.

- Now, right-click on CMD and Run as Administrator.
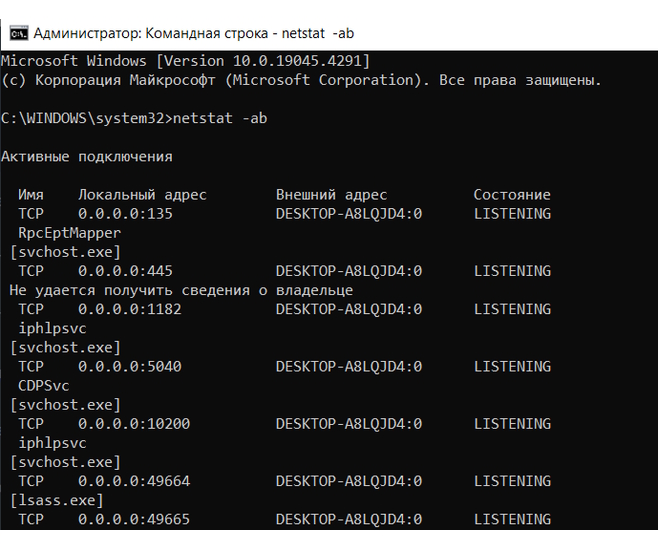
- With the Command Prompt open, type:
Netstat -ab

- Don’t worry about a long list of info scrolling by faster than you can read it. You can simply use CTRL+C and CTRL+V to copy and paste the information into Notepad or any other text editor.
- The information in brackets is the name of the program that’s using the port. TCP or UDP refers to the protocol being used on that port. The number consists of an IP address and then the port number after the colon.
Scanning For Blocked Ports

That takes care of finding which ports are being used and by which application, but it doesn’t tell us which ports are being actively blocked by the Windows Firewall.
- Once again, open the Start Menu and search for CMD.
- Right-click on CMD and Run as Administrator.
- With the Command Prompt open, type:
netsh firewall show state

This is a display of blocked and open ports as per the configuration of your Windows Firewall.
You’ll see a note about this command being deprecated, but the new command doesn’t show us the information we want. So for now using the ‘show state’ command is still the fastest and easiest way to get port information.
Just because the Windows Firewall isn’t blocking a port, that doesn’t mean your router or ISP aren’t. So the last thing we want to do is check if any external blocking is happening.
- Open the Start Menu and search for CMD.
- Now, right-click on CMD and Run as Administrator.
- With the Command Prompt open, type:
netstat -ano | findstr -i SYN_SENT

If you don’t get any hits listed, then nothing is being blocked. If some ports are listed, it means they are being blocked. If a port not blocked by Windows shows up here, you may want to check your router or pop an email to your ISP, if switching to a different port isn’t an option.
Useful Apps To Map Out Your Port Status
While the Command Prompt is a good quick and dirty tool, there are more refined third-party applications that can help you get a picture of your port configuration. The two highlighted here are just popular examples.
SolarWinds Free Port Scanner

SolarWinds requires that you submit your name and details in order to download it, but it’s up to you whether you put your real information into the form or not. We tried several free tools before settling on SolarWinds, but it was the only tool that both worked properly under Windows 10 and had an easy interface.
It was also the only one not to trigger a false positive virus flag. One of the big problems with port scanning software is that security companies tend to see them as malware. So most users ignore any virus warning that come with such tools. That’s a problem because you can’t tell the difference between a false positive and a real virus in these apps.
SolarWinds might come with some strings attached, but it actually works as advertised and is easy to use.
CanYouSeeMe

This is, as you can probably tell, a website service rather than an application. It’s a good first port of call to see if external data can get through your local port or not. It auto-detects your IP address and all you have to do is specify which port to test.
It will then tell you if the port is blocked or not and you’ll then have to figure out whether the blockage is on the computer, router or at the service provider level.
Conclusion
For most users, ports aren’t something you need to worry about. They are managed by your operating system, applications and network hardware.
When things go wrong however, it’s good to have the tool in hand that let you find open ports to sniff out suspicious activity or figure out where exactly your precious information is hitting a brick wall.
Related Posts
- HDMI Cable Types and Specifications Explained
- Flat vs Round Ethernet Cables: What’s Different and Which Is Better?
- USB-C vs HDMI: What’s Different and Which Is Best for Video Output?
- What Is Bluetooth 5 and How to Upgrade?
- What Is Mesh Network Topology?
arrow-right
Created with Sketch.
Андрей Мареев
1 335
В избр.
Сохранено
Читайте, как открыть или закрыть порты на компьютере или ноутбуке с Windows 10, 8 или 7. Как проверить открыт ли нужный порт, как посмотреть состояние всех портов, и как узнать какой порт использует конкретная программа.
Мнение автора может не совпадать с мнением редакции

Введение
Операционная система «Windows 10», управляющая компьютерными устройствами и следящая за корректным исполнением всех запушенных процессов, обладает мощной встроенной службой комплексной защиты «Защитник Windows». Одним из элементов предустановленной службы, оберегающем пользователей от множественных разнообразных сетевых угроз в «Интернете» (как от входящего потока данных, так и от разнообразных локальных приложений, пытающихся получить несанкционированный доступ), является «Брандмауэр Windows». Защитный инструмент ограничивает доступ для всех объектов, кроме разрешенных. И если пользователю необходимо разрешить сетевую передачу данных без ограничения брандмауэром, то потребуется соответствующим образом открыть в настройках порт.
Это одно их важных условий создания устойчивого соединения, ведь когда устройство подключается к другому устройству в сети (включая сеть «Интернет»), оно указывает номер порта, что позволяет принимающему устройству корректно обрабатывать передачу данных. Если «IP-адрес» выступает сетевым идентификатором устройства и показывает конкретное местоположение устройства, то номер порта позволяет принимающему устройству определить, какая программа настроена на получение входящего информационного потока.
По умолчанию, большая часть входящих нежелательных сетевых пакетов данных из «Интернета» блокируется «Брандмауэром Windows». Но если пользователи увлекаются играми и планируют создать собственный игровой сервер или регулярно и на постоянной основе пользуются файлообменниками (например, торрентами), то для успешного исполнения намеченных действий необходимо открыть порт, чтобы пропустить требуемую информационную пакетную передачу данных без блокировки брандмауэром.
Примечание. В данной статье показано, как открыть порт в брандмауэре конкретного компьютера, чтобы разрешить сетевую передачу. Если доступ в «Интернет» происходит через маршрутизатор (один из самых распространенных способов), также будет необходимо разрешить пропуск данных и в маршрутизаторе путем установления соответствующей переадресации.
Как открыть порт в «Windows 10»?
Выполнить непосредственную процедуру по открытию порта в операционной системе «Windows 10» можно в соответствующем мониторе брандмауэра с привилегированным режимом повышенной безопасности. Открыть необходимый раздел приложения можно разными способами. Но в нашей статье мы остановимся лишь на двух возможных вариантах.
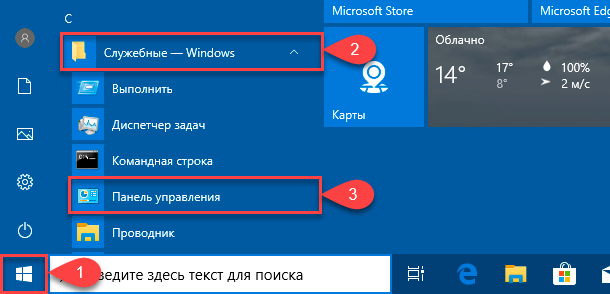
Нажмите на «Панели задач» в нижнем левом углу рабочего стола на кнопку «Пуск» и откройте главное пользовательское меню «Windows». В основном перечне установленных приложений и системных служб, используя колесо управления манипулятора (компьютерной мыши) или задействуя бегунок полосы прокрутки, перемещайтесь по списку, отыщите и откройте раздел «Служебные-Windows». Во вложенной всплывающей вкладке выберите, из доступных вариантов, раздел «Панель управления», которая содержит все основные служебные инструменты управления настройками операционной системой.
атем, в открывшемся окне элементов управления, выберите из списка предложенных инструментов раздел «Брандмауэр Защитника Windows».

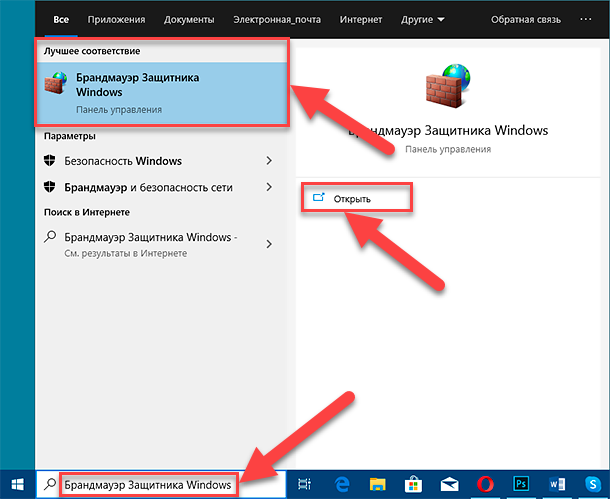
Или введите в строку поискового запроса, расположенную на «Панели задач» в нижнем левом углу экрана рядом с кнопкой «Пуск», фразу «Брандмауэр Защитника Windows». В поисковой панели в разделе «Лучшее соответствие» будет представлен искомый инструмент. Щелкните его левой кнопкой мыши или в правом боковом меню управления нажмите на кнопку «Открыть», и искомое приложение будет запущено.
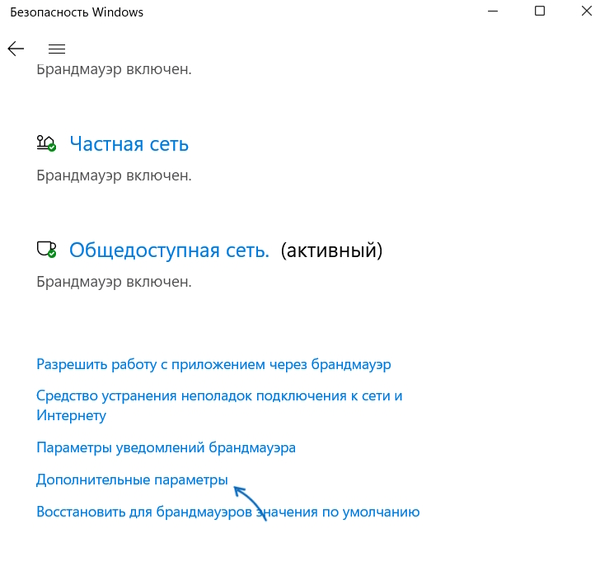
В новом окне панели управления системой, ответственном за надлежащую организацию защиты компьютера от злоумышленников и вредоносных программ в «Интернете» или локальной сети, нажмите на текстовую ссылку «Дополнительные параметры», расположенную в левом боковом меню.

Пользователи смогут открыть окно «Монитор брандмауэра Защитника Windows в режиме повышенной безопасности», регулирующий политики режимов защиты компьютерных устройств, функционирующих под управлением операционной системы «Windows 10».
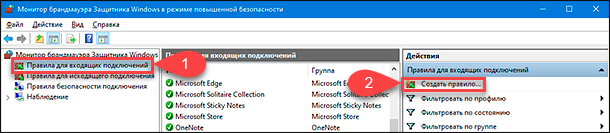
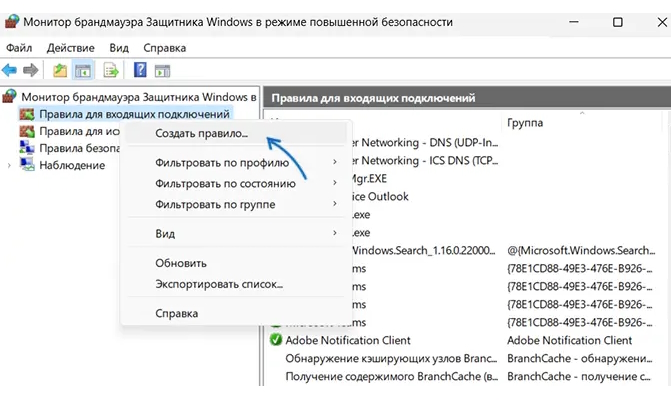
Выберите в левой боковой панели окна раздел «Правила для входящих подключений», полный список которых будет мгновенно отображен в центральной панели окна. А затем нажмите в правой боковой панели раздел «Создать правило».
Если возникла необходимость создать правило для исходящего потока информационных данных, то в левой боковой панели вместо раздела «Правила для входящих подключений» выберите вариант «Правила для исходящего подключения». Большинство приложений довольно хорошо умеют создавать свои собственные исходящие правила при первоначальной установке, но иногда пользователи могут столкнуться с ситуацией, когда необходимо выполнить открытие порта для исходящего потока самостоятельно вручную.

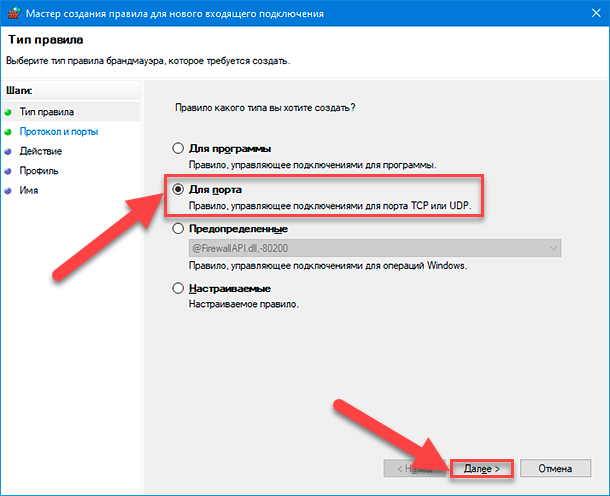
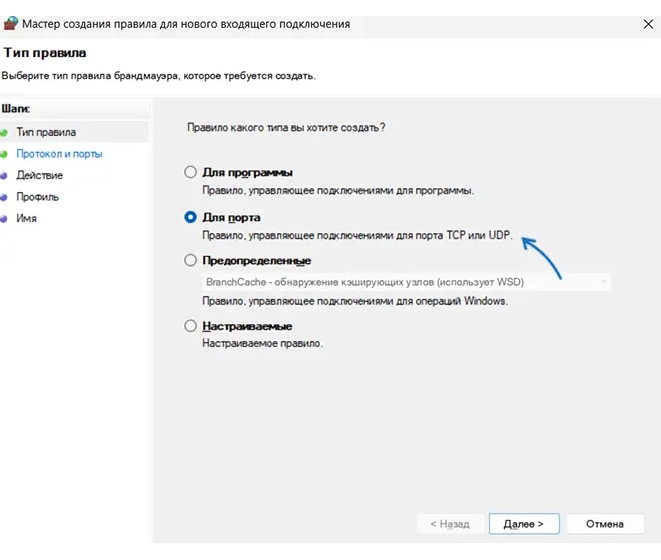
В новом окне «Мастер создания правила для нового входящего подключения» на странице «Тип правила» выберите раздел «Для порта», установив в соответствующей ячейке индикатор выбора (точку), и нажмите на кнопку «Далее».
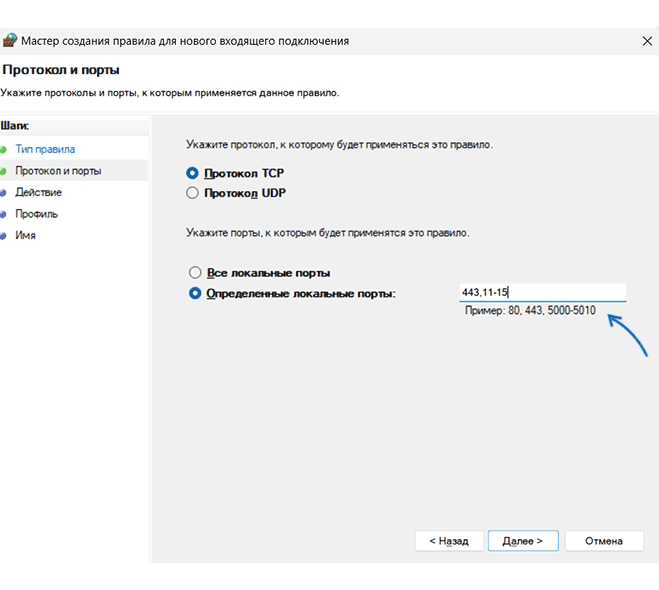
На следующей странице пользователям необходимо выбрать, будет ли открываемый порт использовать протокол управления передачей «TCP» (основной распространенный протокол управления потоковой передачей данных) или протокол пользовательских датаграмм «UDP» (значимый элемент набора сетевых протоколов, использующий датаграммный, в виде отдельных сообщений, интерфейс обмена данными). К сожалению, точно указать, какой конкретно протокол использовать мы не можем, потому что различные приложения используют разные протоколы, индивидуальные для каждой программы. Номера портов могут варьироваться от «0» до «65535», причем порты до «1023» зарезервированы для привилегированных услуг. Пользователи могут найти неофициальный список большинства, доступных для использования, портов формата «TCP» и «UDP» на соответствующей странице «Википедии» с указанием возможного зарезервированного приложения. Если не удалось определить конкретный протокол, который будет использоваться для приложения, можно создать два новых правила для входящих подключений — одно для протокола «TCP» и второе, соответственно, для «UDP».
Выберите параметр «Определенные локальные порты», установив в связанной ячейке индикатор выбора (точку), а затем введите номер порта в соответствующее поле. Если планируется открыть более одного порта, можно разделить их запятыми, а для диапазона портов необходимо использовать дефис («-»). Потом нажмите на кнопку «Далее» для продолжения.

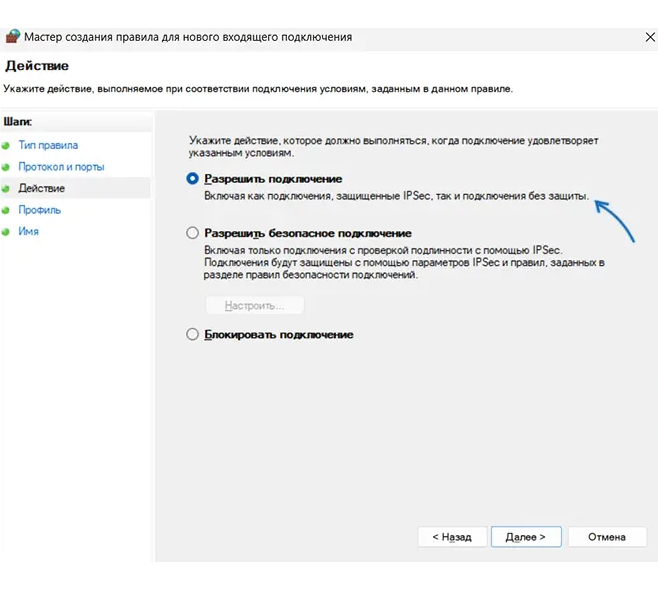
На следующей странице установите индикатор выбора (точку) в ячейке раздела «Разрешить подключение», а затем нажмите кнопку «Далее».
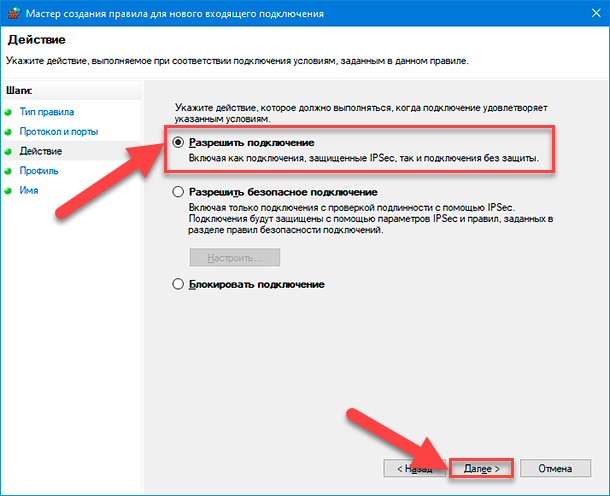
Примечание. В данном руководстве мы будем использовать параметр «Разрешить подключение», поскольку доверяем соединению, для которого создаем правило. Если присутствуют определенные опасения, то можно выбрать вариант правила «Разрешить безопасное подключение», которое осуществляет проверку подлинности и использует параметры безопасности «IPSec» для аутентификации соединения. Однако данный параметр многие приложения могут не поддерживать. Поэтому, если при выборе более безопасного варианта приложение не сможет осуществлять подключение, всегда можно вернуться и перейти на менее защищенный вариант.
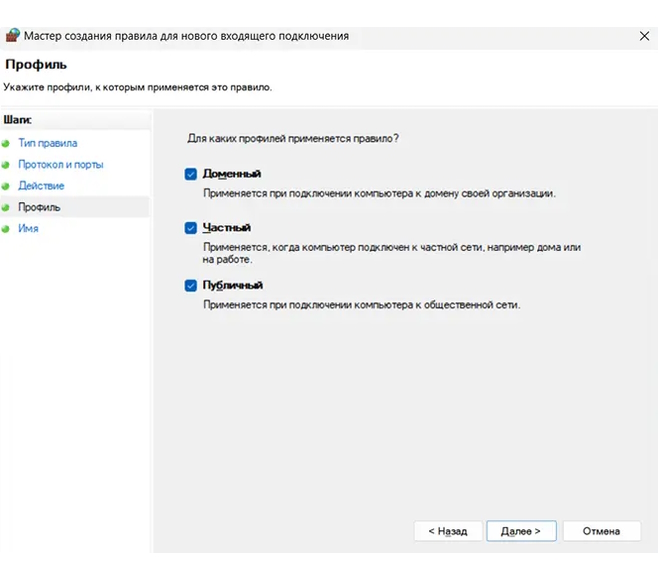
На следующей странице укажите профили, к которым будет применено выбранное правило, установив рядом с каждым подходящим вариантом индикатор выбора («галочку») в соответствующей ячейке, и нажмите на кнопку «Далее» в подтверждение своего решения. На выбор пользователям представлено три возможных профиля, и можно отметить как один, так и все из следующих видов:
- Доменный: когда персональный компьютер подключен к контроллеру домена, операционная система «Windows» может аутентифицировать доступ к домену.
- Частный: персональный компьютер подключен к частной сети, например, к «Домашней сети» или сети, которой вы доверяете.
- Публичный: применяется в случае, когда персональный компьютер подключен к открытой общественной сети, например, в кафе, аэропорту или библиотеке, где любой может присоединиться, и безопасность вам неизвестна.

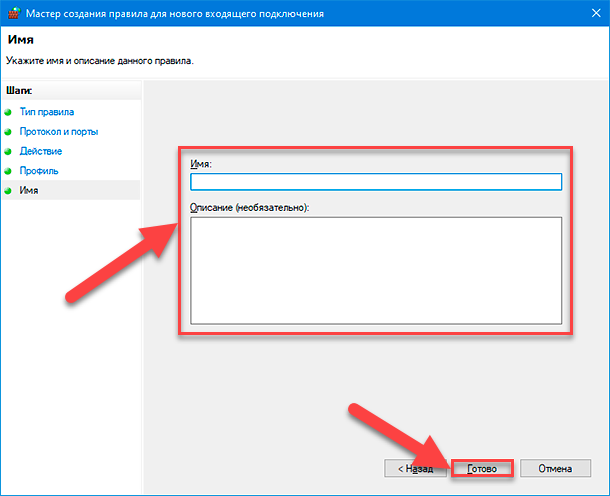
В заключительном окне присвойте новому правилу имя и дополнительно укажите, при желании, более подробное описание. Затем по окончанию, нажмите на кнопку «Готово», и правило с заданными параметрами будет создано.
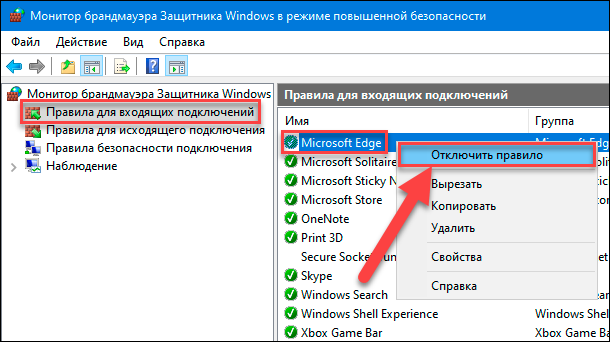
В случае необходимости, пользователи могут отключить созданное или любое из доступных правил в любой момент. Отыщите требуемое правило в центральной панели главного окна, предварительно отметив раздел «Правила для входящих подключений» или «Правила для исходящего подключения» в левой боковой панели, щелкните его название правой кнопкой мыши и, во всплывающем контекстном меню, выберите из вариантов доступных действий раздел «Отключить правило», и команда будет исполнена незамедлительно.
На этом процедура по открытию порта в операционной системе «Windows 10» окончена.
Более подробно ознакомиться с возможными способами открытия или закрытия портов на персональном настольном компьютере или ноутбуке под управлением операционной системы «Windows 10» (и более ранних версий исполнения), методами проверки состояния всех доступных портов и порядком получения сведений об использовании портов каждой конкретной программой можно на нашем видеоканале в руководстве: «Как открыть, закрыть порты, узнать какие порты открыты на ПК с Windows 10, 8, 7 или роутере в 2019».
Полную версию статьи со всеми дополнительными видео уроками читайте в нашем блоге…
Блог проекта
Расскажите историю о создании или развитии проекта, поиске команды, проблемах и решениях
Написать
Личный блог
Продвигайте свои услуги или личный бренд через интересные кейсы и статьи
Написать
Иногда, чтобы использовать определенную программу или игру, нужно подключиться при помощи конкретного порта, однако, по факту, может случиться, что в системе такие порты закрыты по умолчанию, и соединение выполнить нельзя. Не переживайте, и в Windows 10, и в Windows 11, и даже в более ранних версиях ОС, открыть порт довольно несложно.

Наша инструкция расскажет об открытии портов Windows 10/11, о том, как увидеть перечень открытых портов, а также вы узнаете полезную информацию о решении проблем при подключении.
Открытие портов в брандмауэре Windows
В Windows 10 и в Windows 11 проще всего открыть порты, настроив соответствующие правила через брандмауэр.
Для начала открываем настройки ОС, выбрав режим повышенной безопасности. Это можно сделать по-разному:
На втором этапе займемся настройкой правил для портов, которые нас интересуют:
- Нажимаем правой кнопкой мыши на «Правила для входящих подключений», где в контекстном меню выбираем «Создать правило».

- Пользуясь мастером создания правил, выбираем вариант «Для порта» и жмем «Далее».

- Выбираем тип протокола — TCP или UDP (в том случае, когда необходимый тип вы не знаете, можно уточнить это через справку по нужной программе).
- Указываем порты: определенный порт либо диапазон портов. Если портов несколько, их можно перечислить через запятую, а для того, чтобы указать диапазон, используйте дефис. Нажимаем на кнопку «Далее».

- Выбираем пункт «Разрешить подключение».

- Указываем сетевые профили, для которых будем открывать порты.

- Указываем название правила и, если нужно, составляем описание. После этого жмем на «Готово».
- Теперь все эти шаги нужно выполнить для исходящего подключения.
Все, вы открыли порт, и если нет помех, то с соединением проблем быть не должно.
Распространенные проблемы и дополнительные необходимые шаги
В случае, когда возникают сложности с соединением даже при открытых портах, то возможно, есть какие-то помехи, с которыми предстоит справиться, но сначала их нужно найти. Перечислим основные варианты:
- Обмену данными между портами может мешать VPN. Или отключаем его, или смотрим, возможно ли открытие портов для VPN в конкретном случае.
- У роутеров Wi-Fi есть свои опции брандмауэра (файрвола), и иногда нужно поменять настройки для открытия портов. Для различных марок и моделей роутеров делается это по-разному в соответствующем разделе: виртуальный сервер, межсетевой экран, файрвол, перенаправление портов. Схема действий по настройке похожая: необходимо добавить, как правило, совпадающие внутренний (необходимый пользователю) и внешний порт, указать локальный IP компьютера, к которому требуется открыть (пробросить) порт, выбрать подходящий протокол: TCP или UDP, в некоторых случаях не обойтись без указания интерфейса, для соединений из «внешней сети» — WAN.

- Когда брандмауэр заблокировал приложение, у него не будет возможности установить соединение. В этом случае добавляют правила, которые разрешают подключение для ПО по тому же варианту, что и для портов. Об этом мы говорили выше.
- Если для защиты сети используются сторонние антивирусы и файрволы, это тоже способно повлиять на соединение для ряда портов. В этом случае обязательно проверяем настройки для открытия нужных портов либо отключения защиты.

Как посмотреть открытые порты в Windows и какие программы их используют
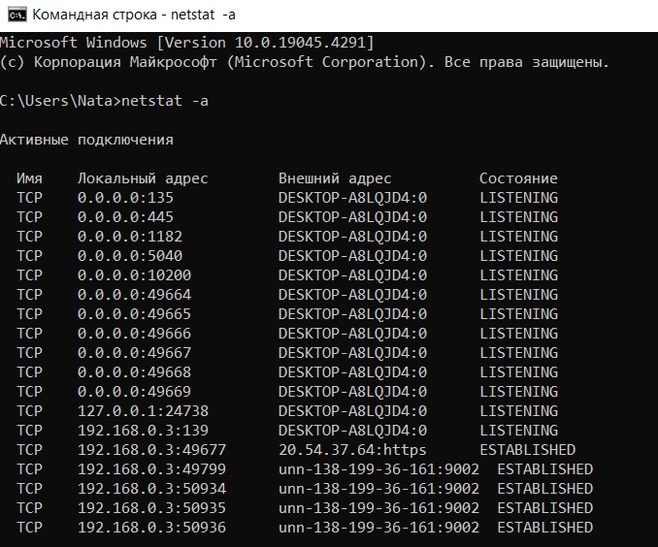
Множество портов остаются открытыми в Windows, потому что без них не смогут работать браузеры, программы, системные службы. Увидеть перечень портов, которые открыты, можно по-разному:
- Откроем командную строку и введем команду (порты указываются в IP-адресе после двоеточия):
netstat –a
- Для того, чтобы узнать, какие порты используют конкретные процессы, вводим от имени администратора команду:
netstat –ab
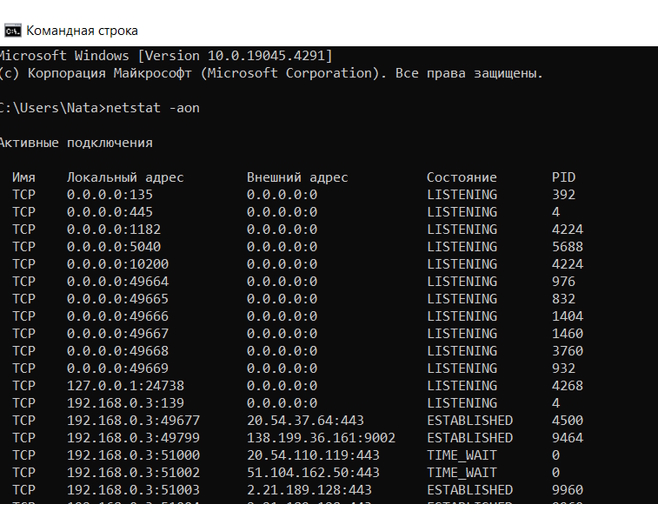
- Чтобы увидеть открытые порты с ИД (PID) процесса (по нему через Диспетчер задач можно посмотреть определенный процесс) вводим команду:
netstat –aon
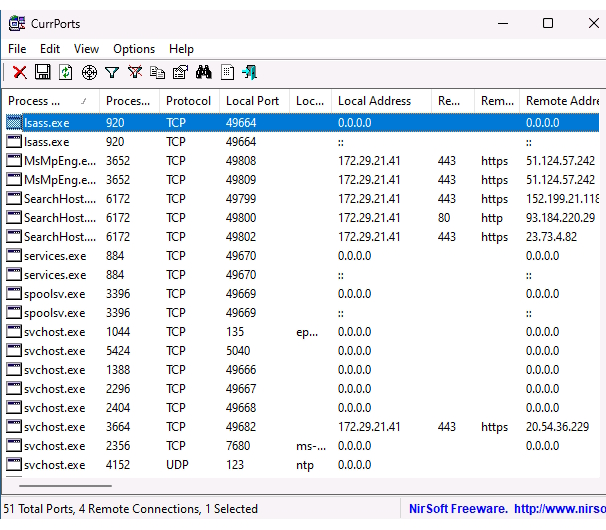
Также получить информацию об открытых портах и процессах, которые их используют, можно при помощи специальных программ, таких как NirSoft CurrPorts (бесплатна для пользователей).
Вы легко найдете в Интернете перечень портов, которые считаются «стандартными» и применяются чаще всего, но для функционирования некоторых программ и игр могут понадобиться другие порты.